1
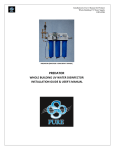
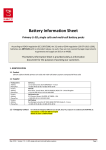
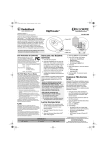
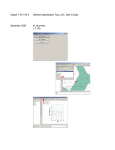
Smart Engine User Manual
© 2007 American Stirling Company
2
Smart Engine User Manual
Table of Contents
Part I Introduction
3
1 Packing List ................................................................................................................................... 3
2 Engine Nomenclature
................................................................................................................................... 4
3 Installation ................................................................................................................................... 8
Part II Engine Operation
9
Part III Software Operation
10
Part IV Pre-Lab
15
Part V Measuring Power Manually
17
Part VI Troubleshooting
19
© 2007 American Stirling Company
Introduction
1
3
Introduction
Congratulations on your purchase of American Stirling Company's "Smart Stirling Engine".
The Smart Stirling Engine is intended for engineering, physics, and thermodynamics classes at either
the advanced high school, or university level.
The engine is electrically heated for accurate power input measurements (which also keeps fumes out
of the lab) and is cooled by air or water. It has built-in pressure, temperature, and angular position
sensors, and a data acquisition system to allow sensed data to be sent to a Windows PC where it can
be plotted and analyzed. A variable voltage DC power supply is available as an option if your lab
needs one to power the electrical heating elements.
Stirling engines are heat engines that make exceptionally good teaching tools. Not only does the
Stirling Cycle match the Carnot cycle for efficiency, but also real Stirling engines can be made to run
on low temperature differences. This ability to run on low temperature differences makes them well
suited for use in laboratories.
The Smart Stirling Engines manufactured in the spring of 2007 include new hardware and software
features not available in previous versions of this product. Acquired data is now sent to the computer
over a USB cable, rather than over a serial cable, which is much more in keeping with today's
computers. Data acquisition and analysis software has been written from scratch, and includes many
new built-in features, including:
· automatic generation, display, and evaluation of pressure/volume (P/V) graphs;
· automatic computation of indicated power using the P/V graphs;
· a built-in software dynamometer, computing power and torque using the rate at which the engine
"spins up" the flywheel;
· ability to save acquired data both for later re-display and analysis, as well as for transfer to Excel;
and
· ability to compute figures of merit (power, RPM, etc) for a series of experiments, and send the
summary to Excel.
We are proud of the new features which we are providing for you, but also realize that the new
software is not as thoroughly field tested as was the older software. Please feel free to contact the
author of the software directly if you have questions, problems, comments, or suggestions. Jon Bondy
may be reached at [email protected].
1.1
Packing List
Your Smart Stirling Engine consists of the following:
1. the engine proper;
2. a plastic bag containing the software for the Data Acquisition System (DAQ);
3. the "Smart Engine Data Logger Software" CD;
4. a plastic bag containing the USB cable;
5. a 9 V "power brick";
6. an "adaptaplug" to connect the power brick to the engine electronics; and
7. this manual.
© 2007 American Stirling Company
4
1.2
Smart Engine User Manual
Engine Nomenclature
The Smart Engine consists of the following major parts:
1. Front Panel
2. Water Box and Engine
3. Tower
4. Electronics
Note that the 12 V 3 A power supply shown in the picture, above, is there for purposes of illustration,
only. You must provide such a power supply yourself (it does not come with the engine).
© 2007 American Stirling Company
Introduction
5
Front Panel
The Front Panel contains the followings indicators and connections:
1. Helium Ports: connect a helium supply hose here to flush the air out of the engine and fill it with
helium, to demonstrate increased performance with that gas.
2. 9 V DC Power Connection: connect the supplied 9V power brick to supply power to run the
electronics associated with the engine.
3. Power-on LED, which lights up when the 9V power supply is connected.
4. Lab Power Supply Connection: connect your 12 V 3 A power supply here to power the high
power resistors that are used to heat the hot plate of the engine.
5. USB Connection: connect the engine electronics to your computer so that you can collect data
from the engine.
© 2007 American Stirling Company
6
Smart Engine User Manual
Water Box and Engine
The white plastic box can be filled with water and/or ice in order to minimize the temperature on the
cold side of the engine. You can use the large clear plastic tubes to fill the box with water and to drain
the box. Use the supplied pinch clamps to keep the water in the box, or drain it, as needed.
The engine is mounted to the side of the water box, and should need no adjustment.
© 2007 American Stirling Company
Introduction
7
Note that the top (right) surface of the engine can be heated by the four copper-colored
resistors that are mounted there. When heated in this manner, the top of the engine can
become uncomfortably hot. To prevent accidental burns, avoid touching this surface when the
engine is in operation.
Tower
The tower supports the tachometer sensor at the bottom, the the power output and crankshaft of the
engine, and the spring scale for use in measuring power. The large hole in the base, just in front of the
tower, is used for measuring engine power.
Electronics
The electronics are self-contained, and should not need adjusting.
© 2007 American Stirling Company
8
1.3
Smart Engine User Manual
Installation
DAQ Software
Insert the "MCC DAQ Software" CD into the CD/DVD drive in your Windows computer. The
installation/setup software should start up automatically. You will not need either of the other CDs
delivered with the DAQ hardware (the "UL for LabView" CD or the "Universal Library" CD). Install all of
the software available on the "MCC DAQ Software" CD and then re-boot your computer.
InstaCal Software
Your engine comes with the DAQ hardware (the USB-1208LS, a fist-sized gray box mounted on the
rear of the engine) already installed. Plug the provided USB cable to connect the engine with your
computer. Wait until the computer says that your new hardware is ready for use.
Using the "Start" button on Windows, locate the "Measurement Computing" software that you just
installed, and start the "InstaCal" program. When InstaCal notices the new 1208 hardware, allow
InstaCal to add the 1208 to the list of known devices.
Then, under the "Install" menu, use "Configure" to set the 1208 to single-ended mode. If you fail to do
this, the software will not function properly. The original form should look like this:
© 2007 American Stirling Company
Introduction
9
When you're finished, it should look like this:
Smart Engine Data Logger Software
Once the DAQ hardware and software are correctly installed, insert the CD supplied by American
Stirling Company, called "Smart Engine Data Logger Software", into your computer's CD/DVD drive
and install that software on your computer by executing "SmartStirlingEngineSetup.exe".
2
Engine Operation
The basic procedure for running the engine and taking data is as follows:
© 2007 American Stirling Company
10
Smart Engine User Manual
1. You may wish to fill the white plastic water box with an ice/water mix to within one inch (2.5 cm) of
the top. An ice bath is not required; however, maximum speed and power is only achieved with an
ice bath, to get the cold plate of the engine to be as cold as possible. Make sure that the drain pinch
clamp is closed tightly before you put water in the box.
2. Plug the supplied 9 V power brick into the 9 V connector to provide power to the on-board
electronics. The front panel LED should light up, and the temperature display should show a
temperature reading.
3. Connect a USB cable from the engine to your Windows PC. Start the Smart Engine Data Logger
software. Among other things, this software monitors the temperature of the hot plate, to ensure that
you do not allow the plate to get too hot. You should always run the Smart Engine Data Logger
software whenever the heating resistors are powered up.
4. Verify that your variable voltage DC power supply is turned off and then connect the wires from the
DC power supply to the red and black binding posts on the lower right portion of the front panel to
provide power to the heating resistors.
5. Adjust your power supply so it is supplying 12 volts at about 3 amps, or about 35 watts. After the
power has been turned on, it may take three to five minutes before the engine is hot enough to run,
since Stirling engines do not start instantly or automatically. You can monitor the temperatures by
inspecting the temperatures shown on the LCD display on the black electronics box at the left rear
of the engine, or by watching the pair of temperatures displayed under the Quit button by the Smart
Engine Data Logger software. When the engine has become hot enough (generally a 20 C
temperature difference), gently spin the output shaft clockwise by hand to start the engine. If the
engine is hot enough, it will start quickly, and build up speed. If the engine is not hot enough, no
amount of spinning will make it start. Air leaks (sometimes caused by pinch clamps that are not
tight enough) can also cause the engine to fail to start, even when hot. You should keep the
engine running at all times while the engine is being heated: if the engine stops running,
heat starts to build up on the hot plate, and the engine may over heat. If the hot plate on the
engine gets too hot, either turn the 12 V power supply off, or lower the voltage and/or
current.
6. While exact performance will differ with changing atmospheric conditions and the condition of your
engine, the Smart Engine needs a temperature difference of approximately twenty degrees C to run
when its working fluid is air, and ten degrees C if helium is used as the working fluid. Maximum
performance is achieved with the hot side at the maximum allowable temperature of 370 K and the
cold side at 273 K. Note that if you exceed the maximum hot temperature of 370 K, the engine
may develop a leak, and may stop working entirely: monitor that temperature carefully while
running the engine.
7. This engine spins clockwise when you are looking at it from the front. It is worth noting that you
cannot harm the engine by spinning it backwards. In fact, if the engine is hot and is spun
backwards, it may come to a complete stop, reverse itself, and run in the clockwise direction.
3
Software Operation
With your Smart Stirling Engine running, and with the USB cable connecting the engine to your
Windows computer, run the Smart Engine Data Logger software. If you see an error message like
this, verify that you performed the Installation correctly.
© 2007 American Stirling Company
Software Operation
11
If the green box to the right of the Grab button is red, or if you do not see waveforms like the ones
below, verify that you performed the Installation correctly.
Once the connection with the DAQ hardware is working correctly, you will see a display like the
following.
There are five main functions, represented as buttons:
· Grab: click this to acquire 1 second of data and view the Pressure, Tachometer, and PV graphs;
· Dyna: click this to acquire 5 seconds of data and view the Tachometer, RPM, and Power/Torque
graphs;
· Export: click this to save your current data in a CSV file, for later use by Excel or to re-Import the
data back into this program;
· Import: click this to re-load data which you saved previously. The software comes pre-loaded with
various input files which you can load and inspect.
· Multiple: clicking this allows you to load a series of import files, compute their figures of merit (RPM,
power, etc) and create a single spreadsheet (CSV) file that contains a summary of all of this data.
This can be very helpful if you want to see RPM or power trends for differing engine temperatures.
The Help button summons this help information; the Quit button terminates the program.
The Continuous check box allows you to perform Grab operations repeatedly, if you want to watch the
engine's performance change over time.
The numbers below the Quit button show the current hot and cold plate temperatures; the numbers in
© 2007 American Stirling Company
12
Smart Engine User Manual
the white grid show the data that has been acquired using Grab, Dyna, or Import.
The colored box to the right of the Grab button should be green at all times: if it becomes red, that
indicates that the USB connection with the DAQ system on the Smart Engine has stopped working
correctly.
The Graphs
All of the graphs are automatically scaled to fit as much data as possible on the graphs. If you want to
look at the details of some part of a graph, position your cursor at the upper left corner of the data you
wish to inspect, press the [left] mouse button down, drag the mouse to the lower right corner of the
data, and then release the mouse. The graphs will zoom to show you the data you selected. To view
the entire graph again, click and drag in the opposite direction, from the lower right to the upper left.
You can also pan the graphs, whether zoomed or not, by dragging the graph with the right mouse
button. Here is an example of zoomed Pressure and Tachometer graphs:
You can enable or disable any of the five graphs by clicking on the appropriate check boxes in the
Enable Graphs panel. You might choose to do this if you wanted to inspect one of the graphs in detail.
Typically, three of the graphs are visible when you do a Grab, and a different three graphs are visible
when use the Dyna function.
Grabbing Data
When you click the Grab button, you acquire data from the engine for 1 second at 1000 samples per
second. The acquired Pressure data is graphed at the top, and should appear as a sinusoid. The
Tachometer signal is also acquired, and graphed below the Pressure data. The Tachometer data
looks like a single pulse for each rotation of the engine drive shaft, with the pulse occurring when the
piston is at the bottom of its stroke (when the engine volume is at a minimum, and pressure at a
maximum).
The current temperature of the engine's left/cold plate is displayed in the grid below the buttons as "Lo
Tmp"; the right/hot plate temperature is displayed as "Hi Tmp"; the power consumed by the four 1 ohm
heating resistors is displayed as "Res Pwr"; and the difference between the highest and lowest
© 2007 American Stirling Company
Software Operation
13
pressures is displayed as "Press".
When the engine is running very slowly, sometimes only one pulse appears on the Tachometer graph.
When this happens, the software is unable to determine the speed at which the engine is running, and
the RPM and Indicated Power values cannot be computed and will not be displayed. If the engine is
running quickly enough, more than one Tachometer pulse is acquired, and both RPM and Indicated
Power is computed and displayed in the grid below the buttons, as "RPM" and "Ind Pwr".
When you Grab data, the "Power" and "Torque" values are always blank: they are computed with the
Dyna function.
RPM is computed by locating two adjacent Tachometer pulses, computing the time that elapses
between the pulses, and computing the rotational speed from that time.
Indicated Power is computed by plotting a Pressure/Volume graph (PV graph) and computing the area
inside the enclosed line. Pressure data acquired from the engine (and plotted in the top graph) is used
directly to create the PV graph. Volume data is not acquired directly from the engine, but is inferred by
assuming that the drive shaft is rotating at a constant speed, and computing the engine volume over
time as the piston moves in and out. The area inside the curve is computed and multiplied by the
engine RPM to produce a power value.
The Dynamometer
When you click the Dyna button, you acquire data from the engine for 5 seconds at 800 samples per
second. The acquired Tachometer data is plotted in the top graph. The RPMs are computed for the
entire 5 second period, and are displayed below the Tachometer data. Power and Torque data are
computed and graphed in the final graph, at the bottom. Press, RPM, and Ind Pwr will remain blank
after you press the Dyna button.
© 2007 American Stirling Company
14
Smart Engine User Manual
To correctly use the Dynamometer facility, you need to first get the engine up to some test
temperature. Slow the power output shaft down with your fingers until the engine is just barely running.
With the mouse hovering over the Dyna button, release the drive shaft and then click the Dyna button.
The software will acquire data during the period when the engine is spinning the flywheel up to speed.
Power and Torque are computed based on how quickly the engine can increase the RPM, and on the
moment of inertia of the flywheel.
The grid at the lower left allows you to enter the masses (in grams) and diameters (in mm) of the
various components of the crankshaft and the flywheel. The values shown in the screen shot, above,
are for (in order) the plastic flywheel, the large brass disk, the full-diameter portion of the smaller brass
disk, the small-diameter portion of the smaller brass disk (the hub of the plastic flywheel), and the steel
drive shaft. The moments of inertia are computed using formulas for solid disks/cylinders. The values
shown are 1000 times the computed values (in kg and m), so that they can be read reasonably.
The Power and Torque graphs have both thin/dotted lines and thick lines; the former are the raw data,
while the latter are "smoothed" data, averaged over more than one value of the raw data.
In theory, the Power and Torque that are computed in the Dynamometer function are both accurate
and calibrated, as is the Indicated Power that is computed using the PV approach when you Grab
data. In addition, Indicated Power is the maximum theoretical power of the engine, ignoring power that
is subsequently lost due to friction or other losses. That is, one would expect the Indicated Power to
always be larger than the Power that is computed using the Dynamometer approach, or the braking
method described below.
Export
© 2007 American Stirling Company
Software Operation
15
You can export your data (either Grab or Dyna) at any time, by clicking the Export button. Data is
saved in CSV form, for later import into the spreadsheet of your choice, or for re-Import into this
program.
Import
You can import and re-analyze any of the data that you previously saved using the Export button. The
graphs and figures of merit (RPM, power, etc) are re-computed.
Multiple
This button allows you to perform multiple Imports and to save a summary of the figures of merit in a
summary spreadsheet.
You will first be asked where you wish to store the summary data. Create an appropriate file name for
the summary data.
You will then be asked to select multiple Import files for analysis. Use <Ctrl><click> to toggle which
files you wish to include in your analysis. When you have the correct list of files selected, click Open,
and each file will be imported, in turn, and the computed values output to the summary CSV file. The
resulting file will look like this in your spreadsheet:
4
Pre-Lab
Stirling Engine Pre-Lab
This lab is about practical stuff like power, and energy and what efficiency really is.
By the time this lab is over you should have a much better intuitive understanding of these things and
of engines in general.
We'll start with a few questions.
1. What’s the difference between watts and horsepower?
2. Can you convert between watts and horsepower?
© 2007 American Stirling Company
16
Smart Engine User Manual
3. If so, then what is the conversion factor?
4. Is the watt an acceptable way to measure mechanical power (as opposed to electrical power)?
5. If process A is 50% efficient and it feeds into process B which is also 50% efficient what is the
overall efficiency of A feeding into B and becoming a useful output at C?
6. True or false, the correct way to obtain efficiency for a system is to average all the various
efficiencies that make up the system?
7. True or False. If a process is inefficient, it is therefore a bad process.
8. Could an inefficient process ever be a good process?
9. What circumstances can you think of that might make an inefficient process a good one?
10.Calculate the Carnot efficiency of a heat engine with the hot end at 100 C. and the cold end at 23 C
and also with the cold end at 0 C.
Discussion
The engine that we are going to work with in the lab, the Smart Stirling Engine, is called a Stirling
engine. It was invented in 1816 by a Scottish minister named Robert Stirling who didn't name it after
himself. He called his engine a “hot air engine with an economiser.” About a hundred years later
someone else decided that these engines should be called Stirling engines and the name stuck.
When you read the history of science it always seems that theory comes first then someone figures
out how to make something useful out of it. But that’s not the way it usually works. For example, the
Stirling engine was invented by Robert Stirling in 1816. About fifty years later a very good French
scientist and engineer named Sadi Carnot came along a figured out an extremely useful formula for
determining just how efficient any given heat engine could be.
The formula is as follows. Temperature of the hot side of the engine minus temperature of the cold
side of the engine divided by the temperature of the hot side of the engine times 100 is the maximum
efficiency possible for any engine operating between those temperature extremes. The formula is
written (T(hot) – T(cold))/T(hot).
It’s important to remember to use absolute degrees such as Kelvin or Rankine. If you plug Fahrenheit
or Celsius degrees into the Carnot formula all you will get is a meaningless number.
So here’s another question. Say you have an engine operating between a T(hot) of 100 degrees C
(that would be 373 K) and a cold reservoir of room temperature (say about 22 degrees C or 295 K).
11.Which will get you more efficiency (according to Carnot): raising the hot temperature 25 K or
cooling the cold temperature 25 K? Please take this seriously as your boss (who doesn't have a
clue about physics) is demanding that you make the Smart Stirling Engine more efficient or else
he’s going to take away your company car and cancel your expense account. Your boss does
understand expense accounts.
So if the Carnot formula determines the maximum efficiency of any heat engine, and we know that we
can’t exceed this, then the question comes to mind, how much of the Carnot efficiency can we
reasonably expect to achieve with any given engine?
Well if you have been extremely careful, and if you use the right type of engine (a Stirling engine) you
can get up to 50% of Carnot efficiency. Perhaps this could be achieved with other cycles as well. Any
heat engine that achieve 50% of Carnot is an extremely efficient engine!
© 2007 American Stirling Company
Pre-Lab
17
With all this talk about efficiency, and the fact that Stirling engines have the most efficient engine cycle
possible, you probably wonder if the Smart Stirling Engine is a 50% of Carnot engine? Not a chance.
Is it a 25% of Carnot engine? No. Then why do we have one in the lab?
We have one here for several reasons. First, it is a good teaching tool to help you learn about engines
in general. This engine wasn't designed to be efficient. It was designed to be a good teaching tool, to
work well in a lab, and to be easy to understand. It was also designed to a specific price, because if a
school can't afford to buy one, it doesn't do anyone any good.
In the lab you will find out what it’s real efficiency is compared to it’s Carnot efficiency.
Now for the last prelab question.
12.How much of the heat that is expended in heating these resistors, actually goes into the Stirling
engine as opposed to simply heating the air around the engine? Here is a hint: measure the area of
the rectangular resistors. How much of this area is in contact with the engine?
5
Measuring Power Manually
Measuring Power Manually
Shaft output power can be measured manually in one of two ways:
1. Raise a weight from floor level to the bottom of the engine and time how long this takes; or
2. Suspend a thread from the spring scale and wrap it around the output shaft in such a way that the
spinning output shaft wants to raise the weight and measure the resulting engine RPM.
Measuring Power by Lifting a Weight
Place a measured weight (in the range of 10g to 30g.) on the floor, tie a thread to it, and run the thread
up through the access hole in front of the engine tower. Place the weight directly below hole, on the
floor, and allow roughly 30 cm.of thread beyond that needed to reach the shaft. Wind the thread
around the spinning shaft until it catches and then carefully guide the thread onto the spinning shaft to
make sure that it does not bind or fall off the end of the shaft. Have someone measure the amount of
time that it takes to raise the weight from the floor until the weight hits the bottom of the engine and
stalls it.
It is acceptable to unwind the string by gently pulling on it and reversing the direction of the engine as it
unwinds.
Vary the weight used from one so light that the engine hardly slows down to one so heavy that it
almost stalls the engine and takes quite a while to raise the weight.
Set the engine up at a given hot and cold temperature, start it running, and lift one of your weights and
time how long it takes to lift the weight. Then proceed to the next of your weights, collecting a series of
weight/time data pairs. Then use the following formulas to compute power for each of the weights you
used. You should collect 10-20 data points using different weights.
In this case power is mass * gravity * (height raised/elapsed time)
We have prepared an Excel spreadsheet to help you perform these computations easily:
"Computing Power by Lifting Weights.xls"
© 2007 American Stirling Company
18
Smart Engine User Manual
Measuring Power with a String Brake
Tie a thread to the spring scale, drop it down to the power output shaft, and and wrap it three times
around the shaft so the spinning shaft wants to lift the weight, as shown. Then drop the weight down
through the hole and hang your weights at the end of the string.
Set the engine up at a given hot and cold temperature, start it running, and hang one of your weights at
the end of the string, so that it is hanging in the air. Measure the RPM of the engine using the Grab
feature in the software, and record the RPM as well as the mass of the weight and the reading from
the spring scale. Then proceed to the next of your weights, collecting a series of
weight/spring-scale-reading/RPM data triples. Then use the following formulas to compute power for
each of the weights you used. You should collect 10-20 data points using different weights.
This approach is a good method for measuring power (you have just built a simple "prony" brake). It is
quite easy to use although not as emotionally satisfying as watching the weight being raised from the
floor.
Torque = (W - S) * A * R
© 2007 American Stirling Company
Measuring Power Manually
19
where
W = mass of weight (in kg)
S = spring scale reading (in kg)
A = acceleration of gravity = 9.8 m/sec2
R = shaft radius (in meters) = 0.0016
Power = T * engine-radians-per-sec
where
T = Torque
engine-radians-per-sec = RPM * 2 * pi / 60
We have prepared an Excel spreadsheet to help you perform these computations easily:
"Computing Power Using a String Brake.xls"
6
Troubleshooting
Air leaks
If you suspect that your engine might be leaking, spin the drive shaft with your fingers while Grabbing
some data. The pressure should be greater than 3 kPa, peak to peak. If it is closer to 2 kPa, then you
probably do have a leak. Attempt to isolate and repair the leak, using the above test as an indicator of
when you have fixed the leak.
Sometimes you can find a leak by connecting a tube to one of the helium ports, opening the
associated pinch valve, and blowing air into the engine: leaks can sometimes be detected by putting a
wetted finger near the engine, or by using a small feather.
© 2007 American Stirling Company