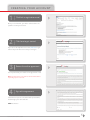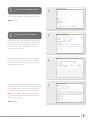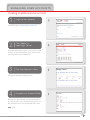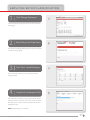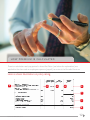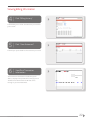
1
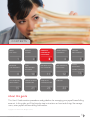
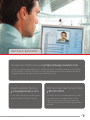
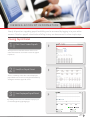
TravPay
SM
Policyholder user’s guide
SMALL BUSINESS | WORKERS COMPENSATION
CONTENTS
ABOUT
THIS GUIDE
IMPORTANT
INFORMATION
PLEASE READ
GETTING
SUPPORT
1
MANAGING
USER ACCOUNTS
2
EMAIL
NOTIFICATIONS
EXPLAINED
8
SELF-REPORTING
YOUR PAYROLL
10
VIEWING ACCOUNT
INFORMATION
15
21
UNDERSTANDING
THE PROCESS
3
EMPLOYEE SETUP/
CLASSIFICATION
11
FREQUENTLY
ASKED QUESTIONS
23
4
HOW PREMIUM IS
CALCULATED
12
CREATING
YOUR ACCOUNT
5
USING A
THIRD-PARTY
PAYROLL PROVIDER
14
GLOSSARY
24
About this guide
This User’s Guide contains procedures and guidelines for managing your payroll-based billing
account. In this guide, you’ll find step-by-step instructions on how to do things like manage
users, enter payroll and view billing information.
Copyright © 2013 InsureLinx Inc. All rights reserved.
POLICYHOLDER USER’S GUIDE
1
GET TING SUPPORT
Access Your Online Account https://travpay.insurelinx.com
Answers to most payroll and premium-related questions are available through a secure login
to your account. Just login with the username and password you have created and you can
view payroll detail, premium calculations and billing history.
Email Customer Service
[email protected]
Call Our Customer Service Team
855.872.8729
If you have a question or need support,
send an email to Customer Service.
Customer Service is available Monday–Friday,
7am–8pm Eastern Standard Time. We’re
happy to walk you through any items you
need assistance with and answer any questions
you have.
POLICYHOLDER USER’S GUIDE
2
I M P O R TA N T I N F O R M AT I O N
Please Read
This page contains very important program terms and procedures regarding the pay-as-you-go
billing for your workers compensation policy. Please read this page thoroughly and contact support if you have any questions. Failure to abide by these procedures may lead to policy
cancellation or inaccurate billing of the premium.
You must complete the online policy registration
You must log in to your account if you have no payroll
You will receive an email with a custom link to create an online
profile for your policy. This will include acknowledging an
online agreement, creating a username and password,
indicating your payroll frequency and reporting method, and
supplying owner/officer information. Instructions on how
to create your account are located on page 5.
You will receive an email each payroll due date as a reminder
that it is due even if you utilize a payroll service. If you have
no payroll for that pay period, it is your responsibility to log in
and indicate “Zero Payroll” under “Enter Payroll” in the main
policyholder menu.
You are responsible for your payroll on or before each
payroll check date
Even if your third-party payroll service has agreed to submit
payroll data on your behalf, you may need to assist in
submitting payroll on occasion.
POLICYHOLDER USER’S GUIDE
You must respond to all system email requests
The InsureLinx System is primarily email-based and you will
receive periodic requests regarding your account, including
employee classification and missing payroll. Failure to respond
to these requests may lead to payroll being processed under
the highest-rated class code or cancellation of your policy.
There is an explanation of all system emails on page 10.
3
U N D E R S TA N D I N G T H E P R O C E S S
1
Confirm
payroll
provider
If you use a third-party payroll provider and want them to report payroll on your behalf, it is
helpful to confirm they are approved ahead of time. If you are unable to locate your payroll
provider on the list, you may request InsureLinx to contact them to become approved. The
list of approved payroll services can be found at insurelinxcertified.com.
2
Complete
account
registration
Once the policy information is received by InsureLinx, the policyholder main contact
will receive an email to complete the online account setup required to start the
Pay-As-You-Go billing. Account setup includes creating a username and password,
identifying owners/officers, indicating payroll provider (if applicable) and frequency,
and submitting bank information for premium billing. Once the account is approved, the
policyholder will receive a confirmation email with directions on what to expect next.
Note: This step is critical - failure to register may lead to cancellation.
3
Set up
and verify
employees
If the policyholder uses a payroll service or is self-reporting by employee, the policyholder
will need to log in to the InsureLinx portal to setup and/or confirm employee classification
prior to payroll being submitted.
4
Report
payroll
Reporting is due each payroll period on or before the payroll check date. If using a
payroll provider, we’ll work with them to accept payroll on behalf of the policyholder,
or if self-reporting, you will need to log in and enter or upload payroll. If you have no
payroll for that particular pay period, you’ll need to log in to your account and indicate
“No Payroll” under the link in the sidebar to enter payroll.
5
Pay
premium
by ACH
Once payroll is received, InsureLinx calculates the premium to be debited from the
designated policyholder account. The following business day, an email confirmation will
be sent to accounting contact detailing the amount to be debited with the actual bank
draft taking place 1-2 business days after notification.
POLICYHOLDER USER’S GUIDE
4
C R E AT I N G Y O U R A C C O U N T
1
Click link in registration email
Once you click the link, you will be redirected into the
system to create your account.
2
Click here to get started
If you do not already have an account, click here to get
started. If you do have an account you can log in.
3
Review the online agreement
It is important that you read the online agreement in full.
Note: You may need to scroll down to view the full document
depending on your screen size.
4
Sign online agreement
Check the box if you are the authorized representative,
and then type your name and title.
Click “Continue.”
POLICYHOLDER USER’S GUIDE
5
5
Create username/password
Your company information is already completed for you.
Click “Continue.”
6
Enter payroll information
Enter payroll frequency and last payroll end and check
dates. Indicate either self-reporting or payroll provider
reporting as your desired reporting method. If you
choose payroll provider reporting, you must click
“Choose Payroll Company.”
Type the name of the payroll provider you are looking
for to see if they are approved. If you find the payroll
provider you are looking for, you can select them and they will appear in the page.
If you don’t find the payroll provider you are looking for,
you can request for them to be contacted to report payroll
on your behalf. You will need to self-report until you are
notified when they are approved and up and running.
Note: ADP and Paychex have been contacted and will
not send payroll directly to InsureLinx. You will need to
opt for the self-reporting.
Click “Continue.”
POLICYHOLDER USER’S GUIDE
6
7
Add owner/officers
Enter the first and last name of any owners or officers
of the company. Select the correct class code for that
person and click “Add Owner/Officer.”
Click “Continue.”
8
Complete policy contacts
If the main contact is responsible for all policy-related
communication, you may check the box just above the
description for the “Payroll Information” contact to
populate them all.
Click “Continue.”
9
Enter banking information
Enter the account holder, bank name, account and
routing number.
Click “Continue.”
10
Registration complete
Once you’ve submitted all of the registration information,
you don’t need to do anything more until you receive the
“Account Setup Confirmation” email. This will give you
further instructions on what needs to be done for payroll
reporting and when.
POLICYHOLDER USER’S GUIDE
7
MANAGING USER ACCOUNTS
There are a number of account-related activities that can be performed and questions
answered through access to your online account. There are also two different access
levels given to account users:
Administrators
Users
This level of account access allows the user
to create additional logins to the account and
manage other user’s access to the account.
This level of account access allows the user access to enter payroll and view billing information.
POLICYHOLDER USER’S GUIDE
8
MANAGING USER ACCOUNTS
Creating an additional user account
1
Log in to Your Account
The website URL is: https://travpay.insurelinx.com
2
Click “Admin” in
Upper Right Corner
If you have administrative rights to your account, you will
be able to create additional users. If not, please contact
the policyholder account administrator.
3
Click User Accounts > New
The page will display the existing accounts.
4
Complete User Account Profile
Select the user type and enter the required information
to create the user account. You will need to give the user
their information as it is not automatically sent to them.
Click “Save.”
POLICYHOLDER USER’S GUIDE
9
E M A I L N O T I F I C AT I O N S E X P L A I N E D
There are a number of email notifications that you will receive periodically that notify you of
account-related activity and requests for additional information. While most of these notifications
will require no action, some will request your assistance by logging into your account or contacting
us back with an answer to our request. Below is a list of the emails you may receive, a description of
why they are sent and what action (if any) you need to take if you receive this email.
EMAIL SUBJECT
DESCRIPTION
ACTION
Account Setup Confirmation
Confirms that your account is set up and can
accept payroll for billing.
If you are behind on payroll based on the
effective date of your policy, you will need to
submit your payrolls as soon as possible
Premium Billing Notification
Details the amount to be drafted from your
bank account based on the payroll submitted.
None
Late Payroll Notification
Indicates that a particular payroll (or payrolls)
has not been received and payroll needs to be
submitted immediately.
Submit the missing payrolls immediately.
Pending Cancellation
Indicates that a particular payroll (or payrolls)
has not been received and your policy is in
jeopardy of cancellation.
Submit all missing payrolls immediately.
Employee Verification Request
Indicates that a new employee (or employees)
has been added to your account profile and
you need to confirm employee classification.
Log in to your online account and go to the
employee management area to classify your
employees.
Bank Return Notification
Indicates that a bank draft was returned on
your account. This can happen from things
like insufficient funds, incorrect bank account
information or ACH blocks.
Contact Customer Service as soon as the email
is received to update your information so the
transaction can be processed.
Payroll Reminder
Sent on each payroll check date as a reminder
that payroll is due. You will receive this even
if a third-party payroll provider is submitting
payroll on your behalf. If payroll has already
been submitted, you will not receive this
notification.
If you have no payroll, you will need to log in
to your account and indicate “Zero Payroll.” If
you are self-reporting, you will need to submit
your payroll by the end of business on the check
date. If you use a third-party payroll service and
did run payroll, you do not need to do anything.
Registration Request
Email is sent daily until the account registration
is complete. This is how the account profile
is established, including username/password,
payroll reporting and banking information
Follow the link in the email and complete the
registration immediately.
Secure Login Invitation
An account administrator has sent you a link
to create a secure login to the policyholder’s
online account. You may receive this email if
you are a designated contact to submit payroll,
classify employees or view billing information.
Follow the link in the email that takes you inside
the sytem to create a username and password
to the policyholder’s account.
POLICY HOLDER USER GUIDE
10
E M P LO Y E E S E T U P / C L A S S I F I C AT I O N
1
Click “Manage Employees”
The link is displayed under the Shortcuts links from the
home page.
2
Select Policy from Drop Down
You should only display multiple policies if your policy has
renewed in the program.
3
Click “New” to add Employee
It is located just under the policy number above the
employee table.
4
Complete the Employee Profile
It is located just under the policy number and above the
employee table. To add the correct class code, just select
the appropriate code from the drop-down box and click
“Add Class Code.”
Click “Save Employee” or “Cancel.”
POLICY HOLDER USER GUIDE
11
H O W P R E M I U M I S C A LC U L AT E D
Premium calculation each pay period is where Net Rates (see below for explanation) are
applied to the class code or employee exposure (payroll) to arrive at the Periodic Premium.
Here is a basic illustration on policy rating.
3
2
4
6
5
1
7
8
POLICY HOLDER USER GUIDE
12
H O W P R E M I U M I S C A LC U L AT E D
1 Base Premium. This is also called “Manual Premium” and is the
sum of all of the Class Premium amounts before any policy credits,
experience modification or Policy Additions.
2 Class Code. This is a three or four digit code associated with the
Class Code Description that is assigned by NCCI, or a State Rating
Bureau. Class Codes help differentiate between the various job
duties or “scope of work performed” by employees.
3 Class Code Description. This is the description or “phraseology”
associated with the Class Code that differentiates between
employee job duties.
4 Class Code Payroll. This is the “exposure” or basis on which the
6 Class Code (Base) Rate. This is the rate per $100 of payroll that is
used to calculate the Class Code Premium.
7 Policy Additions. These are the additional charges or credits that
increase or decrease the premium beyond the Base Premium to
arrive at the Total Premium. These additions are used to calculate
the Net Rate (see below for further explanation on the net rate)
that is used to bill the premium each pay period. Policy Additions
may include but are not limited to items such as experience
modification, terrorism, catastrophe and state surcharges.
8 Total Premium. This is the sum of all Class Code Premium and Policy
Additions that total the estimated annual premium for that state.
Class Code Premium is based.
5 Class Code Premium. This is calculated by multiplying the Class Code rate per $100 of payroll by the Class Code Payroll.
Example: Class Payroll ($56,238) * Class Rate (4.35) / 100 = Class
Premium ($2,446)
Important: Net Rates and Premium Calculation
Net Rate Explanation
This is the rate per $100 of payroll used to calculate your premium each pay period. It is called a “Net Rate” because it factors in Policy
Additions that need to be collected during the policy term.
Net Rates vs. Policy Rates
If only the Base Rate were used, the Policy Additions would not be collected and would be owed or returned at the end of the policy. The
Net Rate will not be listed on your policy but can be viewed in the Rating Tab of the main policy view when accessing your online account.
POLICY HOLDER USER GUIDE
13
U S I N G A T H I R D - P A R T Y PAY R O L L P R O V I D E R
Although not required, using a third-party payroll provider is the simplest way to submit payroll
for this program. By using an approved payroll provider, you will not need to transmit payroll
for your premium billing as long as they are doing so on your behalf.
Keep in mind…
Search for your payroll provider before you bind coverage
While not required, it is best to make sure your payroll provider
is approved (or request for them to be) before your coverage is
bound. A list of approved payroll providers is available online at:
https://travpay.insurelinx.com/locator/searchbycompany.aspx
If you do not find your payroll provider through this online
search, you may also request them to be contacted to
become approved.
Payroll reporting is ultimately your responsibility
Yes, you have asked them and they agreed to send the payroll
data, but your carrier will still cancel the policy if payroll
(and “Zero Payroll”) is not reported.
POLICY HOLDER USER GUIDE
You will need to set up/verify employees
As soon as you receive notification that your policy setup is
complete, you will need to log in and set up your employees.
Yes, your payroll provider will submit the employee information
each pay period, but you will need to confirm their location
and workers compensation classification.
Not all payroll providers are approved
While we will attempt to work with most payroll providers,
some will elect not to send the payroll data on your behalf so
we will need to set you up to self-report in that case.
Note: ADP and Paychex are not on the list of approved payroll
providers as they will not send payroll data to third-parties
like InsureLinx. Please do not put in a request for them to be
contacted as you will be notified that they are not approved and
directed to self-report.
14
S E L F - R E P O R T I N G Y O U R P AY R O L L
For self-reporting, your payroll must be either entered, uploaded or reported as “Zero Payroll”
each pay period.
Entering Payroll
Confirming Zero Payroll
When self-reporting, you have the option to
enter the payroll in the online entry tool.
If your payroll is due but you did not have any
for that particular pay period, you will need
to log in to your account and indicate Zero
Payroll so that it is not flagged as unreported.
Uploading Payroll
You may upload your payroll in a format
acceptable to InsureLinx. You will need
to register the format or use a template
provided by InsureLinx to utilize this feature.
Please contact InsureLinx at 866.951.5469 if you have questions about this.
POLICY HOLDER USER GUIDE
15
Entering Payroll
1
Click “Enter Payroll”
The link is displayed under the Shortcuts links from the
home page.
2
Click “Enter Payroll”
You will need to start with the oldest payroll being
entered first and then the subsequent payrolls if there
are multiple late.
3
Confirm Dates/
Enter Payroll Total
Please make sure that the payroll dates that are populated
in the page are correct. Then add the total (gross)
payroll for that pay period. This will be the report total if
you are entering from a payroll register.
Click “Continue.”
POLICY HOLDER USER GUIDE
16
4
Click “Enter Payroll”
You will need to click “Enter Payroll” next to each of the
employees that you have payroll to report. Enter the
amounts by Wage Type and then “Save” or “Cancel.”
5
Click “Process Payroll”
Once you have entered the entire employee payroll, please
confirm that the total and entered payroll are correct.
Click “Process Payroll.”
6
View Premium Amount
Once processed, the screen will display the premium
amount to be drafted from your account.
POLICY HOLDER USER GUIDE
17
Uploading Payroll
1
Click “Payroll Upload”
The link is displayed under the Shortcuts from the home page.
2
Select Policy to upload payroll
You will only have one policy to select from if your policy
has not yet renewed.
3
Confirm Policy
Once selected, the screen will display the policy you are
uploading payroll for.
POLICY HOLDER USER GUIDE
18
4
Click “Browser” to Find
Payroll File
Once the browser window is open, you will need to
navigate to the folder where your payroll file is located.
Click “Save.”
5
Click “Process” to Upload File
If the upload is unsuccessful, the page will display a
message with the error in your file.
6
View Premium Amount
Once processed, the screen will display the premium
amount to be drafted from your account.
POLICY HOLDER USER GUIDE
19
Confirming Zero Payroll
1
Click “Payroll Upload”
The link is displayed under the Shortcuts on the home page.
2
Click “Zero Payroll”
The link is displayed to the right of the link to Enter Payroll.
3
Review Payroll Dates
The dates are populated from the payroll cycle displayed
in the prior screen. The date fields can be edited if they
are not consistent with the actual payroll dates.
4
Confirm Zero Payroll
Enter your name next to the “Authorized By” and reason
for not having payroll this period. Click the checkbox to
confirm and then “Submit Zero Payroll.”
POLICY HOLDER USER GUIDE
20
V I E W I N G A C C O U N T I N F O R M AT I O N
Nearly all questions regarding payroll and billing can be answered by logging in to your online
account. Detail on payroll submitted and billing history can be accessed in a few simple steps.
Viewing Payroll Detail
1
Click “View” Under Payrolls
The Payrolls list is toward the bottom of the screen
under the Policies list. Click “View” next to the payroll
in question.
2
View/Print Payroll Detail
There is a summary of the class code and employee
payroll listed in the screen. You may print the details by
clicking the link in the upper left corner.
3
View Employee Payroll Detail
By clicking “View” next to the individual employee you
can view the payroll by pay wage type.
POLICY HOLDER USER GUIDE
21
Viewing Billing Information
4
Click “Billing History”
This will take you to the list of transactions processed on
your account.
5
Click “View Statement”
This will open up the detail for the transaction processed.
6
View/Print Transaction
Information
The transaction information includes the payroll
dates, total payroll and premium for that pay period.
The Reference ID will match the ID that comes
through on your bank statement.
POLICY HOLDER USER GUIDE
22
F R E Q U E N T LY A S K E D Q U E S T I O N S
Q What is TravPaySM?
Q Is the process complicated?
A TravPay is Travelers pay-as-you-go billing option for workers
A Absolutely not! TravPay has an easy-to-follow set-up process –
Q Who is eligible for TravPay?
Q What are the benefits of TravPay?
A TravPay is a billing option that is available for workers
A Benefits to businesses include:
compensation policies that allows businesses to link their
payroll directly to their workers compensation premiums.
compensation policies.
Q Does my business have to be a certain size to utilize
TravPay?
A No – TravPay is available to businesses of all sizes.
Q How does TravPay work?
A TravPay allows businesses to pay their workers compensation
premium in real-time as they run their payroll. TravPay
offers two payroll reporting options – businesses can either
self-report their payroll at the end of each pay period or link
TravPay with one of thousands of approved payroll companies
for automated premium withdrawals.
all you need to do is provide a few simple pieces of information
and you’re ready to go!
•
No down payment!
•
Real-time workers compensation premium calculations
•
Improved cash flow for businesses
•
Automatic premium deductions
•
Reduced audit exposure due to real-time premium calculations
Q How much will TravPay cost me?
A Nothing. TravPay is a free billing option available for Travelers
workers compensation clients.
Q How can I get started on TravPay?
A Contact your local agent for more exciting details about
Travelers TravPay.
POLICY HOLDER USER GUIDE
23
G LO S S A R Y
Account. This term references your online profile tied to
your insurance policy(ies) that is accessed securely through a
username and password.
End Date (Payroll). This is the last day for a specific pay
period in which a company’s employees earn income.
Base Premium. The estimated annual premium calculated by
applying the Base Rate to the estimated annual premium for
that class code.
Exempt Payroll. This is the portion (if any) of payroll that
premium will not be charged against. Certain wage types and
owner/officers may be excluded on a state-by-state basis,
which is factored into the premium calculation.
Base Rate. Is the class code rate per $100 of remuneration
listed on the policy. It is used to calculate the Base Premium
for the individual class codes.
Exemptions (Policy). Certain states allow for owner/officers
to exempt themselves from coverage depending on the entity
type proper filings.
Bank Return. The term used when transactions are rejected
by the recipient’s bank. Typically, bank returns are caused by
Non-Sufficient Funds (NSFs) to cover the payment being
processed. Other Bank Returns include incorrect routing
numbers or blocked transactions.
Expense Constant. This is a line item charge listed on the
policy that applies to workers compensation coverage in
states with advisory rates. It does not increase or decrease
with the amount of premium charged but does vary by state.
The issuing insurance carrier charges the expense constant
in addition to the premium and covers a portion of the
administrative cost associated with issuing the policy.
Begin Date (Payroll). This is the first day for a specific pay
period in which a company’s employees earn income.
Check Date (Payroll). This is the date employees are paid
for a specific pay period.
Class Code. This is a numerical code used to describe the
activities for employee classification and used to determine
which rate listed on the policy will be charged for the
premium. The class code is a [see NCCI definition]
travelers.com
The Travelers Indemnity Company and its property casualty affiliates. One Tower Square, Hartford, CT 06183
This material does not amend, or otherwise affect, the provisions or coverages of any insurance policy or bond issued by Travelers. It is not a representation that coverage does or does not exist for
any particular claim or loss under any such policy or bond. Coverage depends on the facts and circumstances involved in the claim or loss, all applicable policy or bond provisions, and any applicable
law. Availability of coverage referenced in this document can depend on underwriting qualifications and state regulations.
© 2013 The Travelers Indemnity Company. All rights reserved. Travelers and the Travelers Umbrella logo are registered trademarks of The Travelers Indemnity Company in the U.S. and other countries.
CX-2723 New 6-13