1
Litebase User Manual
CONTENTS
I NTRODUCTION .......................................................................................................................................................................................1
DATA TABLE STRUCTURE .......................................................................................................................................................................2
OBJECTS THAT PROVIDE ACCESS TO A DATA TABLE ...........................................................................................................................2
PHYSICAL ACCESS TO A DATA TABLE .....................................................................................................................................................3
Creating a data table................................................................................................................................................................................3
Adding fields to a data table.....................................................................................................................................................................4
Appending records ...................................................................................................................................................................................6
The concept of current record....................................................................................................................................................................7
Sequential record access............................................................................................................................................................................8
Random record access .............................................................................................................................................................................12
Making changes to records.....................................................................................................................................................................13
Discarding changes to a record................................................................................................................................................................13
Deleting records.....................................................................................................................................................................................14
Packing a data file.................................................................................................................................................................................15
LOGICAL ACCESS TO A DATA TABLE ....................................................................................................................................................15
How indexes work .................................................................................................................................................................................16
Adding tags to a data table ....................................................................................................................................................................17
Tag order and index masks ....................................................................................................................................................................20
Re-indexing...........................................................................................................................................................................................21
Using tags.............................................................................................................................................................................................22
Deleting records in logical mode ..............................................................................................................................................................23
Searching records: seek...........................................................................................................................................................................24
Numeric to binary conversion and vice versa.............................................................................................................................................25
Creating keys for seek ...........................................................................................................................................................................26
Connecting to the outside world: export & import...................................................................................................................................26
THE U-AREA............................................................................................................................................................................................28
Creating the u-area................................................................................................................................................................................28
Accessing the u -area ..............................................................................................................................................................................28
ADVANCED ISSUES..................................................................................................................................................................................29
When the current record is deleted by another Rlist .................................................................................................................................29
Progress callbacks..................................................................................................................................................................................29
List of Rlist functions whose behaviour changes if a tag is selected............................................................................................................30
MULTI-USER ACCESS AND LOCKING ....................................................................................................................................................31
Introduction
Litebase is a database engine that allows the user to define, create and use database tables. Litebase
presents itself as a software library and API (application programming interface) written in C++.
Besides the library itself, Litebase comes with a set of C++ header files, providing an interface to the
objects, types and functions that implement the functionalities of the database engine.
Litebase was written almost entirely in portable C++ (the exception is the locking functionality to be
used in multi-user applications). It is strongly object oriented, and the mechanism of class derivation
was used abundantly to greatly reduce the number of member functions. Therefore, the API is
simpler, the necessary documentation is smaller, the functionalities are easier to learn, and results in
an overall more structured system.
Litebase is a low-level system, aimed at programmers; you will not interact with databases using SQL
or other high-level languages. The interaction will be achieved by programming in C++, using the
classes provided, the same way you would use a string class or a file I/O class.
This document is intended to work as a tutorial. It explains how to use some of most important of
Litebase’s functionalities. They are presented progressively in examples throughout the text. Each
time a new function is presented in an example, a box containing its declaration in also included. The
1
Litebase User manual
explanation is necessarily brief, but if the reader wants to know that function in greater depth, he
should refer to the Litebase Reference Manual. In fact, the latter is a good companion to the present
document.
Readers of this manual should have notions of object-oriented programming, especially C++. They
should know what a class is, how derivation works and what the access and scope rules of class
members are.
Data table structure
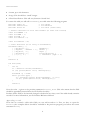
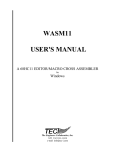
Litebase stores information in the form of data tables, which are in turn composed of records. A table
of records is stored in a data file, which has the following structure, depicted in Fig. 1:
Header
Part 1
u-area
Part 2
Record 0
Record 1
Part 3
...
Record n-1
Fig. 1 – Structure of a data table
The first part is a header, where the engine keeps table management information. This includes record
counters, description of the structure of the records, index descriptors, etc.
The second part is called the u-area. This section (which is optional) may be used to store user-defined
data whose format is not necessarily the same as the records’. For example, an encrypted password,
the identification of the last user to access the table, a time stamp, etc.
The third part of the file contains all the records stored in the table. Each record is divided into fields,
each with its own type and length. This part grows as more records are added to the table.
Objects that provide access to a data table
Litebase defines a set of classes that provide access to the information contained in a data table. The
main Litebase classes are:
•
DataFile:
•
Rbuf:
•
Field:
•
Rlist:
this class is the interface to a table’s physical files. Files are kept in secondary
storage, for example in a computer’s hard disk.
this class represents a record buffer, giving access to individual fields within a record.
Normally, this class will not be used by itself; we will be using classes derived from Rbuf
instead.
this class gives access to the contents of a record field.
this class (derived from Rbuf) provides access to all the table records, allowing the
creation, change and deletion of these records, among other things.
2
Litebase User manual
•
Uarea:
this class (derived from Rbuf) provides access to the table’s u-area.
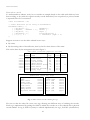
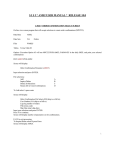
These classes are shown on Fig. 2.
Rbuf
datafile
fields
field
load
flush
discard
clear
setserialflag
getserialflag
lock
unlock
buf
bufsize
DataFile
open
create
insert_field
delete_field
change_field
rcount
delrecs
serial
fragmentation
fields
ufields
tags
setserialcounter
setpagesize
pack
import_csv
hlock
ilock
dbase_ext
opened
Uarea
Rlist
bind
append
top
go
seek
tagno
tagname
tagtext
tags
mkkey
ilock
hlock
setautolockmode
getautolockmode
Field
type
name
text
aslong
asdouble
btol
btof
ltob
ftob
changed
isnumeric
size
select
del
bottom
skip
skipcount
isdeleted
recno
taglen
rcount
cmpkeys
iunlock
hunlock
losecur
positioned
close
move_field
insert_tag
delete_tag
change_tag
created
valrecs
idxchg
namelen
fieldnode
ufieldnode
tagnode
dbname
getpagesize
reindex
export_csv
hunlock
iunlock
index_ext
len
clear
fptr
asint
set
btos
btod
stob
dtob
set_changed
isttypevalid
Fig. 2 – Litebase class hierarchy.
Each box represents a class, with its name in bold followed by a list of its member functions. Arrows
represent derivation (the arrow pointing to the derived class). Derived classes can access the member
functions of their base class; for example, an Rlist can call Rbuf’s method field.
Physical access to a data table
This section deals with physical access to the contents of a data table.
Creating a data table
As was said above, the DataFile class is Litebase’s interface to a table’s physical files. To create a
DataFile, all we have to do is call DataFile::create (a static member function).
#include <stdio.h>
#include "datafile.h"
// for printf
// for DataFile class
int main()
{
int rc = DataFile::create("mytable");
3
Litebase User manual
if (rc) printf("Error: %s\n", emessage(rc));
return 0;
}
The box below shows the declarations of the functions used in this example:
Methods declaration (see the reference manual for details)
static int DataFile::create(const char *filename,
int namelen = 0, int pagesize = 0);
char *emessage(int rc);
If the call to create is successful, a file mytable.db1 will be created in the current directory. The
extension is added automatically by Litebase, and should not be provided by the user.
The second line tests the result of the function call. In Litebase, a return code of zero means success;
a non-zero value is returned in case of error. The emessage function returns a string describing the
error code. It is always a good idea to test the return code of Litebase functions.
Adding fields to a data table
We have just created a table. We could open the table and add records to it; the only problem is that
we would be adding records without fields.
The next step will be adding fields to the table. Suppose we want to create a field to contain names,
with a length of up to 20 characters. We will have to fill a field descriptor and insert it in the table
(the new code, in bold, is added to the previous example):
#include <stdio.h>
#include "datafile.h"
// for printf
// for DataFile class
int main()
{
int rc = DataFile::create("mytable");
if (rc) printf("Error: %s\n", emessage(rc));
FieldNode fnode;
fnode.name = "Name";
fnode.info.type = DB_Text;
fnode.info.len = 20 + 1;
rc = DataFile::insert_field("mytable", 0, &fnode);
if (rc) printf("Error: %s\n", emessage(rc));
return 0;
}
4
Litebase User manual
Types declaration (see the reference manual for details)
struct FieldInfo {
short type;
short len;
};
struct FieldNode {
FieldInfo info;
char *name;
};
Methods declaration (see the reference manual for details)
static int DataFile::insert_field(const char *filename,
int pos, FieldNode *f,
int uflag = 0, pcbsettings *pcb = 0);
The call above tries to insert in table mytable, in position 0 (in Litebase, the first position is always
0), a field whose descriptor is fnode. As always, we test the function’s return value.
The length of the text field is 21, not 20; this is because C strings need an additional character to
store their null terminator.
You may have noted that the example above uses the expression DB_Text for the field type. This is
one of Litebase’s field type specifiers, a set of integer constants identifying each of the available types for
record fields. The complete list is:
• DB_Text specifies a text field. Text fields are used to hold C-like strings (a sequence of characters
followed by a terminating null). For that reason, if we want to store strings of size n in a text field,
the length of the field must be n + 1. When the length of the string to store is shorter than the
length of the field, the string is padded to the right with nulls.
• DB_Short specifies a short signed integer field. This type of field is used to store small integer
values, and is equivalent to a C short.
• DB_Long specifies a long signed integer field. This type of field is used to store large integer values,
and is equivalent to a C long.
• DB_Float specifies a floating-point field in simple precision, and is equivalent to a C float.
• DB_Double specifies a double precision floating point field, and is equivalent to a C double.
• DB_Binary specifies a user defined field. It is used to hold an arbitrary sequence of bytes, whose
contents is not interpreted.
• DB_Serial specifies a long integer field whose value is managed by the DataFile. The values for
this type of field are automatically incremented each time a record is added to the table, and can
be used as a serial number. Otherwise, it is equivalent to a C long.
The user chooses the length of DB_Text and DB_Binary fields; all other fields have pre-defined
length.
Let us consider a different and more complete example. Suppose we want to create a table where
each record represents a student. Each student has:
• A unique number. Each student should receive a number different from all the others.
5
Litebase User manual
• A name, up to 40 characters.
• An age. This should be a “small” integer.
• A final classification. This will vary between 0.0 and 20.0.
To create this table (we will call it students), we could write the following program:
#include <stdio.h>
#include "datafile.h"
#include "rlist.h"
// define
const int
const int
const int
const int
// for printf
// for DataFile
// for Rlist (used later)
constants for each field number (to make code clearer)
NUMBER = 0;
NAME = 1;
AGE = 2;
CLASSIF = 3;
const int NameLen = 40;
// table structure (as an array of FieldNode's)
FieldNode nodes[] = {
{ { DB_Serial, 0 },
"Number" },
{ { DB_Text,
NameLen + 1 }, "Name" },
{ { DB_Short, 0 },
"Age" },
{ { DB_Double, 0 },
"Classification" },
{ { 0, 0 }, 0 }
// terminator (type == 0)
};
DataFile F;
int main(void)
{
int rc;
rc = DataFile::create("students");
if (rc) printf("Error %s\n", emessage(rc));
FieldNode *p = nodes;
while (p->info.type) {
rc = DataFile::insert_field("students", -1, p++);
if (rc) printf("Error %s\n", emessage(rc));
}
return 0;
}
Note the value –1 given as the position parameter in insert_field. This value means that the field
should be appended (inserted after the last field in the table).
Litebase allows fields to be inserted, changed or deleted at any time, even if the table already contains
records. For more information, see the Litebase Reference Manual.
Appending records
Now that we created a table with fields, we can add records to it. First, we have to open the
DataFile (the examples below should be included in the previous program, just before the return
statement in main):
6
Litebase User manual
rc = F.open("students");
if (rc) printf("Error: %s\n", emessage(rc));
Methods declaration (see the reference manual for details)
int DataFile::open(const char *filename,
int readonly = 0,
int multiuser = 0,
int noidx = 0);
After the previous statement, F should be an open DataFile. We can now add a record to it.
To have access to a table’s records, we must use an object of the Rlist class, which should be
initialised with the open DataFile. An Rlist implements an iterator to the DataFile’s records,
allowing also access to a record’s individual fields. Then, we must assign values to the fields of the
current record and call Rlist::append to add it to the DataFile.
Rlist r(&F);
r.field(NAME)->set("John Costa");
r.field(AGE)->set(40);
r.field(CLASSIF)->set(12.0);
rc = r.append();
if (rc) printf("Error: %s\n", emessage(rc));
Methods declaration (see the reference manual for details)
Rlist::Rlist(DataFile *f);
Field *Rbuf::field(int fldno);
void Field::set(int n);
void Field::set(double x);
void Field::set(const char *s);
int Rlist::append(LockType ltype = NoLock);
In the above example, after declaring an Rlist, we access the Rlist’s fields through the
Rbuf::field method (inherited by the Rlist). That method returns a pointer to a Field object. To
assign a value to a field, we invoke the Field::set method. This method is, in fact, a set of
overloaded functions; the function to be called is determined by the type of the argument.
Note that no value was assigned to the Rlist’s field 0; since this is a DB_Serial field, Litebase will
handle this field, assigning a unique value once the record is added.
Finally, all we have to do is to call the Rlist::append method to add the record. The added record
becomes the current record.
The concept of current record
The concept of current record is important; when we access a data table through an Rlist, we work
with a single record each time. We call the record we are working with at each moment the current
record.
If we want to make changes to a record, we must first make that record the current record; in the
same way, Litebase only allows deletion of the current record.
We can change the current record with Rlist’s positioning functions.
7
Litebase User manual
It is not guaranteed that a current record exists at all times. When an Rlist is created, there is no
current record. In the same manner, if an Rlist is empty, there can be no current record.
Keep in mind that it is possible to have as many Rlist’s as necessary associated with the same
DataFile, each one with its own context and current record.
Let us continue our example, by adding a few more records to the DataFile:
struct student {
char *name;
short age;
double classification;
};
student stlist[] = {
{ "Louis Gomez", 36, 13.0 },
{ "Joe Williams", 38, 12.0 },
{ "Manny Klein", 41, 13.5 },
{ "Mike \"Gato\" Perez", 37, 11.5 },
{ "Anne Moore", 42, 13.0 },
{ "Zacarias Furtado", 37, 12.0 },
{ "Danny Page", 44, 10.5 },
{ 0, 0, 0 }
};
student *q = stlist;
while (q->name) {
r.field(NAME)->set(q->name);
r.field(AGE)->set(q->age);
r.field(CLASSIF)->set(q->classification);
rc = r.append();
if (rc) printf("Error: %s\n", emessage(rc));
q++;
}
Sequential record access
After adding the records above, we can list the students inserted in the table:
rc = r.top();
while (!rc) {
printf("%ld; %s; %d; %f\n",
r.field(NUMBER)->aslong(),
r.field(NAME)->text(),
r.field(AGE)->asint(),
r.field(CLASSIF)->asdouble()
);
rc = r.skip(1);
}
8
Litebase User manual
Methods declaration (see the reference manual for details)
int Rlist::top(void);
int Rlist::skip(long n);
char *Field::text(void);
int Field::asint(void);
long Field::aslong(void);
double Field::asdouble(void);
The output of the presented code should be the following:
0
1
2
3
4
5
6
7
John Costa; 40; 12.000000
Louis Gomez; 36; 13.000000
Joe Williams; 38; 12.000000
Manny Klein; 41; 13.500000
Mike "Gato" Perez; 37; 11.500000
Anne Moore; 42; 13.000000
Zacarias Furtado; 37; 12.000000
Danny Page; 44; 10.500000
The example above is quite simple to explain: the function top places the current record at the top of
the Rlist (in other words, the first record); top returns zero if successful. Functions text, asint
and asdouble return the contents of a Field whose type is respectively DB_Text, DB_Short and
DB_Double. Finally, function skip is used to move the current record forward by one record each
time; we keep calling skip while the call is successful (returning zero).
We could also very easily change the above code to list the table contents backwards:
rc = r.bottom();
while (!rc) {
printf("%ld; %s; %d; %f\n",
r.field(NUMBER)->aslong(),
r.field(NAME)->text(),
r.field(AGE)->asint(),
r.field(CLASSIF)->asdouble()
);
rc = r.skip(-1);
}
// start from bottom
// move one record backwards
Methods declaration (see the reference manual for details)
int Rlist::bottom(void);
All we had to do was to replace Rlist::top by Rlist::bottom, and call Rlist::skip with
argument –1 to move backwards. The result of the previous program would produce the list in
inverted order:
7
6
5
4
3
2
1
0
Danny Page; 44; 10.500000
Zacarias Furtado; 37; 12.000000
Anne Moore; 42; 13.000000
Mike "Gato" Perez; 37; 11.500000
Manny Klein; 41; 13.500000
Joe Williams; 38; 12.000000
Louis Gomez; 36; 13.000000
John Costa; 40; 12.000000
9
Litebase User manual
We can now rewrite the examples above in a more general way. Let us create a function to print the
contents of a generic record:
void printrec(Rbuf *r)
//
{
int fields = r->fields();
//
int i;
for (i = 0; i < fields; i++) {
//
Field *f = r->field(i);
//
switch (f->type()) {
//
case DB_Text:
printf("%s", f->text());
//
break;
case DB_Short:
printf("%d", f->asint());
//
break;
case DB_Long:
case DB_Serial:
printf("%ld", f->aslong()); //
break;
case DB_Float:
//
case DB_Double:
printf("%f", f->asdouble()); //
break;
case DB_Binary:
//
{
int j = 0;
int flen = f->len();
//
char *s = f->fptr();
//
while (j < flen) {
//
int n = s[j] & 0x0ff;
printf("%02x", n);
j++;
}
}
break;
}
if (i == fields – 1)
//
printf("\n");
//
else
printf("; ");
//
}
}
print generic record
get number of fields in record
for every field
get Field object
switch field type
print field as string
print field as int
print field as long
float can be treated as double
print field as double
binary field: print in hex
get number of bytes in field
pointer to field contents
for each byte
// get byte (mask off sign)
// print it in hexadecimal
last field in record?
print new line
separate fields with "; "
void printhdr(DataFile *f)
// print header row
{
int fields = f->fields();
for (int i = 0; i < fields; i++) {
FieldNode *fld = f->fieldnode(i);
printf("%s/%c%d", fld->name, fld->info.type, fld->info.len);
printf(i == fields – 1 ? "\n" : "; ");
// separator / newline
}
}
void printlist(Rlist *r)
{
DataFile *f = r->datafile();
// print everything
// get Rlist's DataFile
10
Litebase User manual
printhdr(f);
int rc = r->top();
while (!rc) {
printrec(r);
rc = r->skip(1);
}
// print header row
// print current record
}
// ...
printlist(&r);
Methods declaration (see the reference manual for details)
int Rbuf::fields(void);
int Field::type(void);
int Field::len(void);
char *Field::fptr(void);
FieldNode *DataFile::fieldnode(int n);
DataFile *Rbuf::datafile(void);
This is a long example, but not difficult to understand.
Function printrec takes a record as argument, and for every field in it tests its type; then, according
to the type, an appropriate way of printing the field’s contents is selected. Text fields are printed as
strings; numeric fields are accessed through the asxxx functions; binary fields are printed byte by
byte, in hexadecimal. In this case, to each byte is applied a mask 0x0ff in order to mask off
additional high order bits caused by sign extension (which can happen for byte values greater than
127).
Note that we chose printrec to take a parameter of type Rbuf, not Rlist. This is because Rbuf is
the base class for Rlist, and all methods used are Rbuf’s member functions. As a result, the
printrec function becomes more general: it can be used to print the contents of either an Rlist or a
Uarea.
As for function printhdr, it prints a header row: for every field, it prints its name, type (a character)
and length. This is done through the fieldnode method, which gives access to the FieldNode
descriptor (already described in “Adding fields to a data table”) for a particular field.
Finally, function printlist calls all other functions to print the full list. Note how this function
obtains a pointer to the Rlist’s DataFile to pass as argument to printhdr: by calling method
Rbuf::datafile.
The output of this example would be something like this:
Number/X4; Name/C41; Age/S2; Classification/D8
0
1
2
3
4
5
6
7
John Costa; 40; 12.000000
Louis Gomez; 36; 13.000000
Joe Williams; 38; 12.000000
Manny Klein; 41; 13.500000
Mike "Gato" Perez; 37; 11.500000
Anne Moore; 42; 13.000000
Zacarias Furtado; 37; 12.000000
Danny Page; 44; 10.500000
11
Litebase User manual
The letters identify the field types (which correspond to the DB_xxx integer constants, as declared in
header file ftypes.h). As for the length of the numeric fields, they are the same as the native C types
for long, short, float and double. They depend on the current platform for which the current
Litebase version has been compiled.
Although skip has been used in the previous examples for single step movements, skip can advance
any number of records (assuming that there are enough records available). For example:
rc = r.top();
rc = r.skip(3);
printf("rc '%s'; '%s'; skip count: %ld\n",
emessage(rc), r.field(NAME)->text(), r.skipcount());
rc = r.top();
rc = r.skip(1000);
printf("rc '%s'; '%s'; skip count: %ld\n",
emessage(rc), r.field(NAME)->text(), r.skipcount());
Methods declaration (see the reference manual for details)
long Rlist::skipcount(void);
The first skip call successfully advances three steps from the top of the list, placing the Rlist at the
fourth record. The second call to skip will not be able to go as far as its argument indicates, since the
progression will stop when the bottom of the list is reached, after seven steps.
rc '0 (Ok)'; 'Manny Klein'; skip count: 3
rc 'TooFar'; 'Danny Page'; skip count: 7
The value returned by skipcount indicates how far skip was able to go.
Random record access
Every record in a table as a record number. The record number identifies its absolute physical position
in the table (relative to the beginning of table). The first record has number zero.
It is possible to “jump” to a record in the table given its record number. This is accomplished by
function Rlist::go:
rc = r.go(0);
// equivalent to r.top()
long last = r.rcount() - 1;
rc = r.go(last);
// get number of records minus one
// equivalent to r.bottom()
if (r.recno() == last)
// this test should aways be true
Methods declaration (see the reference manual for details)
int Rlist::go(long pos);
long Rlist::rcount(void);
long Rlist::recno(void);
The example above illustrates the use of Rlist::go. A call to go(n) jumps directly to the (n + 1)-th
record in the table (first record is record 0). Rlist::rcount returns the number of available records
in the table (there is also a function DataFile::rcount that returns the number of records in the
12
Litebase User manual
table; the differences between the two will be explained later on). Finally, Rlist::recno returns the
record number of the current record. If there is no current record, recno returns –1.
Making changes to records
As was said before, in order to make changes to a record we have first to make it the current record.
After that, we only have to set the values for its fields using the Field::set method, much the same
way as when appending a record. The only difference is that Rbuf::flush is used to commit the
changes to file. As an example, let us increase by 10% the classification of each student:
rc = r.top();
while (!rc) {
double classif = r.field(CLASSIF)->asdouble();
classif *= 1.1;
r.field(CLASSIF)->set(classif);
r.flush();
rc = r.skip(1);
}
Methods declaration (see the reference manual for details)
int Rbuf::flush(int force = 0);
In the above example, we scanned the table and for each record we got the contents of the
classification field, multiplied it by 1.1, set the field with the new value and then called flush to
cause the new record contents to be written to disk.
In fact, this example would work even if flush were not called after changing the field value; this is
because the first thing skip does is to make an internal call to flush, before actually skipping the
record. This happens with all Litebase positioning functions (like top, bottom, go, etc). However,
calling flush explicitly can be considered a good programming practice. There is no problem with
efficiency by duplicating calls, because flush only writes to disk if at least one field has changed
since the last time flush was called.
Discarding changes to a record
It is possible to discard changes made to a record if Rbuf::flush has not been called yet (nor any
Rlist positioning function that calls flush implicitly, like skip, top, go, etc). This can be done by
calling Rbuf::discard:
rc = r.top();
r.field(NAME)->set("Wrong name");
r.field(CLASSIF)->set(0.0);
// changed your mind?
r.discard();
Methods declaration (see the reference manual for details)
void Rbuf::discard(void);
Note that discard does not recover the overwritten field values; what it does is to reset the internal
field-changed flag for each field, thus causing flush not to write the record contents to file.
13
Litebase User manual
Deleting records
After adding and changing records in a table, we can see how records are deleted.
Suppose we wanted to delete the fifth record in the table. We could write the following code:
rc = r.go(4);
if (!rc)
rc = r.del();
// 5th record is in position 4
printf("Table %s: total recs %ld / deleted %ld / valid %ld\n",
F.dbname(), F.rcount(), F.delrecs(), F.valrecs());
printf("Table fragmentation: %.1f%%\n", F.fragmentation() * 100.0);
Methods declaration (see the reference manual for details)
int Rlist::del(int *result = 0);
char *DataFile::dbname(void);
long DataFile::rcount(void);
long DataFile::delrecs(void);
long DataFile::valrecs(void);
double DataFile::fragmentation(void);
It should be noted that there is a difference between deleting a record and actually removing it from
the table. A call to Rlist::del marks the record as deleted, but the record remains in the table. In
fact, we can still read the record and change its fields, just like in a normal record. This may appear
strange, but this is what happens during physical access to a table, where we see what is actually
happening behind the curtains. There are other ways of accessing a table, in which deleted records no
longer are seen. This will be explained farther on in section “Logical access to a data table” on page 15.
The output of the example above should be:
Table students: total recs 8 / deleted 1 / valid 7
Table fragmentation: 12.5%
As shown above, what happens is also reflected in the DataFile’s internal counters. rcount provides
the total number of records in the table (8). delrecs gives the number of deleted records (1), and
valrecs gives the number of valid (non-deleted) records, which is always equal to the difference
between rcount and delrecs (7). Finally, fragmentation gives the proportion between deleted
records and the total number of records. The value of fragmentation can be used as a measure to
decide when to pack the data file (see “Packing” on page 15).
If, when listing the contents of a file, we do not want the records marked for deletion to be printed,
we should make a small change to the procedure to list the records:
rc = r.top();
while (!rc) {
if (!r.isdeleted())
printrec(&r);
rc = r.skip(1);
}
// only print non deleted records
Methods declaration (see the reference manual for details)
int Rlist::isdeleted(void);
14
Litebase User manual
The output of this example would be:
0
1
2
3
5
6
7
John Costa; 40; 13.200000
Louis Gomez; 36; 14.300000
Joe Williams; 38; 13.200000
Manny Klein; 41; 14.850000
Anne Moore; 42; 14.300000
Zacarias Furtado; 37; 13.200000
Danny Page; 44; 11.550000
Function isdeleted returns the state of the “deleted mark” for the current record. When a record is
deleted, the only thing done to it (in physical access mode) is to set this mark.
Packing a data file
As was said, deleting a record only marks it for deletion. In order to physically remove the deleted
records, the DataFile must be packed. Packing is an operation by which every record marked for
deletion is removed, thus resulting in a smaller (more compact) data file. Packing may take some time
if the table contains a great number of records; therefore, it should be done as a maintenance
procedure rather than a common one. Consider the following example:
F.close();
rc = DataFile::pack("students");
if (rc) printf("Error: %s", emessage(rc));
// close DataFile
// pack DataFile
rc = F.open("students");
// reopen DataFile
Methods declaration (see the reference manual for details)
void DataFile::close(void);
static int DataFile::pack(const char *filename, pcbsettings *pcb = 0);
Packing implies exclusive access to the DataFile and, for that reason, the DataFile must be closed
before calling pack. This is done by calling close. After the data file is packed, it is re-opened with
open.
Note: if the DataFile has tags defined, after packing a DataFile needs to be re-indexed. More on
this in section “Re-indexing”.
Logical access to a data table
Until now, we dealt with physical access to a data table. In this situation, records are seen in the order
they were added to the DataFile. Records can only be appended to the bottom of the table, and
when deleted they are still visible.
Litebase also supports logical access to a data table. In this mode, records are viewed in a defined order
specified (for example, by alphabetical order of name). When records are added, they appear at the
proper place according to the specified order. Finally, when deleted, a record is no longer visible.
The order by which records are seen is called a tag. A DataFile may have one or more tags, allowing
the records to be seen by one or more different orders. Tags also allow very fast searches.
This type of access is accomplished with the support of an index file.
15
Litebase User manual
How indexes work
To understand how indexes work, let us consider an example based on the table with which we have
been working so far (with the original records, record #4 deleted, but not packed yet), whose format
is repeated below for convenience:
const int NameLen = 40;
// table structure (as an array of FieldNode's)
FieldNode nodes[] = {
{ { DB_Serial, 0 },
"Number" },
{ { DB_Text,
NameLen + 1 }, "Name" },
{ { DB_Short, 0 },
"Age" },
{ { DB_Double, 0 },
"Classification" },
{ { 0, 0 }, 0 }
// terminator (type == 0)
};
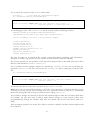
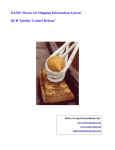
Suppose we want to see the table ordered in two ways:
• By name;
• By decreasing order of classification, then by the first three letters of the name.
This can be done by the arrangement shown in figure 3.
Data file (contains physical records)
fld 0
recno Number
fld 1
Name
00000
00001
00002
00003
00004
00005
00006
...
John Costa
Louis Gomez
Joe Williams
Manny Klein
Mike "Gato" Perez
Anne Moore
Zacarias Furtado
Danny Page
00000
00001
00002
00003
00004
00005
00006
00007
fld 2
Age
fld 3
Class
40
36
38
41
37
42
37
44
del
mark
12.0
13.0
12.0
13.5
11.7
13.0
12.0
10.5
X
Index file (with two tags)
Tag 0
Name
Anne Moore
Danny Page
Joe Williams
John Costa
Louis Gomez
Manny Klein
Zacarias Furtado
...
recno
00005
00007
00002
00000
00001
00003
00006
...
Tag 1
Class
13.5
13.0
13.0
12.0
12.0
12.0
10.5
...
Name
Man
Ann
Lou
Joe
Joh
Zac
Dan
...
recno
00003
00005
00001
00002
00000
00006
00007
...
Fig. 3 – Index structure of a file containing two tags
We can see that the index file stores two tags, allowing two different ways of ordering the records.
Each tag is implemented by pairing the fields by which the records are to be ordered with a physical
record number. In tag 0, field #1 (name) is ordered alphabetically. In tag 1, field #3 (classification)
16
Litebase User manual
and the three initial characters of field #1 (name) are ordered, respectively, in numeric decreasing
order and then alphabetically.
The first tag, which involves a single field, is called a simple tag; on the other hand, the second tag,
which involves more than one field, is called a composite tag or a multi-component tag.
To work with a tag, we must select it. Once a tag is selected, the Rlist switches into logical access
mode, and its positioning functions (top, bottom, skip, go) start working according to the index —
not the data — file.
For example, suppose that tag 0 is selected and we call top. In physical mode, the Rlist would jump
to record #0; however, in this access mode, the Rlist accesses the partition in the index file
containing tag 0 and locates the top entry. The matching record number (#5) is then used to load the
corresponding record (Anne Moore) from the data file.
In the case of tag 1, we have two components: field #3 and the first three characters of field #1. In
this example, the use of only three characters is a way of limiting the size of the index file. If we select
tag 1 and call top, the first entry in the corresponding section of the index file is accessed, yielding 3
as the record number. Record #3 (Manny Klein) is then loaded into the record buffer.
Note that, although the deleted record Mike "Gato" Perez is still present in the unpacked data file,
there are no corresponding entries in the index file. Thus, when a tag is selected, the deleted records
are not seen.
Adding tags to a data table
Adding tags to a DataFile is similar to adding fields. We need to fill a tag descriptor, which is then
passed as argument to a function that does the actual inserting of the tag. The code below (in bold)
creates the tags used in the example above:
#include <stdio.h>
#include "datafile.h"
#include "rlist.h"
// define
const int
const int
const int
const int
// for printf
// for DataFile
// for Rlist (used later)
constants for each field number (to make code clearer)
NUMBER = 0;
NAME = 1;
AGE = 2;
CLASSIF = 3;
const int NameLen = 40;
// table structure (as an array of FieldNode's)
FieldNode nodes[] = {
{ { DB_Serial, 0 },
"Number" },
{ { DB_Text,
NameLen + 1 }, "Name" },
{ { DB_Short, 0 },
"Age" },
{ { DB_Double, 0 },
"Classification" },
{ { 0, 0 }, 0 }
// terminator (type == 0)
};
// student descriptor
struct student {
char *name;
short age;
double classification;
};
17
Litebase User manual
// list of students to add to table
student stlist[] = {
{ "John Costa", 40, 12.0 },
{ "Louis Gomez", 36, 13.0 },
{ "Joe Williams", 38, 12.0 },
{ "Manny Klein", 41, 13.5 },
{ "Mike \"Gato\" Perez", 37, 11.5 },
{ "Anne Moore", 42, 13.0 },
{ "Zacarias Furtado", 37, 12.0 },
{ "Danny Page", 44, 10.5 },
{ 0, 0, 0 }
};
DataFile F;
int main(void)
{
int rc;
rc = DataFile::create("students");
if (rc) printf("Error %s\n", emessage(rc));
// insert fields into DataFile
FieldNode *p = nodes;
while (p->info.type) {
rc = DataFile::insert_field("students", -1, p++);
if (rc) printf("Error %s\n", emessage(rc));
}
rc = F.open("students");
if (rc) printf("Error: %s\n", emessage(rc));
Rlist r(&F);
// add students to DataFile
student *q = stlist;
while (q->name) {
r.field(NAME)->set(q->name);
r.field(AGE)->set(q->age);
r.field(CLASSIF)->set(q->classification);
rc = r.append();
if (rc) printf("Error: %s\n", emessage(rc));
q++;
}
// delete record #4
r.go(4);
r.del();
// must close file in order to change its structure
F.close();
// insert tags into DataFile
TagNode tnode;
TagComponent tc;
// tag descriptor
// tag component descriptor
18
Litebase User manual
// procedure to create tag 0
tnode.clear();
tnode.name = "Name";
// clear TagNode
// assign name
// fill tag component
tc.fno = NAME;
tc.clen = 0;
tc.imask = 0;
tnode.addcomp(&tc);
//
//
//
//
set
set
set
add
field number for this component
its length (0 means full length)
its index mask (0 is default)
component to TagNode
// append tag 0 to DataFile
rc = DataFile::insert_tag("students", -1, &tnode);
// procedure to create tag 1
tnode.clear();
// clear TagNode
tnode.name = "Classif + Name"; // assign name
tc.fno = CLASSIF;
tc.clen = 0;
tc.imask = TG_Reverse;
tnode.addcomp(&tc);
// fill first tag component
tc.fno = NAME;
tc.clen = 3;
tc.imask = 0;
tnode.addcomp(&tc);
// fill second tag component
// use only first 3 chars of name
// use reverse order
// add first component to tag 1
// add second component to tag 1
// append tag 0 to DataFile
rc = DataFile::insert_tag("students", -1, &tnode);
return 0;
}
Declarations (see the reference manual for details)
struct TagComponent {
short fno;
short clen;
short imask;
};
class TagNode {
// private data
public:
char *name;
};
void TagNode::addcomp(TagComponent *comp);
void TagNode::clear();
static int DataFile::insert_tag(const char *filename,
int pos, TagNode *t,
pcbsettings *pcb = 0);
The code above will insert in table students the two tags used as example in the previous section.
To insert a tag in a file, we use the DataFile::insert_tag static function, which should be applied
to a closed data file. This function receives as one of its arguments a tag descriptor, of type TagNode.
19
Litebase User manual
A TagNode contains, in turn, a list of one or more tag components, of type TagComponent.
The TagComponent structure contains the following members:
• fno (field number). Should contain number of the field to which this tag component refers.
• clen (component’s length). Should contain the component’s length. Usually it should be zero,
meaning that the component should have the length of the corresponding field.
• imask (index mask). It is used to set some properties that affect the way the tag component is
ordered. Its value can be made with a combination of constant integer masks (for the complete list,
see the Litebase Reference Manual), combined with the bitwise OR operator ‘|’. A value of zero
sets the default ordering properties according to the field type. More details will be given in section
“Tag order and index masks” farther ahead.
A TagNode is built by adding tag components to it. This is done by calling TagNode’s method
addcomp with a TagComponent as argument. Components are added in order. The name to be given
to the tag can be assigned to TagNode’s member name.
In this example, the first tag takes only one component, referring to the field whose number is the
constant NAME, and that is the value given to member fno. Members clen and imask are set to the
default value of zero. This TagComponent is added to the TagNode through its method addcomp.
Note that clear should be called before calling addcomp for the first time to ensure that the TagNode
is empty.
This tag is inserted into the DataFile by calling its static method insert_tag. The pos argument
indicates the position where the tag will be inserted. The value –1 indicates that the tag should be
appended to the existing ones (like in insert_field).
The second tag has two components. The TagComponent structure to be used as the first component
is filled with the following values: fno is set with CLASSIF; clen is zero; and imask receives the
mask TG_Reverse, indicating that the classifications should be kept in reverse numeric order. This
tag component, the first to be added to the tag descriptor, becomes the first tag component for the
second tag.
As for the second component, the members of the TagComponent structure are filled with the
following values: fno is set with NAME and imask is set with zero; as for clen, it receives the value 3.
This means that the tag component will use only the first three characters of the NAME field for
ordering purposes. This may result, in some cases, in a less than perfect order: the names that start
with the same three characters will not be ordered among themselves, because the following
characters will be ignored. However, the entries of the index file will be smaller, because only the first
three characters will be stored instead of the name’s full length. The fact that the name is the second
ordering criterion may also justify the trade-off of space and speed for exactness.
This tag is also appended to the DataFile through a call to insert_tag.
Tag order and index masks
The Litebase index system supports the ordering of records according to the contents of one or more
fields. The order to be used depends on the field type. Numeric fields are ordered numerically; binary
fields are ordered in “byte order” (numeric order of each byte, from left to right); finally, text fields are
normally ordered in text order (although byte order can be used, too).
Some notes should be made about “text order”. This is one of the strengths of Litebase, because “text
order” approaches very closely the way humans would order text fields, rather than the way a
computer would order text fields. Therefore, when ordering strings, instead of merely doing an ASCII
comparison, Litebase makes the result more “human friendly” by doing the following:
20
Litebase User manual
(i)
The text in the string is divided into words, and words are compared to each other (instead
of treating the string as a sequence of characters). Thus, “a cat” comes before “about a cat”.
(ii)
The division of the text into words defines word as a sequence of letters and/or numeric
digits; all other characters, including white space, are considered separators. A sequence of
separators is treated as a single separator. Thus, “Mr. Smith-Jones” is equivalent to “ Mr
Smith Jones ”; also, “A, B & C” is equivalent to “a+b+c”. This helps solve a common
problem, where using two spaces instead of one was sufficient to make two strings to be
considered different.
(iii)
Upper- and lower-case letters are considered equivalent: ‘a’ is the same as ‘A’.
(iv)
Accented letters are equivalent to non-accented letters: ‘a’, ‘á’ and ‘ã’ are considered equal;
‘c’ and ‘Ç’ are equivalent, like ‘n’ and ‘ñ’, etc. Thus, “café” will come before “cafeteria”.
(v)
Numbers are ordered according to the quantity they represent. Thus, ‘9’ comes before ‘10’,
not after; ‘007’ comes after ‘5’. This applies to composite strings, too: “k7a” comes before
“k10a”.
The default ordering strategy according to field type applied by Litebase is usually adequate. This
behaviour can be changed by assigning appropriate values to the index mask (the imask member of
the TagComponent structure). However, this subject is beyond the scope of the present document;
the Litebase Reference Manual should be consulted for more information. An exception is the use of
the more common TG_Reverse mask, which specifies reverse (decreasing) order for the affected tag
component.
Re-indexing
Let us open now the DataFile after the tags have been inserted:
rc = F.open("students");
if (rc) printf("Error: %s\n", emessage(rc));
The result of this will be:
Error: IndexOpen
This is because a DataFile with tags needs an index file in order to work, which at the moment does
not exist: inserting a tag does not create the index file automatically (it is more efficient to create the
index file only once, after all tags have been created). To create an index file, DataFile::reindex
should be called:
rc = DataFile::reindex("students");
if (rc) printf("Error: %s\n", emessage(rc));
Declarations (see the reference manual for details)
static int DataFile::reindex(const char *filename, pcbsettings *pcb = 0);
Litebase allows tags to be inserted, changed or deleted at any time, even if the DataFile is already
populated with records. However, each time a change is made to the DataFile’s tags, reindex
should always be called; otherwise opening the file may return a BadIndex error.
21
Litebase User manual
Using tags
Now that we created two tags for the students data table, we can start using them. We will list the
contents of the table according to each available tag. To do this, we just need to add the following
code to the previous example (the code should be inserted at the end of main, just before the final
return statement).
// create an index file
rc = DataFile::reindex("students");
if (rc) printf("Error: %s\n", emessage(rc));
// now open the DataFile
rc = F.open("students");
if (rc) printf("Error: %s\n", emessage(rc));
// associate Rlist r with the newly opened DataFile
rc = r.bind(&F);
if (rc) printf("Error: %s\n", emessage(rc));
// print records according to each tag
for (int i = 0; i < r.tags(); i++) {
r.select(i);
// select tag i
printf("\n***Tag %d selected:\n", r.tagno());
rc = r.top();
while (!rc) {
printrec(&r);
rc = r.skip(1);
}
}
Declarations (see the reference manual for details)
int
int
int
int
Rlist::bind(DataFile *f);
Rlist::tags(void);
Rlist::tagno(void);
Rlist::select(int tagno);
The explanation of the above example is simple. First, we call reindex to create an index file for
students.db1 (the index file will be called students.idx).
Now we can reopen the students table, without getting an IndexOpen error.
Note that when the Rlist r was initially declared, its constructor received as argument DataFile F.
However, F had to be closed after that so that tags could be added to it. As a result, when F is
reopened after these structural changes, Rlist r has to be rebound (re-associated) with the “new” F.
To accomplish this, function Rlist::bind is called to bind r to F.
In fact, we have the following equivalence:
extern DataFile F;
// the lines below are equivalent to Rlist r(&F);
Rlist r;
r.bind(&F);
is also useful when we want to declare an Rlist but an open DataFile is not available at that
moment.
bind
22
Litebase User manual
Finally, in order to have the records ordered according to a certain tag, we have to select that tag, using
Rlist::select. Other Rlist methods are used in this example: tags returns the number of tags in
the table (2) and tagno returns the number of the currently selected tag.
Note that when a tag is selected it is no longer necessary to check whether records are deleted with
the Rlist::isdeleted method, because when using logical access deleted records are not visible.
The output of this example would be:
***Tag 0 selected:
5; Anne Moore; 42; 13.000000
7; Danny Page; 44; 10.500000
2; Joe Williams; 38; 12.000000
0; John Costa; 40; 12.000000
1; Louis Gomez; 36; 13.000000
3; Manny Klein; 41; 13.500000
6; Zacarias Furtado; 37; 12.000000
***Tag 1 selected:
3; Manny Klein; 41; 13.500000
5; Anne Moore; 42; 13.000000
1; Louis Gomez; 36; 13.000000
2; Joe Williams; 38; 12.000000
0; John Costa; 40; 12.000000
6; Zacarias Furtado; 37; 12.000000
7; Danny Page; 44; 10.500000
As can be seen, in the first group the records are ordered by name (record with number 4 is missing
because it was deleted). In the second group they are listed in decreasing order by classification and
then by name.
When a tag is no longer needed, it can be un-selected and the Rlist returns to the physical record
order. This is done by calling select with argument –1. This also frees some of the Rlist’s allocated
memory.
Deleting records in logical mode
Deleting records in logical mode (with a tag selected) is somewhat different in behaviour from
deleting records in physical mode. The method Rlist::del is still used to delete the current record;
but since the deleted record becomes invisible, the current record has to change (note that the deleted
record is still in the data file, and quite visible if no tag is selected; deleted records can only be
removed through DataFile::pack).
By default, the record following the one that was deleted becomes the new current record. If there is
no such record (the deleted record was the last one), the record immediately before the deleted record
becomes the current record. If there is no such record, the Rlist must be empty, and therefore there
will be no current record.
The user can be informed of what record was selected as the new current record after a call to
Rlist::del. This method has an optional parameter to allow this information to be obtained:
int result;
rc = r.del(&result);
if (rc) printf("Error: %s\n", emessage(rc));
if (result == NextRecord)
23
Litebase User manual
printf("Next record became current record\n");
else if (result == PrevRecord)
printf("Previous record became current record\n");
else if (result == NoCurrentRecord)
printf("No current record\n");
else
// only happens with no tag selected
printf("Still in current record\n");
Declarations (see the reference manual for details)
int Rlist::del(int *result = 0);
If the current record does not change after its deletion (which only happens if no tag is selected),
result will receive the value 0; otherwise, it will receive one of the constants shown in the previous
example.
Searching records: seek
A tag can be used to accelerate searches in the fields referred by it. When a tag is selected,
Rlist::seek can be used to search a key.
A key is a combination of field contents obeying to the format of a tag. As an example, let us use
seek to search the first record whose name begins with letter “J” in tag 0:
r.select(0);
rc = r.seek("j", 2, SeekPartial, SeekFirst);
if (!rc) printrec(&r);
Declarations (see the reference manual for details)
int Rlist::seek(const char *s, int len, int seekmode, int seekwhich);
The first argument to seek is a character array containing the string "j", followed by the full size of
the string. Note that this should include the terminating null character of the string, and therefore the
second argument is 2. The parameter seekmode specifies whether a strict or a partial search should be
performed. A strict search will only succeed if it finds a record whose name is exactly “j”; a partial
search will accept a record whose name begins with “j”. Finally, the seekwhich parameter indicates
what record should be preferred when more than one meets the search criteria: in this case, the first
record should be located (other possible values for this parameter are SeekLast — locate the last
record matching the criteria — and SeekAny — accept any record matching the criteria).
The result of this search will be:
2 Joe Williams; 38; 12.000000
If the seekwhich parameter received instead the constant SeekLast, the last record beginning with
“j” would be located:
0 John Costa; 40; 12.000000
As we have seen above, searches with text keys are straightforward. On the other hand, searches with
numeric keys are a little more elaborate, because the numeric values will need to be converted into
byte arrays appropriate for seek. To understand this, let us try another example, this time using tag 1,
which calls for a numeric (floating-point) key. The objective will be to locate the first record whose
classification is 12.0:
24
Litebase User manual
r.select(1);
char key[sizeof(double)];
Field::dtob(key, 12.0);
// double to binary conversion
rc = r.seek(key, sizeof key, SeekStrict, SeekFirst);
if (!rc) printrec(&r);
Declarations (see the reference manual for details)
static char *Field::dtob(char *s, double x);
This example takes some additional code in order to construct the search key: since seek expects the
search key to be passed as a character array, the value 14.7 will need to be converted into a character
array with adequate format.
To accomplish this, an array called key is declared, with a size adequate to hold a double. The static
method Field::dtob is used to convert a double value into a binary value, which is stored in key.
Note that dtob should always be used for this purpose, to ensure that the byte placement is done
correctly. Finally, the array key is passed to seek, along with its size.
Unlike text fields, numeric fields only allow strict (exact) searches. This is why SeekStrict was used
as the third seek argument.
The result of this search will be:
2 Joe Williams; 38; 12.000000
The next step is to make a search with a multi-component key. Since tag 1 has two components, of
type double and type text, we will try to locate a student with classification 12.0 and name beginning
with “Z”:
r.select(1);
char key[sizeof(double) + 1 + 1];
// double + letter + null
Field::dtob(key, 12.0);
strcpy(key + sizeof(double), "z");
rc = r.seek(key, sizeof key, SeekPartial, SeekFirst);
if (!rc) printrec(&r);
In this case, we had to store two components in the search key. Therefore, the key array needs room
for a double and the string formed by the letter “z” and a terminating null character.
The first section of the array receives the binary conversion of 12.0. The second section receives the
"z" string. The array is then passed, together with its size, to seek. Note that the seek mode is
SeekPartial; this parameter only applies to the last component of the search key (and only for
components of type DB_Text or DB_Binary). To all other components is applied a strict search (more
complete information about Rlist::seek can be found in the Litebase Reference Manual).
The result of this search will again be:
6 Zacarias Furtado; 37; 12.000000
Numeric to binary conversion and vice versa
In the above example, we used Field’s static method dtob to convert a double into a binary value.
Litebase provides a set of functions to perform this kind of conversion:
25
Litebase User manual
Declarations (see the reference manual for details)
static
static
static
static
static
static
static
static
long
Field::btol(const char *s);
int
Field::btos(const char *s);
double Field::btod(const char *s);
float Field::btof(const char *s);
char *Field::ltob(char *s, long n);
char *Field::stob(char *s, short n);
char *Field::dtob(char *s, double x);
char *Field::ftob(char *s, float x);
//
//
//
//
//
//
//
//
convert
convert
convert
convert
convert
convert
convert
convert
binary to long
binary to short
binary to double
binary to float
long to binary
short to binary
double to binary
float to binary
These functions may be useful when performing field conversions or when preparing search keys for
seek.
Creating keys for seek
In the examples above we saw how to construct keys for seek. As an alternative to formatting keys
into an array using numeric-to-binary conversion routines, Litebase provides the function
Rlist::mkkey. This function allows the easy assembly of a search key from individual search values.
Let us repeat the example where we made a search with a multi-component key (tag 1, 12.0 + “Z”),
this time using mkkey:
r.select(1);
int keylen;
char *key = r.mkkey(1, 2, &keylen, 12.0, "z");
rc = r.seek(key, keylen, SeekPartial, SeekFirst);
if (!rc) printrec(&r);
delete[] key;
Declarations (see the reference manual for details)
char *Rlist::mkkey(int tagno, int ncomps, int *keylen ...);
The function mkkey takes as arguments the number of the tag, the number of components to
assemble in the key, and a pointer to an integer variable where the length of the constructed key will
be stored. After this, the function accepts a variable argument list composed of the values of each
component. The number of arguments of the variable argument list must be equal to the value
supplied as the second argument.
The function returns a pointer to an internally allocated buffer containing the assembled key. It is the
caller’s responsibility to free this memory after use, which should be done through the delete[]
operator.
Connecting to the outside world: export & import
It is possible for the “outside world” to have access to the contents of a DataFile via Litebase’s
export mechanism. The static method DataFile::export converts the contents of a data table into
a CSV file. A CSV file is a normal text file, containing a “copy” of the data table according to the
CSV format. CSV stands for Comma Separated Values1, and is a useful convention to represent data
because this format is accepted by a great number of applications, for example Microsoft Excel.
Despite the CSV name, sometimes values are separated by other characters than commas, such as the semi-colon (;). This
depends on your locale or regional settings.
1
26
Litebase User manual
Let us export the contents of the students data table:
F.close();
// file must be closed before export
rc = DataFile::export_csv("students");
Declarations (see the reference manual for details)
static int DataFile::export_csv(const char *datafile, char *csvfile = 0,
csvparams *params = 0, pcbsettings *pcb = 0);
If everything goes well, a file students.csv will be created with the following contents:
namelen:16;serial:8;stamp:1115851472;idxcount:2
[X4][Number];[C41][Name];[S2][Age];[D8][Classification]
"[1:1/0/0][Name]";"[2:3/0/1 1/3/0][Classif + Name]"
0;John Costa;40;12;
1;Louis Gomez;36;13;
2;Joe Williams;38;12;
3;Manny Klein;41;13.5;
4;"Mike ""Gato"" Perez";37;11.5;*
5;Anne Moore;42;13;
6;Zacarias Furtado;37;12;
7;Danny Page;44;10.5;
The first five lines of an exported file contain control information, including state information,
description of fields, tags and u-area. The records are listed from the sixth line onwards.
The reverse operation is also possible: a CSV file can be imported into a data table. This can be done
with the static method DataFile::import_csv.
Let us consider another example. Suppose we deleted the students.db1 file, but we still keep the
exported students.csv file. We can recover the students.db1 file by importing it from the CSV
file:
rc = DataFile::import_csv("students");
Declarations (see the reference manual for details)
static int DataFile::import_csv(const char *datafile, const char *csvfile = 0,
csvparams *params = 0);
The result of the above code is the recreation of the students.db1 file.
Note: the result of successfully importing a CSV file is the creation of a Litebase data file, possibly
overwriting an existing data file with a matching name. You should be careful in order not to accidentally
destroy an existing data file, testing its existence before calling import_csv.
It is possible to change the contents of the CSV file and then import it back into a Litebase data table;
for example, the user may want to add or make manual changes to some records (rather than
programmatically through the Litebase API). The user should only do this if he knows what he is
doing.
After an import operation, the index file is likely to become outdated, and thus the data table should
be re-indexed.
27
Litebase User manual
The U-area
In the beginning of this document, in figure 1, we saw that a data table can have, besides its header
and the table records, an intermediate area whose size and structure are defined by the user.
This is called the u-area (which stands for user area). This is a place where information (other than
data table records) can be stored.
The u-area is a structured buffer: it may have fields just like a normal record. In fact, the class that
implements the u-area, Uarea, is derived from Rbuf. Therefore, the u-area can be read and written
using all the Rbuf functions.
Creating the u-area
The u-area is created by adding u-area fields to the DataFile. This is identical to creating record
fields in a DataFile; in fact, the same function, insert_field, is used. Consider the following
example:
FieldNode fnode;
fnode.name = "Operator";
fnode.info.type = DB_Text;
fnode.info.len = 20 + 1;
rc = DataFile::insert_field("students", -1, &fnode, 1);
fnode.name = "Last change";
fnode.info.type = DB_Long;
fnode.info.len = 0;
rc = DataFile::insert_field("students", -1, &fnode, 1);
Methods declaration (see the reference manual for details)
static int DataFile::insert_field(const char *filename,
int pos, FieldNode *f,
int uflag = 0, pcbsettings *pcb = 0);
In this case, the uflag parameter, which is zero by default, receives a non-zero value, indicating that
the fields are to be inserted into the u-area.
Accessing the u-area
The access to the u-area is done through a Uarea object:
#include <time.h>
#include "uarea.h"
// for time()
// for Uarea
extern DataFile F;
Uarea u(&F);
// F is an open DataFile
// create a Uarea bound to F
u.field(0)->set("JLB");
long timestamp = (long)time(0);
u.field(1)->set(timestamp);
u.flush();
// set operator username
// set time stamp
// ...
printrec(&u);
// print the uarea contents
28
Litebase User manual
A Uarea is constructed by associating it with an open DataFile. Since the Uarea class is derived
from Rbuf, it can be accessed through Rbuf’s methods. After the fields have been set, flush should
be called to update the u-area on the data file. Another consequence of the fact that the Uarea is
derived from Rbuf is that its contents can be printed using the printrec function that we created
earlier:
JLB; 1115852036
Advanced issues
When the current record is deleted by another Rlist
The fact that a deleted record becomes invisible when a tag is selected can cause some difficulties. If
two Rlist’s a and b are both positioned in the same record and for example a calls del, what
happens to b’s current record?
The answer is: as long as b does not move (with skip, go, top, etc.), b still contains in its buffer a
copy of the current record that was deleted. It can access the fields stored in the record buffer;
however, if changes are made to those fields, when b moves (for example, by calling top or skip),
Rbuf::flush will be called to update the record. The result to this call is that changes to non-tagged
fields will affect the deleted record in the physical file; however, changes made to tagged fields will be
lost because the updates to the index file will fail.
On the other hand, functions whose effect depends on the current record (namely Rlist::skip) are
also affected. If b calls skip after its current record was deleted by another Rlist, skip will not be
able to move because its current record no longer exists. skip will nonetheless try to find a new
current record, in a way similar to del: first it will try to adopt the next record as the new current
record (returning NextRecord). If this is not possible, it will try the previous record (returning
PrevRecord). If this is still not possible, the Rlist is empty and skip will return NoCurrentRecord.
Progress callbacks
Some DataFile functions can take a long time to conclude, because they depend on the number of
records in the table. Examples of such functions are DataFile’s methods pack, reindex,
insert_field, delete_field, insert_tag, delete_tag, etc. All these functions need to perform
a number of operations that is in some way proportional to the number of records in the table. If this
number is very large, the amount of time taken can be considerable.
In order to provide the user with some feedback to the progress of these operations, those functions
accept as an optional parameter a pointer to a pcbsettings structure that allows them to implement
a progress callback mechanism.
The functions that accept a pcbsettings structure will call a callback (a function supplied by the
caller) from time to time. This callback can provide progress feedback to the user, for example by
updating a status bar, a percent counter, etc.
The pcbsettings structure has the following declaration:
struct pcbsettings {
void (*cbk)(void *obj, int n);
void *cbkobj;
int res;
long itemcount;
long counter;
29
Litebase User manual
};
The cbk member should be initialized with the address of the callback function. The callback will be
called with two arguments: the obj parameter will receive the value that is stored in member cbkobj,
whereas parameter n will receive a progress value. This value will vary from 0 to the value specified
by the res (progress resolution) member.
The last two members of the structure are used in situations where the progress callback will span
across several function calls: for example, if the user calls reindex several times and wants the
progress bar to reach its end when the last reindex call completes (rather than progressing from 0 to
100% for each individual call). This aspect is more complex than adequate for an introductory
document; a complete explanation can be found in the Litebase Reference Manual. For now, both
itemcount and counter should be set to zero.
Let us consider an example. Suppose that we are re-indexing a table and we want to have a callback
to be called with a progress indication, varying from 0 to 100%:
void callback(void *obj, int n)
{
FILE *f = (FILE*)obj;
fprintf(f, "Progress: %03d%%\n", n);
}
pcbsettings pcb;
pcb.cbk = callback;
pcb.cbkobj = stderr;
pcb.res = 100;
pcb.itemcount = 0;
pcb.counter = 0;
// progress callback
// output stream comes in obj
//
//
//
//
//
callback
callback parameter
vary from 0 to 100%
default: 0
default: 0
F.close();
// close file before reindexing
rc = DataFile::reindex("students", &pcb);
if (rc) printf("Reindex error: %s\n", emessage(rc));
The callback function will be called a number of times (not more than res + 1) to indicate
progress, each time with a different value for n. The obj parameter receives the stream to where the
output should go.
List of Rlist functions whose behaviour changes if a tag is selected
We have seen that some Rlist functions behave differently depending on whether a tag is selected.
Let us systematise that approach and list those functions:
• top, bottom, skip, go: without a selected tag, these functions see the records in the table in the
order they were originally added, and deleted records are visible. Otherwise, the records are seen in
the tag’s specified order and deleted records are not visible.
• rcount: without a selected tag, this function returns the number of physical records in the table,
including the ones marked as deleted; otherwise, the function returns the number of valid (non
deleted) records.
• del: without a selected tag, the deleted record continues to be the current record; otherwise, the
deleted record becomes inaccessible and the current record changes.
• seek: does not work without a selected tag.
30
Litebase User manual
Multi-user access and locking
It is possible to write multi-user applications with Litebase. Some precautions are needed, however,
to avoid some of the problems that may arise from having several entities (objects, applications or
users) accessing the same data simultaneously.
Litebase provides two mechanisms to support the implementation of multi-user applications:
•
Multi-user file access;
•
Support for locking.
Multi-user file access allows several entities to open and access the same data table simultaneously.
As for the locking mechanism, it enables the application to control access to sections of a file, for
example by granting or denying access to individual records.
Locking is particularly useful to avoid some conflicts that may result from simultaneous access to the
same record by two or more entities. It is also used by the Litebase engine to prevent users of
accessing a file when modifications are being made to it.
For example, when two entities try to change the same record, there is the danger of the loaded copy
of the record not to reflect the actual record on file, which may have been changed by the other
entity. In some cases, this can be an undesirable behaviour; therefore, in order to avoid this, the
application may make use of record locking, preventing other entities from accessing the same record
while it is being used.
Litebase supports two types of lock: shared locks and exclusive locks 2.
Multiple shared locks can be applied simultaneously to the same record; however, only one exclusive
lock is allowed for a record.
The recommended protocol for using shared and exclusive locks is the following:
If a user wants to read a record, it should first attempt a shared lock on it. If the lock fails, the user
should refrain from accessing the record. It the lock operation succeeds, the user may access the
record for reading purposes; it should not attempt to write to it. Thus, other users wanting to read the
same record will be able to do it, because multiple shared locks may co-exist on the same record.
If, on the other hand, a user wants to write to a record, it should attempt an exclusive lock on it. If the
attempt fails, the user should refrain from accessing the record. If the lock succeeds, the user will be
the only one to have authorisation to access that record, and will be able to make changes to it
without fear of interfering with other users.
Needless to say, when a user is done with a record, it should unlock it immediately.
The behaviour of shared and exclusive locks is explained in the following table:
State of the record
Unlocked
Locked with shared lock
Locked with exclusive lock
Operation attempted
Shared lock
Exclusive lock
Succeeds
Succeeds
Fails
Fails
Let us consider an example in which a multi-user application wants to make changes to a record.
Locking is a typical case of a highly system-dependent functionality. In some platforms, only exclusive locking may be available
(resulting that when the user invokes a shared lock, an exclusive lock will be produced instead). In other cases, no locking
facilities will be available at all.
2
31
Litebase User manual
extern Rlist r;
int rc = r.top();
// changes will be made to first record
if (rc) printf("Error: %s\n", emessage(rc));
rc = r.lock(WrLock);
// attempt an exclusive lock (for writing)
if (rc)
// lock failed?
printf("Lock failed: will not change record \n");
else {
// lock succeeded
// now we make all changes to the record
r.field(NAME)->set("Michael Powell");
r.field(AGE)->set(24);
r.field(CLASSIF)->set(14.5);
rc = r.flush();
// commit changes to file
r.unlock();
// unlock the record after use
if (rc) printf("Error: %s\n", emessage(rc));
}
Methods declaration (see the reference manual for details)
int Rbuf::lock(LockType type);
int Rbuf::unlock(void);
In the example above, we call the function Rbuf::lock. This function attempts to lock the current
record, using a non-blocking lock: this means that the function returns immediately after attempting
the lock. The return value is zero if the lock is obtained, non-zero otherwise.
The argument passed to the lock function is WrLock —specifying a write (exclusive) lock. The
constant RdLock could be used to apply a read (shared) lock.
Finally, the function Rbuf::unlock is used to unlock the current record after the changes have been
made, allowing other users / applications to access it.
Note that if the Rlist moves away from a locked current record (for example, by calling skip, top,
etc), the lock is automatically released.
32