1
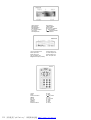
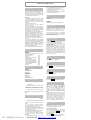
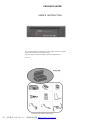
CAR DVD PLAYER USER’S INSTRUCTION Before connecting operating or adjusting this product, please read these instructions completely. Please keep this manual for future reference. Warning: Risk of Serious mechanical breakdown, please don’t play 8 cm Discs SZIR020112-V2 PDF 文件使用 "pdfFactory" 试用版本创建 www.fineprint.com.cn 1.Disc Entrance. 3.Ç Up Button. 5. Æ Right Button. 7.Å Left Button. 9. 9 Previous Button. 11.IR sensor 13.< Stop Button. 2.Eject Button. 4.È Down Button. 6.Enter Button. 8.Power On / Off Button. 10. : Next Button. 12. Play/Pause Button 14.Reset Button. 1.Line-Control Input Jack 3.Video Input Jack 5.Audio Input Jack 7.DC 12V Output Jack 9.Digital Audio Output (Coaxial) 2.Video Output Jack 4.S-video Output Jack 6.Audio Output Jack 8.DC 12V Input Jack 1.Power 2.OSD 3. Direction buttons 4.<Stop 5.7 FR 6.: Next 7.Subtitle 8.Volume 9. Number buttons 10. Eject 11. Menu 12. Play/Pause 13.8 FF 14.9 Previous 15. Setup 16. Audio 17. Mute 18. GOTO PDF 文件使用 "pdfFactory" 试用版本创建 www.fineprint.com.cn PDF 文件使用 "pdfFactory" 试用版本创建 www.fineprint.com.cn ENGLISH INSTRUCTION DVD Features The unit provides high-resolution image, high-quality sound and surround effect. The DVD player can play not only DVD discs of various versions, but also VCD, Super-VCD, CD, HDCD, MP3, JPEG-CD, etc. Features: 1. Electronic Shock Proof function inside. Extra 64Mbit SDRAM cache memory is provided to support disc track buffer time (CD 36sec,VCD 7sec,DVD 4sec,MP3 100sec ). 2. Low Power Consumption. Standby current: 4mA or less. Operating Current: 0.8A or less. 3. Dust Proof Design. The enclosed dustproof metal shell is used to prevent Optical, mechanism, and electrical parts (Optical Pick Up specially) in the machine from possible damage by dust and static electricity. 4. Intelligence. A high performance CPU is used to manage all parts in the machine. 5. Intelligence Disc Entrance: When a disc is detected in Disc Entrance, the machine will switch On from Standby and then play disc automatically without other operations. 6. Dolby AC-3 and DTS audio decoders inside. 7. Advanced intelligence DVD navigator inside. It can adapt to any DVD program disc. 8. All kinds of CD discs and DVD discs are compatible. Including Audio CD / HDCD / DTS-CD / MP3 CD / JPEG CD / Video CD / Super VCD / DVD-5 / DVD-9 / CD-R / CDRW / DVD-R / DVD+RW etc. 9. PAL / NTSC /MUTLI systems selectable. Accessories Picture A Please confirm the accessories below when you purchase this unit. R Remote control 1Pcs R Choke 1Pcs R Battery (AAA, for remote) 2Pcs R User’s Manual 1Pcs R Audio connecting cable 1Pcs R Video connecting cable 1Pcs £ Remote sensor (Optional) 1Pcs R Power adaptor (Optional) 1Pcs R Fixing bracket 2Pcs R Screw some Names of Parts Picture B Frontal panel Picture C Rear panel Picture D Remote control Infrared Remote Control Along with this unit is an infrared remote control which has perfect remote control function. Installing batteries: ⊙ Open battery compartment, Insert 2 AAA batteries, make sure to match the “+” and “-” of batteries to the marks in the battery compartment. ⊙ While operating the remote control, please point it to the frontal panel of the DVD player. Cautions On Remote control To avoid any fault, electric shock, fire or human body damage, please observe what listed below: ⊙ Please replace 2 AAA batteries in infrared remote control when control distance is shorten. ⊙ It may cause error when sunlight or strong light directly irradiate the remote control. Please keep it in a cool place. ⊙ Please take its battery out if you don’t use the remote control for a long time to prevent the batteries from leaking. ⊙ Please remove all the batteries if the unit will not be used for a long period of time. ⊙ Do not peel off the covering on battery and do not use it if the covering has been peeled off. ⊙ Mishandling of battery can cause electrolyte leakage that can damage items, the liquid touches may Cause a fire. ⊙ If electrolyte leaks from the batteries, please consult your dealer. ⊙ Wash thoroughly with water if electrolyte touches any part of your body. Connections Picture E Please see above picture F (Used at home) Picture F Please see above picture G (Used in car) Basic Operation If you want to connect the unit to a TV, plug all power lines into receptacles, load the batteries into remote control, turn on TV power, then you can play the unit to enjoy it. If you want to connect the unit to an amplifier, you can also turn the player on, and select proper amplifier mode according to the type of discs you want to play Power On and Play 1). Press POWER button on the player. 2). Operate TV remote control to shift TV to proper video input mode (VIDEO IN). 3). Put a disc into the disc entrance, with label side upward. 4). The player will slot in the disc automatically, and begin to read it, It can identify different disc formats then display it on the TV screen. If directory or menu picture display in the screen, you can press the direction buttons Ç, È, Å and Æ buttons in the remote control to move lighting band to desired title and press [ENTER] button to select it, also you can directly press number buttons to select track. Pause to pause the playback, Press it Press again to return to normal play. Mute (Available to analog audio output signal only) Press MUTE to remove the sound of the player, press it again to return to normal state. Eject the Disc Press EJECT button, unload the disc until the disc is stopped, and you can take out the disc from disc entrance. Power Down the Machine Press the POWER button. Turn off power of all connected equipment. The Use of Remote Sensor If you want to put the DVD player in where you can‘t see, please insert REMOTE SENSOR in the REMOTE SENSOR INPUT jack and put the REMOTE SENSOR on where you see in automobile, you can control the DVD player so long as the remote control is pointed toward REMOTE SENSOR. Note: 1.While playing if you find the picture is not displayed in full screen or some part hidden or black and white image occur, you need to set the system. Please select proper TV system (PAL or NTSC), please refer to instructions of system setting in chapter 6. 2.When the “ “ symbol shows in TV screen, it indicates the operation is invalid. Frequent Operation We will introduce some regular operations of different types of function, you can perform one and more operations as you like. Use menu to select item If the DVD disc has menu, you can display the menu by pressing MENU button, then you can select a popular item to play according to following procedures. 1). Press MENU The screen display menu picture, the content to be selected varies with different discs. PDF 文件使用 "pdfFactory" 试用版本创建 www.fineprint.com.cn 2). Press the directory buttons Ç,È,Å or Æ to select the desired item. 3). Press ENTER to confirm the selected item. 4). If the screen displays a submenu, you can also select the desired item of the submenu by the same procedures listed in (1)-(3) above. Play fast forward While playing you can push 8 button to play fast forward. Four speeds (FF1x, FF2x, FF3x and FF4x) are available to play forward, each time you press it, the speed grows by one rate. When the speed reaches maximum rate (FF4x), press 8 again to return to playing. Play fast backward While playing you can push 7 button to play fast backward. Four speeds (FR1x, FR2x, FR3x and FR4x) are available to play backward, each time you press it, the speed grows by one rate. When the speed reaches maximum rate (FF4x), press 8 again to return to playing. Skip to next chapter/track Press : button Skip to previous chapter/track Press 9 button Select track There are more than one operation procedures available A. Press : or 9 to skip the next or the previous track and play. B. For those discs with track number, directly Press number buttons to enter the No. Of desired track If the screen displays “ ” there may be three possible reasons: (1) the track in the disc is not numbered; (2) the number entered is beyond the scope; (3) the disc has no number select function . C. Select among the song track list (such mp3 etc. menu list) Select subtitle language For DVD discs, you can Press SUBTITLE to switch the subtitle language. Keep pressing it, and the screen will display available languages alternatively. Select audio channel language For DVD discs, you can push AUDIO to switch the audio channel. And for other discs, press this button to switch L/R channel. Display playing time and state. Push OSD button, TV screen will display current playing time and state, i.e. playing time and remaining time, playing chapter/track information, press OSD each time, the screen will show a time alternatively. System Setup Press SETUP button, then the following SETUP screen will appear. At this moment, press ÇorÈ button to highlight the desired item. Then press ENTER button and the top menu will display. In the top menu, useÆ button to enter the next top menu on the right of the screen. Note: in each menu, you can use ÇorÈ button to highlight the desired item, then press ENTER to confirm the selection. Press Å button to exit the top menu on the right of the screen, in any time, you can press SETUP to exit the system setup. SETUP MENU GENERAL SETUP SPEAKER SETUP AUDIO SETUP KARAOKE SETUP PREFERENCES EXIT SETUP Note: Preferences must be set in the mode of stop. There are some common settings as the following. The user can setup other Items in this way. For example: the setting of the PIC MODE. 1. Press SETUP, the SETUP screen will appear. Ensure to direct to `GENERAL SETUP`, then press ENTER. The following on-screen display will appear. GENERAL PAGE PIC MODE ANGLE MARK OSD LANG CAPTIONS SCR SAVER MAIN PAGE PDF 文件使用 "pdfFactory" 试用版本创建 For example: the setting of audio mixed output mode. 1. Press SETUP, the SETUP screen will appear, press È button to highlight SPEAKER SETUP . Press ENTER button. The following onscreen display will appear. SPEAKER SETUP DOWNMIX >> CENTER REAR SUBWOOFER CNTR DELAY REAR DELAY TEST TONE MAIN PAGE LT/RT STEREO OFF 2.Press Æ button to enter the top menu on the right. If the desired audio mode is STEREO, press È button to highlight STEREO, then press ENTER 3.Press SETUP to exit setup. Fox example: the setting of coaxial output If you use the coaxial output signal, the audio output must be set in ’DATA STREAM’ or ‘PCM`. The detailed operations are as following: 1.Press SETUP and SETUP screen will appear. Firstly. Enter the GENERAL SETUP top menu. Then select `AUDIO SETUP`. Press ENTER button, the following onscreen display will appear. 2. Press Æ button to enter top menu on the right. Press È button to highlight `SPDIF/RAW` or `SPDIF/PCM`, then press ENTER. AUDIO SETUP SPDIF OUTPUT OP MODE DUAL MONO COMPRESSION PRO LOGIC LPCM OUTPUT MAIN PAGE >>OFF SPDIF/RAW SPDIF/PCM 3.Press SETUP to exit setup. Special prompts: When the coaxial signal output isn’t used, the audio output should be set in `OFF`. For example: the setting of parental lock As for the original disc, parents can prohibit the program that is unsuitable for the children. The detailed operations of setting parental lock are as following: 1. Press STOP to stop the MPEG4 player. 2. Press SETUP and SETUP screen will appear. Press È button to highlight `PREFERENCES` and press ENTER. Then press È button to highlight `PARENTAL`, the following on-screen display will appear: 3. PressÆ button to enter the submenu on the right. If you want to switch the parental grade to grade 3, press È button to highlight `3 PG`. Then press ENTER. The player will ask the user to enter the password. If the password set at the factory isn’t changed, press 3,3,0,8 buttons on the remote control. 4. Press SETUP to exit the system setup. Then press enter to confirm REFERENCES TV DISPLAY TV TYPE VIDEO OUTPUT AUDIO SUBTITLE DISC MENU LOCALE PARENTAL PASSWORD DEFAULTS SMART NAV MAIN PAGE KARAOKE SETUP 2. Press Æ button to enter the top menu on the right of the screen. If the desired PIC MODE is FILM, press È button to high-light FILM, then press ENTER. 3. Press SETUP to exit system setup Note: there are three types They are NORMAL/PS, NORMAL/LB and WIDE. They can satisfy the needs of various discs and TV types. 1.Press STOP to stop the DVD player. 2.Press SETUP and then use È to highlight AKRAOKE and press ENTER, the following page will appear on the screen: KARAOKE SETUP KARAOKE MODE >> OFF of TV shape. www.fineprint.com.cn KARAOK OFF KARAOKE MAIN PAGE Then select KARAOKE to enjoy karaoke function 3. Press SETUP again to exit. Keys on Remote Control This part describes the functions and operation procedures of all buttons in the remote control. POWER Power on or Shut down the machine. EJECT Press this button, the disc will be unloaded from the player, and press it again the disc will be loaded. OSD Display the machine status such as playing time, playing track information. MENU While playing DVD, push this button to display the option menu included in the disc (whether it works depends on the type of disc). Direction Buttons, include Ç, È, Å and Æ When the screen display the menu of DVD disc or system menu, the player is in waiting state, you can push these buttons to move cursor then select the desired item. ENTER Press this button to execute the entered number or the selected item. Play or Pause current playing. < While playing, press this button the playing will be stopped completely. properly when you use it. ⊙ Please remove the disc from the unit after you use it,and put it into its box vertically or horizontally. Do not lean or pile them to cause them bend. ⊙ Do not expose discs in the place subject to direct sunlight, high temperature, and moisture. ⊙ It is very dangerous to use disc broken or distorted because the disc will be spinning in a very high speed. Recommend seriously that do not repair disc with plastic tape or glue and try to use it again, which will cause the unit damage or even injure the human body. ⊙ When playing, if you hear strange noise or shaking, please press < button immediately. Cautions On Adapter ⊙ Please hold the plug firmly when you plug or unplug the DC power adaptor. ⊙ Please keep the power wire far away from heading equipment. ⊙ Do not suspend heavy object with DC power wire. ⊙ Do not repair or reconstruct power wire anyway. ⊙ keep the unit away from any liquid. ⊙ Do not put any object on top of the unit. ⊙ External current (such as thunder and static) will affect the unit’s work . If it happens, please switch the power off and unplug the DC power plug . ⊙ when it thunders, Please stop using the unit and unplug the DC plug from DC outlet directly. 8 Search the disc forward. 7 Reverse to search the disc. 9 While playing push this button to skip to previous chapter or track. : While playing push this button to skip to next chapter or track. SETUP For machine Setup, please refer to the chapter about machine setup. SUBTITLE Switch DVD subtitle channel. AUDIO Switch DVD audio channel. VOL+, VOLVolume control. MUTE Switch on/off the audio output. NUMBER BUTTONS: [0],[1],…[9] number buttons are used to enter number, e.g. No. of track, DVD chapter No., time data, etc. 10+ When the number of a track or a chapter is over 9, firstly push [10+] then push relevant buttons. The button is used to enter the number in decade of the No., press it each time, the number in decade will increase by 1. GOTO Search the playing time point by directly input number. While playing press this button, the screen will display a search menu, you can search the disc by track or by time. Technical Terms TITLE: For DVD disc it is defined as a long complete segment of image or music or a movie. Each title has a number that makes it easy to search. TRACK: The music of a CD or a movie clip of a VCD. Each track has a number for search. CHAPTER: It is smaller than title among the units of a DVD, it is defined as a long complete segment of image or music or a movie. A title is made up of several chapters, and each chapter has a number for search. SUBTILE: The literature in TV screen bottom, generally it is translation or dialogue, also recorded in the disc. Condensation inside The Unit ⊙ When temperature and humidity change Suddenly, and if the cold part of this unit is exposed to warm air, Condensation may occur.(it is called “sweating”). In case of condensation, the unit may not work well. But when the moisture has evaporated, it will be working normally. ⊙ When moisture condensation occurred and the unit does not work well, please put it at room temperature till it can function well again. In different conditions, this process may take from 1 to 2 hours. ⊙ In addition, the disc inserted may also cause condensation. So, please wipe it with a soft and dry cloth thoroughly before you use it. Cautions: ⊙Keep the unit away from water or other liquid. If this unit touches water or other liquid, please immediately switch it off, otherwise, it may cause short-circuit or fire. ⊙To prevent electricity leakage or damage, do not spill liquid, alcohol on the product. ⊙ Please do not plug or unplug the unit with wet hands, which may cause electricity short-circuit. ⊙ Please do not put the unit near fire or high temperature. ⊙ Please do not leave the unit in the place near the source of electromagnetic wave. Exposing the unit to electromagnetic wave source may cause the unit failure or document fault. ⊙ Do not drop anything into the product from ventilation hole of the cabinet or any other opening place to prevent electrical problems or other damage; ⊙ Please take off the plug of the unit from the main outlet since the unit will be still connected to AC although the power is turned off; ⊙ Clean the cabinet with dry, soft cloth only after the power is turned off. Notices On Disc Operating Precautions Warning: Risk of Serious mechanical breakdown, please don’t play 8 cm Discs Warning: Do not use broken or distorted disc. ⊙ Be careful not to scratch the surface of disc. Please put the disc into the unit ·Place the product levelly where there is little dust and good ventilation condition. ·Prevent the product and the remote control from moisture , heating, vibration or direct sunlight; · Condensation caused by moisture may affect the lens inside the product, it will affect the play effect. In such case please turn on the power (unload the disc) to play it for 1-2 hours, thus vaporizing the condensation with PDF 文件使用 "pdfFactory" 试用版本创建 www.fineprint.com.cn the home –grown heat; ·Do not turn on/off the product frequently. After you turn off the product, please wait for about 10 seconds prior to open it .Do not play the broken, scratched or twisted discs; ·Please do not insert anything except discs in the unit. · When the disc is improperly loaded , please do not force it into the machine. Maintenance ⊙ Remove the disc from the unit if it is not be used, and switch the power off. ⊙ Remove the plug of power adaptor out from the AC outlet if the unit will not be used for a long time Electrify the unit regularly in order to keep each of the components of the unit in good condition. ⊙ Please carefully choose an eligible maintenance shop to clean the lens if its ability to read a disc is declining obviously or the lens becomes dirty. ⊙ Please wipe the casing and operation panel with a soft cloth. ⊙ Please wipe sticky dirty things away with a Cloth moistened in soap water. ⊙ Before using chemically woven cloth, read the instructions with the cloth carefully. ⊙ Please keep the unit far away from insecticide and volatile objects. ⊙ Please remove the battery from the unit if it can not be used for a long period of time, and switch power on periodically to keep the unit in good condition. Do not leave the unit in places as following: ⊙ A place exposed to direct sunlight for long time. ⊙ A place exposed to steam or coal smoke. ⊙ A place subject to dust or high temperature ⊙ A location near heat equipment. ⊙ A location near strong magnetic objects. ⊙ Please wipe the fingerprinted or stained discs with a soft cloth. ⊙ If the surface of disc is very dirty, please wipe it with a cloth moistened with water. ⊙ Please wipe disc radically. (If you wipe it round, you may make circle-scraped trace on the disc and may affect disc playing). ⊙ Do not paste label on the disc. ⊙ Do not use benzene, thinner, tape-cleaner, or antistatic to wipe the disc. Important Information Safety precautions: Dangerous voltage inside this product, to prevent electric shock, do not open the cabinet by yourself. IF you need any service, please contact professional technician. For components replacement, please use the components recommended by the manufacturer. Cautions: The unit uses laser source which can cause radioactive damage in human body. Be sure to use laser player in accordance to this Instruction. Don’t open the cover and repair by yourself, please send it to maintance shop. Voltage selector: Please make sure the work voltage of the unit is consistent with the external voltage If the external voltage is higher than the work voltage of the unit, it will cause malfunction or damage to the unit. Warning: Risk of Serious mechanical breakdown, please don’t play 8 cm Discs FAQ PDF 文件使用 "pdfFactory" 试用版本创建 www.fineprint.com.cn Trouble Causes Buttons no function Can not read disc The machine doesn’t work No image No sound No play function Mosaic in image or scratched voice in sound 1. Please check the remote control’s battery. 2. Press POWER to standby the player, and then press POWER again to re-power it later. If POWER button does not work, 3. Press the RESET button in the hole, on the down left corner of front panel, by wiry object. And then press POWER to power on the player. 4. Shut down the machine, and switch it on after 5 minutes. 1. There is no disc inside the unit. 2. Disc’s labeled side is not facing up. 3. Disc’s mode is not the requirement. 4. Disc is dirty or damaged. 5. Laser lens is dirty or has been covered with dust. 6. Moisture condensation has occurred. Please remove the disc, switch off the power, and leave the unit aside for about one hour. 7. Lens has got aging. (When you press keys or buttons on the unit and the remote control) 1. Check if the power wire is connected well and whether the power light is on 2. Please press POWER button on the front panel when the unit is set to STANDBY situation 3. Check if the batteries’ energy is exhausted or install the batteries in correct position. 4. There is a hidden button (RESET BUTTON) in the small hold on the down left corner of the front panel, use wiry object to press the button. 1. Check if the voltage of the car storage battery too low 2. Check if the machine turn on the and whether the power light is on 3. Check if the video cable with monitor is firmly connected. 4. Check if the monitor has been turned on power and set to AV input mode 1. Check if the Audio cable is firmly connected 2. Check if the Amplifier has been turned on 3. Check if you have pressed the MUTE key 4. Use VOLUME control key to adjust volume 5. Check if the disc has audio output 1. Check if there is a disc in the unit. 2. Check if the disc’s labeled side is upward 3. The disc is dirty or distorted 4. The disc format is wrong (Such as CDROM disc) 5. Check if the region code of the Disc is wrong, please use right region code 6. Check if the control is set to parental setup. 7. Check if the voltage of the Car storage battery is too low 1. Check if there exist violent shake when the machine plays 2. There is dew in the unit, take out the disc and play it one hour later. 3. There exists dust in the lens, please use clean disc to maintain the lens 4. The lens becomes aged 5. The disc is scratched or dirty Specifications General Disc Video Output Power Supply Power Consumption Net Weight Dimensions Operating Temperature Range Operating Humidity Range Disc Type Playable Composite Video S-Video Analog Audio Audio Digital Audio S/N Ratio Dynamic DC 12V Less than 10 Watt. App 1kg L160 x W160 x H50 mm 0℃~40℃ 20% ~ 75% 12 cm CD/CDR/CDRW 12 cm DVD/DVDR/DVD+RW CD-Audio/HDCD/MP3/WMA /VCD/SVCD/KodakPicture CD /DVD video 1.0 Vp-p (75 ohm load) Luminance Signal: 1.0 Vp-p (75 ohm load) Color Signal: 0.286 Vp-p (75 ohm load) 2 channel (1L/2R) Dolby AC-3 or DTS downmix 0.8 Vrms (@1KHz) Coaxial 1.15 Vp-p ≥80 dB ≥80 dB Adaptor AC input AC 100V~240V, 50~60Hz, 20 Watt DC output DC12V±5%, 1.5Amp Specifications are subject to change without notice PDF 文件使用 "pdfFactory" 试用版本创建 www.fineprint.com.cn