1
Video instructions at www.MyPulseMonitor.com & on product DVD
Computer-powered
Wireless
Ultra-intelligent Real-time
Monitor
(CWURM)
Version 2014.9
Patent no. 6897773
This manual & video instructions are on the product DVD. For the latest
version please visit our website at www.MyPulseMonitor.com.
Copyright© 2005
All rights reserved
Table of Contents
Safety Information .................................................................................. 4
Computer-Powered Wireless Ultra-Intelligent Real-Time Monitor ....... 5
Installing the MyPulse Heart Monitoring Software ............................... 6
Installing the MyPulse Heart Monitoring Hardware .............................. 7
MyPulse WearLink or Bluetooth Heart Rate Transmitter.......... 8
Setting the Frequency Switches ............................................... 10
Launching, Utilizing, and Customizing MyPulse Software................... 13
Launching MyPulse ……...…..…………..……..…………….. 15
Utilizing MyPulse ……….………………………..………..…. 15
Customizing MyPulse …………………..………..…. 15
Starting the MyPulse Heart Rate Monitor .……..…. 23
Selecting the chart to be displayed.……….. 24
Stop watch functions……………………
28
Simultaneous monitoring of multiple users. 29
Stopping MyPulse ……..…………....……………. 31
Reporting……………………..……………………. 32
Advanced Menus...................................................................................... 34
Internet monitoring from a central station or cell phone……… 37
Applications………………………………...…..………………….…… 38
Appendix A (Actual values & Standard Deviations) ............................. 48
Appendix B (Frequency Switches).......................................................... 49
Appendix C (Preselected Defaults for User Age & Sex)......................... 50
Appendix D (Deactivating Screen Savers and Power Shut Down) ….… 51
Glossary of Terms ................................................................................... 52
Trouble shooting ……………………………………………………… 54
Technical specifications ..……………………………………………. 55
References................................................................................................ 57
Warnings and notices …………………………………..……………… 58
3
Safety Information
• Before using this monitor, read all instructions in this manual, product labels
and warnings; loose leaf instructions for the chest strap sensor/transmitter; as
well as all instructions for any peripheral devices that the monitor is connected
to, such as a computer and computer related peripheral devices such as a power
supply, printer and telephone.
• Use only the voltage for which the AC adapter is rated. Excess voltage may
result in fire and electrical shock.
• If your hands are wet, do not touch the AC adapter as doing so may result in
electric shock.
• In case of a damaged power cord (internal wiring exposed or shorted), contact
your original dealer to purchase a replacement cord. A damaged power cord
may result in fire and electric shock.
• If the AC adapter will be unused for a long time, unplug it. Always grasp the
AC adapter. Avoid pulling the power cord as that can cause damage, fire and
electrical shock.
• Do not subject the monitor to large amounts of humidity or dust, as that may
result in fire and electrical shock.
• Do not place the monitor on an unstable or tilted surface as it may fall,
resulting in damage or personal injury.
• Always dispose of a MyPulse WearLink belt ‘used battery’ according to
government regulations.
• Under no circumstances should the Long Range Receiver, Repeater or Short
Range Receiver be opened, taken apart, or modified in any way. Any such
action may result in fire and electrical shock. If the rechargeable battery in the
repeater is worn out, contact your original dealer to purchase a replacement
battery. The dealer will install the battery.
• If the monitor is emitting smoke or a strange odor, turn it off immediately and
unplug the AC adapter from the wall outlet. Contact your original dealer to
request servicing.
4
Computer-Powered Wireless
Ultra-Intelligent Real-Time Monitor
This monitor is a reference device.
General User Information
MyPulse is a multifunction vital signs monitor suitable and convenient for use
in private homes, gymnasiums, sports, nursing homes and hospitals. It is a high
performance, mobile and fully integrated heart monitoring system to help in the
analysis of fitness and performance for the average active person.
Unlike other heart monitoring devices that only detect high or low values in
heart rate, MyPulse provides a comprehensive method for reading and
interpreting data. It monitors and reports heart rate activity in excess of userspecified limits, as well as irregular heart rate fluctuations (by calculating the
frequency of changes in the user’s heart rate). MyPulse defaults to average
norms depending on the user’s age and sex (reference 7,8). It also automatically
customizes to each individual user after collecting data for only a short period
of operating time. The information is displayed in real time, which facilitates
rapid observation of abnormal conditions so that corrective action can be taken
immediately. Archived data (1 year) may be reviewed for cardiac rehabilitation.
The short range monitor has a range of 3 feet. The bluetooth mid range monitor
has a range of 33 feet, extendable with an android smart phone to anywhere
there is internet service. The long range monitor has a range of 1000 feet. They
are safe for children. The chest strap is a welcome alternative to skin irritating
gels and wires. Each wireless monitor provides continuous up to date charts and
graduated sound and full screen color alarms, as well as a worldwide
telephone/email alarm. The user or caregiver decides when to take action, so
there are no false alarms.
Professional Edition User Information
A smart phone will extend the mid range monitor to anywhere that the phone
has internet access, and add GPS coordinates. A single computer can be used to
create a multiple user integrated Nurse’s Station or Physical Trainer's Station.
User administrative data are encrypted and stored along with historical charts.
Charts are separated into internal biological effects and external environmental
effects, in terms of actual values and standard deviations, to speed up and
improve data analysis. A spectral analysis of any desired transformation of any
segment of 24 hour beat to beat and inter-beat data is easily produced. MyPulse
is easy to use and ideal for use at a medical establishment, gymnasium or at
home. Due to very low frequency {5kHz} and short range {3feet}, interference
with other equipment in a hospital or gymnasium is easily avoided (references
1,2,3,4,5,6).
Refer to section titled Applications for more information on monitoring.
5
Installing the MyPulse Heart
Monitoring Software.
NOTE: Turn off popup blocker and virus protection. Install MyPulse. After
installation is complete, add MyPulse.exe to the list of acceptable programs.
NOTE: System Requirements. Before proceeding verify the
following minimum operating system, speed and RAM memory
requirements for your computer.
Operating system: Windows XP, Vista, Windows 7
RAM: 256 Mega Bytes.
Speed: 500MHz.
Insert the Heart Monitoring Software DVD into your computer’s DVD-ROM /
DVD-ROM drive.
The MyPulse Software Setup Wizard will launch automatically. If not doubleclick the desktop ‘My Computer’ icon, double-click the DVD ROM drive icon,
and double-click on the Setup.exe icon. Follow the Setup Wizard’s installation
instructions. The default folder where the software program will be installed is
MyPulse. The installer will ask you to insert the short range or long range
receiver at the appropriate time. Otherwise, the windows device manager may
be used to install the receiver. The mid range bluetooth sensor/transmitter are
installed by Windows Control panel/Add a device.
If MyPulse is reinstalled, for example during an upgrade to a new version, all
user settings from the previous version are retained.
NOTE: The DVD ROM drive contains USB drivers that are
required for the short range and long range MyPulse receivers. The
setup wizard will copy the drivers to the installation folder MyPulse.
This will allow you to install additional receivers without the DVD.
In case of the Bluetooth mid range monitor, if a smart phone is used to collect
and transmit gps coordinates and data to the computer, then in addition to the
MyPulse computer software, MyPulse smart phone must be downloaded from
www.MyPulseMonitor.com and installed on the phone. The DropBox APP must
be downloaded and installed on the computer.
6
Installing the MyPulse Heart
Monitoring Hardware
1. Installing the short range or long range MyPulse Heart Monitoring
Hardware on your computer
In order to install the MyPulse Heart Monitoring device, you must have an
available USB Port.
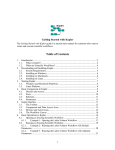
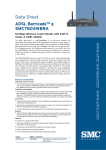
Insert the USB Cable that is connected to the MyPulse Receiver into an
available USB Port on your computer, as shown in the diagram below.
1 foot
minimum
1 foot
minimum
Short range receiver (no antenna) must be at least 1 foot away the computer.
Long range receiver (with antenna) may touch computer.
If the receiver is not yet installed, the windows device manager will appear on
the screen, and will automatically locate and install the receiver device drivers
that are located on the MyPulse installation DVD and in the installation folder
MyPulse. Click next.
7
2 - Installing the MyPulse Hardware on the Person to be Monitored
Follow the instructions below that pertain to the MyPulse Heart Rate
Sensor/Transmitter Model (WearLink or Bluetooth) you are using. Only one of
these two is required.
MyPulse WearLink™ Heart Rate
Sensor/Transmitter (CE 0537):
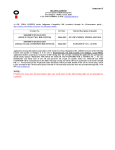
a.
Wet the left and right electrode areas
of the strap under running water and
make sure they are well moistened.
Squeeze the water in so it does not
just run off like it will on a new
strap. Use electrode gel if planning
to be sedentary or for sleep monitoring.
b.
Attach one end the
Sensor/Transmitter connector to
the chest strap connector and
snap the fasteners in place, as
shown on the right.
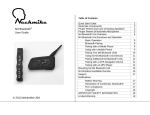
c.
Adjust the strap length to fit
snugly and comfortably. Secure
the strap around your chest, just
below or over the chest muscles
for men, and below or over the
breasts for women (over the
chest muscles or breasts may
give better contact when lying
down), and snap in the second
fastener.
d.
Check that the two electrode
areas are firmly against your
skin and that the MyPulse logo
of the connector is in a central,
upright position.
This turns it on.
8
Extra Small Strap. If your chest size is not the standard Medium - Large or
Small, then it is Extra Small. Extra Small is a non standard size. Therefore,
the elastic portion of the strap must be cut to the size that you require. Follow
steps 1, 2 and 3 in the diagram below.
STEP 1. Cut the elastic
strap here and remove it
from the sliding adjuster.
STEP 2. Cut the elastic strap to
the desired size.
Sliding
size
adjuster.
STEP 3. Rethread the strap
through the sliding size adjuster.
Use adhesive glue to refasten
the strap in place.
Sliding
size
adjuster.
If the sensor/transmitter is a bluetooth transmitter, skip to step 5 below.
9
NOTE: The following step is only necessary when using the
Long Range MyPulse hardware configuration.
e. Attach the MyPulse Signal Repeater within 3
feet
of the
MyPulse
Heart
Rate
Sensor/Transmitter, to an area such as your
belt, waistline, or pocket, as shown to the
right. The repeater may also be placed under
your mattress, recharged and operated
normally while you sleep, so that monitoring
is non-stop.
3 - Setting The Frequency Switches (Long range monitor only)
The MyPulse Signal Repeater and MyPulse Receiver use wireless technology
(radio waves) to transmit information. Therefore, it is essential that they are set
to the same radio wave frequency. As shown in the diagram below, set the
frequency switches on the MyPulse Signal Repeater and MyPulse Receiver to
the same positions. Here, they are all in the down (OFF) position on both
devices.
For further information on frequency settings, refer to Appendix B.
4 - Charging the MyPulse Repeater
The MyPulse Repeater is equipped with a rechargeable battery. It must be fully
charged before first use. It is recharged by connection to the provided A/C
Adapter, which is plugged into an electrical wall outlet. While recharging, the
LED indicator light blinks rapidly. When fully charged, the LED light remains
on. The first full charge will be achieved in 5-7 hours if the Repeater is turned
ON (fast charge mode). Subsequent fast recharges may require as little as one
10
hour. It will slow charge (about 24 hours) when the repeater is turned OFF. The
repeater operates normally while it is being recharged. When it is disconnected
from the charger, and is outside the range of the chest strap, the LED will blink
once every 5 seconds. When placed within 3 feet of the chest strap, it will blink
once for every heartbeat. A full battery will last about 48 hours. Never leave the
battery in a discharged state, as doing so, will damage it. A damaged battery will
not hold charge. Always charge it fully before storing.
5 - Installing the MyPulse bluetooth Heart Rate Sensor/Transmitter
(FCC ID: QOQWT12):
a.
Charging the MyPulse bluetooth Heart Rate Sensor/Transmitter
Plug the charger into a usb port and the sensor/transmitter into the
charger. The green LED indicates the charger is connected to a power
source. The red LED indicates that the sensor/transmitter is charging.
The red light will turn off when it is fully charged. Expect 90% charge
in 1hour, 100% charge in 3 hours. A fully charged new battery will last
about 26 hours.
b. Direct mid range computer communications: Wet the chest strap
electrodes thoroughly, then placed them firmly against your skin,
adjusting the strap length for comfort. Use electrode gel if planning to
be sedentary or for sleep monitoring. Clip the sensor/transmitter to the
chest strap with the MyPulse logo in a central upright position. This
turns it on. The first time you wear the sensor/transmitter, click
Windows Control panel/Add a device to add the sensor/transmitter.
The sensor/transmitter pairing code is 1234. View Devices & Printers
then Right click the new HxM heart monitor icon and click properties
then services. Note the OUTGOING serial port COM number. You
will need it to customize the MyPulse computer software.
11
c. Smart phone indirect global communications: If a smart phone is to
be used to collect and transmit data and gps coordinates to the
computer (for the Smart Phone APP go to MyPulseMonitor.com and
click Downloads), then move at least 33 feet away from the computer
to get out of Bluetooth range. Wet the chest strap electrodes
thoroughly, then placed them firmly against your skin, adjusting the
strap length for comfort. Use electrode gel if planning to be sedentary
or for sleep monitoring. Clip the sensor/transmitter to the chest strap
with the MyPulse logo in a central upright position. This turns it on.
The first time you wear the sensor/transmitter, enable the smart
phone Bluetooth and make it visible. Pair the sensor/transmitter to
the smart phone. The sensor/transmitter pairing code is 1234.
NOTE. Only one option: b) direct communications with the
computer or c) indirect communication with the computer via the
smart phone may be chosen. Consider choosing Method ‘b’
initially as it may simpler. Method ‘c’ can be chosen next.
6 - Deactivating Screen and Computer Power-Saving features (Required)
Prior to using the MyPulse Monitor, it is required that you turn off your
computer’s screen saver, and all power-save options, such as Sleep Mode and
Hibernate Mode. Set the sleep option to NEVER. Set the lap top close lid option
to DO NOTHING. Failure to do so will cause MyPulse to stop operating,
including all alarm functions, if and when the computer enters sleep mode.
Furthermore, the usb ports will be turned off requiring that the computer be
restarted. Also, turn off all other systems and programs that are unrelated to
and/or not required by the MyPulse monitor.
For details on this step refer to Appendix D.
12
Launching, Utilizing, and
Customizing MyPulse Software
Important First Steps
The following are WindowsXP screens. For Windows 7, click on the Start
button then Devices and Printers.
1 -Identify the USB COM Port to which the MyPulse receiver is connected:
•
Double-click on Display
Device Manager icon
(shown to the right).
•
Scroll down and double-click on Ports (COM & LPT).
Double-click on USB Serial Port (COM#) for details.
•
Make a note of the USB Port (7 in this example) to which the
MyPulse receiver is connected (if necessary, unplug and plug
in the receiver). Use a printed number sticker to mark the
receiver with the COM port number. You will need it to
customize the monitor as explained in the next section.
13
2 -Identify the Modem COM Port to which your modem is connected:
•
Double-click on Display
Device Manager icon
(shown to the right) .
•
Scroll down and Double-click on Modems. Double-click on
the listed modem.
•
Make a note of the Modem Port COM number (3 in this
example) to which the telephone line is connected. You will
need it to customize the monitor as explained in the next
section.
14
Launching MyPulse
Double-click on the MyPulse Monitor program icon on your desktop.
Alternatively,
click
on
the
windows
task
bar
Start/All
Programs/MyPulse/MyPulse. If this is the first launch, the program will start and
take you directly to the Customize Screen.
Utilizing MyPulse
There are three main processes to learn when utilizing the MyPulse Heart
Monitoring Software. They are: 1) Customizing the MyPulse Monitor, 2)
Starting the MyPulse Heart Rate Monitor and 3) Reporting. These are described
in detail below.
3 - Customizing MyPulse
Each user must have a unique profile set up before using the MyPulse Monitor.
The steps for creating each profile are as follows. On the Main Menu Screen,
click Customize. This will take you to the user-profile customization screen.
15
NOTE: Unless otherwise specified, all data fields require an
entry.
i.
Set Password (Optional)– Near the top-right corner of this screen, you will
see Set Password. If you double-click on Set Password, a screen will open in
which you can set a password that will restrict access to the custom settings
and to all encrypted client names and data.
NOTE: If you no longer want password protection, set the
password to ‘no’.
ii. Name of Person Being Monitored – If you plan to monitor a previous user,
open the drop-down menu (Professional Edition) and click on that person’s
name. If you are entering a new user, type the user’s name into the
appropriate field and click Add. The name you choose will appear on all
output text and charts.
iii. Social Security Number – Enter the user’s social security number in this
field. This information is strictly used as a unique identifier for each user.
iv. Contact information (Optional) – Enter the user's address and telephone
number.
v. Caregiver (Optional) – In this field enter the name of the caregiver or
supervisor of the person being monitored (user). This person’s name will
appear on all output text and charts.
vi. Type of Monitor – In this field, select ‘1 Wireless Heart Monitor’ from the
drop down menu. This identifies the type of monitor being used. If the
sensor/transmitter has a fixed code that is known, it may be used to identify
it, otherwise use the MyPulse automatic search feature.
vii. USB Serial COMport (monitor) – In this field, specify the number
assigned to your computer’s USB COM Port where the MyPulse Monitor is
connected. (See instructions in section 1 above). In case of the Bluetooth
mid range/global range monitor, if a smart phone is used to collect and
transmit data and gps coordinates to the computer, select SmartPhone. In
addition to the MyPulse computer software, MyPulse smart phone must be
downloaded from www.MyPulseMonitor.com and installed on the phone.
The SmartPhone APP ‘Name’ of person to be monitored must be identical to
the name in ii above. The DropBox APP must be downloaded and installed
on the computer.
16
viii.Age Group – In this field, select the age group of the person being
monitored. Normal pulse rates vary depending on age and sex. The MyPulse
software contains pre-selected default settings for each age range and sex.
These pre-selected choices are for a person who is at rest, sitting down, or
sleeping. If the person being monitored will be walking around or
exercising, their pulse will normally rise far above their resting pulse rate. In
this case, select Walk About Mode from the dropdown menu. This will
prevent excessive false alarms from occurring. The lower pulse limit will be
set to 50 bpm, but there will be no effective upper limit. An alarm will still
be activated if there is a sudden, large increase or decrease in pulse rate
(greater than the preset limits on the standard deviation chart.)
For further information on pre-selected default settings, refer to
Appendix C.
ix. Sex – Select the sex of the person being monitored.
x.
Automatic Phone/email Alarm (Advanced & Professional editions)
Check this box to activate a feature which automatically sounds a local
voice alarm and dials user-specified phone numbers in the event that
any chart for the person being monitored turns red. The phone/email
alarm will continue to ring until the charts are no longer red. Once this
box is checked, a new screen will open, requesting information for
options a through i below.
17
IMPORTANT NOTE: In order for the Automatic Phone
Alarm to operate, your computer must have a modem with an
assigned COM Port (see g below), and an active telephone line.
A cell phone can also be used as modem. Email requires an
internet connection. See warning regarding modem use.
a.
Remote Phone/email– Number will be dialed and email text
message and data sent if any chart remains red (due to noconnection, or due to heart activity in excess of the userspecified limits) for a user-specified period of time (See Time
Before Printer/Telephone/email Alarm on Customize screen.)
It may be used to notify a relative, friend, neighbor, or service
provider at a remote location. If number/email are omitted, all
remote and local telephone/email alarms will be deactivated.
b.
Test Remote Phone/email – This button is used to test the
Remote Telephone connection. It will dial the user-specified
Remote phone number and send email message (no data).
These instructions also apply to the (optional phone/email)
buttons labeled “Test Remote #2, #3, #4, #5 Phone/email.”
c.
Local Phone/email – This number will be dialed (only one
complete ring)/email message sent (no data) if any chart
becomes red (due to no-connection, or due to heart activity in
excess of the user-specified limits) for any amount of time. It
may be used to notify the person being monitored and who
may have traveled outside the listening or viewing range of
the computer. For example, this could be the number/email
address of the cell phone that the user carries.
NOTE: You must enter a Remote Phone number or email address
in order for local or additional remote Phone/email to be activated.
d.
Test Local Phone/email – This button is used to test the Local
Telephone/email connection. It will dial/send email to the
user-specified Local phone number/email address.
Remote #2 Phone/address will also accept the name of a batch file
(Example: AutoDialer.bat) to be executed when MyPulse alarms. The batch
file must be created by the user and placed in the MyPulse folder. It must
contain the command line for a user supplied automatic dialing and message
announcement program (c:\folder name\automatic dialing program name).
e.
Hang Up – This button is used to end or disconnect any test call.
18
NOTE: Each phone/email test above is conclusive when
the recipient of the phone call/email responds. To verify
that the phone resets correctly, hang up and repeat test.
Also, test them while the monitor is operational.
f.
Fax Number (Optional) – This number is for record keeping
only. Faxes are not sent automatically. A Care giver /
Supervisor, or a service provider may manually copy charts,
dynamically while the monitor is operational, paste the charts
into a word processing document and fax the document using
the fax facility provided by the word processor.
g.
Modem COM Port – In this menu, select the Modem COM
Port to which your modem is connected. Please be sure to
select the correct COM Port for the modem you would like to
use.
h.
Baud Rate – In this menu, select your telephone’s Baud rate. If
you do not know the baud rate, consult your telephone
provider’s user manual, or contact your telephone provider for
details.
i.
Sending email address (optional) – A server name and sending
address is required if a receiving address is included in any of
the above Phone/Address fields. A Care giver / Supervisor
may also copy charts, dynamically while the monitor is
operational, paste the charts into a word processing document
and email the document using the email facility provided by
the word processor.
xi. Automatic Print Alarm (Advanced & Professional editions) – Similar to
the Automatic Phone/email Alarm, this feature automatically prints charts in
the event that the charts of the person being monitored becomes red. The
print alarm will only be activated if the user’s charts have been red for
longer than five minutes. The charts will be printed only once.
xii. Advanced Options – Some advanced options are reserved for professionals
with expertise in the variables being monitored, and/or professionals with
expertise in mathematical models.
Click on the Advanced Options button, and a new window will open, giving
you the following options.
19
a.
Variables to Customize – This customization process allows
you the opportunity to change the upper and lower control
settings independently. To set the alarm for the chart of actual
values, enter the lower & upper absolute limits for the
variables listed (you should see only “HR (BPM)”).
b.
Window Length – This feature can be used to improve data
analysis when the data contains cycles. It is set equal to the
longest cycle in the data. If the length of the longest cycle is
unknown, the program can be directed to select the best value
from a set of different values. (See explanation on screen for
more details.)
c.
Transformations – The following differencing, power, and
antithetic transformation options are available to improve data
analysis.
For further information on Window Length and
Transformations, please see references (3, 4, 5).
01 = No transformation
0* = No differencing + power + no antithetic
0a = No differencing + no power + antithetic
0A = No differencing + power + antithetic
11 = Differencing + no power + no antithetic
1* = Differencing + power + no antithetic
1a = Differencing + no power + antithetic
1A = Differencing + power + antithetic
20
d.
Training Zone – enter your Age, Resting heart rate, and Training
objective (Regular, Fat burning, Athletic performance,
or Maximum effort).
Once you have the settings configured properly, click on Customize
Further to accept these settings.
xiii. Code – The transmission code options are as follows.
AUTOMATIC search: Select AUTOmatic search to let MyPulse search
for and discover the code number of the sensor/transmitter or repeater.
This procedure must be used when the sensor/transmitter or repeater
does not have a fixed code, but generates a new random code each time
the sensor is used. This procedure must also be used when the
sensor/transmitter or repeater code is fixed but not known. Refer to the
section 'Starting the MyPulse Heart Rate Monitor' for additional
information on 'Simultaneous Monitoring of Multiple Users.'
If the repeater is marked with a unique 8 digit serial code number:
Select R+T and enter the repeater code number to search for the
sensor/transmitter + repeater codes. This is useful if monitoring two or
more individuals to whom repeaters have been uniquely assigned. They
can be identified even if their sensor/transmitter codes are the same.
Select R and enter the repeater code to lock onto the repeater only, and
ignore the sensor/transmitter code.
Select T to lock onto the transmitter, and ignore the repeater code. This
permits someone to be monitored by means of two or more repeaters
that have been placed at different locations more than 10 feet apart.
NOTE: Receiver serial numbers are unrelated to the transmission code.
In a multi-user environment, heart monitors (chest straps, repeaters &
short range receivers) must never be transferred between users while
they are being monitored. This could cause the charts of different users
to be reassigned incorrectly.
xiv. PORT – Scroll bar displays the database of persons being monitored.
xv. Baud Rate – Select the baud rate for the type of monitor as follows.
Before April 2008, baud rate = 4800 for all monitors.
After April 2008, baud rate = 1200 for all short range monitors.
If a long range monitor repeater is unmarked, the baud rate = 4800.
If the long range monitor repeater is marked with an 8 digit code
number, then the baud rate is determined from the first digit as follows.
21
First
digit
1
2
Baud
Rate
300
600
First
digit
3
4
Baud
Rate
1200
2400
First
digit
5
6
Baud
Rate
4800
9600
First
digit
7
8
Baud
Rate
19200
28800
The bluetooth mid range monitor baud rate =115200.
xvi. Standard Deviation Alarm Threshold – Use this menu to select your
desired standard deviation threshold. The automatic sound and color
alarms are activated when the MyPulse Monitor is running and there is a
relatively sudden change in any heart rate that is greater than the
specified standard deviation threshold. This information is shown on the
standardized chart, and is based on relative heart rate change – which
means that it automatically customizes to the individual being
monitored, regardless of age or sex. For further information on
standard deviation, refer to Appendix A.
xvii. Alarm Criterion – Use this field to select the criteria by which you
want the alarm to initiate. You will have the following options:
a.
Number of Breaches – This selection identifies the
number of times either the upper or lower control
limit of a chart is exceeded.
NOTE: If you select Number of Breaches as your alarm
criteria, you must specify your desired number of breaches in
the No. of Breaches Before Phone/email Alarm field. If the
number of breaches is five or less, only the telephone/email
alarm will be activated. If the number of breaches exceeds five,
the print alarm will be activated as well.
b.
Duration of Breaches – This selection identifies the
length of time that either the upper or lower control
limit is exceeded.
NOTE: If you select Duration of Breaches as your alarm
criterion, you must specify your desired time before the alarm
is activated by selecting a time period in the Time Before
Printer/Telephone/email Alarm Field. If the duration of
consecutive breaches is five minutes or less, only the
telephone/email alarm will be activated. If the duration of
consecutive breaches exceeds five minutes, the print alarm will
be activated.
22
xviii. Time Before Printer/Phone/email Alarm – In this field, select the number
of minutes you want the MyPulse System to allow a breach to occur before
it activates the Print Alarm or Phone/email Alarm. Keep in mind that the
Print and Phone/email Alarms must first be enabled in order to be activated.
xix. Time before no-signal alarm – If no data are received for about this period
of time, the chart will turn red and the local phone/email caller/ID alarm is
initiated. If more than one person is being monitored (professional version),
this time is increased automatically. If the no-signal alarm persists for about
10 minutes (cannot be changed), the remote phone/email callerID alarm is
initiated. The no-signal time before the remote alarm is set to 10 times the
cube root of the number of persons being monitored.
xx. Time Between Chart Updates – In this field, enter the viewing time (1 to 10
seconds per chart) between which the charts are to be updated. The data will
be collected as changes occur, and held in memory for periodic updating of
the chart.
xxi. Display Time – This field allows the user to increase or decrease the
charting observation interval, in either minutes or hours.
NOTE: A short display time will result in a more responsive
chart and alarm system. A long display time will result in a less
responsive chart and alarm system.
Once all Customize settings are correct, click Save, then OK to exit the
Customize Screen.
4 - Starting MyPulse
There are two methods you can use to start the MyPulse Heart Monitor. They
are:
a.
On the Main Menu Screen toolbar, click Start
Monitor. In the drop-down menu, click Start
Monitor (MyPulse).
b.
Shortcut – On the Main Menu Screen,
click the icon shown to the right.
Either one of these methods will take you to the start menu (shown below),
prompting you to select your charts and starting mode.
23
IMPORTANT NOTE: Before proceeding, you must select the
appropriate user and settings in the Customize Menu. If you have
already done so, you may proceed.
You may select from the following options.
i.
Selecting the Charts to be Displayed
There are four chart types to select from, as well as several dual-chart
options (displays more than one chart on the screen). They are
explained below.
Single Chart Options:
a.
Real-time Chart – This is a simple chart containing actual
heart rate data.
b.
Standard Deviation Chart – This chart depicts the heart rate
data in terms of standard deviations. It detects changes in the
data that are sudden and unusual, when compared to earlier
changes.
c.
Special Cause Chart (Professional Edition) – This chart type
depicts random effects, such as irregular pulse rates, or brain
wave fluctuations due to external environmental stimulation.
24
d.
Common Cause Chart (Professional Edition) – This chart
type depicts systematic effects, such as systematic internal
biological changes in heart rate.
Dual-Chart Options (Professional Edition):
e.
Real-time & Special Cause(Professional Edition) – This
option will display both a Real-time Chart and a Special Cause
Chart on one screen.
f.
Real-time & Common Cause (Professional Edition) – This
option will display both a Real-time Chart and a Common
Cause Chart on one screen.
g.
Special Cause & Common Cause (Professional Edition) –
This option will display both a Special Cause Chart and a
Common Cause Chart on one screen.
IMPORTANT NOTE: The MyPulse heart monitoring
system reads heart rate data from a remote device worn
by the user being monitored, and sends alerts via print
(if selected) and telephone (if selected) to user-specified
destinations when the user’s heart rate activity or
standard deviation threshold are in excess of userspecified limits. These “excesses” are referred to as
breaches. If the user’s heart rate activity or standard
deviation thresholds exceed these user-specified limits,
the chart color on your screen will change as follows:
1. Blue – This occurs after the software detects one breach.
2. Yellow – This occurs after the software detects two consecutive
breaches.
3. Red – This occurs after the software detects three consecutive
breaches.*
*If the print and phone/email alarm have been selected, they will be
activated after the chart color remains red for a user-specified length of
time (refer to Time Before Printer / Telephone/email Alarm above).
25
Once activated, the phone/email alarm will continue to ring until the
chart is no longer red, or the alarm is reset via user intervention. (The
alarm may be stopped and reset by clicking STOP on the Main Menu
Screen.)
ii.
Selecting the Starting Mode
There are three Starting Mode selection options, listed below.
a.
Create New Chart – If this is selected, new charts will be
created and updated continuously.
b.
Resume – If the monitor is running, but must be stopped for
any reason, you may select this option to resume monitoring
from the previous stopping point.
c.
Restore – If ‘Create New Chart’ is inadvertently selected, and
the monitor is started, you may recover by stopping the
monitor, selecting ‘Restore’, and starting the monitor once
again.
Noise Filter
The noise filter eliminates any incoming data value that is different from
the immediately preceding data value by the percentage specified.
Listen to data Check this box to hear beep when a data value is received.
Multiple Start See simultaneous monitoring of multiple users below.
Click Continue to accept your selections and start the monitor.
26
IMPORTANT NOTE: The first time you attempt to
start the MyPulse Heart Monitor after installation, a
customer code will appear on the screen and you will be
prompted for an activation code (one time only). The
software will not work without it. In order to obtain the
activation code via e-mail, do the following:
1. Establish an internet connection & visit our website.
2. Click on ‘Contact us.’ Complete the email form.
Enter your customer code (and the bar code number if
printed on the MyPulse container box, and the number
of monitors), in the comment field. Click send.
3.The activation code will be sent to you by return
email.
IMPORTANT NOTE: If you are paying for the monitor
in installments, you will receive a temporary activation
code. This code will expire in an allotted time if full
payment is not received as agreed.
If you do not have an e-mail connection, contact us by telephone or mail
and request your MyPulse software activation code.
Once you receive the activation code, enter it. The monitor will begin searching
for the coded signal being sent from the coded transmitter (only a coded
transmitter must be used). The short range user must always stay within 3 feet
of the receiver. The mid range (Bluetooth) user must always stay within 33 feet
of the receiver. There are two long range options. If the sensor/transmitter or
repeater has a fixed code that is known and was entered in the customize screen,
then the wearer may be detected from a distance, otherwise the automatic search
feature must be used as follows. The user must start out close to the receiver
(with the repeater turned on 1ft from the computer), but can travel up to 1000
feet away after the charts appear on the computer screen. Once the signal is
detected, no other signal with a different code will be accepted. The global
range (Bluetooth) user with a smart phone may be anywhere that there is access
to the internet.
NOTE: If the non-bluetooth chest strap is removed for
more than 10 seconds, the code will change. The monitor
will no longer recognize it. In that case the monitor must
be restarted.
27
The charts will appear next. Of the many charts available, two are shown
below. The standardized chart is the same as the real-time chart, except
that it is rescaled in terms of standard deviations. The real-time and
standardized charts shown below are for different time periods.
Continuous Updating (Note that the windows “X” button is disabled to
prevent accidental stopping of the monitor) The charts will be updated
continuously as new incoming data are received. To temporarily pause
updating, so as to read a chart, or email data to a care giver/supervisor,
double-click the top of the window to maximize it. To resume updating,
double-click the top of the window to restore it. MyPulse will
automatically resume updating after approximately one minute.
Stop watch functions. At any time, click on Start, Lap or Stop to write
‘Start event,’ ‘Lap number’ or ‘Stop event’ into the historical data
records. The data will be divided accordingly.
28
iii.
Simultaneous Monitoring of Multiple Users (Professional Edition) –
The MyPulse Heart Monitoring System can be utilized in a multi-user
environment, and has the capacity to simultaneously monitor several
users. The number of users that can be monitored on one computer is,
however, limited to your computer’s available system resources (due to
the high level of processing) and number of available USB Ports.
Below are instructions for monitoring 2 or more users simultaneously.
Short range monitors. Each monitor must be used with it’s own
receiver, connected to a separate USB COMport and spaced at least 3
feet apart.
Mid range monitors share a common Bluetooth receiver. Each
monitor is paired to a different serial COMport.
Global range monitors use separate Bluetooth smart phones to receive
the data and extend the monitoring range to anywhere that there is
access to the internet. Each monitor is paired to its smart phone.
Long range monitors may share a common receiver and COMport.
However, if only one receiver is installed and the number of monitors is
excessive, they will interfere with each other. In that case interference
can be reduced by adding more receivers and operating them at
different frequencies. Verify that the light on the repeater is on and
flashing.
Coded Repeater (8 digit code marked on the repeater)
If the repeater is coded (best), then the persons to be
monitored can be anywhere (within 1000ft). If all repeaters are
coded, the persons to be monitored can all be moving around
while their monitors are started simultaneously. The repeater
codes must be entered in the customize screen (click on main
menu customize) prior to starting the monitors.
Non-coded Repeater (no 8 digit code on the repeater)
Make sure that the transmission code detected by the computer
is for the correct sensor/transmitter and no other
sensor/transmitter that could be in use within the transmission
range of the receiver. Do this by starting the monitor while the
user is close to the receiver, and is wearing the
sensor/transmitter. This will give the wearer of the
sensor/transmitter priority in the event that there is another
transmitter operating at the same frequency and within the
range of the receiver. When starting a new monitor, all
monitors that are already running may be left on. However,
only one new monitor at a time can be started. Therefore, the
monitor that you are starting must be the only new one turned
on. All other monitors not yet started must be turned off.
29
Individual Starts (necessary for non-coded repeaters)
a. Launch the MyPulse Program by double-clicking the MyPulse
Program icon on your desktop.
b.
Enter the Customize Menu by clicking Customize.
c.
Select the first user to be monitored.
d.
Click Save, then click OK.
e.
On the Main Menu Screen, click Start Monitor then Continue. The
MyPulse Program will begin monitoring User #1.
f.
Minimize the MyPulse Program application and the user's chart.
g.
Launch a second application (Professional Edition) of the MyPulse
Program by double-clicking the MyPulse Program icon on your
desktop.
h.
Enter the Customize Menu by clicking Customize.
i.
Select the second user to be monitored.
j.
Click Save, then click OK.
k.
On the Main Menu Screen, click Start Monitor then Continue. The
MyPulse Program will begin monitoring User #2.
l.
Minimize the MyPulse Program application and the user's chart.
NOTE: Each chest strap (sensor/transmitter) is coded. If a
message appears stating that the transmission code you are
searching for is already being used by the first monitor, you
must change the code before continuing (this will not arise with
coded repeaters or bluetooth sensors). If the chest strap is nonbluetooth, the code may be changed by raising the front part of
the strap (the electrodes) off the skin for at least 10 seconds,
then replacing it.
30
The center console (Nurse’s station or Physical Trainer’s station) contains a list
of the persons being monitored as shown below.
HR (BPM)
To monitor additional users (Professional Edition), simply repeat the steps listed
above. All persons being monitored must be at least 3 feet apart. The names of
additional users will be added to the above center console.
Simultaneous Starts (possible for coded repeaters).
You may also use the Multiple Start ADD name feature to create a list of names
to be monitored and start their monitors simultaneously.
At any time, any user's chart may be restored for normal viewing. Under normal
conditions the user charts will remain minimized. However, if there is a loss of
signal or if a telephone/email alarm is initiated, the related user chart will
automatically be restored for viewing.
iv. Stopping the MyPulse Monitor (Note that the
windows “X” button is disabled to prevent accidental
stopping of the monitor)– To stop the monitor, restore
the main Monitor Window application program screen
that contains the STOP icon shown on the right. If more
than one monitor is running, select the window by the name of the person
being monitored. Minimize (click on -) the window that contains the charts
so as to expose the main Monitor Screen and the STOP icon.
Next, click on the Stop icon (shown on the right.)
You will be prompted to select whether or not you want to terminate the
monitor.
-
If you select Yes, the monitor will terminate, ending the
session, and you will be prompted to select whether or not you
want to exit the MyPulse program.
•
If you select Yes, the MyPulse program will exit.
31
•
-
If you select No, you will be returned to the Main
Menu Screen.
If you select No (to not terminate the monitor), the monitor
will continue to run, and you will be returned to the Main
Menu Screen.
5 – Reporting (Advanced & Professional editions)
There are two methods you can use to enter the MyPulse Report Menu Screen.
They are explained below.
a.
On the Main Menu Screen, click Report. In the dropdown menu, click Review Data History.
b.
Shortcut – On the Main Menu Screen, click the icon
shown on the right.
Either one of these methods will take you to the Report Menu (shown below).
i.
Name of Person to be Reviewed
Open the drop down menu box. If you just started MyPulse, you will
see all the names of persons that were entered from the customize menu
(see customizing the MyPulse monitor). If you were monitoring a
person and just stopped the monitor, the drop down menu will show
only the person who you were monitoring. In that case the name must
be changed using the customize menu. In either case, click the name of
the person to be monitored.
32
ii.
Selecting the historical data to be reviewed.
a.
Start at
Use the vertical scroll bar labeled start at to select the starting
position and date of the data to be reviewed.
b.
End at
Use the vertical scroll bar labeled end at to select the ending
position and date of the data to be reviewed.
iii.
Select the historical chart.
Open the drop down menu box. The listed options are defined as
follows:
a.
Most recent history.
Contains the most recent data values read and recorded by the
monitor.
b.
Minutely history.
Data are aggregated and summarized into intervals of one
minute each.
c.
5 Minutely history
Data are aggregated and summarized into intervals of five
minutes each.
d.
Hourly history.
Data are aggregated and summarized into intervals of one hour
each.
e.
Daily history.
Data are aggregated and summarized into intervals of one day
each.
33
For ‘a,’ select: ‘Recorded data’, or ‘Time between records’ (this represents
interbeat time in the case when each record corresponds to a heartbeat).
For ‘b-e,’ select: Average, Maximum or Minimum values.
Noise Filter The noise filter excludes any recorded data value that is different
from the immediately preceding data value by the percentage specified.
iv.
Plot chart
Click on Plot to create a chart of the data selected.
v.
List/Export
Click on List to display the data selected. The list also shows when
remote phone/email alarms were initiated.
vi.
Email data
Click on Email to send the data selected to a Care giver/Supervisor.
vii.
Close
Click on Close to end reporting and return to the main menu.
6 -Advanced (More Menus) (Professional Edition)
Some advanced menu options are reserved for professionals with expertise in
the variables being monitored, and/or professionals with expertise in
mathematical models.
The monitor archives data at the same time that they are being charted, for up to
one year. The advanced menus permit additional analysis of the historical data.
By using the report menu to select and plot historical data, any desired
transformation of any segment of 24 hour beat to beat and inter-beat data is
easily produced. For example, to display an inter-beat chart (time between beats
in milliseconds), plot the chart then select the Reciprocals transformation.
While the chart is displayed, click on Transformations and select any one of the
following:
Cumulate, Difference, Reciprocals, Exponentiate,
Divide by time (t), Divide by (t^.5),
Natural logarithms, Logarithms (base 10),
Inverse natural logarithms, Inverse logarithms (base 10),
Histogram (frequency distribution)
Spectrum (Fast Fourier transform),
Autocorrelation function (acf), Partial autocorrelation function (pacf),
Standardize (mean/standard deviation).
34
Refer to the following two charts for an example, and to reference 9 for heart
rate analysis and applications, reported by the Task Force of the European
Society of Cardiology & the North American Society of Pacing
Electrophysiology. For more information visit our website.
For example if Spectrum (Fast Fourier transform) is selected:
35
Each chart contains summary data and indices to assist in its interpretation.
36
To reconstruct the model that is used to separate the data into
common cause and special cause charts, click on the main menu
Advanced(more menus). Then, click on Calculate / Model
Parameters, or on the shortcut icon shown to the right. To display
the common cause and special cause charts, click on Report and select the chart.
To change the window length (number of data points) on which the spectrum
and therefore model and charts are based, click on the main menu File / Update.
After making changes, save the file before repeating Calculate & Report. If the
Report/Review data HISTORY menu is used to select a new data segment for
analysis, the window length will be reset to the values specified in the customize
menu. See references 1 & 4 and our website for information to assist in the
interpretation of the model and charts.
See reference 9 for heart rate analysis and applications, reported by the Task
Force of the European Society of Cardiology & the North American Society of
Pacing Electrophysiology. For more information visit MyPulseMonitor.com.
Internet monitoring from a central station or cell phone.
Click Customize on the central station computer and add the name and related
information of the person being monitored, exactly as it appears on the client
computer. This will permit rapid information retrieval in case of an emergency.
If the client computer’s remote telephone/email alarm is activated and it dials
the central station phone number, the client’s name and the most recent data will
be emailed to the central station. The data history for the client may be retrieved
as follows. Start internet explorer or other browser on the central station
computer. Copy the data from the email. Follow the instructions in the email to
paste the data into the specified MyPulse folder file at the central station
computer. On the central station computer, click on customize and select the
name of the person being monitored. Click on save then OK. To recreate any
original or transformed chart, follow the instructions listed above under (5 –
Reporting). Copy and paste the chart into Microsoft word, adding any desired
annotations. Email the chart and annotations as needed, for example, to a
professional.
At any time, access the real time charts via the internet with a web browser, by
setting the url to www.logmein.com and entering the userid and password for
the client monitoring & charting computer. The alternative www.join.me does
not require a password and is perfect for viewing from a cell phone. For
example, make daily visits to an outpatient, or monitor a bicyclist on a crosscountry ride, who is being monitored on a pocket computer connected to the
internet. To retrieve a chart, click on the chart edit/copy, then paste it into
Microsoft word at the central station computer. Then, save it and/or email it as
needed, for example, to a professional.
37
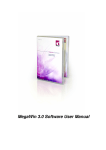
Applications
GLOBAL RANGE
Computer-powered Wireless Ultra-intelligent Real-time monitor
SINGLE HOME USER
INSIDE GYMNASIUM or OUTDOOR PLAYING FIELD
HOSPITAL or NURSING HOME
CARDIOLOGY OFFICE
With user supplied smart phone, one or more users may be anywhere in the world where
there is access to the internet. All normal activities can be performed while being
monitored on a remote computer by a friend, relative or professional.
INTERNET
●●●
●
●
●
Individual monitor
Trainer’s station
Nurse’s station
38
GLOBAL RANGE
Computer-powered Wireless Ultra-intelligent Real-time monitor
SINGLE HOME USER
INSIDE GYMNASIUM or OUTDOOR PLAYING FIELD
HOSPITAL or NURSING HOME
CARDIOLOGY OFFICE
With user supplied smart phone, one or more users may be anywhere in the world where
there is access to the internet. All normal activities can be performed while being
monitored on a remote computer by a friend, relative or professional.
INTERNET
●●●
●
●
●
PC home monitor chart.
Smart phone updates PC.
Join.me displays chart on
smart phone.
Nurse’s station
uses join.me to display
pc home monitor charts
PC home monitor chart.
Smart phone updates PC.
Join.me displays chart
on smart phone.
39
join.me displays
chart on smart
phone and/or
central PC nurse’s
station.
SHORT RANGE
Computer-powered Wireless Ultra-intelligent Real-time monitor
SINGLE HOME USER
User is confined to 3ft radius but can adjust their body position completely free of wires.
If the computer is portable & powered by a motor car battery, then travel is possible.
Local observer at home
inside or outside house
Cellular Telephone
Optional
cellular
telephone
modem
User
Coded
sensor/transmitter
Short range
Receiver
USB PORT USB PORT
MODEM
COMPUTER
(Fixed or portable)
BABY'S ROOM
(USB cable extendable to mother's room)
40
Internet
connection
or
Telephone
wall
jack
MID RANGE
Computer-powered Wireless Ultra-intelligent Real-time monitor
SINGLE HOME USER
User can move about inside home within a 33 foot radius, completely free of wires.
If the computer is portable & powered by a motor car battery, then travel is possible
(e.g. shopping, picnic, etc.).
Professional
Adult user
Cellular phone to receive
local alarm
remote observer
with telephone
and/or computer
Bluetooth
sensor/transmitter
Optional
cellular
telephone
modem
USB PORT USB PORT
Bluetooth
Receiver
MODEM
COMPUTER
(Fixed or portable)
Internet
connection
or
Telephone
wall
jack
STUDY OR COMPUTER ROOM INSIDE HOME
41
LONG RANGE
Computer-powered Wireless Ultra-intelligent Real-time monitor
SINGLE HOME USER
Home adult user can move about inside and outside of home completely free of wires.
If the computer is portable & powered by a motor car battery, then travel is possible
(e.g. shopping, picnic, etc.).
Professional
Adult user
Cellular phone to receive
phone alarm
remote observer
with telephone
and/or computer
Coded sensor/transmitter
Repeater
Optional
cellular
telephone
modem
USB PORT USB PORT
Long range
Receiver
MODEM
COMPUTER
(Fixed or portable)
Internet
connection
or
Telephone
wall
jack
STUDY OR COMPUTER ROOM INSIDE HOME
42
MID RANGE
Computer-powered Wireless Ultra-intelligent Real-time monitor
INSIDE GYMNASIUM or OUTDOOR PLAYING FIELD
Clients can move about (33 feet from computer) completely free of wires.
TRAINER
Cellular phone
OR
Pocket computer
&
Bluetooth receiver
Client 2,3,4
Bluetooth sensor/transmitter
2,3,4
Client 5
Client 1
Bluetooth sensor/transmitter 5
Bluetooth sensor/transmitter 1
Optional
cellular
telephone
modem
USB PORT USB PORT
Bluetooth
Receiver
MODEM
COMPUTER
Internet
connection
or
Telephone
wall
jack
(Fixed or portable hand held) TRAINER’S STATION
Note: Clients are ambulatory and arrive and leave at different times. Therefore, a
single receiver may be used with several bluetooth sensor/transmitters as follows.
Assign a unique bluetooth sensor/transmitters to each client. Add the
sensor/transmitter using its pairing code. Make a note of the assigned OUTGOING
serial COMM port number. Enter each client name and corresponding serial
COMMport number in the MyPulse Customize screen. For each arriving client, start
a new monitor and select the client number in the Customize screen. The monitor will
only accept data from the bluetooth sensor/transmitter that was assigned to that
client. If all clients are present at the same time, the Multiple Start feature may be
used. When a monitor is stopped, the corresponding bluetooth sensor/transmitter
must be removed and placed on its charger.
TRAINER'S STATION
43
LONG RANGE
Computer-powered Wireless Ultra-intelligent Real-time monitor
INSIDE GYMNASIUM or OUTDOOR PLAYING FIELD
Clients can move about (at least 3ft apart from each other) completely free of wires.
TRAINER
Cellular phone
OR
Pocket computer
&
Long range receiver
Client 2,3,4
Coded
sensor/transmitter 2,3,4
Coded repeater 2,3,4
Client 5
Coded
sensor/transmitter 5
Coded repeater 5
Client 1
Coded
sensor/transmitter 1
Coded repeater 1
Optional
cellular
telephone
modem
USB PORT USB PORT
Long range
Receiver
MODEM
COMPUTER
Internet
connection
or
Telephone
wall
jack
(Fixed or portable hand held) TRAINER’S STATION
Note: Clients are ambulatory and arrive and leave at different times. Therefore, a
single receiver may be used with coded sensor/transmitters & coded repeaters as
follows. Assign separate coded repeaters to all clients who will be present at the
same time. Enter each client name and corresponding repeater code in the MyPulse
Customize screen. For each arriving client, start a new monitor using the coded
repeater that is assigned to that client. If all clients are present at the same time, the
Multiple Start feature may be used. When a monitor is stopped, the corresponding
repeater must be turned off and placed on the charger. If only one receiver is
installed as shown and the number of monitors is excessive, they will interfere with
each other. In that case interference can be reduced by adding more receivers and
operating them at different frequencies.
TRAINER'S STATION
44
SHORT RANGE
Computer-powered Wireless Ultra-intelligent Real-time monitor
EXERCISE GUIDANCE
HOSPITAL or NURSING HOME
Clients are exercising (at least 3ft apart) in a confined area
completely free of wires.
ROOM 1
ROOM 2,3,4
User 1
Coded sensor/transmitter 1
Short range receiver 1
ROOM 5
User 5
Coded sensor/transmitter 5
Short range receiver 5
USB Cable 2,3,4
USB Cable 5
USB Cable 1
Optional
cellular
telephone
modem
USB PORT
USB HUB
Internet
connection
or
Telephone
wall
jack
MODEM
COMPUTER
TRAINER’S STATION
45
MID RANGE
Computer-powered Wireless Ultra-intelligent Real-time monitor
EXERCISE GUIDANCE
HOSPITAL or NURSING HOME
Clients can lie down, sit up, or walk about (33 feet from computer)
completely free of wires.
Bed 1
Bed 2,3,4
Bed 5
User 1
Bluetooth
sensor/transmitter 1
Users 2,3,4
Bluetooth
sensor/transmitters 2,3,4
User 5
Bluetooth
sensor/transmitter 5
Bluetooth
Receiver
USB HUB
Optional
cellular
telephone
modem
COMPUTER
TRAINER'S STATION
Note: Bluetooth transmission range is limited to 33 feet in line of
sight, and attenuates significantly when travelling through walls.
Computers and beds must be in the same room.
46
LONG RANGE
Computer-powered Wireless Ultra-intelligent Real-time monitor
EXERCISE GUIDANCE
HOSPITAL or NURSING HOME
Clients can lie down, sit up, or walk about (at least 3 ft apart from
each other) completely free of wires.
ROOM 1
User 1
Coded sensor/transmitter 1
Repeater 1
ROOM 2,3,4
ROOM 5
User 5
Coded sensor/transmitter 5
Repeater 5
Frequency 5
Frequency 1
Long range
Receiver 1
Frequency 2,3,4
,
Long range
Receiver 2,3,4
Long range
Receiver 5
USB HUB
Optional
cellular
telephone
modem
COMPUTER
TRAINER'S STATION
47
Appendix A
Actual values & Standard Deviations
Standard deviation is a measure of dispersal or amount of variation amongst a
set of numbers. A low standard deviation indicates that the numbers are close to
each other. A high standard deviation indicates that the numbers differ greatly.
The MyPulse monitor displays a data chart in terms of actual values and a
standard deviation chart in terms of standard deviations. These charts are
explained below.
Actual values
The chart of actual values is customized to the category in which the person
being monitored falls. The upper and lower alarm limits are for the category (not
the individual person). However, even within a category, one size does not fit
all. A person who exercises regularly may have a relatively strong heart that
pumps more blood with each heartbeat. In that case the normal heart rate is
relatively low, and may be lower than the lower alarm limit. Conversely, a
sedentary person may have a relatively weak heart that pumps less blood with
each heartbeat. In that case the normal heart rate is relatively high, and may be
higher than the upper alarm limit.
Standardized values
The chart of standardized values is customized to the individual person being
monitored. The upper and lower alarm limits are for the individual person (not
their category). The unit of measure on the standardized chart is standard
deviations. The standardized chart will detect a relatively large sudden increase
or decrease in a data value, even if the data value is normal for the designated
category.
48
Appendix B
Frequency Switches
Frequency Switches are mechanical devices used to change the modulation of
information via electrical signals. They are used to set the frequency on the
MyPulse repeater and long range receiver to enable them to communicate with
each other. The switches may also be used to change the operating frequency so
as to avoid interference from other devices.
The MyPulse repeater and long range receiver have three frequency setting
switches each. There are 23=8 possible settings for the frequency switches as
demonstrated below.
SWITCH
position
SWITCH
position
Setting #1
Setting #2
Setting #3
Setting #4
1 2 3
Off Off Off
1 2 3
On Off Off
1 2 3
On On Off
1 2 3
On Off On
Setting #5
Setting #6
Setting #7
Setting #8
1 2 3
Off On Off
1 2 3
Off Off On
1 2 3
Off On On
1 2 3
On On On
49
Appendix C
Pre-selected Default Settings for User Age & Sex
The pre-selected default settings for age range and sex are only for those users
who are at rest, sitting down, or sleeping. If the person being monitored will be
walking around or exercising, their pulse will normally rise far above their
resting pulse rate. In this case, select Walk About Mode. This will prevent
excessive false alarms from occurring. The lower pulse limit will be set to 50
bpm, but there will be no effective upper limit. An alarm will still be activated if
there is a sudden, large increase or decrease in pulse rate (greater than the preset
limits on the standard deviation chart.)
The pre-selected default settings are based on nationally published resting heart
rate ranges for the following age ranges and sex (references 7,8).
Age Group
Newborn
1 to 2 Years
2 to 4 Years
4 to 6 Years
6 to 10 Years
10 to 12 Years
10 to 12 Years
12 to 14 Years
12 to 14 Years
14 to 16 Years
14 to 16 Years
Over 16 Years
Over 16 Years
Sex
M&F
M&F
M&F
M&F
M&F
M
F
M
F
M
F
M
F
50
Resting Heart Rate Range
70 to 170 bpm
80 to 130 bpm
80 to 120 bpm
75 to 115 bpm
70 to 110 bpm
65 to 105 bpm
70 to 110 bpm
60 to 100 bpm
65 to 105 bpm
55 to 95 bpm
60 to 100 bpm
50 to 90 bpm
55 to 95 bpm
Appendix D
Deactivating Screen Savers and
Automatic Power Shut Down Options
It is imperative that you turn off all screen savers and deactivate sleep mode,
hibernate mode and any other automatic power shut down options.
To assist in this process use the Display and Power controls Icon to launch the
display properties window.
NOTE: Certain screens appear differently depending on the
particular operating systems and computer. This sample
screen is one example of the display properties for a laptop
running Windows XP.
To Turn Off Your Screen Saver:
1- Select the “POWER” button.
2- Select the appropriate setting to disable
all power down options. button.
51
Glossary of Terms
Automatic Phone/email Alarm– Automatically dials user-specified phone
numbers and sends email and text message in the event that any chart of the
person being monitored becomes red. A chart will turn red after three
consecutive breaches of the user specified limits.
Automatic Print Alarm– Automatically prints charts in the event that any chart
of the person being monitored is red for a user specified time. A chart will turn
red after three consecutive breaches of the user specified limits.
Baud Rate– Baud rate is a measure of the number of times per second a signal in
a communications channel changes state.
Breach– Any heart rate activity in excess of user-specified control limits.
Caregiver– A person who is responsible for attending for the needs of a child or
a dependent adult.
Common Cause– Vital signs response associated with internal biological effects.
External Cause– An event that is triggered by something outside the body.
Frequency Switch – Mechanical device used to modulate the flow of
information via electrical signals.
Internal Cause– An event that is triggered by something inside the body.
Local Phone Number– Phone number dialed if any chart becomes red.
Modem – A device or program that enables a computer to transmit data over, for
example, telephone or cable lines.
Modem COM Port– A signal input (access) or output cable point for a modem
on your computer.
Password – A form of authentication that uses secret data to control access to a
resource. The password should be kept secret from those not allowed access.
MyPulse Heart Rate Transmitter– A wireless chest strap transmitter that detects
heart rate accurately from a user’s chest, and sends this information to the
MyPulse receiver.
Profile– A subset of information that is used as a unique identifier for an
individual.
52
Real-time– A level of computer responsiveness that allows a user to access
information almost immediately.
Remote Phone Number/address– Phone number dialed if any chart remains red
for a user specified period of time. A text message and data are emailed to the
specified address. Additional remote devices will receive phone calls and text
messages but no data.
Local Phone Number/address– Phone number dialed if any chart remains red for
any period of time. A text message with no data is emailed to the specified
address.
Session– A period of time devoted specifically to heart rate monitoring.
Special Cause– Vital signs response associated with external environmental
effects
Standard Deviation – Measures the dispersal, or variation in a group of
numbers. It represents how tightly a set of values is clustered around the average
of those same values. (See also Appendix A.)
MyPulse Heart Monitoring System– A low-cost alternative for monitoring heart
rate during exercise activities in the average household, in sports, in hospitals,
and in nursing homes. MyPulse also serves as a mobile and fully integrated heart
monitoring system to help in the analysis of fitness and performance for the
active adult.
MyPulse Receiver – Wireless device which receives heart rate information from
the transmitter, and feeds the heart rate information into a personal computer.
MyPulse Signal Repeater – Receives heart rate information from the transmitter
and re-transmits the heart rate information to the MyPulse Long Range Receiver
Threshold– The point that must be exceeded to begin producing a given effect or
result; or to elicit a specific response.
USB (Universal Serial Bus) Port– An external interface signal input (access) or
output cable point for communication between a computer and peripheral.
USB Cable– An electrical conductor used to connect a USB cable point in the
computer to the external peripheral.
Walk About Mode– The lower pulse limit will be set to 50 bpm, with no
effective upper pulse limit. An alarm will still be activated if there is a sudden,
large increase or decrease in pulse rate (greater than the preset limits on the
standard deviation chart.)
53
Trouble Shooting
No data or chart appears on the screen.
Causes:
The chest strap (5KHz) battery has expired (the battery life is about 2500 hours).
The bluetooth (FCC ID:QOQWT12) chest strap has discharged (cycle 26 hrs).
The chest strap electrodes require moistening.
The short range monitor receiver is less than 1 foot from the computer.
The USB drivers for the receiver are not installed.
The USB port number assigned in the customize menu is not correct.
The repeater battery requires recharging (long range monitor only).
The repeater is turned off.
The repeater is more than 3 feet from the chest strap.
The repeater is less than 1 foot from the computer or other interference
generating electrical equipment. The light may stop flashing. If the repeater is in
the front of a motor car, move the repeater towards the rear of the car.
The receiver is not plugged in.
The repeater and receiver frequency switch settings do not match.
The repeater is more than 1000 feet from the receiver.
The monitor is experiencing interference at the particular frequency to which it
is set (on the repeater & receiver). The frequency settings must be changed.
Chart has stopped updating (see also the above comments on interference).
Causes: The short range chest strap was temporarily removed and replaced, and
the transmission code changed. The monitor must be restarted.
A Bluetooth USB adapter is in an overloaded hub.
Repeater LED does not blink
Causes: The repeater requires recharging.
Repeater LED blinks every 5 seconds not with every heat beat
Causes: The repeater is more than 3 feet from the chest strap or the strap needs
moistening or a new battery. The battery life is about 2500 hours.
Repeater battery does not hold charge
Causes:
Battery was left discharged for an extended period. Place the repeater on a 24
hour slow charge (switch turned OFF). If that fails, the battery is damaged.
Battery is damaged or has expired. A damaged battery can result from storage in
a state of discharge. Also, the battery will expire after about 1000 recharges or
about 2 years of use.
Telephone alarm(email) does not work.
Causes: The port number for the modem to which the telephone is connected is
not correct (for email: no internet connection). Correct the port settings and test
the telephone/email connection and number from the customize screen.
54
Technical Specifications
INTENDED USE:
Pulse rate measurement, real time charts, variability,
analysis and wireless notification.
PATENT:
US Patent #6897773
CE notice:
Chest strap sensor/transmitter: N2965 CE0537 indicates
compliance with European medical device directive.
FCC notice:
FCC ID: QU8FOURCAST, QOQWT12.
Declaration of conformity to FCC Rule part 15.
TCB notice:
Grant of equipment authorization.
Declaration of conformity to FCC Rule part 2.931.
ANSI notice:
Declaration of conformity to ANSI standard C63.4-1992.
UL listed:
81J1E81356.
FEATURES:
Provides fast reliable pulse rate measurements on any
person.
Non-invasive.
Wireless convenience. Coded to prevent interference. No
wires to entangle or restrict the movement of a person. No
contact gels to irritate the skin.
Ideally suited for use in homes, gymnasiums, sports, work
place, at a picnic.
Tele-monitoring from a remote location.
METHOD OF POWER:
Chest sensor/transmitter (5KHz 3feet)
Battery type: CR2025
Battery life: Approximately 2500 hours or 2 years
(1hour/day, 7 days/week).
Chest sensor/transmitter (Bluetooth 2.4-2.4835MHz 33feet)
Rechargeable 90% in1 hr, 100% in 3hrs 26 hr charge cycle.
Repeater:
Battery type: Size AA. Rechargeable. 1.5volt. Nickel metal
hydride.
Charging circuit includes a 2amp fuse and monitoring to
prevent overcharging.
Time between charges (inside device): 48 hours.
Battery life: Approximately 1000 recharges in 2 years.
55
Receiver:
5 volts USB computer port.
Charger:
Wall transformer: CUI Stack DPD030040-P7-DK.
Input 120VAC 60 Hz 4W. Output 3VDC 400mA
Model No. DV-3400
OPERATING TEMPERATURE:
14degF to 122degF
(-10degC to 50degC).
DIMENSIONS:
Chest sensor/transmitter: 2.5x1.5x0.5 inch hard
plastic enclosure
Chest strap: 1.125 inch wide. Adjustable length.
Repeater: 2.75 x 2 x 0.8 inch.
Charger: 2.125 x 1.375 x 1.375 inch.
Receiver: 2.75 x 2 x 0.8 inch.
WEIGHT:
Chest sensor/transmitter
Chest strap
Chest total (on body)
Repeater (in pocket)
Receiver (remote) 3.0
1.8 (without battery)
---8.0 ounces
Grand total
MATERIALS:
1.0
1.3
---2.3
2.7
Sensor/Transmitter: Hard plastics enclosure. Polyamide.
Water proof up to 30meters (100 feet).
Chest strap: Polyurethane, polyester, polyamide, nylon and natural
rubber including a small amount of latex.
Repeater: Hard plastic enclosure.
Receiver: Hard plastic enclosure.
Plastic covered metal wire cable between receiver and computer.
DATA COMMUNICATIONS:
Wireless to computer via USB port. Coded to prevent interference
INFORMATION DISPLAY:
Computer screen: Real time. Beat to beat numeric pulse rate. Time chart of
current pulse rates and archived pulse rate log for up to approximately 1 year
for 1000 users. Hard copy printable.
56
References
1.
Ridley, A.D., "Single versus dual process control charts," Proceedings
of the Production and Operations Management Conference: POMS
2003, Savannah, Ga. April 4-7, 2003.
2.
, "Pulse Oximetry: an mws model," Proceedings of the
ICC&IEMS 2001 Conference. ISBN 0-9710330-0-5. Cocoa Beach, Fl.
Pages 25-29, March 5-7, 2001.
3.
,
“A
Model-free
Power
Transformation
to
Homoscedasticity,” International Journal of Production Economics.
Vol. 36, No. 2, Pages 191-202, October 1994.
4.
Ridley, A. D. and Duke, D. “Moving Window Spectral Model Based
Statistical Process Control,” International Journal of Production
Economics, Volume 105, Issue 2, Pages 492-509, February 2007.
http://dx.doi.org/10.1016/j.ijpe.2006.02.012
5.
Ridley, A. D. “Complementary Antithetic Weights for Lognormal Time
Series Forecasting,” Computers and Operations Research, Volume 27,
Issue 13, Pages 1347-1349, 2000.
6.
Ridley, A.D., and Ngnepieba, P. “Antithetic time series analysis and
the CompanyX data,” Journal of the Royal Statistical Society, A,
Volume 177, Issue 1, Pages 83-94, 2014.
7.
Kosier, B. & Erb, G. “Fundamentals of Nursing: Concepts and
Procedures. 2nd edition, Addison – Wesley, 1983.
8.
Malasonas, L., Barkauskas, V., Moss, M. & Stoltenberg – Allen, K.
Health Assessment, 2nd edition,The C.V. Mosby Co., 1981.
9.
Malik, M. “Heart Rate Variability: standards of measurement,
physiological interpretation, and clinical use. Task Force of the European
Society of Cardiology & the North American Society of Pacing
Electrophysiology. http://circ.ahajournals.org/cgi/content/full/93/5/1043.
57
WARNINGS and NOTICES
WARNING! The products to which these instructions apply rely
on the proper operation of the user's computer, sound speaker,
video screen, modem, telephone system, electrical power supply,
other hardware and software at all times. Without any one of these
components, the alarm systems will not operate. The user must
inspect each of these items to ensure that they are operating
correctly at all times.
WARNING! The program relies on the windows operating
system provided by the user. The user must check the computer
screen periodically (at least once every hour) to verify that the
charts are being updated, and especially once per day when the
operating system updates the date calendar.
WARNING! The monitor uses the computer's modem to execute
the telephone alarm. The monitor can be used on a computer that is
also being used by other applications. However, there must be no
sharing of the same modem and/or telephone line. For example if
the computer is being used to browse the internet via a single
modem, the monitor's telephone alarm will not function because
the modem will already be in use. In that case, a separate modem
or other means of internet connection must be used. If the internet
connection is different from DSL, for example when using a
pocket computer with a blue tooth connection to a cell phone, the
internet connection must be separate from the cell phone. If the
internet connection is via a cell phone, it's number must be
omitted. Otherwise, neither phone nor email notification will
occur. If phone notification is desired, the number must be for a
separate phone.
WARNING! In a multi-user environment, heart monitors (chest
straps, repeaters & short range receivers) must never be transferred
between users while they are being monitored. This could cause
the charts of different users to be reassigned incorrectly.
58
NOTICE
The products to which these instructions apply are recommended for the noninvasive measurement of biological vital signs. They display data on a computer
screen and a printer, and will alarm when values fall outside a predetermined
user specified range. They are not suggested or recommended for use in
connection with any illness or health defect whatsoever. No medical
interpretation or diagnosis is performed and no treatment or action whatsoever,
medical or otherwise, is suggested or recommended. They will not prevent, treat
or cure any illness. By using this reference monitor, the user accepts full and
complete responsibility for the proper operation of the user's computer, sound
speaker, video screen, modem, telephone system, electrical power supply, other
hardware and software at all times, so as to alarm when biological vital signs
data fall outside any predetermined user specified range. In case of illness
consult a physician.
DISCLAIMER
The manufacturer of this product is continually striving to improve the quality
and function of its products and services; for this reason, it reserves the right to
make changes without notice. Specifications are based on representative lot
samples. Values may vary from lot to lot and are not guaranteed. The
manufacturer makes no guarantee, warranty, or representation regarding the
suitability or legality of any product or service for use in a specific application.
No device, product or service is intended for use in applications of a critical
nature where the safety of life or property is at risk. The user assumes full
liability for the use of the device, product or service in such applications. Under
no circumstances will the manufacturer be responsible for losses arising from
the use or failure of any device, product or service in any application, other than
the repair, replacement, or refund limited to the original device, product or
service purchase price. Some devices are patented. Under no circumstances shall
any user be conveyed any license or right to use or ownership of these patents.
59
RADIO FREQUENCY
The long-range monitor described in this product contains a RF module that has
been previously tested and found to comply with the limits for a Class B digital
device, pursuant to Part 15 of the FCC Rules. These limits are designed to provide
reasonable protection against harmful interference in a residential installation.
This equipment generates, uses and can radiate radio frequency energy and if not
installed and used in accordance with the instructions, may cause harmful
interference to radio communications. However, there is no guarantee that
interference will not occur in a particular installation. If this equipment does cause
harmful interference to radio or television reception, which can be determined by
turning the equipment on and off, the user is encouraged to try to correct the
interference by one or more of the following measures:
Reorient or relocate the receiving antenna.
Increase the separation between the equipment and the receiver.
Connect the equipment into an outlet on a circuit different from that to which the
receiver is connected.
Consult the dealer or an experienced radio/TV technician for help.
This equipment has been certified to comply with the limits for a Class B
computing device, pursuant to FCC Rules. In order to maintain compliance with
FCC regulations, shielded cables must be used with this equipment. Operation
with non-approved equipment or unshielded cables is likely to result in
interference to radio and TV reception. The user is cautioned that changes and
modifications made to the equipment without the approval of the manufacturer
could void the user's authority to operate this equipment.
FCC ID: QU8FOURCAST, FCC ID:QOQWT12
THIS DEVICE COMPLIES WITH PART 15 OF THE FCC RULES.
OPERATION IS SUBJECT TO THE FOLLOWING TWO CONDITIONS:
(1) THIS DEVICE MAY NOT CAUSE HARMFUL INTERFERENCE, AND
(2) THIS DEVICE MUST ACCEPT ANY INTERFERENCE RECEIVED,
INCLUDING INTERFERENCE THAT MAY CAUSE UNDESIRED
OPERATION.
Model Number: FOURCAST
Tested To Comply
With FCC Standards
FOR HOME OR OFFICE USE
60