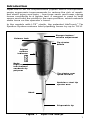
1
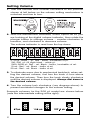
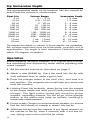
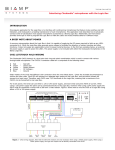
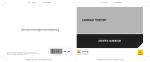
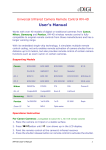
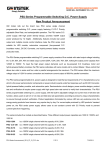
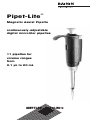
Pipet-Lite®
Magnetic Assist Pipette
continuously-adjustable
digital microliter pipettes
11 pipettes for
volume ranges
from
0.1 µL to 20 mL
Table of Contents
Introduction ..................................................................1
Setting Volume..............................................................2
Filter ............................................................................3
Tip Selection and Mounting ............................................3
Tip Immersion Depth .....................................................4
Operation .....................................................................4
Pipetting Guidelines.......................................................5
Pre-Rinsing Recommended ............................................5
Reverse-Mode Pipetting .................................................5
Pipetting Liquids of Varying Density.................................6
Temperature Considerations ...........................................6
Autoclaving ..................................................................6
Tip Ejector Arm Removal ................................................7
Pipet-Lite Storage ..........................................................7
Troubleshooting and Repairs ..........................................8
Service, Calibration, and Repair ......................................9
Specifications .............................................................10
Replacement Parts ......................................................11
Contacting RAININ............................................Back Page
Figures
Figure 1
Figure 2
Figure 3
Pipet-Lite Pipette ........................................1
Filter Orientation.........................................3
Removing the Tip Ejector Arm......................7
Line Drawings
Pipet-Lite
Pipet-Lite
Pipet-Lite
Pipet-Lite
Pipet-Lite
Pipet-Lite
Pipet-Lite
Pipet-Lite
Pipet-Lite
Pipet-Lite
Pipet-Lite
2 µL
10 µL
20 µL
100 µL
200 µL
300 µL
1000 µL
2000 µL
5000 µL
10 mL
20 mL
..................................................12
..................................................12
..................................................12
..................................................12
..................................................12
..................................................12
..................................................13
..................................................13
..................................................13
..................................................13
..................................................13
Contents of package
Sample tips
Pipet-Lite as ordered
Instruction Manual
Rainin Test Report
Performance Assurance Brochure
If any item is missing call Customer Service: 800-472-4646.
Rainin, Pipet-Lite, LTS, are registered trademarks, and LiteTouch, Hang-Ups are
trademarks of Rainin Instrument, LLC. Pipet-Lite pipettes are manufactured
under U.S. Patent Nos. 5,614,153; 5,700,959; and 5,849,248. For use under
U.S. patents 6,168,761 B1; 6,171,553 B1; and D426,643.
Introduction
Pipet-Lite is an air-displacement pipette which incorporates
major ergonomic improvements to reduce the risk of repetitive strain injury and pain – low force seals and lower spring
forces contribute to a lighter feel. A magnet is used to help
sense and hold the piston in the zero position, which reduces
static force on the operator’s hand.
In the models with LTS™ shafts, the patented LiteTouch™ Tip
Ejection System reduces total pipetting forces by up to 70%.
Volume lock
Plunger button /
volume adjustment
Tip ejector
button
Digital
volume
indicator
Body:
high-impact,
low thermal
conductivity
polymer
Tip ejector arm
quick release
Stainless steel tip
ejector arm
Shaft
Disposable tip
Figure 1
Pipet-Lite 200 µL
1
Setting Volume
1. Turn the volume lock counter-clockwise to the position
shown at left below so the volume setting mechanism is
unlocked and free to turn.
2. With the mechanism unlocked, orient Pipet-Lite so you
are looking at the digital volume indicator, then rotate the
plunger button to change volume – counter-clockwise to
increase, and clockwise to decrease volume.
The volume indicator is read from the top down.
Red digits
Black digits
2–20 µL: Black – µL. Red – tenths, hundredths of µL.
100–300 µL: All digits black – whole µL.
1000–5000 µL: Red – mL. Black – tenths, hundredths of mL.
10 mL: Red – mL. Black – tenths of mL
20 mL: Red – mL. Black – tenths of mL.
3. To eliminate errors due to mechanical backlash: when setting the desired volume, first turn the knob 1⁄3 turn above
the desired volume. Then turn the knob slowly clockwise
until the desired volume is displayed. Always dial down to
the desired volume.
4. Turn the volume lock clockwise (see diagram above) to
prevent accidental changes to the volume setting.
Example volumes for the 200 µL model are shown below
(note the intermediate setting at the right).
2
Volume ranges and increments are shown below:
Pipet-Lite
Volume
2 µL
10 µL
20 µL
100 µL
200 µL
300 µL
1000 µL
2000 µL
5000 µL
10 mL
20 mL
Range (µL)
Adjustable
Recommended
0 to 2
0.1 to 2
0 to 10
0.5 to 10
0 to 20
2 to 20
0 to 100
10 to 100
0 to 200
20 to 200
0 to 300
30 to 300
0 to 1,000
100 to 1,000
0 to 2,000
200 to 2,000
0 to 5,000
500 to 5,000
0 to 10 mL
1 mL to 10 mL
0 to 20 mL
2 mL to 20 mL
Increment
µL
0.002
0.02
0.02
0.2
0.2
0.5
2.0
2.0
5.0
20.0
20.0
Filter
Pipet-Lite 5000 µL, 10 mL, and 20 mL pipettes use a filter in
the end of the shaft to help prevent liquid entering the shaft
and contaminating the piston, should the plunger snap up
during aspiration. Using such a filter is particularly important
when pipetting large volumes. Replace the filter if it gets wet.
Figure 2 Filter Orientation
The 5000 µL and 10 mL pipettes use the same filter oriented
as shown in the diagram above:
5000 µL: insert the small diameter into the shaft.
10 mL: insert the large diameter into the shaft.
Filter part numbers are 6190-164 (pack of 100) and 6190165 (pack of 1000).
The filter for 20 mL is a cylinder. Filter part numbers: 6190221 (pack of 100) and 6190-222 (pack of 500).
Tip Selection and Mounting
Always use RAININ tips with Pipet-Lite pipettes. Pipet-Lite
pipettes are calibrated with RAININ tips, and performance to
published specifications can only be guaranteed when RAININ tips are used.
To mount a tip, press the Pipet-Lite shaft into the end of the tip
with light force. The tip will seal properly on the shaft with
minimal force — do not use more force than is required.
3
Tip Immersion Depth
The recommended depth for tip insertion into the sample for
each Pipet-Lite volume is shown below.
Pipet-Lite
2 µL
10 µL
20 µL
100 µL
200 µL
300 µL
1000 µL
2000 µL
5000 µL
10 mL
20 mL
Volume Range
0.1 - 2 µL
0.5 - 10 µL
2 - 20 µL
10 - 100 µL
20 - 200 µL
30 - 300 µL
100 - 1000 µL
200 - 2000 µL
500 - 5000 µL
1 mL - 10 mL
2 mL - 20 mL
Immersion Depth
1-2 mm
1-2 mm
2 - 3 mm
2 - 3 mm
3 - 6 mm
3 - 6 mm
3 - 6 mm
3 - 6 mm
6 - 10 mm
6 - 10 mm
6 - 10 mm
Tip immersion depth is critical. If these depths are exceeded,
the volume measured may be inaccurate, possibly out of
specification. Tip angle is also important. Hold the pipette
within 20 degrees of vertical.
Operation
Before pipetting valuable samples, it is a good idea to practice aspirating and dispensing water before pipetting with
actual samples.
1. Set the desired volume as described on page 2.
2. Attach a new RAININ tip. Press the shaft into the tip with
only sufficient force to make a good seal.
3. Press the plunger button to the FIRST STOP, and hold it in
this position. The magnetic assist will help you sense and
hold this position.
4. Holding Pipet-Lite vertically, place the tip into the sample
to the proper depth and relax your thumb pressure on the
plunger. The light piston spring will move the piston
upward, aspirating sample. Do not let go of the plunger
button, or the piston may snap up quickly, resulting in
inaccurate measurement.
5. Pause briefly (longer for macrovolume pipettes) to ensure
that the full volume of sample is drawn into the tip.
6. Withdraw the tip from the sample. If any liquid remains on
the outside of the tip, wipe it carefully with a lint-free tissue, taking care not to touch the tip orifice.
4
Dispensing:
1. Touch the tip end against the side wall of the receiving
vessel and press the plunger slowly, past the FIRST STOP,
to blowout (bottom of stroke.) Wait: 1 second for
2–300 µL volumes, 1-2 seconds for 1000 µL and larger.
(Longer for viscous solutions.)
2. Still holding the plunger, withdraw the tip, sliding it along
the wall of the vessel. Release the plunger.
3. Press the tip ejector button lightly to discard the tip. Use a
new tip for each sample to prevent carry-over. Repeat for
the next pipetting cycle.
Pipetting Guidelines
Pipet-Lite pipettes incorporate several new features which
enhance pipetting consistency. You should also maintain:
1. Consistent pickup and dispense rhythm.
2. Consistent speed and smoothness when pipetting.
3. Consistent pressure on the plunger button at the FIRST
STOP.
4. Consistent immersion depth. See table on page 4.
5. Pipette vertically, or within 20° of vertical.
6. Don’t invert or lay the pipette flat with liquid in
the tip.
Pre-Rinsing Recommended
Some solutions may leave a film on the inside tip wall. This
film remains relatively constant in successive pipettings with
the same tip, so excellent precision can be obtained by refilling the tip and using the refilled volume as the sample.
Successive samples from this same tip will exhibit good
reproducibility.
Reverse Mode Pipetting
Another way of reducing error due to film retention, especially
useful for more viscous liquids, is reverse mode pipetting. The
operating sequence is reversed:
1. Mount a disposable tip on the pipette shaft.
2. Press the pushbutton fully to the SECOND STOP.
3. Immerse the tip in liquid and allow the button to return
slowly to the fully UP position. Wait a moment for the liquid column to reach equilibrium in the tip.
5
4. Wipe any excess liquid from the outside of the tip without
touching the orifice.
5. To dispense, rest the end of the tip against the vessel wall
and press the plunger to the first stop. Hold this position a
few seconds, or long enough for the liquid column to
reach equilibrium again.
6. Remove the tip from the receiving vessel without blowing
out the remaining liquid.
7. Return excess sample in the tip to the original sample
container, if desired. Discard the used tip.
Pipetting Liquids of Varying Density
Pipet-Lite lets you compensate for solutions of density much
different from water, by setting the volume slightly higher or
lower than that required. The compensation amount must be
determined empirically.
For example, if pipetting 10 µL of CsCl solution, you determine that the volume delivered is actually 8.5 µL (≥5 samples). Change the volume setting to 11.8 µL and repeat the
measurements. If the volumes delivered are still not close
enough to 10 µL, make another slight volume adjustment
until the measurements are as desired.
Temperature Considerations
Warm or cold liquids can be measured with good precision
by using a consistent pipetting rhythm. This will help minimize any differences in heating or cooling effects within the
pipette.
Use a new tip each time for best accuracy and precision
when measuring samples with temperatures greatly different
from ambient, and do not pre-rinse. As with any air-displacement pipette, you will get best results if there is no delay
between picking up the sample and dispensing it.
Autoclaving
Autoclavable parts of Pipet-Lite are the shaft and the tip ejector:
121°C, 1 bar, 15-20 minutes.
Do not autoclave the complete pipette or any parts
other than the shaft and the tip ejector.
6
Tip Ejector Arm Removal
Three types of tip ejector are used and all types can be
removed with minimum effort - do not use force.
For models up to 2000 µL, press in the quick-release tabs
on the ejector arm and pull the ejector down.
For 5000 µL and 10 mL models, grasp the top of the ejector
arm and pull outward then downward.
For the 20 mL model, pull off the lower part of the ejector
arm; the upper part stays in place. (Replace by aligning the
rod with the hole in the upper part and pressing firmly.)
To replace the ejector arm (except 20 mL), insert the shaft
through the large opening, align the top with the tip ejector
pushrod, and push until the ejector arm snaps in place.
Figure 3 Removing the Tip Ejector Arm
Pipet-Lite Storage
After use, store the pipette in a clean safe place. Pipet-Lite is
a precision instrument and should be treated with the level of
care appropriate for laboratory instrumentation. Three types
of hanger are available to hold your Pipet-Lite conveniently
when not in use.
CR-7:
Free-standing carousel holds seven pipettes.
HU-M3: Set of three individual magnetic Hang-Ups ™ for
mounting on ferrous surfaces.
HU-S3: Three Hang-Ups attached to a clamp which fits onto
a shelf.
7
Troubleshooting and Repairs
WARNING:
When removing the shaft from the pipette body, make sure
the spring, seal and o-ring do not fall off the piston, especially on the smaller models.
Sample Splash (liquid inside the mechanism)
1. Remove the tip ejector arm. Also refer to the appropriate
drawing on page 12 or 13.
2. On pipettes up to 1000 µL, unscrew the shaft coupling (B)
and remove the shaft (C). For 2000 µL, unscrew the shaft.
For 5000 µL, 10 mL and 20 mL unscrew the lower part
of the shaft. Note the way the spring, seal and O-ring fit on
the piston.
3. Inspect the seal assembly and piston for contamination.
The piston should be shiny and free of corrosion. Clean
with distilled water or isopropyl alcohol. Dry with a lintfree tissue and reassemble after inspecting the interior of
the shaft for any contamination. For 5000 µL, 10 mL
and 20 mL models, apply a small amount of grease to
the seal.
4. If piston corrosion or staining is evident, do not use the
instrument. Call 800-662-7027 for Service.
Leaks, Inaccuracy, Abnormal Stroke
1. Loose shaft. Tighten coupling by hand.
2. Split or cracked shaft. Remove the tip ejector and
inspect the shaft. Replace the shaft if necessary. If the
shaft was dropped, remove it to see if the piston is bent.
If so, return the instrument for service.
3. Worn seal and / or o-ring. All models up to 2000 µL
incorporate a polyethylene seal and o-ring. Examine the
seal and o-ring, replacing them as necessary. Pull off the
old seal and o-ring, position the new seal and o-ring on
the piston assembly as shown in the drawings on pages
12-13, and reassemble the pipette.
Note: It is NOT necessary to recalibrate Pipet-Lite after
changing seals.
4. Do not lubricate any components*. Pipet-Lite uses a dry
sealing system. *Except 5000µL, 10 mL, and L-20ML
models. These pipettes require a small amount of grease
to be applied to the o-ring to make the seal.
8
Service, Calibration and Repair
RAININ Pipette Repair and Calibration facilities:
It is recommended to use only genuine RAININ replacement parts
such as seals, o-rings, and shafts. It is NOT necessary to recalibrate the pipette after changing the seal, o-ring, or shaft. Recalibration of the pipette is only necessary when the piston is
replaced, and should be done only by qualified factory-trained
personnel in one of the above-mentioned facilities.
For pipettes under warranty, please note that the warranty will be voided if the pipette has been damaged
as a result of physical or chemical abuse, or if the
pipette has been repaired or recalibrated by any service facility which is not authorized by Rainin.
In the US, call 800-543-4030 for service. Or visit the web:
www.rainin.com/service.asp.
Service is also available outside the US.
See the RAININ website home page, www.rainin.com, and click
on the link “Customers outside North America”.
METTLER TOLEDO Pipette Repair and Calibration facilities or
authorized RAININ distributors who provide service can be found
by following this link and specifying the country or geographical
region.
Contact Technical Support at 800-543-4030 for further information.
9
Specifications
These manufacturer’s specifications should be used as guidelines when establishing your own performance specification.
Pipet-Lite Specifications
Volume Increment
Model
µL
µL
Accuracy
%
µL (±)
%
Precision
µL (≤)
2 µL
0.2
1.0
2.0
0.002
12.0
2.7
1.5
0.024
0.027
0.030
6.0
1.3
0.7
0.012
0.013
0.014
10 µL
1.0
5.0
10.0
0.02
2.5
1.5
1.0
0.025
0.075
0.1
1.2
0.6
0.4
0.012
0.03
0.04
20 µL
2
10
20
0.02
7.5
1.5
1.0
0.15
0.15
0.2
2.0
0.5
0.3
0.04
0.05
0.06
100 µL
10
50
100
0.2
3.5
0.8
0.8
0.35
0.4
0.8
1.0
0.24
0.15
0.1
0.12
0.15
200 µL
20
100
200
0.2
2.5
0.8
0.8
0.5
0.8
1.6
1.0
0.25
0.15
0.2
0.25
0.3
300 µL
30
150
300
0.5
2.5
0.8
0.8
0.75
1.2
2.4
1.0
0.25
0.15
0.3
0.375
0.45
1000 µL
100
500
1000
2
3.0
0.8
0.8
3.0
4.0
8.0
0.6
0.2
0.15
0.6
1.0
1.5
2000 µL
200
1000
2000
2
3.0
0.8
0.8
6.0
8.0
16.0
0.6
0.2
0.12
1.2
2.0
2.4
5000 µL
500
2500
5000
5
2.4
0.6
0.6
12.0
15.0
30.0
0.6
0.2
0.16
3.0
5.0
8.0
10 mL
1 mL
5 mL
10 mL
20
5.0
1.0
0.6
50.0
50.0
60.0
0.6
6.0
0.2 10.0
0.16 16.0
20 mL
2 mL
10 mL
20 mL
20
5.0 100.0
1.0 100.0
0.6 120.0
0.6 12.0
0.2 20.0
0.16 32.0
Specifications are subject to change without notice.
Acids and Corrosives
After pipetting concentrated acids or highly corrosive solutions, disassemble Pipet-Lite and inspect and clean the
piston assembly, shaft, and seal with distilled water. Dry
all components thoroughly and reassemble.
Extensive contact with corrosive fumes may result in premature seal wear and damage to the piston. Exposure of
internal components to corrosive fumes can be reduced by
using RAININ tips with aerosol barrier filters.
10
Replacement Parts
(see pages 12-13)
Legend for Pipet-Lite 2 µL to 2000 µL
B- Shaft Coupling
A - Plunger Button
E - Piston Assembly
D - Tip Ejector*
H - Stroke Spring
G - O-ring
C - Shaft*
F - Seal
J - Seal Retainer
L- Series: note the second set of A and B (shaded) are for the new-handle Pipet-Lite (2007)
L-2
A 6202-055
A 6202-500
B 6202-062
B 6202-499
C 6202-063
D 6202-071
E 6202-076
F 6200-131
G 6200-132
H 6202-083
J 6200-196
L-10
6202-056
6202-501
6202-062
6202-499
6202-064
6202-071
6202-077
6200-138
6200-139
6202-083
6200-196
L-20
6202-057
6202-502
6202-062
6202-499
6202-065
6202-071
6202-078
6200-143
6200-170
6202-083
6200-198
L-100
6202-058
6202-504
6202-062
6202-499
6202-066
6202-073
6202-079
6200-150
6200-151
6202-084
6200-201
L-200
6202-059
6202-505
6202-062
6202-499
6202-067
6202-073
6202-080
6200-154
6200-155
6202-084
6200-200
L-300
6202-306
6202-506
6202-062
6202-499
6202-425
6200-419
6202-427
6200-415
6200-414
6202-084
6200-416
L-1000
6202-060
6202-507
6202-062
6202-499
6202-068
6202-074
6202-081
6200-161
6200-162
n/a
n/a
L-2000
6202-192
6202-509
n/a
n/a
6202-214
6200-168
6202-082
6200-166
6200-167
n/a
n/a
SL- Series: note the second set of A and B (shaded) are for the new-handle Pipet-Lite (2007)
SL-2
A 6202-109
A 6202-516
B 6202-062
B 6202-515
C 6200-134
D 6200-133
E 6202-183
F 6200-131
G 6200-132
H 6202-083
J 6200-196
SL-10
6202-110
6202-517
6202-062
6202-515
6200-140
6200-133
6202-184
6200-138
6200-139
6202-083
6200-196
SL-20
6202-111
6202-518
6202-062
6202-515
6200-145
6200-144
6202-185
6200-143
6200-170
6202-083
6200-198
SL-100
6202-112
6202-519
6202-062
6202-515
6200-147
6200-148
6202-079
6200-150
6200-151
6202-084
6200-201
SL-200
6202-113
6202-520
6202-062
6202-515
6200-157
6200-156
6202-080
6200-154
6200-155
6202-084
6200-200
SL-300
6202-426
6202-521
6202-062
6202-515
6200-413
6200-419
6202-427
6200-415
6200-414
6202-084
6200-416
SL-1000
6202-114
6202-522
6202-062
6202-515
6200-160
6200-163
6202-081
6200-161
6200-162
n/a
n/a
SL-2000
6202-115
6202-523
n/a
n/a
6200-169
6200-168
6202-082
6200-166
6200-167
n/a
n/a
* These parts are autoclavable (C - shaft, D - tip ejector arm)
Legend for Pipet-Lite 5000 µL , 10 mL and 20 mL
A - Plunger Button
C- Tip Ejector*
D - Piston Assembly
E - Piston O-ring
F - Cylinder G - Cylinder O-ring
H - Shaft*
L- Series:
SL- Series:
L-5000
L-10ML
L-20ML
SL-5000
SL-10ML
A
6202-193
6202-194
6202-297
6202-217
6202-218
A
6202-510
6202-511
6202-512
6202-524
6202-525
C
6200-373
6200-374
6202-298
6200-373
6200-374
D
6202-215
6202-216
6202-296
6202-215
6202-216
E
6200-363
6200-369
6202-299
6200-363
6200-369
F
6200-365
6200-371
6202-301
6200-365
6200-371
G
6200-364
6200-370
6202-300
6200-364
6200-370
H
6202-222
6202-223
6202-302
6200-362
6200-368
* These parts are autoclavable (C - tip ejector arm, H - shaft)
Common parts for 5000 µL, 10 mL, and 20 mL:
Tube of grease:
6100-555
Filters for 5000 µL/10 mL:
6190-164 (100), 6190-165 (1000)
Filters for 20 mL:
6190-221 (100), 6190-222 (500)
11
Pipet-Lite 2 & 10 µL
Pipet-Lite 20 µL
A
A
H
H
B
B
J
J
F
G
F
G
C
C
E
E
D
D
Pipet-Lite 200 & 300 µL
Pipet-Lite 100 µL
A
A
H
H
B
J
J
B
F
G
F
G
E
E
C
C
D
D
Legend for Pipet-Lite 2 µL to 2000 µL Models
(this page and top of next page)
A - Plunger Button
D - Tip Ejector
G - O-ring
12
B- Shaft Coupling
E - Piston Assembly
H - Stroke Spring
C - Shaft
F - Seal
J - Seal Retainer
Pipet-Lite 1000 µL
Pipet-Lite 2000 µL
A
A
F
G
F
G
B
E
E
C
C
D
D
Legend for Pipet-Lite 5000 µL, 10 mL and 20 mL (below)
A - Plunger Button
E - Piston O-ring
H - Shaft
C- Tip Ejector Arm
F- Cylinder
Pipet-Lite 5000 µL & 10 mL
D - Piston Assembly
G - Cylinder O-ring
Pipet-Lite 20 mL
A
A
D
D
E
E
F
F
G
G
H
H
C
C
13
Limited Warranty
See the Limited Warranty and Limitations of Liability Statement.
Please complete and return the Warranty Registration Card on receipt
of your pipette.
RAININ pipettes are calibrated with RAININ tips. To assure excellent
reproducibility and performance, use only RAININ tips as recommended in this manual. Specified performance is guaranteed only
when RAININ tips are used.
Contacting RAININ
Technical Information:
F: 510-564-1617
T: 800-543-4030
Pipette Service:
T: 800-662-7027
F: 781-935-7631
Direct Order Line:
T: 800-472-4646
F: 510-564-1617
RAININ website: www.rainin.com
[email protected]
[email protected]
[email protected]
From outside North America:
T: +1-510-564-1600
[email protected] (from outside the U.S.)
METTLER TOLEDO Offices
METTLER TOLEDO website: www.mt.com/rainin
Mettler-Toledo (Schweiz) GmbH, Im Langacher , 8606 Greifensee CH
Verkauf
044 944 45 45
[email protected]
Service
044 944 47 47
[email protected]
Mettler Toledo GmbH, Ockerweg 3 , 35396 Giessen DE
Verkauf
+49 641 507 222
[email protected]
Service
+49 641 507 307
[email protected]
Mettler-Toledo SAS, 18-20 avenue de la Pépinière , 78220 Viroflay FR
Ventes
01 30 97 17 17
[email protected]
Laboratoire d'Etalonnage Accrédité,
264 rue Abraham Lincoln Service Pipette, 62400 Bethune FR
Service
03 21 64 54 66
[email protected]
N.V. Mettler-Toledo S.A., Leuvensesteenweg 384 , 1932 Zaventem BE
Sales
+32 2334 0211
[email protected]
Service
+32 2334 0211
[email protected]
Mettler-Toledo S.A.E., Miguel Hernández 69-71 ,
08908 L'Hospitalet de Llobregat (Barcelona) ES
Ventas
0034 93 223 7666
[email protected]
Servicio Técnico 0034 93 223 7666
[email protected]
Mettler-Toledo A/S, Naverland 8 , 2600 Glostrup DK
Salg
43 27 08 25
[email protected]
Service
43 27 08 25
[email protected]
Rainin Instrument, LLC
7500 Edgewater Drive, Box 2160, Oakland, CA 94621-0060
a METTLER TOLEDO Company
Prices and specifications are subject to change without notice.
Copyright 2007, Rainin Instrument, LLC.
ISO 9001:2000
REGISTERED
9920-237 Rev M