1
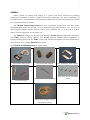
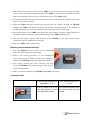
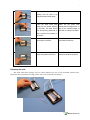
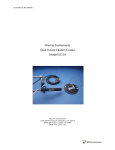
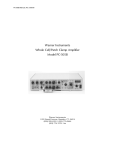
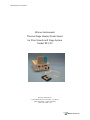
TB-3/CS Manual, Rev 070423.1
Warner Instruments
Thermal Stage Heater/Cooler Insert
for Prior NanoScanZ Stage System
Model TB-3/CS
Warner Instruments
1125 Dixwell Avenue, Hamden, CT 06514
(800) 599-4203 / (203) 776-0664
(203) 776-1278 - fax
Warner Instruments
TB-3/CS Manual, Rev 070423.1
Table of Contents
INTRODUCTION....................................................................................................................................... 4
GENERAL................................................................................................................................................... 4
SETUP.......................................................................................................................................................... 5
General procedure.................................................................................................................................. 5
Connecting the Thermal Cooling Module ............................................................................................ 5
Mounting onto the NanoScanZ stage .................................................................................................... 6
Loading the slide..................................................................................................................................... 6
Removing the slide.................................................................................................................................. 7
OPERATION .............................................................................................................................................. 8
APPENDIX.................................................................................................................................................. 9
Maintenance............................................................................................................................................ 9
Specifications........................................................................................................................................... 9
Warranty and service........................................................................................................................... 10
Warranty............................................................................................................................................. 10
Service notes....................................................................................................................................... 10
Warner Instruments
TB-3/CS Manual, Rev 070423.1
3
The TB-3/CS Thermal Stage Insert has been designed for use with Prior’s NanoScanZ piezo stage
system. The TB-3/CS uses reliable and precise Peltier technology to control the temperature in
disposable, rectangular chambered slides and cover glasses available from Nunc, Beckton
Dickinson, and other sources.
Stage insert temperatures can be stably maintained from 0 to 50 °C. An integral water jacket
uses recirculation water from Warner’s TCM-1 Thermal Cooling Module to remove excess heat
from the Peltier electronics within the TB-3/CS.
The efficiency of specimen heating and cooling has dependence on the type of slide and on the
presence of condensation. Thermal transfer efficiency also depends on a good mechanical
attachment of the slide to its support, for this reason we provide two sets of slide clamps to
both position the slide and to bring it into close apposition with the stage insert. The base of
the TB-3/CS has a thermal barrier designed to reduce the occurrence of condensation when the
unit is cooled to below the dew point.
The TB-3/CS Thermal Stage Insert is designed to fit directly into the NanoScanZ stage and uses
the same mounting and positioning provisions as for other sample holders that fit the
NanoScanZ.
THIS EQUIPMENT IS NOT DESIGNED NOR INTENDED
FOR USE ON HUMAN SUBJECTS
Warner Instruments
4
TB-3/CS Manual, Rev 070423.1
GENERAL
Peltier control of heating and cooling is a proven and direct method for providing
temperature regulation to devices comprised of metal components. The quiet performance of
the Peltier device, coupled with the high thermal conductivity of the metal components, makes
for a robust and efficient system.
The TB-3/CS Thermal Stage Insert has been specifically designed for use with Prior’s
NanoScanZ piezo stage system and it can accommodate any slide having a 1 x 3 in (25 x 76
mm) footprint. Slightly smaller footprint slides, most commonly the 1 x 2 inch (25 x 50 mm)
slides, are also supported; test fit before use.
The TB-3/CS is designed to be used with Warner’s CL-100 Bipolar Temperature Controller
and TCM-1 Thermal Cooling Module. The CL-100 provides feedback-driven regulation of
heating/cooling power and the TCM-1 quietly and effectively dissipates the heat generated by
the operation of the integral TB-3/CS Peltier device.
Each TB-3/CS Thermal Stage Insert is supplied with:
The thermal stage insert
One lift-out tool
Two black slide clamps
Two aluminum slide clamps
One 0.028 inch Allen wrench
Four #2 x 10 mm mounting
screws
Two 3-meter lengths of ¼ in
OD Tygon® tubing
Warner Instruments
5
TB-3/CS Manual, Rev 070423.1
SETUP
A fully assembled TB-3/CS, including the
CL-100 and TCM-1, is shown to the right.
Instructions for the use of the CL-100 and TCM-1
are left their respective user’s manuals.
General procedure
The general assembly procedure is to attach
the TCM-1 to the TB-3/CS, away from the
microscope, and to check for secure, leak-free
connections. This is followed by positioning the
TB-3/CS into the NanoScanZ stage. Then leveling
and securing the insert. A connection is then
made between the TB-3/CS and CL-100. Finally, your sample slide in inserted into the stage
insert and your experiment begun.
Connecting the Thermal Cooling Module
Note: This step should be performed away from
the microscope.
1. First review the assembly instructions for the
TCM-1 Thermal Cooling Module. We will use a
modified procedure.
2. The goal is to connect flow lines from a fill
reservoir to the TB-3/CS, to the TCM-1, and,
finally back to the fill reservoir. Once the system
is filled the lines entering and exiting the fill
reservoir are joined.
3. Begin
TCM-1 upper
flow port
by
connecting the WATER JACKET
CONNECTING TUBES (supplied with the TCM-1) to
the upper and lower fluid flow ports on the rear
of the TCM-1 as shown to the right.
4. Now cut the two 3-meter Tygon® tubes
(supplied with the TB-3/CS) to length. Attach
these tubes to the TB-3/CS perfusion flow ports
as shown to the right.
TB-3 perfusion flow ports
5. Join the open end of one the aforementioned
tubes to the upper WATER JACKET CONNECTING
TUBE which you attached to the TCM-1 flow port in step 3.
6. Now take a short length of Tygon® tubing and connect to the other WATER
CONNECTING TUBE (attached to the lower fluid flow port on the rear of the TCM-1).
JACKET
Warner Instruments
6
TB-3/CS Manual, Rev 070423.1
7. Next, remove the screw on the top of the TCM-1 to reveal the fill port for the internal fluid
reservoir. Add the supplied algaecide (part of the TCM-1) to the fill reservoir. Refill the bottle
with water and add to the reservoir. This will act to prime the TCM-1 pump.
8. Fill a 500 ml beaker with water and submerge the open ends of the two Tygon® tubes from
steps 5 and 6 into the beaker.
9. Power the TCM-1. Solution should begin moving from the beaker, through the TB-3/CS,
through the TCM-1, and finally back into the beaker. Add more fluid to the beaker as
needed. The flow path is full once bubbles stop coming out of the outflow tube.
10. Turn off the power to the TCM-1 and remove the short length of Tygon® tubing attached to
the WATER JACKET CONNECTING TUBE connected to the lower TCM-1 fluid flow port.
11. Join the full length Tygon® tube attached to the TB-3/CS to the open
CONNECTING TUBE to complete the flow path.
WATER JACKET
12. Power the TCM-1 and check for leaks.
Mounting onto the NanoScanZ stage
1. Place the TB-3/CS into the cutout on the NanoScanZ
stage. The fit should be an exact match.
2. Refer to the leveling procedure in your NanoScanZ
user’s manual and if needed, adjust the leveling setscrews of the TB-3/CS using the supplied Allen wrench.
3. Once proper leveling has been achieved, you may
secure the TB-3/CS to the stage using the four #2 x 10
mm mounting screws.
4. Make a connection between the TB-3/CS and CL-100 at this time.
Loading the slide
If your slide has dimensions of
less than 1 x 3 inch
If your slide has dimensions of
1 x 3 inch
Begin by placing one of the
black slide clamps on one end
of the stage insert opening.
Do not place the black clamp
until after the slide has been
inserted.
Warner Instruments
7
TB-3/CS Manual, Rev 070423.1
Insert the slide into the holder.
Making sure the slide is up
against the black slide clamp.
Insert the slide into the holder.
Place the other black slide
clamp into the space adjacent
to the slide. The slide should
now be securely positioned so
that it cannot move laterally in
the holder.
Place the two black slide
clamps into the stage insert, on
top of the outboard edges of
the slide, to clamp it into place.
Place the first top slide clamp
into position as shown.
Place the first top slide clamp
into position as shown.
Place the second top slide
clamp into position as shown.
Place the second top slide
clamp into position as shown.
Removing the slide
The slide and black clamps can be easily removed by use of the included removal tool.
Insert the flat end under the edge of the item to be removed and lift out.
Warner Instruments
TB-3/CS Manual, Rev 070423.1
8
OPERATION
1. Turn on the power to TCM-1.
2. Turn on the power to CL-100.
3. Set the CL-100 MODE SELECTOR SWITCH into auto, the INTERNAL/EXTERNAL SELECTOR SWITCH
to internal (see the CL-100 user’s manual), and the LOOP SPEED SELECTOR SWITCH to
medium.
4. If desired, place a TA-29 thermistor into the bath area to measure the temperature at a
point of interest.
5. Adjust the SET TEMP on the CL-100 to the desired operating temperature. Allow the
system to thermally stabilize. Monitor the temperature at the point of interest using the
TA-29 thermistor.
6. Make any temperature adjustments on the CL-100 to compensate for heat loss to the
surrounding area.
7. Additional adjustment of the heater set point may be required if any of the following
change substantially during an experiment:
•
Perfusion solution flow rate (if present)
•
Temperature of solution entering the heater (if flowing solutions)
•
Ambient (room) temperature
•
Air currents around chamber
Efforts to minimize these factors will be rewarded.
Warner Instruments
9
TB-3/CS Manual, Rev 070423.1
APPENDIX
Maintenance
The TB-3/CS can be cleaned with soap and water should the outside surface become dirty.
Salt solutions and TCM-1 perfusion solutions can be corrosive to metal components and
can shorten the life of the heater/cooler if left in contact with the unit during storage. If storing
the TB-3/CS for an extended length of time, the TB-3/CS - TCM-1 flow path should be drained,
flushed with distilled water, and blown dry.
Specifications
Minimum Temperature:
0°C
Maximum Temperature:
50°C
Accuracy:
±0.1°C
Water Jacket Ports:
Delrin® barbed connectors
0.12” ID x 0.147” OD
Controller:
CL-100 Bipolar Temperature Controller
Physical Dimensions:
3.6 x 2.5 x 0.4 inch (L x W x D)
9.2 x 6.4 x 1.0 cm (L x W x D)
Cable Length:
2.5 m
Connector Type:
15 pin Male “D”
Weight:
150 g
Warranty:
1 year
Warner Instruments
10
TB-3/CS Manual, Rev 070423.1
Warranty and service
Warranty
The model TB-3/CS is covered by our Warranty to be free from defects in materials and
workmanship for a period of one year from the date of shipment. If a failure occurs within
this period, we will either repair or replace the faulty component(s). This warranty does not
cover failure or damage caused by physical abuse, lack of maintenance, or electrical stress
(inputs exceeding specified limits).
In the event that instrument repairs are necessary, shipping charges to the factory are
the customer's responsibility. Return charges will be paid by Warner Instruments.
Normal business hours are 8:30 AM to 5:30 PM (EST), Monday through Thursday and
8:30 AM to 5:00 PM on Friday. Our offices are located at 1125 Dixwell Avenue, Hamden,
CT 06514, and we can be reached by phone at (800) 599-4203 or (203) 776-0664. Our fax
number is (203) 776-1278.
In addition, we can be reached by e-mail at [email protected] or through the
web at http://www.warneronline.com.
Service notes
Please refer all questions regarding service to our Customer Service department.
A) Should service be required, please contact the factory. A problem can sometimes be
easily corrected by our shipping a replacement part. Factory service, if required will be
expedited to minimize the customer’s inconvenience.
B) Instruments are inspected immediately upon receipt and the customer is notified if the
repair is not covered by the warranty. Repairs can often be completed in 1-2 days from
our receipt of the instrument.
C) If factory service is required, please observe the following instructions:
1) Package the instrument with at least 2 inches of cushioning on all sides. Use the
original shipping carton if it is available.
2) Insure the shipment for its full value.
3) Include with the shipment an explanation of the problem experienced.
IMPORTANT: CUSTOMERS OUTSIDE OF THE U.S.
Please be sure to contact us before return shipping any goods. We will provide instructions so
that the shipment will not be delayed or subject to unnecessary expense in clearing U.S.
Customs.
Warner Instruments