1
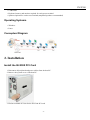
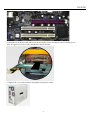
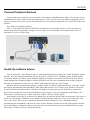
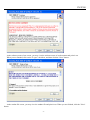
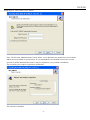
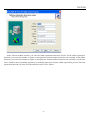
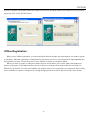
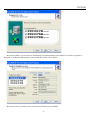
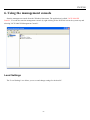
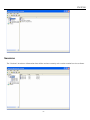
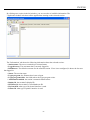
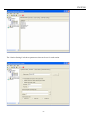
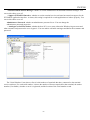
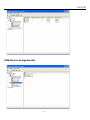
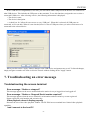
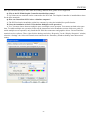
IN-X300
IN-X300 User Guide
Inctel co,.ltd would like to thank you for purchasing this product.
-1-
IN-X300
Table of Contents
1. Product Features ..................................................................................................................................................................... - 3 What is the access terminal kit?.......................................................................................................................................... - 3 What is the terminal services software?.............................................................................................................................. - 3 Features............................................................................................................................................................................... - 3 Minimum System Requirements......................................................................................................................................... - 3 Operating Systems .............................................................................................................................................................. - 4 Conceptual Diagram ........................................................................................................................................................... - 4 2. Installation .............................................................................................................................................................................. - 4 Install the IN-X300 PCI Card ............................................................................................................................................. - 4 Connect Peripheral Devices................................................................................................................................................ - 6 Install the software drivers.................................................................................................................................................. - 6 Install the terminal services software and register .............................................................................................................. - 7 3. Product Registration ............................................................................................................................................................. - 13 Online Registration ........................................................................................................................................................... - 16 Offline Registration .......................................................................................................................................................... - 18 4. Uninstallation........................................................................................................................................................................ - 21 5. Updating the Terminal Services Software ............................................................................................................................ - 21 6. Using the management console............................................................................................................................................. - 22 Local Settings ................................................................................................................................................................... - 22 Sessions............................................................................................................................................................................. - 23 Information & Settings ..................................................................................................................................................... - 26 USB-Device Assignment(s).............................................................................................................................................. - 30 7. Troubleshooting an error message ........................................................................................................................................ - 31 Troubleshooting the access terminal................................................................................................................................. - 31 Troubleshooting the host PC............................................................................................................................................. - 32 8. Glossary ................................................................................................................................................................................ - 32 9. FAQ ...................................................................................................................................................................................... - 33 -
-2-
IN-X300
1. Product Features
What is the access terminal kit?
The IN-X300 access terminal kit enables you to dramatically cut computing costs by sharing the untapped power
of PCs. The kit includes three access terminals, one PCI card, and terminal services software that work together to
efficiently harness excess computing capacity and enable multiple users to share a single PC. Best of all, IT staff and
end users do not need special training because this end-to-end solution is easy to manage and is compatible with
standard PC applications.
What is the terminal services software?
Note: This document uses the following terms interchangeably: "User software," "host INCTEL software,"
"terminal services software “and” NCX-2000-XP".
NCX-2000-XP, the terminal services software for the IN-X300, divides the host PC's resources into independent
sessions that give each user their own robust PC experience. One PC can support up to seven users.
Features
Cost effective
Save up to 70% on your computing costs versus buying a traditional desktop PC.
Minimal maintenance required
You only have to maintain and upgrade the host PC.
Simultaneous desktop operation
Each user can run their own applications.
Supports multiple resolutions
1024x768, 800x600, 16-bit color
Small, efficient and eco-friendly
With a small footprint and no moving parts, the IN-X300 runs completely silent and saves energy by using only
5 watts. Its design meets strict environmental guidelines and is ROHS compliant.
Minimum System Requirements
For one IN-X300 PCI card, a host PC with at least the following:
• A 1.3 GHz processor
• 512 MB RAM
• Keyboard, mouse, and monitor required for each access terminal
• Speakers optional for each access terminal (amplified speakers recommended)
For two IN-X300 PCI cards, a host PC with at least the following:
• A 2.4 GHz processor
-3-
IN-X300
• 1 GB RAM
• Keyboard, mouse, and monitor required for each access terminal
• Speakers optional for each access terminal (amplified speakers recommended)
Operating Systems
• Windows
• Linux
Conceptual Diagram
2. Installation
Install the IN-X300 PCI Card
1. Disconnect all peripheral and power cables from the host PC.
2. Remove the system cover of the host PC.
3. Find an available PCI slot for the IN-X300 PCI card.
-4-
IN-X300
4. Insert the IN-X300 PCI card and secure the end of the card to the chassis with a retaining screw.
Note: If required, you can use the included low profile bracket.
5. Replace the cover and reconnect all peripheral and power cables.
-5-
IN-X300
Connect Peripheral Devices
Connect each access terminal to a port on the PCI card using the included Ethernet cables. You can also use any
standard Ethernet cable. Do not exceed the length limit of 15 feet. Also, do not use any Ethernet equipment, such as
a hub or a switch, between the access terminal and the PCI card. Connect peripheral devices to each IN-X300 access
terminal.
Note: Please use amplified speakers.
Note: A LAN cable between the IN-X300 PCI card and the access terminal as long as 33 feet (10 meters) is
allowed if the cable is high quality. Category 6 (Cat6) cables are recommended. Lower quality cables can be a
maximum of 16 feet (5 meters) long.
Install the software drivers
Turn on the host PC. After Windows starts, it will automatically bring up a dialog box called “Hardware Update
Wizard.” Insert the Software Installation CD into the host PC's CD drive. The “Hardware Update Wizard” dialog
box will ask whether it is OK to contact Windows Update to find drivers for the IN-X300 PCI card. Note: Do not
install anything from Windows Update for the IN-X300 PCI card. The driver installation must be done using the
IN-X300 setup application. Select the “No, thanks” radio button and click the “Next” button.
Windows will now automatically bring up a window called, “Found New Hardware Wizard.” Select the “Install
the software automatically (Recommended)” radio button and click the “Next” button. Next, Windows will search
for an IN-X300 bus enumerator driver. Windows will display a message that says the IN-X300 bus enumerator
driver has been found and it has not passed Windows Logo testing to verify its compatibility with Windows XP.
Click on the “Continue Anyway” button. In the next window, click the “Finish” button.
Now Windows will bring up a similar set of dialog boxes as it did for the IN-X300 bus enumerator. This time it’s
for the IN-X300 graphics controller. In the “Hardware Update Wizard” dialog box, select “No, not this time” and
click on the “Next” button. In the “Found New Hardware Wizard” dialog box, select “Install the software
automatically (Recommended)” and click the “Next” button. Windows searches for the IN-X300 graphic controller
driver and brings up a dialog box that says the driver has been found and it has not passed Windows Logo testing.
Click on the “Continue Anyway” button and then the
-6-
IN-X300
“Finish” button in the next screen.
The previous paragraph’s process is repeated two more times.
Install the terminal services software and register
Go to "My Computer", open the CD drive's icon, and start the "Install.exe" application.
At the installation screen, click the "software" button.
Before the installation starts, the installation software attempts to connect to the Internet to compare the software
version on the CD with the latest software version on the host server. If there is a later version on the host server, a
prompt will appear to ask if you want to use the version on the CD or if you want to download the latest version and
use it.
Note: It is recommended to download the latest version and use it rather than use an older version on the CD.
At the "Welcome" screen, click the "Next" button.
-7-
IN-X300
At the antivirus and firewall warning screen, click the "Next" button.
At the software license screen, you may view the software license and print it out. When you are finished, click
on the "I agree" checkbox, and then click the "Next" button.
-8-
IN-X300
At the software terms of use screen, you may view the software terms of use document and print it out.
When you are finished, click on the "I agree" checkbox, and then click the "Next" button.
At the readme file screen, you may view the readme file and print it out. When you are finished, click the "Next"
button.
-9-
IN-X300
At the "Choose destination location" screen, you can install to the default location, or you can choose a different
location. When you are finished, click on the "Next" button.
At the "Choose Password for Administrator" screen, select whether or not to use an administrator password and
whether or not to install the Network Administration Console. If you choose to use an administrator password, enter
- 10 -
IN-X300
it and retype it. Click on the "Next" button.
Note: The Network Administration Console allows you to administer the terminal services software
and the access terminals in your network. It is recommended to be installed at least once on each
network to enable administration tasks. It may be installed on every software installation.
The next dialog box requires registration information.
The software is installed.
- 11 -
IN-X300
At the "Add new users" screen, select whether or not you would like to add new users to the system. If you click
on the "Yes" button, the installation program will launch a screen to administer user accounts on the host PC. If you
click the "No" button, the installation process will continue without bringing up the user administration screen.
Note: It is recommended that all users have their own user accounts to enable control of their own settings.
At the "NCX-2000-XP successfully installed" screen, select whether or not to restart the computer.
- 12 -
IN-X300
Note: It is required to reboot the computer before using the software or the access terminals connected to the host
PC.
3. Product Registration
When registering the terminal services software, all the access terminals must be connected to the host PC.
Product registration uses the Internet and enables downloading updates and technical support. Select "Product
Registration" in the Windows Start menu.
- 13 -
IN-X300
At any time during the registration process, you can click on the "Cancel" button and the process will be
cancelled at that point.
At any time during the process, you can use the "Back" button to return to previous screens in the registration
process to change your entries.
At the welcome screen, if you have password protection turned on, enter your password. Click the "Next" button.
At the "Collecting information" screen, if the data fields are not already populated, enter the registered user's
name, company, country, zip code, address, phone number, fax number, email address, and second address line (city
and state) (use “relevant information” instead). Each field must be entered in this window. When you are finished,
click on the "Next" button.
- 14 -
IN-X300
At the "Choose method" window, you can select what registration function to invoke. For the online registration
functions, you can select whether to register or unregister the software and associated access terminals. In the offline
functions, you can select whether to register or unregister the software and associated access terminals via a file that
can be emailed, cancel a pending registration, or manually input keys from the offline registration process. Select the
registration function you want to invoke and click on the "Next" button.
- 15 -
IN-X300
If you choose online registration, follow the instructions here. If you choose offline registration, skip ahead to
that section.
Online Registration
When you select to register or unregister online, the next screen allows you to select what serial numbers to
register or unregister. The window shows you a list of all access terminal serial numbers that are accessible via
Ethernet by the host PC. For each serial number, the window shows if it is registered or not registered. Select which
access terminals to register or unregister by clicking the appropriate check boxes and click on the "Next" button.
- 16 -
IN-X300
In the "Ready to register" screen, you see the user information you entered and the serial numbers you chose to
register or unregister. Confirm the information is correct and click on the "Next" button to complete the process.
In the "On-line Registration process" screen, you see the registration progress. Once the online registration
- 17 -
IN-X300
process is complete, the window shows the results of the process, including which serial numbers were successfully
registered. Click on the "Finish" button.
Offline Registration
When you use offline registration, you can email a data file that includes the serial numbers you want to register
or unregister. When the registration or unregistered is processed, you receive a key that must be input manually into
the registration screens. To start the process, select whether to register or unregister offline.
When you select to register or unregister online, the next screen allows you to select what serial numbers to
register or unregister. The window shows you a list of all access terminal serial numbers that are accessible via
Ethernet by the host PC. For each serial number, the window shows if it is registered or not registered. Select which
access terminals to register or unregister by clicking the appropriate check boxes and click on the "Next" button.
- 18 -
IN-X300
In the next window, you see the user information you entered and the serial numbers you chose to register or
unregister. Confirm the information is correct and click on the "Next" button.
In the next screen, you select where to place the file that must be emailed.
- 19 -
IN-X300
Once you create the file, you can copy it to another PC, if necessary. Email the file to
[email protected]. You will receive an email reply that includes an activation key for each serial number that
you selected to register or unregister.
When you receive the activation keys, start the registration program again and select "Key Input".
In the next window, you are given the ability to select a serial number that is pending offline registration or
unregistration and enter the corresponding activation key. When you have entered the key and selected the correct
serial number, click on the "Accept" button. Do this for each serial number.
When you are finished, click on the "Finish" button to complete the process.
- 20 -
IN-X300
To cancel an offline registration or unregistration that is already in progress, select the "Off line -Cancel
registration" radio button and click on the "Next" button.
The next window shows the serial numbers that are known by the host PC. Select the serial numbers for which to
cancel the registration or unregistration process and click on the "Next" button.
4. Uninstallation
To uninstall the software, select “Uninstall NCX-2000-XP” in the “Start” menu. Follow the prompts and the
programs are removed from the host PC. After the program is uninstalled, you must restart the host PC to complete
the process.
5. Updating the Terminal Services Software
Once you have successfully completed the registration process, you can update the terminal services program
directly over the Internet by selecting “NCX-2000-XP Internet Update” from the “Start” menu.
Note: If the “Enter Password” window appears, enter the administrator password.
Click the “Connect” button to check for a software update. If there is a new version available, click on the
“Download” button to start the update process. If there is no new version available, click the “Exit” button. When the
download is complete, the installation of the new version will begin.
- 21 -
IN-X300
6. Using the management console
Start the management console from the Windows Start menu. The application is called, "NCX-2000-XP
Console”. You can also start the management console by right-clicking on the IN-X300 icon in the system tray and
selecting "NCX-2000-XP Management Console".
Local Settings
The "Local Settings" tree allows you to see and change settings for the host PC.
- 22 -
IN-X300
Sessions
The "Sessions" item shows information about all the sessions currently active on the terminal services software.
- 23 -
IN-X300
By clicking on a session in the left window, you see two tabs of available information. The
"Application loaded" tab shows all the applications running on the selected session.
The "Information" tab shows the following information about the selected session:
• Station name: The access terminal's provisioned name.
• Logged in user: The username that is currently logged in.
• Default user: The default username for the terminal session. If one is not configured, it shows the last user
that logged in.
• Status: The session status.
• Logon program: the filename that is run at logon.
• Logon program folder: the folder where the logon program exists.
• AutoLaunch enabled: the station’s automatic launch status.
• Display Id: the terminal’s display ID.
• Hardware Id: the terminal’s virtual hardware ID.
• Keyboard Id: what type of keyboard interface is used.
• Pointer Id: what type of pointer interface is used.
- 24 -
IN-X300
The “Station Settings” tab shows parameters that can be set for each station.
- 25 -
IN-X300
Here is a description of each parameter that can be set in this window:
• Station name: The name of the station.
• Automatically turn station on when system starts: If this is turned off, the station will not start when the
system boots up. After this, if you want to start the station, you must turn this on.
• Enable “Shut Down” option without logging on to the station: If this is turned on, access terminal users see
the shut down options in the logon window. This means the host PC can be shut down without a valid user logon. If
this is turned off, the shut down options are not visible until the user logs on.
• Enable “Auto Logon” mode: When this is enabled and there is an entry in the “username” and “password”
fields, the specified username is automatically logged in when the station starts.
• Run this program only during Logon: When you select a program to run and the folder where it is located,
the program is started when there is a logon using the station.
• Initial keyboard state: These are where you can set how these settings should appear when the stations starts.
There are separate settings for Num-Lock, Caps-Lock and Scroll-Lock. In the toolbar, there is one button: “Stop
station”. When you select a station and click this button, a confirmation window asks if you want to stop the selected
station. It also reminds you to exit all programs and log off the station.
Information & Settings
- 26 -
IN-X300
The "Product Information" tree item shows information about the installed terminal services software, such as
product name, build date, version string and vendor information.”
- 27 -
IN-X300
The "User information" tree item shows the information entered during the registration process.
The "System Settings" tree item shows the following settings for the terminal services software.
Double-clicking on the name of the setting allows you to adjust it, unless it is read-only, which is specified
below.
• Maximum number of stations (incl. Host): the maximum number of sessions the terminal services software
is configured to support. This number includes the host PC. This setting is read-only.
• Current number of additional stations: the number of additional stations. This setting is read only.
• This machine: the name of the host PC. This setting is read-only.
• This user: the currently logged-in user’s username. This setting is read-only.
• System uptime: how long the system has been up. This setting is read-only.
• Start stations at boot?: whether or not the stations start when the host PC boots. You can set this either on or
off.
• Allow Shutdown/Reboot from stations: whether or not the stations are given the option to shutdown or
reboot the host PC. You can set this either on or off.
• IN-X300 card video mode settings: The video mode settings for the IN-X300 stations. You can set this to
either 800x600 or 1024x768.
• Allow only the last logged in user the shutdown of the system: whether or not it is required that there is one
and only one user logged on for the system to be shut down or rebooted. You can set this either on or off.
• Delay until shutdown (seconds): the default amount of time after a shutdown command is issued until the
shutdown occurs. You can set the number of seconds.
- 28 -
IN-X300
• Disable Send Broadcast Message: whether or not the administrator has disabled broadcast messages. You
can set this either on or off.
• Support WTSAPI32 Interface: whether or not the terminal services software has turned on support for the
WTSAPI32 application interface. At times, this setting is required for certain applications to behave properly. You
can set this either on or off.
Administrator Password: whether an administrator password is set. You can change the
administrator password properties.
• Autologon on the Host Station: whether the host PC is set to start without the Windows logon screen and
what username and password to use to bypass it. You can enable or disable autologon and define the username and
password.
The "Serial Numbers" item shows a list of serial numbers of terminals that have connected to the terminal
services software. For each serial number, it shows the number of licenses required for that terminal, the station
number (if available), whether or not it is registered, and the location of the serial number record.
- 29 -
IN-X300
USB-Device Assignment(s)
- 30 -
IN-X300
In the "USB-Device Assignment(s)" tree item, you can control what USB ports on the host PC are connected to
what USB devices. This includes the USB ports on the terminals. To use this function, navigate the tree to select a
connected USB device. After selecting a device, the following information is displayed:
• The device's name.
• The device's description.
• A check box for "Allow all users access to every USB port". When this is selected, all USB ports are
connected, as if in one hub. When it is not checked, there is a list of USB ports where you select which ones to be
connected to the selected device.
When you click on the "Apply" button, changes to the USB-Device assignments are saved. To discard changes,
simply navigate to another tree item or close the console without clicking on the "Apply" button.
7. Troubleshooting an error message
Troubleshooting the access terminal
Error message: “Station x. stopped!”
This message appears on the access terminal when the station is not yet logged in or has logged off.
Error message: “Station x. Stopped! Serial number required!”
This message appears when the access terminal’s serial number and activation key are not registered.
Please register the serial number and activation key.
Video playback doesn’t display properly
Decrease the size of the video playback window. The IN-X300 access terminals have limited video playback
capability.
I can’t connect to the host PC
- 31 -
IN-X300
Make sure the access terminal’s cable is connected to the host PC, the host PC is running and the access terminal
is registered. If the date of the system is changed to a date prior to when the software was installed, the access
terminals’ registration will show “Expired”. If this happens, correct the system date. You may have to restart the host
PC to connect.
Troubleshooting the host PC
Checking the IN-X300 PCI Card Driver has been installed correctly
Open the control panel and then open the “System” item. Select the “Hardware” tab and open the “Multifunction
adapters” item. You can check the installation status of the drivers here.
8. Glossary
Access terminal: a network computing terminal using IN-X300. It doesn't use
a CPU, VGA, or main chipsets. It only uses a programmable system on a chip and a PCI card to connect to the
Host PC.
Administrator: a person who is responsible for managing a multi-user computing environment, such as a local
area network (LAN). The responsibilities of the system administrator typically include: installing and configuring
system hardware and software; establishing and managing user accounts; upgrading software; and backup and
recovery tasks.
Download: the transmission of a file from one computer system to another.
Ethernet: the most widely-installed local area network (LAN) technology - specified in a standard, IEEE 802.3.
- 32 -
IN-X300
Firewall: a set of related programs that protect the resources of a private network from users on other networks
and control what outside resources its own users have access to. (The term also implies the security policy that is
used with the programs.)
Gateway: a network point that acts as an entrance to another network. On the Internet, a node or stopping point
can be either a gateway node or a host (end-point) node.
Host PC: a computer in which the terminal services software has been installed
Internet: a worldwide system of computer networks in which users at any one computer can, if they have
permission, get information from any other computer (and sometimes talk directly to users at other computers).
IP Address: the Internet Protocol (IP) is basically the set of rules for one network communicating with any other
(or occasionally, for broadcast messages, all other networks). Each network must know its own address on the
Internet and that of any other networks with which it communicates. To be part of the Internet, an organization needs
an Internet network number, which it can request from the Network Information Center (NIC). This unique network
number is included in any packet sent out of the network onto the Internet.
LAN: local area network (LAN) is a group of computers and associated devices that share a common
communications line or wireless link and typically share the resources of a single processor or server within a small
geographic area (for example, within an office building). Usually, the server has applications and data storage that
are shared in common by multiple computer users. A local area network may serve as few as two or three users (for
example, in a home network) or as many as thousands of users (for example, in an FDDI network).
Log on: in general computer usage, logon is the procedure used to get access to an operating system or
application. Almost always, a logon requires that the user have (1) a user ID and (2) a password. Often, the user ID
must conform to a limited length such as eight characters and the password must contain at least one digit and not
match a natural language word
User: one who uses a computer system, Users may need to identify themselves for the purposes of accounting,
security, logging and resource management. In order to identify oneself, a user has an account and a username.
USB: (Universal Serial Bus) is a standard designed to allow peripherals to be connected to a computer using a
standardized interface socket and to improve plug-and-play capabilities by allowing devices to be connected and
disconnected without rebooting the computer.
9. FAQ
Q: I can't download any updates. The “Download” button is grayed out and I can’t click on it.
A: Make sure that the product is registered (see “Product Registration” section).
Q: Why does a warning message appear when I install the terminal services software?
A: Windows XP SP2 provides a firewall that displays a security warning message when a new port is used (see
below). If you click the “Keep Blocking” button, you will not be able to find host servers. If you select the “Unlock”
button, the port will open unless you block it manually. If you select the “Ask Me Later” button, the port will open
temporarily and the security message will continue to appear when the port is accessed.
Q: What kind of games is supported?
A: Generally 2D games are supported at the moment. Casual games (Java and Flash), which can be played on the
Internet, are also supported. High performance 3D games, which require a high GPU (Graphic Processor Unit) and a
hardware accelerated function, are currently not supported. Other
games including single user games which require a CD for operation are not supported. A game, which is
designed to be used only on the same computer by checking the IP, is not supported. Windows itself checks out
- 33 -
IN-X300
those specifications and rejects more than one loading, and thus those games are not supported.
Q: Why is the IN-X300 Graphic Controller installed three times?
A: Up to three access terminals can be connected to the PCI Card. The Graphic Controller is installed three times
for the three terminals.
Q: How can I install the PCI Card to a slim line computer?
A: The PCI Card can be installed to a slim line computer by using the included low profile bracket.
W: Does the installation of the PCI Card allow multiple screen operation?
A: Yes. You must choose between multiple users or multiple screen operation. You cannot run both at the same
time. To enable multiple user operation, follow all the instructions in the installation section of this user guide. To
enable multiple screen operation, only install the IN-X300 bus enumerator and graphics drivers. Do not install the
terminal services software. Then, right-click the desktop and select “Properties.” In the “Display Properties” window,
select the “Settings” tab. Select an external screen and check the “Extend my Windows desktop onto this monitor”
setting.
- 34 -