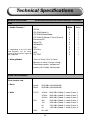
1
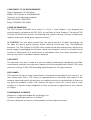
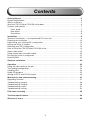
Manual
48/24/48B
Featuring
1.0.0
1
CONFORMITY TO CE REQUIREMENTS
Type of Equipment: CD-RW Writer
Model: TDK CyClone AI-CDRW482448B
Conforms to the following standards:
EMC: EN 55022, EMS 55024
Safety: EN 60950, IEC 60950
LASER INFORMATION
The TDK CyClone CD-R/RW writer, which is a “Class 1 Laser Product”, was designed and
manufactured in compliance with IEC 825-1 on the Safety of Laser Products. The internal TDK
CyClone CD-R/RW writer features the following laser caution marking: “Caution: Invisible laser
radiation when open. Avoid direct exposure to beam.”
☛ CAUTION: The laser beam emitted from the optical pickup is invisible. Accordingly: do
not open the optical pickup housing; obtain technical service only from TDK-authorised
personnel. The TDK CyClone CD-R/RW writer should only be disconnected from the electrical
power supply by unplugging the AC power cord of the computer in which it is installed. Use of
controls or adjustments to or performance of procedures other than those specified in this
manual may result in hazardous radiation exposure.
COPYRIGHT
This document may not, in whole or in part, be copied, photocopied, reproduced, translated,
transmitted or reduced to any electronic medium or machine-readable form without TDK's prior
consent in writing. © 2002 TDK Recording Media Europe S.A. All rights reserved.
DISCLAIMER
TDK reserves the right to make improvements in the products described in this manual at any
time without prior notice. TDK makes no representations or warranties with respect to the
contents hereof and specifically disclaims any implied warranties of mechantability or fitness for
any particular purpose. Further, TDK reserves the right to revise this manual and to make
changes in its content without obligation to notify any person or organisation of such revision
or change.
TRADEMARKS, LICENSES
Windows is a registered trademark of Microsoft, Inc.
Tyvek® is a registered trademark of DuPontTM.
All other trademarks or licenses are the property of their respective owners.
2
Contents
Getting Started . . . . . . . . . . . . . . . . . . . . . . .
System requirements . . . . . . . . . . . . . . . . . . .
What's in the box . . . . . . . . . . . . . . . . . . . . . .
What the TDK CyClone CD-R/RW writer does
Features and controls. . . . . . . . . . . . . . . . . . .
Front panel . . . . . . . . . . . . . . . . . . . . . . .
Rear panel . . . . . . . . . . . . . . . . . . . . . . . .
Precautions . . . . . . . . . . . . . . . . . . . . . . .
.
.
.
.
.
.
.
.
.
.
.
.
.
.
.
.
.
.
.
.
.
.
.
.
.
.
.
.
.
.
.
.
.
.
.
.
.
.
.
.
.
.
.
.
.
.
.
.
.
.
.
.
.
.
.
.
.
.
.
.
.
.
.
.
.
.
.
.
.
.
.
.
.
.
.
.
.
.
.
.
.
.
.
.
.
.
.
.
.
.
.
.
.
.
.
.
.
.
.
.
.
.
.
.
.
.
.
.
.
.
.
.
.
.
.
.
.
.
.
.
.
.
.
.
.
.
.
.
.
.
.
.
.
.
.
.
.
.
.
.
.
.
.
.
.
.
.
.
.
.
.
.
.
.
.
.
.
.
.
.
.
.
.
.
.
.
.
.
.
.
.
.
.
.
.
.
.
.
.
.
.
.
.
.
.
.
.
.
.
.
.
.
.
.
.
.
.
.
.
.
.
.
.
.
.
.
.
.
.
.
.
.
.
.
.
.
.
.
.
.
.
.
.
.
.
.
.
.
.
.
.
.
.
.
.
.
.
.
.
.
.
.
.
.
.
.
.
.
.
.
.
.
.
.
.
.
.
.
.
.
.
.
.
.
.
.
.
.
.
.
.
.
.
.
.
.
.
.
.
.
5
5
5
6
7
7
8
8
Installation . . . . . . . . . . . . . . . . . . . . . . . . . . . . . . . . . . . . . . . . . . . . . . . . . . . . . . . . . . . . . 9
Quickstart installation — for experienced PC users only . . . . . . . . . . . . . . . . . . . . . . . . . . . . 9
Preparing for installation. . . . . . . . . . . . . . . . . . . . . . . . . . . . . . . . . . . . . . . . . . . . . . . . . . . 10
Determining your existing IDE* configuration . . . . . . . . . . . . . . . . . . . . . . . . . . . . . . . . . . . 10
Setting the writer*’s jumpers . . . . . . . . . . . . . . . . . . . . . . . . . . . . . . . . . . . . . . . . . . . . . . . . 11
Selecting your IDE* configuration . . . . . . . . . . . . . . . . . . . . . . . . . . . . . . . . . . . . . . . . . . . . 13
How to install the TDK CyClone CD-R/RW writer . . . . . . . . . . . . . . . . . . . . . . . . . . . . . . . . 14
About cable select* . . . . . . . . . . . . . . . . . . . . . . . . . . . . . . . . . . . . . . . . . . . . . . . . . . . . . . 15
Using soundcards and audio cables . . . . . . . . . . . . . . . . . . . . . . . . . . . . . . . . . . . . . . . . . . 20
Ensuring the writer is recognised . . . . . . . . . . . . . . . . . . . . . . . . . . . . . . . . . . . . . . . . . . . . 21
Enabling DMA . . . . . . . . . . . . . . . . . . . . . . . . . . . . . . . . . . . . . . . . . . . . . . . . . . . . . . . . . . 22
Software installation. . . . . . . . . . . . . . . . . . . . . . . . . . . . . . . . . . . . . . . . . . . . . . . . . . . . . 23
Operation . . . . . . . . . . . . . . . . . . .
Using the right media for the job . .
Tray loading and operation . . . . . . .
Handling CDs . . . . . . . . . . . . . . . . .
Audio CD playback . . . . . . . . . . . .
Writing to CD-R and CD-RW media
.
.
.
.
.
.
.
.
.
.
.
.
.
.
.
.
.
.
.
.
.
.
.
.
.
.
.
.
.
.
.
.
.
.
.
.
.
.
.
.
.
.
.
.
.
.
.
.
.
.
.
.
.
.
.
.
.
.
.
.
.
.
.
.
.
.
.
.
.
.
.
.
.
.
.
.
.
.
.
.
.
.
.
.
.
.
.
.
.
.
.
.
.
.
.
.
.
.
.
.
.
.
.
.
.
.
.
.
.
.
.
.
.
.
.
.
.
.
.
.
.
.
.
.
.
.
.
.
.
.
.
.
.
.
.
.
.
.
.
.
.
.
.
.
.
.
.
.
.
.
.
.
.
.
.
.
.
.
.
.
.
.
.
.
.
.
.
.
.
.
.
.
.
.
.
.
.
.
.
.
.
.
.
.
.
.
.
.
.
.
.
.
.
.
.
.
.
.
.
.
.
.
.
.
.
.
.
.
.
.
.
.
.
.
.
.
.
.
.
.
.
.
.
.
.
.
.
.
.
.
.
.
.
.
.
.
.
.
.
.
.
.
.
.
.
.
.
.
.
.
.
.
23
23
24
24
25
26
Maintenance and troubleshooting .
Upgrading firmware*. . . . . . . . . . . . .
Troubleshooting: general . . . . . . . . .
Troubleshooting: reading . . . . . . . . .
Troubleshooting: audio . . . . . . . . . . .
Troubleshooting: writing . . . . . . . . . .
.
.
.
.
.
.
.
.
.
.
.
.
.
.
.
.
.
.
.
.
.
.
.
.
.
.
.
.
.
.
.
.
.
.
.
.
.
.
.
.
.
.
.
.
.
.
.
.
.
.
.
.
.
.
.
.
.
.
.
.
.
.
.
.
.
.
.
.
.
.
.
.
.
.
.
.
.
.
.
.
.
.
.
.
.
.
.
.
.
.
.
.
.
.
.
.
.
.
.
.
.
.
.
.
.
.
.
.
.
.
.
.
.
.
.
.
.
.
.
.
.
.
.
.
.
.
.
.
.
.
.
.
.
.
.
.
.
.
.
.
.
.
.
.
.
.
.
.
.
.
.
.
.
.
.
.
.
.
.
.
.
.
.
.
.
.
.
.
.
.
.
.
.
.
.
.
.
.
.
.
.
.
.
.
.
.
.
.
.
.
.
.
.
.
.
.
.
.
.
.
.
.
.
.
.
.
.
.
.
.
.
.
.
.
.
.
.
.
.
.
.
.
.
.
.
.
.
.
.
.
.
.
.
.
.
.
.
.
.
.
.
.
.
.
.
.
27
27
28
29
31
32
FAQ about recording . . . . . . . . . . . . . . . . . . . . . . . . . . . . . . . . . . . . . . . . . . . . . . . . . . . . 35
Technical specifications . . . . . . . . . . . . . . . . . . . . . . . . . . . . . . . . . . . . . . . . . . . . . . . . . . 36
Glossary of terms . . . . . . . . . . . . . . . . . . . . . . . . . . . . . . . . . . . . . . . . . . . . . . . . . . . . . . . 38
3
Congratulations!
Thank you for purchasing the TDK CyClone CD-R/RW writer, a reliable, high-performance CD
rewriter, recorder and reader. We appreciate the confidence you have shown in us. Our goal is
to put you – and keep you – at the leading edge of CD technology.
Your TDK CyClone CD-R/RW writer includes Buffer Underrun* Protection that ensures even
more reliable writing performance by preventing the problems associated with buffer
underruns*. As soon as recording starts, the internal CD-R/RW controller starts monitoring
buffer status. Should the controller detect an imminent buffer underrun*, recording is
suspended at the respective location. The writer remains in suspended mode until the host*
device has replenished the data buffer, after which recording is resumed at the end of the
previously recorded section.
Your TDK CyClone CD-R/RW writer is equipped with Continuous Recording Speed Control
(CRSC) technology. CRSC continuously monitors the condition of the recording area over the
whole disc to determine the highest possible recording speed. Your TDK CyClone writer may
adjust the recording speed if the disc characteristics cannot support the user-selected speed.
CRSC ensures optimum recording quality at the highest recording speed.
About this manual
This manual is designed to assist you in installing and using your internal TDK CyClone
CD-R/RW writer. Please read this manual carefully and keep it handy for easy reference.
Use the manual as an installation, operation and troubleshooting guide. You should find it
contains all the information you need to successfully install, operate and troubleshoot your
writer. Technical terms marked with an asterisk are explained in the “Glossary of Terms”.
However, please contact our technical support engineers if you run into an unsolvable problem.
(See “Technical Support” manual for details of how to contact us).
Registration
You can register your TDK CyClone CD-R/RW writer online at www.tdk-europe.com/support.
Among the benefits of online registration is our automated e-mail alert whenever new firmware
releases or updates of your burning software will be available for download.
4
Getting Started
System requirements
To ensure the correct operation of the TDK CyClone CD-R/RW writer, your computer must meet
the following minimum requirements:
•
IBM/AT-compatible, 200 MHz Pentium processor or higher,
•
at least 64 MB main memory*,
•
a vacant 5.25” drive bay,
•
operating system: Windows 95/98/98SE/Me/2000/XP Windows NT 4.0 or higher
•
one free E-IDE* (ATAPI*) interface* connector (to be found inside the computer),
•
200 MB available hard drive space
•
soundcard*.
What’s in the box
Please check the box containing your TDK CyClone CD-R/RW writer contains the following
parts before you start installing the writer*:
•
TDK CyClone CD-R/RW writer,
•
4 mounting screws,
•
audio cable, IDE* cable,
•
emergency eject tool (resembles a straightened paper clip),
•
1 TDK blank CD-RW High Speed, 1 TDK blank CD-R,
•
Nero Express, InCD and TDK Digital MixMaster software,
•
TDK CyClone CD-R/RW Technical Support manual,
•
Software manual (PDF file on disc) and Quick install poster,
•
CD-R pen.
☛ NOTE: SAVE YOUR BOX! Be sure to save the box after you have installed your TDK
CyClone CD-R/RW writer. Both the box and the packaging material used were designed and
drop-tested to ensure that your TDK CyClone CD-R/RW writer can endure rough treatment and
still arrive in working order. If you ever need to return your writer to TDK, the original box forms
the best possible packaging. TDK cannot assume liability for any damage your writer sustains
during shipment. Therefore, please ship your writer in the safest manner possible.
5
What the TDK CyClone CD-R/RW writer does
The TDK CyClone CD-R/RW writer provides professional-quality CD writing, rewriting and
reading performance.
The TDK CyClone CD-R/RW writer writes to CD-R (recordable CD) media at up to 48x speed,
or to CD-RW (rewritable CD) media at up to 24x speed. It reads all CD-ROM media at a
maximum of 48x speed.
Reliable writing performance is ensured thanks to unique circuitry that enables the TDK
CyClone CD-R/RW writer to automatically detect the type of media being recorded and react
with the optimum laser power and length of burn. Furthermore, the TDK CyClone CD-R/RW
writer’s IDE interface* supports the ATAPI-4* command set*, including special CD-R
commands.
☛ NOTE: While most new CD-ROM drives can read CD-RW discs, this is not always the case
with older drives.
The TDK CyClone CD-R/RW writer is fully MMC2-compliant* and supports writing features such
as Disc-at-Once*, Track-at-Once* and Session-at-Once* as well as variable and fixed packet
writing*. The writer also supports the UDF* writable file system used for packet writing*.
The TDK CyClone CD-R/RW writer supports running OPC* and is compatible with Windows
plug-and-play. Flash* memory permits the TDK CyClone CD-R/RW writer to be upgraded to the
latest firmware* revision (available from the TDK website at www.tdk-europe.com/support)
without having to open the writer*. In addition, TDK backs the TDK CyClone CD-R/RW writer
with a two-year limited warranty on parts and labour and provides a freephone Technical
Support in the countries specified in the “Technical Support” manual.
WHAT YOU CAN DO WITH THE TDK CYCLONE CD-R/RW WRITER
Here are just a few examples of what you can all do with your TDK CyClone CD-R/RW writer:
•
record audio files onto writable or rewritable CD media,
•
play audio CDs and read CD-ROMs,
•
periodically back up your computer's hard disk* data files,
•
save photos, videos and other images on writable or rewritable CD media,
•
publish your own databases, catalogues and promotional material on inexpensive CD-R
discs for distribution to customers and colleagues,
•
master new software programs on CD.
6
Features and controls
Before proceeding to install the writer*, you should first familiarise yourself with the controls
and features of your TDK CyClone CD-R/RW writer.
Figure 1: Front panel of the TDK CyClone CD-R/RW writer 48/24/48B
24/10/40B
48/24/48B
1
2 3 4
5
6
1. Headphone jack—stereo mini-jack for headphones and powered speakers.
2. Volume control—controls headphone jack volume.
3. Emergency eject hole—insert emergency eject tool, straightened paper clip or other thin,
rigid object to eject the tray if the automatic eject button fails to work.
☛ CAUTION: THE POWER SUPPLY TO THE COMPUTER MUST BE SWITCHED OFF
BEFORE USING THIS FEATURE.
4. Busy/Write/Rewrite indicator —Indicates drive's operation status. Green light stands for
Busy (playing). Red light stands for Write/Rewrite. Orange light is lit when Buffer Underrun
Protection is activated.
5. Tray front door—attached to tray drawer.
6. Eject button—push to eject tray.
7
Figure 2: Rear panel of the internal TDK CyClone CD-R/RW writer 48/24/48B
1
2
4
3
5
1. Digital Audio connector: the audio digital signal output* connector.
2. Analog Audio connector: produces an analogue stereo signal; use to connect to soundcard*
or audio amplifier with standard MPC-3* type, 4-pin connector.
3. Jumpers*: use to select drive operation as an IDE master* or slave* or in cable select* mode
(also see “Setting the writer’s jumpers” for details on how to change the jumpers’ factory
settings should this prove necessary).
4. IDE* interface* connector: connects to IDE* interface* using a 40-pin IDE* flat-ribbon cable.
5. Power connector: connects to a free power supply cable inside your computer to provide
the TDK CyClone CD-R/RW writer with DC +5V and +12V.
PRECAUTIONS
Like the rest of your computer system, your TDK CyClone CD-R/RW writer requires reasonable
care in its installation and use.
YOU ARE ADVISED TO OBSERVE THE FOLLOWING GUIDELINES:
•
Keep the area around your writer free of dust, smoke and other contaminants.
•
Never allow moisture or liquids, including water or cleaning fluids, to come into contact with
the writer. Thinners, lighter fuel or alcohol-based solvents can mar the surface of your writer.
•
Never drop or jolt the writer.
•
Never attempt to open the writer and service it yourself. Dismantling the writer may expose
you to harmful electrical voltages or to laser radiation and will invalidate your warranty. For
your safety, technical servicing should only be performed by TDK-authorised service
personnel
•
Keep your CD-ROM discs free of dirt or other contaminants by storing them in jewel cases.
Use only industry-standard discs. Never insert dirty, warped, poorly balanced or cracked
discs into the writer.
•
Never clean discs using a circular motion! Instead, use a radial motion: start at the centre
of the disc and work outwards using a clean, soft cotton cloth.
8
Installation
This section explains how to physically install your TDK CyClone CD-R/RW writer in your
computer. You will need to complete the following steps:
•
Turn OFF your computer system.
•
Set the jumpers on your new TDK CyClone CD-R/RW writer.
•
Mount the TDK CyClone CD-R/RW writer into an available drive bay inside the computer
system.
•
Make all necessary cabling connections: IDE*, power and audio cables.
•
Turn ON your computer system.
You will find further details on how to complete these various steps on the following pages.
If you have installed internal computer peripherals before, refer to the “Quickstart Installation”
section immediately below.
Quickstart installation
FOR EXPERIENCED PC USERS ONLY!
This “quickstart” installation is designed to get you up and running quickly. Always turn off and
unplug your PC before you start.
Typical scenario 1: your PC features an IDE* interface* with a free secondary IDE* port* and
runs with Windows 95/98/98SE/Me/2000/XP/NT 4.0 or higher.
What to do: leave the TDK CyClone CD-R/RW writer’s factory jumper setting as master*,
connect the writer to the secondary IDE* port*. Then close and reboot your computer. Windows
will recognise the new writer automatically.
Typical scenario 2: your PC features an IDE* interface* with a CD-ROM connected to the
secondary IDE* port* and runs with Windows 95/98/98SE/Me/2000/XP/NT 4.0 or higher.
What to do: change the CD-ROM’s jumper setting to slave*, leave the TDK CyClone
CD-R/RW writer’s factory jumper setting as master*, connect the TDK CyClone CD-R/RW writer
to the secondary IDE* port*. Then close and reboot your computer. Windows will recognise the
new writer automatically.
If neither of these situations applies to you or you are unused to IDE* installations, you should
read the rest of this section for more detailed installation instructions.
9
Preparing for the installation
To determine whether your TDK CyClone CD-R/RW writer will be a master* or a slave*, you will
need to open your computer and examine the IDE* connections to the motherboard*. Before
proceeding, make sure the POWER to your computer and any external peripherals are OFF and
your computer is UNPLUGGED from its power source.
•
Remove the cover of your computer as instructed in the manufacturer’s manual. Typically,
this will involve loosening or removing several screws on the back panel of your computer
and sliding off the cover as shown in Fig. 3 below.
•
Discharge the static electricity from your computer and any other peripheral equipment by
touching the housing of the respective device.
Figure 3: Removing the cover of a typical computer
Determining your existing IDE configuration
A computer is usually equipped with a primary and a secondary IDE* (ATAPI*) interface*
connector. A maximum of two internal IDE* devices can be connected to each of these connectors (e.g. a hard disk* and a CD-ROM drive). In total, therefore, a maximum of four IDE*
devices can be connected to the computer. As a rule, the computer’s hard disk* drive will be
connected to the primary and a CD-ROM drive to the secondary IDE* connector. Please consult
your computer’s manual or the motherboard* handbook to locate and identify these connectors
in your computer.
10
The drives connected to each of these IDE* connectors must be correctly configured for the
computer to operate properly. This is achieved by ensuring the appropriate MASTER*/SLAVE*
(jumper) setting on each device. For instance, your computer’s hard disk* drive will usually be
connected to the primary IDE* connector with a MASTER* setting. A second device connected
to the same IDE* connector should be set to SLAVE*. However, you are strongly recommended
to connect your TDK CyClone CD-R/RW writer to the secondary IDE* connector with a
MASTER* setting. Should you wish to connect a second device (e.g. a CD-ROM or a further
hard disk* drive) to the same connector, the device should be set to SLAVE*.
You will need to open your computer (refer to previous page for further details) to determine its
existing IDE* configuration (also see “How to install your TDK CyClone CD-R/RW writer”, for
further orientation). You will need to identify which device(s) the 40-pin IDE* ribbon cable(s) is
connected to and, if more than one device is connected, in which capacity (i.e. as master* or
slave*).
One end of an IDE* cable is connected to a port* on the computer’s motherboard*; and the
other end is connected to one or two internal peripheral devices (such as a hard disk* or
CD-ROM drive). If there are two devices, one is considered the master* and the other the slave*.
If there are two 40-pin IDE* ribbon cables and thus two IDE* ports, one is for the primary IDE*
data bus* and the other for the secondary IDE* data bus*.
One of the following IDE* configurations will normally apply to a typical computer:
•
Two hard disks* connected to the primary IDE* port* as master* and slave* devices;
CD-ROM drive connected to the secondary IDE* port* as the master* device.
•
hard disk* connected to the primary IDE* port* as the master* device and CD-ROM drive
connected as the slave*; nothing connected to the secondary IDE* port*.
•
hard disk* connected to the primary IDE* port* as the master* device; nothing connected
to the secondary IDE* port*.
Setting the writer’s jumpers
The jumper block at the rear of the writer determines its MASTER* or SLAVE* setting. You can
change this setting if required by repositioning the jumper in the jumper block.
The TDK CyClone CD-R/RW writer is delivered with its jumper set to MASTER*. This will work
with most commonly found PC configurations.
11
CHANGING THE JUMPER ON YOUR INTERNAL TDK CyClone CD-R/RW writer
As shown in Figure 4, the TDK CyClone CD-R/RW writer arrives from the factory with its jumper
set to MASTER*. (A setting is enabled if the jumper is installed on a pair of jumper pins and
disabled if the jumper is removed.)
Figure 4: Factory jumper settings at the rear of the writer
CS
SL
MA
Jumper settings for MASTER*, SLAVE* or CABLE SELECT* mode: The writer’s MASTER*,
SLAVE* or CABLE SELECT* setting is determined by the position of the jumper. To change the
setting from MASTER* to SLAVE* or CABLE SELECT*, you must reposition the jumper. For
example, changing the TDK CyClone CD-R/RW writer to a SLAVE* setting entails repositioning
the jumper to cover the middle set of pins, leaving the other pins uncovered. Resetting the writer
to CABLE SELECT* involves moving the jumper to cover the left set of pins.
CABLE SELECT* IDE* configuration: For best results when using CABLE SELECT* mode, the
TDK CyClone CD-R/RW writer should be connected to the cable select* IDE* cable in the
MASTER* position.
Changing jumper settings: To remove a jumper, gently pull it off with your fingers or a pair of
needle-nose pliers. To install a jumper, gently push it onto the jumper pins (see Fig. 5 below).
Figure 5: Installing jumpers across vertical pairs of pins
NEVER install
jumpers horizontally.
ALWAYS install
jumpers vertically.
Jumper
12
☛ CAUTION: Ensure power to the writer is OFF before repositioning jumpers.
☛ CAUTION: The jumper must be positioned across a set of pins as shown (vertically).
Never connect a horizontal pair of pins (i.e. crosswise) as this could damage the writer.
Selecting your IDE configuration
The writer’s jumper setting should reflect the desired IDE* configuration as shown in this table
and the diagrams on the following page.
IDE* set-up prior to TDK CyClone
CD-R/RW writer installation
How to install the TDK CyClone
CD-R/RW writer
hard disk*s connected to the primary
IDE* port* as MASTER* and SLAVE*
devices; CD-ROM connected to the
secondary IDE* port as the MASTER*
device.
Connect the TDK CyClone CD-R/RW
writer to the secondary IDE* port* as the
MASTER* device. Disconnect the CDROM drive, change its jumper setting to
SLAVE*, and reconnect it to the
secondary IDE* port*.
☛ NOTE: This configuration makes it
very difficult to write from the CD-ROM
to the TDK CyClone CD-R/RW writer
using “on-the-fly”* copying. The image
writing method should instead be used
for best results.
B
hard disk* connected to the primary IDE*
port as the MASTER* device and CDROM connected as the SLAVE*; nothing
connected to the secondary IDE* port*.
Connect the TDK CyClone CD-R/RW
writer to the secondary IDE* port* as the
MASTER* device.
C
hard disk* connected to the primary IDE*
port* as the MASTER* device; nothing
connected to the secondary IDE* port*.
Connect the TDK CyClone CD-R/RW
writer to the secondary IDE* port* as the
MASTER* device.
A
☛ NOTE: For best performance, the IDE* port* used to connect the TDK CyClone
CD-R/RW writer should ideally be connected to neither the hard disk* drive nor to a CD-ROM
drive. In most cases, the TDK CyClone CD-R/RW writer should be connected to the free
secondary IDE* port as the MASTER* device.
☛ NOTE: You are strongly advised to install the TDK CyClone CD-R/RW writer with a MASTER*
device jumper setting. DMA (Direct Memory Access) must be enabled on your computer system
to achieve 40x CD-R writing speed (also see “Enabling DMA (Direct Memory Access)” for
further details).
13
How to install the TDK CyClone CD-R/RW writer
Figure 6: How to install the TDK CyClone CD-R/RW writer.
A
connected as master
connected as slave
HARD DISK
HARD DISK
Primary
IDE port
connect TDK CyClone
CD-R/RW writer as master
connect as slave
CD-ROM
TDK CyClone
CD-R/RW writer’s
correct jumper setting:
CS
SL
MA
Secondary
IDE port
B
connected as master
connected as slave
HARD DISK
HARD DISK
Primary
IDE port
connect TDK CyClone
CD-R/RW writer as master
TDK CyClone
CD-R/RW writer’s
correct jumper setting:
CS
Secondary
IDE port
14
SL
MA
C
connected as master
HARD DISK
Primary
IDE port
connect TDK CyClone
CD-R/RW writer as master
TDK CyClone
CD-R/RW writer’s
correct jumper setting:
CS
SL
MA
Secondary
IDE port
You should double-check the TDK CyClone CD-R/RW writer’s jumper setting corresponds
to your computer’s existing IDE* configuration.
Record the serial number:
Record your writer’s serial number on the inside front cover of this manual.
Mount the TDK CyClone CD-R/RW writer in the computer:
You can mount your internal TDK CyClone CD-R/RW writer in any vacant 5.25” bay. You
will first need to remove the small panel that covers the bay you want to use.
position. TDK cannot guarantee the writer’s performance if installed in a vertical position.
About Cable Select
By setting the writer’s jumper to cable select mode, the TDK CyClone CD-R/RW writer uses the
CABLE SELECT* signal from the IDE* interface* for configuration purposes. This signal enables
the TDK CyClone CD-R/RW writer to automatically select the correct MASTER*/SLAVE* setting.
This feature can only be used with:
•
a computer that supports CABLE SELECT*;
•
a special CABLE SELECT* IDE* cable.
15
Português
☛ NOTE: Your TDK CyClone CD-R/RW writer was designed for installation in a horizontal
Figure 7: Jumper setting for CS-supported TDK CyClone CD-R/RW writer configuration.
CS
SL
MA
TDK CyClone CD-R/RW writer’s
correct CABLE SELECT*
jumper setting for
CS-supported writer
configuration.
If your computer lacks an empty drive* bay, remove the existing IDE* CD-ROM drive and install
the TDK CyClone CD-R/RW writer in its place.
You will need to make a minimum of two cable connections to install your TDK CyClone
CD-R/RW writer:
•
•
the IDE* cable and
the power cable
A third cable connection will need to be made if your computer features a soundcard* and you
plan to connect the TDK CyClone CD-R/RW writer’s audio output to the soundcard’s* audio
connector for audio playback using non-TDK software.
Do you need another IDE* flat-ribbon cable?
The IDE* cable is a standard 40-pin flat-ribbon cable, along the length of which there are usually
three connectors. One end connects to the IDE* port* on your computer’s motherboard* and
the other two connectors are free for attaching internal peripherals such as a hard disk* or CDROM drive. If you need another IDE* ribbon cable, you can use the extra IDE* cable supplied
with your TDK CyClone CD-R/RW writer.
Figure 8: Internal IDE* 40-pin ribbon cable
To PIN #1
16
☛ NOTE: Avoid stringing too many IDE* cables together. IDE* cables must not exceed 45 cm
in length.
Do you need a power cable?
Most computers provide spare internal power connectors. When you open the computer, check
the cable running from the hard disk* to the computer’s internal power supply and see
if there are any spare connectors. If so, you can plug one of these into the power socket at the
rear of the TDK CyClone CD-R/RW writer.
If you do not find any additional connectors (either because they were not supplied or are all in
use), you will have to buy a “splitter” or a “Y-connector”. These are commonly available from
most retail and mail-order computer stores.
MOUNTING THE TDK CyClone CD-R/RW Writer
1. Power down your system and disconnect your computer and any external peripherals from
their power source.
2. Remove the cover of your computer as instructed in the manufacturer’s manual if you have
not already done so. This will typically involve loosening or removing several screws on the
back panel of your computer and sliding off the cover (also see Fig. 3).
3. Discharge the static electricity from your computer and any other peripheral equipment
by touching the housing of the respective device.
4. Remove the cover from the bay that will hold the TDK CyClone CD-R/RW writer. You will
usually only have to apply moderate pressure to the cover (from inside the computer) to pop
it out. However, some older computers use screws to hold the cover in place.
Figure 9: Removing the bay cover
Available bay with
cover panel removed
17
5. Check whether you need to attach mounting rails to the sides of your writer by sliding the
drive into the open bay. If the drive fits tightly with little or no clearance on either side, you
will not have to use mounting rails. You can then proceed to mount the drive directly in
your computer. Go to step 7.
☛ NOTE: TDK does not provide mounting rails. If required, mounting rails can be
obtained from the computer manufacturer or from retail or mail-order computer stores.
6. If mounting rails are needed, these will normally be attached to the lower pair of holes
shown in Figure 10. (In some cases, though, the rails may need to be attached to the upper
set of holes.) Check the attached rails are in the correct position by test-sliding
the writer into the bay before attempting to complete the installation.
Figure 10: Attaching mounting rails (if required)
Be sure not to mistake the
inner and outer face of the
rail when attaching.
Typically, the smooth side of
the rail faces away from the
writer’s casing.
☛ NOTE: Do not attach the mounting rails to your writer using screws other than those
supplied by the rail manufacturer. You may damage the writer if you insert screws that are
too long.
7. Plug a free connector along the IDE* cable into the IDE* connector at the rear of the drive
before you insert the drive into your computer. Then thread the cable through the front
of the open bay and back towards the motherboard*. The drive should slide smoothly into
the bay. If it does not, check for obstructions in the bay and ensure the mounting rails (if
needed) are attached properly.
8. If not already connected, attach one end of the IDE* ribbon cable to the connector on the
motherboard*.
18
Figure 11: Connecting the 40-pin IDE* flat-ribbon cable
PIN #1 (coloured wire)
Ensure one cable connector is
attached to the TDK CyClone
CD-R/RW writer and another is
attached to the motherboard*.
Maximum cable length: 45 cm
☛ NOTE: Ensure your IDE* ribbon connector is the right way up before plugging it into
either your drive or the motherboard*. This can be quite tricky with “unkeyed” connectors.
“Keyed” connectors, however, feature a “key” – marked by a coloured stripe – that fits into
a slot situated at the centre of the IDE* connector of the motherboard*, the TDK CyClone
CD-R/RW writer and any other internal IDE* peripherals. The coloured stripe along one side
of the IDE* cable must match Pin 1 on the motherboard* and Pin 1 on the drive. (Pin 1 on
the drive is closest to the power connector.)
9. Double-check your work. You must ensure the side of the IDE* cable bearing the coloured
stripe is matched to Pin 1 on the motherboard* and on the drive.
Figure 12: Power and IDE* connections for the internal TDK CyClone CD-R/RW writer
Internal TDK CyClone CD-R/RW writer
CD-ROM audio
connector to PC’s
Power cable
AUX in
CD in
IDE ribbon cable
Power supply
19
10. Connect an internal power cable to the TDK CyClone CD-R/RW writer’s DC INPUT
connector. Most computers provide spare internal power connectors.
Check the cable running from the hard disk* to the computer’s internal power supply and
see if there are any spare connectors. If so, you can plug one of these into the power socket
at the rear of the TDK CyClone CD-R/RW writer.
11. Connect the audio cable if you want to use a soundcard* in your system with non-TDK audio
playback software. This cable runs from the four-pin audio output* connector at the rear of
your TDK CyClone CD-R/RW writer to your soundcard*. Also see “Using soundcards and
audio cables” on for more information.
12. Mount the TDK CyClone CD-R/RW writer in the computer using only the four screws
supplied with your drive.
☛ NOTE: Do not mount the drive in your computer using screws other than those supplied
by TDK. You may damage the drive if you insert screws that are too long.
Using soundcards and audio cables
The manual belonging to your soundcard* will provide the best information regarding its
installation. Once you have successfully installed the soundcard* in your computer, please see
the table below for details of the cable connections that need to be made.
Audio connection
Cable required
How to connect
MPC* audio source
MPC*-compliant audio cable
Connect one cable end to
MPC* audio source and the
other to the audio output*
connector at the rear of the
TDK CyClone CD-R/RW
writer.
Sound Blaster or
compatible soundcard*
Sound Blaster-compatible
audio cable
Connect one cable end to
the Sound Blastercompatible soundcard* and
the other to the audio
output* connector at the rear
of the TDK CyClone CDR/RW writer.
20
Ensuring the writer is recognised
After installation, check that the TDK CyClone CD-R/RW writer and any other internal IDE*
peripherals are recognised by your computer by following the instructions below:
ON A PC WITH WINDOWS 95/98/98SE/Me/XP:
1. Turn the computer ON. After the computer boots up, you should see the Windows display.
2. Open Windows Explorer and ensure there are icons for the TDK CyClone CD-R/RW writer,
the hard disk* and any other installed CD-ROM drives or other internal peripherals. The TDK
CyClone CD-R/RW writer will usually be designated as drive D: or E:, whichever is
appropriate.
3. If the TDK CyClone CD-R/RW writer is not recognised by Windows, you first will need to
reboot the computer and then use your computer’s setup program to program the BIOS* to
recognise the new drive.
☛ WARNING: INEXPERIENCED PC USERS ARE STRONGLY ADVISED TO SEEK EXPERT
ASSISTANCE FOR ANY BIOS* LEVEL PROGRAMMING THAT MAY BE NECESSARY.
☛ NOTE: Refer to your Windows handbook for information on how to run the setup
program.
Use the setup program to set up IDE* master* and slave* designations as needed for your
configuration. If a master* or slave* is set to “disable” or “none” (or a similar designation)
change it as appropriate to “enable” or “auto” (or a similar designation depending on your
setup program).
4. Save and exit your CMOS* setup to restart your computer with the new settings.
5. In Windows, click the Start button, then Settings, then Control Panel, then System, then
Device Manager.
6. Click the “+” sign next to the CD-ROM icon and view the TDK CDRW482448B writer entry
beneath the CD-ROM icon.
7. If the TDK CDRW482448B writer icon does not appear or if it is marked with a yellow
diamond plus an exclamation mark (!), you will need to contact your PC or motherboard*
manufacturer to obtain an appropriate IDE* controller driver.
21
ON A PC WITH WINDOWS NT/2000:
1. Turn the computer ON. After the computer boots up, you should see the Windows display.
2. Open Windows Explorer and ensure there are icons for the TDK CyClone CD-R/RW writer,
the hard disk* and any other installed CD-ROM drives or other internal peripherals. The TDK
CyClone CD-R/RW writer will usually be designated as writer D: or E:, whichever is
appropriate.
3. If the TDK CyClone CD-R/RW writer is not recognised by Windows NT/2000, you first will
need to reboot the computer and then use your computer’s setup program to program the
BIOS* to recognise the new writer. You will need to reboot your computer when you have
finished.
☛ WARNING: INEXPERIENCED PC USERS ARE STRONGLY ADVISED TO SEEK
EXPERT ASSISTANCE FOR ANY BIOS* LEVEL PROGRAMMING THAT MAY BE
NECESSARY.
☛ NOTE: Refer to your Windows NT/2000 handbook for information on how to run the
setup program.
Use the setup program to set up IDE* master* and slave* designations as needed for your
configuration. If a master* or slave* is set to “disable” or “none” (or a similar designation)
change it as appropriate to “enable” or “auto” (or a similar designation depending on your
setup program).
4. Reboot your computer to activate the changes.
Enabling DMA
(Direct Memory Access)
The DMA setting must be enabled for the TDK CyClone CD-R/RW writer in order to achieve top
reading and writing speeds. The instructions below will help you enable DMA:
•
Click the Windows Start button, then Settings, then Control Panel, then double-click the
System icon, then select the Device Manager tab. You will see a list of devices in your
system.
22
•
Double-click the CD-ROM icon and select TDK CDRW482448B with a single click. Then,
click on the Properties button and select the Settings tab. You will now see the properties
for the TDK CyClone CD-R/RW writer.
•
Ensure the DMA box is checked ON (i.e. is enabled), then click OK.
•
Close the System Properties window by clicking the Close button.
•
When prompted, reboot your system.
Software Installation
Before you can start making full use of your TDK CyClone CD-R/RW writer, you will first need
to install TDK’s unique software suite from the CD-ROM delivered with the writer.
If you encounter any problems, please first refer to the software manual for immediate
assistance. The software manual is available on the software disc, in .pdf format. Adobe
Acrobat Reader is also available on this disc. However, TDK’s Technical Support will be able to
help you with any persistent problems.
Operation
This section explains how to use your TDK CyClone CD-R/RW writer as well as how to load,
handle and look after your CDs.
Using the right media for the job
Make sure you use the right media for the job you want to complete! Your TDK CyClone
CD-R/RW writer supports the following disc types:
•
CD-ROM for immediate playback of audio CDs or reading of pre-recorded data discs,
•
CD-R recordable discs for write-once recording and subsequent reading,
•
CD-RW rewritable discs for recording, re-recording (up to 1,000 times) and subsequent
reading.
23
☛ NOTE: Firmware* upgrades for your TDK CyClone CD-R/RW writer are available as
downloads from the TDK website. Please check the web site at www.tdk-europe.com/support.
Tray loading and operation
OPERATING THE WRITER’S CD TRAY (WITH THE POWER ON):
1. Push the Eject button on the front panel to slide out the tray drawer (takes 2 – 3 seconds).
2. Place a CD in the depression in the tray, label side up; the CD should lie flat in the tray, press
the Eject button again to slide the tray shut (takes 2 – 3 seconds).
☛ NOTE: Always use the Eject button to close the tray. Closing the tray manually by pressing
the front of the drawer is not recommended and risks damage to or premature wearing of the
mechanism.
Figure 13: Loading the tray
Handling CDs
Handle all CD media, especially blank CD-R and CD-RW discs, with care. Dust, scratches and
even fingerprints on the data (i.e. shiny) side of the disc can cause read and write errors. Discs
should be picked up with your fingertips at the outer edge only or by inserting a one finger into
the centre hole and one along the outer edge for balance. Newly created discs (CD-R or CDRW) should be labelled on the non-recorded side using an indelible, soft felt-tip pen (special
CD-R/-RW labelling pens are also available from computer supply stores).
24
☛ NOTE: It is inadvisable to affix self-sticking labels to CD-R/-RW/-ROM discs. The weight
of the label may unbalance the disc and cause read/write errors. If you want to enter information
on the label side of the disc, please use the TDK CD-R pen.
CLEANING DISC
•
All CD media must be clean for proper read and write performance. Trying to record
on a dirty disc may result in a failed session and ruin the disc.
•
Discs should be cleaned with a clean, soft cotton cloth using a radial motion from the centre
out.
•
Never wipe discs in a circular motion!
Figure 14: Cleaning a disc working from the centre out.
☛ TIP: When not in use, store all discs (even frequently used ones) in their jewel boxes or in a
Tyvek® sleeve supplied with the TDK i-Storage system. This will protect discs from soiling or
damage.
Audio CD playback
Playing audio CDs using the front-panel controls is the writer’s most basic operation. No special
drivers are needed to operate this feature.
Connections for playing audio CDs: In order to listen to an audio CD, plug a pair of stereo
headphones or self-powered speakers into the headphone jack on the writer’s front panel.
25
Figure 15: Connections for playing audio CDs using the headphone jack
24/10/40B
48/24/48B
Stereo mini-plug
(to headphone jack)
☛ NOTE: The volume control on the front panel of your writer adjusts only the sound level of
the headphone jack. You will need to install TDK’s software to control the volume of the signal
from the rear panel audio outputs.
Writing to CD-R and CD-RW media
In conjunction with your TDK CyClone CD-R/RW writer, pre-mastering and packet writing*
software such as InCD (included) lets you write audio (as data), video or other data
to writable (CD-R) or re-writable (CD-RW) media.
☛ NOTE: While most new CD-ROM drives can read CD-RW discs, this is not always the case
with older drives.
26
Maintenance & Troubleshooting
This section deals with maintenance and troubleshooting procedures for your TDK CyClone
CD-R/RW writer.
Proper writer maintenance will help to ensure trouble-free operation. If any problems do arise,
you will often be able to find a solution without having to wait for assistance from TDKauthorised technical staff.
☛ TIP: Read all parts of this section. While many of the listed problems are rare and others may
seem inapplicable, it pays to be aware of the variety of hitches that can occur just in case.
Upgrading firmware
TDK creates firmware* revisions to meet the changing specifications of the latest PCs. However,
these will hardly ever impact the performance or operation of your TDK CyClone CD-R/RW
writer. Still, should your TDK CyClone CD-R/RW writer fail to respond to other troubleshooting
efforts, you should download the latest firmware* revision from the TDK website (address
below) and then try again.
DOWNLOADING NEW FIRMWARE FOR YOUR TDK CYCLONE CD-R/RW WRITER:
•
Go to the TDK web site at www.tdk-europe.com/support.
•
Choose the correct upgrade from the list of latest firmware* revisions and their intended
use.
•
Follow the instructions for downloading the firmware* to your computer.
UPGRADING FIRMWARE:
•
Run the executable file you downloaded from the TDK CyClone website.
•
Accept all default settings by continuing to click the “Next” button until “Firmware* update
has completed” appears on screen.
•
Reboot your system.
•
Verify DMA is enabled before using the TDK CyClone CD-R/RW writer.
☛ NOTE: DMA must be enabled (checked ON) for normal TDK CyClone CD-R/RW writer
operation.
27
Troubleshooting
This troubleshooting guide is designed to help you should you encounter problems while or
right after installing your TDK CyClone CD-R/RW writer.
GENERAL
SYMPTOMS
POSSIBLE CAUSES
POSSIBLE SOLUTIONS
Computer does not
recognise TDK CyClone
CD-R/RW writer.
1. IDE* cable is not
connected properly.
1. Ensure IDE* cable is
properly connected (e.g. the
right way up). The IDE*
connector pins on the
motherboard* and the writer
must be straight.
2. Writer or IDE* bus* is
disabled in the computer’s
BIOS*.
2. Ensure the IDE* port* is
enabled and set properly in
the computer’s BIOS*. See
“Ensuring the writer is
recognised” for more details.
3. Jumper conflict.
3. Check jumper settings of
the TDK CyClone CD-R/RW
writer and any other internal
writer (hard disk* or CDROM) that is connected to
the same IDE* cable. Ensure
the jumper for one device is
set to master* and the other
to slave*.
Two devices on one cable
cannot share the same
setting.
4. Wrong cable with jumper
4. Connect a CS-compatible
set to Cable Select*.
IDE* cable if you have
jumpered the TDK CyClone
CD-R/RW writer to Cable
Select* mode.
28
SYMPTOMS
POSSIBLE CAUSES
POSSIBLE SOLUTIONS
Computer does not
recognise TDK CyClone
CD-R/RW writer.
(continued)
5. Power connector is not
attached to TDK CyClone
CD-R/RW writer or does not
work.
5. Ensure a spare internal
power connector is securely
attached to the TDK CyClone
CD-R/RW writer’s power
socket. The TDK CyClone
CD-R/RW writer’s LED
indicator should blink briefly
when the computer’s power
is turned ON. You can also
try using a different power
cable.
TDK CyClone CD-R/RW
writer does not respond
1. No power.
1. Ensure the power cable is
connected securely to the
(LED or eject button fail
to work).
TDK CyClone CD-R/RW
writer’s power connector.
Try a different power cable.
2. Incorrect IDE* cable
connection.
2. Ensure the IDE* cable is
undamaged and properly
inserted.
Ensure the IDE* connector
pins are not bent.
Cannot eject tray.
1. CD was not properly
placed in tray and is now
stuck.
1. Insert the emergency eject
tool into the emergency eject
hole in the TDK CyClone
CD-R/RW writer’s front panel
to manually eject the tray.
SYMPTOMS
POSSIBLE CAUSES
POSSIBLE SOLUTIONS
TDK CyClone writer has
read errors, does not
respond to a DIR command
or cannot run a program.
1. Faulty or dirty CD-R/RW/-ROM disc.
1. Clean the disc as detailed.
READING
Try a different CD-R/-RW
disc.
29
READING
SYMPTOMS
POSSIBLE CAUSES
TDK CyClone CD-R/RW
2. Bad connection between
writer drive has read errors, the TDK CyClone CD-R/RW
does not respond to a DIR
writer and the motherboard*.
command or cannot run a
program. (continued)
POSSIBLE SOLUTIONS
2. Ensure the IDE* connector
pins on the motherboard* and
the writer are not recessed,
broken or bent. Ensure the
IDE* ribbon cable displays no
signs of excessive wear, such
as kinking.
3. Audio CD in the drive.
Audio CDs contain no
computer data, so entering
DOS commands while an
audio disc is in your drive
produces an error message.
3. Use a data CD in the TDK
CyClone CD-R/RW writer.
4. Disc is inserted upside
down.
4. Eject the disc and load it
with the label or text side up.
5. Blank CD-R or CD-RW
disc is inside the drive.
5. Try again using another
disc.
Cannot use other CD-ROM
1. Trying to use a CD-ROM
1. Use the TDK CyClone CD-
drives to read discs written
by TDK CyClone CD-R/RW
drive that does not support
reading CD-RW discs.
R/RW writer to read CD-RW
discs or use a different CD-
writer.
ROM drive. CD-RW discs
cannot be read by older CDROM drives.
2. The UDF* reader required
to use a CD-ROM drive for
reading CD-RW or packet
written discs is not installed.
2. Refer to your packet
writing* software manual for
details on how to obtain and
install a UDF* reader.
3. A CD-R recording session
was left open and lacks a
“Table of Contents”.
3. Reload this disc and use
the same software originally
used to write to it. Then close
the session/disc.
30
SYMPTOMS
POSSIBLE CAUSES
POSSIBLE SOLUTIONS
Excessive noise.
Excessive vibration.
Slow read performance.
1. CD-R/-ROM is poorly
1. Ensure that no adhesive
label is attached to the disc
surface.
Caution: In case an adhesive
label is attached to the disc,
do not tear it off, as this
could damage the disc.
balanced. Low-quality or
unevenly labelled discs can
cause significant vibration
and read errors at high
reading speeds.
Clean the disc as detailed.
Can read only the last
session of a multisession
CD-R or CD-RW disc.
1. “Import previous session”
or a similar feature was not
enabled when the multisession disc was created.
1. Use CD-R or CD-RW
mastering software to import
session(s). Such features may
vary in name depending on
the software used. Please
refer to the appropriate
user’s manual regarding this
feature.
AUDIO
SYMPTOMS
POSSIBLE CAUSES
When playing an audio CD, 1. Soundcard* volume too
you do not hear sound even low.
though everything appears
to be functioning normally.
POSSIBLE SOLUTIONS
1. Each soundcard* has a
different setting for each
input* source, including one
Mixer settings for soundcard* for audio CDs. Run your
set too low.
soundcard*’s mixer program
and verify that the volume is
Need soundcard*.
turned up or not muted. You
can do this by doubleNeed audio cable
clicking on the speaker icon
connection.
on your computer’s task bar.
Soundcard* not properly
configured.
Speakers not properly
connected.
31
Check your system configuration to ensure the
soundcard* settings (such as
IRQ*, memory, etc.) do not
conflict with other devices
connected to the system.
SYMPTOMS
POSSIBLE CAUSES
When playing an audio CD, 1. (continued)
you do not hear sound even
though everything appears
to be functioning normally.
(continued)
POSSIBLE SOLUTIONS
Ensure all the necessary
drivers and multimedia
devices required by your
soundcard* are installed (your
soundcard* manual should
provide further details).
Make sure the audio cable is
properly connected between
the TDK CyClone CD-R/RW
writer and the soundcard*.
Ensure correct speaker
connections for the type of
audio playback you require.
See “Connections for playing
audio CDs”.
Low sound level from TDK
CyClone CD-R/RW
writer.
1. Bad audio cable
connection between the TDK
CyClone CD-R/RW writer and
the soundcard*.
1. Check the cable
connection from the TDK
CyClone CD-R/RW writer to
the soundcard*.
2. Low-level signals from the
audio mixer.
2. Check and adjust the
master*, CD and line levels of
all audio mixers.
WRITING
SYMPTOMS
POSSIBLE CAUSES
POSSIBLE SOLUTIONS
Cannot write to CD-R or
CD-RW disc.
1. You are using authoring
software other than that
supplied with your TDK
1. Use the authoring software
provided with the TDK
CyClone CD-R/RW writer. To
CyClone CD-R/RW writer.
use other types of authoring
software, contact the supplier
and ensure the software
supports the TDK CyClone
CD-R/RW writer 482448B.
32
SYMPTOMS
POSSIBLE CAUSES
POSSIBLE SOLUTIONS
Cannot write to CD-R or
CD-RW disc.
(continued)
2. TDK CyClone CD-R/RW
writer does not support the
CD-R or CD-RW media used.
2. Use TDK-recommended
CD-R or CD-RW media
3. Disc inserted upside down. 3. Eject the disc from tray
and load it with the label side
up.
4. Insufficient hard disk*
capacity. Requirements for
free hard disk* space vary
with different software
packages. Contact the
software manufacturer or
4. Delete files from your hard
disk* to free up sufficient
space or use another hard
disk*.
check the software documentation for recommendations.
CD-R or CD-RW software
1. Power connector is not
1. Ensure the internal power
cannot detect TDK CyClone attached to your TDK
CD-R/RW writer.
CyClone CD-R/RW writer.
cable is securely attached to
the TDK CyClone CD-R/RW
writer’s power connector.
The TDK CyClone CD-R/RW
writer’s LED indicator should
blink briefly when the
computer’s power is turned
ON.
Try connecting another power
cable to the TDK CyClone
CD-R/RW writer.
2. Incorrect IDE cable
connection.
2. Ensure that the IDE* cable
is undamaged and properly
connected to both the TDK
CyClone CD-R/RW writer and
the motherboard*. Ensure the
IDE* connector pins on the
drive and motherboard* are
not bent.
33
SYMPTOMS
POSSIBLE CAUSES
CD-R or CD-RW software
3. Writer or IDE bus* disabled
cannot detect TDK CyClone in the computer’s BIOS*.
CD-R/RW writer.
(continued)
4. Jumper conflict.
POSSIBLE SOLUTIONS
3. Ensure the IDE* port* is
enabled and set properly in
the computer’s BIOS*. See
“Ensuring the writer is
recognised” for further
details.
4. Check jumper settings of
the TDK CyClone CD-R/RW
writer and any other internal
drive (hard disk* or CD-ROM)
that is connected to the same
IDE* cable. Ensure the jumper
for one device is set to
MASTER* and the other to
SLAVE*. Two devices on one
cable cannot share the same
setting.
5. Wrong cable with jumper
set to Cable Select*.
5. Connect a CS-compatible
IDE cable if you have
jumpered the TDK CyClone
CD-R/RW writer to Cable
Select* mode.
Cannot add information to
a CD-R or CD-RW disc.
Cannot write at 48x speed.
1. The CD-R or CD-RW disk
1. Always use the same
was originally written using
authoring software to add
other software. If the software content to a disc.
is different, incompatibility
errors may occur.
2. Use a higher-capacity
CD-R or CD-RW disc. Use
2. Insufficient disc capacity.
the originally used drive to
A standard 74-min. CD can
add information to the CD-R
store 650 MB of data.
or CD-RW disc.
1. Low-quality CD-R media
may not be 48x compatible.
1. Use TDK-recommended
CD-R media. A list of
supported CD media can be
found on the Support website.
34
SYMPTOMS
POSSIBLE CAUSES
POSSIBLE SOLUTIONS
Cannot write at 48x speed.
(continued)
2. Using CD-RW media. This
writer does not support 48x
speed with CD-RW media.
Maximum 24x speed.
2. Make sure you use “high
speed” certified CD-RW
discs.
3. Faulty CD-R media.
3. CD-R media may be dirty,
scratched or damaged.
Rewrite using another CD-R
disc.
4. CD-ROM writer used
cannot read data fast enough
for the TDK CyClone CDR/RW writer to record at 48x.
4. Record to hard disk* first,
then to TDK CyClone CDR/RW writer.
FAQ about Recording
What media should I use with my TDK CyClone CD-R/RW writer?
IMPORTANT: For best results, TDK CD-R and CD-RW media should be used. Problem free
operation cannot be guaranteed with other media.
When can I use CD-RW media?
CD-RW media can only be recorded using rewritable drives; they can be read using
rewritable drives or newer MultiRead CD-ROM drives.
You can, for instance, use CD-RW media:
•
like large capacity floppy disks,
•
to transport data files to and from work,
•
to periodically backup your important computer files.
When should I use CD-R media?
CD-R media can be read in most CD-ROM or CD-R drives. You can, for instance, use
CD-R media:
•
to create permanent data archives,
•
to copy music to CD for personal use,
•
to share non-editable presentations.
35
Technical Specifications
SPECIFICATIONS
AI-482448B (internal) with Buffer Underrun* Protection
DISC
• Usable Formats**
CD-DA
CD-ROM (Mode 1)
CD-ROM (Mixed Mode)
CD-ROM XA (Mode 2, Form1/Form2)
Enhanced CD
** Depending on the PC/ MAC
and programs you are using,
some of these formats might not
be supported.
• Writing Modes
Photo CD
(S)VideoCD
CD-I
CD Extra
UDF
CD-TEXT
Write
√
√
√
√
Read
√
√
√
√
√
√
√
√
√
√
√
√
√
√
√
√
√
√
Track-at-Once*, Disc-at-Once*,
Session-at-Once*, Packet writing*
(Fixed-size packets, Variable-size
packets, Mt. Rainier), Multisession.
DRIVE PERFORMANCE
Data transfer rate
• Burst
Read:
Write:
33,3 MB/s (UltraDMA/33)
33,3 MB/s (UltraDMA/33)
• Write
P-CLV
18-40x:
6000 kB/s (Mode 1, mode 2 form 1)
18-32x:
18-24x:
4800 kB/s (Mode 1, mode 2 form 1)
3600 kB/s (Mode 1, mode 2 form 1)
CLV
CAV
16x:
2400 kB/s (Mode 1, mode 2 form 1)
12x:
1800 kB/s (Mode 1, mode 2 form 1)
8x:
1200 kB/s (Mode 1, mode 2 form 1)
4x:
600 kB/s (Mode 1, mode 2 form 1)
21x-48x
36
• Rewrite
•
•
•
•
Read
Access Time
Data Buffer
Error Rate
• Spindle Motor
CAV
CLV
24x: 3600 kB/s
16x: 2400 kB/s
12x: 1800kB/s (Mode 1, mode 2 form 1)
10x: 1500 kB/s (Mode 1, mode 2 form 1)
8x: 1200 kB/s (Mode 1, mode 2 form 1)
4x: 600 kB/s (Mode 1, mode 2 form 1)
2x: 300 kB/s (Mode 1, mode 2 form 1))
21x - 48x (max. 7200 kB/s)
CAV
80 ms
2 MB with Buffer Underrun* Protection
Mode 1 (ECC on): less than 10-12 Block/Bits
Mode 2 (ECC off): less than 10-9 Block/Bits
DC brushless
FRONT PANEL
•
•
•
•
•
Eject
Light (LED)
Disc loading
Headphone Jack
Volume control
Eject button, Emergency eject hole
Busy/Write/Rewrite
Auto loading
Stereo mini jack, 0,8V at 32 Ohms
Headphone volume
REAR PANEL
• Power Supply
• Audio output
• Jumper Switches
• Interface*
DC +5V and DC +12V
Analogue output (Molex connector)
SPDIF output (digital)
MASTER*, SLAVE*, CABLE SELECT*
ATAPI* (E-IDE*)
DIMENSIONS AND WEIGHT
• Dimensions (W x H x D)
• Weight
145,8 x 41,3 x 190 mm
1000 g
RELIABILITY
• MTBF*
• Tray Loading
• Warranty
70,000 POH (25% duty cycle)
30,000 load cycles
2 Year On Site Collect and Return Service
(in E.U., Norway and Switzerland)
Specifications are subject to change without notice.
37
Glossary of Terms
ATAPI / ATAPI-4: Advanced Technology Attachment Packet Interface*; part of the PC’s
IDE*/E-IDE* interface* that provides additional commands for controlling IDE* peripherals (e.g.
CD-ROM/-R/-RW writers). The “-4” suffix denotes a later (faster) ATAPI generation.
BIOS: Basic Input/Output* System; as part of your PC’s system software, the usually invisible
though critical BIOS is mainly responsible for loading/executing the PC’s operating system and
constitutes the lowest-level interface* to internal and external peripherals (e.g. keyboard,
mouse, printer, CD-ROM/-R/-RW writers, etc.); although it is possible to access the BIOS
yourself, this is best left to computer experts or programmers.
BUFFER UNDERRUN: The inability of the PC’s “buffer” (i.e. an interim store of information)
to supply a continuous stream of data that matches the speed of writing from the host* device
to the recording device during CD-R/RW writing operations; the problem is common
to current CD technology and often results in ruined CD-R.
BUS: part of a chip or circuit board that serves as a route for exchanging signals between a
PC’s various functional units.
CABLE SELECT/CS: by choosing this jumper setting when installing the drive in a
CS-compatible PC, the TDK CyClone CD-R/RW writer automatically selects the correct
master/slave* configuration using a signal from the IDE* interface*.
CMOS: Complementary Metal Oxide Semiconductor; a special RAM* chip for non-volatile*
storage of a PC’s “vital statistics” like hard disk* size, amount and type of main memory*, etc.
COMMAND SET: a set of instructions that tells a program to perform a specific action/function;
menu items are also often referred to as commands.
CPU: a PC’s main operating device that interprets and performs instructions - the so-called
“brain” of your computer.
DISC-AT-ONCE: refers to writing a complete disc in one go using a continuous data stream;
however, any remaining space on a CD-R is lost as the disc cannot be written to again.
FIRMWARE: ROM*-stored system software (part of the PC’s operating system), often used to
control the behaviour of a particular system when it is first switched on.
38
HARD DISK: the PC’s main data storage medium whose capacity (space or size) is measured
in megabytes (older PCs) or gigabytes (newer PCs).
HOST: a computer or other device that acts as a source of information or signals for another
(e.g. a CD-ROM drive supplying a CD-RW writer with data).
IDE / E-IDE: Integrated Drive Electronics / Enhanced Integrated Drive Electronics; a common
type of PC hard drive containing the necessary controller electronics; the enhanced version is
a further development of the IDE standard.
INPUT/OUTPUT: PC operations or a part of the system concerning the passage of data
between various I/O peripherals and the CPU* (e.g. data input from a CD-ROM and output via
the printer).
INTERFACE: An element of a PC, software program or peripheral device that enables
communication with other system components; the term is also used to mean user interface,
most commonly denoting the graphical on-screen display.
IRQ: Interrupt Request; a method by which the microprocessor can be requested to suspend
its current operation and pass control to the device driver issuing the interrupt request; as
peripherals are preset to a specific IRQ, knowing which is which can help to avoid conflicts with
other devices that use the same IRQ; check your hardware manuals for further details.
MAIN MEMORY: the storage element of a PC that holds currently used programs and all
working data; insufficient main memory (e.g. less than 64 MB RAM* with regard to the TDK
CyClone CD-R/RW writer) precludes the use of many modern software programs.
MASTER: denotes a principal, controlling computer or peripheral device.
MOTHERBOARD: also called system board and planar; the PC’s main circuit board containing
vital system elements like the processor, CPU*, bus, etc.
MPC: Multimedia Personal Computer; the minimum hardware specifications (set by Microsoft)
for running multimedia software; modern PCs now generally outperform all three MPC levels.
MPC-3: third-level MPC (1996).
MTBF: Abbreviation of “Mean Time Between Failures”.
NON-VOLATILE: refers to data that remains permanently stored on a storage medium (like
a CD-ROM but also certain internal storage chips) irrespective of power supply.
39
ON-THE-FLY: refers to dynamic operations, i.e. those whose performance is based on
decisions made while the program is running rather than ones made ahead of time, for instance
if buffers are created on-the-fly, the interim storage space is created when it is needed and not
reserved ahead of time.
OPC: Optimum Power Calibration
PACKET WRITING: refers to writing incremental tracks to CD-R-/RW discs in small data
“packets” (similar to storing data on a floppy disk); this makes more efficient use of disc space
and is a useful backup tool; however, packet writing requires special software (e.g. Ahead’s
InCD) and CD-R/-RW discs must be formatted prior to writing.
PORT: internal or external connection point or socket for connecting internal and external
I/O devices (e.g. printer, monitor, CD-ROM, etc.) to the computer.
RAM: Random Access Memory; a type of volatile memory (data store) that can be written to
and read in any order, i.e. randomly, and is used to perform necessary tasks when the computer
is on (e.g. an active program is loaded into RAM); once the PC’s power is turned off, any
information loaded into RAM is lost; the term should not be confused with the storage capacity
provided by the hard disk.
ROM: Read Only Memory; a type of non-volatile memory chip used to store data that cannot
be modified and that is filled with instructions for the PC’s CPU*.
SESSION-AT-ONCE: refers to performing a disc writing session in one go without any
interruptions; given sufficient remaining disc space, further sessions can be added at a later
date.
SLAVE: a computer or peripheral device that is controlled by a master computer or device.
SOUNDCARD: an optional PC expansion board that enables audio data to be played and
recorded from a variety of different file types.
TRACK-AT-ONCE: refers to writing to a CD-R/-RW disc a session at a time; given sufficient
remaining disc space, further information can be added at a later date.
UDF: Universal Disc Format; a CD-ROM file system standard designed to enable read-write
interoperability between the major operating systems and compatibility between rewritable and
write-once recording media; CD-R/-RW writers can use UDF in packet writing modes and DVD
drives require UDF to contain audio and video data streams.
40