1
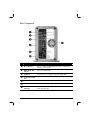
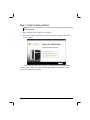
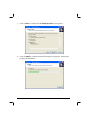
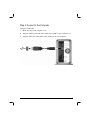
TRADEMARKS
All brand and product names are trademarks or registered trademarks of their
respective companies.
NOTE
The information in this manual is subject to change without notice.
Safety Information
Only qualified persons are authorized to carry out maintenance on this device.
z
Read this User Manual carefully and follow the correct procedure when
setting up the device.
z
Do not open a disk drive or attempt to disassemble or modify it. Never insert
any metallic object into the drive to avoid any risk of electrical shock, fire,
short-circuiting or dangerous emissions. The disk drives contain no
user-serviceable parts. If it appears to be malfunctioning, have it inspected
by a qualified technical support representative.
z
Never expose your device to rain, or use it near water, or in damp or wet
conditions. Never place objects containing liquids on your device, as they
may spill into its openings. Doing so increases the risk of electrical shock,
short-circuiting, fire or personal injury.
z
Make sure that the computer and your storage device are electrically
grounded. If the devices are not grounded, there is an increased risk of
electrical shock. Power requirements 100~240 Vac, 1.5 A.
z
Do not expose the device beyond 35 oC degree. Doing so may damage the
device or disfigure its casing. Avoid placing your device near a source of
heat or exposing it to sunlight (even through a window). Inversely, placing
your device in an environment that is too cold may damage the unit.
z
Always unplug the device from the electrical outlet if there is a risk of
lightning or if it will be unused for an extended period of time. Otherwise,
there is an increased risk of electrical shock, short-circuiting or fire.
z
Use only the power supply shipped with the device.
z
Do not use the device near other electrical appliances such as televisions,
radios or speakers. Doing so may cause interference which will adversely
affect the operation of the other products.
z
Do not place the device near sources of magnetic interference, such as
computer displays, televisions or speakers. Magnetic interference can affect
the operation and stability of your device.
z
Do not place heavy objects on top of the device or use excessive force on it.
i
z
Protect your device from excessive exposure to dust during use or storage.
Dust can build up inside the device, increasing the risk of damage or
malfunction.
z
Never use benzene, paint thinners, detergent or other chemical products to
clean the outside of the device. Such products will disfigure and discolor the
casing. Instead, use a soft dry cloth to wipe the device.
z
Replace defective hard drives immediately.
z
Turn off the system and unplug the device from the electrical outlet before
removing the device cover.
Table of Contents
Safety Information ................................................................................ i
Table of Contents................................................................................ iii
Chapter 1
Introduction .................................................................. 1
1.1 Unpacking ............................................................................................2
1.2 Specifications.......................................................................................3
1.3 System View ........................................................................................4
Front Components..........................................................................4
Rear Components ..........................................................................5
Chapter 2
Setting Up ..................................................................... 7
Step 1. Install the Hard Disks......................................................................7
Step 2. Install the Backup Master .............................................................11
Step 3. Connect to Power .........................................................................16
Step 4. Connect to the Computer .............................................................17
Step 5. Configure the Backup Master.......................................................18
Step 6. Configure HDD Mode of Your Storage System............................18
Chapter 3
Configuring the Backup Master .................................... 19
3.1
3.2
3.3
3.4
Backup Now.......................................................................................21
Basic Setup........................................................................................24
Schedule Setup .................................................................................25
Advanced Setup ................................................................................27
Locating Backup Files ..................................................................30
3.5 Restore ..............................................................................................32
Chapter 4
Configuring the HDD Mode............................................. 39
4.1 Setting the HDD Mode.......................................................................41
4.2 Disk Information Indicators on Various HDD Modes .........................43
iii
Chapter 1 Introduction
Your Muse R-Duo RAID is a high-performance, extremely flexible RAID
(Redundant Array of Independent/Inexpensive Disks) subsystem that is ideally
suited for integration with databases, imaging systems and email and Web
servers.
RAID technology is one of the best means to protect your data, while providing
greater data integrity and availability than standard hard disk storage. With the
ability to provide single error detection and redundant information to recover
the original if a disk fails, a RAID system is an ideal means to safeguard
valuable data while also stream-lining performance.
1
1.1 Unpacking
After unpacking the shipping carton, you should find these standard items:
Muse R-Duo RAID
Drive Rail × 2
Power Adapter
Power Cord
eSATA Cable
USB Cable
Set of Screws
Utility Disc
Quick Start Guide
2
1.2 Specifications
NOTE: Specifications are subject to change without notice.
Processor
Silicon Image 4723 + Sunplus SPIF216A
Architecture
• Universal Serial Bus Specification, Rev. 2.0
high speed (480 Mbps) and full speed
transfer rate (12 Mbps)
• Serial ATA II: extension to Serial ATA 1.0a,
Rev. 1.2 transfer rate (3 Gb/s)
External Socket Interface
• High speed USB 2.0 Type-B
• eSATA / eSATAII
Internal Hard Disk Drive Interface
Two SATA (Serial ATA)
Hard Disk Drive Bay/Type
Up to two 3.5-inch SATA
Storage Capacity
750 GB for each SATA hard disk drive
Applied System
• Microsoft Windows 2000/XP/2003
• Mac
Disk Configuration
RAID 0 (FAST) / RAID 1 (SAFE), LINEAR
(LNR), BIG (BIG)
Power Supply
DC output 12 V / 5 A
Dimension (W×H×D)
76×136×259 mm
Environment
• Operating temperature:
0
0
0
0
–5 C (23 F) to 35 C (95 F)
• Operating relative humidity:
0 % to 85 % non-condensing
• Non-operating temperature:
0
0
0
0
–20 C (–4 F) to 60 C (140 F)
• Non-operating relative humidity:
0 % to 90 % non-condensing
• Storage temperature:
0
0
0
0
–30 C (–22 F) to 60 C (140 F)
• Storage relative humidity:
0 % to 95 % non-condensing
Certification
• CE
• FCC
• UL
• CUL
• BSMI
3
1.3 System View
Front Components
Ref
Component
Description
n
Hard Disk Drive
Compartment
Inside are two hard disk drive slots.
o
Disk Information
Indicator
Shows the current hard disk drive status.
4
NOTE: Refer to the later section for various LED indicator
displays under different HDD modes.
Access
Blinks red to indicate hard disk drive read/write function.
Status
Glows blue to indicate hard disk drive is workable.
Rear Components
Ref
Component
Description
n
Reset Button
Sets to a different HDD mode. Use this in combination
with the power switch.
o
HDD Mode DIP
Switch
Select the HDD mode.
p
q
USB Port
Connects to your computer using the USB cable.
eSATA/eSATAII
Port
Connects to your computer using the eSATA cable.
r
s
t
Power Switch
Turns the power on and off.
Power Connector
Connects the power cord.
Ventilation
Opening
Maintain proper operating temperature. Do not cover or
block the openings.
5
Chapter 2 Setting Up
Step 1. Install the Hard Disks
1. Rotate the two rubber feet outward and place your device on a flat and
stable surface.
2. Pull off the front cover from the device.
CAUTION: Be gentle when pulling off the front cover. Pulling it vigorously could damage
the cover hinges and device.
7
3. Fasten two screws on "0" position to secure the drive rail on the hard disk
drive placed upside down.
4. Slide the hard disk drive all the way into the device.
NOTE: Install the first hard disk drive on the left compartment, the second hard disk drive
on the right compartment.
8
5. To install the second hard disk drive, fasten two screws on "1" position to
secure the drive rail on the hard disk drive.
6. Slide the hard disk drive all the way into the device.
7. Replace the front cover on the device.
CAUTION: Be gentle when replacing the front cover to avoid damaging the cover hinges
and device.
9
In the event that you would need to replace a hard disk drive, pull on the plastic
handle to slide the disk off the compartment.
10
Step 2. Install the Backup Master
NOTE: Do not connect the device to your computer until after you have finished installing
the Backup Master.
1. Make sure that your computer is turned on.
2. Insert the included Utility disc into your optical drive and the following
screen appears.
Click “Backup Master user manual”, could browse the Backup Master
software user manual, click the “Muse R-Duo RAID User Manual”, could
browse the product user manual
11
3. Click on Install Backup Master and the following screen appears.
4. Click on Next to continue, and the following screen appears. If you want to
select a different folder, click on Browse and select your desired folder.
12
5. To continue, click on Next and the following screen appears. If you want to
select a different Start menu folder, click on Browse instead and select your
desired folder.
6. To continue, click on Next and the following screen appears. Click on Create
a desktop icon if wish to do so.
13
7. Click on Next to continue and the Ready to Install screen appears.
8. Click on Install to continue and the following screen appears, showing the
progress of installation.
14
9. When the next screen appears, click on Finish to exit the Backup Master
installation.
would appear on your Windows
The External RAID Storage Detector icon
system tray to signify that the Backup Master was successfully installed.
15
Step 3. Connect to Power
1. Make sure that the device is turned off.
2. Plug the DC cord of the AC adapter to the power connector on the rear of
the device (n).
3. Plug the female end of the AC power cord to the AC adapter and the male
end to an electrical outlet (o).
4. To turn on your storage system, press the Power switch.
CAUTION:
z When you disconnect the AC adapter, disconnect from the electrical outlet first and then
from the device. A reverse procedure may damage the AC adapter or the device.
z When unplugging the connector, always hold the plug head. Never pull on the cord.
16
Step 4. Connect to the Computer
Using the USB cable:
1. Make sure that your computer is on.
2. Plug the USB Type B end of the cable to the USB 2.0 port of the device.
3. Plug the other end of the cable to the USB port on your computer.
17
Using the eSATA cable:
1. Make sure that your computer is on.
2. Plug one end of the eSATA cable to the eSATA/eSATAII port of the
device.
3. Plug the other end of the eSATA cable to the eSATA port on your
computer.
Step 5. Configure the Backup Master
See the next chapter for configuring and using the Backup Master.
Step 6. Configure HDD Mode of Your Storage System
See chapter 4 for HDD mode configuration instructions.
18
Chapter 3 Configuring the Backup
Master
After installing the Backup Master, you can start the configuration process.
Your choice is important and impacts how best you can use the device. To start
using the Backup Master:
z
Double-click on the External RAID Storage Detector icon
Windows system tray, or
z
Select Start Æ Program Æ Backup Master Æ Backup Master.
on your
After finding your device, the Main Menu appears as shown:
There are 5 options on the Main Menu namely: Backup Now, Basic Setup,
Schedule Setup, Advanced Setup, and Restore.
NOTE: If the device is not connected to your computer or to power, and is not turned on,
the following screen appears. Click on Yes to quit.
19
20
3.1
Backup Now
The Backup Now option allows you to perform a backup based on your settings
on the Basic Setup menu.
When you select Backup Now on the Main Menu without first specifying the
backup target and destination, the following screen would appear for about 10
seconds.
Afterwards, the Basic Setup menu would appear to allow you to configure the
Backup Now settings. See Section 3.2 for instructions on configuring the basic
setup.
21
The next time you click on Backup Now on the Main Menu, the Backup Master
would perform backup based on this initial settings. The following screen
appears showing the progress of your backup.
z
To hide this screen, click on Hide, and an icon would appear on your
Windows system tray.
Right-click on the icon using your mouse and click on SHOW to restore the
screen
.
Or, you can place your mouse on top of the icon to show the completion
percentage of your backup operation
22
.
z
To cancel the backup process anytime, click on Stop Backup and the
following screen appears.
After backup is complete, the following screen appears.
23
3.2
Basic Setup
The Basic Setup option allows you to specify the backup target (drives,
directories, or files) and backup destination (drive).
Upon clicking on Basic Setup on the Main Menu, the following screen would
appear to allow you to configure the Basic Setup settings.
To configure your settings for Basic Setup:
1. Select the drive, directory, or files to backup. Your choice(s) would be
retained the next time you start up your device. Click on Clear All in case
you want to remove all selection.
2. Select the destination drive where you want to store your backup files. You
can only select the destination drive, Backup Master will create the
directory /Backup Master/Backup Master Backup/ (if not yet
existing) and store the file(s) there.
3. Click on Finish to return to the Main Menu.
The next time you click on Backup Now on the Main Menu, the Backup Master
would perform backup based on your last settings on Basic Setup.
24
3.3
Schedule Setup
The Schedule Setup option allows you to automatically perform backups.
Upon clicking on Schedule Setup on the Main Menu, the Basic Setup menu
would appear. See Section 3.2 for instructions on configuring the basic setup if
you have not done so or you want to change the previous settings.
To configure your settings for Schedule Setup:
1. Click on Finish on the Basic Setup menu and the following screen appears.
You can select Specific date or Set for weekly.
z
If you select Specific date, you may scroll through the particular month
by clicking on the arrow buttons.
Set the Time (hour:minute) for scheduled backup to occur.
Click on the Monthly checkbox if you want the scheduled backup to be
performed every month on your specified date.
To select the date(s) to backup automatically, select this date(s) on the
left window, then click on “+” . The right window would show the
detailed date information.
To remove the date(s), select it on the right window, then click on “-” .
25
z
If you select Set for weekly, click on the particular day(s) of the week.
Set the Time (hour:minute) for scheduled backup to occur.
2. Click on Finish to return to the Main Menu.
Backup Master would automatically perform backup based on your settings on
Schedule Setup.
Just as the scheduled time for backup is about to occur, the following would
appear onscreen. Click on anywhere inside the dialog box if you do not want the
scheduled backup to proceed.
If the scheduled backup has already started and you want to terminate it
on your
prematurely, right-click the External RAID Storage Detector icon
Windows system tray and click on Stop Schedule Backup.
26
3.4
Advanced Setup
The Advanced Setup option allows you to select Comprehensive or Duplicate
backup.
Upon clicking on Advanced Setup on the Main Menu, the following screen
would appear to allow you to configure the Advanced Setup settings.
Select the type of backup.
z
Comprehensive backup – (default)
selecting this option allows you to create restore points, file compression
and encryption when backup occurs based on your settings under Basic
Setup or Schedule Setup. Restore points are very useful when you want to
recover deleted or older versions of files. Compression would allow you to
conserve on disk space. While encryption would safeguard your files from
others.
z
Duplicate –
selecting this option would just perform standard backup based on your
settings under Basic Setup or Schedule Setup.
27
1. If you select Comprehensive backup, click on Next and the following screen
appears.
If you select Duplicate, click on Next and the following screen appears. Only
the No Compression and No Encryption option is available. Proceed
immediately to step 3.
2. Select whether you want to compress and encrypt the files or not.
If you select Compression and Encryption, you need to enter a password on
the Please input password text box (up to twelve alphabets and/or numerals
28
but not less than four characters).
Confirm the password by typing it again on the Confirm password text box.
3. Click on Next and the following screen appears.
29
z
Backup the updated content – (applicable for Duplicate backups only)
selecting this option allows you to backup the files that have been
updated as well as filenames not existing on the destination folder only.
Backup Master would compare the filename and last saved date and if
they are not the same, would perform the backup.
z
Backup all content – (default)
selecting this option allows you to backup and overwrite all the files
from the source to the destination folder.
4. Click on Finish to return to the Main Menu.
Locating Backup Files
z
To locate files that was backed-up using the Comprehensive backup option,
Backup Master will automatically create the following directories –
x:\Backup Master\Backup Master Backup\Backup at
06_21_2006_16_27_10\
where x is the destination drive and 06_21_2006_16_27_10 is the date
(June 21, 2006) and time (16:27:10) the particular backup was performed.
New backups could be added and easily distinguished using the date and
time the backup was performed.
z
To locate files that was backed-up using the Duplicate option, Backup
Master will automatically create the following directories –
x:\Backup Master\Backup Master Duplicates\Duplicate
of basic\Duplicate of D\Jeffery\
where x is the destination drive, D is the source drive, and Jeffery is the
name of the folder and its corresponding contents the particular backup was
performed.
New backups could be added and easily distinguished using the source
drive letter, folder name or filename of the backup that was performed.
30
NOTE: In case the destination drive’s capacity is full, the following screen would appear.
Clear up enough space before performing backup again.
31
3.5
Restore
The Restore option allows you to recover deleted or older versions of files based
on previous backups. This is only possible for backups performed with the
Comprehensive backup option under Advanced Setup.
Upon clicking on Restore on the Main Menu, the following screen would
appear.
32
1. Click on the particular restore point that you desire and the following screen
appears. The left side of the screen would show the details of the restore
point.
2. Click on Next and the following screen appears. You can select whether to
restore to its original location or to a new location.
33
z
Restore to original location
Upon clicking on Next, the following warning would appear onscreen.
z
Restore to new destination
Upon clicking on Next, the following screen appears. Select the
destination drive where you want to save your restored files.
34
Click on “+” or right-click on the desired destination drive to choose
between opening the selected directory and creating a subdirectory.
If you choose to create a subdirectory, the following screen appears
allowing you to enter the new folder name.
35
The newly created subdirectory would be shown onscreen.
3. Upon clicking on Yes (for Restore to original location) or Next (for Restore
to new destination), the following screen appears showing the progress of
the restore process.
z
36
To hide this screen, click on Hide, and an icon would appear on your
Windows system tray.
Right-click on the icon using your mouse and click on SHOW to restore
the screen
.
Or, you can place your mouse on top of the icon to show the completion
percentage of your restore operation
z
.
To cancel the restore process anytime, click on Stop and the following
screen appears.
37
4. Upon completing the restore process, the following screen appears. Click on
the Main Menu icon to return to the Main Menu.
38
Chapter 4 Configuring the HDD Mode
Before you use the device to configure the HDD mode, take a minute to study
the following terms. The terms represent the configuration options for mapping
the physical to the virtual drives. You will choose from these options during the
configuration process. Your choice is important and impacts how best you can
use the device.
z
LNR—A LNR (LINEAR) configuration is similar to using multiple hard
disks in a regular computer. It is the simplest configuration available but
provides no data redundancy. Each disk is an independent entity, and the
data on it is self-contained. You can add or remove the disks without
affecting the other disks. All the available disk space is used for data.
If your device has only one disk, you must use a LNR configuration.
However, you can use a LNR configuration for two disks as well.
z
BIG—A BIG (BIG) allows the device to make any two disks (same or
different size) appear as one large disk for extra capacity. If you have two 6
GB disks in a BIG, you will have one 12 GB virtual disk. You will write data
to the first disk until it fills, then write to the second disk – enabling you to
dynamically expand storage capacity and file system size.
For BIG, your device must have two disks and the disks can be any size.
z
RAID 0 (FAST)—Instead of writing all the data to one disk in a LNR or
BIG fashion, some bytes are written to one disk, and other bytes are written
to another. Performance is faster because reading and writing activities can
occur on two disks simultaneously. All the available disk space is used for
data. If you have one 30 GB disk and another 20 GB disk in a FAST, you
will have one 40 GB virtual disk (twice the size of the smaller disk, in this
case 20 GB multiplied by 2).
39
z
RAID 1 (SAFE)—In this configuration, all the data written to one disk is
duplicated on the other disk. This offers greater data protection since if one
disk fails, all your data is still intact on the other disk. However, using RAID
1 means only half of your available disk space is used for data; the other half
is used for a duplicate (mirror) of that data.
You can use RAID 1 only if your device has two disks. If the disks are not
the same size, the smaller of the two disks is used for data, and the larger of
the two disks is used as the mirror. If one disk fails, the other disk continues
to make its data available.
40
4.1 Setting the HDD Mode
WARNING: Changing the HDD mode deletes data stored on your hard disk drive(s). If you
have saved data on the disks, back up data before performing the following steps.
To set the HDD mode:
1. Turn off the device.
2. Use a small pointed device to select the dip switch setting.
The following table shows the dip switch setting combination for the four
possible HDD mode.
HDD Mode
DIP Switch Setting
Switch 1
Switch 2
LINEAR (LNR)
Off
Off
BIG (BIG)
On
Off
RAID 0 (FAST)
Off
On
RAID 1 (SAFE) – default
On
On
41
3. Press the Reset button (n) and continue pressing it for about 5 seconds
while turning on the device using the Power switch (o). Your device has
now been set to the new HDD mode.
4. If applicable, restore previously backed up data onto the device.
42
4.2
Disk Information Indicators on Various HDD Modes
The left and right hard disk drives have their own set of LEDs that show the
system states. The following table shows the different HDD modes and their
indications.
HDD
Mode
Device State
Connected LED Indicators
to AC
Status Access
Power
(Blue) (Red)
Idle
Yes
On
Off
Read/write activity
Yes
On
Blink
BIG
Idle
No
Blink
Blink
RAID 0
Idle
Yes
On
Off
RAID 1
Read/write activity
Yes
On
Blink
Error: incorrect serial number or,
one or more bad partial volumes
Yes
Blink
Blink
Disk rebuild (a physical partition is
being rebuilt)
Yes
Blink
On
Disk rebuild (a physical partition is
being verified)
Yes
On
Flash
LNR
RAID 1
NOTE: The easiest way to tell the difference between a blinking LED and a flashing LED is
that flashing stops when the read/write activity is finished, and blinking does not stop. The
blink rate is slower too, but the difference in speed is more difficult to detect visually.
43