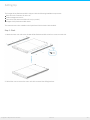
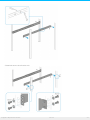
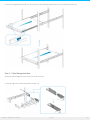
1
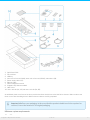
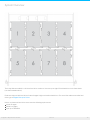
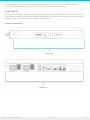
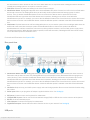
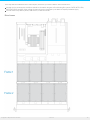
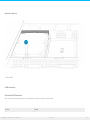
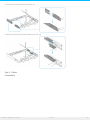
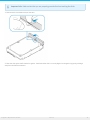
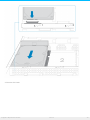
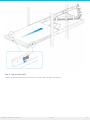
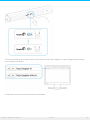
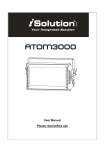
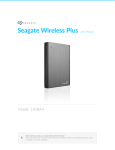
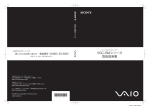
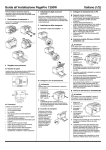
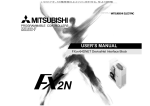
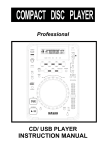
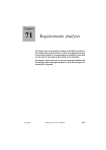
Seagate 8-Bay Rackmount NAS User Manual モデル: 8-Bay Rackmount NAS このドキュメントのオンライン最新版にアクセスするには ここをクリックしてください。最新のコンテンツ、展開可能な図解、分かりやすいナビゲーション、検索機 能もあります。 Cont ent s 1 Regulatory . . . . . . . . . . .Compliance .........................................................................4 ....... . . . . .Declaration FCC . . . . . . . . . . of . . Conform . . . . . . . . .ance . . . . . . . . . . . . . . . . . . . . . . . . . . . . . . . . . . . . . . . . . . . . . . . . . . . . . . . . . . . . . . . . . . . . . . . . . . . . . . . . . . . . . . .4. . . . . . . . . . . . . .Class FCC . . . . .A. Inform . . . . . . .ation . . . . . . . . . . . . . . . . . . . . . . . . . . . . . . . . . . . . . . . . . . . . . . . . . . . . . . . . . . . . . . . . . . . . . . . . . . . . . . . . . . . . . . . . . . . . . . .4. . . . . . . . . . . . . . Cautio FCC . . . . . . n. . . . . . . . . . . . . . . . . . . . . . . . . . . . . . . . . . . . . . . . . . . . . . . . . . . . . . . . . . . . . . . . . . . . . . . . . . . . . . . . . . . . . . . . . . . . . . . . . . . . 4. . . . . . . . . . . . . .rtant Impo . . . . No . . . te: . . .FCC . . . . .Radiatio . . . . . . .n. Expo . . . . . sure . . . . .Statement . . . . . . . . . . . . . . . . . . . . . . . . . . . . . . . . . . . . . . . . . . . . . . . . . . . . . . . . . . . . . . . . . . . . . . . . . 4. . . . . . . . . . . . . . . . . Canada Industry . . . . . . . . . . . . . . . . . . . . . . . . . . . . . . . . . . . . . . . . . . . . . . . . . . . . . . . . . . . . . . . . . . . . . . . . . . . . . . . . . . . . . . . . . . . . . . . . . . . . . . . . .4. . . . . . . . . . . . . .rtant Impo . . . . No . . . te . . fo . . r. .mo . . bile . . . . device . . . . . . .use . . . . . . . . . . . . . . . . . . . . . . . . . . . . . . . . . . . . . . . . . . . . . . . . . . . . . . . . . . . . . . . . . . . . . . . . . . . . . . . . 4. . . . . . . . . . . . te No . . Impo . . . . .rtante . . . . . .po . . ur . . .l'utilisatio . . . . . . . . n. .de . . .dispo . . . . .sitifs . . . . mo . . . biles . . . . . . . . . . . . . . . . . . . . . . . . . . . . . . . . . . . . . . . . . . . . . . . . . . . . . . . . . . . . . . . . .5. . . . . . . . . . . . . . . . –. .EU Europe . . . Declaration . . . . . . . . . . .of . .Conform . . . . . . . . ity . . . . . . . . . . . . . . . . . . . . . . . . . . . . . . . . . . . . . . . . . . . . . . . . . . . . . . . . . . . . . . . . . . . . . . . . . . . . . . . .5. . . . . . . . . . . . . . . source Power . . . . . . . . . . . . . . . . . . . . . . . . . . . . . . . . . . . . . . . . . . . . . . . . . . . . . . . . . . . . . . . . . . . . . . . . . . . . . . . . . . . . . . . . . . . . . . . . . . . . . . . . . . .6. . . . . . . . . . . . . . . . safety Battery . . . . . . . . . . . . . . . . . . . . . . . . . . . . . . . . . . . . . . . . . . . . . . . . . . . . . . . . . . . . . . . . . . . . . . . . . . . . . . . . . . . . . . . . . . . . . . . . . . . . . . . .6. . . . . . . . . 2 Introduction . . . . . . . . . . . . . . . . . . . . . . . . . . . . . . . . . . . . . . . . . . . . . . . . . . . . . . . . . . . . . . . . . . . . . . . . . . . . . . . . . . . .8 ....... . . . . . .is. .in. .this What ...m . . anual . . . . . . . . . . . . . . . . . . . . . . . . . . . . . . . . . . . . . . . . . . . . . . . . . . . . . . . . . . . . . . . . . . . . . . . . . . . . . . . . . . . . . . . . . . . . . . . . . .8. . . . . . . . . . . . . . should Who . . . . . . .use . . .this . . . .m. anual . . . . . . . . . . . . . . . . . . . . . . . . . . . . . . . . . . . . . . . . . . . . . . . . . . . . . . . . . . . . . . . . . . . . . . . . . . . . . . . . . . . . . . . . . . . . .8. . . . . . . . . . . . . contents Box . . . . . . . . . . . . . . . . . . . . . . . . . . . . . . . . . . . . . . . . . . . . . . . . . . . . . . . . . . . . . . . . . . . . . . . . . . . . . . . . . . . . . . . . . . . . . . . . . . . . . . . . . . . . .8. . . . . . . . . . . . . . . um Minim . . . .system . . . . . . requirem . . . . . . . . ents . . . . . . . . . . . . . . . . . . . . . . . . . . . . . . . . . . . . . . . . . . . . . . . . . . . . . . . . . . . . . . . . . . . . . . . . . . . . . . . . . . . . . . . . .9. . . . . . . . . . . . . . . OS: Client . . . . . . . . . . . . . . . . . . . . . . . . . . . . . . . . . . . . . . . . . . . . . . . . . . . . . . . . . . . . . . . . . . . . . . . . . . . . . . . . . . . . . . . . . . . . . . . . . . . . . . . .10 .......... . . . . . bro Web . . . .wsers: . . . . . . . . . . . . . . . . . . . . . . . . . . . . . . . . . . . . . . . . . . . . . . . . . . . . . . . . . . . . . . . . . . . . . . . . . . . . . . . . . . . . . . . . . . . . . . . . . . . . .10 .......... . . . . . . rk: Netwo . . . . . . . . . . . . . . . . . . . . . . . . . . . . . . . . . . . . . . . . . . . . . . . . . . . . . . . . . . . . . . . . . . . . . . . . . . . . . . . . . . . . . . . . . . . . . . . . . . . . . . . .10 .......... 3 System . . . . . . . .Overview . . . . . . . . . . . . . . . . . . . . . . . . . . . . . . . . . . . . . . . . . . . . . . . . . . . . . . . . . . . . . . . . . . . . . . . . . . . 12 ........ . . . . . . . NAS Seagate . . . . .OS . . . . . . . . . . . . . . . . . . . . . . . . . . . . . . . . . . . . . . . . . . . . . . . . . . . . . . . . . . . . . . . . . . . . . . . . . . . . . . . . . . . . . . . . . . . . . . . . . . . .13 .......... . . . . . . . . . dim Enclosure . . . .ensions . . . . . . . . . . . . . . . . . . . . . . . . . . . . . . . . . . . . . . . . . . . . . . . . . . . . . . . . . . . . . . . . . . . . . . . . . . . . . . . . . . . . . . . . . . . . . . . . . . .13 .......... . . . . . .panel Front . . . . .view . . . . . . . . . . . . . . . . . . . . . . . . . . . . . . . . . . . . . . . . . . . . . . . . . . . . . . . . . . . . . . . . . . . . . . . . . . . . . . . . . . . . . . . . . . . . . . . . . . . . .14 .......... . . . . .panel Rear . . . . .view . . . . . . . . . . . . . . . . . . . . . . . . . . . . . . . . . . . . . . . . . . . . . . . . . . . . . . . . . . . . . . . . . . . . . . . . . . . . . . . . . . . . . . . . . . . . . . . . . . . . . .15 .......... . . . . .po USB . . rts . . . . . . . . . . . . . . . . . . . . . . . . . . . . . . . . . . . . . . . . . . . . . . . . . . . . . . . . . . . . . . . . . . . . . . . . . . . . . . . . . . . . . . . . . . . . . . . . . . . . . . .15 .......... . . . . . .fram Drive . . . .es . . . . . . . . . . . . . . . . . . . . . . . . . . . . . . . . . . . . . . . . . . . . . . . . . . . . . . . . . . . . . . . . . . . . . . . . . . . . . . . . . . . . . . . . . . . . . . . . . . . . . 16 ........... 4 System . . . . . . . .LEDs . . . . . . . . . . . . . . . . . . . . . . . . . . . . . . . . . . . . . . . . . . . . . . . . . . . . . . . . . . . . . . . . . . . . . . . . . . . 18 ........ . . . . . . . . . . . . . . . . . . . . . . . . . . . . . . . . . . . . . . . . . . . . . . . . . . . . . . . . . . . . . . . . . . . . . . . . . . . . . . . . . . . . . . . . . . . . . . . . . . . . . . . . . . . . . . . 18 Front ........... . . . . . . . . . . . . . . . . . . . . . . . . . . . . . . . . . . . . . . . . . . . . . . . . . . . . . . . . . . . . . . . . . . . . . . . . . . . . . . . . . . . . . . . . . . . . . . . . . . . . . . . . . . . . . . . 18 Rear ........... . . . . . . . chassis Interior . . . . . . . . . . . . . . . . . . . . . . . . . . . . . . . . . . . . . . . . . . . . . . . . . . . . . . . . . . . . . . . . . . . . . . . . . . . . . . . . . . . . . . . . . . . . . . . . . . . . . . . . .19 .......... . . . . .behavior LED . . . . . . . . . . . . . . . . . . . . . . . . . . . . . . . . . . . . . . . . . . . . . . . . . . . . . . . . . . . . . . . . . . . . . . . . . . . . . . . . . . . . . . . . . . . . . . . . . . . . . . . . . . .19 .......... . . . . . . . . LED General . . . . behavio . . . . . . . .r. . . . . . . . . . . . . . . . . . . . . . . . . . . . . . . . . . . . . . . . . . . . . . . . . . . . . . . . . . . . . . . . . . . . . . . . . . . . . . . . . . . . . . . . . .19 .......... . . . . . . and Status . . . . disk . . . . LEDs . . . . . . . . . . . . . . . . . . . . . . . . . . . . . . . . . . . . . . . . . . . . . . . . . . . . . . . . . . . . . . . . . . . . . . . . . . . . . . . . . . . . . . . . . . . . . . . .20 .......... . . . . . . . . . identificatio Ethernet, . . . . . . . . . . n, . . .and . . . mute . . . . . LEDs . . . . . . . . . . . . . . . . . . . . . . . . . . . . . . . . . . . . . . . . . . . . . . . . . . . . . . . . . . . . . . . . . . . . . . . . . . . . . . . .21 .......... . . . . . . . . .LEDs Ethernet . . . . . . . . . . . . . . . . . . . . . . . . . . . . . . . . . . . . . . . . . . . . . . . . . . . . . . . . . . . . . . . . . . . . . . . . . . . . . . . . . . . . . . . . . . . . . . . . . . .21 .......... . . . . . . . . . . .n. LED Identificatio . . . . . . . . . . . . . . . . . . . . . . . . . . . . . . . . . . . . . . . . . . . . . . . . . . . . . . . . . . . . . . . . . . . . . . . . . . . . . . . . . . . . . . . . . . . . . . . .21 .......... . . . . . LED Mute . . . . . . . . . . . . . . . . . . . . . . . . . . . . . . . . . . . . . . . . . . . . . . . . . . . . . . . . . . . . . . . . . . . . . . . . . . . . . . . . . . . . . . . . . . . . . . . . . . . . . . .22 .......... 5 Setting . . . . . . . Up . . . . . . . . . . . . . . . . . . . . . . . . . . . . . . . . . . . . . . . . . . . . . . . . . . . . . . . . . . . . . . . . . . . . . . . . . . . . 23 ........ . . . . .1. -. .Rack Step . . . . . . . . . . . . . . . . . . . . . . . . . . . . . . . . . . . . . . . . . . . . . . . . . . . . . . . . . . . . . . . . . . . . . . . . . . . . . . . . . . . . . . . . . . . . . . . . . . . . . . . .23 .......... . . . . .2. -. .Cable Step . . . . . Managem . . . . . . . . .ent . . .Arm . . . . . . . . . . . . . . . . . . . . . . . . . . . . . . . . . . . . . . . . . . . . . . . . . . . . . . . . . . . . . . . . . . . . . . . . . . . . . . . . . . . . . . .25 .......... . . . . .3. -. .Cables Step . . . . . . . . . . . . . . . . . . . . . . . . . . . . . . . . . . . . . . . . . . . . . . . . . . . . . . . . . . . . . . . . . . . . . . . . . . . . . . . . . . . . . . . . . . . . . . . . . . . . . . . 26 ........... . . . nnectio Co . . . . . . . ns . . . . . . . . . . . . . . . . . . . . . . . . . . . . . . . . . . . . . . . . . . . . . . . . . . . . . . . . . . . . . . . . . . . . . . . . . . . . . . . . . . . . . . . . . . . . . . . . . . . .26 .......... . . . . . . . . . . . . . . . . . . . . . . . . . . . . . . . . . . . . . . . . . . . . . . . . . . . . . . . . . . . . . . . . . . . . . . . . . . . . . . . . . . . . . . . . . . . . . . . . . . . . . . . . . . . . . .27 Placement .......... . . . . . . rk Netwo . . .and . . . .po . . wer . . . . . . . . . . . . . . . . . . . . . . . . . . . . . . . . . . . . . . . . . . . . . . . . . . . . . . . . . . . . . . . . . . . . . . . . . . . . . . . . . . . . . . . . . . . . . . .28 .......... . . . . .4. -. .Drives Step . . . . . . . . . . . . . . . . . . . . . . . . . . . . . . . . . . . . . . . . . . . . . . . . . . . . . . . . . . . . . . . . . . . . . . . . . . . . . . . . . . . . . . . . . . . . . . . . . . . . . . . .29 .......... . . . . . .ve Remo . . the . . . .co . .ver . . . . . . . . . . . . . . . . . . . . . . . . . . . . . . . . . . . . . . . . . . . . . . . . . . . . . . . . . . . . . . . . . . . . . . . . . . . . . . . . . . . . . . . . . . . . . . . .29 .......... . . . . . . the Insert . . . drives . . . . . . . . . . . . . . . . . . . . . . . . . . . . . . . . . . . . . . . . . . . . . . . . . . . . . . . . . . . . . . . . . . . . . . . . . . . . . . . . . . . . . . . . . . . . . . . . . . . . .30 .......... . . . . .5. -. .Log Step . . . on . . . to . . the . . . .NAS . . . . . . . . . . . . . . . . . . . . . . . . . . . . . . . . . . . . . . . . . . . . . . . . . . . . . . . . . . . . . . . . . . . . . . . . . . . . . . . . . . . . . . . . . . . .35 .......... 6 Software . . . . . . . . . . . . . . . . . . . . . . . . . . . . . . . . . . . . . . . . . . . . . . . . . . . . . . . . . . . . . . . . . . . . . . . . . . . . . . . . . . . 39 ........ 7 Getting . . . . . . . Help . . . . . . . . . . . . . . . . . . . . . . . . . . . . . . . . . . . . . . . . . . . . . . . . . . . . . . . . . . . . . . . . . . . . . . . . . . . . 41 ........ . . . . . . . . . . . . . . . topics Troubleshooting . . . . . . . . . . . . . . . . . . . . . . . . . . . . . . . . . . . . . . . . . . . . . . . . . . . . . . . . . . . . . . . . . . . . . . . . . . . . . . . . . . . . . . . . . . . . . . . . .41 .......... . . . . 8-bay The . . . . . . Rackmo . . . . . . . unt . . . NAS . . . . .will . . . no . . .t.turn . . . . o. n. . . . . . . . . . . . . . . . . . . . . . . . . . . . . . . . . . . . . . . . . . . . . . . . . . . . . . . . . . . . . . . . . . . . . . . . . .41 .......... . . . . 8-bay The . . . . . . Rackmo . . . . . . . unt . . . NAS . . . . .turns . . . . . o. ff . .when . . . . . I. co . . .nnect . . . . . a. .USB . . . . device. . . . . . . . . . . . . . . . . . . . . . . . . . . . . . . . . . . . . . . . . . . . . . . . . . . . . . . . . .41 .......... Regulatory Compliance FCC Declara on of Conformance This device complies with Part 15 of the FCC Rules. Operation is subject to the following two conditions: (1) this device may not cause harmful interference, and (2) this device must accept any interference received, including interference that may cause undesired operation. FCC Class A Informa on This equipment has been tested and found to comply with the limits for a Class A digital device, pursuant to Part 15 of the FCC Rules. These limits are designed to provide reasonable protection against harmful interference in a residential installation. This equipment generates, uses and can radiate radio frequency energy and, if not installed and used in accordance with the instructions, may cause harmful interference to radio communications. However, there is no guarantee that interference will not occur in a particular installation. If this equipment does cause harmful interference to radio or television reception, which can be determined by turning the equipment off and on, the user is encouraged to try to correct the interference by one of the following measures: Reorient or relocate the receiving antenna. Increase the separation between the equipment and receiver. Connect the equipment into an outlet on a circuit different from that to which the receiver is connected. Consult the dealer or an experienced radio/TV technician for help. This device complies with Part 15 of the FCC Rules. Operation is subject to the following two conditions: (1) This device may not cause harmful interference, and (2) this device must accept any interference received, including interference that may cause undesired operation. FCC Cau on Any changes or modifications not expressly approved by the party responsible for compliance could void the user's authority to operate this equipment. Important Note: FCC Radia on Exposure Statement This equipment complies with FCC radiation exposure limits set forth for an uncontrolled environment. This equipment should be installed and operated with minimum distance 20cm between the radiator & your body. This transmitter must not be co-located or operating in conjunction with any other antenna or transmitter. The availability of some specific channels and/or operational frequency bands are country dependent and are firmware programmed at the factory to match the intended destination. The firmware setting is not accessible by the end user. Industry Canada This device complies with RSS-210 of the Industry Canada Rules. Operation is subject to the following two conditions: (1) This device may not cause harmful interference, and (2) this device must accept any interference received, including interference that may cause undesired operation. Ce dispositif est conforme à la norme CNR-210 d'Industrie Canada applicable aux appareils radio exempts de licence. Son fonctionnement est sujet aux deux conditions suivantes: (1) le dispositif ne doit pas produire de brouillage préjudiciable, et (2) ce dispositif doit accepter tout brouillage reçu, y compris un brouillage susceptible de provoquer un fonctionnement indésirable. Important Note for mobile device use Seagate 8-Bay Rackmo unt NAS 1/21/15 4 Radiation Exposure Statement: This equipment complies with IC radiation exposure limits set forth for an uncontrolled environment. This equipment should be installed and operated with minimum distance 20cm between the radiator & your body. Note Importante pour l'u lisa on de disposi fs mobiles Déclaration d'exposition aux radiations: Cet équipement est conforme aux limites d'exposition aux rayonnements IC établies pour un environnement non contrôlé. Cet équipement doit être installé et utilisé avec un minimum de 20 cm de distance entre la source de rayonnement et votre corps. Europe – EU Declara on of Conformity This device complies with the essential requirements of the EMC Directive 2004/108/EC. The following test methods have been applied in order to prove presumption of conformity with the essential requirements of the EMC Directive 2004/108/EC: EN 60950-1:2006/AC:2011: Information technology equipment - Safety - Part 1: General requirements EN 55022: 2010/AC:2011: Information technology equipment - Radio disturbance characteristics Limits and methods of measurement EN 55024: 2010: Information technology equipment - Immunity characteristics - Limits and methods of measurement Česky [Czech] Seagate tímto prohlašuje, že tento Rackmount NAS je ve shodě se základními požadavky a dalšími příslušnými ustanoveními směrnice 2004/5/ES. Dansk [Danish] Undertegnede Seagate erklærer herved, at følgende udstyr Rackmount NAS overholder de væsentlige krav og øvrige relevante krav i direktiv 2004/5/EF. Deutsch [German] Hiermit erklärt Seagate, dass sich das Gerät Rackmount NAS in Übereinstimmung mit den grundlegenden Anforderungen und den übrigen einschlägigen Bestimmungen der Richtlinie 2004/5/EG befindet. Eesti [Estonian] Käesolevaga kinnitab Seagate seadme Rackmount NAS vastavust direktiivi 2004/5/EÜ põhinõuetele ja nimetatud direktiivist tulenevatele teistele asjakohastele sätetele. English Hereby, Seagate, declares that this Rackmount NASis in compliance with the essential requirements and other relevant provisions of Directive 2004/5/EC. Español [Spanish] Por medio de la presente Seagate declara que el Rackmount NAS cumple con los requisitos esenciales y cualesquiera otras disposiciones aplicables o exigibles de la Directiva 2004/5/CE. Ελληνική [Greek] ΜΕ ΤΗΝ ΠΑΡΟΥΣ SeagateΔΗΛΩΝΕΙ ΟΤΙRackmount NASΣΥΜΜΟΡΦΩΝΕΤΑΙ ΠΡΟΣ ΤΙΣ ΟΥΣΙΩΔΕΙΣ ΑΠΑΙΤΗΣΕΙΣ ΚΑΙ ΤΙΣ ΛΟΙΠΕΣ ΣΧΕΤΙΚΕΣ ΔΙΑΤΑΞΕΙΣ ΤΗΣ ΟΔΗΓΙΑΣ 2004/5/ΕΚ. Français [French] Par la présente Seagate déclare que l'appareil Rackmount NASest conforme aux exigences essentielles et aux autres dispositions pertinentes de la directive 2004/5/CE. Seagate 8-Bay Rackmo unt NAS 1/21/15 5 Italiano [Italian] Con la presente Seagate dichiara che questo Rackmount NAS è conforme ai requisiti essenziali ed alle altre disposizioni pertinenti stabilite dalla direttiva 2004/5/CE. Latviski [Latvian] Ar šo Seagatedeklarē, ka Rackmount NAS atbilst Direktīvas 2004/104/EK būtiskajām prasībām un citiem ar to saistītajiem noteikumiem. Lietuvių [Lithuanian] Šiuo Seagate deklaruoja, kad šis Rackmount NAS atitinka esminius reikalavimus ir kitas 2004/104/EB Direktyvos nuostatas. Nederlands [Dutch] Hierbij verklaart Seagate dat het toestel Rackmount NAS in overeenstemming is met de essentiële eisen en de andere relevante bepalingen van richtlijn 2004/104/EG. Malti [Maltese] Hawnhekk, Seagate, jiddikjara li dan Rackmount NAS jikkonforma mal-ħtiġijiet essenzjali u ma provvedimenti oħrajn relevanti li hemm fid-Dirrettiva 2004/104/EC. Magyar [Hungarian] Alulírott, Seagate nyilatkozom, hogy a Rackmount NASmegfelel a vonatkozó alapvetõ követelményeknek és az 2004/104/EC irányelv egyéb elõírásainak. Polski [Polish] Niniejszym Seagate oświadcza, że Rackmount NAS jest zgodny z zasadniczymi wymogami oraz pozostałymi stosownymi postanowieniami Dyrektywy 2004/104/EC. Português [Portuguese] Seagate declara que este Rackmount NAS está conforme com os requisitos essenciais e outras disposições da Directiva 2004/104/CE. Slovensko [Slovenian] Seagateizjavlja, da je at Rackmount NAS v skladu z bistvenimi zahtevami in ostalimi relevantnimi določili direktive 2004/104/ES. Slovensky [Slovak] Seagate týmto vyhlasuje, že Rackmount NAS spĺňa základné požiadavky a všetky príslušné ustanovenia Smernice 2004/104/ES. Suomi [Finnish] Seagate vakuuttaa täten että Rackmount NAS tyyppinen laite on direktiivin 2004/104/EY oleellisten vaatimusten ja sitä koskevien direktiivin muiden ehtojen mukainen. Svenska [Swedish] Härmed intygar Seagate att denna Rackmount NAS står I överensstämmelse med de väsentliga egenskapskrav och övriga relevanta bestämmelser som framgår av direktiv 2004/104/EG. Power source Caution: Use the product with the provided power supply only. Note: To protect your data, always follow the safe removal procedures for your operating system when disconnecting your product. Ba ery safety This product contains a lithium-ion battery that must be disposed of properly. Follow the battery safety items below: Do not dismantle, open or shred secondary cells or batteries. Seagate 8-Bay Rackmo unt NAS 1/21/15 6 Do not expose cells or batteries to heat or fire. Avoid storage in direct sunlight. Do not short-circuit a cell or a battery. Do not store cells or batteries haphazardly in a box or drawer where they may shortcircuit each other or be short-circuited by, other metal objects. Do not use any charger other than that specifically provided for use with the equipment. Do not use any cell or battery which is not designed for use with the equipment. Do not mix cells of different manufacture, capacity, size or type within a device. Seek medical advice immediately if a cell or a battery has been swallowed. Do not subject cells or batteries to mechanical shock. In the event of a cell leaking, do not allow the liquid to come in contact with the skin or eyes. If contact has been made, wash the affected area with copious amounts of water and seek medical advice. Keep cells and batteries out of the reach of children. Keep cells and batteries clean and dry. Secondary cells and batteries need to be charged before use. Always use the correct charger and refer to the manufacturer's instructions or equipment manual for proper charging instructions. Do not leave a battery on prolonged charge when not in use. After extended periods of storage, it may be necessary to charge and discharge the cells or batteries several times to obtain maximum performance. Secondary cells and batteries give their best performance when they are operated at normal room temperature (20°C±5°C). Retain the original product literature for future reference. Use only the cell or battery in the application for which it was intended. Dispose of properly. Seagate 8-Bay Rackmo unt NAS 1/21/15 7 Introduc on What is in this manual Thank you for purchasing a Seagate 8-bay Rackmount NAS. Offering both high-end performance and advanced data sharing, your 8-bay Rackmount NAS is the next generation of Business Storage. This user manual gives you step-by-step instructions on installation, hardware maintenance, and troubleshooting. If you encounter problems, check Getting Help . Important info:Refer to Warranty before performing any hardware repairs or maintenance that is not described in this manual. Who should use this manual This user manual assumes that you have a working knowledge of networks, NAS (network-attached storage), and storage products. If you do not have these skills or, are not confident with the instructions in this guide, do not proceed with the installation or component replacement. Box contents Seagate 8-Bay Rackmo unt NAS 1/21/15 8 1. Quick Start Guide 2. Drive stickers 3. USB key 4. Inner rack rail screws (M4x4); outer rack rail screws (M5x10), and washers (W) 5. Power supply cables (x2) 6. Ethernet cable 7. Cable management arm kit 8. Seagate 8-bay Rackmount NAS 9. Hard drives 10. Inner rack rails (A1, A2) and outer rack rails (B1, B2) An additional plastic sac of screws has been provided to fasten hard drives to the NAS drive drawers. Make certain to use these screws when installing drives in NAS enclosures that are not fully populated. Important info:Save your packaging. In the event that the product should need to be repaired or serviced, it must be returned in its original packaging. Minimum system requirements Client OS: Seagate 8-Bay Rackmo unt NAS 1/21/15 9 Client OS: Windows 8 (32-bit/64-bit) Windows 7 (32-bit/64-bit) Windows Vista (32-bit/64-bit) Windows XP Windows Server 2012 Windows Server 2008 R2 Windows Server 2008 Mac OS 10.6 and later Linux 2.6 and later Web browsers: Internet Explorer™ 7.0 or higher Firefox™ 3.0 or higher Safari™ 3.0 or higher Chrome 2.0 or higher Network: Computer with an Ethernet network adapter Ethernet switch or router 10/100/1000 (Mb/s) Important info:Consider the following when configuring your NAS: Connect your NAS to a network with a DHCP server for automatic remote server setup; the NAS's performance can be affected by such external forces as network activity, hardware, distance, and setup; for optimal performance, make certain that you are using Gigabit Ethernet routers and peripherals, and that the computers on the network support Gigabit Ethernet. Seagate 8-Bay Rackmo unt NAS 1/21/15 10 Seagate 8-Bay Rackmo unt NAS 1/21/15 11 System Overview The 8-bay Rackmount NAS is a 1U-sized hard drive enclosure. It houses up to eight 3.5-inch hard drives in its front chassis (see the illustration above). Enclosures shipped with hard drives feature Seagate's high-end nearline hard drives. For more information on nearline hard drives, go to Seagate Enterprise Drives . New or replacement hard drives must meet the following requirements: SATA I or higher 3.0Gb/s or higher Spin up to 7200 RPM Seagate 8-Bay Rackmo unt NAS 1/21/15 12 In case of disk failure or, the need to expand storage capacity, each individual hard drive is hot-swappable and field replaceable. When adding hard drives to the enclosure, consider using Seagate nearline storage. Seagate NAS OS The 8-bay Rackmount NAS is managed by Seagate NAS OS. Written to all drives within the enclosure, NAS OS helps you to create volumes with RAID protection. Direct attached storage (DAS) can be connected to the enclosure's external ports for NAS backup. However, it is not possible to expand volumes using DAS. Enclosure dimensions Seagate 8-Bay Rackmo unt NAS 1/21/15 13 Front panel view 1. Rackmount brackets: Attaches your Seagate 8-bay Rackmount NAS to standard, 19-inch computer equipment racks. See Setting Up . 2. Power button: Used to turn the system on and off. See Operation . 3. Status LED: Indicates that the device is powered on and provides status signals. See System LEDs . 4. Ethernet LEDs 1 and 2: A LED will turn blue when its respective port is connected to the network. Blinking indicates activity on the LAN. 5. USB 2.0 port: Connect compatible USB devices to the port. 6. MAC address label: Slide the label toward you to view the MAC addresses for the Ethernet ports. The MAC addresses Seagate 8-Bay Rackmo unt NAS 1/21/15 14 are also listed on a sticker located on the rear cover. MAC addresses are requested when running the NAS OS Installer to reinstall the operating system or to repair or rescue the system. 7. Disk LEDs: Indicates the status and activity for the drives in the enclosure. 8. Identification button: Pushing this button will cause the identification LEDs in the front and rear of the device to flash amber and the alarm to sound. The flashing LEDs allow you to identify the 8-bay Rackmount NAS among a group of racked devices. There is another identification button on the rear of the device that can also be pushed to turn on the identification LEDs and sound the alarm. Both buttons work in tandem, allowing you to turn the visual and audio identifications on and off. For example, you can use the identification button on the front of the device to turn them on and then turn them off via the rear identification button. A third identification option is available in the NAS OS administration tool. 9. Mute button: Push the button to turn off an existing audio alarm or, to prevent the system from sounding an audio alarm. An audible alarm will sound when someone pushes an identification button or chooses the option in the NAS OS administration tool. It will also sound if the unit senses a problem with the hardware, such as a faulty power supply unit or elevated temperatures. When the Mute button is pushed, its LED will turn amber, indicating that the alarm will not sound, even if the NAS experiences hardware errors. For details on LED behavior. See System LEDs . Rear panel view 1. Identification Button and LED: Pushing this button will cause the identification LEDs in the front and rear of the device to flash amber and the alarm to sound. The flashing LEDs allow you to identify the 8-bay Rackmount NAS among a group of racked devices. There is another identification button on the front of the device that can also be pushed to turn on the identification LEDs and sound the alarm. Both buttons work in tandem, allowing you to turn the visual and audio identifications on and off. For example, you can use the identification button on the front of the device to turn them on and then turn them off via the rear identification button. A third identification option is available in the NAS OS administration tool. 2. Ventilation: Helps to keep your NAS's power supply units cool during operation. Be sure not to block this fan when using the product. 3. Power inputs: Where you plug in the AC adapter supplied with the drive. See Setting Up . 4. PS/2 ports: Connect a mouse and keyboard for maintenance. 5. Hi-Speed USB 2.0 ports: Can be used for direct-attached storage (DAS) or USB devices such as a mouse and keyboard. 6. RS-232: Serial communications port. 7. VGA video port: Connect a VGA display for maintenance. 8. Gigabit Ethernet ports: Connect Ethernet cables from the device to your network. See Setting Up . USB ports Seagate 8-Bay Rackmo unt NAS 1/21/15 15 The 8-bay Rackmount NAS has three USB 2.0 ports, which lets you connect DAS or other USB devices: Storage devices connected to a USB port should be formatted using one of the following file systems: FAT32, NTFS, HFS+, EXT2, EXT3, EXT4, and XFS. Other storage formats will not be recognized by the NAS. No capacity limitations apply. You can connect any USB keyboard, USB mouse, or USB accessories. Drive frames Seagate 8-Bay Rackmo unt NAS 1/21/15 16 The 8-bay Rackmount NAS has two drive frames, each housing four 3.5-inch form factor disk drives. The frame has mounting locations for SATA drives. The drive frame provides thermal conduction, radio frequency, and electro-magnetic induction protection and affords the drives physical protection. Seagate 8-Bay Rackmo unt NAS 1/21/15 17 System LEDs The 8-bay Rackmount NAS features three sets of LEDs that provide information on the system's status. Review the illustrations below for the LED locations on the chassis. Front 1. 2. 3. 4. 5. Status LED Ethernet LEDs Disk LEDs Identification LED Mute LED Rear 1. Identification LED and LED button Seagate 8-Bay Rackmo unt NAS 1/21/15 18 Interior chassis 1. Disk LEDs LED behavior General LED behavior The list of colors below will help you identify the general status of your NAS: Color Seagate 8-Bay Rackmo unt NAS State 1/21/15 19 Solid blue Ready Blinking blue Startup; shutdown; activity Blinking red and blue RAID synchronization; software update Blinking red Warning Solid red Error Solid purple Updating hardware Blinking purple Communication has been lost Status and disk LEDs The status and disk LEDs work together to provide up-to-date details on your NAS's health. Status LED Behavior Disk LEDs Behavior State Blinking blue Blinking blue for working disks (until they are fully initialized) Occurs as the device is booting and will cease once the drives are fully initialized. Solid blue Blinking blue for working disks Drives working (read/write) Blinking blue/red Blinking blue/red RAID synchronizing and will cease once the operation is finished. Blinking blue for working disks NAS OS update in progress. Solid red for non-functional disk(s) RAID is degraded. data remains intact but the array is no longer protected should another disk fail. Blinking blue led for all disks Temperature alert (first level warning) Blinking red Fans are not spinning A power supply has been cut but power is provided by the second power supply and/or the ups. Seagate 8-Bay Rackmo unt NAS 1/21/15 20 Solid red Blinking blue for working disks Temperature alert (critical level). the product will shut off due to the high temperature. The power supplies are not providing power and, if applicable, the ups has run out of reserve power. the product will shut off. Solid red for non-functional disks RAID has failed and all data has been lost. Off on disks A disk has not been plugged into the slot's SATA connection or it is not receiving power. Solid purple Solid blue Updating hardware Blinking purple Solid blue Communication has been lost. See Hardware Maintenance . Ethernet, iden fica on, and mute LEDs Ethernet LEDs Behavior State Solid blue The Ethernet port is connected to the network. Blinking blue Activity on the Ethernet port. Off The Ethernet port is not connected to the network. Iden fica on LED Behavior State Seagate 8-Bay Rackmo unt NAS 1/21/15 21 Blinking amber An identification button has been pushed (front, rear, or NAS OS). A corresponding LED on the rear of the NAS will also blink amber to identify the unit in the rack. Off The identification feature is off. Mute LED Behavior State Solid amber The mute button has been pushed to turn off an audible alert or, to stop the unit from sounding an audible alert. Off The mute feature is off. Seagate 8-Bay Rackmo unt NAS 1/21/15 22 Se ng Up The Seagate 8-bay Rackmount NAS is shipped with the following installation components: Rack rail kit for a standard 19-inch rack Cable management arm kit Hard drives (the amount of disks will vary by model) Seagate 8-bay Rackmount NAS chassis The instructions are also available in the Quick Start Guide included with the NAS. Step 1 - Rack 1. Attach the inner rack rails to the Seagate 8-Bay Rackmount NAS using four screws on each side. 2. Unlock the rear screws on the outer rack rails to extend the sliding brackets. Seagate 8-Bay Rackmo unt NAS 1/21/15 23 3. Attach the outer rack rails to the rack. Seagate 8-Bay Rackmo unt NAS 1/21/15 24 4. Slide the Seagate NAS into the rack. You will hear a click indicating that the NAS is securely fastened to the rack. Step 2 - Cable Management Arm Attach the cable management arm to the back of the rack rails. 1. Snap the right outer connection into the outside rail. Seagate 8-Bay Rackmo unt NAS 1/21/15 25 2. Snap the left connection into the outside rail. 3. Guide the right inner connection into the inner rack rail. Step 3 - Cables Connec ons Seagate 8-Bay Rackmo unt NAS 1/21/15 26 Ethernet Power cables (2) You can also connect: A second Ethernet cable for redundancy or performance. A mouse, a keyboard and a VGA monitor for maintenance. Placement 1. Open the panels on the cable management arm and thread the cables. Allow slack for external connections and sliding the NAS on its rails. Seagate 8-Bay Rackmo unt NAS 1/21/15 27 2. Close the panels. Network and power 1. Connect the Ethernet cables to your router. Seagate 8-Bay Rackmo unt NAS 1/21/15 28 Connect the Ethernet cables to your router. 2. Connect the power cables to outlets. Step 4 - Drives Remove the cover 1. Slide the NAS toward you until it locks into position. 2. Release the cover by simultaneously pushing both front latches toward you. Seagate 8-Bay Rackmo unt NAS 1/21/15 29 3. Lift the cover. Insert the drives Seagate 8-Bay Rackmo unt NAS 1/21/15 30 Important info: Make certain that you are properly grounded before touching the disks. 1. Push the disk’s lock button to open the latch. 2. Place the disk on the NAS’s hard drive guides. Confirm that the disk is correctly aligned on the guides by gently pushing it away from the SATA connection. Seagate 8-Bay Rackmo unt NAS 1/21/15 31 3. Slide the disk into the SATA connection. Seagate 8-Bay Rackmo unt NAS 1/21/15 32 4. Close the disk’s latch. Seagate 8-Bay Rackmo unt NAS 1/21/15 33 5. Repeat the steps for each disk. 6. Close the cover and slide the NAS into the rack. To unlock the rails, pull the rail fasteners on each side toward you. Secure the NAS to the rack using the two front screws. Seagate 8-Bay Rackmo unt NAS 1/21/15 34 Step 5 - Log on to the NAS 1. Power on the NAS. Wait for the status LED to turn solid before moving to the next step. Seagate 8-Bay Rackmo unt NAS 1/21/15 35 2. From a workstation on your network, launch a web browser to enter http://seagate-r8 or, http://seagate-r8.local for Mac or any workstation using Bonjour. 3. Follow the on-screen instructions to complete the installation. Seagate 8-Bay Rackmo unt NAS 1/21/15 36 Seagate 8-Bay Rackmo unt NAS 1/21/15 37 Seagate 8-Bay Rackmo unt NAS 1/21/15 38 So ware The Seagate 8-bay Rackmount NAS is preinstalled with Seagate NAS OS. To manage the NAS, the administrator can launch the web-based administration tool. Use NAS OS to: Allocate the NAS's drives into volumes Configure RAID Set up the NAS's network connection Link the Ethernet ports for performance or protection Create shares for data distribution Create users and groups for access rights to data Create iSCSI targets Set up remote access Check the health of the NAS See the NAS OS User Manual on how to manage all the features available to the Seagate 8-bay Rackmount NAS. Seagate 8-Bay Rackmo unt NAS 1/21/15 for instructions 39 Seagate 8-Bay Rackmo unt NAS 1/21/15 40 Ge ng Help If you are having issues with your product, first consult this user manual and the troubleshooting topics below. If the problem persists, refer to: The Seagate NAS OS User Manual Seagate Technical Support Warranty rights and responsibilities Note: Seagate is dedicated to providing high quality products that enrich the lives of our customers. To help Seagate offer the best customer support, we encourage you to create an account and register your product at https://www.onlineregister.com/seagate/ . You can give us important feedback as well as receive updated information on your Seagate device. Troubleshoo ng topics The 8-bay Rackmount NAS will not turn on. Q: Can you confirm that the NAS is receiving power? A: Make sure the power cord is properly connected, then push the power button until the Status LED turns ON. Q: Have you connected a USB storage device? A: The NAS may be attempting to boot from it. Unplug the device and retry to reboot the system. Q: Does the motherboard battery need to be replaced? A: A non-functioning motherboard battery could prevent the system from booting. Contact Seagate support for confirmation and help. Q: Is there a problem with one or both power supply units? A: Connect a monitor, mouse, and keyboard, and turn your product on. If you don't see anything on the monitor,that means that the problem may result from the NAS's power supply units. Your NAS has redundant power supplies that allow for one to fail. Contact Seagate support if you believe that one or both power supplies have failed. In the rare case in which both power supplies fail at the same time, you may be asked to send NAS to Seagate for review. ______________________________________________________________________________________ The 8-bay Rackmount NAS turns off when I connect a USB device. Q: Have you connected more than three bus-powered USB devices or is one of your devices drawing an inordinate amount of power? A: Connect no more than three bus-powered USB devices and/or make sure that none of the devices is drawing an inordinate amount of power. Seagate 8-Bay Rackmo unt NAS 1/21/15 41 Q: Did the product turn off as soon as the USB device and the 8-bay Rackmount NAS's USB port came into contact? A: The USB device may have caused a short circuit. Unplug any USB devices you have connected since the failure and reboot the product. Seagate 8-Bay Rackmo unt NAS 1/21/15 42