1
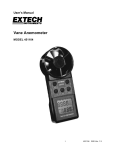
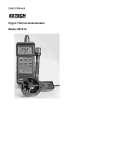
User’s Manual
Battery Operated Counting Scale
MODEL 160273
WARRANTY
EXTECH INSTRUMENTS CORPORATION warrants the basic instrument to be free of defects in
parts and workmanship for one year from date of shipment (a six month limited warranty applies
on sensors and cables). If it should become necessary to return the instrument for service during
or beyond the warranty period, contact the Customer Service Department at (781) 890-7440 for
authorization. A Return Authorization (RA) number must be issued before any product is
returned to Extech. The sender is responsible for shipping charges, freight, insurance and proper
packaging to prevent damage in transit. This warranty does not apply to defects resulting from
action of the user such as misuse, improper wiring, operation outside of specification, improper
maintenance or repair, or unauthorized modification. Extech specifically disclaims any implied
warranties or merchantability or fitness for a specific purpose and will not be liable for any direct,
indirect, incidental or consequential damages. Extech's total liability is limited to repair or
replacement of the product. The warranty set forth above is inclusive and no other warranty,
whether written or oral, is expressed or implied.
CALIBRATION AND REPAIR SERVICES
Extech offers complete repair and calibration services for all of the products we sell. For periodic
calibration, NIST certification or repair of any Extech product, call customer service for details on
services available. Extech recommends that calibration be performed on an annual basis to insure
calibration integrity.
(
Tech Support Hotlines
781-890-7440 ext. 200
[email protected]
www.extech.com
Copyright © 1999 Extech Instruments Corporation.
All rights reserved including the right of reproduction in whole or in part in any form.
160273 V1.1 2/00
2
Introduction
Congratulations on your purchase of Extech’s 160273 Counting Scale. This scale accurately weighs
and Counts components and parts up to 25 lbs. Zero and Tare functions are standard. The Scale is
battery operated and the internal battery is rechargeable using the supplied AC adapter. Proper use
and care of this meter will yield years of reliable service.
Specifications
Display
Status LED
Status LCD arrows
Max. Weight
Resolution
Accuracy
Max. Piece Count
Power supply
Range selection
Auto Power OFF
Operating temp.
Pan Size
Dimensions
Weight
Accessories
Three LCD Displays for Weight, Piece Weight, and Quantity
Red: Battery drained; Green: fully charged; Amber: some charge
LCD status arrows for Zero, Net weight, Light samples, Add samples
25 lbs.
0.005 lbs.
±0.02%
9,999
Internal rechargeable battery
Automatic ranging
Programmable for 5, 10, 20, or 30 minutes (can be deactivated)
32 to 122oF (0 to 50oC)
9.4 x 11” (240 x 280mm)
11.3W x 13.5D x 4.3H” (287W x 344D x 110H mm)
15 lbs. (6.8 kg)
AC Adapter, Spider assembly installation kit
3
Scale Description
1.
2.
3.
4.
5.
Programming Keypad
Scale Platform
AC Adapter/Recharger input
ON/OFF switch (bottom of unit)
LCD Displays for Weight, Piece Weight, & Count
Preparation
1. Place the Scale on a firm, stable tabletop before use. Do not expose the Scale to high wind,
fluctuating temperature/humidity, vibration, or direct sunlight. Avoid dust, sand, and other
particulates when using the Scale.
2. The Scale is powered by an internal re-chargeable battery. The AC adapter used for recharging is
supplied. When the QUANTITY display indicates LobAt (low battery), connect the adapter to the
scale then plug the adapter into a 110V 50/60Hz receptacle to begin charging the Scale. The
CHARGE LED light that is located between the PIECE WEIGHT and the QUANTITY LCD displays
will turn green when the internal battery is fully charged. A red charge light indicates that the
battery is completely drained. An amber light indicates some charge is present in the battery.
3. To optimize the accuracy of the Scale’s readings, warm up the Scale for 30 minutes. Do not leave
weight on the Scale while it is warming up. Connect the AC Adapter to the Scale and to an AC
receptacle (110VAC 50/60Hz) to warm up the Scale since the Auto Power OFF feature will
automatically power the Scale down after 5, 10, 20, or 30 minutes of non-use (programmable).
Auto Power OFF can be defeated, refer to the section entitled “Scale Testing and Configuring”
later in this manual for instructions on configuring the Auto Power OFF feature.
4
Operating Instructions
Explanation of Displays
WEIGHT DISPLAY
LCD Display (left side) indicates Gross weight or Net weight in lbs. (Net weight is used when
Tare function is activated)
PIECE WEIGHT DISPLAY
LCD Display (center) indicates the average or unit piece weight depending upon how the Scale
is programmed.
QUANTITY DISPLAY
LCD Display (right side) indicates the accumulated total number of pieces on the Scale
platform.
ZERO INDICATOR
Located on the lower left hand side of the WEIGHT LCD, this down-arrow indicator appears
when the Scale is zeroed.
NET INDICATOR
Located on the lower right hand side of the WEIGHT LCD, this down-arrow indicator appears
when the weight display is NET (used with TARE function only) rather than GROSS.
ADD SAMPLES INDICATOR
Located on the lower right hand side of the PIECE WEIGHT LCD, this down-arrow indicator
appears when the piece sample on the Scale’s platform is not enough to provide an accurate
count
LIGHT SAMPLE INDICATOR
Located on the lower left hand side of the PIECE WEIGHT LCD, this down-arrow indicator
appears when the piece sample is not heavy enough to provide an accurate count.
Explanation of Programming Keys
ON/OFF KEY
Located on the bottom right hand side of the Scale. Press to power the Scale. Press again to
power down.
ZERO KEY
Resets the weight display to zero
TARE KEY
Press to store Tare weight. If you want to weigh an object while in a container but do not want
the weight of the container to be part of the weight display, simply enter in the weight of the
container as a Tare and only the object weight will display. Refer to later section for more on
the Tare function.
NUMERIC KEYS (0 – 9)
Used to set numeric data for Tare, Sample Number, Sample Weight, or Limit Numbers.
DECIMAL POINT KEY
Used to set the decimal point manually for Tare or Sample Weight.
WT SET KEY
Used to set a known unit weight for normal operation. Also used to set the user programmable
Alarm limit for count checking. For more on the Alarm function, refer to later sections in this
manual.
5
SAMPLE KEY
Used to set a sample count number into memory. When a known number of pieces are set on
the platform, the number would be programmed and then the SAMPLE key would be pressed
to store the number.
CLEAR KEY (CE)
Used to cancel a numeric programming entry or to cancel unit weight data.
CHECK KEY
Used to toggle between Normal counting and Check operations.
MEMORY KEY (M+)
Stores accumulated count data when pressed.
CANCEL MEMORY KEY (CM)
Press to clear the memorized data.
TOTAL KEY
Press to toggle between normal operation and recalling stored data.
Tare Operation
Before beginning, confirm that the ZERO indicator (small down arrow on bottom left of the WEIGHT
LCD ) is ON and the weight display reads zero. If the indicator and the display do not show zero,
press the ZERO key and observe again. Use one of the two following Tare methods:
Push-button Tare
1. Place the Tare weight on the platform.
2. Press the TARE key. The NET down-arrow indicator will appear on the bottom right hand side
of the WEIGHT LCD (LCD on left) and the WEIGHT display will read zero.
3. Remove the Tare weight from the platform. The WEIGHT display will indicate a negative
reading. The reading will be negative in the amount of the TARE weight.
4. When objects are weighed, the reading will be the object weight minus the TARE value.
5. To remove the previous Tare value from memory, remove the weight from the Scale platform
and press the TARE key so that the NET indicator turns off and the WEIGHT display returns to
zero.
Keypad Tare
1. Set the known weight of the Tare object using the numeric and decimal keys on the Scale’s
keypad. Use the PIECE WEIGHT LCD (center) to observe the weight as it’s being entered.
2. Press the TARE key. The NET indicator will illuminate on the WEIGHT LCD and the WEIGHT
display will indicate a negative reading. The reading will be negative in the amount of the
TARE weight.
3. When objects are weighed, the reading will be the weight minus the TARE value.
4. To remove the previous Tare value from memory, Remove the weight from the Scale platform
and press the TARE key so that the NET indicator turns off and the WEIGHT display returns to
zero.
6
Sample Piece Setting
There are two sampling methods:
Numeric entry Sample Setting
1. Place the sample pieces on the Scale platform. The total weight will display on the WEIGHT
LCD (left).
2. Set the number of sample pieces using the numeric keypad. The sample number will readout
on the PIECE WEIGHT LCD (center) while programming.
3. Press the SAMPLE key and the PIECE WEIGHT LCD will read the average piece weight. The
QUANTITY LCD will readout the sample number.
Unit Weight Sample Setting (use when individual piece weight is known)
1. Program the known piece weight using the numeric and decimal keys. The weight will readout
on the PIECE WEIGHT LCD (center).
2. Press the WT SET key (weight set) and the flickering display will become stable indicating that
the reading is stored in memory.
3. If an error is made while programming, press the CE key (Cancel entry) to clear the LCD and
start again.
4. The ADD SAMPLES indicator will appear on the lower right hand area of the PIECE WEIGHT
LCD (center) if the total weight of the samples is below 4.4 ounces. If this occurs, add pieces
until the indicator turns off. Set the new number of samples using the numeric keys and then
press the SAMPLE key. The piece limit is 9,999.
5. If the LIGHT SAMPLES indicator appears on the lower left of the PIECE WEIGHT LCD
(center), the average weight or set unit weight is not heavy enough for accurate counting
(under 0.14 ounces).
User Alarm Limit Function
To set a piece count audible Limit Alarm, press the CHECK key and then enter a value for the Limit
Alarm using the numeric keys. Next press the WT SET then the CHECK key. After this operation,
when the piece count reaches the user defined Alarm Limit, the scale will sound an audible tone. To
clear the Alarm setting, press the CHECK, CE, WT SET, CHECK keys in sequence.
7
Scale Testing and Configuring
Test Mode
1. To enter the Test mode, press any key while powering the Scale and release the key once the
Scale powers. The WEIGHT LCD will read CAL.
2. Press and hold the “1” key to verify that the LCDs are operating normally. This will allow you to
view all the LCD indicators at once for possible display errors.
3. Press the “2” key to start testing the numeric keys. After pressing the “2” key, begin pressing
the numeric keys one by one to verify their operation. Press the CE key to close the test.
4. Press the “3” key to enter the Configuration mode (see below).
Configuration Mode
(Note: Use the WT SET key to step through the following parameters. Any changes made by the user
while stepping through the parameter list must be followed by a TARE keypress in order to store data
and move to the next step.)
Program Step
Auto Power OFF
Parameter
PO
Selections
= 0 (Auto Power OFF is defeated)
= 1 (after 5 mins.)
= 2 (after 10 mins.)
= 3 (after 20 mins.)
= 4 (after 30 mins.)
Back light
P1
= 0 (OFF)
= 1 (ON)
= 2 (ON only when weight is on platform)
Maintenance
Battery Recharging
When the low battery symbol appears on the lower right hand side of the WEIGHT LCD (left),
connect the AC adapter to the Scale and to a 110VAC 50/60Hz receptacle. The battery status LED
that sits between the center LCD and the rightmost LCD has three states:
GREEN:
AMBER:
RED:
Battery fully charged
Half charged
Battery needs recharging
8