1
A Modular Control System for Remote Subsea
Equipment
by
Eric Stephen Smith
Bachelor of Science
Mechanical Engineering
North Carolina State University
1996
A thesis submitted to the
Department of Marine and Environmental Science
at Florida Institute of Technology
in partial fulfillment of the requirements
for the degree of
Master of Science
In
Ocean Engineering
Melbourne, Florida
July, 2003
© Copyright 2003 Eric Stephen Smith
All Rights Reserved
The author grants permission to make single copies
ii
We the undersigned committee hereby approve the attached thesis
A Modular Control System for Remote Subsea Equipment
by
Eric Stephen Smith
Stephen L. Wood, Ph.D., P.E.
Assistant Professor
Ocean Engineering
Principle Advisor
Andrew Zborowski, Ph.D.
Professor and Program Chair
Ocean Engineering
Héctor Gutierrez, Ph.D., P.E.
Assistant Professor
Mechanical Engineering
George A. Maul, Ph.D.
Department Head
Department of Marine
and Environmental Systems
iii
Abstract
Title:
Author:
A Modular Control System for Remote Subsea Equipment
Eric Stephen Smith
Principle Advisor:
Stephen L. Wood, Ph.D., P.E.
The following details the design of an expandable control system for use on
remotely operated tooling and vehicles for the subsea industry. The main objective
is to develop a basic control module which uses “off the shelf” microcontroller
technology and allows for the ability to connect modules together with little
hardware and/or software modification. A basic control module was developed
that uses commercially available microcontroller technology as a foundation. This
baseline system can be used singularly to control a simple oil field intervention
tool, or in multiples, and applied to a full work class ROV.
After a review of related ROV technology, the development of the software
is detailed and the resulting baseline system is described including hardware such
as the microchip, I/O capabilities and power requirements. To aid in this
description, an application of the system integrated with a subsea, oilfield tool is
demonstrated.
Finally, a theoretical layout of a full scale ROV consisting of multiple nodes
exhibits the advantages of this design. The modular capabilities are based on
existing industrial technology and the use of microcontrollers enables a more
efficient design.
iv
Table of Contents
CHAPTER 1
Introduction ................................................................................... 1
CHAPTER 2
Overview of Related ROV Technology ...................................... 11
CHAPTER 3
Microcontroller Selection Process............................................... 44
CHAPTER 4
Initial Development ..................................................................... 56
CHAPTER 5
Description of Valve Pack ........................................................... 66
CHAPTER 6
Explanation of Torque Tool Control System C Code ................. 71
CHAPTER 7
Explanation of Surface Control Unit Graphical User
Interface (GUI) ............................................................................ 76
CHAPTER 8
CAN Overview............................................................................ 81
CHAPTER 9
Expanded System ........................................................................ 93
CHAPTER 10
Conclusion................................................................................. 112
APPENDIX A
TryGPIO .................................................................................... 115
APPENDIX B
TryREADOUT .......................................................................... 120
APPENDIX C
Serial Test.................................................................................. 125
APPENDIX D
LabViewGPIO ........................................................................... 131
APPENDIX E
adctest2 ...................................................................................... 138
APPENDIX F
TryDAC ..................................................................................... 152
APPENDIX G
Valve Pack ................................................................................. 157
APPENDIX H
Baseline System......................................................................... 162
GLOSSARY........................................................................................................... 192
LIST OF REFERENCES ....................................................................................... 208
v
List of Keywords
CAN
Control Area Network
Control network system
Industrial control
Microcontroller
Remotely operated vehicle
ROV
Serial Bus
“Smart” tooling
vi
List of Figures
FIGURE 1.1:
Work-Class ROV System with Deck Components....................... 3
FIGURE 1.2:
Work-Class ROV with Torque Tool ............................................. 4
FIGURE 1.3:
ROV Topside and Bottom Side System Operated from
a Ship ............................................................................................. 6
FIGURE 2.1:
ALSTOM Schilling Quest Electric ROV.................................... 12
FIGURE 2.2:
ALSTOM Schilling SeaNet Telemetry Hub ............................... 13
FIGURE 2.3:
Benthos Super SeaRover ............................................................. 14
FIGURE 2.4:
Benthos Stingray ......................................................................... 15
FIGURE 2.5:
DOE Phantom XTL..................................................................... 16
FIGURE 2.6:
DSSI MAX-Rover Mk 2 ............................................................. 17
FIGURE 2.7:
Hydrovision Diablo ..................................................................... 18
FIGURE 2.8:
SeaEye Lynx and TMS “Garage”................................................ 19
FIGURE 2.9:
Hydrovision CURVETECH PC/104 Control System................. 20
FIGURE 2.10:
ISE Hysub 250............................................................................. 21
FIGURE 2.11:
ISE PC/104 Control Pod Designed for MBARI .......................... 23
FIGURE 2.12:
Mitsui Kaiko, 10,000m Depth Capability ................................... 24
FIGURE 2.13:
Oceaneering Hydra Magnum with Torque Tool and
“Garage” TMS ............................................................................. 25
FIGURE 2.14:
Oceaneering Magellan (8000m) with Phoenix V in
Background .................................................................................. 26
FIGURE 2.15:
Perry Slingsby Triton MRV ........................................................ 27
FIGURE 2.16:
Perry Slingsby PCBs ................................................................... 28
FIGURE 2.17:
Perry Slingsby Control Pod ......................................................... 28
vii
FIGURE 2.18:
Sonsub Innovator with “Tophat” TMS........................................ 29
FIGURE 2.19:
Stolt Core Vehicle (SCV) 3000 with A-Frame
Launching and Recovery System................................................ 30
FIGURE 2.20:
Sub-Atlantic Super Mohawk with Composite Frame ................. 31
FIGURE 2.21:
Sub-Atlantic PCBs – Eurocard and Octagonal............................ 32
FIGURE 2.22:
Subsea 7 Centurion...................................................................... 33
FIGURE 2.23:
Thales G3 ..................................................................................... 34
FIGURE 2.24:
Thales Sealion Mk II ................................................................... 35
FIGURE 2.25:
ABB (Clockwise from top left) Workover Control
Package, Deepwater Control Pod, Control Umbilical
Reel, Subsea Running Tool......................................................... 36
FIGURE 2.26:
FAU Ocean Voyager I and II ...................................................... 37
FIGURE 2.27:
HBOI Life Guard Panther Deployed with “Tophat” TMS.......... 38
FIGURE 2.28:
Ifremer Victor 6000 with Under-Vehicle Work Skid .................. 39
FIGURE 2.29:
JAMSTEC Dolphin-3K with A-Frame LARS ............................ 40
FIGURE 2.30:
MBARI Tiburon.......................................................................... 41
FIGURE 2.31:
WHOI Jason II/Medea................................................................. 42
FIGURE 3.1:
Typical ROV Control Pod ........................................................... 45
FIGURE 3.2:
ROV Operable Torque Tool with Mechanical Counter .............. 47
FIGURE 3.3:
Torque Tool Test Jigs .................................................................. 49
FIGURE 4.1:
Hall Effect Sensor........................................................................ 58
FIGURE 4.2:
LED Display................................................................................ 59
FIGURE 4.3:
Operational LED Display............................................................ 60
FIGURE 4.4:
LED Test Set Up ......................................................................... 61
FIGURE 5.1:
Valve Pack Assembled ................................................................ 68
FIGURE 5.2:
Valve Pack, Exploded View ........................................................ 69
FIGURE 5.3:
Controller Board .......................................................................... 70
FIGURE 7.1:
Topside GUI Window ................................................................. 77
viii
FIGURE 8.1:
Nominal Bit Time ........................................................................ 89
FIGURE 9.1:
CAN Bus with Multiple EVMs (Evaluation Modules) ............... 94
FIGURE 9.2:
MSCAN Message Buffer Organization....................................... 95
FIGURE 9.3:
ROV with Expanded System, Port Side View .......................... 102
FIGURE 9.4:
ROV with Expanded System, Port Side, Bottom View ............ 104
FIGURE 9.5:
ROV with Expanded System, Starboard Side View ................. 105
FIGURE 9.6:
ROV with Expanded System, Rear, Bottom View.................... 106
ix
Chapter 1
Introduction
Remotely Operated Vehicles (ROVs) have become the instrument of choice
for performing deep water work and research. Due to the increasing operational
depths as well as the cost and complication of sending a person (diver or manned
submersible), it is much more practical to use an ROV. These vehicles consist of
multiple subsystems and add-on specialty tools which must be operated from a
surface control station. As the tasks the ROV is required to perform grow more
complicated, the control system must evolve as well.
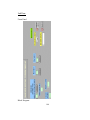
This thesis describes the design of a control system for remotely operated,
subsea tooling that can also control a work class ROV (see Figure 1.1). A basic
system that can be expanded modularly without complicated software or hardware
changes was designed. This was accomplished by the selection of proper
components and suitable programming techniques. The central processing unit
(CPU) selected was the Motorola DSP56F805 because its functions fit the project
requirements as will be seen in Chapter 3. The C language was used along with the
Motorola DSP (digital signal processor) libraries to create portable and easily
understandable code. Finally, the Control Area Network (CAN) provides the
networking ability that allows basic control modules to be chained together for
more complicated control solutions
This system was developed to control a subsea torque tool (Figure 1.2) that
is an ROV operated tool found in the offshore oil industry. Torque tools are
hydraulically driven tools used to open or close subsea valves and perform tasks
requiring a rotational motion (see Glossary for a more thorough definition). Most
torque tools in use today do not have a dedicated control system and are operated
with spare solenoid (on/off) valves from the host ROV. These tools are prone to
1
damaging equipment because of the lack of pressure and rotational speed control.
The torque on these tools is set by way of a pressure relief valve supplying
hydraulic pressure to the torque motor. These relief valves must be set on the
surface. With the use of a control system that includes proportional speed and
force control with feedback, the tool becomes much more versatile. The pressure
(and therefore torque) may be set through the control interface preventing
unnecessary recoveries to the surface. The speed may be controlled proportionally
to prevent damage and accelerate operation times.
2
A -FRAME
CONTROL
VANS
“TOPHAT”
TMS
ROV
MAIN
UMBILICAL
WINCH
Figure 1.1: Work-Class ROV System with Deck Components
3
FOAM BLOCK
CAMERA
PAN/TILT UNIT
TORQUE TOOL
MANIPULATOR
Figure 1.2: Work-Class ROV with Torque Tool
There are vast numbers of specialty tools that have been designed for ROV
use ranging from cable burial jetting skids for the communication industry to XYZ,
3 axis alignment systems used for precision tool guidance in the oil and gas
industry. As these tools become more complicated, they begin to require their own
control systems including analog and digital I/O (input and output), serial
4
communications, and processing power. A torque tool was selected since the
requirements for this tool are representative of what is necessary for an ROV
control system on a smaller scale. The control system designed in this thesis
demonstrates serial communication (RS-232), digital I/O, and analog I/O. This
paper will describe the progressive development of the software and then give a full
explanation of the baseline control system as it is applied to the torque tool
including the hydraulic manifold with valves, electrical layout, and C code.
A theoretical layout of an expanded system in a work class ROV will be
described in the ending chapters. The baseline control system has been designed in
such a way that it can be configured to control a variety of components required on
an ROV such as valve packs, electric thrusters, camera pan and tilt units, etc. By
linking these multiple control “modules” together with their associated hardware
component, an entire ROV system can be assembled. The goal of this layout is to
convey the advantages of using this expandable system and how it would be
implemented.
A Brief Description of an ROV Control System
An ROV control system includes two discrete structures, a topside and
vehicle or bottom side system connected by an umbilical (Figure 1.3). The topside
system is the user interface and is made up of a graphical/video display and user
controls such as joysticks, switches, paddles, etc. These user inputs are constructed
into a data string that is transmitted to the vehicle via the umbilical. Any
processing of data typically takes place on the topside controller/processor. The
bottom side system receives the user inputs and executes the command via the
various subsystems and components such as manipulators, thrusters, and cameras.
It will relay information back to the topside unit including sensor data and current
component settings (for instance the power setting of a particular thruster).
6
TOPSIDE
CONTROLS,
LOCATED IN
CONTROL VAN1
UMBILICAL,
CARRIES
POWER AND
CONTROL
SIGNALS
BETWEEN
SURFACE
AND ROV
BOTTOMSIDE
CONTROL UNIT,
LOCATED IN SEALED
HOUSING OR OILFILLED, PRESSURE
COMPENSATED
CONTAINER2
ROV
Figure 1.3: ROV Topside and Bottom Side System Operated from a Ship
The topside control computer is generally a PC (personal computer) and
therefore, runs a processor such as an Intel x86 or AMD type microchip. The
bottom side CPU can be a microcontroller, Intel type processor, programmable
logic controller (see Glossary), or a number of other industrial CPU’s. There are
many definitions for these different CPU types. In this thesis, microcontroller
refers to a microchip which runs a set of embedded instructions and is often
tailored to a specific application. A processor is equivalent to the CPU found in
standard desktop and laptop computers and runs an operating system which
governs processor usage. As a rule of thumb, processors typically run at higher
1
speeds, have a wider range of capabilities than a microcontroller, and are intended
for use with peripheral devices.
An Introduction to the System
The control system designed in this paper uses a PC for the topside CPU
and a microcontroller for the bottom side. The topside PC provides a platform
which is familiar to the operator through the use of a Windows operating system.
The selection of a microcontroller instead of a more powerful processor on the
bottom side is due to limited requirements of the subsea portion of an ROV control
system. The primary purpose of the bottom side controller is to act as a relay
system. It must be able to receive and prioritize commands from the surface
system, carry out the required functions via input/output (I/O) capabilities, and then
deliver status information back to the surface. The testing of this control system on
the Motorola DSP was completed in a step by step fashion. This means the
software progressively incorporated more complicated functions. This allowed a
comparison between the microcontroller running a single I/O function (such as
turning an LED on and off) versus running the final product. There was no visible
perception of a slow down in performance during this comparison.
The focus on software structure mentioned above is an attempt to use
manufacturer provided libraries to create code that can be easily understood and
modified. Many items on an ROV have identical functionality from a processing
perspective. For example, an analog pressure transducer and an analog flow meter,
each with an output range of 0 to 5 volts DC, would appear identical to the
controller. Calibration of this data can occur on the topside processor allowing the
operator to not only view useable information, but also use the raw data for
diagnostic purposes. By following this methodology, generic subroutines can be
developed that can be used for multiple purposes.
12
It should be noted that all programming in this design was done in the C
language. Many microcontrollers in the past required a thorough understanding of
Assembly code whereas the Motorola development environment provides the
designer the choice of C, Assembly, or a mix of the two. Because C is widely
accepted throughout the industry and a great deal of code is available as shareware,
the use of the C language helps meet the design goals of being easily expandable,
portable, and widely known.
An additional requirement was the ability to expand to accommodate a
more complex system. To accomplish this, multiple microcontrollers are used
instead of a single processor. The system bus selected for connecting these
multiple nodes is the Control Area Network (CAN) protocol developed by Bosch.
This was chosen because of its proven reliability in noisy, industrial environments.
Each microcontroller is assigned a specific piece of equipment or set of equipment.
For instance, one controller might be assigned a valve pack manifold which
controls a robotic manipulator. Another might be assigned to control all the
thrusters onboard. While another might control the movements of the camera pan
and tilt units. These components can then be assembled to create a mission specific
ROV. If mission requirements change, components can be added or subtracted as
necessary.
Method of Writing and Organization
The layout of this paper is intended to allow the reader to duplicate, and in
the process learn, the completed research. A list of software requirements
necessary to control an ROV torque tool was assembled and then each of these was
completed independently. The final baseline system was a result of combining
these individual sections of code. This method worked because it allows the
developer to become familiar with the controller and development environments by
13
completing small tasks one at a time. It also encourages the use of organized and
methodical programming techniques to meet the software structure goals
mentioned above.
Another benefit of this approach was the chance to observe the differences
in controller response between simple applications and the final system which
includes prioritized multi-tasking. It was this comparison that confirmed the
processor was capable of performing the application rapidly and that it did not
display any noticeable lag in response time.
The final layout of the expanded system as applied to an ROV is theoretical
and serves as grounds for further research and development. This description was
influenced by insights gained in the development of the baseline system, research
into the CAN protocol, and field experience gained while working with and
designing ROV systems for the offshore oil and gas industry.
This thesis is organized into ten chapters, eight appendices, and a glossary.
Chapter 1 is an introduction that gives a general overview and objectives for the
research. Chapter 2 presents an in-depth review of existing ROV technology to
determine why this research is unique and worthwhile. Chapter 3 explains the
reasoning behind the selection of the Motorola DSP microcontroller and the CAN
bus system. Chapter 4 describes the step by step method of the software
development. Chapters 5, 6 and 7 explain the finished product including the
hardware (valve pack, controller card and hydraulics), the bottom side C code, and
the topside user interface that was programmed in LabView. Chapter 8 is a review
of the Control Area Network protocol developed by Bosch. Chapter 9 describes
how the CAN system and Motorola’s MSCAN can be used to develop an expanded
system based on the control system described in chapters 5, 6 and 7. Chapter 10 is
the conclusion that reviews the research and explains why the original objectives
were met. The appendices contain the C code from the initial development and the
final baseline system, the mechanical drawings for the construction of the valve
14
pack, an electrical schematic of the controller board, and a hydraulic schematic of
the baseline control system as applied to the torque tool. A glossary can be found
at the end that contains definitions of many of the technical terms and abbreviations
used in this thesis.
15
Chapter 2
Overview of Related ROV Technology
Remotely Operated Vehicles of the World lists 123 companies and
institutions that manufacture remotely operated vehicles.1 They range from the
world renowned Woods Hole Oceanographic Institution (WHOI), who can claim
such successes as the discovery of the wreck of the HMS Titanic, to Seaeye
Marine, which manufactures small electric ROVs. This chapter will review these
groups and determine whether the control system designed for this thesis is unique
when compared to existing technology.
ROV control systems are as numerous as the manufacturers themselves.
They include PC-based systems and those using microcontrollers such as PIC and
Zilog. A number of these control systems are considered modular or expandable.
However, these systems were designed with different goals in mind and resulted in
products that do not meet the design parameters of this research. The system
described in this research is intended to control a simple ROV tool. It would be
beneficial for the baseline control system to maintain a small size in order to be
accommodated on a variety of ROV sizes. This baseline system should have the
ability to be chained together in multiples to control a more complex system such
as a work class ROV. To accomplish this, the Control Area Network bus has been
selected.
This chapter will answer the following two questions:
Are there similar systems out there?
If so, what sets this project apart to warrant even doing it?
16
Industrial ROV Manufacturers:
ALSTOM SCHILLING ROBOTICS –
Figure 2.1: ALSTOM Schilling Quest Electric ROV2
ALSTOM Schilling Robotics is based in Davis, CA and was founded in
1985. They are known for the design and production of ROVs and ROV
components, particularly robotic manipulators. Their introduction of the Quest
(Figure 2.1) all-electric ROV was one of the larger innovations in the ROV
industry in recent years. Some of the ideas it presented:
17
Central, expandable telemetry hub allows for increased control system
capacity/modularity.
SeaNet connectors with PIC Chip based logic are common to all items.
Logic connectors and visual software combine for a plug & play effect
which is extremely user friendly.
OIL -FILLED JUNCTION BOX
ONE ATMOSPHERE CAN
SEANET CONNECTORS
Figure 2.2: ALSTOM Schilling SeaNet Telemetry Hub3
The design from Schilling emphasizes modularity on the scale of a full-size
ROV. Figure 2.2 shows the central control module called SeaNet. This hub has
the ability to control an entire vehicle, and if extra capacity is needed, another hub
may be added on. Although small in size for a control system of this capacity, it
proves cumbersome if only a few control functions need to be added. The
small, one-atmosphere sphere that houses the processor, the SeaNet connectors
18
attached to both a camera and light, and the rectangular section of the module that
serves as an oil-filled junction box can be seen in the figure.4
BENTHOS, INC. –
Benthos was founded in 1962 with the goal of designing and producing
custom designed oceanographic research equipment.5 The company is based out of
North Falmouth, MA and is most widely known for the production of underwater
acoustic systems (transponders, releases, imaging), flotation, and ROVs.
Figure 2.3: Benthos Super SeaROVER6
The vehicles they produce include the EROV, a small inspection ROV for
the nuclear power industry, the MiniROVER Mk II, the Openframe, the Openframe
MiniROVER Mk II, the SeaROVER, the Super SeaROVER (Figure 2.3) and the
15
Stingray (Figure 2.4). The Stingray uses a “proprietary digital control system
developed by Under Control which utilizes an open system architecture based on
an embedded Linux operating system.”7
Figure 2.4: Benthos Stingray8
16
DEEP OCEAN ENGINEERING, INC. –
DOE builds the popular Phantom line of ROVs commonly used for
scientific research, military applications, hull inspections, nuclear facility work,
television, and police search and recovery. The company was formed in 1982 and
is based in San Leandro, CA. 9
Figure 2.5: DOE Phantom XTL10
The Phantom ROVs (Figure 2.5) are small, portable and based upon a
common electrical architecture that allows interchangeability for spare parts and
topside controllers. Very little electric hardware is located on the vehicle side
allowing for a light weight product.
DEEP SEA SYSTEMS INTERNATIONAL, INC. –
DSSI manufactures the MAX-Rover line of ROVs that includes the Mk1,
Mk2 (Figure 2.6), Mk3, Mini-MAX, and Omni-MAX. The company was founded
17
in 1983 in Cataumet, MA. Their ROVs have the ability to operate in depths of
6000m and are available in a small package to allow for easy transport. The
vehicles have been used by National Geographic productions, oceanographic
research institutions, and NASA. 11
Figure 2.6: DSSI MAX-Rover Mk 212
18
The vehicles use a “proprietary subsea Remote Data Acquisition System.
The RDAS is a multi-tasking 14 bit microprocessor and supports full IEEE
communications protocol, watch dog timers and multiple I/O ports.”13
HYDROVISION/SEAEYE –
Figure 2.7: Hydrovision Diablo14
Hydrovision Limited was founded in 1989 and is located in Aberdeen,
Scotland. They produce ROV components such as electronic and hydraulic control
systems as well as ROVs. Seaeye Marine Limited was founded in 1986 and
19
acquired by Hydrovision in 1999. They are located in Fareham, Hampshire in
southern England. The Hydrovision line of vehicles are primarily hydraulic work
class types and include the Demon, Diablo (Figure 2.7), Hyball, Offshore Hyball,
and Venom. Seaeye produces all electric ROVs such as the Falcon, Lynx (Figure
2.8), Panther, Puma, Surveyor Plus, and Tiger 1000.
Figure 2.8: SeaEye Lynx and TMS “Garage”15
Hydrovision recently introduced their CURVETECH control system based
on the PC-104 footprint (Figure 2.9). Their development includes the following
points16 :
Selection of components kept to standard items available from more than
one source.
20
Chose PC-104 and configured it to run as an Allen-Bradley PLC
(programmable logic controller).
Based software programming on SCADA, OPC, DF1, and ladder logic,
communication protocols and programming languages common to industrial PLCs
(see glossary for definitions of these terms).
Claim to be able to run the control system on any PC-based host.
Configured system such that it can be modular from tooling packages up to
full size ROV’s
Figure 2.9: Hydrovision CURVETECH PC 104 Control System 17
The CURVETECH system was developed with the main requirement that it
be a “new, scaleable control system for ROVs, subsea tooling and other
applications.” (Hydrovision, 1998) This design requirement closely follows the
goals laid out in the beginning of the chapter. The use of PLC style controllers
allows for compatibility with many industrial products but these require a
programmer who is fluent in the communications protocols and programming
methods mentioned above. As mentioned in the introduction, one of the goals of
the design in this paper is to maintain an easily expandable system. The use of the
C programming language is viewed as a primary tool of achieving this requirement.
21
The selection of a PC-104 platform is excessive for the requirements.
While the PC-104 is readily available from a variety of manufacturers, a single
board system based on a microcontroller such as the DSP selected here is more
efficient as far as processing power and can take up less physical space.
INTERNATIONAL SUBMARINE ENGINEERING LTD. –
ISE was founded in 1974 along with its sister company ISE Research, Ltd.
They specialize in robotics for harsh environments including ROVs, specialized
subsea tooling for offshore oil and gas as well as oceanographic research, robotic
manipulators, and AUVs (autonomous underwater vehicles).
Figure 2.10: ISE Hysub 25018
Most of their large control projects are based upon the custom designed
ACE (Automated Control Engine). “ACE 3.0 is a fast and powerful open
architecture real time, event-driven control engine. The software allows control
22
systems engineers to create highly configurable soft control systems based on reusable software components. A library of control components is included to
address a broad range of configuration options. ACE can be configured as a soft
PLC Control System or as a DCS (multiple instances of ACE on a network).”19
Unique points20 :
Supports Windows NT, QNX, DOS, and custom apps developed for DSPs
and embedded systems
Communications protocols - Modbus, ARC Net, TCP, Ethernet, UDP and
Device Net
Have also developed a control system based upon PC-104 architecture for
MBARI (Monterey Bay Aquarium Research Institute) (Figure 2.11).
Figure 2.11: ISE PC 104 Control Pod designed for MBARI21
23
ISE has developed this proprietary control engine based upon the expansive
library of code they have assembled. As a result, they can put together a control
system using virtually any of the common hardware platforms and operating
systems in use today.
MITSUI ENGINEERING AND SHIPBUILDING CO., LTD. –
Mitsui is a large shipbuilding company with a division that builds small
inspection ROVs. They are also known as the manufacturer of the Kaiko, which is
the deepest diving ROV in the world capable of reaching the bottom of the
Marianas Trench (11911m). Their vehicles include the inspection ROV RTV-200
Mk II, the Dolphin 3k, and the Kaiko (Figure 2.12).
24
Figure 2.12: Mitsui Kaiko, 10,000m Depth Capability22
25
OCEANEERING INTERNATIONAL, INC. –
Figure 2.13: Oceaneering Hydra Magnum with Torque Tool and “Garage” TMS
Oceaneering holds a 33% market share of the worlds ROV operations.
They were formed as a diving company in 1964 and are based in Houston, TX.
Currently they operate over 120 systems that include the Hydra Magnum (Figure
2.13), Hydra Millennium, Hydra Minimum, Phoenix, Quantum, Mongoose and
deep diving Magellan (Figure 2.14).23
26
Figure 2.14: Oceaneering Magellan (8000m) with Phoenix V in Background
A majority of the vehicles operate on a PC-based, industrial backplane,
control system developed by GESPAC Industrie. The company has also produced
control systems based upon the PC-104 architecture.24
PERRY SLINGSBY SYSTEMS –
Perry Slingsby is a Coflexip Stena Offshore group. It is the result of the
2000 merger of Perry Tritech and Slingsby Engineering. They have two main
offices in York, England and Jupiter, FL. The company’s customers include
offshore oil and gas, telecommunications, nuclear facilities, and the military. They
have built 300 ROVs and 150 diving and submarine systems since their formation
35 years ago. This comprises 50% of the world’s commercial ROV fleet.25
27
Figure 2.15: Perry Slingsby Triton MRV26
The systems they produce include the Flexjet, Gator I and II, MRV,
Olympian, Scarab III, Scorpion, Trojan, Viper, Voyager, and the Triton class
vehicles (Figure 2.15). These systems operate on a PC-based, industrial backplane
control system (Figures 2.16, 2.17).
28
Figure 2.16: Perry Slingsby PCBs27
Figure 2.17: Perry Slingsby Control Pod28
29
THE SONSUB GROUP –
Sonsub is owned by Saipem SpA, a division of the Italian company
ENI/AGIP. They were bought by Saipem in 1992 and are based out of Houston,
TX.29 They operate 14 ROVs and 7 cable burial/trenching systems that were
designed in house, plus a number of vehicles provided by outside manufacturers.
These in house designs include the Innovator ROV (Figure 2.18), the TLP Riser
Inspection Vehicle, the TLP Riser in-service Inspection Vehicle, as well as the
Centaur, Giano, Metra, and Sedna cable burial systems. These systems operate on
a PC-based control system.
Figure 2.18: Sonsub Innovator with “Tophat” TMS30
30
STOLT OFFSHORE LTD. –
Stolt is an offshore construction company with locations in Stavanger,
Norway, Aberdeen, Scotland, and Houston, TX. They operate a fleet of 90 ROVs
including over 20 that were designed and built in house.31 These 20 Stolt Core
Vehicles (SCVs) include the SCV Solo Mk 2, the 100, the 1500, and the 3000
(Figure 2.19). They use a PC-based control system along with the ARCNet
communication protocol.
Figure 2.19: Stolt Core Vehicle (SCV) 3000 with A-Frame Launching and
Recovery System32
31
SUB-ATLANTIC LTD. –
Figure 2.20: Sub-Atlantic Super Mohawk with Composite Frame 33
Sub-Atlantic is an ROV and specialty, subsea tooling manufacturer located
in Aberdeen, Scotland. They produce fully electric observation and small, workclass vehicles including the Apache, Cherokee, Mohawk, and Super Mohawk
(Figure 2.20). Their telemetry system (the SUB-0176) is based on the
VersaModular Eurocard or VME bus (see glossary). This includes the standard
Eurocard and a non standard octagonal shaped card (Figure 2.21).
32
Figure 2.21: Sub-Atlantic PCBs – Eurocard and Octagonal34
SUBSEA 7 –
Subsea 7 is the result of the combination of Halliburton Subsea and DSND
Subsea in 2002. They operate a fleet of 112 ROVs with a maximum water depth
capability of 5000m.35 The vehicles include the Tuna, Centurion (Figure 2.22),
Clansman, Eagle Eye, Examiner, Hammerhead, Hercules, Pioneer, Stealth, and
Warrior along with vehicles manufactured by Perry Slingsby and Hydrovision.
Varying control systems are used in their many systems. The Tuna uses three
programmable logic controllers (PLCs), two on the vehicle and one topside. The
Warrior and Hercules use a PC-based system using multiple printed circuit boards
(PCBs) connected on a parallel bus.
33
Figure 2.22: Subsea 7 Centurion36
34
THALES GEOSOLUTIONS –
Figure 2.23: Thales G337
Thales GeoSolutions is based in London and is owned by the French
company Thales Electronics Plc. Their business concentrates on GPS positioning
and tracking, ROV design, and geo-technical sensor development. They operate a
fleet of approximately 50 ROVs including the Sea Pup, G3 (Figure 2.23), Seal,
Sealion Mk II (Figure 2.24), Sealion 3000, and Sea Serpent. The Seal and Sealion
Mk II use a control system based upon the Zilog Z80 family of microcontrollers.38
The more recent vehicles use a PC-based rack system using the ARCNet protocol. 39
35
Figure 2.24: Thales Sealion Mk II40
Offshore Control Industry:
ABB –
ABB develops automation systems for industrial and utility use. They
focus on large system developments that can be integrated throughout a customer’s
company including engineering, purchasing, management, etc. The company’s Oil,
Gas, and Petrochemicals group develops control systems for production, workover, and process equipment (Figure 2.25). These subsea control systems are
developed around open architecture communication protocols such as HART,
Foundation Fieldbus, and PROFIBUS (see Glossary for definitions). These types
of protocols are ideal for industrial applications and harsh environment areas such
as below the ocean surface. The protocols themselves are designed to be usable in
high noise environments with built in error checking. Since it is an open
architecture, the designer is allowed flexibility in the size and expandability of the
36
system as well as the peripheral equipment that can be used. However, the
downside of all this design flexibility is a relatively expensive and complicated
system to install. For large process automation control systems such as a chemical
plant or a subsea drilling control system, this approach is probably more sensible.
For the small, baseline control system described in this writing, it is a bit more
complicated than the project requires.41
Figure 2.25: ABB (Clockwise from top left) Workover Control Package,
Deepwater Control Pod, Control Umbilical Reel, Subsea Running Tool42
37
Government and Educational Research Programs:
FLORIDA ATLANTIC UNIVERSITY –
The Autonomous Underwater Vehicle (AUV) department of FAU has
developed a number of vehicles over the past decade including the Ocean Voyager
I and II, (Figure 2.26) and the Explorer series. The development of an AUV has
different requirements from an ROV design. An AUV must have all processing
power onboard the vehicle. There are no topside computers or operators to share
decision making tasks. This means that the selected control system must have the
processing power and speed to perform navigational duties as well as mission
specific tasks simultaneously. This being said, it is still educational to review AUV
control systems and explore any similarities with their ROV brethren.
Figure 2.26: FAU Ocean Voyager I and II43
One of the goals of their designs at FAU was to provide a modular system
with mission specific work packages. (FAU) To accomplish this goal, the LON
Works network protocol was selected. This control system is similar to a CAN
38
system in that it de-centralizes control to a network of multiple nodes
communicating via a common bus.
The university has also used the real time operating system VxWorks from
WindRiver combined with control modules written in C to produce the Ocean
Voyager’s Intelligent Control System (ICS). The system uses the VME bus with
two onboard 16 MHz 68020 processor.44
Harbor Branch Oceanographic Institution –
HBOI, located in Ft. Pierce, FL, is a research and educational institution
that has been designing and building ROVs since the CORD (Cable Operated
Remote Device) in 1973. Their vehicles have included the CORD, the SCOOP
(Scientific Collection and Observation Platform), the Life Guard Panther (Figure
2.27), and the HBOI Fly Away, a deep water version of the Deep Sea Systems Mini
Rover. They develop PC-based control systems and were a consultant on the
MBARI (Monterey Bay Aquarium Research Institute) Ventana ROV. 45
Figure 2.27: HBOI Life Guard Panther Deployed with “Tophat” TMS46
39
IFREMER –
Ifremer, or the French Research Institute for the Exploration of the Seas, is
a public research institute controlled by the four French ministries of Research,
Agriculture and Fisheries, Transport and Housing, and Environment. They operate
the Victor 6000 ROV (Figure 2.28) which they developed in conjunction with the
French company ECA. ECA specializes in control systems developed around
parallel architectures and CORBA (Common Object Request Broker
Architecture).47
Figure 2.28: Ifremer Victor 6000 with Under-Vehicle Work Skid 48
40
JAPAN MARINE SCIENCES AND TECHNOLOGY CENTER –
JAMSTEC was created in 1971 and is located in Yokosuka City, Japan.
The Deep Sea Research Department operates two manned submersibles as well as
four ROVs. The Kaiko and Dolphin-3K (Figure 2.29) were manufactured by
Mitsui, while the UROV7K and the Hyper-Doplhin were manufactured in house
with consultation from Mitsui.49
Figure 2.29: JAMSTEC Dolphin-3K with A-Frame LARS50
MONTEREY BAY AQUARIUM RESEARCH INSTITUTE –
MBARI is an educational and research institute located in Moss Landing,
CA. They operate the ROV Tiburon (Figure 2.30) which was designed in house
with outside consultation and equipment provided by ISE, HBOI, and WHOI
(Woods Hole Oceanographic Institute). The Tiburon control system is based on the
VME (VersaModular Eurocard) bus and uses the Intel 87C196KC chip as its main
processor. MBARI produced nine custom PCBs (printed circuit boards) to meet
41
project specific goals. These “D” shaped boards were produced to incorporate an 8
bit backplane bus and fit inside a 6” inside diameter housing.51
Figure 2.30: MBARI Tiburon52
WOODS HOLE OCEANOGRAPHIC INSTITUTE –
WHOI is a research and educational institute located in Woods Hole, MA.
Most widely known for the manned submersible ALVIN, they also operate the
ROV combination Jason II/ Medea (Figure 2.31). These vehicles function in
tandem with Medea also acting as a suppressor weight to uncouple Jason from
surface motion conveyed along the main lift umbilical. Ethernet is the
communication protocol used onboard.53
42
Figure 2.31: WHOI Jason II/Medea54
Results:
As the examples above show, a number of companies have developed
modular or expandable control systems in the subsea industry. However, the goals
or design decisions of these existing projects resulted in a product that does not
meet the requirements of this thesis. Schilling has developed a unique system
based upon PIC microcontrollers however; the scale of the design is much too large
to consider using for something as simple as an ROV torque tool. Hydrovision has
developed a basic control module for tooling and ROVs based on the PC-104
platform. Although widely available and contained in a small footprint, the PC-104
provides more processing power than necessary and is still relatively large when
compared to the SBCs (single board computers) developed with microcontrollers.
As will be seen in chapter 5, a single board containing the DSP microcontroller and
all I/O connections, along with all necessary hydraulic components can be
43
incorporated into one single, small package. This would not be possible with a PC
104 stack.
The result of this research into existing systems gave insight into how the
subsea industry has approached control system development. It has shown that no
company has developed a simple control system and then followed through by
using this baseline system (and the experience gained from its development) in a
more complex project. To answer the questions mentioned at the beginning of the
chapter, yes there are similar systems out there. However, no one has tried to
incorporate all the concepts described in this thesis into one single design which
makes this research unique. These ideas include:
A basic control module that can be chained together in multiples to control
more complex systems.
The use of microcontrollers to create a small, single board controller.
The selection of the CAN (Control Area Network) communications
protocol that allows for the expansion of the system.
45
Chapter 3
Microcontroller Selection Process
An ROV control system is comprised of a topside or surface control unit
and a bottom side or vehicle unit connected by an umbilical that carries power and
data signals. The purpose of the topside unit is to provide a user interface for the
operator as well as perform a majority of the processing tasks. This portion of the
control system receives operator inputs through hardware such as joysticks, mice,
sliders, and pushbuttons. It also provides status information on vehicle systems
through a graphical user interface (GUI) which is typically seen as an overlay on a
video monitor. The vehicle control unit receives commands from the topside unit
and relays these commands to individual subsystems to carry out the required task.
This control unit must also be able to collect sensor and status information that is
relayed back to the topside control unit.
A good number of existing ROVs use PC based control systems on the
vehicle side. While these provide a robust and relatively easy to program platform,
they are not necessarily suited to the task. Bus protocols such as VME and ISA
(PC 104, for example, uses a modified ISA protocol) typically consist of a number
of PC boards connected via a back plane bus. One card is dedicated to the
processor, another to digital I/O, another to analog I/O, and so on. All this
hardware must be contained in a large sealed housing (see Figure 3.1) with multiple
connectors to attach to the ROV subsystems. With the use of a microcontroller, the
processing and I/O capabilities can be found on the same microchip. This in turn
can be used to create a single board computer (SBC) requiring less space,
substantial weight savings, and a reduction in vehicle wiring.
46
Figure 3.1: Typical ROV Control Pod1
The microcontroller selection process for this control system revolved
around a list of requirements for the most basic application (in this case a subsea
torque tool) and the ability to expand modularly to accommodate more complex
systems. The final selection was also limited by time and money constraints. The
first section of this chapter will outline the basic tasks this control system must be
able to accomplish. The second section explains the choice of the Control Area
Network (CAN) to meet the expansion requirements. The final section describes
why the Motorola DSP56F805 was selected and how it meets the design
requirements.
Baseline System:
The first question to be answered in order to define the basic requirements
is: What is a “smart” ROV torque tool or rotary actuator intervention tool?
According to API SPEC 17D, a torque tool applies “torque to a rod or other linkage
to operate a valve, connecting device, or other rotationally operated subsea well
47
equipment apparatus.”2 Subsea oil field equipment such as christmas trees and
blow out preventers (see glossary) contain valves that require ROV intervention
during installation, work-over (repair, upgrade, or scheduled maintenance), and
sometimes during time of emergency (failure of surface control system). These
valves have what are called end-effectors or rotary actuator fixtures attached to the
valve stems that allow an ROV operable torque tool to either close or open the
valve by rotating the stem. As a result of the misuse and lack of control of these
tools, expensive equipment has been damaged resulting in the loss of a great deal of
money. Thus the development of the “smart” torque tool, which implies the tool
has an electronic control system with feedback information such as torque,
hydraulic feed pressure, hydraulic flow, and turns count. The control system gives
the operator the ability to proportionally control the speed the tool rotates at and the
torque it can produce.
48
VALVE INTERFACE
PRESSURE GAUGES
MECHANICAL
COUNTER
HYDRAULIC MOTOR
Figure 3.2: ROV Operable Torque Tool with Mechanical Counter
The basic, mechanical torque tool without electronic controls is seen in
Figure 3.2. It consists of a hydraulic motor in line with the valve interface or
socket. Two pressure gauges display the pressure on the “A” side or “B” side
depending on which way the tool is turning. A mechanical counter with chain
drive displays the turns count. The typical method of using the tool is to calibrate it
on deck using a torque tool test jig (Figure 3.3) and record pressure versus torque.
A hydraulic pressure relief valve is set on the surface to limit the maximum torque.
Hydraulic flow is adjusted with a hand operated needle valve to control speed.
The current “smart” tools have a telemetry link to the surface that transmits
the pressure and flow data. Torque readings (measured via a series of strain gages)
and turns count (recorded using a number of magnets and a reed switch or Hall
Effect sensor) are also relayed to the surface. The control system incorporates
49
proportional pressure and flow control valves that allow the operator to adjust the
speed and torque during the dive via the GUI. This allows the tool to be used for
multiple jobs requiring different torques and rotational speeds. The proportional
adjustment also allows the rotational speed to be ramped up to prevent shock
loading. The selection of the microcontroller and associated demonstration board
had to supply the following capabilities:
Turns count information displayed either via an LED or transmitted to the
surface.
Turns counter (Hall Effect or reed switch) input – digital I/O.
Torque (strain gage) input – analog I/O.
Communication link for relay of information such as pressure and flow.
50
ANALOG TEST JIG
WITH DYNAMOMETER
DYANAMOMETER
DIGITAL TEST JIG
WITH STRAIN GAGE
STANDARD TORQUE TOOL
INTERFACE RECEPTACLE
DIGITAL READOUT
Figure 3.3: Torque Tool Test Jigs
Beyond these initial requirements, a valve pack with proportional controlled
flow and pressure valves is supplied with this product. These valves require a
variable analog input for control. In order to complete the system, the controller
would also have to be able to drive a digital to analog converter (DAC). The entire
baseline list consists of the following:
Digital I/O port capable of receiving up to eight (8) separate sensors.
Analog to digital (ADC) port capable of receiving (4) separate signals.
Digital to analog converter capable of driving three (3) signals.
One (1) serial communication port, RS-232 0r RS-485 compatible.
51
Method of Expansion:
The torque tool control system designed for this thesis requires a method for
expansion to develop more complex control systems such as for a work-class ROV.
A communication method had to be selected to provide for data and control signals
to move between the various subsystems of the ROV. The following
communication protocols were investigated for this purpose.
UNIVERSAL SERIAL BUS –
“Plug and play” was first pursued as the easiest way to create an expandable
system, which led to researching the PC bus known for this attribute, the universal
serial bus (USB). USB allows the user to “hot” plug an item onto the bus and the
software handles the integration. “Hot” plug means that the item can be plugged
into the system without a power down or reboot. The device then transmits an
identifier which tells the host computer what the device is and what software
drivers need to be loaded. If the item is not recognized or drivers are not available,
the user will be prompted to provide the information and/or files. An added benefit
is that low power items (5 volts or less) can be powered via the bus.3
These basic principles seem like an excellent idea upon which to base the
expansion of an ROV. The bus supplied power would simplify wiring. Although
the “hot” plug option is interesting, in the offshore world this is not typically done
due to safety and money issues due to the remote chance that a piece of equipment
could short circuit when connected. The problem with this bus, though, is that it
was not developed for the industrial environment. Maximum transmit length is
approximately 9 meters over standard USB cables and problems will arise in high
noise environments. An ROV with motors running off of upwards of 3000 volts,
hydraulic pumps running, and other equipment, qualifies as a high noise
environment.
57
TCP/IP –
The data transfer protocol TCP/IP (Transmission Control Protocol/Internet
Protocol) was investigated because of its popular use in local and wide area
networks (LANs and WANs) as well as being the standard communication protocol
for the Internet. The TCP/IP protocol was developed to enable communication
between dissimilar computer platforms without a direct connection.4
Communication is done point to point meaning data is addressed between
individual computers. This data is broken down into packets that are transmitted
separately node by node or hub by hub over the network. If a node receives a
transmission and it does not recognize the address, it passes the information along
to the next node. Once the address is recognized by the intended receiver and all
packets have been received, the message is reassembled.
This protocol is useful over large networks such as the Internet. Multiple
path delivery allows for packets from the same message to arrive at the destination
via different routes depending on bus congestion. For long distance transmissions,
the transmitting computer does not need to wait for the message to travel the entire
distance. Instead, the data takes multiple short hops from hub to hub.
ETHERNET –
The Ethernet protocol was originally developed by Xerox, Digital
Equipment Corporation (DEC), and Intel in 1980. It is the most common
communication specification used in Local Area Networks (LANs).5 Ethernet has
a number of standards that specify the hardware it is transmitted with as well as the
maximum transmit speed. The most common is called 10BaseT where 10 refers to
the bus speed (10 Mbps), and T refers to the transmission medium (twisted pair).6
All nodes on an Ethernet system are identified by a unique address. Bus
communication can be done via unicast (single node addressing), multicast (group
58
addressing), or broadcast mode (all nodes addressed). 10BaseT uses a bus
configuration called a “star” where all nodes communicate through common hub
computers. This differs from the linear bus configuration used by 10Base2 and
10Base5 systems. A linear system defines a common line that all nodes attach to
individually.7
Communication on the common bus is governed by the Carrier Sense
Multiple Access\Collision Detection Method (CSMA\CD). When a node detects
that the bus is idle for a specified amount of time it will attempt to transmit.
Another node could possibly begin transmitting at the same time. If this occurs, a
collision is signaled on the bus. A collision results in all nodes waiting for a
“backoff” period of time before they attempt to re-send. Priority can be assigned to
nodes by varying the initial time period a node waits to transmit on an idle bus and
by assigning varying “backoff” times.8
CONTROL AREA NETWORK (CAN) –
Industrial bus protocols are designed to work in high noise environments
with a high level of reliability. This means they have multiple methods of error
checking designed into the protocol to provide a robust communication system.
There are a number of these protocols out there such as ARCNet, Foundation
FieldBus, HART, and Profibus. However, most of these systems are based upon
open protocols that require proprietary software to make a complete system. The
Control Area Network (CAN) developed by Bosch is an industrial bus developed
for the automotive industry. The protocol is widely available on microcontrollers
and PC based systems. The high level software such as CANOpen, MSCAN, and
CANKingdom necessary to integrate the protocol into a control system is available
from a number of sources. The CAN bus was designed to have the following
attributes9 :
Multiple layers of error checking to ensure proper communication.
59
Built in message prioritization which can be user modified.
The ability to drop out any node which fails error checks a user controllable
number of times.
A decentralized method of networking that transmits all messages to all
nodes and allows each individual component to decide whether to ignore or
respond to the message.
The ability to drop a node out is particularly useful for ROV systems. If a
part of the system becomes disabled (flooded with seawater, for instance) the entire
vehicle may still operate and be recovered to the surface for repair.
The final selection of CAN as the best choice resulted from a few key
factors. First of all, as will be seen in the next section, CAN has been integrated on
a number of microcontrollers available as “off the shelf” technology. Also,
although most industrial bus protocols advertise low development prices, CAN was
cheapest in both initial money to be spent ($5000 for Motorola’s MSCAN) and
time to be invested learning the programming techniques. The determination that
the time spent would be less was not realized until after initial development phase.
Chapter 8 will present an overview of the CAN protocol. This chapter will
describe individual attributes of CAN and compare them with other networking
protocols to help explain why this was the correct choice for an ROV control
system.
60
Controller Selection:
A number of microcontrollers on the market meet the basic requirements of
the system. Processors such as Rabbit 2000 (Rabbit semiconductor), Jackrabbit (ZWorld), even BASIC stamps and PIC chips (MICROCHIP) have the I/O
capabilities and can be set up for serial communication. The limiting factor turned
out to be the ability to deal with CAN messages. The search for this type of
controller uncovered a great number of chips that were developed for individual
companies in the automotive industry and therefore, proprietary information. Even
if there was a way to get access to one of these controllers, that would defeat the
purpose of using a product that was readily available in decent numbers. Two
controllers were available through common suppliers (Digi-Key and Allied
Electronics). These were the Intel 87C196CA and the Motorola family
DSP56F8XX. The Motorola DSP56F805 was chosen for this project.
The Motorola demonstration board was on the shelf and ready to be
shipped, but it had other benefits as well. First of all, a development environment
was supplied with the board called CodeWarrior IDE (Integrated Development
Environment). This provides the developer with a programming environment
including a C compiler and builder as well as the capability to program the
microcontroller via a parallel port connection with real time debugging. A note on
the programming language: the CodeWarrior software allows programming in the
C language instead of the standard Assembly. This makes the controller more
accessible because of the wide spread usage of the C language.
The other software supplied with demonstration board was the Embedded
Software Development Kit (SDK). This was a compilation of libraries, example
code, and programming lessons which allow the developer to speed up time to
production. The examples and teaching methods emphasized code which would be
portable across a number of Motorola products. The code written for this thesis can
61
theoretically be taken directly to another chip within the DSP56F8XX family.
Also, Motorola produces the M68HC12 and HCS12 families of microcontrollers
that support CAN. The code is purported to be portable to these with slight
modifications. Considering Motorola is consistent with their use of the SDK
libraries and the CodeWarrior IDE, it is reasonable to believe the code will work
with different driver subroutines.10
Overall, as will be seen in the following sections, the selection of the
DSP56F805 was a proper choice for this task. The chip not only exceeded the
basic requirements, but the SDK was an indispensable tool in meeting deadlines
and speeding time of delivery. For a basic tool, such as the torque tool, the
controllers from the other two Motorola families might be more suited. It should
be noted that the 80 MHz bus speed of the DSP11 is almost 10 times that of
alternative microcontrollers and enables quicker response and communication
times. Because of this difference in processing speed, even the simple baseline
control system might experience lag times with slower chips that would be
unacceptable. For the purpose of demonstrating the basic application plus the
overall concept of expansion, the DSP56F805 was the proper choice.
62
Chapter 4
Initial Development
One of the design goals mentioned in the Introduction was to produce a
software structure that is easy to understand and logical in construction. The
baseline requirements outlined in the last chapter are:
Turns count information displayed either via an LED or transmitted to the
surface.
Turns counter (Hall Effect or reed switch) input – digital I/O.
Torque (strain gage) input – analog I/O.
Communication link for relay of information such as pressure and flow.
It seemed a logical step to approach these design requirements individually.
This would aid in the learning of the programming techniques particular to the
Motorola DSP microcontroller by solving small problems one step at a time. It also
encourages the production of C code that is modular in construction. Each of the
programs listed below eventually helped produce generic subroutines that were
used in the final baseline system. As mentioned in Chapter 1, many components of
an ROV have identical functionality from a processing perspective. A subroutine
written for an analog flow meter can also be used for an analog pressure transducer.
The following programs were written during initial development and will be
detailed in this chapter:
63
“TryGPIO” – controlled the on/off status of an LED with the input from a
Hall Effect Sensor; this required the use of digital inputs and outputs.
“TryREADOUT” – outputs a number to an LED readout; requires digital
output.
“Serial test” – demonstrates serial communication with a laptop; requires
use of the serial port.
“LabViewGPIO” – displays an incremented count read from a Hall Effect
sensor on a GUI (graphical user interface) written in LabView; requires digital
input, digital output, serial communications.
“adctest2” – displays the output of a variable resistor (pot) on a LabView
GUI; requires analog input and serial communication.
“TryDAC” – sets the value of an analog output pin according to a user
supplied value; requires analog output.
Project “TryGPIO”:
This simple project had the main goal of being able to hook up an on/off
switch (such as a reed switch or Hall Effects sensor) to the controller and trigger an
interrupt. The code for “main.c” and “appconfig.h” can be found in Appendix A.
The digital I/O ports and individual pins are configured in the subroutine main.
Port B, pin 0 is set up to drive an onboard LED. Port D, pin 1 is set up to trigger an
interrupt when pulled high. Upon reception of an interrupt, the program jumps to
subroutine “ButtonA_ISR”, which toggles the LED either on or off and resets the
interrupt. One thing to note in the “appconfig.h” file is that the interrupt priority of
port D had to be defined. Whereas most priorities are given a default interrupt in
the related “include” file, general purpose I/O’s must be defined individually. The
Hall Effect Sensor used to test this project can be seen in Figure 4.1.
64
Figure 4.1: Hall Effect Sensor
65
DISPLAY
LED DRIVERS
Figure 4.2: LED Display
Project “TryREADOUT”:
The second step in developing the software was to try and connect the board
to a 4 digit LED display (Figure 4.2). The result was the code listed in Appendix B
– “TryREADOUT” which consists of “main.c” and “appconfig.c”. The main
subroutine is rather simple. Ports B and D, required for control of the LED display
are initialized, and a number (in this case “123”) is output to the display. Each
digit of the display receives a binary input over four pins. If pin one for a digit is
high, then it reads one, if pin four is held high, it reads eight, and so on. Values
above nine are received as errors. Pins 0 through 3 of port B are connected to the
ones digit of the display. Pins 4 through 7 of port B are connected to the tens digit.
66
Pins 0 through 3 of port D are connected to the hundreds digit. The final digit is
held to ground (and therefore reads zero) which explains the reading seen in Figure
4.3.
Figure 4.3: Operational LED Display
Since onboard power is not ample enough to drive the display, a power
supply was connected separately. The test bench for this set up can be seen in
Figure 4.4.
67
VARIABLE POWER SUPPLY
DEMONSTRATION
BOARD
LED DISPLAY
Figure 4.4: LED Test Set Up
Project “Serial test”:
This program enables the controller to receive a character via the serial port
and outputs “Hello” as the response. The code can be found in Appendix C –
“Serial test”, which contains “main.c” and “appconfig.c”. Subroutine “main.c”
initializes the serial port and declares three call-back functions for receive, transmit
and exception interrupts. The only one used in this case is “sciRxCallBack” which
is called when an interrupt is triggered upon receiving “SciReadLength” number of
characters. The subroutine then outputs “Hello” via the serial port. All
communications were done using Windows HyperTerminal.
68
Project “LabViewGPIO”:
With a basic understanding of setting up serial communications and the
ability to implement a digital counter, the next step was to combine the two and
construct a topside display using LabView. The results can be found in Appendix
D – “LabViewGPIO”. Appendix D includes the c code, “main.c” and
“appconfig.h”, as well as the LabView panel and diagrams.
This program was developed in a simplistic manner and does not use
interrupts to trigger a count. Instead, it reads the I/O port connected to the counter
and calls subroutine “COUNTRECEIVED” if the pin is held high. Smoothing is
done by installing a quarter second pause. This set-up works ok for a simple
program such as this, but when multiple operations are brought together such as on
the completed baseline system, interrupts have to be used and prioritized to make
the system work.
Following through the code, “main.c” initializes the serial port and GPIO
ports as in the previous sections. An LED is still used as a debugging tool to
ensure the counter is working. A continuous while loop comprises the GPIO read
and calls subroutine “COUNTRECEIVED” if the pin registers high. This
subroutine first calls subroutine “TURNSCOUNT” which appends the two count
strings: “digittens” and “digitones”. It then constructs the string to be sent
(“goingout”) by appending the ones digit to the end of the tens digit. The
constructed string is sent via the serial port.
The LabView display shown is an example supplied with LabView 5.0
called “Serial Read with Timeout”. No modifications were made at this point to
the supplied example program.1
67
Project “adctest2”:
Having developed the basic structure of the software, the final two tasks
that remained were to test the ADC and DAC capabilities of the controller. To
simulate a strain gage, a variable resistance pot running off of board power was
attached to ADC channel 0 (Pin 1, J9). This simulated a variable voltage input with
a range of 0 to 3.3 VDC. The resulting code is found in Appendix E – “adctest2”.
This contains the c code, “adctest2.c” and “appconfig.h”, as well as the LabView
panel and diagrams. Once again, the LabView example, “Serial Read with
Timeout” was used to view the results.
Walking through “adctest2.c”, the first major definition seen is “sadc1”,
which is an adc_sState constant, defining the configuration when opening the ADC
port. The second definition is “Data1”, which is an ADC channel structure. This
defines the buffer where information from the ADC port is stored. The constant
definition that follows is for “low2Threshold”. The yellow LED turns on and off
when the value read at the ADC port falls below this constant. It was used
primarily for debugging purposes.
Continuing into the main routine, the serial port is initialized, the ADC port
is opened, and the GPIO ports are initialized. An ADC read is then started and if
the buffer length is greater than zero, the value is sent via the serial port. Note that
the value is calibrated by dividing by 10.853. It was assumed that code might be
used for reading a pressure value from 0 to 3000 psi (standard pressure range on an
ROV hydraulic system).
The code then turns the yellow LED on or off depending the reading from
the ADC port. Finally, it resets the synchronization flag (if a read did occur) and
initiates another ADC read. This re-initiation of ADC reads is necessary because
of the set-up in “appconfig.h”. When viewing this file, it can be seen that the ADC
scan mode is defined as sequential once. This means that the controller will step
68
through all of the configured ports (in this case, only Port 0) sequentially and only
one time. Therefore, processing power is not wasted by continuously reading the
value. Also defined are the number of samples taken and the callback (interrupt)
mode. The interrupt mode defines when the ADC triggers an interrupt. This can
be triggered by a high or low threshold setting, a zero crossing, or it can just return
raw data in which the interrupt resets are more or less done manually in the code as
is shown here.
Project “TryDAC”:
The final step before assembling the pieces was to test the DAC on the
controller. This was simply done by using an example program provided with the
SDK. The code can be found in Appendix F – “TryDAC”. This contains the c
code “TryDAC.c” and “appconfig.h”. Routine main opens the DAC port, defines a
value to be written, and writes that value to the DAC channel (in this case channel
A). Values were read using a multimeter at Pin 0, J20.
Conclusion:
These initial developments provide a subroutine base for assembling the
final baseline control system. They also presented an opportunity to learn the
proper programming methods for the DSP56F805 microcontroller. A good
learning example is the while loop used to read the counter in Project
“LabViewGPIO”. This worked for a single function program such as this. When
this was tried in the baseline system where serial communication, analog inputs,
and other functions are vying for processor time, a runtime error occurs. The
proper method for accomplishing this sort of multitasking is through the use of the
interrupt drivers.
69
This programming approach was easily remedied during the initial
development. If the step by step approached had not been used, debugging that
runtime error would have been much more difficult in the combined system.
Progressive programming techniques such as these help the programmer save time
and develop logical software structures.
70
Chapter 5
Description of Valve Pack
The baseline control system designed for this thesis was developed to
control an ROV operable torque tool. The subsea control hardware required for
this “smart” torque tool includes the controller SBC (single board computer), a
proportional hydraulic flow valve for controlling the rotational speed, and a
proportional hydraulic pressure valve for controlling the output torque. This
chapter will describe the hardware designed for this thesis. Appendix G contains
the mechanical drawings, a hydraulic schematic, and an electrical schematic to
construct the necessary hardware.
A controller pack has been designed to meet the control requirements. This
valve pack consists of a machined manifold, the controller card, a proportional
pressure reducing valve, and a bi-directional, proportional flow control valve, along
with the necessary hydraulic and electrical fittings. The entire pack is designed to
be filled with dielectric oil for pressure compensation to eliminate the need for a
bulky, one atmosphere housing. O-ring groove and SAE porting parameters were
taken from the Parker O-Ring Handbook.1
The torque tool control system is designed for a depth of 10,000 fsw (feet of
seawater) so it must withstand pressures up to 4,610 psi. The controller card depth
is limited solely by the crystal. To solve the depth problem, a process of potting
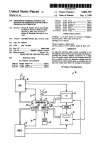
the crystal in epoxy has been successfully used in the offshore oil and gas industry.
The valves and associated amplifier/controller cards were tested and are
operational to this depth. The specified flow control valve is a Wandfluh NG4Mini proportional directional valve (P/N VWS4-D42-08-TF-G12) with a nominal
flow rate of 2 gpm (gallons per minute) and a maximum operating pressure of 3600
psi.2 The proportional pressure valve is a Wandfluh screw-in cartridge,
71
proportional pressure reducing valve (P/N MVP-PM18-200-G12) with a maximum
flow rate of 5 gpm and a maximum operating pressure of 5800 psi.3 These two
valves are controlled with a Wandfluh proportional amplifier card (P/N
P02A01D33) that is mounted directly on the valve. If the P02 card is configured
for a variable voltage control input, it requires a 0 to 8 volt signal for the entire
range.4 The DAC (digital to analog converter) chip that supplies the analog output
signals on the SBC controller card is the Maxim MAX5251. It is only capable of
an output voltage of 0 to 3 volts.5 To get this to work, the Maxim DAC can be set
up with an external resistor as a digital programmable current source.6 This can
then be connected per the Wandfluh specification7 to drive the P02 amplifier card.
See the electrical schematic (Drawing # SSE-ELEC-0003) in Appendix G for more
details.
Power and telemetry enter the unit from the backside through a port labeled
“ELEC”. The amplifier cards and controller board require 12 volts DC at 3 amps
and a two wire RS-232 connection is needed (this can be upgraded to support the
CAN protocol). Sensor signals enter from the tool through the port labeled, “To
Tool”. These lines carry signals from the Hall Effects sensors and strain gauges.
The lines can be upgraded to include a pressure transducer and flow meters that can
be implemented in a control loop.
The use of this system is as follows. The proportional pressure reducer
reduces supplied system pressure to the torque tool and controls the output torque.
An API Class 3 torque tool has a range of 0 to 1000 ft-lbs8 and a typical hydraulic
supply is 0 to 3000 psi. The flow control valve determines which way the tool
rotates along with the speed. The following figures display the valve pack
assembly and controller board. Appendix G – Valve Pack contains figures,
machine, electrical, and assembly drawings allowing construction of the pack.
72
Figure 5.1: Valve Pack Assembled
73
PROPORTIONAL
PRESSURE REDUCER
PROPORTIONAL FLOW
CONTROL
MANIFOLD
CONTROLLER
BOARD
Figure 5.2: Valve Pack, Exploded View
74
Figure 5.3: Controller Board
76
Chapter 6
Explanation of Torque Tool
Control System C Code
The initial development work described in Chapter 4 laid the groundwork
for assembling the final baseline system. The functions and subroutines were
developed during this phase to perform analog and digital I/O and serial
communication. The next major step was to combine these pieces of code along
with the necessary timing structure to create a workable baseline control system.
Chapter 4 discusses the use of while loops and built in pauses to smooth data
collection and timing. The final system required the use of interrupt drivers and
priority settings to create the real time, multitasking control program presented in
this chapter.
The C code, LabView panel and LabView diagrams can be found in
Appendix J – Baseline System. This includes the C code “Put It All Together.c”
and “appconfig.h”. The intention of this software is to meet the requirements as
laid out in Chapter 3 for the subsea portion of the baseline system. To reiterate,
these requirements are:
Turns count information displayed either via an LED or transmitted to the
surface.
Turns counter (Hall Effect or reed switch) input – digital I/O.
Torque (strain gage) input – analog I/O.
Communication link for relay of information such as pressure and flow.
To better explain the software developed for this thesis, it is easiest to
“walk” through the code step by step. Walking through “Put It All Together.c”,
77
global numeric and string variables as well as functions are declared. As in the
earlier ADC example, the adc_sState constant, “sadc0”, is defined which
configures the ADC port during an open call. “Data0”, an ADC channel structure
which describes the ADC storage buffer, is then defined. Moving into function
main, the DAC port is opened and then “ConfigSerial” is called. This function
configures serial port 0 for 8 bit words, no parity, and 9600 baud rate. It then
declares “sciRxCallBack” as the receive interrupt callback function which is called
when the controller receives “SciReadLength” number of characters. In this case
“SciReadLength” is set to 1.
Back in function main, “ConfigGPIOPort” is called to configure the GPIO
ports. In this subroutine, the character string “TurnsCounterString” is initialized to
“C0000”, GPIO port D, pin 0 is opened, and interrupts are enabled. The serial
communication method used in this software does not send all information values
continuously. Instead, it only sends values when there is an updated value. In this
case, the controller would only send the value of the counter if a new count is
received. In order to differentiate multiple strings, a simple addressing scheme was
implemented in which the count string is preceded by a “C”, the torque string by a
“T”, and the pressure string by a “P”. In a more complicated system, a different
addressing scheme would have to be used. However, for the current example, this
method proved sufficient and easier to use while debugging.
Function main then calls subroutine “ConfigADCPort”. This opens the
ADC port per the configuration in sadc0, initializes the synchronization flag, and
instructs the ADC to proceed with the first read.
“ConfigTimer” is then called to configure the timer which determines how
often the ADC port is read. It creates a timer, “Timer1”, which triggers an interrupt
a quarter second after the program has started and every quarter second thereafter.
When the interrupt is triggered, the function “Timer1ISR” is called. This in turn
calls the function “ReadADCChannel”.
78
Finally, function main installs the interrupt routine,
“COUNTRECEIVED_ISR”, which is called when an interrupt is triggered at GPIO
port D (which is anytime the Hall Effect sensor pulls pin 0 high). A continuous
while loop is inserted at the end.
Moving down in the code, “COUNTRECEIVED_ISR” clears the Port D
interrupt that initiated the call, and then disables port D interrupts. This is done to
prevent an interrupt from triggering while the subroutine is running. It also has a
smoothing effect on the output and prevents accidental and unwanted counts. It
then adds one to the turns counter variable and calls the function
“CreateStringFrmDigits”. This function is used multiple times in the program and
is used to create a four character long string from a four digit number. The string
“TurnsCounterString” is then defined as this newly created string, preceded by a
“C” (the identifier mentioned above). A quarter second pause is inserted and then
Port D interrupts are re-enabled.
Subroutine “CC_CallBack” is defined in “appconfig.h” to handle the ADC
conversion interrupt as described in Project “adctest2”, Chapter 4.
“ReadADCChannel” is called every quarter second by the timer interrupt. This
reads the information in the ADC buffer and determines if a read did occur based
on a buffer length greater than zero. It then converts the value to a string using the
“CreateStringFrmDigits” function and defines this string, preceded by a “T”, as the
torque string to be sent. The three strings, “ADCString”, “TurnsCounterString”
and “PressureString” are then written to the serial port. Finally, the
synchronization flag is reset and a new ADC read is initiated.
Subroutine “sciRxCallBack” is called when the buffer receives a specified
number of characters (in this case, 1) and an interrupt is triggered. It then reads the
buffer and performs a check in the first set of if else statements. If the buffer
contains a character value of “P”, “A”, or “B”, the following characters to be read
correspond to pressure, A side flow, or B side flow. Two counters are then
79
initialized to manage the construction of the strings. Counter “m” determines
which string is currently being read (m=1 refers to pressure, m=2 to A side flow,
and m=3 to B side flow). Counter “n” determines how many characters of the
string have been read. Based on these counters, the three functions
“ConstructPressureString”, “ConstructASideString” and “ConstructBSideString”
are used to assemble the individual strings. Again, a simple addressing scheme is
used in which the pressure string starts with a “P”, the A side string with an “A”,
and the B side string with a “B”. At the end of each read from the serial buffer, a
command is issued to clear the buffer.
In the final if statement of each of the “ConstructString” functions, is a call
to the subroutine “SetDACOutput”. This function reads the counter “m” to
determine which value it’s re-issuing and then converts the corresponding string to
an integer. This value is re-calibrated for a range of 0 – 65535 (the resolution of
the DAC channels) and then output to the corresponding channel.
Conclusion:
“Put It All Together.c” combines the requirements laid out at the beginning
of this chapter into a C program capable of real time control. The code allows for
proportional speed control of a torque tool in two rotational directions as well as
proportional control of output torque through the use of a pressure reducing valve.
This rotational motion is monitored by the use of a turns count Hall Effect sensor
and the torque via a strain gauge. All of this information is transmitted by way of
an RS-232 serial link.
The following chapter will detail the topside portion of this torque tool
control system at the other end of this serial link. The topside graphical user
interface (GUI) has been written using LabView software and provides a method of
user input and status monitoring.
80
Chapter 7
Explanation of Surface Control Unit
Graphical User Interface (GUI)
The majority of this paper is dedicated to the development of the vehicle
portion of the torque tool control system. However, the graphical user interface
(GUI) is the portion of the system most evident to the operator. The real time
operating system VxWorks from WindRiver was investigated because of its
acceptance in industry and advertised quick development time.1 However, the cost
of such a system was beyond the budget of this project. The topside control
interface must be user friendly so a Windows environment was selected because of
its widespread familiarity. A number of programming languages are available to
develop a Windows GUI such as Visual Basic and Visual C++. LabView was
finally selected because of past experience with the software and because it is
intended for the development of industrial control systems.
This chapter will describe the topside portion of the torque tool control
system that was programmed using LabView. The LabView documentation can be
found in Appendix J – Baseline System. Viewing the LabView panel, it can be
seen that the user controls are pressure, flow side A, and flow side B along with the
associated submit control buttons. The readout indicators are pressure, torque, and
turns count. Further readouts are classed under a “Diagnostics” section and include
the raw string being transmitted from the LabView application, the string being
received, a telemetry error indicator, and a telemetry timeout indicator.
81
Figure 7.1: Topside GUI Window
The user can enter any value from 0-3000 psi into the pressure digital
control and press the associated “Submit” button. Values over 3000 will be
interpreted as 3000. The software then sends this value via the serial port to the
valve pack controller board. The bottom side controller echoes this value back
which serves as an error check to ensure the number was received. Further error
checking is available by use of the strain gage/torque reading set-up. The bottom
side controller, by way of a strain gage, reads the actual torque output of the tool
and transmits the value top side via the serial port. This value is displayed in footlbs and can be visually compared to the current pressure setting.
Rotational speed of the tool is controlled with the two controls labeled
“Flow Side A” and “Flow Side B”. The value is entered as a percentage (0-100)
and transmitted bottom side via the serial port. No feedback is currently enabled
due to the fact a visual determination of speed can be made by observing the tool.
However, it is recommended that this feedback be installed as an upgrade.
The “Diagnostics” section aids in any troubleshooting and allows the
operator to check readouts with the actual strings being sent and received. The
“Transmit String” indicator displays raw data being sent from the topside computer
via the serial port. “Receive String” shows the raw data coming in. “Error Out”
indicates if an error has occurred with a serial port connection or link up with the
82
bottom side controller. The “Timeout” indicator will display if the serial port
attempts to connect with the controller but does not succeed within the specified
amount of time.
All serial programming is based upon the serial communications examples
provided with LabView. LabView Version 5.1 was used for this project.2
Explanation of Diagrams:
In order to enable the multiple serial sends and reads, a series of case
structures were used. Moving from the outside in, the first case structure is
attached to the Flow Side B submit button and labeled “CASE STRUCTURE 1”.
When true, this triggers a serial initialization with a 9600 baud rate, a buffer size of
5 characters, port # 0 (comm port 1), 8 data bits, and 1 stop bit.
An error code is associated with the next case structure labeled “CS 2”.
This error code registers a “1” if the baud rate, data bits, stop bits, or port number
are out of range. “CS 2” will then follow the true value which causes the transmit
string value to be set to zero and the “Error out” indicator to light.
If the error code does not light, the false path of “CS 2” is followed and the
string conversion and send processes are started. For the three strings sent (Flow
Side A, Flow Side B, and Pressure) this process is the same. First, the decimal
entered at the user control is converted to a string. Then, a series of nested case
structures are used to concatenate the string with the proper identifier and number
of zeroes to make the string the correct form. For Flow Side A and B, the proper
output would be of the form “AXXX” or “BXXX”, where “XXX” is the percentage
value being transmitted. For Pressure the proper output would be of the form
“PXXXX”, where “XXXX” is the pressure value being transmitted.
Using Flow Side B as an example, a comparison is made to see if the string
length is greater than 1 and the result is used in the case structure “CS 3”. If false
82
(not greater than 1), then the string is concatenated with “B00” resulting in the
string “B00X”. This string is sent via the serial port using the Serial Port Write VI
(a LabView supplied VI) on port 0 (comm port 1). The string is also displayed in
the “Transmit String” dialog box under diagnostics. The error indicator is attached
to this write VI as well. The same errors mentioned above will cause the indicator
to light.
If “CS 3” receives a true answer (the string is greater than 1), then it moves
on to another comparison to see if the string is greater than 2. The same process is
continued with “CS 4” and “CS 5” until the proper string form is assembled. All
sent strings are displayed in the “Transmit String” dialog box and any errors in
serial communication result in an error out light.
Moving back to the outermost case structure “CASE STRUCTURE 1”, it
can be seen that if it receives a false result, a similar set of case structures is
embedded that are tied to Flow Side A. These case structures, “CS 6”, “CS 7”, “CS
8”, “CS 9”, and “CS 10”, perform a serial write of the Flow Side A user entered
value if “CS 6” receives a true value. This serial write and the above mentioned
case structures perform exactly as those described for Flow Side B above.
If “CS 6” receives a false answer, another set of embedded case structures
performs the same function for the Pressure value. These structures are labeled
“CS 11”, “CS 12”, “CS 13”, “CS 14”, “CS 15”, and “CS 16”. If “CS 11” receives
a true value, the above mentioned case structures will enable a serial write of the
Pressure user entered value.
Finally, the while loop “WHILE LOOP 1” is encountered if “CS 11” is
false. This while loop and the associated embedded case structures perform a serial
read at port 0 (comm port 1) while the timeout limit is not reached. If the timeout
limit is reached, the while loop will not execute and the “Timeout” indicator will be
lit.
83
If the serial port is operating ok, the while loop is executed and the Bytes at
Serial Port VI (again, supplied with LabView 5.1) will count bytes received at the
indicated port (in this case port 0). If the required byte count (20) is not reached,
“CS 17” will register false and “CS 18” and “CS 19” will perform a timeout check
and a wait. If the error still exists, no read will be performed and the “Error out”
light will be lit.
If the proper numbers of bytes are received, “CS 17” will follow the true
execution. The Serial Port Read VI (supplied by LabView) is used to read the
indicated number of bytes at port 0. This string is displayed in the “Received
String” dialog box. A series of match pattern functions are used to check the
identifier and the associated value is displayed. The identifiers are “P” for the
pressure value, “C” for turns count, and “T” for the torque.
Conclusion:
LabView software was used to create a user friendly Windows type
interface that allows for the real time control of an ROV torque tool. This interface
allows the operator to set the hydraulic pressure and flow of the tool, which
controls the tool’s torque and speed respectively. The GUI displays the current
torque output and turns count. Other information such as an echoed current
pressure setting and received telemetry string are also displayed to aid in
troubleshooting. This interface is laid out in a single window format with relatively
easy to use controls.
84
Chapter 8
CAN Overview
Control Area Network, or CAN, was developed by Bosch in the 1980’s and
first published in 1986. Version 2.0 or the extended version was released in 1991.1
In the Open Systems Interconnection standard, CAN is a low level communication
protocol requiring a higher layer protocol to make a complete communication
system. CAN was created specifically for vehicle networking, an environment with
a high level of electronic noise and a great need for reliability. It is used in
applications such as anti-lock brake, engine control and body electronics systems.
The protocol allows for bit rates up to 1Mbit/s and because it uses a single common
bus, permits the elimination of a complicated wiring system.2
This chapter will present an overview of the CAN protocol so that the
reader may have some basic knowledge of the standard. This will allow for a more
thorough understanding of Chapter 9, which describes how the torque tool control
system may be expanded to control a more complicated system such as a work
class ROV.
The Open Systems Interconnection standard defined a basic structure for a
communication system. CAN is a low level communication protocol, meaning that
it must be used with a higher layer protocol in order to have a complete, workable
system. The OSI model will be described below to understand where the CAN
protocol fits in.
85
Open Systems Interconnection
The Open Systems Interconnection (OSI) standard is a reference model to
describe how data moves between two computers or nodes in a communications
network. It was developed in 1984 by the International Organization of Standards
(ISO) and serves as the prime outline for computer network systems.3 The model
divides the overall task into seven separate layers4 :
Application, Layer 7
Presentation, Layer 6
Session, Layer 5
Transport, Layer 4
Network, Layer 3
Data Link, Layer 2
Physical, Layer 1
The upper, or high, layers are termed application layers. These include
application, presentation and session. The lower layers are dubbed data transport
layers that consist of transport, network, data link, and physical.
The physical layer defines the actual physical link between the networked
computers. This portion of the model defines items such as connector style,
voltage levels, and communication timing. Ethernet defines a physical layer since
it defines whether a twisted pair or coaxial cable should be used for the protocol. 5
The data link layer handles transmission reliability issues such as error
notification, physical addressing, data flow, and data sequencing. The data link
layer is divided into two sub layers: logical link control (LLC) and media access
control (MAC). The LLC layer is defined under IEEE 802.2 and defines services
for data transfer and remote data requests.6 The MAC layer is responsible for the
86
transfer protocol, and also assigns MAC addresses that are used by some protocols
to identify individual nodes.7
The network layer defines the layout of the network and network
addressing. This layer can define how nodes are addressed on the network (as
opposed to the MAC address) and the routes that messages are transmitted across a
network.8
The transport layer is responsible for data transmission, flow control, and
the multiplexing of data. This layer takes is responsible for proper transmission
rates and transmission error checking. TCP and UDP are both transport layer
protocols.9
The session layer controls the actual communication session. This layer
ensures the synchronization between communicating devices such as the three-way
handshaking method that TCP/IP uses.10
The presentation layer ensures that data conforms to a format acceptable by
the receiving computer. Common presentation formats include JPEG, MPEG, and
TIFF that are accepted by a number of computer systems.11
The application layer is an umbrella definition of anything outside the OSI
definition that is required to interact with the current application. This includes any
software necessary to prepare the data for processing by the user application. 12
CAN as a Low Level Protocol
As mentioned above, CAN is a low level protocol. It only defines
communications at the physical and data link layer levels. Per the OSI standard,
the data link layer is divided into the LLC and MAC layers. The Bosch CAN
specification defines the scope of these layers as the following13 :
87
The physical layer defines how signals are actually transmitted and
therefore deals with the description of bit timing, bit encoding, and
synchronization. Within this specification, the Driver/Receiver characteristics are
not defined so as to allow transmission medium and signal level implementations to
be optimized for the application. Within one network, the physical layer must
remain consistent from one node to the next.
The MAC sub layer represents the kernel of the CAN protocol. It presents
messages received from the LLC sub layer ad accepts messages to be transmitted to
the LLC sub layer. The MAC sub layer is responsible for message framing, bus
arbitration, data acknowledgement, and error detection and signaling. This sub
layer is supervised by a management entity called fault confinement which is a selfchecking mechanism fro distinguishing short disturbances from permanent failures.
The LLC sub layer is responsible for message filtering, overload
notification, and recovery management.
Since CAN only defines the lower two layers, a higher-layer protocol
(HLP) is required to construct a complete network communications system.
Basic CAN Concepts
The method of communication used on the CAN bus is called “broadcast”.
This means that no message is sent to a single node address. Instead, data is
broadcast along a common bus to all nodes, which then determine, according to the
identifier preceding the data, whether the information is pertinent to that particular
node. Ethernet is set up to use broadcast communication as well as multicast
(address groups) and unicast (single address). TCP/IP protocol and USB use point
to point communication meaning messages are sent to single addresses. The
advantage to the broadcast method is that a command requiring action from
88
multiple nodes can be sent once and avoid unnecessary use of the bus. Depending
on whether standard frames (CAN 2.0A) or extended frames (CAN 2.0B) are being
used, the identifier is 11 or 29 bits long, respectively.
FRAME TYPES –
There are four types of data frames that can be broadcast14 :
Data frame
Remote frame
Error frame
Overload frame
The data frame can be broken down into seven fields: start of frame,
arbitration, control, data, CRC, ACK, and end of frame. The start of frame (SOF)
field is a single dominant bit. The arbitration field in the standard format contains
an 11 bit identifier followed by the remote transmission request (RTR) bit which is
dominant. In extended format, the arbitration field consists of an 11 bit base
identifier, a substitute remote request (SRR) bit which is recessive, an identifier
extension (IDE) bit that is recessive, and an extended identifier of 18 bits. The
control field is six bits long and contains the 4 bit data length code that defines the
length of the data field. The data field is the actual data being transmitted and can
be anywhere from 0 to 8 bytes in length. The CRC (cyclic redundancy check) field
contains the CRC sequence (derived from a CRC polynomial calculation) and a
CRC delimiter that is recessive. The ACK (acknowledge) field is two bits long and
contains the ACK slot and ACK delimiter both of which are recessive for the
transmitter. Any receiver that receives the data field correctly according to the
CRC check will superscribe a dominant bit into the ACK slot. Finally, the end of
frame sequence consists of seven recessive bits.15
89
The remote frame is similar to the data frame with two differences: the RTR
bit is recessive and there is no data field. This frame type is used as a request for
information. Typically the identifier is the same as that of the data being requested.
The data length code must be identical to that of the data being requested for the
request to be accepted.16
Any node that detects a transmission error on the bus transmits an error
frame. An error frame consists of an error flag and an error delimiter. An error
flag can be either active (6 consecutive dominant bits) or passive (6 consecutive
recessive bits). Because of an error checking method called “bit stuffing”, six
consecutive bits of the same value are not allowed; therefore, the transmission of an
error flag causes all other nodes on the network to transmit their own error flag.
The superposition of all error flags will be anywhere from six to twelve bits long.
After the transmission of an error flag, each node starts transmitting recessive bits
until it receives a recessive bit. This means all nodes have stopped sending error
flags. Once a recessive bit is detected, seven more recessive bits are sent. At the
completion of an error frame, the transmitter that was interrupted will attempt to re
send its data.17
The overload frame is sent by a node that has received data beyond the
capacity of its receive buffer. It conforms to the structure of an error frame.18
BUS ARBITRATION –
Any node on the CAN bus may begin transmission of a frame when it
detects intermission and an idle bus. Intermission consists of 3 recessive bits and
the idle bus length is user defined. At this point, the possibility of multiple nodes
transmitting simultaneously exists. Therefore, all transmitters monitor the bus level
and if a dominant bit is received when a recessive bit has been sent, that node
ceases its transmission. This prevents any loss of time due to different nodes
fighting over the bus and provides a built-in method of message prioritization. A
90
dominant bit is typically logic zero; therefore, the frame with the lowest value
identifier will win arbitration.19
The Ethernet and IEEE 802.3 protocols use a transmission scheme similar
to CAN. However, bus arbitration in these two protocols does not use nondestructive transmission. In Ethernet, any node that detects a collision (two nodes
broadcasting simultaneously) broadcasts a “jam” signal that causes all nodes to
wait for a “backoff” period of time. Since this “backoff” time can be set as a
random number or a varying number per node, message priorities can be set on a
per node basis. Although both methods have good end results and overall
transmission rates, the system used by CAN is much more efficient since it does
not allow for time delays because of arbitration. Also, the CAN system is much
more predictable since priorities are set by numeric message identifiers rather than
a separate time delay.
ERROR HANDLING AND CONFINEMENT –
The CAN specification provides 5 methods of error detection. The first is
bit monitoring and happens when a node sends a bit and monitors a different value
on the bus. The exception to this error is when two nodes are in arbitration for
control of the bus. The node that loses arbitration transmits a recessive bit and
detects a dominant bit on the bus. This will not signal an error flag.
The second form of error handling results from “bit stuffing”. During the
SOF (start of frame), arbitration, control, data, and CRC fields, a transmitting node
will place a complementary bit after a series of five identical bit values. This
means that six consecutive bits of the same value will result in an error on the bus.
The method of “bit stuffing” is not used during error or overload frames, as well as
the fields not mentioned for the data and remote frames.
The third error handler is the CRC check included in the data frame. The
CRC check is a polynomial calculation created from the de-stuffed bit stream
91
consisting of the SOF, arbitration, control, and data fields. The Bose, Chaudhuri
and Hocquenghem (BCH) method is specified and results in a 15 bit CRC
sequence.20 Receiving nodes perform the CRC calculation and compare the result
with the transmitted sequence. If the results do not match, an error frame is
transmitted.
A form error occurs when a wrong value is monitored for a frame with a
specified format. If a particular bit in a frame is supposed to be recessive and a
dominant bit is monitored, an error is broadcast on the bus.21
The fifth form of error handling is the ACK slot. If a transmitter does not
detect a dominant bit during this period, it assumes that no nodes received the
transmitted message and an Acknowledgement error is signaled.22
Confinement of network errors is achieved through a method of error
counting. Each node keeps two separate counts, transmit and receive. These are
incremented according to a series of rules laid out in the CAN specification. As
long as the counts remain below 128, the node is in an error active state. This
means it can communicate over the bus normally and signal an active error flag
when it detects a bus error. When either of these counts is greater than or equal to
128, the node enters what is called error passive state where it still has access to the
bus but can only respond to errors with a passive error flag. If the transmit error
count exceeds 256, the node becomes bus off which means it cannot transmit over
the bus.23
BIT TIMING –
The CAN protocol does not have a provision for a global clock. Therefore,
each node must have a local oscillator and system synchronization is done at the
edge between changing bit values. As mentioned above, the maximum bus speed
available is 1 Mbit/s dependent upon the oscillator selected. The nominal bit time,
or the time for one bit to be transmitted over the bus, may be found by taking the
92
reciprocal of the bus speed. This nominal bit time can be broken down into 4
segments as seen below in Figure 8.1.
Figure 8.1: Nominal Bit Time24
The value of time quantum is derived from the nominal bit time. This
value can be adjusted by a prescaler that is user programmable. There are
anywhere from 5 to 25 time quanta in a bit time.25
The synchronization segment of the bit time is 1 time quanta in length. The
edge of the bit is expected to fall into this period and results in a hard
synchronization. The propagation segment is provided to make up for delay times
within the bus. This segment may be anywhere from 1 to 8 time quanta in length.26
Both phase segments are adjustable in order to correct for a
resynchronization, which occurs if the edge of the bit does not fall within the
synchronization segment. Phase segment 1 may be shortened and has an overall
length of 1 to 8 quanta. Phase segment 2 may be lengthened and its overall length
is 2 to 8 quanta. Between the phase segments is the sampling point during which
the value of that bit is read.27
The synchronization jump width (SJW) is defined as the maximum amount
of adjustment allowed when correcting for a resynchronization. There are four user
programmable values:
The SJW which has a value between 1 and the minimum of 4 and the length
of phase segment 1.
93
The number of quanta before the sample point
The number of quanta after the sample point
The clock prescaler value
PHYSICAL ATTRIBUTES –
The signals transmitted across the bus are termed dominant and recessive.
A dominant bit has a logic “0” value and a recessive bit has a logic “1” value.
Nodes are connected to the bus such that a dominant bit will drive the signal even if
all other nodes are transmitting a recessive bit.28
The most common used wiring scheme is specified under ISO 11898, which
calls out a two-wire balanced signal. Approximate transmission lengths are29 :
1 Mbit/s – 40 m
500 kbit/s – 100m
250 kbit/s – 200m
125 kbit/s – 500m
10 kbit/s – 6000m
Although there is no standard CAN connector, those typically used include
a 9 pin DSUB, a 5 pin mini-c, and a 6 pin Deutch connector.30
Conclusion:
As can be seen in the preceding overview, CAN has multiple methods of
error checking. This is one of the main reasons the protocol was selected and is
important for a communications system being developed for a high noise, industrial
environment. The protocol also allows for a simple method of adding new nodes to
the system because of the “broadcast” message transmission method it uses. As a
94
result, items do not require individual addressing or other complicated
identification schemes.
There are other protocols such as Ethernet and TCP/IP that have attributes
similar to CAN. Ethernet uses the broadcast method with a common bus and has
extensive error checking. However, the method of bus arbitration that Ethernet
uses is more complicated than and not as efficient as the non-destructive method
used by CAN.
TCP/IP uses point to point addressing and has extremely efficient message
routing built in. If a node is offline or a part of the communication bus is
congested, data packets can be sent via other routes. This type of system is ideal
for an ever expanding network such as the Internet. An ROV, on the other hand, is
unusual if it has more than thirty separate items requiring a control node on the
network. An ROV control system would not make use of a multi-path wiring
scheme allowing different routing of data because of the necessity to keep wiring
runs (and thus failure points) to a minimum. Also, the broadcast method as
opposed to individual addressing fits easily with an ROV’s control signals. For
example, an operator’s motion on a joystick may require a number of thrusters on
the vehicle to operate. This control signal may be sent once to all thrusters rather
than multiple times to individual components.
The next chapter will describe how the torque tool control system can be
expanded to control a work class ROV using the CAN protocol as the basis for a
communication network. The higher layer protocol MSCAN (Motorola Scalable
Control Area Network) will be described along with the basic structure of the
expanded system.
95
Chapter 9
Expanded System
This chapter will present a theoretical layout of a work class ROV based
upon the control system described previously in this paper. A work class ROV as
defined under API specifications has dimensions greater than or equal to
86”x70”x95” and weighs over 5000 lbs..1 These vehicles are also equipped with a
robotic manipulator that is used to grab and move items or tools. The driving idea
behind the design of this expanded system is that individual components of the
ROV have their own controllers and software. These components can then be
added or removed from the system more easily and, in the case of single
component failure, the entire system is not brought down.
The CAN protocol presented in Chapter 8 is used as a communications link
between these components. However, a higher-layer protocol (HLP) is necessary
to create a full network system. The HLP designed for the DSP56F805 is called
Motorola Scalable Controller Area Network (MSCAN).
Motorola Scalable Controller Area Network
MSCAN is an add-on module to the Embedded SDK for digital signal
processors (DSPs). It is based upon the MSCAN12 definition first used on the
MC68HC12 family controllers.2 The module provides CAN drivers as well as
functions written in C that allow the programmer to write code using the SDK
environment. The drivers are written with a default setting such that the designer
can begin creating the basic program without having to adjust more complicated
settings such as bit timing, clock source, message filtering, or power states. These
96
static settings and program functions will be described below. First, an overview of
some of the features offered by MSCAN will be presented.
MSCAN FEATURES
Motorola Scalable Controller Area Network adheres to CAN version 2.0
A/B. It supports both the standard 11 bit identifiers and extended 29 bit identifiers.
Data messages can be anywhere from 0 to 8 bytes in length and bus speeds range
from 10 kbit/s to 1 Mbit/s depending on the oscillator.
The DSP56F8XX family output a CAN signal directly from the controller.
On the evaluation board used for this research, this signal passes to a Philips
PCA82C250T transceiver that sends a two-wire, balanced signal in accordance
with ISO 11898. The recommended connection of multiple evaluation boards
(EVMs) in a common CAN bus can be seem in Figure 9.1.
Figure 9.1: CAN Bus with Multiple EVMs (Evaluation Modules)3
MSCAN provides a multiple buffering scheme for sending and receiving
messages as shown below in Figure 9.2. There are three transmitting buffers and
two receive buffers. Transmit buffers signal they are ready to handle data by
setting the associated TxE (transmitter empty) flag. Data can then be written to the
97
transmit buffer and the data will be sent when the bus becomes available. If
multiple transmit buffers are full, the message with the highest priority will be sent
first. The highest priority is determined by the message with the lowest numbered
identifier.
Figure 9.2: MSCAN Message Buffer Organization4
The two receive buffers consist of two MSCAN memory buffers that are
mapped alternately to a single CPU (central processing unit) buffer. This means
that only one of the buffers is accessible by the CPU at any one time. Incoming
98
messages that pass filtering parameters are written to the RxBG or background
receive buffer. If the receiver full (RxF) flag is not set, the message is copied to the
RxFG (foreground receive buffer), the RxF flag is set, and the message received
interrupt service routine (ISR) is emitted. An ISR is a program function that is
called as the result of an interrupt or trigger. In this case the ISR function would
probably read the message, store any pertinent data to memory, and reset the RxF
flag allowing any incoming messages to be written to the buffer. An overload error
can occur when both the RxBG and RxFG are full and another message is received
from the CAN bus.
MSCAN offers a message filtering scheme consisting 32 bit, 16 bit, or 8 bit
filters. These filters define acceptable numerical patterns in the standard or
extended identifiers.5 Parts of the identifier may also be masked, or ignored, as
defined by the particular filter.
Finally, three low power states are available. Sleep mode allows the
MSCAN controller to finish current message operations and then cease bus
operations. If any bus activity is detected, the controller will return to normal
operations. The soft reset mode ceases any message activity immediately and puts
the transmit pin in a recessive state. Initializations can be made during a soft reset.
Power down mode is entered when the CPU is shut down. Soft reset and power
down mode should not be entered unless the controller was previously put into
sleep mode. Bus error could result if this is not followed.
MSCAN DRIVER DEFINITIONS
Motorola Scalable Controller Area Network has sixteen static definitions
that can be declared to customize the communications for a particular application.
As mentioned above, MSCAN has a default setup such that none of these static
definitions are required. The default setting for the driver is6 :
CAN 2.0A addressing protocol
99
11 bit Identifier length
Un-Queued message transmission mode
The driver can be set to operate in either CAN 2.0A or 2.0B addressing
modes. This defines the identifier length to be either 11 or 29 bits long,
respectively. Queued and Un-Queued mode means memory buffers are allocated
for transmitted and received messages before they are written to the five MSCAN
buffers (3 transmit and 2 receive). This is one of the settings that enable the
programmer to control how much memory a particular application will require.
1 & 2 - CAN_MAX_RECEIVE_ID & CAN_MAX_TRANSMIT_ID:
These two definitions specify the maximum number of message buffers that
can be open at one single time while in Queued mode. The maximum value for
each is seven buffers meaning that seven messages can be waiting for transmit and
seven messages with different identifiers can be received. This is separate from the
multiple buffering scheme that defines two receive buffers and three transmit
buffers. Those five buffers are actually located in the MSCAN hardware. The
seven buffers declared by these two “MAX_ID” definitions are defined by software
and allocated out of program memory.
3 through 8 - CAN BIT TIMING DEFINITIONS:
The MSCAN driver provides six static definitions to control the bit timing
parameters. These are “CAN_SPEED”, “CAN_TIME_SEGMENT1”,
“CAN_TIME_SEGMENT2”, “CAN_PRESCALER”, “CAN_SAMPLING”, and
“CAN_SYNCH_JUMP_WIDTH”. “CAN_SPEED” allows the programmer to
specify the bit rate of the application from nine predefined speeds ranging from 1
Mbits/s down to 10 kbits/s. If this setting is defined, the five other timing
definitions cannot be used.
100
“CAN_TIME_SEGMENT1” and “CAN_TIME_SEGMENT2” define the
length of the two time segments in clock cycles.
“CAN_PRESCALER” is used t set the multiplication value used to
determine the minimum time quanta.
“CAN_SAMPLING” determines how many times the bus is sampled during
a bit time. If set to “0”, the bus is sampled once. If set to “1”, three samples will
be taken during a bit time to determine the actual value of the bit being sent.
“CAN_SYNCH_JUMP_WIDTH” determines how many clock cycles a bit
time may be lengthened or shortened in order to achieve re-synchronization. If this
is defined, “CAN_TIME_SEGMENT2” may not be defined and will be set
automatically by the driver.
9 - CAN_STOP_IN_WAIT_MODE:
If set to “1”, the MSCAN hardware will enter the low power sleep mode if
it detects that the central processing unit (CPU) is in a wait state. If set to “0”, the
sleep mode is disabled.
10 - CAN_LOOP_BACK:
This is self-test mode that enables a chip to internally feed transmitted
messages back to its receiver. When set to “1”, the loop back mode is enabled.
11 - CAN_WAKE_UP_MODE:
This can be set to prevent the MSCAN driver from waking up from sleep
mode due to noise on the bus. When set to “1”, a continuous, dominant pulse on
the bus is required to wake up from sleep mode. When set to “0”, any recessive to
dominant edge will cause a wake up. This means that any voltage jump on the bus
could be read as a wake up call.
101
12 - CAN_CLOCK_SOURCE:
This defines whether the internal DSP bus clock is used for CAN bit timing,
or whether the timing is determined directly from the oscillator. If set to “0”, the
oscillator is defined as the CAN clock.
13 & 14 - CAN_CUSTOM_FILTER_CODE &
CAN_CUSTOM_FILTER_MASK:
These two settings are used to define custom message filtering settings. If
they are not defined, all message filtering is set when the message buffers are
opened. The filter code describes the actual string of numbers in the filter. The
filter mask determines which parts of the identifier can be ignored.
15 - CAN_RECEIVE_ID_QUEUE_SIZE:
This determines the size of the message buffer used for received messages.
Once this buffer is full, new messages will start overwriting any messages already
in the queue.
16 - CAN_RAW_CALLBACK:
This defines the ISR (Interrupt Service Routine) called when a message is
received to the queue. The receive ISR is a function which will most likely read
the message and store any pertinent data.
MSCAN FUNCTIONS –
Five functions are provided for use in the application code. The “open”
function opens a specified CAN identifier for writing or reading. This identifier is
then allocated a buffer space and ready to accept data. The “close” statement is
used to close any open identifier in order to free up the allocated buffer space.
102
The “read” statement returns the data portion of the message specified by
the associated read identifier. The “write” statement places data into either one of
the buffers specified in Queued mode, or directly into one of the three MSCAN
transmit buffers.
The “ioctl” statement is used to either set a particular CAN mode or retrieve
a status from the CAN hardware. The three modes that can be set are reset, sleep,
and wake up. The status messages that can be returned are:
CAN_SYNCHORNIZED – the device is synchronized to a bus
CAN_SLEEP – the device is in sleep mode
CAN_WAKEUP – the device was in sleep mode and has woken up due to
bus activity
CAN_RX_WARN – receiver error count exceeds 96
CAN_TX_WARN – transmitter error count exceeds 96
CAN_RX_ERR – receiver error counter exceeds 127 and the device has
entered the receiver error passive state
CAN_TX_ERR – transmit error counter exceeds 127 and the device has
entered the transmitter error passive state
CAN_BUSOFF – transmit error exceeds 255, CAN device is in bus off state
CAN_OVERRUN – a data overrun has occurred (both MSCAN receive
buffers are full and another message was attempted to be read)
CAN_RX_FULL – the receive buffer is full (Queued buffer)
CANID_EMPTY – the specified message buffer is empty
CANID_FULL – the specified message buffer is full
CANID_OVERFLOW – messages are being overwritten in the specified
buffer
103
MSCAN and the Expanded System
The ROV that the expanded system must control is laid out in the following
section. The target is a work class vehicle capable of depths of 10,000 fsw (feet of
seawater). Components that cannot withstand the pressures at these depths (4,610
psi) must be contained in a sealed, one atmosphere housing. Electronic
components that can withstand these pressures can be placed in thinner walled
housings that are filled with non-conducting (dielectric) oil and pressure
compensated to prevent water incursion. The controller board described for the
basic system in Chapter 5 has been designed to take these pressures. The only
component that is susceptible to the high pressures is the crystal oscillator. This
item can be potted in a small housing using epoxy and the entire board mat be
placed in an oil-filled housing.
104
MAIN LIFT POINT
FOAM BLOCK
ROBOTIC
MANIPULATOR
ELECTRIC MOTOR
WITH HYDRAULIC
PUMP
SOLENOID VALVE PACK
Figure 9.3: ROV with Expanded System, Port Side View
The vehicle can be seen in Figures 9.3 through 9.6. The major items on the
system are as follows:
Flotation (Foam) block - provides buoyancy to the system
Aluminum frame - the structure upon which the vehicle is built
(2) Robotic manipulators - used for retrieving and operating items/tools
(2) Solenoid or digital valve packs - these “on/off” valves are used to
control the manipulators plus any mission specific equipment; one controller card is
required per pack
Electric motor with hydraulic pump - provides hydraulic power to the
system
Vehicle power can - contains power supplies, transformers and isolation
equipment to supply power to the system (except main motor), relays to actuate
105
higher power items such as lights, and fiber optic equipment for converting
telemetry signals from optics to electrical; one controller card required
(2) Hydraulic reservoirs - contain the hydraulic fluid and provide a pressure
compensation system due to an internal spring contained in the flexible, rubber
bladder
(5) Thrusters - provide the force to maneuver the vehicle
Umbilical termination can - where the main umbilical (or tether) is splayed
out into individual wires.
Transformer can - contains the main power transformer for converting the
3000 volts AC run down the umbilical to the 480 volts required by the electric
motor.
Contactor can - provides a means of soft starting the electric motor in case
of a vehicle power down
Proportional valve pack - provides proportional control for thrusters as well
as any mission specific tooling; two controller cards required
106
VERTICAL
THRUSTER
HYDRAULIC
RESERVOIR
VEHICLE POWER CAN
VEHICLE FRAME
Figure 9.4: ROV with Expanded System, Port Side, Bottom View
The valve packs, power can, and contactor can each contain their own
controller boards much like the valve pack described in Chapter 5. The robotic
manipulators have up to seven functions each requiring seven three position valves
with two digital signals for each valve. The solenoid valve packs must be able to
support one manipulator each plus have spare functions for use with tooling and
camera pan and tilt units. A ten station valve pack would be suitable requiring 20
digital I/O signals to control it. The DSP56F805 can manage up to 22 digital I/O
signals so one controller card per valve pack would be sufficient.
107
UMBILICAL
TERMINATION CAN
TRANSFORMER CAN
CONTACTOR CAN
DIGITAL VALVE PACK
Figure 9.5: ROV with Expanded System, Starboard Side View
The proportional valve pack needs to run five thrusters plus spare functions
for tooling. Each controller card can run up to 4 analog channels so an eight
function proportional pack (5 thrusters plus three spare) would require two
controller cards. All valve packs would be oil-filled housings.
108
THRUSTER
HYDRAULIC
RESERVOIR
PROPORTIONAL
VALVE PACK
Figure 9.6: ROV with Expanded System, Rear, Bottom View
109
The vehicle power can would need to be a sealed, one atmosphere housing.
The fiber optic converters, relays, and capacitors are not able to withstand the
ambient pressures. One controller card can be situated here to provide a
communications link to the surface via a serial (RS-232 or 485) link that is
converted to fiber optic. This controller card can also be responsible for controlling
dimmer functions on lights by way of the four DAC (digital to analog converter)
signals.
The entire vehicle system is connected via the common CAN bus as
depicted in Figure 9.1. Instead of an EVM (evaluation modules) at each node there
is a controller board. If an additional valve pack needs to be added to the system,
then it just needs to be teed into the bus. The only requirements are that it must
follow the same identifier rules as the existing control system and it must adhere to
the CAN protocol. Given that the DSP56F800 series controllers have onboard
digital and analog I/O, pulse width modulation modules, and support serial
communication (RS-232), there are few pieces of equipment that the controller will
not support.
Conclusion:
The Control Area Network protocol provides an easy method to create an
expanded system based on the torque tool control system described earlier. The
MSCAN drivers are provided in a format similar to the code already written for the
existing control system. The drivers also provide a default setting that allows the
designer to concentrate on the integration of the various components and ordering
of message priorities rather than the details of making the CAN protocol work
properly.
The theoretical layout of the ROV shows how the CAN network system
simplifies the design process. In ROV designs with card racks and limited
110
expansion space, the engineer must also concentrate on including space for possible
future components. The use of a networked vehicle eliminates this concern. Future
components can be added on as new nodes with no software modifications
required.
111
Chapter 10
Conclusion
The purpose of this research was to develop a basic control system for use
on subsea, ROV (Remotely Operated Vehicle) tooling that can be expanded to
control a full, work-class ROV. This was done by selecting an off the shelf
microcontroller that supported a communication protocol with expansion
properties. The Motorola DSP56F80X series of microcontrollers was selected
because it provides a fast (80MHz) central processing unit (CPU) with onboard I/O
capabilities (digital and analog), RS-232 communications, SPI (serial peripheral
interface), PWM (pulse width modulation), and CAN (Control Area Network).
An extensive review of current ROV technology revealed that the majority
of ROV systems in existence use a PC-based control system. The vehicle side
typically contains an Intel (or comparable) processor incorporated onto an
industrial bus such as VME. The topside computer is often a standard desktop
computer or a rack mount derivative. The vehicle control hardware of these
systems require large, one atmosphere, sealed housings to protect the vehicle
electronics. The baseline control system designed in this thesis improves upon this
housing problem by the basing itself upon a microcontroller that was incorporated
into an application specific single board control card. This single board controller
has been designed in such a way that it may be housed in a smaller, oil-filled
container subject to ambient pressures. The result is a small footprint, lightweight
control system.
The baseline system was designed to control an ROV operated, rotary
actuator tool or torque tool. The selection of this particular tool provided a simple
foundation for the baseline system while having extensive enough requirements to
be representative of the expanded system. The baseline system incorporated I/O
112
(both digital and analog) as well as serial communication. It also presented a need
for a user friendly graphical user interface (GUI) which was met through the use of
the LabView software. The final product resulted in a single, small footprint unit
containing the valves, manifold, and electronics. This system can be easily
incorporated into any larger control system that uses serial communications or the
CAN protocol.
The method of expansion contributed to the choice of the Motorola DSP
because of its support for the Bosch Control Area Network. CAN provides a low
level communication protocol that has multiple methods of error checking and high
bus speeds. These attributes help explain the success of the protocol in automotive
control systems such as anti-lock brakes where reliability is the principle issue.
The Motorola MSCAN drivers provide the higher layer protocol and
support software. This package, along with the Software Development Kit (SDK),
provides a user friendly environment that can lead to quick product development.
After initial development, the default settings may be modified to create a more
efficient system.
There are a number of communication protocols available that provide
excellent networking capability as well as extensive error checking. The Universal
Serial Bus (USB), Ethernet, and TCP/IP were seen as other possible options. USB
is known for the “plug & play” attribute that allows the user to simply plug in new
components without having to go through complicated jumper settings or software
driver installations. Ethernet and TCP/IP are the two most popular protocols used
in network systems such as LANs, WANs, and the Internet. Both provide the
ability to easily add network nodes and communicate with high reliability.
However, none of these methods match the simplicity of the CAN model’s
broadcast method along with the reliability that results from the five methods of
error checking.
113
ROVs are high noise environments requiring reliable control systems.
Because of confined electronics housings, power cables are often run in close
proximity to signal wires. Electric motors, hydraulic pumps, and operation in salt
air environment also add to the list of electrical engineering obstacles. The Control
Area Network was designed for and has been proven to be reliable on automotive
control systems. These systems are subject to the wear and tear an automobile
must withstand and are still reliable enough to control systems such as anti-lock
brakes. While the failure of an ROV won’t result in an injury (or possible death) of
a person, the money and time involved in offshore industry and research requires a
robust system.
The development of this baseline system lays the groundwork for further
system design. While the creation of an expanded system will require more
funding than this project (MSCAN alone costs $5000), this development opens the
door to greater opportunity. When an application arises that requires a control
system, the basics have already been done cutting the time to completion
dramatically.
114
Appendix A
TryGPIO
115
C Code:
/*
/*
FILE: main.c
PROJECT:
*/
TryGPIO.mcp
*/
#include "port.h"
#include "gpio.h"
#include "bsp.h"
/* File descriptor for LED driver */
static UWord16 LedFD;
/*****************************************************************************/
/*
This function is called upon reception of an interrupt
*/
static void ButtonA_ISR(void)
{
/* Toggle (change) state of the green LED */
ioctl(PortB, GPIO_TOGGLE, gpioPin(B,0));
/*reset interrupt*/
ioctl(PortD, GPIO_CLEAR_INTERRUPT_PEND_REGISTER, gpioPin(D,1));
}
/*****************************************************************************/
int PortB;
int PortD;
void main (void)
{
int value=0;
PortB = open(BSP_DEVICE_NAME_GPIO_B, NULL);
//initialize Port B
PortD = open(BSP_DEVICE_NAME_GPIO_D, NULL);
//initialize Port D
ioctl(PortB, GPIO_SETAS_GPIO, gpioPin(B,0));
// Set Port B, pin 0 as a general
purpose I/O
ioctl(PortD, GPIO_SETAS_GPIO, gpioPin(D,1));
// Set Port D, pin 1 as a general
purpose I/O
ioctl(PortB, GPIO_SETAS_OUTPUT, gpioPin(B,0));
// Set Port B, pin 0 as an output
116
ioctl(PortD, GPIO_INTERRUPT_ENABLE, gpioPin(D,1));
// Enable interrupt control
on Port D, pin 1
ioctl(PortD, GPIO_ENABLE_PULLUP, gpioPin(D,1));
// Enable pullup on Port D,
pin 1
/* Turn green LED on */
ioctl(PortB, GPIO_CLEAR, gpioPin(B,0));
// Turn off LED by clearing Port B, pin0
/* Install ButtonISR function as an GPIO Port D interrupt service */
archInstallISR(&((*pArchInterrupts).MpioD), ButtonA_ISR);
// start loop
while(1)
{
value=ioctl(PortD, GPIO_READ, gpioPin(D,1));
}
}
117
// value is only used for
debugging purposes
/*
/*
FILE: appconfig.h – External RAM
PROJECT:
TryGPIO.mcp
*/
*/
#ifndef __APPCONFIG_H
#define __APPCONFIG_H
/*****************************************************************************
*
* Include needed SDK components below by changing #undef to #define.
* Refer to ../config/config.h for complete list of all components and
* component default initialization.
*
*****************************************************************************/
#define INCLUDE_BSP
/* BSP support - includes SIM,COP,CORE,PLL,ITCN */
#undef INCLUDE_3DES
/* 3des library */
#undef INCLUDE_ADC
/* ADC support */
#undef INCLUDE_AEC
/* AEC library */
#undef INCLUDE_BLDC
/* BLDC library */
#undef INCLUDE_BUTTON
/* Button support */
#undef INCLUDE_CALLER_ID /* CallerID library */
#undef INCLUDE_CAN
/* CAN support */
#undef INCLUDE_CAS_DETECT /* CAS_detect library */
#undef INCLUDE_COP
/* COP support (subset of BSP) */
#undef INCLUDE_CORE
/* CORE support (subset of BSP) */
#undef INCLUDE_CPT
/* CPT library */
#undef INCLUDE_DAC
/* DAC support */
#undef INCLUDE_DECODER
/* Quadrature Decoder support */
#undef INCLUDE_DES
/* DES library */
#undef INCLUDE_DSPFUNC
/* DSP Function library */
#undef INCLUDE_DTMF_DET /* DTMF detect library */
#undef INCLUDE_DTMF_GEN /* DTMF generation library */
#undef INCLUDE_FILEIO
/* File I/O support */
#undef INCLUDE_FLASH
/* Flash support */
#undef INCLUDE_G165
/* G165 vocoder library */
#undef INCLUDE_G711
/* G711 vocoder library */
#undef INCLUDE_G726
/* G726 vocoder library */
#define INCLUDE_GPIO
/* General Purpose I/O support */
#define INCLUDE_IO
/* I/O support */
#undef INCLUDE_ITCN
/* ITCN support (subset of BSP) */
#define INCLUDE_LED
/* LED support for target board */
#undef INCLUDE_MCFUNC
/* Motor Control functional library */
#undef INCLUDE_MEMORY
/* Memory support */
#undef INCLUDE_PCMASTER /* PC Master support */
#undef INCLUDE_PLL
/* PLL support (subset of BSP) */
#undef INCLUDE_PWM
/* PWM support */
#undef INCLUDE_QUAD_TIMER /* Quadrature timer support */
#undef INCLUDE_SCI
/* SCI support */
118
#undef
#undef
#undef
#undef
#undef
#undef
#undef
#undef
#undef
#undef
INCLUDE_SIM
/* SIM support (subset of BSP) */
INCLUDE_SPI
/* SPI support */
INCLUDE_SRM
/* Switch Relactance library */
INCLUDE_STACK_CHECK /* Stack utilization routines */
INCLUDE_SWITCH
/* Switch support */
INCLUDE_TIMER
/* Timer support */
INCLUDE_VAD
/* VAD library */
INCLUDE_V8BIS
/* V8bis library */
INCLUDE_V22
/* V22 library */
INCLUDE_V42BIS
/* V42bis library */
/*****************************************************************************
*
* Overwrite default component initializations from config/config.h
* using #defines here
*
*****************************************************************************/
#define GPR_INT_PRIORITY_20 1 /* Setup MpioD ISR priority */
#endif
119
Appendix B
TryREADOUT
120
C Code:
/*
/*
FILE: main.c
PROJECT:
*/
TryREADOUT.mcp
*/
#include "port.h"
#include "gpio.h"
#include "bsp.h"
int PortB;
int PortD;
void main (void)
{
int n=0;
int ones=3,
tens=2,
huns=1;
// open Ports B & D
PortB = open(BSP_DEVICE_NAME_GPIO_B, NULL);
PortD = open(BSP_DEVICE_NAME_GPIO_D, NULL);
// Initialize Port B & D as outputs
for (n=0;n<8;n++)
{
ioctl(PortB, GPIO_SETAS_GPIO, gpioPin(B,n));
ioctl(PortB, GPIO_SETAS_OUTPUT, gpioPin(B,n));
}
for (n=0;n<8;n++)
{
ioctl(PortD, GPIO_SETAS_GPIO, gpioPin(D,n));
ioctl(PortD, GPIO_SETAS_OUTPUT, gpioPin(D,n));
}
// Output to led display
if(ones&1)
ioctl(PortB, GPIO_SET, gpioPin(B,0));
if(ones&2)
ioctl(PortB, GPIO_SET, gpioPin(B,1));
if(ones&4)
121
ioctl(PortB, GPIO_SET, gpioPin(B,2));
if(ones&8)
ioctl(PortB, GPIO_SET, gpioPin(B,3));
if(tens&1)
ioctl(PortB, GPIO_SET, gpioPin(B,4));
if(tens&2)
ioctl(PortB, GPIO_SET, gpioPin(B,5));
if(tens&4)
ioctl(PortB, GPIO_SET, gpioPin(B,6));
if(tens&8)
ioctl(PortB, GPIO_SET, gpioPin(B,7));
if(huns&1)
ioctl(PortD, GPIO_SET, gpioPin(D,0));
if(huns&2)
ioctl(PortD, GPIO_SET, gpioPin(D,1));
if(huns&4)
ioctl(PortD, GPIO_SET, gpioPin(D,2));
if(huns&8)
ioctl(PortD, GPIO_SET, gpioPin(D,3));
/* sit in loop */
while(1)
{
}
}
122
/*
/*
FILE: appconfig.h – External RAM
PROJECT:
TryREADOUT.mcp
*/
*/
#ifndef __APPCONFIG_H
#define __APPCONFIG_H
/*****************************************************************************
*
* Include needed SDK components below by changing #undef to #define.
* Refer to ../config/config.h for complete list of all components and
* component default initialization.
*
*****************************************************************************/
#define INCLUDE_BSP
/* BSP support - includes SIM,COP,CORE,PLL,ITCN */
#undef INCLUDE_3DES
/* 3des library */
#define INCLUDE_ADC
/* ADC support */
#undef INCLUDE_AEC
/* AEC library */
#undef INCLUDE_BLDC
/* BLDC library */
#undef INCLUDE_BUTTON
/* Button support */
#undef INCLUDE_CALLER_ID /* CallerID library */
#undef INCLUDE_CAN
/* CAN support */
#undef INCLUDE_CAS_DETECT /* CAS_detect library */
#undef INCLUDE_COP
/* COP support (subset of BSP) */
#undef INCLUDE_CORE
/* CORE support (subset of BSP) */
#undef INCLUDE_CPT
/* CPT library */
#undef INCLUDE_DAC
/* DAC support */
#undef INCLUDE_DECODER
/* Quadrature Decoder support */
#undef INCLUDE_DES
/* DES library */
#undef INCLUDE_DSPFUNC
/* DSP Function library */
#undef INCLUDE_DTMF_DET /* DTMF detect library */
#undef INCLUDE_DTMF_GEN /* DTMF generation library */
#undef INCLUDE_FILEIO
/* File I/O support */
#undef INCLUDE_FLASH
/* Flash support */
#undef INCLUDE_G165
/* G165 vocoder library */
#undef INCLUDE_G711
/* G711 vocoder library */
#undef INCLUDE_G726
/* G726 vocoder library */
#define INCLUDE_GPIO
/* General Purpose I/O support */
#define INCLUDE_IO
/* I/O support */
#undef INCLUDE_ITCN
/* ITCN support (subset of BSP) */
#define INCLUDE_LED
/* LED support for target board */
#undef INCLUDE_MCFUNC
/* Motor Control functional library */
#undef INCLUDE_MEMORY
/* Memory support */
#undef INCLUDE_PCMASTER /* PC Master support */
#undef INCLUDE_PLL
/* PLL support (subset of BSP) */
#undef INCLUDE_PWM
/* PWM support */
#undef INCLUDE_QUAD_TIMER /* Quadrature timer support */
#undef INCLUDE_SCI
/* SCI support */
123
#undef
#undef
#undef
#undef
#undef
#undef
#undef
#undef
#undef
#undef
INCLUDE_SIM
/* SIM support (subset of BSP) */
INCLUDE_SPI
/* SPI support */
INCLUDE_SRM
/* Switch Relactance library */
INCLUDE_STACK_CHECK /* Stack utilization routines */
INCLUDE_SWITCH
/* Switch support */
INCLUDE_TIMER
/* Timer support */
INCLUDE_VAD
/* VAD library */
INCLUDE_V8BIS
/* V8bis library */
INCLUDE_V22
/* V22 library */
INCLUDE_V42BIS
/* V42bis library */
/*****************************************************************************
*
* Overwrite default component initializations from config/config.h
* using #defines here
*
*****************************************************************************/
//#define GPR_INT_PRIORITY_20 1 /* Setup MpioD ISR priority */
#endif
124
Appendix C
Serial Test
125
C Code:
/*
/*
FILE: main.c
PROJECT:
*/
Serial test.mcp
*/
#include "port.h"
#include "sci.h"
#include "io.h"
#include "bsp.h"
#include "assert.h"
// CallBack function prototypes
void sciRxCallBack(void);
void sciTxCallBack(void);
void sciExceptionCallBack(void);
int SCI0, count;
UWord16 DataR;
/**********************************************************************
* SCI Receive CallBack Routine
*
* Description: This function is called when the SCI driver has received
* the number of characters specified by the read length.
***********************************************************************/
void sciRxCallBack(void)
{
read( SCI0, &DataR, sizeof(DataR) ); // Read a character
write(SCI0, "Hello", sizeof("Hello") ); // Send it back to the pc (echo)
}
/**********************************************************************
* SCI Transmit CallBack Routine
*
* Description: This function is called when the SCI driver has sent all
* data in its transmit buffer.
***********************************************************************/
void sciTxCallBack(void)
{
/* Add code for Transmit handling */
asm(nop);
}
/**********************************************************************
126
* SCI Exception CallBack Routine
*
* Description: This function is called when the SCI driver has detected
* an exception.
***********************************************************************/
void sciExceptionCallBack(void)
{
/* Add code for exception handling */
asm(debug);
}
void main (void)
{
UWord16 SciReadLength;
sci_sConfig SciConfig;
SciConfig.SciCntl = SCI_CNTL_WORD_8BIT | SCI_CNTL_PARITY_NONE;
SciConfig.SciHiBit = SCI_HIBIT_0;
SciConfig.BaudRate = SCI_BAUD_9600;
SCI0 = open(BSP_DEVICE_NAME_SCI_0, O_RDWR | O_NONBLOCK, &SciConfig);
if (SCI0 == -1)
{
assert(!" Open /sci0 device failed.");
}
/* Set the data format for 8-bit characters
and Clear the Read and Write buffers */
ioctl(SCI0, SCI_DATAFORMAT_EIGHTBITCHARS, NULL);
/* Set the Receive, Transmit, and Exception Callback functions */
ioctl(SCI0, SCI_CALLBACK_RX, sciRxCallBack);
ioctl(SCI0, SCI_CALLBACK_TX, sciTxCallBack);
ioctl(SCI0, SCI_CALLBACK_EXCEPTION, sciExceptionCallBack);
/* The SCI Rx CallBack function will be called by the SCI driver after
one character is received by setting the read length to 1. */
SciReadLength = 1;
ioctl(SCI0, SCI_SET_READ_LENGTH, &SciReadLength);
/* Wait for data to be received */
/* Use HyperTerminal to send characters, "Hello" will be echoed back
by the Receive CallBack function */
while (1)
{
127
count++;
}
return;
}
128
/*
/*
FILE: appconfig.h – External RAM
PROJECT:
Serial test.mcp */
*/
#ifndef __APPCONFIG_H
#define __APPCONFIG_H
/*****************************************************************************
*
* Include needed SDK components below by changing #undef to #define.
* Refer to ../config/config.h for complete list of all components and
* component default initialization.
*
*****************************************************************************/
#define INCLUDE_BSP
/* BSP support - includes SIM,COP,CORE,PLL,ITCN */
#undef INCLUDE_3DES
/* 3des library */
#undef INCLUDE_ADC
/* ADC support */
#undef INCLUDE_AEC
/* AEC library */
#undef INCLUDE_BLDC
/* BLDC library */
#undef INCLUDE_BUTTON
/* Button support */
#undef INCLUDE_CALLER_ID /* CallerID library */
#undef INCLUDE_CAN
/* CAN support */
#undef INCLUDE_CAS_DETECT /* CAS_detect library */
#undef INCLUDE_COP
/* COP support (subset of BSP) */
#undef INCLUDE_CORE
/* CORE support (subset of BSP) */
#undef INCLUDE_CPT
/* CPT library */
#undef INCLUDE_DAC
/* DAC support */
#undef INCLUDE_DECODER
/* Quadrature Decoder support */
#undef INCLUDE_DES
/* DES library */
#undef INCLUDE_DSPFUNC
/* DSP Function library */
#undef INCLUDE_DTMF_DET /* DTMF detect library */
#undef INCLUDE_DTMF_GEN /* DTMF generation library */
#undef INCLUDE_FILEIO
/* File I/O support */
#undef INCLUDE_FLASH
/* Flash support */
#undef INCLUDE_G165
/* G165 vocoder library */
#undef INCLUDE_G711
/* G711 vocoder library */
#undef INCLUDE_G726
/* G726 vocoder library */
#undef INCLUDE_GPIO
/* General Purpose I/O support */
#define INCLUDE_IO
/* I/O support */
#undef INCLUDE_ITCN
/* ITCN support (subset of BSP) */
#undef INCLUDE_LED
/* LED support for target board */
#undef INCLUDE_MCFUNC
/* Motor Control functional library */
#undef INCLUDE_MEMORY
/* Memory support */
#undef INCLUDE_PCMASTER /* PC Master support */
#undef INCLUDE_PLL
/* PLL support (subset of BSP) */
#undef INCLUDE_PWM
/* PWM support */
#undef INCLUDE_QUAD_TIMER /* Quadrature timer support */
#define INCLUDE_SCI
/* SCI support */
129
#undef INCLUDE_SIM
/* SIM support (subset of BSP) */
#undef INCLUDE_SPI
/* SPI support */
#undef INCLUDE_SRM
/* Switch Relactance library */
#undef INCLUDE_STACK_CHECK /* Stack utilization routines */
#undef INCLUDE_SWITCH
/* Switch support */
#undef INCLUDE_TIMER
/* Timer support */
#undef INCLUDE_VAD
/* VAD library */
#undef INCLUDE_V8BIS
/* V8bis library */
#undef INCLUDE_V22
/* V22 library */
#undef INCLUDE_V42BIS
/* V42bis library */
/*****************************************************************************
*
* Overwrite default component initializations from config/config.h
* using #defines here
*
*****************************************************************************/
#endif
130
Appendix D
LabViewGPIO
131
C Code:
/*
/*
FILE: main.c
PROJECT:
*/
LabViewGPIO.mcp
*/
#include "port.h"
#include "gpio.h"
#include "bsp.h"
#include "sci.h"
#include "io.h"
#include "assert.h"
#include "time.h"
#include <string.h>
#include <stdio.h>
static void COUNTRECEIVED(void);
static void TURNSCOUNT(void);
/*******************************************************
* Skeleton C main program for use with Embedded SDK
*******************************************************/
int SCI0;
int count=0x30;
int prevcount=0x00;
char digitones[2]="0";
char digittens[2]="0";
char goingout[2] ="00";
int PortB;
int PortD;
/******************************************************************/
static void TURNSCOUNT()
{
int temp1=*digittens;
prevcount=count;
count++;
if(temp1==(0x39) & count==(0x39+1))
{
count=0x30;
*digitones=count;
temp1=0x30;
132
*digittens=temp1;
}
else if(count==(0x39+1))
{
count=0x30;
*digitones=count;
temp1++;
*digittens=temp1;
//count=0x30;
}
else
{
*digitones=count;
}
}
/*****************************************************************************/
static void COUNTRECEIVED(void)
{
//
call function to assemble count string
TURNSCOUNT();
//
construct outgoing string
strcpy(goingout, digittens);
strcat(goingout, digitones);
/* Toggle (change) state of the red LED */
ioctl(PortB, GPIO_TOGGLE, gpioPin(B,0));
//
write string to serial port
write(SCI0, &goingout, sizeof(goingout));
}
133
/*****************************************************************************/
void main (void)
{
/*
This program serves as a quick start guide to
writing either C or ASM programs using the
Embedded SDK. Modify it at will
*/
int value;
struct timespec QuartSecond = {0, 250000000};
sci_sConfig SciConfig;
//define pause of 1/4 second
SciConfig.SciCntl = SCI_CNTL_WORD_8BIT | SCI_CNTL_PARITY_NONE;
SciConfig.SciHiBit = SCI_HIBIT_0;
SciConfig.BaudRate = SCI_BAUD_9600;
SCI0 = open(BSP_DEVICE_NAME_SCI_0, O_RDWR | O_NONBLOCK, &SciConfig);
if (SCI0 == -1)
{
assert(!" Open /sci0 device failed.");
}
/* Set the data format for 8-bit characters
and Clear the Read and Write buffers */
ioctl(SCI0, SCI_DATAFORMAT_EIGHTBITCHARS, NULL);
//
Initialize gpio ports b and d
PortD = open(BSP_DEVICE_NAME_GPIO_D, NULL);
PortB = open(BSP_DEVICE_NAME_GPIO_B, NULL);
//
Initialize pins B,0 and D,1
ioctl(PortB, GPIO_SETAS_GPIO, gpioPin(B,0));
ioctl(PortD, GPIO_SETAS_GPIO, gpioPin(D,1));
//
Set Pin B,0 as output
ioctl(PortB, GPIO_SETAS_OUTPUT, gpioPin(B,0));
//
Set pin D,1 as input
ioctl(PortD, GPIO_ENABLE_PULLUP, gpioPin(D,1));
134
/* Clear B,0 */
ioctl(PortB, GPIO_CLEAR, gpioPin(B,0));
/* Install ButtonISR function as an IRQ A interrupt service */
//archInstallISR(&((*pArchInterrupts).MpioD), COUNTRECEIVED);
while(1)
{
value=ioctl(PortD, GPIO_READ, gpioPin(D,1));
if(value)
{
COUNTRECEIVED();
nanosleep(&QuartSecond, NULL);
}
}
}
135
/*
/*
FILE: appconfig.h – External RAM
PROJECT:
LabViewGPIO.mcp
*/
*/
#ifndef __APPCONFIG_H
#define __APPCONFIG_H
/*****************************************************************************
*
* Include needed SDK components below by changing #undef to #define.
* Refer to ../config/config.h for complete list of all components and
* component default initialization.
*
*****************************************************************************/
#define INCLUDE_BSP
/* BSP support - includes SIM,COP,CORE,PLL,ITCN */
#undef INCLUDE_3DES
/* 3des library */
#undef INCLUDE_ADC
/* ADC support */
#undef INCLUDE_AEC
/* AEC library */
#undef INCLUDE_BLDC
/* BLDC library */
#undef INCLUDE_BUTTON
/* Button support */
#undef INCLUDE_CALLER_ID /* CallerID library */
#undef INCLUDE_CAN
/* CAN support */
#undef INCLUDE_CAS_DETECT /* CAS_detect library */
#undef INCLUDE_COP
/* COP support (subset of BSP) */
#undef INCLUDE_CORE
/* CORE support (subset of BSP) */
#undef INCLUDE_CPT
/* CPT library */
#undef INCLUDE_DAC
/* DAC support */
#undef INCLUDE_DECODER
/* Quadrature Decoder support */
#undef INCLUDE_DES
/* DES library */
#undef INCLUDE_DSPFUNC
/* DSP Function library */
#undef INCLUDE_DTMF_DET /* DTMF detect library */
#undef INCLUDE_DTMF_GEN /* DTMF generation library */
#undef INCLUDE_FILEIO
/* File I/O support */
#undef INCLUDE_FLASH
/* Flash support */
#undef INCLUDE_G165
/* G165 vocoder library */
#undef INCLUDE_G711
/* G711 vocoder library */
#undef INCLUDE_G726
/* G726 vocoder library */
#define INCLUDE_GPIO
/* General Purpose I/O support */
#define INCLUDE_IO
/* I/O support */
#undef INCLUDE_ITCN
/* ITCN support (subset of BSP) */
#undef INCLUDE_LED
/* LED support for target board */
#undef INCLUDE_MCFUNC
/* Motor Control functional library */
#undef INCLUDE_MEMORY
/* Memory support */
#undef INCLUDE_PCMASTER /* PC Master support */
#undef INCLUDE_PLL
/* PLL support (subset of BSP) */
#undef INCLUDE_PWM
/* PWM support */
#undef INCLUDE_QUAD_TIMER /* Quadrature timer support */
#define INCLUDE_SCI
/* SCI support */
136
#undef INCLUDE_SIM
/* SIM support (subset of BSP) */
#undef INCLUDE_SPI
/* SPI support */
#undef INCLUDE_SRM
/* Switch Relactance library */
#undef INCLUDE_STACK_CHECK /* Stack utilization routines */
#undef INCLUDE_SWITCH
/* Switch support */
#define INCLUDE_TIMER
/* Timer support */
#undef INCLUDE_VAD
/* VAD library */
#undef INCLUDE_V8BIS
/* V8bis library */
#undef INCLUDE_V22
/* V22 library */
#undef INCLUDE_V42BIS
/* V42bis library */
/*****************************************************************************
*
* Overwrite default component initializations from config/config.h
* using #defines here
*
*****************************************************************************/
#define GPR_INT_PRIORITY_20 1 /* Setup MpioD ISR priority */
#endif
LabView:
Front Panel
137
Block Diagram
138
139
Appendix E
adctest2
138
C Code:
/*
/*
FILE: adctest2.c
PROJECT: adctest2.mcp
*/
*/
#include "port.h"
#include "arch.h"
#include "io.h"
#include "string.h"
#include "fcntl.h"
#include "assert.h"
#include "adc.h"
#include "led.h"
#include "periph.h"
#include "gpio.h"
#include "types.h"
#include "bsp.h"
#include "sci.h"
int CCFlag;
/* synchronization flag */
void CC_CallBack( adc_eCallbackType type, adc_tSampleMask causedSampleMask );
/**********************
static const adc_sState sadc1 = {
ADC Channel 0 Configuration
********************/
/* AnalogChannel
= */ ADC_CHANNEL_0,
/* NumSamplesPerScan = */ 1,
/* OffsetRegister = */ 0,
/* LowLimitRegister = */ 0,
/* HighLimitRegister = */ 0,
/* ZeroCrossing
= */ 0,
};
/**********************
struct ChannelData
{
UWord16 handle;
ssize_t len;
Frac16 Buf[8];
};
struct ChannelData Data1;
/*
ADC Channel Structure
Low limit threshold for enabling/disabling LED
139
***********************/
*/
static const Frac16 low2Threshold = FRAC16(0.6);
static int LedFD;
static int PortD;
main()
{
int
int
int
int
int
int
i;
NumSend;
NumSendTens;
NumSendOnes;
NumSendHuns;
NumSendThous;
sci_sConfig SciConfig;
int SCI0;
//
Opern ADC port
Data1.handle = open(BSP_DEVICE_NAME_ADC_0, 0, &sadc1 );
/********************** CONFIG SERIAL *************************/
SciConfig.SciCntl = SCI_CNTL_WORD_8BIT | SCI_CNTL_PARITY_NONE;
SciConfig.SciHiBit = SCI_HIBIT_0;
SciConfig.BaudRate = SCI_BAUD_9600;
SCI0 = open(BSP_DEVICE_NAME_SCI_0, O_RDWR | O_NONBLOCK, &SciConfig);
if (SCI0 == -1)
{
assert(!" Open /sci0 device failed.");
}
/* Set the data format for 8-bit characters
and Clear the Read and Write buffers */
ioctl(SCI0, SCI_DATAFORMAT_EIGHTBITCHARS, NULL);
/*
CONFIG GPIO
*/
#if defined( BSP_DEVICE_NAME_GPIO_D )
PortD = open( BSP_DEVICE_NAME_GPIO_D, 0);
ioctl(PortD, GPIO_SETAS_OUTPUT, gpioPin(D, 4) );
ioctl(PortD, GPIO_SETAS_GPIO, gpioPin(D, 4) );
ioctl(PortD, GPIO_SET, gpioPin(D, 4) );
#endif /* defined( BSP_DEVICE_NAME_GPIO_D ) */
140
LedFD = open(BSP_DEVICE_NAME_LED_0, 0);
#if defined( LED_YELLOW )
ioctl(LedFD, LED_OFF, LED_YELLOW);
#endif /* defined( LED_YELLOW ) */
CCFlag = 0;
//
Start ADC read
ioctl( Data1.handle, ADC_START, 0 );
//
Construct string
while(1)
{
Data1.len = read( Data1.handle, Data1.Buf, sizeof(Data1.Buf) );
if( Data1.len > 0 )
{
NumSend=Data1.Buf[0];
/* Calibrate Data: ADC range 0-32559,theoretical pressure range 0-3000 psi */
/* 32559/3000 = 10.853 */
NumSend=NumSend/10.853;
//NumSendThous=NumSend/1000;
//NumSendHuns=(NumSend-(NumSendThous*1000))/100;
//NumSendTens=(NumSend-(NumSendThous*1000)-(NumSendHuns*100))/10;
//NumSendOnes=(NumSend-(NumSendThous*1000)-(NumSendHuns*100)//
(NumSendTens*10));
/*************** SEND STRING******************/
write(SCI0, &NumSend, sizeof(NumSend));
//
Set LED if ADC read is below threshold
if( Data1.Buf[0] > low2Threshold )
{
#if defined( LED_YELLOW )
ioctl(LedFD, LED_ON, LED_YELLOW);
#endif /* defined( LED_YELLOW ) */
}
else
{
#if defined( LED_YELLOW )
ioctl(LedFD, LED_OFF, LED_YELLOW);
#endif /* defined( LED_YELLOW ) */
}
Data1.len = 0;
141
}
//
Reset synchro flag and start another ADC read
if( CCFlag > 0 )
{
CCFlag = 0;
ioctl( Data1.handle, ADC_START, 0 );
}
}
}
/*********************FUNCTION CC_CallBack
/*
/*
/*
/*
**************************/
*/
This function handles the ADC conversion complete interrupt and
increments the syncronization flag to start another read.
*/
*/
*/
/****************************************************************************/
void CC_CallBack( adc_eCallbackType type, adc_tSampleMask causedSampleMask )
{
CCFlag = 1;
}
142
/*
/*
FILE: appconfig.h - External RAM
PROJECT: adctest2.mcp */
*/
#ifndef __APPCONFIG_H
#define __APPCONFIG_H
/* Refer to config/config.h for complete list of all components and
component default initialization */
/*****************************************************************************
*
* Include needed SDK components
*
*****************************************************************************/
#define INCLUDE_BSP
/* BSP support */
#undef INCLUDE_CODEC
/* codec driver */
#define INCLUDE_IO
/* I/O support */
#define INCLUDE_LED
/* led support for target board */
#undef INCLUDE_SPI
/* spi support */
#undef INCLUDE_TIMER
/* timer support */
#undef INCLUDE_FLASH
/* flash support */
#define INCLUDE_SCI
/* SCI support */
#define INCLUDE_ADC
/* ADC support */
#undef INCLUDE_QUAD_TIMER /* Quadrature timer support */
#undef INCLUDE_CAN
/* CAN support */
#define INCLUDE_GPIO
#undef INCLUDE_MEMORY
#undef INCLUDE_DSPFUNC
/* memory support */
/* dsp functional library */
/*****************************************************************************
*
* Overwrite default component initialization from config/config.h
*
*****************************************************************************/
/*
Set scan mode for ADC port
*/
#define ADC_SCANMODE ADC_SEQUENTIAL_ONCE
/* include samples */
#define INCLUDE_ADCA_SAMPLE_0
/* user callback */
#define ADC_RAW_CONVERSION_COMPLETE_CALLBACK CC_CallBack
#endif
143
LabView:
Front Panel
144
Block Diagram
145
146
Appendix F
TryDAC
152
C Code:
/*
/*
FILE: TryDAC.c
PROJECT: TryDAC.mcp
*/
*/
#include "port.h"
#include "arch.h"
#include "stdlib.h"
#include "io.h"
#include "fcntl.h"
#include "dac.h"
#include "dspfunc.h"
#include "time.h"
#include "led.h"
#include "assert.h"
static UWord16 AValues[1];
static int dacDevice;
/*******************************************************************************
*
* Module: main()
*
* Description:
* The DAC driver application is designed to test and demonstrate the usage
* of the DAC driver’s API to control and communicate with the DSP56805 EVM
* target board hardware.
*
*
*
* Returns: None
*
* Arguments: None
*
* Range Issues: None
*
* Special Issues: None
*
*******************************************************************************/
void main(void)
{
int n=0;
/* Get handle to DAC device */
dacDevice = open(BSP_DEVICE_NAME_DAC, NULL);
153
//
Set Value for output
AValues[0]=65535;
/* Output value on Channel A */
ioctl(dacDevice, DAC_SET_CHANNEL_A, NULL);
ioctl(dacDevice, DAC_WRITE_MODE_UPDATE, NULL);
write(dacDevice, AValues, sizeof(UWord16));
}
154
/*
/*
FILE: appconfig.h - External RAM
PROJECT: TryDAC.mcp */
*/
#ifndef __APPCONFIG_H
#define __APPCONFIG_H
#ifdef __cplusplus
extern "C" {
#endif
/*****************************************************************************
*
* Include needed SDK components by changing the #undef to #define
* Refer to config/config.h for complete list of all components and
* component default initialization.
*
*****************************************************************************/
#define INCLUDE_BSP
/* BSP support */
#undef INCLUDE_CODEC
/* codec driver */
#define INCLUDE_IO
/* I/O support */
#undef INCLUDE_SPI
/* spi support */
#define INCLUDE_TIMER
/* timer support */
#undef INCLUDE_FLASH
/* flash support */
#undef INCLUDE_SCI
/* SCI support */
#undef INCLUDE_ADC
/* ADC support */
//#define INCLUDE_QUAD_TIMER /* Quadrature timer support */
#undef INCLUDE_CAN
/* CAN support */
#undef INCLUDE_PWM
/* PWM support */
#undef INCLUDE_DECODER
/* Quadrature Decoder support */
#undef INCLUDE_FILEIO
/* File I/O support */
#define INCLUDE_GPIO
/* General Purpose I/O support */
#undef INCLUDE_BUTTONS
/* Buttons support */
#undef INCLUDE_PCMASTER /* PC Master support */
#define INCLUDE_DAC
/* DAC support */
#define INCLUDE_LED
/* led support for target board */
#define INCLUDE_DSPFUNC
/* dsp functional library */
#undef INCLUDE_MCFUNC
/* mc functional library */
#undef INCLUDE_BLDC
/* bldc library */
#undef INCLUDE_MEMORY
/* memory support */
#undef INCLUDE_STACK_CHECK /* stack utilization routines */
/* POSIX timers */
//#define INCLUDE_USER_TIMER_C_0 1
//#define INCLUDE_USER_TIMER_C_1 1
//#define INCLUDE_USER_TIMER_C_2 1
155
/*****************************************************************************
*
* Overwrite default component initialization from config/config.h
*
*****************************************************************************/
#ifdef __cplusplus
}
#endif
#endif
156
Appendix G
Valve Pack
157
158
159
160
161
Appendix H
Baseline System
162
C Code:
/*
/*
Put It All Together.c
*/
PROJECT PUT IT ALL TOGETHER
*/
#include "port.h"
#include "arch.h"
#include "stdlib.h"
#include "io.h"
#include "fcntl.h"
#include "dac.h"
#include "time.h"
#include "assert.h"
#include "bsp.h"
#include "gpio.h"
#include "sci.h"
#include "string.h"
#include "adc.h"
/************************** GLOBAL VARIABLES
int SCI0;
Serial Port 0 definition
int PortD;
GPIO Port D definition
int TurnsCounter=0;
GPIO Counter
struct timespec QuartSecond = {0, 250000000};
//
int CCFlag;
flag for ADC Read
struct sigevent Timer1Event;
Timer1 - ADC Read
timer_t Timer1;
Timer for ADC Read
struct itimerspec Timer1Settings;
value, repeat value
struct timespec HalfSecond = {0, 500000000};
//
int
n=0;
ReceiveString construction integer
int
m=0;
ReceiveString indicator integer
static int dacDevice;
device handle
static UWord16 DACOut[1];
word
/**********************
GLOBAL STRINGS
*******************************/
163
**************************/
//
//
//
Quarter second delay time
// Synchronization
//
Timer Event
//
//
Timer1 settings: initial
Half second delay time
//
//
//
DAC
// DAC Output
char
char
char
string
char
char
char
string
TurnsCounterString[5]="C0000";
CreatedString[4]="0000";
ADCString[5]="T0000";
// Counter serial output string
// Created string return from function
// Torque serial output
ASideString[4]="A000";
BSideString[4]="B000";
PressureString[5]="P0000";
// Pressure serial output string
// Pressure serial output string
// Pressure serial output
/********************* FUNCTION DECLARATIONS **************************/
static void COUNTRECEIVED_ISR(void);
void ConfigGPIOPort(void);
void CreateStringFrmDigits(int NumberToConv);
void ConfigSerial(void);
void CC_CallBack( adc_eCallbackType type, adc_tSampleMask causedSampleMask );
void ConfigADCPort(void);
void ReadADCChannel(void);
void ConfigTimer(void);
static void Timer1ISR(union sigval);
void sciRxCallBack(void);
void SetDACOutput(void);
void ConstructASideString(char temp1[1]);
void ConstructBSideString(char temp1[1]);
void ConstructPressureString(char temp1[1]);
/**********************
static const adc_sState sadc0 = {
ADC Channel 0 Configuration
********************/
/* AnalogChannel
= */ ADC_CHANNEL_0,
/* NumSamplesPerScan = */ 1,
/* OffsetRegister = */ 0,
/* LowLimitRegister = */ 0,
/* HighLimitRegister = */ 0,
/* ZeroCrossing
= */ 0,
};
/**********************
struct ChannelData
{
UWord16 handle;
ssize_t len;
Frac16 Buf[8];
};
ADC Channel Structure
164
***********************/
struct ChannelData Data0;
//ADC Channel 0 Declaration
/*********************FUNCTION MAIN
**************************************/
/*****************************************************************************/
void main(void)
{
int n=0;
/* Get handle to DAC device */
dacDevice = open(BSP_DEVICE_NAME_DAC, NULL);
/*
Configure serial port
ConfigSerial();
/* Configure GPIO port
ConfigGPIOPort();
*/
*/
/*
Configure ADC port
ConfigADCPort();
*/
/*
Configure timer for ADC read
ConfigTimer();
*/
/* Install COUNTRECEIVED_ISR function as an GPIO interrupt service */
archInstallISR(&(pArchInterrupts->MpioD), COUNTRECEIVED_ISR);
/* Main loop */
while(1)
{
}
}
/*********************FUNCTION COUNTRRECEIVED_ISR
***************************/
165
/*
*/
/*
This function is called upon reception of a GPIO interrupt from pin D,1. */
/* It clears the interrupt, increments the turns counter, and calls the
*/
/* function CreateStringFrmDigits() to update the Counter serial string */
/*
*/
/*****************************************************************************/
static void COUNTRECEIVED_ISR(void)
{
char temp1[1]="C";
ioctl(PortD, GPIO_CLEAR_INTERRUPT_PEND_REGISTER, gpioPin(D,0));
ioctl(PortD, GPIO_INTERRUPT_DISABLE, gpioPin(D,0));
TurnsCounter++;
CreateStringFrmDigits(TurnsCounter);
TurnsCounterString[0]=temp1[0];
TurnsCounterString[1]=CreatedString[0];
TurnsCounterString[2]=CreatedString[1];
TurnsCounterString[3]=CreatedString[2];
TurnsCounterString[4]=CreatedString[3];
nanosleep(&QuartSecond, NULL);
ioctl(PortD, GPIO_INTERRUPT_ENABLE, gpioPin(D,0));
}
/*********************FUNCTION ConfigGPIOPort
/*
***************************/
*/
/*
This function configures GPIO port D: opens port, setas general purpose */
/* I/O, and enable interrupts. It also initializes the counter serial
*/
/* string.
*/
/*
*/
/****************************************************************************/
void ConfigGPIOPort(void)
{
char temp1[1]="C";
char temp2[1];
*temp2=0x30;
166
TurnsCounterString[0]=temp1[0];
TurnsCounterString[1]=temp2[0];
TurnsCounterString[2]=temp2[0];
TurnsCounterString[3]=temp2[0];
TurnsCounterString[4]=temp2[0];
PortD = open(BSP_DEVICE_NAME_GPIO_D, 0);
ioctl(PortD, GPIO_SETAS_GPIO, gpioPin(D,0));
ioctl(PortD, GPIO_INTERRUPT_ENABLE, gpioPin(D,0));
}
/*********************FUNCTION CreateStringFrmDigits **********************/
/*
*/
/*
This function will create a 4 character string from a 4 digit number. */
/*
*/
/****************************************************************************/
void CreateStringFrmDigits(int NumberToConv)
{
int NumThous,NumHuns,NumTens,NumOnes;
char string_thous[1]="0";
char string_huns[1]="0";
char string_tens[1]="0";
char string_ones[1]="0";
NumThous=(NumberToConv/1000);
NumHuns=((NumberToConv-(NumThous*1000))/100);
NumTens=((NumberToConv-(NumThous*1000)-(NumHuns*100))/10);
NumOnes=((NumberToConv-(NumThous*1000)-(NumHuns*100)-(NumTens*10)));
NumThous=0x30+NumThous;
NumHuns=0x30+NumHuns;
NumTens=0x30+NumTens;
NumOnes=0x30+NumOnes;
*string_thous=NumThous;
*string_huns=NumHuns;
*string_tens=NumTens;
*string_ones=NumOnes;
CreatedString[0]=string_thous[0];
167
CreatedString[1]=string_huns[0];
CreatedString[2]=string_tens[0];
CreatedString[3]=string_ones[0];
}
/*********************FUNCTION ConfigSerial **************************/
/*
*/
/*
This function configures serial port 0: opens port with 8 bit words, */
/* no parity, 9600 baud. It also sets the receive interrupt callback
*/
/* function as sciRxCallBack(), and the read length at 1.
*/
/*
*/
/****************************************************************************/
void ConfigSerial(void)
{
int SciReadLength;
sci_sConfig SciConfig;
// Declaration of Serial Port Config Structure
/*
Definition of Serial Port Structure */
SciConfig.SciCntl = SCI_CNTL_WORD_8BIT | SCI_CNTL_PARITY_NONE;
SciConfig.SciHiBit = SCI_HIBIT_0;
SciConfig.BaudRate = SCI_BAUD_9600;
/*
Open Serial Port 0 */
SCI0 = open(BSP_DEVICE_NAME_SCI_0, O_RDWR | O_NONBLOCK, &SciConfig);
/*
Serial Port Initialization Error */
if (SCI0 == -1)
{
assert(!" Open /sci0 device failed.");
}
/* Set the data format for 8-bit characters
and Clear the Read and Write buffers */
ioctl(SCI0, SCI_DATAFORMAT_EIGHTBITCHARS, NULL);
/* Set the Receive Callback function */
ioctl(SCI0, SCI_CALLBACK_RX, sciRxCallBack);
/* The SCI Rx CallBack function will be called by the SCI driver after
one character is received by setting the read length to 1. */
168
SciReadLength = 1;
ioctl(SCI0, SCI_SET_READ_LENGTH, &SciReadLength);
}
/*********************FUNCTION CC_CallBack
/*
/*
/*
/*
**************************/
*/
This function handles the ADC conversion complete interrupt and
increments the syncronization flag to start another read.
*/
*/
*/
/****************************************************************************/
void CC_CallBack( adc_eCallbackType type, adc_tSampleMask causedSampleMask )
{
CCFlag = 1;
}
/*********************FUNCTION ConfigADCPort
/*
/*
/*
/*
***************************/
*/
This function configures the ADC port: opens ADC channel 0 - according */
to structure sadc0, initializes the synchro flag, and starts the first
*/
read.
*/
/*
*/
/****************************************************************************/
void ConfigADCPort(void)
{
/*
Open ADC Port */
Data0.handle = open(BSP_DEVICE_NAME_ADC_0, 0, &sadc0 );
CCFlag = 0;
//
Initialize synchro flag to zero
ioctl( Data0.handle, ADC_START, 0 );
//
Start ADC reads
}
169
/*********************FUNCTION ReadADCChannel
/*
***************************/
*/
This function is called byt Timer1ISR and reads the value from ADC
channel 0. If a number is read, it calibrates it for ft-lbs and
*/
calls the CreateStringFrmDigits() routine to construct the ADC serial
string. It then writes the ADC, counter, and pressure strings to the
serial port. Finally, the synchro flag is reset to 0 and another ADC
read commences.
*/
/*
/*
/*
/*
/*
/*
*/
*/
*/
*/
/*
*/
/****************************************************************************/
void ReadADCChannel(void)
{
int
NumSend;
char temp1[1]="T";
Data0.len = read( Data0.handle, Data0.Buf, sizeof(Data0.Buf) );
if( Data0.len > 0 )
{
// If something was read at ADC channel 0
NumSend=Data0.Buf[0];
//
Set local int = to ADC channel 0 buffer
/* Calibrate Data: ADC range 0-32559,theoretical ft-lb range 0-1000 ft-lbs */
/* 32559/1000 = 32.559 */
NumSend=NumSend/32.559;
CreateStringFrmDigits(NumSend);
ADCString[0]=temp1[0];
ADCString[1]=CreatedString[0];
ADCString[2]=CreatedString[1];
ADCString[3]=CreatedString[2];
ADCString[4]=CreatedString[3];
Data0.len = 0;
}
write(SCI0, &ADCString, sizeof(ADCString));
write(SCI0, &TurnsCounterString, sizeof(TurnsCounterString));
write(SCI0, &PressureString, sizeof(PressureString));
nanosleep(&QuartSecond, NULL);
if( CCFlag > 0 )
{
CCFlag = 0;
170
ioctl( Data0.handle, ADC_START, 0 );
}
}
/*********************FUNCTION ConfigTimer ***************************/
/*
*/
/*
This function configures Timer1ISR which calls for an ADC read every */
/*
quarter second.
*/
/*
*/
/****************************************************************************/
void ConfigTimer(void)
{
Timer1Event.sigev_notify_function = Timer1ISR;
timer_create(CLOCK_AUX1, &Timer1Event, &Timer1);
Timer1Settings.it_interval.tv_sec = 0;
Timer1Settings.it_interval.tv_nsec = 250000000;
Timer1Settings.it_value.tv_sec = 0;
Timer1Settings.it_value.tv_nsec = 250000000;
timer_settime(Timer1, 0, &Timer1Settings, NULL);
}
/*********************FUNCTION Timer1ISR
/*
/*
/*
***************************/
*/
This function defines the timer interrupt configured by ConfigTimer
It then calls ReadADCChannel.
*/
*/
/*
*/
/****************************************************************************/
static void Timer1ISR(union sigval)
{
ReadADCChannel();
}
171
/*********************FUNCTION sciRxCallBack
/*
***************************/
*/
/* This function is called by the receive buffer full interrupt. Upon
*/
/*
reading a "P", "A" or "B" from the serial line, the function will
*/
/*
construct the PressureString (which is echoed back over the serial line), */
/*
ASideString or BSideString over the next 4 reads. It will then call the */
/*
corresponding ConstructXXXXString function to assemble the string.
*/
/*
Finally, after every read, it clears the receive buffer.
*/
/*
*/
/****************************************************************************/
void sciRxCallBack(void)
{
char
tempP[1]="P";
char
tempA[1]="A";
char
tempB[1]="B";
char tempstring1[1];
n++;
read(SCI0, &tempstring1, sizeof(tempstring1) );
if(tempstring1[0]==0x50)
{
PressureString[0]=tempP[0];
n=0;
m=1;
}
else if(tempstring1[0]==0x41)
{
ASideString[0]=tempA[0];
n=0;
m=2;
172
// Read Pressure
}
else if(tempstring1[0]==0x42)
{
BSideString[0]=tempB[0];
n=0;
m=3;
}
if(m==1)
{
ConstructPressureString(tempstring1);
}
else if(m==2)
{
ConstructASideString(tempstring1);
}
else if(m==3)
{
ConstructBSideString(tempstring1);
}
ioctl(SCI0, SCI_CMD_READ_CLEA R, NULL);
}
/*********************FUNCTION SetDACOutput
/*
***************************/
*/
/* This function is called by sciRxCallBack and will construct an integer */
/*
from the pressuere, a or b side string. It will then calibrate the
/*
DACOutput value for a range of 0 - 2.574 VDC equivalent to a pressure
/*
setting of 0 - 3000 psi or a flow of 0-100 %. Finally, it will set the */
173
*/
*/
/*
proper ADC channel to that value.
*/
/*
*/
/****************************************************************************/
void SetDACOutput(void)
{
int temp1, temp2;
DACOut[0]=0;
if(m==1)
{
temp1=PressureString[1] - 0x30;
temp2=1000*temp1;
temp1=PressureString[2] - 0x30;
temp2=temp2 + 100*temp1;
temp1=PressureString[3] - 0x30;
temp2=temp2 + 10*temp1;
temp1=PressureString[4] - 0x30;
temp2=temp2 + temp1;
if(temp2>3000)
{
temp2=3000;
}
temp2=(temp2*65535)/3000;
DACOut[0]=temp2;
/* Output pressure value on Channel A */
ioctl(dacDevice, DAC_SET_CHANNEL_A, NULL);
ioctl(dacDevice, DAC_WRITE_MODE_UPDATE, NULL);
write(dacDevice, DACOut, sizeof(UWord16));
}
if(m==2)
{
temp1=ASideString[1] - 0x30;
temp2=100*temp1;
174
temp1=ASideString[2] - 0x30;
temp2=temp2 + 10*temp1;
temp1=ASideString[3] - 0x30;
temp2=temp2 + temp1;
if(temp2>100)
{
temp2=100;
}
temp2=(temp2*65535)/100;
DACOut[0]=temp2;
/* Output A-Side value on Channel B */
ioctl(dacDevice, DAC_SET_CHANNEL_B, NULL);
ioctl(dacDevice, DAC_WRITE_MODE_UPDATE, NULL);
write(dacDevice, DACOut, sizeof(UWord16));
}
if(m==3)
{
temp1=BSideString[1] - 0x30;
temp2=100*temp1;
temp1=BSideString[2] - 0x30;
temp2=temp2 + 10*temp1;
temp1=BSideString[3] - 0x30;
temp2=temp2 + temp1;
if(temp2>100)
{
temp2=100;
}
temp2=(temp2*65535)/100;
DACOut[0]=temp2;
/* Output B-Side value on Channel C */
ioctl(dacDevice, DAC_SET_CHANNEL_C, NULL);
ioctl(dacDevice, DAC_WRITE_MODE_UPDATE, NULL);
175
write(dacDevice, DACOut, sizeof(UWord16));
}
}
/*********************FUNCTION ConstructPressureString
/*
*******************/
*/
/* This function constructs the pressure string and once complete makes */
/*
makes a call to SetDACOutput
*/
/*
*/
/****************************************************************************/
void ConstructPressureString(char temp1[1])
{
if(n==1)
{
PressureString[n]=temp1[0];
}
else if(n==2)
{
PressureString[n]=temp1[0];
}
else if(n==3)
{
PressureString[n]=temp1[0];
}
else if(n==4)
{
PressureString[n]=temp1[0];
SetDACOutput();
n=0;
176
m=0;
}
}
/*********************FUNCTION ConstructASideString ***********************/
/*
*/
/* This function constructs the A Side string and once complete makes
*/
/*
makes a call to SetDACOutput
*/
/*
*/
/****************************************************************************/
void ConstructASideString(char temp1[1])
{
if(n==1)
{
ASideString[n]=temp1[0];
}
else if(n==2)
{
ASideString[n]=temp1[0];
}
else if(n==3)
{
ASideString[n]=temp 1[0];
SetDACOutput();
n=0;
m=0;
}
}
177
/*********************FUNCTION ConstructBSideString ***********************/
/*
*/
/* This function constructs the B Side string and once complete makes
*/
/*
makes a call to SetDACOutput
*/
/*
*/
/****************************************************************************/
void ConstructBSideString(char temp1[1])
{
if(n==1)
{
BSideString[n]=temp1[0];
}
else if(n==2)
{
BSideString[n]=temp1[0];
}
else if(n==3)
{
BSideString[n]=temp1[0];
SetDACOutput();
n=0;
m=0;
}
}
178
/*
/*
File:
appconfig.h - External RAM
Project: PUT IT ALL TOGETHER.mcp
*/
*/
#ifndef __APPCONFIG_H
#define __APPCONFIG_H
#ifdef __cplusplus
extern "C" {
#endif
/*****************************************************************************
*
* Include needed SDK components by changing the #undef to #define
* Refer to config/config.h for complete list of all components and
* component default initialization.
*
*****************************************************************************/
#define INCLUDE_BSP
#define
#define
#define
#define
#define
#define
/* BSP support */
INCLUDE_IO
/* I/O support */
INCLUDE_TIMER
/* timer support */
INCLUDE_SCI
/* SCI support */
INCLUDE_ADC
/* ADC support */
INCLUDE_GPIO
/* General Purpose I/O support */
INCLUDE_DAC
/* DAC support */
/*****************************************************************************
*
* Overwrite default component initialization from config/config.h
*
*****************************************************************************/
#define SCI0_SEND_BUFFER_LENGTH 20 // Setup transmit buffer length
#define SCI0_RECEIVE_BUFFER_LENGTH 5 // Setup receive buffer length
#define GPR_INT_PRIORITY_20 1 /* Setup GPIO Port D ISR priority */
#define ADC_SCANMODE ADC_SEQUENTIAL_ONCE
#define INCLUDE_ADCA_SAMPLE_0
/* Set ADC Scan Mode*/
/*Setup ADC Sample 0 */
/* user raw conversion callback */
#define ADC_RAW_CONVERSION_COMPLETE_CALLBACK CC_CallBack
#ifdef __cplusplus
}
#endif
#endif
179
LabView:
Front Panel
Block Diagram
180
181
182
183
184
185
186
187
188
189
190
191
Glossary
192
10BaseT
An Ethernet standard that specifies a 10 Mbps transfer rate
(10) over a twisted pair line (T). This standard also uses a
“star” bus configuration. Individual computers in the system
are connected to common “hub” computers instead of a
signal common communication line.1
ADC
Analog to digital converter
API
American Petroleum Institute
ARCNet
Originally developed by the Datapoint Corporation as a
high- speed local area network (LAN) and was frequently
found in office automation applications. Like Ethernet and
Controller Area Network (CAN), ARCNet is a data-link
layer technology with no defined application layer.
AUV
Autonomous underwater vehicle
BCH method
The Bose, Chaudhuri and Hocquenghem method is a type of
CRC.
BOP
Blowout preventer. This large structure is placed over the
wellhead during drilling operations and is comprised of
multiple valves and seals. Its purpose is to create an isolated
drilling environment that can be “shut-in” in case of an
emergency such as a large release of natural gas or a high
pressure pocket of oil. The BOP can actually sever the drill
string and seal off the hole.
193
Buffer
A memory location reserved for the collection of a particular
type of data.
Bus
A network bus is the transmission path that communication
signals travel to move from one network point to another.
CAN
Control Area Network. Developed by Bosch, it is “a serial
communications protocol which efficiently supports
distributed real-time control with a very high level of
security.”2
Checksum
A checksum is a count of the number of bits in a
transmission unit that is included with the unit so that the
receiver can check to see whether the same number of bits
arrived. If the counts match, it's assumed that the complete
transmission was received. Both TCP and UDP
communication layers provide a checksum count and
verification as one of their services.
Christmas tree
Used in reference to the offshore oil industry, this applies to
the structure placed over a subsea wellhead once drilling is
completed and the production phase is set to begin. It
consists of a series of valves used to control the flow out of
the well.
CPU
Central processing unit
194
CRC
Cyclic redundancy checking is a method of checking for
errors in data that has been transmitted on a communications
link. A sending device applies a 16- or 32-bit polynomial to
a block of data that is to be transmitted and appends the
resulting cyclic redundancy code (CRC) to the block. The
receiving end applies the same polynomial to the data and
compares its result with the result appended by the sender. If
they agree, the data has been received successfully. If not,
the sender can be notified to resend the block of data.3
CSMA/CD
Carrier Sense Multiple Access/Collision Detection. Used by
the Ethernet protocol to govern communication timing over
its common bus. When two nodes attempt to transmit at the
same time, a collision is declared that results in a “backoff
time”. By varying these times between nodes, one node will
priority over another for bus access.4
DAC
Digital to analog converter
DeviceNet
A higher layer protocol (HLP) designed for use with the
Motorola Control Area Network (CAN).5
DF1
An Allen-Bradley data-link layer protocol that combines
features of subcategories D1 (data transparency) and F1
(two-way simultaneous transmission with embedded
responses) of ANSI x3.28 specification. There are two
categories of DF1 protocol, half-duplex protocol (master-
195
slave communication), and full-duplex protocol (peer-to-peer
communication).6
DSP
Digital signal processor
Ethernet
Ethernet was originally developed by Xerox, DEC, and Intel.
An Ethernet LAN typically uses coaxial cable or special
grades of twisted pair wires. There are several types of
Ethernet standards but the most common one is 10BaseT that
transmits at 10Mbps over twisted pair wires.
Communication is over a common bus and is governed by
Carrier Sense Multiple Access/Collision Detection method.7
EVM
Evaluation board or evaluation module.
Foundation Fieldbus
An all digital, serial, two-way communication system
running at 31.25 kbit/s which interconnects “field”
equipment such as sensors, actuators and controllers.
Fieldbus is a Local Area Network (LAN) for instruments
used in both process and manufacturing automation with
built-in capability to distribute the control application across
a network.8
GPIO
General Purpose I/O
GPM
Gallons per minute
GUI
Graphical user interface
196
Hall Effect
Named after Edwin Hall, who in 1879 observed that
electrons moving longitudinally along a metal strip (under
the influence of an electric field) will, if also subject to a
magnetic field perpendicular to the plane of the strip, be
deflected toward the side of the strip. Because of this, an
excess of charge will build up one side of the strip. This Hall
voltage is proportional to the strength of the magnetic field.
That is, a plot of Hall voltage (or equivalently the electrical
resistance of the material to the sideways current flow)
versus field strength would be linear.9
HART
HART or "Highway Addressable Remote Transducer” was
developed by Rosemount in the 1980’s.10 The HART
Protocol supports two way digital communications for
process measurement and control devices and is overlaid on
a standard 4-20mA control signal. Applications include
remote process variable interrogation, cyclical access to
process data, parameter setting and diagnostics.11
HLP
Higher-layer protocol
IDE
Integrated development environment
IDE bit
Identifier extension
IEC
International Electrotechnical Commission
197
IEC 61131-3
Publication 61131 governs the IEC standard on
programmable controllers. Part 3 “specifies syntax and
semantics of programming languages for programmable
controllers as defined in part 1 of IEC 61131.”12
IEEE
Institute of Electrical and Electronic Engineers
IEEE 802.3
The IEEE specification for CSMA/CD model
communications. The subcommittee that developed this
standard based it on Ethernet.
I/O
Input/output. Refers to the capabilities of a microcontroller
such as the ability and number of digital signals it can
receive and transmit.
ISA bus
A 16 bit computer bus specified by the Industry Standards
Association. This bus was common to the IBM AT
computers and a modified version is used on the PC-104
form factor controllers.
ISO
International Organization of Standards
ISR
Interrupt service routine. An ISR is a program function that
is called as the result of an interrupt or trigger.
198
Ladder logic
Or Ladder diagram is based on the graphical presentation of
Relay Ladder Logic and is defined as one of two graphical
programming languages under IEC 61131-3. The three main
elements are relay, coil, and special function block.13
LAN
Local area network.
LED
Light emitting diode
LLC
Logical link control. One of two sub layers of the data link
layer as defined by the OSI standard of networking.
LONWorks
Created by Echelon Corp and governed by the ANSI/EIA
709.1 Control Networking Standard. “The protocol provides
a set of communication services that allow the application
program in a device to send and receive messages from other
devices over the network without needing to know the
topology of the network.” Similar to the CAN protocol in
that “every device on a channel looks at every packet
transmitted on the channel to determine if it is an addressee.
If so, it processes the packet to see if it contains data for the
device’s application program or whether it is a network
management packet.”14
MAC
Media access control. One of two sub layers of the data link
layer as defined by the OSI standard of networking.
199
Microcontroller
A microchip built for a particular control purpose. Typically
runs an instruction set embedded in onboard memory that
includes instructions for boot up, power modes, and the
application to be run. Can have a wide range of I/O
capabilities including timers, digital switching, analog I/O,
serial communication, pulse width modulation, etc.
MODBUS
An application layer messaging protocol, positioned at level
7 of the OSI model that provides client/server
communication between devices connected on different
types of buses or networks. MODBUS ® Protocol was
developed by Modicon in 1979.15
MSCAN
Motorola Scalable Controller Area Network.
OLE
“Microsoft's framework for a compound document
technology. Briefly, a compound document is something like
a display desktop that can contain visual and information
objects of all kinds: text, calendars, animations, sound,
motion video, 3-D, continually updated news, controls, and
so forth. Each desktop object is an independent program
entity that can interact with a user and also communicate
with other objects on the desktop. Part of Microsoft's
ActiveX technologies, OLE takes advantage and is part of a
larger, more general concept, the Component Object Model
(COM) and its distributed version, DCOM. An OLE object is
necessarily also a component (or COM object).”16
200
OPC
OLE for Process Control. “Based on Microsoft’s OLE (now
ActiveX), COM (component object model) and DCOM
(distributed component object model) technologies, OPC
consists of a standard set of interfaces, properties, and
methods for use in process-control and manufacturingautomation applications. The goal of the standard is Plugand-Play.”17 The standard is managed by the OPC
Foundation consisting of 150 international members.
OSI
Open Systems Interconnection is a standard description or
"reference model" for how messages should be transmitted
between any two points in a telecommunication network. Its
purpose is to guide product implementers so that their
products will consistently work with other products. OSI
was officially adopted as an international standard by the
International Organization of Standards (ISO). Currently, it
is Recommendation X.200 of the ITU-TS. OSI divides
telecommunication into seven layers.18
201
PC 104
The PC/104 specification was developed by the IEEE in
1992 and is titled P996.1 Standard for Compact EmbeddedPC Modules. The specification called for a reduced form
factor of the IEEE P996 (draft) specification for the PC and
PC/AT buses, for embedded applications. The key
differences between PC/104 and the regular PC bus (IEEE
P996) are19 :
•
Compact form-factor (3.6 by 3.8 inches)
•
Unique self-stacking bus which eliminates the cost and
bulk of backplanes and card cages
•
Pin-and-socket connectors - rugged and reliable 64- and
40-contact male/female headers replace the standard PC's
edge card connectors.
•
Relaxed bus drive (6 mA). Lowers power consumption
(to 1-2 Watts per module) and minimizes component
count.
PCB
Printed circuit board
PDU
Power distribution unit. The PDU includes various power
transformers, supplies, circuit breakers, and alarms to
provide power and isolation to the ROV system.
PLC
Programmable logic controller
202
Plug & play
The ability to attach a piece of equipment to a computerized
system without having to perform complicated hardware
changes to make it work. The term was developed to
describe modern peripherals that can be installed into a wide
range of desktop computers with the associated driver
software without having to manipulate dip switches and
BIOS settings.
Processor
In this text refers to a microchip found in a desktop computer
or laptop. Operation revolves around an operating system
such as Windows, DOS, Linux, etc. which provides the user
with a working environment. These chips are not designed
to work by themselves but with a wide variety of peripherals
such as external memory storage devices (hard drives, CDROMs), user input devices (keyboard, mouse), and graphical
displays (monitor).
PROFIBUS
Process Field Bus is governed by IEC 61158. According to
PROFIBUS International, the key features of PROFIBUS are
speed, ease of use, versatility, economical, interoperability
with plug and play, open, and standardized. It can be
controlled by PLC-, PC-, or DCS-based systems.20
PWM
Pulse width modulation.
203
Reed switch
This device is a proximity sensor that detects the presence of
a magnet. Inside the switch there are two ferromagnetic
contacts. Introduction of a magnetic field by the presence of
a magnet either attracts the two contacts in a normally open
reed switch or repels the two contacts in a normally closed
reed switch. 21
ROV
Remotely operated vehicle. In this case, it is an underwater
robotic vehicle that is operated by human pilots from a
surface control station. An ROV “flies” through the ocean
using propeller style thrusters and receives power and
command signals via an armored umbilical to the surface.
RTR bit
Remote transmission request
RxBG
Background receive buffer in the MSCAN message
buffering system.
RxF flag
Receiver full flag.
RxFG
Foreground receive buffer in the MSCAN message buffering
system.
SBC
Single board computer.
204
SCADA
Supervisory control and data acquisition. “An industrial
measurement and control system consisting of a central host
or master (usually called a master station, master terminal
unit or MTU); one or more field data gathering and control
units or remotes (usually called remote stations, remote
terminal units, or RTU's); and a collection of standard and/or
custom software used to monitor and control remotely
located field data elements. Contemporary SCADA systems
exhibit predominantly open-loop control characteristics and
utilize predominantly long distance communications,
although some elements of closed-loop control and/or short
distance communications may also be present.”22
SDK
Software development kit
SOF
Start of frame
SRR bit
Substitute remote request
TCP
Transmission Control Protocol is a communication protocol
used along with the Internet Protocol (IP) to send
information over LANs, WANs, and the Internet. TCP is an
alternative to the User Datagram Protocol (UDP) and,
together with IP, is sometimes referred to as TCP/IP. TCP
handles the disassembly and assembly of data packets as
well as error checking. In the Open Systems Interconnection
(OSI) communication model, TCP, like UDP, is in layer 4,
the Transport Layer.23
205
Telemetry
“The wireless transmission and reception of measured
quantities for the purpose of remotely monitoring
environmental conditions or equipment parameters. The term
is also used in reference to the signals containing such
data.”24
TMS
Tether management system.
Torque tool
rotary actuator intervention tool as defined in API Spec 17D
Section 921.2f. It creates a rotary action that can be used for
such applications as rotating a valve stem to the open or
closed position.
TxE flag
Transmit empty flag.
UDP
User Datagram Protocol is a communication protocol used
along with the Internet Protocol (IP) to send information
over LANs, WANs, and the Internet. UDP is an alternative
to the Transmission Control Protocol (TCP) and, together
with IP, is sometimes referred to as UDP/IP. UDP does not
disassemble and reassemble data packets but requires higher
layer software to determine that the entire data message has
arrived. As a result, UDP requires less processor overhead
and is not designed to handle large data messages like TCP.
In the Open Systems Interconnection (OSI) communication
model, UDP, like TCP, is in layer 4, the Transport Layer.25
206
USB
Universal serial bus. According to the Universal Serial Bus
Specification Revision 2.0; “The goal is to enable such
devices from different vendors to interoperate in an open
architecture. The specification is intended as an enhancement
to the PC architecture, spanning portable, business desktop
and home environments. It is intended that the specification
allow system OEMs and peripheral developers adequate
room for product versatility and market differentiation
without the burden of carrying obsolete interfaces or losing
compatibility.”26
VME bus
The VerseModular Eurocard bus was designed as a master
slave bus system to withstand high shock, vibration and
temperatures. The standard specifies a circuit board called
the Eurocard that comes in three different footprints.
WAN
Wide area network.
Work Class ROV
According to API specifications, a heavy work class ROV
equals or exceeds the following dimensions: 86”x70”x95”
and 5000 lbs.27 This type of vehicle is typically equipped
with multiple cameras and lights, two robotic manipulators,
sonar, and various tools depending on the task at hand.
Heavy work class ROVs are used for projects such as
oceanographic research, offshore oilfield work, underwater
construction projects, communications cable installation, and
salvage work.
207
List of
References
208
Chapter 1 References:
1. SubAtlantic Ltd. “ROV Products.” http://www.subatlantic.co.uk/product_pages/rov.htm, 2001.
2. Chaffey, Mark, Edward Mellinger, and Andrew Pearce. “Distributed
Multiplexers for an ROV Control and Data System.”
http://www.mbari.org/dmo/tiburon/dcpaper.html, May 11, 2000.
Chapter 2 References:
1. Remotely Operated Vehicles of the World, 5th Edition. Houston: Oilfield
Publications Inc, 2002.
2. Alstom. “The Quest WROV: A Next-Generation Electric Work-Class ROV”
Publication no. POWC/PROB/ROV/uke/ROBO/O8.00/USA/1045.
http://www.schilling.com, 2000.
3. Alstom. “SeaNet Communication/Telemetry Hub” Publication no. M-0175
Rev. 3. http://www.schilling.com, 2000.
4. Alstom. “The Quest WROV: A Next-Generation Electric Work-Class ROV”
Publication no. POWC/PROB/ROV/uke/ROBO/O8.00/USA/1045.
http://www.schilling.com, 2000.
5. Benthos, Inc. 2001 Annual Report. North Falmouth, MA: Benthos, Inc., 2002.
6. Benthos, Inc. “SuperSeaRover.” http://www.benthos.com, 2000.
7. Benthos, Inc. “Stingray Remotely Operated Vehicle System.”
http://www.benthos.com, 2001.
209
8. Benthos, Inc. “Stingray Remotely Operated Vehicle System.”
http://www.benthos.com, 2001.
9. Deep Ocean Engineering, Inc. “Company Profile.” http://www.deepocean.com,
1997.
10. Deep Ocean Engineering, Inc. “Phantom XTL.” http://www.deepocean.com,
1997.
11. Deep Sea Systems International, Inc. “Company Profile.”
http://deepseasystems.com/aboutd.htm, 2003.
12. Deep Sea Systems International, Inc.
http://deepseasystems.com/images/common/mr-mk2.jpg, 2003.
13. “MAX Rover MK1,” Remotely Operated Vehicles of the World, 5th Edition.
Houston: Oilfield Publications Inc, 2002.
14. Hydrovision Ltd. “Company Profile.”
http://www.hydrovision.co.uk/comp3.html, 2003.
15. Seaeye Marine Ltd. “Lynx Rev. 1.” http:// www.seaeye.com, 2003.
16. Hydrovision Ltd. “Curvetech Control Systems.”
http://www.hydrovision.co.uk/products.html, 2003.
17. Hydrovision Ltd. “Curvetech Control Systems.”
http://www.hydrovision.co.uk/products.html, 2003.
18. International Submarine Engineering Ltd.
http://www.ise.bc.ca/images/HYSUB-250_web.jpg, 2002.
210
19. International Submarine Engineering Ltd. “Control Systems.”
http://www.ise.bc.ca/control_systems, 2002.
20. International Submarine Engineering Ltd. “Control Systems.”
http://www.ise.bc.ca/control_systems, 2002.
21. International Submarine Engineering Ltd.
http://www.ise.bc.ca/images/MBARI_Telemetry_Can.jpg, 2002.
22. Japan Marine Science and Research Center. http://www.jamstec.go.jp/jamstece/gallery/mujin/kaiko_1.html, 2000.
23. Oceaneering International, Inc. “Background.”
http://www.oceaneering.com/about.htm, 2003.
24. “Phoenix V,” Remotely Operated Vehicles of the World, 5th Edition. Houston:
Oilfield Publications Inc, 2002.
25. Perry Slingsby Systems, Coflexip Stena Offshore Group. “Company Profile.”
http://www.perryslingsbysystems.com, 2001.
26. Perry Slingsby Systems, Coflexip Stena Offshore Group.
http://www.perryslingsbysystems.com/ps_rov00.htm#triton_MRV, 2003.
27. Perry Slingsby Systems, Coflexip Stena Offshore Group. “Company Profile.”
http://www.perryslingsbysystems.com, 2001.
28. Perry Slingsby Systems, Coflexip Stena Offshore Group. “Company Profile.”
http://www.perryslingsbysystems.com, 2001.
29. Sonsub, Inc., Saipem SpA. “Company Profile.” http://www.sonsub.com,
2003.
211
30. Sonsub, Inc., Saipem SpA. “InnovatorT M.” http://www.sonsub.com, 2003.
31. Remotely Operated Vehicles of the World, 5th Edition. Houston: Oilfield
Publications Inc, 2002.
32. Stolt Offshore Ltd. “SCV-3000.” http://www.stoltoffshore.com, 2000.
33. SubAtlantic Ltd. “ROV Products.” http://www.subatlantic.co.uk/product_pages/rov.htm, 2001.
34. SubAtlantic Ltd. “Electronics Products.” http://www.subatlantic.co.uk/product_pages/electronic.htm, 2001.
35. Subsea 7. “Company Profile.”
http://www.subsea7.com/company_information/company_profile.asp, 2003.
36. Subsea 7. “Centurion, Work Class ROV Series.” http://www.subsea7.com,
2002.
37. Thales GeoSolutions Group Ltd. “Thales G3, High Performance Work Class
ROV.” Publication No: 0334/1202/10395. http://www.thalesgeosolutions.com, 2002.
38. Thales GeoSolutions Group Ltd. “Seal, Light Work Class ROV.” Publication
No: 0292/1001/1629D. http://www.thales-geosolutions.com, 2001.
39. Thales GeoSolutions Group Ltd. “Thales G3, High Performance Work Class
ROV.” Publication No: 0334/1202/10395. http://www.thalesgeosolutions.com, 2002.
212
40. Thales GeoSolutions Group Ltd. “Sealion MkII, Heavy Work Class ROV.”
Publication No: 0293/1001/1629D. http://www.thales-geosolutions.com,
2001.
41. ABB Automation, Inc. “ControlIT .” http://www.abb.com, 2000.
42. ABB Oil, Gas, and Petrochemicals, Inc.
http://www.abb.com/global/abbzh/abbzh251.nsf!OpenDatabase&db=/GLOB
AL/NOOFS/NOOFS187.NSF&v=F216&e=us&m=9F2&c=E7FDDBDE1D1
C0BE9412567520054388E, 2003.
43. Harbor Branch Oceanographic Institute.
http://www.hboi.edu/eng/auv_systems.html, 2002.
44. Harbor Branch Oceanographic Institute.
http://www.hboi.edu/eng/auv_systems.html, 2002.
45. Harbor Branch Oceanographic Institute. “Harbor Branch Engineering Skills & Services.” http://www.hboi.edu/eng/auv_systems.html, 2002.
46. Harbor Branch Oceanographic Institute. “Harbor Branch Engineering Skills & Services.” http://www.hboi.edu/eng/auv_systems.html, 2002.
47. French Research Institute for Exploitation of the Seas (Ifremer). “Victor
6000.” http://www.ifremer.fr/fleet/systemes_sm/engins/victor.htm, 2001.
48. Drogou, J.F., Dr. Michael Klages, and J.L. Michel. “French-German
cooperation in arctic deep sea research : Experiences in the joint use of the
deep sea ROV « VICTOR 6000 » at a long-term arctic station.”
http://www.ifremer.fr, 2003.
49. Japan Marine Science and Research Center. “Deep Sea Research
Department.” http://www.jamstec.go.jp/jamstec-e/shinkai, 1998.
213
50. Japan Marine Science and Research Center. http://www.jamstec.go.jp/jamstece/gallery/mujin/3k_1.html, 2000.
51. Chaffey, Mark, Edward Mellinger, and Andrew Pearce. “Distributed
Multiplexers for an ROV Control and Data System.”
http://www.mbari.org/dmo/tiburon/dcpaper.html, May 11, 2000.
52. Monterey Bay Aquarium Research Institute. “ROV Tiburon.”
http://www.mbari.org/dmo/vessels/tiburon.html, 2003.
53. Woods Hole Oceanographic Institute. “Jason 2 ROV General Specifications.”
http://www.whoi.edu, 2000.
54. Woods Hole Oceanographic Institute. “Jason II/Medea, Overview.”
http://www.whoi.edu/marops/vehicles/jason/index.html, 2003
Chapter 3 References:
1. Alstom. “SeaNet Communication/Telemetry Hub” Publication no. M-0175
Rev. 3. http://www.schilling.com, 2000.
2. “Section 921.2f,” Specification for Subsea Wellhead and Christmas Tree
Equipment, API Specification 17D (Spec 17D) First Edition, October 30,
1992. Dallas: American Petroleum Institute, 1993.
3. Universal Serial Bus Specification, Revision 2.0. Compaq Computer
Corporation, Hewlett-Packard Company, Intel Corporation, Lucent
Technologies Inc, Microsoft Corporation, NEC Corporation, Koninklijke
Philips Electronics N.V., 2000.
4. Chappell, Laura. “Chapter 8, TCP/IP Overview,” Introduction to Cisco Router
Configuration. Indianapolis: Cisco System, Inc., 1999.
214
5. Chappell, Laura. “Chapter 3, Physical and Data Link Layers,” Introduction to
Cisco Router Configuration. Indianapolis: Cisco System, Inc., 1999.
6. “10BaseT,” searchNetworking.com Definitions. Needham, MA: TechTarget,
Inc., 2003.
7. Chappell, Laura. “Chapter 3, Physical and Data Link Layers,” Introduction to
Cisco Router Configuration. Indianapolis: Cisco System, Inc., 1999.
8. Chappell, Laura. “Chapter 3, Physical and Data Link Layers,” Introduction to
Cisco Router Configuration. Indianapolis: Cisco System, Inc., 1999.
9. “2 Basic Concepts,” CAN Specification, Part B, Version 2.0. Stuttgart: Robert
Bosch GmbH, 1991.
10. “Chapter 1, Introduction,” Embedded SDK (Software Development Kit),
Programmer’s Guide. Document No. SDK101/D, Rev. 3, 07/16/2002.
Denver: Motorola, Inc., 2002.
11. “Chapter 2, Technical Summary,” DSP56F805 Evaluation Module, Hardware
User’s Manual. Document No. DSP56F805EVMUM/D, Rev. 3.0, 02/2001.
Denver: Motorola, Inc., 2001.
Chapter 4 References:
1. “LabViewT M 5.1.” National Instruments, 1999.
Chapter 5 References:
215
1. Parker O-Ring Handbook. Cleveland: Parker Hannifin Corporation, 1992.
2. “Section 1.10-06E, Proportional directional valve,” Wandfluh Hydraulics +
Electronics Catalog, Edition 11. Frutigen, Switzerland: Wandfluh AG, 2000.
3. “Section 2.3-43E, Proportional pressure reducing valve,” Wandfluh Hydraulics
+ Electronics Catalog, Edition 11. Frutigen, Switzerland: Wandfluh AG,
2000.
4. “Section 1.13-62E, Proportional-amplifier PO2,” Wandfluh Hydraulics +
Electronics Catalog, Edition 11. Frutigen, Switzerland: Wandfluh AG, 2000.
5. “MAX5221, +3V, Quad, 10-Bit Voltage-Output DAC with Serial Interface.”
Document No. 19-1172, Rev 0. Sunnyvale, CA: Maxim Integrated Products,
1996.
6. “MAX5221, +3V, Quad, 10-Bit Voltage-Output DAC with Serial Interface.”
Document No. 19-1172, Rev 0. Sunnyvale, CA: Maxim Integrated Products,
1996.
7. “Section 1.13-62E, Proportional-amplifier PO2,” Wandfluh Hydraulics +
Electronics Catalog, Edition 11. Frutigen, Switzerland: Wandfluh AG, 2000.
216
Chapter 7 References:
1. “VxWorks® 5.x.” Document No. MCL-DS-VXW-0107. Alameda, CA,
WindRiver Systems, Inc., 2001.
2. “LabViewT M 5.1.” National Instruments, 1999.
Chapter 8 References:
1. “Control Area Network, CAN Overview,” http://www.kvaser.com/can. Kvaser,
2003.
2. “1 Introduction,” CAN Specification, Part B, Version 2.0. Stuttgart: Robert
Bosch GmbH, 1991.
3. “Chapter 1, Internetworking Basics, Open System Interconnection Reference
Model,” Internetworking Technologies Handbook. Indianapolis: Cisco Press,
1999.
4. “Chapter 1, Internetworking Basics, Open System Interconnection Reference
Model,” Internetworking Technologies Handbook. Indianapolis: Cisco Press,
1999.
5. “Chapter 1, Internetworking Basics, OSI Model Physical Layer,”
Internetworking Technologies Handbook. Indianapolis: Cisco Press, 1999.
6. “1 Introduction,” CAN Specification, Part B, Version 2.0. Stuttgart: Robert
Bosch GmbH, 1991.
7. “1 Introduction,” CAN Specification, Part B, Version 2.0. Stuttgart: Robert
Bosch GmbH, 1991.
217
8. “Chapter 1, Internetworking Basics, OSI Model Network Layer,”
Internetworking Technologies Handbook. Indianapolis: Cisco Press, 1999.
9. “Chapter 1, Internetworking Basics, OSI Model Transport Layer,”
Internetworking Technologies Handbook. Indianapolis: Cisco Press, 1999.
10. “OSI,” searchNetworking.com Definitions. Needham, MA: TechTarget, Inc.,
2003.
11. “OSI,” searchNetworking.com Definitions. Needham, MA: TechTarget, Inc.,
2003.
12. “Chapter 1, Internetworking Basics, OSI Model Application Layer,”
Internetworking Technologies Handbook. Indianapolis: Cisco Press, 1999.
13. “2 Basic Concepts,” CAN Specification, Part B, Version 2.0. Stuttgart: Robert
Bosch GmbH, 1991.
14. “3.2 Frame Types,” CAN Specification, Part B, Version 2.0. Stuttgart: Robert
Bosch GmbH, 1991.
15. “3.2.1 Data Frame,” CAN Specification, Part B, Version 2.0. Stuttgart: Robert
Bosch GmbH, 1991.
16. “The CAN Protocol,” http://www.kvaser.com/can/protocol/index.htm. Kvaser
AB, 2002.
17. “3.2.3 Error Frame,” CAN Specification, Part B, Version 2.0. Stuttgart: Robert
Bosch GmbH, 1991.
18. “The CAN Protocol,” http://www.kvaser.com/can/protocol/index.htm. Kvaser
AB, 2002.
218
19. “The CAN Protocol,” http://www.kvaser.com/can/protocol/index.htm. Kvaser
AB, 2002.
20. “3.2.1 Data Frame,” CAN Specification, Part B, Version 2.0. Stuttgart: Robert
Bosch GmbH, 1991.
21. “The CAN Protocol,” http://www.kvaser.com/can/protocol/index.htm. Kvaser
AB, 2002.
22. “The CAN Protocol,” http://www.kvaser.com/can/protocol/index.htm. Kvaser
AB, 2002.
23. “8 Fault Confinement,” CAN Specification, Part B, Version 2.0. Stuttgart:
Robert Bosch GmbH, 1991.
24. “The CAN Protocol,” http://www.kvaser.com/can/protocol/index.htm. Kvaser
AB, 2002.
25. “10 Bit Timing Requirements,” CAN Specification, Part B, Version 2.0.
Stuttgart: Robert Bosch GmbH, 1991.
26. “10 Bit Timing Requirements,” CAN Specification, Part B, Version 2.0.
Stuttgart: Robert Bosch GmbH, 1991.
27. “The CAN Protocol,” http://www.kvaser.com/can/protocol/index.htm. Kvaser
AB, 2002.
28. “The CAN Protocol,” http://www.kvaser.com/can/protocol/index.htm. Kvaser
AB, 2002.
29. “The CAN Protocol,” http://www.kvaser.com/can/protocol/index.htm. Kvaser
AB, 2002.
219
30. “The CAN Protocol,” http://www.kvaser.com/can/protocol/index.htm. Kvaser
AB, 2002.
Chapter 9 References:
1. “Section 921, Intervention Fixtures,” Specification for Subsea Wellhead and
Christmas Tree Equipment, API Specification 17D (Spec 17D) First Edition,
October 30, 1992. Dallas: American Petroleum Institute, 1993.
2. “8.1 Introduction,” DSP56F801/803/805/807, 16-Bit Digital Signal Processor
User’s Manual, Preliminary. Document No. DSP56F801-7UM/D, Rev. 3.0.
Denver: Motorola, Inc., 2001.
3. “A.2 CAN Bus Installation,” Embedded SDK (Software Development Ki)
DSP56800/MSCAN Driver User’s Manual. Document No. SDK116/D, Rev.
2, 07/22/2002. Denver: Motorola, Inc., 2002.
4. “8.7.1 Message Storage,” DSP56F801/803/805/807, 16-Bit Digital Signal
Processor User’s Manual, Preliminary. Document No. DSP56F801-7UM/D,
Rev. 3.0. Denver: Motorola, Inc., 2001.
5. “1.3 MSCAN Overview,” Embedded SDK (Software Development Ki)
DSP56800/MSCAN Driver User’s Manual. Document No. SDK116/D, Rev.
2, 07/22/2002. Denver: Motorola, Inc., 2002.
6. “2.2 MSCAN Driver Static Configuration,” Embedded SDK (Software
Development Ki) DSP56800/MSCAN Driver User’s Manual. Document No.
SDK116/D, Rev. 2, 07/22/2002. Denver: Motorola, Inc., 2002.
Glossary References:
220
1. “10Base-T,” searchNetworking.com Definitions. Needham, MA: TechTarget,
Inc., 2003.
2. CAN Specification, Part B, Version 2.0. Stuttgart: Robert Bosch GmbH, 1991.
3. “Cyclic Redundancy Checking,” searchNetworking.com Definitions. Needham,
MA: TechTarget, Inc., 2003.
4. Chappell, Laura. “Chapter 3, Physical and Data Link Layers,” Introduction to
Cisco Router Configuration. Indianapolis: Cisco System, Inc., 1999.
5. “DeviceNet™ Technical Overview.” Open DeviceNet. Vendor Association,
2001.
6. DF1 Protocol and Command Set Reference Manual. Publication 1770-6.5.16.
Milwaukee: Allen-Bradley Company, Inc., 1996.
7. “Ethernet,” searchNetworking.com Definitions. Needham, MA: TechTarget,
Inc., 2003.
8. “Foundation Fieldbus Technical Overview.” Document No. FD-043, Revision
2.0. Austin: Fieldbus Foundation, 1998.
9. Schewe, Philip F. “Elucidating the Hall Effect,” APS News Online.
http://www.aps.org/apsnews/1298/129803.html. The American Physical
Society, 1998.
10. “Protocol History,” http://www.hartcomm.org/develop/history.html. HART
Communication Foundation, 2003.
11. “Protocol Overview,” http://www.hartcomm.org/develop/overview.html.
HART Communication Foundation, 2003.
221
12. “IEC 61131-3 (2003-01), Programmable Controllers – Part 3: Programming
Languages,” http://www.iec.ch/cgibin/procgi.pl/www/iecwww.p?wwwlang=E&wwwprog=catdet.p&wartnum=029664. Geneva: IEC, 2003.
13. “FAQ, What is ladder logic?” http://performancesw.com/faq.shtml.
Centennial, CO: Performance Software Associates, Inc., 2003.
14. Introduction to the LONWorks® System. Document No. 078-0183-01A,
Version 1.0. Palo Alto, CA: Echelon Corporation, 1999.
15. “Modbus FAQs,” http://www.modbus.org/default.htm. North Andover, MA:
Schneider Electric, 2002.
16. “OLE,” searchNetworking.com Definitions. Needham, MA: TechTarget, Inc.,
2003.
17. “OPC Technical Overview,” http://www.startmag.com/specialissues.asp#OPC.
OPC Foundation, 1998.
18. “OSI,” searchNetworking.com Definitions. Needham, MA: TechTarget, Inc.,
2003.
19. “What is PC/104?” http://www.pc104.org/technology/reg_info.html. San
Francisco: PC/104 Consortium, 2003.
20. “PROFIBUS FAQ,” http://www.profibus.com/support.html. Karlsruhe,
Germany: PROFIBUS Nutzerorganisation e.V., 2001.
21. “The Reed Switch,” http://www.theproductfinder.com/sensors/reesen.htm.
Motion Control Solutions, 1998.
222
22. “The SCADA Primer, Components of SCADA Systems,”
http://members.iinet.net.au/~ianw/primer.html. Tek Soft Consulting, 1997.
23. “TCP,” searchNetworking.com Definitions. Needham, MA: TechTarget, Inc.,
2003.
24. “Telemetry,” searchNetworking.com Definitions. Needham, MA: TechTarget,
Inc., 2003.
25. “UDP,” searchNetworking.com Definitions. Needham, MA: TechTarget, Inc.,
2003.
26. Universal Serial Bus Specification, Revision 2.0. Compaq Computer
Corporation, Hewlett-Packard Company, Intel Corporation, Lucent
Technologies Inc, Microsoft Corporation, NEC Corporation, Koninklijke
Philips Electronics N.V., 2000.
27. “Section 921, Intervention Fixtures,” Specification for Subsea Wellhead and
Christmas Tree Equipment, API Specification 17D (Spec 17D) First Edition,
October 30, 1992. Dallas: American Petroleum Institute, 1993.
223
224