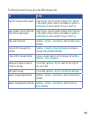
1
Xda Zest
User Manual
1
E2899
First edition
August 2008
2
Copyright © O2 (UK) Limited. All Rights Reserved.
No part of this manual, including the products and software described in it, may be reproduced, transmitted,
transcribed, stored in a retrieval system, or translated into any language in any form or by any means, except
documentation kept by the purchaser for backup purposes, without the express written permission of O2 (UK)
Limited (“O2 (UK)”).
The Bluetooth® trademark is owned by Bluetooth SIG, Inc
Wi-Fi is a registered trademark of the Wireless Fidelity Alliance, Inc
microSD is a trademark of SD Card Association
Copyright® 2008, Adobe Systems Incorporated
The Java™ and all Java-based marks are either trademarks or registered trademarks of Sun Microsystem, Inc
Product warranty or service will not be extended if: (1) the product is repaired, modified or altered, unless such
repair, modification or alteration is authorised in writing by O2 (UK); or (2) the serial number of the product is
defaced or missing.
O2 (UK) PROVIDES THIS MANUAL “AS IS” WITHOUT WARRANTY OF ANY KIND, EITHER EXPRESS OR IMPLIED,
INCLUDING BUT NOT LIMITED TO THE IMPLIED WARRANTIES OR CONDITIONS OF MERCHANTABILITY OR FITNESS
FOR A PARTICULAR PURPOSE. IN NO EVENT SHALL O2 (UK), ITS DIRECTORS, OFFICERS, EMPLOYEES OR AGENTS
BE LIABLE FOR ANY INDIRECT, SPECIAL, INCIDENTAL, OR CONSEQUENTIAL DAMAGES (INCLUDING DAMAGES
FOR LOSS OF PROFITS, LOSS OF BUSINESS, LOSS OF USE OR DATA, INTERRUPTION OF BUSINESS AND THE LIKE),
EVEN IF O2 (UK) HAS BEEN ADVISED OF THE POSSIBILITY OF SUCH DAMAGES ARISING FROM ANY DEFECT OR
ERROR IN THIS MANUAL OR PRODUCT.
SPECIFICATIONS AND INFORMATION CONTAINED IN THIS MANUAL ARE FURNISHED FOR INFORMATIONAL USE
ONLY, AND ARE SUBJECT TO CHANGE AT ANY TIME WITHOUT NOTICE, AND SHOULD NOT BE CONSTRUED AS A
COMMITMENT BY O2 (UK). O2 (UK) ASSUMES NO RESPONSIBILITY OR LIABILITY FOR ANY ERRORS OR INACCURACIES
THAT MAY APPEAR IN THIS MANUAL, INCLUDING THE PRODUCTS AND SOFTWARE DESCRIBED IN IT.
Microsoft®, ActiveSync™, Outlook®, Pocket Outlook®, Windows®, and the Windows® logo are either registered
trademarks or trademarks of Microsoft Corporation in the United States and/or in other countries. Microsoft
products are licensed to OEMs by Microsoft Licensing, Inc., a wholly owned subsidiary of Microsoft Corporation.
Table of Contents
Safety Information........................................................................12
Notices..........................................................................................20
O2 Xda Zest specifications.............................................................21
Package contents..........................................................................23
Chapter 1: Getting started
1.1 Getting to know your Xda....................................................24
Front features.......................................................................25
Top features..........................................................................26
Back features........................................................................26
Bottom features....................................................................26
Left features.........................................................................27
Right features.......................................................................27
1.2 Getting your Xda ready.........................................................28
Installing the SIM card and battery........................................28
Charging the battery............................................................30
Installing and removing a microSD card.................................31
1.3 Starting up...........................................................................32
Powering your Xda...............................................................32
Using the stylus....................................................................32
3
Calibrating your Xda.............................................................33
Locking your Xda..................................................................33
1.4 The Today screen..................................................................34
Status indicators...................................................................35
Main window panels............................................................38
Using the window panels......................................................38
Now Screen..........................................................................39
Professional..........................................................................39
Classic .................................................................................41
O2 Menu...............................................................................41
Speed Dial............................................................................42
Today Plug-In........................................................................44
Taskbar smart gestures..........................................................45
Enabling the Taskbar smart gestures.....................................46
Screen orientation................................................................47
Start menu...........................................................................47
1.5 Searching for information.....................................................48
1.6 Getting Help.........................................................................48
Chapter 2: Xda features
2.1 Using the Xda.......................................................................50
4
Xda pad................................................................................50
Turning off the phone function.............................................50
Adjusting the volume............................................................51
2.2 Making a call........................................................................52
Making a voice call...............................................................52
Calling using the Xda pad.....................................................52
Making an emergency call....................................................57
Making an international call.................................................58
Making a video call...............................................................58
Making a video call from Contacts........................................59
Making a video call from Call History....................................59
Video Call Setting.................................................................60
General settings....................................................................60
Service settings.....................................................................60
2.3 Receiving a call.....................................................................61
2.4 Options during a call.............................................................62
Managing multiple calls................................................................63
Chapter 3: Xda Synchronisation
3.1 Synchronising your Xda........................................................65
3.2 Microsoft® ActiveSync...........................................................65
5
Synchronising via mini-USB...................................................67
Synchronising via Bluetooth® ...............................................68
Synchronising with an Exchange Server.................................69
Chapter 4: Managing your Xda
4.1 Customising your Xda...........................................................71
Customising the Start menu.................................................71
Customising the Today screen...............................................71
Customising the Now screen................................................72
Customising the Today Plug-in..............................................73
Customising the gestures......................................................74
Customising the O2 Menu.....................................................75
Entering your contact information........................................75
Setting Sounds and Notifications..........................................76
Setting the date, time, and alarm..........................................76
Setting the ring tone.............................................................77
Wake-up settings..................................................................78
4.2 Managing and backing up files.............................................79
Using the File Explorer..........................................................80
Chapter 5: Getting connected
6
5.1 Using the Wireless Manager.................................................82
Enabling/disabling flight mode..............................................82
Enabling/disabling the wireless connections..........................82
Using your Xda as an external modem..................................83
Using a USB cable to connect your Xda to your PC...............83
Using Direct Push..................................................................84
5.2 Using Bluetooth® .................................................................85
Activating Bluetooth in your Xda..........................................85
Adding Bluetooth devices.....................................................86
5.3 Using Wi-Fi...........................................................................87
Turning on Wi-Fi...................................................................87
Configuring wireless networks..............................................88
Adding a wireless network....................................................88
Using Wi-Fi Manager............................................................89
5.4 Setting the GPRS connection................................................91
Connecting GPRS.................................................................92
Disconnecting GPRS..............................................................93
5.5 Setting the network..............................................................94
Configuring the network......................................................94
5.6 GSM/3G Networks................................................................95
7
5.7 Using the Opera Mobile........................................................96
5.8 Using the Internet Explorer Mobile........................................98
Chapter 6: Messaging
6.1 Entering text and numbers..................................................101
Using the Input Panel..........................................................101
Using the Block Recogniser.................................................101
Using the on-screen keyboard.............................................102
Using the Letter Recogniser................................................103
Using the Transcriber..........................................................104
Using the XT9 input mode..................................................105
6.2 Email messaging.................................................................106
Setting up an email account...............................................106
Managing email accounts...................................................107
Sending an email message..................................................108
Downloading email messages.............................................109
Synchronising email messages............................................110
Managing folders...............................................................111
6.3 Threaded SMS....................................................................112
Sending a threaded SMS.....................................................112
8
6.4 MMS messaging.................................................................113
Accessing MMS..................................................................113
Editing MMS settings..........................................................113
Sending an MMS message..................................................114
6.5 Windows® Live...................................................................116
Using Hotmail® ..................................................................116
Using Windows® Live Messenger........................................118
Chapter 7: Organising your life
7.1 Using Contacts...................................................................121
Viewing Contacts...............................................................121
Using the SIM Manager......................................................123
7.2 Using Calendar...................................................................124
Scheduling an appointment................................................124
Viewing an appointment....................................................125
Viewing your schedule........................................................125
7.3 Using Tasks.........................................................................126
The Tasks list.......................................................................126
7.4 Microsoft® Mobile Device Manager 2008............................128
Using Mobile Device Manager 2008...................................128
9
Chapter 8: GPS features
8.1 GPS Catcher.......................................................................130
Updating GPS data.............................................................130
Setting GPS Catcher...........................................................131
8.2 External GPS.......................................................................131
8.3 CoPilot Live 7......................................................................133
Using the trial version.........................................................133
Using the licensed version...................................................135
Navigating your first trip.....................................................137
Quick address entry............................................................137
More navigation tips...........................................................138
Change the driving view.....................................................138
Safety camera alerts............................................................139
Find a Point of Interest........................................................139
Chapter 9: Multimedia features
9.1 Working with pictures and videos.......................................141
Using the camera................................................................141
Camera features.................................................................142
Taking photos.....................................................................143
10
Recording videos................................................................144
Organising your pictures and videos....................................145
Chapter 10: O2 Features and Applications
10.1 Newstation.........................................................................149
Using Newstation...............................................................149
Using Newstation menus....................................................150
Channel menu....................................................................151
Subject menu.....................................................................151
10.2 Microsoft® Office Mobile.....................................................152
Excel® Mobile.....................................................................153
OneNote® Mobile...............................................................153
PowerPoint® Mobile............................................................153
Word® Mobile.....................................................................153
10.3 Adobe Reader LE.................................................................154
Service and Support....................................................................154
11
Safety Information
Specific Absorption Rate (SAR)
Your O2 Xda Zest has been designed, manufactured and tested not to exceed the limits for exposure
to electromagnetic fields recommended by the Council of the European Union. These limits are part of
comprehensive guidelines developed by independent scientific organisations.
European standards provide for the amount of radio frequency electromagnetic energy absorbed by the body
when using a phone to be measured by reference to the Specific Absorption Rate (SAR). The SAR limit for the
general public is currently 2 watts per kilogram averaged over 10 grams of body tissue.
The maximum SAR value for the O2 Xda Zest is 0.754 W/kg @10g (CE).
Xda care
You should never attempt to open the Xda casing. There are no user-serviceable parts inside and you might
damage sensitive electronic circuits and components. Unauthorised disassembly will void the warranty.
You should never leave your Xda in the window of your car or otherwise expose it to strong sunlight or
excessive heat for a prolonged period. This may damage it.
You should never handle your Xda with wet hands or expose it to moisture or liquids of any kind.
Continuous changes from a cold to a warm environment may lead to condensation inside the Xda, resulting
in corrosion and possible damage.
If you pack your Xda in your suitcase during travel, beware of damage. Cramming a suitcase may crack the
LCD display. Remember to switch off your wireless connections during air travel.
12
As with all other radio devices, touching the built-in antenna area during telephone conversation may impair
the quality and lead to shorter standby time due to increased power consumption.
The battery
Your Xda is equipped with a high-performance Li-Ion battery. Optional battery types may be available; check
with your local retailer. Observe the maintenance guidelines and your battery should give you a long service
life.
• At the beginning of the battery’s life, fully charge and discharge (let it go flat) three times.
• D
o not overcharge the Li-Ion battery, as this can result in a reduction in battery performance and
lifespan. The recommended maximum charge time is 2.5 hours.
Avoid repeated short charging. It is preferable to let the battery go flat and then recharge it completely.
• A
void charging in strong heat or extreme cold. Ambient room temperature is preferable. The battery
has its optimum performance in an ambient temperature of +5 °C to +50 °C.
• Do not store a battery near a fire or heat source.
• Use only the battery approved by the manufacturer.
• Never replace the battery with a non-approved battery.
• Never soak the battery in water or any other fluid.
• N
ever try to open the battery as it contains substances that might be harmful if swallowed or allowed
to come into contact with unprotected skin.
• N
ever short-circuit the battery, as it may overheat and cause a fire. Keep it away from jewellery and
other metal objects.
• Never dispose of the battery in a fire. It could explode and release harmful substances into the environment.
13
• N
ever dispose of the battery with your regular household waste. Take it to a hazardous material
collection point.
• Do not touch the battery terminals.
WARNING!
There is a risk of explosion if the battery is replaced by an incorrect type.
Dispose of used batteries according to the instructions.
The charger
• Use only the charger supplied with your Xda.
• Never pull the charger cord to release it from the mains – pull the charger itself.
Memory card
• Do not remove or insert a memory card or turn off the handset while data on the card is being edited.
• Do not touch the metal terminals with your hands or with other metal objects.
• D
o not bend the memory card or subject it to violent impact. Keep it away from water and high
temperatures.
• Keep all memory cards out of reach of small children.
• D
o not short circuit the contact points or expose it to liquids or moisture. When not in use, keep it in
the antistatic container it came in.
• D
o not use force when inserting or handling the card, and do not expose it to excessive heat or strong
magnetic fields.
14
Cleaning and storing
• Y
our Xda should always be handled with care and protected from dirt, dust and dampness. To avoid
scratches, never place your Xda face down.
• If cleaning is necessary, switch the Xda off and wipe carefully with a soft, slightly damp (not wet)
cloth. Use a cotton swab to clean the camera lens. Allow the Xda to dry completely before switching
it on. Never use solvents for cleaning.
• Never expose your Xda to moisture or liquids of any kind.
• Do not paint your Xda or otherwise block the keypad, microphone or earpiece function, i.e. with stickers.
WARNING!
Failure to follow these instructions may lead to serious personal injury and
possible property damage.
Driving safety
• Never use a handheld phone while driving. Use hands-free car kits or alternative hands-free accessories.
• For safety, we recommend the use of a cradle while using any form of hands-free accessory.
• While driving, we recommend that you use voicemail whenever possible, and that you listen to your
messages when you are not in the car. If you must make a hands-free call when driving, keep it brief.
• An airbag inflates with great force. Do not place objects, including both installed or portable wireless
equipment, in the area over the airbag or in the airbag deployment area. If in-vehicle wireless
equipment is improperly installed and the air bag inflates, serious injury could result.
15
Electronic devices
Most modern electronic equipment is shielded from RF energy.
However, certain electronic equipment may not be shielded against the RF signals from your Pocket PC phone.
Pacemakers
To avoid potential interference, the Health Industry Manufacturers’ Association recommends that a minimum
separation of six (6”) inches be maintained between a phone and a pacemaker.
These recommendations are consistent with the independent research by and recommendations of Wireless
Technology Research.
If you have a pacemaker:
• Always keep your Xda more than six inches from your pacemaker when turned on.
• Do not carry your Xda in a breast pocket.
• Use the ear opposite the pacemaker to minimise the potential for interference.
• If you have any reason to suspect that interference is taking place, turn your Xda off immediately.
Hearing aids
Some digital phones may interfere with some hearing aids. In the event of such interference, call O2 Customer
Service to discuss alternatives.
Other medical devices
16
If you use any other personal medical device, consult the manufacturer of your device to determine if
it is adequately shielded from external RF energy. Your physician may be able to assist you in obtaining
this information.
Turn your phone off in healthcare facilities when any regulations posted in these areas instruct you to do so.
Hospitals or healthcare facilities may be using equipment that could be sensitive to external RF energy.
Vehicles
RF signals may affect improperly installed or inadequately shielded electronic systems in motor vehicles.
Check with the manufacturer or its representative regarding your vehicle. You should also consult the
manufacturer of any equipment added to your vehicle.
Posted facilities
Turn off your Xda where posted notices so require.
Magnetic media
Magnetic fields generated by Smartphone may damage data on magnetic storage media, such as credit
cards, computer discs or tapes. Do not place your Xda next to such media.
You should never expose your Smartphone to strong magnetic fields as this may cause temporary malfunction.
Other Safety Guidelines
Aircraft
Regulations prohibit using your Xda while in the air. Switch off your Xda before boarding an aircraft or turn
off the wireless connections.
17
Blasting areas
To avoid interfering with blasting operations, turn off your Xda when in a ‘blasting area’ or in areas posted:
‘Turn off two-way radio.’ Obey all signs and instructions.
Potentially explosive environments
Turn off your Xda when in any area with a potentially explosive environment and obey all signs and instructions.
Sparks in such areas could cause an explosion or fire resulting in bodily injury or even death.
Areas with a potentially explosive environment are often, but not always, clearly marked. They include fuelling
areas such as gas stations, below decks on boats, fuel or chemical transfer or storage facilities, vehicles using
liquified petroleum gas (such as propane or butane), areas where the air contains chemicals or articles, such
as grain, dust, or metal powders, and any other area where you would normally be advised to turn off your
vehicle’s engine.
Choking
Keep your Xda away from children as the SIM card and other small parts present a choking hazard.
Cautions
Your Xda is a high quality piece of equipment. Before operating, read all instructions and cautionary markings
on (1) AC Adapter (2) Battery and (3) Product.
• Do not use this equipment in an extreme environment where high temperature or high humidity exists.
18
• D
o not abuse the equipment. Avoid striking, shaking or giving it a shock. When not using the unit,
lay it down to avoid possible damage due to instability.
• Do not expose this equipment to rain or spilled beverages.
• Do not use unauthorised accessories.
• D
o not disassemble the Xda or its accessories. If service or repair is required, return the unit to an
authorised service centre. If the unit is disassembled, a risk of electric shock or fire may result.
• Do not short-circuit the battery terminals with metal items.
About this guide
This document is provided as a Full User Manual to the O2 Xda Zest and to this system only. O2 Xda Zest is a
trademark of the O2 group of companies.
Mandatory statements
We hereby declare that the O2 Xda Zest is in conformity with all essential requirements of Directive 1999/5/EC.
Year of Manufacturing: 2008
19
Notices
Regulatory Notices
Intended for use in the European Union.
Products with CE marking comply with the R&TTE directive (99/5/EC), the EMC directive (89/366/ECC), and the Low
Voltage Directive (73/23/EEC) issued by the Commission of the European Community.
Compliance with these directives implies conformity to the following European Norms (in parentheses are the
equivalent international standards).
EN 301 908 Electromagnetic compatibility and Radio spectrum Matters (ERM); Base Stations (BS) and User
Equipment (UE) for IMT-2000 third generation cellular networks.
EN 301 489-24 Electromagnetic compatibility and Radio spectrum Matters (ERM); ElectroMagnetic Compatibility
(EMC) standard for radio equipment and services; part 24: Specific conditions for IMT-2000 CDMA direct spread
(UTRA) for mobile and portable (UE) radio and ancillary equipment.
EN 60950-1 Safety of Information Technology Equipment.
ETSI EN 301 511 Global system for mobile communications (GSM); harmonised EN for mobile stations in the GSM
900 and GSM 1800 bands, covering essential requirements of article 3.2 of the R&TTE directive (1995/5/EC).
ETSI EN 301 489-1 Electromagnetic compatibility and Radio spectrum Matters (ERM); ElectroMagnetic Compatibility
(EMC) standard for radio equipment and services; Part 1: Common technical requirements.
ETSI EN 301 489-7 Electromagnetic compatibility and Radio spectrum Matters (ERM); ElectroMagnetic
Compatibility (EMC) standard for radio equipment and services; Part 7: Specific conditions for mobile and
portable radio and ancillary equipment of digital cellular radio telecommunication systems (GSM and DCS).
20
O2 Xda Zest specifications
ITEM
SPECIFICATIONS
Processor
Marvell TavorP 624MHz
Operating System
Microsoft® Windows Mobile™ 6.1 Professional
Memory
256 MB NAND Flash ROM
128 MB SDRAM
Display
2.8-inch, 480 x 640 TFT Touchscreen Liquid Crystal Display (LCD)
with 65,536 colour and back-lighting
Frequency band
HSDPA 3.6Mbps, UMTS 2100Mhz, EDGE/GPRS/GSM
(900/1800/1900Mhz): Class 10
GPS
Built-in SiRF star III chipset
GPRS
Class B, Multi-slot class 10
Camera
Back: 3.0 megapixel auto focus camera. Front: VGA camera
Connectivity
Bluetooth : V2.0 EDR
USB : USB 1.1 compatible
WLAN : 802.11b/g
Battery capacity
1300 mAh Lithium Ion
(Manufacturer: TD HiTech Energy; Model: SBP-19)
Expansion slot
MicroSD card slot
Audio
Mini-USB audio port
Built-in microphone and output speaker
continued on the next page
21
Weight
120.5g (with battery)
Dimension
102 x 60.5 x 16.5 mm
Talk time*
3G: up to 3 hrs; 2G: up to 5 hrs
Standby time*
3G: up to 220 hrs; 2G: up to 260 hrs
* The actual performance is dependent on multiple factors, including network environment and usage behaviour.
22
Package contents
Check your product package for the following items:
Standard items
• Xda Zest device with stylus
• Y-cable (audio/charging cable)
• Battery (1300mAh)
• Getting Started CD
• AC Adapter
• Quick Start Guide
• Mini-USB cable
• Warranty Card
• Headset
• CoPilot map SD card
NOTE: If any of the above items is damaged or missing, contact your retailer.
23
Chapter 1
Getting started
1.1 Getting to know your Xda
1.2 Getting your Xda ready
1.3 Starting up
1.4 The Today screen
1.5 Searching for information
1.6 Getting Help
1.1 Getting to know your Xda Zest
Front features
FEATURE
9
1
Earpiece receiver
Allows you to listen to incoming/outgoing calls.
1
8
2
LCD touch screen
This 2.8-inch, 65,536-colour, 480 x 640 resolution,
touchscreen TFT LCD allows you to write, draw, or make
selections using the stylus.
2
3
OK key
Press to confirm a command or close/exit an open
application.
4
End key
Press to end a call.
5
Navigation key
This five-direction navigation key allows you to navigate
7
3
6
4
through menus. Press down to confirm a command.
6
Call key
Press to receive an incoming call or to make a voice call.
5
Press and hold to make a video call.
LED INDICATOR
STATUS
Green
Battery is fully charged.
Flashing green
Signal/network detected.
Red
Battery is charging.
Flashing blue
Bluetooth, Wi-Fi, or GPS
is on.
Flashing red
Event alarm/notification
7
Start key
Press to launch the Start menu.
8
LED indicator
It indicates the status of your battery, signal/network,
Bluetooth, and WLAN. See the LED indicator table for
more information.
9
Front camera lens
Makes yourself visible during video calls.
25
Bottom features
Top features
11
10
14
12
13
FEATURE
Back features
10
Power key
Press and hold to power on/off the Xda.
Press to set suspend mode or to wake Xda from sleep mode.
16
11
Built-in microphone
The built-in microphone allows you to make or receive phone
calls, record sounds and voices, or give voice commands.
15
12
Mini-USB sync/power connector
Synchronises data in your Xda with your PC or charges your
battery.
17
13
Carrying strap hole
Allows you to attach a strap to the Xda.
14
Reset key hole
Insert your stylus into this hole to soft-reset your Xda.
15
Output speaker
Allows you to listen to audio and phone calls.
16
Back camera lens
3.0 megapixel lens for taking pictures and videos.
17
Back cover
Covers the internal components such as the battery.
26
Left features
Right features
20
FEATURE
18
18
GPS port
Allows you to install a GPS antenna for better signal
reception.
21
19
19
Volume key
Allows you to adjust the volume.
20
Stylus
Use the stylus to write, draw, or select items on the screen.
21
Hold key
Allows you to disable the keys and the LCD screen.
22
22
Camera key
Press to launch the camera. In camera mode, half-press to
focus the object, and full-press to take a picture. In video
mode, press to start recording and press again to stop.
27
1.2 Getting your Xda Zest ready
Installing the SIM card and battery
Before you can make a phone call using your Xda, you need to install a Subscriber Identity
Module (SIM) card. The SIM card contains your phone number, subscriber details, phonebook,
and additional phone memory.
Your Xda comes with a rechargeable Lithium-Ion (Li-Ion) battery.
New batteries come partially discharged and should be fully charged before using them.
CAUTION: Use only the specified battery.
To install a SIM card and battery:
1. Remove the back cover.
28
2. Insert the SIM card with its gold contacts
facing down and the notched corner
oriented to the upper left corner of the
slot as shown.
3. Install the battery into the compartment
with its copper contacts properly aligned
to the copper conductor on the Xda.
4. Replace the back cover.
29
Charging the battery
The bundled battery is shipped partially charged. Charge the battery up to four hours before
using for the first time.
To charge battery:
1. Connect the mini-USB cable to the AC adapter.
2. Connect the other end into the mini-USB connector at the bottom of the Xda.
3. Connect the AC power plug into a grounded wall socket or power strip.
NOTES:
The notification LED turns red and the charging battery icon appears on
the status bar indicating that the battery is charging.
If your battery gets totally discharged, you need to recharge it for at least
20 minutes before you can turn it back on.
30
Installing and removing a microSD card
Your Xda is equipped with a microSD card slot. A microSD card provides you with extended
memory where you can store your files and data.
To install/remove a microSD card:
1. Locate the microSD card slot beneath the SIM card slot
inside the Xda.
2. With the golden fingers facing down, insert the microSD
card into the slot until it snaps properly.
3. To remove, push the card until it ejects out, then remove the card safely.
31
1.3 Starting up
Powering your Xda
Ensure that your Xda is fully charged before using it for the first time.
To turn on power:
1. Press and hold the Power button on top of the Xda.
Power button
2. Follow the on-screen instructions to align the screen and set the local time zone.
Using the stylus
The stylus is a pen-like Xda found behind the upper right corner of your Xda.
Stylus
• Use the stylus to write, draw, select, or drag
an item on the screen.
• Single-tap an item to select or open it.
• Tap and hold an item to see a menu.
32
Calibrating your Xda
Calibrating your Xda ensures that the item you tap on the screen is activated. This involves
tapping the centre of targets that appear in various locations on the screen.
To calibrate your screen:
1. Tap
> Settings > System tab, then tap Screen icon.
2. On the General tab, tap Align Screen, then follow the calibration screen instructions.
Locking your Xda
You can lock the keys, buttons, and touch screen of your Xda to avoid inadvertently dialling
numbers or launching any application.
Hold key
• Locate the Hold key and slide downward
to lock.
• Slide upward to unlock.
33
The Today screen
The Today screen features easy and accessible functions and tools that keep your Xda organised.
It features the main window panels (Now Screen, O2 Menu, and Speed Dial), the quick panel
(smart taskbar gestures), the Today plug-in (home, weather forecasts, world time, and photo
speed dial), Contacts (smart contact search), Task Manager, colour-based themes, and improved
usability for Xda locking.
Tap to view the connection status
Status bar
Tap to open the Start menu
Tap to set the date, time,
and alarm
Displays the signal status
(The icon shows no SIM card and no signal
when no SIM card is installed.)
Indicates the battery status
Tap to adjust volume
Today Plug-In
Tap to set owner information
Tap any tab icon to quickly access an application
or feature.
Tap to open messages
Tap to view tasks
Tap to read or make
appointments
Tap to launch CoPilot
Tap to open the Contacts list
NOTE: 34
Tap and enter a word or words for a
quick web search
Tap to open the O2 Menu list
To know more about customising the functions and tools on your Xda,
refer to Chapter 4: Managing your Xda of this Full User Manual.
Status indicators
Refer to the table below for the status indicators.
Icon
Call status
Description
Call in progress
Call forwarded
Call on hold
Missed call
General Packet Radio Service
(GPRS) connection status*
GPRS available
Connecting via GPRS
* This icon depends on your location and
mobile service provider.
Connected via GPRS
3rd Generation (3G) service available
High-Speed Download Packet
Access (HSDPA) connection status
Connected via HSDPA
Messaging status
New Short Messaging Service (SMS) message
New voice mail
New Multimedia Messaging Service (MMS) message
35
Icon
Battery status
Description
Battery fully charged
Battery partially charged
Battery charging
Battery low
Signal status
No cellular phone service
No signal
Searching for cellular phone service
Indicates signal strength
Xda off
ActiveSync connection status
ActiveSync synchronisation in progress
Connecting with ActiveSync
ActiveSync connection not active
Synchronisation error
36
Icon
Sound status
Description
Sound ON
Sound OFF
Wi-Fi status
Wi-Fi is not connected
Wi-Fi connected
Bluetooth headset connection
Bluetooth stereo headset connected
Hands-free on
Roaming service
Roaming service. This icon appears if you have
international roaming feature.
Mode status
Vibrate or Meeting mode on
Speakerphone status
Speakerphone on
Alarm status
Appears when you set the alarm
SIM card status
No SIM card installed
Notification status
Notice indicator
37
Main Window Panels
The three main window panels (Now Screen, O2 Menu, and Speed Dial) work as a shell to your
Today screen and do not replace it. All of these panels are designed for a stylus-free navigation
and support animated transitions.
Using the window panels
To use the window panels:
• Use the left-right gesture or soft keys to switch between the main window panels.
, or press the ok key to close the panels and
• Slide your finger in a downwards gesture, tap
return to the Today screen (or the last active application).
Now Screen
38
O2 Menu
Speed Dial
Now Screen
Now Screen gives you a quick and easy way to check your Xda status. You can see your most
important information with a quick glance, for the fastest and most direct way to use your Xda. For
example, you can open your Inbox to read new emails with just a tap, or with a few key clicks.
You can choose from any of these two Now Screen layouts: Professional and Classic.
NOTE:
To customise the Now Screen settings, refer to the section Customising
the Now Screen in Chapter 4 of this Full User Manual.
Professional
The Now Screen professional layout provides you with the
following information:
• The battery indicator icon on the top left corner shows the
remaining power in your battery.
• The network signal indicator on the top right corner shows
the signal strength of your mobile service provider. Next to
it the data connection status indicator.
• The weather forecast icon on the upper left for the selected
city. Tap to open the weather details panel where you can
update the weather forecast or access the weather options.
39
• In the upper middle you have indicators for emails, SMS,
and missed calls. For example, when you receive an email
you will see the email icon highlighted with the number of
new email messages you have in your Inbox. You can open
your Inbox to read new email messages with just a tap, or
with a few key presses.
• With the speaker indicator on the upper right, you can
adjust the following phone profiles on your Xda. Select On,
Vibrate or Off from the profiles list.
• The digital clock in the middle of the Now Screen displays
your current time and date. Tap to open the time screen
for more details.
• Under the digital clock you will find the alarm notification
bar when an alarm time is set and the corresponding
option is enabled.
• You will find the next two appointment notification bars
(if available) in the lower part of Now Screen. All day event
appointments will not be displayed.
• The calendar displays the days that correspond to the
selected month and year settings. The selected date is
your Xda’s current setting. You can see a full month, three
weeks, two weeks, one week or disable the calendar from
the corresponding option in the options.
40
• Use the left-right gesture or soft keys to switch between
the main window panels. Slide your finger in a downwards
, or press ok key to return to the Today
gesture, tap
screen (or the last active application).
Classic
The Now Screen classic layout provides you with almost the same information you can find in the
professional layout. However, some features are different, these are:
• The ability to choose between a digital or analogue clock views.
• The ability to disable or enable the display of current and upcoming appointments.
• The calendar is not available in the classic layout.
O2 Menu
O2 Menu allows you to quickly and conveniently access an
application or feature on your Xda. You can navigate in any
O2 Menu screens without using the stylus and using only
finger gestures.
To use the O2 Menu, do either of the following:
• Tap the O2 Menu soft key from the Today screen, then
tap any of the tabs on the O2 Menu.
> Programs > O2 Menu, then tap or move your
• Tap
finger on any of the icons.
Slide your finger to go to the previous or next page or
menu level.
Slide your finger downwards to return to the Today
screen or to the last active application.
41
The nine sub-menu items in O2 Menu contain these useful features and tools:
• O2 Contacts: Under the Phone Book category you can find the O2 Contacts tool. When you
start entering a phone number or contact name, O2 Contacts will automatically search and
sort the contact entries that match the sequence you have entered. You can then select the
desired number or contact from the filtered list to dial. To find a contact name you can enter
the first letter of a contact’s first name or surname. O2 Contacts will search for the letter
starting from the first character of a contact name as well as from the character that appears
after a space, dash, or underscore in a contact name. For example, if you tap number “5”
which is associated with [j, k, l], contact names such as the following will be considered
matches: Sue Jackson, Armstrong Jason, Julia, Lisa, Kim. If the matching list is long and you
want to narrow down the search further, enter another letter. Each time you tap the back
arrow you will go to the previous search screen.
• Task Manager: Under the Tools category. Use the task Manager to display your active
programs list. Tap program to Activate, Close, Close All, Close All But This and Minimise All
active programs to the Task Manager.
• Theme: Under the Tools category. Tap and select a colour to change the colour of key user
interface elements (including Today).
• Xda Lock: Under the Tools category. You can lock your Xda using a hardware key, soft key
on the Today screen or a shortcut. You also can unlock the Xda using only soft keys.
• Phone Profiles: Under the Tools category. This tool allows you to select one of three basic
phone profiles Normal, Vibrate only, and Silent.
NOTE:
42
To customise the O2 Menu, refer to the section Customising the O2 Menu
in Chapter 4 of this Full User Manual.
Speed Dial
Speed Dial allows you to add up to 16 photo contacts of
your choice. You can also add a shortcut to the O2 Contacts
on the panel.
• From the main window slide your finger in a left-right
gesture to go to the Speed Dial panel. You can also have
quick access to Speed Dial panel from any application using
the taskbar gesture.
• Add your favourite photo contacts to the Speed Dial panel
(applies only to entries stored in Contacts on your Xda).
• If the contact profile doesn’t include photo, the name of
the contact will be shown instead.
• You can devote a square(s) in the speed dial grid to recent received or dialled calls.
• Tap the photo, name, or number of the contact whom you want to call.
• The contact panel of your selected contact is then displayed. Select one of the phone
numbers that you want to dial or send a text message.
• Tap Open to view the contact profile.
• To go back to the Speed Dial panel slide your finger in a right gesture or tap the back soft key.
• To close the Speed Dial panel slide your finger in a downward gesture or tap
NOTE: .
To edit information associated with the selected contact, tap and hold
the contact’s name on the Speed Dial panel and select the corresponding
option from the context menu.
43
Today Plug-In
The Today Plug-In consists of these four dynamic tab icons: Home, Time, Weather Forecast,
and Photo Speed Dial. Tap any of these icons to quickly and conveniently access the
applications or features on the Xda.
Time
Tap to display the local time of three
selected cities, and to set your alarm
and clock settings.
Home
Tap to quickly access your most
frequently used applications or
features on the Xda.
NOTES: Weather Forecast
Tap to display the weather forecast for a
specific city or area.
Photo Speed Dial
Tap to make a call, send SMS/MMS/email
messages, edit a contact information, or
remove a contact from the Today screen.
Tap and hold a tab icon to enable/disable the Auto-Hide Mode of the
sub-items or view the options in the selected tab.
To customise the Today Plug-In, refer to the section Customising the
Today Plug-In in Chapter 4 of this Full User Manual.
44
Taskbar Smart Gestures
The taskbar smart gestures allow you, if enabled, to select and launch the Now Screen, O2
Menu, or Speed Dial screen from any application you are in. The gesture panel thumbnails
show you a real-time preview of the current panel status.
Taskbar Gesture: Now Screen
selected
NOTE:
Taskbar Gesture: O2 Menu
selected
For more details on gestures, refer to the section Customising the
gestures in Chapter 4 of this Full User Manual.
45
Enabling the taskbar smart gestures
To enable the taskbar smart gestures:
1. Launch the O2 Menu. To do this, do any of the following:
• From the Today screen, tap O2 Menu.
• Tap
> Programs > O2 Menu.
2. From the O2 Menu main screen, tap Settings > O2 Menu.
3. From the Animation tab, select Enable taskbar smart gestures to launch one of the main
window panels (Now Screen, O2 Menu, and Speed Dial) from any application you are in.
4. Tap
when finished.
To use the taskbar smart features:
• Tap and hold in the left-half of the taskbar while moving your finger in a downwards gesture.
• Select one of the panels and release when the gray pop-ups window appears.
• If you release your finger outside the grey area then the highlight disappears and the panels launching is cancelled.
NOTES: You can use an alternative to the taskbar gestures by assigning a panel to one
of the hardware keys using the default Windows Mobile button mapper.
If you want to activate the panel very quickly, you can just swipe your
finger in a downwards gesture from the taskbar. The panel that will be
activated depends on the gesture direction (left part of the screen: Now
Screen, centre: O2 Menu, right part of the screen: Speed Dial).
46
Screen orientation
You can set the screen to three different orientations:
1. Portrait
2. Landscape (right-handed)
3. Landscape (left-handed)
Set to Portrait mode to get a better view or better operation of certain applications on your Xda.
Set to Landscape when viewing pictures, video or viewing longer text files.
To change the screen orientation, tap
orientation you want.
> Settings > System tab > Screen, then select the
Start menu
The Start menu contains various programs and applications that you commonly use. Tap
display the Start menu items.
to
You can also customise the items that appear in the Start menu.
To customise the Start menu:
1. Tap
> Settings > Personal tab > Menus.
2. Select the check boxes of the items you want to appear in the Start menu. You can select up
to seven items.
47
1.5 Searching for information
The Search tool enables you to search for files and other items stored in your Xda or in the
external MicroSD card. You can search by file name or by words located in various applications
including the Calendar, Contacts, Excel Mobile, Word Mobile, Help, Messages, Notes, and Tasks.
You can also filter your search to files larger than 64 KB.
2.1 Using
th
2.2 Making a
Tap
> Programs > Search.
2.3 Receiving
In Search for field, enter the file name, word, or other information you want to search.
2.4 Options
In Type field, select the data type to help you filter your search.
To search for a file or an item:
1.
2.
3.
4. Tap Search. Found items are listed in Results.
5. In the Results list, tap the item with the information you need.
1.6 Getting Help
You can easily find Help for using any program on the Xda.
To get help for a program:
• From the Today screen or program, tap
that explain how to use the program.
48
> Help. Then a page opens with links to topics
he Xda Zest
Chapter 2
a call
Xda Zest features
g a call
during a call
2.1 Using the Xda Zest
2.2 Making a call
2.3 Receiving a call
2.4 Options during a call
2.1 Using the Xda
Like a standard mobile phone, you can use your Xda Zest to make and receive voice and video calls.
You can also keep a history of calls made, missed, and received, send SMS or MMS messages, take
notes while talking, call from Contacts, and copy data from an installed SIM card to your Xda.
Phone pad
The phone pad allows you to easily dial and access the Contacts, Call History, and Phone settings.
To launch the phone pad, do any of the following:
• Tap
> Programs > Phone.
• Press the Call key
.
Turning off the phone function
You may use other functions even when your Xda’s phone function is turned off.
To turn off the phone function:
1. Tap the signal icon
or tap
> Settings > Connections tab > Wireless Manager.
2. Tap the Phone icon. The icon turns grey when turned off.
50
Adjusting the volume
To adjust the volume:
1. Tap
from the status bar.
2. From the volume menu, you can:
• Move the slider to adjust the volume.
• Tap On, Vibrate, or Off to change the mode and ringer volume settings.
NOTE:
You can also press the volume
button at the left side of the
Xda to adjust the volume.
Press up/down to increase/
decrease volume.
51
2.2 Making a call
You can make a phone call using the phone pad. You can also make calls directly from the
Contacts, Call History, Speed Dial, or Voice Commander.
Making a voice call
Calling using the Xda pad
To make calls using the Xda pad:
1. Tap
> Programs > Phone or press
to launch the phone pad.
2. Tap the number or choose a contact or a recently dialled number from the list above the
phone pad.
If you tapped the wrong number, tap
3. Press
to make the call.
4. When finished, press
52
to end the call.
to erase number to the left.
Xda pad features
Back arrow
Contacts
Tap to show/hide the keypad
Tap to launch Menu
Displays the current call status
Tap to mute/unmute a call
Tap to launch the Contacts list
Tap to turn the speaker on/off
Tap to take notes
Tap to switch between keypad and call
status screen
Tap to put a call on hold
Tap to launch Call History
Tap to launch Menu
53
Calling from Contacts
To make a call from Contacts:
1. Tap Start > Contacts or from the Today screen, tap Contacts.
2. You can do any of the following to make a call:
• Tap name of contact, then tap Call.
• Tap name of contact, then press
• You can also tap and hold the contact, and from the shortcut menu tap Call Work, Call
Home, or Call Mobile.
• T ap Enter a name... then enter the name or number you want to call from Contacts.
to dial the highlighted item.
Press
.
Calling from Call History
Your Xda enables you to check your call logs such as your missed, incoming, or outgoing calls.
To make a call from the Call History list:
1. Launch Call History. To do this, do any of the following:
> Programs > Phone, then tap Menu > Call History.
• Tap
• After making a call, tap
.
The Call History screen displays the following tabs:
54
•
(default): Displays all calls made, received, or missed.
•
: Displays all missed calls.
•
: Displays all the calls you made.
•
: Displays all the calls you received.
2. Scroll to the desired contact or phone number, then tap Call or press
.
Tap Menu to do other tasks such as saving a caller’s contact information to your Contacts
list, or send a text message to a caller.
to end the call.
3. Press
Calling using Smart dialler
The Smart dialler feature in your Xda enables you to find a contact more quickly. Just key in the
first letters of the contact you want to call. Your Xda smartly matches it with your Contacts list
and displays the possible matches.
To use Smart dialler:
1. On the phone pad, key in the first letters of the contact name.
2. From the list displayed, tap the contact you want to call.
3. Press
.
4. To end the call, press
.
Calling using the Speed Dial
The Speed Dial function enables you to quickly and conveniently call frequently called numbers.
You may assign speed dial entries from 2-99.
To create a Speed Dial entry:
1. Ensure that the entry you want to create is already in the Contacts list.
55
2. Tap
from the Today screen.
3. Tap Menu > Speed Dial to enter the Speed Dial menu. Tap Menu > New to add a contact.
4. Edit the name and number and select a numeric key for this contact.
5. Tap
when finished.
To call a Speed Dial number:
1. Tap
> Phone. Tap and hold the numeric key assigned to the contact you want to call.
2. To end the call, press
.
To delete a Speed Dial entry:
1. Tap
> Phone > Menu > Speed Dial.
2. Tap the contact that you want to delete from the speed dial list, then tap Delete.
3. Tap Yes from the pop-up message.
Using Voice Commander
To make a phone call using Voice Commander:
1. Tap
> Programs > Voice Commander.
2. From the following screen, your Xda asks you to “Say command”.
3. Audibly say “Call” then the name to call from your Contact list.
4. Say “Yes” or “No” after the confirmation question.
56
If you said “Yes”, the application proceeds and dials the number. Otherwise, it returns to the
Voice Commander menu.
5. Say “Goodbye” or tap
NOTES:
to exit Voice Commander.
To use Voice Commander while using a headset, press the answer button*
on the headset then follow given instructions. (* Answer button may not
be available in some headset models.)
Some languages may not support the Voice Commander function.
To personalise the voice commander:
1. Tap
> Settings > Personal tab > Voice Commander Settings.
2. Set the Voice Commander according to your preference.
Refer to the Help centre on your Xda for details.
To launch the Help centre, tap
3. Tap
> Help.
when done.
Making an emergency call
Calls to emergency service number can be made under any circumstances, even if you have
locked the SIM card.
To place an emergency call:
Enter the emergency number appropriate for your location, and press
.
57
Making an international call
To place an international call:
1. Tap and hold “0“ on the keypad to enter a (+) plus sign.
2. Enter the full phone number with the country code, area code, and phone number,
.
and then press
Making a video call
IMPORTANT: Before using the video call function, apply for a 3G SIM card from your mobile service provider.
Ensure that you and the recipient of your call are both using mobile devices with video call function, 3G SIM card, and under 3G network service.
Using the phone pad
To make a video call using the phone pad:
1. Tap
> Phone or press
, then key in the number you want to call.
2. Tap Menu > Video Call, then the Xda begins to establish the connection.
3. When finished, press
58
to end the call.
Making a video call from Contacts
To make a video call from Contacts:
1. From the Today screen, tap Contacts.
2. Select a contact and tap Menu > Video Call.
3. When finished, press
to end the call.
Making a video call from Call History
To make a call from the Call History list:
1. Launch Call History. To do this, do any of the following:
> Programs > Phone > Menu > Call History.
• Tap
• After making a call, tap
.
The Call History screen displays the following tabs:
•
(default): Displays all calls made, received, or missed.
•
: Displays all missed calls.
•
: Displays all the calls you made.
•
: Displays all the calls you received.
2. Scroll to the desired contact or phone number, then tap Menu > Video Call.
3. Press
to end the call.
59
Video Call Setting
The Video Call Setting function enables you to set up the video call related features.
General settings
To set the General settings:
1. Tap
> Settings > Personal tab > Video Call Setting > General tab.
2. Select your preferred items.
Select the Accept without camera box if you do not want to show your video profile in
video call.
Select the Vibration when connected box if you want to enable the vibration alert when a
video call is established.
Select the profile you want to show in a video call. The default is video profile. You can also
set a picture as your profile.
Set the default audio path for video call.
3. Tap Done or
when finished.
Service settings
To set the Service settings:
1. Tap
> Settings > Personal tab > Video Call Setting > Service tab.
2. Select the service item that you want to set. Then tap Retrieving Settings button.
60
NOTE:
The service options vary with different service providers.
3. Set the preferences that you want for your selected service option.
4. Tap
when finished.
2.3 Receiving a call
When you receive a call, a message prompts and allows you to answer or reject the incoming call.
To answer or reject an incoming call:
• To answer a call, tap Answer or press
• To reject an incoming call, tap Ignore or press
NOTE:
Press and hold
.
.
to switch receiver to speakerphone mode.
To terminate a call:
• Press
.
61
2.4 Options during a call
Listed in the table below are the possible menu options for when a call is in progress. Some of
these options are available only when multiple calls are in progress or during a conference call.
62
IN-CALL MENU OPTION
DESCRIPTION
Hold
Places the active call on hold. You can also press
active call to put it on hold.
Unhold
Activates the call that is on hold. You can also press
the call that is on hold.
Mute
Switches off the microphone for the active call (you can hear the
caller but the caller cannot hear you).
Unmute
Turns the microphone for the active call back on.
Speakerphone On/Off
Activates/deactivates the speakerphone.
Turn Hands-free On/Off
Turns on the hands-free function. You can also press and hold
to turn on/off the hands-free function.
Conference
Joins together all existing calls if you have subscribed to this service.
Paste
Pastes the phone number you copied from your messages, notes, or
contacts to the phone pad instead of keying in the number manually.
View Contacts
Opens the Contacts list.
Save to Contacts
Saves the caller to the Contacts list.
Create Note
Allows you to create a note during an active call.
Call History
Opens the Call History list.
Speed Dial
Opens the Speed Dial list.
Options
Opens the Phone settings.
during an
to activate
Managing multiple calls
To answer another call:
1. Tap Hold to place the first call on hold and answer the second call.
2. To end the second call and return to the first call, press
.
To hold a call to make a second call:
Tap Hold to place the first call on hold and call a second number. Press
call and go back to the first call.
to end the second
To switch between calls:
To switch between two calls, tap Swap.
To set up a multiple call:
With multiple calls in progress, tap Menu > Conference.
NOTE:
The service options vary with different service providers.
63
Chapter 3
Xda Zest Synchronisation
3.1 Synchronising your Xda Zest
3.2 Microsoft® ActiveSync
3.1 Synchronising your Xda
Your Xda enables you to synchronise data in your Xda with the data on your computer. You can
synchronise contents and transfer data between your Xda and your computer using Microsoft®
ActiveSync on Windows XP™ platform, or Microsoft® Windows Mobile Device Center on
Windows Vista™ platform.
NOTE:
For synchronising on Windows Vista™ platform, refer to the Microsoft®
Windows Mobile Device Center’s website at http://www.microsoft.com/
windowsmobile/devicecenter.mspx
3.2 Microsoft® ActiveSync
ActiveSync allows you to synchronise data in your Xda with data in your computer. ActiveSync
can also synchronise over a wireless or mobile network with Microsoft Exchange Server, provided
that your mobile phone service or company is running Microsoft Exchange Server with Exchange
ActiveSync. When synchronised directly with Exchange Server, you can stay up to date even when
your computer is turned off.
During synchronisation, ActiveSync compares the data in your Xda with the data in your
computer or Exchange Server, and updates all data with recent changes.
You can select and synchronise data in the following locations using ActiveSync:
• Contacts
• Calendar
• Email
• Tasks
65
• Notes
• Favourites
• Files
• Media
You can also exchange data between your computer and Xda without synchronising.
ActiveSync is already installed in your Xda, but before you can synchronise data with your
computer, you must first install ActiveSync in your computer. You can download the latest
ActiveSync program from www.microsoft.com.
After you have installed ActiveSync, set up a sync relationship between your Xda and your
computer. ActiveSync recognises your Xda and automatically transfers the synchronisation
settings you have in your Xda.
If you wish to synchronise your Xda with Exchange Server through your company or service
provider, obtain the name of the Exchange Server, user name, password, and domain name from
your network administrator before starting the Sync Setup Wizard.
To install and configure ActiveSync in your computer:
1. Insert the Getting Started CD that came with your Xda package.
2. Follow the screen instructions.
3. After the set-up is complete, the Sync Setup Wizard automatically starts when you connect
your Xda to your computer. Follow screen instructions to complete the wizard.
4. From the Sync Set-up Wizard, you can:
66
• Configure an Exchange Server connection to synchronise directly with an Exchange Server. Acquire from your network administrator the required parameters for input.
• Create a synchronisation relationship between your computer and your Xda.
5. Select the information type that you want to synchronise.
6. After you finish the wizard, ActiveSync/Microsoft® automatically synchronises your Xda. You
can disconnect the Xda after the synchronization is complete.
NOTES:
When connected, your Xda is automatically synchronised with your
computer. ActiveSync synchronises every time you make a change on either
the Xda or computer.
You cannot use WLAN to synchronise database.
Refer to your Windows® Mobile Help, for more information about
ActiveSync synchronisation.
Wireless connection may require separately purchased equipment
(e.g. Wireless router or Access Point).
Synchronising via mini-USB
You can connect to your Xda using the bundled mini-USB cable to synchronise to your computer.
To synchronise your Xda via mini-USB:
1. After installing ActiveSync to your computer, connect the mini-USB plug to the mini-USB
connector at the bottom of the Xda.
2. Connect the other end of the USB cable to your computer. Upon connection, ActiveSync
automatically synchronises your Xda.
67
Synchronising via Bluetooth®
NOTE:
Ensure that Bluetooth is turned on both on your Xda and your computer.
To synchronise your Xda via Bluetooth:
1. Configure the settings of ActiveSync and Bluetooth on your computer.
NOTE:
Refer to the Microsoft® ActiveSync Help on your computer for details.
2. Connect your Xda with your computer using Bluetooth.
NOTE:
Refer to the section Using Bluetooth® in this Full User Manual for more
details.
3. From the list of connected devices, tap the name of the computer you want to synchronise with.
4. Select ActiveSync, then tap Save.
5. Tap
to exit the Bluetooth settings.
> Programs > ActiveSync > Menu > Connect via Bluetooth. The
6. From your Xda, tap
Xda starts to connect to your computer.
7. When connected, tap Sync to synchronise data.
NOTE:
68
Media files, such as music and video files, can be synchronised only via a
USB cable.
Synchronising with an Exchange Server
To synchronise your Xda with Exchange Server:
1. From the ActiveSync screen, tap Menu > Add Server Source...
2. Key in your email address, then tap Next. If you prefer the Xda to detect the Exchange Server
Settings automatically, select the check box.
3. In the Server Address field, key in the name of the server running Exchange Server then tap
Next. If necessary, tap the check box This server requires an encrypted (SSL) connection.
4. Enter user name, password, and domain then tap Next.
5. Tap the check boxes to select the data items that you want to synchronise with Exchange
Server. To change the available synchronisation settings, select a data item then tap Settings.
Tap Finish when done.
6. Start the sync process.
Setting the synchronisation
schedule
Volume
Recommended set-up
To set the synchronisation with Exchange
Server:
High
Select a shorter interval in
the Peak times list.
1. From the ActiveSync screen, tap Menu >
Schedule.
Low
Select As items arrive
option or a longer interval
in the Off-peak times list.
2. Set the schedule according to your
preference. Refer to the table for
input details.
While roaming
Check Use above
settings when roaming.
Sending messages
Check Send/receive
when I click Send.
69
Chapter 4
Managing your Xda Zest
4.1 Customising your Xda Zest
4.2 Managing and backing up files
4.1 Customising your Xda Zest
Customising the Start menu
You can choose up to seven programs to appear in the Start menu.
To customise the Start menu:
1. Tap
> Settings > Menus.
2. Select up to seven programs that you want to be on the Start menu.
3. Tap
.
Customising the Today screen
To change the theme of your Xda:
1. Tap
> Settings > Personal tab > Today.
2. From Appearance tab, select a theme for your Xda.
3. Tap
when finished.
To customise the items displayed on the Today screen:
1. Tap
> Settings > Personal tab > Today.
2. From Items tab, check the items you want to show on the Today screen.
4. Tap
when finished.
71
To change the background image:
1. Tap
> Settings > Personal tab > Today.
2. From Appearance tab, select the box of Use this picture as the background and tap
Browse. Then tap an image to use as the background image.
3. Tap
when finished.
Customising the Now Screen
To customise the Now Screen:
1. Launch the O2 Menu. To do this, do any of the following:
• From the Today screen, tap O2 Menu.
• Tap
> Programs > O2 Menu.
2. From the O2 Menu main screen, tap Settings > O2 Menu.
3. From the Now Screen tab, make the necessary settings:
• Select Show the Now Screen when the Xda wakes up to display the Now Screen each time your Xda wakes up from standby mode.
• From the drop-down list, select either Professional or Classic as the layout of the Now Screen. Tap Configure. to change the selected layout settings.
4. Tap
72
when finished.
Customising the Today Plug-In
To customise the Today Plug-In:
1. Launch the O2 Menu. To do this, do any of the following:
• From the Today screen, tap O2 Menu.
• Tap
> Programs > O2 Menu.
2. From the O2 Menu main screen, tap Settings > O2 Menu.
3. From the Today tab, make the necessary settings:
• Select Auto-hide the tab content to hide the selected tab’s content in the Today’s
Plug-In on the Today screen.
• Select Backlight indicator in the Home Tab to show the backlight indicator in the Home tab for quick access.
• From the drop-down lists, assign your Today’s screen left or right soft keys to launch any of the functions or features, or to lock your Xda.
4. Tap
when finished.
To customise the items on the Today Plug-In:
1. Launch the O2 Menu. To do this, do any of the following:
• From the Today screen, tap O2 Menu.
• Tap
> Programs > O2 Menu.
2. From the O2 Menu main screen, tap Settings > O2 Menu.
73
3. From the Tabs tab, set up the necessary settings. You can move up, move down, add and
replace the item.
4. Tap
when finished.
Customising the gestures
To customise the gestures:
1. Launch the O2 Menu. To do this, do any of the following:
• From the Today screen, tap O2 Menu.
• Tap
> Programs > O2 Menu.
2. From the O2 Menu main screen, tap Settings > O2 Menu.
3. From the Animation tab, make the necessary settings:
• Select Enable taskbar smart gestures to allow you to launch one of the main window panels (Now Screen, O2 Menu, and Speed Dial) from any application you are in.
• Select Animate transitions to allow animated transitions for the main window panels.
•
Under the Animation effect on gesture, select the animated transition effect from the drop-down lists. From the Main Window drop-down list, select the transition effect when shifting between the main window panels. From the More/Back drop-down list, select the transition effect when you want to move back and forth between the subpanels of the main window.
4. Tap
74
when finished.
Customising the O2 Menu
To customise the O2 Menu:
1. Launch the O2 Menu. To do this, do any of the following:
• From the Today screen, tap O2 Menu.
• Tap
> Programs > O2 Menu.
2. From the O2 Menu main screen, tap Settings > O2 Menu.
3. From the Advance tab, tap Menu. The list of default items on the O2 Menu is displayed.
Make the necessary changes.
4. Tap
when finished.
Entering your contact information
The Owner Information feature allows you to enter and display your personal contact
information, such as your name, alternative contact numbers, and email address, on your Xda.
NOTE:
We recommend that you enter your contact information so you can easily
be contacted in case of loss.
To enter owner information:
1. Tap
> Settings > Personal tab > Owner Information.
2. Key in your details and tap
.
75
Setting Sounds and Notifications
This function enables you to customise the sounds for ring tones, notifications, reminders, alert,
warnings, email, text message, and key tones. The Xda comes with some polyphonic ring tones
from which you can choose.
To change the sound:
1. Tap
> Settings > Personal tab > Sounds and Notifications.
2. From the Sounds tab, select the items you want to enable sounds for.
3. When done, tap
.
To change the notifications:
1. Tap
> Settings > Personal tab > Sounds and Notifications.
2. From the Notifications tab, select an event from the drop-down list and change the
settings.
3. When done, tap
.
Setting the date, time, and alarm
To set the date and time:
1. Tap
> Settings > System tab > Clock and Alarms.
2. On the Time tab, enter the Time zone, Date, and Time settings.
3. Tap .
76
To set the alarm:
> Settings > System tab > Clock and Alarms.
1. Tap
2. On the Alarm tab, enter the necessary alarm settings.
3. Tap
.
Setting the ring tone
With your Xda you can add and configure your favourite music as your ring tone. You can easily
configure your favourite song or sound as your ring tone with the following compatible audio
formats: aac, amr, .mp3, .wav, .wma, and .mid.
Adding the ring tone to selection
To add ring tone to the selection category under phone setting:
1. Tap
> Settings > Personal tab > Ring tones.
2. Select a specific file extension from the list box.
3. Tap to check a ring tone file that you want to add.
Tap
4. Tap
to play ring tone sound and tap
to stop.
when finished.
77
Changing the ring tone
To change the ring tone:
1. Tap
> Settings > Personal tab > Phone.
2. On the Phone tab, select a ring tone from the Ring tone list box. The songs or sounds
that you added as ring tone appears on this list along with the default ring tones that
came with the Xda.
Tap
3. Tap
to play ring tone sound and tap
to stop.
when finished.
Wake-up settings
You can set the wake-up actions whenever your Xda is in sleep mode.
To set the wake-up action:
1. Tap
> Settings > Personal tab > Wake-up Source.
2. Select from the available wake-up actions.
Tap Select All to select all actions or tap Select None to deselect all available actions.
3. Tap
78
when finished.
4.2 Managing and backing up files
To manage your files, you can use the File Explorer or a storage card (microSD card) on your Xda
or the ActiveSync on your PC.
You can back up files to your PC using ActiveSync or copy files to a storage card on your Xda. You
can also efficiently manage your files and folders using the File Explorer program on your Xda.
Changes you make to the information on your Xda will not affect the information on the PC. If you
want to automatically update information on both your Xda and PC, synchronise the information
instead. For more information about copying and synchronising files, see the ActiveSync Help
guide on your PC.
To copy a file using ActiveSync
Copying a file results in separate file versions in your Xda and your PC. Because the files are not
synchronised, changes made to one file will not affect the other.
1. Connect your Xda to your PC.
2. In ActiveSync, click Explore.
3. Select the file you want to copy on your Xda or PC.
4. Do one of the following:
• From your PC, right-click the file, and click Copy. Right-click the desired folder on your Xda,
and click Paste.
NOTE
To copy files to a storage card, insert a micro SD card (see Installing and
removing a microSD card). You can play MP3 and other media files directly
from a micro SD card inserted into your Xda.
• From your Xda, right-click the file and click Copy. Right-click the desired folder on your PC,
and click Paste.
79
Using File Explorer
File Explorer allows you to manage the files and folders on your Xda just like you do on your PC.
To start File Explorer
• Tap
> Program > File Explorer.
Once in the File Explorer application, you can do the following:
80
2.1 Using th
2.2 Making a
2.3 Receiving
2.4 Options
TO
DO THIS
Create a new folder
Tap Menu > New Folder. Enter a name for the new folder.
Rename a file or folder
Select the file or folder that you want to rename, and tap Menu >
Rename.
Delete a file or folder
Select the file or folder that you want to delete, and tap Menu >
Delete.
Beam a file
Select the file that you want to send. Tap Menu > Beam File... Select
the device you want to send to and tap Tap to send.
Send a file by email
Select the file to send, tap Menu > Send... > Outlook Email. The
Outlook Email screen will launch with the selected file already attached.
Sort files and folders
Tap Menu > Sort By, and select a sort option.
Move a file or folder from one
location to another
Select the file or folder that you want to move. Tap Menu > Edit >
Cut. Navigate to the new location and tap Menu > Edit > Paste.
Duplicate a file or folder
Select the file or folder that you want to duplicate. Tap Menu > Edit >
Copy. Navigate to the new location and tap Menu > Edit > Paste.
he Xda Zest
Chapter 5
a call
Getting connected
g a call
during a call
5.1 Using the Wireless Manager
5.2 Using Bluetooth®
5.3 Using Wi-Fi
5.4 Setting the GPRS connection
5.5 Setting the network
5.6 GSM/3G networks
5.7 Using the Opera Mobile
5.8 Using the Internet Explorer Mobile
5.1 Using the Wireless Manager
The Wireless Manager allows you to enable/disable the flight
mode function; enable/disable Wi-Fi, Wireless, Bluetooth and
phone connections; use your Xda as an external modem; and
disable/enable Direct Push.
Enabling/disabling flight mode
Your Xda allows you to enable flight mode before taking an onboard
flight. The flight mode feature enables you to turn off the wireless
connections and transmitting function of your Xda but allows you to
use its basic functions, such as listen to music and play games, while
onboard. You cannot send SMS or make calls while flight mode is
enabled.
To enable/disable flight mode:
1. Tap
> Settings > Connections tab > Wireless Manager.
2. Tap the Flight Mode icon. When enabled, the icon turns blue.
To disable the flight mode function, tap the Flight Mode icon. The icon turns gray when disabled.
Enabling/disabling the wireless connections
You can turn on/off the wireless connections on your Xda such as Wi-Fi, Bluetooth, and GPRS
connections from the Wireless Manager application.
To enable/disable the wireless connections:
1. Tap
82
> Settings > Connections tab > Wireless Manager.
2. Tap the Wi-Fi, Bluetooth, or GPRS icons to turn on any of these wireless connections.
The selected icon turns blue when enabled.
To disable a wireless connection, tap the icon of the wireless connection that you want to
turn off. The icon turns gray when disabled.
Using your Xda as an external modem
With Internet Sharing, you can use your Xda to connect your PC to the Internet. To connect your
Xda to your PC, you can use a USB Bluetooth dongle.
NOTE:
Ensure that you have Internet connection via Wi-Fi or GPRS connection. Refer
to the Wi-Fi or GRPS sections in this Full User Manual for more details.
Using a USB cable to connect your Xda to your PC
NOTE:
Ensure that you have installed Microsoft® ActiveSync 4.5 or later on your PC.
To use a USB cable to connect your Xda to your PC:
1. Ensure that the ActiveSync USB connection on your PC is disabled. To disable:
• Open ActiveSync on your PC, and click File > Connection Settings.
• Clear the Allow USB connections checkbox.
2. Tap
> Settings > Connections tab > Wireless Manager > Internet Sharing.
3. Select USB from the PC Connection drop-down list.
83
4. From the Network Connection list, select the network that your Xda will use to connect to
the Internet.
5. Tap Connect. Allow a few seconds for your Xda to establish the Internet connection.
Using Direct Push
Direct Push is a technology that allows you to continuously retrieve email messages even without
synchronising your Xda with your PC.
To use Direct Push:
1. Tap
> Settings > Connections tab > Wireless Manager.
2. Tap the Direct Push icon to enable the Direct Push function. When enabled, the icon turns blue.
84
To disable Direct Push, tap the Direct Push icon. The icon turns grey when disabled.
5.2 Using Bluetooth®
Bluetooth® is a short-range wireless communication technology that allows devices with
Bluetooth capabilities to exchange data within a radius of about 10 meters (30 feet) without
requiring a physical connection. With Bluetooth enabled in your Xda, you can:
• Connect and communicate, such as beam files, tasks, or contacts, with other Bluetooth-
enabled devices.
• Use Bluetooth service. After you connect to another device or computer using Bluetooth, you can use the services available on that device.
Activating Bluetooth in your Xda
Use the Wireless Manager to enable or disable Bluetooth in your Xda.
To activate Bluetooth in your Xda:
1. Launch the Wireless Manager. To do this, you can either:
• Tap
> Settings > Connections tab > Wireless Manager.
• Tap
> Wireless Manager.
2. Tap the Bluetooth icon to turn on/off the Bluetooth connection. The icon turns blue when
enabled, and grey when disabled.
TIP:
When not in use, deactivate Bluetooth in your Xda to conserve
battery power.
85
Adding Bluetooth devices
To add Bluetooth devices:
1. Ensure that Bluetooth is enabled on the device you want to add and the device is set
as visible.
2. Tap
> Settings > Connections tab > Bluetooth.
3. Tap Add new device... to search for available Bluetooth devices. The search may take
a while.
4. Select the device you want to connect to, then tap Next or press the Right Soft key.
5. Enter the alphanumeric passcode of the device you want to connect then tap Next or press
the Right Soft key. You can find the passcode in the documentation that came with the
target device.
6. Enter the display name for this connection.
7. Repeat steps 3 – 6 to connect to more devices.
86
5.3 Using Wi-Fi
NOTE:
Bluetooth and Wi-Fi share the same frequency band depending on
the environment and wireless equipment being connected. Hence,
performance may vary if both the device’s Bluetooth and Wi-Fi features are
used simultaneously.
Turning on Wi-Fi
To turn on Wi-Fi:
1. Tap
> Settings > Connections tab > Wi-Fi Manager > Menu > Turn On Wi-Fi.
The Xda then automatically scans for all available wireless networks within the Wi-Fi range.
2. From the list of detected wireless networks, select a wireless network that you want to
connect the Xda to, then tap OK.
3. Select whether the wireless network connects to The Internet or Work network, then tap
Connect.
4. Enter a password and tap Connect. If no password needed, just tap Connect. The Xda then
connects to the selected network.
87
Configuring wireless networks
To configure a wireless network:
1. To launch the Wi-Fi settings page, you can either:
• Tap
> Settings > Connections tab > Wi-Fi.
• Tap
from the status bar and then tap Settings > Wi-Fi.
2. On the Configure Wireless Networks screen, tap an available wireless network, then make
the necessary changes.
If the wireless network you want to connect to is not on the list, tap Add New.
Refer to the succeeding sections for details on how to add new wireless networks.
Tap the Network Adapters tab and select an adapter. Tap an adapter to set if necessary.
3. Tap
when done.
Adding a wireless network
If the Xda fails to automatically detect the wireless network you want to connect to, you can
manually add a network. Ask for the wireless network settings from your network administrator.
To add a wireless network:
1. To launch the Wi-Fi settings page, you can either:
• Tap
> Settings > Connections tab > Wi-Fi.
• Tap
from the status bar and then tap Settings > Wi-Fi.
Then tap Add New... from the Wireless tab.
2. Enter a name for the network and select an item from the Connects to: drop-down menu.
Then tap Next.
88
3. Set authentication, data encryption, and network key. Ask your network administrator for
this information. Then tap Next.
NOTE:
Obtain the authentication, data encryption, and network key from your
network administrator.
4. If you need to change the EAP type, check the check box and then change the EAP type.
5. Tap Finish when done.
Using Wi-Fi Manager
The Wi-Fi Manager shows connection status and information on a wireless network, and allows
you to manually scan your area for available wireless networks.
To open the Wi-Fi Manager:
• Tap
> Settings > Connections tab > Wi-Fi Manager.
There are four tabs in the Wi-Fi Manager:
• Wi-Fi status
This page shows the current connection status and link information.
• Setting
This page allows you to define settings for establishing a device-to-device wireless connection
as well as power saving settings. We recommend you set the Power Save to Enable.
89
• IP Info
This page shows the network information and provides a way to get the new IP address
from the DHCP server.
The Renew button enables you to request the DHCP server for a new IP address.
This function would take several seconds to get the new IP address.
The Ping button serves as the network’s diagnostic tool. It enables you to detect if your Xda
is connected to the network.
• Site Survey
90
This page shows the available wireless network. Tap Re-Scan to search for available
wireless networks.
Each wireless network is preceded by an icon for easy identification. The network channel,
RSSI, and SSID are also displayed in columns.
5.4 Setting the GPRS connection
Your Xda allows you to connect via General Packet Radio Service (GPRS). GPRS is a wireless
communication standard. It supports a wide range of bandwidth that allows sending and
receiving small bursts of data, such as email and web browsing.
To set a GPRS connection in your Xda:
1. Tap
> Settings > Connections tab > Connections.
2. From the Connections screen, tap Add a new modem connection.
3. Enter a unique name for the connection then select Cellular Line from the modem list.
4. Enter the Access point name. Consult your network service provider for the access point.
5. Enter your user name, password, and domain then tap Finish. Contact your network
administrator for assistance.
NOTES:
The network connection may vary with different locations and mobile
service providers. Consult your mobile service provider for the applicable
network connection in your area.
The charge for GPRS services and the GPRS connection settings might vary
with different operators. Consult your service provider for suitable solution.
The GPRS and USB connections cannot be used at the same time.
91
Connecting GPRS
To connect GPRS:
1. Tap
> Settings > Connections tab > Connections.
2. From the Connections screen, tap Manage existing connections.
3. Tap and hold on an existing connection then from the pop-up menu tap Connect.
Tap Delete if you want to delete the selected connection.
4. When connected, tap
to exit.
If you have set a default GPRS connection, it automatically connects when you launch an
application that connects to the Internet.
1. Launch any application that connects to the Internet such as Internet Explorer. The Xda will
automatically connect to your default GPRS connection. A pop-up callout appears to display
the connection status.
2. When connected, you can start browsing the Internet. If you are using Internet Explorer, the
default site will be displayed.
92
Disconnecting GPRS
To disconnect GPRS:
1. Tap
> Settings > Connections tab > Wireless Manager.
2. Tap the GPRS icon. The icon turns grey when disabled.
NOTES: You can only disconnect but you cannot enable the GPRS connection in the
Wireless Manager application.
If your ActiveSync is set to sync with Exchange Server automatically,
synchronisation will occur after you connect again.
GPRS will automatically reconnect every time you launch an application
that requires GPRS connection (such as Internet Explorer or Windows
Live Messenger).
93
5.5 Setting the network
Your Xda enables you to configure your Xda’s network connection as well as set multiple
networks in the order that you want to access them.
Configuring the network
To configure the network settings:
1. Tap
> Programs > O2 Connection Settings.
2. Select the Country and Profile from the drop-down lists.
3. When done, tap
94
.
5.6 GSM/3G Networks
GSM/3G Networks allows you to conveniently switch network type. Network options include
Automatic, 3G, and GSM. The default setting is Automatic, which allows the Xda to search for
the proper service automatically.
To choose network type:
1. Tap
> Settings > Connections tab > GSM/3G Networks.
2. Select a proper network type, then tap
.
If you prefer to use the service your SIM card automatically detected, select Automatic.
3. When prompted, tap
NOTES:
to restart your Xda and apply changes.
Network type varies with different service providers.
Ensure that you choose the right network type for your SIM card.
95
5.7 Using the Opera Mobile
Opera Mobile enables you to browse the Internet on your Xda. It allows you to import your
favourite links from Internet Explorer; send links as email/SMS/MMS messages; and download
images and copy texts from web pages.
To launch the Opera Mobile, tap
NOTE:
96
> Programs > Opera Browser.
Before using this application, ensure that you have Internet connection
via GPRS or Wi-Fi connection. Refer to the GPRS or Wi-Fi section of this
Full User Manual for more details.
TO
DO THIS
Set a web page as the homepage
Tap Menu > Tools > Settings > General tab. Key in the URL address
of the website that you want to set as the homepage.
Go to the homepage
Tap Action > Go to Homepage.
Go to a web page
Tap Action > Go to to enter or change the page address. Key in the
address, then tap ok to open the page. You can also use this screen to
access the Bookmarks and History folders.
Go back to the last web page
viewed
Tap Action > Back.
Go to next web page viewed
Tap Action > Forward.
Stop the web page from loading
Tap Action > Stop.
Refresh the current web page
Tap Action > Reload.
Go to the top of the current
web page
Tap Action > Go to Top.
TO
DO THIS
Save a web page
Tap Action > Save This Page.
Manage saved web pages
Tap Menu > Tools > Settings > Manage Saved Pages. Tap Menu
to add or delete saved web pages.
Bookmark a favourite web page
Tap Action > Bookmark This Page.
Manage bookmarks
Tap Menu > Tools > Manage Bookmarks. Tap Menu to add, edit or
delete a bookmark. You can also create a folder and import Favourites
from the Internet Explorer®.
Clear history, cookies, and cache
Tap Menu > Tools > Settings > History tab. Tap Clear History,
Clear Cookies, or Clear Cache. A confirmation message appears.
Tap Yes to confirm.
Open a new window
Tap Menu > Windows > New Window.
Toggle between windows
Tap Menu > Windows > Next Window.
Close a window
Tap Menu > Windows > Close Window.
Change the size of text on Web
pages
Tap Menu > Display > Zoom and select the size you want.
Show or hide pictures on Web
pages
Tap Menu > Display > Load Images to select (show) or deselect
(hide) this function.
View a page in full screen mode
Tap Menu > Display > Full Screen.
Exit full screen mode
Tap and hold the screen. The menu appears. Deselect Full Screen.
Change Web page display
options
Tap Menu > Display. Select one of the display options.
Show downloads
Tap Menu > Tools > Show Downloads. The list of downloads
appears. Tap Menu to open or delete downloaded files.
Send a web link via email/SMS/
MMS messaging
Tap Menu > Tools > Send Current Web Address As. Select if you
want to send the link through email/SMS/MMS messaging.
97
5.8 Using the Internet Explorer Mobile
Use the Internet Explorer® Mobile to browse the Internet on your Xda. With the Internet
Explorer® Mobile, you can add a website to your favorites list; send a web link via SMS/MMS/
email messaging; and do other tasks that you normally do while browsing the Internet on
a desktop PC.
To launch the Internet Explorer® Mobile, tap
NOTE:
98
> Internet Explorer.
Before using this application, ensure that you have Internet connection
via GPRS or Wi-Fi connection. Refer to the GPRS or Wi-Fi section of this
Full User Manual for more details.
TO
DO THIS
Set a web page as the homepage
Tap Menu > Tools > Options > General tab. Key in the URL address
of the website that you want to set as the homepage.
Go to the homepage
Tap Menu > Home.
Go to a web page
Tap the URL bar. Key in the web address of website that you want
to browse.
Set up the security settings such
as allowing or clearing cookies,
receiving alerts when a page is
blocked or not secure
Tap Menu > Tools > Options > Security tab. Make the necessary
security settings.
Add or delete favourites
Tap Favourites. From the Favourites screen, select Add/Delete tab
to add, delete favourites.
Create a new folder in Favourites
Tap Favorites > Add/Delete tab > New Folder.
Adding a web page to the
Favourites list
From the current web page, tap Menu > Add to Favorites.
TO
DO THIS
Viewing a web page from your
History list
Tap Menu > Tools > History, and select a web page.
Clear history, or temporary files
Tap Menu > Tools > Options... > Memory tab.
Send a web link via email/SMS/
MMS messaging
Select the web page that you want send. Tap Menu > Tools > Send
Link. Select if you want to send the link through email/SMS/MMS
messaging.
Change web page display
options
Tap Menu > View. Select one of the display options.
Change the text size on web
pages
Tap Menu > View > Zoom Level. Select the size that you want.
View a page in full screen mode
Tap Menu > View > Full Screen.
Exit full screen mode
Tap and hold the screen. The menu appears. Deselect Full Screen.
99
Chapter 6
Messaging
6.1 Entering text and numbers
6.2 Email messaging
6.3 Threaded SMS
6.4 MMS messaging
6.5 Windows® Live
6.1 Entering text and numbers
Using the Input Panel
When you start an application or select a field that requires text, symbols, or numbers, the Input
Panel icon appears on the menu bar. The Input Panel allows you to select various input methods
including: Block Recogniser, Keyboard, Letter Recogniser, Transcriber, and XT9.
Using the Block Recogniser
The Block Recogniser allows you to use a single stroke to write letters, numbers, symbols,
or punctuations, which are converted into typed text.
To use the Block Recogniser:
1. In an application that accepts user input, tap the Input Panel arrow, then tap
Block Recogniser.
2. Write letters, numbers, symbols, or punctuations in the designated writing area.
• Write letters on the abc (left) area of the box.
• Write numbers on the 123 (right) area of the box.
• Tap the space
• Tap the special symbols button to input
symbols, punctuations and other special characters.
• Tap Help
button to input a space.
button for help on how to write characters.
101
Using the on-screen keyboard
With the on-screen keyboard, you can enter texts, symbols, numbers, or other special characters.
To input text using the on-screen keyboard:
1. In an application that accepts user input, tap the Input Panel arrow, then tap Keyboard.
2. Tap the keys on the on-screen keyboard to enter.
To enlarge the on-screen keyboard:
1. Tap the Input Panel arrow, then tap Options.
2. Select Keyboard from the Input Method list.
3. Tap Large Keys.
102
Using the Letter Recogniser
With the Letter Recogniser you can write individual letters, numbers, or special characters, which
are converted into typed text.
To use the Letter Recogniser:
1. In an application that accepts user input, tap the Input Panel arrow, then tap
Letter Recogniser.
2. Write letters, numbers, symbols, or punctuations in the designated writing area.
• Write capital letters on the ABC (left) area of the box.
• Write lower case letters on the abc (middle) area of the box.
• Write numbers on the 123 (right) area of the box.
• Tap the space
• T ap the special symbols
special characters.
• Tap Help
button to input a space.
button to input symbols, punctuations and other
button for help on how to write characters.
103
Using the Transcriber
Transcriber is a handwriting recognition program that allows you to write in cursive, print, or
mixed styles. It recognises not only written text but also numbers and symbols. Make sure to
write legibly. See Help for more information on the Transcriber.
To use the Transcriber:
1. Start an application that accepts user input, such as Notes or Word Mobile.
2. Tap the Input Panel arrow, then tap Transcriber.
3. The Transcriber Intro screen appears. Tap
more instructions.
to close the introduction, or tap Help to find
To write using Transcriber:
1. Tap screen to position the cursor where you want the text to appear.
2. Use the stylus to write on the screen. The handwriting will be converted to text after you lift
the stylus from the screen.
To edit text:
1. Tap the text you want to edit to position the cursor.
2. You can now rewrite the text or use the Transcriber gestures to edit your selected text.
See Help
for more details about the Transcriber gestures.
104
Using the XT9 input mode
The XT9 input mode enhances your text input as it provides you with possible word matches as
you key in your text in a text entry, such as SMS messaging.
To use the XT9 input mode:
1. In an application that accepts user input, tap the Input Panel arrow, then tap XT9.
2. From the XT9 screen, tap the letters, symbols, or numbers that you want to key in.
105
6.2 Email messaging
Setting up an email account
Before you can send and receive email messages, you need to set up an email account that you have
with an Internet Service Provider (ISP) or an account that you access using a VPN server connection
(typically a work account). You can send email messages by synchronising or by connecting directly to
an email server through your Internet Service Provider or a corporate network.
NOTE:
Before you set up an email address on your Xda, you must have an Internet
or an email account.
To set up an email account:
1. Tap
> Messaging > Set-up Email.
2. Key in your Email address and Password, then tap Next.
NOTE: By default, your Xda automatically attempts to obtain your email settings from
the Internet, particularly for Internet email accounts such as Yahoo or Hotmail.
3. If you want to manually enter your email settings, clear the Try to get email settings
automatically from the Internet checkbox. Otherwise, tap Next.
NOTE: Obtain the email server information from your mobile service provider.
4. Key in Your name and Account display name, then tap Next.
106
5. From the drop-down list, select the time interval that you want to automatically send/receive
email messages. If you want to view more download settings, tap Review all download
settings, and select your preferred download settings.
6. When done, tap Finish.
Managing email accounts
TO
DO THIS
View a list of accounts
> Messaging. A list of accounts is displayed with the number
Tap
of unread messages in the Inbox of each account shown in parenthesis.
Send/receive Internet email
messages
> Messaging. Select the Internet email account for which you
Tap
want to send and receive messages and tap Menu > Send/Receive. To
stop this process, tap Menu > Stop Send/Receive.
Delete an account
Tap
Switch between accounts
With an account open, tap Menu > Go To, then tap an account you
want to switch to. You can also push the navigation key left or right to
quickly switch to another account.
Changing account options
Tap
> Messaging. Select an account and tap Menu > Options and
then select the type of option you want to change. Tap when finished.
> Messaging. Select an account and tap Menu > Delete.
107
Sending an email message
To send an email message:
1. Tap
> Messaging.
2. Tap an email account.
3. Tap Menu > New.
4. In To: field, enter email address of the person to whom you want to send the message or tap
Menu > Add Recipient to select from your Contacts list.
NOTE: If you are sending a message to more than one recipient, separate them
with a semicolon (;).
5. Key in your message in the message field.
6. When finished, tap Send.
NOTE: 108
If you are working offline, email messages are saved to the Outbox folder
and sent the next time you connect.
TO
DO THIS
Insert a picture/voice note/file into an
email message
While composing your message, tap Menu > Insert > Picture/
Voice Note/File.
Set the priority, security, permission,
and language of an email message
While composing your message, tap Menu > Message Options.
Cancel a message
While composing your message, tap Menu > Cancel Message.
Save a message
While composing your message, tap Menu > Save to Drafts.
Delete a message
With the message you want to delete selected, tap Delete.
Move a message to another folder
With the message you want to move selected, tap Menu > Move.
Tap the new folder and tap Select.
Sort messages
On any account screen, tap Menu > Tools > Sort By and select
your desired sort method.
Insert a signature
On any account screen, tap Menu > Tools > Options >
Signatures.
Change message options
On any account screen, tap Menu > Tools > Options....
Downloading email messages
To send and receive email messages:
• Synchronise email messages with Microsoft Exchange or Microsoft Outlook on your computer.
• Send and receive email messages by connecting directly to an email server through an
Internet Service Provider (ISP) or a network.
109
Synchronising email messages
You can include email messages as part of the general synchronisation process. On Windows®
XP platform, you need to enable mail synchronisation in Microsoft® ActiveSync. For more
information on enabling mail synchronisation, see the ActiveSync online help on your computer.
On Windows® Vista platform, you can synchronise your email messages via the Windows® Mobile
Device Center.
NOTES:
For synchronising on Windows® Vista platform, refer to the Windows®
Mobile Device Center’s website at http://www.microsoft.com/
windowsmobile/devicecenter.mspx
To connect directly to an email server, see Synchronising with an
Exchange Server in this Full User Manual.
110
Managing folders
Each Messaging account has a set of five folders: Deleted Items, Drafts, Inbox, Outbox,
and Sent Items. These folders store messages that you send and receive through the account.
You can move a message to a different folder within the same account.
TO
View message folder contents
Moving a message to a different folder
DO THIS
> Messaging. Select the account that you want to view.
Tap
Tap Menu > Go To > Folders and select the folder that you
want to view.
> Messaging. Select the account with the message
Tap
that you want to move. Select the message you want to move
and tap Menu > Move.... Select the folder into which to move
the message.
111
6.3 Threaded SMS
Your Xda organises your SMS messages from a single contact or number into a single
thread of conversation, making it easier for you to follow the messaging flow and send the
appropriate responses.
Sending a threaded SMS
To send a threaded SMS message:
1. Tap
> Messaging > Text Messages > Menu > New.
2. Key in your recipient’s phone number or tap To: to select a recipient from the Contacts list.
Separate multiple recipients with a semicolon (;).
3. Key in your message.
4. When finished, tap Send to send out the message.
NOTE: 112
Once your recipient replies to your message, your Xda displays the message
thread, making it easier for you to follow the mobile
conversation with your recipient.
6.4 MMS messaging
Multimedia Messaging System (MMS) allows you to send text messages with multiple slides.
Each slide may include a picture, video or audio, or text. MMS messages are sent by GPRS
(General Packet Radio Service) to email accounts or other MMS-enabled mobile devices.
NOTES:
You need to subscribe to the GPRS and MMS services with your service
provider before you can send and receive MMS messages. Ask your mobile
service operator on how to activate the MMS feature. Only mobile phones
with MMS feature can send/receive MMS messages.
Depending on the service that you subscribe to, you may not be able to send
and receive MMS messages to users using a different mobile phone network.
Accessing MMS
To access MMS, do any of the following:
• Tap
> Messaging > MMS.
• After capturing a picture or video clip, tap Menu > Send via MMS.
Editing MMS settings
1. From the MMS main screen, tap Menu > Tools > Options.
2. From the list of accounts, tap MMS.
113
3. On the MMSC Settings tab, select your Internet Service Provider from the list. Tap Edit
to access Multimedia Messaging Service Centre (MMSC) settings.
NOTE: Contact your mobile service provider for the detailed settings.
Sending an MMS message
To send an MMS message:
1. Tap
> Messaging > MMS > Menu > New.
2. In the To: field, key in the mobile phone number or email address of your recipient.
You can enter it using the phone pad or tapping Menu > Add Recipient to select from your
Contacts. If you have more than one recipient, separate them with semicolon (;).
3. In the Subject field, key in a subject for the message.
4. Tap the Insert Picture/Video field. All of your pictures and video clips will be displayed in
thumbnail view.
5. Tap a picture or video clip to insert it to the message.
6. Tap the Insert Audio field. All of your available audio clips will be displayed in thumbnail view.
7. Select the audio clip you want to attach, then tap Select.
NOTE:
You will not be able to attach an audio file to a slide with a video clip.
8. Tap the Insert Text field and key in your message.
9. Tap Send to send the message.
114
The following assumes that you are on the MMS message screen.
TO
DO THIS
Copy the message to other recipients
Using the stylus, move the scroll bar to display the Cc: field. Key
in the recipient‘s phone number or email address or tap Menu >
Add Recipient to select a recipient from your Contacts list.
Hide a recipient’s contact information
from other message recipients
Using the stylus, move the scroll bar to display the Bcc: field. Key
in the recipient‘s phone number or email address or tap Menu >
Add Recipient to select a recipient from your Contacts list.
Hide sender information
Tap Menu > Options > Send Options. Select the Hide Sender
checkbox.
Create an MMS message from a
template
Tap Menu > Template > New from Template to compose a
message using a pre-defined template.
Create an MMS message template
Create a message or open an existing message, and tap Menu >
Template > Save as Templates.
Add preset or frequently used text
strings to a message
In a text field, tap Menu > My Text. Select the text string that
you want to add.
Edit a preset message
In a text field, tap Menu > My Text > Edit My Text Messages.
Request message read notification
Tap Menu > Options > Send Options. Select the Read Report
checkbox.
Request message delivery notification
Tap Menu > Options > Send Options. Select the Delivery
Report checkbox.
115
6.5 Windows® Live
Windows® Live provides a set of services including email, messaging, and search that brings
all your online necessities together. With Windows® Live, you can conveniently do the following
on your Xda:
• Access your Hotmail, Messenger, or Microsoft Exchange account and send or receive email messages.
• Start a chat with your friends who are online.
• Search the web using the Windows® Live search engine.
To use Windows® Live, you must have a Passport account. If you have a Hotmail® or an MSN®
account, you already have a Passport. Once you have obtained either a Microsoft® Passport or
Microsoft® Exchange Server account, you are ready to set up your account.
NOTE: You need a Microsoft® Passport account to use Windows Live® application. If
you do not have a passport account, go to www.passport.com to obtain one.
Using Hotmail®
Use the Windows® Live application to access your Hotmail® mailbox and access your email
messages on your Xda.
To sign in Hotmail®:
1. Tap
> Programs > Windows Live.
2. On the Windows Live-Sign In screen, tap Sign in to Windows Live to enter Windows Live
Set-up session.
3. Tap Accept, then enter the email address and password for your Hotmail® account.
4. Select Save password and tap Next.
116
5. Tap the check boxes to show or hide Windows® Live items on the Today screen, then
tap Next.
6. Select the items you want to synchronise on your Xda, then tap Next. Wait for a few
minutes for the synchronisation process to finish.
The next time you sign in to Windows® Live, your username and password is displayed.
117
Using Windows® Live Messenger
To sign in and out of Windows® Live Messenger:
1. Set email address and password in Windows® Live.
2. When the setting is finished, tap
> Programs > Messenger.
3. On the Windows® Live Messenger main screen, tap Signing In.
4. To sign out, press Menu > Sign Out.
NOTE: If you do not sign out of the Windows® Live Messenger application, you
will remain connected. This may result in additional charges from your
service provider.
Common Windows® Live Messenger features
118
TO
DO THIS
Add a contact
Tap Menu > Add new contact, and follow the instructions on
the screen.
Delete a contact
Select the contact to delete and tap Menu > Contact options >
Remove Contact.
Send an instant message
Select the recipient you want to chat with and tap Send IM.
Key in your message and tap Send.
Add other people to a conversation
From a chat session, tap Menu > Options > Add participant,
then select a contact and tap Add.
TO
DO THIS
Switch to another chat session
In the list of ongoing chats displayed at the bottom of screen,
tap the name of a contact with whom you want to chat.
Return to the contacts list
Tap
End a chat session
From a chat session, tap Menu > End Conversation.
See all who are chatting
From a chat session, tap Menu > Options > View participants.
Block someone on your Messenger
contacts list from seeing and
contacting you
In the Messenger contacts list, select the contact’s name.
Tap Menu > Contact options > Block contact. The contact will
no longer be able to see your status or send you messages.
Unblock a contact
In the Messenger contacts list, select the contact’s name.
Tap Menu > Contact options > Unblock contact.
Change your status
Above the Messenger contacts list, tap your name, then tap a
status description to use. Or tap Menu > Change Status, then
tap a status description.
Send a voice clip
Tap Voice clip from a chat session to record then tap Send.
NOTES:
at the bottom of the screen.
If your Internet service provider (ISP) only allows one Access Point Name (APN)
connection at a time, you may meet some problems when using Windows Live
Messenger concurrently with other Internet related applications.
We recommend that you close Windows Live Messenger before activating
any applications that require an Internet connection such as Internet
Explorer, MMS, or Streaming Player.
119
Chapter 7
Organising your life
7.1 Using Contacts
7.2 Using Calendar
7.3 Using Tasks
7.4 Microsoft® Mobile Device Manager 2008
7.1 Using Contacts
Contacts contains your list of contact information such as mobile or work numbers and email
addresses. Using Bluetooth® on the Xda, you can quickly share Contacts information with other
Xda users. If you use Outlook on your computer, you can synchronise Contacts between your Xda
and computer.
Viewing Contacts
To view the Contacts list, do any of the following:
• Tap
> Contacts.
• On the Today screen, tap Contacts.
The contact list displays the names of your contacts alphabetically. Beside each name in the
contact list is an abbreviation for the default communication method, such as the person’s
work phone number (w), mobile phone number (m), or home phone number (h). Your Xda
automatically sets a contact’s mobile phone number as the contact’s default number.
If there are phone numbers stored in your SIM card, the entries display with a SIM card icon
before the name.
TO
DO THIS
Create a new contact
on the Xda
On the Today screen, tap Contacts > New > Outlook Contact. Enter the
information for the new contact and tap .
Create a new contact
on the SIM card
On the Today screen, tap Contacts > New > SIM Contact.
NOTE: You can only store one phone number for a SIM contact.
Edit a contact’s
information
On the Today screen, tap Contacts. Select the contact whose information you
want to edit and tap Menu > Edit. When finished making changes, tap .
121
122
TO
DO THIS
Call a contact from
the contact list
On the Today screen, tap Contacts. Tap the contact you want to call and use the
stylus to scroll to the number you want to call, and tap Call.
Send a text message
to a contact
On the Today screen, tap Contacts. Tap the contact to which you want to send
a text message and scroll to the number. Tap Send Contact > Text Messages.
Send an MMS
message to a contact
On the Today screen, tap Contacts. Tap the contact to which you want to send
an MMS message and scroll to the number. Tap Menu > Send MMS.
Beam a contact’s
information to
another device
On the Today screen, tap Contacts. Tap the contact to beam and scroll to the
number. Tap Menu > Send Contact > Beam. Tap the device name to send.
Find a contact by
name
On the Today screen, tap Contacts. If you are not in Name view, tap Menu >
View By > Name. Enter the first few letters of the contact’s name until the
contact is displayed.
Find a contact by
company
On the Today screen, tap Contacts. Tap Menu > View By > Company.
Tap the company to see all the contacts listed under it.
Find a contact using
filter
From the Contact list, tap Menu > Filter. Tap the category. To show all contacts
again, tap All Contacts.
Assign a ring tone to
a contact
On the Today screen, tap Contacts. Select the contact to which you want to
assign a custom ring tone and tap Menu > Edit and scroll to Ring tone. Tap
Ring tone and select a ring tone, then tap .
NOTE: You can only assign a ring tone to contacts stored in your Outlook
Contact list.
Add a picture to a
contact
On the Today screen, tap Contacts. Select the contact to which you want to add
a picture and tap Menu > Edit. Tap Select a picture... and tap an picture, or
select Camera and take a picture to use.
NOTE: You can only add a picture to contacts stored in your Outlook
Contact list.
Using the SIM Manager
SIM Manager enables you to manage your contacts stored in the SIM card, as well as to copy
contacts from your Xda to the SIM card and vice versa.
To launch the SIM Manager, tap
> Programs > SIM Manager.
TO
DO THIS
Create a new contact
on the SIM card
Tap New and then key in the contact name and phone number. Tap Done when
finished.
Select/deselect all
contacts on the SIM
card
To select all contacts on the SIM card, tap Menu > Select All. To deselect all
contacts, tap Menu > Deselect All.
Copy a contact from
the SIM card to the
Contacts list on the
Xda
Select the contact entry that you want to copy. Tap Menu > Copy to Contacts,
then tap Copy.
Copy or retrieve a
contact from the
Contacts list to the
SIM card
Tap Menu > Retrieve from Contacts. The contacts stored on your Xda is
displayed. Select the contact entry that you want to copy or retrieve from your
Xda to the SIM card, then tap Retrieve.
Deleting a contact on
the SIM card
Select the contact that you want to delete, then tap Menu > Delete. From the
confirmation screen, tap Delete.
Calling or editing a
contact
Tap and hold the contact that you want to call or edit, then tap Dial or Edit.
123
7.2 Using the Calendar
Use Calendar to schedule appointments, including meetings and other events. You can also set
the Calendar to remind you of your appointments. If you use Outlook on your computer, you can
synchronise appointments between your Xda and computer.
To open the Calendar program, tap
> Calendar.
Scheduling an appointment
To schedule an appointment:
1. Tap
> Calendar.
2. Tap Menu > New Appointment.
3. Enter information about the appointment.
To schedule an all-day event, in All Day, select Yes.
4. Tap
124
.
TO
DO THIS
Make a recurring appointment
Tap the appointment and tap Menu > Edit. Tap Occurs and select one
of the recurrence options.
Delete an appointment
Tap the appointment to delete and tap Menu > Delete.
Beam an appointment
Tap the appointment to beam and tap Menu > Beam...
Viewing an appointment
To view an appointment:
1. Tap
> Calendar.
2. Tap the appointment to view.
Viewing your schedule
To view your schedule:
1. Tap
> Calendar.
2. Tap Menu > View and then select your
desired view.
• Agenda
• Day
• Week
• Month
• Year
TO
DO THIS
View today’s
appointment
From any Calendar view, tap Menu
> Go to Today.
View your
agenda for a
specific date
From any Calendar view, tap Menu
> Go to Date. Tap the date to view.
Show week
numbers
From any Calendar view, tap Menu
> Tools > Options. Select the
Show week numbers checkbox.
Change the
display of the
work week
In any Calendar view, tap Menu
> Tools > Options. and do the
following:
• To specify the first day of the
week, in 1st day of week, select
Sunday or Monday.
• To specify the number of days you
want to appear in a week, in Week
view, select 5-day week, 6-day
week, or 7-day week.
125
7.3 Using Tasks
Use Tasks to keep track of what you have to do.
The Tasks list
The task list is your “things to do” list. When you create or edit tasks with Outlook on your
computer and then synchronise it with your Xda, additional information, such as due date,
priority, and category, may show. A task that has been marked as high priority is preceded
by an exclamation mark, and a low priority task is marked by a downward-pointing arrow.
Overdue tasks are displayed in bold red.
NOTE:
You can synchronise information on your Xda with your computer to keep
your task list up to date in both locations.
TO
Create a task
Mark a task as completed
Delete a task
126
DO THIS
> Programs > Tasks > Menu > New Task. Enter the
Tap
task name and details, then tap .
> Programs > Tasks. Select the task to mark complete,
Tap
then tap Complete.
> Programs > Tasks. Select the task to delete, then tap
Tap
Menu > Delete Task. Tap Yes to confirm.
TO
Change a completed task to
incomplete
Find a task
DO THIS
> Programs > Tasks. Select a completed task, then press
Tap
Activate to change status to incomplete.
> Programs > Tasks. Tap Menu > Sort by and select a
Tap
sort option or Menu > Filter and select a category.
127
7.4 Microsoft® Mobile Device Manager 2008
Microsoft® System Centre Mobile Device Manager 2008 provides organisations with enhanced
security and control over mobile devices within their organisations, and gives mobile employees access
to corporate resources such as confidential information on corporate networks with firewalls.
2.1 Using th
Your company’s network administrator can control the following features in your Xda: 2.2 Making a
2.3 Receiving
• Password policies
The system administrator can impose setting up a password on your Xda, and set the2.4 Options
Using Mobile Device Manager 2008
password length and complexity.
• Communications functions lockdown
The system administrator can disable Wi-Fi, SMS, MMS, Bluetooth, email messaging, and
camera functions in your Xda.
• Disable device applications
The system administrator can disable the applications in your Xda.
• File encryption
The system administrator encrypts the files, and turn on/off encryption on your Xda.
• Software distribution
The system administrator can distribute software/applications to your Xda.
NOTE:
128
To connect your Xda with your company’s resources, you need to enroll
a domain. Consult your network administrator about using this function.
he Xda Zest
Chapter 8
a call
GPS features
g a call
during a call
8.1 GPS Catcher
8.2 External GPS
8.3 CoPilot Live 7
8.1 GPS Catcher
The GPS Catcher allows you to update the Global Positioning System (GPS) data in your Xda. The
GPS data contains important information about the status of satellite, and the current date and
time for determining the satellite position.
Updating GPS data
To update GPS data:
1. Tap
> Programs > GPS Catcher.
2. Tap Update to start update.
3. Tap
when finished.
NOTES:
To make a successful update, ensure that your Xda is connected
to the Internet.
GPS data expires in three days. You need to update it again when
it expires.
You can also set GPS Catcher to update automatically, refer to the
Setting GPS Catcher section for details.
130
Setting GPS Catcher
To set GPS Catcher:
1. From the GPS Catcher screen, tap Menu > Setting.
2. Set the options according to your preference. Tap Done when finished.
8.2 External GPS
Your Xda allows you to use an external GPS device to receive GPS data.
NOTES:
Your Pocket PC support only Bluetooth-enabled external GPS devices.
Before using an external device, connect your external GPS device to your
Pocket PC via Bluetooth. Refer to Using Bluetooth® section for details.
To set an external GPS device:
1. Tap
> Settings > System tab > External GPS.
2. From the Programs tab, select a program port.
NOTE:
By default, the port is set to GPD1. We recommend that you DO NOT
change the default setting.
131
3. From the Hardware tab, specify a hardware port and baud rate for your external GPS
device to use.
NOTE:
By default, the hardware port is set to COM2, and the baud rate is set
to 57600. Refer to the Full User Manual of your external GPS device for
details.
4. From the Access tab, select the Manage GPS automatically (recommended) box.
IMPORTANT: If you clear this checkbox, some GPS related application in your Xda
may not be able to obtain GPS data.
132
8.3 CoPilot Live 7
CoPilot Live 7 is a satellite navigation software that is pre-loaded on your Xda to guide you
wherever you go – simply, safely, and reliably. You have 14 days to explore a full featured
version of CoPilot Live 7 on your Xda. To continue enjoying its features, buy the full licence at
www.copilotlive.co.uk/o2 before the end of the 14-day trial period.
NOTES:
Ensure that you set the correct location, date, and time on your Xda to
enjoy the best GPS functionality.
Before using CoPilot, ensure that you insert the supplied CoPilot map SD
card into the microSD card slot on your Xda.
The supplied CoPilot map SD card contains the UK and Ireland maps.
Using the trial version
To use the trial version:
1. Tap
> Programs > CoPilot.
2. In the online validation screen, tap Next.
NOTE:
CoPilot will connect to the Internet every time you start using it during the
14-day trial period. This requires approximately 2kb of mobile data usage
which you will be charged for.
133
3. In the Subscription Alert screen, the remaining days on your free trial version is displayed.
Tap Cancel to use the free trial version.
NOTE:
The CoPilot Live 7 trial version on your Xda expires in 14 days. After it
expires, you need to buy the full licence at www.copilotlive.co.uk/o2.
Refer to Using the licensed version for more details.
If you are using CoPilot for the first time, you need to set up the following settings:
134
• From the list of data regions, select the region which you require for navigation, then tap Next. In the confirmation screen, tap Finish to confirm your selected region.
• In the Set Language screen, set the language for the on-screen text and voice guidance, then tap Next.
• Select between miles or kilometres for the distance unit used in maps and instructions, then tap Next.
• In the Warning screen, tap Accept to accept the Safety Warning Statement for CoPilot Live.
4. After setting up the initial settings, the Welcome screen
appears. The Welcome screen includes a quick menu
which allows you to easily enter a Destination, select your
Favourites, access your Settings, or Drive to set off. To close
the quick menu tap
.
NOTE:
Tips and tricks are displayed at start-up to let you
learn more about the various features of CoPilot.
Scroll backwards or forwards to see more tips and
to close the window.
tricks, or tap
Using the licensed version
After the 14-day trial period, you need to purchase a full licence to continue using CoPilot Live.
Purchase the full licence at www.copilotlive.co.uk/o2. Once you have purchased a full licence,
a Product Key will be sent to you via email.
To use the licensed version:
1. Tap
> Programs > CoPilot.
2. In the Subscription Alert screen, tap Next.
3. Enter your Product Key, then tap Next to activate CoPilot Live. You may activate CoPilot in
any of these three ways:
135
Activating using the Internet connection on your Xda
• Tap Internet and then tap Next.
• Enter your email address when requested and tap Next.
Activating using the Internet connection on your PC
• Connect your Xda to a PC with an Internet connection using the synchronisation software and cable supplied with your device.
• Tap Internet and then tap Next.
• Enter your email address when requested and tap Next.
Activating via the CoPilot activation website
• Activate your licence on the CoPilot Live activation website at http://activate.alk.com.
4. Once your CoPilot is activated, the Activation Successful screen is displayed. Tap Next to
continue using CoPilot.
NOTES:
CoPilot Live automatically detects your Xda’s built-in GPS receiver
for navigation.
You will not be able to receive a GPS signal inside buildings, tunnels,
garages, multi-storey and basement car parks. To work effectively the
GPS receiver needs to have a clear line of sight to the sky.
136
Navigating your first trip
CoPilot Live uses GPS satellites to calculate your exact position so you do not have to enter
your starting point. Simply enter your destination and CoPilot Live will take you there, providing
detailed instructions all the way.
To navigate your first trip:
1. From the CoPilot main screen, tap Menu > Destination > Address.
2. Enter the city/town name of your destination.
3. Select the correct city or area when it appears in the list below. Scroll down to see more
options matching what you have typed.
4. Enter the first three or four letters of the street name. Select the correct one when it appears
in the list below the street name field.
5. Enter the house number and tap Finish, or just tap Finish to skip this step.
6. A screen will then appear, showing you a map of the route. Select Drive to begin navigating
your route.
Quick address entry
In the UK, you can quickly enter an address in CoPilot Live using a full postcode:
1. Tap Menu > Destination > Address.
2. Enter the postcode. Select a street name and key in a house number then tap Finish.
137
More navigation tips
There is more you can do when inputting your destination and setting off.
• To plan a trip with multiple destinations, tap Menu >
> Plan or Edit Trip.
• To set and save your Home address for quick and easy route planning, tap Menu >
Destination > Home.
• To create and manage your favourite destinations, tap Menu > Destination > Favourites.
Change the driving view
CoPilot Live has a selection of different driving views. Simply select
Menu > Driving Views and choose from one of the below:
138
• Driver Safety
• 3D
• 2D Where Am I
• 2D Next Turn
• 2D Destination
• Itinerary (>)
Safety camera alerts
Safety alerts let you know where safety cameras are located. To enable this feature or to adjust
the warning distance select Menu >
>Settings >
> Safety Alerts.
Taking a detour
You can programme CoPilot Live to make a detour from your current route. You can choose an
alternate route, or just detour around a section of the route. Select Menu > Detour.
Find a Point of Interest
If you are running low on fuel, looking for a place to park or a nearby restaurant, tap
Menu >
> Nearby POI to search for what you need.
139
Chapter 9
Multimedia features
9.1 Working with photos and videos
9.1 Working with pictures and videos
The built-in 3.0 megapixel camera allows you to take photos and record audio/video clips.
After you have taken the photos and video clips, you can organise, edit, beam or send them
using a messaging application.
Using the camera
To start using the camera, do either of the following:
• Tap
> Programs > Pictures and Videos > Camera icon.
• Press the Camera button on the lower right side of your Xda.
To exit the Camera, tap the exit icon
NOTES:
on the camera screen.
By default, the preview screen is set to landscape.
After launching the camera, your Xda is set to camera mode by default.
141
Camera features
Scene mode
Macro mode
Timer
Burst
Picture size
Tap to close
the camera
Tap to preview Pictures
and Videos
Tap to set to
Frame mode
Tap to set to video mode
Tap to set to
GPS mode
Tap to set to
Panorama mode
Tap to set to camera mode
Tap to switch mode
Tap to set to MMS
camera mode
Tap to set to MMS
video mode
Tap to zoom out
Tap to launch Menu
Tap to zoom in
142
Taking photos
After launching the camera, your Xda is set to Camera mode by default. You can switch between
camera and video mode by tapping the camera/video mode icon on the screen.
To take photos:
1. Aim Xda to your subject then half-press the camera button to auto-focus on the subject.
While the camera button is half-pressed, the auto-focus frame appears on the centre of
the screen.
2. Full-press the camera button.
3. Tap Camera and then repeat steps 1 to 2 to take more photos.
NOTE: The image is automatically saved to the default storage location and can be
viewed using the Pictures and Videos application.
143
Recording videos
To record videos, set the Xda to video capture mode.
To set video mode:
• Tap the video mode icon on the screen.
To record video:
1. Aim Xda to your subject then half-press the camera button to auto-focus on the subject.
While the camera button is half-pressed, the auto-focus frame appears on the centre of
the screen.
2. Full-press the camera button to begin recording. The record indicator turns from green to red
while video is recording.
3. Press the camera button again to stop recording.
NOTES:
The video clip is automatically saved to the default storage location.
Use Windows Media Player Mobile to play back video clip in your Xda.
Use Apple® QuickTime™ player, if you wish to play video clips in
your computer. You can download QuickTime™ installer from
www.apple.com/quicktime.
144
Organising your photos and videos
Use the Pictures and Videos application to preview stored images and playback video clips.
To launch the application, tap
> Programs > Pictures and Videos.
TO
DO THIS
Set the photo scene
Set to Camera Mode. Select Menu > Scene. You may also tap the
Scene Mode icon.
Set the photo/video size
Set to either Camera Mode or Video Mode. When you have chosen
the mode, select Menu > Picture (or Video) Size to select the photo/
video size. You may also tap the Picture Size icon.
Set the photo quality
Set to Camera Mode. Select Menu > Advanced. Choose from
Normal, Fine, or Super Fine.
Zoom a photo
Set to Camera Mode. Tap the Zoom in or the Zoom out icon.
Set the timer for taking a photo
Set to Camera Mode. Select Menu > Self Timer or the Self
Timer icon.
Save a photo or a video clip
Set to either Camera Mode or Video Mode. Select Menu >
Advanced > General tab. You can save a picture or a video clip in a
storage card or in the main memory.
Set the advanced settings
Set to either Camera Mode or Video Mode. Select Menu >
Advanced.
145
146
TO
DO THIS
View a picture or a video clip
Select the picture or video clip you want to view and tap View.
Delete a picture or a video clip
Select the picture or video clip you want to delete and tap Menu >
Delete.
View your pictures as a slide
show
Tap Menu > Play Slide Show.
Set a picture as the Today
Background
Select the picture you want to use and tap View > Menu > Set as
Today Background. Use the Left/Right navigation keys to select the
display area and press Next. Adjust the transparency and tap Finish.
Send a picture or a video clip
Select the picture or video clip you want to beam and tap Menu >
Beam. Tap the device to which you want to send and tap Beam.
Change the name of a picture
Select a picture and tap View >Menu > Save > Save as. Change the
name in the Name field.
Edit a picture
Select the picture you want to edit and tap View. Tap Menu > Edit,
and do the following:
• To rotate the picture 90 degrees, tap Rotate.
• To crop the picture, tap Menu > Crop. Use the navigation pad to
position the first corner of the cropping area and tap Next. Position
the second corner and tap Finish. To start over, tap Previous.
• To automatically readjust the brightness and contrast levels of the
picture, tap Menu > Auto Correct.
Tap Menu > Save As, to save the edited picture with a different
name or to a different location.
TO
DO THIS
Email a picture or video clip
Select the picture or video clip you want to send and tap Menu >
Send. Select Outlook Email and tap Select. A new email message is
created with the file attached. Enter the recipient’s email address, the
subject, and your message; and tap Send.
Send a picture or video clip
using MMS
Select the picture or video clip you want to send and tap Menu >
Send. Select MMS and tap Select. A new MMS message is created
with the file attached. Enter the recipient’s mobile phone number and
the subject. Scroll down to Insert Audio (available only for pictures),
press the centre navigation key, and select an audio clip to attach.
Scroll down to Insert Text, enter your message; and tap Send.
Set a picture size to use when
emailing pictures
Tap Menu > Options > General. Select the picture size.
Set whether pictures are rotated
clockwise or counter-clockwise
Tap Menu > Options > General. Select to rotate either Right
(clockwise) or Left (counter-clockwise).
147
Chapter 10
O2 Features and Applications
10.1 Newstation
10.2 Microsoft® Office Mobile
10.3 Adobe Reader LE
2.1 Using th
2.2 Making a
2.3 Receiving
2.4 Options
10.1Newstation
With the Newstation in your Xda, you can conveniently browse news and blogs anywhere
and anytime.
he Xda Zest
NOTE:
Ensure that your Xda is connected to Internet when using Newstation.
a call
g a call
duringUsing
a callNewstation
To read RSS news:
1. Tap
> Programs > Newstation.
2. Tap a category folder to open.
3. Tap a channel name to open.
4. Browse your favourite subjects.
To create a new category folder:
1. Tap
> Programs > Newstation.
2. Tap Menu > New Category then edit the category name.
149
To add a channel:
1. Tap
> Programs > Newstation, then tap a category folder to open.
2. Tap Menu > New Channel. You can add a channel from either Internet or an existing file.
• Input from URL
Select the radio button of Input from URL and enter the URL address. Then tap Next.
Select a category where you want to add the channel. Then tap Finish.
• Import from a file
Select the radio button of Import from a file, then tap Next.
Select a folder and choose a file from the list.
Choose channels from the list, then tap Next.
Select a category where you want to add the channel, then tap Finish.
Using Newstation menus
Category Menu
To use the category menu:
1. Tap
> Programs > Newstation.
2. Select a category folder. Then tap Menu. The menu list pops up.
3. Tap an option that you need.
150
Channel Menu
To use the channel menu:
1. Tap
> Programs > Newstation.
2. Tap a category folder, then select a channel and tap Menu.
3. Tap an option that you need.
Subject Menu
To use the subject menu:
1. Tap
> Programs > Newstation.
2. Tap a category folder. Then tap a channel to open. Select a subject and tap Menu. The menu
list pops up.
3. Tap an option that you need.
151
10.2Microsoft® Office Mobile
Your Xda comes with pre-installed Microsoft® Office Mobile applications which enable you to
create, view, and edit spreadsheets, presentations, note, and word files on your Xda. Use these
applications like you would normally use the Office applications on your computer.
To access these applications tap
application to use.
ICON
> Programs > Office Mobile. Select the appropriate
DESCRIPTION
Excel Mobile allows you to view, create, and edit an Excel spreadsheet.
OneNote Mobile allows you to view, create, and edit an OneNote file.
Powerpoint Mobile allows you to view a powerpoint presentation.
Word Mobile allows you to view, create, and edit a word file.
152
Excel® Mobile
Excel® Mobile enables you to view, and edit spreadsheets on your Xda. Any editing or formatting
done on a spreadsheet file is kept intact even when you open the spreadsheet file on your
computer. Excel® Mobile is compatible with Microsoft® Office Excel 2007.
OneNote® Mobile
OneNote Mobile is a note-taking application. It allows you to capture information in multiple
ways and organise it according to your needs. Besides text, you can also insert audio recording
and pictures to your notes.
PowerPoint® Mobile
PowerPoint Mobile enables you to only view presentation files on your Xda. It is compatible with
Microsoft® Office PowerPoint 2007.
Word® Mobile
Word® Mobile enables you to view and edit Word documents on your Xda. It saves the editing
or formatting that you have done on a Word document from your Xda, even when you open the
Word document on your computer. Word® Mobile is compatible with Microsoft® Office Word 2007.
153
10.3Adobe Reader LE
Adobe Reader LE allows you to view portable document format (pdf) files on your Xda.
To launch the Adobe Reader LE, tap
> Programs > Adobe Reader LE.
Service and Support
For more information about your O2 Xda Zest, answers to Frequently Asked Questions,
documentation and software upgrades, please visit www.seeO2.com. You can also register
online to receive information on updates and promotions.
Should you have further enquiries or feedback, log on to 02.co.uk/xda and click on Contact Us.
Alternatively, you may call us for assistance. For a complete list of customer service phone
numbers, refer to your O2 Warranty Card.
154