1
2. Installation Precautions
1. Users MUST use a proper and well-installed surge
arrestor and grounding kit with WNAP-7350; otherwise, a
random lightening could easily cause fatal damage to
WNAP-7350. EMD (Lightning) DAMAGE IS NOT
COVERED UNDER WARRANTY.
Quick Installation Guide
WNAP-7350
300Mbps 802.11a/n
Wireless Outdoor AP
2. Users MUST use the “Power cord & PoE Injector” shipped
in the box with the WNAP-7350. Use of other options will
cause damage to the WNAP-7350.
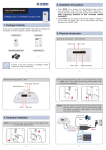
1. Package Contents
Thank you for choosing PLANET WNAP-7350. Before
installing the AP, please verify the contents inside the
package box.
WNAP-7350
Quick Guide
3. Users MUST power off the WNAP-7350 first before
connecting the external antennas to it; otherwise,
damage might be caused to the WNAP-7350 itself.
PoE Injector & Power Cord
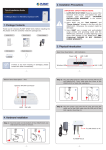
3. Physical Introduction
Rear Panel Description – Port & Connector
Mounting Kit x 1
Note
CD-ROM
RJ-45 Waterproof Kit x 2
If there is any item missed or damaged, please
contact the seller immediately.
–1–
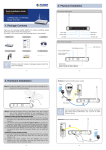
4. Hardware Installation
STEP 1: Plug the N-Type (M) to N-Type (M) RF cables into
the antenna connectors of the WNAP-7350, and
then connect the N-Type (F) antennas to the
other side of the RF cables.
STEP 2: Plug the RJ-45 Ethernet cable into the LAN Port of
WNAP-7350 through the waterproof kit.
–3–
WAN/LAN
N-Type (F)
N-Type (F) LAN (802.3af PoE)
–2–
STEP 3: Take out the power cord and PoE injector, plug
the power cord into the DC port and plug the
other side of the RJ-45 cable into the POE port of
the PoE injector.
STEP 4: Plug the other waterproof kit to the WAN/LAN
port to complete the installation.
–4–
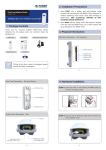
STEP 5a: Pole Mounting
STEP 5b: Wall Mounting
(a.1) Attach the mounting bracket to the back of the
device by using four screws and flat washers.
(b.1) Attach the mounting bracket to the back of the
device by using four screws and flat washers.
(a.2) Assemble the M bracket to the outside of the
mounting bracket by using four screws and flat
washers.
(b.2) Assemble the M bracket to the wall by using four
screws and flat washers.
(a.3) Install the mounting bracket assembly to the pole
by using the toothed bracket, and then tighten it by
four long screws.
(b.3) Install the mounting bracket assembly inside the M
bracket mounted in the wall by using four screws
and flat washers.
(b.1)
(a.1)
(b.2)
(a.2)
(b.3)
(a.3)
IMPORTANT SAFETY PRECAUTIONS:
1) LIVES MAY BE AT RISK! Please be aware for
the electric wires around, and tighten the
pole. Carefully read the section "OUTDOOR
INSTALLATION WARNING" in the manual
before installation.
Note
Pole diameter less than 5cm may require the use
of hex nuts to lock the long screws to the
suitable location.
Caution
2) Users MUST use the “Power cord & PoE
Injector” shipped in the box with the
WNAP-7350. Otherwise, the product might be
damaged.
–5–
5. Web Login
–6–
Default IP Address: 192.168.1.1
Default User name: admin
Connect the WNAP-7350 with your PC by an Ethernet cable
plugging in LAN port of PoE injector in one side and in LAN
port of PC in the other side. Power on the WNAP-7350 by PoE
from PoE injector.
1. Assign a static IP address to your PC which should be in
the same network segment with the WNAP-7350. As
the default IP address of the WNAP-7350 is
192.168.1.1, you may choose from 192.168.1.2 to
192.168.1.254. Then click OK.
Default Password: admin
Default SSID: WNAP-7350
4. Now, you can see the Web management UI of the
WNAP-7350.
You can use Easy Setup at the top of the screen to
configure the WNAP-7350.
2. Open the web browser on your PC, key in the IP
address (192.168.1.1) of the WNAP-7350 in the
address bar, and then enter.
3. The default User name and Password are both
“admin”. Enter them and then click OK.
FURTHER INFORMATION:
The above steps introduce simple installations and
configurations for WNAP-7350. For further configurations of
different operation modes, please refer to the user’s manual
in the CD. If you have further questions, please contact the
local dealer or distributor where you purchased this product.
2011-E10510-001
–7–
–8–