1
CamPro Professional Professional Intelligent Video Surveillance Software User’s Manual 0 Copyright & Disclaimer Copyright & Disclaimer No part of this publication may be reproduced in any form or by any means, whether electronic, mechanical, photocopying, or recording without the written consent of OvisLink Corp. OvisLink Corp. has made the best effort to ensure the accuracy of the information in this user’s guide. However, we are not liable for the inaccuracies or errors in this guide. Please use with caution. All information is subject to change without notice All Trademarks are properties of their respective holders. AirLive CamPro Professional Manual Table of Contents Table of Contents 1. Overview......................................................................................1 1.1 Introduction ..........................................................................................1 1.2 Product Feature ...................................................................................1 1.3 Minimum System Requirements ..........................................................3 2. Installation...................................................................................4 2.1 Package Content .................................................................................4 2.2 Before you Install .................................................................................4 2.3 Software Installation (WindowXP)........................................................6 2.4 Software Installation (Window Vista/7)...............................................10 2.5 Uninstall the Program ........................................................................11 2.6 Install the USB Key ............................................................................13 2.7 Upgrade the License..........................................................................13 2.8 Desktop Icons ....................................................................................14 2.9 Run the Program (Windows XP)........................................................15 2.10 Run the Program (Windows Vista/7)................................................15 2.11 Getting Start with CamPro Professional ...........................................16 3. Configuration ............................................................................17 3.1 Using the Configuration Wizard .........................................................17 3.2 Adding IP Cameras ............................................................................18 3.3 Remove the Camera..........................................................................24 3.4 Recording the Video ..........................................................................24 3.5 Recording Detailed ............................................................................26 3.6 PTZ Setting........................................................................................28 4. Intelligent Setting .....................................................................32 4.1 Overview ............................................................................................32 4.2 Motion Detection ................................................................................34 4.3 Tampering Detection ..........................................................................36 4.4 Object Loss Detection........................................................................37 AirLive CamPro Professional Manual Table of Contents 4.5 Tripwire Detection ..............................................................................38 4.6 Object Counting .................................................................................40 4.7 Foreign Object Detection ...................................................................42 4.8 Face Detection...................................................................................43 5. Event Handling .........................................................................45 5.1 Overview ............................................................................................45 5.2 Mail server .........................................................................................47 5.3 FTP Server.........................................................................................48 5.4 HTTP Server ......................................................................................50 5.5 TCP Server ........................................................................................51 5.6 Warning Sound ..................................................................................53 5.7 Emergency.........................................................................................55 5.8 Action Group ......................................................................................56 5.9 Event Schedule..................................................................................57 6. E-Map .........................................................................................60 6.1 Overview ............................................................................................60 6.2 Location Setting .................................................................................61 6.3 Detail Setting......................................................................................62 7. User Account ............................................................................66 7.1 Overview ............................................................................................66 7.2 User Group ........................................................................................67 8. Recording..................................................................................68 8.1 Recording ..........................................................................................68 8.2 Recording Detailed ............................................................................69 8.3 Recording Schedule ..........................................................................71 9. Backup.......................................................................................74 9.1 Overview ............................................................................................74 9.2 Media Database Backup....................................................................74 9.3 AVI Export ..........................................................................................76 ii AirLive CamPro Professional Manual Table of Contents 9.4 Configuration Backup.........................................................................77 10. Log View..................................................................................79 11. Client Viewer ...........................................................................80 11.1 Login Window...................................................................................80 11.2 Add Server .......................................................................................81 12. Live View .................................................................................85 12.1 Overview..........................................................................................85 12.2 Adjust Viewing Layout......................................................................87 12.3 Sequence Monitor............................................................................90 12.4 Full Screen.......................................................................................92 12.5 Screen Assign ..................................................................................95 12.6 PTZ & Preset Control.......................................................................96 12.7 Video Window Control Bar...............................................................98 12.8 Server & Channel Status................................................................103 13. E-Map Monitor.......................................................................105 14. Event Monitor........................................................................110 14.1 Live Event Monitor .........................................................................110 14.2 History Event Monitor.....................................................................112 15. Playback ................................................................................117 16. Media Player..........................................................................121 16.1 Play the exported AVI file ...............................................................121 16.2 Play the database file.....................................................................125 16.3 Configure the OSD Display............................................................128 17. Remote Web Access ............................................................129 17.1 PTZ Control: ..................................................................................131 17.2 Preset ............................................................................................131 17.3 Sequence Viewing .........................................................................132 17.4 Video Window Control Bar.............................................................134 17.5 Digital PTZ .....................................................................................135 AirLive CamPro Professional Manual Table of Contents 17.6 Keep video in original aspect ratio and full screen.........................135 17.7 Change display language ..............................................................136 17.8 Playback: .......................................................................................136 17.9 Methods to search Playback Videos..............................................137 Appendix A: Camera Support List ............................................143 Appendix B: Remote Backup ....................................................156 iv AirLive CamPro Professional Manual 1. Overview 1 1. Overview 1.1 Introduction The CamPro Professional is AirLive’s intelligent video surveillance recording software that is designed to meet most demands for professional installations. The Professional version greatly enhances the video analysis functions that can be applied to diverse surveillance scenarios. Bases on client/server architecture, CamPro Professional also offers remote management, which means you can install it in your server room and access the system anywhere. With the bundled CMS software, you can quickly build-up central managed surveillance structure for franchise stores and central-branch office networks. Moreover, the CMS software also supports AirLive’s hardware NVR family. CamPro Professional supports not only AirLive IP camera, but also cameras from most of the main stream brands. In an installation project where a hybrid environment occurs, CamPro Professional can easy help you to integrate most of those existing IP cameras. Even projects with CCTV cameras, you can still use our VS-100 for integrating them into CamPro Professional. 1.2 Product Feature Intelligent Video Analysis Tempering Detection Object Loss Detection Foreign Object Detection Tripwire Detection Object Counting Face Detection Image Enhancement AirLive CamPro Professional Manual 1 1. Overview CMS Software The bundled CMS software can support both CamPro Professional and NVR. It adds scalability to the existing NVR and also provides advance functions. It can support up to 16 NVRs, including CamPro Profession software NVR, and 256 channels totally. Client-Server Architecture The Client-Server Architecture allows you to configure your CamPro Professional and view the videos from other computers in your local network or through the Internet. Up to 9 clients can be supported simultaneously. 2 AirLive CamPro Professional Manual 1. Overview Large Camera Support List CamPro Professional also supports more than 25 brands of IP cameras in the main stream market. Even for old CCTV systems, you can just use our VS-100 as the video encoder and integrate those analog cameras to the IP networks. 1.3 Minimum System Requirements Software requirement: OS: Windows 2000(SP4), Windows XP, Windows 2003, Windows 7 Hardware requirement: CPU: Intel Core 2 Duo or above RAM: Minimum 1 GB, 2GB or above is recommended HDD: SATA 200GB or above is recommended Display card: Independent display card suggested. Ethernet interface: 10/100Mb Ethernet card or above At last one available USB port for USB Key Note: Please make sure your display DPI setting is set to default at 96DPI. To set DPI value, right-click on desktop, choose “Settings”Æ“Advanced”Æ “General” AirLive CamPro Professional Manual 3 2. Installation 2 2. Installation 2.1 Package Content You can find the following items in the package: Installation CD: The CD includes the programs and documents. USB Key: The USB Key is burned with the software license. For activating the CamPro Professional, please remember to plug the Key to the machine. This Quick Installation Guide (QIG) This document for guiding you installs the system. If any of the above is missing, please contact your dealer immediately. 2.2 Before you Install For running CamPro Professional on your machine, you need to install some additional library. Please first check if you have installed “Microsoft Visual C++ 2008 Redistributable Package”. If not, please follow the steps below for installing the additional library: 1. Open your browser and go to Microsoft Download Center: 4 AirLive CamPro Professional Manual 2. Installation 2. Search for the “Microsoft Visual C++ 2008 Redistributable Package”. 3. Then select the one for your operation system and download it. If you can not sure which package should you install, please contact with the reseller of your machine. 4. After downloading the package, please follow the instruction to install the package. AirLive CamPro Professional Manual 5 2. Installation 2.3 Software Installation (WindowXP) 1. Put the installation CD into your CD drive, and the Auto Run window will show up. The items will be explained as below: Install CamPro Professional (Full): Please click on this item if you want to install both server and client program on your PC. If your Operation System is Vista or Windows7, please see 2.4, for further instruction to install the program. Install CamPro Professional (Client Only): If you have another server in the machine room and want to use this PC to connect to the server, please select this installation. This will install the client applications only. If your Operation System is Vista or Windows7, please go to the CD’s sub folder and install the program as administrator. Install Central Management Software (CMS Lite): The CMS Lite is a separate program for managing distributed CamPro Professional or NVR. If you want to install the CMS Lite, please choose this item. If your Operation System is Vista or Windows7, please go to the CD’s sub folder and 6 AirLive CamPro Professional Manual 2. Installation install the program as administrator. Install Driver & Utility: Click on this link for open the utility folder and you can find the NVR Media Player under this folder. Quick Start Guide: Open the sub folder that the QSG is located. User’s Manual: Open the sub folder that the user’s manuals of CamPro Professional and CMS Lite are located. Acrobat Reader: Click on this item for installing the Acrobat Reader. Browser CD: Click on this item for further browsing this CD. 2. Below will show the full installation process for illuminating. Please select “Install CamPro Professional (Full)”. 3. If the Auto Run window does not show up, please open the software folder and double click on the setup.exe for starting the installation. If your operation system is Windows Vista or 7, please see 2.4 Software Installation (Window Vista/7). 4. The installation program will prepare to install the program. AirLive CamPro Professional Manual 7 2. Installation 5. Click on “Next” to continue. 6. Click “Next” to accept the default installation directory, or click “Change” to in- stall it in a directory of your choice. 8 AirLive CamPro Professional Manual 2. Installation 7. Click “Next” again to confirm your setting. 8. The installation will then begin. AirLive CamPro Professional Manual 9 2. Installation 9. Simply click “Finish” to exit the installation when it’s done. Note: For Windows Vista/7 installation, please make sure the software is installed with “Administrator” privilege. To do so, right-click on the “Setup.exe” file and select “Run as Administrator” option from the drop-down menu. 2.4 Software Installation (Window Vista/7) 1. Insert the CD in the CD-ROM drive and the “Autoplay” dialog should be displayed automatically (as shown below): 2. Click on “Open folder to view files” and the windows explorer should come up and display the CD contents: 10 AirLive CamPro Professional Manual 2. Installation 3. Go to the “Program” folder. 4. Right-click on the “Setup.exe” file and select “Run as administrator” option from the pull-down menu. 5. Then the program will begin to install. 2.5 Uninstall the Program 1. Go to the “Start” menu and “All Programs” >> “AirLive” >> “CamPro Professional” >> “Uninstall CamPro Professional”. 2. Click “Yes” to confirm the action. AirLive CamPro Professional Manual 11 2. Installation 3. You should be prompted that the Windows Installer is preparing to remove the program. 4. You will be prompted with a warning message, simply click “OK” and accept the defaults. 5. The un-installation will continue. 12 AirLive CamPro Professional Manual 2. Installation 2.6 Install the USB Key The software license is protected by the bundle USB key. If you have the key, please plug it to your PC for activating CamPro Professional. Without the key presented, you can only run this program in demo mode. Plug the USB Key to the USB port. How many IP cameras you could add to the CamPro Professional depends on the license burn into the key. 2.7 Upgrade the License When the software (channel) license is not enough for new coming IP camera, you need to purchase new licenses for those new IP cameras. Please contact with you reseller for buying the additional license. Or you can also send mail to [email protected] for buying the additional license. After you purchase the new licenses, you will receive a license file. Please follow the steps below for importing the new licenses. 1. Start the Config Wizard via the desktop icon. 2. Click on the Upgrade Button in the on the Config Wizard. Upgrade Button AirLive CamPro Professional Manual 13 2. Installation 3. Then the dialogue box will pop up. Please choose and import the license file you received. After importing the license, your CamPro Professional now can add the new coming IP camera. 2.8 Desktop Icons After Installing the CamPro Professional, you can find the shortcut icons on your desktop. Or you can also find the shortcut under Start Æ Programs Æ AirLive Æ CamPro Professional. There will also be three icons on your desktop: The “Config-Wizard”: It’s the configuration utility that helps users quickly configure the necessaries (such as adding cameras, PTZ set- tings, and various function settings). Please use this program for configuring the CamPro Professional before you initiating the program. Use this program to control the service running on your server. Once you launch this program, it will stay in the system tray. You can right click on the icon to check the status of the service or start/stop the service. The “Monitor”: Use this program to access the CamPro Professional server. It can be run on the very same machine the CamPro Professional is installed, and it will be accessing the “local machine” to view the cameras’ live videos. It can be installed on a different machine, and simply run it to access the remote server with its public IP address. If you want to install the client only, please select “Install CamPro Professional (Client Only)” under the installation window. And you will see the Media Player under Start Æ Programs Æ AirLive Æ CamPro Professional. 14 AirLive CamPro Professional Manual 2. Installation The “Media-Player”: The NVR Server has its own database which is used to store the recorded videos (media) in its proprietary database file format. The media player can be used to play the database file as well as the AVI videos that are exported by the software. This can illuminate the hassles for users to install a third-party player software (or codec) in order to playback the recorded media. 2.9 Run the Program (Windows XP) Click on the icon of CamPro Express Monitor on the desktop. Or you might find the short cut in the “Start Æ Program File Æ AirLive Æ CamPro Express 64”. 2.10 Run the Program (Windows Vista/7) 1. Right-click on the application shortcut from the desktop and choose “Properties”. 2. Go to the “Compatibility” tab and check “Run this program as an administrator: AirLive CamPro Professional Manual 15 2. Installation 2.11 Getting Start with CamPro Professional Upon fresh install, the software contains no configuration profile, which, the soft- ware’s service can not be initiated as no configuration has been performed to the software yet. To get started, start the “Config-wizard” from the desktop shortcut: Or access it from the “Start” menu; the path should be as below: For the software’s service to be properly initiated, make any changes to the settings through the Config Wizard then save it and exit the program. Restart the Config Wizard and the software’s service should be initiated. 16 AirLive CamPro Professional Manual 3. Configuration 3 3. Configuration 3.1 Using the Configuration Wizard 1. Upon the start of the Config Wizard, you should be prompted with the login screen like below. By default, no username and password is required for login. Simply click the “Login” icon highlighted below to log in. 2. You should be prompted with the System page in the Config Wizard like below. AirLive CamPro Professional Manual 17 3. Configuration 1. License Info 2. Streaming Port 3. Web Server Port 4. DDNS Setting 3.2 Adding IP Cameras To add cameras using the configuration wizard, go to “Channel” from the menu on the left. 1. The “Channel List” page should be display which is an overview page that displays a list of cameras currently added to the software. 18 AirLive CamPro Professional Manual 3. Configuration 2. To add a new camera, click on the “Channel Setting” tab and select an available channel from the “Channel” drop-down menu, and then click on “Search” to begin: 1. 2. 3. Note: The “Search” function only works when the cameras are installed in the same subnet as the PC the NVR software is installed. 3. The program will perform a search and locate the cameras available within the same subnet: AirLive CamPro Professional Manual 19 3. Configuration 4. A new dialog should be prompted and displays a list of available cameras: 5. Double-click on a camera from the list and it should direct you back to the “Channel Setting” page. The camera’s IP address and HTTP port should be automatically filled in the “Network Setting section: 6. For cameras located in different subnet (but within the same local network), enter its private IP, HTTP port, user- name and password manually and click “Detect”. 20 AirLive CamPro Professional Manual 3. Configuration 7. Fill in the camera’s username and password (must be the root privilege account) in the corresponding fields shown below and click “Detect”: 1. 2. 3. 8. Upon a successful detection, the camera’s information and its current settings should be detected: (as shown below) AirLive CamPro Professional Manual 21 3. Configuration 9. The settings shown in the “Other Setting” section can be changed by using either the available drop-down menu or by clicking the corresponding cell box: Use the drop-down to make changes Preview the Camera Remove, Add and Cancel buttons 22 AirLive CamPro Professional Manual 3. Configuration 10. Click the “Add Camera” button to confirm the settings and you should be directed back to the “Channel List” page: 11. You can click the “Cancel” button to cancel the configuration and you should be directed back to the “Channel List” page: 12. You should now see a list of cameras you’ve been added to the software from the “Channel List” page: AirLive CamPro Professional Manual 23 3. Configuration 3.3 Remove the Camera 1. To remove a camera, simply click on a camera from the list under the “Channel List” page, it should direct you to the “Channel Setting” page: 2. And all settings of the camera you just clicked on will be displayed. Click on the “Remove camera” button to remove the camera: 3.4 Recording the Video The recording configuration page allows users to configure the followings: Quickly enable/disable certain types of recording Recording storage path Recording frame rate of each recording type on each channel Pre-alarm/Post-alarm time Schedule recording 24 AirLive CamPro Professional Manual 3. Configuration 1. You should first be prompted with the overview page that displays the current recording configurations of each channel and the storage path. To add a new storage path, click on the “Add” button (as shown below): 2. A new dialog should be prompted which you can select a new path to store the recording data: AirLive CamPro Professional Manual 25 3. Configuration 3. You can also configure the software to always keep the previous number of days of recording data if you wish to do so: 3.5 Recording Detailed You can configure the detail recording settings in the “Recording Setting” page. In this page, you can configure the followings: Enable/disable recording types Recording frame rate Pre-Alarm/post-alarm time Channel Selector Recording Format, Frame Rate Selector and Pre-, Post-Alarm Setting Channel List 26 AirLive CamPro Professional Manual 3. Configuration 1. For making the program record video, first click on the desired channel on the list. 2. Then you need to select the video format. If “Same to Live” is selected, the video compression format of the recorded clips will be the same with the Live View setting. 3. For some installation, it may request higher quality to recorded video. And he can choose “Video Setting” for further selecting the desired format. 4. Click on “Save” for saving the configuration. AirLive CamPro Professional Manual 27 3. Configuration 3.6 PTZ Setting After adding cameras to the software, all the PTZ cameras will be available in the “PTZ Setting” page (Channel >> PTZ Setting) 1. Only PTZ cameras will be listed in the “Channel” drop-down menu: (as shown below) 28 AirLive CamPro Professional Manual 3. Configuration 2. The live video of the selected IP camera should then be displayed in the lower-right hand corner: 3. Use the on-screen PTZ panel to move the view point and select PTZ movement speed from the “Speed” drop-down to determine the distance of each movement: AirLive CamPro Professional Manual 29 3. Configuration 4. Next, type in a name in the “Preset Name” field to name the preset point and click “Add” to finish: 5. The preset point will then be added and will be available in the “Preset Points List” (as shown below) 30 AirLive CamPro Professional Manual 3. Configuration 6. To modify the preset point, click to highlight the preset point, use the PTZ panel to move the lens to desired position, and then click on Confirm button. Or you can also click on the “Remove” to remove button the preset point: AirLive CamPro Professional Manual 31 4. Intelligent Setting 4 4. Intelligent Setting 4.1 Overview The software has built-in various intelligent video analytic features which need to be configured and enabled in the configuration wizard. The configuration page can be accessed in the configuration wizard under “Intelligent” from the menu on the left. You should be greeted with an overview list when first access this page. The overview provides the overall configuration status of each intelligent function on the available channels. Intelligent Function List Channel List Only the channels that have been configured with cameras (regardless if they are online or not) would have the “X” or O” mark. X: Disabled O: Enabled 32 AirLive CamPro Professional Manual 4. Intelligent Setting Intelligent Function List: Face Detection Foreign Object Detection Object Counting Tripwire Detection Object Lost Detection Tampering Detection Motion Detection To configure the detail settings of each intelligent function, click on the “Intelligent Setting” tab to access the detail configurations: Save Clear Testing AirLive CamPro Professional Manual 33 Cancel 4. Intelligent Setting 4.2 Motion Detection To start configuring the Motion Detection settings, select a channel first, and its video should be displayed in the lower-right hand corner: Next, click on an intelligent function you wish to configure from the list: 34 AirLive CamPro Professional Manual 4. Intelligent Setting Check “Start” and ROI” By that, take motion detection as an example, it means that the motion area that you set on the video will be highlighted: (as shown below) * Click and hold the mouse button and move diagonally to draw a square on the video to define the motion detection area. Repeat the same step to define multiple areas. AirLive CamPro Professional Manual 35 4. Intelligent Setting 4.3 Tampering Detection For tamper detection, simply enable the function in the configuration wizard. You can define the detection sensitivity by entering a number between 0 ~ 999 in the “Sensitivity” field, and the detection interval by entering a number between 0 ~ 9999 in the “Period (ms) field: 36 AirLive CamPro Professional Manual 4. Intelligent Setting 4.4 Object Loss Detection This function provides an alarm when an item is removed from its last location. Detection can be defined to immediately alarm when an object is removed/stolen. To configure “Object Loss”, click on it from the list on the left first and make sure “Start” is checked. Follow the same step desired in the previous page to define an area (or select an object) in the video for object loss detection: button to apply settings of the current page or the Click the previously defined area and start over. button to clear the Next, define the detection interval by entering a number between 0 ~ 999999 in the “Period (ms)” field: AirLive CamPro Professional Manual 37 4. Intelligent Setting 4.5 Tripwire Detection This function provides an alarm when a person or vehicle breaches a demarcation line of separation. Detection can be configured to prohibit any crossover or to allow movement in a single direction. Tripwire detection ignores movement in parallel to specified lines and only alerts if the lines are crossed. The tripwire feature allows the definition of more than one line per scene and multiple segments per single line. To define a line of separation, click and hold the mouse button and drag the mouse to a desired direction to draw a line on the video: 38 AirLive CamPro Professional Manual 4. Intelligent Setting Next, define the detection direction. To do so, hover the mouse cursor to the gray cell box in the middle of the line: Click on the cell box to change detection to one direction only. Continue doing so will change detection to the other direction. Click it again to change back to bi- directional detection. AirLive CamPro Professional Manual 39 4. Intelligent Setting Click on the cell box To re-arrange the location of the line, hover the mouse to the tip end of the line (like shown below). Once you see the cell box turns green, hold down the mouse left button and drag it to a new location. Do the same to the other tip end to completely re-arrange the line’s location: 4.6 Object Counting Object counting works similar to the tripwire function except it adds the calculation function to the object that is crossing the line. The detection ignores movement in parallel to specified line and only alerts if the line is crossed. The detection allows the definition of only one line per scene. 40 AirLive CamPro Professional Manual 4. Intelligent Setting To define a line of separation, click and hold the mouse button and drag the mouse to a desired direction to draw a line on the video: Next, define the detection direction. To do so, hover the mouse cursor to the gray cell box in the middle of the line: AirLive CamPro Professional Manual 41 4. Intelligent Setting To re-arrange the location of the line, hover the mouse to the tip end of the line (like shown below). Once you see the cell box turns green, hold down the mouse left button and drag it to a new location. Do the same to the other tip end to completely re-arrange the line’s location: 4.7 Foreign Object Detection It’s a function similar to loitering where software continuously detects the act of remaining in a particular public place for a protracted time. Once the function is set to enable, it detect the whole region in the scene. 42 AirLive CamPro Professional Manual 4. Intelligent Setting Next, define the detection interval by entering a number between 0 ~ 99999 in the “Period (ms)” field: 4.8 Face Detection To configure this function, define a detection zone in the scene by clicking and holding the mouse then move diagonally on the video Alarm criteria is the number of counts during the counting interval will be treated as one event trigger. AirLive CamPro Professional Manual 43 4. Intelligent Setting Flow Period: The software outputs count (the “AVG” value) on the live video during the “Flow Period”; if it’s 3600 seconds, the software calculates how many counts during the last 3600 seconds. Switch to live view in the monitor program and once a face is detected, it will be highlighted with a green rectangle like shown below. And the counting statistic is displayed in the lower-right hand corner on the video. Face Detected Counting Static 44 AirLive CamPro Professional Manual 5. Event Handling 5 5. Event Handling 5.1 Overview The software can receive different types of events and respond to certain actions such as performing recording, send warnings to various event servers or FTP an event image...etc. Users can also create an “action group” and apply it to a certain type of event on a particular channel. AirLive CamPro Professional Manual 45 5. Event Handling To create an event action group, go to the “Action Group” tab and click the “+” button to begin: Noticing a new event action group has been added but the “Detail Setting” section is not available for configuration yet: By default, all the event servers are grayed out as none has been added to the software yet. Settings of these event servers will be described below. 46 AirLive CamPro Professional Manual 5. Event Handling 5.2 Mail server Mail servers are used to send warning emails with pre-defined text content to designated recipient when events are triggered. Add Mail Server Delete Mail Server To add a new mail server, click on the “Add” button at the bottom: AirLive CamPro Professional Manual 47 Save Clear 5. Event Handling Next, fill in the empty fields as below: Note: Enter a valid public IP address or FQDN (Fully Qualified Domain Name) in the “Mail Server” field 5.3 FTP Server FTP servers are used to send warning with pre-defined text content or camera snapshot to designated FTP servers when events are triggered. 48 AirLive CamPro Professional Manual 5. Event Handling Add FTP Server Delete FTP Server Click “Add” button at the bottom to add a new FTP server: Fill in the empty fields as illustrated below: AirLive CamPro Professional Manual 49 Save Clear 5. Event Handling Note: By default, the software uploads files to the top-level directory of the FTP server. Enter the folder name after the “\” in the “Upload Path” field if you would like to software to upload to a specific folder. 5.4 HTTP Server HTTP servers are used to send warning with pre-defined text content or camera snapshot to designated HTTP servers when events are triggered. Add FTP Server Delete FTP Server Save Click “Add” button at the bottom to add a new HTTP server: 50 AirLive CamPro Professional Manual Clear 5. Event Handling Fill in the empty fields as illustrated below: 5.5 TCP Server TCP servers are used to send warning with pre-defined text content to designated TCP servers when events are triggered. AirLive CamPro Professional Manual 51 5. Event Handling Add FTP Server Delete FTP Server Save Click “Add” button at the bottom to add a new TCP server: Fill in the empty fields as illustrated below: 52 AirLive CamPro Professional Manual Clear 5. Event Handling Note: Enter a valid public IP address in the “Host Address” field 5.6 Warning Sound Users can set up sound files in the software and have the software play them when events are triggered. Different warning sounds can be used for different types of triggered events. Add FTP Server AirLive CamPro Professional Manual Delete FTP Server Save 53 Clear 5. Event Handling Note: Only .Wav file is supported To Configure, click the “Add” button: Put in a description for the warning sound in the “Description” field (as shown below): Click on the “folder” icon to locate the sound file: 54 AirLive CamPro Professional Manual 5. Event Handling You can preview the sound before applying the new configuration by clicking on the “Speaker” button: 5.7 Emergency This allows users to create emergency contact information. Add FTP Server AirLive CamPro Professional Manual Delete FTP Server 55 Save Clear 5. Event Handling To add information, click “Add” button: Fill in the empty field with desired information: 5.8 Action Group Once you have all the event servers configured, you can go back to the “Action Group” tab and finish the “Detail Setting” section by selecting the desired event servers for a particular event action group: 56 AirLive CamPro Professional Manual 5. Event Handling 2. Name the Group 3. Select Desired Reaction 1. Add Group 5.9 Event Schedule The software provides users the ability to set one schedule per channel and only events triggered during the defined schedule will be treated as events and the con- figured event actions will be triggered. AirLive CamPro Professional Manual 57 5. Event Handling Channel Selection Time that has been selected Clear the Schedule To configure an event schedule for a particular channel, select one from the top (only the ones available will a checkbox next to the channel number): By default, the schedule is set in full: 58 AirLive CamPro Professional Manual 5. Event Handling To quickly clear the default setting, click on the “Clear” button: Click and hold the mouse then move the house cursor from left to right (horizontally or diagonally) to define (add) new hours or days for event trigger: Click and hold the mouse then move it from right to left (horizontally or diagonally) will erase the previously added hours/days AirLive CamPro Professional Manual 59 6. E-Map 6 6. E-Map 6.1 Overview The software provides E-Map function in a multiple layered structure. Users can place cameras on one map and create a “group” that contains those cameras, and then place the camera “group” on a different map. Users can also create an additional group that contains multiple camera groups and place the new group onto a different map. When accessing the “E-Map” configuration page in the wizard, you should be prompted with the “Overview” page first: Object Type List All, Group or Cameras 60 AirLive CamPro Professional Manual 6. E-Map 6.2 Location Setting This page is an overview page based on the final E-Map settings. It displays all E-Maps and the positions of each camera (or camera group). E-Map Name Camera Camera Group Double-click on a “camera group” (ex. Group 1) icon will direct you to the E-Map that represents camera group 1 and displays the positions of each camera (or cam- era group) in camera group 1. To go back to the previous layer, simply double-click anywhere on the map in the current layer. AirLive CamPro Professional Manual 61 6. E-Map 6.3 Detail Setting A camera can be quickly placed to a new camera group (a group that’s on the same layer) on the fly in detail setting. To do so, simply click and drag a camera icon then drop it onto a camera group icon: Camera Group View Upload Picture Add Camera Group Save Cancel By default, all the cameras should be listed in the tree-view list on the left (as shown below). All cameras should be listed under the “Home” group (or Group#1): 62 AirLive CamPro Professional Manual 6. E-Map To create a new group, click on the “Add new group” button as shown below: The next available group ID and group name should be automatically filled in to the corresponding fields. If you’d like to configure this group as a sub group of another group, choose the main group from the “Dependent” drop-down menu: To change the map image, click on the icon (as shown below) to do so: AirLive CamPro Professional Manual 63 6. E-Map Finally, click on the “camera group” icon and hold the mouse then drag the icon to the desired position on the map to determine its new position. Move the icon on the map to determine its position Similar to the instructions described from page 51 ~ 53, except you click on the camera from the list on the left this time. The “Channel” and “Name” fields will be automatically filled. 64 AirLive CamPro Professional Manual 6. E-Map Simply select a desired camera group this camera will belong to from the “Dependent” drop-down menu: Click and drag the camera icon to determine its new position: Move the icon on the map to determine its position You can also change the camera’s pointing direction on the map from the “Direction” drop-down menu nested on its actual setup in the real world environment: AirLive CamPro Professional Manual 65 7. User Account 7. User 7 Account 7.1 Overview The software provides the option to allow users to set different access privileges and they can be assigned to different user groups. Users can then create multiple user accounts and assigned them to different user groups to determine the access privilege of each user account. Account List Add User Remove User Save Cancel Note: By default, the software does not have any user account/user group created. It’s strongly recommended that you create a user account to prevent unauthorized access to the software. Note: Please do not create an additional user group account that has less access privilege and assign the only user account to that group. You will be asked to log in next time you start the software which you will then only have limited access. Note: You can not create a user account until you create a user group (the first user group will be the “Admin” group) 66 AirLive CamPro Professional Manual 7. User Account 7.2 User Group To create a new user group account, click on the “User Group Setting” tab and click on the “Add Group” button at the bottom: You will then be able to assign access privileges to the new group. You may also change the name of the group if you wish: Group name A particular function of a particular channel that has not been granted for access A particular function of a particular channel that has been granted for access AirLive CamPro Professional Manual 67 8. Recording 8 8. Recording 8.1 Recording The recording configuration page allows users to configure the followings: Quickly enable/disable certain types of recording Recording storage path Recording frame rate of each recording type on each channel Pre-alarm/Post-alarm time Schedule recording 1. You should first be prompted with the overview page that displays the current recording configurations of each channel and the storage path. To add a new storage path, click on the “Add” button (as shown below): 68 AirLive CamPro Professional Manual 8. Recording 2. A new dialog should be prompted which you can select a new path to store the recording data: 3. You can also configure the software to always keep the previous number of days of recording data if you wish to do so: 8.2 Recording Detailed You can configure the detail recording settings in the “Recording Setting” page. In this page, you can configure the followings: Enable/disable recording types Recording frame rate Pre-Alarm/post-alarm time AirLive CamPro Professional Manual 69 8. Recording Channel Selector Channel List Recording Format, Frame Rate Selector and Pre-, Post-Alarm Setting 1. For making the program record video, first click on the desired channel on the list. 2. Then you need to select the video format. If “Same to Live” is selected, the video compression format of the recorded clips will be the same with the Live View setting. 3. For some installation, it may request higher quality to recorded video. And he can choose “Video Setting” for further selecting the desired format. 70 AirLive CamPro Professional Manual 8. Recording 4. Click on “Save” for saving the configuration. 8.3 Recording Schedule Schedule recording allows users to set the software start and stop recording automatically within the scheduled time frame: Hours Day AirLive CamPro Professional Manual 71 8. Recording To configure schedule recording for a particular channel, click on one of the channel from the “CH” column in the upper-left hand corner. Then you can edit the recording schedule of the selected channel in the “Schedule” section: Next, click on the cell boxes on the schedule table to configure the desired recording time. Selected cell boxes will be marked in green which means recording will be started at that particular time of that particular day: Note: Each cell box represent 15 minutes. To set the software to record in consecutive hours on a particular day, click on a cell box (as the starting point) and hold the mouse then move it horizontally. Release the mouse when you are done. 72 AirLive CamPro Professional Manual 8. Recording To set the software to record on consecutive days during a particular hour, click on a cell box (as the starting point) and hold the mouse then move it vertically. Release the mouse when you are done. To clear the schedule, left click and drag the mouse. AirLive CamPro Professional Manual 73 9. Backup 9. Backup 9 9.1 Overview The software provides the backup function which can back up the followings: Media database: Recorded data in the database format AVI export: Recorded data exported to AVI file format Configuration: The configuration files of the software 9.2 Media Database Backup To backup the media database, follow the procedures below: Select channels from the “Channel List” to back their media database Change or accept the default backup directory Set the “Begin Time Set the “End Time” or select the “Export length” Click to begin the backup process 74 AirLive CamPro Professional Manual 9. Backup Channel List Backup Directory Select the Time Start Button You should be notified once the process completes. The stored file name and the storage directory should also be displayed: AirLive CamPro Professional Manual 75 9. Backup 9.3 AVI Export The software provides the function to allow users to backup the recorded file of one or more channels and export them as AVI file format. The file can then be played by the bundled media player. Channel List Backup Directory Select the Time and File Size Start Button To export the recorded video to AVI, follow the procedures below: Select channels from the “Channel List” for AVI export Set the “Begin Time Set the “End Time” or select the “Duration time” Click to begin the backup process 76 AirLive CamPro Professional Manual 9. Backup 9.4 Configuration Backup In the “Configuration” page, you can backup the current settings or restore a previously saved configuration file. Change the Export Path Start to Export Select the File to Import Start to Import To backup the configuration file, select a folder of where you would like the configuration file to be saved to and click “Backup”: You should be notified once the backup is completed successfully. AirLive CamPro Professional Manual 77 9. Backup To restore a previously saved configuration file to the system, locate the file first and then click “Restore”: You should be prompted to confirm the restore process. 78 AirLive CamPro Professional Manual 10. Log View 10. Log 10 View The software provides a detailed log which records what has been done and who has done what to the software: Export the Log Clean the Log Click “Export” to export the log file to text file. You should be prompted once it’s exported successfully. AirLive CamPro Professional Manual 79 11. Client Viewer 11 11. Client Viewer 11.1 Login Window Client Viewer is the program that connects to the CamPro server and performs certain functions to it. Once the client viewer is started, you should be prompted with the login screen. The login screen provides the following options: Connect to a PC NVR Pro server (local or remote) Display language Login username and password Language Search and Add server Available Server List User Name Password Login & Exit Button 80 AirLive CamPro Professional Manual 11. Client Viewer 11.2 Add Server You can select available servers from the drop-down menu at the login screen or you can click on the icon highlighted below to add new servers. The server list dialog should be displayed as shown below: CamPro Professional Server List Required information to access a new server Auto Search for CamPro Professional Server AirLive CamPro Professional Manual 81 Add, Remover, Modify and Cancel Button 11. Client Viewer Add Server manually To add a new server manually, first to click on “Add” button, then enter the corresponding information in all fields on the “Server List” dialog. Click “Modify” button for saving the setting: 2. 1. 3. Note: The “server port” is the port that’s used for video streaming. The new server will then be added and you should find it on the server list: To change its settings, click on it from the server list and click the “Modify” button: 82 AirLive CamPro Professional Manual 11. Client Viewer Add Server Automatically You can also perform an auto search and the software should be able to find servers that are available on the same subnet: A new dialog should be prompted and displays the search progress: New servers that are found should be listed in the list on the top AirLive CamPro Professional Manual 83 11. Client Viewer Check the check box before the desired server, and then click on the button, it should direct you back to the previous dialog and you should find it listed on the server list: Or you can click on button for searching again. The newly added server would be listed in the drop-down menu at the login screen next time you log in: 84 AirLive CamPro Professional Manual 12. Live View 12 12. Live View 12.1 Overview The software basically provides the following functions for the live view: Change screen layout (views in various numbers of split screen) Show OSD and sequence viewing Display videos in their original ratio Server and channel status Audio Snapshot of live videos On-screen event warning PTZ and Digital PTZ controls Manual recording Image enhancement AirLive CamPro Professional Manual 85 12. Live View Top Menu Bar Split screen selections E-Map/Event Monitor/Playback Logout Add current live view layout to favorite Enable/disable video control bar Show OSD on video Display video in original ratio Apply “Event Display on all channels CPU usage of the local viewer Side Manu Dock away side menu Channel Status Live Event List Channel status: Blue: Channel Online Green: Recording in process Red: Event Trigger and Event Recording in process Gray: Channel Offline Camera List Sequence View Control PTZ Control My Favorite View Full Screen View Screen Assignment 86 AirLive CamPro Professional Manual 12. Live View Despite of full screen mode, the side menu can be “docked away” to allow maximum viewing space: 12.2 Adjust Viewing Layout The software offers various viewing layouts which allow users to determine how many videos can be displayed at once. Users can select from the available split window options on the top to changes the viewing layout: AirLive CamPro Professional Manual 87 12. Live View Once the layout is determined, users can quickly decide which channel they would like to view by selecting cameras from the “Camera List” which is available from the side menu: Simply click and drag a camera from the list and drop it onto a desired video window on the left: 88 AirLive CamPro Professional Manual 12. Live View Once you have finish placing the desired cameras on the chosen layout, you can click on the “Add Favorite” button to save the layout as a profile: Click “Yes” to confirm: You can find all the “Favorites” from the side menu under “My Favorites”: With “My Favorites” menu, you can also: Add new favorites Edit settings of existing favorites Remove existing favorites AirLive CamPro Professional Manual 89 12. Live View Remove favorite Add new favorite Edit favorite 12.3 Sequence Monitor SEQ (Sequence) Monitor is a function that displays videos of the selected channels (or favorites) and they are switched automatically with definable interval. The SEQ Monitor can be accessed from the side menu under “SEQ Monitor”: 90 AirLive CamPro Professional Manual 12. Live View To configure the software to automatically sequence the videos of the selected channels, decide the sequence interval first from the drop-down menu (as shown below): Next, choose how many channels you would like to view at once by choosing an option from the drop-down menu under “Manual SEQ”, and then click “Start”: (Options are given depends on the number of channels available in the software) Other than viewing the channels you manually selected in sequence automatically, the software can also be configured to sequence the “My Favorites”. Simply check the ones you like from the “Favorite SEQ” list and click “Start”: 1. 3. 2. AirLive CamPro Professional Manual 91 12. Live View 12.4 Full Screen The software can detect the number of monitors are currently installed on the PC and display different function pages or live videos onto those monitors. The software supports up to 5 monitors and live videos can be assigned to be displayed onto all 5 monitors in full screen. The software is capable of displaying up to 16 live videos on each monitor when in full screen. To enter full screen, 1. Select the screen layout from the top bar 2. Choose the channels in camera list from the side menu and drop them onto the live view area 3. Click “Full Screen” from the side menu 4. Choose the monitor to go full screen 1. 2. 3. 4. 92 AirLive CamPro Professional Manual 12. Live View Note: Windows OS assigns an “ID” number for each monitor installed on the PC; the NVR software uses the same ID number for displaying videos in full screen or different function pages. There are various functions provided when in full screen for maximum flexibility and convenience. You can: Switch among different “My Favorite” Enable/disable display of OSD View all videos in their original ratio Turn on/off video window control bar (more details about this function on page To access these functions, right-click anywhere on the screen when in full screen: AirLive CamPro Professional Manual 93 12. Live View Switch among different “My Favorite” by right-clicking anywhere on the full screen, and go to “Favorite”. Select a “Favorite” from the pull-down menu: If “Show OSD” is clicked, OSDs will be displayed on all videos, which display the channel number and their current frame rate: If “Keep Ratio” is clicked, all videos will be displayed in their original ratio: To turn on the video window control bar, right-click anywhere on the full screen and click “Menu Show”, and then hover the mouse onto any video window: 94 AirLive CamPro Professional Manual 12. Live View 12.5 Screen Assign As mentioned in the previous page that the software can display either live videos in full screen or different function pages on up to 5 monitors, users can configure which monitor displays which function page. To do so: 1. Click “Screen Assign” from the side menu 2. Assign monitors based on its ID number in the drop-down menu for the listed function pages 3. Access the function pages from the top bar AirLive CamPro Professional Manual 95 12. Live View 3. 1. 2. 12.6 PTZ & Preset Control The software comes with various controls for PTZ cameras. They are provided in the virtual PTZ panel from the side menu. The controls include: Pan, tilt, zoom and PTZ speed adjustment Preset points (total 8) monitor, go to preset “Home” point and preset sequence viewing Pan right, pan left, and auto pan Manual focus adjustment and auto-focus Manual brightness adjustment and auto brightness 96 AirLive CamPro Professional Manual 12. Live View Preset Point Pan Right, Pan Left, Stop Pan and Auto Pan Focus Near and Focus Far Auto Focus Brightness UP, Down and Auto Zoom Out and Zoom In The software also offers a more intuitive way to control PTZ cameras with the “mouse-over-video” PTZ controls. That is, users can click (right-click) on the video to pan and tilt view points, and to use the mouse scroll button to zoom in/out. This feature is only available for PTZ cameras and you can tell it is available when the “red cross” and “red arrow” are shown on the video: Note: The closer the red arrow is to the Red Cross, the lower the PTZ speed will be applied Note: For “non-PTZ” comer- as, the software provides the “digital PTZ” function which is mentioned in page. AirLive CamPro Professional Manual 97 12. Live View 12.7 Video Window Control Bar The software provides a “quick access” to certain functions for live videos with a “mouse-over-video” control bar. This function is turned off by default and can be turned on from the top bar (as shown below): Once enabled, hover the mouse onto any video window and the control bar should appear on top of the video window: The control bar provides the following functions: 1. Turn on/off audio 2. Audio post 3. Snapshot 4. Display warning on video when an event is triggered (On-Video Event Display) 5. Display OSD 6. Digital PTZ 7. Start/stop manual recording 8. Keep ratio 9. Image enhancement 98 AirLive CamPro Professional Manual 12. Live View Audio If a camera does not support the audio function, a pop-up message will be displayed when the audio button is clicked. This is to notify the user that this channel does not support the audio function. Snapshot When this button is click, the software takes a snapshot of the video. A new dialog should appear and display the snapshot of the video: Save the Image Event Display The event display is a function that helps users quickly identify when there are events going on one or more channels. The movement in the video will be marked with small green cubes: AirLive CamPro Professional Manual 99 12. Live View Note: Event must be enabled and configured in the “Config Wizard” before this function can work properly. Please see chap 4 for further information about Intelligent Setting. Note: You can also enable “Event Display” on all channels by checking “Video Alert” from the top bar. Certain types of events will be displayed under different section at the bottom of the event display list. They are: 1. Camera Tampering Detection 2. Object Loss Detection 3. Foreign Object Detection Double Click for resetting the alert 100 AirLive CamPro Professional Manual 12. Live View The reason for this is that the software needs the users to manually acknowledge the events detection for the detection to be reset and start detection over again. Without users manually acknowledging the detection, the warning would stay on the screen in case the users are not in front of the monitor and can then be reminded when they return. To acknowledge the detection, simply double-click on the red check mark and then the detection would be reset. Digital PTZ To use digital PTZ, enable the function from the video window control bar first: The mouse cursor should turn into a magnifier when you hover the mouse onto one of the video windows. Click and drag diagonally on an area you would like to zoom in: AirLive CamPro Professional Manual 101 12. Live View Note: Once the video is zoomed in, the mouse cursor will turn into the icon which you can click and drag to move within the zoomed area. Note: Use the scroll button on the mouse to zoom in further or zoom out. Right click on the video to exit the digital PTZ mode. Manual Recording You can quickly start manual recording from the video window control bar when seeing something abnormal from the live video. Click the same button to stop: Once the manual recording starts. You can find the corresponding changes in the UI in “Channel Status” and “Event List” from the side menu. Channels marked in green means “manual recording” is currently in progress. 102 AirLive CamPro Professional Manual 12. Live View Image Enhancement This function is aimed to improve the interpretability or perception of information in images for human viewers. Simply enable this function from the video window control bar to see the difference: Off On 12.8 Server & Channel Status You can obtain the detail information about the server and the current status of each channel by clicking “Local Service” from the top bar: It opens up a new dialog which displays detail information of the followings: Server CPU usage Total Bandwidth consumption HDD usage and recycle status Channel number and name Channel IP address Channel Status (Connected/Disconnected/Recording...etc) BitRate consumed by each channel Current frame rate of each channel AirLive CamPro Professional Manual 103 12. Live View 104 AirLive CamPro Professional Manual 13. E-Map Monitor 13 13. E-Map Monitor E-Map Monitor provides monitoring with instant event notifications with the geographical information of each camera (and camera group). Small-sized video of a channel will be shown on the map during a trigger of an event. Playback Home Back to Up Layer Channel Info Live View Event View Event List Camera Groups Camera & Event Contact Info The E-Map Monitor displays the top layer of e-map by defaults. Double-click on the camera group icon to go down a layer and enter the e-map of the camera group. AirLive CamPro Professional Manual 105 13. E-Map Monitor Note: Press on the “Home” button to go back the “Home” layer or the “Previous” button for previous layer. When there is an event going on, the camera icon (or the camera group icon) will be surrounded with red square flashes on the map: 106 AirLive CamPro Professional Manual 13. E-Map Monitor Camera Preview Double-click on the “camera group” icon will direct you to the emap of that camera group Double-click on the “camera” icon” will display the small-sized video of that channel. Once the “camera” icon is clicked, its channel information and event trigger information will be displayed on the side bar: AirLive CamPro Professional Manual 107 13. E-Map Monitor The triggered events will be listed on the side bar: The contact info of the channel will also be displayed on the side bar if this has been configured in the “Config Wizard”: 108 AirLive CamPro Professional Manual 13. E-Map Monitor AirLive CamPro Professional Manual 109 14. Event Monitor 14 14. Event Monitor 14.1 Live Event Monitor Event Monitor is a function that plays back “event only” videos. It’s a convenient tool that allows users to play through a list of event recordings that are happening at the moment: Events will be listed on the side bar and clicking on any one of them will instantly play back the recording: 110 AirLive CamPro Professional Manual 14. Event Monitor The channel information and contact information of that particular channel will also be displayed on the side bar: The software also displays thumbnail images of the most recent events. The images get replaced whenever there are new events coming in: AirLive CamPro Professional Manual 111 14. Event Monitor The mini-sized E-Map available at the lower-left hand corner displays the location of the camera: 14.2 History Event Monitor By default, the Event Monitor page displays “live” events which, events listed on the side bar gets refreshed automatically whenever new events are triggered. If you want to access the older events without going to the Playback page, you can access the “History Events” from the top bar in Event Monitor page: 112 AirLive CamPro Professional Manual 14. Event Monitor The History Event page should be displayed with the similar user interface with only the difference of letting users to “search” the older events. The search function is available at the lower-right hand corner on the side bar: To perform search, select which channels to perform search on by choosing either “ALL” or “SELECT”, which gives you a drop-down menu to select channels: Then determine a start time: AirLive CamPro Professional Manual 113 14. Event Monitor Finally, you can either search all events or set up a filter to search a particular type of event only: Results will then be listed. Simply click on to start playback: 114 AirLive CamPro Professional Manual 14. Event Monitor Playback should then start and the corresponding channel information and camera’s geographical information would also be displayed accordingly: The “Event Image List” at the bottom would display the thumbnail images of the events with the time that is the closest to the event trigger time of the channel that was just selected for playback AirLive CamPro Professional Manual 115 14. Event Monitor For control of the playback, check “Playback Control Bar” from the top and it should appear in the playback video window: 116 AirLive CamPro Professional Manual 15. Playback 15 15. Playback Playback provides functions to allow users to playback all recording data of all channels while offering additional features to assist users to find what they are looking within the shortest period of time and to enhance the playback experience. These features are: Display all available recording data at the bottom and display “event only” recordings of the selected channels on the side bar Capture screenshot Digital PTZ Image Enhancement To start search recordings, simply select desired channels from the channel list at the upper-right hand corner: AirLive CamPro Professional Manual 117 15. Playback As soon as the channels are selected, their recording data should be display in the bottom bar as well as the side bar (If there are event recordings): About the time bar at the bottom: Time Range Channel Recording Data Indicator of current playback time Recording Data: Areas that are marked in dark gray: regular recording data Areas that are marked in red: event recording data Green Playback indicator: indicating the progress of the playback The time bar displays all recording data from the oldest to the latest. You can then ask the software to display a portion of the recording data by selecting on the time bar. Simply click and hold the mouse, then drag it horizontally to select: It will then zooms in and display the recording data of that portion. The begin time and end time would also change accordingly. 118 AirLive CamPro Professional Manual 15. Playback To go back up a level, simply “right-click” anywhere on the time bar: Right Click You can click and drag the green indicator horizontally to jump to a specific play time: The playback also provides control bars with the following features: Playback Control Bar: Single step back/rewind/play/stop/pause/fast forward/single step forward videos Playback Video Window Control Bar: Turn on/off audio/snapshot/display OSD/digital PTZ/keep video ratio/image enhancement AirLive CamPro Professional Manual 119 15. Playback By default, these two control bars are hidden but can be enabled from the top bar: You can also set to have all playback videos to be displayed in their original aspect ratio and display OSD by checking the options from the top bar: The green indicator in the time bar at the button indicates the progress of the play- back and which portion is being played back. You can find the exact playback time from the top bar: 120 AirLive CamPro Professional Manual 16. Media Player 16 16. Media Player The software comes with a player program which plays the recording files that are in their original database file format or in the AVI file format that were exported by the software. You can find the software shortcut under “Start Æ Programs Æ AirLive Æ CamPro Professional”: 16.1 Play the exported AVI file To playback the exported AVI file, go to “Open” >> “AVI File” from the top menu: A new dialog will be displayed asking you to locate the AVI file. Go to C:\Program Files\<installed path>\AVI as it’s the default directory of where the exported AVI files are saved: AirLive CamPro Professional Manual 121 16. Media Player The playback should begin and the video should be played back in its original resolution by default: Move the indicator horizontally to jump back and forth to a specific time: Use the control buttons at the bottom to play/stop/pause/rewind/fast forward the video 122 AirLive CamPro Professional Manual 16. Media Player You can click on the “Snapshot” button at the bottom to take a snapshot of the video: Note: The snapshots can only be saved in “JPEG” format. Click on the “OSD” button at the bottom displays the OSD on the video: Note: The OSD displays in the upper-left hand corner by default. More settings can be done to it such as font size/color and display position. The player also supports the digital function. Simply use the scroll button to zoom in/out. You can also click and hold the house then drag diagonally to select a particular area to zoom in. AirLive CamPro Professional Manual 123 16. Media Player Draw a square on the video to zoom in a particular area Once the video is zoomed in, click and hold the mouse button then move the mouse to move the zoomed area: Click and hold the mouse button then move the mouse to move the zoomed in area To exit digital PTZ mode, simply right-click anywhere on the video. 124 AirLive CamPro Professional Manual 16. Media Player 16.2 Play the database file To play the media database file, simply go to “Open” >> “Media Data Base” from the top menu: A dialog shown like below should be displayed: The default MDB path should be displayed. If you have altered the database storage path in the Config Wizard, click “Browse” to locate the new path: A new dialog should be displayed to allow you to locate the directory of where the database files are stored: AirLive CamPro Professional Manual 125 16. Media Player After the directory is selected, click on “Check”: A pop-up message should be displayed once the database is successfully located (as shown below): Next, select a desired time zone from the drop-down menu: 126 AirLive CamPro Professional Manual 16. Media Player Note: The MDB file does not contain any time zone information. Simply select a time zone based on your current location or select one if you know the time zone of NVR server where the MDB was exported from. The “Channel” drop-down menu lists only the channels that have recording files available. Simply select a channel and press “Search”: The beginning and ending time of the selected channel should then be found: Simply specify the “Start Time” within the range of begin and end time and click “OK” to play the database file: The playback should begin and the video should be played back in its original resolution: AirLive CamPro Professional Manual 127 16. Media Player 16.3 Configure the OSD Display To make changes of how OSD is displayed on the playback video, go to “Setting Æ OSD” from the top menu: A new dialog should be displayed which lets you change the OSD setting (as shown below): Select the time zone Select to display time, resolution or both The Position of the OSD OSD font Setting 128 AirLive CamPro Professional Manual 17. Remote Web Access 17 17. Remote Web Access CamPro has built-in web server which allows users to access the live video and payback video through a web browser remotely. This is convenient be- cause it doesn’t require users to install remote application in order to see the live and playback videos. You can view live videos of up to 16 channels simultaneously through the web browser. As soon as you log in through the web browser, it displays live video of the first available channel in single window view. You can switch the split mode by clicking the camera list on the left: AirLive CamPro Professional Manual 129 17. Remote Web Access Click to see live videos of first 16 channels in 16 split mode Click a sub-group to see live videos of the 4 channels in that group in quad window view Click the camera icon to see the live video of that channel in single window view The camera icons are marked with different colors representing their current status: Online Offline Recording Not Configured 130 AirLive CamPro Professional Manual 17. Remote Web Access 17.1 PTZ Control: The PTZ control is available at the lower-left hand corner. Select a camera from the drop-down menu to use PTZ control: Focus Near & Far Auto Focus Zoom In and Zoom Out Brightness Adjust 17.2 Preset Click on “Preset” to access the preset menu. The drop-down menu should list the available preset points of the selected channel that were previously configured. Simply select one from the list and click “Go to”: AirLive CamPro Professional Manual 131 17. Remote Web Access The buttons below the drop-down menu allows you to set the camera to pan right or left automatically or pan 360 degrees if the camera supports such function: You can also set the camera to “patrol” among the preset points continuously by clicking the “Start” at the bottom: 17.3 Sequence Viewing You can also set to view all or selected channels in sequence automatically by going to “Sequence”: Select “All Channels” to start sequence view on all channels in single window view. You can set the sequence interval by selecting one of the pre-defined options from the “Interval drop-down menu. Click “Start” to begin: 132 AirLive CamPro Professional Manual 17. Remote Web Access Select “All Groups” to start sequence view in quad window view (4 cameras in one group): You can also set to start sequence view in 16 window view by checking the “1 - 16”, “17 32”...etc checkboxes: AirLive CamPro Professional Manual 133 17. Remote Web Access 17.4 Video Window Control Bar Each video window in live view comes with its control bar. The control bar allows users to: Take snapshot of the live video Turn on/off audio (speaker) Turn on/off audio post (Mic.) Snapshot, Audio on/off, Audio post on/off To take a snapshot, click on the snapshot icon and a new window should be displayed. Simply close the window to finish as the snapshot will be saved to C:\SnapshotFolder automatically: 134 AirLive CamPro Professional Manual 17. Remote Web Access 17.5 Digital PTZ The digital PTZ function is supported to all video windows, which you can click and hold the mouse and drag diagonally to draw a square to zoom in a particular area on the video: Once zoomed in, an icon will be available on the video. Simply click and hold the mouse and then drag to move the zoomed in area to a desired direction: You can right-click anywhere on the video to exit the digital PTZ mode at any time. 17.6 Keep video in original aspect ratio and full screen At all time, you can set to display all videos in their original aspect ratio by clicking the function button available at the upper-right hand corner. To display in full screen, click the button next to it: Keep Ratio & Full Screen AirLive CamPro Professional Manual 135 17. Remote Web Access 17.7 Change display language The web user interface supports display in different languages. To change the display language, click the logged in user account at the upper-right hand corner: Click the User Account A pop-up window should be displayed. Please select a desired language from the “Language” drop-down menu and click “Apply”: 17.8 Playback: Playback is a function that allows you to play one or more videos that were previously recorded by a chosen recording method or due to an event trigger. The web interface offers synchronized playback from up to 4 channels and various types of search methods are provided to help you find the footage you need quickly. 136 AirLive CamPro Professional Manual 17. Remote Web Access You can turn on or off the audio of a recorded video at your choice if audio was also recorded during the recording of the video. Playback video can be viewed in full screen and snapshots can be taken and saved during a video playback. Playback Control Video Playback Channel List Data Search Method 17.9 Methods to search Playback Videos The NVR offers four methods to quickly help users find videos that were previously recorded: Search by time chart: Select a desired date of recording from the time chart Search by specific time: Find videos by specifying a start time Search by event: Display recording data that were recorded due to event triggers Search by event (most recent): Display the most recent event recording data AirLive CamPro Professional Manual 137 17. Remote Web Access Search by time chart Start by selecting which channel(s) you would like to perform a search on: Selected channels will be marked in red Select “Search by time chart” from the “Search Method” drop-down list and click “Go” to start the search: Results will then be displayed in a “Date/Channel” table and boxes marked in dark gray represent videos found on those dates: 138 AirLive CamPro Professional Manual 17. Remote Web Access Click on any dark gray cell box should direct you to the hour/channel table if there were multiple videos recorded during that date: Videos from other cameras that are recorded on the same date will also be displayed Click on the cell box again will start playing back the videos if you have reached the end of search results: Videos found from other cameras that were recorded at the same time will also be played. AirLive CamPro Professional Manual 139 17. Remote Web Access Search by event Start by selecting which channel(s) you would like to perform a search on: Select “Search by event” from the “Search Method” drop-down list and click “Go” to start the search: Results will then be listed like what is shown below (displays the oldest record top down). Click on a particular result to start the playback: You can click “Next Search” to display the next 15 results. You may also specify a new start time to search and display results from then on. You can restrict the number of results to be displayed at once (max. 30) and perform the search again. 140 AirLive CamPro Professional Manual 17. Remote Web Access Play by specific time If you know when a recording was taken place, you may choose the “Play by start time” from the “Search Method” drop-down list Then you will be prompted to enter a specific time and date for the recorded video. AirLive CamPro Professional Manual 141 17. Remote Web Access Search by event (most recent) This function quickly displays the most recent event recordings from the selected channels, displaying the most recent result top down. You may click “Update” to update the list to display the most recent result 142 AirLive CamPro Professional Manual Appendix A: Camera Support List A Appendix A: Camera Support List Brand AirLive Model OD-300CAM OD-325HD OD-600HD OD-2025HD OD-2025PHD IP-150CAM IP-200PHD POE-100CAM POE-200CAM POE-100CAMv2 POE-200CAMv2 POE-260CAM POE-100HD POE-100HD-ICR POE-200HD POE-250HD POE-2600HD WN-150CAM WN-200HD WN-2600HD WL-2000CAM WL-2600CAM WL-350HD VS-100 Axis All dual-stream and H.264 capable cameras Panasonic BL-C1 (Communication) BL-C10 BL-C20 AirLive CamPro Professional Manual Compression MJPEG/MPEG4 MJPEG/MPEG4/H.264 MJPEG/MPEG4/H.264 MJPEG/MPEG4/H.264 MJPEG/MPEG4/H.264 MJPEG/MPEG4 MJPEG/MPEG4/H.264 MJPEG/MPEG4 MJPEG/MPEG4 MJPEG/MPEG4 MJPEG/MPEG4 MJPEG/MPEG4 MJPEG/MPEG4/H.264 MJPEG/MPEG4/H.264 MJPEG/MPEG4/H.264 MJPEG/MPEG4/H.264 MJPEG/MPEG4/H.264 MJPEG/MPEG4 MJPEG/MPEG4/H.264 MJPEG/MPEG4/H.264 MJPEG/MPEG4 MJPEG/MPEG4 MJPEG/MPEG4/H.264 MJPEG/MPEG4/H.264 Firmware LM.1.6.16.05 5.0.2.3844 5.0.2.3844 6.D.2.6590 6.D.2.6590 LM.1.6.18 6.B.2.6589 LM.1.6.16.05 LM.1.6.16.05 LM.1.6.16.05 LM.1.6.16.05 LM.1.6.16.05 5.0.2.3844 5.0.2.3844 5.0.2.3844 5.0.2.3844 6.C.2.6590 LM.1.6.18 6.B.2.6589 6.C.2.6590 LM.1.6.16.05 LM.1.6.16.05 MG.1.6.02 5.a.2.5703 MJPEG/MPEG4/H.264 v4.30 or above MJPEG MJPEG MJPEG 1.29 1.24 1.3 143 Appendix A: Camera Support List Panasonic (Business) BL-C30 BL-C111 BL-C131 BB-HCS301 BB-HCM100 BB-HCM110 BB-HCM311 BB-HCM331 BB-HCM371 BB-HCM-381 KX-HCM110 KX-HCM280A BB-HCM403 BB-HCE481 BB-HCM511 BB-HCM527 BB-HCM531 BB-HCM547 BB-HCM515 BB-HCM580 BB-HCM581 BB-HCM715 BB-HCM715 BL-C210A BB-HCM701CE MJPEG MJPEG/MPEG4 MJPEG/MPEG4 MJPEG MJPEG MJPEG MJPEG MJPEG MJPEG MJPEG MJPEG MJPEG MJPEG MJPEG MJPEG/MPEG4 MJPEG/MPEG4 MJPEG/MPEG4 MJPEG/MPEG4 MJPEG/MPEG4 MJPEG/MPEG4 MJPEG/MPEG4 MJPEG/MPEG4/H.264 MJPEG/MPEG4/H.264 MJPEG/MPEG4/H.264 MJPEG/MPEG4/H.264 1.3 3.1 3.1 1.3 1.3 1.30R01 1.3 1.3 1.3 1.3 1.3 1.3 1.33 1.29 3.12 3.51R00 3.12 3.51R00 3.11 3.13 3.13 4.10R00 4.10R00 4.31R00 4.31R00 BB-HCM705CE MJPEG/MPEG4/H.264 4.31R00 BB-HCM735CE WV-NP1004 WV-NP244 WV-NS202 WV-NF284 WJ-NT304 WV-NW484S WV-NS202A WV-NS954 WV-NW964 WJ-NT314 WV-NF302 MJPEG/MPEG4/H.264 MJPEG MJPEG/MPEG4 MJPEG MJPEG/MPEG4 MJPEG MJPEG/MPEG4 MJPEG/MPEG4 MJPEG/MPEG4 MJPEG/MPEG4 MJPEG MJPEG/MPEG4 4.31R00 v1.21 v1.50 v1.30 v1.11 v1.10 v1.03 v1.10 v2.20 v1.10 N/A v1.10 144 AirLive CamPro Professional Manual Appendix A: Camera Support List Sony WV-NP304 MJPEG/MPEG4 v1.10 GXE-500 MJPEG/MPEG4/H.264 v1.03 WV-NP502 MJPEG/MPEG4/H.264 v1.02/v1.06/v1.07 WV-SF336 MJPEG/MPEG4/H.264 v1.03 WV-SP305 MJPEG/MPEG4/H.264 Application:1.06, Image data:1.04 WV-NW502S MJPEG/MPEG4/H.264 Application:1.20, Driver: 1.07, Image data:1.06 WV-SP105 MJPEG/H.264 1 Application: 1.31 2 Image data: 1.03 WV-SC385 MJPEG/H.264 1 Application: 1.04 2 Driver: 1.19 3 Image data: 1.14 WV-SP102 MJPEG/H.264 1 Application: 1.31 2 Image data: 1.03 WV-SP306 MJPEG/H.264 1 Application: 1.30 2 Image data: 1.04 WV-SF335 MJPEG/H.264 1 Application: 1.30 2 Image data: 1.05 WV-SP336 MJPEG/H.264 1 Application: 1.30 2 Image data: 1.06 SNC-CS10 SNC-CS11 SNC-CS20 MJPEG/MPEG4 MJPEG/MPEG4 MJPEG/MPEG4 v1.06 v1.06 v1.02 SNC-CS50 MJPEG/MPEG4/H.264 v2.23 SNC-DF40 SNC-DF50 SNC-DF70 MJPEG/MPEG4 MJPEG/MPEG4/H.264 MJPEG/MPEG4 v1.18 v1.14 v1.18 SNC-DF80 MJPEG/MPEG4/H.264 v1.14 SNC-DS10 SNC-DS60 SNC-P1 SNC-P5 SNC-RZ25 MJPEG/MPEG4 MJPEG/MPEG4 MJPEG/MPEG4 MJPEG/MPEG4 MJPEG/MPEG4 v1.02 v1.02 v1.29 v1.29 v1.30 SNC-RZ50 MJPEG/MPEG4/H.264 v1.13 SNC-RX530 MJPEG/MPEG4/H.264 v3.02/v2.32 AirLive CamPro Professional Manual 145 Appendix A: Camera Support List SNC-RX550 SNC-RX570 SNC-CM120 SNC-CS20 SNC-DM110 SNC-DM160 SNC-DS10 SNC-DS60 MJPEG/MPEG4/H.264 MJPEG/MPEG4/H.264 MJPEG/MPEG4 MJPEG/MPEG4 MJPEG/MPEG4 MJPEG/MPEG4 MJPEG/MPEG4 MJPEG/MPEG4 v3.02/v2.32 v3.02/v2.23 v1.03 v1.03 v1.03 v1.03 v1.03 v1.03 SNC-RH124 MJPEG/MPEG4/H264 1.04.00 SNC-RH164 MJPEG/MPEG4/H264 1.04.00 SNC-RS46 MJPEG/MPEG4/H264 1.04.00 SNC-RS44 MJPEG/MPEG4/H264 1.04.00 SNC-RS86 SNC-RS84 SNT-EX101 SNT-EX104 SNT-EX154 SNT-EP104 SNT-EP154 SNC-CH140 SNC-CH210 SNC-CH240 SNC-DH140 MJPEG/MPEG4/H264 MJPEG/MPEG4/H264 MJPEG/MPEG4/H264 MJPEG/MPEG4/H264 MJPEG/MPEG4/H264 MJPEG/MPEG4/H264 MJPEG/MPEG4/H264 MJPEG/MPEG4/H264 MJPEG/MPEG4/H264 MJPEG/MPEG4/H264 MJPEG/MPEG4/H264 1.04.00 1.04.00 1.04.00 1.04.00 1.04.00 1.04.00 1.04.00 1.10.03 1.12 1.11 1.10.03 SNC-DH140T SNC-DH180 MJPEG/MPEG4/H264 MJPEG/MPEG4/H264 1.10.03 1.11 SNC-DH240 MJPEG/MPEG4/H264 1.10.03 SNC-DH240T MJPEG/MPEG4/H264 1.10.03 SNC-DF85 MJPEG/MPEG4/H264 1.2 SNC-CH220 SNC-DH220 / T SNC-CH160 SNC-DH160 SNC-CH280 SNC-DH280 SNC-CH260 SNC-DH260 SNC-DH210 / T MJPEG/MPEG4/H.264 MJPEG/MPEG4/H.264 MJPEG/MPEG4/H.264 MJPEG/MPEG4/H.264 MJPEG/MPEG4/H.264 MJPEG/MPEG4/H.264 MJPEG/MPEG4/H.264 MJPEG/MPEG4/H.264 MJPEG/MPEG4/H.264 1.21.02 1.23.01 1.13.00 1.13.00 1.26.01 1.26.01 1.23.02 1.23.02 N/A 146 AirLive CamPro Professional Manual Appendix A: Camera Support List AVTech Canon ACTi SNC-CH120 SNC-DH120 / T SNC-CH180 MJPEG/MPEG4/H.264 MJPEG/MPEG4/H.264 MJPEG/MPEG4/H.264 1.13.00 1.13.00 1.26.01 SNC-CH110 MJPEG/MPEG4/H.264 N/A SNC-RH164 SNC-RH124 AVI-201 AVI-202 AVI-203 AVN-211 AVN-212 AVN-222 MJPEG/MPEG4/H.264 MJPEG/MPEG4/H.264 MJPEG/MPEG4 MJPEG/MPEG4 MJPEG/H.264 MJPEG/MPEG4/H.264 MJPEG/MPEG4/H.264 MJPEG/MPEG4 1.25.00 1.25.00 N/A N/A N/A N/A N/A N/A AVN-244 MJPEG/MPEG4/H.264 N/A AVN-252 AVN-263 AVN-284 MJPEG/MPEG4/H.264 H.264 MJPEG/MPEG4/H.264 N/A N/A N/A AVN-362 MJPEG/MPEG4/H.264 N/A VB-C300 VB-C60 VB-C500D ACM1011 ACM1511 ACM1231 ACM1232 ACM3011 ACM3401 ACM3411 ACM3511 ACM4000 ACM4001 ACM4200 ACM4201 ACM5601 ACM5611 ACM7411 ACD2100 ACD2200 MJPEG MJPEG/MPEG4 MJPEG/MPEG4 MJPEG/MPEG4 MJPEG/MPEG4 MJPEG/MPEG4 MJPEG/MPEG4 MJPEG/MPEG4 MJPEG/MPEG4 MJPEG/MPEG4 MJPEG/MPEG4 MJPEG/MPEG4 MJPEG/MPEG4 MJPEG/MPEG4 MJPEG/MPEG4 MJPEG/MPEG4 MJPEG/MPEG4 MJPEG/MPEG4 MJPEG/MPEG4 MJPEG/MPEG4 V1.1 V1.0.0 V1.0.0 V3.11 V3.11 V3.11 V3.11 V3.11 V3.11 V3.11 V3.11 V3.11 V3.11 V3.11 V3.11 V3.11 V3.11 V3.11 V3.11 V3.11 AirLive CamPro Professional Manual 147 Appendix A: Camera Support List D-Link Toshiba Abus ACD2300 ACD2400 TCM-5311 CAM-6610 CAM-6630 CAM-6510 CAM-7301 CAM-7321 CAM-7322 ACM-8201 DCS-2102 DCS-2121 DCS-3410 DVS-N3010 DVS-N3014 DVS-N3040 DVS-N3044 DCS-N3530 DCS-N3531 DCS-N3534 DCS-N5440 DCS-N5442 DCS-N5444 DCS-N6240 DCS-N6241 DCS-N6244 DCS-N2100 DCS-N2104 DCS-N40-20H2 DCS-N40M-32H2 DCS-N40M-33H2 DCS-N30-10H2 IK-WD01A K-WB70A TV7240 TV7230 TV7203 TV7204 MJPEG/MPEG4 MJPEG/MPEG4 MJPEG/MPEG4/H.264 MJPEG/MPEG4 MJPEG/MPEG4 MJPEG/MPEG4 MJPEG/MPEG4 MJPEG/MPEG4 MJPEG/MPEG4 MJPEG/MPEG4 MJPEG/MPEG4 MJPEG/MPEG4 MJPEG/MPEG4 MJPEG/MPEG4 MJPEG/MPEG4 MJPEG/MPEG4 MJPEG/MPEG4 MJPEG/MPEG4 MJPEG/MPEG4 MJPEG/MPEG4 MJPEG/MPEG4 MJPEG/MPEG4 MJPEG/MPEG4 MJPEG/MPEG4 MJPEG/MPEG4 MJPEG/MPEG4 MJPEG/MPEG4 MJPEG/MPEG4 MJPEG/MPEG4/H.264 MJPEG/MPEG4/H.264 MJPEG/MPEG4/H.264 MJPEG/MPEG4/H.264 MJPEG/MPEG4 MJPEG/MPEG4 MJPEG/MPEG4 MJPEG/MPEG4 MJPEG/MPEG4 MJPEG/MPEG4 148 V3.11 V3.11 V3.11 V2.09.11-AC V2.09.11-AC V2.09.11-AC V2.09.11-AC V2.09.11-AC V2.09.11-AC V3.11.13-AC v1.03 v1.03 v1.03 v3.2.58 v3.2.58 v3.2.58 v3.2.58 v3.2.58 v3.2.58 v3.2.58 v3.2.58 v3.2.58 v3.2.58 v3.2.58 v3.2.58 v3.2.58 v3.2.58 v3.2.58 N/A N/A N/A N/A N/A N/A 0102a,0102c,0910l 0102a,0102c,0910w 0202a,0203a,0210l 0202a,0203a,0210w AirLive CamPro Professional Manual Appendix A: Camera Support List Arecont Vision Etrovision Mobotix TV7206 TV7220 TV7221 TV7222 TV7223 AV1300 AV1305 AV1355 AV2100 AV2105 AV2155 AV3100 AV3105 AV3155 AV3130 AV5100 AV5105 AV5155 AV8180 AV8185 AV8360 AV8365 EV6150 EV6150A MJPEG/MPEG4 MJPEG/MPEG4 MJPEG/MPEG4 MJPEG/MPEG4 MJPEG/MPEG4 MJPEG MJPEG/H.264 MJPEG/H.264 MJPEG MJPEG/H.264 MJPEG/H.264 MJPEG MJPEG/H.264 MJPEG/H.264 MJPEG MJPEG MJPEG/H.264 MJPEG/H.264 MJPEG MJPEG/H264 MJPEG MJPEG/H264 MJPEG/MPEG4/H.264 MJPEG/MPEG4/H.264 0100b 610l 4270 710l 4970 N/A N/A N/A N/A N/A N/A N/A N/A N/A N/A N/A N/A N/A N/A N/A N/A N/A v1.5.1 v1.5.1 EV6151A MJPEG/MPEG4/H.264 v1.5.1 EV6153A EV6551A EV6552A EV8150A MJPEG/MPEG4/H.264 MJPEG/MPEG4/H.264 MJPEG/MPEG4/H.264 MJPEG/MPEG4/H.264 v1.5.1 v1.5.1 v1.5.1 v1.5.1 EV6353A MJPEG/MPEG4/H.264 v1.5.1 EV6250A EV3850A MJPEG/MPEG4/H.264 MJPEG/MPEG4/H.264 v1.5.1 v1.5.1 EV3151A MJPEG/MPEG4/H.264 v1.5.1 EV3151 EV3150A M12 M22 MJPEG/MPEG4/H.264 MJPEG/MPEG4/H.264 MJPEG MJPEG v1.5.1 v1.5.1 3.4.5.18 3.4.5.18 AirLive CamPro Professional Manual 149 Appendix A: Camera Support List ALinking Brickcom D12 D24 9122/9122p 9751/9751w 9852/9852w 9451 9351 9551 9552 9553 9152 9652 CB-100Ae-08 (VGA) WCB-100Ae-08 (VGA) CB-100Ae-08 WCB-100Ae-08 CB-101Ae-00 CB-102Ae-00 CB-100Ap-0c WCB-100Ap-0c CB-101Ap-04 CB-102Ap-04 FB-100Ae WFB-100Ae FB-100Ap MJPEG MJPEG MJPEG/MPEG4 MJPEG/MPEG4 MJPEG/MPEG4 MJPEG/MPEG4 MJPEG/MPEG4 MJPEG/MPEG4 MJPEG/MPEG4 MJPEG/MPEG4 MJPEG/MPEG4 MJPEG/MPEG4 MJPEG/MPEG4/H.264 3.4.5.18 4.0.1.15 v1.29 v1.27 v1.32 v1.27 v1.33 v1.27 v1.33 v1.27 v1.33 v1.27 v1.33 v1.27 v1.33 v1.27 v1.33 v1.27 v1.33 v1.27 v1.33 Latest MJPEG/MPEG4/H.264 Latest MJPEG/MPEG4/H.264 MJPEG/MPEG4/H.264 MJPEG/MPEG4/H.264 MJPEG/MPEG4/H.264 MJPEG/MPEG4/H.264 MJPEG/MPEG4/H.264 MJPEG/MPEG4/H.264 MJPEG/MPEG4/H.264 MJPEG/MPEG4/H.264 MJPEG/MPEG4/H.264 MJPEG/MPEG4/H.264 Latest Latest Latest Latest Latest Latest Latest Latest Latest Latest Latest WFB-100Ap FB-130Ap MJPEG/MPEG4/H.264 MJPEG/MPEG4/H.264 Latest Latest WFB-130Ap MJPEG/MPEG4/H.264 Latest FB-130Np MJPEG/MPEG4/H.264 Latest WFB-130Np MJPEG/MPEG4/H.264 Latest FB-300Ap WFB-300Ap FD-100Ae FD-100Ap FD-130Ap MD-100Ae MJPEG/MPEG4/H.264 MJPEG/MPEG4/H.264 MJPEG/MPEG4/H.264 MJPEG/MPEG4/H.264 MJPEG/MPEG4/H.264 MJPEG/MPEG4/H.264 Latest Latest Latest Latest Latest Latest 150 AirLive CamPro Professional Manual Appendix A: Camera Support List IQInvision Hunt Pixord LevelOne MD-100Ap MJPEG/MPEG4/H.264 Latest OB-100Ae WOB-100Ae OB-100Ap MJPEG/MPEG4/H.264 MJPEG/MPEG4/H.264 MJPEG/MPEG4/H.264 Latest Latest Latest WOB-100Ap GOB-100Ap OSD-040D/E 36xp PZ-040D/E 12xp VD-100Ae VD-100Ap VD-130Ap IQA2xx series IQA1xx serires IQ04xx/D4xx/05xx series IQEye5xx IQEye7xx/8xx series All P600 FCS-0010v2 WCS-0010 FCS-0020 WCS-0020 FCS-1091 WCS-1090 FCS-1030 V2.0 WCS-2030 V3.0 FCS-1060 WCS-2060 FCS-3021 FCS-5030 FCS-4010 FCS-5011 FCS-1101 FCS-1081A FCS-4x00 FCS-0030 MJPEG/MPEG4/H.264 MJPEG/MPEG4/H.264 MJPEG/MPEG4/H.264 MJPEG/MPEG4/H.264 MJPEG/MPEG4/H.264 MJPEG/MPEG4/H.264 MJPEG/MPEG4/H.264 MJPEG MJPEG Latest Latest Latest Latest Latest Latest Latest V3.0/4 V3.0/4 MJPEG V3.0/4 MJPEG MJPEG MJPEG/MPEG4 MJPEG/H.264 MJPEG/MPEG4 MJPEG/MPEG4 MJPEG/MPEG4 MJPEG/MPEG4 MJPEG/MPEG4 MJPEG/MPEG4 MJPEG/MPEG4 MJPEG/MPEG4 MJPEG/MPEG4 MJPEG/MPEG4 MJPEG/MPEG4 MJPEG/MPEG4 MJPEG/MPEG4 MJPEG/MPEG4 MJPEG/MPEG4 MJPEG/MPEG4 MJPEG/MPEG4 MJPEG/MPEG4/H.264 V2.8/6 V2.8/6 N/A 1.0.5_rc1_1 1.0.12 1.0.13 1.0.07 1.0.07 1.0.07 1.0.07 0204a 0205a 0204a 0204b 0101b 0102g 0100f 0100f 1.6.16P02 1.6.16P02 1.6.16P02 N/A AirLive CamPro Professional Manual 151 Appendix A: Camera Support List HIKVision Dynacolor Sanyo WCS-0030 FCS-1121 FCS-3061 FCS-4020 FCS-3071 FCS-1131 FCS-1141 FCS-3031 FCS-3051 FCS-1151 FCS-7111 FCS-3091 FCS-1131 FCS-3071 FCS-3081 FCS-5051 DS2CD862MF DS2CD892P DS2CD892N DS2CD792PF DS2CD792NF DS2CD852MF MJPEG/MPEG4/H.264 MJPEG/MPEG4/H.264 MJPEG/MPEG4/H.264 MJPEG/MPEG4 MJPEG/H.264 MJPEG/H.264 MJPEG/MPEG4/H.264 MJPEG/MPEG4/H.264 MJPEG/MPEG4/H.264 MJPEG/MPEG4/H.264 MJPEG/MPEG4/H.264 MJPEG/H.264 MJPEG/H.264 MJPEG/H.264 MJPEG/H.264 MJPEG/H.264 MJPEG/H.264 MJPEG/H.264 MJPEG/H.264 MJPEG/H.264 MJPEG/H.264 MJPEG/MPEG4 N/A v1.0 N/A 0100b L20100602NS L20100602NS L20100602NS 1.0.04 1.0.04 0100c 0100d 2.0.0330 L20101112NS L20101112NS L20101222NS L20101222NS V2.0 build 100125 only V2.0 build 100125 only V2.0 build 100125 only V2.0 build 100125 only V2.0 build 100125 only V2.0 build 100125 only DS2CD752MF DS2CD762MF V1-A V1-B V6-A1270 V6-B1270 DH801e-S4 NH061 VCC-HD2300 VCC-HD2500 VCC-HD4600 VDC-HD3300 MJPEG/MPEG4 MJPEG/MPEG4 MJPEG/H.264 MJPEG/H.264 MJPEG/H.264 MJPEG/H.264 MJPEG/H.264 MJPEG/MPEG4/H.264 MJPEG/H.264 MJPEG/H.264 MJPEG/H.264 MJPEG/H.264 VDC-HD3500 MJPEG/H.264 V2.0 build 100125 only V2.0 build 100125 only 20100602NS 20100602NS 20100602NS 20100602NS 20100602NS 20100602NS CAM MAIN Ver. 1.01-02 (100506-00) CAM SUB Ver. 1.00-00 (090910-00) NET MAIN Ver. 1.02-00 (100521-01) NET SUB Ver. 1.00-02 (100422-00) 152 AirLive CamPro Professional Manual Appendix A: Camera Support List Flexwatch Planex Compro FW-1170-VO CS-WMV04N IP55 IP60 IP70 IP540 IP530 IP570 MJPEG/H.264 MJPEG/MPEG4 MJPEG/MPEG4 MJPEG/MPEG4/H.264 MJPEG/MPEG4/H.264 MJPEG/MPEG4/H.264 MJPEG/MPEG4 MJPEG/MPEG4/H.264 IVC4000T(T1) MJPEG/MPEG4 CNB IDC4050IR ISMC1063N AirLive CamPro Professional Manual 4.07-13 1.34 1.50d 1.50d 1.50d 1.50d 1.392 1.499h UBoot Version: XNET.T1-1.0.10.0902 Kernel Version: XNET.T1-1.0.10.0909 Software Version: XNET.T1-1.0.10.0909 HTML Version: XNET.T1-1.0.10.0909 ActiveX Version: XNET.T1-1.0.10.719 MJPEG/H264 Boot: XNET.A2-1.01.10.0929 Kernel: XNET.A2-1.01.10.0929 Root: XNET.A2-1.01.10.0929 Local: XNET.A2-1.01.10.0929 ActiveX: XNET.A2-1.01.10.0726 MJPEG/MPEG4/H.264 Boot: XNET.A1-1.01.10.0630 Kernel: XNET.A1-1.01.10.0630 Root: XNET.A1-1.01.10.0630 Local: XNET.A1-1.01.10.0630 153 Appendix A: Camera Support List Vivotek IDP4030VR MJPEG/MPEG4/H.264 Boot: XNET.A1-1.01.10.0634 Kernel: XNET.A1-1.01.10.0634 Root: XNET.A1-1.01.10.0634 Local: XNET.A1-1.01.10.0634 7000 Series IP7131 (Ver.1) MJPEG/MPEG4 0102b IP7132 (Ver.1) MJPEG/MPEG4 0102a IP7135 (Ver.1) MJPEG/MPEG4 0301b IP7137 (Ver.1) MJPEG/MPEG4 0401a PT7135 (Ver.1) MJPEG/MPEG4 0301a PT7137 (Ver.1) New 7000 Series IP7130 MJPEG/MPEG4 0400b MJPEG/MPEG4 0101b IP7133 MJPEG/MPEG4 0101b P7134 MJPEG/MPEG4 0101e IP7142 MJPEG/MPEG4 0201a IZ7151 MJPEG/MPEG4 0101f IP7153 MJPEG/MPEG4 0100b IP7154 MJPEG/MPEG4 0100b IP7160 MJPEG/MPEG4 0102a IP7161 MJPEG/MPEG4 102h IP7251 MJPEG/MPEG4 0100f IP7330 MJPEG/MPEG4 0103a PZ7111 MJPEG/MPEG4 0106b PZ7112 MJPEG/MPEG4 0104e PZ7121 MJPEG/MPEG4 0106b PZ7122 MJPEG/MPEG4 0104c PZ7131 MJPEG/MPEG4 0100b PZ7132 MJPEG/MPEG4 0100e PZ7151 MJPEG/MPEG4 0101b 154 AirLive CamPro Professional Manual Appendix A: Camera Support List PZ7152 MJPEG/MPEG4 0101b PT7135 MJPEG/MPEG4 0301a FD7131 MJPEG/MPEG4 0201c FD7132 MJPEG/MPEG4 0201c FD7141 MJPEG/MPEG4 0101b FD7141V MJPEG/MPEG4 0101b FD7151 MJPEG/MPEG4 0201b SD73x3 MJPEG/MPEG4 0102a IP8161 MJPEG/MPEG4/H.264 0100m VS2403 IP8151 IP8330 IP8332 FD8361 FD8161 FD8134 VS8102 SD8121 MJPEG/MPEG4 MJPEG/MPEG4/H.264 MJPEG/MPEG4/H.264 MJPEG/MPEG4/H.264 MJPEG/MPEG4/H.264 MJPEG/MPEG4/H.264 MJPEG/MPEG4/H.264 MJPEG/MPEG4/H.264 MJPEG/MPEG4/H.264 0103e 0100e 0101b 0101a 0200b 0101b 0101b 0201a 0100e AirLive CamPro Professional Manual 155 Appendix B: Remote Backup B Appendix B: Remote Backup Most system administrators will be asked to backup the video data remotely. For CamPro Professional, you can use kinds of remote backup software once they support your operating system. In this chapter we will recommend you to use FBackup. You can download it from the link: http://www.fbackup.com/ Please follow the steps below for setting the backup jobs. 1. Please make sure you have a file server for saving the backup file. And you also need the privilege to put your file on to the file server. If you are not sure if you have the privilege, please check with your network administrator. 2. Install the program on the CamPro Professional server. Launch the FBackup and the wizard will show up. Please click on”Backup” button for creating new backup job. 156 AirLive CamPro Professional Manual Appendix B: Remote Backup 3. 4. Click on “New” button and name your job. You might press the “Test” button for testing the connection. Then click “Next”. Select the folder the CamPro Professional saved the video clips. For AirLive CamPro Professional Manual 157 Appendix B: Remote Backup 5. Choose “Make mirror” as your backup method. For “Make mirror” will only backup the last update files, and 6. Set the schedule and configure the user account for doing the backup. And then click on “Save”. 158 AirLive CamPro Professional Manual Appendix B: Remote Backup 7. If you want to play the video file on the file server, please use the CamPro Professional Player. You can find it under “Start Æ Programs Æ AirLive Æ CamPro Professional”. For more information about the Player, please refer to chapter 16, Media Player in this manual. AirLive CamPro Professional Manual 159
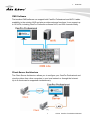
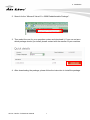
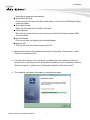
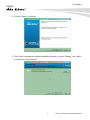
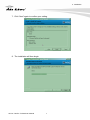
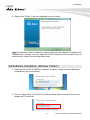
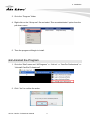
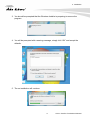


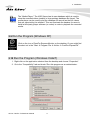
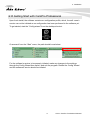
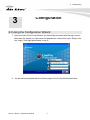
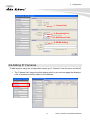
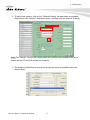
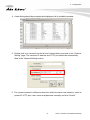
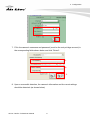

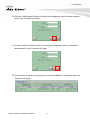
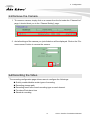
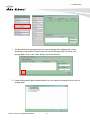
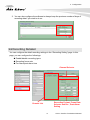
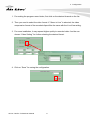
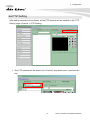

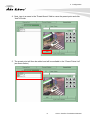
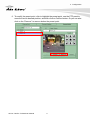
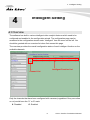
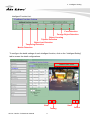
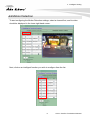
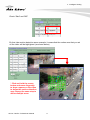
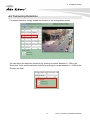

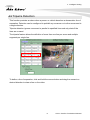

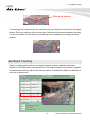
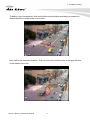
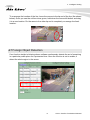
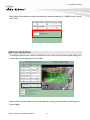
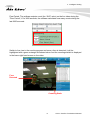
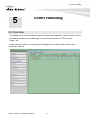
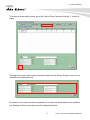
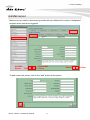
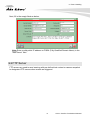
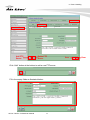
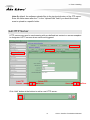
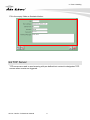
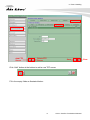
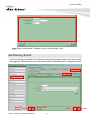
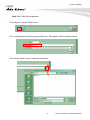

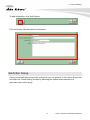
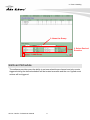
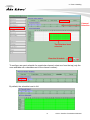
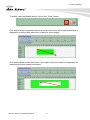
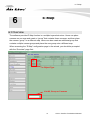
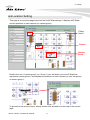
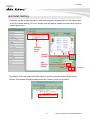
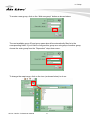
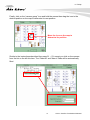
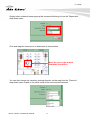

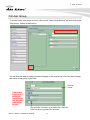
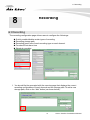
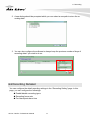
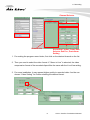
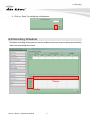
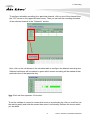

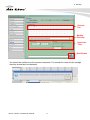
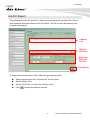
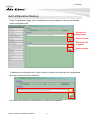
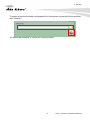
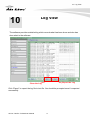
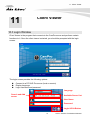

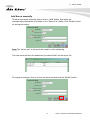
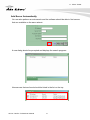
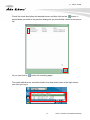
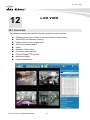
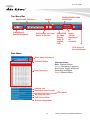
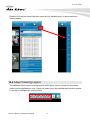
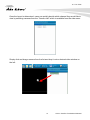

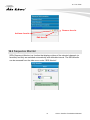
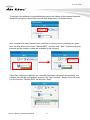
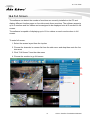
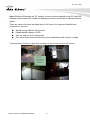
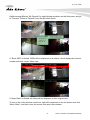

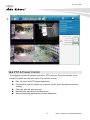
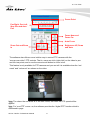
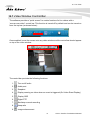
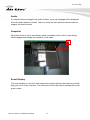
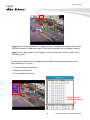

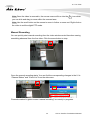
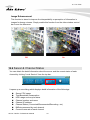
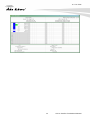
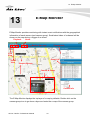
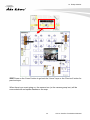
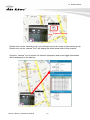
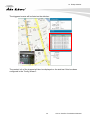
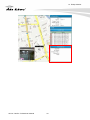
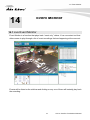
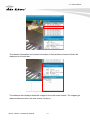
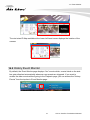
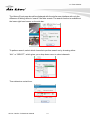
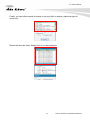
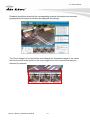
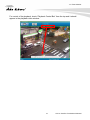
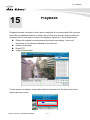
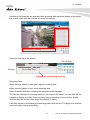
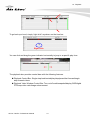

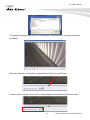
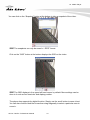
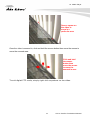
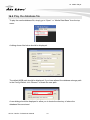
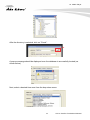
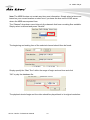

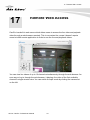
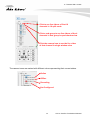
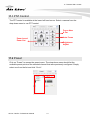
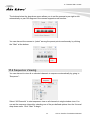
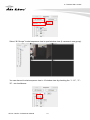
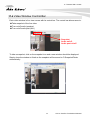
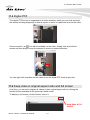

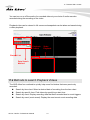
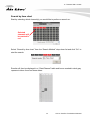
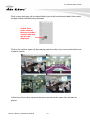
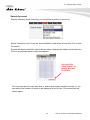
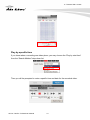
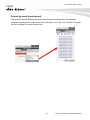
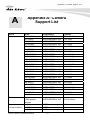
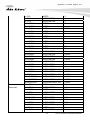
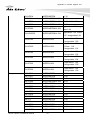
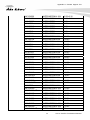
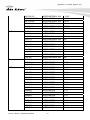
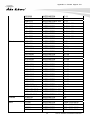
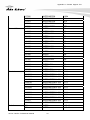
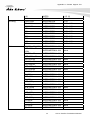
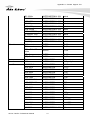
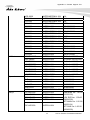
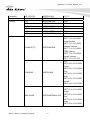
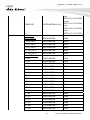
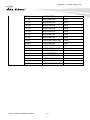

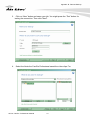
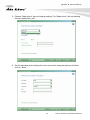


![[MANUAL] WebCCTV Installation Manual 4.4.0.0](http://vs1.manualzilla.com/store/data/005935803_1-1275fe61ae4b5b7c0ce4f62506e594f6-150x150.png)