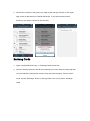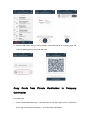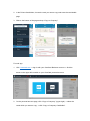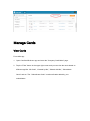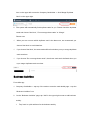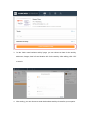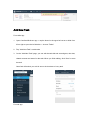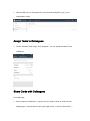
1
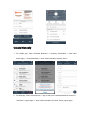
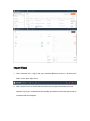
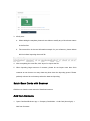
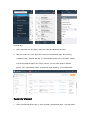
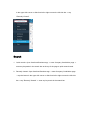
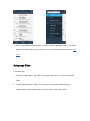
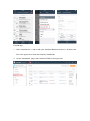
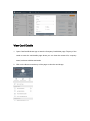
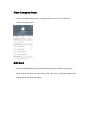
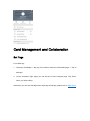
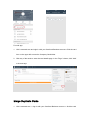
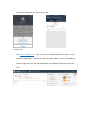
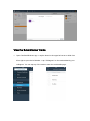
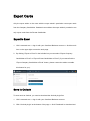
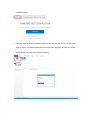
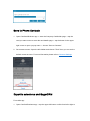
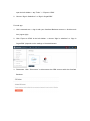
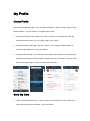
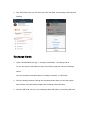
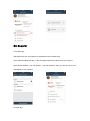
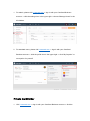
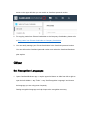
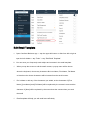
CamCard Business User Guide Contents Add Cards ......................................................................................................................... 3 Take Photo ................................................................................................................ 3 Create Manually ......................................................................................................... 4 Import Excel ............................................................................................................... 5 Batch Scan Cards with Scanner ................................................................................ 6 Add from Contacts ..................................................................................................... 6 Exchang Cards .......................................................................................................... 7 Copy Cards from Private CardHolder to Company CardHolder ................................. 8 Manage Cards ................................................................................................................ 10 View Cards .............................................................................................................. 10 Recently Viewed ...................................................................................................... 11 Search ..................................................................................................................... 12 Advanced Filter ........................................................................................................ 13 View Card Details .................................................................................................... 15 View Company News ............................................................................................... 16 Edit Card .................................................................................................................. 16 Card Management and Collaboration ............................................................................. 17 Set Tags .................................................................................................................. 17 Merge Duplicate Cards ............................................................................................ 18 Business Activities ................................................................................................... 19 Add New Task.......................................................................................................... 22 Assign Tasks to Colleagues ..................................................................................... 23 Share Cards with Colleagues................................................................................... 23 View the Subordinates’ Cards .................................................................................. 25 Export Cards ................................................................................................................... 26 Export to Excel ......................................................................................................... 26 Save to Outlook ....................................................................................................... 26 Save to Phone Contacts .......................................................................................... 28 Export to salesforce and SugarCRM........................................................................ 28 My Profile ........................................................................................................................ 30 Create Profile ........................................................................................................... 30 Send My Card .......................................................................................................... 30 Exchange Cards ...................................................................................................... 31 Set Superior ............................................................................................................. 32 Private CardHolder .................................................................................................. 33 Other ............................................................................................................................... 34 Set Recognition Languages ..................................................................................... 34 Edit Email Template ................................................................................................. 35 Contacts Settings ..................................................................................................... 36 Add Cards Take Photo 1. Open CamCard Business app and enter the ‘’Company CardHolder’’ page. Click the “Capture Card” button at the bottom of the page to capture card images. When capturing the card image, please make the card fill the frame to the full and ensure a good lighting condition. The app will automatically focus and capture the card image. If you are not satisfied with the image, please tap the “Retake” button in lower-left to re-capture an image. 2. Tap the "Add Backside” button in the upper right corner then you can capture and save the backside image of the card. 3. After capturing the card image, you can group the card with tags. Select “Company Tags” to save and categorize the cards in Company CardHolder, or select “Private Tags” to save and categorize the cards in your Private CardHolder. 4. Tap “Next” to continue taking photos, or tap “Done” to save the card. 5. Card information will be recognized and saved automatically. You don’t have to manually proofread the card details. Create Manually 1. For mobile app: Open CamCard Business -> Company CardHolder -> Add Card (lower-right) -> Create Manually -> enter card information and tap “Save”. 2. For web app: Visit b.camcard.com -> sign in with your CamCard Business account -> “Add Card “ (upper-right) -> enter card information and click “Save” (upper-right). Import Excel 1. Visit b.camcard.com -> sign in with your CamCard Business account -> click the tools button in the upper right corner. 2. Click “Import Excel” on the left side and follow the prompts to download the excel template. Input your card data into the template and make sure that the data format is consistent with the template. 3. Kindly note: a. When editing the template, please do not delete or modify any of the column names in the first line. b. The second line is the card information sample for your reference, please delete this line before importing the excel file. 4. After completing the excel file, click “Import” to import the file. 5. When importing large amounts of contacts, please do not import more than 2000 contacts at one time as too many data may slow down the importing speed. Please patiently wait and do not interrupt when the data are importing. Batch Scan Cards with Scanner Click here to view the user manual of CamCard scanner. Add from Contacts 1. Open CamCard Business app -> Company CardHolder -> Add Card (lower-right) -> Add from Contacts 2. Choose the contacts or the groups you want to add and tap “Confirm” in the upper right corner to add them into CamCard Business. If you have several contact accounts, you need to choose an account first. Exchang Cards 1. Open CamCard Business app -> Exchange Cards (lower-left) 2. Choose “Nearby Contacts” and tap the exchange icon at the bottom of the page then you can search the people who are also using this feature nearby. Once a person found, tap the “Exchange” button on the right side of his or her card to exchange cards. 3. Choose “QR Code” and you can exchange cards with friends by scanning their QR codes or asking them to scan your QR code. Copy Cards from Private CardHolder to Company CardHolder For mobile app: 1. Open CamCard Business app -> tap the button in the upper right corner or slide from left to right to open the left side bar -> choose Private CardHolder. 2. In the Privare CardHolder, choose the card you want to copy and enter the card details page. 3. Slide to the bottom of the page and tap “Copy to Company”. For web app: 1. Visit b.camcard.com -> sign in with your CamCard Business account -> click the arrow on the upper left to switch to your CamCard personal account. 2. On the personal account page, click “Copy to Company” (upper-right) -> select the cards which you want to copy -> click “Copy to Company CardHolder”. Manage Cards View Cards For mobile app: 1. Open CamCard Business app and enter the “Company CardHolder” page. 2. Tap the “Filter” button in the upper right corner and you can view the cards based on different tags like “All Cards”, “Created by Me”, “Shared with Me”, “Subordinate Cards” and etc. The ‘’Subordinate Cards’’ contains all cards added by your subordinates. For web app: 1. Visit b.camcard.com and sign in with your CamCard Business account. 2. Click the card icon on the upper left to enter the CardHolder page. By choosing “Created by Me”, “Shared with Me” or “Subordinate Cards” in the “All Cards” column or choosing different tags in the “Tags” column, you can view cards in different groups. The ‘’Subordinate Cards’’ includes all cards added by your subordinates. Recently Viewed 1. Open CamCard Business app -> enter Company CardHolder page -> tap the button in the upper left corner or slide from left to right to enter the left side bar -> tap “Recently Viewed”. Search 1. Quick search: Open CamCard Business app -> enter Company CardHolder page -> enter any keywords in the search bar at the top of the page to quick search cards. 2. Recently viewed: Open CamCard Business app -> enter Company CardHolder page -> tap the button in the upper left corner or slide from left to right to enter the left side bar -> tap “Recently Viewed” -> enter any keywords in the search bar. 3. Filter: Open CamCard Business app -> enter Company CardHolder page -> Tap “Filter” button in the upper right corner of the page. For more information please refer to View Card Advanced Filter For mobile app: 1. Company CardHolder -> tap “Filter” in the upper right corner -> choose “Advanced Filter”. 2. On the “Advanced Filter" page, you can enter any information about the tags, creation date, created by who and etc. and tap “OK” to quick filter cards. For web app: 1. Visit b.camcard.com -> sign in with your CamCard Business account -> click the card icon in the upper left to enter the Company CardHolder 2. On the “CardHolder” page, click “Advanced Filter” in the upper left. View Card Details 1. Open CamCard Business app to enter the Company CardHolder page. Tap any of the cards to enter the card details page where you can view the contact info, company news, business activities and tasks. 2. Click on the blue area at the top of the page to view the card image. View Company News 1. On the card details page, tap the “Company News” icon to view or search the contact’s company news. Edit Card 1. On the card details page, tap the button in the upper right corner to get a pop-up menu, choose “Edit” then you can edit the card. Tap “Save” in the upper-right to save changes when you finish the editing. Card Management and Collaboration Set Tags For mobile app: 1. Company CardHolder -> tap any of the cards to enter the card details page -> “Tap to add tags” 2. On the “Company Tags” page, you can add one or more company tags. Tap “Done” when you finish editing. Otherwise, you can also add tags when capturing card image, please refer to Take Photo. For web app: 1. Visit b.camcard.com and sign in with your CamCard Business account. Click the card icon on the upper left to enter the Company CardHolder 2. Click any of the cards to enter the card details page. In the “Tags” column, click “Add” to choose tags. Merge Duplicate Cards 1. Visit b.camcard.com -> sign in with your CamCard Business account -> click the card icon on the upper left to enter the Company CardHolder -> click “Merge Duplicate Card” on the upper right. 2. The system will automatically find duplicate cards for you. Please check the duplicate cards and choose “Not Now”, “Do not merge these cards” or “Merge”. Please note: When you are not sure which duplicate card is the latest one, we recommend you choose “Not Now” to avoid data loss. If you choose “Not Now”, the same cards will be found when you try to merge duplicate cards next time. If you choose “Do not merge these cards”, then those cards won’t be listed when you try to merge duplicate cards next time. Business Activities For mobile app: 1. Company CardHolder -> tap any of the cards to enter the card details page -> tap the “Business Activities” icon. 2. On the “Business Activities” page, tap “Add” in the upper right corner to add business activity. Tap “Item” to quick add item for the business activity Tap “Enter notes” to add texts, pictures and etc. Tap “Location” to get the current location information Tap “Time” to add time for the activity Tap “Save” to save the business activity 3. After saving, tap “Send” at the top of the page and you can send the business activity to your superior instantly via email. For web app: 1. Visit b.camcard.com -> sign in with your CamCard Business account -> click the card icon on the upper left to enter the Company CardHolder. 2. Click a card as needed to enter the card details page and click “Add a new business activity” button under the card image. 3. On the “Add a new business activity” page, you can choose an item for the activity, add notes, images, time info and location info for the activity. After editing, click “OK” to save it. 4. After saving, you can choose to send the business activity via email to your superior. Add New Task For mobile app: 1. Open CamCard Business app -> tap the button in the upper left corner or slide from left to right to open the left side bar -> choose “Tasks”. 2. Tap ‘’Add New Task’’ to add tasks 3. On the “Add New Task” page, you can edit the task title and set assignee, due date, related contacts and status for the task. When you finish editing, click “Save” to save the task. CamCard will remind you at 9:00 am on the due date of every task. For web app: 1. Click the task icon on the upper left to view the task assigned by you or your subordinates’ tasks: Assign Tasks to Colleagues 1. On the “Add New Task” page, click “Assignee”, you can assign the tasks to your colleagues. Share Cards with Colleagues For mobile app: 1. Enter Company CardHolder -> tap the card you want to share to enter the card details page -> tap the button in the upper-right corner -> choose “Share with” -> choose the colleagues you want to share with. For web app: 1. Visit www.b.camcard.com -> sign in with your CamCard Business account -> enter Company CardHolder -> choose the card you want to share -> In the “Accessible to” columns (right side) you can add departments and colleagues that can access this card. View the Subordinates’ Cards 1. Open CamCard Business app -> tap the button in the upper left corner or slide from left to right to open the left sidebar -> tap “Colleagues” to view cards added by your colleagues. You can tap any of the cards to enter the card details page. Export Cards Only the super admin or the users with the super admin’s permission can export cards from the Company CardHolder. Standard users without the super admin’s permission can only export cards from the Private CardHolder. Export to Excel 1. Visit b.camcard.com -> sign in with your CamCard Business account -> click the tools icon on the upper right to enter the tools page. 2. By clicking “Export to Excel” in the left side bar you can select “Export Company CardHolder to Excel” or “Export Private CardHolder to Excel” (If you cannot find the “Export Company CardHolder to Excel” button, please contact the admin to enable this feature for you). Save to Outlook To save cards to Outlook, you need to download the Outlook plugin first. 1. Visit b.camcard.com -> sign in with your CamCard Business account. 2. Click “Outlook plugin” at the bottom of the page -> click “Download” to download and install the plugin. 3. After the Outlook plugin is installed, open Outlook and click the CC icon on the upper right to sign in your CamCard Business account. After signing in, all card info will be automatically exported to the Outlook contacts. Save to Phone Contacts 1. Open CamCard Business app -> enter the Company CardHolder page -> tap the card you want to save to enter the card details page -> tap the button in the upperright corner to open a popup menu -> choose “Save to Contacts”. 2. Set contact account: Open the left sidebar and choose “Tools” then you can set the default contact account. For more information please refer to Contacts Settings. Export to salesforce and SugarCRM For mobile app: 1. Open CanCard Business app -> tap the upper-left button or slide from left to right to open the left sidebar -> tap “Tools” -> “Export to CRM” 2. Choose “Sign in Salesforce” or “Sign in SugarCRM” For web app: 1. Visit b.camcard.com -> sign in with your CamCard Business account -> click the tools icon (upper-right) 2. Click “Export to CRM” in the left sidebar -> choose “Sign in salesface” or “Sign in SugarCRM” (depends on the settings of the administrator 3. Disconnect. Click ‘’Disconnect’’ to disconnect the CRM account with the CamCard Business. My Profile Create Profile Open CamCard Business app -> tap the upper-left button or slide from left to right to open the left sidebar -> tap “My Profile” to complete your profile. 1. Capture card image: Tap “Capture My Card” to import your own business card. By importing business card, you can quickly create your profile. 2. Importing existing card image: Tap the + button -> tap “Choose Existing Photo” to choose a card image from your photo album. 3. Create profile manually: If you don’t have your paper card at hand, you can create your profile by entering personal information manually: tap your username -> tap the “Edit” button in the upper-right -> enter your personal information. Send My Card 1. Open CamCard Business app -> tap the button in the upper left corner or slide from left to right to open the left sidebar -> tap “My Profile”. 2. Tap “Send Card” then you can send your card via email, text message, QR code and WeChat. Exchange Cards 1. Open CamCard Business app -> Company CardHolder -> Exchange Cards Or you can open the left sidebar to enter “My Profile” page and choose “Exchange Cards”. You can exchange cards with others via “Nearby Contacts” or “QR Code”. 2. Choose “Nearby Contacts” and tap the searching button then you can find people who are also using this feature nearby and exchange cards with them. 3. Choose “QR Code” then you can exchange cards with others via scanning QR code. Set Superior For mobile app: Standard users can set superior for themselves on the mobile app. Open CamCard Business app -> tap the upper-left button or slide from left to right to open the left sidebar -> tap “My Profile” -> tap “My Superior” then you can set one of your colleagues as your superior. For web app: 1. For admin, please visit b.camcard.com -> sign in with your CamCard Business account -> click the settings icon in the upper-right ->choose “Manage Users” in the left sidebar. 2. For standard users, please visit b.camcard.com -> sign in with your CamCard Business account -> click the profile icon in the upper-right -> click “My Superior” to set superior for yourself. Private CardHolder 1. Visit b.camcard.com -> sign in with your CamCard Business account -> click the arrow on the upper left then you can switch to CamCard personal version. 2. For copying cards from Private CardHolder to the Company CardHolder, please refer to Copy cards from Private CardHolder to Company CardHolder. 3. You can easily manage your Private CardHolder in the CamCard personal version. You can still use the CamCard personal version even when the CamCard Business plan expires. Other Set Recognition Languages 1. Open CamCard Business app -> tap the upper-left button or slide from left to right to open the left sidebar -> tap “Tools” -> tap “Set Recognition Language” and choose the language you are using most frequently. Setting recognition language can help improve the recognition accuracy. Edit Email Template 1. Open CamCard Business app -> tap the upper-left button or slide from left to right to open the left sidebar -> tap “Tools” -> tap “Edit Email Template” 2. You can enter your frequently-used subject and contents in the email template. When you tap the screen to edit the email content, a popup menu will be shown above the keyboard, choose any characters like Last Name, First Name, Full Name or Note then the chosen characters will be inserted into the email content. Don’t delete or edit any of the characters you added, as the characters of [First Name], [Last Name] and [Full Name] will be replaced by the contact’s name and the character of [Note] will be replaced by the notes about the contact when you send the email Email template will help you edit email more efficiently. Contacts Settings 1. Open CamCard Business app -> tap the upper-left button or slide from left to right to open the left sidebar -> tap “Tools” -> tap “Set Default Account for Contacts”.