1
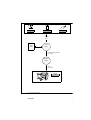
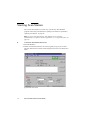
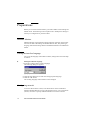
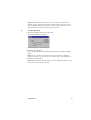
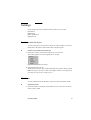
Océ Scan Station
9400 series
User Manual
Océ-Technologies B.V.
This manual contains a description of scanning on the Océ 9400 series. The
introduction (chapter 1) contains a general description of the working methods
for using Scan Station and it is recommended that you read at least this chapter.
Trademarks
HP-GL, HP-GL/2, HP-RTL are trademarks of Hewlett-Packard Company.
Microsoft and MS are registered trademarks of Microsoft Corporation.
Windows is a trademark of Microsoft Corporation.
CalComp is a trademark of California Computer Products Inc.
Intel and Pentium are registered trademarks of Intel Corporation.
Adaptec is a registered trademark of Adaptec, Inc.
Novell is a trademark of Novell Inc.
TIFF is a trademark of Aldus Corporation.
CALS is a military standard.
Copyright
Océ-Technologies B.V. Venlo, The Netherlands © 1999
All rights reserved. No part of this work may be reproduced, copied, adapted,
or transmitted in any form or by any means without written permission from
Océ.
Océ-Technologies B.V. makes no representation or warranties with respect to
the contents hereof and specifically disclaims any implied warranties of
merchantability or fitness for any particular purpose.
Further, Océ-Technologies B.V. reserves the right to revise this publication and
to make changes from time to time in the content hereof without obligation to
notify any person of such revision or changes.
Code number 7114434
Edition 4.0
GB
Contents
Chapter 1
Introduction
The concept 6
Using this manual 8
Related documentation 8
Chapter 2
Getting started
Installation 10
Starting Scan Station 12
Preparations 14
Machine Monitor 14
Setting the interface language 14
Configuring network 14
Defining a list of users and accounts 16
Defining Preferences 18
Tools 19
Quitting Scan Station 24
Using Help 25
Chapter 3
Using Scan Station
The scanning process 28
Scan Station Main window 29
Settings 31
Resolution and check plot 31
File format 31
File optimisation 32
Original size 33
Job settings 34
Océ 9400 series scanner settings 36
Scanning 37
Using Scan Tickets 38
Contents
3
Appendix A
Miscellaneous
Notation conventions 44
Reader’s comment sheet 45
Addresses of local Océ organisations 47
Index 49
4
Océ Scan Station 9400 series User Manual
Océ Scan Station 9400 series
User Manual
Chapter 1
Introduction
The concept of scanning and the interaction between Scan
Station and the printer. How to get information from paper
to file.
5
The concept
Océ Scan Station 9400 series is one of the software modules you need to
productively scan hard copy drawings on an Océ 9400, and convert them to
digital files. You will also need another software module: Océ Machine
Monitor.
The scans can be viewed on the Scan Station screen with the built-in viewer,
(see Océ View Station User Manual) or on paper when a check plot is
requested.
Machine Monitor Machine Monitor provides the communication between the
Océ Scan Station 9400 series and the Océ 9400 series printer/scanner.
For more information, see the Océ Machine Monitor User Manual.
Océ Scan Station 9400 series Océ Scan Station 9400 series is a Microsoft
Windows application which allows you to control the scanning (also called
upload) process. You can specify settings like resolution and file format. You
also specify where the resulting files must be stored, which can be a network
disk. When a file has been received by Scan Station you may view it on the
PC's screen to check the quality of the scan.
This manual describes Océ Scan Station 9400 series in more detail.
6
Océ Scan Station 9400 series User Manual
.
Floppy disk
Network
Hard disk
scanned
files
Scan
Ticket
Scan
Station
Local or Remote (TCP/IP)
connection
Machine
Monitor
SCSI
connection
Scanner
Printer
[1] Océ scanning concept
Introduction
7
Using this manual
This manual is intended for the operator of Scan Station. The user of Scan
Station is often also the operator of the Océ printer/copier. It is assumed that
you have some understanding of the Océ printer. More information can be
found in the User Manual.
This manual explains:
■ how to install Scan Station and how to get things up and running (Chapter 2)
■ how to use Scan Station to scan files (Chapter 3)
Read Chapter 2 for a brief introduction and learn how to install and get the
program running on your PC.
If you want to have a thorough understanding of the functions of Scan Station,
you should read Chapter 3.
Related documentation
Océ 9400 series User Manual
Océ Machine Monitor User Manual
Océ View Station User Manual
Océ Job Ticket Interface Programmer’s Manual
8
Océ Scan Station 9400 series User Manual
Océ Scan Station 9400 series
User Manual
Chapter 2
Getting started
How to install the software on your Windows PC. What
preparations are required before you can actually use it.
9
Installation
The recommended hardware for Scan Station is:
■ a PC with Pentium 90 MHz Intel processor, running Windows 95 or
Windows NT version 3.51 or 4.0.
Note: Although not recommended, Scan Station will also run on Windows
version 3.1/3.11.
■ internal memory of 32 MByte.
■ a dongle for Océ View Station, used by Scan Station (the dongle is delivered
with Océ View Station).
■ a TCP-IP network (needed for remote connections).
■ sufficient disk space to save the scan files.
Note: Install Océ View Station before installing Scan Station.
Machine Monitor Note that during the installation of Scan Station you are
asked whether also Machine Monitor must be installed on your PC. This
depends on your configuration:
■
■
▼
It is possible to run Scan Station and Machine Monitor on different PC’s.
Machine Monitor must always run on the PC that is directly coupled to the
printer with a SCSI connection. Scan Station may run on a different PC, and
remotely couple to Machine Monitor via a network. In that case select not to
install Machine Monitor as well. Machine Monitor must be installed
separately on the other PC (see the ‘Océ Machine Monitor User Manual’ for
more information).
In the recommended configuration, Scan Station and Machine monitor run
on the same PC. This PC is directly coupled to the printer with a SCSI
connection. In that case select Machine Monitor to be installed as well. Make
sure to install the SCSI connection to the printer first:
Installing the SCSI connection
1 Install the Adaptec SCSI board on the PC.
2 Install the EZ-SCSI software.
3 Connect the Océ 9400 and make sure that it is recognized as ‘Tandberg TDC
3600’.
During installation of Scan Station several files will be copied to the hard disk
of your PC. The installation program prompts you to create the destination
directory in which the files are copied.
10
Océ Scan Station 9400 series User Manual
▼
Installing Scan Station software
1 Insert the CD ROM into the CD ROM drive.
2 Now follow the instructions in the CD ROM’s booklet.
Getting started
11
Starting Scan Station
You can start Scan Station in several ways, just like any other Windows
program. Follow the procedure below. Quitting Scan Station is explained in
‘Quitting Scan Station’ on page 24.
Note: If you are using Scan Tickets, Scan Station can be started up
automatically by a separate software application (see ‘Using Scan Tickets’ on
page 38).
▼
To start Océ Scan Station 9400 series
1 Start MS-Windows.
2 Double-click the Scan Station-icon in the program group you just created.
The Scan Station main window will be displayed as shown in the illustration
below:
2366-144
[2] Scan Station main window
12
Océ Scan Station 9400 series User Manual
The very first time you start Scan Station:
1 You must enter your name and the name of your company. This will be
displayed on the start up screen.
2 You will be asked to specify the location (directory and filename) of Océ View
Station. If you have not yet installed Océ View Station, select Cancel and
install View Station first:
■ Select Use viewer in the Preferences (see ‘Defining Preferences’ on
page 18).
■ Exit Scan Station
■ Install Océ View Station
■ Start Scan Station
■ Specify the location of Océ View Station
3 You are asked to specify whether Scan Station has to connect to a remote
Machine Monitor application or to a local Machine Monitor. If the printer is
coupled to this PC, choose Local.
If the printer is coupled to another PC which runs Machine Monitor, choose
Remote and enter the name of the PC and network ID.
When the viewer has been enabled (see ‘Defining Preferences’ on page 18),
and Scan Station starts up, Océ View Station is automatically started.
When a local Machine Monitor has been selected (see ‘Configuring network’
on page 14), also the Machine Monitor is started automatically. Machine
Monitor will appear in the state that you have specified: either as an icon or a
window on your desktop.
If you have selected a remote connection, Scan Station will try to connect to
Machine Monitor across the network.
Note: The first time you start Scan Station, it creates an initialization file
named ocestf94.ini in the directory in which the software is installed. This file
contains your default settings.
Getting started
13
Preparations
Before you can work with Scan Station, you need to define several settings and
default values. The following sections explain how to modify these settings to
match your configuration or personal wishes.
Machine Monitor
Machine Monitor is the application that provides the connection to the printer.
You need to make some settings in Machine Monitor first, like printer type,
language, and network settings. Refer to the Machine Monitor User Manual for
details.
Setting the interface language
You can set the language of Scan Station menus, dialog boxes and on-line help
as follows:
▼
Setting the interface language
1 From the Configure menu, choose Language.
The following dialog box appears:
2368-144
[3] Language window
2 Open the drop-down list box and select the appropriate language.
3 Click the ‘OK’ button.
The working language of Scan Station will be changed.
Configuring network
To receive data from the scanner, Scan Station must connect to Machine
Monitor. Machine Monitor can run on the same PC (local), or on a network PC
(remote). You have to specify if Machine Monitor runs local or remote.
14
Océ Scan Station 9400 series User Manual
Note: If Machine Monitor runs remote, the PC’s must be connected via a
TCP/IP network. Scan Station will use a TCP/IP socket connection to send
data to Machine Monitor. Scan Station can only make a connection when
Machine Monitor is already running on the remote PC.
▼
Configuring Network
1 From the Configure menu, choose Network.
The Network dialog box appears.
2367-144
[4] Network dialog box
2 Select Local or Remote.
If you select Remote, also define the PC name (Host) and the Port number
(Port).
Note: The port number must match the Scan port number in Machine
Monitor. Normally you can use the port number that is already filled in.
3 Click the Connect button.
Note: Machine Monitor must already be running. If Machine Monitor starts
later, you must repeat this procedure.
Getting started
15
Defining a list of users and accounts
You can define a list of users and accounts, e.g. departments, assigning a
number to each user and account. When you start a new scan job, you can
select user and account names from the list to assign to scan jobs and check
plots (see ‘Job settings’ on page 34). They are displayed in the Scan Station
Main window during scanning, and can be used for statistical purposes.
You can define a list of users and accounts in Machine Monitor and Scan
Station. If the applications are installed correctly, only one list of users and
accounts is used. You can use any of the named applications to add users and
accounts to this list, or to remove them.
Attention: Only if Machine Monitor and Scan Station are installed on the
same PC and in the same directory, the named applications will use the
same list: the ASCII file ‘accounts.txt’. If installed on different PC’s, after
changing the list you must copy the file ‘accounts.txt’ in the directory
‘Accounts’ (one directory higher than the directory where the Océ software
resides) to the same place on the PC where the software of the other named
application resides.
▼
Adding Users and accounts to the list
1 From the Configure menu, choose ‘Users and accounts’.
The Users and Accounts dialog box appears.
2369-144
[5] Users and accounts dialog box
16
Océ Scan Station 9400 series User Manual
2 In the Name box of the Users and/or Accounts, type the respective name of the
3
4
5
6
▼
user or account user you wish to define.
For example, an account name could be the name of a department: ‘Sales’.
In the Number box, type the number you wish to assign to the user or account
(you can enter up to 9 digits). If you click the button that is located at the right
side of the number field, the first free number (following the currently
displayed number) will appear. This number is not in use for other users or
accounts.
Choose the Add button.
Repeat steps 2 to 4 to add all the users and accounts of your choice.
Click the OK button.
Removing Users and accounts from the list
1 From the Configure menu, choose ‘Users and accounts’.
The Users and Accounts dialog box appears (see figure 5).
2 Click the button behind the Name box of the Users and/or Accounts to select
a user or account you want to remove from the list.
3 Click the appropriate ‘Delete’ button to remove the selected user or account
from the list.
4 If you want to remove all users or all accounts from the list, click the
appropriate ‘Delete all’ button.
5 Click the OK button.
Getting started
17
Defining Preferences
The Preferences dialog box is used to:
■ specify scan history length
■ specify scanned files units
■ specify original size units
■ specify filename extension for TIFF and CALS
■ specify the disconnect time
■ select if incoming scans must be viewed.
2370-144
[6] Preferences dialog box
▼
To specify preferred settings
1 In the Scan history box, type the maximum number of files that are visible (or
can be scrolled into view) in the Scanned files list of the main window. This
setting does not affect the number of scans that can be made in a job, only the
number that is shown.
2 In the Scanned files box, define the unit that is used in the main window, to
show the length and width of the scanned file. Choose mm, inches or pixels.
3 In the Original size units box, define the unit that is used in the main window,
to define the original size if ‘non standard’ is selected.
18
Océ Scan Station 9400 series User Manual
4 Specify which default extension will be used for CALS or TIFF files. For
example: If you type TG4 in the TIFF extension, all scanned files in TIFF
format will get the filename <name>.tg4. This only happens if you did not
specify a specific extension elsewhere (see ‘Job settings’ on page 34).
5 Specify the time after which Scan Station will automatically disconnect if no
data is received from the Océ 9400. Default this time is set to 13 minutes.
6 Only select Use viewer when you want Océ View Station to start automatically
when Scan Station is started and display all incoming scan files.
Deselect Use viewer when you do not want to examine all the scanned files..
Note: You can always view a file by selecting it from the list and clicking the
View button. It is also possible to double click the file (only when Double
click on file name in the Tools window is checked). (see page 22).
7 Click OK to save your Preferences or Cancel to discard the changes. The
Preference settings are active for all scan jobs.
Tools
You can start other applications without leaving Scan Station. This allows you
to for instance view, or convert images after they are scanned. These
applications are called Tools in Scan Station and they are listed in the Tools
menu.
The Tools menu lists either applications, or groups of applications. For
instance: Viewers, Convert, Access. Where Viewers is a group of viewers, and
Convert and Access are applications.
Applications can be associated with certain types of files through their
extension, for instance Viewer1 for all .TIF files, Viewer2 for all .CAL files
and Viewer3 for all other files.
The table below illustrates how the applications in the above example can be
grouped into Tools and how they can be linked to file extensions.
Getting started
19
Tool
Extension
Application
Viewers
CAL
TIF
*
@@@
@@@
VIEWER1.EXE
VIEWER2.EXE
VIEWER3.EXE
CONVERT.EXE
MSACCESS.EXE
Convert
Access
There are three ways to start a Tool:
■ Select it from the Tools menu
When a file in the 'Scanned files' area was selected, the application will start
and open that file.
■ Double click on a file in the 'Scanned files' area.
This feature must be enabled in the 'Configure tools' window.
■ Select a file in the ‘Scanned files’ area and click the View button.
The application will start and open the selected file.
If a group of applications is selected, e.g. Viewers, which application will be
started, depends on the extension with which it is associated.
Three types of extensions can be used.
'@@@', for an application which must be started without a file,
■ the exact extension (e.g. TIF, CAL), for only files with that extension,
■ an asterisk (*), for any file.
■
Applications associated with '@@@' have the highest priority, then the
programs coupled to the exact extension and finally applications associated
with an asterisk.
20
Océ Scan Station 9400 series User Manual
▼
Defining a tool
1 From the Configure menu, choose Tools.
The Configure tools dialog box appears.
2371-144
[7] Configure tools dialog box
2 In the New Menu Entry dialog box, type a descriptive name for a tool you wish
to define, e.g. ‘View file’.
3 Choose the Add button.
The Associations dialog box appears.
2372-144
[8] Associations dialog box
4 In the Extension box, type the extension of the print files, e.g. ‘txt’, ‘hgl’, ‘tif’
etc.
You can use the wildcard character * for all the extensions which you do not
want to specify explicitly.
Note: You can also enter the extension @@@. You can use this option to
start an application of your choice from within Scan Station, but not open
the selected file. This may be handy for applications which are not directly
related to a scanned file, but which you frequently use in combination with
Scan Station, e.g. Microsoft Calculator.
5 In the Command Line box, type the name of the program file, including the
path and extension.
Getting started
21
6
7
8
9
10
11
12
13
▼
For example, to add Microsoft Notepad, located in the directory named
C:\WINDOWS, type c:\windows\notepad.exe.
If you don’t know the name of the program file, choose the Browse button to
display a list of files and directories. Select the appropriate filename from the
list, and then choose the OK button.
In the Arguments box, define the necessary arguments. Arguments are fixed
parameters that are used when the application starts. If you need to specify
arguments, this information is supplied with the tool.
Click Add in the Associations dialog box.
Repeat steps 4 to 7 to make all the necessary associations.
You can make as many associations as you want. For example, you may have
a number of viewing applications at your disposal, each of which can be used
to view specific file types. You may then want to use the tool Viewers in
different ways, depending on the extension of the selected file, e.g. start an
application to view TIFF files (*.tif) and start another application to view
HP-GL (*.hpg) files.
Click OK in the Associations dialog box.
Repeat steps 2 to 9 to define all the tools of your choice.
You can define up to 10 tools.
Arrange the defined tools in the order of your choice by selecting a tool in the
Menu Contents box and then clicking the Up or Down button. The first tool,
i.e. the tool which appears on top of the list, is the default tool. This tool will
also be displayed as such in the Tools menu.
If necessary, select the option Double click on filename = start first tool.
This option means that, if you double click a file in the file list, the first
(default) tool will start and open the selected file automatically.
Click OK in the Configure Tools dialog box.
Starting a tool
1 Select a file in the file list (the scanned files area).
2 From the Tools menu, choose a tool.
If you want to start the default tool, you can also either press the View button
or double click the selected file (the latter only if this option is enabled in the
Configure Tools window).
The associated application is started from within Scan Station.
▼
Changing or deleting a file association
1 From the Configure menu, choose Tools.
2 Select the tool in the Menu Contents box for which you want to change the file
association.
3 Choose the Associate button.
The Associations dialog box appears.
22
Océ Scan Station 9400 series User Manual
4 In the Extension box, type the extension which you want to delete or associate
5
6
7
8
9
▼
with a different application.
The name of the existing associated application, if any, appears in the
Command Line box.
In the Command line box, delete the name of the program file.
You now have the following options:
■ If you just want to delete the file association, proceed with step 8.
■ If you want to create a new association, proceed with step 6.
In the Command line box, type the name, path and extension of the new
program file. If you do not know the name of the program file, choose the
Browse button to display a list of files and directories. Select the appropriate
filename from the list, and then choose the OK button.
In the Arguments box, define the necessary arguments, fixed parameters that
are used when the application starts.
If, for example, you want to update the file C:\data\scans.mdb with MS Access
enter the filename in the Arguments box.
Click OK in the Associations dialog box.
Click OK in the Configure Tools dialog box.
Deleting a tool
1 From the Configure menu, choose Tools.
2 Select the tool in the Menu contents list box.
3 Click Delete.
4 Click OK.
Getting started
23
Quitting Scan Station
You can quit Scan Station by selecting Exit from the File menu or Close from
the system menu. Normally you have to click the Stop button first and wait for
all scanned files to be saved to disk.
▼
Quit Scan Station and save all scans
1 Click the Stop button.
Wait until the last scan is received.
2 From the system menu select Close or from the File menu select Exit.
▼
Quit Scan Station immediately
3 From the system menu select Close or from the File menu select Exit.
You are asked if scans in progress must be deleted or saved. Select ‘deleted’ to
quit immediately.
Note: When Scan Station stops, Machine Monitor on the same PC will remain
active. You have to explicitly quit this application.
24
Océ Scan Station 9400 series User Manual
Using Help
On-line help for Scan Station is a quick and convenient way to look up
information about a task you are performing, a feature you would like to know
more about, or a command you want to use.
Help is available whenever you see a Help command button, or help as an item
on the menu bar.
When you select help from the menu, the first page of Scan Station Help
appears.
▼
Using the Help menu
1 From the Help menu choose Contents.
You can also press F1 at any time for help information. For menus, the Status
bar at the bottom of the window also displays a one-line text to explain the
purpose of the currently selected menu item.
Getting started
25
26
Océ Scan Station 9400 series User Manual
Océ Scan Station 9400 series
User Manual
Chapter 3
Using Scan Station
How to use all functions of the main window. Where to store
the images and accounting information for this scan job.
Settings on the scanner and the actual scanning process.
27
The scanning process
Note: Make sure Scan Station and Machine Monitor are started up and
connected.
Scanning requires that settings are selected on both Scan Station and the
scanner.
This chapter describes all settings that can be made on Scan Station and the
settings you have to make on the scanner.
Scan Station supports the concept of scan jobs, sets of scans that belong
together because they share:
■ user and account name
■ destination, the drive and directory where the scans are stored
■ the file naming procedure.
A scan job cannot be interrupted by other jobs on the printer. The printer must
be released to process print or copy jobs explicitly by stopping the scanning
process in Scan Station.
Scan Tickets If you are using a software application to generate Scan Tickets,
the required setttings on Scan Station will be made automatically for each
drawing (see ‘Using Scan Tickets’ on page 38).
28
Océ Scan Station 9400 series User Manual
Scan Station Main window
In this section the items in the main window will be explained.
2373-144
[9] Scan Station main window
The central part of the Scan Station main window is called ‘Scanned files’.
This window lists the files created during this session of Scan Station. Files
that were uploaded during a previous session, or files that have scrolled out of
the list are not displayed anymore. Use the File Manager to handle these files.
Each line denotes:
■ Status of the file. The status can be R or A.
R = ready, the scan data has been completely written to the file
A = active, the information is still arriving.
■ Name of the file
■ Size of the file (in kilo bytes)
■ Resolution (in dots per inch)
■ Width of the file/image (in pixels, mm or inches as set in preferences).
■ Length of the file/image (in pixels, mm or inches as set in preferences).
Note: See ‘Defining Preferences’ on page 18.
Using Scan Station
29
■
■
User ID
Account ID
The Delete button is to remove the selected file from the list of scanned files
and from the disk.
The View button is to display the selected file in the viewer. Click the View
button to start the view tool for the selected file.
The Start button is to start the scan process and claim the connection to the
scanner. When you use the Start button the first time and you did not use the
New button, the New scan job window will automatically open (see ‘Job
settings’ on page 34).
The Stop button is to stop or finish the current scan job. This releases the
device for printing or copying. You can click Start to scan again. When no
scans are made during a period of approximately 13 minutes, Scan Station
automatically stops the scan job.
The New button will start a new scan job. The New scan job window will be
opened (see ‘Job settings’ on page 34).
30
Océ Scan Station 9400 series User Manual
Settings
In the settings area of Scan Station’s main window you can set the:
■ resolution
■ file format
■ File optimisation
■ original size.
Resolution and check plot
You can specify the scan resolution. Only if you select 300 dpi, you can also
define that a check plot will be made of each scanned original.
▼
Set the scan resolution and check plot
1 Select the resolution at which the originals are to be scanned.
This setting applies to the next original that is scanned.
2374-144
[10] Resolutions supported by the scanner
2 Select Check plot on or off.
When selected, a paper copy will be made while the original is being scanned.
Note: Check plots can only be made with 300dpi resolution. Activating Check
plot might slow down the scanning process.
File format
You can specify the file format that is used to save the scanned file on disk.
▼
Set the file format
1 Select the format in which the scanned files are to be saved. You can choose
either CALS or TIFF.
Using Scan Station
31
CALS type 1 is a raster file format, for which no additional parameters need to
be specified.
TIFF is a raster file format, for which additional settings can be specified.
2375-144
[11] Selecting the file format
2 Press More to define TIFF settings.
2376-144
[12] TIFF settings
3 Select compression method group 4, or None (untiled, unstripped).
4 Press OK.
These settings apply to the next original that is scanned.
File optimisation
With this option you can decrease the amount of memory that is needed to store
the scanned image. Also scanned images can be better vectorized.
Note: If the original contains picture images or photos, it is advised not to use
this option.
2380-144
[13] Setting the File optimisation
▼
Setting the File optimisation
1 Click the File optimisation button.
32
Océ Scan Station 9400 series User Manual
Original size
With original size you can define whether a standard original or a non-standard
original will be scanned.
You also need to set the correct orientation of the original: portrait or
landscape. Landscape is possible for the standard page sizes, except the
following original sizes: A0, 36", 34", 30" and 700mm.
▼
Defining standard original size and orientation
1 Click Standard.
2377-144
[14] Standard original size and orientation
2 Select the required size from the scroll list.
The scanned image will be clipped to the length of the selected original size.
3 Set the Orientation to Portrait or Landscape.
If a non standard size original is scanned you have to specify its size:
▼
Defining non-standard original size
1 Click Non standard.
2378-144
[15] Non standard original size
2 Type a value for the original width or use the scroll buttons.
3 Set the Auto option to on or off. When Auto is on, the scanner automatically
detects the length and the complete original length is scanned.
4 When Auto is off, type a value for the original length or use the scroll buttons.
The scanned image will be clipped to the specified original length.
These settings apply for the next original that is scanned.
Using Scan Station
33
Job settings
The New scan job window will appear when:
■ the Start button is pressed for the first time after Scan Station was started, or
■ after pressing the New button in Scan Station's main window.
2390-144
[16] New scan job window
Enter the following information in this window:
■ user and account name for the scan job,
■ the directory in which scanned files will be saved,
■ the naming of the files as they will be stored on your hard disk or network
disk.
Note: To define users and accounts (see ‘Defining a list of users and accounts’
on page 16).
User and account names User and account names are used to identify the
initiator of a scan job. They are displayed in the Scan Station Main window
during scanning, and can be used for statistical purposes.
Scan Station keeps a record of all jobs it has submitted. For each job the same
information as shown in the Scan Station main window is added to the log file.
This file is called scan.log and can be found in the directory where the Océ
34
Océ Scan Station 9400 series User Manual
software resides. The log file is a text file, which can be read with any (ASCII)
editor.
The numbers linked to user and account name are used in the log file.
▼
Selecting user and account name for scan job
1 Select the user name in the user list box.
2 Select the account name in the account list box.
Note: The numeric IDs are shown automatically.
▼
Specifying the directory for scanned files
Files can be stored in a directory on a disk which is accessible from the Scan
Station PC.
1 Type the path or click Browse to select the drive and directory where you want
your scans to be saved. To specify the file names, select one of the three
options:
■ Prompt for filename
Scan Station asks for a filename the moment it needs to store the data from
the scanner. It does so for every scan. If you omit the extension in this file
name, it is automatically added by Scan Station. The extension as specified
in Preferences is used.
■ Fixed filename, variable suffix
The filename is fixed for all scans, but the suffix (extension) is numeric and
is incremented with every scan. Specify a filename, e.g. “project”, the
starting number, e.g. “1”, and the number of digits for the suffix, e.g. “3”.
In this example a job of three pages will result in files called “project.001”,
“project.002” and “project.003”
■ Filename with variable part
The filenames for all scans of the job consist of a fixed part and a numeric
variable part. The variable part is denoted by three #-signs, placed anywhere
in the filename. By specifying “proj###.tif” and a starting value of “100”, a
job of three pages will result in files called “proj100.tif”, “proj101.tif” and
“proj102.tif”. If you omit the extension in this file name, it is automatically
added by Scan Station. The extension as specified in Preferences is used.
▼
Specifying filenames for scans
1 Select the required file naming method.
2 If applicable, enter the file name, the starting value and the number of digits.
3 Click OK if you want to make the current settings active. Select Cancel if you
do not want to change the settings.
Now make the required settings on the scanner operator panel.
Using Scan Station
35
Océ 9400 series scanner settings
The following Océ 9400 series scanner settings can be used:
■
■
■
■
Lighter/darker.
Auto exposure on/off.
Leading edge removal.
Media selection.
Only when Check plot is enabled.
All other functions are disabled.
Note: When modifying the exposure settings for a subsequent scan, leave the
original in the scanner. Settings will be lost if the original is removed (refer to
Océ 9400 series User Manual for further details).
Note: When Check plot is enabled the number of copies is fixed to ‘1’.
standard
trailing
%
synchro
leading
steps
cut
edge
zoom
+4
manual
2
roll 2
roll 1
lighter
auto
0
-2
darker
media
please
wait
start
exposure
printer
error
-
+
stop/
correction
[17] Scanner operating panel
36
Océ Scan Station 9400 series User Manual
Scanning
During the scanning process, you do not have to go back to the Scan Station
PC, unless you need to make changes to the settings. The productive concept
will show to its full advantage when a large number of originals are scanned in
one 'batch'. The scanner can then be used at full speed and all images are
automatically written to separate files on the disk.
You can also change the settings any time you want between scans. The new
settings apply to the next original that you feed to the scanner.
Note: The size of the drawing which can be scanned is limited by the amount
of memory which is installed in the Océ 9400 series controller and the bitmap
partitioning (refer to the Océ 9400 series User Manual).
▼
Scanning one or more originals
1 Start-up the Océ Scan Station
2 On the Scan Station, make the required settings and press the ‘Start’ button on
the main window.
3 Make all required settings on the operator panel of the scanner.
4 Feed the original into the scanner.
5 Press the start button on the scanner operator panel.
The original is scanned and, if selected, printed on paper. At the same time it
is sent to the Scan Station to be stored on disk. Each scan appears as one entry
in the ‘Scanned files’ list in the main window. Using the viewer, you can see
the scanned image on the screen of the Scan Station.
6 Repeat step 3 to 5 for each original you want to scan.
7 The scan process can be stopped by pressing the ‘Stop’ button on the Scan
Station main window, or by quitting the application.
The Océ engine is now free for printing and copying.
Using Scan Station
37
Using Scan Tickets
Scan Tickets can be used to connect your EDM application to Scan Station. A
Scan Ticket contains information about which drawing you want to scan, and
what scan settings should be used.
Note: You will need additional software to enable your EDM application to
generate the required Scan Tickets and start up Scan Station automatically (see
Océ Job Ticket Interface Programmer’s Manual for more information).
In this way it is possible to feed the EDM application with all the references
(META data) of the drawings you want to scan, and let the EDM system start
up Scan Station, using the required Scan Tickets.
Start up
&
Scan
Ticket
EDM
application
Scan
Station
Scanned
file
&
Info file
Machine
Monitor
Scanner
Printer
[18] Using Scan Tickets
38
Océ Scan Station 9400 series User Manual
A Scan Ticket contains information about each drawing that is to be scanned:
■
■
■
■
■
■
■
Original identification, e.g. name or codenumber
Original size and orientation
Resolution
File Format
Check Plot (yes/no)
Name and directory to store the scanned file
Name and direcory to store the info file
If Scan Station is started up to process a Scan Ticket, the settings for each
drawing will be read from the Scan Ticket and activated in Scan Station
automatically.
The Scan Jobs Settings window will show the operator which drawing is to be
scanned. The operator can feed the original into the scanner.
After scanning, the scanned file will be saved automatically, using the name
and directory as specified in the Scan Ticket. Also an info file can be created,
containing logging data of the scan. It will be saved, using the name and
directory as specified in the Scan Ticket.
▼
Using Scan Tickets
1 Use the EDM application to start up Scan Station to process a Scan Ticket.
Using Scan Station
39
2 The Scan Job Settings window will be opened. This window shows
information about the drawing that is to be scanned (see figure 19 on page 40).
2381-144
[19] Scan Job Settings window
3 In the upper right corner of the Scan Job Settings window two numbers are
displayed. For example, 1:5 means: First drawing of a total of five drawings to
be scanned.
4 If you decide not to scan the requested drawing, click the Skip button in the
main window. If the Scan Ticket contains more drawings to scan, the next
drawing will appear in the Scan Job Settings window. Otherwise the scan job
will be ended.
40
Océ Scan Station 9400 series User Manual
5 If required, you can overrule the ticket settings concerning the original size and
orientation in the main window.
2382-144
[20] Main window after starting up to process a Scan Ticket
6 If required, you can make additional settings (e.g lighter/darker) on the
operating panel of the scanner (see ‘Océ 9400 series scanner settings’ on
page 36).
7 Feed the required original into the scanner.
8 Repeat step 2 to 7 until all drawings as specified in the Scan Ticket are scanned.
9 After scanning all drawings, the Behaviour of Scan Station depends on how the
EDM application started Scan Station:
■ Scan Station will return to is normal mode. You can use Scan Station for
manual scan jobs.
■ Scan Station will be terminated.
▼
Interrupting a Scan Ticket Job
1 If you want to stop the scan process before reaching the end of the Scan Ticket,
click the Stop button on the main screen. The Scan Ticket will be kept on disc
to resume the scan job later on.
Using Scan Station
41
▼
Resuming an interrupted Scan Ticket job
1 Use the EDM application to start up Scan Station to process the Scan Ticket of
the interrupted scan job. The following window will appear:
2383-144
[21] Selecting to proceed where you left or to start at the beginning of the Scan Ticket.
2 Click Yes if you want to resume the interrupted scan job where you left. If you
want to start at the beginning of the interrupted job, click No.
3 If you decided to resume the interrupted scan job where you left, the following
window will appear:
2384-144
[22] Selecting to redo the scanning of the last drawing you scanned.
4 If you want to redo the scanning of the last drawing you scanned, click Yes. If
you want to scan the next drawing, click No.
5 The scanning will proceed.
42
Océ Scan Station 9400 series User Manual
Océ Scan Station 9400 series
User Manual
Appendix A
Miscellaneous
43
Notation conventions
There are a number of notation conventions used in this manual. This
consistent style enables you to quickly become conversant with the use of this
manual and consequently the Océ 9400 series.
Description Each section or subsection contains a description of the feature or
operation identified in the title. It might also include possible applications, as
well as any guidelines that you should bear in mind.
Procedures A description is followed by a procedure. A procedure always
begins with a phrase which briefly describes the procedure, followed by a
series of numbered steps that take you, step by step, through all phases of
performing the operation.
Figures and tables Figures and tables are titled and numbered sequentially
throughout this manual. Figures include pictures of product components,
screendumps, examples, and diagrams of concepts discussed in the
description.
Attention getters There are several types of information to which we draw
your attention. This information is classified as follows:
Note: In a ‘Note’, information is given about matters which ensure the proper
functioning of the machine or application, but useful advice concerning its
operation may also be given.
Attention: The information that follows ‘Attention’ is given to prevent
something (your copy or original, the copier or printer, data files etc.)
being damaged.
Caution: The information that follows ‘Caution’ is given to prevent you
suffering personal injury.
44
Océ Scan Station 9400 series User Manual
Reader’s comment sheet
Have you found this manual to be accurate?
❏ Yes
❏ No
Could you operate the product after reading this manual?
❏ Yes
❏ No
Does this manual provide enough background information?
❏ Yes
❏ No
Is the format of this manual convenient in size, readability and arrangement
(page layout, chapter order, etc.)?
❏ Yes
❏ No
Could you find the information you were looking for?
❏ Always
❏ Most of the times
❏ Sometimes
❏ Not at all
What did you use to find the required information?
❏ Table of contents
❏ Index
Are you satisfied with this manual?
❏ Yes
❏ No
Thank you for evaluating this manual.
If you have other comments or concerns, please explain or suggest
improvements overleaf or on a separate sheet.
7114434
Miscellaneous
45
Comments:
------------------------------------------------------------------------------------------------------------------------------------------------------------------------------------------------------------------------------------------------------------------------------------------------------------------------------------------------------------------------------------------------------------------------------------------------------------------------------------------------------------------------------------------------------------------Date:
This reader’s comment sheet is completed by:
(If you prefer to remain unknown, please do fill in your occupation)
Name:
Occupation:
Company:
Phone:
Address:
City:
Country:
Please return this sheet to:
Océ-Technologies B.V.
For the attention of ITC user documentation.
P.O. Box 101,
5900 MA Venlo
The Netherlands
46
Océ Scan Station 9400 series User Manual
Addresses of local Océ organisations
Océ-Australia Ltd.
P.O.Box 363
Ferntree Gully MDC VIC 3165
Australia
Océ-Danmark A.S.
Kornmarksvej 6
DK 2605 Brøndby
Denmark
Océ-Österreich GmbH
Postfach 95
1233 Vienna
Austria
Océ-France S.A.
32, Avenue du Pavé Neuf,
93161 Noisy-le-grand, Cedex
France
Océ-Belgium N.V./S.A.
Avenue J.Bordetlaan 32
1140 Brussels
Belgium
Océ-Deutschland GmbH
Postfach 101454
4330 Mülheim an der Ruhr (13)
Deutschland
Océ-Brasil Comércio e Industria Ltda.
Caixa Postal 3187
01060-970 Sao Paulo, SP
Brazil
Océ (Hong Kong China) Ltd.
12/F 1202 The Lee Gardens
33 Hysan Avenue, Causeway Bay
Hong Kong
Océ-Canada Inc.
525, Logan Avenue,
Toronto, Ontario M4K 3B3
Canada
Océ-Hungária Kft.
P.O.B. 237
1241 Budapest
Hungary
Océ Office Equipment (Beijing) Co Ltd.
Xu Mu Cheng
Chaoyang District
Beijing 100028
China
Océ-Italia S.p.A.
Strada Padana Superiore 2/B
20063 Cernusco sul Naviglio (MI)
Italia
Océ-Česká republika s.r.o.
Hanusova 18
14021 Praha 4
Pankrác,
Czech Republic
Miscellaneous
Océ Systems (Malaysia Sdn. Bhd.)
#3.01, Level 3, Wisma Academy
Lot 4A, Jalan 19/1
46300 Petalig Jaya
Malaysia
47
Océ-Nederland B.V.
P.O.Box 800
5201 AV ‘s-Hertogenbosch
The Netherlands
Océ (Taiwan) Ltd.
No. 99-24 Nan Kang Road Sec.2
Taipeh, Taiwan
Taiwan, RO
Océ Norge A/S
Postboks 53, Grefsen
0409 Oslo 4
Norway
Océ (Thailand) Ltd.
16th Floor, B.B. Building
54 Asoke Road, Sukhumvit 21
Bangkok 10110
Thailand
Océ-Poland Ltd.
ul. Lopuszànska 53
02-0232 Warszawa
Poland
Océ-Lima Mayer S.A.
Av. José Gomes Ferreira, 11
Ed. Atlas II Miraflores
1495 Algés
Portugal
Océ-U.K.Ltd.
Langston Road
Loughton, Essex IG10 3SL
United Kingdom
Océ-USA Inc.
5450 North Cumberland Av.
Chicago, Ill. 60656
U.S.A.
Océ (Far East) Pte. Ltd./
Océ (Singapore) Pte. Ltd.,
#03-00 Wisma Gulab
190 MacPherson Road
Singapore 348548
Océ España SA
Business Park MAS BLAU
C/Osona 2, 2-3a Planta
08820 El Prat del Llobregat (Barcelona)
Spain
Océ-Svenska AB
P.O.box 1231
S-164 28 Kista
Sweden
Océ-Schweiz AG
Sägereistrasse 29
CH8152 Glattbrugg
Switzerland
48
Océ Scan Station 9400 series User Manual
Index
E
edm application 38
exit 24
A
account id 30
account name 34
accounts
defining 16, 17
accounts
defining a list of users and - 16
F
file
button
delete 30
new 30
start 30
stop 30
view 30
length 29
name 29
size 29
status 29
width 29
file format 31
cals 31
tiff 31
file optimisation 31, 32
filename
extension 18, 35
variable part 35
variable suffix 35
filenames for scans 35
C
H
cals 18, 31
close 24
configure
preferences 18
tools 21
I
B
help 25
id
D
default tool 22
defining
list of users and accounts 16
delete button 30
directory for scanned files 35
account 30
user 30
image
length 29
width 29
installation 10
interrupt 28
L
list of users and accounts
defining a - 16
Index
49
M
machine monitor 14
explained for océ 9400 series connection 6
N
network 15
new button 30
new scan job window 30
non-standard original 33
scanning
procedure 37
settings
original size 31
resolution 31
scan station 29
standard original 33
start button 30
starting scan station 12
stop button 30
T
tiff 18, 31, 32
tools 19
O
orientation 33
original size
non-standard 33
standard 33
P
preferences 18
Q
U
units
original size (9400 series) 18
scanned files - 18
use viewer 19
user id 30
user name 34
users
defining 16, 17
users and accounts
defining a list of - 16
quit 24
V
R
related documentation 8
resolution 29, 31
view button 30
viewer 18
S
scan history 18
scan job 28
scan station
quit 24
start - 12
scan tickets 38
50
Océ Scan Station 9400 series User Manual