1
VoiceLive
Harmony | Correction | Effects
USER’S MANUAL
IMPORTANT SAFETY INSTRUCTIONS
The lightning flash with an arrowhead
symbol within an equilateral triangle, is
intended to alert the user to the
presence of uninsulated "dangerous voltage" within the product's enclosure that may be of
sufficient magnitude to constitute a risk of
electric shock to persons.
The exclamation point within an
equilateral triangle is intended to alert
the user to the presence of important
operating and maintenance (servicing)
instructions in the literature accompanying the
product.
1
2
3
4
5
6
7
Warning!
•
To reduce the risk of fire or electrical shock,
do not expose this equipment to dripping or
splashing and ensure that no objects filled
with liquids, such as vases, are placed on the
equipment.
•
This apparatus must be earthed.
•
Use a three wire grounding type line cord
like the one supplied with the product.
•
Be advised that different operating voltages
require the use of different types of line
cord and attachment plugs.
•
Check the voltage in your area and use the
correct type. See table below:
8
9
10
11
12
13
14
Read these instructions.
Keep these instructions.
Heed all warnings.
Follow all instructions.
Do not use this apparatus near water.
Clean only with dry cloth.
Do not block any ventilation openings. Install
in accordance with the manufacturer's
instructions.
Do not install near any heat sources such
as radiators, heat registers, stoves, or other
apparatus (including amplifiers) that produce
heat.
Do not defeat the safety purpose of the
polarized or grounding-type plug. A
polarized plug has two blades with one
wider than the other. A grounding type plug
has two blades and a third grounding prong.
The wide blade or the third prong are provided
for your safety. If the provided plug does not fit
into your outlet, consult an electrician for
replacement of the obsolete outlet.
Protect the power cord from being walked
on or pinched particularly at plugs,
convenience receptacles, and the point
where they exit from the apparatus.
Only use attachments/accessories specified
by the manufacturer.
Use only with the cart, stand, tripod,
bracket, or table specified by the
manufacturer, or sold with the
apparatus. When a cart is used, use
caution when moving the cart/apparatus
combination to avoid injury from tip-over.
Unplug this apparatus during lightning storms
or when unused for long periods of time.
Refer all servicing to qualified service
personnel. Servicing is required when the
apparatus has been damaged in any way,
such as power-supply cord or plug is
damaged, liquid has been spilled or objects
have fallen into the apparatus, the
apparatus has been exposed to rain or
moisture, does not operate normally, or has
been dropped.
Voltage
Line plug according to standard
110-125V
UL817 and CSA C22.2 no 42.
220-230V CEE 7 page VII, SR section
107-2-D1/IEC 83 page C4.
240V
•
•
•
•
•
BS 1363 of 1984.
Specification for 13A fused
plugs and switched and
unswitched socket outlets.
This equipment should be installed near the
socket outlet and disconnection of the device
should be easily accessible.
To completely disconnect from AC mains,
disconnect the power supply cord from the AC
receptable.
The mains plug of the power supply shall
remain readily operable.
Do not install in a confined space.
Do not open the unit - risk of electric shock
inside.
Caution:
You are cautioned that any change or
modifications not expressly approved in this
manual could void your authority to operate this
equipment.
Service
•
There are no user-serviceable parts inside.
•
All service must be performed by qualified
personnel.
a
IMPORTANT SAFETY INSTRUCTIONS
EMC / EMI.
This equipment has been tested and found to
comply with the limits for a Class B Digital
device, pursuant to part 15 of the FCC rules.
These limits are designed to provide
reasonable protection against harmful
interference in residential installations. This
equipment generates, uses and can radiate
radio frequency energy and, if not installed and
used in accordance with the instructions, may
cause harmful interference to radio
communications. However, there is no
guarantee that interference will not occur in a
particular installation. If this equipment does
cause harmful interference to radio or television
reception, which can be determined by turning
the equipment off and on. The user is
encouraged to try to correct the interference by
one or more of the following measures:
•
•
•
•
Reorient or relocate the receiving antenna.
Increase the separation between the
equipment and receiver.
Connect the equipment into an outlet on a
circuit different from that to which the
receiver is connected.
Consult the dealer or an experienced
radio/TV technician for help.
For the customers in Canada:
This Class B digital apparatus complies with
Canadian ICES-003.
Cet appareil numérique de la classe B est
conforme à la norme NMB-003 du Canada.
Certificate Of Conformity
TC Electronic A/S, Sindalsvej 34, 8240
Risskov, Denmark, hereby declares on own
responsibility that following products:
VoiceLive -
Harmony, Correction and
Effects Processor
- that is covered by this certificate and
marked with CE-label conforms with
following standards:
EN 60065
Safety requirements for mains
(IEC 60065) operated electronic and
related apparatus for household
and similar general use
EN 55103-1 Product family standard for
audio, video, audio-visual and
entertainment lighting control
apparatus for professional
use. Part 1: Emission.
EN 55103-2 Product family standard for
audio, video, audio-visual and
entertainment lighting control
apparatus for professional
use. Part 2: Immunity.
With reference to regulations in following
directives:
73/23/EEC, 89/336/EEC
Issued in Risskov, 03 - 2004
Mads Peter Lübeck
Chief Executive Officer
b
TABLE OF CONTENTS
INTRODUCTION
Table of Contents
Text Conventions
Introduction . . . . .
Front Panel . . . . .
Rear Panel . . . . .
Signal Flow . . . . .
.
.
.
.
.
.
.
.
.
.
.
.
.
.
.
.
.
.
.
.
.
.
.
.
.
.
.
.
.
.
.
.
.
.
.
.
.
.
.
.
.
.
GLOBAL EDIT SCREENS
.
.
.
.
.
.
.
.
.
.
.
.
.
.
.
.
.
.
.
.
.
.
.
.
.
.
.
.
.
.
.
.
.
.
.
.
.
.
.
.
.
.
.
.
.
.
.
.
.3
.3
.5
.6
.8
.9
QUICKSTART
Getting Sound From the VoiceLive . .10
Step Through Orientation . . . . .
Preset Mode . . . . . . . . . . . . . . .
Song Mode . . . . . . . . . . . . . . . .
User Button . . . . . . . . . . . . . . .
Expression Pedal . . . . . . . . . . .
Making Scale Harmony Presets
Work With Your Song . . . . . . . .
Basic Editing Concepts . . . . . . .
.
.
.
.
.
.
.
.
.
.
.
.
.
.
.
.10
.10
.12
.13
.13
. . . .14
. . . .15
BASIC OPERATION
Live Setup with Guitar . . . . . . . . . . . .16
Live Setup with a MIDI Keyboard . . .16
BASIC OPERATION
Parameter Types . . . . . . . . .
Preset Types . . . . . . . . . . . .
MIDI Backup and Restore . .
Global Effect Preset Setting
Store Operation . . . . . . . . .
.
.
.
.
.
.
.
.
.
.
.
.
.
.
.
.
.
.
.
.
.
.
.
.
.
.
.
.
.
.
.17
.17
.17
.17
.18
PRESET MODE
Preset Mode . . . . . . . . . . . . . . . . . . .19
Preset Direct Mode . . . . . . . . . . . . . .20
Preset Voice Mode . . . . . . . . . . . . . .20
PRESET EDIT SCREENS
Configuration Screens . . . .
Voice Edit Screens . . . . . .
Harmony Edit Screens . . .
Thicken Edit Screen . . . . .
Effects Edit Screens . . . . .
Pitch Correct Edit Screens
Special Edit Screens . . . . .
.
.
.
.
.
.
.
.
.
.
.
.
.
.
.
.
.
.
.
.
.
.
.
.
.
.
.
.
.
.
.
.
.
.
.
.
.
.
.
.
.
.
.
.
.
.
.
.
.
.21
.22
.26
.28
.30
.33
.35
IO Edit Screens . . . . . . . . . . . . . . . .37
Utility Edit Screens . . . . . . . . . . . . . .40
SONG MODE
Song
Song
Song
Song
Mode . . . . . . . . . . . . . .
Mode LCD Screen . . .
Edit Mode LCD Screen
Edit Functions . . . . . . .
.
.
.
.
.
.
.
.
.
.
.
.
.
.
.
.
.
.
.
.
.45
.45
.45
.46
.
.
.
.
.
.
.
.
.
.
.
.
.
.
.
.
.
.
.
.
.
.
.
.
.
.
.
.48
.48
.48
.48
.48
.48
.49
.50
.51
HARMONY AND TUNING
Harmony . . . . . . . . . . .
Harmony Hold . . . . . . .
Harmony Modes . . . . .
Notes Mode . . . . . . . .
Shift Mode . . . . . . . . .
Chord (Chordal) Mode
Scale (Scalic) Mode . .
Diatonic and Chromatic
Just Tuning . . . . . . . . .
.
.
.
.
.
.
.
.
.
.
.
.
.
.
.
.
.
.
.
.
.
.
.
.
.
.
.
.
.
.
.
.
.
.
.
.
.
.
.
.
.
.
.
.
.
.
.
.
.
.
.
.
.
.
.
.
.
.
.
.
.
.
.
FOOTSWITCH FUNCTION TABLES
Preset Mode Footswitch Functions . .52
Song Mode Footswitch Functions . . .53
SPECIFICATIONS
MIDI Implementation . . . . . . . . . . . . .54
Technical Specifications . . . . . . . . . .57
TEXT CONVENTIONS
Throughout this manual the following conventions will be followed:
• Names of front panel controls, and keys are
written in CAPITALS.
• Parameter names are in SMALL CAPITALS.
• Parameter values are in underline.
• Special notes appear in italic.
English Version
Prod. No: E60503512
Rev 1.02 – SW – V 1.00
3
INTRODUCTION
Thank you for purchasing VoiceLive, TC-Helicon's harmony, correction and effects
processor built for the road. A lot of effort went into this product. TC-Helicon engineers and
product specialists met with performing musicians to make sure VoiceLive enhances your
vocals on stage. The analog and digital signal path is designed to the same standards as
our studio processors. However, every aspect of VoiceLive, from VOS™ limiting to the
instrument input, has been designed for the specific demands of live performance. We hope
you and your fans enjoy VoiceLive.
We update our manuals and various support material on a regular basis. For the most up to date
information we encourage you to visit our website at www.tc-helicon.com
Features:
•
Studio-quality mic preamp (Burr Brown INA163 based) with VOS™ Limiter and
48V phantom power
•
Vocal processing technology based on VoiceWorks including:
·
The most natural sounding vocal harmony available using proprietary TCHelicon technology
-
HybridShift™ harmony generation for smooth, natural harmony voices
-
Humanization of harmony voices utilizing FlexTime™, Human-Modeled
Vibrato, Inflection, Pitch randomization, Portamento and gender
-
Four harmony control modes for intelligent voicing and/or MIDI control
-
Selectable Equal-tempered and Just tuning for harmonies
-
HarmonyHold™ - freezes harmony voices for more interesting harmony
phrasing.
·
Automatic pitch correction using factory and custom scales
·
Lead voice thickening
·
TC Electronic 3-band EQ, low cut and compressor/gate
·
TC Electronic reverb & tap-tempo delay
•
Eight smooth-travel footswitches
•
Four edit knobs and one encoder for hands-on preset editing
•
Expression pedal input
•
MIDI control over all parameters via CC and SYSEX
•
MIC pass-thru for post mixing by Front of House engineer
•
Instrument input to reverb/delay
•
24 bit harmony processing
•
S/PDIF digital I/O
Please refer to this manual often, as there are many features and variations to explore.
Our website is another good resource for applications, support and other user services.
Enjoy!
The TC-Helicon Team
www.tc-helicon.com
5
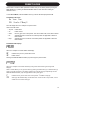
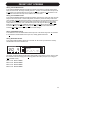
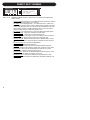
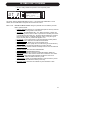
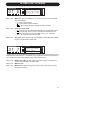
FRONT PANEL
VOICE LIVE
HARMONY | CORRECTION | EFFECTS
Pr37
GLOBAL FX
EDITED
MIC IN
LED TEXT DISPLAY
Displays important, top-level
performance and editing
information.
GLOBAL FX DOT
Indicates that a global effect
preset has been selected. This
means that delay and reverb
settings will remain unchanged
when changing presets.
EDITED DOT
Indicates that preset settings
have been edited. Powering
down or changing to another
preset without first storing will
result in a loss of changes.
MIC IN DOT
Indicates that the microphone
input is selected.
LIMIT DOT
Indicates that the limiter is
active.
INPUT METER
Peak meter shows Mic or Line
Input level. The meter range is:
-40 to 0dB.
INPUT CLIP LED
Indicates that the Mic/Line or
instrument input level is too
high, possibly causing digital
distortion. Reduce the input
level to correct this condition.
The Input Clip LED may flash
when the limiter is enabled,
which indicates clipping of initial
transients and does not
severely degrade audio
performance.
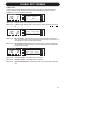
6
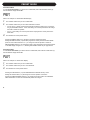
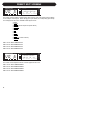
LIMIT
Out Clip
Input Clip
PROGRAM DISPLAY
0 PPM dB
-5
-10
-20
-40
Flying Eagle
37: Scale F#maj1
MIDI IN
PRESET#
HARMONY MODE
ROOT
SCALE/CHORD
VOICE 1
VOICE 2
VOICE 3
VOICE 4
HARMONY
THICKEN
EFFECTS
PITCH CORR.
I/O
UTILITIES
LEAD
HARMONY
INSTRUMENT
OUTPUT
EDIT 1
EDIT 2
EDIT 3
EDIT 4
OUTPUT CLIP LED
Indicates an internal DSP
overflow. Reduce the overall
level of the harmony voices and
vocal effects to correct this
condition.
MIDI IN LED
Indicates valid, incoming MIDI
information.
LCD TEXT DISPLAY
Displays top-level preset
information (preset mode),
detailed preset information
(preset edit screens), system
configuration (I/O and utility
edit screens), Song data (Song
mode), and any important status
messages or user alerts.
Voices LEDs (1-4)
Indicates On/Off status of
individual harmony voices. All 4
green LEDs flash to indicate
Harmony Mute as a result of the
HARMONY MUTE/HOLD FOR
BYPASS button pressed.
Red Voice Effect LEDs
These indicate the effects that
are enabled for a preset. All 4
red LEDs flash to indicate that
VoiceLive is in Bypass mode as
a result of holding the
HARMONY MUTE/HOLD FOR
BYPASS button.
HARMONY LED
Indicates On/Off status of overall
harmony.
THICKEN LED
Indicates On/Off status of
lead voice thickening.
EFFECTS LED
Indicates On/Off status of
Reverb and Delay.
PITCH CORRECT LED
Indicates On/Off status of
pitch correction.
I/O LED
Indicates that you are on an
IO parameter edit screen.
UTILITIES LED
Indicates that you are on a
Utility parameter edit screen.
LEVEL/EDIT KNOBS
In performance modes,
these are used to adjust
audio levels of Lead Voice,
Harmony Voices,
Instrument input and overall
Output level. You store the
IO/UTIL settings to save
these level settings. Press
STORE to initiate this
procedure. In the edit
modes, these knobs are
used to adjust parameter
values. Please note that at
the end of the travel of these
knobs, the parameter values
will scroll. Turn back the
knob to stop scrolling and
adjust to find your desired
value.
FRONT PANEL
PRESET
SONG
1
SELECT
SELECT
PRESET
Direct A / Voice 1
KEY
STEP
2
HOLD FOR MODE
SONG
SCALE
REWIND
3
Direct B / Voice 2
DIRECT
4
HOLD FOR SUBMODE
VOICE
Direct C / Voice 3
Direct D / Voice 4
USER
HARMONY MUTE
PUSH TO ENTER
PREVIOUS
5
NEXT
6
7
8
HOLD FOR
EDIT KEY
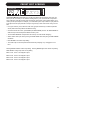
Enters and exits edit modes.
STORE KEY
Press STORE to begin the store
process. Presets, Songs and
IO/Utility parameters may be
stored using this key. Each Preset
and Song name/number store
destination may be changed after
the first press. Pressing the
STORE key a second time will
complete the store operation.
DATA WHEEL
This control is used to select
presets in preset mode, songs in
Song mode and edit screens in
edit mode. With the Store
Operation this is used to select
whether to store Preset, Song or
IO/Util parameters. Parameters
surrounded by triangular brackets
(eg. <STEP INS> ) may be
changed using the DATA WHEEL.
BYPASS
FOOTSWITCH BUTTONS
These allow control of VoiceLive in performance. These
buttons are multifunctional depending on the operating mode
of the unit.
The best place to get an understanding of how these work is
the Performance Mode Step Through Orientation in the
Quickstart section of the manual. For a detailed reference of
the operation of the footswitches in the various modes, see
the Footswitch Function Tables near the end of the manual.
Please note that the footswitch buttons have multiple
functions. To ensure clarity in this manual they will often
be referred to as switches 1 through 8 as numbered
above.
PUSH WHEEL TO ENTER
Pressing the DATA WHEEL
activates special functions in the
Preset edit and Song edit
modes. Parameters surrounded
by triangular brackets (eg.
<Execute> MIDI-Dump) perform
their actions when ENTER is
pressed.
7
REAR PANEL
BALANCED INPUT
INSTRUMENT
LINE
BALANCED OUTPUTS
LEFT
RIGHT
DIGITAL I/O
IN
MIDI
THRU
OUT
PEDAL
IN
DI
S/PDIF
DO
MIC PASS THRU
MIC INPUT
MIC LEVEL
MIC IN
-20dB SELECT LIMITER +48V
CAUTION
RISK OF ELECTRIC SHOCK
DO NOT OPEN
SERIAL NO.
TYPE: HFW001
WARNING
TO REDUCE THE RISK OF FIRE OR ELECTRIC
SHOCK DO NOT EXPOSE THIS EQUIPMENT TO
RAIN OR MOISTURE
AVIS: RISQUE DE CHOC ELECTRIQUE-NE PAS
OUVRIR.
US Patent: #4,688,464 #5,231,671 #5,301,259
#5,567,901 #5,641,926 #5,986,198 #6,046,395
Balanced Inputs (1/4” TRS)
Line - You have the option of selecting this or
the mic input as the main Vocal input.
Instrument - This input is designed to accept
output from the following sources:
• Mixer
• Guitar pedal or preamp
• Active pickups (guitar with batteries)
• Acoustic guitar with preamp
• Keyboard output
Plugging an electric or acoustic guitar with
passive pickups directly into this input will
not result in optimal audio quality. (See
note on page 16.)
Balanced Outputs (1/4” TRS)
Left/Right - This is the stereo output of
VoiceLive. If mono operation is desired
use either of the outputs and set the
OUTPUT parameter to Mono (edit screen
IO9). These outputs may be connected
directly to balanced mic inputs with proper
1/4”TRS to XLR out adapters as long as
there is no phantom power on the input. It
is also necessary to set the OUTPUT RANGE
to a lower setting (edit screen IO9) when
driving mic inputs. When there is phantom
power, direct boxes are necessary to
connect to mic inputs.
Digital I/O
S/PDIF In/Out - Sends and receives digital
audio to S/PDIF standards.
MIDI
In, Out and Thru - Standard MIDI interface
Pedal In
Accepts passive volume pedals and
expression pedals. The operation of the
THIS CLASS B DIGITAL DEVICE MEETS ALL REQUIREMENTS OF THE CANADIAN INTERFERENCECAUSING EQUIPMENT REGULATIONS AND COMPLIES WITH PART 15 OF THE FCC RULES.
OPERATION SUBJECT TO CONDITIONS STATED IN THE MANUAL.
MADE IN THAILAND
R
C
UL6500
EN/IEC 60065
US
100-240VAC
50-60Hz, 15W
expression pedal can be programmed per
preset on edit screen XPED and globally on
edit screen UT1.
Mic Pass Thru
This connects directly to the microphone
input and is used to connect directly to a
mixing board. If VoiceLive loses power for
any reason, the signal from the
microphone will still get through to the
mixer. When using this connector and
microphones requiring phantom power,
you have the option of using the phantom
power from VoiceLive or the mixing
console. Please note that using both the
mixing console phantom power through
this connector and VoiceLive phantom
power will result in too much power to the
microphone.
Mic Input
Mic Connector - Balanced microphone input.
MIC LEVEL Knob - This controls the input gain
of the mic input.
-20dB - This attenuates the input by 20dB to
handle high output condenser
microphones (and the occasional really
loud singers with dynamic microphones).
MIC IN SELECT Button - This selects the
microphone for the Vocal input. When not
pressed, VoiceLive defaults to the Line
input.
LIMITER Button- This enables the VOS™
optical limiter on the mic input.
+48V - This enables +48 V phantom power on
the mic input. Never plug single ended
(unbalanced) microphones or instruments
or signal processors (balanced or
unbalanced) into the mic input if +48V
phantom power is on.
Note: Optimal connection to balanced equipment is achieved using balanced cables. However, if
your equipment is NOT balanced you will generally have no problems.
8
LINE INPUT LEVEL
Digital Input
[S/PDIF]
48 kHz
44.1 kHz
Digi
Clock
Select
INSTRUMENT INPUT LEVEL
LEAD
LIMITER
Mic Input
Select
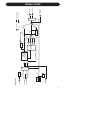
MIC GAIN
INSTRUMENT INPUT
LINE INPUT
MIC INPUT
VoiceLive
A/D
Digital R
Digital L
HARMONY
PROCESSING
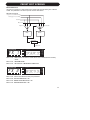
INSTRUMENT AUDIO PATH
LOW CUT
3 BAND EQ
COMP/GATE
PITCH CORRECTION
THICKEN
HARMONY
LEVEL
EFFECTS
LEAD VOICE
LEVEL*
INDIVIDUAL
HARMONY VOICE
LEVELS
THICKEN
LEVEL
EFFECTS
LEVEL
Normal
D/A
OUTPUT
LEVEL
Digital Output
[S/PDIF]
RIGHT OUT
LEFT OUT
- Pan
Dry Off
Mono Signal Path
Stereo Signal Path
- Summing point
SIGNAL FLOW
9
QUICKSTART
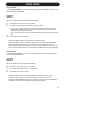
Getting Sound From VoiceLive
VoiceLive Performance Features
What you Need:
• VoiceLive
• Power cable
• microphone
• microphone cable
• two 1/4" cables
• PA or powered speakers
VoiceLive is designed to be the ultimate vocal
performance product. Foot control of vocal
effects and harmonies can be achieved at various levels. On a basic level in preset mode,
you can scroll through presets. On an
advanced level in Song mode you can arrange
preset sequences with markers within the
sequence. Along with this sophistication of preset access, is the preset-assignable USER
button and EXPRESSION pedal control.
1. Connect the power cable to VoiceLive and
to your mains power. VoiceLive does not
have a power switch so just plugging it in
will turn it on.
2. Connect the two 1/4" cables to the Left and
Right output of VoiceLive into two inputs on
your PA or powered speakers.
3. With the MIC LEVEL knob and the OUTPUT knob at minimum (fully counter-clockwise) connect one end of your microphone
cable to your microphone. Plug the other
end into the MIC input of VoiceLive.
4. Engage the 'microphone' and 'limiter'
switches on the back panel (the limiter
switch will make it easier to set the levels).
If your microphone requires phantom power
engage the 'phantom power' switch on the
back panel.
5. While singing into the microphone increase
the microphone volume using the MIC IN
knob until the level meters on the display
are fluctuating above '-20dB' but never to
the 'red' with clipping. If the level from the
microphone is always too high, engage the
'-20dB Pad' switch on the back panel.
7. With your PA or speaker level at a nominal
setting sing through the microphone adjusting the 'Lead', ‘Harmony', 'Effects' and
'Output' level using the edit knobs on the
front panel.
8. Push on the PREVIOUS/NEXT buttons
(5,6) or turn the DATA WHEEL to try out the
different presets.
10
Step Through Orientation
Most of this orientation may be done with the
footswitch buttons. Plug in a microphone and
put it on a stand to free up your hands to hold
this manual. Try going through this procedure,
singing into the microphone as you go and
jamming with VoiceLive. Often during this orientation we give background to how certain
things are set up. This often means referring
to “edit screens”. These edit screens can
accessed by pressing the EDIT button and
turning the DATA WHEEL.
Preset Mode
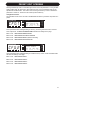
This is VoiceLive's basic performance mode.
On power-up VoiceLive is in Preset Mode.
VOICE LIVE
Out Clip
Input Clip
HARMONY | CORRECTION | EFFECTS
Pr39
GLOBAL FX
PRESET
SONG
1
EDITED
MIC IN
LIMIT
SELECT
SELECT
PRESET
Direct A / Voice 1
Take it Over
39: Scale Bmaj2
MIDI IN
PRESET#
HARMONY MODE
ROOT
SCALE/CHORD
HOLD FOR MODE
LEAD
HARMONY
INSTRUMENT
OUTPUT
EDIT 2
EDIT 3
EDIT 4
SONG
PUSH TO ENTER
SCALE
REWIND
3
Direct B / Voice 2
DIRECT
Direct C / Voice 3
USER
NEXT
6
VOICE 1
VOICE 2
VOICE 3
VOICE 4
HARMONY
THICKEN
EFFECTS
PITCH CORR.
I/O
UTILITIES
EDIT 1
KEY
STEP
2
PREVIOUS
5
PROGRAM DISPLAY
0 PPM dB
-5
-10
-20
-40
7
4
HOLD FOR SUBMODE
VOICE
Direct D / Voice 4
HARMONY MUTE
8
HOLD FOR
BYPASS
• Press the PREVIOUS/NEXT buttons (5, 6
shown above) to change the preset number.
• Select preset Number 11 which is a Scale
type preset.
QUICKSTART
• Press the USER Button. You will now hear
the “Telephone Voice” effect. This preset
has the USER button setup to do this
function. (make sure you try singing into the
mic to hear what’s going on)
• Press the HARMONY MUTE button (8) to
turn off the harmonies.
• Press the USER button and then the
HARMONY MUTE button to enable the
harmonies and disable the Telephone Voice
effect.
• Hold the HOLD FOR BYPASS BUTTON (8)
to bypass all effects on VoiceLive.
• Hold the HOLD FOR BYPASS BUTTON (8)
again to enable effects in VoiceLive.
• Press the KEY button (2) followed by the
PREVIOUS/NEXT buttons to change the
key of the harmony scale.
Note: Holding a direct button when a preset
has not been changed ("*" is not displayed) will
cause VoiceLive to leave direct mode.
Here's how the LED text Display works in
Preset Direct Mode:
PA23
For example:
P: This character indicates that the unit is in
Preset Mode.
A: A,B,C,D means that a Direct preset is
recalled. Holding one of the top 4 buttons
when this is displayed will put VoiceLive
into a new mode. If this character is a “*”
then a Direct preset is not recalled.
Holding one of the 4 top buttons will program this button to recall the current preset.
23: This indicates the current preset number.
• Press the SCALE button (3) followed by the
PREVIOUS/NEXT buttons to change the
scale type.
• Find a preset that you like with lots of
harmony using the PREVIOUS/NEXT
buttons.
• Press the PRESET SELECT (1) button
followed by the PREVIOUS/NEXT buttons to
change the preset number.
• Hold one of the top four buttons to program
a DIRECT button to this preset.
Note: Key and Scale may only be changed
with scale type presets. Pressing the KEY (2)
and SCALE buttons when on anything other
than a Scale preset will have no effect.
Preset Direct Mode
Preset Direct Mode makes the top buttons on
VoiceLive respond like radio station buttons on
a car radio for preset access.
• Hold the DIRECT button (3) when in preset
mode until the LED Text Display flashes
DRCT, putting VoiceLive into Preset Direct
Mode.
• Press any of the top 4 buttons to access the
programmed direct presets.
• Press the PREVIOUS/NEXT buttons to find
a different preset that you like, making sure
that the second character on the LED text
display is a “*”.
• Press and hold one of the top 4 buttons,
until the second character on the LED text
display changes to A, B, C or D. You have
now programmed that button to recall the
desired preset.
Preset Voice Mode
• Hold the VOICE button (4) until the LED text
display flashes VOIC to put VoiceLive into
Preset Voice Mode.
• Press any of the top four buttons to
enable/disable a harmony voice. Notice that
the Vocal 1 - 4 LEDs to the right of the LCD
display indicate which Voices are enabled.
• Press the PREVIOUS/NEXT buttons to
change presets. Notice that the
enabled/disabled combination of voices do
not change as you change presets.
Here's how the LED text Display works in
Preset Voice Mode:
PV23
For example:
P: This character indicates that the unit is in
Preset Mode.
V: This indicates that VoiceLive is in Voice
Mode.
23: This indicates the current preset number.
11
QUICKSTART
Song Mode
Editing Song Step Sequences
This is VoiceLive’s advanced performance
mode. Song mode allows you to:
• Press the EDIT KEY to enter the Song Step
edit mode.
1. Create sequences of presets that you can
step through.
• Turn EDIT 1 knob to select the step you
would like to edit or turn to to a new step.
2. Modify the Scale Root and Type as well as
Chord Root and Type of the presets within
the Song steps.
• Turn EDIT 2 knob to change the preset
number.
3. Set up to 4 markers in each song with Direct
Song mode.
Follow the steps below to learn the capabilities
of Song Mode.
• Turn EDIT 3 knob to change the
Chord/Scale root.
• Turn EDIT 4 knob to change the
Chord/Scale type.
• Turn the DATA WHEEL to select Insert or
Delete step functions.
• Hold the SONG button (2) until the LED text
display flashes SONG to enter Song mode.
• Once the desired function is selected, press
the DATA WHEEL to enter.
• Press the PREVIOUS/NEXT buttons (5, 6)
to change the Song number to Song 3,
“Amazing Grace”.
• To save changes press the STORE KEY.
You may then change the Song name and
number
• Press the STEP button (2) to allow stepping
through the song.
• Press the STORE KEY again to complete
the store operation.
• Sing into your microphone. You’ll hear
chord based harmonies.
• Press the EDIT KEY to go back to the Song
Step mode.
• Press the NEXT button (6) to advance the
step of the song. Hear how the harmonies
change.
Song Direct Mode
• The Song Mode LCD screen looks like this:
3: AMAZING GRACE
S2 P39c G Dom7
Top Line- Song number and name
S2 -
Step number.
P39c - Preset number and harmony type. s=
Scale; c= Chord; n= notes; blank =shift.
G DOM7 - Root and Scale/Chord type for
Scale and Chord presets.
• Press the NEXT button (6) a few times while
watching the LCD display. Notice that the
preset number does not change. All that
changes between steps is the Root and
chord type. This is how this song was
programmed.
• Press the REWIND button (3) to rewind
back to the first step.
Song Direct mode is a powerful way to use
VoiceLive. You can use it in a number of
different ways.
2. Sequence the chords of the intro, Verse,
chorus and bridge of a song into the steps
of a Song. Go into Song Direct mode and
assign the beginning of each section to the
direct buttons.
1. Put 4 presets with Root and Scale/chord
types customized for your music in a song
and have direct access to them. There are
50 songs in VoiceLive so in doing this you
could effectively create 50 groups of presets
for efficient live recall.
• Press the SONG SELECT button (1) to
change the Song number.
• Press the NEXT button (5) to advance to an
empty song.
• Press the STEP button (2).
• Press the EDIT KEY to enter edit mode.
• Turn EDIT 1 and EDIT 2 knobs to assign
presets 62, 64, 68 and 69 to steps 1 - 4.
12
QUICKSTART
• Press the EDIT KEY to exit edit mode.
USER Button
• Hold the DIRECT button (3) to enter Song
Direct mode.
In every preset you have the option of either
assigning a unique function to the USER button or setting the USER button to Default (edit
screen UBTN). When set to Default the USER
button is assigned to the setting in the global
edit screen UT2. Most factory presets in
VoiceLive have the USER button set to default
unless the USER button is integral to the preset. If you like to sustain your harmonies, then
you may want to set the default USER button
to Harmony Hold. If you perform songs where
there are short phrases of harmonies, rather
than having to press the HARMONY MUTE
button at the start and at the end of the phrases, you can set the default USER button to
Momentary Harmony. In cases where you
have a harmony preset that works for a song
but the intro requires a Low-Fi telephone
sound, you may want to edit the preset and set
the USER button (edit screen UBTN) to
TeleVoice All so that regardless of the default
USER button setting, in that preset, pressing
the USER button creates a Low-Fi effect.
• Press the NEXT button (5) to advance to
Step 2
• Hold the DIRECT B button (2) to assign
Step 2 to this button. Please note that when
new songs are created all direct buttons are
assigned to Step 1.
• Press the NEXT button (5) to advance to
Step 3
• Hold the DIRECT C button (3) to assign
Step 3 to this button.
• Press the NEXT button (5) to advance to
Step 4
• Hold the DIRECT D button (4) to assign
Step 4 to this button.
• Talk into the mic and press the different
DIRECT buttons (DiRECT A to DIRECT D).
Hear yourself take on different personalities.
• To store the Song to the current location,
press the STORE key, edit the Song name
using EDIT knobs 1 and 2 and press
STORE again.
Song Voice Mode
Song Voice mode makes it possible to toggle
each individual harmony voice on/off. This is
useful for building up voices during a chorus.
• Hold the VOICE button (4) until the LED text
display flashes VOIC to enter the Voices
Submode. (Note that if you changed Song
steps with the PREVIOUS/NEXT buttons (5,
6) prior to holding this button or any of the
top four buttons, the second character on
the LCD display will show “*” and the current
step would then be programmed to that
DIRECT button. The second character on
the LED display must read A,B,C or D to
allow changing to another mode).
• Press any of the upper 4 buttons to turn on
and off individual voices.
EXPRESSION Pedal
In the same way as the USER button, you
have the option of assigning a unique function
to the Expression Pedal or setting it to default
in the preset (edit screen XPED). Most factory
presets in VoiceLive come with the Expression
Pedal set to Default. In the UT1 edit screen
you may want to set this default to Harm Lev
Narrow so that you can control the harmony
levels with your foot.
You must calibrate the EXPRESSION pedal for
proper operation. See edit screen UT9 for
details.
The USER button and Expression pedal capabilities are extremely flexible and powerful,
allowing you to set VoiceLive for optimal control and creative possibilities.
• Press the PREVIOUS/NEXT buttons (5, 6)
to change the Song step. Note that the
enabled/disabled combinations of voices do
not change while changing steps. This is
really handy when you want to increase the
number of harmony voices for a later part of
a song.
13
QUICKSTART
Making Scale Harmony Presets
Work with Your Song
When you're not using MIDI, Scale Presets
are the best way to produce harmonies in
VoiceLive. You need to know a few things to
make this work:
1. In what key is the song (A,B C.. etc.)?
2. Is the song in a major or minor key?
Another thing you need is an instrument to
sing with so that you know that you are singing
in the right key.
• Hold the PRESET button (1) to put
VoiceLive into preset mode.
• While singing “ahhh” into VoiceLive, find a
preset with the word “Scale” in the second
line having only one or two VOCAL LEDs lit.
Choose one that has a general sound to the
harmonies that you would like for the song.
• Press the KEY button (2) followed by the
NEXT button to set the key of the Song.
• Press the SCALE button (3) followed by the
NEXT button (6) to set the scale type of the
song to either “M1” if the song is in a major
key or “m1” if the song is in a minor key.
• Play a chord or a starting note on your
instrument to ensure that you are going to
sing in the right key, and try singing the
song into VoiceLive.
• If the harmonies don’t sound right try a
different Scale type number (1, 2 or 3) by
pressing the PREVIOUS/NEXT buttons
(5,6). Remember to stick with “M” if your
song is in a major key and “m” if your song
is in a minor key.
• If they still don’t sound right, press the KEY
button (2) followed by the PREVIOUS button
(5) five times to set the key to a 5th above
the key of the song.
• If they still don’t sound right press the
SCALE button (3) followed by the
PREVIOUS/NEXT buttons (5,6) to select a
different scale type.
14
• Finally, if they still don’t sound right press
the KEY button (2) followed by the
PREVIOUS button (5) two times to set the
key to a 4th above the key of the song then
try changing the scale.
• If one of the Key/Scale type combinations
you tried above sounded close but not quite
right, go back and set the Key and Scale to
the best setting you achieved.
Up to this point we have been trying to find a
key and scale type with a scale preset to work
with the song. If there are only one or two
notes in the song that don’t sound right with
the current setting, it may be possible to
“adjust” the harmonies for those notes using a
custom pitch map.
• Sing the song into VoiceLive and stop on
the note that has the wrong harmonies.
• Figure out what note it is using your ears
and your instrument or look at sheet music
of the song.
• Press the EDIT key and turn the DATA
WHEEL to edit screen VO7.
• Press ENTER (the DATA WHEEL) and turn
the DATA WHEEL until the In: note is the
note with the wrong sounding harmonies.
• Adjust the voices to the correct notes using
the 4 EDIT knobs. (you only have to adjust
the voices that are shown lit on the LEDs)
• Try singing the song again to see if you
need to adjust any more harmony voices
and correct them using the procedure
above.
• Press ENTER to allow normal operation of
the DATA WHEEL.
If this still does not result in acceptable
harmonies it may be because in the song you
need to have different harmonies for the same
note, depending on what the chord is. You
then need to use chord presets in Song mode
to step though the changing chord information
in the song.
QUICKSTART
Basic Editing Concepts
We have designed the factory presets in
VoiceLive to be useful in many musical situations, but we know you will want to make your
own presets that suit your taste and your
needs. If you follow this tour you will quickly
learn the basics of editing VoiceLive presets.
Turning the voices and effects on and off
within a preset and exploring their editable
parameters
1. Hold the PRESET button (1) to enter preset
mode.
2. Go back to Preset 1 using either the DATA
WHEEL or the PREVIOUS/NEXT buttons
(5,6).
2. Notice that each of the eight VOICES &
EFFECTS LEDs is lit on the front panel.
When the LED is lit, the voice or effect
described by the LED is on.
3. Press the EDIT KEY and turn the DATA
WHEEL until the LED TEXT DISPLAY
reads CFG2 (This is the second edit screen).
To get to this screen you can turn the DATA
WHEEL counter clockwise a couple of turns
and then clockwise one click).
7. Turn the DATA WHEEL to see what you
can control and edit. Each edit screen has
up to 4 parameters that may be edited
using the 4 EDIT knobs. The IO and
Utilities LEDs indicate that you are on
pages that are Global and are not stored in
the preset.
8. To save a preset at this point:
• Press the STORE key
• Select the “store to” location using EDIT 4
knob
• Edit the preset name using EDIT knobs 1
and 2.
• Press STORE again.
9. Press the EDIT key once to return to the
top menu.
10.If you did not save the preset in step 8,
pressing the PREVIOUS/NEXT buttons
(5,6) or turning the DATA WHEEL will
change the preset and to undo your edits.
4. While singing, try turning off each of the
four voices using the 4 EDIT knobs. Notice
how the VOICE LEDs go off. Turn them
back on.
5. Turn the DATA WHEEL counterclockwise
one click to get to the CFG1 edit screen,
then turn EDIT knob 1 to turn the HARM
(harmony) parameter off. Notice that the
Harmony LED goes off.
6. With harmonies off, now turn off the THICKEN, EFFECTS and PITCH CORRECT
using the EDIT knobs 2-4. You will now
only hear your singing voice. Turn them all
back on.
15
APPLICATIONS
Live Setups
Using Voicelive is like bringing 4 professional backup singers to your gig! You’ve got several
options when it comes to controlling VoiceLive live. For best results you can use (in various
combinations) the Express-1 expression pedal, a MIDI keyboard, a MIDI CC controller, and of
course the controls on the box itself. We’ve provided setup examples below for a few common
situations.
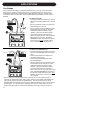
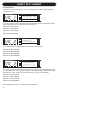
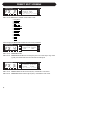
Live Setup with Guitar
• Connect a microphone to the XLR mic input on
VoiceLive and enable the MIC input on the rear
panel.
MIXER
• Connect a guitar with a built-in pre-amp to the
instrument input of VoiceLive*.
PEDAL
INPUT
LEFT/RIGHT
OUTPUT
AC POWER
VOICE LIVE
Out Clip
Input Clip
HARMONY | CORRECTION | EFFECTS
Pr43
GLOBAL FX
PRESET
SONG
EDITED
MIC IN
LIMIT
PROGRAM DISPLAY
0 PPM dB
-5
-10
-20
-40
Baby Go Home
43: Scale Dmaj2
MIDI IN
PRESET#
SELECT
SELECT
HARMONY MODE
ROOT
PRESET
LEAD
HARMONY
INSTRUMENT
EDIT 2
EDIT 3
VOICE 1
VOICE 2
VOICE 3
VOICE 4
HARMONY
THICKEN
EFFECTS
PITCH CORR.
I/O
UTILITIES
OUTPUT
PUSH TO ENTER
EDIT 4
SCALE
REWIND
SONG
DIRECT
Direct B / Voice 2
Direct C / Voice 3
Direct D / Voice 4
USER
HARMONY MUTE
HOLD FOR MODE
PREVIOUS
SCALE/CHORD
EDIT 1
KEY
STEP
Direct A / Voice 1
MIC
INPUT
INSTRUMENT
INPUT
NEXT
HOLD FOR SUBMODE
VOICE
HOLD FOR
• Plug any passive volume or expression pedal
into the Pedal Input of VoiceLive. You must
calibrate the expression pedal for proper
operation. See edit screen UT9 for details.
• Connect the VoiceLive stereo output to a
stereo channel (or two mono channels panned
left and right) on your mixer. For mono
operation use either of the VoiceLive outputs
and set the unit to mono operation with the
OUTPUT parameter in the edit screen IO9.
BYPASS
Live Setup with a MIDI Keyboard
AUDIO
OUT
MIDI KEYBOARD
• Connect a microphone to the XLR mic input on
VoiceLive and enable MIC input from the rear
panel.
MIXER
MIDI OUT
• Connect the keyboard mono output to the
VoiceLive Instrument Input.
• Connect the keyboard MIDI Output to the
VoiceLive MIDI input.
LEFT/RIGHT
OUTPUT
PEDAL
INPUT
AC POWER
VOICE LIVE
HARMONY | CORRECTION | EFFECTS
Pr47
GLOBAL FX
PRESET
SONG
EDITED
MIC IN
LIMIT
SELECT
SELECT
PRESET
Direct A / Voice 1
PREVIOUS
Out Clip
Input Clip
PROGRAM DISPLAY
0 PPM dB
-5
-10
-20
-40
Itchy Cratch
47: Scale Bmaj2
MIDI IN
PRESET#
HARMONY MODE
ROOT
SCALE/CHORD
LEAD
HARMONY
INSTRUMENT
EDIT 1
EDIT 2
EDIT 3
KEY
STEP
HOLD FOR MODE
MIC
INPUT
INSTRUMENT
INPUT
MIDI
IN
VOICE 1
VOICE 2
VOICE 3
VOICE 4
HARMONY
THICKEN
EFFECTS
PITCH CORR.
I/O
UTILITIES
OUTPUT
PUSH TO ENTER
EDIT 4
SCALE
REWIND
SONG
DIRECT
Direct B / Voice 2
Direct C / Voice 3
Direct D / Voice 4
USER
HARMONY MUTE
NEXT
HOLD FOR SUBMODE
VOICE
HOLD FOR
BYPASS
• Plug any passive volume or expression pedal
into the Pedal Input of VoiceLive. You must
calibrate the expression pedal for proper
operation. See edit screen UT9 for details.
• Connect the VoiceLive stereo outputs to a
stereo channel (or two mono channels) on your
mixer. For mono operation use the either of
the VoiceLive outputs and set the unit to mono
operation with the OUTPUT parameter in the
edit screen IO9.
* Note: For electric or acoustic guitars without a pre-amp, the use of an external preamp is
necessary for optimal performance. Often, using a “stomp box” style effects pedal between the
guitar and the VoiceLive produces acceptable results. The output of the stomp box will be
compatible with the instrument input of VoiceLive. Make sure that the stomp box does not have a
passive bypass. You can check this by removing the stomp box’s battery- when you do you
should not be able to get any sound out of it regardless of how many times you stomp on it.
16
PRESET HANDLING
Parameter types
VoiceLive has over 100 useful parameters and
a user interface that lets you view and edit
efficiently. There are preset parameters and
global parameters. Pressing the EDIT key
when in preset mode gets you into the edit
mode where you can change these
parameters.
Preset parameters are stored in each preset.
In the edit menu The LED text display
indicates the type of parameter. CFGconfiguration, VO- individual voice, HAharmony, TH - thickening, FX- effects, CO- pitch
correction, XPed expression pedal and UBtn
USER button are all preset parameter types.
Global parameters do not change when a
different preset is recalled. In the preset edit
menu the I/O or UTIL LEDs are lit and the
LED text Display shows IO or UT for global
parameters. I/O and Util parameters include:
Lead input level and pan, Compression/Gate,
and EQ parameters among many others. If
you change your microphone (or singer!) the
EQ/Compression settings need be adjusted
only once in the edit menu. If you wish to
backup your setup settings, VoiceLive is able
to MIDI dump setup parameters to sysex for
later retrieval.
Preset Types
It’s important to understand the concept of the
current preset versus stored presets.
The current preset is the preset that is always
active in VoiceLive. Recalling a preset copies
preset data from one of the 99 stored presets
into the current preset. As you change the
current preset, the underlying stored presets
are not affected until you choose to store the
current preset back to a stored preset.
When dumping and receiving presets via MIDI,
data is dumped from and received to stored
presets. The current preset remains
untouched.
MIDI Backup and Restore
VoiceLive allows MIDI dumping of all or
individual presets, all or individual songs and
VoiceLive global parameters.
• Connect the VoiceLive MIDI Out to MIDI In
on either another VoiceLive or an external
MIDI device.
• Enter the edit menu by pressing the EDIT
key and scroll to the edit screen UT8.
• Turn EDIT 1 knob to select the MIDI-Dump
function.
• Select what you would like to backup using
the EDIT 2 knob. Pn indicates a preset;
Sm indicates a song, and Setup indicates all
global parameters.
• If connected to another VoiceLive simply
press ENTER and your data will be copied
to the other VoiceLive.
• If connected to a sequencer, arm it to record
SYSEX data and press ENTER on
VoiceLive.
It is possible to directly receive and dump from
the current preset. Refer to the SYSEX MIDI
documentation available on:
www.tc-helicon.com.
All presets may be restored to their factory
default from edit screen UT8.
Global Effect Preset Setting
If you select a preset for the GLBFX parameter
in the edit menu (edit screen UT3), its effect
settings will be used regardless of the current
preset effect settings. The Global FX LED
DOT is lit when active.
If you store the current preset while a Global
Effect is active, the current preset data will be
stored to the selected preset number, but any
changes to the effect data (which come from
the Global preset) will be stored to the global
preset.
All 99 presets shipped with VoiceLive can be
modified or overwritten. You can always
restore a preset to its factory default in the
global edit screen UT8.
VoiceLive is always ready to receive
MIDI System Exclusive Dumps.
Simply connect MIDI Out from the device you
are dumping from to the MIDI In on VoiceLive
and send the SysEx dump at any time.
17
STORE OPERATION
Pressing the STORE key on VoiceLive allows storing the current Preset or Song, or IO and Util
Global System Parameters.
VOICE LIVE
HARMONY | CORRECTION | EFFECTS
Stor
GLOBAL FX
EDITED
MIC IN
LIMIT
Out Clip
Input Clip
PROGRAM DISPLAY
0 PPM dB
-5
-10
-20
-40
<Preset> To:23
Go Your Own
MIDI IN
PRESET#
HARMONY MODE
ROOT
SCALE/CHORD
VOICE 1
VOICE 2
VOICE 3
VOICE 4
HARMONY
THICKEN
EFFECTS
PITCH CORR.
I/O
UTILITIES
Above is an example of the store screen after editing a preset and pressing store. VoiceLive keeps
track of the last thing you changed. Pressing the STORE button again will store the preset to the
current location. For example, if the last thing you changed was a Global parameter under the IO
and UTIL edit screens, the LCD display would show:
<IO/Util>
At this point the EDIT knobs and data wheel do the following:
DATA WHEEL: Selects whether to store current Preset, Song or IO/Util parameters.
When Preset or Song are selected by the DATA WHEEL:
EDIT 1 knob: Select character of preset/song name to edit
EDIT 2 knob: Change selected character.
EDIT 4 knob: Change Store destination.
Pressing store again will execute the store operation. To abort the store operation press the EDIT
key. Storing after a quick edit is as simple as pressing the STORE button twice.
18
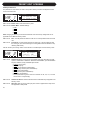
PRESET MODE
Preset mode is VoiceLive’s basic performance mode. Here you can select presets by turning the
DATA WHEEL or by pressing the PREVIOUS/NEXT buttons. Direct and Voice modes give
additional control.
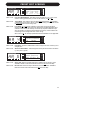
To enter Preset Mode, hold the PRESET button (1) until the LED text display flashes PRE.
Preset Mode LCD Screen
Go Your Own
39: Scale F#maj2
The LCD display above is an example of a preset screen.
Here’s what it all means.
• Top Line
Preset Name
• 39
Preset number.
• Scale
Harmony type of the current preset. This can be either Scale, Chord, Shift or Notes.
• F#
Scale/Chord Root for scale and chord mode presets. Not applicable to Shift and
Notes Presets.
• Maj2
Scale/Chord Type for scale and chord mode presets. Not applicable to Shift and
Notes Presets.
Preset Mode LED Displays
PR39
Above is an example of a Preset Select LED Display.
pr
39
Indicates that you are in preset select mode.
Preset number.
Pressing the PREVIOUS/NEXT buttons (5,6) will change the preset number.
F”M2
Above is an example of the Preset Scale Key Change and Preset Scale Type Change LED
Displays.
When in Preset Mode you can get here either by pressing the KEY button (2) or SCALE button (3)
when on a Scale type preset. This allows changing the scale key and type respectively with the
PREVIOUS/NEXT buttons (5,6). Not applicable for other preset types.
F”
M2
Indicates the key of the scale of the current preset. ”indicates a sharp (#).
Scale type. M indicates Major, m indicates minor. VoiceLive has 3 major scales, 3 minor
scales and one custom scale type.
19
PRESET MODE
Preset Direct Mode
To enter Preset Direct Mode, you need to be in Preset Mode, then hold the DIRECT button (3)
until the LED text display flashes DRCT.
PA21
Above is an example of a Preset Direct Mode Display
P
A
21
This character means that you are in Preset Mode.
This character means that you are in Direct Submode as well as:
•
If it’s an A,B, C or D then a Direct Preset has been recalled by pressing one of corresponding top four DIRECT buttons. In this case holding one of the top four buttons will change
the mode of VoiceLive operation.
•
If it’s a “*” then holding one of the top four buttons will program the current preset to the
button held.
This indicates the current preset number.
Pressing the DIRECT buttons (1-4) will jump to the direct programmed preset.
Holding the DIRECT buttons (1-4) will either program the current preset to that Direct Button
(when the second LED character is a “*”) or change the mode of operation of VoiceLive.
PREVIOUS/NEXT buttons (5, 6) changes the preset. When this happens the second character
on the LED display changes to a “*”, indicating that a DIRECT button may be programmed.
Preset Voice Mode
To enter Preset Voice Mode, you need to first be in Preset Mode, then hold the VOICE button (4)
until the LED text display flashes VOIC.
PV21
Above is an example of a Preset Voice Display.
P
V
21
This character means that you are in Preset Mode.
This character means that you are in Voice Submode.
This indicates the current preset number.
Pressing the VOICE buttons (1-4) will enable/disable the individual harmony voices.
Holding the VOICE buttons (1-4) will change the mode of operation of VoiceLive.
Pressing the PREVIOUS/NEXT buttons (5, 6) changes the preset number. The enabled/disabled combinations of voices are maintained as presets are changed.
20
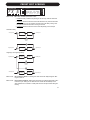
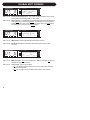
PRESET EDIT SCREENS
Pressing the EDIT key while in Preset Mode gives access to the edit parameters. Turning the data
wheel scrolls through the edit screens. Each edit screen has up to four parameters that may be
adjusted with the EDIT knobs. This section of the manual goes screen by screen to describe the
parameters in VoiceLive. To leave the edit screens press the EDIT key.
Configuration Screens
The parameters in this section are used to enable/disable the harmony and effect components of a
preset.
VOICE LIVE
HARMONY | CORRECTION | EFFECTS
Cfg1
GLOBAL FX
EDITED
MIC IN
LIMIT
Out Clip
Input Clip
PROGRAM DISPLAY
0 PPM dB
-5
-10
-20
-40
Harm Thk FX Cor
On
Off On On
MIDI IN
PRESET#
HARMONY MODE
ROOT
SCALE/CHORD
VOICE 1
VOICE 2
VOICE 3
VOICE 4
HARMONY
THICKEN
EFFECTS
PITCH CORR.
I/O
UTILITIES
These parameters allow enabling/disabling of Harmony, Thickening, Effects and Pitch correction
audio components. The Voices and Effects LEDs will reflect the settings of this page.
EDIT 1 knob:
ENABLE/DISABLE HARMONY VOICES
EDIT 2 knob:
ENABLE/DISABLE LEAD VOICE THICKENING
EDIT 3 knob:
ENABLE/DISABLE EFFECTS (Reverb and Delay)
EDIT 4 knob:
ENABLE/DISABLE PITCH CORRECTION
VOICE LIVE
HARMONY | CORRECTION | EFFECTS
Cfg2
GLOBAL FX
EDITED
MIC IN
LIMIT
Out Clip
Input Clip
PROGRAM DISPLAY
0 PPM dB
-5
-10
-20
-40
Voice Enable
On On Off Off
MIDI IN
PRESET#
HARMONY MODE
ROOT
SCALE/CHORD
VOICE 1
VOICE 2
VOICE 3
VOICE 4
HARMONY
THICKEN
EFFECTS
PITCH CORR.
I/O
UTILITIES
These parameters allow enabling/disabling of individual harmony voices. Voices and Effects LEDs
will reflect the settings of this page.
EDIT 1 knob:
ENABLE/DISABLE VOICE 1
EDIT 2 knob:
ENABLE/DISABLE VOICE 2
EDIT 3 knob:
ENABLE/DISABLE VOICE 3
EDIT 4 knob:
ENABLE/DISABLE VOICE 4
21
PRESET EDIT SCREENS
Voice Edit Screens
VoiceLive can create up to 4 harmony voices. The parameters in this section allow adjustment of
the individual voices.
VOICE LIVE
HARMONY | CORRECTION | EFFECTS
Vo 1
GLOBAL FX
EDITED
MIC IN
LIMIT
Out Clip
Input Clip
PROGRAM DISPLAY
0 PPM dB
-5
-10
-20
-40
Voice Level (dB)
-3 -8
0 -2
MIDI IN
PRESET#
HARMONY MODE
ROOT
SCALE/CHORD
VOICE 1
VOICE 2
VOICE 3
VOICE 4
HARMONY
THICKEN
EFFECTS
PITCH CORR.
I/O
UTILITIES
This screen is used to set the output level of the individual harmony voices. Please note that there
is also a master harmony voice level found on edit screen HA 1.
EDIT 1 knob: VOICE 1 LEVEL
EDIT 2 knob: VOICE 2 LEVEL
EDIT 3 knob: VOICE 3 LEVEL
EDIT 4 knob: VOICE 4 LEVEL
VOICE LIVE
HARMONY | CORRECTION | EFFECTS
Vo 2
GLOBAL FX
EDITED
MIC IN
LIMIT
Out Clip
Input Clip
PROGRAM DISPLAY
0 PPM dB
-5
-10
-20
-40
Voice Pan
L99 R99 L45 R34
MIDI IN
PRESET#
HARMONY MODE
ROOT
SCALE/CHORD
VOICE 1
VOICE 2
VOICE 3
VOICE 4
HARMONY
THICKEN
EFFECTS
PITCH CORR.
I/O
UTILITIES
This screen is used to set the pan position of the individual harmony voices.
EDIT 1 knob: VOICE 1 PANNING
EDIT 2 knob: VOICE 2 PANNING
EDIT 3 knob: VOICE 3 PANNING
EDIT 4 knob: VOICE 4 PANNING
VOICE LIVE
HARMONY | CORRECTION | EFFECTS
Vo 3
GLOBAL FX
EDITED
MIC IN
LIMIT
Out Clip
Input Clip
PROGRAM DISPLAY
0 PPM dB
-5
-10
-20
-40
Voicing Scale
--4 -8 +3 +5
MIDI IN
PRESET#
HARMONY MODE
ROOT
SCALE/CHORD
VOICE 1
VOICE 2
VOICE 3
VOICE 4
HARMONY
THICKEN
EFFECTS
PITCH CORR.
I/O
UTILITIES
This screen is used to set the voicing of the four harmony voices. Voicing means setting the harmony voice note/pitch with respect to the lead note/pitch. This parameter means different things for different harmony modes. The harmony mode of the preset is shown on the LCD display.
EDIT 1 knob: VOICE 1 VOICING
EDIT 2 knob: VOICE 2 VOICING
EDIT 3 knob: VOICE 3 VOICING
EDIT 4 knob: VOICE 4 VOICING
Note: the EDIT knobs will have no effect with Notes mode presets.
22
PRESET EDIT SCREENS
Voicing in Scale Mode Presets
In this mode the VOICING parameter specifies the interval of the harmony note with respect to the
input note in the scale. The range of values goes from --8, which is 2 octaves below the input note,
to ++8 which is two octaves above the input note. For example, a setting of +3 will result in a harmony voice a third above the input voice, related to the current scale.
Voicing in Chord Mode Presets
In this mode the VOICING parameter specifies the relation of the harmony note to the input note with
respect to the current chord. In chord mode presets, the harmony voices are always notes in the
chord. A setting of Up1 will result in the harmony voice being the next note above the input voice in
the chord. For example, if the Chord was C Major and the input note was an E, an Up1 setting
would produce a G harmony voice, just above the input E. The range of values goes from Dn5
(Down 5) to U (unison) to Up6. Additional values are Rt1 and Rt2 which give the decoded chord
root as the harmony voice, and Bs1 and Bs2 (bass voicing) which give the lowest MIDI note
received. Rt2 and Bs2 are the higher pitch root and bass settings.
Voicing in Shift Mode Presets
In this mode the voices are shifted relative to the input note. The values range from -24 semitones
to +24 semitones, shifted relative to the input note, creating parallel harmonies.
Voicing Notes Mode Presets
In this mode a MIDI keyboard needs to be connected. On this screen you will see the currently
decoded MIDI note for the selected voice.
VOICE LIVE
HARMONY | CORRECTION | EFFECTS
Vo 4
GLOBAL FX
EDITED
MIC IN
LIMIT
Out Clip
Input Clip
PROGRAM DISPLAY
0 PPM dB
-5
-10
-20
-40
Gender
-12 -4
MIDI IN
PRESET#
HARMONY MODE
0
ROOT
+10
SCALE/CHORD
VOICE 1
VOICE 2
VOICE 3
VOICE 4
HARMONY
THICKEN
EFFECTS
PITCH CORR.
I/O
UTILITIES
This screen is used to shift the formant (often called gender) of the Harmony Voices. Use it to alter
the character of the voice ranging from -50 (a big person with a deep voice) to 0 (no change) to
+50 (mice/alien sound).
EDIT 1 knob: VOICE 1 GENDER
EDIT 2 knob: VOICE 2 GENDER
EDIT 3 knob: VOICE 3 GENDER
EDIT 4 knob: VOICE 4 GENDER
23
PRESET EDIT SCREENS
VOICE LIVE
HARMONY | CORRECTION | EFFECTS
Vo 5
GLOBAL FX
EDITED
MIC IN
LIMIT
Out Clip
Input Clip
PROGRAM DISPLAY
0 PPM dB
-5
-10
-20
-40
VibStyle Ballad
1
12
6
7
MIDI IN
PRESET#
HARMONY MODE
ROOT
SCALE/CHORD
VOICE 1
VOICE 2
VOICE 3
VOICE 4
HARMONY
THICKEN
EFFECTS
PITCH CORR.
I/O
UTILITIES
This screen is used to select a vibrato style for each harmony voice. The vibrato styles are based
on the analysis of real singers. When changing the style number, the corresponding style description is displayed on the screen. Available Vibrato styles include:
•
•
•
•
•
•
•
•
•
•
•
•
Ballad
Tremolo
RandVib (random depth and speed vibrato)
Broadway
Excited
Folk
Fast
Warm
Discreet
Head
RandTrem (random tremolo)
Soprano.
EDIT 1 knob: VOICE 1 VIBRATO STYLE
EDIT 2 knob: VOICE 2 VIBRATO STYLE
EDIT 3 knob: VOICE 3 VIBRATO STYLE
EDIT 4 knob: VOICE 4 VIBRATO STYLE
VOICE LIVE
HARMONY | CORRECTION | EFFECTS
Vo 6
GLOBAL FX
EDITED
MIC IN
LIMIT
Out Clip
Input Clip
PROGRAM DISPLAY
0 PPM dB
-5
-10
-20
-40
Vibrato Amount
100 99 20 44
MIDI IN
PRESET#
HARMONY MODE
ROOT
SCALE/CHORD
VOICE 1
VOICE 2
VOICE 3
VOICE 4
HARMONY
THICKEN
EFFECTS
PITCH CORR.
I/O
UTILITIES
This screen is used adjust the amount of vibrato applied to each voice.
EDIT 1 knob: VOICE 1 VIBRATO AMOUNT
EDIT 2 knob: VOICE 2 VIBRATO AMOUNT
EDIT 3 knob: VOICE 3 VIBRATO AMOUNT
EDIT 4 knob: VOICE 4 VIBRATO AMOUNT
24
PRESET EDIT SCREENS
VOICE LIVE
HARMONY | CORRECTION | EFFECTS
Vo 7
GLOBAL FX
EDITED
MIC IN
LIMIT
Out Clip
Input Clip
PROGRAM DISPLAY
0 PPM dB
-5
-10
-20
-40
Maj1 Map In:<C>
--C -E
E
G
MIDI IN
PRESET#
HARMONY MODE
ROOT
SCALE/CHORD
VOICE 1
VOICE 2
VOICE 3
VOICE 4
HARMONY
THICKEN
EFFECTS
PITCH CORR.
I/O
UTILITIES
CUSTOM VOICE MAPPING (Scale Mode Only). Scale mode harmonies are basically pitch maps. For
each input note in a scale you can define a resulting harmony note. VoiceLive has 3 major and 3
minor scale pitch maps for all scale roots, and intervals. The Custom voicing feature allows you to
create your own pitch maps. For example, you could define a pitch map so that a C input produces
an E output and a D input produces an A output. A good way to work with custom voicing is as follows:
• For a given harmony voice, select the scale root, type (HA1 edit screen), and interval (VO3 edit
screen) that most closely matches the desired voicing.
• Come back to this edit screen, press ENTER (the DATA WHEEL) and turn the DATA WHEEL TO
select the input note that requires a different harmony note.
• Turn the EDIT KNOB that corresponds to the harmony voice that needs remapping.
• Select various other input notes by turning the DATA WHEEL and remap using the EDIT KNOBS
as desired.
• Press ENTER to exit custom map editing.
• The custom map can be transposed under the Harmony Edit page 1 by changing the SCALE
ROOT.
Pressing ENTER activates custom map editing. Pressing ENTER again exits custom map editing.
DATA WHEEL: Change input note for map editing
EDIT 1 knob: Voice 1 note mapped to input.
EDIT 2 knob: Voice 2 note mapped to input.
EDIT 3 knob: Voice 3 note mapped to input.
EDIT 4 knob: Voice 4 note mapped to input.
25
PRESET EDIT SCREENS
Harmony Edit Screens
The parameters in this section are used to set up basic harmony functions and adjust the overall
sound of the harmonies.
VOICE LIVE
HARMONY | CORRECTION | EFFECTS
HA 1
GLOBAL FX
EDITED
MIC IN
LIMIT
Out Clip
Input Clip
PROGRAM DISPLAY
0 PPM dB
-5
-10
-20
-40
Lev Mode Rt Type
-8 Scale C Maj1
MIDI IN
PRESET#
HARMONY MODE
ROOT
SCALE/CHORD
VOICE 1
VOICE 2
VOICE 3
VOICE 4
HARMONY
THICKEN
EFFECTS
PITCH CORR.
I/O
UTILITIES
EDIT 1 knob: HARMONY LEVEL. Sets overall harmony level.
EDIT 2 knob: HARMONY MODE. Available settings:
•
•
•
•
Scale
Chord
Shift
Notes
Note: Changing the harmony mode will reset individual voice and harmony settings that are not
applicable across different harmony modes.
EDIT 3 knob:
ROOT. In Scale presets this sets the scale root. In Chord presets this sets the chord
root.
EDIT 4 knob:
SCALE/CHORD. In Scale presets this sets the scale type. In Chord presets this sets
the chord type. (The Chord will change if incoming MIDI notes are detected as representing Valid chords).
See the “Harmony and Tuning” section of the manual for a full description of each harmony mode.
VOICE LIVE
HARMONY | CORRECTION | EFFECTS
HA 2
GLOBAL FX
EDITED
EDIT 1 knob:
MIC IN
LIMIT
Out Clip
Input Clip
PROGRAM DISPLAY
0 PPM dB
-5
-10
-20
-40
Hum Amt Smooth
TimPit 3 40%
MIDI IN
PRESET#
HARMONY MODE
ROOT
SCALE/CHORD
VOICE 1
VOICE 2
VOICE 3
VOICE 4
HARMONY
THICKEN
EFFECTS
PITCH CORR.
I/O
UTILITIES
HUMANIZATION STYLE. This is a list of humanization style types. Each Style is made
up from a combination of Flextime™ based time randomization, pitch randomization
and pitch inflection (scoop). Available styles include:
•
•
•
•
•
•
•
•
ScpDwn (Scoop down)
ScpUp (Scoop up)
ScpTim (Scoop and time randomization)
Loose (Scoop, time and pitch randomization)
Timing (time randomization)
TimPit (time and pitch randomization)
Pitch (pitch randomization)
Detune (static detuning of the voices to a maximum of +25, -25, +19, -19 cents
for the Voices 1-4 respectively).
EDIT 2 knob:
HUMANIZATION AMOUNT. Sets the amount that the humanization style is applied to the
harmony voices.
EDIT 3 knob:
SMOOTHING. Sets how much of the input pitch nuance is applied to the output voice.
Not applicable to Shift presets.
26
PRESET EDIT SCREENS
VOICE LIVE
HARMONY | CORRECTION | EFFECTS
HA 3
GLOBAL FX
EDITED
MIC IN
LIMIT
Out Clip
Input Clip
PROGRAM DISPLAY
0 PPM dB
-5
-10
-20
-40
Lead Tune Latch
On
Just Off
MIDI IN
PRESET#
HARMONY MODE
ROOT
SCALE/CHORD
VOICE 1
VOICE 2
VOICE 3
VOICE 4
HARMONY
THICKEN
EFFECTS
PITCH CORR.
I/O
UTILITIES
EDIT 1 knob:
LEAD VOICE ENABLE/DISABLE. This allows turning the lead voice On or Off. This is
useful in creating presets where you want to hear harmony voices only.
EDIT 2 knob:
TUNING MODES. This gives the option of either Equal temperament, Just intonation,
or Barbershop tuning modes. See the “Harmony, and Tuning” section of the manual
for a full description of each tuning mode.
EDIT 3 knob:
LATCH MODE. On or Off. When enabled in Chord mode, the last chord played
remains active after the notes have been released from the MIDI keyboard. When
enabled in Notes mode, the harmony voices will only respond to MIDI note input
when the number of notes being played equals the harmony voices enabled. This
ensures logical voice assignment when voices change.
When Latch is On, the envelope parameters Attack and Release are not applicable.
VOICE LIVE
HARMONY | CORRECTION | EFFECTS
HA 4
GLOBAL FX
EDITED
MIC IN
LIMIT
Out Clip
Input Clip
PROGRAM DISPLAY
0 PPM dB
-5
-10
-20
-40
Porta Pitchbend
34
Gender
MIDI IN
PRESET#
HARMONY MODE
ROOT
SCALE/CHORD
VOICE 1
VOICE 2
VOICE 3
VOICE 4
HARMONY
THICKEN
EFFECTS
PITCH CORR.
I/O
UTILITIES
EDIT 1 knob:
PORTAMENTO. The time in milliseconds to reach a target note when a harmony voice
changes pitch.
EDIT 2 knob:
ASSIGN PITCHBEND WHEEL. Allows assignment of the pitch bend wheel to the harmony voice pitch or gender.
VOICE LIVE
HARMONY | CORRECTION | EFFECTS
HA 5
GLOBAL FX
EDITED
MIC IN
LIMIT
Out Clip
Input Clip
PROGRAM DISPLAY
0 PPM dB
-5
-10
-20
-40
Notes Envelope
Att: 23 Rel: 50
MIDI IN
PRESET#
HARMONY MODE
ROOT
SCALE/CHORD
VOICE 1
VOICE 2
VOICE 3
VOICE 4
HARMONY
THICKEN
EFFECTS
PITCH CORR.
I/O
UTILITIES
EDIT 1 knob:
ATTACK TIME. Sets the envelope attack time in milliseconds for harmony voices.
Available in Notes and Chords mode with LATCH set to Off (edit screen HA3).
EDIT 2 knob:
RELEASE TIME. Sets the envelope release time for harmony voices. Available in
Notes and Chords mode with LATCH set to Off (edit screen HA3).
27
PRESET EDIT SCREENS
Thickening Edit Screen
A good portion of hit vocals use an effect similar to VoiceLive’s thickening to add a stereo “shimmer” to the lead voice. The parameters in this section are used to set the thickening parameters.
Thickening Block Diagram
Pan Center to Full Left
0 to 25 cent
Instrumental Shift
(Detune amount)
Lead Voice
0 to -25 cent
Instrumental Shift
(Detune amount)
VOICE LIVE
HARMONY | CORRECTION | EFFECTS
TH 1
GLOBAL FX
Output
(Spread Parameter)
EDITED
MIC IN
LIMIT
Out Clip
Input Clip
Pan Center to Full Right
PROGRAM DISPLAY
0 PPM dB
-5
-10
-20
-40
ThLev Det Spread
-12dB 10
85%
MIDI IN
PRESET#
HARMONY MODE
ROOT
SCALE/CHORD
VOICE 1
VOICE 2
VOICE 3
VOICE 4
HARMONY
THICKEN
EFFECTS
PITCH CORR.
I/O
UTILITIES
EDIT 1 knob:
THICKEN LEVEL. This sets the volume level of the lead voice thickening effect.
Setting this between -6dB to 0dB gives a thick doubling or unmodulated chorus
effect. Setting it between -10dB to -20dB gives the lead voice a subtle shimmer and
creates a stereo quality.
EDIT 2 knob:
DETUNE AMOUNT. Sets the amount of lead voice detuning in cents. One voice is
detuned above and one is detuned below by this amount.
EDIT 3 knob:
SPREAD AMOUNT. Sets the amount that the detuned voices are panned. A value of
100% results in the detuned voices being panned hard R and L. A value of 0%
pans the detuned voices to center.
28
PRESET EDIT SCREENS
Effects Edit Screens
VoiceLive has a maximum of 1800 milliseconds of stereo delay time with filtering and 12 Reverb
models. The parameters in this section provide control of these effects.
Effects Block Diagram
Lead (pitch corrected with thickening)
Harmony (up to 4 voices mixed)
Instrument
Effects On/Off
Reverb Sends
Delay Sends
Delay
Reverb
Reverb/Delay
Mix
Effects Out
VOICE LIVE
Out Clip
Input Clip
HARMONY | CORRECTION | EFFECTS
FX 1
GLOBAL FX
EDITED
MIC IN
LIMIT
PROGRAM DISPLAY
0 PPM dB
-5
-10
-20
-40
FXLev R/DMix D2R
-15 50/50
-3
MIDI IN
PRESET#
HARMONY MODE
ROOT
SCALE/CHORD
VOICE 1
VOICE 2
VOICE 3
VOICE 4
HARMONY
THICKEN
EFFECTS
PITCH CORR.
I/O
UTILITIES
EDIT 1 knob:
EFFECT LEVEL. This sets the overall volume of the combined Reverb and Delay
effects.
EDIT 2 knob:
REVERB/DELAY MIX.
EDIT 3 knob:
DELAY OUTPUT
VOICE LIVE
HARMONY | CORRECTION | EFFECTS
FX 2
GLOBAL FX
EDITED
MIC IN
LIMIT
TO
REVERB EFFECTS SEND LEVEL.
Out Clip
Input Clip
PROGRAM DISPLAY
0 PPM dB
-5
-10
-20
-40
Snd Lead Har Ins
Rev -20 -12 -18
MIDI IN
PRESET#
HARMONY MODE
ROOT
SCALE/CHORD
VOICE 1
VOICE 2
VOICE 3
VOICE 4
HARMONY
THICKEN
EFFECTS
PITCH CORR.
I/O
UTILITIES
EDIT 1 knob: Used to select Reverb or Delay send parameters
EDIT 2 knob: LEAD
VOICE
SEND LEVEL in dB.
EDIT 3 knob: HARMONY VOICES SEND LEVEL in dB.
EDIT 4 knob: INSTRUMENT SEND LEVEL in dB.
29
PRESET EDIT SCREENS
VOICE LIVE
HARMONY | CORRECTION | EFFECTS
FX 3
GLOBAL FX
EDITED
MIC IN
LIMIT
Out Clip
Input Clip
PROGRAM DISPLAY
0 PPM dB
-5
-10
-20
-40
Reverb Type
Classic Hall
MIDI IN
PRESET#
HARMONY MODE
ROOT
SCALE/CHORD
VOICE 1
VOICE 2
VOICE 3
VOICE 4
HARMONY
THICKEN
EFFECTS
PITCH CORR.
I/O
UTILITIES
EDIT 1 knob: REVERB TYPE. Available reverb models include:
•
•
•
•
•
•
•
•
•
•
•
•
•
•
Living Room
Chamber
Club
Classic Hall
Concert Hall
Large Cathedral
Vocal Studio
Vocal Room
Vocal Hall
Ambience
Live Reverb
Plate 1
Plate 2
Spring
Note: Changing the REVERB TYPE will affect the other reverb parameters.
VOICE LIVE
HARMONY | CORRECTION | EFFECTS
FX 4
GLOBAL FX
EDITED
MIC IN
LIMIT
Out Clip
Input Clip
PROGRAM DISPLAY
0 PPM dB
-5
-10
-20
-40
DecayTime PreDly
1.8s
16ms
MIDI IN
PRESET#
HARMONY MODE
ROOT
SCALE/CHORD
VOICE 1
VOICE 2
VOICE 3
VOICE 4
HARMONY
THICKEN
EFFECTS
PITCH CORR.
I/O
UTILITIES
EDIT 1 knob:
REVERB DECAY TIME.
EDIT 2 knob:
REVERB PRE-DELAY TIME. Sets the delay time prior to the reverb output. Large rooms
typically have reverbs that start much later than the initial signal.
VOICE LIVE
HARMONY | CORRECTION | EFFECTS
FX 5
GLOBAL FX
EDITED
MIC IN
LIMIT
Out Clip
Input Clip
PROGRAM DISPLAY
0 PPM dB
-5
-10
-20
-40
LowColor HiColor
Round
Clear
MIDI IN
PRESET#
HARMONY MODE
ROOT
SCALE/CHORD
VOICE 1
VOICE 2
VOICE 3
VOICE 4
HARMONY
THICKEN
EFFECTS
PITCH CORR.
I/O
UTILITIES
EDIT 1 knob:
REVERB LOW COLOR. Sets the low frequency characteristics of the reverb.
EDIT 2 knob:
REVERB HIGH COLOR. Sets the high frequency characteristics of the reverb .
30
PRESET EDIT SCREENS
VOICE LIVE
HARMONY | CORRECTION | EFFECTS
FX 6
GLOBAL FX
EDITED
MIC IN
LIMIT
Out Clip
Input Clip
PROGRAM DISPLAY
0 PPM dB
-5
-10
-20
-40
DlyType FB Damp
DualMono 46% 1k0
MIDI IN
PRESET#
HARMONY MODE
ROOT
SCALE/CHORD
VOICE 1
VOICE 2
VOICE 3
VOICE 4
HARMONY
THICKEN
EFFECTS
PITCH CORR.
I/O
UTILITIES
EDIT 1 knob: DELAY TYPE. Available parameters include:
• DualMono Delay- maintains the panning of the harmony, lead and instrument
sends.
• PingPong1 sends the lead voice to the left effect send only and the instrument
to the right send only. This results in the lead voice’s first delay coming out of
the right side and the instrument’s coming out the left.
• PingPong2 sends the lead voice to the sends depending on the lead pan
setting.
Dual Mono Delay
Left Delay Send
HF Damping
Delay
Left Delay Out
Delay
Right Delay Out
Delay
Left Delay Out
Delay
Right Delay Out
Feedback
Amount
Right Delay Send
HF Damping
PingPong1 and PingPong2 Delay
Right Delay Send
HF Damping
Feedback
Amount
Left Delay Send
HF Damping
EDIT 2 knob:
DELAY FEEDBACK AMOUNT. Increasing this value causes the delayed signal to take
longer to fade out.
EDIT 3 knob:
HIGH FREQUENCY DAMPING. Setting this to flat results in a delayed signal that is identical to the input. Setting this to 16k0 and lower values will simulate tape and is
often preferred since it results in a delay that enhances the input without being distracting.
31
PRESET EDIT SCREENS
VOICE LIVE
HARMONY | CORRECTION | EFFECTS
FX 7
GLOBAL FX
EDITED
MIC IN
LIMIT
Out Clip
Input Clip
PROGRAM DISPLAY
0 PPM dB
-5
-10
-20
-40
Time Src BeatDiv
1120 Tap
3:4
MIDI IN
PRESET#
HARMONY MODE
ROOT
SCALE/CHORD
VOICE 1
VOICE 2
VOICE 3
VOICE 4
HARMONY
THICKEN
EFFECTS
PITCH CORR.
I/O
UTILITIES
EDIT 1 knob:
DELAY TIME (ms). This can be used to manually set a delay time or adjust a delay
time entered through tap tempo.
EDIT 2 knob:
DELAY TIME SOURCE. Select from the following:
• TAP: the delay time comes from the last tapped tempo.
• MCLK: the delay time comes from incoming MIDI clock messages.
• Manual: the delay time always comes from the value manually entered into the
preset using the DATA WHEEL.
EDIT 3 knob:
BEATS PER DIVISION. This sets the ratio between the Tapped or MIDI tempo and the
resulting delay.
Note: Tempos can only be tapped in with the USER button. The USER button must be set up to do
this. See edit screens UBTN and UT2.
32
PRESET EDIT SCREENS
Pitch Correction Edit Screens
VoiceLive will listen to the pitch of your voice, compare it to the selected correction scale, and then
apply pitch correction in real-time. The amount of correction applied is governed by the various
amount and timing settings.
In order to correct the pitch of a vocal, VoiceLive needs three pieces of information. It needs to
know what pitch you are singing, it needs to know what pitch you would like to be singing, and it
needs to know how perfectly you would like to be singing it. The first piece of information is determined automatically by VoiceLive as you sing using voice trained pitch detection algorithms. The
second piece is supplied by you in the form of a set of possible target correction notes. VoiceLive
looks at the set of supplied notes, listens to your vocal, and determines which note you are closest
to at any given time. Depending on how you’ve configured the correction settings, VoiceLive will
either subtly nudge your pitch, or aggressively force it to match the target note.
Pitch correcting your lead voice not only makes for great sounding lead vocals, it can also benefit
your harmonies - pitch correction is applied prior to harmony voice generation.
VOICE LIVE
HARMONY | CORRECTION | EFFECTS
Co 1
GLOBAL FX
EDITED
MIC IN
LIMIT
Out Clip
Input Clip
PROGRAM DISPLAY
0 PPM dB
-5
-10
-20
-40
Root ScaleType
C
Maj
MIDI IN
PRESET#
HARMONY MODE
ROOT
SCALE/CHORD
VOICE 1
VOICE 2
VOICE 3
VOICE 4
HARMONY
THICKEN
EFFECTS
PITCH CORR.
I/O
UTILITIES
The best way to supply a set of target notes is in the form of a scale that matches the musicality of
your vocal. The parameters in this screen let you do this. For example, you could select all of the
notes of a C Major scale to be your target notes.
EDIT 1 knob: PITCH CORRECTION SCALE ROOT.
EDIT 2 knob: PITCH CORRECTION SCALE TYPE. Available options include:
•
•
•
•
•
•
Maj (Major)
Min1 (natural minor)
Min2 (harmonic minor)
Min3 (ascending melodic minor)
Chro (Chromatic)
Custom.
This setting in combination with scale root determines which notes your input
vocal will be corrected to.
VOICE LIVE
HARMONY | CORRECTION | EFFECTS
CO 2
GLOBAL FX
EDITED
MIC IN
LIMIT
Out Clip
Input Clip
0 PPM dB
-5
-10
-20
-40
MIDI IN
PROGRAM DISPLAY
Wn55
PRESET#
At31 Am78
HARMONY MODE
ROOT
SCALE/CHORD
VOICE 1
VOICE 2
VOICE 3
VOICE 4
HARMONY
THICKEN
EFFECTS
PITCH CORR.
I/O
UTILITIES
This screen gives access to parameters that determine how subtle or aggressive the pitch correction. The upper line of the display shows in real-time the pitch correction being applied by
VoiceLive. The maximum correction displayed is +/- 200 Cents (there are 100 cents per semitone).
EDIT 1 knob:
WINDOW (cents). When VoiceLive tries to determine which target note you are closest to, it uses this parameter. For example, if the set of correction notes includes
“C, D, E, F, G, A, B” (C-major), and you are singing a very sharp D (80 cents
sharp), the window dictates whether you should be corrected to D, or not at all. If
the window was set to 80 or more cents, the D# would be corrected to the D
33
PRESET EDIT SCREENS
because it falls within the window. If the window was less than 80 cents, no correction would take place. Your input pitch must fall within the window around one of
the supplied correction notes if it is to be corrected at all. This allows you to naturally inflect your vocals and slide between notes while cleaning up the pitches as
you get fairly close to them. A setting of 100 cents or larger will cause correction to
be on continuously when using the scale C-Major, as 200 cents is the largest interval between any two notes.
EDIT 2 knob:
ATTACK. Once the target correction pitch has been identified by VoiceLive, it begins
to shift the pitch of your vocal at a rate determined by this parameter. A setting of
99 gives the fastest setting which instantaneously pulls your vocal in-tune, an effect
that can be useful for some types of music. Settings between 16 and 40 give the
most natural results.
EDIT 3 knob:
AMOUNT. Scales the amount of automatic correction applied to the input voice. The
range is 0% to 100%. However, 0% does not mean that the correction is turned off.
The amount of applied correction depends on how far out of tune the input note is.
This allows for a very musical way of correcting pitch. It corrects the large pitch
errors while preserving the natural micro variations around the target pitch. For
example:
With the amount set to 100%, a 10 cent flat input will be corrected by 10 cents and
a 50 cent flat input will be corrected by 50 cents.
With the amount set to 80%, a 10 cent flat input will be corrected by approximately
5 cents and a 50 cent flat input will be corrected by approximately 40 cents.
With the amount set to 0%, a 10 cent flat input will not be corrected and a 50 cent
flat input will be corrected by approximately 10 cents.
VOICE LIVE
HARMONY | CORRECTION | EFFECTS
Co 3
GLOBAL FX
EDITED
MIC IN
LIMIT
Out Clip
Input Clip
PROGRAM DISPLAY
0 PPM dB
-5
-10
-20
-40
Cus C#D#EF#G#A#B
O-o-oo-o-o-ol
MIDI IN
PRESET#
HARMONY MODE
ROOT
SCALE/CHORD
VOICE 1
VOICE 2
VOICE 3
VOICE 4
HARMONY
THICKEN
EFFECTS
PITCH CORR.
I/O
UTILITIES
This screen shows the actual notes of the of current correction scale (Maj, Min1, Min2, Min3,
Chrom or Cus). It provides a chromatic list of notes beginning with the scale root. Below this list a
series of “o”s and “-”s indicating which notes are in the pitch correct scale and which are ignored.
“o” indicates that the note is in the scale and “-” indicates that the note is ignored. The scale may
be modified by moving the cursor to an “o” or “-” with EDIT 1 KNOB and turning the EDIT KNOB 2
to change its state. Modified (custom) scales are stored with presets.
EDIT 1 knob:
Selects note.
EDIT 2 knob:
Adds or removes note from the correction scale (selects either “o” or “-”)
34
PRESET EDIT SCREENS
Special Edit Screens
The USER button and EXPRESSION pedal functions in VoiceLive give the performer foot control of
their sound. They allow you to be your own sound man while you are performing. These special
screens allow you to setup the USER button and EXPRESSION pedal in the preset.
VOICE LIVE
HARMONY | CORRECTION | EFFECTS
Xped
GLOBAL FX
EDITED
EDIT 1 knob:
MIC IN
LIMIT
Out Clip
Input Clip
PROGRAM DISPLAY
0 PPM dB
-5
-10
-20
-40
X-Ped Assign
Pan Mirror
MIDI IN
PRESET#
HARMONY MODE
ROOT
SCALE/CHORD
VOICE 1
VOICE 2
VOICE 3
VOICE 4
HARMONY
THICKEN
EFFECTS
PITCH CORR.
I/O
UTILITIES
EXPRESSION PEDAL ASSIGN. Assigns a parameter to be controlled by the Expression
pedal. Options include:
•
•
•
•
•
•
•
•
•
•
•
•
•
•
•
•
•
Off. This setting disables the operation of the expression pedal.
Lead Lev Full. Control of lead voice level from off to maximum.
Harm Lev Full. Control of harmony voice level from off to maximum.
Harm Lev Narrow. Control of harmony voice level. Foot control range: -10dB to
0 dB with respect to other settings.
Inst Lev Full. Control instrument output level (not input gain) from off to max.
This is especially useful for performers with multiple instruments to mute the
instrument signal when changing instruments.
Inst Lev Narrow. Control of instrument output level (not input gain) from -10dB
to max. The maximum position will give the same output level as set by the
instrument level knob.
Voices 1+2 Lev. Control of Voice 1 and Voice 2 level from off to the maximum
level set in the preset.
Voices 3+4 Lev. Control of Voice 3 and Voice 4 level from off to the maximum
level set in the preset.
FX Level. Control of Reverb and Delay level from off to the maximum in the
preset.
Reverb level. Control of reverb level from off to the maximum level set in the
preset.
Delay Level. Control of delay level from off to the maximum level set in the
preset.
Vibrato. Controls the vibrato intensity from minimum to maximum.
Smoothing. Control of the smoothing parameter from 0 to 100.
Voicing Mirror. Controls voicing of the harmonies (see edit screen VO3). At
minimum expression pedal position the voicing is as in the preset; at center
position the voicing is unison and at full position the voicing is the programmed
interval on the opposite side of unison. The is useful for creative applications.
With Shift mode presets you can use this to create extreme voice shift special
effects. With Chord mode presets you can create voice appegiator like effects.
Gender mirror. Control of the four voice gender settings (see edit screen VO4).
At minimum expression pedal position the gender is as in the preset (ie. 12); at
center position the gender is 0 (no format shifting applied) and at full position
the gender is minus the programmed interval (ie. -12).
Pan mirror. Control of the four voice pan settings. At minimum expression pedal
position the panning is as in the preset (ie. R45); at center position all pan
settings are C (center) and at full position the pan setting is minus the
programmed interval (ie. L45).
Default (UT1). With this setting the expression pedal will default to settings in
the UT1 edit screen.
35
PRESET EDIT SCREENS
VOICE LIVE
HARMONY | CORRECTION | EFFECTS
Ubtn
GLOBAL FX
EDITED
EDIT 1 knob:
MIC IN
LIMIT
Out Clip
Input Clip
PROGRAM DISPLAY
0 PPM dB
-5
-10
-20
-40
UserBtn Assign
Tap Tempo
MIDI IN
PRESET#
HARMONY MODE
ROOT
SCALE/CHORD
VOICE 1
VOICE 2
VOICE 3
VOICE 4
HARMONY
THICKEN
EFFECTS
PITCH CORR.
I/O
UTILITIES
USER BUTTON ASSIGN. Assigns a parameter to be controlled by the USER button.
Options include:
• Harmony Hold (Not Latching). For a complete description of Harmony Hold see
the Harmony and Tuning section of the manual.
• Tap Tempo. The LED Displays TAP* - the * flashes the tempo. Please note
that this setting will only have an effect on presets where the delay time source
is set to TAP (see edit screen FX7). Tap tempo will be maintained in VoiceLive
through preset changes. If multiple presets are used in a song with a given
tempo, the delay time only needs to be tapped in once.
• FX Override – This controls turning on and off the Reverb and Delay effects.
• RevSend Override - Mutes and un-mutes the Reverb sends.
• DlySend Override - Mutes and un-mutes the Delay sends.
• Bypass Toggle – this is for people who do not like having to hold the harmony
BYPASS button for bypass and would like to do it with a fast click.
• Harmony Override. Similar to pressing the harmony BYPASS button, except
that this button can turn on harmonies from a preset that has them stored as
off.
• PtchCor Override –Pitch Correction Enable/Disable.
• Thicken Override Enable/disable thickening
• RoboVoice - Enables pitch correction and overrides Window, Attack and
Amount parameters to their maximum values which creates the “Cher” effect.
• TeleVoice All – Takes over the EQ parameters to make the voice sound
telephone like. Affects the lead and harmony voices.
• TeleVoice Harm– Takes over the EQ parameters to make the harmony voices
sound telephone like. Effects the harmony voices only.
• Momentary Harm - Harmonies are enabled only while this button is held.
• Default (UT2). With this setting the USER button will default to settings in the
UT2 edit screen.
36
GLOBAL EDIT SCREENS
IO Edit Screens
IO edit screens provide parameters that relate to general audio settings. All IO parameters are
“global” in that they are not stored with the preset and are applicable to all presets. Press the
STORE Key to save IO parameters after editing.
VOICE LIVE
HARMONY | CORRECTION | EFFECTS
IO 1
GLOBAL FX
EDITED
MIC IN
LIMIT
EDIT 1 knob:
LINE
EDIT 2 knob:
LOW CUT
Hz.
HARMONY | CORRECTION | EFFECTS
IO 2
EDITED
MIC IN
LIMIT
PROGRAM DISPLAY
0 PPM dB
-5
-10
-20
-40
LineIn LowCut
12
80Hz
MIDI IN
PRESET#
INPUT GAIN.
VOICE LIVE
GLOBAL FX
Out Clip
Input Clip
FILTER.
HARMONY MODE
ROOT
SCALE/CHORD
VOICE 1
VOICE 2
VOICE 3
VOICE 4
HARMONY
THICKEN
EFFECTS
PITCH CORR.
I/O
UTILITIES
Sets the input gain for the line input.
12dB per octave. Cutoff frequency options include 60, 80 and 120
Out Clip
Input Clip
PROGRAM DISPLAY
0 PPM dB
-5
-10
-20
-40
Lead Instrument
Dry On
Dry On
MIDI IN
PRESET#
HARMONY MODE
ROOT
SCALE/CHORD
VOICE 1
VOICE 2
VOICE 3
VOICE 4
HARMONY
THICKEN
EFFECTS
PITCH CORR.
I/O
UTILITIES
EDIT 1 knob:
DRY LEAD ON/OFF. Setting this to off removes the dry lead audio from the signal
path. This is useful when using the signal from the Mic Pass Thru connector for the
dry lead signal or when you want 100% wet output.
EDIT 2 knob:
DRY INSTRUMENT ON/OFF. Setting this to off removes the dry instrument audio from
the signal path. This allows VoiceLive to have an effects send from a mixing board
feed the instrument input.
VOICE LIVE
HARMONY | CORRECTION | EFFECTS
IO 3
GLOBAL FX
EDITED
MIC IN
LIMIT
Out Clip
Input Clip
PROGRAM DISPLAY
0 PPM dB
-5
-10
-20
-40
LPan Ipan Tune
R12 L52 440.0
MIDI IN
PRESET#
HARMONY MODE
ROOT
SCALE/CHORD
VOICE 1
VOICE 2
VOICE 3
VOICE 4
HARMONY
THICKEN
EFFECTS
PITCH CORR.
I/O
UTILITIES
EDIT 1 knob:
LEAD VOICE PANNING. This setting pans the lead voice.
EDIT 2 knob:
INSTRUMENT PANNING. This setting pans the instrument.
EDIT 3 knob:
SYSTEM TUNING REFERENCE. This sets the overall tuning reference with respect to A440.
37
GLOBAL EDIT SCREENS
VOICE LIVE
HARMONY | CORRECTION | EFFECTS
IO 4
GLOBAL FX
EDITED
MIC IN
LIMIT
Out Clip
Input Clip
PROGRAM DISPLAY
0 PPM dB
-5
-10
-20
-40
DynAssgn EQAssgn
Lead
Lead+Hm
MIDI IN
PRESET#
HARMONY MODE
ROOT
SCALE/CHORD
VOICE 1
VOICE 2
VOICE 3
VOICE 4
HARMONY
THICKEN
EFFECTS
PITCH CORR.
I/O
UTILITIES
VoiceLive has EQ and dynamics processing optimized for vocals. This screen and the following
provide parameters for setting up the EQ and dynamics processing.
EDIT 1 knob:
DYNAMIC PROCESSING ASSIGN. This allows assigning of dynamic processing (compressor and gate) to the lead voice, harmony voices, both lead and harmony voices
or neither. Hint: assigning only to the lead voice with a medium compressor setting
(threshold: -15dB, ratio:2:1) keeps the lead voice a consistent volume but keeps
harmony levels following the singers level. This gives control of harmony levels
with mic technique.
EDIT 2 knob:
EQ ASSIGN. This allows assigning of the three band EQ to the lead voice, harmony
voices, both lead and harmony voices or neither.
VOICE LIVE
HARMONY | CORRECTION | EFFECTS
IO 5
GLOBAL FX
EDITED
MIC IN
LIMIT
Out Clip
Input Clip
PROGRAM DISPLAY
0 PPM dB
-5
-10
-20
-40
Thrsh Ratio Gate
-12
2.5
-45
MIDI IN
PRESET#
HARMONY MODE
ROOT
SCALE/CHORD
VOICE 1
VOICE 2
VOICE 3
VOICE 4
HARMONY
THICKEN
EFFECTS
PITCH CORR.
I/O
UTILITIES
Compressor / Gate settings. The compressor in VoiceLive has auto makeup gain to a maximum of
+20dB. This means that the volume level of the signal will be increased for most volume levels of
input with the compressor enabled.
EDIT 1 knob:
COMPRESSOR THRESHOLD LEVEL. Range: 0 to -60 dB.
EDIT 2 knob:
COMPRESSION RATIO. Range: 1.1:1 to 64:1
EDIT 3 knob:
GATE THRESHOLD. Range: Off, -70dB to 0dB
VOICE LIVE
HARMONY | CORRECTION | EFFECTS
IO 6
GLOBAL FX
EDITED
MIC IN
LIMIT
Out Clip
Input Clip
PROGRAM DISPLAY
0 PPM dB
-5
-10
-20
-40
LowShlf HighShlf
L200+3 H4k0+7
MIDI IN
PRESET#
HARMONY MODE
ROOT
SCALE/CHORD
VOICE 1
VOICE 2
VOICE 3
VOICE 4
HARMONY
THICKEN
EFFECTS
PITCH CORR.
I/O
UTILITIES
VoiceLive has an extremely flexible 3 band EQ with frequency adjustable high and low shelving
bands and a fully parametric band with Q, frequency and Gain controls. This screen gives control
over the high and low shelf EQ parameters.
EDIT 1 knob:
LOW SHELF FREQUENCY (Hz). Range: 80Hz to 16kHz
EDIT 2 knob:
LOW SHELF CUT/BOOST (dB). Range: Cut (12 dB per octave low cut at the LOW
SHELF FREQUENCY), -12dB to +12dB
EDIT 3 knob:
HIGH SHELF FREQUENCY (Hz). Range: 80Hz - 16kHz
EDIT 4 knob:
HIGH SHELF CUT/BOOST (dB). Range: Cut (12 dB per octave high cut at the HIGH
SHELF FREQUENCY), -12dB to +12dB.
38
GLOBAL EDIT SCREENS
VOICE LIVE
HARMONY | CORRECTION | EFFECTS
IO 7
GLOBAL FX
EDITED
MIC IN
LIMIT
Out Clip
Input Clip
PROGRAM DISPLAY
0 PPM dB
-5
-10
-20
-40
MidPara
M3k2-2
MIDI IN
PRESET#
Q
0.32
HARMONY MODE
ROOT
SCALE/CHORD
VOICE 1
VOICE 2
VOICE 3
VOICE 4
HARMONY
THICKEN
EFFECTS
PITCH CORR.
I/O
UTILITIES
This screen provides control of the fully parametric mid EQ.
EDIT 1 knob:
CENTER FREQUENCY (Hz)
EDIT 2 knob:
CUT/BOOST (dB)
EDIT 3 knob:
Q. This value is equal to the center frequency of the filter divided by the difference
between the upper and lower -3dB frequencies. The higher the Q value the narrower the filter. Range is .1 (wide band) to 10 (very narrow band).
VOICE LIVE
HARMONY | CORRECTION | EFFECTS
IO 8
GLOBAL FX
EDITED
MIC IN
LIMIT
Out Clip
Input Clip
PROGRAM DISPLAY
0 PPM dB
-5
-10
-20
-40
BypMode DlyComp
Stage
On
MIDI IN
PRESET#
HARMONY MODE
ROOT
SCALE/CHORD
VOICE 1
VOICE 2
VOICE 3
VOICE 4
HARMONY
THICKEN
EFFECTS
PITCH CORR.
I/O
UTILITIES
EDIT 1 knob:
BYPASS MODE. This sets how VoiceLive operates in Bypass as controlled by the
footswitches. The Stage setting disables all effect processing except for EQ and
Dynamics processing. The Studio setting removes all effect processing including
the EQ and Dynamics and outputs the lead signal at full level to the digital output.
EDIT 2 knob:
DELAY COMPENSATION. Turning this on delays the lead vocal so that the humanized
harmony voices will be randomly ahead and behind the lead voice. Turning this off
results in minimum lead voice processing delay.
VOICE LIVE
HARMONY | CORRECTION | EFFECTS
IO 9
GLOBAL FX
EDITED
MIC IN
LIMIT
Out Clip
Input Clip
PROGRAM DISPLAY
0 PPM dB
-5
-10
-20
-40
OutRng
+14dBu
MIDI IN
PRESET#
Output
Stereo
HARMONY MODE
ROOT
SCALE/CHORD
VOICE 1
VOICE 2
VOICE 3
VOICE 4
HARMONY
THICKEN
EFFECTS
PITCH CORR.
I/O
UTILITIES
EDIT 1 knob:
OUTPUT RANGE. This sets the output level range. The value displayed reflects the
maximum output level at that setting. Please note that some mixers will produce a
distorted signal with a +20dB signal. If you experience distortion and neither the
input nor output clip lights are flashing on VoiceLive, try adjusting this parameter to
a lower setting.
EDIT 2 knob:
OUTPUT MODE: Stereo or Mono.
VOICE LIVE
HARMONY | CORRECTION | EFFECTS
Io10
GLOBAL FX
EDITED
MIC IN
LIMIT
Out Clip
Input Clip
PROGRAM DISPLAY
0 PPM dB
-5
-10
-20
-40
S-Rate
44.1kHz
MIDI IN
PRESET#
HARMONY MODE
Input
Analog
ROOT
SCALE/CHORD
EDIT 1 knob:
SAMPLE RATE: 44.1kHz, 48kHz or External.
EDIT 2 knob:
INPUT SELECT: Analog or Digital.
VOICE 1
VOICE 2
VOICE 3
VOICE 4
HARMONY
THICKEN
EFFECTS
PITCH CORR.
I/O
UTILITIES
39
GLOBAL EDIT SCREENS
Utility Edit Screens
Utility screens provide parameters that relate to the general setup of VoiceLive. All Utility parameters are “global” in that they are not stored with the preset and are applicable to all presets.
VOICE LIVE
HARMONY | CORRECTION | EFFECTS
UT 1
GLOBAL FX
EDITED
MIC IN
LIMIT
Out Clip
Input Clip
PROGRAM DISPLAY
0 PPM dB
-5
-10
-20
-40
X-Ped Default
Harm Lev Narrow
MIDI IN
PRESET#
HARMONY MODE
ROOT
SCALE/CHORD
VOICE 1
VOICE 2
VOICE 3
VOICE 4
HARMONY
THICKEN
EFFECTS
PITCH CORR.
I/O
UTILITIES
This screen sets the default expression pedal function. In the preset if the expression pedal is set
to default, then the expression pedal assignment will come from this screen.
EDIT 1 knob:
EXPRESSION PEDAL DEFAULT ASSIGN. Assigns a parameter to be controlled by the
Expression pedal. Options include:
• Lead Lev Full. Control of lead voice level from off to maximum.
• Harm Lev Full. Control of harmony voice level from off to maximum.
• Harm Lev Narrow. Control of harmony voice level. Foot control range: -10dB to
0 dB with respect to other settings.
• Inst Lev Full. Control instrument output level (not input gain) from off to max.
This is especially useful for performers with multiple instruments to mute the
instrument signal when changing instruments.
• Inst Lev Narrow. Control of instrument output level (not input gain) from -10dB
to max. The maximum position will give the same output level as set by the
instrument level knob.
• Voices 1+2 Lev. Control of Voice 1 and Voice 2 level from off to the maximum
level set in the preset.
• Voices 3+4 Lev. Control of Voice 3 and Voice 4 level from off to the maximum
level set in the preset.
• FX Level. Control of Reverb and Delay level from off to the maximum in the
preset.
• Reverb level. Control of reverb level from off to the maximum level set in the
preset.
• Delay Level. Control of delay level from off to the maximum level set in the
preset.
• Vibrato. Controls the vibrato intensity from minimum to maximum.
• Smoothing. Control of the smoothing parameter from 0 to 100.
• Voicing Mirror. Controls voicing of the harmonies (see edit screen VO3). At
minimum expression pedal position the voicing is as in the preset; at center
position the voicing is unison and at full position the voicing is the programmed
interval on the opposite side of unison. The is useful for creative applications.
With Shift mode presets you can use this to create extreme voice shift special
effects. With Chord mode presets you can create voice arpeggiator like effects.
• Gender mirror. Control of the four voice gender settings (see edit screen VO4).
At minimum expression pedal position the gender is as in the preset (eg. 12); at
center position the gender is 0 (no format shifting applied) and at full position
the gender is minus the programmed interval (eg. -12).
• Pan mirror. Control of the four voice pan settings. At minimum expression pedal
position the panning is as in the preset (eg. R45); at center position all pan
settings are C (center) and at full position the pan setting is minus the
programmed interval (eg. L45).
40
GLOBAL EDIT SCREENS
• Off. This setting disables the operation of the expression pedal.
VOICE LIVE
HARMONY | CORRECTION | EFFECTS
UT 2
GLOBAL FX
EDITED
MIC IN
LIMIT
Out Clip
Input Clip
PROGRAM DISPLAY
0 PPM dB
-5
-10
-20
-40
UserBtn Default
Radio Voice
MIDI IN
PRESET#
HARMONY MODE
ROOT
SCALE/CHORD
VOICE 1
VOICE 2
VOICE 3
VOICE 4
HARMONY
THICKEN
EFFECTS
PITCH CORR.
I/O
UTILITIES
This screen sets the default USER button function. In the preset if the USER button is set to
default, then the USER button assignment will come from this screen.
EDIT 1 knob:
USER BUTTON DEFAULT ASSIGN. Assigns a parameter to be controlled by the User
Button. Options include:
• Harmony Hold (Not Latching). For a complete description of Harmony Hold see
the Harmony and Tuning section of the manual.
• Tap Tempo. The LED Displays TAP* - the * flashes the tempo. Please note
that this setting will only have an effect on presets where the delay time source
is set to TAP (see edit screen FX7). Tap tempo will be maintained in VoiceLive
through preset changes. If multiple presets are used in a song with a given
tempo, the delay time only needs to be tapped in once.
• FX Override – This controls turning on and off the Reverb and Delay effects.
• RevSend Override - Mutes and un-mutes the Reverb sends.
• DlySend Override - Mutes and un-mutes the Delay sends.
• Bypass Toggle – this is for people who do not like having to hold the harmony
BYPASS button for bypass and would like to do it with a fast click.
• Harmony Override. Control of Reverb and Delay level from off to the maximum
in the preset.
• PtchCor Override –Pitch Correction Enable/Disable.
• Thicken Override Enable/disable thickening
• RoboVoice - Enables pitch correction and overrides Window, Attack and
Amount parameters to their maximum values which creates the “Cher” effect.
• TeleVoice All– Takes over the EQ parameters to make the voice sound
telephone like. Affects the lead and harmony voices.
• TeleVoice Harm– Takes over the EQ parameters to make the harmony voices
sound telephone like. Effects the harmony voices only.
• Momentary Harm- Harmonies are enabled only while this button is held.
41
GLOBAL EDIT SCREENS
VOICE LIVE
HARMONY | CORRECTION | EFFECTS
UT 3
GLOBAL FX
EDITED
MIC IN
LIMIT
Out Clip
Input Clip
PROGRAM DISPLAY
0 PPM dB
-5
-10
-20
-40
GlbFX VibrtoCtrl
Off
Boost
MIDI IN
PRESET#
HARMONY MODE
ROOT
SCALE/CHORD
VOICE 1
VOICE 2
VOICE 3
VOICE 4
HARMONY
THICKEN
EFFECTS
PITCH CORR.
I/O
UTILITIES
EDIT 1 knob:
GLOBAL EFFECTS PRESET SELECT. This makes the effect parameters of the chosen
preset global for all recalled presets and Song steps.
EDIT 2 knob:
VIBRATO CONTROL. This sets whether the vibrato follows the onset and attack of the
model (Boost) or is instantaneous (Manual). The Mod Wheel on most keyboards
controls the vibrato in both modes, boosting the preset value in the Boost setting
and starting from a value of 0 in the Manual Setting.
VOICE LIVE
HARMONY | CORRECTION | EFFECTS
UT 4
GLOBAL FX
EDITED
MIC IN
LIMIT
Out Clip
Input Clip
PROGRAM DISPLAY
0 PPM dB
-5
-10
-20
-40
MidiChan SYXID
1
0
MIDI IN
PRESET#
HARMONY MODE
ROOT
SCALE/CHORD
VOICE 1
VOICE 2
VOICE 3
VOICE 4
HARMONY
THICKEN
EFFECTS
PITCH CORR.
I/O
UTILITIES
EDIT 1 knob:
MIDI CHANNEL. Sets the base MIDI Send and Receive channel.
EDIT 2 knob:
SYSTEM EXCLUSIVE ID. This parameter sets the MIDI system exclusive ID for
VoiceLive.
VOICE LIVE
HARMONY | CORRECTION | EFFECTS
UT 5
GLOBAL FX
EDITED
MIC IN
LIMIT
Out Clip
Input Clip
PROGRAM DISPLAY
0 PPM dB
-5
-10
-20
-40
CC-Ctrl GlblChrd
On
On
MIDI IN
PRESET#
HARMONY MODE
ROOT
SCALE/CHORD
VOICE 1
VOICE 2
VOICE 3
VOICE 4
HARMONY
THICKEN
EFFECTS
PITCH CORR.
I/O
UTILITIES
EDIT 1 knob:
MIDI CC CONTROL. On: sends and responds to MIDI CC messages. Off: MIDI CC
messages not sent or responded to.
EDIT 2 knob:
GLOBAL CHORD. Options are as follows:
• On - The last MIDI detected chord type and root is retained when switching
through chordal presets.
• Off - The chord type and root is always taken from the preset recalled.
42
GLOBAL EDIT SCREENS
VOICE LIVE
HARMONY | CORRECTION | EFFECTS
UT 6
GLOBAL FX
EDITED
EDIT 1 knob:
MIC IN
LIMIT
Out Clip
Input Clip
PROGRAM DISPLAY
0 PPM dB
-5
-10
-20
-40
M.Flt N4C BndRng
Prg+SX Off +-12
MIDI IN
PRESET#
HARMONY MODE
ROOT
SCALE/CHORD
VOICE 1
VOICE 2
VOICE 3
VOICE 4
HARMONY
THICKEN
EFFECTS
PITCH CORR.
I/O
UTILITIES
MIDI FILTER. With this parameter you can cause VoiceLive to ignore certain MIDI
commands and data.
• P - ignore program changes.
• SX - ignore system exclusive messages.
• P+SX -ignore program changes and system exclusive messages.
EDIT 2 knob:
NOTES FOUR CHANNEL MODE.
• Off - All harmony voices in Notes Mode will respond to the base MIDI channel.
• On - In Notes mode, Harmony Voice 1 responds to the base MIDI channel;
Harmony Voice 2 responds to the base MIDI channel +1 etc. All Harmony
Voices will respond to unique MIDI channels.
EDIT 3 knob:
BEND RANGE. Sets in semitones the range that MIDI pitch bend information will alter
the pitch of the harmonies in Notes mode.
VOICE LIVE
HARMONY | CORRECTION | EFFECTS
UT 7
GLOBAL FX
EDITED
MIC IN
LIMIT
Out Clip
Input Clip
PROGRAM DISPLAY
0 PPM dB
-5
-10
-20
-40
KB-Split Transp
Above C4 +2
MIDI IN
PRESET#
HARMONY MODE
ROOT
SCALE/CHORD
VOICE 1
VOICE 2
VOICE 3
VOICE 4
HARMONY
THICKEN
EFFECTS
PITCH CORR.
I/O
UTILITIES
The parameters on this screen allow keyboard players to specify a range of the keyboard to control
Notes and Chord mode harmonies. For example using a combination of the three controls below, a
user can set the top octave of the keyboard to play notes mode harmonies.
EDIT 1 knob:
MIDI SPLIT ABOVE/BELOW. Sets whether notes above or below the split point are
used for notes mode and chord mode presets.
EDIT 2 knob:
MIDI SPLIT POINT.
EDIT 3 knob:
MIDI TRANSPOSE. This transposes the harmony voices in Notes mode. The value
corresponds to octaves.
43
SONG MODE
VOICE LIVE
HARMONY | CORRECTION | EFFECTS
UT 8
GLOBAL FX
EDITED
MIC IN
LIMIT
Out Clip
Input Clip
PROGRAM DISPLAY
0 PPM dB
-5
-10
-20
-40
<Function> Item
MIDI Dump P-All
MIDI IN
PRESET#
HARMONY MODE
ROOT
SCALE/CHORD
VOICE 1
VOICE 2
VOICE 3
VOICE 4
HARMONY
THICKEN
EFFECTS
PITCH CORR.
I/O
UTILITIES
In this screen the selection from the first knob affects the options in the second knob. Once you
have made the selections you must press the DATA WHEEL for ENTER to perform the function.
EDIT 1 knob selection: MIDI Dump. Allows SYSEX MIDI dumping of all or individual presets, all or
individual Songs and the VoiceLive IO/Util parameters.
• Select what you would like to backup using the EDIT2 KNOB. Pn denotes a preset;
Sn Denotes a song; Setup is all IO/Util parameters.
• If connected to another VoiceLive simply press ENTER and your data will be copied
to the other VoiceLive.
• If connected to a sequencer, arm it to record SYSEX data and press ENTER on
VoiceLive.
EDIT 1 knob selection: RestorePre. Restore a Preset to its Factory setting.
• Select what preset you would like to restore using the EDIT2 knob.
• Press ENTER to restore the preset.
EDIT 1 knob selection: RestoreSng. Restore a Song to its Factory setting.
• Select what Song you would like to restore using the EDIT2 knob.
• Press ENTER to restore the song.
EDIT 1 knob selection: ClearSng. Clear song steps and name of a song.
• Select what song you would like to clear using the EDIT2 knob.
• Press ENTER to clear the song.
VOICE LIVE
HARMONY | CORRECTION | EFFECTS
UT 9
GLOBAL FX
EDITED
MIC IN
LIMIT
Out Clip
Input Clip
PROGRAM DISPLAY
0 PPM dB
-5
-10
-20
-40
PedalCalibration
<Enter> to Start
MIDI IN
PRESET#
HARMONY MODE
ROOT
SCALE/CHORD
VOICE 1
VOICE 2
VOICE 3
VOICE 4
HARMONY
THICKEN
EFFECTS
PITCH CORR.
I/O
UTILITIES
VoiceLive will operate properly with most passive volume and expression pedals. Use this screen
to calibrate the pedal. To calibrate the expression pedal follow instructions on the VoiceLive LCD
display:
With the expression pedal plugged into the Pedal Input on the back of VoiceLive press the DATA
wheel for ENTER.
• Move the pedal to its MAXIMUM position.
• Press the data wheel for ENTER.
• Move the pedal to it’s MINIMUM position.
• Press the data wheel for ENTER.
44
SONG MODE
SONG MODE
Song mode is VoiceLive’s advanced performance mode. You can pre-program a sequence of
presets, scale, root, or chord changes, and step forwards and backwards through them as needed
as well as jump directly to song steps in Direct mode - all with foot control. There is a maximum of
50 songs in VoiceLive with 30 steps each.
This feature also allows you to use a single preset throughout a sequence of footswitch steps while
changing only the musical information - the chord, root, and type information in chordal presets,
and the key and scale information in scalic presets.
To enter Song Mode hold the SONG button (2) until the LED text display flashes SONG.
Song Mode LCD Screen:
33: Happy Joe
S2 P53s C#Maj2
The LCD display above is an example of a Song mode screen.
Here’s what it all means.
• Top Line
Song number and name
• S2
Step number.
• P53s
Preset number and harmony type. s= Scale; c= Chord; n= notes; blank =shift.
• C# Maj2
Root and Scale/chord type for scale and chord mode presets.
To access the Song Edit screen press the EDIT key while in Song Mode.
Song Edit Mode LCD Screen:
Sng33 <STEP INS>
S21 P53s C#Maj2
The LCD display above is an example of a Song edit screen.
Here’s what it all means.
• Sng33
Song number
• <Step INS> Song Edit Function. This is selectable by turning the data wheel and is executed
by pressing the data wheel (ENTER).
• S21
Step number. Change the step number using the EDIT 1 knob.
• P53s
Preset number and harmony type. s= Scale; c= Chord; n= notes; blank =shift. The
preset number may be edited using the EDIT 2 knob.
• C#
Scale/Chord Root for scale and chord mode presets. This may be changed using
the EDIT 3 knob.
• Maj2
Scale/Chord Type for scale and chord mode presets. This may be changed using
the EDIT 4 knob.
45
SONG MODE
Song Edit Functions
Turn the data wheel to select between the following two Song Edit Functions:
<STEP INS>
<STEP DEL>
inserts a copy of the current step.
deletes the current step.
Press ENTER to execute the function.
Once you have created a Song, remember to press the STORE key to save your work.
Song Mode LED Displays
SG31
Above is an example of a Song Select LED text display.
Sg
31
Indicates that you are in Song select mode.
Song number.
Pressing the PREVIOUS/NEXT buttons (5,6) will change the song number.
When in Song Mode you can get there by pressing the SELECT button (1).
ST21
Above is an example of a Song Step Display.
ST
21
Indicates that you are in Song step mode.
Song step number.
Pressing the PREVIOUS/NEXT buttons (5,6) will change the step number.
When in Song Mode you can get there by pressing the STEP button (2).
46
SONG MODE
Song Direct Mode
To enter Song Direct Mode, you need to be in Song Mode, then hold the DIRECT button (3) until
the LED text display flashes DRCT.
SA21
Above is an example of a Song Direct Mode LED text display
S
A
21
This character means that you are in Song Mode.
This character means that you are in Direct Submode as well as:
•
If it’s an A,B, C or D then a Direct Step has just been recalled by pressing one of corresponding top four DIRECT buttons. In this case holding one of the top four buttons will
change the mode of VoiceLive operation.
•
If it’s a * then holding one of the top four buttons will program the current step to the button
held.
This indicates the current Song step.
Pressing the DIRECT buttons (1-4) will jump to the programmed step.
Holding the DIRECT buttons (1-4) will either program the current step to that Direct Button
(when the second LED character is a *) or change the mode of operation of VoiceLive.
PREVIOUS/NEXT buttons (5, 6) changes the Song step. When this happens the second character on the LED display changes to a *, indicating that a DIRECT button may be programmed.
Song Voice Mode
To enter Song Voice Mode, you need to be in Song Mode, then hold the VOICE button (4) until
the LED text display flashes voic.
SV21
Above is an example of a Song Select LED text display.
S
V
21
This character means that you are in Song Mode.
This character means that you are in Voice Submode.
This indicates the current Song step.
Pressing the VOICE buttons (1-4) will enable/disable the individual harmony voices.
Holding the VOICE buttons (1-4) will change the mode of operation of VoiceLive.
Pressing the PREVIOUS/NEXT buttons (5, 6) changes the Song step. The enabled/disabled
combinations of the voices are maintained as Song steps are changed.
47
HARMONY AND TUNING
Harmony
Here's where we can go into a little more
depth about harmonies. We've tried to keep it
practical, focusing on what VoiceLive can do
for you.
Harmony Hold
Truly an innovation, the Harmony Hold feature
lets you (on a whim) sustain the backing harmony voices while you continue to sing
through them. On activation (assign the USER
button to this function in either edit screen
UBTN or UT2 and press and hold or use the
Harmony Hold MIDI CC), you can freeze whatever the harmony voices are doing, and they
will hold their notes (in a very natural way) until
you let go (of the PEDAL button or by sending
the proper CC value). See edit screen UBTN
description in the “Preset Edit Screen” section of
the manual and the “MIDI Implementation”
section of the manual for more information.
Harmony Modes
VoiceLive has four different harmony modes,
which give four unique methods of creating
harmony. Once we get into describing the
more complex harmony modes, we’ll be showing you examples based on the C major scale.
If you are unfamiliar with this scale we’ve
shown C major here.
Notes Mode
In this Mode, you provide VoiceLive with specific MIDI note information to determine the
pitch of the harmony voices. VoiceLive has two
“Manual/Notes” harmony modes, single and 4
channel. VoiceLive may be set to Notes 4
Channel mode through the Edit Screen UT6.
Notes 4 Channel mode allows you to send 4
channels of MIDI information, one for each
individual harmony voice. This is the most
direct and flexible way of creating harmonies,
allowing you to weave complex melodies and
counter harmonies irrespective of your lead
vocal.
Shift Mode
Also known as “Fixed Interval”, this takes the
pitch of your lead voice and creates harmonies
48
a set number of semitones away, based on
that pitch. The method of creating harmonies,
using a fixed number of semitones relative to
an input note or pitch, is called chromatic harmony, the theory of which we'll go into later.
We consider this type of harmonizing to be
non-intelligent because VoiceLive is not set to
any particular key or scale. These are pure,
parallel harmonies. The most common shift
harmony voices are the 5th (7 semitones) and
octave (12 semitones), ranging from two
octaves below the input to two octaves above
the input pitch.
Below is The C Major scale, showing third
above chromatic scale harmony, as used in
VoiceLive Shift Mode.
Black = Lead & Grey = Harmony
Chord (Chordal) Mode
Chordal harmonies take your chord information
to create intelligent, diatonic harmonies based
on your voice. To make “Chordal” harmonies,
you need to input in real time the chords of the
song. This may be done either via MIDI or
through a programmed sequence of chord
roots and types in Song mode. Chord information consists of the chord root and type,
which define the 3 or 4 notes in a given chord.
In Chordal mode the Voicelive will only create
harmony voices that fall on the notes of the
chord. Chordal harmonies are “intelligent”
because they decipher the chord you’re playing and the note you’re singing to produce
musically pleasing harmonies. When 1 above
is defined as a harmony voice (Up1), the next
note from the chord above the input note is
output for that harmony voice.
The subsequent illustration shows the harmony notes for the C major scale with a voicing
selection of a C major chord and a single “one
above”.
Root: C, Chord Type: Maj, Voicing: Up1
HARMONY AND TUNING
Black = Lead & Grey = Harmony
You might have noticed that each harmony
note can cover more than one input note, or
that each input note doesn’t necessarily have
a unique harmony note. For instance, C and D
both have E as the 3rd above, E and F share
G, and so on. This gives a more stepped
sound to the harmony as the changes are both
greater in magnitude and less frequent than
when using other harmony methods (shift
mode for example). The benefit of this method
is that it is very easy to integrate vocal harmonies into your songs if you already know
their chord progressions! The following lists the
chords available with respect to the root of “C”:
Maj
Maj6
Maj7
Maj7sus4
Min
Min6
Min7
Min7b5
Dim
Dim7
C
C
C
C
C
C
C
C
C
C
Dom7
Dom7b5
Aug
Aug7
Sus
Sus2
Sus7
C
C
C
C
C
C
C
E
E
E
F
Eb
Eb
Eb
Eb
Eb
Eb
E
E
E
E
F
D
F
G
G
G
G
G
G
G
Gb
Gb
Gb
(equiv.
G
Gb
G#
G#
G
G
G
A
B
B
A
Bb
Bb
Bbb
to A)
Bb
Bb
Bb
Bb
Scale (Scalic) mode
Harmonies use key and scale information to
create musically correct, diatonic harmonies.
Most popular music uses a single scale, so
you usually only have to input the information
at the beginning of your song. “Scalic” harmonies are more dynamic than the chordal
harmonies because there are unique harmony
notes for each input note. The subsequent
illustration shows the harmony notes for the C
major scale with a voicing selection of a C
major scale and a single “third above” harmony voice. You can see from the next diagram
that the “Scalic” harmonies are intelligent and
closely follow your lead voice for a tighter
sound.
Black = Lead & Grey = Harmony
Under the Harmony Edit Screen HA2, is a
parameter called SMOOTHING. When set to
100% the harmony voices follow your input
pitch, errors and all, but when set to 0% the
harmonies will jump directly to the scalic harmony notes, kind of like a hard pitch correction
on the harmony voice. Setting the SMOOTHING
parameter between 0 and 100% is like having
variable amounts of pitch correction on the harmonies. VoiceLive has six preprogrammed harmony scales: three major, three minor and one
custom per preset. To create a custom scale or
pitch map see the "Custom Voice Mapping"
section in the "Preset Edit Screens" part of this
manual.
It is also tricky to pick out the key in some
songs. An example is “Sweet Home Alabama”.
Listening, you might think this song is in the
key of “D”, as that’s the first chord, but the harmonies actually work best in the key of “G” -try running the song through VoiceLive to hear
for yourself.
Setting the scale can also take a bit of practice:
for songs centered around the third or root of
the scale it might not sound like there’s any
noticeable differences between the three major
or three minor scales. This is because your
song doesn’t hit any of the scale’s altered
notes. A melody centered around the fifth of the
scale, (such as B in the key of E), highlights
the differences between the scales. Try the
“Sha Lala Lala ...La Tee Daa” chorus of Van
Morrison’s “Brown Eyed Girl” (key: E, scale:
major, 3rd above voicing) with each major
scale to hear the audible difference between
them. For the minor scales, Santana’s “Evil
Ways” (key: G, scale: minor, 3rd above voicing)
highlights the differences between the three
minor scales.
The following table illustrates the third and fifth
above for a given input note to illustrate the differences between the six different scales. “nc”
means no change, in that the harmony voice
will simply keep its previous pitch until the lead
voice pitch changes to a non “nc” note.
49
HARMONY AND TUNING
nc
nc
D
F
nc
nc
C
Eb
nc
nc
Ab
C
B
D
nc
nc
D
F
nc
nc
C
Eb
nc
nc
A
C
Bb
D
D
F
nc
nc
D
F
D
F
C
E
nc
nc
C
Eb
nc
nc
nc
nc
Ab
C
Bb
D
nc
nc
A
C
Bb
D
D
F
D
F
C
E
nc
nc
nc
nc
A
C
C
E
B
Bb
D
F
C
E
A
G#
nc
nc
A
C
B
D
F#
nc
nc
F
G
D
F
Diatonic and Chromatic
We've described scalic and chordal harmonies
as diatonic, and shift harmonies as chromatic;
but what do those words mean?
Look at a piano keyboard. Between middle "C"
and the next "C" there are twelve keys - 7
white keys and 5 black keys. Each of those
keys are pitched one semitone apart for a total
of, you guessed it, 12 semitones. The chromatic scale uses all twelve semitone notes
opposed to the diatonic scales. Thus there is
only one chromatic scale, but 12 each of the
major, minor, etc. diatonic scales (C major, C#
major, D major, etc). Most of us have grown up
hearing the traditional "doh ray me fah so la
tee doh" diatonic scale, so that harmonies
based on the diatonic scale sound correct.
What does this mean, harmony-wise?
Diatonic scale harmonies can only use notes
within specified scale or chord, so a “third
above” harmony voice actually varies between
3 and four semitones above the lead note
where the chromatic harmony would stay
exactly 4 semitones (a major 3rd) above each
note.
50
nc
nc
F
A
MIN3
nc
nc
Eb
G
3rd above
5th above
G
Bb
nc
nc
F
A
MIN2
nc
nc
Eb
G
3rd above
5th above
G
Bb
nc
nc
G
Bb
nc
nc
G
Bb
F
A
F
Bb
nc
nc
Eb
G
3rd above
5th above
MIN1
MAJ3
nc
nc
E
G
3rd above
5th above
G
C
nc
nc
F
A
nc
nc
E
G
MAJ2
3rd above
5th above
G
B
F
A
nc
nc
D
C#
nc
nc
E
G
3rd Above
5th Above
MAJ1
Lead Voice C
Eb
E
To recap: we have three different harmony
modes that use chromatic or diatonic scales.
Shifting, which uses the chromatic, 12 semitone scale, changes the input pitch by a fixed
number of semitones:
Chordal, which uses the root, third, fifth and
sometimes seventh of the many diatonic
scales, pitches the harmony voice to the
closest note contained within the chord:
Scalic, which uses one of many diatonic
scales, pitches the harmony voice to the nearest note contained within the scale:
HARMONY AND TUNING
Theory aside, the best way to get great sound
is to experiment with all of VoiceLive' possible
harmony modes. Not only will you develop an
intuitive sonic sense of what works best where,
but by investigating different permutations and
combinations you could discover some delightful sounds you might otherwise have missed.
Just Tuning
Why just tuning? Although probably no one
has ever told you this, your expensive grand
piano and the last great keyboard synthesizer
you bought are both out of tune! Well, to be
fair we can say instead that they are all tuned
using Equal temperament.
Harmony is the result of the interaction
between differing audible frequencies in ratios
that sound musical to the human ear. A more
exact ratio leads to a nicer sounding harmony.
Most instruments (like the piano) are absolute
by nature. Each note on the keyboard has a
specific pitch. Equal temperament tuning uses
approximations for the tuning of each note,
allowing us to easily alter the key of our music
without re-tuning our instruments.
Unfortunately, with this method of tuning we
lose the ability to create perfect ratios when
playing multiple notes. As a result, much of the
harmony you’ve heard in music has not been
perfectly in tune!
natural tendency, and what sounds best, is to
sing with “just tuning” so that beating is minimized. One of the goals in barbershop quartet
singing is to strive for “just relative intonation”
so that a sub-frequency is audible. Achieving
this goal results in what barbershop fans often
describe as the coveted "ring and lock" sound.
In barbershop music it is the lead singer's
responsibility to try to sing the melody as close
to the tuning of a piano (equal temperament)
as possible. The other singers must then tune
their harmonies to the melody using “just relative intonation”. VoiceLive is able to do this in
both the Just and Barbershop tuning modes.
Barbershop differs from Just tuning in Chordal
mode. Just tuning will use the root of the chord
for the tuning reference, while Barbershop tuning uses the input notes as the tuning reference. For this reason it is better to use
Barbershop in an a-cappella situation and Just
when playing with other instruments, because
Just tuning sounds more in-tune with the other
instruments that most likely have equal temperament tuning.
Our best advice is to experiment and use your
ears!
The bottom line is that the approximations of
equal temperament tuning are practical, but
imperfect. Using VoiceLive with Just tuning will
definitely expand your musical horizons!
Just tuning is practice of maintaining the relative (and perfect) ratios between pitches, creating perfect harmonies.
Singers, especially when performing multi-part
a cappella music, base their tuning on how it
harmonically sounds with other singers. The
51
52
Voice
Direct
Normal
Submode
Voice
Direct
Normal
Submode
Repeat Decrement Preset#
Repeat Decrement Preset#
Decrement Preset#
Decrement Preset#, Key, or
Scale
Repeat Decrement Preset#,
Key, or Scale Repeat
Decrement Preset#
Button 5
Enter Song Mode
Button 2
Key Select
Enter Song Mode
Recall Direct B Preset
Program Direct B* Preset
OR Enter Song Mode
Enable/Disable Voice 2
Enter Direct Mode
Enable/Disable Voice 3
Button 3
Scale Select
Enter Direct Mode
Recall Direct C Preset
Program Direct C* Preset
Button 6
Repeat Increment Preset#
Repeat Increment Preset#
Increment Preset#
Increment Preset#, Key, or
Scale
Increment Preset#, Key, or
Scale Repeat
Increment Preset#
Button 7
*
User defined function
User defined function
User defined function
User defined function
User defined function
User defined function
Mute/ Unmute Harmony
Voices
Bypass/ Unbypass
Mute/ Unmute Harmony
Voices
Bypass/ Unbypass
Mute/ Unmute Harmony
Voices
Bypass/ Unbypass
Button 8
Enter Voice Mode
Button 4
N/A
Enter Voice Mode
Recall Direct D Preset
Program Direct D* Preset
OR Enter Voice Mode
Enable/Disable Voice 4
Preset Mode Footswitch Functions: Buttons 5-8
Button 1
Preset Select
N/A
Recall Direct A Preset
Program Direct A* Preset
OR Enter Preset Mode
Enable/Disable
Voice 1
Enter Preset Mode (leave
Voice Submode)
* Direct buttons are programmed when the second character of the LED display is a , otherwise the mode is changed.
Hold
Press
Hold
Press
Hold
Press
Action
Hold
Press
Hold
Action
Press
Hold
Press
Preset Mode Footswitch Functions: Buttons 1-4
FOOTSWITCH FUNCTION TABLES
Hold
Press
Hold
Press
Action
Enter Song Mode
Button 2
Song Step Select
N/A
Goto Direct B Step
Program Direct B* Step OR
Enter Song Mode
Enable/Disable Voice 2
Enter Direct Mode
Enable/Disable Voice 3
Button 3
Rewind to Step 1
Enter Direct Mode
Goto Direct C Step
Program Direct C* Step
Repeat Increment Song# or
Step#
Increment Song Step#
Button 6
Increment Song# or Step#
User defined function
User defined function
Button 7
User defined function
Mute/ Unmute Harmony
Voices
Bypass/ Unbypass
Button 8
Mute/ Unmute Harmony
Voices
Bypass/ Unbypass
Enter Voice Mode
Button 4
N/A
Enter Voice Mode
Goto Direct D Step
Program Direct D* Step OR
Enter Voice Mode
Enable/Disable Voice 4
Song Mode Footswitch Functions: Buttons 5-8
Button 5
Decrement Song# or Song
Step#
Repeat Decrement Song# or
Step#
Decrement Song Step#
Action
Button 1
Press Song Select
Hold Enter Preset Mode
Press Goto Direct A Step
Program Direct A* Step OR
Hold
Enter Preset Mode
Enable/Disable
Press
Voice 1
Hold Enter Preset Mode
Repeat Decrement Song
Repeat Increment Step#
User defined function
Step#
Decrement Song Step
Increment Song Step#
User defined function Mute/ Unmute Harmony
Press
Voice
Number
Voices
Hold
Repeat Decrement Step #
Repeat Increment Step#
User defined function Bypass/ Unbypass
* Direct buttons are programmed when the second character of the LED display is a *, otherwise the mode is changed.
Direct
Normal
Submode
Voice
Direct
Normal
Submode
Song Mode Footswitch Functions: Buttons 1-4
FOOTSWITCH FUNCTION TABLES
53
MIDI IMPLEMENTATION
Parameter Name
CC#
Range / Description
Voice
Voice
Voice
Voice
Voice
Voice
Voice
1 Level
1 Voicing
1 Gender
1 Vibrato Style
1 Vibrato Amount
1 Pan
1 Active
46
14
29
89
90
16
106
0-127
Harmony Mode Dependent
0-127
0-Number of Styles
0-100
0-127
0-63 Off, 64-127 On
Voice
Voice
Voice
Voice
Voice
Voice
Voice
2 Level
2 Voicing
2 Gender
2 Vibrato Style
2 Vibrato Amount
2 Pan
2 Active
17
18
19
61
62
20
107
0-127
Harmony Mode Dependent
0-127
0-Number of Styles
0-100
0-127
0-63 Off, 64-127 On
Voice
Voice
Voice
Voice
Voice
Voice
Voice
3 Level
3 Voicing
3 Gender
3 Vibrato Style
3 Vibrato Amount
3 Pan
3 Active
21
22
23
88
15
24
108
0-127
Harmony Mode Dependent
0-127
0-Number of Styles
0-100
0-127
0-63 Off, 64-127 On
Voice
Voice
Voice
Voice
Voice
Voice
Voice
4 Level
4 Voicing
4 Gender
4 Vibrato Style
4 Vibrato Amount
4 Pan
4 Active
25
26
27
3
105
28
109
0-127
Harmony Mode Dependent
0-127
0-Number of Styles
0-100
0-127
0-63 Off, 64-127 On
Harmony Root
Harmony Type
Harmony Level
Harmony Smooth
Harmony Style Amount
Harmony Portamento
Harmony Notes Attack
Harmony Notes Release
Harmony Latch
Harmony Bypass
30
31
12
116
41
84
73
72
35
110
0-11
Harmony Mode Dependent
0-127
0-127
0-127
0-127
0-127
0-127
0-63 Off, 64-127 On
0-63 Off, 64-127 On
Thickening Bypass
111
0-127
54
MIDI IMPLEMENTATION
Parameter Name
CC#
Range / Description
Fx
Fx
Fx
Fx
Fx
Fx
Fx
Fx
Fx
Fx
Fx
91
51
52
53
55
56
58
59
63
45
112
0-127
0-127
0-127
0-127
0-127
0-127
0-127
0-13
0-2
0-127
0-63 Off, 64-127 On
Correction Scale Root
Correction Scale Type
Correction Window
Correction Attack
Correction Amount
Correction Scale LSB
Correction Scale MSB
Correction Bypass
47
48
49
54
57
117
118
113
0-11
0-5
0-127
0-127
0-127
*Special
*Special
0-63 Off, 64-127 On
Setup Dry Level
Setup Lead Pan
Setup Dynamics
Setup EQ Routing
Setup Low Shelf Freq
Setup Low Cut Boost
Setup High Shelf Freq
Setup High Cut Boost
Setup Mid Freq
Setup Mid Boost
Setup EQ Q
Setup Output Level
Sustain Pedal
13
0-127
10
0-127
60
0-3
44
0-3
80
0-127
81
0-127
82
0-127
83
0-127
50
0-127
85
0-127
86
0-127
87
0-127
64
0-63 Off, 64-127 On
Affects performance in Notes and Chord Mode
presets only.
Level
Rev:Delay Mix
Lead2Reverb Send
Harmony2Reverb Send
Lead2Delay Send
Harmony2Delay Send
Delay2Reverb Send
Reverb Type
Delay Type
Delay Feedback
Bypass
Note: Wherever applicable, the entire CC range is mapped to a given parameter.
55
MIDI IMPLEMENTATION
Parameter Name
CC#
Range / Description
Instrument Pan
Instrument Level
102
103
0-127
0-127
Bypass All
Harmony Hold CC Control
Global Vibrato
114
119
1
0-63 Off, 64-127 On
0-63 Off, 64-127 On
0-127
Song Step Forward
Song Step Backward
115
9
>63, Song Steps Forward”
>63, Song Steps Backward”
*Special CC’s (same for both the Advanced and GM-Basic CC maps)
Pitch Correction Scale Notes
118
MSB
nn
o=1
p=1
q=1
r=1
s=1
0nnopqrsB (Binary Pattern)
reserved
C note on
C#/Db note on
D note on
D#/Eb note on
E note on
117
LSB
t=1
u=1
v=1
w=1
x=1
y=1
z=1
0tuvwxyzB
F note on
F#/Gb note on
G note on
G#/Ab note on
A note on
A#/Bb note on
B note on
o...z=0
notes off use 0 value
Example Custom Scale Message:
Intended scale: C, E, G, B based on a C root. This scale may be transposed by changing
the scale root.
Message:
CC#118, 00010001 (converts to 17 decimal), CC#117, 00010001
(17 decimal)
MIDI Program Change messages result in a Song Number change while in Song mode.
In any other mode, MIDI Program Change messages result in a Preset Number change.
Note: To capture the desired correction scale you can change the correction scale from the front
panel and record the MIDI out.
Other MIDI messages:
Program Change: Received/Transmitted. In Song mode only received
- changes Song number.
Pitch Bend:
Received. Controls Pitch or Gender, assignable in preset.
Note On/Off:
Received.
56
TECHNICAL SPECIFICATIONS
Digital Inputs and Outputs
Connectors:
Formats:
Sample Rates:
Frequency Response DIO:
RCA Phono (S/PDIF)
S/PDIF (24 bit), EIAJ CP-340, IEC 958
44.1 kHz, 48 kHz
DC to 22/23.9 kHz ± 0.01 dB @ 44.1/48 kHz
Analog Inputs
Connectors, balanced:
Impedance:
Balanced/Unbalanced
Line Input Level @ 0 dBFS:
Line Sensitivity @ 12 dB headroom:
Instrument Input Level @ 0 dBFS:
Instrument Sensitivity @ 12 dB headroom:
Mic. Input Level @ 0 dBFS: Pad Off/On
Mic. Sensitivity @ 12 dB headroom: Pad Off/On
Line, Mic. @ Min gain, Dynamic Range:
EIN @ Max. mic amp. gain, Rg = 200 Ohm:
THD:
Line Frequency Response:
Mic. Frequency Response, max gain:
Crosstalk:
A to D Conversion:
A to D Delay:
Mic.: XLR, Line: ¼"phone jack
Mic.: 3.6/1.8 kOhm, Line: 21/13 kOhm
24 dBu to 0 dBu
12 dBu to -12 dBu
18 dBu to -12 dBu
6 dBu to -24 dBu
-13 dBu/7 dBu to -51 dBu/-31 dBu
-25 dBu/-5 dBu to -63 dBu/-43 dBu
> 92 dB, 20 Hz - 20 kHz
126 dBu
< -100 dB (0,001 %) @ 1 kHz
+0/-0.1 dB, 20 Hz to 20 kHz
-1.5 dB @ 40 Hz, +0/-0.1 dB (200 Hz to 20 kHz)
<-85 dB, 20 Hz to 20 kHz
24 bit, 128 x oversampling bitstream
0.65/0.70 ms @ S.R. = 48/44.1 kHz
Analog Outputs
D to A Conversion:
D to A Delay:
Connectors, balanced:
Output Impedance:
Max. Output Level:
Output Range:
Dynamic Range:
THD:
Frequency Response:
Crosstalk:
24 bit, 128 x oversampling bitstream
0.63/0.68 ms @ S.R.= 48/44.1 kHz
¼"phone jack
40 Ohm
20 dBu/14 dBu, R-load = 1200 Ohm
20 dBu / 14 dBu / 8 dBu / 2 dBu
> 104 dB, 20 Hz to 20 kHz
<-98 dB (0.0013 %) @ 1 kHz
+0/-0.3 dB, 20 Hz to 20 kHz
<-100 dB, 20 Hz to 20 kHz
EMC
Complies with:
Safety
Certified to:
Balanced/Unbalanced
EN 55103-1 and EN 55103-2
FCC part 15, Class B, CISPR 22, Class B
IEC 65, EN 60065, UL6500 and CSA E60065
CSA FILE #LR108093
Environment
Operating Temperature:
Storage Temperature:
Humidity:
32° F to 122° F (0° C to 50° C)
-22° F to 167° F (-30° C to 70° C)
Max. 90 % non-condensing
Control Interface
MIDI:
Pedal:
In/Out/Thru: 5 Pin DIN
1/4" phone jack
Supplementary
Display:
Dimensions:
Weight:
Mains Voltage:
Power Consumption:
Warranty Parts and labor:
4 character LED, 16x 2 character LCD
11.1" x 10.25" x 3.5" (282 x 260 x 89 mm)
5.9 lb. (2.7 kg)
100 to 240 VAC, 50 to 60 Hz (auto-select)
<15 W
1 year
Due to continuous development these specifications
are subject to change without notice.
57