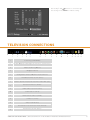
1
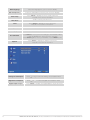
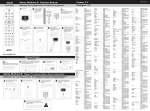
GENESIS + HOSPITALITY TV USERS MANUAL TABLE OF CONTENTS REMOTE CONTROL PAGE 2 TV SETUP WIZARD PAGES 3-4 BASIC OPERATIONS PAGE 5 NAVIGATING THE ON-SCREEN MENU PAGE 5 SELECTING YOUR ON-SCREEN LANGUAGE PAGE 6 VIDEO MENU OPTIONS PAGES 6-7 AUDIO MENU OPTIONS PAGES 7-8 TV MENU OPTIONS PAGES 8-9 SETUP MENU OPTIONS PAGES 9-11 PARENTAL MENU OPTIONS PAGES 11-13 TELEVISION CONNECTIONS PAGE 13 GENESIS + HOSPITALITY TV SPECS PAGES 14-15 +PORTAL SOFTWARE AND CLONE BOX PAGES 16 REMOTE CONTROL ON Power On OFF Power Off Guide Displays Channel Guide Scan Initiate a Channel Scan Source Select TV Signal Input Source ATSC/NTSC Select Cable or Antenna TV Signal CC Display Closed Captioning Lang Display Language for Audio Playback Freeze Freeze TV Action, Digital Mode Only List Display Channel List for Digital TV Favorite Select or Display Favorite Channel Format Select Picture Format VOLUME Adjust Volume Up or Down Menu Display On-Screen Menu CHANNEL Scroll Up or Down the Channel Numbers Exit Clears On-Screen Menu Display Select Selects an Option or Sub-menu 0-9 Select Channels by Entering Numbers Mute Toggles the Volume Off and On Jump Goes Back to the Previous Channel Sleep Set Time for the TV to Play Before it Turns Off Info Displays Current Signal Source Display Displays Current Signal Source and TV Version Number Dash Displays Digital Sub-Channels Press Menu to Exit the On-Screen Menu 2 THERE’S ONLY ONE™ ELECTRIC MIRROR® | E [email protected] | T +1 425 776-4946 | F +1 425-491-8200 | W www.electricmirror.com TV SETUP WIZARD Note: Commands shown in the setup wizard may not match the button labels on your remote control. This document shows remote button names in bold text along with the screen commands. Select [OK] means that you should press the Select button to initiate the OK function. Power on the TV, the Initial Setup window displays a welcome message on your TV screen. Press Menu [OK]. The Initial Setup Language window displays. Scroll using + / - to select a language for your on-screen menu, then press Select [Next]. The Time Zone window displays. Scroll using + / - to select your time zone, then press Select [Next]. The Tuner window displays. THERE’S ONLY ONE™ ELECTRIC MIRROR® | E [email protected] | T +1 425 776-4946 | F +1 425-491-8200 | W www.electricmirror.com 3 Scroll using + / - to select a video reception mode, then press Select [Next]. The Channel Scan window displays. Press Scan on your remote. The window shows a progress bar while the TV scans for channels. Channel scanning can take up to 10 minutes. The Initial Setup Complete window displays when the channel scan is finished. Press Menu [Back] to exit the wizard. 4 THERE’S ONLY ONE™ ELECTRIC MIRROR® | E [email protected] | T +1 425 776-4946 | F +1 425-491-8200 | W www.electricmirror.com BASIC OPERATIONS Turning on Your TV On 1. Connect the TV to an electrical outlet using the power cable. The LCD indicator shows red and your TV enters a power on standby mode. 2. Press the power button on the TV unit or the ON button on the remote control. Turning Your TV Off With your TV on, press the power button on the TV unit or press the OFF button on the remote control. Your TV will return to the power on standby mode. Adjust Your TV Volume Press Volume to adjust the TV volume up or down. Press Mute to turn the sound off. Press Mute to turn the sound back on again. Selecting a TV Channel To To To To To scroll up or down the list of channels on your TV, use the Channel + and – buttons. enter a channel number, use the 0 to 9 buttons. select a 1 digit channel number (such as channel 5): press the 5 button. select a 2 digit channel number (such as 20): press the 2 button, then the 0 button. select a 3 digit channel number (such as 103): press the 1 button, the 0 button, and then the 3 button. Selecting Your Input Source To display a list of input source options, press the Source button on the remote control. Input sources toggle in a small window. Choices include TV, AV, S-VIDEO, YPBPR, and VGA. Press or to scroll through the choices. Press Menu to select and exit the menu. NAVAGATING THE ON-SCREEN MENU Use the remote control to navigate the on-screen menu. From here you will set up your TVs programmable options and settings. Press Menu to display the on-screen menu. Press + or – to scroll up and down the list of sub-menus. Press Select to access the sub-menu controls. Press or to adjust the control settings. Press Menu to exit and save your settings. Note: Commands in the on-screen menu do not match the button labels on your remote. This document shows remote button names in bold text along with the screen commands. Select [OK] means that you should press the Select button to initiate the OK function. THERE’S ONLY ONE™ ELECTRIC MIRROR® | E [email protected] | T +1 425 776-4946 | F +1 425-491-8200 | W www.electricmirror.com 5 SELECTING YOUR ON-SCREEN LANGUAGE Press Menu [OK] to display the on-screen menu. Press + or – to scroll and select the Setup sub-menu. Press Select to access the sub-menu controls. Press or to select OSD Language. Press + or – to select the language you want. When you are satisfied with your settings, press Menu to select and exit. OSD Language Select the Language for Your On-Screen Display. OSD Transparency Set the Transparency Value for Your On-Screen Display. Time Setup Set the Time Clock for your On-Screen Display. Time Display Mode Set the Time Display for a 12 Hour or a 24 Hour Clock. Caption Set the Caption Display. Reset Default Return all Settings to the Factory Defaults. VIDEO MENU OPTIONS Press Menu [OK] to display the on-screen menu. Press + or – to scroll and select the Video Sub-menu. Press Select to access the sub-menu. Press+ or – to scroll and select the sub-menu controls. Press or to adjust the control settings. When you are satisfied with your settings, press Menu to select and exit. 6 THERE’S ONLY ONE™ ELECTRIC MIRROR® | E [email protected] | T +1 425 776-4946 | F +1 425-491-8200 | W www.electricmirror.com Picture Mode You can use Preset Modes, or you can customize your own settings by choosing the User Mode. Brightness Controls the relative lightness and darkest of your TV image. Contrast Controls the difference between the darkest and the lightest areas of your TV image. Color Controls the color saturation of your TV image. Sharpness Controls the focus of your TV image. DNR Controls visual “noise”that appears in video images. Color Temperature Controls the warmness or coolness of the colors in your video image. Please Select to view the sub-menu. Press + or – to scroll and select the sub-menu controls. Press User. or select Cool, Standard, Warm, or To adjust colors individually, press Select. Then press + or – to adjust Red, Green, or Blue gain values. When you are satisfied with your settings, press Menu to select and exit. AUDIO MENU OPTIONS Press Menu to display the on-screen menu. Press + or – to scroll and select the Audio sub-menu. Press Select to access the sub-menu. Press + or – to scroll and select the sub-menu controls. Press or to adjust the control settings. When you are satisfied with your settings, press Menu to select and exit. THERE’S ONLY ONE™ ELECTRIC MIRROR® | E [email protected] | T +1 425 776-4946 | F +1 425-491-8200 | W www.electricmirror.com 7 Balance Adjust the balance between bass and treble. Bass Adjust the level of the lower-pitched sounds. Treble Adjust the level of the higher-pitched sounds. Sound Mode Select the type of sound that you want for the program you are watching. Sound Surround Turn surround sound on or off. Auto Volume Control Allows the TV to automatically equalize the volume between high and low channels. Select on or off. TV MENU OPTIONS This TV Menu only displays in cases where you are using the TV input. Press Menu [OK] to display the on-screen menu. Press + or – to scroll and select the TV sub-menu. Press Select to access the sub-menu. Press + or – to scroll and select the sub-menu controls. Press or to adjust the control settings. When you are satisfied with your settings, press Menu to select and exit. Tuner Mode Select Antenna or Cable for your signal input mode. Time Shifting Mode Channel Scan Warning: Scanning for all channels wipes out all channels previously scanned into memory. Channel Skip 8 Press or to switch the time shifting mode off or on. Press Select to scan for channels. A status bar shows the progress of the channel scan. You can wait until the scan is complete or press Menu to stop the scan. If you stop in the middle of a scan the channels scanned up to that point will be saved. You can program the TV to skip certain channels. THERE’S ONLY ONE™ ELECTRIC MIRROR® | E [email protected] | T +1 425 776-4946 | F +1 425-491-8200 | W www.electricmirror.com Highlight Channel Skip, then press Select. A list of channels displays. Press + or – to scroll up and down the list to highlight channels. Press Select to clear the check box. Channels with checked boxes are skipped. To make a channel display on your TV, you must clear its check box. SETUP MENU OPTIONS Press Menu [OK] to display the on-screen menu. Press + or – to scroll and select the Setup sub-menu. Press Select to access the sub-menu. Press + or – to scroll and select the sub-menu controls. Press or to adjust the control settings. When you are satisfied with your settings, press Menu to select and exit. THERE’S ONLY ONE™ ELECTRIC MIRROR® | E [email protected] | T +1 425 776-4946 | F +1 425-491-8200 | W www.electricmirror.com 9 OSD Language Select the language for your on-screen display. OSD Transparency Select the transparency level of your on-screen display. Time Setup Press Select to display the Time Setup sub-menu. Press + or – to choose a control. Time Zone Scroll to select your time zone. Time Press Select to display the Time sub-menu. Press + or – to set the correct time. Sleep Timer Press Select to select the sleep timer. Time Display Mode Press + or – to select either 12-hour or 24-hour time display. Reset Default Press Select to reset your menu settings to their default values. A pop-up displays the “Are You Sure?” message. Press Select again to reset your defaults or press Menu to exit. Caption Press Select to display the Caption sub-menu. Press + or – to choose a control. Analog Closed Caption Press or to select an analog closed caption filed. Digital Closed Caption Press or to select a digital closed caption field. Digital Caption Style 10 Press Select to display the Digital Caption Style sub-menu. THERE’S ONLY ONE™ ELECTRIC MIRROR® | E [email protected] | T +1 425 776-4946 | F +1 425-491-8200 | W www.electricmirror.com Press + or – to scroll the font attributes in the sub-menu. Press or to adjust the control settings. When you are satisfied with your settings, press Menu to select and exit. Caption Style If you select a broadcaster, the other sub-menu options will be disabled. If you select Custom you can set caption attributes for the fonts, background and window. Font Size Press or to select Small, Medium, or Large. Font Color Press or to select Red, Green, Blue, Yellow, Magenta, Cyan, Black or White. Font Opacity Press or to select Solid/Transparent or Translucent. Background Color Press or to select Red, Green, Blue, Yellow, Magenta, Cyan, Black or White. Background Opacity Press or to select Solid/Transparent or Translucent. Window Color Press or to select Red, Green, Blue, Yellow, Magenta, Cyan, Black or White. PARENTAL MENU OPTIONS Press Menu [OK] to display the on-screen menu. Press + or – to scroll and select the Parental sub-menu. To access the Parental Menu controls, press Select. Then use the remote control number buttons to enter the password. The default password is 2020. The Parental sub-menu displays once the password is entered. THERE’S ONLY ONE™ ELECTRIC MIRROR® | E [email protected] | T +1 425 776-4946 | F +1 425-491-8200 | W www.electricmirror.com 11 Press + or – to scroll and select the Parental sub-menu controls. or to adjust the control settings. When you are satisfied with your settings, press Menu to select and exit. On Source Select TV input, HDMI-1, HDM-2, VGA, Component, S-video, AV or TV. On Channel If On Source is set to TV, the On Channel option is enabled. Here you can select channels scanned into the TVs memory or any analog channel. TV Logical Channel Label Displays the TV channel on the right side of the screen. This option is disabled if the TV Virtual Channel Label option is enabled. TV Virtual Channel Label Displays on the left side of the screen when used with Pro-Channel feature. This option is disabled if TV Logical Channel Label option is enabled. Disables the TV label for certain providers. Set label to on or off. AV Label Energy Star Bypass Used for factory internal testing. LOGO Configuration Sets the EM logo to display during the power on cycle. Clean All Press Select, the screen will display “Are You Sure?” Press Select to clear all parental control settings. Program Block Press Select. Set Rating Enable to On to access and program TV ad movie ratings. Videos with ratings that are enabled can be viewed on the TV. Disabled videos will be blocked. Press + or – to select a ratings system. Press Select to display the settings for the selected system. 12 THERE’S ONLY ONE™ ELECTRIC MIRROR® | E [email protected] | T +1 425 776-4946 | F +1 425-491-8200 | W www.electricmirror.com Use the + / – and buttons to scroll through the settings. Press Select to make a setting. TELEVISION CONNECTIONS s s s s s s s s s s s s s s s 1 2 3 4 5 6 7 8 9 10 11 12 1 Power Plug (TEC320 C13) 2 Speaker Outputs Left & Right (3.5 mm Mono, 3.5 mm Mono) 3 Data Port (Cloning Option) 4 Bridgeport (RJ 12) 5 Configuration Switch (VOD/IPTV Mode Selection) 6 Line Out (Pre-Amp 3.5 mm Stereo) 7 Audio In (Component, Composite and S-Video RCA Type) 8 Component Video In (YPbPr) 9 SVGA Audio In (3.5 mm Stereo) 10 SVGA Video In (HD 15) 11 HDMI Video & Audio In (HDCP) 12 S-Video In (S-VHS) 13 Video In (Composite) 14 RF Television In (F Connector North America) 15 RS-232 Port (3.5 mm Stereo) THERE’S ONLY ONE™ ELECTRIC MIRROR® | E [email protected] | T +1 425 776-4946 | F +1 425-491-8200 | W www.electricmirror.com 13 14 15 13 GENESIS + HOSPITALITY TV SPECIFICATIONS Genesis +Hospitality TV puts control in the hands of the hotel. Channel remapping, auto volume limiters, and IPTV compatibility make the Genesis Hospitality TV optimal for all hospitality projects. INTERACTIVE HOSPITALITY LED TV NORTH & SOUTH AMERICA MODELS IM5-156-1A & 1M5-190-1A PRODUCT HIGHLIGHTS Hospitality HDTV Ultra-slim design IPTV Compatible LED high bright panel Genesis™ TV platform 50,000 hour product life Easy installation and removal 5 Year Limited Warranty (parts and labor) Ideal amplification to support multiple external speaker options KEY HOSPITALITY FEATURES IPTV compatibility BridgePort – RJ-12 Interactive port with IR pass-through Hotel logo Channel re-mapping Power On channel/input select Clone™ box capable +Portal ™ software compatible Auto volume limiters Guest and master remote Programmable protocol DB15 input Pro:Idiom MPEG24 H.264 (external option purchased separately IR control OPTIONAL ACCESSORIES +Portal™ software Clone™ box Bose™ wall mounted Speakers Glass Waves™ audio technology Micros™ integrated state-of-the-art mini-speakers for high quality stereo sound Hospitality multi-functional wall cover plate SAFETY/ENVIRONMENTAL Tested to UL/UL-C 962 CE, CCC and international certifications LED mercury free environmentally sustainable TV back lighting IP44 – Designed for humid bathroom environments FCC compliant Low-volt versions VIDEO HD Ready/FHD – HD 16.7 million colors LED back light 16:9 true wide screen ratio 50,000 hour panel life 400 cd/m2 brightness 14 THERE’S ONLY ONE™ ELECTRIC MIRROR® | E [email protected] | T +1 425 776-4946 | F +1 425-491-8200 | W www.electricmirror.com AUDIO Speaker out (variable) 3.5mm jack 8W/channel L/R Stereo Out Line level out L/R Stereo input FEATURES Caption (subtitle) – CC, CC2, TI OSD Language – English, French, Spanish INPUT & OUTPUT CONNECTIONS S-Video (shared audio) HDMI (independent audio) RF input Component (Y/Pb/Pr) Composite (AV) (shared audio) IR wired remote input STANDARD ACCESSORIES Waterproof remote Installation manual Power cord MOUNTING Quick install and replacement mounting system 8mm screws (6) POWER AC Power Slide – AC 110-120V 60Hz DC Power Slide – 12V (20’) with 5V set top box or clock support NOTICES Some features are dependent upon broadcasting of information by local off-air and cable TV channels Specifications are subject to change without notice HDMI, the HDMI logo, and High Definition Multimedia Interface are trademarks or registered trademarks of HDMI Licensing LLC ELECTRIC MIRROR is a registered trademark all rights reserved THERE’S ONLY ONE™ ELECTRIC MIRROR® | E [email protected] | T +1 425 776-4946 | F +1 425-491-8200 | W www.electricmirror.com 15 +PORTAL SOFTWARE AND CLONE BOX +PORTAL software gives the hotel control over the channel line-up, start-up volume, auto volume limiters, and welcome message. Once settings are chosen from the computer, they are copied to the Electric Mirror Clone Box via USB cable. From the Clone Box, hotel personnel can clone the settings determined in +PORTAL to the Genesis +Hospitality TVs. With Electric Mirror’s new hospitality TV technology, it’s really that easy to customize your bathroom mirror TV setup. GENESIS TV PLATFORM EM’s universal TV platform that provides both low voltage and high voltage removable power supply and LED panel upgrades IPTV COMPATIBILITY Seamless integration with major IPTV providers: VDA, NXTV, Guestteck, Enseo, Locatel, Quadrigia and other providers. HOTEL LOGO/WELCOME MESSAGE To provide your guests with a constant, yet subtle, reminder of your property our TV has the ability to display your logo on the screen. The logos can be uploaded with the Clone™ box. CHANNEL RE-MAPPING Eliminate confusion and give your hotel guests the same channel line-up in the bathroom that they have in the guestroom. This convenient feature gives you the flexibility to change the digital channel from a minor to a major broadcast one. You can even add your A/V devices to your channel listing. POWER ON CHANNEL/INPUT SELECT Start the guest on your in-house channel to feature your hotel’s latest amenities or start them on the input channel of your choice. CLONE BOX CAPABLE To help you work more efficiently, the innovative EM Clone™ box allows you to easily customize and then copy the settings onto all of your TVs, instead of doing this individually. That includes hotel logos, picture size, IPTV protocols, audio limiting, start up channel, and channel mapping. PORTAL SOFTWARE CAPABLE +Portal, EM’s TV configuration software puts the hotel in control of all mirror TV settings. This includes channel mapping, channel start-up, welcome message, volume start-up and more. AUTO VOLUME LIMITERS During initial product set-up, minimum and maximum volume levels can be locked to help minimize disturbance to other hotel guests. PRO:IDIOM READY Pro:Idiom ready for external communication to support MPEG4 H.264 Pro:Idiom set top box GUEST AND MASTER REMOTE Simplified guest remote for easy operation and to restrict guest access. Master remote for engineering set up. EM PROTOCOL EM developed protocol for seamless communications with IPTV providers. DB15 PORT DB15 port allows protocol and firmware updates as technology changes or new IPTV providers are implemented. IR CONTROL Communication port for basic IR control needs. 16 THERE’S ONLY ONE™ ELECTRIC MIRROR® | E [email protected] | T +1 425 776-4946 | F +1 425-491-8200 | W www.electricmirror.com THERE’S ONLY ONE™ ELECTRIC MIRROR® [email protected] | 425-776-4946