1
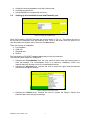
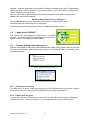
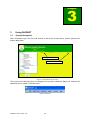
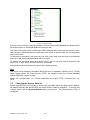
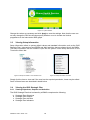
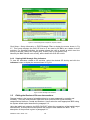
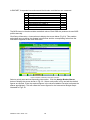
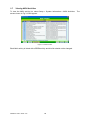
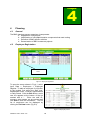
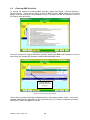
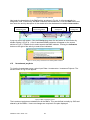
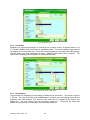
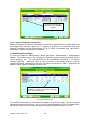
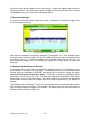
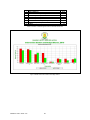
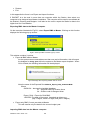
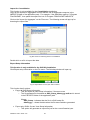
DiHPART District Health Planning and Reporting Tool Version 1.07 User Manual DiHPART is an initiative of the Ghana Health Service as a tool for Planning and Reporting The DiHPART software has been engineered by the University Computing Centre Ltd, Dar es Salaam, Tanzania, together with the Ghana Health Service. For more details on the Ghana Health Services visit www.ghanahealthservice.org or for the University Computing Centre visit www.ucc.co.tz The contents of this manual is contained on the installation CD obtainable from the Ghana Health Service Abbreviations BMC BOD BPEM DiHPART DHA DSS GHS GoG HQ IGF MDG MoH MTEF PE PPME SP SBS Budget Management Centre Burden of Disease Budget Planning Expenditure Monitoring District Health Planning and Reporting Tool District Health Administration District Sentinel Sites Ghana Health Service Government of Ghana Headquarters Internally Generated Funds Millennium Development Goals Ministry of Health Medium Term Expenditure Framework Personal Emoluments (salaries) Policy, Planning, Monitoring and Evaluation Strategic Plan Sector Budget Support Glossary of Terms used in DiHPART Application path Base year BMC Activity BMC Indicator Budget Check box Consolidation Drop-down list Employee Menu bar Personal emoluments Pick List Read only SP Objective SP Output SP Activity SP Indicator Station Tree view A folder in the computer hard disk where DiHPART is installed The first financial year for which expenditure or planning is required BMC specific activity or operation for achieving an SP Indicator BMC defined indicator to measure the BMC activity Estimated cost A small box on the computer screen which can contain a tick or be left blank The adding up of similar data for analytical purposes A list that appears on a computer screen item when a small arrow is clicked BMC staff The bar at the top of the screen which displays options (File, Edit, View, etc) Salaries and statutory allowances A list that appears on a computer screen item when a small arrow is clicked Data cannot be entered or edited Strategic Plan Objective defined by the GHS and shared by all BMCs Strategic Plan Output defined by GHS and shared by all BMCs Strategic Plan Action-oriented statement of what is required to achieve an SP output Strategic Plan Indicator defined by GHS and shared by all BMCs District, Regional or GHS HQ installations Format of menu like Windows Explorer consisting of branches from a main stem DiHPART User’s Guide 1.07 2 CONTENTS 1 Introduction ...................................................................................................................... 4 1.1 Overview .................................................................................................................. 4 1.2 Functions ................................................................................................................. 4 2 Setting up DiHPART ........................................................................................................ 5 2.1 Starting the program ................................................................................................ 5 2.2 Setting up the installation level and financial year .................................................... 7 2.3 Creating User Accounts ........................................................................................... 8 2.4 Logging in to DiHPART ............................................................................................ 9 2.5 Creating, Editing and Deleting users ........................................................................ 9 2.6 Managing Databases ............................................................................................. 11 3 Using DiHPART ............................................................................................................. 12 3.1 System Navigation ................................................................................................. 12 3.2 Changing the System Defaults ............................................................................... 13 3.3 Viewing Setup Information ..................................................................................... 14 3.4 Viewing the GHS Strategic Plan............................................................................. 14 3.5 Editing the Burden of Disease Interventions........................................................... 15 3.6 Viewing BPEM Activities ........................................................................................ 17 3.7 Viewing MOH Activities .......................................................................................... 18 4 Planning ......................................................................................................................... 19 4.1 General .................................................................................................................. 19 4.2 Employee Registration ........................................................................................... 19 4.3 Entering BMC Activities ......................................................................................... 20 4.4 Investment projects ................................................................................................ 21 5 Budgeting ....................................................................................................................... 22 5.1 General .................................................................................................................. 22 5.2 Employee Budgets ................................................................................................. 22 5.3 Administration budget ............................................................................................ 24 5.4 Service delivery ..................................................................................................... 25 5.5 Investment budget ................................................................................................. 26 5.6 Addressing the Burden of Disease ......................................................................... 26 6 Expenditure .................................................................................................................... 28 6.1 Employee PE Expenditure ..................................................................................... 28 6.2 Administration Expenditure .................................................................................... 28 6.3 Service Delivery Expenditure ................................................................................. 29 6.4 Investment Expenditure ......................................................................................... 29 7 Producing Printouts ........................................................................................................ 31 Appendix A Setting up DiHPART in Different BMCs .......................................................... 33 Appendix B Importing and Exporting Data ......................................................................... 34 Appendix C Backup and Restore data ............................................................................... 39 Appendix D Priority Areas and Interventions ..................................................................... 40 DiHPART User’s Guide 1.07 3 21 Chapter Chapter 1 Introduction 1.1 Overview The GHS District Health Planning and Reporting Tool (DiHPART) is a database designed to assist BMCs at district, regional or GHS HQ level in planning, budgeting and reporting on their daily activities and operations and associated expenditure. In particular it allows users to compare the budget for a district or region with the burden of disease in that area. It also facilitates the consolidation of budgets and expenditure at district, regional and national levels by either manual data export or though synchronisation over the internet. 1.2 Functions The database enables users to: Import setup information from the GHS including the annual SP and indicators Enter a BMC plan as components of the respective level‟s MTEF aligned with the SP Associate MoH and BMC indicators with BMC activities and display them Produce the various reports required by the GHS and other stakeholders Enter the staff PE, promotion and recruitment budgets Enter the administration, service budget and investment budgets Enter expenditure on a periodic basis Compare expenditure with budget Track budget implementation Produce investment activity time charts for the current year Export relevant data to the regional and national levels DiHPART User’s Guide 1.07 4 22 Chapter Chapter 2 Setting up DiHPART The DiHPART software is distributed by the GHS on a CD. It is designed to operate on any of the following Microsoft platforms: Windows XP, Windows Vista and Windows 7. The software installation is self-sufficient incorporating a „run-time‟ version of Microsoft Access. It therefore does not require Microsoft Office or any other application to be preinstalled. 2.1 Starting the program The following steps have to be taken to start using the program. Before you install the program, check that the computer internal clock date is correct. To check it, go to Start/Control Panel/Date and Time and change if necessary. In addition, check that your screen resolution is set to 1024 x 768. Installing DiHPART If you are upgrading DiHPART from a previous version, you must back up your existing data. (See paragraph 11.3.2 of this manual). Using the CD: Close all programs on the computer Insert the CD in the drive, and use Windows Explorer to open it, by right- clicking on the Start button, then left clicking Explore. The CD will normally be drive D or E There are 4 files on the CD, including this User Manual and a simplified, shorter User Guide, both in PDF format. If the computer is running Windows Vista or Windows 7, right-click on the file DiHPART.exe and select „Run as Administrator‟. If the computer is running Windows XP, simply double-click on the file DiHPART.exe The following windows will appear: Figure 2.1 Initial installation screens DiHPART User’s Guide 1.07 5 Click Next in both cases and follow the instructions. More installation screen will follow as illustrated: Figure 2.2 Progress and finish screens appearing during installation Click Finish at the end of the installation, and the system will prompt an option for restarting the Computer. Click OK and let the computer restart. Starting DiHPART There are two different ways to start DiHPART: Either double-click the „desktop‟ icon marked „DiHPART‟ or On the Start menu, click > (All) Programs >DiHPART > DiHPART The option will appear like this: Click here to start DiHPART Click DiHPART > DiHPART Either method of starting DiHPART will display the Welcome screen shown in Fig 2.3, which will appear every time the application is used. Figure 2.3 Welcome screen Click Next to proceed with program operation. The setting up of the database comprises three different stages: DiHPART User’s Guide 1.07 6 a. Setting the working database level and financial year b. Creating user accounts c. Assigning BMCs to created user accounts 2.2 Setting up the installation level and financial year Figure 2.4 Setting the installation level When first installed, DiHPART displays the screen shown in Fig 2.4. This allows the user to set up both the installation level and financial year. Click on the down arrow on each box to view and select the desired value, then click the Save button. There are 4 levels of installation: a. b. c. d. Consolidation GHS HQ Regional and District The functionality of DiHPART changes depending on the level selected. The financial years range from 2006-2015. Selecting the Consolidation level, the user needs to select only the financial year to save the settings. The Consolidation level is a „read-only‟ installation, which only imports data from all other levels for consolidated printouts. Selecting the Regional level, requires the user to select the region and the financial year before saving the settings Figure 2.5 Regional level select screen Selecting the District level, requires the user to choose the Region, District and financial year before saving the settings. DiHPART User’s Guide 1.07 7 Figure 2.6 District level select screen For a district setup, the user must also select the DSS Site whose profile will be used for the Burden of disease graph. There are three designed sites, SOUTHERN, CENTRAL and NORTHERN. The default is SOUTHERN. Click Save settings to accept the selected choices. A message for confirming the saving will appear. Figure 2.7 Saving installation levels After saving the settings, the screen is greyed out except for the financial year. That means the user CANNOT change the other settings information after saving. Only the Financial year and the DSS Site can be updated. Click Next to continue with the setup. „Greyed-out‟ settings which cannot be changed Figure 2.16 Saved installation level NOTE: Make sure of the setting selections before saving as this is not reversible! 2.3 Creating User Accounts After the level of installation is set up, the system will display the screen for creating user accounts (right). Select the Administrator User group and enter a new User name and password. (Note: unless a user at Administrator level is created first, the system will not operate). Once any user is created, at least one BMC must be assigned to that user. Click Assign BMC to enable the drop-down list, and select the BMC(s) as DiHPART User’s Guide 1.07 8 required. Open the drop down list and select the BMCs to assign to the user. To add another BMC to the user, click the drop list on the next row below. Any or all of DHA, Sub-Districts or District Hospitals can be selected. After the initial user at Administrator level has been created, any number of users can be added at the three levels available: Administrators, Supervisors or Operators Click the Save button and the opportunity will be given to create another user. Note that each user can belong to only one group. Once all required users have been created, click Save and exit the screen. 2.4 Logging in to DiHPART The system will next display the login screen as shown opposite. Enter the user name and password to access the system, which is described in the next chapter. 2.5 Creating, Editing and Deleting users After the initial setup of the system, administrators can create, edit or delete users as required. From the Treeview menu select the „Security‟ option or from the menu bar, click Security, then the required option. Figure 2.8 Security Treeview sub-menu Figure 2.9 Security Menu bar sub-menu 2.5.1 Creating user accounts To create users, click the “Create User accounts” in the Treeview Security sub menu or Menu bar security sub menu, and continue as described in the setup section above. 2.5.2 Editing user accounts To edit users, click the “Edit User accounts” in the Treeview Security sub menu or Menu bar security sub menu. The screen shown in Fig 2.10 appears with a list of existing users. DiHPART User’s Guide 1.07 9 Figure 2.10 Edit user account Specific permissions can be added or withheld by clicking the Permissons button (Fig 2.11). Figure 2.11 Permission assignment screen To change individual setting(s), click the Edit button. Deselect the action(s) which are not to be granted to the users and click the Close button to save the settings. To change the level of permission of a user, for example from Operator to Supervisor, select the user name, then select the new level from the drop down list labelled Move to User Group. Click the Redefine button to action the change. A warning message will be displayed as appropriate. 2.5.3 Deleting user accounts To delete a user, click the Delete user account option in the Treeview „Security‟ sub menu or corresponding Menu bar sub menu. The screen shown in Fig 2.12 will appear. Select the user to be deleted and then click the Delete button. DiHPART User’s Guide 1.07 10 Figure 2.12 Delete user account screen 2.6 Managing Databases A user at Administrator, Supervisor or Operator level can create a new database or change the default database at any time. In normal usage at district this would not be necessary, but at other levels this is a very useful facility. 2.6.1 Creating a blank Database To create a blank database, select File > Connect to database. The screen shown in Fig 2.13 appears. Click the Edit button, and double-click the box labelled SQL Server Database Name. Figure 2.13 Database connection screen The screen shown opposite will than appear with a list of the available databases. Double-click the word Template, then the Connect button to create a new database. A message indicating a successful connection will appear. The Welcome screen of Fig 2.3 will appear next and the new database can be set up for the required level and financial year in the normal way. 2.6.2 Connecting to an Existing Database To connect to an existing database, simply double-click its name and then the Connect button and after the confirmation message and Welcome screen appear, the log in screen for that database will display. DiHPART User’s Guide 1.07 11 23 Chapter Chapter 3 Using DiHPART 3.1 System Navigation After successful login, the user has access to the home screen where various options and actions take place. Logged in User Version number Figure 3.1 The DiHPART Home screen The home screen has two types of navigation; the top bar, called the “Menu bar” and the left hand side menu, called “Treeview menu” Figure 3.2 Menu bar DiHPART User’s Guide 1.07 12 Figure 3.3 Treeview menu If at any time you wish to close the program, click the button marked Quit at the bottom left of the Home screen, or select File, Exit from the menu bar. The menu bar works similar to Microsoft Office standard menu bars and the treeview menu works similar to Windows Explorer. Both menus are active so that the user can use whichever one is convenient. To access any command in the menu bar, just click on the menu item text on the top and drop down list of the commands associated with it will open. To access any command within the treeview menu, click on the menu item to expand it until there is no “+” sign, and it will show the list of commands. Both the Menu bar and the treeview menu open similar screens. Note: The home screen displays information about the level of installation (District XX-YY: District name, Region name), the Financial year, (FFFF), the Logged in user, the Current Database and the DiHPART version number. Where, XX = Region code, YY = District code within the region, FFFF = Financial year, e.g. 2010. 3.2 Changing the System Defaults System defaults refer to the current or active logon user BMC which will appear as the default, the default financial year and the DSS site whose BOD is used for budgeting. To change any of these values, click the System defaults option on the menu. The screen shown in Fig 3.4 will appear. DiHPART User’s Guide 1.07 13 Figure 3.4 System defaults Change the values as necessary and click Apply to save the settings. Note that the user can not only change the DSS site but also specify whether or not to include the Vertical programmes in the Intervention BOD graph. 3.3 Viewing Setup Information Setup information refers to system default values and standard information such as the GHS Strategic Plan, Interventions and BPEM and MoH activities that are shared by all the BMCs. The setup information can be viewed or input into the system via the Setup sub menu on the Treeview or Menu bar. Figure 3.5 Setup information in the Treeview menu Figure 3.6 Setup information sub menu Simply click the item to view and if the user has the required permission, items may be edited. Some of these items are described in detail below. 3.4 Viewing the GHS Strategic Plan 3.4.1 Viewing Objectives, Outputs and Activities The GHS Strategic Plan that is shared by all BMCs comprises the following: a. b. c. d. Strategic Plan Objectives Strategic Plan Outputs Strategic Plan Activities Strategic Plan Indicators DiHPART User’s Guide 1.07 14 Figure 3.7 GHS Strategic Plan, Objectives, Outputs, Activities Click Setup > Setup Information > GHS Strategic Plan to display the screen shown in Fig 3.7. This screen displays the GHS SP that is to be used by all BMCs as a basis for their activities. For Strategic Activities, the system allows the user to specify at which level the activity is relevant; (GHS) HQ, Region (RG), District (DH) or Sub-District (SD). Normally the BMC should never modify, add or delete the GHS SP entries. 3.4.2 Viewing GHS Strategic Plan Indicators To view SP Indicators related to SP activities, select the desired SP Activity and click the Indicators button to display the screen shown in Fig 3.8. Figure 3.8 GHS Strategic Plan Indicators 3.5 Editing the Burden of Disease Interventions Disease burden is the impact of a health problem in an area measured by mortality and morbidity. There are three different DSS sites which produce BOD figures annually, categorised as Northern, Central and Southern. Users select the most appropriate BOD using the system default option described in paragraph 3.2. Using the inbuilt tool related to the BOD, DiHPART allows the comparison of the health budget with the BOD, so that planners can optimise the budget to best address the BOD. A full description of the process is given in paragraph 5.6. DiHPART User’s Guide 1.07 15 In DiHPART, 8 separate interventions and their burden contributions are measured: No 1 2 3 4 5 6 7 8 Description IMCI (MDG 4) Malaria Control (MDG 6) NTDCP- (MDG 4) HIV/ AIDS / STI (MDG 6) Maternal (MDG 5) Immunization EPI+ (MDG 4) TB DOTS (MDG 6) Other BOD 30.2 28.7 18.1 20.7 1.8 8.7 8.3 7.1 The BOD shown in the above table are default values. Each DSS site produces its own BOD profiles annually. Click Setup Information > Interventions to display the screen below (Fig 3.9). This enables authorised users to define the disease interventions and the corresponding ratios from the information supplied for the three DSS sites. Figure 3.9 Burden of disease Interventions and ratios Select a priority area and corresponding intervention. Click the Assign Burden Shares button to display the screen shown in Fig 3.9. Select each profile in turn and edit the default figures as required. Enter the required figures in the columns labelled Formula to allocate the shares appropriately. This will create the correct figures for the Intervention Budget Graph illustrated in Fig 5.10. DiHPART User’s Guide 1.07 16 Figure 3.10 Burden of disease Expenditure budget ratios This screen can be used to apportion the Expenditure budget shares of the service delivery budget in accordance with how each intervention will contribute to the burden of disease reduction for a specific DSS site. Note that in the left panel, the Profiles include just default shares, which can be overridden on the right panel for a specific DSS site. Also note that some of the Profiles could be applicable to some of the DSS sites and not necessarily to the whole country. For example, the screen above shows a scenario where “Malaria Control (MDG 6)” contributes 28.7% in the disease burden. The interventions linked to it are: INCLUDE - IMNCI, 25% from ANY fund source; INCLUDE - Immunization, 25% from ANY fund source; INCLUDE - Malaria, 100% from ANY fund source; and EXCLUDE - IMNCI, 100% from MULTI-DONOR BUDGET SUPPORT fund source 3.6 Viewing BPEM Activities Figure 3.11 BPEM Activities To view the BPEM activity list, select Setup > System Information > BPEM Activities. The screen shown in Fig 3.11 will appear. DiHPART User’s Guide 1.07 17 3.7 Viewing MOH Activities To view the MOH activity list, select Setup > System Information > MOH Activities. The screen shown in Fig 3.12 will appear. Figure 3.12 MOH Activities Each MoH activity is linked with a BPEM activity and this link should not be changed. DiHPART User’s Guide 1.07 18 24 Chapter Chapter 4 Planning 4.1 General The BMC planning process comprises 4 components: a. Registration of Employees b. Identification of utility/administration components that need costing c. Definition of BMC specific activities d. Determination of BMC Investment projects 4.2 Employee Registration Insert new record here Figure 4.1 Employee registration To open the screen shown in Fig 4.1, select Input Data > Employees > Employee Register. To add an employee for inclusion in the budget, first select the Staff type; Established Posts, Contract Appointments or Daily Rated. Click the Edit button, and a new line appears at the bottom of the list marked with a *. Enter the staff ID, surname, other names, etc as required and click Add to save the information. The full list of employees can be displayed by clicking the Preview button (Fig 4.2). Figure 4.2 Employee printout DiHPART User’s Guide 1.07 19 4.3 Entering BMC Activities To access the screen for entering BMC activities, select Input Data > Service Delivery > Service Activity. There are two ways to enter a BMC activity: either select an SP activity directly from the drop-down list illustrated in Fig 4.2, or select first the SP Objective, then the SP Output, then the activity. Figure 4.2 BMC service delivery activities Once the relevant SP activity has been selected, clicking the Edit button allows the user to enter firstly the relevant SP indicator, baseline data and target value. Double–click for a list of SP indicators (Fig 4.3) Figure 4.2 BMC service delivery activities This is done by double-clicking the shadowed box in the column marked „Code‟. A list of the possible indicators then appears in a pop-up window (Fig 4.3). Select an indicator by doubleclicking on it, and it will appear in the list. DiHPART User’s Guide 1.07 20 Figure 4.3 List of SP indicators Next enter the description of the BMC activity as shown in Fig 4.4. It will automatically be assigned a code. If the activity has BMC indicators associated with it, click the Edit button and then enter the activity description in the double-click the shadowed box labelled Intervention. Enter BMC activity description here Double-click here for list of interventions Select related MoH activity here Click here for indicator list A pop-up screen will appear. Click the Priority drop-down list and select an intervention by double-clicking it (Fig 4.4). A list of associated BMS indicators will appear on the screen similar to Fig 4.3. Double-click to select a particular BMC indicator. Clicking the Indicators button on the right of the activity to enter those indicators. Figure 4.4 List of priority interventions for selecting BMC indicators 4.4 Investment projects To view the Investments screen, select Input Data > Investments > Investment Projects. The screen shown in Fig 4.5 will appear. Figure 4.3 BMC Investment projects The investment projects are standard for all the BMCs. They are defined centrally by GHS and shared by all the BMCs. Hence no changes are required in the plan displayed. DiHPART User’s Guide 1.07 21 25 Chapter Chapter 5 Budgeting 5.1 General There are five different types of budgets that can be entered in DiHPART; i. Personal Emoluments (PE), a. Normal PE (Employee Salaries) b. Employee Promotions c. Employee Recruitment ii. Administration iii. Service Delivery iv. Investment The General menu to enter the budget is the Input Data sub menu on the Treeview or Menu Bar. Fig 5.1 Budgets menu 5.2 Employee Budgets 5.2.1 PE budget To enter the budget for PE, select Input Data > Employees > Employee PE Budget. The screen shown in Fig 5.2 appears. First select the code from the drop-down list (DHA, Subdistricts or District Hospital). Then select the staff member from the list of staff on the Employee Register. All the details entered at the planning stage will appear, including the account code and salary. The funding source must then be entered from the drop-down list and the Post button clicked. A confirmation message will appear saying „Update Employee Information and Post PE budget?‟. Clicking Yes will complete the process and enter the salary into the budget, with the associated message „PE budget updated successfully’. DiHPART User’s Guide 1.07 22 Fig 5.2 PE Budget screen 5.2.2 Promotion Budgeting for expected promotions is carried out on a similar screen, as shown below in Fig 5.3. Select the BMC code, staff ID as for established staff. The current grade of appointment will appear on the left hand side. Enter the promoted grade on the right hand side together with the Scale type, Step and Band as before. Post the information when complete. The confirmation messages should appear as for established staff. Fig 5.3 Employee Promotion budget screen 5.2.3 Recruitment The procedure for budgeting for recruitment is different from promotion. The screen is shown in Fig 5.4. The user must firstly click the Edit button, and then enter the funding source for the proposed new staff member. The account code must then be entered at the bottom row beside the * (Fig 5.4), followed by the profession, grade, etc. Eventually the salary will appear at the right and the information can be posted as before. DiHPART User’s Guide 1.07 23 Pick the account code here and enter the other details as required Fig 5.4 Employee Recruitment budget screen 5.2.4 Approve Employees Promotion Before a promotion is posted to the budget, it must first be approved from a certain date, after the budget itself has been approved. To approve a promotion, an authorised user must required information on the screen shown in Fig 5.5, which is accessed from Input Data > Employees > Approve Employees Promotions. 5.3 Administration budget To enter the budget for administration, select Input Data > Administration > Administration Budget. The screen shown in Fig 5.5 appears. Select the account codes as desired, and the unit of measure, etc. The total estimate will be automatically calculated in the column coloured light blue. Note that where a unit of measure in not already existing, a pop-up window will appear, informing the user that „This value is not in the list. Add?‟. Answering Yes adds the value, making it available for future use. Shaded cell indicates underlying account code breakdown. Double click the cell to reveal the list of components (Fig 5.6) Fig 5.5 Administration budget It is sometimes necessary to sub-divide the budget for one account code. There is a special procedure to permit this function. The unit cost of cleaning materials in Fig 5.5 is shaded blue. Double-clicking on the cell reveals the three underlying components shown in Fig 5.6. DiHPART User’s Guide 1.07 24 Fig 5.6 Breakdown of single account code in administration budget To create a breakdown list of components as shown, simply select „Unit‟ in the column marked Unit of Measure, then 1 in the Qty column. Then double-click the empty Unit Cost box in the row. A blank version of Fig 5.6 will appear. Click Edit and enter the components with their separate units, quantities and unit costs. The total for each component and for the whole group will appear and be entered as a single budget line and the cell shaded blue. The associated printout can be previewed directly from the screen shown in Fig 5.5 with or without the components, by clicking the Preview button and checking the Details box or not as desired (Fig 5.7). Details of a single account components are displayed here, or can be suppressed Fig 5.6 Preview showing breakdown of single account code in administration budget 5.4 Service delivery 5.4.1 To enter the Service Delivery budget, select Input Data > Service Delivery > Service Activity budget. The screen shown in Fig 5.7 appears. Select the relevant SP indicator and BMC activity. Click the Edit button to add budget lines, starting with the account code. Insert the Unit of measure, etc as for the Administration budget, and also the funding source. Note that it is possible to break down a single account code into a number of different components as described above in paragraph 5.3. DiHPART User’s Guide 1.07 Fig 5.7 Service delivery budget entry screen 25 Continue to enter all the budget lines for each activity. Clicking the Close button saves the information entered. The entire service delivery budget can be viewed at any time by clicking the Preview button, with or without the component details. 5.5 Investment budget To enter the Investment budget, select Input Data > Investment > Investment budget to get the screen shown in Fig 5.8. Fig 5.8 Investment budget entry screen Note that the breakdown functionality described in paragraph 5.3 is also available when formulating the Investment budget, but that the funding source must first be entered and that the quantity must be 1. Create the breakdown list by double clicking the unit cost cell. The entire investment budget can be previewed by clicking the Preview button as described previously. 5.6 Addressing the Burden of Disease An important factor in the District Health Sector planning process is the addressing of the actual Burden of Disease in the population. Percentage figures from the selected District Sentinel Sites are embedded in DiHPART and these can be viewed by clicking the button labelled Preview Burden Intervention Graph. The Burden of Disease percentages appear as red bars in the chart (see Fig 5.10). The green bars indicate the percentage of the overall budget spent on the various interventions. The figures „behind‟ the green bars are calculated from relevant formulas within the system which link certain interventions to the Burden of Disease. The purpose of the chart shown in Fig 5.10 is to allow planners to compare expenditure plans with the actual Burden of Disease. The heights of the green bars should, to some extent at least, reflect the respective heights of the red bars. The actual figures on which the Burden of Disease is based is shown in Table 5.9. DiHPART User’s Guide 1.07 26 No 1 2 3 4 5 6 7 8 Description IMCI (MDG 4) Malaria Control (MDG 6) NTDCP- (MDG 4) HIV/ AIDS / STI (MDG 6) Maternal (MDG 5) Immunization EPI+ (MDG 4) TB DOTS (MDG 6) Other Ratio 30.2 28.7 18.1 20.7 1.8 8.7 8.3 7.1 Table 5.9 Burden of Disease figures from the selected sentinel site Fig 5.10 Health intervention burden and budget shares DiHPART User’s Guide 1.07 27 26 Chapter Chapter 6 Expenditure DiHPART software is designed to be used for capturing monthly expenditure records/monthly expenditure aggregates of the daily transactions and generating related printouts. 6.1 Employee PE Expenditure Select Input Data > Employees > PE Expenditure to get the screen shown in Fig 6.1. Each month, the user should enter this screen and select the Expenditure Month. Then every member of staff should be selected in turn and the Post button clicked. To assist the user, each member of staff in turn will appear consecutively if the check box shown in Fig 6.1 is ticked. Leave checked for each staff member to appear consecutively Fig 6.2 Employees monthly salary payment The salary payments for each established staff member by are displayed by month on a printout described below. 6.2 Administration Expenditure Selecting Input Data > Administration > Administration Expenditure causes the screen shown in Fig 6.3 to be displayed. Select the BMC code, then the reporting month, and then the relevant expenses code. Enter the totals expenditure for the month for that code in the white box under the correct source – GOG, IGF or SBS. The screen displays the total budget for each source, the total spent expenditure and the balance. DiHPART User’s Guide 1.07 28 Fig 6.3 Administration monthly expenditure entry screen 6.3 Service Delivery Expenditure Selecting Input Data > Service Delivery > Service Activity Expenditure causes the screen shown in Fig 6.4 to be displayed. Select the BMC code, and the relevant month from the drop-down list. Then select the SP indicator for the service activity whose expenditure is to be reported, and then activity itself. The account code(s) associated with that service activity will then be displayed. In the example of Fig 6.4, four account codes are displayed. Note that the expenditure should be entered in the column for the source of funds entered for that activity account code. (The cells under the other funding sources are inactive). Once the expenditure for the month has been entered the user should click the Post button. Fig 6.4 Service Delivery Activity monthly expenditure screen 6.4 Investment Expenditure Selecting Input Data > Service Delivery > Service Activity Expenditure causes the screen shown in Fig 6.5 to be displayed. Select the BMC code, than month, then project and enter the expenditure as appropriate. Click Post when all the month‟s expenditure is entered. DiHPART User’s Guide 1.07 29 Fig 6.5 Investment monthly expenditure DiHPART User’s Guide 1.07 30 27 Chapter Chapter 7 Producing Printouts DiHPART has a large number of printing options which can be accessed from the main menu by clicking the Printouts button. Note that the printouts are all designed as A4 size and that printers should be set to that size when using DiHPART. The printout section, like the Data entry section, is divided into 5 categories and can be accessed either from the Treeview menu or directly form the menu bar. The categories are: Employees Administration Service delivery Investment General Setup Information The Treeview menu is shown in Fig 7.1. Fig 7.1 Printout options To make a printout, first preview and then click the word File at the top left of the screen as shown. Then click Print. As some printouts are many pages long, be careful to only select the page(s) you require. To close a screen press Esc. The printout function is illustrated below in Fig 7.2. DiHPART User’s Guide 1.07 31 Fig 7.2 Printout menu options Sometimes a printout may need to be enlarged or scaled down, in which case the Zoom sub menu will be useful. Select the appropriate zoom sized to re-size the printout on the screen. Note that this zoom function applies only on the viewing screen and not on the printer. DiHPART User’s Guide 1.07 32 2A Chapter Appendix Appendix A Setting up DiHPART in Different BMCs In order to facilitate the use of DiHPART simultaneously at the Planning and Budget preparation stage, it has been designed to operate separately in different BMCs, with a „master‟ computer being designated, in, for example, the Planning BMC, say in DHA for the case of Districts. The Administrator should do the following: Install DiHPART to all BMC which will be used for data entry. Setup the installation (level, specific station, financial year, users and permissions) The non-master user will (non-master computer) Enter the data as per permissions Import setup information from GHS (if there are updates) Export the BMC data (if has rights) to the master computer The master user will (master computer) Enter respective BMC‟s data as per permissions Import setup information from GHS (if there are updates) Import data from non-master BMCs Export station‟s data to higher level (regional or national) for Consolidation DiHPART User’s Guide 1.07 33 B Appendix Appendix B Importing and Exporting Data Importing Data from the GHS Clicking the File menu displays the following: Fig B.1 File menu DiHPART is designed to work at different installation levels, namely: District Regional GHS HQ, and Consolidation For the District and Regional installations, only the data related to the Station can be entered or updated. Data that is shared by all the BMCs in the country, that is the setup information, cannot be changed at this level. The GHS HQ installation is the only level that can access and change or update the sharable setup information. Connect to Database Change password Switch to another user Export BMC data to Master Import BMC data into Master Export for Consolidation Import for Consolidation – available only for the CONSOLIDATION installation Export Setup Information – available only for GHS HQ installation Import Setup Information Backup DiHPART User’s Guide 1.07 34 Restore Exit In this appendix the focus is on Export and Import functions. If DiHPART is to be used in more than one computer within the Station, then select one computer to be designed as a Master installation. This computer will be used to consolidate all the Station‟s Planning and Budgets. It will also be the one to export the Station‟s data to the higher level for Consolidation. Exporting BMC data to the Master Computer On the menu bar illustrated in Fig B.1, select Export BMC to Master. Clicking on this function displays the following pop-up screen: Fig B.2 The Export BMC to Master pop-up screen This window contains 2 options: Export all BMC data to Master As the system can accommodate more than one year‟s information, this will export the budgets for every year within the system to the Master export template. When OK is clicked, the following information will be displayed: Fig B.3 Message after exporting all BMC data to master Note the name of the Exported file: GHS2104_Export_DHA_20052010.MDB Where GHS2104 – denotes the installed database 21 – Regional code for Greater Accra 04 – District code for Dangme West Export_DHA – Export for DHA BMC 13052010-The date of the export, formatted as ddmmyyyy (day->2 digits; month->2 digits; and year-> 4 digits) Export only BMC Current year data to Master This will transfer only the data for the current budget year. Importing BMC data into the Master computer DiHPART User’s Guide 1.07 35 After exporting the BMCs‟ data, the next step is to import them into the Master computer for consolidation. To import BMC data, copy the exported files, normally stored in the EXPORTS folder of the Application. If the default installation folder is C:\Program Files\DiHPART, then the exported data is stored in C:\Program Files\DiHPART\EXPORTS. Copy the files and paste then into the IMPORTS (C:\Program Files\DiHPART\IMPORTS) folder, created by default when the application starts. The following screen is used for Importing from the BMC into the master copy. Fig B.4 Export BMC Current year data to master The window has the following functions: Browse… button helps locate the import file Import options…in case of more than file name being displayed, select “Import all BMCs in the Import file” to import all BMCs data without selecting one by one, or Import only selected BMC if it is preferred to import a few of the BMCs. Export for Consolidation This function generates an export file for aggregating data at a higher level, normally not within the station, for example, from District to Region, District to National, Region to National, and GHS HQ to National. Like the Export from the BMC to the Master computer, here too, you can Export the Current year‟s data or all the stations data (all budget years having data) and a pop-up window displays the name and location of the file. Fig B.5 Screen for Exporting Station data for Consolidation DiHPART User’s Guide 1.07 36 Import for Consolidation This function is only available for the Consolidation installation. Copy all the exports for aggregates from all stations into an Aggregate computer in the IMPORTS folder of the application path. For example, if the application path is C:\Program Files\DiHPART, then paste the export files into C:\Program Files\DiHPART\IMPORTS. Click on the “Import for Aggregate” on the File menu. The following screen will pop up for browsing the import files. Fig B.6 Screen for selecting data for Consolidation Double-click on a file to import the data. Export Setup Information This function is only available for the GHS HQ installation. Click Export setup information on the File menu. The following window will open up. Fig B.7 Export BMC Current year data to master This function has 2 options: Export all GHS Setup Information o This will export all years setup information, if there are more o The file generated is formatted as GHS_Setup_ddmmyyyy.mdb and is stored in the EXPORTS folder of the application path. Where: GHS_Setup - indicates that the file is a GHS setup file, ddmmyyyy - shows the date when the file was created or generated Export only GHS‟s Current Year Setup Information o This option will generate an export file just for the current financial year. DiHPART User’s Guide 1.07 37 o The generated file format is GHS_Setup_FFFF_dmmyyyy.mdb and is stored in the EXPORTS folder of the application path. Where: GHS_Setup - indicates that the file is a GHS setup file FFF - Indicates the financial year of the exported file ddmmyyyy - shows the date when the file was created or generated Copy the exported file from the EXPORTS folder of the master computer and send it to all the BMCs at all levels for updates. Importing Setup Information At any time the GHS HQ can update the setup information. When this happens, the GHS HQ exports the setup information into an intermediary Ms Access file GHS_Setup_ddmmyyyy.mdb Where: dd-day of the month in 2 digits ,e.g. 14 for 14th of the month mm-month in 2 digits, e.g. 05 for May yyyy-a 4 digit year, e.g. 2010 The format of the setup export file helps identify the proper export file to be imported. Whenever GHS HQ updates the setup information, they will send an export file either by email or in a flash disk. Copy this file in the IMPORTS folder of the application path on each BMC installation. Click on the Import Setup Information function on the File menu. The following window will open for browsing the proper file. Fig B.8 Export BMC Current year data to master Double-click on the desired file to update the Setup information. DiHPART User’s Guide 1.07 38 C Appendix Appendix C Backup and Restore data These are the last two functions on the File menu (Fig B.1). Data Backup To backup data under the folder and name of choice, click Backup on the File menu. The Windows pop-up for browsing the backup folder will open up. Fig C.1 Screen for backing up data Specify the name of the backup file under the space provided for File name. Click on the Save button to save the file or Cancel to ignore. Restore database To restore the data to a previous status, click on the Backup function on the File menu. The screen below will open for browsing the backup file to restore. DiHPART User’s Guide 1.07 39 D Appendix Appendix D Priority Areas and Interventions Priority Areas In DiHPART, the Burden of disease is categorised by the following 5 Priority areas: ii. iii. iv. v. vi. Reproductive and Child Health Promotion and Care Communicable Disease Control Non – Communicable Disease Control Treatment and care of other common diseases of local priority within the District Health Promotion and environmental Health and Sanitation Interventions The related interventions are as follows: Reproductive and Child Health Promotion and Care Antenatal care (ANC) Obstetric care including emergency care Post- Natal Care Post Abortion Care Gynaecology Family Planning Adolescent sexual reproductive health Integrated Management of Neonatal and Childhood illnesses (IMNCI) Immunization Perinatal care Care of newborn Regenerative health and nutrition Other maternal conditions including infertility, rape and FGM Reproductive system cancers Care for most vulnerable children including orphans, children with disabilities, abused and neglected children Early childhood development Communicable Disease Control TB Epidemics (Cholera, Meningitis, Plague, Yellow fever, Measles, Polio etc.) Reduce Transmission of Neglected Tropical Diseases (eg,oncho, elephantiasis, shisto, soil transmitted helminth Malaria HIV/AIDS & STI Non – Communicable Disease Control Cardiovascular disease Diabetes Neoplasm/cancers Acute and chronic respiratory diseases Mental Health Anaemia & Nutritional Deficiencies DiHPART User’s Guide 1.07 40 Treatment and care of other common diseases within the District Eye Diseases (trachoma, cataract, etc) Health Promotion and environmental Health and Sanitation Health Communication for Behaviour Change – IEC School Health Promotion Occupational Health and Safety Enforcement of by-laws and regulation related to health Monitoring of hazardous waste Improved solid and liquid waste management Food control and hygiene DiHPART User’s Guide 1.07 41