1
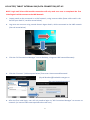
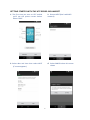
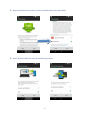
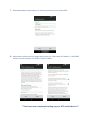
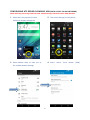
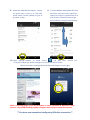
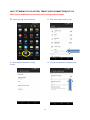
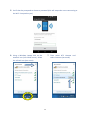
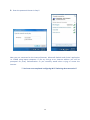
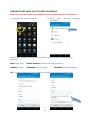
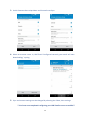
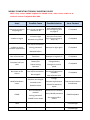
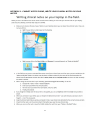
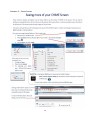
COMMUNITY NURSING MOBILE COMPUTING MANUAL TABLE OF CONTENTS Community Nursing .................................................................................................................. 1 Mobile Computing Manual ....................................................................................................... 1 Purpose of Manual ....................................................................................................................... 3 Contact Information .................................................................................................................. 3 HP Laptop/ Tablet Internal SIM (data connection) Set-up ....................................................... 4 Getting Started with the HTC Desire 610 Handset ................................................................... 5 Configuring HTC Desire 610 mobile APN (Data access to HNE Network) ................................. 8 Wi-Fi Tethering to HP Laptop/ Tablet (data connection) Set-up ............................................ 11 Configure HNE Email on HTC Desire 610 Mobile .................................................................... 14 Mobile Computing Trouble Shooting Guide .............................................................................. 16 Appendix 1 - Cannot access CHIME, write your clinical notes on your laptop ....................... 17 Appendix 2 – Chime Screen .................................................................................................... 18 2 PURPOSE OF MANUAL The Mobile Computing Manual is for HNELHD Community Nurses who work in the community environment working with electronic computing devices. Document provides support and guidance to community nurse using internal sim data and or Integrated Data via a Mobile phone to serve clinical and administrative services. Mobile Computing enables networked clinical program CHIME, electronic medical record, which has capacity to report data to be used. Step by step guides are provided to enable the internal sim data and or Integrated Data via Mobile phones. Troubleshooting and key contacts are documented to support the process implemented across Hunter New England Local Health District. CONTACT INFORMATION If experiencing difficulty, assess the issue then contact the appropriate person in the detailed table below. Troubleshooting guide is at the back of this user manual. If you are unsure who to contact please contact your line manager who will advise the correct team to contact. HNE Team Contact Details Phone: 492 13800 opt 3, opt 1 IT Support – Helpdesk Troubleshooting Issue Fax: 492 13038 CHIME Team – Helpdesk Phone: 492 13800 opt 1, opt 2 Hardware Network and/or tethering connection Error messages CHIME function ISSUES ONLY Mobile handset issues [email protected] Telecommunicatio ns Officer Phone: 498 53436 Line Manager Name: 3 Theft, loss or damage to the device Client incidents Security issues WH & S issues HP LAPTOP/ TABLET INTERNAL SIM (DATA CONNECTION) SET-UP NOTE: Login and Telstra VPN module connection will only work once user as completed the first initial logon in whilst connect to the HNE Network. 1. Laptop needs to be connected to a HNE network, using internet cable (Same cable used in the back of your desk PC, see blue arrow below). 2. Log onto user account using normal domain logon details, whilst connected to the HNE network (See red arrow below). 3. Click the “HP Connections Manager” Icon on desktop, to log onto HNE network Remotely 4. Click the “Connect”. (Yellow square below) Then enter Username and Password. (Payroll Number)@hnehealth.nsw.gov.au Use your Network password 5. After the first initial login, user will only need to login via “HP Connection Manager” to connect to network. (no internal cable now required unless new user) 4 GETTING STARTED WITH THE HTC DESIRE 610 HANDSET 1. The first time you turn on HTC mobile you’ll see the picture screen below. Select START. 2. Choose NEXT (Don’t add WiFi network) 3. Select date and time then select NEXT (if screen appears) 4. Select CANCEL when this screen shows 5 5. Swipe to the bottom of screen, select Remind Me Later then select NEXT 6. Select SKIP then NEXT for both of the following screens 6 7. Allocated handset unique name (i.e. Community Nurse 1) then select NEXT. 8. Swipe down to bottom of the page making sure the “Help make HTC better” is UNTICKED and the last two options are TICKED. Then hit FINISH. **You have now completed starting up your HTC mobile device** 7 CONFIGURING HTC DESIRE 610 MOBILE APN (DATA ACCESS TO HNE NETWORK) NOTE: Difficulty connecting to 4G lock to 3G. Mobile Settings> Network mode> GSM/ WCCMA 1. Select the 9 tiny squares (circled Yellow) to display the apps list 2. Then select Settings (circled yellow) 3. Select Mobile data, to take you to the mobile network settings. 4. Select 8 Access Point Names (APN) 5. First picture, select the 3 dot menu button and choose New APN (see arrow) 6. Add below information into each field. Accurately enter information. NAME: HNELHD VPN PORT: 8080 APN: telstra.corp PROXY: hneproxy.hneahs.nswhealth.net USERNAME: (payroll number)@hnehealth.nsw.gov.au PASSWORD: (Network Password – same password used for Windows, Email, HETI etc.) AUTHENTICATION TYPE: Select PAP APN TYPE: default,hipri,dun 7. Select 3 dots in second picture and SAVE (see arrow) 9 8. Select the HNELHD VPN option; ensure the green dot is next to it. Tap back arrow twice (circled yellow) to get to previous screen. 9. Turn the Mobile data option OFF then back ON. You’ll then see a signal bar change to 3/4G or H symbol next to it. (See arrow). Select home key to go back to Home screen (circled yellow) 10. Open internet browser on home screen and type HNE internet link in http://intranet.hne.health.nsw.gov.au/ and save as home screen. (Select three dots >Settings>General>Set Home Page>Current Page) NOTE: Accessing google you’ll be prompted to enter username & password. Same process using a HNE Desktop/ Laptop computer when trying to access the Internet. **You have now completed configuring APN data connection** WI-FI TETHERING TO HP LAPTOP/ TABLET (DATA CONNECTION) SET-UP NOTE: Ensure mobile data is turned on prior to turning on Wi-Fi Hotspot 1. Select Settings (circled yellow) 2. Then Select More (see arrow) 3. Select Mobile Network Sharing arrow) 4. Turn On Portable Wi-Fi hotspot (see 11 5. You’ll then be prompted to choose a password (this will stop other users connecting to the Wi-Fi hotspot but you.) 6. Using a Windows Laptop click on the network icon (Left hand corner). Select the refresh icon (see arrow) 7. Then select HTC Hotspot and select Connect (see arrow) 12 8. Enter the password chosen in Step 5. Now you are connected to the Internet/Intranet, Microsoft Outlook and clinical application i.e. CHIME using laptop computer. If you try and go to an Internet address you will be prompted for proxy authentication as you normally would when trying to access the internet. **You have now completed configuring Wi-Fi Tethering data connection** 13 CONFIGURE HNE EMAIL ON HTC DESIRE 610 MOBILE NOTE: Ensure HTC Desire 610 mobile APN (Data access to HNE Network) is configured first. 1. Select the mail icon from apps list. 2. Then select ActiveSync Microsoft Exchange 3. Add below information into each field (example shown in pictures). Accurately enter information. EMAIL: Your Email SERVER ADDRESS: webmail.hnehealth.nsw.gov.au DOMAIN: hneahs USERNAME: Payroll number PASSWORD: Network Password Tick “This server requires an encrypted SSL connection” (see arrow) then select NEXT. 14 3. Untick Contacts then swipe down and choose Smart Sync. 4. Select an account name. ie, HNE Email. Configured correctly your email will start downloading/ syncing. 5. Sync and account settings can be changed by selecting the 3 dots, then settings. **You have now completed configuring your HNE Email account on mobile** 15 MOBILE COMPUTING TROUBLE SHOOTING GUIDE NOTE: Only contact CHIME helpdesk for CHIME issues, other issues unable to be resolved contact IT Helpdesk 4921 3800. Issue Possible Cause Possible Solution Issue Contact Network connection dropping out Area (rural) not able to connect to 4G Lock network to 3G (See configuring APN on page 9) IT Helpdesk Incorrect login Retry the first initial login process (page 4, step 1-4) IT Helpdesk Attempt to login again IT Helpdesk Timed out Attempt to log back in IT Helpdesk Battery flat Charge battery Power setting incorrect Change via control panel Loss of/no connection See loss of connection solutions Unable to log on Network busy/failed Loss of/no connection Unable to access network applications Wrong password Network failure Loss of connection Computer will not start No access to file shares Mobile hardware issues CHIME Not mapped Handset not charged Map network drive Charge Cracked screen Request replacement Handset failure Submit for warranty repair Not connected to network Reconnect to network Retry CHIME password Wrong password IT Helpdesk IT Helpdesk Telecommunications Coordinator CHIME helpdesk CHIME Server down See attached fact sheets Theft - - Line Manager WHS Injury - - Line Manager 16 APPENDIX 1 - CANNOT ACCESS CHIME, WRITE YOUR CLINICAL NOTES ON YOUR LAPTOP 17 APPENDIX 2 – CHIME SCREEN 18