1
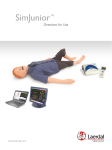
Virtual Phlebotomy
Directions for Use
Using
System
the Hapic
Overview
Device
6.1 Software Overview
The Virtual Phlebotomy Self-Directed Learning System software consists of two distinct parts:
(1) T
he basic menus screens, which present the case scenario, provide assessment of
performance, and support many other functions; and
(2) T
he simulation training sequence that enables interaction between the trainee
inserting the needle and the three-dimensional (3D) model of the arm, (Described
in the Quick Start Chapter)
The following section describes the Basic menu screens (Section 6.2), while the Training Sequence is
covered in Chapter 7.
WARNING
Precautions when using the simulation software
•T
he Virtual Phlebotomy Self-Directed Learning System has been designed to work on the computer supplied with the product. The computer is an integral part of the system. It will not work
on other computer platforms, because of its requirements for very specific, high speed graphics
capabilities. Do not attempt to install and run this software on any other computer other than that
which has been provided by the manufacturer.
•N
o software should be installed on the computer supplied with the Virtual Phlebotomy SelfDirected Learning System, except for those products supplied by the manufacturer of the
software.
• Running any program, such as anti-virus software, on the computer supplied with the simulator, may
cause the Virtual Phlebotomy Self-Directed Learning System to crash or slow the simulation to
an unstable condition. This is a dedicated computer and should not be used for other purposes,
except those explicitly stated by the software manufacturer.
www.laerdal.com
41
Virtual Phlebotomy
Directions for Use
System Overview
6.2 Basic menu screens
To start the application, click on the Virtual Phlebotomy section of the boot screen.
This will initially bring up a loading screen, immediately followed by the Introductory Screen (see
below) and prompt the trainee to enter their user name and password. Please note that these
accounts need to be created by the System Administrator (usually the Instructor – see section called
‘Administration’ below).
Login
This screen prompts the trainee to enter user name and password. Click the check button to move
to the next screen, or the No button to remove the Login pop-up screen. Press the Virtual Products
button to return to the Boot screen to Virtual I.V. and Infant Virtual I.V.
42
www.laerdal.com
Virtual Phlebotomy
Directions for Use
System Overview
System Icons
There are a number of navigation icons that are found at the bottom right of the
screen. The icon will change color when activated by a mouse click. In other cases,
icons will become grey if they are not available. See the ‘System Tutorial’ video within
the application for more detailed information.
Examples of these icons and their definitions are shown on the pages below.
Navigation Icons
Right arrow: Proceed to the next screen
Back arrow: Return to Previous screen
or Help Help for Current Screen
Inactive Icon: Icons that appear grey are not available.
Exit the application to the Virtual Products Boot
Screen
Return to the Main Menu
www.laerdal.com
43
Virtual Phlebotomy
Directions for Use
System Overview
Log Off the current user or Instructor
Information about Virtual Phlebotomy
Interface Icons
Yes, Accept, Save
No, cancel
Make Active / Inactive
Simulation and Debriefing Icons
Haptic Device Available
Haptic Device is Not Available
Insert Needle into Haptic Device Indicator
Palpate Haptic Device Indicator
Specimen Tube Attachment
44
www.laerdal.com
Virtual Phlebotomy
Directions for Use
System Overview
View case scenario
Learn how to orient the site
Select equipment
Case scenario level indicator
Change site for insertion
Movie available.
Click to play movie.
Wash Hands
Inform Patient
Palpate Site
Make Fist
Patient Status
Warn of Stick
Patient Identification
www.laerdal.com
45
Virtual Phlebotomy
Directions for Use
System Overview
6.3 Navigation and Training Aids
Tool Tips
By moving the mouse over any navigation or administration icon, a small pop-up “Tool Tip” will
appear, providing a brief explanation of that item. An example is presented here:
46
www.laerdal.com
Virtual Phlebotomy
Directions for Use
System Overview
Information Box
At the bottom of many screens, there is a rectangular box that prompts the trainee on how to proceed.
An example is presented here:
www.laerdal.com
47
Virtual Phlebotomy
Directions for Use
System Overview
Help Screens
Most screens in the Virtual Phlebotomy Self-Directed Learning System have help screens that explain
the functionality of the screen.
The help screen is activated by clicking on the help button (question mark) located on the lower right
corner of the screen:
An example help screen is shown here, with call-outs showing the various components of the menu
screen. Use the scroll bar, or scroll the middle mouse button to view the complete help screen.
48
www.laerdal.com
Virtual Phlebotomy
Directions for Use
System Overview
Main Menu screen
This screen presents a menu of options, including:
•C
ompetency Training: A progressive, tiered hierarchy of case studies, cognitive tests, and
required skills that ranges from novice (Level 1) to expert (Level 3).
•P
ractice Cases: Individual cases can be tried from all of the levels.
•A
natomical Viewer: This module presents a three-dimensional (3D) model of the arm that can be
used to identify structures and learn anatomy.
•P
rocedure Training: This video introduces the beginning student to the techniques and skills
required for venous specimen acquisition.
• S ystem Tutorial: This video shows the trainee how to use the Virtual Phlebotomy simulator
system.
•C
ompetency Review: This module shows that trainee record of performance.
For the beginning trainee, it is important to view both the Procedure Training and System Overview
videos to understand how to perform both proper venous specimen collection and to best use the
Virtual Phlebotomy Self-Directed Learning System.
www.laerdal.com
49
Virtual Phlebotomy
Directions for Use
System Overview
Procedure Training video
This screen presents the procedural video demonstrating:
1. Introduction to Phlebotomy
2. Standard Precautions and Patient Assessment
3. Factors Affecting Laboratory Results
4. Environment and Equipment
5. Tube Selection and Specimen Collection
6. Vein Selection and Site Preparation
7. Venipuncture Procedure
8. Complications and Difficult Draws
This video is divided into chapters, allowing the learner to select the section they wish to view by
clicking on the appropriate section. There is also a video slider, allowing the trainee to choose a specific place in the video for review.
It is highly recommend that the beginning student watch the video in its entirety before attempting
the simulation.
There are play/pause and stop buttons in the video player.
50
www.laerdal.com
Virtual Phlebotomy
Directions for Use
System Overview
System Overview
System Tutorial video
This screen presents the System Tutorial video which is divided into the following chapters:
1. Introduction to Virtual Phlebotomy
2. System Overview
3. Training Types
4. Performing the Procedure
5. Debriefing
6. Competency Review
7. Conclusion
8. For the Instructor
This video allows the learner to select the section of the video they wish to view by clicking on the
appropriate section. There is also a slider, allowing the trainee to choose specific place in the video
they would like to review. There are also play/pause and stop buttons in the video player.
www.laerdal.com
51
Virtual Phlebotomy
Directions for Use
System Overview
Anatomical Viewer
The Anatomical Viewer allows the learner to view and identify anatomical structures in the arm and
hand. The arm can be positioned in either a pronated or supinated position by selecting the corresponding buttons. To zoom in and out of the arm model, roll the middle mouse button. To re-orient
the arm in a different position, click and hold the middle mouse button and move the mouse.
Structures can be revealed through the selection and de-selection of different tissues, including:
• Skin • Nerves
• Arteries
• Bones
• Veins
• Muscles and Connective Tissue
For identification, move the mouse cursor over the anatomic structure and its name will appear in the
text box at the lower left of the screen.
52
www.laerdal.com
Virtual Phlebotomy
Directions for Use
Competency Review
Competency Review screen
The Competency Review screen presents your competency accomplishments in a concise and intuitive format.
Selecting the number and types of cases for review
Select the number of cases to display by clicking on one of the buttons under the “Show Cases”
heading on the left of the screen.
Viewing average user scores and progress
There are different ways to review the user’s general progress:
If the administrator has configured the Virtual Phlebotomy system to save practice cases, then additional filters will be presented to view competency training and practice cases independently, or
together.
Clicking on the “Level Averages” tab will display a graph of the cognitive test and skills (case scenario)
averages at each level of difficulty.
www.laerdal.com
53
Virtual Phlebotomy
Directions for Use
Competency Review
Clicking on the “Average Skill Scores” tab will display a list of critical and non-critical assessment
errors, the ratio of the times you performed that category correctly, and a list of specific skill errors
and how frequently they were performed in-correctly.
Clicking on the “Progress” graph tab will display a graph of the score on all of the selected cases
and cognitive tests in a scatter plot.
Viewing specific case scenario and cognitive test debriefings
Click on the specific case scenario or cognitive test at the bottom of the screen to view the associated debriefing.
Once the specific case scenario is accessed, the trainee is able to display the assessment in html format for printing by clicking on the print icon at the bottom of the case scenario pop-up.
Sorting
The case scenarios and cognitive tests can be sorted by clicking the column headings.
54
www.laerdal.com
Virtual Phlebotomy
Directions for Use
Training Sequence
7 Training sequence
The trainee has the option of selecting either Practice Cases (see Section 4, ‘Quick Start Guide’ for a
rapid run-through) or Competency Training Mode. In either case, the learner will be presented a case
scenario.
Case Scenario screen
The patient scenario contains information vital to the trainee’s successful performance of the subsequent venous specimen acquisition procedure. Read the paragraph, required tests and look at the bulleted hints below to ensure that you select the correct equipment specific to the case presented.
The cases become more difficult as you progress in Competency Training Mode from Level 1 to
Level 3. Highlights (marked as yellow text) are not provided at advanced levels.
www.laerdal.com
55
Virtual Phlebotomy
Directions for Use
Training Sequence
Site Selection
This screen allows you to select the specific venous access site. First select from left or right arms,
then select between the antecubital fossa or pronated wrist.
Based on the information presented in the preceding Case Scenario, choose the site which is most
suitable for venipuncture. Once the trainee has chosen a site, click on the right arrow to advance to
the Equipment Selection Screen.
56
www.laerdal.com
Virtual Phlebotomy
Directions for Use
Training Sequence
Equipment Selection
This screen presents the inventory of equipment that can be used in the simulation. Holding the
mouse over an item will present the trainee with a brief description of the corresponding piece of
equipment. To select an item, click on that item and it will appear on the Equipment toolbar on the
left hand side of the screen. The trainee may click on an item multiple times, and the quantity of that
piece of equipment will appear in parentheses after the item on the Selection list. To deselect an item,
click on the “x” at the upper right of the equipment in the tray.
After choosing the equipment, click on the right arrow to advance to the Simulation screen. It is possible to return to the Equipment Selection screen at any time during the procedure.
A reference chart for proper specimen tube selection can be accessed by clicking the Reference Chart
icon.
www.laerdal.com
57
Virtual Phlebotomy
Directions for Use
Training Sequence
Simulation Screen and Performance of the Intravenous Procedure
The Simulation component of the Virtual Phlebotomy Self-Directed Learning System allows the trainee to perform the specimen acquisition procedure by interacting with the software and using the haptic device. All of the items chosen from the Equipment Selection screen will appear on the left side of
the screen and be available for use in the procedure.
You can review the case scenario, select more equipment, or change sites by clicking on the three
icons at the top of the screen. Note: you will not be allowed to perform venous access outside the
selected site. To perform venous access outside the currently selected site, select a different site by
clicking the Site Selection button. If not already done, remove the needle from the haptic device, and
completely detach the specimen tube from the multi-sample needle before beginning the procedure.
To zoom in and out of the arm model, scroll the middle mouse button. To orient the arm differently,
click and hold the middle mouse button and move the mouse around.
Messages will appear in a box at the lower left of the screen to guide you in the use of the system.
To select a piece of equipment, click on the toolbar on the left side of the screen. Most items must
either be placed on the arm, or disposed of in either the metal trashcan, bio-hazard bag, or sharps
container. Specimen tubes can be placed into the specimen tray. Specimen labels must be attached to
specimen tubes in the tray or disposed.
Certain items, such as the tourniquet, gauze, needle, specimen tube, etc. can be removed by clicking
on them.
58
www.laerdal.com
Virtual Phlebotomy
Directions for Use
Training Sequence
The haptic device contains three (3) separate regions: (1) The top of the
device is for vein palpation and pressure application, (2) The middle of the
device is for needle insertion, and (3) The bottom of the device is for skin
stretch:
An icon of the haptic device appears in the upper right corner and will show you when and how
to interact with he haptic device. To begin the procedure, the specimen tube must be completely
removed from the multi-sample needle.
** Special note: Under no circumstances should any needle other than those supplied
with the Virtual Phlebotomy Self-Directed Learning System ever be used with the
haptic device.
The tourniquet can be placed on the arm to enhance vein engorgement. However, be aware that the
trainee is negatively assessed if the constricting band is left on the arm for too long.
www.laerdal.com
59
Virtual Phlebotomy
Directions for Use
Training Sequence
To use a multi-sample needle and tube holder, select the appropriate gauge from the inventory on
the left side of the screen and move it to the arm. A target cursor will appear on the arm. Locate the
insertion point on the arm with the target cursor; click and the needle will appear. Insert the multisample needle/tube holder combination into the needle insertion receptacle located in the middle of
the haptic device. A slight tug will be felt as the needle is engaged by the haptic device. After engagement, the transparent needle on the screen will be highlighted. The position of the bevel will also
appear in the circle next to the arm.
To palpate the arm, select the Palpation button on the top left of the Simulation Screen. Move the
palpation fingers to a location on the arm, click the mouse and feel the vein using the top part of the
haptic device. To palpate a new location on the arm, move the cursor and click a new location. The
palpation fingers are automatically removed when you select another piece of equipment, or click the
palpation button a second time.
All Body Substance Isolation (BSI) techniques should be followed. These may include the use of gloves
and goggles, which can be selected and deselected by clicking on the corresponding icon.
The insertion site can be prepared using the cleansing supplies in the inventory. All items must be disposed of properly, either in the trashcan, biohazard bag or the sharps container.
60
www.laerdal.com
Virtual Phlebotomy
Directions for Use
Training Sequence
Depending on the patient case, it may be more or less difficult to correctly insert the needle. During
needle insertion, stretching the skin at the bottom part of the haptic device should assist in securing
the vein for insertion. 29 different arms supplied with the Virtual Phlebotomy Self-Directed Learning
System, ranging from pediatric to geriatric, and including rolling veins, fragile veins and arms and hands
with difficult-to-penetrate skin.
The appropriate angle for needle insertion is 10-30 degrees.
In some cases, the learner will perform the procedure in an incorrect fashion, resulting in bleeding,
bruising or swelling that will appear on the arm.
Use equipment by clicking on the equipment toolbar at the left. All pieces of equipment are prepared
and ready to use.
A number of procedure tasks appear along the left edge of the round window. It is necessary to
perform some of these tasks to successfully complete the procedure.
Using the Haptic Device
To insert the needle, palpate, apply pressure or stretch the skin, perform the function on the haptic
device in the corresponding area.
www.laerdal.com
61
Virtual Phlebotomy
Directions for Use
Training Sequence
Needle insertion: To perform the needle insertion, select a needle with vacuum tube holder from
the toolbar. Move the needle cursor to the desired location on the site and click. Then, insert the real
needle with vacuum tube holder into the haptic device.
Note: Before performing the needle insertion, it is necessary to engage the haptic device needle in
the haptic device. Insert the needle into the Needle Insertion Point on the haptic device until the needle on the screen lights up. You will feel a small tug and hear a sound when the haptic device engages.
Applying Pressure: Once you have selected the gauze and applied it to the arm, you can apply pressure to it by pressing the palpation/pressure application area of the haptic device.
Click on the palpation icon to turn palpation on. A palpation finger will attach to the cursor. Move
fingers to the simulation window, click on the site to locate the palpation point. To turn palpation off,
click on palpation or select another piece of equipment.
Equipment Use: Specific
To select a specimen tube click on the specimen tube icon in the toolbar. A selection of 6 long draw
and 6 short draw tubes will appear. Click to select the specific tube. Once selected, the tube can be
placed in the tube tray at the right of the simulation window, or directly into the multisample needle
with tube holder. If automatic tube selection is configured by the administrator, empty tubes in the
tube tray will be automatically attached to the multisample needle starting with the left most tube.
To select a multisample needle, click on the multisample needle with tube holder icon in the toolbar.
A selection of 3 different gauge needles will appear. Select the appropriate gauge needle and move
cursor over site. A target will appear. Click to locate needle insertion point. The bevel position will be
displayed in a circular inset at the top right of the screen.
62
www.laerdal.com
Virtual Phlebotomy
Directions for Use
Training Sequence
To select and use a label, click on the label icon in the toolbar. A selection of all labels available for this
case will appear. Select the label to apply. A menu will appear allowing you to mark the label with different handling and labelling instructions. Mark the label as appropriate for the case by clicking in the
circle next to the corresponding text. Click the check mark once you have marked the label. The label
will then attach to your cursor. Click the label on the corresponding collection tube to apply.
To apply tape or dressing, click on the corresponding icon, move to site and click on desired location.
To apply a warm compress to the arm, click on the corresponding icon in the toolbar, and click on a
location on the arm. The warm compress will take a few seconds to have any effect.
To use gauze and apply pressure to the site, click on the gauze icon in the tool tray. If a needle is on
the arm, the gauze will appear above the puncture site. If no needle is on the arm, then click at the
location you wish to apply the gauze. Apply pressure to the gauze pad by pressing down in the palpation/pressure application area of the haptic device.
To place the tourniquet, click on the corresponding tool bar icon, move to arm and click on desired
location.
To use an alcohol wipe, povidon iodine swab or chlorhexidine wipe, click on the corresponding icon
on the toolbar and move to the desired site on the arm. Once at the desired site, click, hold and
move the mouse to cleanse the site. Release mouse button when cleansing is complete.
Procedure Tasks: Specific
To palpate, identify the patient, wash your hands, confirm that the patient followed physicians orders,
ask the patient to make a fist, inform the patient of the procedure, warn the patient of the stick, or
view a video about site orientation, click on the corresponding icon on the left edge of the simulation
window.
Once you have completed the procedure, advance to the next screen to review your
performance.
www.laerdal.com
63
Virtual Phlebotomy
Directions for Use
Training Sequence
Debriefing
Following the procedure, the learner will be assessed as to how well he or she performed the procedure. To view the debriefing screen, push the advance button after performing the procedure. The
assessment is divided into Venous Access Events, Critical and Non-Critical errors. Critical errors are vital
to proper performance of the procedure. Depending on the configuration chosen by the administration under Training / Simulation Options, a quantitative score may be displayed. This Overall Rating
may be high, but the trainee can still fail the procedure if Critical errors were made. The total time of
the procedure, as well as the time the constricting band was placed on the arm is timed.
For some Critical and Non-Critical errors, a movie icon will appear next to the error. Clicking on that
error will display a video showing the proper way to perform that sub-task of the procedure.
Clicking on the Venous Access event video shows the trainee an “under-the-skin” view of what
occurred during cannulation. For example, if the angle of insertion was too steep, the video will display the consequences of a steep insertion.
From the debriefing screen, the learner is able to display the assessment in html format for printing by
clicking on the print icon at the bottom of the screen. If the trainee is in Competency Training Mode
and succeeds at the procedure, then the next case or a qualification test will be automatically presented when the trainee advances to the next screen. If the trainee fails the procedure, he or she may
be presented with the same case scenario, a different case scenario, the procedure training screen, or
with a remedial case scenario with hints to help the trainee better understand proper procedure.
64
www.laerdal.com
Virtual Phlebotomy
Directions for Use
Training Sequence
Cannulation Event Animations
These generic animations display a record of the learner’s performance in terms of the angle of needle
insertion, lateral or direct needle placement, vein behavior (rolling), nerve involvement and vein puncture (vein present, vein punctured through, etc.), and whether the trainee performed the venous
access correctly. The animation is controlled using standard video control buttons.
An example is presented here:
www.laerdal.com
65
Virtual Phlebotomy
Directions for Use
Training Sequence
Remediation Case Scenario
If the student fails the procedure, a remediation case with red hints may appear following advancement from the Debriefing screen.
An example Remediation Case Scenario is presented here:
66
www.laerdal.com