1
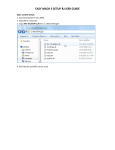
STEPPER3 LLC MACH FOR WIN64 USERS GUIDE VERSION 1.0 MachForWin64 Users Guide I. MachForWin64 Kit Contents Your MachForWin64 Kit comes with the following components: ● An ethernet breakout board This is connected to your computer over ethernet and provides two parallel port headers and an additional 10 pin header of I/O to control your CNC system. ● An ethernet cable To connect the board to the computer ● This user guide ● A CD, which contains: ○ An electronic copy of this user manual ○ An installer for the Mach plugin needed in order to use the MachForWin64 Kit II. Setting up the MachForWin64 Kit Step 1: Powering up the breakout board From a 24 volt power supply, connect +24 volts to the VM terminal and ground to the GND terminal. Turn on the supply and observe that the LEDs on the ethernet board light, indicating that it was successfully powered. Step 2: Connecting your CNC system The MachForWin64 kit is designed to work with your existing CNC system; as such, it provides two parallel port headers, for port one and port two. Simply plug your existing system into the parallel headers. If you need more I/O than the two parallel ports provide, a third, 10 pin header provides 6 additional input pins. See the section below on the board pinout for more information. Step 3: Install the MachForWin64 Plugin On the CD included in the kit, there is an installer named M4W64InstallerXX.exe, where XX is the version number of the plugin. If you misplace your CD or want to update to a later version of the plugin, it can be downloaded at http://machforwin64.com/plugin. When you run the installer, it will ask for the location of your Mach3 installation, defaulting to C:\Mach3. It will then install the plugin along with any prerequisites required on your computer. Page 1 of 12 STEPPER3 LLC MACH FOR WIN64 USERS GUIDE VERSION 1.0 After the installation is complete, the following files will be added to the PlugIns folder in your Mach3 install: ● M4W64Plugin.dll The Mach plugin itself ● m4w64changelog.txt The changelog for the plugin, up to the installed version ● s3license.txt The Stepper3 license agreement that was presented in the plugin installer. Step 4: Configure your network settings and connect the board to the PC In order to function efficiently, we highly recommend configuring your ethernet card to match the settings explained below. Without doing this, services such as DHCP may cause the connection to reset during use. These instructions are for Windows 7, but the process is very similar on XP and 8. 1. Click the Network connections system tray icon and select “Open Network and Sharing Center” 2. Click “Change adapter settings on the far right of the window that opens. Page 2 of 12 STEPPER3 LLC MACH FOR WIN64 USERS GUIDE VERSION 1.0 3. Right click the icon for the Ethernet port you are using and select “Disable”. Then, right click again and select “Properties” Page 3 of 12 STEPPER3 LLC MACH FOR WIN64 USERS GUIDE VERSION 1.0 4. Uncheck things in the properties dialog until it looks like the image below. Then, double click on “Internet Protocol Version 4” to open its properties. Page 4 of 12 STEPPER3 LLC MACH FOR WIN64 USERS GUIDE 5. Edit the properties so that it looks like the image below: Page 5 of 12 VERSION 1.0 STEPPER3 LLC MACH FOR WIN64 USERS GUIDE VERSION 1.0 6. Press OK on the Internet Protocol Version 4 Properties dialog. Press OK on the Local Area Connection Properties dialog. Right click the icon for the adapter again and select “Enable”. 7. You can now connect the computer to the ethernet breakout board using either the provided ethernet cable or your own cable. Page 6 of 12 STEPPER3 LLC MACH FOR WIN64 USERS GUIDE VERSION 1.0 Step 5: Start Mach and select the plugin Next, start Mach. Once Mach has initialized you should be presented with a dialog asking you to select a control device. Select MachForWin64, check “Don’t ask me again”, click OK, and then restart Mach. Now, when you run Mach, the MachForWin64 Plugin and the ethernet breakout board will be used instead of the parallel port. In most cases, your existing configuration will work as is, but if it does not, the next sections will explain the configuration and pinout of the MachForWin64 kit. Page 7 of 12 STEPPER3 LLC MACH FOR WIN64 USERS GUIDE VERSION 1.0 III. Configuring the MachForWin64 Plugin The MachForWin64 plugin gets most of its configuration data from the normal Mach configuration dialogs, but there are the following exceptions: ● Step/Dir spindle motor settings ● Step signal pulse width ● Homing pull off amounts that is, how far, in inches, the motors back up after reaching the home switch when homing. To change these settings, you must use the plugin config dialog. You can get to this dialog by either going to the PlugIn Control menu and selecting MachForWin64 or by going to Config>Config Plugins and clicking the CONFIG button to the left of the MachForWin64 plugin listing. Page 8 of 12 STEPPER3 LLC MACH FOR WIN64 USERS GUIDE VERSION 1.0 Either way, you will reach the following dialog: The available options are as follows: ● Movement Update Rate: This is currently not used and should remain at 5. Changing this can cause unpredictable and/or unusual breakout board behavior. ● Step Pulse Width: The pulse width, in microseconds, of all of the step signals. ● Home Pull Off Amounts: These values are the distance, in inches, that the breakout board will move when backing off of a triggered home switch during the homing process. ● Spindle settings for step/dir spindle: ○ Pulses Per Revolution: The number of step pulses that must be output to complete one revolution of the spindle ○ Max RPM: The maximum speed of the spindle, in RPM ○ The acceleration of the spindle in revolutions per second squared After changing any settings in Mach or in the plugin configuration screen, it is recommended that you restart Mach, although it is not always necessary with many settings. Page 9 of 12 STEPPER3 LLC MACH FOR WIN64 USERS GUIDE VERSION 1.0 IV. Breakout Board Information A. Diagram The board contains the following relevant components: 1. Ethernet Port Plug your ethernet cable in here 2. 10 Pin IO Header (port 3) A header that contains duplicates of two port 2 input pins alongside 6 additional inputs. 3. Port 2 The second parallel port header, which typically drives axes B and C 4. Port 1 The primary parallel port header, which typically drives axes X, Y, Z, and A 5. Power Terminal Block A terminal block to connect a 24 volt power supply 6. I/O voltage select jumper. As labeled on the board, this jumper selects whether the I/O ports operate at 5 volts or 3.3 volts. 7. Power and motion LEDs Two of these LEDs are lit when the board is powered and another lights up to indicate motion. 8. Connection LED This LED is lit while the board is successfully connected to Mach. B. Parallel Ports The parallel ports (ports 1 and 2) are configured such that certain pins are fixed as inputs and others are fixed as outputs. On port 1, pins 1 through 9, 14, 16, and 17 are outputs and pins 10 through 13 and 15 are inputs. Page 10 of 12 STEPPER3 LLC MACH FOR WIN64 USERS GUIDE VERSION 1.0 On port 2, pins 1 through 5, 14, 16, and 17 are outputs and pins 10 through 13 and 15 are inputs. Pins 6 through 9 are not connected in this version of the MachForWin64 kit, but may be connected in a later version. On port 3, pins 3, 4, 5, 6, 7, and 8 are inputs corresponding to header pins 3, 4, 5, 6, 7, and 9. On the header, pins 1 and 2 are alternative connections to port 2 pins 3 and 5. C. Other Information ● ● ● ● Board Dimensions: 4.5 in x 3.35 in Distance between screws: ○ Long side (corner to corner): 4.010 in ○ Short side (corner to corner): 2.8 in ○ Corner to middle screw hole: 2.046 in ○ Middle screw hole to other corner: 1.964 in Power requirements: 24 volts Max Current: ○ 100 mA total on port 1 pins 2 through 9. This will be increased in a future revision. V. Troubleshooting I keep getting a message that it failed to find or connect to the breakout board. Ensure that the board is powered and connected to the correct ethernet port on your computer. Ensure that your network settings for that ethernet port match the ones explained in section II. Try restarting your computer and then unpowering and repowering the board. Also, some wireless adaptors have been found to interfere with connecting to the board. I keep getting a message that I lost connection to the breakout board. Ensure that your network settings for that ethernet port match the ones explained in section II. If your computer is too slow, and is being interrupted by too much other network traffic or other activities, it may not be able to write data to the breakout board quickly enough. To prevent this, ensure that you are running a clean install of Windows with no viruses, malware, etc. Also, minimize other network traffic to ensure maximum bandwidth for the board. My inputs and outputs are behaving incorrectly. Note that the breakout board has dedicated pins for input and output. Trying to set put an output on an input pin will not work. Also, assigning multiple outputs to the same pin will results in undefined behavior. Ensure that your settings in Config>Ports and Pins are correct given the Page 11 of 12 STEPPER3 LLC MACH FOR WIN64 USERS GUIDE VERSION 1.0 pinout of the breakout board (explained above). The breakout board is losing or skipping steps. This is likely due to an issue with your network throughput; for some reason, your computer cannot write the movement data to the board quickly enough. Ensure that your network settings for that ethernet port match the ones explained in section II. If your computer is too slow, and is being interrupted by too much other network traffic or other activities, it may not be able to write data to the breakout board quickly enough. To prevent this, ensure that you are running a clean install of Windows with no viruses, malware, etc. Also, minimize other network traffic to ensure maximum bandwidth for the board. I think I have found a bug in the plugin or breakout board. If you believe that you have found a bug or problem with the MachForWin64 kit, you can report it to us using a form available at: http://machforwin64.com/support. As long as you provide a valid email address, we will respond if we find any issues related to your report. Page 12 of 12