1
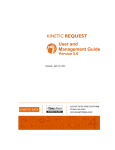
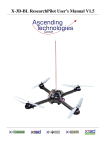
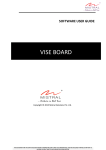
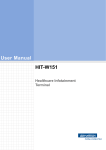
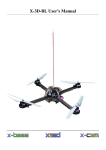
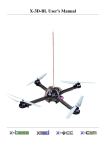
CoreExpress Carrierboard Manual v1.0
-1-
CoreExpress Carrierboard Manual v1.0
Contents
1 System Overview
1.1 Status LEDs . . . . . . . . . .
1.2 Interfaces . . . . . . . . . . .
1.2.1 USB Ports . . . . . .
1.2.2 Mini PCI express Port
1.2.3 Micro SD-Card Port .
1.2.4 UART Ports . . . . . .
1.2.5 Display Connector . .
.
.
.
.
.
.
.
.
.
.
.
.
.
.
.
.
.
.
.
.
.
.
.
.
.
.
.
.
.
.
.
.
.
.
.
.
.
.
.
.
.
.
.
.
.
.
.
.
.
.
.
.
.
.
.
.
.
.
.
.
.
.
.
.
.
.
.
.
.
.
.
.
.
.
.
.
.
.
.
.
.
.
.
.
.
.
.
.
.
.
.
.
.
.
.
.
.
.
.
.
.
.
.
.
.
.
.
.
.
.
.
.
.
.
.
.
.
.
.
.
.
.
.
.
.
.
.
.
.
.
.
.
.
.
.
.
.
.
.
.
.
.
.
.
.
.
.
.
.
.
.
.
.
.
.
.
.
.
.
.
.
.
.
.
.
.
.
.
.
.
.
.
.
.
.
.
.
.
.
.
.
.
.
.
.
.
.
.
.
.
.
.
.
.
.
.
.
.
.
.
.
.
.
.
.
.
.
.
.
.
3
3
3
3
3
3
3
3
2 Preinstalled Ubuntu on micro SD card
2.1 Login . . . . . . . . . . . . . . . . .
2.2 Drivers . . . . . . . . . . . . . . . .
2.2.1 Wifi . . . . . . . . . . . . . .
2.2.2 USB Client port . . . . . . .
2.2.3 Graphics . . . . . . . . . . .
.
.
.
.
.
.
.
.
.
.
.
.
.
.
.
.
.
.
.
.
.
.
.
.
.
.
.
.
.
.
.
.
.
.
.
.
.
.
.
.
.
.
.
.
.
.
.
.
.
.
.
.
.
.
.
.
.
.
.
.
.
.
.
.
.
.
.
.
.
.
.
.
.
.
.
.
.
.
.
.
.
.
.
.
.
.
.
.
.
.
.
.
.
.
.
.
.
.
.
.
.
.
.
.
.
.
.
.
.
.
.
.
.
.
.
.
.
.
.
.
.
.
.
.
.
.
.
.
.
.
.
.
.
.
.
.
.
.
.
.
.
.
.
.
.
6
6
6
6
6
6
3 Installation of Linux on SD card
3.1 Installation . . . . . . . . . . . . . . . . . . . . . . . . . . . . . . . . . . . . . . . . . . .
3.2 Enable Boot from SD card . . . . . . . . . . . . . . . . . . . . . . . . . . . . . . . . . . .
3.3 Further Notes . . . . . . . . . . . . . . . . . . . . . . . . . . . . . . . . . . . . . . . . . .
8
8
8
8
4 Contact Information
9
Ascending Technologies GmbH
.
.
.
.
.
.
.
.
.
.
.
.
.
.
.
.
.
.
.
.
.
-2-
www.asctec.de
CoreExpress Carrierboard Manual v1.0
1 System Overview
1.1 Status LEDs
1.2.3 Micro SD-Card Port
green Power
The SD card interface is SDHC compatible allowing
you to use Micro SD-cards > 2 GB. The port is internally connected to the System Controller Hub directly
and not via USB. Therefore r/w operations have no
influence on the USB bus as it would be the case for
Atom N2xx series processors. The BIOS is able to
boot from SD cards.
orange SD-Card r/w access
red UART transfer
blue Status of connected mini PCIe device
1.2 Interfaces
1.2.4 UART Ports
The board is equipped with a dual port FTDI
(FT2232) serial to USB converter that is connected
internally to USB port 1. Under Linux, both UARTs
• Ports 7 and 8 support USB 2.0 devices only.
appear as /dev/ttyUSB0 and /dev/ttyUSB1.
Most keyboards/mouses might not work on these
ports. All other ports support USB 1.1 as well as Pinout on the 10-pos DF13 mini-connector (as seen
USB 2.0.
from the CoreExpress module):
1.2.1 USB Ports
• Port 8 is shared with the mini-PCIexpress connector. See 1.2.2.
• Port 3 can be configured in the BIOS either as
client or host port. This port is not powered, i.e.
the client/host has to be powered externally. The
port is set up as client port as default.
Pin
Name
Pin
Name
1
2
3
4
5
TXD
RXD
RTS
CTS
DTR
6
7
8
9
10
DSR
DCD
RI
+5V
GND
• Each port can source 500 mA. Permanent load
on all ports should not exceed 1000 mA. Peak
load should be at maximum 2000 mA.
A flashing LED (red) next to the connector indicates
data transfer.
1.2.2 Mini PCI express Port
1.2.5 Display Connector
According to the mini PCIexpress specification, this
port is equipped with one PCIexpress lane and one
USB port. Which port is used depends on the design
of the mini PCIexpress module. In case it uses USB,
USB port 8 is occupied by this module and must not
be connected to any other device.
Ascending Technologies GmbH
On this connector, you can connect LVDS displays
for debug/installation purposes such as our display
available as accessory. The LVDS port supports 18
and 24 bit color displays. Power for backlight and
backlight enable/brightness signals are available as
-3-
www.asctec.de
CoreExpress Carrierboard Manual v1.0
well. In case you want to connect your own LVDS
display, please contact us for further information.
To connect/disconnect the display, always power off
the system! Otherwise, the LVDS port or the display
could be damaged permanently.
In order to work with the display, connect the grey
ribbon cable of the display to the display connector
(white) on the carrierboard and switch on the carrierboard.
Ascending Technologies GmbH
-4-
www.asctec.de
CoreExpress Carrierboard Manual v1.0
UART1
MicroSD
slot
UART0
USB3
Power
switch
USB2
USB4
Display
connector
(LVDS)
USB5
USB6
Figure 1.1: Carrierboard top view
Aux.
power
Extension
connector
USB7
USB8
miniPCI
Express
Figure 1.2: Carrierboard bottom view
Ascending Technologies GmbH
-5-
www.asctec.de
CoreExpress Carrierboard Manual v1.0
2 Preinstalled Ubuntu on micro SD card
To make the start easier, we already preinstalled more stable and runs as a service. You can configUbuntu 9.04 on a 8 GB micro SD card.
ure it with a GUI to automatically connect to you desired wireless network. Once configured properly, the
connection will be established without having to log
into your system locally. Depending on your wireless
2.1 Login
device, one of the blue status LEDs indicates that a
connection is established.
The OS boots to a console login by default.
Attention: Wireless networks secured with WEP do
• User: asctec
not support 802.11n speed! Either use unsecured
wireless networks or better WPA(2) secured networks
• Password: asctec
with AES encryption.
To start the grahical user interface, run startx.
2.2.2 USB Client port
Alternatively, you can login
via a serial console (38400, 8, N, 1) on UART1. You can use the USB client port (port 3) to act eitty6 is configured to output/receive commands on ther as mass storage device or as a networking device
/dev/ttyUSB1.
using the Linux-USB Gadget API Framework, which
is already installed. For a full documentation, see
http://www.linux-usb.org/gadget.
Serial console login
2.2 Drivers
Additionally, to make the gedget drivers working with
the USB-client port, you need to patch and recompile
your kernel. The patch and a manual is located in the
folder “intel.com” on the Desktop of the user asctec.
2.2.1 Wifi
The stock dirvers coming with Ubuntu 9.04 still
have issues with the support of 801.11n for the
latest wireless LAN cards. Therefore, we compiled and installed the drivers from http://www.
linuxwireless.org/. We recommend the use
of WLAN devices with Atheros chipsets because
Linux driver support seems to be the best. A list of
supported devices is also available at http://www.
linuxwireless.org/
2.2.3 Graphics
The Intel GMA500 graphics card is not supported by
Ubuntu 9.04 by default. Therefore,
deb http://ppa.launchpad.net/
ubuntu-mobile/ppa/ubuntu jaunty main
deb-src http://ppa.launchpad.net/
ubuntu-mobile/ppa/ubuntu jaunty main
If you update your kernel, please download the latest
version of the Linux wireless driver that is suitable to
was
added
to
the
repositories
list
the new kernel version, install the kernel-headers and
and
the
packages
psb-firmware
compile and install the new driver version.
psb-modules psb-kernel-source
We removed the GNOME Networkmanager and in- psb-kernel-headers xpsb-glx
stalled the networkmanager wicd instead. wicd runs poulsbo-driver-2d
were
installed.
Ascending Technologies GmbH
-6-
www.asctec.de
CoreExpress Carrierboard Manual v1.0
Additionally,
the
section
“Device”
/etc/X11/xorg.conf was changed to:
in
Section "Device"
Identifier "Configured Video Device"
Option "Accel Method" "EXA"
Option "DRI" "off"
Option "MigrationHeuristic" "greedy"
EndSection
Ascending Technologies GmbH
-7-
www.asctec.de
CoreExpress Carrierboard Manual v1.0
3 Installation of Linux on SD card
3.1 Installation
• sdhci-pci
• mmc_block
Create a bootable Live USB drive that contains the
installation files. We recommend using UNetbootin Save the file and run update-initramfs -u
(http://unetbootin.sourceforge.net). with root priveledges.
Make
sure
that
the
root-partition
in
We highly recommend to install Linux on the target /boot/grub/menu.lst is set correctly. The
SD card inserted into a USB cardreader. This is SD card should appear either as /dev/mmcblk0p1
because standard installation routines might not or with its UUID.
recognize the SD card properly which might cause
errors during installation. Also, to succesfully boot
from SD card, some extra steps will be necessary that
can be performed the easiest way when the OS was
3.3 Further Notes
booted from the SD card in the card reader.
Connect the cardreader as well as the bootable USB
stick, switch on your CoreExpress computer and
press .ESC during startup. In the boot-menu, select
Hard Disk and then your USB stick.
In case you installed from a USB stick and automounting devices throws errors, comment out a line
in /etc/fstab, that looks like this:
/dev/sdb1 /media/cdrom0 udf,iso9660
user,noauto,exec 0 0
Follow the instructions of the installation routine of
your Linux distribution. Select the SD card in the
cardreader as target device. You should choose manual partitioning. Create an ext3 partition for the operating system and do not create a swap partition. Proceed with the installation.
3.2 Enable Boot from SD card
After having installed Linux succesfully, leave
the SD card in the cardreader and boot your
new installation from the cardreader for the first
time.
In order to enable booting from SD
card, some modules have to be built into the
initramfs-image: Add the following modules to
/etc/initramfs-tools/modules (each in
one line):
• sdhci
Ascending Technologies GmbH
-8-
www.asctec.de
CoreExpress Carrierboard Manual v1.0
4 Contact Information
Ascending Technologies GmbH
Konrad-Zuse Bogen 4
82152 Krailling
GERMANY
Phone: +49 (89) 89556079-0
E-Mail: [email protected]
Web: www.asctec.de
CEOs:
Michael Achtelik, Klaus-Michael Doth
Dipl.-Ing. Daniel Gurdan, Dipl.-Ing. Jan Stumpf
Handelsregister München: HRB 166748
Ust.-ID: DE254728199
CoreExpress is a registered trademark of LiPPERT Embedded Computers. All other trademarks
are the property of their respective owners.
Ascending Technologies GmbH
-9-
www.asctec.de