1
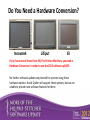
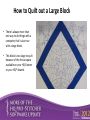
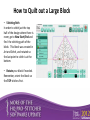
Welcome to the Handi Quilter Education
This Webinar is being
We’ve got a special
Webinar
recorded. You will find
offer just for our
it on the Education tab
Webinar participants.
October 11, 2012
on HandiQuilter.com
beginning tomorrow.
Pro-Stitcher Update
While you’re waiting for the
Webinar to begin, make sure
your computer speakers are on,
so you will be able to hear us.
Stick around to the
end for a coupon.
Your presenter today is
Vicki Hoth
Handi Quilter
Education Coordinator
Your presenter today is
Marie Eldredge
Handi Quilter
Studio Educator
HQ Pro-Stitcher
We are pleased to announce
an update to the HQ ProStitcher software. As of
October 9, 2012, version 1210-0020 is now available for
download at
www.handiquilter.com.
Do You Need a Hardware Conversion?
Innovatek
Lilliput
IEI
If you have one of these three HQ Pro-Stitcher Monitors, you need a
Hardware Conversion in order to use the 2012 software upDATE.
No further software updates are planned for systems using these
hardware options. Handi Quilter will support these systems, but we are
unable to provide new software features for them.
Do You Need a Hardware Conversion?
If you have the ASUS
Eee PC, you are ready
for the software update
without any hardware
changes.
The introduction of Art & Stitch
design software coincided with
the first shipment of this
monitor (also referred to as the
netbook).
ASUS Eee PC
The Answer to all of
those
HQ Pro-Stitcher
Questions!
How to Quilt out a Large Block
• There’s always more than
one way to do things with a
computer, that’s also true
with a large block.
• This block is too large to quilt
because of the throat space
available on your HQ Sixteen
or your HQ18 Avanté.
How to Quilt out a Large Block
• Stitching Path
In order to stitch just the top
half of the design where there is
room, go to New Start/End and
find the stitching path of the
block. This block was created in
Art and Stitch, and rotated so
the last point to stitch is at the
bottom.
• Rotate your block if needed.
Remember, orient the block so
the TOP stitches first.
How to Quilt out a Large Block
Step 1
• Press Design/File and find
desired design.
Step 2
Create an Area
• Create a triangle that fits in
the top portion of the space
by using Multi Point.
• There will be three times you
push Multi Point to create
this triangle area.
Step 3
• Press Skew/Align use the
align tools to position to the
top center of the triangle.
Notice the design is not the correct size.
How to Quilt out a Large Block
Step 4
• Press Resize
• Press Lock Aspect
• Use the “+” or “–” tools to fit
the area.
.
How to Quilt out a Large Block
Step 5
• Since the area has been
defined there may be a need
to reposition using Nudge to
fine tune it to fit the triangle.
• Use the keypad to enter a
smaller nudge amount such
as .01.
How to Quilt out a Large Block
New Start/End
Move the end point using the
slider and arrows to a point
that is within the throat space.
TIP: A point is a good place to
stop stitching.
Make a note of the end point
number. On this design it is
972.
This number will be the start point on the
bottom of the design after advancing.
How to Quilt out a Large Block
• Press Quilt.
• Press Settings. Turn off your
end tie off.
• Press Run.
• Stitch out top part of design.
• Press Half Stitch. This will
place the needle down in the
fabric at the end point where
it stopped.
• Disable motors.
• Advance quilt carefully.
How to Quilt out a Large Block
Press Reposition.
• Your needle is at the end
point on your quilt. You have
moved your quilt so that it
no longer lines up with the
crosshairs and your design.
• Press End Point.
• This will shift your design
and now your crosshairs will
line up with your needle,
design and quilt.
Notice the design is no longer in the area
box because you have shifted your quilt.
How to Quilt out a Large Block
•
Press New Start/End.
• Create New End Point.
• Move the Scroll Bar so the
end point will now be at the
end of the design.
How to Quilt out a Large Block
• Using the Scroll Bar move
the Start Point to the
number you recorded for the
end point of the top. (for this
design, it would be 972)
• This number now becomes
the New Start point.
How to Quilt out a Large Block
• Now the best part of all.
• Quilt!
• Stitch out the rest of the
block.
There’s more than one
way to quilt out this
large block.
How to Quilt out a Large Block
• Quilt the top half of the
design.
• Press Half Stitch.
• The needle will drop down
into the fabric.
• Disable Motors.
• Advance your quilt.
Press Quilt.
How to Quilt out a Large Block
• Press Reposition.
• The crosshairs and design are
no longer lined up.
• There is an orange circle
showing where the machine
stopped stitching.
Press Current Point …
AND….
How to Quilt out a Large Block
• VOILA! Magic! Now the
design has been repositioned.
• The needle, crosshairs,
design and the stitching on
the quilt are all at the same
position.
• The CURRENT POSITION.
• Now press Resume and
finish stitching the block.
This technique will work when doing
edge to edge or vertical borders.
Edge to Edge, Cropping, New Start/End
•
Press Rotate.
•
Flip the design if needed so the
start point is in the top left corner
or close to the top left.
•
If the quilt is directional, place it on
the frame so the orientation will be
the same.
Note: Flip and Mirror apply to the
original design unless you have
pressed Baseline.
Edge to Edge, Cropping, New Start/End
Step 1
•
Select Design from File.
Step 2
•
Press Area.
•
Move the machine to the top
left corner of the quilt—position
it just outside the edge of the
quilt.
•
Press the 2 Corner Button.
Edge to Edge, Cropping, New Start/End
•
Move the machine to the
bottom right corner of the
throat space, just outside the
edge of the quilt.
•
Press the 2 Corner button.
Edge to Edge, Cropping, New Start/End
•
The area now appears as a
purple box.
•
Press Refresh to see the design
and the area.
•
To layout the design for the
entire quilt adjust the area
measurements. The quilt width
has been defined.
Edge to Edge, Cropping, New Start/End
•
Enter the quilt height in the Area
Height box.
•
This quilt has a nesting pattern,
and will need a few inches
cropped off of the top.
Add a couple of inches to the
length of the quilt to allow for
the cropping or draw in.
•
•
Select Refresh.
•
The whole quilt area is displayed
on the screen in the purple box
and the design is in the blue box.
Edge to Edge, Cropping, New Start/End
QUESTION: With edge to edge, when you set the area for the whole
quilt, does the quilt design automatically adjust to fill to the edges.
Some designs have gaps at the edges.
• Fit calculates the number of repeats without stretching the design.
• Use the Stretch Width and Stretch Height buttons to fill the Area.
• The quilt layout can be resized larger than the area, then crop the
outside edges off.
Edge to Edge, Cropping, New Start/End
Step 3
• Press Repeat.
• Press Fit.
• Press Point 2 Point to join
the repeated designs.
Edge to Edge, Cropping, New Start/End
• Press Stretch Width.
• Press Stretch Height.
• By doing this the design
will stretch to fit the
purple area box that
was defined on the
quilt.
Notice the gaps between the rows.
Edge to Edge, Cropping, New Start/End
•
To adjust the vertical
distance between each row,
press the “+” or “-” buttons.
•
A negative value will bring
the designs closer together.
•
A positive value will move
the designs farther apart.
Edge to Edge, Cropping, New Start/End
QUESTION: How do I crop at the top of my
panto or edge to edge?
This is next on the agenda… it’s coming up.
Edge to Edge, Cropping, New Start/End
Step 4
•
Press Area.
•
Press Clear. This clears the previous area.
•
Note: this does not change the positioning of
the design on the quilt.
•
Press 2 Corner.
•
Move the machine to the top left corner of
the quilt, just outside the top of the fabric.
Edge to Edge, Cropping, New Start/End
•
Move the machine to the
right side of your quilt,
outside the fabric.
•
Look on the screen to
determine how much of the
pattern needs to be cropped.
Edge to Edge, Cropping, New Start/End
•
Press 2 Corner.
•
The desired crop area is defined.
•
Press Crop.
•
Press Inside. To crop everything
inside the area box.
•
Press Closed. Each loose end created
after a crop will be tied to the next
end point by stitching along the
border of the area to get to the next
point.
•
Press Baseline.
Edge to Edge, Cropping, New Start/End
1. QUESTION: What about designs that have nesting gaps at the
sides that need to be cropped?
Use Area to define the area to be cropped. Use the same technique as
cropping the top, it will just be down the sides. If it is more area than your
throat space, enter the height of the quilt.
Edge to Edge, Cropping, New Start/End
• Step 5
• Press Reposition.
• Move the machine to the top
left corner of the quilt.
• Press Start Point.
• This will position the design to
the top left corner of the quilt.
• Follow the design with the
crosshairs to confirm the
design is positioned correctly.
Edge to Edge, Cropping, New Start/End
Check Settings
• 1. Tie off Start and End are selected.
• 2. Auto Pull up is deselected.
• 3. Speed at medium. (This can be changed after
the machine starts stitching.)
Edge to Edge, Cropping, New Start/End
QUESTION: Why does it always start on the
left, can it be set to do the second row from
right to left?
• This can be done in Art and Stitch by changing the
stitch path or start and end points.
•
It can’t be changed on the HQ Pro-Stitcher.
Edge to Edge, Cropping, New Start/End
Press Quilt.
Press Run.
Stitch the first row.
Tie off.
Press Resume. Machine will
move to the start point of the
second row and take a pull up
stitch.
• Press Half Stitch at pull up stitch
position.
• Disable motors.
• Advance quilt with the needle
down.
•
•
•
•
•
Edge to Edge, Cropping, New Start/End
Step 7
• Press Cancel.
• Press New Start/End.
• Press the Jump Points arrow
forward to position the start
point at the first of the
second row.
Edge to Edge, Cropping, New Start/End
• Step 8
• Press Design.
• Press Reposition.
• Press Start Point.
• This will reposition row two
on the fabric.
• This will also be the row that
is used to stitch each time the
quilt is advanced.
Edge to Edge, Cropping, New Start/End
Step 9
• Press Quilt.
• Press Run.
• Quilt row two.
Edge to Edge, Cropping, New Start/End
Step 10
• After row 2 has quilted and tied off, Press
Resume, and machine will move to the left
side and take a pull up stitch.
• Press Half Stitch, dropping needle into
fabric at the pull up position.
• Advance the quilt.
• Press Cancel.
• Press Design.
• Press Reposition. Press Start Point.
This will reposition the design for
row 3 using row 2 as the stitching
row. Row 2 is now the stitching row.
Row 3 is the positioning row.
Edge to Edge, Cropping, New Start/End
How to crop the bottom:
• You are at the bottom of the quilt, and notice there is too much design for the
quilt top. You will need to crop.
• Advance the quilt and reposition, just as you did for the previous rows.
• Press Area.
• Move the machine to the left of the quilt and to the area you would like to crop
off.
• Press 2 Corner.
Edge to Edge, Cropping, New Start/End
• Move the machine to the right,
below the bottom of the quilt
top an inch or two. (this would
be in the batting area).
• Press 2 Corner. You have now
created an area to crop.
Edge to Edge, Cropping, New Start/End
• Press Crop.
• Press Inside.
• Pressed Closed. This will crop
away the bottom of the design
which is inside the area box.
• Press Quilt.
• Press Run. Finish stitching the
last row which has been
cropped.
New Start/End for Thread Break
What do I do when my thread
breaks or I run out of bobbin
thread?
• Press Pause.
• Fix your thread break issue
by rethreading or replacing
bobbin.
New Start/End for Thread Break
• Press Quilt.
• Press New Start/End.
• Press Start Auto. This will
turn on the function.
• Move machine to position
of thread break.
• Press Start Auto. This will
set the start position and
turn off Start Auto.
• Note: The point in the
design closest to the
crosshairs will be the new
start point.
Why would I activate Art & Stitch on
the HQ Pro-Stitcher?
Why would I activate Art & Stitch on
the HQ Pro-Stitcher?
Edge to edge
• You want to change the stitching order and make the ProStitcher stitch from right to left.
• You want to use a design that needs to be offset. I can place
both rows together in Art & Stitch.
• More than 300 designs immediately accessible.
• Magic square immediately.
• Magic circle immediately.
• Change a point in the design without leaving the quilting area.
• Use Freehand on the Pro-Stitcher, transfer into Art & Stitch,
edit and transfer back to Pro-Stitcher.
Many Quilters use the Trace Outline Function to trace the outer
perimeter of the design for correct placement.
Using Follow is a very useful function instead of Trace Outline.
• Press Follow. This will center the crosshairs on the screen.
• Press Zoom. Zoom in on the design and move the machine.
• As you move the machine the crosshairs will stay stationary on
the screen and the design will move across the screen.
• This view can be very helpful if the design must be zoomed in
and the quilter does not want to constantly pan the view to find
the crosshairs.
• You can not use Pan and Follow at the same time, but you can
use Zoom and Follow together.
Can I Crop round or curved designs?
Yes You Can!!!
• Choose the design file to place in the
background.
• Create an area for the block.
• Skew the design into the four corner
area.
• Press Baseline.
• Clear Area.
• Create a new area of the embroidery
or applique using Multi Point.
Can I Crop round or curved designs?
• Press Crop.
• Press inside.
• Press Closed if you prefer
the lines to be connected
and stitch around the
design.
Tip: Because the closed option
may not stitch the entire area
outline, use the Trace Outline
Function, with stitch enabled,
to stitch around the perimeter
of the Area.
Can I Crop round or curved designs?
• Press Crop.
• Press Inside.
• Press Open if you prefer
the lines to tie off and
jump to the next point of
stitching.
Questions and Answers from Customers
1. Will this software update work on my HQ Sixteen?
Yes, HQ Pro-Stitcher will work on all Handi Quilter Machines.
Questions and Answers from Customers
Are there pop-up numeric inputs for the area height/width boxes in
the design menu----
Yes but you must define the area and then increase or decrease the size of
the area by using the popup number boxes.
Questions and Answers from Customers
Does it pause between rows ?
Yes, the jump is auto set at 6”. If you are doing an edge to edge, the machine
will pause at the end of the row, the motors will disable allowing you to
bring up your bobbin thread and clip your threads. Then follow the prompt
on the screen that tells you to “Resume”. Your machine will move to the
start of the next row and take a pull-up.
Questions and Answers from Customers
Do you have to clear the area first before you nudge or reposition?
No, you can use reposition, repeat, resize without clearing the area.
Questions and Answers from Customers
How do we get the licenses for Art & Stitch?
On page 5 of your Quick Start Guide you will find the instructions for
installing, activating and getting the licenses for Art & Stitch.
Questions and Answers from Customers
Does this update include a border rotate for those borders that are
not straight?
Yes, you can use 2- Point Rotation to rotation your border without having
figure the angle. On Page 5.11 of the HQ Pro-Stitcher User Manual are
instructions on how to use this awesome tool.
Questions and Answers from Customers
Will Handi Quilter offer any Art & Stitch training?
Yes.
There will be an Art & Stitch retreat hosted by Handi Quilter on April 22-23, 2013
at the Handi Quilter Studio in North Salt Lake, Utah.
Handi Quilter will also offer a Technology Seminar at MQS on May 13-14, 2013 in
Wichita, Kansas, which will offer two days of Pro-Stitcher and Art & Stitch
training.
Questions and Answers from Customers
When will Handi Quilter post the 2013 retreat schedule?
The classes will be posted at the end of October.
They fill up fast so watch for them on our website.
Questions and Answers from Customers
We have downloaded the manual from the HQ site but there are no
lessons. Where can we find lessons?
There are tutorials on the Handi Quilter Website.
http://www.handiquilter.com/freedownloads/
Also go to our webinars under education.
http://www.handiquilter.com/webinar/
Questions and Answers from Customers
Where can we find lessons on the Art & Stitch software?
There are tutorials on the Art & Stitch website.
http://www.artnstitch.com/tutorials.htm
Also the installation CD for Art & Stitch has many videos
to watch and the manual to download.
You don’t have to. A copy of this
webinar will be on the
HandiQuilter.com website under the
Education tab. Just click on Webinars.
The next Education Webinar will be
offered December 13 at 11:00 a.m.
Mountain Standard Time.
The topic will be All about Rulers
and Templates