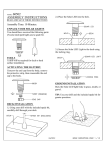
1
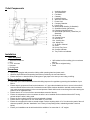
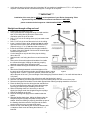
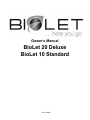
Owner’s Manual BioLet 20 Deluxe BioLet 10 Standard Rev. 060802 Index Specifications .............................................................................................................................................................................................. 2 Capacity................................................................................................................................................................................................... 2 Electrical Specifications ......................................................................................................................................................................... 2 Weight Limit ........................................................................................................................................................................................... 2 Measurements and Weight .................................................................................................................................................................... 2 Introduction ................................................................................................................................................................................................ 2 Description .............................................................................................................................................................................................. 2 Package Contents........................................................................................................................................................................................ 2 Toilet Components ...................................................................................................................................................................................... 3 Installation .................................................................................................................................................................................................. 3 Tools Required ........................................................................................................................................................................................ 3 Precautions .............................................................................................................................................................................................. 3 Before installing your BioLet................................................................................................................................................................. 3 Straight run through ceiling and roof ................................................................................................................................................... 4 Through the exterior wall using 2 – 45° elbows. .................................................................................................................................. 5 Starting the toilet .................................................................................................................................................................................... 5 Theory of composting toilets....................................................................................................................................................................... 6 Moisture................................................................................................................................................................................................... 6 Temperature............................................................................................................................................................................................ 6 Aeration ................................................................................................................................................................................................... 6 Carbon to Nitrogen ratio (C:N) ............................................................................................................................................................. 6 Use and Care ............................................................................................................................................................................................... 7 Precautions .............................................................................................................................................................................................. 7 Adding starter mulch ............................................................................................................................................................................. 7 Approved mulches.................................................................................................................................................................................7 Homemade mulch..................................................................................................................................................................................7 Using the mixer ....................................................................................................................................................................................... 7 10 Standard............................................................................................................................................................................................7 20 Deluxe ..............................................................................................................................................................................................8 Adjusting the thermostat........................................................................................................................................................................ 8 Things to watch .....................................................................................................................................................................................8 Emptying the humus tray....................................................................................................................................................................... 8 Shutting down your toilet....................................................................................................................................................................... 9 In case of paper build up........................................................................................................................................................................ 9 Cleaning................................................................................................................................................................................................... 9 Insect control........................................................................................................................................................................................... 9 Helpful hints................................................................................................................................................................................................ 9 Troubleshooting .......................................................................................................................................................................................... 9 Odors in bathroom ................................................................................................................................................................................. 9 Odors outside the structure ................................................................................................................................................................... 10 Excess moisture in the tray .................................................................................................................................................................... 10 Excess moisture in the composting chamber ........................................................................................................................................ 10 Warranty...................................................................................................................................................................................................... 11 Limited 3-Year Parts Warranty:........................................................................................................................................................... 11 Limited Lifetime Body Warranty: ........................................................................................................................................................ 11 Exclusions and Exceptions of Incidental or Consequential Damage: ................................................................................................ 11 Notes ............................................................................................................................................................................................................ 12 BioLet Warranty Registration .................................................................................................................................................................... 14 1 Specifications Capacity • • 3 people - full-time use 4 people - part-time use Electrical Specifications • • • • • Total – 275 Watts (20 Deluxe) 250 Watts (10 Standard) Average continuous consumption over 24 hr period – 55 Watts (20 Deluxe) 50 Watts (10 Standard) Heater – 225 Watts Fan motor – 25 Watts Mixer Motor – 25 Watts (20 Deluxe only) Weight Limit 350 lb Measurements and Weight Shipping Installed Depth 30” 29” Width 22.25” 21.5” Height 27.25” 26” Seat Height 20” 20” Additional depth to remove tray ---- 22” Weight including vent kit and initial starter mulch 66 lb 59.5 lb Introduction Thank you for your purchase of a BioLet Composting Toilet. With proper installation and maintenance we are certain it will offer you the convenience and reliability you would expect from the manufacturer of the best selling septic-free toilet in the world. Please, read these instructions carefully, as they will give you vital information about installing and maintaining your BioLet. *** Please remember: State and Local regulations always supersede instructions in this manual. Always check with your local health authorities and building inspectors for regulations governing composting toilets prior to installation of your BioLet. *** Description Your BioLet Composting Toilet is a biological composting toilet that uses the processes of evaporation and aerobic decomposition to transform human fecal waste, urine, and toilet paper to a hygienically safe product (humus) that may be safely utilized if disposed of in a manner described in this manual or by your local health authorities. Package Contents 1 – Composting Toilet 1 – Starter Mulch (8 gallon bag) 1 – Bowl Cap 1 – Emptying Frame 1 – Manual Mixing Rake 5 – 2’ sections 54mm white vent pipe, belled 1 end 1 – 2’ section 54mm white vent pipe, no bell 1 – 22” section 108mm black vent pipe, belled 1 end 1 – 26” section 108mm black vent pipe, no bell 2 – 22” sections of Styrofoam insulation 1 – 108mm X 54mm reducing coupling 1 – Roof flashing 1 – Insect screen 2 Toilet Components 1. Ventilation Outlet 2. Thermostat Dial 3. Fan Motor 4. Cassette 5. Heating Element 6. Warm Air Channels 7. Power Cord 8. Compost Chamber 9. Humus Tray 10. Manual Mixer Handle (10 Standard) 11. Seat Micro Switch (20 Deluxe) 11b. Retaining Nut (20 Deluxe) 12. Mixer Motor (20 Deluxe) / Gear Box (10 Standard) 13. Bowl Cap 14. Compost Cover 15. Mixer Shaft 16 a. Leveling Arm 16 b. Mixing Arm 17. Air Return Channel 18. Grate 19. Humus Tray Cover 20. Overflow Indicator 21. Tray Fluid Level Indicator Installation Tools Required • • • • • • 100% adhesive silicon calking (do not use latex silicon) • Plum bob or weighted string • Pencil Standard screwdriver Drill 2 1/4” hole saw Hammer Roofing nails Precautions • • • Always wear goggles and protective clothing while operating hand and power tools. Observe all precautions and operating instructions provided by the tool manufacturer. Ensure there are no electrical wires, water pipes or gas pipes in the area you are cutting or drilling. Before installing your BioLet • • • • • • • • Check with your local health authorities and building inspector for regulations governing the installation of your BioLet. Ensure there is generous air flow into the bathroom. A 1” gap under the bathroom door or a vent in the wall will ensure sufficient airflow to the toilet. Overhead vents and open windows should be used with caution as these may cause a negative pressure in the room and promote a back draft into the room through the toilet causing the presence of an unpleasant odor. Ensure there is 22” in front of toilet to accommodate removal of the tray. Ensure the temperature in the room where the toilet is to be installed can be maintained above 64°F during periods while the toilet is being used. Ensure the floor under the toilet is level and insulated or heated. Ensure there is a grounded 110 VAC outlet within 5’ of the toilet. Ensure the vent pipe will be able to extend at least 6” above anything within 10’ of it or above the peak of the roof whenever possible. (See the “Installation” and “Theory of composting toilets; maintaining aeration” sections below) Ensure your installation can be achieved with the addition of no more than 2 – 45° angles. 3 • Verify that the total run for the vent pipe is less than 30’ in a straight up installation or 27’ if 2 – 45° angles are required. Consult with BioLet USA technical support if a longer run is required. ****IMPORTANT**** Installation of the vent pipe is CRITICAL to the operation of your BioLet Composting Toilet. If you must vary the installation from these instructions in ANY WAY, please contact technical support at 1-800-524-6538 PRIOR to installation. Straight run through ceiling and roof 1. 2. 3. 4. 5. 6. 7. 8. 9. 10. 11. 12. 13. 14. 15. 16. 17. 18. 19. 20. Position the toilet against the wall. Using a plumb-bob or a weighted string, find and mark the spot on the ceiling directly above the center of the ventilation outlet on top of the toilet. Drill a 2 1/4” hole in the ceiling where you just made a mark in Step 2. Drill a 2 1/4” hole in the roof above the hole in the ceiling. Insert 1 length of 54mm, white, belled pipe into the rubber connector on the back of the toilet with the belled end up. (Pipe will only go ¼” to ½” into the rubber connector.) Insert the next white, belled pipe into the pipe installed in the back of the toilet. Repeat until the end of the white pipe extends through the roof. Cut the last pipe so only the bell of the pipe is sticking above the roof. Seal the hole in roof using the silicone to caulk around the pipe. Remove the 54mm white pipe and insulation from inside the 108mm black pipe. Keeping the reducing coupling attached to the white 54mm pipe with no bell. Slide non-belled black pipe into belled end of other black pipe. With the bell facing downward cut the black pipe so it fits Figure 2 the angle of the roof and the end other end extends at least 6” above anything within 10 feet if it. Wherever possible, extend the vent pipe above the peak of the roof. (The total length of the black piping must be at least 2’; 4’ on roofs with less than a 3/12 pitch.) Cut the insulation to the angle of the roof as done with the black pipe in step 11. Slide the roof flashing over black pipe with the top of the flashing away from the cut end of the pipe. Reinsert white pipe and insulation into the black pipe with the reducing coupling toward the uncut end. Place the black pipe over the white pipe that extends from the roof, ensuring that the white pipe inside the black pipe securely joins with the pipe extending from the roof. Slide roof flashing down so it lies evenly on the roof, slipping its flanges under the shingles along the top edge. Outline the flashing on the roof. Raise the flashing and apply silicone sealant inside the outline. Slide the flashing back down, sliding the flange under the shingles along the top edge and press it firmly into the sealant. When the flashing is properly placed the top part of the flashing should be under the shingles and the lower portion should be on top so water sheds easily. Secure the top of the flashing with corrosion resistant nails or staples at each corner and along the sides at 4” – 6” intervals. 4 21. 22. 23. 24. 25. Exposed nails or staples should be sealed with silicone sealant. Slide the reducing coupling down till it fits over the black pipe. Cut off the white 55mm pipe even with the top of the reducing coupling. Slide the insect netting down over the top of the reducing coupling. Secure it in place using a hose clamp. Plug the unit into a grounded 110VAC outlet. *** IMPORTANT *** Wherever the ventilation pipe passes through an unconditioned area (i.e. attic space) it needs to be insulated. Use a pipe wrap with an insulating value of at least R11. A rain cap is not necessary. If one is desired, use ONLY the BioLet authorized wind directional cap (Part# wind) that can be obtained from BioLet or your authorized dealer. Any other cap may hinder the airflow from the toilet and cause a reduction in the performance of the unit. Through the exterior wall using 2 – 45° elbows. 54mm 45° elbows (part# 820021) and 108mm outside pipe kits (part# 506) may be purchased from BioLet or your authorized dealer. 1. 2. 3. 4. 5. 6. 7. 8. 9. 10. 11. 12. 13. 14. 15. 16. 17. Position the toilet against the wall. Mark the place on wall directly above the vent opening on the toilet where you want the pipe to pass through the wall (*** MUST BE AT LEAST 8” ABOVE THE TOILET ***). Drill a 2 1/4” hole at a 45° angle through the wall where marked in the previous step. Cut the belled end off 1 length of 54mm white pipe. Insert the male stub of the 45° elbow into one end of the pipe you just cut in step 4. Pass the other end of the pipe/elbow assembly trough the hole you drilled in step 3. Measure the distance from the top of the vent pipe opening on the toilet to the end of the 45° elbow and add 2”. Cut the belled end of the straight white pipe to achieve the length found in step 7. (you should now have a straight white pipe, non-belled) Insert 1 length of 54mm, white, belled pipe into the rubber connector on the back of the toilet with the belled end up. (Pipe will only go ¼” to ½” into the rubber connector.) Insert the next white, belled pipe into the pipe installed in the back of the toilet. Repeat until the end of the white pipe reaches the 45° elbow. (the last pipe in this assembly should be the pipe you cut in step 8) Insert the male stub of the 45° elbow passing through the wall into the end of the pipe explained in step 10. Outside the structure cut the pipe sticking through the wall so only 2” of pipe are protruding. Insert the male stub of the 2nd 45° elbow into the pipe protruding through the wall. Insert the other male stub of the 45° elbow into the non-belled end of a 54mm white pipe. Wrap the pipe in step 14 in insulation and tape the seams using duct tape. Slide the non-belled 108mm black pipe over the insulated pipe in step 15. Continue the pipe upward as in the “Straight run through ceiling and roof” procedures above insulating each pipe as in steps 15 & 16 in this procedure. The remaining 108mm black pipes should be assembled with the belled end down. Starting the toilet 1. 2. 3. 4. 5. 6. Add approximately 3 quarts of water to the 8 gallon bag of starter mulch. Mix thoroughly. (This is only to keep the mulch from dusting) Open the compost cover by pressing on the toilet seat. Add 2 gallons of the 8 gallon bag of starter mulch into the toilet. Turn the mixer handle several times in the clockwise direction (10 Standard) or press and hold the micro switch behind the seat (20 Deluxe), until the mixer stops (approx 5 seconds). Then release the button and allowing the mixing arms to complete their cycle between each press (approx 1 minute). Repeat 2 – 3 times until the mulch is evenly disbursed through the toilet. Add another 2 gallons of starter mulch to the toilet. Turn the mixer handle several times in the clockwise direction (10 Standard) or Press and hold the micro switch behind the seat (20 Deluxe), until the mixer stops (approx 5 seconds). Then release the button and allowing the mixing arms to complete their cycle between each press (approx 1 minute). Repeat 2 – 3 times until the mulch is evenly disbursed through the toilet. *** IMPORTANT *** A majority or all of the mulch will fall through the grate and into the tray. THIS IS NORMAL - DO NOT EMPTY THE TRAY! 5 7. Adjust your thermostat to the appropriate setting using the chart below. (This may not be your ideal setting. See “Use and Care”, “Adjusting the Thermostat” below) Toilet used by 1 person 2 people 3 – 4 people 8. Recommended setting 2 4 6 Your BioLet is now ready to use. Theory of composting toilets There are 4 factors that affect the efficiency of a composting toilet: Moisture In optimum conditions, the composting material has the consistency of a well-wrung sponge – about 45% to 70% moisture. When below 45%, there is not sufficient moisture for the microorganisms to function, and above 70%, saturated conditions begin to develop, and oxygen depletion becomes a limiting factor. Maintaining moisture In your BioLet 10 Standard or 20 Deluxe the moisture content is maintained by proper ventilation, addition of proper mulch, frequent mixing of the compost and adjustment of the thermostat. Temperature The typical temperature range for most composting toilets is 68°F to 112°F. Lower temperatures result in a moldering process that takes a significantly longer period of time to compost and therefore requires a much larger composting chamber. Maintaining temperature Since there is a constant flow of air through your toilet the ambient room temperature needs to be maintained above 64°F during periods while the unit is in use. The toilet heater is unable to maintain sufficient heat to evaporate the excess liquid and sustain the composting process when temperatures decrease below this level. During periods of lower ambient temperatures (late autumn, early spring, and winter) you may find it necessary to increase the thermostat to maintain the proper operating state of a moist, loamy material with no indication of liquid. Conversely, you may find it necessary to decrease the thermostat during higher ambient temperatures (late spring, summer, early autumn) to keep from drying out the material inside the toilet. (see “Adjusting the thermostat, Things to watch” section below) Aeration The aerobic organisms responsible for the composting process require free atmospheric or molecular oxygen to survive. Without oxygen, they will die and be replaced by anaerobic microorganisms that will slow the composting process and generate odors. For composting toilets to work most effectively, the materials being composted should be unsaturated with liquids, and have a loose texture to allow air to circulate freely within the pile. Maintaining aeration Although the fan in your BioLet 10 Standard or 20 Deluxe does help with the flow of air through your ventilation pipe, it is designed primarily for circulating the air throughout the unit. Therefore, maximum aeration can be achieved by: 1) Keeping the product inside the composting chamber in a loamy consistency. 2) Proper installation of the ventilation pipe. Keep in mind that the addition of any angles in the vent pipe will reduce the airflow. 3) Ensure a good flow of air to the bathroom from the living area. 4) Proper mixing of the product inside the composting chamber (see “Using the mixer” on page 8). Carbon to Nitrogen ratio (C:N) Microorganisms require digestible carbon as an energy source for growth, and nitrogen and other nutrients for protein synthesis. When measured on a dry weight basis, an optimum C:N ratio for aerobic bacteria is about 25:1. 6 Maintaining C:N A small handful of starter mulch per person per day or approximately 1 quart per person every week is a good rule of thumb to maintain a helpful C:N ratio, absorb excess moisture, and maintain pores in the composting material. Use and Care To ensure that your BioLet 10 Standard or 20 Deluxe will operate at its peak potential and that the end product (Humus) will be hygienically safe to handle and to recycle on your property, pay close attention to the following directions. Precautions • • • • Always observe good biohazard safety practices when working on the BioLet. Wear goggles, disposable rubber gloves and clothing to prevent contact with unprocessed human excrement. Unprocessed human excrement contains potentially dangerous human pathogens, which may cause illness. NEVER put cigarettes or other burning or glowing materials into your BioLet! Do not put sanitary napkins, food scraps, or animal excrement in your BioLet. Your BioLet is intended for the disposal of human urine, fecal matter and toilet paper ONLY. Introduction of other materials may hinder the composting process or decrease the capacity of your toilet. Always unplug the toilet before working on it or emptying the tray. Adding starter mulch It is very important to add starter mulch to your toilet on a regular basis in order to promote aeration, add carbon and to improve the compost's ability to absorb liquid. During regular operation add a minimum of 1 quart of starter mulch per week per person. Therefore, one should make it a habit to add about 1/2 cup of starter material after each fecal use. Approved mulches Use of only BioLet approved starter mulches is recommended. Approved mulches will carry the BioLet logo. Using any other mulch may cause a decrease in the efficiency of your toilet and may void the warranty on mixer parts if their failure is determined to be caused by usage of unapproved mulch. Homemade mulch If you desire to make your own mulch you can use the following recipe for 10 gallons of starter mulch: • 6 1/2 gal – Blond high fibrous, Canadian sphagnum peat moss (ALL PEAT MOSS IS NOT THE SAME) • 3 1/2 gal - Pine wood shavings (obtainable from nearly any livestock feed store as livestock bedding) DO NOT USE SAWDUST, CHIANSAW CHIPS, OR CEDAR CHIPS • 2 cups – Good rich garden soil from first 6” layer of soil (ENSURE FROM AN AREA WHERE PESTICIDES ARE NOT USED) • 1 pound – Dry molasses. • 1 pound – Hulls of buckwheat, wheat, peanuts or cocoa. • 1 pound – Coarse Perlite Keep your mixture dry and allow it to breathe. Except for when starting your BioLet, do not dampen. The mulch will mix in and dampen with bathroom use. *** IMPORTANT *** BioLet USA cannot guarantee the operation of your unit unless you are using approved mulch. Using the mixer The function of the mixer is to mix paper and waste, increase aeration and to keep the compost porous and uniformly moist. This is necessary to transform the compost into humus, as well as to transport the compost into the collection tray. 10 Standard After each use of the toilet, turn the handle two full revolutions in the clockwise direction (four turns). 7 20 Deluxe When you lift the upper seat to its fully upright position the microswitch on the back of the toilet will be depressed and the mixing arms will turn for approximately 5 seconds. When you finish using the toilet, lower the upper seat. This will release the microswitch and allow the mixing arms to complete their cycle. The full cycle takes approximately 1 minute. If the seat is lifted to its fully upright position in the middle of the mixing cycle, the mixer will stop and then resume whenever the seat is lowered again. If you desire to use the unit again before the mixing cycle is complete, ensure the upper mixing arm did not stop directly below the seat. Adjusting the thermostat Since no two applications are exactly alike, the first month using your BioLet Composting Toilet is the most critical. Therefore, you will need to pay close attention to the liquid indicating tube on the right-hand side (when facing toilet) of the toilet and the consistency of the humus inside the toilet. To ensure your toilet is started properly and will provide you with years of trouble-free service, please pay close attention to the following, until your unit is running in a consistent state with the proper moisture content Things to watch • • • Glance at the indicating tube on the right-hand side (when you face the toilet) before each use to see if there is any indication of liquid. o If liquid is indicated: increase the thermostat setting by 1 o If liquid level continues to rise after subsequent uses, continue increasing the thermostat 1 number at a time until the level in the indicating tube becomes stable. Occasionally press on the seat and look at the material inside the toilet. It should appear to be a moist loamy material. o If the material appears dry, decrease the thermostat setting by 1 Continue to watch the above conditions and make the appropriate adjustments until you reach a state where you have a moist, loamy material inside the toilet with no liquid indicated in the tube. Emptying the humus tray In a full-time residential setting, empty the humus tray when the compost reaches the upper mixing arm/ leveler or once every 6 months, whichever comes first. In a part-time cabin/cottage setting empty the humus tray when the compost reaches the upper mixing arm/ leveler or once a year whichever comes first. 1. Switch off the electricity. 2. Place newspaper or sheet of plastic in front of the toilet. Check the liquid level indicator tube, on the left hand side of the toilet (when facing toilet), to ensure that there is no liquid in the bottom part of the toilet. a. If liquid is present in the tube DO NOT open the tray door until it has been drained off. b. By placing a shallow tray under the indicating tube and removing the tube from its top connection excess liquids may be drained off. i. If you suspect the liquid has been building up for an extended period of time and there could be a substantial amount of liquid in the bottom of the toilet, move the toilet to a suitable place outside the building before draining off the liquid. 3. Open the front cover by removing the 2 thumbscrews and detach the indicator tube from the tray. Bend the tube upwards and push its upper part into the toilet (behind the metal frame) making more room to pull out the tray. 4. When pulling out the tray, you might want to use the metal frame supplied with your BioLet. a. b. c. d. e. f. g. 5. Insert the mouth of a garbage bag through opening in frame. Drape top of bag over frame in a manner so the frame holds the bag open. Place holes on each side of frame over the bolts for the front cover. Replace the thumbscrews to hold the frame in place. Push in on the bottom of the bag and pull the tray into the bag. Remove the frame and bag and take outside. Empty the tray into the bag. Dispose of the humus, whenever possible, by adding it to an existing outside compost pile for finishing or when an existing compost pile is not available, by mixing it with soil or compost and trench it in around ornamental trees and plants and cover it with a minimum of 5" topsoil, or dispose of it in a manner approved by your local health authorities. 8 6. Check whether any compost material has spilled onto the bottom of the toilet. If this is the case, while wearing rubber gloves, clean up the spilled material and empty it back into the toilet. 7. Clean the tray thoroughly; particularly the area around the indicator tube nipple to ensure the flow of liquid is not being restricted. 8. Insert the humus tray and reattach the indicator tube. 9. Replace the front cover, ensuring the thumbscrews are hand tight. 10. Rotate the mixer handle several times in the clockwise direction (10 Standard) or press the microswitch several times (20 Deluxe) until compost falls through the grate into the humus tray, thereby reducing the volume in the composting chamber. Shutting down your toilet If your BioLet is going to be idle and not used for periods of two days or more: Add about one quart of humus starter per week that you will be away or one gallon (whichever is less) and mix it well into the compost. Unplug the toilet and seal the opening by inserting the bowl cap supplied with the unit (white, boat-shaped cover with a rubber seal). This will prevent the compost from turning dry & hard and will stop insects from entering the BioLet. In case of paper build up If a build-up of toilet paper occurs, sprinkle a small amount of water over it to make it dissolve and mix into the compost. Cleaning Use a sponge or sponge style toilet brush and liquid soap or some other mild detergent when cleaning your BioLet. Never use scouring powder or other strong detergent that could scratch the surface. Insect control The presence of insects in and around your BioLet is frequently an indication of excess moisture. If there is excess moisture you will need to remedy this situation to be able to completely remove the insects from your toilet. Use of mulch not authorized for use in your BioLet may also introduce insect larvae into your toilet. To rid your toilet of insects: Insert a Hot-Shot No Pest Strip (blue and white envelope type package), Spectracide Bug Stop Pest Strip (green and yellow envelope type package) or similar product containing Dichlorvos as the ONLY active ingredient inside the bottom of the unit but outside the tray. These items are readily available at you local hardware store or department store in their garden centers. Helpful hints • • • Keep a small sealed container, with starter mulch and a ½ cup measurer in it, next to the toilet for convenience of adding mulch after each fecal use. Hang a sign above the toilet, for the convenience of guests, that states “To ‘flush’: 1) Add 1/2 cup starter mulch after each fecal use. 2) (10 Standard) Turn the mixer handle 2 complete revolutions after each use. (20 Deluxe) Lower the seat after use.” For male urination, the gentlemen may either sit or stand close enough to the toilet so their knee applies a little pressure to the toilet seat and opens the compost cover. Troubleshooting Odors in bathroom If you detect a pungent or ammonia odor in your bathroom there is a possibility of insufficient airflow from your toilet. Please check the following: • • • • • Is your unit plugged in? Can you hear the fan motor running? All vent pipe connections airtight? Compost tray door properly secured? Is the vent pipe inside the rubber connector on the back of the toilet? 9 • • • • • • Vent pipe ends at least 6” above anything within 10’ (see “Installation”)? Vent pipe unobstructed? Is the vent pipe insulated in all unconditional (i.e. attic) areas? If there is a ventilation fan in the ceiling or wall of your bathroom, do not use it. The fan will draw air from the bathroom, causing a back draft through the toilet. If there is a window in your bathroom and the air is drawn out through it, you should close the window. If the odor is detected during periods when there is a breeze outside. Install an approved wind directional cap (part# wind) that is available from BioLet or your local authorized dealer. Odors outside the structure The presence of odors outside the structure is a positive indication that the vent pipe is in an area of air turbulence above the roof. The vent pipe must be raised to get the top above the air turbulence. Excess moisture in the tray If you see excess moisture in the indicating tube(s) and cannot control it by adjusting the thermostat as described in the “Use and Care section”: *** IMPORTANT *** If liquid is present in the indicating tube on the left side of the toilet (when facing toilet), DO NOT open the tray door before draining off the liquid (see step 2 under “Emptying the humus tray”). This tube indicates there is liquid outside the tray. Removal of the door will release liquid onto the floor. • • • • • • Is your unit plugged in? Can you hear the fan motor running? Check for proper operation of the thermostat by turning the thermostat from 1 to 10 and listening for a slight “click”. Check for proper heater operation by following these steps: 1. Set the thermostat on 5 and run the toilet for 2 hours. 2. Turn the thermostat back and forth and listen very closely for a slight click. 3. Make a note at what setting the thermostat clicks. 4. Turn the thermostat to 10 and run the unit for ½ hour. 5. Turn the thermostat back and for to its limits again and listen for the click again. 6. If the click in step 5 is at a higher setting than the click in step 2, everything is working correctly. Ensure the mulch is not compacted. Ensure you are using the toilet within its limits of 3 people full-time use and 4 people part-time use. Excess moisture in the composting chamber If you notice the material inside the composting chamber is not loamy and appears to be holding excessive moisture: • • • • • • • • Is your unit plugged in? Can you hear the fan motor running? Are you mixing the material after each use? Ensure you are using approved starter mulch (see “adding starter mulch” in the “use and care” section above). Ensure you are adding a sufficient amount of starter mulch. Ensure there is sufficient ventilation from the toilet (see “Odors in the bathroom” above) Ensure you are using the toilet within its limits of 3 people full-time residential and 4 people part-time cabin. If all else fails add 1 quart of coarse Perlite (available from most nurseries) to each gallon of starter mulch. 10 Warranty Limited 3-Year Parts Warranty: During the first full three years after the date of original purchase, BioLet USA will repair or replace any parts that are defective in material or workmanship due to normal noncommercial use in accordance with the owner’s manual supplied by BioLet USA. Proof of date of purchase may be required by BioLet USA either in the form of a warranty registration card on file or copy of original invoice. After assessment by an authorized BioLet service technician, BioLet USA will ship replacement parts and instructions for replacement to the customer. Labor for the replacement of the defective parts is the responsibility of the customer. In the event the customer is unable to service the unit themselves they may elect, at their expense, to completely sanitize the unit and return it to BioLet USA for repair. Any unit received by BioLet USA for service that is not sanitized will be refused and returned at the customer’s expense. No unit may be returned to BioLet USA for repair without an authorized Return Material Authorization (RMA). Any returns received without a proper Return Material Authorization (RMA) will be refused and returned at the customer’s expense. This warranty extends to the replacement of defective parts only; any additional costs are the responsibility of the customer. Limited Lifetime Body Warranty: In addition to the limited 3-year parts warranty described above, BioLet USA will replace unit body parts (top, base, and tray door), which are defective in material or workmanship due to normal noncommercial use in accordance with the owner’s manual supplied by BioLet USA for the lifetime of the original owner. In the event the exact replacement part is not available BioLet USA will supply the customer with modifiable parts or issue a credit equal to the value of the part to be deducted from the purchase of a new unit. Exclusions and Exceptions of Incidental or Consequential Damage: Neither the manufacturer, its agents, or dealers accept responsibility, legal or otherwise for incidental or consequential damage to property or persons resulting from the use of its products. Some areas do not allow the above, so this exclusion may not apply. This warranty gives you specific legal rights and you may have other rights which may vary from area to area. This warranty is in lieu of all other warranties either expressed or implied and no person is authorized to enlarge our warranty responsibility, which is limited to the terms of this certificate. The company reserves the right to change, improve or modify its products without obligation to install these improvements on equipment previously manufactured. 11 Notes 12 13 BioLet Warranty Registration To validate your warranty and help us serve you better please fill out and return this registration card or call our customer service department at 1-800-524-6538. Under NO circumstances will BioLet USA ever sell or give away this information. You will not receive mailings, telephone calls or email unless you indicate below that you would like to receive periodic information on updates and specials. Date Purchased: Purchased From: Address: City: State: Zip: State: Zip: Model: Serial#: Owner’s Name: Address: City: Phone: Email: I would like to receive periodic mailings or emails about product updates and specials from BioLet USA. Address of Installation: City: Number of floors in building where installed? State: Zip: Installed on which floor? Type of vent installation? Straight up Angled inside Angled through the wall Other I would like to participate in a 10 minute customer survey and receive a coupon for $10 off a bag of starter mulch. I would like to receive a free bag of starter mulch. I am sending you pictures of my installation and a brief letter about my buying and installation experience. I understand that all pictures will become the property of BioLet USA and give my permission for BioLet USA, Inc. to use my pictures and letter for the purposes of advertising and referral. Signature: Date: 14 Fold Here Affix Postage Business Reply Mail BioLet USA, Inc. 53671 Lafayette Township Rd 508 Fresno, OH 43824