1
Fig. 1
BOATS
SP 75 Ti
CENTRELINE
SP 95 Ti
Fig. 2
Fig. 1
SP125Ti
Fig. 3
Fig. 2
SP125Ti
BOATS
BOATS
CENTRELINE
CENTRELINE
Fig. 2
Fig. 3
BOATS
CENTRELINE
TUNNELS
CENTRELINE
TUNNELS
CENTRELINE
Ø 9mm
Ø 32mm
0,35"
1,26"
28,0mm
1,1"
7
TUNNELS
CENTRELINE
Ø 11,00mm
7/16"
Ø 46,00mm
Ø 32mm
1,81"
40,0mm
1,57"
1,26"
Ø 46,00mm
1,81"
40,0mm
1,57"
Fig. 7
Fig. 4
2
1
IL
RO
GEA 90
EP
3
4
Fig. 3
Bolt tightening forces:
Bolts (2x) holding gearhouse to bracket:
SP 75 Ti / SP 95 Ti: 17 Nm (12,4
Bolts lb/ft)
(2x) holding gearhouse to bracket:
SP 125 Ti: 33 Nm (24 lb/ft) SP 75 Ti / SP 95 Ti: 17 Nm (12,4 lb/ft)
SP 125 Ti: 33 Nm (24 lb/ft)
Bolt tightening forces:
PORT
Fig. 7
Bolt tightening forces:
2
Fig. 5
SP 75 Ti
SP STARBOARD
95 Ti
PORT
7
Ø 11,00mm
7/16"
P
Fig. 6
Bolts (2x) holding gearhouse to bracket:
SP125Ti
33 Nm (24 lb/ft)
STARBOARD
PORT
S
Fig. 6
SP125Ti
Fig. 4
P
STARBOARD
PORT
S
P
S
PORT
STARBOARD
STARBOARD
D
and motor bracket
Getriebe und Motorhalterung
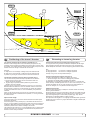
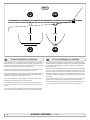
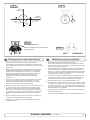
GB Fitting gearhouse and motor bracket
N
Montering
av girhus og brakett
D
Fitting gearhouse and motor bracket
Getriebe
und Motorhalterung
el and the boats centreline. SP75Ti
1. Die Mittellinie von Tunnel und Boot markieren.
1. Marker
båtens og tunnelens senterlinje på tunnelen.
1.
Mark
centrelinelidof(the
the tunnel and
the
centreline.
be
with
the the
gearhouse
SPcentreline.
75 boats
Ti / SP
95 Ti: Damit
und
arkfitted
the centreline
of the tunnel
and the boats
SP75Ti
1.Schubrichtung
Die MittellinieGirhuset
vonKontrollpanel
Tunnel
und Bootmed
markieren.
må plasseres
merket P mot babord og enden
eP95Ti:
propellers)
on
the
starboard
side
of
über-einstimmen,
das
Getriebegehäuse
so
einbauen,
daß der enden
TheThe
gearleg
must
be
fitted
with
the
P-mark
facing
port
and
S-mark
gearhouse must be fitted with the gearhouse lid (the
SP 75 Ti / SPmerket
95 Ti:SDamit
Schubrichtung
und
mot
styrbord (Fig. 4) for
at Kontrollpanel
skyveretning skal korrespondere
to
correspond
with
the
control
panel
Ver-schluß
des
Getriebegehäuses
(der
verschraubte
Verschluß
starboard
(Fig.propellers)
4) for the thrust
direction
to correspond
the crewed in lidfacing
behind
one of the
on the
starboard
side of withüber-einstimmen,
das Getriebegehäuse
so einbauen, daß der
med Steuerbord
merkingen
på
kontrollpanelene.
hinter
einem
der
beiden
Propeller)
Richtung
zeigt
control
panel
e boat for the thrust direction to correspond with the control panel
Ver-schluß des Getriebegehäuses (der verschraubte Verschluß
(Fig. 5).
2. Bruk girhuspakningen for å sjekke målene (7). Thrusteren skal plas5). SP
Ti:
6 holesgasket
oig.mark
the
centre
of
the
and (7) to mark
2. 125
Use
theFig.
gearhouse
the centre
of6the holes andhinter einem der beiden Propeller) Richtung Steuerbord zeigt
SP
125
Ti:
Fig.
seres på styrbord side av senterlinjen med boltehullet i midten av
(Fig.
5).
nts.
Place
the
thruster
in
the
boats
double check
Placeof
the
thruster
the boats
se the gearhouse
gasketthe
(7)measurements.
to mark the centre
the
holes in
and
båten
(Fig. überprüfen!
1). Alle hull må være på båtens eller tunnelens senterlinje
SP
125
Ti:
Fig.
6Maße
2.
Die
Löcher
mit
der
Dichtung
(7)
markieren.
the
centre
(Fig.
1).
It
is
absolutely
centreline
with
the
bolt
hole
as
the
centre
(Fig.
1).
It
is
absolutely
ouble check the measurements. Place the thruster in the boats
for1).
å får
tilder
en presis
installasjon. Dette skyldes at det er meget liten
Den
Thruster
schiffssmittig
plazieren
(Fig.
Da
Abstand
ine
with
the
tunnels’
centreline
to
necessary
are in-line
with
centreline2.
to Die Löcher mit der Dichtung
(7) markieren.
Maße überprüfen!
entreline with
the bolt that
holeallasholes
the centre
(Fig.
1).the
It istunnels’
absolutely
klaring
mellom
tunnelveggen
og propellen.
zwischen
Propellern
wegen größtmöglicher
he clearance
between
theinstallation,
that
ensure
precise
thetunnels’
clearance
between
the und Tunnel
Den Thruster
schiffssmittig plazieren (Fig. 1). Da der Abstand
ecessary
all
holes
are
in-line withasthe
centreline
to
Performance
minimal
ist, 3.
müssen
für må
eine
präzise
nimal
ensure
best possible
Tunnelen
haTunnel
en jevnwegen
overflategrößtmöglicher
der braketen skal festes, all støp,
propellers
and the
is minimal
to ensure
best
possiblekonstruiert
zwischen
Propellern
und
nsureto
precise
installation,
as tunnel
the clearance
between
the
Installation
alle Löcher auf der
Tunnelmittellinie
liegen.
evt
glassfiber
eller epoxyist,
rester
må pusses
ned präzise
så braketen passer
performance.
Performance
minimal
konstruiert
müssen
für eine
opellers and
the tunnel is minimal to ensure
best possible
jevnt
på tunnelen.
Ujevnheter
her vil resultere
i svikt i girhuset.
Löcher
der
Tunnelmittellinie
liegen.
erformance.
3. the
Immotor
Bereich
der is
Motorhalterung
darf keinalle
Laminat
aufauf
dem
e the motor
bracket
isbe
to no
be casting
placed,where
3. There
must
bracket
to be placed,Installation
Tunnel
diesmotor
zu 3.
einem
Getriebeschaden
führenØkann.
e of the
motor
4. der
Bor Motorhalterung
senterhullet
46darf
mm,kein
og deLaminat
to boltehullene
Ø 11 mm
gearhouse.
as no
thiscasting
willThe
cause
possible
failure bracket
of
the gearhouse.
The
Im Bereich
auf dem
here
must
be
where
the motor
issein,
to beda
placed,
Liegt
die
Motorhalterung
nicht
eben sein,
auf dem
Tunnel
auf,
so Getriebeschaden führen kann.
if the
tunnel
is not
smooth,
bracket
must
fitfailure
steadyofon
thegearhouse.
tunnel,
if the
tunnel
is not smooth,
Tunnel
da
dies
zu
einem
sunnel,
this will
cause
possible
the
The
motor
5. Prøv girhuset i tunnelen sammen med pakning 1m.m. Monter propell
sind
sämtliche
UnebenheitenLiegt
in diesem
Bereich abzuschleifen.
tacket
be grinded
smooth.
allfit
bumps
uneven
parts must
grinded
smooth.
die Motorhalterung
ebenav
auftunnelen.
dem Tunnel
auf, so ikke er i midten
must
steadyoron
the tunnel,
if thebe
tunnel
is not
smooth,
å sjekk at den nicht
er i midten
Hvis propellen
sind
sämtliche
Unebenheiten
diesem
abzuschleifen.
l bumps
or
uneven
parts
must
be
grinded
smooth.
4.
Bohren
Sie
das
Zentrumsloch
(ø
32
mm)
dann forsøk
die inå bruk
nd
then the
two
screw-holes
ø
9mm.
avund
tunnelen,
den Bereich
endre pakningen,
eller begge to sam4. Drill the centre-hole ø 46mm and then the two screw-holes ø 11mm.
beiden
Schraubenlöcher
(ø Bohren
9 mm). Sie das
tidig.Zentrumsloch
Hvis tunnelen ikke
harmm)
en jevn
overflate
så kan et tetningsmate4.
(ø 32
und
dann die
rill
centre-hole
ø 32mm
and
then
the(without
two
screw-holes
ø 9mm.
oilthe
type
EP90
through
the oil
5
Try the
lower-unit
in drain
the
tunnel
the zinc anodes
and the
rialedurch
brukesdie
for(ø
å sikre
mot lekkasje.
beiden Schraubenlöcher
9 mm).
5. Das
Getriebegehäuse
EP90
Öffnung
copper
lower(3)
parton
ofagain.
the
flexible
coupling)
by
using
the
insidemit
theGetriebeöl
re-fill
thegasket
gearhouse
with
gear
oil type
EP90
through
thegasket
oil drain
der(3)
Ölablaßschraube
(4) befüllen.
Kupferdichtung
(3)mit
einsetzen.
6. Før girhuset
gjennom
hovedhullet
tunnelen
monter braketten og
tunnel.
Trytoon
the
propellers
make
sure
are in the middle
5. ofDas Getriebegehäuse
Getriebeöl
EP90i durch
dieogÖffnung
crew
(4).the
Make
sure
get
the
copper to
gasket
onthey
again.
(without
zinc
anodes
and
the
girhuset
forsiktig
sammen.
the
tunnel
andinside
turn freely
with 6.
the Das
sameGetriebegehäuse
clearing from each (ohne
blade der
toZinkanoden
Ölablaßschraube
(4)
befüllen.
Kupferdichtung
(3)
einsetzen.
und
unteren
Teil
der
ng)
by
using
the
gasket
the
y the lower-unit
in theUse
tunnel
(withoutsealant
the zinc
andno
theleakages
the
tunnel.
toanodes
ensure that
elastischen
Kupplung)
unter
Verwendung
dersammen
Dichtung
inZinkanoden
den
make
sure
they
are in coupling)
theappropriate
middleby
ofusing the
7. Skru
motorbraketten
og und
girhuset
med orginalbolter
(Fig. 3).
6. Das
Getriebegehäuse
(ohne
unteren
Teil der
wer
part
of occur.
the
flexible
gasket inside
the
Tunnel
einpassen.
Den
Propeller
auf
die
Achse
stecken;
dieser
he
same
clearing
from
each
blade
to
elastischen Kupplung) unter Verwendung der Dichtung in den
nnel. Try on the propellers to make sure they are in the middle of
mußhole
sichineach
frei
bewegen
lassen
und einpassen.
jedes Propellerblatt
muß auf die Achse stecken; dieser
kaflex
to6.
ensure
no leakages
Push
the
gearhouse
through
main
the tunnel
Tunnel
Den Propeller
e tunnel
and
turnthat
freely
with the
same the
clearing
from
blade and
to push
den
gleichen
Abstand zum Tunnel
aufweisen.
Ist dielassen
Tunnelthe sealant
gearhouse
motor-bracket
gently
together.
muß sich
frei bewegen
und jedes Propellerblatt muß
e tunnel. Use
e.g.and
Sikaflex
to ensure
that
no leakages
innenseite ungleichmäßig, etwas
Sikaflex Abstand
o.ä. auftragen,
den gleichen
zum Tunnel aufweisen. Ist die Tunnelccur.
gets in to
oil-holes
(2).unit and the motor-bracket
7.the
Screw
the lower
together
with
the
two
damit keine undichte Stelle auftritt.
innenseite ungleichmäßig, etwas Sikaflex o.ä. auftragen,
sure
provided
bolts
(Fig.
S!
Make
sealant
gets
oil-holes
(2).
il or
grease
onthat
theno
O-rings
in 3).
the in to thePS
! Die Durchgänge
für dasdamit
Öl (2)keine
von undichte
Dichtmasse
freihalten.
Stelle
auftritt.
it together
withthere
the gearhouse.
ake
sure that
is some oil or grease
the O-rings
the auf die O-ringe
PS ! Die
für das
Öl (2) von Dichtmasse freihalten.
7. on
Etwas
Öl oderinFett
derDurchgänge
Motorhalterung
geben,
otor
bracket
before
mounting
together with
gearhouse.
e main
hole in
the tunnel
and itpush
dathe
diese
sonst beim Montieren
beschädigt
werden
können.
7. Etwas
Öl oder Fett
auf die
O-ringe der Motorhalterung geben,
ket
together. through the main hole in the tunnel and push
ushgently
the gearhouse
sonst im
beim
Montieren
8. Das Getriebegehäuse durch da
dasdiese
Hauptloch
Tunnel
führenbeschädigt werden können.
e gearhousetogether
and motor-bracket
gently together.
otor-bracket
with the two
und vorsichtig mit der Motorhalterung
zusammenschieben.
8. Das Getriebegehäuse
durch das Hauptloch im Tunnel führen
crew the lower unit and the motor-bracket
with the two und dieund
vorsichtig mit
Motorhalterung
zusammenschieben.
9. together
Das Getriebegehäuse
Motorhalterung
mitder
Hilfe
der beiovided bolts (Fig. 7).
den Bolzen verschrauben9.(Fig.
7).
Das Getriebegehäuse und die Motorhalterung mit Hilfe der beiden Bolzen verschrauben (Fig. 7).
SP 75 Ti / SP 95 Ti / SP 125 Ti 2.5.1SE2007
170/250 TC - SE210/250TC 1.0.0- 2008
11
22
SP 75 Ti / SP 95 Ti / SP 125 Ti 2.5.1- 2007