1
Brigham Young University Idaho
TESTING CENTER
SARAS USER
MANUAL
EXCELSOFT
1|Page
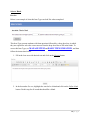
Contents
Recent Updates ............................................................................................................................................. 4
TYPOGRAPHIC CONVENTIONS ............................................................................................................. 5
SARAS PROGRAM NAVIGATION ........................................................................................................... 6
MANAGE REPOSITORY ....................................................................................................................... 6
MANAGE ITEM ...................................................................................................................................... 7
BASIC ITEM CREATION ....................................................................................................................... 7
ITEM TYPES.......................................................................................................................................... 13
Connect the Points HTML5 ................................................................................................................ 13
Entry List Static .................................................................................................................................. 15
Essay ................................................................................................................................................... 16
Fill In The Blank Drag And Drop ....................................................................................................... 18
Fill In The Blank Dynamic ................................................................................................................. 20
Fill In The Blank Text......................................................................................................................... 22
Horizontal Sequencing ........................................................................................................................ 24
Hotspot Multiple Choice HTML5....................................................................................................... 25
Hotspot Multiple Response HTML5................................................................................................... 27
Image Labeling ................................................................................................................................... 29
Image Labeling Entry.......................................................................................................................... 33
Likert Scale ......................................................................................................................................... 37
Matching ............................................................................................................................................. 38
Matching Drag And Drop ................................................................................................................... 39
Matrix.................................................................................................................................................. 41
Multiple Choice Dynamic ................................................................................................................... 43
Multiple Response Dynamic ............................................................................................................... 46
Multiple Choice Static ........................................................................................................................ 49
Multiple Response Static .................................................................................................................... 50
Numeric............................................................................................................................................... 52
Pull Down List .................................................................................................................................... 54
Ranking ............................................................................................................................................... 56
Select a Blank ..................................................................................................................................... 58
Slider HTML5 ..................................................................................................................................... 60
Text Match .......................................................................................................................................... 61
2|Page
True/False ........................................................................................................................................... 62
Vertical Sequencing ............................................................................................................................ 63
Write a Program .................................................................................................................................. 65
MANAGE BLUEPRINT ........................................................................................................................ 67
MANAGE TEST .................................................................................................................................... 69
MANAGE GRADE SCHEMES ............................................................................................................. 76
MANAGE DIGITAL ASSETS .............................................................................................................. 76
MANAGE ESSAY EVALUATION ...................................................................................................... 77
SCHEDULE............................................................................................................................................ 79
REPORTS ............................................................................................................................................... 82
Performance Report ............................................................................................................................ 82
IRT Reports......................................................................................................................................... 83
Item Information Function (IIF) ......................................................................................................... 83
Test Information Function (TIF) ......................................................................................................... 84
Item Characteristics Curve (ICC) ....................................................................................................... 85
INDEX ........................................................................................................................................................ 86
GLOSSARY ............................................................................................................................................... 88
3|Page
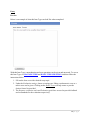
Recent Updates
4|Page
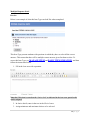
TYPOGRAPHIC CONVENTIONS
The following are Typographic Conventions used in this User Manual.
Words in
Represent
Italics underlined
Option buttons displayed on the screen.
Bold
Sub-titles.
BOLD CAPS
UNDERLINED
Hyperlinks, titles displayed on the screen.
Highlighted:
Note: Brief information about a particular topic.
Underlined
Titles
BOLD CAPS
Main Section Titles
Italics
Options and definitions
Bold Underlined
Item Types
5|Page
SARAS PROGRAM NAVIGATION
HOME
The Dashboard displays a summary of scheduled test activities.
CONTENT MANAGEMENT
Under Content Management, there are titles Manage Repository, Manage Item, Manage
Blueprint, Manage Test, Manage Grade Scheme, Manage Digital Asset, and Manage Essay
Evaluation. These options will help create and manage tests.
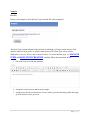
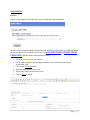
MANAGE REPOSITORY
Manage Repository is the first feature under Content Management and where the filing structure
in SARAS is organized. Under Manage Repository, there are folders such as Digital Assets, Test
Template, Items and Test.
6|Page
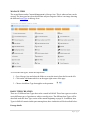
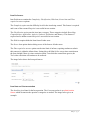
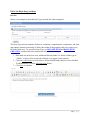
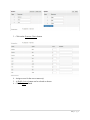
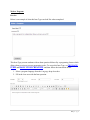
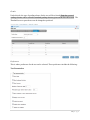
MANAGE ITEM
The second feature under Content Management is Manage Item. This is where an Item can be
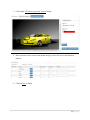
created. The Item types have been divided into subject categories. Below is an image showing
the different Item Types in Manage Item.
To access the Item types, follow the steps below:
1. Go to Manage Item and select the folder to create the item in from the list on the left.
2. Click on the Add button which is on the upper right corner of the page.
3. Choose which Item Type best applies to the question.
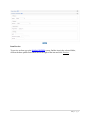
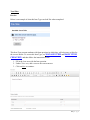
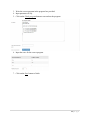
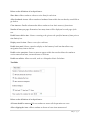
BASIC ITEM CREATION
There are 42 different Item Types that can be created in SARAS. These Item types are used to
create different types of questions to achieve test objectives. The different Item Types will be
described under the Item Type section of the manual beginning on page 10. In addition, Item
Types in SARAS contain similar parts among them, these similarities will be described below:
Passage details
7|Page
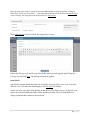
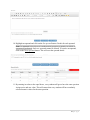
Some question styles require a passage for accurate understanding of what the question is asking for.
When in the Item Type, Click on the “+” sign to the right of Passage details and click on Add passage to
create a Passage. The image below shows the location of Add passage.
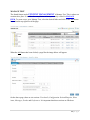
When Add passage has been clicked, the image below is seen.
Fill out the Passage code and Passage label fields which are both required, then fill out the
Passage text and click Save. The Passage will now be applied.
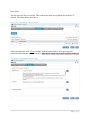
Item details
Item details contains details about the test. It includes Language Select, Item code, Item label,
and Item stem. All of the Item details apply to all Item Types in SARAS.
Under Item stem, type in the item question or instruction. The Ribbon features in the Item stem
makes the creation of different kinds of Item questions possible. These include addition of
images, equations and symbols to the questions.
8|Page
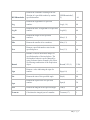
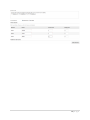
The list below contains mathematical functions supported by SARAS.
N AME
D ESCRIPTION
U SAGE
R ESULT
Abs
Returns the absolute value of a specified
number.
Abs(-1)
1M
Acos
Returns the angle whose cosine is the
specified number.
Acos(1)
0d
Asin
Returns the angle whose sine is the
specified number.
Asin(0)
0d
Atan
Returns the angle whose tangent is the
specified number.
Atan(0)
0d
Ceiling
Returns the smallest integer greater than or
equal to the specified number.
Ceiling(1.5)
2d
Cos
Returns the cosine of the specified angle.
Cos(0)
1d
Exp
Returns 𝑒 raised to the specified power.
Exp(0)
1d
Floor
Returns the largest integer less than or equal
to the specified number.
Floor(1.5)
1d
9|Page
IEEERemainder
Returns the remainder resulting from the
division of a specified number by another
specified number.
IEEERemainder(3,
2)
-1d
Log
Returns the logarithm of a specified
number.
Log(1, 10)
0d
Log10
Returns the base 10 logarithm of a specified
number.
Log10(1)
0d
Max
Returns the larger of two specified
numbers.
Max(1, 2)
2
Min
Returns the smaller of two numbers.
Min(1, 2)
1
Pow
Returns a specified number raised to the
specified power.
Pow(3, 2)
9d
Round
Rounds a value to the nearest integer or
specified number of decimal places. The
mid number behavior can be changed by
using Evaluate Option. Round Away From
Zero during construction of the Expression
object.
Round(3.222, 2)
3.22d
Sign
Returns a value indicating the sign of a
number.
Sign(-10)
-1
Sin
Returns the sine of the specified angle.
Sin(0)
0d
Sqrt
Returns the square root of a specified
number.
Sqrt(4)
2d
Tan
Returns the tangent of the specified angle.
Tan(0)
0d
Truncate
Calculates the integral part of a number.
Truncate(1.7)
1
10 | P a g e
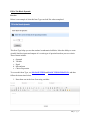
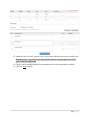
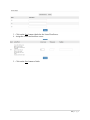
Item Preferences
Item Preferences contains the Complexity, Classification, Hide Item, Secure Item and Time
required to answer options.
The Complexity option sets the difficulty level for the item being created. This feature is required
and is one of the reasons Blueprint is successful in test creation.
The Classification option puts the item into a category. These categories include Knowledge,
Comprehension, Application, Analysis, Synthesis, Evaluation, and Memory. This feature is
required and is another reason Blueprint is successful in test creation.
The Hide Item option hides the Item from all other users.
The Secure Item option denies editing access of the Item to all other users.
The Time required to answer option sets the time limit of an Item, requiring students to submit
their answer(s) within the allotted time. Setting this to 00 Min 00 Sec sets no time restriction on
the Item, though if there is a time restriction on the Test which the created Item goes to, the
Test’s time restriction will continue to be enforced.
The image below shows the Item preferences.
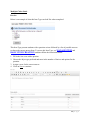
Item hints and Custom metadata
The Item hint gives hints for the Item question. The Custom metadata is an administration
feature which customizes the question’s categories as needed. The image below gives an
example.
11 | P a g e
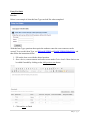
Item Preview
To preview an Item, go to the MANAGE ITEM screen, find the item in the selected folder,
click on the three parallel horizontal bars to the right of the item and click Preview.
12 | P a g e
ITEM TYPES
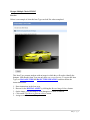
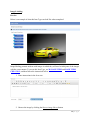
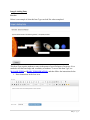
Connect the Points HTML5
Preview
Below is an example of what this Item Type can look like when completed.
This Item type deals with the connection of points to achieve the correct answer. It can be used
in a variety of classes. To access this Item type, see MANAGE ITEM and BASIC ITEM
CREATION, and then follow the instructions below.
1. Fill out the Item stem with the desired question or statement
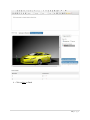
2. Click on Browse image library to access files already stored in Digital Assets. Select the
preferred image and resize it if needed.
13 | P a g e
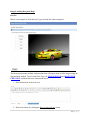
3. Click on Draw Points to place points on the image. Points can be cleared by clicking on
the Clear all button.
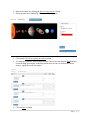
4. Click on the Draw Lines button to connect the correct points on the image. Notice that
the correct route below is from P1 to P2 to P3 which is from Utah to Georgia to Virginia,
and P4 to P5 to P6 is wrong. The Lines were drawn by clicking P1 then P2 and P2 then
P3 and so on.
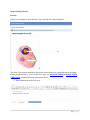
5. When the lines are connected, click on the Click here to generate choices button which
will create Choice details as the image below shows.
6. Input scores for the correct and incorrect answers.
7. Click the Save button to finish.
14 | P a g e
Entry List Static
Preview
Below is an example of what this Item Type can look like when completed.
With this Item Type, questions that require the student to enter the correct answers can be
created. To access this Item Type, see MANAGE ITEM and BASIC ITEM CREATION, and
then follow the instructions below.
1. Fill out the Item stem with the desired question.
2. Enter choices, correct answers and correct scores under Choice details. More choices can
be added if needed by clicking on the Add question stem button.
3. Click on Save to finish.
15 | P a g e
Essay
Preview
Below is an example of what this Item Type can look like when completed.
With this Item Type, comprehension and essay questions can be given and answered. To access
this Item Type, see MANAGE ITEM and BASIC ITEM CREATION, and then follow the
instructions below.
1. Fill out the Item stem with a desired essay topic.
2. Under the Evaluation settings, choose a scoring type. Either a total numeric score or a
rubric score can be given. Clicking on the Rubric score will help create or provide
choices from a list provided.
3. The Response evaluation tools and Evaluation guidelines are used to provide feedback
and set standards for the evaluation respectively.
16 | P a g e
4. The Student response area settings has options Input language, Essay title space, and
Number of words. It is required to input a Lower limit and Upper limit which are
minimum number of words and maximum number of words respectively.
5. Click on Save to finish.
17 | P a g e
Fill In The Blank Drag And Drop
Preview
Below is an example of what this Item Type can look like when completed.
This Item Type tests the students’ abilities in vocabulary, comprehension, composition, and word
and sentence structure knowledge. It allows the student to drag and drop the correct answers to
fill in the blank area. To access this Item Type, see MANAGE ITEM and BASIC ITEM
CREATION, and then follow the instructions below.
1. Enter Item text in the Item stem, and then define the blanks. To define a blank, type in
“{blank}” in place of the word(s) the blank(s) are to appear in the question.
2. Click on Create blanks to create choices for the defined blanks and give scores for them.
To add distractors, click the Add Distractor button.
3. Click Save to continue.
18 | P a g e
19 | P a g e
Fill In The Blank Dynamic
Preview
Below is an example of what this Item Type can look like when completed.
This Item Type helps you test the students’ mathematical abilities. It has the ability to create
virtually limitless inputs and outputs of a certain type of question based on your set criteria.
These criteria include:
a.
b.
c.
d.
e.
Operand
Variable
Equal
Min and max
Choice Expression
To access this Item Type, see MANAGE ITEM and BASIC ITEM CREATION, and then
follow the instructions below.
1. Enter Item text in the Item Stem using variables.
20 | P a g e
2. Click on the Get text button. This will transfer the question to the box below the Get Text
button.
3. Highlight an operand and click on the Set operand button. Do this for each operand.
An operand is the object of a mathematical operation, a quantity on which an operation
is performed. Already set operand cannot be deleted. If the removal of an operand is
required, click on the Reset operand button. This will reset the operand details.
4. Depending on what is required, values can be put in the Equal boxes. Doing that means
every student will get to have the same question. Or values can be put in the min and max
boxes. Doing that means every student will have randomly selected numeric values for
the same question.
5. To create a choice text, highlight the operand required to be blank and click on the Create
blank button.
6. Enter in the choice expression using the variables given under operand details.
7. Input score for correct answer and click on the Verify expression button.
8. Click on Save to continue.
21 | P a g e
Fill In The Blank Text
Preview
Below is an example of what this Item Type can look like when completed.
This Item Type tests the students’ abilities in vocabulary, comprehension, composition, and word
and sentence structure knowledge. The students get to answer the questions by typing the
answer(s) into the blanks. To access this Item type, see MANAGE ITEM and BASIC ITEM
CREATION, and then follow the instructions below.
1. Enter Item text in the Item stem, and then define the blanks. To define a blank, type
“{blank}” in place of the word(s) the blank(s) should appear in the question.
2. Click on Create blanks to create choices for the defined blanks and then give scores for
them, then give Blank length for the word(s).
3. Click Save to finish.
22 | P a g e
23 | P a g e
Horizontal Sequencing
Preview
Below is an example of what this Item Type can look like when completed.
This Item Type tests the knowledge of students by presenting them with a question from which
they will need to re-order sentences or ideas in a correct order or sequence. To access this Item
Type, see MANAGE ITEM and BASIC ITEM CREATION, and then follow the instructions
below.
1. Enter instructions in the Item stem.
2. Enter text in Letter/Word boxes below the Item stem and then click Save. To add more
Letter/Word boxes, click on the Add button.
3. Under Choice details, provide correct score and wrong score.
4. Click Save to continue.
24 | P a g e
Hotspot Multiple Choice HTML5
Preview
Below is an example of what this Item Type can look like when completed.
This Item Type presents students with an image in which they will need to identify the
hotspots. Note that this Item Type can only have one correct answer. To access this Item
Type, see MANAGE ITEM and BASIC ITEM CREATION, and then follow the
instructions below.
1.
2.
3.
4.
5.
Enter instructions in the Item stem.
Browse for the DIGITAL ASSET by clicking the Browse Image Library button.
On the image, click and drag to create hotspots over areas of interest.
Click on the Click here to generate choices button.
Assign scores for correct Item points.
25 | P a g e
6. Click on Save to finish.
26 | P a g e
Hotspot Multiple Response HTML5
Preview
Below is an example of what this Item Type can look like when completed.
This Item Type presents students with an image in which they will need to label on the given
image, a listed option(s). To access this Item Type, see MANAGE ITEM and BASIC ITEM
CREATION, and then follow the instructions below.
1. Enter the instructions/question(s) in the Item stem.
2. Browse the image by clicking the Browse image library button
27 | P a g e
3. On the image, click and drag to create hotspots over areas of interest.
4. Click on the Click here to generate choices button and assign scores to correct answers.
5. Click on Save to finish.
28 | P a g e
Image Labeling
Preview
Below is an example of what this Item Type can look like when completed.
Image labeling presents students with images in which they will need to label parts of the images
with the correct names. To access this Item Type, see MANAGE ITEM and BASIC ITEM
CREATION, and then follow the instructions below.
1. Enter instructions in the Item stem.
2. Browse the image by clicking the Browse image library button.
29 | P a g e
3. Click on the Click here to generate choices button.
4. Enter in choices to the corresponding Item points and assign scores for correct and
incorrect answers.
5. Click on Save to continue.
30 | P a g e
Image Labeling Drag And Drop
Preview
Below is an example of what this Item Type can look like when completed.
This Item type presents students with questions that will require them to label images using the
drag and drop method. To access this Item Type, see MANAGE ITEM and BASIC ITEM
CREATION, and then follow the instructions below.
1. Enter instructions in the Item stem.
2. Browse the image by clicking the Browse image library button.
31 | P a g e
3. Click on the Click here to generate choices button.
4. Enter in choices to the correct Item points and give scores for correct and incorrect
answers.
5. Click on Save to finish.
32 | P a g e
Image Labeling Entry
Preview
Below is an example of what this Item Type can look like when completed.
This Item Type requires students to enter in the names of specified parts of an image. It is a
method to test the knowledge and vocabulary of students. To access this Item Type, see
MANAGE ITEM and BASIC ITEM CREATION, and then follow the instructions below.
1. Enter instructions in the Item stem.
33 | P a g e
2. Browse the image by clicking the Browse image library button.
3. Select the parts to be labeled by clicking on it on the image.
4. Click on the Click here to generate choices button.
5. To create more choices, enter in choices in the Choice box and click the Add button to
create the drop down menu. In the drop down menu, be sure to click on the correct
answer. Apply this to all item points.
6. Click on Save to finish.
34 | P a g e
Image Labeling Selection
Preview
Below is an example of what this Item Type can look like when completed.
This Item Type requires students to choose the correct answer to a specified part on an image
from a drop down menu. To access this Item Type, see MANAGE ITEM and BASIC ITEM
CREATION, and then follow the instructions below.
1. Enter instructions in the Item stem.
35 | P a g e
2. Select the previously saved image from DIGITAL ASSETS folder by clicking the
Browse image library button. Note that the image needs to be in the folder before the
question is made.
3. Click on the Click here to generate choices button.
4. To create choices, enter choices in the Choice box and click the Add button to create the
drop down menu. In the drop down menu, click on the correct answer and click on the Set
Correct button. Apply this to all item points.
5. Click the Save button to finish.
36 | P a g e
Likert Scale
Preview
Below is an example of what this Item Type can look like when completed.
This Item Type allows students to choose an option from the semantic differentials such as
strongly agree or strongly disagree. To access this Item Type, see MANAGE ITEM and BASIC
ITEM CREATION, and then follow the instructions below.
1. Enter a statement in the Item stem.
2. Select the number of choices and the choice presentation layout.
3. Enter in the choice texts and scores. Other choice texts can be added by clicking the Add
button.
4. Click on Save to finish.
37 | P a g e
Matching
Preview
Below is an example of what this Item Type can look like when completed.
This Item Type presents students with items which have sub-items accompanied with a drop
down box from which they have to choose or match with the correct answers. To access this Item
Type, see MANAGE ITEM and BASIC ITEM CREATION, and then follow the instructions
below.
1.
2.
3.
4.
Fill in the Item stem with instructions or a question.
Fill in the Text box with choice texts that will be made visible to the student.
Fill in the Match Text box with choice options. These will go into the drop down menu.
Click on the Add button to add more choices if needed.
5. Click on Save to finish
38 | P a g e
Matching Drag And Drop
Preview
Below is an example of what this Item Type can look like when completed.
This Item Type presents students with questions in which they will have to match the correct
options to the correct choices by dragging and dropping the options. To access this Item Type,
see MANAGE ITEM and BASIC ITEM CREATION, and then follow the instructions
below.
1. Fill in the Item stem with instructions or questions.
2. Under the Choice box, enter in choice texts. These remain stationary in the actual
question.
3. Under the Option box, enter in option texts. These are the options that can be dragged
and dropped to applicable places in the actual question.
39 | P a g e
4. Select the correct option for each choice, and then assign a score.
5. Click on Save to finish.
40 | P a g e
Matrix
Preview
Below is an example of what this Item Type can look like when completed.
This Item Type presents students with an Item followed by Sub-Items. Note that each sub-item
contains multiple options from which the students have to choose the correct option as the
answer. To access this Item Type, see MANAGE ITEM and BASIC ITEM
CREATION, and then follow the instructions below.
1. Fill in the Item stem with a question.
2. Enter in the number of choices and the number of options for the question, and then click
on the Generate button.
3. Enter in the choice texts and options.
4. Assign scores for correct answers.
5. Click on Save to finish.
41 | P a g e
42 | P a g e
Multiple Choice Dynamic
Preview
Below is an example of what this Item Type can look like when completed.
This Multiple Choice Item Type has the ability to create virtually limitless inputs and outputs of
a certain type of question based on the set criteria. These criteria include:
a. Operand: This is an object of a mathematical operation or a quantity on which an
operation is performed. These could be numbers such as 3, 5, 4 etc.
b. Variable: This is an alphabetic character or symbol; usually a letter like x or y
representing a number we don't know yet.
c. Equal (=): This is a symbol that shows that what is on the left of the sign is equal in
amount or value to what is on the right of the sign.
d. Min and max: These are absolute minimum and maximum values of the function in its
domain.
e. Expression: This is a phrase that combines numbers and/or variables using mathematical
operations.
To access this Item Type, see MANAGE ITEM and BASIC ITEM CREATION, and
then follow the instructions below.
1. In the Item stem, enter in the question using symbols as appropriate to identify operands.
2. Click on the Get text button. This will transfer the question to the box below the Get text
button.
43 | P a g e
3. Highlight an operand and click on the Set operand button. Do this for each operand.
Note: An operand is the object of a mathematical operation, a quantity on which an
operation is performed. Once set, operands cannot deleted. To remove an operand, click
on the Reset operand button. This will reset the operand details.
4. By entering in values to the equal boxes, every student will get to have the same question.
Assign a min and max value. This will ensure that every student will have randomly
selected numeric values for the same question.
44 | P a g e
5. Under the choice details, enter in choice expressions with the correct one given the score.
Note that choice expressions are mostly formulas that are created using the Variables
given in the Operand details.
6. Choices can be shuffled and choice presentation can be set as horizontal or vertical.
7. Click on Save to finish.
45 | P a g e
Multiple Response Dynamic
Preview
Below is an example of what this Item Type can look like when completed.
This Multiple Response Item Type has the ability to create virtually limitless inputs and outputs
of a certain type of question based on the set criteria. These criteria include:
f. Operand: This is an object of a mathematical operation or a quantity on which an
operation is performed. These could be numbers such as 3, 5, 4 etc.
g. Variable: This is an alphabetic character or symbol; usually a letter like x or y
representing a number we don't know yet.
h. Equal (=): This is a symbol that shows that what is on the left of the sign is equal in
amount or value to what is on the right of the sign.
i. Min and max: These are absolute minimum and maximum values of the function in its
domain.
j. Expression: This is a phrase that combines numbers and/or variables using mathematical
operations.
Note that this Item Type is similar to the Multiple Choice Dynamic. The only difference is that
with Multiple Response Dynamic, multiple answers can be chosen.
To access this Item Type, see MANAGE ITEM and BASIC ITEM CREATION, and
then follow the instructions below.
8. In the Item stem, enter in the question using symbols as appropriate to identify operands.
9. Click on the Get text button. This will transfer the question to the box below the Get text
button.
46 | P a g e
10. Highlight an operand and click on the Set operand button. Do this for each operand.
Note: An operand is the object of a mathematical operation, a quantity on which an
operation is performed. Once set, operands cannot be deleted. To remove an operand,
click on the Reset operand button. This will reset the operand details.
11. By entering in values to the equal boxes, every student will get to have the same question.
Assign a min and max value. This will ensure that every student will have randomly
selected numeric values for the same question.
47 | P a g e
12. Under the choice details, enter in choice expressions with the correct one given the score.
Note that choice expressions are mostly formulas that are created using the Variables
given in the Operand details.
13. Choices can be shuffled and choice presentation can be set as horizontal or vertical.
14. Click on Save to finish.
48 | P a g e
Multiple Choice Static
Preview
Below is an example of what this Item Type can look like when completed.
This Item Type presents students with a question or item followed by a list of possible answers
to choose the correct answer from. To access this Item Type, see MANAGE ITEM and
BASIC ITEM CREATION, and then follow the instructions below.
1. Fill in the Item stem with a question.
2. Choose the object type preferred and enter in the number of choices and options for the
question.
3. Assign a score for the correct answer.
4. Click on Save to continue.
49 | P a g e
Multiple Response Static
Preview
Below is an example of what this Item Type can look like when completed.
This Item Type presents students with questions in which they have to select all the correct
answers. This means that there will be multiple correct answers given for them to select. To
access this Item Type, see MANAGE ITEM and BASIC ITEM CREATION, and then
follow the instructions below.
1. Fill in the Item stem with a question.
Note that if this item is scored on the ‘choice level’ as indicated in the item stem, partial credit
can be assigned.
2. In choice details, enter in the text in the Choice boxes.
3. Assign minimum and maximum choices to be selected.
50 | P a g e
4. Assign scores for correct answers.
5. Click Save to finish.
51 | P a g e
Numeric
Preview
Below is an example of what this Item Type can look like when completed.
This Item Type presents students with questions in which they will type out the answer. Only
numeric answers can be given; so, letters cannot be used. This Item Type can be used for
Mathematics, Physics, History and even more classes. To access this Item type, see MANAGE
ITEM and BASIC ITEM CREATION, and then follow the instructions below.
1. Fill in the Item stem with the question.
2. Assign the correct answer and an answer range
3. Assign scores for the correct answer. Scores can be given for answering within the range
given if desired or else, give zero.
52 | P a g e
4. Click on Save to finish.
53 | P a g e
Pull Down List
Preview
Below is an example of what this Item Type can look like when completed.
This Item Type presents students with a prompt followed by a drop-down list from which they
select an answer. To access this Item Type, see MANAGE ITEM and BASIC ITEM
CREATION, and then follow the instructions below.
1. Fill in the Item stem with the Item question.
2. Fill in the Choice text box with the questions and the Option text box with the answer
options.
54 | P a g e
3. Click on the Generate Choice button.
4. Assign a score for the correct answer(s).
5. A Shuffle choices button can be selected or chosen.
6. Click on Save to finish.
55 | P a g e
Ranking
Preview
Below is an example of what this Item Type can look like when completed.
This Item Type presents students with items followed by a drop box from which they select the
sequences in the chronological order to get the correct answer. To access this Item Type, see
MANAGE ITEM and BASIC ITEM CREATION, and then follow the instructions
below.
1.
2.
3.
4.
Fill in the Item stem with the Item question.
Fill in the Choice text boxes with Item questions and rank them under Rank.
Assign a correct score. Choices can be shuffled by selecting the Shuffle choice box.
Click on Save to finish.
56 | P a g e
57 | P a g e
Select a Blank
Preview
Below is an example of what this Item Type can look like when completed.
This Item Type presents students with Item questions followed by a drop down box in which
they are required to select the correct answer from the drop down box to fill in the blank. To
access this Item Type, see MANAGE ITEM and BASIC ITEM CREATION, and then
follow the instructions below.
1. Fill in the Item stem with desired text and click on the Get text button
2. In the box under Get text, highlight the word to be a blank and click on the Define blank
button. Do this step for all words that should be a blank.
58 | P a g e
3. By each choice, click on the blue box under ‘Incorrect answer’ to add incorrect answers.
Enter the incorrect answer in the Wrong score box and click on Add as seen below.
4. Assign the correct score. You may Shuffle choices by selecting the Shuffle choice box.
5. Click on Save to continue.
59 | P a g e
Slider HTML5
Preview
Below is an example of what this Item Type can look like when completed.
This Item Type presents student with a question in which they will need to use a slider to locate
the correct answer. To access this Item Type, see MANAGE ITEM and BASIC ITEM
CREATION, and then follow the instructions below.
1. Fill in the Item stem with the question.
2. Set the slider properties by entering a minimum value, maximum value and an
incremental value.
3. Click on the Generate button.
4. Slide the slider to the correct value.
5. Enter in the correct and incorrect score.
6. Click on Save to finish.
60 | P a g e
Text Match
Preview
Below is an example of what this Item Type can look like when completed.
This Item Type presents students with questions in which they will need to enter the correct
answer(s) in a text box. To access this Item Type, see MANAGE ITEM and BASIC
ITEM CREATION, and then follow the instructions below.
1. Fill in the Item stem with the item question.
2. Give the number of lines and line width. The line width should be more than the length of
the longest answer.
3. Enter in the answers in the Keyword boxes.
4. Assign scores for correct answer(s).
5. Click on Save to continue.
61 | P a g e
True/False
Preview
Below is an example of what this Item Type can look like when completed.
This Item Type presents students with Item questions in which they will select true or false for
the correct answer. To access this Item Type, see MANAGE ITEM and BASIC ITEM
CREATION, and then follow the instructions below.
1. Fill in the Item stem with the Item question.
2. Under Choice text, add a score to the correct answer.
3. Click on Save to continue.
62 | P a g e
Vertical Sequencing
Preview
Below is an example of what this Item Type can look like when completed.
This Item Type presents students with an Item question where they will need to re-order the
sentences in a vertical sequence. To access this Item Type, see MANAGE ITEM and
BASIC ITEM CREATION, and then follow the instructions below.
1. Fill in the Item stem with the Item question or instruction.
2. Fill in the Letter/Word boxes with text that will be re-ordered. Click on the Add
Letter/Word button to add more Letter/Word boxes if required.
63 | P a g e
3. Click on the Save button right below the Letter/Word boxes.
4. Assign the correct and incorrect scores.
5. Click on the Save button to finish.
64 | P a g e
Write a Program
Preview
Below is an example of what this Item Type can look like when completed.
This Item Type presents students with an Item question followed by a programing feature which
allows them to write out correct programing codes. To access this Item Type, see MANAGE
ITEM and BASIC ITEM CREATION, and then follow the instructions below.
1. Select a program language from the Language drop down box.
2. Fill in the Item stem with the Item question.
65 | P a g e
3. Write the correct program in the program box provided.
4. Input parameters if any.
5. Click on the Check program button to run and test the program.
6. Input the score for the correct program.
7. Click on the Save button to finish.
66 | P a g e
MANAGE BLUEPRINT
The third feature under CONTENT MANAGEMENT is Manage Blueprint. With the
Blueprint feature, faculty members can share test questions with one another from a pre-loaded
test bank. The Blueprint allows a faculty member to indicate certain numbers of questions based
on specific learning objectives. Students will be given different random questions based on the
selected learning objectives. This will allow the students of the same class to take the same
exam with different questions for each test but on the same learning outcome.
When in Manage Blueprint as the image above shows, click on Add to add a Blueprint. This will
go to the Add Blueprint page like the image below where the necessary information will be filled
out.
67 | P a g e
When that is done, select topics to choose a folder for the Blueprint.
Selecting the yellow folder symbol will open an image like the one below
Select a folder, click on Select which goes back to the Add Blueprint page then click Save.
68 | P a g e
MANAGE TEST
The fourth feature under CONTENT MANAGEMENT is Manage Test. This is where test
creation takes place. It includes the compilation of items previously created in MANAGE
ITEM. To create a test, go to Manage Test, select the desired folder and click on the Add button
located on the top right area of the page.
When the Add button has been clicked, a page like the image below will appear.
On the above page, there are six sections: Test details, Configuration Section/Blueprint, Select
items, Messages, Grades and Preferences. It is important that these sections are filled out.
69 | P a g e
Test details
The Test details section contains information about the test: Test code, Test name, Test details,
Test term, Select course/subject and Test rule. Fill in the required information carefully before
moving on to the next section.
Configuration Section/Blueprint
This tab uses a Blueprint to build a test. On default, the Configuration Section/Blueprint is
shown, by clicking No on “Do you want sections in the test?” under Test rule in Test details, the
Configuration Section/Blueprint disappears. Also, by clicking Yes on Blueprint, the test will be
put in the correct section. The image below describes the tab.
Choose Add Section or Select blueprint to create sections if needed, then click Next to continue.
Note that tests can have sections even if Blueprint is not used.
70 | P a g e
Select Items
The next tab is the Select Items tab. This is where the items are organized into sections, or
selected. The image below describes it.
After selecting items, click Next to continue to the next tab which is Messages. Here the
preferred instructions are given for the test. Note that the instructions can be modified as desired.
71 | P a g e
Grades
Under this tab, the type of grading scheme for the test will be selected. Note that personal
grading schemes can be created or standard grading schemes given on the list can be used. The
Threshold score to pass the test can be changed as preferred.
Preferences
This is where preferences for the test can be selected. These preferences include the following:
Test Presentation
72 | P a g e
Below are the definitions of each preference:
Show hints: Allows student to choose to view hints for each item.
Allow bookmark in tests: Allows student to bookmark items within the test that they would like to
go back to.
Clear Answers: Enables a button that allows student to clear their answer(s) from items.
Number of items per page: Determines how many items will be displayed on each page of the
test.
Enable buzzer before time: Causes a warning to be given at the specified amount of time prior to
time limit of test.
Display score for item: Shows a score for each item.
Enable item panel: Causes a panel to display on the bottom of each item that allows easy
navigation to any item on the test.
Enable review questions: Causes a menu to appear within the test that allows the student to
review unanswered items, answered items or all items.
Enable test utilities: Allows test aids, such as a Notepad or Basic Calculator.
Test Rule
Below are the definitions of each preference:
All items should be answered: Forces students to answer all the questions on a test.
Allow skipping the items: Allows students to choose to leave items unanswered.
73 | P a g e
Allow backward navigation: Enables students to go back to previous questions on a test.
Enforce timing at: Determines whether a test is timed at item level, test level or not timed at all.
Time required to complete the test: If timing occurs at test level, this sets time limit.
Post Test actions
Below are the definitions of each preference:
Show grade: Displays a grade for test.
Allow student to view report in the test: Displays a report of how many items the student
attempted within the test upon completion.
Allow students to view progress report in the test: Displays a report that includes the number of
items correct and incorrect in addition to information about how many items were attempted
upon completion of test.
Detailed summary: Gives report in table form.
Test summary in paragraph: Displays test summary in paragraph form.
View percentile: Shows student the percentage of the class that they performed better than.
74 | P a g e
Other
Below are the definitions of each preference:
Proctored in the Testing Center: This requires a test to be administered in the Testing Center.
Hide test: This prevents users other than the test creator from viewing the test.
Secure test: This requires the test to be taken in a lockdown browser.
Select all the boxes desired for test set up. Click Finish when done with preferences selection.
75 | P a g e
MANAGE GRADE SCHEMES
The fifth feature under CONTENT MANAGEMENT is Manage Grade Schemes. This is
where grade schemes for tests are created, edited, or deleted. Click on Add to create a new grade
scheme. The image below will be seen.
Fill out the necessary information and click on Save to add the grade scheme.
Note: The Grade scale must range from 0 to 100.
MANAGE DIGITAL ASSETS
The sixth feature under CONTENT MANAGEMENT is MANAGE DIGITAL
ASSETS. To use this feature, follow the steps below.
1. Select your sub-folder in Manage Digital Assets.
2. Click on the Add button. A box containing Single or Multiple uploads appears as seen in
the image below.
3. Upload the desired digital material and click Save.
76 | P a g e
MANAGE ESSAY EVALUATION
This is the seventh feature under CONTENT MANAGEMENT. Under this feature, essay
evaluation and grading can be done. To evaluate an essay, click on the lock symbol and then on
the evaluate link on the right.
77 | P a g e
The image below will appear. Click on Evaluate which will bring up the essay page to be
evaluated.
When the evaluation is finished, click on Save and the status of that essay will change to
“completed” as the image describes.
78 | P a g e
SCHEDULE
The tests are scheduled in this section. To schedule a test, click on the Schedule button located
on the top of the page as the image describes.
Click on the continue button to manage the test schedule. When that is done, this image will
appear.
Next, click on the Add button. This will go to the Manage Test Schedule information page as
described below.
79 | P a g e
Fill in the required information such as Schedule name, which is going to be the name of the test
and Mode of delivery, which describes how the test is to be taken. Click on the Select test button
to access the already created test in Manage Test.
Click on the Select button and the image below will appear.
Access the test folder, select the test to schedule and click Finish to continue. This will go to the
next page where batches or users are tagged to the test.
To tag a batch (group of people), click on tag batches or to tag users (individuals), click on tag
users as the image below shows. Select batch(es) or user(s) as required and click on Finish.
When finished, the schedule date and time is now made visible.
80 | P a g e
Select a Start date and Start time and then an End date and End time. Tag a Test Center and
Proctor as required and click on Save and the information below is shown.
The test has been successfully scheduled.
81 | P a g e
REPORTS
This feature gives a comprehensive and authoritative report on the exam’s statistics. The exam’s
statistics include the student’s identification and their performance. It is comprised of Items
attempted, Items answered correctly, scores, percentages etc. It also gives information on when
the exam was taken. Under the Reports feature there are two options, IRT and Performance
Reports.
To view the Reports, place the mouse over Reports to select the preferred option.
Performance Report
By clicking Performance Report, the Learning outcome-summary page will come up. This page
contains options such as Start date, End date, Test center, Search type, Select report, Export and
Print. These options can be used to view a summary of test statistics. Below is an explanation of
the search type option:
Search type
Use the pull down menu to select the parameters of the search. To change the type of report,
click on Select report located in the top right corner of the screen. The search will depend on the
needs of the user(s).
82 | P a g e
IRT Reports
Item Response Theory Reports present graphs that represent students’ performance on specific
items, and tests as a whole.
Below are options available when generating reports.
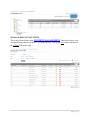
Item Information Function (IIF)
The IIF gives an analytical overview on specific items in a selected test. Select a test from the
pull down menu and click View to see the IIF reports. The image below shows what an IIF
report looks like.
83 | P a g e
On the analysis chart, the x-axis represents the ability of students and the y-axis represents the
success or failure of the students on their performance of the item. For example, on the graph
above, high-performing students did well on the item, while low-performing students did poorly.
Also, on the right, Question Analysis Details shows how many students attempted the item and
how many did not, as well as how many got the item correct or incorrect. On the above graph, 16
out of 20 students got the item incorrect, which indicates that the item might be too difficult, or
the class performs poorly overall. Comparison with other item and test reports can help
determine if the items are too difficult or if the class performs poorly.
Test Information Function (TIF)
The Analysis Chart in the TIF is read the same as in the IIF, however, the report is for the overall
performance of all items in the test selected. On the right side of the image above, the Test
Analysis Details displays how many students fall into different percentage brackets below the
total number of students that took the test.
84 | P a g e
Item Characteristics Curve (ICC)
The ICC gives information about the performance history of the items in a test. Information from
the ICC is used when generating reports for the IIF and TIF. The graph is read the same as in IIF
and TIF.
85 | P a g e
INDEX
Add passage…………………………………... 7
Hotspot multiple choice HTML5…………….24
Analysis.………………………………...10, 83
Hotspot multiple response HTML5…………..26
Application …………………………………10
Image labeling………………………………..28
Basic item creation …………………………...6
Image labeling drag and drop………………...30
Blanks.……………………………………17, 21
Image labeling entry………………………….32
Blueprint ………………………….5, 10, 66-69
Image labeling selection……………………...34
Classification ……………………………….10
IRT Reports…………………………………..82
Complexity………………………………….10
Item Characteristic curve…………………….84
Comprehension………….………………….10
Item code………………………………………7
Configuration section/blueprint………………69
Item details…………………………………….7
Connect the points html5……………………..11
Item hint…………………………………….10
Content management…………………………..5
Item Information function……………………82
Custom metadata…………………………....10
Item label………………………………………7
Digital Assets………………………..............75
Item Points……………………24, 29, 31, 33, 35
Draw Lines…………………………………...12
Item preferences…………………………….10
Draw Points ………………………………….12
Item preview………………………………….11
Entry list static………………………………..14
Item stem………………………………………7
Essay………………………………………….15
Knowledge…………………………………..10
Evaluate Essay………………………………..76
Language select………………………………..7
Evaluation settings…………………………...15
Likert scale…………………………………...36
Fill in the blank………………………………18
Manage blueprint…………………………..5, 66
Fill in the blank drag and drop……………….17
Manage digital assets…………………………75
Grades………………………………………...68
Manage essay evaluation…………………..5, 76
Hide item……………………………………10
Manage grade schemes……………………….75
Home…………………………………………..5
Manage item…………………………………...6
Horizontal sequencing………………………..23
Manage repository……………………………5
86 | P a g e
Manage test………………………………...…68
Sub-items…………………………………37, 40
Matching……………………………………...37
Synthesis………………………………..…….10
Matching drag and drop………………………38
Tag batch………………………..……………79
Matrix………………………………………..40
Tag User………………………………..…….79
Memory………………………………..……10
Test details……………………………..……..68
Multiple choice dynamic……………………..42
Test Information function……………..……...83
Multiple choice static………………………...48
Test presentation……………………………...71
Numeric………………………………..…… 51
Test rule…………………………………..69, 72
Operand ……………………………...19, 42, 45
Text match……………………………………60
Passage details ……………………………….7
Time…………..………………..………..10, 73
Performance report…………………………...81
True/false……………………………………..61
Post test actions………………………………73
Upload………………………………………..75
Preferences…………………….…...11, 68, 71
Vertical sequencing…………………………..62
Pull down list…………………………………53
Write a program………………………………64
Ranking………………………………………55
Reports……………………………………….81
Rubric score…………………………………..15
Schedule…………………………………..….78
Secure item………………………………….10
Select a blank…………………………………57
Select Blueprint………………………………69
Select items……………………………….68, 70
Shuffle choice box………………………..55, 58
Slider html5…………………………………. 59
87 | P a g e
GLOSSARY
Add passage: An option when creating Items which allows users to preface their Item with a
dialogue. Usually necessary to provide instructions prior to the Item content in order for the
student to analyze the Item as expected.
Classification: A required identification setting for all Items created. Classification levels come
from Bloom’s Taxonomy and include Knowledge, Comprehension, Application, Analysis,
Synthesis, Evaluation, and Memory. This feature is a reason Blueprint is successful in test
creation.
Complexity: A required identification setting for all Items created. Selections include None,
Very Easy, Easy, Moderate, Difficult and Very Difficult. This feature is a reason Blueprint is
successful in test creation.
Configuration section/blueprint: A test design feature which is available when desired in the test
creation process. If the user indicates it is not desired, it will not show up when entering test
details. It allows the test creator to select Items from a predesigned blueprint, as well as section
the test as needed.
Connect the Points HTML5 An Item Type which requires an image and allows the user to place
points on the image, then connect them with lines to form a correct answer which the student
must emulate exactly to get the most credit. Points may be given for a variety of specified semicorrect or incorrect answers.
Content management: A sub menu accessible from the top of the screen which contains
exclusive links to the test and item management options Manage Repository, Manage Item,
Manage Blueprint, Manage Test, Manage Grade Scheme, Manage Digital Asset, and Manage
Essay Evaluation. These options will help create and manage a test.
Dashboard: SARAS Homepage which displays tests summary and basic test statistics for the
day, and upcoming scheduled tests.
Digital Asset: All digital media which has been uploaded to the program. Digital Assets can be
managed by clicking on Manage Digital Assets under the Content Management pull-down menu
at the top of the screen.
Entry list static: An Item Type which is designed for the user to provide short prompts or
questions followed by empty boxes for the student to type their short responses or answers in.
Answers must be typed exactly in order to be correct. The Item creator will need to keep casesensitivity in mind, as well as the needs of the students to be informed of case-sensitivity.
Essay: An Item Type which allows the user to set requirements for student essays in tests. Some
options include setting a lower and upper word limit, choosing to grade on a rubric or numeric
88 | P a g e
setting, allowing feedback and providing a space for a title to the essays to be added by the
students.
Fill in the blank text: An Item Type which allows the user to type a passage and blank out
selected words, requiring the student to fill in the blank(s). The user must specify blanks in the
passage by deleting the word and replacing it with the exact statement {blank}.
Fill in the blank drag and drop: An Item Type which allows the user to type a passage and blank
out selected words, requiring the student to fill in the blank(s) by dragging and dropping word
selections provided by the Item creator. The user must specify blanks in the passage by deleting
the word and replacing it with the exact statement {blank}. Incorrect words may be added to
make the Item more difficult.
Fill in the blank dynamic: A mathematical Item Type that allows the user to establish questions
relating to one thing of mathematics and incorporate random elements to the equation.
Grades: In SARAS, grades are referred to in Blueprint or Test creation primarily and the exact
specifications for grading are set by the Blueprint or Test creator. A predesigned Grade Scheme
can be selected for use OR the user can design their own grade scheme to implement and save.
The Grade Scheme designed or chosen will determine the exact grading of the student’s
performances.
Hide item: This prevents other users from seeing the item(s).
Hide Test: This prevents other users from seeing the test(s).
Home: An option accessible from the top of the screen which when clicked on will return the
user to the Dashboard.
Horizontal Sequencing: An Item Type which allows the user to create a list of separate terms
which should be randomized. The terms will be presented horizontally in bubbles which can be
clicked on, dragged and rearranged. The goal of the student is to arrange the terms in the
intended or correct order.
Hotspot multiple choice HTML5: An Item Type which requires an image and allows the user to
create customizable boxed areas over the image to highlight sections of the image the user wants
the student to identify. What to identify should be listed in the Item Stem or Passage and points
are assigned to the correct boxed areas by the Item creator. The student may only select one box
as an answer.
Hotspot multiple response HTML5: An Item Type which requires an image and allows the user
to create customizable boxed areas over the image to highlight sections of the image the user
wants the student to identify. What to identify should be listed in the Item Stem or Passage and
89 | P a g e
points are assigned to the correct boxed areas by the Item creator. The student may select
multiple boxes in their answer.
Image labeling: An Item Type which requires an image and allows the user to mark certain
points on the image for the student(s) to label. The Item creator provides a list of terms which the
student will click on, then the student will click on the point on the image they want to match it
to.
Image labeling drag and drop: An Item Type which requires an image and allows the user to
mark certain points on the image for labeling by the student. The Item creator provides a list of
terms which the student will click on and drag to the point on the image that they wish to label.
Image labeling entry: An Item Type which requires an image and allows the user to place points
on the image to be labeled by the student. The points turn into entry boxes on the image when
taken by the student and the student enters their answer(s) on the image. The user can designate
multiple correct answers for each point and may adjust case sensitivity for each point.
Image labeling selection: An Item Type which requires an image and allows the user to place
points on the image to be labeled by the student. The points turn into pull-down menus which the
student may select their answer from. The user can designate only one correct answer for each
point.
Item: The word SARAS uses synonymously with in place of the word Question. An Item is an
individual question, prompt or problem to be compiled and presented in a Test with other Items.
Item code: A code selected by the Item creator during Item creation by which the Item will be
identified in conjunction with its Item label. Item codes are required at the time of Item creation
and cannot be identical to other existing Item codes.
Item details: A section in Item creation which contains options for Language selection, Item
code, Item label and Item stem.
Item hint: An optional section in Item creation which allows the user to provide up to 3 hints to
the student, which the student may reveal during the test to seek assistance.
Item label: A label selected by the Item creator during Item creation by which the Item will be
identified in conjunction with its Item code. Item labels are required at the time of Item creation
and can be identical to other existing Item labels.
Item preferences: A section in Item creation which contains options for Complexity,
Classification, Hide Item, Secure Item and Time Required to Answer. Complexity and
classification are required fields at the time of Item creation, but can be set to None.
Item Preview: A feature which can be selected after an Item has been created in the Manage
Items area. When Preview is selected from the pull-down menu to the right of the Item on the
90 | P a g e
list, a pop-up window is displayed with the Item in all of the functionality specified by the
creator. This allows for quick testing and editing of specific Items.
Item stem: An area in the Item details section during Item creation where the user will provide
information which will be useful in guiding the student to an understanding of the expectations
of them and the manner in which the Item is to be solved or answered.
Item type: A specific classification of the Item chosen by the Item creator from a list during Item
creation which suits the needs of the creator. Different Item types are necessary in order to allow
a wide variety of questions to be presented on Tests.
IRT Reports: Item Response Theory reports are highly detailed reports which are primarily
designed to be read by psychometricians, though most can understand their basic concept. In IRT
reports, users may view graphical representations of student performances on specific Items or
entire Tests over multiple instances and periods of time in relation to student ability. Ultimately,
this information can be used to edit Tests or Items in a manner which makes them more
applicable to wide varieties of student ability types.
Likert scale: An Item Type which allows the user to present some options that the student will
select as a response. It is designed to be presented in survey form and puts questions/answers in
the format of “---------. Do you agree?” / “Agree” “Neither agree nor disagree” “Disagree”.
Manage Blueprint: An option under the Content Management pull-down menu at the top of the
screen which takes the user to an area where Test Blueprints can be created and edited.
Everything regarding the creation of a Blueprint is performed in the Manage Blueprint area.
Manage Digital Asset: An option under the Content Management pull-down menu at the top of
the screen which takes the user to an area where digital assets are uploaded and stored. Digital
assets, or digital media as it is more commonly referred to, can be moved and renamed from this
area as well. Digital assets are integrated with Items during Item creation when the user clicks on
the “Browse image library” button and selects the image they desire to use.
Manage Essay Evaluation: An option under the Content Management pull-down menu at the top
of the screen which takes the user to an area where they may read and grade student essays.
Essays must be locked in order to be evaluated.
Manage Grade Schemes: An option under the Content Management pull-down menu at the top
of the screen which takes the user to an area where they may create and edit grade schemes to be
used on tests. Grade schemes are important and must be accurate for the intentions of the test
creator, as they will frame the performance of the students and can be easily overlooked.
Manage Item: An option under the Content Management pull-down menu at the top of the screen
which takes the user to an area where they may create and edit Items to be used in Tests. In this
area, Items may be deleted and tested as well.
91 | P a g e
Manage Repository: An option under the Content Management pull-down menu at the top of the
screen which takes the user to an area where they may view and edit repository data. The
Repository is a comprehensive list of varieties of data within SARAS. Folders may be added or
deleted at the user’s discretion and should include Digital assets, Test Template, Item and Test
folders by default. The repository is for data location management and handling or editing of
each of the resources themselves is best done in their respective Content Management sections.
Manage test: An option under the Content management pull-down menu at the top of the screen
which takes the user to an area where they may create and edit tests. Tests are comprised of
many factors. What Items are used and what restrictions are imposed are the primary
components of a test and they may be specified through the features of Manage Test.
Matching: An Item Type which allows the user to pose lines of text beside pull-down menus
which the student will be expected to select their answer from. The answers in the pull-down
menus are composed of all correct answers which the user has entered during Item creation. The
student must match the answers correctly with the set text to the left in order to receive credit.
Matching drag and drop: An Item Type which allows the user to pose lines of text beside other
lines of text. The student must click on the answer they want on the right side and drag it up or
down so that it is next to the text on the left side they want to match. In this form of matching,
the user may provide extra answers which are incorrect to dilute the selections and make the item
more difficult, if desired. Without randomization, the user must also arrange the answers in their
own fashion to avoid having the answers automatically be by their correct counterparts.
Matrix: An Item Type which allows the user to create multiple questions on a list OR a prompt to
do specific instructions with all of the following listed elements with multiple choice responses
to the right of the questions or elements. This should be tested well to ensure proper alignment
with the text and answers.
Multiple choice dynamic: An Item Type which allows the user to implement a wide range of
customizability in a multiple choice question. The user can set a range of values which will
randomize when the Item is performed and set these values amidst constant operands. This Item
type is optimized for use in mathematical operations because of its unique characteristics.
Multiple response dynamic: An Item Type which allows the user to implement a wide range of
customizability in a multiple choice question. Multiple response dynamic is similar to the
Multiple choice dynamic except that with this Item Type, students can choose multiple answers
instead of just one answer. The user can set a range of values which will randomize when the
Item is performed and set these values amidst constant operands. This Item type is optimized for
use in mathematical operations because of its unique characteristics.
92 | P a g e
Multiple choice static: An Item Type which allows the user to pose a question or a prompt and
create a customized amount of choices for the student to select from. Points may be given for as
many choices as the user desires, though the student may only select one choice for their answer.
Multiple response static: An Item Type which allows the user to pose a question or a prompt and
create a customized amount of choices for the student to select from. Points may be given for as
many choices as the user desires and the student may select as many answers as the user allows
when they create the Item.
Numeric: An Item Type which allows the user to pose a question or a prompt with the
expectation of a numeric response from the student. Only numeric responses are allowed during
performance of the Item. The user may give points to the student if they are within a certain
range OR they may give points for being precise and correct OR both.
Passage: A portion of text which is optional to add when creating Items and is present in most
Item types. Passages are displayed above the Item stem during Item performance and serve as
another area in which SARAS users can deliver information pertinent to their Items. Passages
may be created for a specific Item or imported from a list of passages previously created, as all
passages must be assigned a code and a label when created and will be stored for future use.
Passage details: The specific area during Item creation in which a passage may be created or
imported and adjusted to suit the needs of the user.
Performance reports: These reports allow the user to view a wide range of different reports on
specific users, Tests, or schedules. Some reports will not apply to the selected group.
Preferences: Different from Item Preferences, this is a tab found during Test creation which has
four designated preference lists for Test presentation, Test rule, posttest actions and other. This is
where the personalization of a test is primarily defined, such as time limits, pre-test and/or posttest messages, allowing online proctoring, allowing the student to see their grade afterward,
allowing the student to skip Items and go back to them later.
Pull down list: An Item Type which allows the user to create a list of terms or phrases with pulldown menus displayed to the right of each. The user can determine what is on the pull-down
menus, even adding answers which are incorrect for all terms or phrases. The user cannot
provide different pull-down menus for each question. Each pull-down menu will have all of the
options available on them.
Ranking: An Item Type which allows the user to create a list of terms or phrases with pull-down
menus displayed to the right of each. The user determines the rank of each term or phrase during
Item creation and will be unable to assign the same rank to multiple terms or phrases, i.e. four
terms or phrases will be labeled 1, 2, 3 and 4, not 1, 1, 2 and 3, etc. The student uses the pulldown menu to rank the terms or phrases in order.
93 | P a g e
Reports: A submenu accessible from the top of the screen which contains exclusive links to IRT
Reports and Performance Reports.
Schedule: 1. A submenu accessible from the top of the screen which contains exclusive links to
manage schedules and assign markers to schedule. 2. A schedule is a necessary component in
test administration and must be set in order to deliver a test. Once a test has been created, the
manage schedule area is the next place to go in order to deliver the test on time. When a schedule
is active, the scheduled test can be delivered by proctors.
Secure item: This prevents other users from editing the item(s).
Secure Test: Causes students to open tests within a lockdown browser environment.
Select a blank: An Item Type which allows the user to present text with specified blanks
throughout. The user may provide incorrect answers to add to the pull-down lists that will appear
in place of the blanks when the student performs the item. All blank spots will be replaced with
the same pull-down list of options for the student to select from.
Select items: A section where Items can be selected to be implemented in a test during test
creation.
Slider HTML5: An Item Type which allows the user to provide a question or a prompt for a
numerical answer and specify the range that the slider tool the students will use will have. The
student then uses the provided slider to select their numerical answer during Item performance.
Test details: The first section of test creation when adding a new test. It contains entry fields and
options for Test code, Test name, Test details, Test term, Select course/subject and Test rule.
Objects marked with a red asterisk are required.
Text match: An Item Type which allows the user to prompt the student to type multiple
responses into a typing field of specified dimensions. The user may set the size of the typing
field during Item creation and may adjust it to be constrictive (to indicate the correct amount of
responses expected) or to be expansive (to avoid indicating a certain amount of correct responses
expected). The option for case sensitivity is available on this Item.
True/false: An Item Type which allows the user to pose a prompt or a question followed by a
simple option for “True” or “False”.
Typing: An Item Type which allows the user to provide instructions for a typing evaluation
situation. The Item is designed to track the student’s typing statistics and provide a score based
on their performance.
Vertical sequencing: An Item Type which allows the user to create a list of separate terms which
should be randomized. The terms will be presented vertically in bubbles which can be clicked
94 | P a g e
on, dragged and rearranged. The goal of the student is to arrange the terms in the intended or
correct order.
Write a program: An Item Type which allows the user to create an environment in which to
evaluate the student’s program writing abilities. The user selects the language to be evaluated
and provides functional code for the Item to run tests with. The student must then emulate that
code as best they can with only the instructions provided to build from. If the student’s code
functionality properly emulates the functionality of the Item creator’s code, the student should
receive points.
95 | P a g e