1
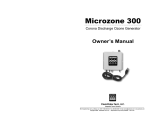
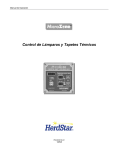
Ozone Systems
Installation & Operation Manual
Microzone 300 & 500
Corona Discharge Ozone Generators
ClearWater Tech, LLC
Ozone Systems for Water & Air Purification
850-E Capitolio Way, San Luis Obispo, CA 93401 • 805-549-9724 phone • 805-549-0306 fax • [email protected]
www.cwtozone.com • Copyright © 2008 - ClearWater Tech, LLC.• Reproduction of any kind is prohibited • LIT94 • REV111208
ClearWater Tech, LLC Limited One-Year Warranty
ACCESSORIES
Summary of the Warranty
Check Valve
Diffuser Stone
Parts Bag: (2) screws,
(2) hose clamps
8” Clear Hose
OZONE GENERATOR - Microzone 300
FRONT VIEW
BOTTOM VIEW
TOP VIEW
Power Cord
Inlet/Outlet
Power Light
Ground Lug
Variable
Off/On Switch
ClearWater Tech, LLC (“CWT”) makes every effort to assure that its products meet high quality and durability standards and warrants the
products it manufactures against defects in materials and workmanship for a period of one (1) year, commencing on the date of original
shipment from CWT, with the following exceptions: 1) The warranty period shall begin on the installation date if the installation is performed
within 90 days of the original shipment from CWT: 2) The warranty period shall begin on the date of the bill of sale to the end user if the
installation date is more 90 days after the original shipment date. To validate the warranty, a warranty card must be returned to CWT and
must include the following information:
•
•
•
•
•
End user name
Complete address, including telephone number
Date installed
Complete model and serial number information
Name of company from which the unit was purchased
Repairs and replacement parts provided under this warranty shall carry only the unexpired portion of this warranty or 90 days, whichever
is longer.
Items Excluded from the Warranty
This warranty does not extend to any product and/or part from which the factory assigned serial number has been removed or which has
been damaged or rendered defective as a result of:
OZONE GENERATOR - Microzone 500
FRONT VIEW
BOTTOM VIEW
SIDE VIEW
Power Cord
Power
Light
Ground
Lug
Inlet/Outlet
Variable
Off/On Switch
• Read and follow all instructions
• Save these Instructions
• Before attempting any electrical connections, be sure all power is off at the main circuit breaker.
• Install all electrical equipment at least five feet from any open body of water using
non-metallic plumbing.
• Install check valves and a Hartford Loop to prevent water from contacting the electrical equipment.
• Be sure to bond (ground) the system using the copper bonding lug on the bottom of
the ozone generator. The system should be bonded with solid copper wire conforming with all local, state and national electrical codes.
Ozone Gas - Warning: Low concentrations of ozone can cause
irritation to the eyes, throat and respiratory system.
Any product and/or part not performing satisfactorily may be returned to CWT for evaluation. A Return Goods Authorization (RGA) number
must first be obtained by either calling or writing your local authorized dealer, distributor or CWT direct, prior to shipping the product. The
problem experienced with the product and/or part must be clearly described. The RGA number must appear prominently on the exterior of
the shipped box(es). The product and/or part must be packaged either in its original packing material or in comparable and suitable packing
material, if the original is not available. You are responsible for paying shipping charges to CWT and for any damages to the product and/
or part that may occur during shipment. It is recommended that you insure the shipment for the amount you originally paid for the product
and/or part.
If, after the product and/or part is returned prepaid and evaluated by CWT, it proves to be defective while under warranty, CWT will, at its
election, either repair or replace the defective product and/or part and will return ship at lowest cost transportation prepaid to you except
for shipments going outside the 50 states of the United States of America. If upon inspection, it is determined that there is no defect
or that the damage to the product and/or part resulted from causes not within the scope of this limited warranty, then you must bear the
cost of repair or replacement of damaged product and/or part and all return freight charges. Any unauthorized attempt by the end user to
repair CWT manufactured products without prior permission shall void any and all warranties. For service, contact your authorized dealer
or distributor or CWT direct at (805) 549-9724, extension 23.
Exclusive Warranty
There is no other expressed warranty on CWT products and/or parts. Neither this warranty, or any other warranty, expressed or implied,
including any implied warranties or merchantability of fitness, shall extend beyond the warranty period. Some states do not allow limitations
on how long an implied warranty lasts, so that the above limitation or exclusion may not apply to you.
CAUTION!
OZONE
GAS
High Voltage - WARNING: ClearWater Tech ozone generators operate at high
voltages. If contact is made with operating high voltage components electric shock will occur.
1
An accident, misuse, alteration or abuse
An act of God such as flood, earthquake, hurricane, lightning or other disaster resulting only from the forces of nature
Normal wear and tear
Operation outside the usage parameters stated in the product user’s manual
Use of parts not sold by CWT
Service or unit modification not authorized by CWT • Check valve/solenoid valve failure
Failure to meet service requirements as outlined in the I & O manual
• Damage which may occur during shipping
Obtaining Service Under the Warranty
SAFETY WARNINGS
Two aspects of ClearWater Tech ozone generators represent potential
dangers, ozone gas and high voltage electricity.
•
•
•
•
•
•
•
Disclaimer of Incidental and Consequential Damages
No responsibility is assumed for any incidental or consequential damages; this includes any damage to another product or products resulting
from such a defect. Some states do not allow the exclusion or limitation of incidental or consequential damages, so that above limitation or
exclusion may not apply to you.
Legal Remedies of Purchaser
This warranty gives you specific legal rights and you may also have other rights which vary from state to state.
THIS STATEMENT OF WARRANTY SUPERSEDES ALL OTHERS PROVIDED TO YOU AT ANY PRIOR TIME.
UNPACKING
Figure 3
Shown: Hartford Loop
Waterline
Check Valve
Compare the ozone system equipment to packing list provided. Before beginning any
installation procedures, thoroughly inspect all components for damage. If damage is noticed,
promptly notify the freight carrier and request an on site inspection. Inspect all packing
materials for small parts before discarding.
Coiled Tubing
EQUIPMENT PLACEMENT
Min. of three
12” loops
(Harford Loop)
To point of use
From ozone generator
Note: The top of the Hartford loop and the check valve must be mounted above the water line
START-UP
• The ozone generator is equipped with a 0 to 100% variable OFF/ON switch. Depending
on the amount of ozone required you may adjust the ozone output control switch
counter clockwise for minimum output or off and clockwise for maximum output.
• The ozone generator is equipped with a main power indicating light next to the variable
switch. This light will be illuminated when the switch is not in the off position.
• The ozone generator will not produce ozone until airflow is initiated.
MAINTENANCE
Disconnect power from unit before any maintenance procedures.
• Check valve – replace diaphragm check valve, annually.
• Reaction chamber - replace the reaction chamber every 3 years.
SPECIFICATIONS
Microzone 300
• Electrical – 120VAC 60Hz 0.2A, 220VAC 50Hz 0.1A
• Dimensions – 5.875" h x 5.375" w x ” x 2" d, 2 lbs.
• Ozone Output – 0.3 g/h @ 6 SCFH
• When placing ozone system components, make sure to consider safety, maintenance
requirements, local building and fire codes.
• To determine the most favorable placement, the following should be considered:
• Located downstream of all other existing water system components.
• Located upstream of the residual sanitizer injection point (if so equipped).
• The pH adjustment chemical injection point should be located downstream of the residual sanitizer injection point (if so equipped).
• Location of ozone generator should be no more than 8 feet from point of use.
• Adequate protection from weather, dust and excessive heat. Ambient temperature range: 20ºF to 85º F continuous.
Note: Equipment installed in extreme environmental conditions will void manufacturers warranty.
THEORY OF OPERATION & PRODUCT DESCRIPTION
The microzone ozone generators may
be used to inject or diffuse ozone
i n t o w a t e r. T h e i n j e c t i o n m e t h o d
requires a venturi injector to draw the
ozone from the ozone generator and
into the water line. ClearWater Tech
has developed the PRO Series System with magnetic drive pump, programmable timer and venturi to provide a
suitable suction port for the injection
method (see Figure 1). For typical spa
applications the spa manufacture has
provided an “ozone ready” suction port,
which eliminates the need for additional
equipment (see spa manual for
installation). The diffusion method requires
a pressurized air source, which feeds air
through the ozone generator and out to
an atmospheric body of water. A diffuser
stone provided with the Microzone ozone
generator is used for increased mixing
of ozone in solution. For this application ClearWater Tech has developed the
OAS7 compressor, with programmable
timer to provide the pressure required
(see Figure 2).
Note:
Regardless of application, water back flow
prevention devices such as a check valve
and Hartford Loop should be implemented
with the use of the Microzone ozone
generators (see figure 3).
Microzone 500
• Electrical – 120VAC 60Hz 0.4A, 220VAC 50Hz 0.2A
• Dimensions – 6.250” h x 9.375” w x 3.5” d. 3 lbs.
• Ozone Output – 0.5 g/h @ 5 SCFH
5
2
INJECTION METHOD INSTALLATION
DIFFUSION METHOD INSTALLATION
Step 1: Mount the Microzone ozone generator to a suitable flat surface, using the two
self-tapping screws provided. Note: The distance from the Microzone to the
injection port should be no more than 8 feet.
Step 2: Attach one end of the supplied tubing to the ozone outlet port of the Microzone
generator and secure with a hose clamp provided.
Step 3: Coil the tubing to create a “Hartford Loop” above the water line. Insert the check
valve provided at the highest point of the Hartford Loop (see Figure 3).
Determine orientation of the check valve by blowing through it, flow should be
directed to the point of use.
Step 4: Attach the other end of the tubing to the injection port and secure with the hose
clamp provided.
Step 5: Plug the Microzone into a suitable outlet. If the PRO Series system is being used,
the Microzone may be plugged into its switched outlet provided. Note: All
equipment wiring and grounding must comply with all local electrical codes.
Step 1: Mount the Microzone ozone generator to a suitable flat surface, using the two
self-tapping screws provided. Note: The distance from the Microzone to point
of diffusion should be no more than 8 feet.
Step 2: Cut a suitable length of the supplied tubing, attach one end to the air prep outlet
of the pressurized source used. Attach the other end to the air inlet port of the
Microzone and secure with a hose clamp provided.
Step 3: Attach one end of the supplied tubing to the ozone outlet port of the Microzone
and secure with the hose clamp provided.
Step 4: Coil the tubing to create a “Hartford Loop” above the water line. Insert the check
valve provided at the highest point of the Hartford Loop (see Figure 3).
Determine orientation of the check valve by blowing through it, flow should be
directed to the point of use.
Step 5: Attach the opposite end of the tubing to the barbed fitting of the diffuser stone
provided.
Step 6: Plug the Microzone into a suitable outlet. If the OAS7 is being used the
Microzone may be plugged into its switched outlet provided. Note: All
equipment wiring and grounding must comply with all local electrical codes.
Figure 2
Figure 1
Shown: OAS7 with Microzone 300 ozone generator
Shown: PRO10 with Microzone 300 ozone generator
Air Flow
Microzone 300
Microzone 300
Switched
Power
O Z O N E
Main Power
O Z O N E
G E N E R A T O R
Air Prep Outlet
Air Flow
Air Flow
K
Water Flow
G E N E R A T O R
K
Switched
Power
Check Valve
Check Valve
Diffuser Stone
Main Power
Water Flow
Injector Port
Note: OAS7 maximum head pressure: 6 feet
3
4