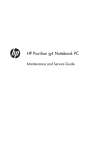
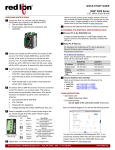
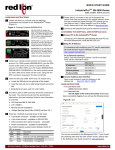
1
User’s Manual
For
NTR – BMT
Web Application
(Version 1.1)
1
User Manual for
National Transplant Registry
NTR – BMT Web Application
1.
Introduction ........................................................................................................ 3
a. NTR - BMT Web Application modules......................................................... 3
i. Online data access and Remote data capture ............................................. 3
ii. Real time report.......................................................................................... 3
iii.
Data Dictionary ...................................................................................... 3
iv.
Maintenance ........................................................................................... 3
b. Security .......................................................................................................... 4
c. Overall data flow process............................................................................... 8
d. Forgot password data flow process ................................................................ 9
2 To Log in the system......................................................................................... 10
(A) Log in via SMS authentication .............................................................. 10
(B) Alternative for SDP users with poor phone line reception: Log in via password
...................................................................................................................... 12
3a) To Notify a new patient ................................................................................. 13
3b) To View / Edit Blood and Marrow Transplant Notification Form ................ 20
3c) To Notify new Ad Hoc Event for a patient.................................................... 24
4 To Search Patient record ................................................................................... 30
a. To sort within current patient list ................................................................. 31
b. Audit Information......................................................................................... 32
5 To View Report................................................................................................. 33
i. Centre report ............................................................................................ 33
ii. Centre statistics report.............................................................................. 38
iii.
Registry statistics report....................................................................... 42
6
To Change user password ............................................................................ 47
7 To View / Download data dictionary ................................................................ 49
8 Logout of the NTR – BMT Web Application................................................... 51
9 Help Desk support............................................................................................. 51
2
1. Introduction
a.
i.
NTR - BMT Web Application modules
Online data access and Remote data capture
Each SDP is given right to access their own data and enter data remotely at their site
via the NTR - BMT Web Application. The forms that incorporate these two
functionalities are ‘Blood and Marrow Transplant Notification Form’ and ‘Blood and
Marrow Ad Hoc Event Notification form’.
ii.
Real time report
Reports are generated on a real time basis based on data entered via the Online data
access and Remote data capture module. There are three sections of reports, i.e.
Centre report, Centre Statistics and Registry Statistics.
iii.
Data Dictionary
This documents the definition of all variables in both the ‘Blood and Marrow
Transplant Notification Form’ and ‘Blood and Marrow Ad Hoc Event Notification
form’.
iv.
Maintenance
This module allows user to change their password.
changing their passwords every time it expires.
Users are responsible for
3
b. Security
Each authorised user is required to sign read through, understand and sign The Security Policy
for NTR-BMT Web Application before being authorised to access the application. This is to
ensure that users play an active role in ensuring security of data at their level.
Security practices as follows:
Prior to entry of application, user is reminded of their responsibility by laws of Malaysia.
Following message is notified to user every time user logs into the system.
“
You are about to gain access to the National Transplant Registry – Blood and Marrow
Transplantation (NTR - BMT) Web Application. By proceeding, you are agreeing to maintain
the confidentiality of all information made available to you through this application. Any
unauthorized access, use and/or disclosure of information shall be construed under the laws of
Malaysia, and any action instituted pursuant to the terms of the Confidential Rule Agreement,
as set forth in the Governance Manual of the NTR, shall be brought in the Court of Malaysia.
Actions may include but not limited to loss of access privileges, an action for civil damages,
an action for criminal charges, and/or disciplinary action including but not limited to
suspension or dismissal.
The security of your data is of utmost concern to us. We practice strong security measures to
prevent unauthorised access and interference of transactions and data. Read more about our
policies and practices.
”
Policies and Practices as follows:
“
As a good security practice, you are strongly advised to:
Keep your password confidential!
•
•
•
•
•
Avoid sharing or divulging your Password to anyone. This includes any person who
may appear to represent or work for the Registry. Our administrator never requires
your password at any time.
Avoid using the same Web Application Password for any other web-based services
such as for e-mail or for Internet Service Provider login.
Avoid choosing a Password that is easily anticipated by a third party, like your NRIC
number, telephone number, date of birth, etc.. You should select a unique Password to
make it difficult for anyone to anticipate.
Avoid writing down or "saving" your Password on your browser or any other
software. Memorizes your Password.
If you suspect your Password may have been compromised, change your Password
immediately.
Tips: Your password is what tells the system that you are who you say you are. Because
your password is like a key to your account, you need to safeguard it. Anyone who has
your password can pose as you. Therefore, you may be held responsible for someone
else's actions, if they are able to get your password. Do not write your passwords down!
Ensure you are accessing the correct website!
4
•
Never access the website via a hyperlink from an e-mail. Always enter the correct
website address yourself, which is either www.mst.org.my
Only access Web Application using a secure and trusted computer!
•
•
•
•
Never access your Web Application on computers / devices which you have doubts
with regard to security, such as those located in public places. If you have to use such
computers (for example, when you are on trips), change your password once you have
access to a secure computer.
Keep your operating system (eg. Microsoft Windows) and Internet-related software
updated with the latest security patches.
Protect your computer from viruses and malicious programs with anti-virus software
and firewalls where possible. Always update your anti-virus software with the latest
virus signatures.
Always log out your Internet session by clicking on the "logout" button whenever you
leave your computer, even for a short while. Do not simply close the browser window
when you wish to end the Web Application session.
”
5
Due to the criticality to safeguard data of patients, various technological mechanisms are set
up and administered by the administrator to counter security risks.
i. Authentication
ii. Access control
iii. Encryption
iv. Audit trail
v. Physical security
vi. Control of external communication links and access
vii. System backup and recovery
i. Authentication
• Web application owner authentication – VeriSign ensures that the website belongs
to NTR and not an impostor’s.
•
User authentication – There are two levels of user authentication. After user logs in
using User ID and password, an SMS containing additional password will be sent
to user’s mobile phone. User then types in the additional password before gaining
access to system.
6
ii. Access control - Only authorized users, for authorized purposes, can gain access to a
system. Depending on the role, different roles have different access rights to the
application, i.e. some may view data only but not edit data, some may view and edit data,
etc. If the application is left idle for more than 20 minutes, the application will be logged
off automatically.
iii. Encryption – All Personal Health Information are encrypted in the database and during
transmission. We use SSL technology to secure the data.
(Note: By definition of http://www.webopedia.com/TERM/S/SSL.html , SSL is short for Secure Sockets
Layer, a protocol developed by Netscape for transmitting private documents via the Internet. SSL works by
using a private key to encrypt data that's transferred over the SSL connection. Both Netscape Navigator and
Internet Explorer support SSL, and many Web sites use the protocol to obtain confidential user information,
such as credit card numbers. By convention, URLs that require an SSL connection start with https: instead of
http:.)
Security features:
• Address bar: https indicating use of SSL technology
•
Lock sign at the bottom right of the web page indicates SSL secured – 128 bit
encryption
iv. Audit trail – Tracks activities in the application, i.e. who made a change, what change was
made, when was the change made and why was the change made.
v. Physical security – Access to secured data storage media and area is limited to authorized
qualified personnel only.
vi. Control of external communication links and access - Various hardware, software, policies
and network designs are in place to ward off insecure and suspicious activities from
outside the network.
vii. System backup and recovery – Strict adherence to backup policies are implemented to
ensure smooth and accurate data recovery.
7
c. Overall data flow process
Access NTR website:
www.mst.org.my
Click 'BMT' under 'Online Data Access' section
Log in 1:
Key in the user name and password then submit.
Log in 2:
Key in the authentication number received via sms.
Home page: Patient List
New Patient?
Existing Patient?
Register Patient
New Ad Hoc Event?
Register Ad Hoc Event
Data Entry / Data Edit / Data Viewing
END
8
d. Forgot password data flow process
Ac c e s s N TR w e b s ite :
w w w .m s t.o r g .m y
C lic k 'B M T'u n d e r 'O n lin e D a ta Ac c e s s 's e c tio n
C lic k o n 'F o r g o t Y o u r Pa s s w o r d ? 'lin k
(below s ubmit button)
F ill u p fo llo w in g :
-U s e r n a m e
- R e p o r tin g c e n tr e c o d e (A s s tated in the
-H a n d p h o n e n u m b e r
- Em a il a d d r e s s
A uthoriz ation lis t.)
SM S w ill b e s e n t to yo u
EN D
9
2 To Log in the system
(A) Log in via SMS authentication
1. Type user name
2. Type password
3. Click Submit
1. Type your assigned user name
2. Type your password.
(Note: You are required to change your password every 3 months for security reasons.)
3. Click Submit.
10
4. Wait for a few seconds. The password to
access the system will be sent to you via sms.
5. Type the password that you received via sms
in the SMS Authentication code box.
(Note: The password sent via sms will be
different for each new log in. You may delete
the sms after successfully accesssing the
application.)
6. Click Submit.
5. Type this password in
the SMS Authentication
code box.
6. Click Submit
11
(B) Alternative for SDP users with poor phone line reception: Log in via password
1. Type user name
2. Type password
3. Click Submit
1. Type your assigned user name
2. Type your password.
(Note: You are required to change your password every 3 months for security reasons.)
3. Click Submit.
4. Type fixed
password in the SMS
Authentication code
box.
5. Click Submit
4. In the authentication page, type the fixed password given to you by NTR - BMT Web
Application Administrator / NTR Manager.
5. Click Submit.
12
3a) To Notify a new patient
Flow Chat to notify a new patient
1) Home page
2) Add Patient
3) Patient Add page appear
4) Fill up the form
6) Reset
5) Add
5i) Confirm
5ii) Back
13
1) Home Page
2) Click on
on the left panel
14
3) A new page – ‘Add Patient Detail’ will appear.
15
4) Fill up the form.
5) Upon completion, click on
button.
16
Confirm page will appear after click “Add”.
5 i) To confirm, click on
5 ii) To go back to edit, click on
button.
button.
6) To reset to empty values for all data n this page, click on
button.
17
Upon confirmation, Patient List (Home) page will appear. The patient added is shown in the
Patient List as shown in the diagram below.
New patient record added
18
To print the details in the ‘Patient-Confirm’ page, click on
There is a window popup page with the ‘Patient-Confirm’ page. Click on
.
.
19
3b) To View / Edit Blood and Marrow Transplant Notification Form
View or Edit Patient Data Flow Chat
1) Home page
2) Select patient and click on “Edit”
3) Patient Update page
4) Edit the data
5) Update
5i) Confirm
6) Reset
5ii) Back
20
1) If you are not at Patient List page, click
2) To view / edit a patient record, click on
on the left panel
button.
21
3) A new page – ‘Patient - Update’ will appear.
4) Edit the data.
5) Upon completion, click on
button.
22
Confirm page will appear after click “Update”
5i) To confirm, click on
5ii) To go back to edit, click on
button.
button.
6) To reset to original values for all data in this page, click on
To print the details in the ‘Patient-Confirm’ page, click on
button.
.
23
3c) To Notify new Ad Hoc Event for a patient
Add New Ad Hoc Event Flow Chat
1) Home page
2) Click on Ad Hoc Event
3) Ad Hoc Event List page
4) Patient Ad Hoc Event-Add page
5) Add
5i) Confirm
6) Reset
5ii) Back
24
1) Home page
2) To notify a new ad hoc event record of a patient, click on
of the patient record.
If the patient you are searching for is not in current page, you may either click on the page number
or click on
on the left panel.
(Note:
-> click
to go to first page
-> click
to go to last page
-> click
to go to next five pages,)
The Ad Hoc Event List for the selected patient will appear.
25
3) Add Hoc Event List Page
-
Name of your centre
Name of patient you
selected in Patient list
Hospital Registration Num.
Date of Transplant
Click Add to notify
new ad hoc event for
the patient you have
selected
Click on the
button to notify a new Ad Hoc Event for the selected patient. If you want to go
back to Patient List page, click on
button.
26
4) The New page - ‘Patient Ad Hoc Event - Add’ will appear. Fill up the form.
5) Upon completion, click on
button.
27
Confirm page appear after click “Add”.
5i) To confirm, click on
5ii) To go back to edit, click on
button.
button.
6) To reset to original values for all data in this page, click on
To print the details in the ‘Patient-Confirm’ page, click on
button
.
28
Upon confirmation, patient’s Ad Hoc Event List page will appear. The record you’ve just added
will be shown in the list.
-
Outcome: Died will be
display when Patient is
died.
Not allow to add new record
when patient is died
New record
added
To go to Patient List, click on
.
To continue adding another new ad hoc event for the same patient, repeat from Step 1 to 5.
To edit/view for the same patient, click on “Edit”.
To add another new ad hoc event for a different patient, go back to Home page and repeat Step 1
to 5.
29
4 To Search Patient record
1. Click
on the left panel
2. Patient – Search page will appear.
3. Type the search criteria. You may key in more than one search criteria. Then, click
to show patient list that fulfils the criteria. To reset to no value for all search
criteria, click on
button
Key in ONE or MORE
search criteria
• Name
• Hospital Registration
number
• Old IC number
• New IC number
Details keyed in can be
30
4. Search detail can be either Whole word (S), Contain (*S) or Begin with (S*).
5. Patient List fulfilling the criteria will appear.
a. To sort within current patient list
Click on the title to sort the
data as need.
1. Click on Column Title to sort the column to view the data as needed to display.
31
b. Audit Information
Audit Information shows
• when was patient record notified
• who was the person notifying the patient record
• when was patient record last updated
• who was the person last updating the record
32
5 To View Report
1. Click
on the left panel
2. Reports page will appear. There are three different categories of reports:
a. Centre report – reports pertaining your centre’s patient data
b. Centre statistics – aggregated data reports of your centre
c. Registry statistics – aggregated data reports of all centres in the registry
3. Click on the hyperlink of the report you want to view.
4. At the report page, go to menubar to select File > Print Preview to preview the formatting
of the page for printing purpose and to identify how many pages will be printed.
5. Following are details of each report
i. Centre report
a. Patient listing
33
This report can be sort by 3 options. Date of Tx (Descending), Date of Tx(Ascending) or Patient
Name.
This report lists all patients of your centre.
34
35
b. Patient Basic Details listing
This report can be filter by key in the search criteria.
This report lists all patient’s basic details.
Click to access
Details in the
‘Confirm’ data
page format as
shown below.
36
37
ii. Centre statistics report
a. Summary of Patient diagnosis
This reports the number of patients by diagnosis
b. Totals by Current Patient Outcome Status
This report lists total number of patients for each Outcome status by year.
Total Patient = Alive + Alive in CR + Alive with disease + Moved to another centre + Lost to
follow-up + Relapsed + Died + Others.
38
c. Stock and Flow
This reports list the total number of patient for new transplant patient, death and lost
to follow up patient by year. It also shows at the end of each year.
d. Totals by Type of Transplant
This report lists total number of patients for each type of transplant by year
39
e. Totals by Type of Transplant by Month
This report lists total number of patients for each type of transplant by month
f. Totals by Transplant Source
This report lists total number of patients for each Source of transplant by year
40
g. Totals by Transplant Source by Month
This report lists total number of patients for each Source of transplant by month
41
iii. Registry statistics report
a. Summary of Patient diagnosis for all centres
This reports the total number of patients by diagnosis of all SDPs (Source data providers) of the
NTR.
42
b. Totals by Current Patient Outcome Status for all centres
This report lists total number of patients for each Outcome status by year of all SDPs (Source data
providers) of the NTR. Please refer to Totals by Current Patient Outcome Status for further
details on how data is calculated.
43
c. Stock and Flow for all centres
This reports the total by current patient’s outcome status of all SDPs (Source data providers)
of the NTR.
d. Totals by Type of Transplant
This report lists total number of patients for each type of transplant by year of all SDPs
(Source data providers) of the NTR.
44
e. Totals by Type of Transplant by Month for all centers
This report lists total number of patients for each type of transplant by year of all SDPs (Source
data providers) of the NTR.
f. Totals by Transplant Source
This report lists total number of patients for each Source of transplant by year of all SDPs
(Source data providers) of the NTR.
45
g. Totals by Transplant Source by Month for all centres
This report lists total number of patients for each Source of transplant by year of all SDPs (Source
data providers) of the NTR.
h. Total number of transplants by month per site/centre
This report lists total number of transplants performed by year of all SDPs (Source data providers)
of the NTR.
46
6 To Change user password
1. Click
on the left panel
2. Change password page will appear.
3. Type the current password on the first line.
4. Type the new password on the second line and retype new password on third line again to
verify.
5. Upon completion, click
button.
47
6. SMS Authentication code page for Change Password will appear. Wait for a few seconds.
The password to access the system will be sent to you via sms. Type the password and the
click
6. Type this password in the SMS
Authentication code box. Click
Submit
7. Following page will appear to notify you that password has been changed.
8. Test from the login page to make sure you can log in using the new password you have
just changed.
48
7 To View / Download data dictionary
1. Click
on the left panel
2. Data Dictionary in pdf format will appear. You may download Acrobat Reader for free at
http://www.adobe.com/products/acrobat/readstep2.html if you do not have one.
toolbar
on the toolbar. To print the file, click
on the toolbar.
3. To save the file, click
4. (Note: There are links in the file that leads to other section or other files indicated by
words underlined as shown below:
49
Page
#
3
Details
4
Click on Appendix I to link to Appendix I of this file
4
Click on Appendix IV to link to Appendix IV of this file
6
Click on Appendix II to link to Appendix II of this file
8
Click on WHO to link to another file as shown below
Click on Appendix III to link to Appendix III of this file
50
8 Logout of the NTR – BMT Web Application
1. Click
on the left panel
9 Help Desk support
For assistance in completing your application or if you experience technical
difficulties using this site, including problems related to data entry, please contact
the NTR - Administrator at: Tel: 03-4045 5948 or 4044 0615
email: [email protected]
51