1
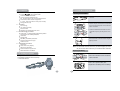
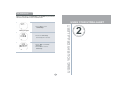
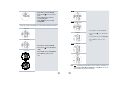
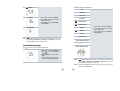
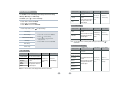
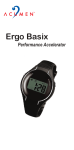
Temperature & Humidity Detection
2.4GHz
+ Sport Digital Heart Rate Monitoring
Conductive Fabric Chest Belt
1.
Product Introduction ................................................2
1.1
1. 2
1. 3
1.4
Features………………………………….............................….3
Package Contents............ ……………………...................…..3
Chest Belt Installation …………...................……..................4
SY NC S e t u p … . .. . .. . . . .. . .. . . .. . .. . . . .. . .. . . . .. . . .. . . .. . . .. . . . . . . . . . . . . . .. . . . . . . . . . 5
2. Using Your Hydra Alert..........…………....................6
2.1 Clock Mode……………………………………….................….8
2.2 F l u i d L o s s M o d e ……………………………….................…8
2.3 T M P / H U M M o d e ……………………………….................….8
2. 4 H e a t I n d e x M o d e … … … … … … … … … … … … … . . . . . . . . . . . . . . . . 9
2 . 5 S t o p w a t c h M o d e … … … … … … … … … … … … . . . . . . . . . . . .. . . . . … 9
2.6 I n t e r v a l T i m e r ...................................................................10
2.7 F r e e T r a i n i n g M o d e ........................................................10
2 . 8 L a p T r a i n i n g M o d e . . .. . . . . . . . . . . . . . .. . . .. . . . . . . . . . . . . . . . . . .. . . . . . . . . . . . . . . .. 14
2 . 9 E x e r c i s e F i l e M o d e . . .. . . . . . . . . . . . . . . . . . . . . . . . . . . . . . . . . . . . . . . . . . . . . . . . . . . . . . 1 7
2.10 S e t M o d e ...........................................................................21
2.11 Replacing the Battery...............................................
........................ 26
3.
Technical Reference…………………......................2 7
3.1
3.2
3.3
3.4
3.5
3.6
Ta r g e t Z o n e & F i t n e s s T r a i n i n g …………....................28
G e t t i n g t o K n o w H e a t I n d e x ………………...................30
D e t e r m i n i n g Yo u r M E T P a r a m e t e r ………...................32
B o d y F l u i d C h e c k M o n i t o r i n g Guideines and Tips.......33
Sp e c i f i c a t i o n s …………………………………....................34
Te c h n i c a l D i s p l a y G u i d e ................................................34
4.
Precautions, Warranty, Service and Repair…..36
4.1 G e n e r a l P r ec a u t i o n s ……………….................................37
4.2 W a r r a n t y ...........................................................................37
4.3 S e r v i c e a n d R e p a i r ........................................................38
Product Introduction
Product Introduction
CONTENTS
CONTENTS
1
1.1 Features
1.3 Chest Belt Installation
HEART RATE MONITORING (HRM)
Attaching Your Chest Belt
2.4 GHZ
+ Sport Digital HRM
Conductive Fabric Chest Belt
Current / Average / Maximum HR
EZ - Set Target Zone with Visual & Audible Alarms
Time Above / Within / Below Target Zone
In - Zone - Goal Count Down Timer (5-60 minutes)
Average HR Per Lap
TRAINING
Free Training
Lap Training (50 laps)
Interval Timers
Stopwatch for Elapsed Exercise Time
DEHYDRATION & FITNESS
Fluid CheckTM for Safeguarding Against Dehydration
Temperature and Humidity Detection
Heat Index
Fitness Index
Max MET (VO2 MAX) Calibration
Programmable Exercise Type
Calorie Counter
STANDARD FEATURES
Daily Alarm
Clock / Date / Day Display
NiteLite with SmartLite
Scratch Resistant Crystal Lens
Water Resistant to 30 Meters
1. Moisten both strips of conductive fabric on the
chest belt.
2. Insert the two pins at the back of the transmitter
into the two mounting holes on the Conductive
Fabric Chest Belt.
0RESS
0RESS
3. Push the transmitter downwards to lock the
transmitter in place. (See the picture on the
left).
4. Check and adjust the tension of the Elastic Strap
to ensure that the conductive fabrics fit tightly
against your skin.
Note: The watch does not have to be worn on your wrist to register your heart
rate, but it must be within 3 feet from your Conductive Fabric Chest Belt.
Replacing the Battery
1.2 Package Contents
A. Hydra-Alert TM HRM Watch
B. Heart Rate Transmitter with Chest Strap
C. Instruction Manual
1. Remove the transmitter from the Conductive
Fabric Chest Belt.
0RESS
Unscrew
B
A
3
44
0RESS
Screw
2. Use a coin to open the battery door.
3. Replace the used battery with a new battery.
1.4 SYNC Setup
Before you start training, enter SYNC Setup under Set Mode to synchronize the
heart rate chest belt with the watch as described below.
USING YOUR HYDRA-ALERT
USING YOUR HYDRA-ALERT
● Press "EXIT" to return
to SYNC Setup.
Waiting for Signal
● Advance to SYNC Setup
automatically after 2 seconds.
If success
● Press“
” to start SYNC
Setup again.
● Press "EXIT" to return to
SYNC Setup.
If fails
5
2
Overview
2.1 Clock Mode
The Normal Modes in Hydra-Alert
TM
HRM can be toggled in the following
Without HR
sequence by pressing “MODE”.
Press “MODE”
Press “MODE”
Clock Mode
Set Mode
Exercise File Mode
Press “MODE”
Press "EL" to activate
the NiteLite
Press & Hold" " to Turn
On / Off the Daily Alarm
Press “MODE”
Lap Training Mode
Fluid Loss Mode
Press “MODE”
Press "MODE" to Advance
to Fluid Loss Mode
Press “MODE”
TMP/HUM Mode
Free Training Mode
Press “MODE”
With HR
Press “MODE”
Press “MODE”
Press “MODE”
Interval Timer Mode
Stopwatch Mode
Heat Index Mode
Note: The icon that needs to be pressed & held will blink slowly.
Summary of Icons
2.2 Fluid Loss Mode
Heart Rate
Interval Timer
Current HR
Above TZ
Current HR
Below TZ
TZ Alarm
Daily Alarm
● Press "EL" to activate
the NiteLite.
Turn On / Off Daily Alarm, TZ Alarm &
Interval Timer
● Press "MODE" to advance
to TE M /H U M M ode.
Summary of Beeps
Button
Produces a short beep
SYNC Setup
If SYNC fails, produces a 3-second beep
Daily Alarm
Produces 1-minute of double short beep
2.3 TEM/HUM Mode
until a button is pressed to stop it
Produces 4 double short beeps at the
Interval Timer
● Press "EL" to activate the
NiteLite.
completion of each Interval
Produces 4 triple short beeps at the
completion of each Cycle
Produces a 3-second beep at the
completion of the Final Interval
TZ Alarm
Beeps constantly until HR is back to TZ
TZ Goal Timer
Produces a 3 - second beep when the
● Press " MODE " to advance
to H eat Index M ode.
TZ Goal Time is reached
7
8
2.4 Heat Index Mode
2.6 Interval Timer Mode
Press "
● Press "EL" to activate the
NiteLite.
" to see the set information about Interval Timer.
● Press "EL" to activate the NiteLite
● Press & hold " " to turn On / Off the
Interval Timer.
● Press "
" to enter Interval Timer
Mode.
● Press "MODE" to advance to Free
Training Mode.
● Press " MODE " to advance
to Stopwatch Mode.
Note: When the Heat Index is shown and its current value is at a very high level,
the watch will alert you by switching between the Heat Index values and warning
messages. The warning messages include Care, Ultra Care, Danger and Ultra
Danger (Refer to page 31 for additional details).
In Interval Timer Mode, you can view Timers’ different information:
Timer 1
● Press "EL" to activate the NiteLite
2.5 Stopwatch Mode
● Press & hold " " to turn On / Off the
Interval Timer.
Press "STR" to start the stopwatch.
● Press "NXT" to advance to next
item.
● Press "EL" to activate the NiteLite.
● Press "STR" to start the stopwatch
Timer 2
● Press "MODE" to advance to
Interval Timer Mode.
Timer 3
Note 1: All three Timers will be turned On or Off simultaneously, so if you just
want to adjust one or two of the Timers, then you should set the time of
the other Timers to zero in Set Mode. The Timer will not be activated
when it is set to zero.
● Press "EL" to activate the NiteLite.
When the stopwatch
is running
When the stopwatch
is stopped
● Press "EXIT" to return to Interval
Timer Mode.
● Press "STOP" to stop the stopwatch
● Press "MODE" to advance to
Interval Timer Mode.
Note 2: When the Interval Timer starts, it will replace the Stopwatch.
● Press "EL" to activate the NiteLite.
● Press "STR" to start the stopwatch
● Press "CL" to reset the stopwatch
and return to stopwatch mode
● Press "MODE" to advance to Interval
Timer Mode.
2.7 Free Training Mode
Before you begin training, make sure you have synchronized the Heart Rate
Transmitter with the watch. Press “STR” to start free training and enter the Total
Time of free training.
9
10
LM Time Above TZ
● Press "EL" to activate the NiteLite.
● Press & hold " " to turn On / Off TZ
Alarm.
● Press "STR" to start free training
and enter Total Time.
● Press "MODE" to advance to Lap
Training Mode.
LM Time Below TZ
When the stopwatch is running, you can view the following information:
Total time
● Press "EL" to activate the NiteLite
AVG HR
● Press & hold " " to turn O
ff fTfZTZ
onn//oO
Alarm.
ch
● Press "STOP"
TOP" to stop the sSttooppwwaatcth
● Press "NXT" to advance to next
item.
Time in TZ
LM
Ma x H R
● Press "EL" to activate the NiteLite
● Press & hold " " to turn On / Off TZ
Alarm.
Fluid Loss
● Press "STOP" to stop the Stopwatch
● Press "NXT" to advance to next
item.
Calorie
Note: " LM " represents information that can only be viewed in Long Menu. You
can set Long or Short Menu in HR Setup. In Long Menu, you can see
more information about your exercise event.
11
12
When the stopwatch is stopped, you can view the following information:
Store Data
Fitness Index
● Press " EL" to activate the NiteLite.
● Press "
" to store data and exit to
Free Training Mode.
● Press " EXIT " if you do not wish to
store data and exit to Free Training
Mode.
Fitness Index
2.8 Lap Training Mode
● Press "EL" to activate the NiteLite.
Before you begin training, make sure you have synchronized the Heart Rate
Transmitter with the watch. Press “STR” to start Lap Training and enter the Lap
Time of Lap Training.
● Press & hold " " to turn On / Off TZ
Total time
Time In TZ
Alarm.
● Press "STR" to start Free training
and enter Total Time.
● Press "EL" to activate the NiteLite.
● Press & hold " " to turn On / Off
TZ Alarm.
● Press "STR" to start lap training and
enter Lap Time.
● Press "MODE" to advance to
Exercise File Mode.
● Press "NXT" to enter next item.
Fluid Loss
● Press "EXIT" to advance to Store
Data.
LM Time Above TZ
LM Time Below TZ
AVG HR
LM
When the stopwatch is running, you can view the following information:
Max HR
Lap Time
Calorie
● Press " EL" to activate the NiteLite.
● Press & hold "
Note 1 : Fitness Index is used to measure your fitness level by monitoring how
" to turn On / Off TZ
Alarm.
quickly your heart rate recovers in one minute.
The Fitness Index Level is as follows:
41-60 OK
0-20 Poor 21-40 Fair
61-80 Good 81-100
Excellent
Lap.
● Press "LAP" to start a new Lap.
● Press "NXT" to enter next item.
Total time
Note 2 " LM "represents information that can only be viewed in Long Menu. You
Time in TZ
can set Long or Short Menu in HR Setup. In Long Menu, you can see
more information about your exercise event.
13
14
..
● Press "STO
TOP" to stop the sSttooppwwaatctchh
LM
Fluid Loss
LM
Time Above TZ
LM
Time Below TZ
AVG HR
Time Below TZ
AVG HR
● Press " EL" to activate the NiteLite.
● Press & hold " " to turn On /Off TZ
LM
Alarm.
● Press "LAP" to start a new Lap.
Max HR
Calorie
● Press "EL" to activate the NiteLite
● Press & hold " " to turn On / Off TZ
● Press "NXT" to enter next item.
LM
Max HR
Alarm.
● Press "STOP" to stop the Stopwatch
Time & AVG HR of Lap-50
● Press "STR" to start Lap Training
and enter Lap Time.
……
Calorie
● Press "NXT" to enter next item.
● Press "EXIT" to advance to Store
Time & AVG HR of Lap-1
Note : " LM "represents information that can only be viewed in Long Menu. You
Data.
can set Long or Short Menu in HR Setup. In Long Menu, you can see
more information about your exercise event.
After pressing “LAP”
Starting a new Lap
The screen will freeze for 2 seconds, then
go back to the last screen.
Note 1 : For more Information about Fitness Index, please refer to the Fitness
Index in Free Training.
Note 2 : You can view the time and average HR of all the laps.
Note 3 : " LM " represents information that can only be viewed in Long Menu.
You can set Long or Short Menu in HR Setup. In Long Menu, you
can see more information about your exercise event.
When the stopwatch is stopped, you can view the following information:
Fitness Index
Store Data
● Press "EL" to activate the NiteLite .
● Press " EL" to activate the NiteLite.
● Press & hold " " to turn On / Off TZ
Total time
Time in TZ
Alarm.
● Press "
● Press "STR" to start Lap Training
● Press "EXIT " if you do not wish to store data and exit to Lap Training Mode.
and enter Lap Time.
Fluid Loss
● Press "NXT" to enter next item.
● Press "EXIT" to advance to Store
LM Time Above TZ
" to store data and exit to Lap Training Mode.
Data.
15
16
2.9 Exercise File Mode
Time in TZ
● Press "EL" to activate the NiteLite.
● Press "MODE" to advance to Set
Mode.
Fluid Loss
Note: Hydra - AlertTM HRM has just one exercise file, so it can only save Free
Training information or Lap Training information.
2.9.1 File Mode (for free training)
Press "
" to view the recorded Exercise Information.
● Press " EL" to activate the NiteLite.
● Press " " to view recorded information.
● Press "MODE" to advance to Set
Mode.
● Press & hold " CL" to reset the file
and return to Exercise File Mode.
● Press “ EL” to activate the NiteLite
LM
Time Above TZ
Recorded Exercise Information
LM Time Below TZ
File
● Press “ EL” to activate the NiteLite.
Total Time
● Press “NXT ” to scroll to the recorded
exercise information.
● Press “EXIT” to return to File Mode
for free training .
AVG HR
17
18
● Press “NXT ” to scroll to the recorded
exercise information.
● Press “EXIT” to return to File Mode
for free training
Recorded Exercise Information
L M Ma x HR
File
Total time
Time in TZ
Calorie
● Press “ EL” to activate the NiteLite.
Fluid Loss
● Press “NXT ” to scroll to the recorded
exercise information.
● Press “EXIT” to return to File Mode
for free training.
LM
Time Above TZ
LM
Time Below TZ
Fitness Index
AVG HR
LM
Max HR
● Press “ EL” to activate the NiteLite.
● Press “NXT ”to scroll to the recorded
exercise information.
● Press “EXIT” to return to File Mode
for lap training.
Calorie
Fitness Index
Note : " LM "represents information that can only be viewed in Long Menu. You
can set Long or Short Menu in HR Setup. In Long Menu, you can see
Time & AVG HR of Lap-50
more information about your exercise event.
......
2.9.2 File Mode (for Lap training)
Press "
Time & AVG HR of Lap-1
" to view the recorded Exercise Information
● Press "EL" to activate the NiteLite.
● Press " " to view recorded Exercise
Information
● Press "MODE" to advance to Set
Mode.
● Press & hold "CL" to reset the file
and return to Exercise File Mode
Note 1 : " LM "represents information that can only be viewed in Long Menu. You
can set Long or Short Menu in HR Setup. In Long Menu, you can see
more information about your exercise event.
Note 2: Under all Normal Modes, if there is no HR or button signal for 3 minutes,
it will return to Clock Mode.
19
20
Setting Items
2.10 Set Mode
SmartLite
The Set Mode includes Time Setup, Alarm Setup, Interval Timer Setup,
HR Setup, MET Setup and SYNC Setup.
In Set Mode, press "
SmartLite
(From)
" to initiate Time Setup.
SmartLite
(To)
● Press " EL" to activate the NiteLite.
● Press "
" to enter Time Setup.
● Press "MODE" to return to Clock Mode.
In each setup section, press "
Setting Items
" to adjust settings.
● Press "EL" to activate the NiteLite.
● Press "
Interval Timer Setup
HR Setup
Press"NXT"
Press"EXIT"
● Increase/Decrease the
value
● Press & hold to increase
the speed at which the
values adjust
Advance to
Return to
next setting
Time Setup.
item.
pp
m SSeetutu
22.1.100..22 AAllaarm
Time Setup
Alarm Setup
Press "+ "/" - "
Set the SmartLite to
On / Off
Hour
● Increase/Decrease the
valu e
Minutes
● Press & hold to increase
the speed at which the
values adjust
Alarm ON/OFF
Set the Alarm to On / Off
" to start setting.
● Press "NXT" to toggle between
setup sections.
● Press "EXIT" to return to Set Mode
Press "+ "/" - "
Press"NXT"
Press"EXIT"
Advance to
Return to
next setting
Alarm Setup.
item.
Note: You can also turn On / Off Daily Alarm swiftly by Press and Hold "
Clock Mode.
MET Setup
" in
22.1.100..33 IInntterval TTiim
meerrSSeetutupp
SYNC setup
Setting Items
2.21.010.1.1TTiim
mee Seettuupp
Timer ON/OFF
Setting Items
Press "+ "/" - "
12/24 Format
Set 12 /24 hour format
Hour
Minutes
Year
Month
Date
● Increase/Decrease the
value
● Press & hold to increase
the speed at which the
values adjust
Press"NXT"
Press"EXIT"
Advance to
Return to
next setting
Time Setup.
Press "+ "/" - "
Press"NXT"
Press"EXIT"
Set Interval Timer to
ON /OFF
Number of Timers
Number of Cycles
for Timer 1
● Increase/Decrease the
valu e
Minutes for
Timer1
item.
Seconds for
Timer1
Number of Cycles
for Timer 2
Minutes
Timer2
Note: In a 12-hour format, Time display without PM icon means AM.
21
22
for
● Press & hold to increase
the speed at which the
values adjust
Advance to
Return to
next setting
Interval Timer
item.
Setup.
Setting Items
Press "+ "/" - "
Press"NXT"
Seconds for
Timer2
● Increase/Decrease the
Number of Cycles value
for Timer 3
● Press & hold to increase
Minutes
Timer3
for
the speed at which the
values adjust
2.10.5 MET Setup
Press"EXIT"
Advance to
Return to
next setting
Interval Timer
i t em.
Setup.
Seconds for
Timer3
Setting Items
Press "+ "/" - "
Exercise Type
Select exercise type,
"MET" or "CALAB"
Exercise Intensity
Select exercise intensity
MET Parameter
Return to
next setting
MET Setup.
● Increase/Decrease the
item.
value
Note: ● If you choose a particular type of Exercise, press "NXT" to return to MET
Setup Mode after setting the Exercise Intensity.
●If you choose “MET” in Exercise Type, press "NXT" to go to MET Parameter.
●If you choose “CALIB” in Exercise Type, press "NXT" to go to REST HR
for MET Calibration.
RRSSeetu
2.120.1.04.4HH
tupp
Press "+ "/" - "
Advance to
● Press & hold to increase
the speed at which the
values adjust
Note: You can also turn On / Off Interval Timer Swiftly by Press & Hold" " in
Interval Timer Mode.
Setting Items
Press"NXT" Press "EXIT"
Press"NXT" Press"EXIT"
Menu Short/ Long Set Short / Long Menu
Personal MET Calibration (Max MET (VO2 Max) Calibration)
Unit
Set Unit to Metric or
US
Phrase 1: Rest HR
Weight
Rest HR
Age
Max HR
Upper Limit for
TZ zone
● Increase/Decrease the
value
Advance to
● Press & hold to increase next setting
the speed at which the
item.
values adjust
Press "+" / "-"
Select "AUTO" or
"MANU" to set the
Rest HR
Return to
HR Setup.
Upper Limit for
Press "NXT"
Advance to set the
Rest HR by "MANU"
or "AUTO. "
Press“"EXIT"”
Return to
Exercise
Type
"MANU"
TZ zone
REST HR
Press "+" /"-"
In-Zone-Goal
Count Down Timer
● Increase/Decrease
Rest HR
TZ Alarm ON/OFF Set TZ Alarm to On / Off
● Press & hold to increase
the speed at which the
values adjust
Note: You can also turn On / Off TZ Alarm by Press & Hold " " in Free Training
& Lap Training Mode.
23
24
Press "NXT"
Press"EXIT"
Advance to
Exercise HR
Return to
Exercise Type
Replacing the Battery
" AUTO "
TM
Hydra-Alert HRM uses a Lithium CR2032 battery.
●Press "STR" to start the 1-minute countdown. Your
average Rest HR will be displayed when the countdown
is completed.
●Press " EXIT " to return to Exercise Type.
Note: 1.It will enter Exercise HR automatically 2 seconds after the display of the
average HR.
2.If there is no heart rate signal during recording, it will display "ERR" and
then return to Personal MET Calibration again.
When the watch displays “LOW BATT” (as in the figure below), the battery in
your watch needs to be replaced. To maintain its water resistance, professional
battery replacement service is advised. Improper battery replacement or service
will void the warranty. In the case of self replacement, removal of the old battery
should be documented in detail to ensure proper replacement of new battery, position
of contacts, and O-ring line-up. To maintain the watch’s water resistance, it is a good
idea to smear a small drop of silicone lubricant spray on the O-ring.
Phrase 2: Exercise HR
Exercise Distance
Press "+ "/" - "
Select 1.6 KM
or 1 Mile
Start Exercise
Press "STR"
Press"NXT"
Press"EXIT"
Advance to
Stopwatch display
Return to
Exercise Type
Note: After the first low battery warning comes on for 15 minutes, the EL, Heart
Rate, Humidity & Temperature features will be turned off to conserve
the battery power.
Press "EXIT "
Start the stopwatch Return to Exercise
HR (Before the
stopwatch starts).
Stop Exercise
Press "STOP" to end the stopwatch and advance to
Calibrated MET.
Calibrated MET
Your Calibrated MET value will be displayed on the screen
and it will return to MET Setup after 2 seconds.
Note: If there is no heart rate signal during recording, it will display "ERR"
and then return to Exercise HR after 2 seconds.
2.10.6 SYNC Setup (Refer to section 1.4 SYNC Setup)
25
26
3.1 Target Zone & Fitness Training
Determining Your Target Zone
What is Target Zone Heart Rate Training? To benefit the most from your workout,
you should become familiar with your heart rate training zone. By exercising within
the correct heart rate range, you will achieve your fitness goals and strengthen your
cardiovascular system in less time. Here is basically how it works.
Technical Reference
Technical Reference
Scientific research has shown that effective conditioning requires that you maintain
your heart rate at the proper level for at least 20 minutes per workout (or per day).
Exercising above you heart rate training zone can be counter-effective. For most
people, as your heart rate exceeds 85% of your maximum Heart Rate, which is the
upper limit, your body begins to become anaerobic and produces acids. At this stage,
your body begins to burn muscle instead of fat. When you have reached the lower
limit of you Target Zone Heart Rate Training, effective conditioning can be achieved.
A heart monitor will tune you in to your body’s internal activity level and helps prevent
injury.
3
The Hydra-Alert TM HRM automatically sets the correct Heart Rate Target Limits by
using the American Heart Association standard range of 65% to 85% of the calculated
maximum Heart Rate based on your age. The maximum HR is calculated based
on the equation, max HR = [207 – (Age x 0.7)].
There are various formulas for calculating Heart Rate Target Zones. In most cases,
the formulas provide a range that is the same as or very close to the auto-setting
TM
of the Hydra-Alert HRM. If you prefer to fine-tune or program your own limits,
this can also be done in the HR Setting Mode. The internal automatic TZ calculation
is based on the following example:
The calculated exercise range for a 30-year-old would be a low of 121 beats per
minute and a high of 158 beats per minute. You should never exercise near your
maximum heart rate (max HR) for any period of time.
Basic Fitness Target Zone & Tips
Depending on your specific goals, individual fitness level or just on how energetic
you feel, you may want to modify your heart rate range from one day to the next
based on the following chart:
28
from excessive training.
• Duration: 20 to 30 minutes per workout.
• Frequency: At least 3 or 4 times per week.
The Anaerobic Zone: 85% to Max HR
The Anaerobic Zone is ONLY recommended for to professional athletes or
those in exception physical condition. This zone can also be used for interval
training (high intensity for short durations) to help enhance overall strength and
endurance.
Monitor your Progress
Stretching
Heart rate fluctuations during physical activity can be tracked and documented
to determine overall health and fitness progress. As the cardiovascular system
becomes stronger, the resting heart rate will decrease. It will require more intensive
physical activity to reach the target zone and less time for the heart rate to recover.
Stretch at the beginning and end of every workout. Stretching before your workout
increases flexibility and helps prevent muscle strain or injury. Stretching after your
workout loosens tight muscles and helps prevent soreness.
• Stretch before warm up and after cool down.
• Stretch slowly and gently. Never bounce or stretch to a point of pain.
• Hold each stretch for 30-60 seconds and exhale as you extend into stretches.
Warm Up & Cool Down: 55% or Less of Max. HR
Begin and end every workout with a slow and gradual warm up and cool down,
respectively, Smoothly easing into and out of strenuous activity helps your body
prepare your metabolism and blood flow to efficiently break down fat and change
from one intensity level to another. Going into your Heart Rate Target Zone too
quickly can cause your heart rate to increase too rapidly. Rapid increase of the
heart rate could compromise consistent energy levels during a workout.
• Slowly bring your heart rate to a level just below the lower limit of your Heart
Rate Target Zone.
• Maintain your heart rate at this level for 5 to 10 minutes.
The Fat Burning Zone: 55%-65% of Max.HR
The Fat Burning Zone is recommended for those who are not in adequate physical
shape. This is the ideal zone for those who are beginning to exercise regularly,
would like to loose weight, and are at high risk for heart problems. It is intended
for low intensity and/or long duration exercise. Exercising at a lower intensity allows
for a longer, continuous exercising period. For weight loss and new exercise programs,
longer, continuous, low intensity workouts are safer and more beneficial. Slow and
steady wins the race!
• Duration: Build up gradually to 30 to 60 minutes per workout.
• Frequency: Workout 3 or 4 times per week.
Higher than usual resting heart rate and slower than usual heart rate recovery
could be an indication of strain of the heart from strenuous exercise or dehydration.
Resting for a day, lower intensity exercising, and replenishing the body with fluids
are advised. If your heart rate activity does not return to normal, please consult
a doctor.
.
3.2 Getting to Know Heat Index
The Heat Index combines the effects of heat and humidity. When heat and
humidity combine to reduce the amount of evaporation of sweat from the body,
outdoor exercise becomes dangerous even for those in good physical condition.
Key rules for coping with heat are to drink plenty of water to avoid dehydration,
slow down, and cool off when feeling fatigued, headache, a high pulse rate or
shallow breathing. Overheating can cause serious, even life-threatening conditions
such as heat stroke. The Apparent Temperature, which combines the temperature
and relative humidity, is a guide to the danger. Below is the Heat Stress Index
based on the Apparent Temperature.
The Aerobic Zone: 65%-85% of Max. HR
The Aerobic Zone is recommended for those in good physical condition who
have been exercising on a consistent basis for an extended period of time.
Exercising at this range helps improve your fitness level and prevent injury
29
30
Heatstroke:
In some cases, extreme heat can upset the body’s thermostat causing body
temperature to rise to 105 degrees or higher. Heat stroke symptoms include
lethargy, confusion, and unconsciousness. Suspicion of heatstroke also requires
immediate medical attention since heatstroke can result in death.
Apparent Temperature Heat Stress Index
Category
Apparent
Temperature
Dangers
Care
80-89°F
Exercise more fatiguing than usual
Ultra Care
90-104°F
Heat cramps, exhaustion possible
The importance of the Heat Index is to show how hot a particular combination
of heat and humidity feels. The Heat Index in the Hydra-Alert TM is a report of
the latest weather conditions based on the current temperature and the relative
humidity. Please refer to the following Heat Index Chart to learn about the
Apparent Temperature and to minimize the possibility of getting heat stroke.
How Temperature and Humidity Combine to Make If Feel Hotter
Danger
105-130°F
Heat exhaustion likely
Ultra Danger
Greater than
Heat sroke imminent
130°F
Effects of Heat Illnesses
Heat Cramps:
Exercising in hot weather can lead to muscle cramps, especially in the legs,
because of brief imbalances in body salts. Cramps become less frequent as a
person becomes used to the heat. As with heat cramps, the cure is to take it
easy.
Heat Syncope or Fainting:
Anyone not used to exercising in the heat can experience a quick drop in blood
pressure that can lead to fainting.
Heat Exhaustion:
The loss of fluid and salt through perspiration and improper replacement of
them can lead to dizziness and weakness. Body temperature might rise, but
not above 102 degrees. In some cases, victims especially the elderly should
be hospitalized. Heat exhaustion is more likely to occur after continuous exposure
to excessive heat waves. The best prevention from heat exhaustion is to drink
plenty of water and minimize physical activity in the heat. Salt tablets should
not be taken without consulting a physician.
31
3.3 Determining Your MET Parameter
If a specific activity is not available in your watch, choose a similar exercise
type and use the corresponding parameter from the table below to set your
watch (Please refer to page 28 to set the MET Parameter).
32
If the exercise period is under 60 to 90 minutes, water intake is always appropriate.
If the exercise period is more than 60 to 90 minutes, a sports drink offers an
energy advantage that can enhance stamina and endurance.
Table of MET Parameter
Intensity Level
Medium
7,8
8,9
3
6-8
3-5
3
4-6
8
6,7
4,5
6
5-8
3-5
9,10
8
8
10
8 - 10
11 - 15
6,7
5
8 - 10
6,7
5
6,7
4
5-7
4
5,6
6,7
4,5
4,5
3
3
4-6
Exercise
Light
6
7
2
AEROBICS
BASKERBALL
BOWLING
CYCLING
DANCING
FOOTBALL
GOLF
HIKING
JUMPING ROPE
JOGGING
RUNNING
SKATING(ice/inline)
SKIING
SKIING(Cros-sCountry)
SWIMMING
STAIRS
TENNIS
VOLLEYBALL
WALKING
H igh
9
10 -12
4
9,10
7,8
9,10
7
9 -11
11,12
1 2
16,17
8,9
11,12
8
8 - 10
7,8
8,9
6
7
Cardiac drift occurs because dehydration causes a drop in blood volume causing
less blood to be pumped with each heartbeat. The heart rate increases 7 beats
per minute for each 1% loss in body weight due to dehydration.
The keys to Proper Hydration:
Drink on schedule, rather than relying on thirst
Drink during training as well as competition
Drink cold water to increase gastric emptying
The American College of Sports Medicine on Exercise and Fluid Replacement
(ACSM, 1996) states that adequate fluid replacement helps maintain hydration
and, therefore promotes the health, safety, and optimal physical performance
of individuals participating in regular physical activity.
3.5 Specifications
• Shock Resistant
Standard shock resistance.
• Water Resistant
98 feet (or 30 meters). Not intended for diving.
• Operating Temperature
32 °F to 122 °F (0 °C to 50 °C)
• Heart Rate Range
TM
Body Fluid Check Monitoring Guidelines and Tips
The ACUMEN Hydra-Alert TM provides an indication of the level of dehydration.
The purpose of the dehydration reading is to remind individuals to replenish the
body with fluids during exercise.
It takes the human body 12 to 24 hours to replace fluids from heat and
exercise. To prevent the harmful effect of excessive dehydration it is
necessary to drink before you become thirsty.
The thirst mechanism is not precise in humans. An individual can lose fluids
equaling up to 3% of their body weight before a person feels that they need
to quench their thirst.
20~240 BPM
• Heart Rate Transmitter/Receiver Distance
0~34 inches
• Battery Type
Heart Rate Transmitter: Lithium CR2032
3.6 Technical Display Guide
Strength and endurance are reduced by 10-15% after just a 2% loss of body
weight, through dehydration.
Display Items
Default Setting
Most people need more than eight glasses (8 ounces) of water per day. Water
intake each day needs to be half your body weight in ounces. Do not drink
more than 32 ounces at any one time. Water intake should be divided throughout
the entire day.
Time
12:00:00 AM
Time Alarm
off,12:00 AM
33
Watch: Lithium CR2032
34
Range
12/24 hr. Clock
ON/OFF
Default Setting
Range
Date
01/01/2000
To 12/31/2099
Stopwatch
00:00:00
24:00:00
A ge
30
7~99
Unit
Metric
Metric / US
Weight(KG/Lbs)
75.0 KG/150 Lbs
30 ~ 250 KG / 50 ~ 500 Lbs
In-Zone-Goal Count
Down Timer
OFF
OFF, 5~60 minutes
Heart Rate Display
Precautions,Warranty,Service & Repair
Precautions,Warranty,Service & Repair
Display Items
20~240 bpm
Upper Target Zone
Limit
162 BPM
OFF, 20~240 bpm
Lower Target Zone
L im i t
124 BPM
OFF, 20~240 bpm
TZ Alarm
OFF
ON/OFF
MET Parameter
5
2-20
Exercise Type
Aerobics
19 Exercise Types
Calorie Display
0
0~9999 Kcal (roll over at
10,000)
SmartLite
OFF
ON/OFF
Humidity
1-99%
Temperature
14 ~ 140 ◦F / -10 ~ 60◦C
Fluid Loss
0~999.9 Ounce/0~99.99%
or 0~99999 ml/0~99.99%
Heat Index
64-151
35
4
in violation of written instructions furnished by Acumen Inc. or to units which
have been altered or modified without authorization of Acumen Inc., or to damage
to products or parts thereof which have had the serial number removed, altered,
defected or rendered illegible. The product must be returned to an authorized
dealer for service if purchased outside of the USA.
4.1 General Precautions
• Do not operate buttons under water
A lth o u g h y o u r m o n ito r is w a te r r e s is ta n t, b e s u r e th a t y o u d o n o t o p e r a te th e
b u tto n s u n d e r w a te r a s p r e s s u r e c a n c a u s e th e m to le a k .
• Dry off watch after use
Moisture can affect the Temperature and Heat Index reading. Please dry off
y o u r w a tc h a fte r u s e .
• Dry off transmitter after use
The transmitter will automatically shut itself off once you have removed it
from your chest. However, it is important to thoroughly dry it off after every
use since moisture on the conductive fabric can cause it to remain on longer.
• Global Reset
If your monitor should ever get stuck or act erratically due to dropping it, static
shock or some other unforeseen reason, the Global Reset feature will allow
you to reset the unit and return all settings back to their internal defaults. To
perform this function, Press and Hold all four buttons together for 3 seconds
under any mode (display all LCD). The unit will automatically reset and return
to initial setting mode.
Note: Please return the product to local authorized dealer for service if
purchased outside of the USA.
4.3 Service & Repair
Do not attempt to repair your product. Should the product malfunction, please
visit our website at www.acumeninc.com for Consumer Customer Service. If
the problem cannot be resolved, return the product to the factory for repair. Under
no circumstances should you attempt to open the housing and repair the product.
Should you do this, your warranty will be voided.
In USA, securely package and return the product pre-paid to:
Acumen Inc.,
101 A Executive Dr., Suite 100,
Sterling, VA 20166
Caution: Global Reset will RESET ALL FUNCTIONS BACK TO ORIGINAL
FACTORY SETTINGS including your Personal Settings.
• Battery Replacement
USA.
TM
The Hydra-Alert HRM uses a Lithium CR2032 battery.
To maintain the watch’s water resistance, professional battery replacement
service is advised. Improper battery replacement or service will void the warranty.
In the case of self replacement, removal of the old battery should be documented
in detail to ensure proper replacement of the new battery, position of contacts,
and O-ring line-up. It is a good idea to smear a small drop of silicone lubricant
spray on the O-ring.
4.2 Warranty
This product is warranted by Acumen Inc. for one year from the date of purchase
(with the exception of batteries and elastic chest strap) against defects in
workmanship and material. During this one-year period, these defects will be
repaired or the product will be replaced by Acumen Inc. at its sole discretion
without charge. This warranty covers normal consumer usage and does not
cover damage which occurs in shipment or failure which results from accident,
misuse, abuse, tampering, alteration or disassembling of the product or improper
maintenance. This warranty is effective only if the product is purchased and
operated in the USA and does not extend to any units which have been used
37
To Return for Service
a . First visit our website at www.a cume ninc.com/ re turna uthoriz a tion.a sp to
obtain a Return Authorization Number.
b . Enclose your name, address and phone number.
c . Enclose the date of purchase (or receipt as a gift).
d . An description of the malfunction or reason to return.
e . Seven dollars and fifty cents ($7.50) Check or Money Order payable to
Acumen Inc. for return postage and handling.
f . To insure prompt “In warranty” service, be sure to include proof of date of
purchase.
We r e c o m m e n d y o u t a k e t h e n e c e s s a r y p r e c a u t i o n o f i n s u r i n g t h e
parcel.
Outside USA, you should contact the local dealer or Acumen distributor
in your country for customer service.
Acumen Europe BV
E-Mail:[email protected]
Website: www.acumeninc.com
38