
1
The eG Manager’s Data
Storage Maintenance &
Tuning Guide
Restricted Rights Legend
The information contained in this document is confidential and subject to change without notice. No part of
this document may be reproduced or disclosed to others without the prior permission of eG Innovations,
Inc. eG Innovations, Inc. makes no warranty of any kind with regard to the software and documentation,
including, but not limited to, the implied warranties of merchantability and fitness for a particular purpose
Trademarks
Microsoft Windows, Windows NT, Windows 2000, and Windows 2003 are either registered trademarks or
trademarks of Microsoft Corporation in United States and/or other countries.
The names of actual companies and products mentioned herein may be the trademarks of their respective
owners.
Copyright
©2015 eG Innovations, Inc. All rights reserved.
The copyright in this document belongs to eG Innovations, Inc. Complying with all applicable copyright laws
is the responsibility of the user.
Confidentiality Notice
The information contained in this document is strictly confidential and is not to be distributed without the
prior written consent of eG Innovations, Inc.
The eG Manager's Data Storage Maintenance & Tuning
1.1 Introduction
The eG database is a critical component of the three-tier eG management console architecture. All the
measurement results are stored in the eG database, and alerting and data analysis is performed based on
the data stored in the eG database. Ensuring that the eG database is functioning optimally is critical for the
overall operation of the eG Enterprise system.
eG Enterprise has many self management capabilities built in that simplify the maintenance of the eG
database. However, additional fine-tuning and maintenance activities may be necessary to ensure the
proper operation of the eG Enterprise system.
The purpose of this document is to provide a set of criteria for the administrators of the eG Enterprise
system to follow in order to ensure that their monitoring system is functioning optimally, with peak
performance. eG Enterprise supports Oracle 8i and above, or Microsoft SQL server 2000 and above for
hosting the eG database. Depending on the database server being used, some of the maintenance activities
may differ. All such differences are explicitly noted in the rest of this document.
1.2 Adequately Configuring/Sizing the Database
Choose the right hardware: Before starting your eG Enterprise installation, please ensure that
the database server hardware is rightly sized in terms of memory, CPU & disk. Refer to “Sizing
the Hardware and Database required by an eG Manager” document for more information on
this. Also, ensure that sufficient database connection licenses are available to support the database
connection pool required on the eG manager.
Periodically analyze the hardware: As you add additional agents or users to the eG system,
periodically recheck the workload being provided to the database to make sure that you are not
running out of capacity on the database server. Check the server CPU, memory, disk activity, etc.
to look for any bottlenecks.
Use a separate database: For installations with 50 agents or less, the eG database can be
hosted on the same server as the eG manager. However, if you plan to support more than 50
agents, it is preferable to host the eG database on a separate server, so that there is no resource
contention between the eG manager and the eG database.
Keep the database dedicated for the eG Enterprise system: Since the eG manager
extensively uses the database – for real-time storage, analysis, and reporting – it is preferable to
allocate a dedicated database server for the eG Enterprise system.
1.3 Tuning the eG Database Self-Maintenance Activities
The eG Enterprise manager includes several capabilities that can reduce the maintenance required on the
database server.
Setting the data retention periods: After the eG manager has been installed, set the database
cleanup periods according to your requirements (Refer to eG User Manual’s “Configuring the
Database Settings” section for details on how these can be set). The cleanup periods indicate
how long data is to be maintained in the database. Accordingly, the eG manager automatically
purges old data in the database.
Setting the connection pool settings for the eG Manager : The eG manager uses a pool of
database connections to optimize accesses to the database – so that a connection is not opened
and closed for every request being issued to the database server. By using a connection pool, the
eG manager reduces unnecessary load of connection establishment and teardown on the database
server. The connection pool setting has a lower and upper bound – the lower limit representing the
minimum number of connections that will remain established between the manager and the
database, and the upper limit being the maximum number of connections that the eG manager will
use to access the database. The maximum number of connections required is dependent on the
3
The eG Manager's Data Storage Maintenance & Tuning
performance of the database server itself. A rule of thumb for setting the maximum limit is
provided in the “Sizing the Hardware and Database required by an eG Manager”
document. For configuring the database connection pool settings refer to the eG User Manual’s
“Configuring the Database Settings” section.
Since the number of connections needed is highly dependent on the performance of the database
and the hardware allocated to it, tuning the connection pool is a trial and error process. Check the
file error_log under the <EG_INSTALL_DIR>\manager\logs directory of the eG manager system for
messages relating to the connection pool. If the used connections hit the maximum connection
pool limit often, it means that the database connection pool may need to be resized or that the
database itself may need retuning.
Whenever you add new components/servers to be monitored and whenever you change the
cleanup period, please revisit the settings above to ensure that the database server in geared to
cope up with the increased load.
1.4 To-Dos in Maintaining the eG Database
In addition to the above, the following list includes a set of activities that must be performed to keep the eG
database functioning optimally.
(a) Avoid disk contention
Ensure that there is no contention amongst the log disk and the data store disk of the database. Make
sure that the log files and database data files are stored in separate drives with their own channels to
avoid high contention for write cycles.
(b) Avoid fragmented files/file systems
Ensure that the disks are periodically de-fragmented by using the OS tools/recommended tools. For
example, in the Windows 2003 Server use the “Disk Defragmenter” from “Administrative Tools”>”Computer Management”. Note that this may not be needed on most Unix platforms.
(c) Ensure adequate memory/buffers
Ensure that the database buffers are sized adequately for optimal performance. Too low buffers would
mean inadequate work memory and too many buffers without enough primary memory would result in
thrashing and both would impact performance, hence caution has to be exercised when setting this.
(d) Setting the Memory Management Preferences:
If the backend is MSSQL and the database is hosted on a dedicated system, then it is appropriate to
allow the database server to take up as much memory as possible. To do this, login to the enterprise
manager, select the appropriate database server and right click on it and select SQL Server Properties
->Memory->Choose “Dynamically configure SQL Server Memory” option.
(e) Ensure that logs do not clog
Ensure that the redo log files/transaction logs/trace log files do not grow to un-manageable sizes.
Make sure that these logs roll over after a specific size, or truncate these logs periodically.
4
The eG Manager's Data Storage Maintenance & Tuning
(f) Avoid setting resource limits for database queries
Specific jobs or activities in the eG system may have long running queries. If resource limits are set in
the database for queries, this could result in some of the eG activities being terminated abruptly, and
this could in turn have a disruptive impact on the performance of the eG Enterprise system.
(g) Ensure that day-end database backups do not overlap with eG’s day end activities
Often database backups are scheduled during mid-night which is also around the time at which the
day-end jobs of the eG Enterprise system start. This results in heavy load on the database server,
which in turn causes rapid performance degradation. To avoid this, either schedule the backup jobs at
a different time or schedule the eG day-end jobs to run at a different time via the SCHEDULED
CLEANUP TIME AT option in the DATA MANAGEMENT page of the eG administrative interface.
1.5 Scheduled Database Maintenance Activity for
Microsoft SQL Server
Rebuilding Indexes to reduce/eliminate fragmentation
Login as the eG install user, and execute the following command to reindex all tables in the current
context.
EXEC sp_MSforeachtable @command1 = 'DBCC DBREINDEX ("?")'
However, it is advisable to execute this after the manager is brought down. This is because, during
rebuilding a clustered index, an exclusive table lock is put on the table, preventing any table access
by your users. Also, while rebuilding a non-clustered index, a shared table lock is put on the table,
preventing all but SELECT operations to be performed on it. Therefore, you should schedule DBCC
DBREINDEX statement during CPU idle time and slow production periods.
Alternatively, you can run the ALTER INDEX statement to rebuild the index. However, note that this
statement can be run in the ONLINE mode only in the Enterprise Editions of the SQL server. The
table below provides the syntax for this SQL script on various versions of the MS SQL server:
5
The eG Manager's Data Storage Maintenance & Tuning
SQL Server
Version
Rebuild indexes with
Default fill
factor
Specific fill
factor
State of the eG manager
while re-building
indexes
Online
SQL script
Offline
select 'ALTER INDEX ALL ON
['+schema_name(schema_id)+'].['+name+'] REBUILD
WITH (ONLINE=ON)' from sys.objects where type='U';
Sample Output of the above SQL Script:
ALTER INDEX ALL ON [eguser].[UserLicenseReport]
REBUILD WITH (ONLINE=ON)
select 'ALTER INDEX ALL ON
['+schema_name(schema_id)+'].['+name+'] REBUILD
WITH (ONLINE=OFF)' from sys.objects where
type='U';
Sample Output of the above SQL Script:
ALTER INDEX ALL ON [eguser].[UserLicenseReport]
REBUILD WITH (ONLINE=OFF)
select 'ALTER INDEX ALL ON
['+schema_name(schema_id)+'].['+name+'] REBUILD
WITH
(FILLFACTOR=<FILL_FACTOR_PERCENT>,ONLINE=
ON)' from sys.objects where type='U';
MS SQL
2005/2008/2008
R2/2012/2014
Sample Output of the above SQL Script:
ALTER INDEX ALL ON
[eguser].[CUSTOMDASHBOARDTEMPLATES]
REBUILD WITH (FILLFACTOR=80,ONLINE=ON)
select 'ALTER INDEX ALL ON
['+schema_name(schema_id)+'].['+name+'] REBUILD
WITH
(FILLFACTOR=<FILL_FACTOR_PERCENT>,ONLINE=
OFF)' from sys.objects where type='U';
Sample Output of the above SQL Script:
ALTER INDEX ALL ON
[eguser].[CUSTOMDASHBOARDTEMPLATES]
REBUILD WITH (FILLFACTOR=80,ONLINE=OFF)
6
The eG Manager's Data Storage Maintenance & Tuning
SQL Server
Version
Rebuild indexes with
Default fill
factor
Specific fill
factor
State of the eG manager
while re-building
indexes
Online
Offline
MS SQL database
on Azure
NA
SQL script
select 'ALTER INDEX ALL ON [' + schema_name (
schema_id )+ '].[' + name + '] REBUILD WITH
(ONLINE= ON)' from sys . objects where type = 'U' ;
Sample Output of the above SQL Script:
ALTER INDEX ALL ON [eguser].[UserLicenseReport]
REBUILD WITH (ONLINE=ON)
NA
select 'ALTER INDEX ALL ON [' + schema_name (
schema_id )+ '].[' + name + '] REBUILD WITH
(ONLINE= OFF)' from sys . objects where type = 'U' ;
Sample Output of the above SQL Script:
ALTER INDEX ALL ON [eguser].[UserLicenseReport]
REBUILD WITH (ONLINE=OFF)
You can execute these queries in batches, so as to save time in index rebuilding and to have
greater control over the rebuilding process. For instance, you can copy the first five queries to the
SQL Management Studio and execute them simultaneously. After those queries complete
execution, you can copy five more queries and execute them at one go. This way, you can quickly
and easily rebuild indexes.
Truncating the transaction log file:
Transaction logs can grow to a very large size and clog your disks, and can hence slow down
writes into the disks and make them more resource intensive.
First, to help ensure that there is no potential for any data loss we need to determine if the space
being used by the transaction log, is being used by data or if it is a free/white-space being held in
the transaction log.
One way to check is by highlighting the database in the Enterprise Manager,
selecting the View->TaskPad option and looking at the amount of space free/in use within the
Transaction Log device.
If a large amount of space is being consumed by data, then you should perform a transaction log
backup, truncate the log and then immediately perform a full SQL backup to help preserve data. If
you cannot perform the transaction log backup due to the lack of available disk space, then
truncate the log (ex: backup log <dbname> with truncate_only). Immediately after performing this
step, you must perform a full SQL database backup in order to ensure the recoverability of your
database. You should then realize that the remaining space in your transaction log is now free
space that should be released back to the OS. To perform this, execute a DBCC SHRINKFILE
(<TranLogLogicalName>,<minsize>) where the TranLogLogicalName is the logical name of the
transaction log device for that database and the minsize is the least size that you would like to set
the transaction log to (in MB).
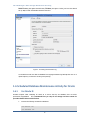
The command to use to shrink the log file is DBCC SHRINKFILE (1170_Apr8_log, 21), where
1170_Apr8_log is the logical name of the log that can be found in the Transaction Log page of the
7
The eG Manager's Data Storage Maintenance & Tuning
Shrink File dialog box against the field name, File Name (see Figure 1 below), and 21 is the desired
size (in MB) to which the database should be shrunk to.
Figure 1: Truncating the transaction log
You should then make sure that the database has ongoing transaction log backups that occur on a
repeat frequency or whenever the size grows quite big.
1.6 Scheduled Database Maintenance Activity for Oracle
1.6.1
For Oracle 9i
Schedule frequent index rebuilding for Oracle 9i to ensure that the eG database does not suffer
performance degradations. It is recommended that you stop the eG manager and then execute the
procedures detailed below to rebuild indexes.
1.
Execute the following commands on Windows:
SET HEADING OFF
SET FEEDBACK OFF
8
The eG Manager's Data Storage Maintenance & Tuning
SET PAGESIZE 1000
SET TERMOUT OFF
SPOOL C:\rebuildindex.sql
SELECT 'ALTER INDEX '||INDEX_NAME||' REBUILD; ' FROM USER_INDEXES
WHERE INDEX_NAME LIKE 'IDX_%';
SPOOL OFF
SET TERMOUT ON
SET HEADING ON
SET FEEDBACK ON
SET PAGESIZE 40
EXIT
On Unix, the commands will be as follows:
SET HEADING OFF
SET FEEDBACK OFF
SET PAGESIZE 1000
SET TERMOUT OFF
SPOOL /opt/rebuildindex.sql
SELECT 'ALTER INDEX '||INDEX_NAME||' REBUILD ; ' FROM USER_INDEXES
WHERE INDEX_NAME LIKE 'IDX_%';
SPOOL OFF
SET TERMOUT ON
SET HEADING ON
SET FEEDBACK ON
SET PAGESIZE 40
EXIT
2.
1.6.2
Copy the queries from the C:\rebuildindex.sql file (or the /opt/rebuildindex.sql file, as the case
may be) that is created in the previous step, paste them on to the SQL prompt, and execute
the queries. This will rebuild secondary indexes and reduce fragmentation.
For Oracle 10g
Oracle 10g recommends a two-pronged approach to database maintenance:
Index rebuilding, and;
Reclamation of the space that is released by eG’s daily database cleanup activity
Both these procedures have to be performed at recommended intervals to ensure peak performance of the
eG database.
9
The eG Manager's Data Storage Maintenance & Tuning
1.6.2.1
Rebuilding Indexes for Oracle 10g
Index rebuilding in Oracle 10g can only be performed when the eG database is offline. We hence
recommend that you perform this exercise once in a while - say, once every 6 months - to ensure peak
performance of the eG database.
1.
Create a procedure in eG Database by executing the commands below:
create or replace PROCEDURE IndexQueries
as
tableName varchar2(50);
tableIndex varchar2(50);
cursor cur_table is select table_name from user_tables;
begin
open cur_table;
loop
fetch cur_table into tableName;
EXIT WHEN cur_table%NOTFOUND;
DBMS_OUTPUT.PUT_LINE(CHR(10)||'Alter
move;');
table
'
||
tableName
||
'
for curindex_name in (select index_name from user_indexes where
table_name=tableName)
loop
DBMS_OUTPUT.PUT_LINE('Alter
index
curindex_name.index_name || ' rebuild;');
end loop;
end loop;
close cur_table;
Exception
when NO_DATA_FOUND then
DBMS_OUTPUT.PUT_LINE('');
close cur_table;
end;
10
'
||
The eG Manager's Data Storage Maintenance & Tuning
2.
Execute the following script on Windows to generate the index queries:
SET SERVEROUTPUT ON
SET HEADING OFF
SET FEEDBACK OFF
SET PAGESIZE 1000
SET TERMOUT OFF
SPOOL C:\rebuildindex.sql
Exec IndexQueries
SPOOL OFF
SET TERMOUT ON
SET HEADING ON
SET FEEDBACK ON
SET PAGESIZE 40
On Unix, the commands will be as follows:
SET SERVEROUTPUT ON
SET HEADING OFF
SET FEEDBACK OFF
SET PAGESIZE 1000
SET TERMOUT OFF
SPOOL /opt/rebuildindex.sql
Exec IndexQueries
SPOOL OFF
SET TERMOUT ON
SET HEADING ON
SET FEEDBACK ON
SET PAGESIZE 40
3.
Copy the queries from the C:\rebuildindex.sql file (or the /opt/rebuildindex.sql file, as the case may be)
that is generated in the previous step, paste them onto the SQL prompt, and execute the queries. This
will rebuild the primary and secondary indexes and reduce fragmentation.
1.6.2.2
Reclamation of Database Space
The eG manager automatically runs a cleanup procedure on the eG database every day to remove
obsolete/stale data from the database and to make space for recent data. In the process, free space is
created in the eG database, which will have to be reclaimed time and again, so as to avoid the performance
degradation that may creep in due to fragmentation. Using the procedure discussed below, this can be
11
The eG Manager's Data Storage Maintenance & Tuning
achieved. Since this procedure can even be run in the ónline’ mode, it is recommended that you perform it
once every 15 days.
1. Create a file named SHRINK_SPACE.SQL in any location on the eG database host - say C:\ on Windows
or /opt/usr on Unix - and save the following script to that file. Given below is a sample script on
Windows:
SPOOL E:\ROW_ENABLE.SQL
SELECT 'ALTER TABLE '||TABLE_NAME||' ENABLE ROW MOVEMENT;' FROM
USER_TABLES;
SPOOL OFF
SPOOL E:\ROW_ENABLE_OUT.TXT
@E:\ROW_ENABLE.SQL
SPOOL OFF
SPOOL E:\OBJECT_SHRINK.SQL
SELECT 'ALTER TABLE '||TABLE_NAME||' SHRINK SPACE CASCADE;' FROM
USER_TABLES;
SPOOL OFF
SPOOL E:\OBJECT_SHRINK_OUT.TXT
@E:\OBJECT_SHRINK.SQL
SPOOL OFF
Given below is a sample script on Unix:
SPOOL OPT/USR/ROW_ENABLE.SQL
SELECT 'ALTER TABLE '||TABLE_NAME||' ENABLE ROW MOVEMENT;' FROM
USER_TABLES;
SPOOL OFF
SPOOL OPT/USR/ROW_ENABLE_OUT.TXT
@OPT/USR/ROW_ENABLE.SQL
SPOOL OFF
SPOOL OPT/USR/OBJECT_SHRINK.SQL
SELECT 'ALTER TABLE '||TABLE_NAME||' SHRINK SPACE CASCADE;' FROM
USER_TABLES;
SPOOL OFF
SPOOL OPT/USR/OBJECT_SHRINK_OUT.TXT
@OPT/USR/OBJECT_SHRINK.SQL
SPOOL OFF
2. Next, to run the script, login to the eG database as the <eGDBUser> and issue the following command
from the SQL prompt.
On Windows, the syntax of the command is:
SQL > @E:\SHRINK_SPACE.SQL
On Unix, the command syntax is as follows:
SQL > @/opt/SHRINK_SPACE.SQL
12


![CPU32 Reference Manual [330 pages!]](http://vs1.manualzilla.com/store/data/005686632_1-79fc9549061344d5fca8ab86e2038cb9-150x150.png)