1
™
r!
e
si
a
E
g
in
th
ry
Making Eve
4th Edition
g
n
i
k
r
o
Netw
N E
A L L- I N - O
91
BOOKS
IN
• Networking Basics
• Building a Network
• Network Administration and Security
• TCP/IP and the Internet
• Wireless Networking
• Mobile Networking
• Windows Server® 2008 R2 Reference
• Using Other Windows Servers
• Managing Linux® Systems
Doug Lowe
www.allitebooks.com
Get More and Do More at Dummies.com ®
Start with FREE Cheat Sheets
Cheat Sheets include
• Checklists
• Charts
• Common Instructions
• And Other Good Stuff!
To access the Cheat Sheet created specifically for this book, go to
www.dummies.com/cheatsheet/networkingaio
Get Smart at Dummies.com
Dummies.com makes your life easier with 1,000s
of answers on everything from removing wallpaper
to using the latest version of Windows.
Check out our
• Videos
• Illustrated Articles
• Step-by-Step Instructions
Plus, each month you can win valuable prizes by entering
our Dummies.com sweepstakes. *
Want a weekly dose of Dummies? Sign up for Newsletters on
• Digital Photography
• Microsoft Windows & Office
• Personal Finance & Investing
• Health & Wellness
• Computing, iPods & Cell Phones
• eBay
• Internet
• Food, Home & Garden
Find out “HOW” at Dummies.com
*Sweepstakes not currently available in all countries; visit Dummies.com for official rules.
www.allitebooks.com
Networking
ALL-IN-ONE
FOR
DUMmIES
‰
4TH EDITION
www.allitebooks.com
www.allitebooks.com
Networking
ALL-IN-ONE
FOR
DUMmIES
‰
4TH EDITION
by Doug Lowe
www.allitebooks.com
Networking All-in-One For Dummies®, 4th Edition
Published by
Wiley Publishing, Inc.
111 River Street
Hoboken, NJ 07030-5774
www.wiley.com
Copyright © 2011 by Wiley Publishing, Inc., Indianapolis, Indiana
Published by Wiley Publishing, Inc., Indianapolis, Indiana
Published simultaneously in Canada
No part of this publication may be reproduced, stored in a retrieval system or transmitted in any form or
by any means, electronic, mechanical, photocopying, recording, scanning or otherwise, except as permitted under Sections 107 or 108 of the 1976 United States Copyright Act, without either the prior written
permission of the Publisher, or authorization through payment of the appropriate per-copy fee to the
Copyright Clearance Center, 222 Rosewood Drive, Danvers, MA 01923, (978) 750-8400, fax (978) 646-8600.
Requests to the Publisher for permission should be addressed to the Permissions Department, John Wiley
& Sons, Inc., 111 River Street, Hoboken, NJ 07030, (201) 748-6011, fax (201) 748-6008, or online at http://
www.wiley.com/go/permissions.
Trademarks: Wiley, the Wiley Publishing logo, For Dummies, the Dummies Man logo, A Reference for the
Rest of Us!, The Dummies Way, Dummies Daily, The Fun and Easy Way, Dummies.com, Making Everything
Easier, and related trade dress are trademarks or registered trademarks of John Wiley & Sons, Inc. and/
or its afiliates in the United States and other countries, and may not be used without written permission.
All other trademarks are the property of their respective owners. Wiley Publishing, Inc., is not associated
with any product or vendor mentioned in this book.
LIMIT OF LIABILITY/DISCLAIMER OF WARRANTY: THE PUBLISHER AND THE AUTHOR MAKE NO
REPRESENTATIONS OR WARRANTIES WITH RESPECT TO THE ACCURACY OR COMPLETENESS OF
THE CONTENTS OF THIS WORK AND SPECIFICALLY DISCLAIM ALL WARRANTIES, INCLUDING WITHOUT LIMITATION WARRANTIES OF FITNESS FOR A PARTICULAR PURPOSE. NO WARRANTY MAY BE
CREATED OR EXTENDED BY SALES OR PROMOTIONAL MATERIALS. THE ADVICE AND STRATEGIES
CONTAINED HEREIN MAY NOT BE SUITABLE FOR EVERY SITUATION. THIS WORK IS SOLD WITH THE
UNDERSTANDING THAT THE PUBLISHER IS NOT ENGAGED IN RENDERING LEGAL, ACCOUNTING, OR
OTHER PROFESSIONAL SERVICES. IF PROFESSIONAL ASSISTANCE IS REQUIRED, THE SERVICES OF
A COMPETENT PROFESSIONAL PERSON SHOULD BE SOUGHT. NEITHER THE PUBLISHER NOR THE
AUTHOR SHALL BE LIABLE FOR DAMAGES ARISING HEREFROM. THE FACT THAT AN ORGANIZATION OR WEBSITE IS REFERRED TO IN THIS WORK AS A CITATION AND/OR A POTENTIAL SOURCE
OF FURTHER INFORMATION DOES NOT MEAN THAT THE AUTHOR OR THE PUBLISHER ENDORSES
THE INFORMATION THE ORGANIZATION OR WEBSITE MAY PROVIDE OR RECOMMENDATIONS IT
MAY MAKE. FURTHER, READERS SHOULD BE AWARE THAT INTERNET WEBSITES LISTED IN THIS
WORK MAY HAVE CHANGED OR DISAPPEARED BETWEEN WHEN THIS WORK WAS WRITTEN AND
WHEN IT IS READ.
For general information on our other products and services, please contact our Customer Care
Department within the U.S. at 877-762-2974, outside the U.S. at 317-572-3993, or fax 317-572-4002.
For technical support, please visit www.wiley.com/techsupport.
Wiley also publishes its books in a variety of electronic formats. Some content that appears in print may
not be available in electronic books.
Library of Congress Control Number: 2010935591
ISBN: 978-0-470-62587-3
Manufactured in the United States of America
10 9 8 7 6 5 4 3 2 1
www.allitebooks.com
About the Author
Doug Lowe has written a whole bunch of computer books, including more
than 40 For Dummies books, among them Networking For Dummies, 9th
Edition, Java All-in-One For Dummies, 3rd Edition, PowerPoint 2010 For
Dummies, and Word 2010 All-in-One For Dummies. He lives in sunny Fresno,
California, where the motto is “Fres-YES!,” (unfortunately, I’m not making that
up). He’s one of those obsessive-compulsive decorating nuts who creates
computer-controlled Halloween decorations that rival Disney’s Haunted
Mansion.
www.allitebooks.com
www.allitebooks.com
Dedication
To My Family.
Author’s Acknowledgments
I’d like to thank everyone who was involved with the fourth edition of this
book, especially the most excellent project editor Blair Pottenger, who put
up with late submissions and who did a great job following through on all the
little editorial details needed to put a book of this scope together on time.
Thanks also to Dan DiNicolo, who gave the manuscript a thorough review to
ensure the technical accuracy of every sentence, and in the process offered
many excellent suggestions for improvements, and to copy editor Virginia
Sanders, who whipped my prose into shape, crossing all the i’s and dotting
all the t’s, or something like that. And, as always, thanks to all the behind-thescenes people who chipped in with help I’m not even aware of.
www.allitebooks.com
Publisher’s Acknowledgments
We’re proud of this book; please send us your comments at http://dummies.custhelp.com.
For other comments, please contact our Customer Care Department within the U.S. at 877-762-2974,
outside the U.S. at 317-572-3993, or fax 317-572-4002.
Some of the people who helped bring this book to market include the following:
Acquisitions and Editorial
Composition Services
Project Editor: Blair J. Pottenger
Project Coordinator: Patrick Redmond
Acquisitions Editor: Amy Fandrei
Layout and Graphics: Carl Byers,
Samantha K. Cherolis, Ronald G. Terry
Copy Editor: Virginia Sanders
Technical Editor: Dan DiNicolo
Editorial Manager: Kevin Kirschner
Editorial Assistant: Amanda Graham
Sr. Editorial Assistant: Cherie Case
Proofreaders: Laura L. Bowman,
Jessica Kramer
Indexer: Broccoli Information Managment
Special Help
Annie Sullivan
Cartoons: Rich Tennant
(www.the5thwave.com)
Publishing and Editorial for Technology Dummies
Richard Swadley, Vice President and Executive Group Publisher
Andy Cummings, Vice President and Publisher
Mary Bednarek, Executive Acquisitions Director
Mary C. Corder, Editorial Director
Publishing for Consumer Dummies
Diane Graves Steele, Vice President and Publisher
Composition Services
Debbie Stailey, Director of Composition Services
www.allitebooks.com
Contents at a Glance
Introduction ....................................................................... 1
Book I: Networking Basics .................................................. 7
Chapter 1: Understanding Networks ................................................................................................ 9
Chapter 2: Understanding Network Protocols and Standards ................................................... 21
Chapter 3: Understanding Network Hardware ............................................................................. 43
Chapter 4: Understanding Network Operating Systems.............................................................. 61
Book II: Building a Network.............................................. 75
Chapter 1: Planning a Network ....................................................................................................... 77
Chapter 2: Installing Network Hardware ....................................................................................... 95
Chapter 3: Setting Up a Network Server ...................................................................................... 111
Chapter 4: Coniguring Windows Clients ..................................................................................... 121
Chapter 5: Macintosh Networking ................................................................................................ 135
Chapter 6: Coniguring Other Network Features ........................................................................ 141
Chapter 7: Verifying Your Network Installation ......................................................................... 151
Chapter 8: Going Virtual ................................................................................................................ 157
Book III: Network Administration and Security ................. 169
Chapter 1: Help Wanted: Job Description for a Network Administrator ................................. 171
Chapter 2: Security 101 .................................................................................................................. 185
Chapter 3: Managing User Accounts ............................................................................................ 195
Chapter 4: Firewalls and Virus Protection .................................................................................. 203
Chapter 5: Extending Your Network with VPN Access .............................................................. 215
Chapter 6: Managing Network Software ...................................................................................... 221
Chapter 7: Solving Network Problems ......................................................................................... 233
Chapter 8: Network Performance Anxiety................................................................................... 249
Chapter 9: Backing Up Your Data ................................................................................................. 259
Chapter 10: Disaster Recovery and Business Continuity Planning .......................................... 271
Book IV: TCP/IP and the Internet ..................................... 279
Chapter 1: Introduction to TCP/IP and the Internet .................................................................. 281
Chapter 2: Understanding IP Addresses ...................................................................................... 289
Chapter 3: Using DHCP .................................................................................................................. 307
Chapter 4: Using DNS ..................................................................................................................... 321
Chapter 5: Using FTP ...................................................................................................................... 347
Chapter 6: TCP/IP Tools and Commands .................................................................................... 371
Book V: Wireless Networking .......................................... 397
Chapter 1: Setting Up a Wireless Network .................................................................................. 399
Chapter 2: Securing a Wireless Network ..................................................................................... 419
Chapter 3: Hotspotting .................................................................................................................. 431
Chapter 4: Troubleshooting a Wireless Network ....................................................................... 437
Chapter 5: Wireless Networking with Bluetooth ........................................................................ 443
Book VI: Mobile Networking............................................ 449
Chapter 1: Managing Mobile Devices ........................................................................................... 451
Chapter 2: Managing BlackBerry Devices ................................................................................... 455
Chapter 3: Managing iPhone Devices........................................................................................... 461
Chapter 4: Managing Android Devices ........................................................................................ 469
Chapter 5: Managing Netbooks ..................................................................................................... 473
Book VII: Windows Server 2008 Reference ....................... 477
Chapter 1: Installing and Coniguring Windows Server 2008 R2............................................... 479
Chapter 2: Managing Windows Server 2008 ................................................................................ 493
Chapter 3: Dealing with Active Directory .................................................................................... 509
Chapter 4: Managing Windows User Accounts ........................................................................... 519
Chapter 5: Managing a File Server ................................................................................................ 539
Chapter 6: Using Group Policy ...................................................................................................... 553
Chapter 7: Troubleshooting .......................................................................................................... 563
Chapter 8: Windows Commands .................................................................................................. 575
Book VIII: Using Other Windows Servers .......................... 603
Chapter 1: Using Internet Information System (IIS) ................................................................... 605
Chapter 2: Managing Exchange Server 2010 ............................................................................... 615
Chapter 3: Using SQL Server 2008 ................................................................................................ 635
Chapter 4: Using SharePoint ......................................................................................................... 655
Book IX: Managing Linux Systems ................................... 669
Chapter 1: Installing a Linux Server ............................................................................................. 671
Chapter 2: Getting Used to Linux ................................................................................................. 685
Chapter 3: Basic Linux Network Coniguration .......................................................................... 693
Chapter 4: Running DHCP and DNS .............................................................................................. 707
Chapter 5: Doing the Samba Dance .............................................................................................. 717
Chapter 6: Running Apache........................................................................................................... 731
Chapter 7: Running Sendmail ........................................................................................................ 743
Chapter 8: Running FTP ................................................................................................................. 753
Chapter 9: Linux Commands ......................................................................................................... 759
Appendix A: Directory of Useful Web Sites ....................... 787
Appendix B: Glossary...................................................... 795
Index ............................................................................. 823
Table of Contents
Introduction........................................................................ 1
About This Book .............................................................................................. 2
How to Use This Book ..................................................................................... 3
How This Book Is Organized .......................................................................... 3
Book I: Networking Basics .................................................................... 3
Book II: Building a Network .................................................................. 4
Book III: Network Administration and Security ................................. 4
Book IV: TCP/IP and the Internet ......................................................... 4
Book V: Wireless Networking ............................................................... 4
Book VI: Mobile Networking ................................................................. 4
Book VII: Windows Server 2008 R2 Reference .................................... 5
Book VIII: Using Other Windows Servers ............................................ 5
Book IX: Managing Linux Systems ....................................................... 5
Icons Used in This Book ................................................................................. 5
Where to Go from Here ................................................................................... 6
Book I: Networking Basics ................................................... 7
Chapter 1: Understanding Networks . . . . . . . . . . . . . . . . . . . . . . . . . . . . .9
What Is a Network? .......................................................................................... 9
Network building blocks ..................................................................... 10
Why bother? ......................................................................................... 12
Of Clients and Servers................................................................................... 13
Dedicated Servers and Peers ....................................................................... 14
Networks Big and Small ................................................................................ 14
Network Topology ......................................................................................... 15
Bus topology......................................................................................... 15
Star topology ........................................................................................ 16
Expanding stars.................................................................................... 17
Ring topology ....................................................................................... 18
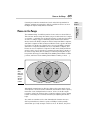
Mesh topology ...................................................................................... 18
Chapter 2: Understanding Network Protocols and Standards. . . . . . .21
Understanding Protocols.............................................................................. 21
Understanding Standards ............................................................................. 23
The Seven Layers of the OSI Reference Model .......................................... 24
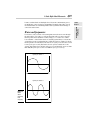
The Physical Layer .............................................................................. 25
The Data Link Layer............................................................................. 26
xii
Networking All-in-One For Dummies, 4th Edition
The Network Layer .............................................................................. 28
The Transport Layer ........................................................................... 30
The Session Layer ................................................................................ 32
The Presentation Layer ....................................................................... 32
The Application Layer ......................................................................... 33
Following a Packet through the Layers ...................................................... 33
The Ethernet Protocol .................................................................................. 34
Standard Ethernet ................................................................................ 35
Fast Ethernet ........................................................................................ 36
Gigabit Ethernet ................................................................................... 37
The TCP/IP Protocol Suite ............................................................................ 37
IP ............................................................................................................ 38
TCP ........................................................................................................ 39
UDP ........................................................................................................ 40
Other Protocols Worth Knowing About ..................................................... 41
Chapter 3: Understanding Network Hardware . . . . . . . . . . . . . . . . . . . .43
Servers ............................................................................................................ 43
What’s important in a server.............................................................. 43
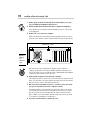
Components of a server computer .................................................... 44
Server form factors .............................................................................. 46
Network Interface Cards ............................................................................... 48
Network Cable ................................................................................................ 48
Coaxial cable ........................................................................................ 49
Twisted-pair cable ............................................................................... 50
Switches .......................................................................................................... 51
Repeaters ........................................................................................................ 54
Bridges ............................................................................................................ 55
Routers............................................................................................................ 57
Network Attached Storage ........................................................................... 58
Network Printers ........................................................................................... 59
Chapter 4: Understanding Network Operating Systems . . . . . . . . . . . .61
Network Operating System Features .......................................................... 61
Network support .................................................................................. 61
File-sharing services ............................................................................ 62
Multitasking .......................................................................................... 62
Directory services................................................................................ 64
Security services .................................................................................. 64
Microsoft’s Server Operating Systems ....................................................... 65
Windows 2000 Server .......................................................................... 66
Windows Server 2003 .......................................................................... 66
Windows Server 2008 .......................................................................... 68
Windows Server 2008 R2 ..................................................................... 68
Other Server Operating Systems ................................................................. 68
Linux ...................................................................................................... 69
Apple Mac OS/X Server ....................................................................... 69
Novell NetWare .................................................................................... 69
Table of Contents
xiii
Peer-to-Peer Networking with Windows ..................................................... 70
Advantages of peer-to-peer networks ............................................... 70
Drawbacks of peer-to-peer networks ................................................ 71
Windows 7............................................................................................. 71
Windows Vista ...................................................................................... 72
Older Windows versions ..................................................................... 73
Book II: Building a Network .............................................. 75
Chapter 1: Planning a Network . . . . . . . . . . . . . . . . . . . . . . . . . . . . . . . . .77
Making a Network Plan ................................................................................. 77
Being Purposeful............................................................................................ 78
Taking Stock ................................................................................................... 79
What you need to know ...................................................................... 79
Programs that gather information for you ....................................... 83
To Dedicate or Not to Dedicate: That Is the Question.............................. 84
Types of Servers ............................................................................................ 84
File servers............................................................................................ 84
Print servers ......................................................................................... 85
Web servers .......................................................................................... 85
Mail servers .......................................................................................... 85
Database servers.................................................................................. 85
Choosing a Server Operating System.......................................................... 86
Planning the Infrastructure .......................................................................... 86
Drawing Diagrams ......................................................................................... 87
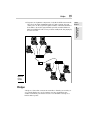
Sample Network Plans .................................................................................. 88
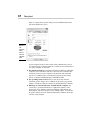
Building a small network: California Sport Surface, Inc. ................. 88
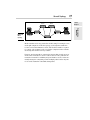
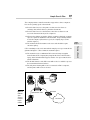
Connecting two networks: Creative Course Development, Inc...... 90
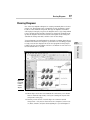
Improving network performance: DCH Accounting ........................ 92
Chapter 2: Installing Network Hardware. . . . . . . . . . . . . . . . . . . . . . . . .95
Installing a Network Interface Card ............................................................. 95
Installing Twisted-Pair Cable........................................................................ 97
Cable categories ................................................................................... 97
What’s with the pairs? ......................................................................... 98
To shield or not to shield ................................................................... 98
When to use plenum cable ................................................................. 99
Sometimes solid, sometimes stranded ............................................. 99
Installation guidelines ....................................................................... 100
Getting the tools that you need ....................................................... 101
Pinouts for twisted-pair cables ........................................................ 102
Attaching RJ-45 connectors .............................................................. 103
Crossover cables................................................................................ 105
Wall jacks and patch panels ............................................................. 105
xiv
Networking All-in-One For Dummies, 4th Edition
Installing Coaxial Cable ............................................................................... 107
Attaching a BNC Connector to Coaxial Cable .......................................... 108
Installing Switches ....................................................................................... 109
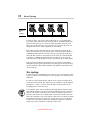
Daisy-Chaining Switches ............................................................................. 109
Chapter 3: Setting Up a Network Server . . . . . . . . . . . . . . . . . . . . . . . .111
The Many Ways to Install a Network Operating System ........................ 111
Full install versus upgrade................................................................ 111
Installing over the network ............................................................... 112
Automated and remote installations ............................................... 113
Gathering Your Stuff.................................................................................... 114
A capable server computer .............................................................. 114
The server operating system ........................................................... 115
Other software ................................................................................... 115
A working Internet connection......................................................... 115
A good book........................................................................................ 116
Making Informed Decisions ........................................................................ 116
Final Preparations ....................................................................................... 117
Installing a Network Operating System .................................................... 117
Phase 1: Collecting Information ....................................................... 118
Phase 2: Installing Windows ............................................................. 118
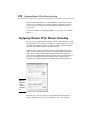
Coniguring Your Server ............................................................................. 119
Chapter 4: Configuring Windows Clients. . . . . . . . . . . . . . . . . . . . . . . .121
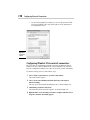
Coniguring Network Connections ............................................................ 121
Coniguring Windows XP network connections ............................. 122
Coniguring Windows Vista network connections......................... 126
Coniguring Windows 7 network connections ............................... 128
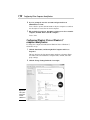
Coniguring Client Computer Identiication ............................................. 130
Coniguring Windows XP computer identiication ........................ 131
Coniguring Windows Vista or Windows 7 computer
identiication ................................................................................... 132
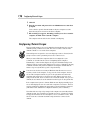
Coniguring Network Logon ....................................................................... 134
Chapter 5: Macintosh Networking . . . . . . . . . . . . . . . . . . . . . . . . . . . . .135
What You Need to Know to Hook Up a Macintosh Network .................. 135
Mac networking protocols ................................................................ 135
Mac OS X Server ................................................................................. 136
What You Need to Know to Use a Macintosh Network .......................... 137
Coniguring a Mac for networking ................................................... 137
Accessing a network printer............................................................. 138
Sharing iles with other users........................................................... 138
Accessing shared iles ....................................................................... 139
What You Need to Know to Network Macintoshes with PCs................. 139
Table of Contents
xv
Chapter 6: Configuring Other Network Features . . . . . . . . . . . . . . . . .141
Coniguring Network Printers .................................................................... 141
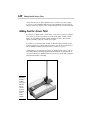
Adding a network printer.................................................................. 141
Accessing a network printer using a Web interface ...................... 143
Coniguring Internet Access ....................................................................... 145
Coniguring clients for DHCP ............................................................ 145
Using Internet Connection Sharing .................................................. 147
Mapping Network Drives ............................................................................ 147
Chapter 7: Verifying Your Network Installation . . . . . . . . . . . . . . . . . .151
Is the Computer Connected to the Network?........................................... 151
Is the Network Coniguration Working? .................................................... 152
Can the Computers Ping Each Other?....................................................... 154
Can You Log On?.......................................................................................... 154
Are Network Drives Mapped Correctly? ................................................... 155
Do Network Printers Work?........................................................................ 155
Chapter 8: Going Virtual . . . . . . . . . . . . . . . . . . . . . . . . . . . . . . . . . . . . . .157
Understanding Virtualization ..................................................................... 157
Looking at the Beneits of Virtualization .................................................. 159
Getting Started with Virtualization............................................................ 161
Creating a Virtual Machine ......................................................................... 162
Book III: Network Administration and Security ................. 169
Chapter 1: Help Wanted: Job Description for a
Network Administrator . . . . . . . . . . . . . . . . . . . . . . . . . . . . . . . . . . . . . . .171
Knowing What Network Administrators Do ............................................. 171
Choosing the Part-Time Administrator..................................................... 173
Establishing Routine Chores ...................................................................... 174
Managing Network Users ............................................................................ 175
Patching Up Your Operating System and Software................................. 175
Discovering Software Tools for Network Administrators ...................... 176
Building a Library ........................................................................................ 178
Getting Certiied ........................................................................................... 179
CompTIA ............................................................................................. 180
Microsoft ............................................................................................. 180
Cisco .................................................................................................... 181
Gurus Need Gurus, Too .............................................................................. 181
Helpful Bluffs and Excuses ......................................................................... 182
xvi
Networking All-in-One For Dummies, 4th Edition
Chapter 2: Security 101 . . . . . . . . . . . . . . . . . . . . . . . . . . . . . . . . . . . . . . .185
Do You Need Security? ............................................................................... 186
Considering Two Approaches to Security................................................ 187
Physical Security: Locking Your Doors .................................................... 187
Securing User Accounts .............................................................................. 189
Obfuscating your usernames ........................................................... 189
Using passwords wisely .................................................................... 190
A Password Generator For Dummies .............................................. 191
Securing the Administrator account ............................................... 192
Hardening Your Network ............................................................................ 192
Using a irewall ................................................................................... 192
Disabling unnecessary services ....................................................... 193
Patching your servers ....................................................................... 193
Securing Your Users .................................................................................... 193
Chapter 3: Managing User Accounts . . . . . . . . . . . . . . . . . . . . . . . . . . .195
Exploring What User Accounts Consist Of ............................................... 195
Looking at Built-In Accounts ...................................................................... 196
The Administrator account .............................................................. 196
The Guest account ............................................................................. 197
Service accounts ................................................................................ 197
Assigning User Rights ................................................................................. 198
Controlling User Access with Permissions (Who Gets What) ............... 199
Assigning Permissions to Groups .............................................................. 200
Understanding User Proiles ...................................................................... 201
Automating Tasks with Logon Scripts ...................................................... 201
Chapter 4: Firewalls and Virus Protection. . . . . . . . . . . . . . . . . . . . . . .203
Firewalls ........................................................................................................ 203
The Many Types of Firewalls ..................................................................... 205
Packet iltering ................................................................................... 205
Stateful packet inspection (SPI) ....................................................... 207
Circuit-level gateway ......................................................................... 207
Application gateway .......................................................................... 208
The Built-In Windows Firewall ................................................................... 208
Virus Protection........................................................................................... 210
What is a virus? .................................................................................. 210
Antivirus programs ............................................................................ 211
Safe computing ................................................................................... 212
Using Windows Action Center ................................................................... 213
Chapter 5: Extending Your Network with VPN Access. . . . . . . . . . . .215
Understanding VPN ..................................................................................... 215
Looking at VPN Security ............................................................................. 216
Understanding VPN Servers and Clients .................................................. 217
Table of Contents
xvii
Chapter 6: Managing Network Software. . . . . . . . . . . . . . . . . . . . . . . .221
Understanding Software Licenses ............................................................. 222
Using a License Server ................................................................................ 224
Options for Deploying Network Software ................................................. 226
Deploying software manually ........................................................... 226
Running Setup from a network share .............................................. 226
Installing silently ................................................................................ 227
Creating an administrative installation image ............................... 229
Pushing out software with group policy ......................................... 229
Keeping Software Up to Date ..................................................................... 230
Chapter 7: Solving Network Problems . . . . . . . . . . . . . . . . . . . . . . . . . .233
When Bad Things Happen to Good Computers ....................................... 234
Fixing Dead Computers ............................................................................... 235
Ways to Check a Network Connection...................................................... 236
A Bunch of Error Messages Just Flew By!................................................. 237
Double-Checking Your Network Settings ................................................. 237
Using the Windows Networking Troubleshooter .................................... 238
Time to Experiment ..................................................................................... 239
Who’s on First? ............................................................................................ 240
Restarting a Client Computer..................................................................... 240
Booting in Safe Mode .................................................................................. 242
Using System Restore ................................................................................. 242
Restarting Network Services ...................................................................... 244
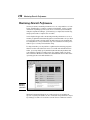
Restarting a Network Server ...................................................................... 245
Looking at Event Logs ................................................................................. 246
Documenting Your Trials and Tribulations ............................................. 247
Chapter 8: Network Performance Anxiety. . . . . . . . . . . . . . . . . . . . . . .249
Why Administrators Hate Performance Problems .................................. 249
What Exactly Is a Bottleneck? .................................................................... 250
The Five Most Common Network Bottlenecks ........................................ 252
The hardware inside your servers .................................................. 252
The server’s coniguration options ................................................. 252
Servers that do too much ................................................................. 253
The network infrastructure .............................................................. 254
Malfunctioning components ............................................................. 254
Tuning Your Network the Compulsive Way ............................................. 255
Monitoring Network Performance ............................................................. 256
More Performance Tips .............................................................................. 258
Chapter 9: Backing Up Your Data . . . . . . . . . . . . . . . . . . . . . . . . . . . . . .259
Backing Up Your Data ................................................................................. 259
All about Tapes and Tape Drives .............................................................. 260
xviii
Networking All-in-One For Dummies, 4th Edition
Backup Software .......................................................................................... 261
Types of Backups ........................................................................................ 262
Normal backups ................................................................................. 263
Copy backups ..................................................................................... 264
Daily backups ..................................................................................... 264
Incremental backups ......................................................................... 264
Differential backups........................................................................... 265
Local versus Network Backups.................................................................. 266
How Many Sets of Backups Should You Keep? ........................................ 267
A Word about Tape Reliability................................................................... 268
About Cleaning the Heads .......................................................................... 269
Backup Security ........................................................................................... 270
Chapter 10: Disaster Recovery and Business Continuity Planning . . . 271
Assessing Different Types of Disasters..................................................... 272
Environmental disasters ................................................................... 272
Deliberate disasters ........................................................................... 273
Disruption of services ....................................................................... 273
Equipment failure .............................................................................. 274
Other disasters................................................................................... 274
Analyzing the Impact of a Disaster ............................................................ 275
Developing a Business Continuity Plan .................................................... 276
Holding a Fire Drill....................................................................................... 277
Book IV: TCP/IP and the Internet...................................... 279
Chapter 1: Introduction to TCP/IP and the Internet . . . . . . . . . . . . . . .281
What Is the Internet? ................................................................................... 281
A Little Internet History .............................................................................. 283
TCP/IP Standards and RFCs ....................................................................... 284
The TCP/IP Protocol Framework ............................................................... 286
Network Interface layer..................................................................... 286
Network layer ..................................................................................... 287
Transport layer .................................................................................. 287
Application layer ................................................................................ 288
Chapter 2: Understanding IP Addresses . . . . . . . . . . . . . . . . . . . . . . . .289
Understanding Binary ................................................................................. 289
Counting by ones ............................................................................... 289
Doing the logic thing ......................................................................... 291
Working with the binary Windows Calculator ............................... 292
Introducing IP Addresses ........................................................................... 293
Networks and hosts ........................................................................... 294
The dotted-decimal dance ................................................................ 294
www.allitebooks.com
Table of Contents
xix
Classifying IP Addresses ............................................................................. 295
Class A addresses .............................................................................. 297
Class B addresses .............................................................................. 299
Class C addresses .............................................................................. 299
Subnetting..................................................................................................... 299
Subnets ................................................................................................ 300
Subnet masks...................................................................................... 300
Network preix notation .................................................................... 302
Default subnets .................................................................................. 302
The great subnet roundup ................................................................ 303
IP block parties .................................................................................. 303
Private and public addresses ........................................................... 304
Network Address Translation .................................................................... 305
Chapter 3: Using DHCP . . . . . . . . . . . . . . . . . . . . . . . . . . . . . . . . . . . . . . .307
Understanding DHCP .................................................................................. 307
Coniguration information provided by DHCP ............................... 307
DHCP servers...................................................................................... 308
How DHCP actually works ................................................................ 308
Understanding Scopes ................................................................................ 310
Feeling excluded? ............................................................................... 311
Reservations suggested .................................................................... 311
How long to lease? ............................................................................. 312
Working with a DHCP Server...................................................................... 313
Installing and coniguring a DHCP server ....................................... 313
Managing a DHCP server................................................................... 316
How to Conigure a Windows DHCP Client............................................... 318
Automatic Private IP Addressing ..................................................... 319
Renewing and releasing leases......................................................... 319
Chapter 4: Using DNS . . . . . . . . . . . . . . . . . . . . . . . . . . . . . . . . . . . . . . . .321
Understanding DNS Names ........................................................................ 321
Domains and domain names ............................................................ 322
Fully qualiied domain names........................................................... 323
Top-Level Domains ...................................................................................... 324
Generic domains ................................................................................ 324
Geographic domains.......................................................................... 325
The Hosts File .............................................................................................. 327
Understanding DNS Servers and Zones .................................................... 330
Zones ................................................................................................... 330
Primary and secondary servers ....................................................... 332
Root servers ....................................................................................... 332
Caching................................................................................................ 335
Understanding DNS Queries....................................................................... 335
A real-life DNS example ..................................................................... 336
xx
Networking All-in-One For Dummies, 4th Edition
Zone Files and Resource Records ............................................................. 337
SOA records ........................................................................................ 339
NS records .......................................................................................... 340
A records............................................................................................. 340
CNAME records .................................................................................. 341
PTR records ........................................................................................ 341
MX records ......................................................................................... 342
Reverse Lookup Zones ................................................................................ 342
Working with the Windows DNS Server.................................................... 343
How to Conigure a Windows DNS Client ................................................. 345
Chapter 5: Using FTP . . . . . . . . . . . . . . . . . . . . . . . . . . . . . . . . . . . . . . . . .347
Discovering FTP ........................................................................................... 347
Coniguring an FTP Server .......................................................................... 348
Installing FTP ...................................................................................... 348
Creating an FTP site........................................................................... 348
Changing the FTP site properties .................................................... 351
Adding content to your FTP site ...................................................... 353
Accessing an FTP Site with a Browser ...................................................... 354
Using an FTP Command Line Client .......................................................... 355
FTP Command and Subcommand Reference ........................................... 358
The FTP command ............................................................................. 358
! (Escape) ............................................................................................ 359
? (Help) ................................................................................................ 359
append................................................................................................. 359
ascii ...................................................................................................... 360
bell ....................................................................................................... 360
binary .................................................................................................. 360
bye ....................................................................................................... 360
cd ......................................................................................................... 360
close..................................................................................................... 361
debug ................................................................................................... 361
delete ................................................................................................... 361
dir ......................................................................................................... 361
disconnect .......................................................................................... 362
get ........................................................................................................ 362
glob ...................................................................................................... 362
hash ..................................................................................................... 363
help ...................................................................................................... 363
lcd ........................................................................................................ 363
literal ................................................................................................... 363
ls .......................................................................................................... 364
mdelete................................................................................................ 364
mdir ..................................................................................................... 364
mget ..................................................................................................... 364
mkdir ................................................................................................... 365
Table of Contents
xxi
mls ....................................................................................................... 365
mput .................................................................................................... 365
open ..................................................................................................... 365
prompt................................................................................................. 366
put ........................................................................................................ 366
pwd ...................................................................................................... 366
quit ....................................................................................................... 367
quote.................................................................................................... 367
recv ...................................................................................................... 367
remotehelp ......................................................................................... 368
rename................................................................................................. 368
rmdir .................................................................................................... 368
send ..................................................................................................... 368
status ................................................................................................... 369
trace ..................................................................................................... 369
type ...................................................................................................... 369
user ...................................................................................................... 370
verbose................................................................................................ 370
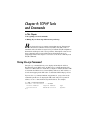
Chapter 6: TCP/IP Tools and Commands . . . . . . . . . . . . . . . . . . . . . . . .371
Using the arp Command ............................................................................. 371
Using the hostname Command .................................................................. 372
Using the ipconig Command ..................................................................... 373
Displaying basic IP coniguration .................................................... 373
Displaying detailed coniguration information .............................. 374
Renewing an IP lease ......................................................................... 374
Releasing an IP lease ......................................................................... 375
Flushing the local DNS cache ........................................................... 375
Using the nbtstat Command....................................................................... 375
Using the netdiag Utility ............................................................................. 377
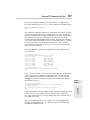
Using the netstat Command ....................................................................... 378
Displaying connections ..................................................................... 379
Displaying interface statistics .......................................................... 379
Using the nslookup Command ................................................................... 382
Looking up an IP address .................................................................. 382
Using nslookup subcommands ........................................................ 383
Displaying DNS records .................................................................... 384
Locating the mail server for an e-mail address .............................. 385
Taking a ride through DNS-Land ...................................................... 386
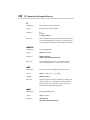
Using the pathping Command ................................................................... 389
Using the ping Command ........................................................................... 390
Using the route Command.......................................................................... 391
Displaying the routing table ............................................................. 391
Modifying the routing table .............................................................. 394
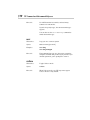
Using the tracert Command ....................................................................... 395
xxii
Networking All-in-One For Dummies, 4th Edition
Book V: Wireless Networking ........................................... 397
Chapter 1: Setting Up a Wireless Network . . . . . . . . . . . . . . . . . . . . . .399
Diving into Wireless Networking ............................................................... 400
A Little High School Electronics ................................................................ 400
Waves and frequencies ..................................................................... 401
Wavelength and antennas................................................................. 402
Spectrums and the FCC ..................................................................... 402
Eight-Oh-Two-Dot-Eleventy Something? (Or, Understanding
Wireless Standards)................................................................................. 404
Home on the Range ..................................................................................... 405
Wireless Network Adapters........................................................................ 406
Wireless Access Points ............................................................................... 407
Infrastructure mode .......................................................................... 408
Multifunction WAPs ........................................................................... 409
Roaming ........................................................................................................ 410
Wireless bridging ............................................................................... 410
Ad-hoc networks ................................................................................ 411
Coniguring a Wireless Access Point ......................................................... 411
Basic coniguration options.............................................................. 411
DHCP coniguration ........................................................................... 413
Coniguring Windows XP for Wireless Networking ................................. 414
Using a Wireless Network with Windows XP ........................................... 415
Connecting to a Wireless Network with Windows Vista ........................ 417
Connecting to a Wireless Network with Windows 7 ............................... 417
Chapter 2: Securing a Wireless Network . . . . . . . . . . . . . . . . . . . . . . .419
Understanding Wireless Security Threats................................................ 419
Intruders ............................................................................................. 420
Freeloaders ......................................................................................... 421
Eavesdroppers ................................................................................... 421
Spoilers................................................................................................ 422
Rogue access points .......................................................................... 422
What About Wardrivers and Warchalkers?.............................................. 423
Wardriving .......................................................................................... 423
Warchalking ........................................................................................ 424
Securing Your Wireless Network ............................................................... 425
Changing the password..................................................................... 425
Securing the SSID ............................................................................... 425
Enabling WEP ..................................................................................... 427
Using WPA........................................................................................... 428
Using MAC address iltering ............................................................. 429
Placing your access points outside the irewall ............................ 430
Table of Contents
xxiii
Chapter 3: Hotspotting . . . . . . . . . . . . . . . . . . . . . . . . . . . . . . . . . . . . . . . .431
What Is a Hotspot? ...................................................................................... 431
What’s So Great about Hotspots? .............................................................. 432
Safe Hotspotting .......................................................................................... 432
Free Hotspots ............................................................................................... 432
Fee-Based Hotspots ..................................................................................... 433
T-Mobile .............................................................................................. 434
Boingo ................................................................................................. 434
Setting Up Your Own Hotspot .................................................................... 434
Chapter 4: Troubleshooting a Wireless Network. . . . . . . . . . . . . . . . .437
Checking for Obvious Problems ................................................................ 437
Pinpointing the Problem ............................................................................. 438
Changing Channels ...................................................................................... 438
Fiddle with the Antennas ............................................................................ 439
Adding Another Access Point .................................................................... 440
Help! I Forgot My Router’s Password! ....................................................... 441
Chapter 5: Wireless Networking with Bluetooth. . . . . . . . . . . . . . . . .443
Understanding Bluetooth ........................................................................... 443
Bluetooth Technical Stuff ........................................................................... 444
How to Add Bluetooth to Your Computer ................................................ 445
Using Bluetooth in Windows ...................................................................... 445
Installing a USB Bluetooth Adapter ........................................................... 446
Enabling Discovery ...................................................................................... 446
Installing a Bluetooth Mouse or Keyboard............................................... 447
Book VI: Mobile Networking ............................................ 449
Chapter 1: Managing Mobile Devices . . . . . . . . . . . . . . . . . . . . . . . . . .451
The Many Types of Mobile Devices .......................................................... 451
Considering Security for Mobile Devices ................................................. 453
Chapter 2: Managing BlackBerry Devices . . . . . . . . . . . . . . . . . . . . . .455
Understanding BlackBerry ......................................................................... 455
Adding a BES User ....................................................................................... 458
Locking and Erasing a Handheld ............................................................... 460
Chapter 3: Managing iPhone Devices . . . . . . . . . . . . . . . . . . . . . . . . . .461
Understanding the iPhone .......................................................................... 461
Integrating iPhone with Exchange ............................................................. 462
Enabling Exchange Mobile Services ................................................ 463
Enabling ActiveSync for a user’s mailbox....................................... 464
Coniguring the iPhone for Exchange e-mail .................................. 465
xxiv
Networking All-in-One For Dummies, 4th Edition
Chapter 4: Managing Android Devices . . . . . . . . . . . . . . . . . . . . . . . . .469
Understanding Android Phones ................................................................ 469
Looking at the Android Operating System ............................................... 470
Perusing Android’s Core Applications...................................................... 471
Integrating Android with Exchange........................................................... 471
Chapter 5: Managing Netbooks . . . . . . . . . . . . . . . . . . . . . . . . . . . . . . . .473
Understanding Netbook Computers ......................................................... 473
Connecting with a Netbook ........................................................................ 474
Tips for Using a Netbook Effectively ......................................................... 476
Book VII: Windows Server 2008 Reference ....................... 477
Chapter 1: Installing and Configuring Windows Server 2008 R2 . . . .479
Planning a Windows Server Installation ................................................... 479
Checking system requirements........................................................ 479
Reading the release notes ................................................................. 480
Deciding whether to upgrade or install .......................................... 481
Considering your licensing options................................................. 481
Thinking about multiboot ................................................................. 481
Choosing a ile system....................................................................... 482
Planning your partitions ................................................................... 483
Deciding your TCP/IP coniguration ................................................ 484
Choosing workgroups or domains .................................................. 485
Before You Install . . . .................................................................................. 485
Backing up .......................................................................................... 486
Checking the event logs .................................................................... 486
Uncompressing data .......................................................................... 486
Disconnecting UPS devices............................................................... 486
Running Setup .............................................................................................. 486
Adding Server Roles and Features ............................................................ 489
Chapter 2: Managing Windows Server 2008 . . . . . . . . . . . . . . . . . . . . .493
Using the Administrator Account .............................................................. 493
Using Remote Desktop Connection ........................................................... 494
Enabling remote access .................................................................... 494
Connecting remotely ......................................................................... 495
Using Microsoft Management Console ..................................................... 497
Working with MMC ............................................................................ 497
An overview of the MMC consoles .................................................. 498
Customizing MMC........................................................................................ 501
Adding snap-ins .................................................................................. 501
Adding taskpads................................................................................. 502
Table of Contents
xxv
Chapter 3: Dealing with Active Directory . . . . . . . . . . . . . . . . . . . . . . .509
What Directories Do .................................................................................... 509
Remembering the Good-Ol’ Days of NT Domains .................................... 510
PDCs and BDCs................................................................................... 510
Trusts .................................................................................................. 511
NetBIOS names ................................................................................... 511
Active Directory to the Rescue .................................................................. 511
Understanding How Active Directory Is Structured ............................... 512
Objects ................................................................................................ 512
Domains .............................................................................................. 513
Organizational units .......................................................................... 514
Trees .................................................................................................... 514
Forests ................................................................................................. 515
Creating a Domain ....................................................................................... 516
Creating an Organizational Unit ................................................................ 516
Chapter 4: Managing Windows User Accounts . . . . . . . . . . . . . . . . . .519
Understanding Windows User Accounts .................................................. 519
Local accounts versus domain accounts........................................ 519
User account properties ................................................................... 520
Creating a New User .................................................................................... 520
Setting User Properties ............................................................................... 523
Changing the user’s contact information ....................................... 524
Setting account options .................................................................... 524
Specifying logon hours ...................................................................... 525
Restricting access to certain computers ........................................ 526
Setting the user’s proile information ............................................. 527
Resetting User Passwords .......................................................................... 528
Disabling and Enabling User Accounts ..................................................... 529
Deleting a User ............................................................................................. 529
Working with Groups .................................................................................. 530
Group types ........................................................................................ 530
Group scope ....................................................................................... 530
Default groups .................................................................................... 531
Creating a group................................................................................. 533
Adding a member to a group ............................................................ 534
User Proiles ................................................................................................. 535
Types of user proiles ........................................................................ 536
Creating a roaming proile ................................................................ 536
Creating a Logon Script .............................................................................. 538
Chapter 5: Managing a File Server . . . . . . . . . . . . . . . . . . . . . . . . . . . . .539
Understanding Permissions ....................................................................... 539
Understanding Shares ................................................................................. 541
Coniguring the File Server Role ................................................................ 542
xxvi
Networking All-in-One For Dummies, 4th Edition
Managing Your File Server ......................................................................... 542
Using the Provision a Shared Folder Wizard .................................. 543
Sharing a folder without the wizard ................................................ 548
Granting permissions ........................................................................ 549
Chapter 6: Using Group Policy . . . . . . . . . . . . . . . . . . . . . . . . . . . . . . . . .553
Understanding Group Policy ...................................................................... 553
Enabling Group Policy Management on Windows Server 2008 ............. 554
Creating Group Policy Objects .................................................................. 555
Filtering Group Policy Objects ................................................................... 560
Chapter 7: Troubleshooting . . . . . . . . . . . . . . . . . . . . . . . . . . . . . . . . . . .563
Working with the Event Viewer ................................................................. 563
Using the Event Viewer ..................................................................... 564
Setting event log policies .................................................................. 565
Monitoring Performance............................................................................. 566
Using the Reliability and Performance Monitor............................. 567
Creating performance logs ............................................................... 570
Using the Computer Management Console .............................................. 572
Working with Services ................................................................................ 573
Chapter 8: Windows Commands . . . . . . . . . . . . . . . . . . . . . . . . . . . . . . .575
Using a Command Window ........................................................................ 575
Opening and closing a command window ...................................... 576
Editing commands ............................................................................. 576
Using the Control menu .................................................................... 577
Special Command Tricks ............................................................................ 577
Wildcards ............................................................................................ 578
Chaining commands .......................................................................... 578
Redirection and piping ...................................................................... 579
Environment variables ...................................................................... 580
Batch iles ........................................................................................... 581
The EventCreate Command ....................................................................... 582
Net Commands............................................................................................. 583
The Net Accounts command ............................................................ 584
The Net Computer command ........................................................... 585
The Net Conig command ................................................................. 585
The Net Continue command............................................................. 586
The Net File command ...................................................................... 586
The Net Group command ................................................................. 587
The Net Help command .................................................................... 588
The Net Helpmsg command ............................................................. 589
The Net Localgroup command......................................................... 589
The Net Name command .................................................................. 591
The Net Pause command .................................................................. 591
Table of Contents
xxvii
The Net Print command .................................................................... 592
The Net Send command .................................................................... 593
The Net Session command ............................................................... 594
The Net Share command................................................................... 594
The Net Start command .................................................................... 596
The Net Statistics command ............................................................ 596
The Net Stop command..................................................................... 597
The Net Time command.................................................................... 597
The Net Use command ...................................................................... 598
The Net User command .................................................................... 599
The Net View command .................................................................... 601
The RunAs Command ................................................................................. 602
Book VIII: Using Other Windows Servers ........................... 603
Chapter 1: Using Internet Information System (IIS) . . . . . . . . . . . . . . .605
Installing IIS .................................................................................................. 605
Understanding the Default Web Site ......................................................... 608
Creating Web Sites ...................................................................................... 610
Chapter 2: Managing Exchange Server 2010. . . . . . . . . . . . . . . . . . . . .615
Creating a Mailbox....................................................................................... 615
Managing Mailboxes .................................................................................... 621
Enabling Mailbox Features ............................................................... 622
Creating a Forwarder......................................................................... 623
Setting Mailbox Storage Limits......................................................... 625
Coniguring Outlook for Exchange ............................................................ 628
Viewing Another Mailbox ........................................................................... 631
Chapter 3: Using SQL Server 2008 . . . . . . . . . . . . . . . . . . . . . . . . . . . . . .635
What Is a Database? .................................................................................... 635
What Is a Relational Database? .................................................................. 636
What Is SQL?................................................................................................. 637
SQL dialects ........................................................................................ 637
SQL statements .................................................................................. 637
Using the select statement ............................................................... 638
Installing SQL Server 2008 .......................................................................... 639
Using the SQL Server 2008 Management Studio ...................................... 646
Creating a New Database ............................................................................ 647
Creating Tables ............................................................................................ 648
Editing Tables .............................................................................................. 651
Working with Queries ................................................................................. 652
Working with Scripts ................................................................................... 653
xxviii
Networking All-in-One For Dummies, 4th Edition
Chapter 4: Using SharePoint . . . . . . . . . . . . . . . . . . . . . . . . . . . . . . . . . .655
What Is SharePoint? .................................................................................... 655
Connecting to a SharePoint Site ................................................................ 656
Adding Users ................................................................................................ 657
Adding and Removing Announcements.................................................... 661
Creating New Pages ..................................................................................... 663
Editing the Quick Launch Menu................................................................. 666
Working with Document Libraries ............................................................ 667
Book IX: Managing Linux Systems .................................... 669
Chapter 1: Installing a Linux Server . . . . . . . . . . . . . . . . . . . . . . . . . . . .671
Planning a Linux Server Installation.......................................................... 671
Checking system requirements........................................................ 671
Choosing a distribution..................................................................... 672
Thinking about multiboot ................................................................. 673
Planning your partitions ................................................................... 673
Deciding on your TCP/IP coniguration .......................................... 674
Installing Fedora 7 ....................................................................................... 675
Using the Setup Agent ......................................................................................... 683
Chapter 2: Getting Used to Linux . . . . . . . . . . . . . . . . . . . . . . . . . . . . . . .685
Linux: It Isn’t Windows................................................................................ 685
X Window ............................................................................................ 685
Virtual consoles ................................................................................. 686
Understanding the ile system ......................................................... 686
On Again, Off Again ..................................................................................... 688
Logging on........................................................................................... 688
Logging off .......................................................................................... 689
Shutting down .................................................................................... 689
Using GNOME ............................................................................................... 689
Getting to a Command Shell ....................................................................... 690
Managing User Accounts ............................................................................ 691
Chapter 3: Basic Linux Network Configuration . . . . . . . . . . . . . . . . . .693
Using the Network Coniguration Program .............................................. 693
Restarting Your Network ............................................................................ 697
Working with Network Coniguration Files .............................................. 698
The Network ile ................................................................................. 699
The ifcfg iles ...................................................................................... 700
The Hosts ile ...................................................................................... 701
The resolv.conf ile ............................................................................ 702
The nsswitch.conf ile ....................................................................... 702
The xinetd.conf ile ............................................................................ 703
Displaying Your Network Coniguration with the ifconig Command ... 704
www.allitebooks.com
Table of Contents
xxix
Chapter 4: Running DHCP and DNS. . . . . . . . . . . . . . . . . . . . . . . . . . . . .707
Running a DHCP Server............................................................................... 707
Installing DHCP................................................................................... 708
Coniguring DHCP .............................................................................. 709
Starting DHCP ..................................................................................... 710
Running a DNS Server ................................................................................. 711
Installing BIND .................................................................................... 711
Looking at BIND coniguration iles ................................................. 712
Restarting BIND .................................................................................. 716
Chapter 5: Doing the Samba Dance . . . . . . . . . . . . . . . . . . . . . . . . . . . .717
Understanding Samba ................................................................................. 717
Installing Samba ........................................................................................... 718
Starting and Stopping Samba ..................................................................... 719
Using the Samba Server Coniguration Tool ............................................ 721
Coniguring server settings............................................................... 722
Coniguring Samba users .................................................................. 723
Creating a share ................................................................................. 725
Editing the smb.conf File ............................................................................ 727
Using the Samba Client ............................................................................... 729
Chapter 6: Running Apache . . . . . . . . . . . . . . . . . . . . . . . . . . . . . . . . . . .731
Installing Apache ......................................................................................... 731
Starting and Stopping Apache ................................................................... 732
Conirming that Apache Is Running .......................................................... 733
Using the HTTP Coniguration Tool .......................................................... 734
Restricting Access to an Apache Server ................................................... 735
Coniguring Virtual Hosts ........................................................................... 736
Coniguring the default host ............................................................. 736
Creating a virtual host ....................................................................... 739
Setting the Apache User Account .............................................................. 740
Manually Editing Apache’s Coniguration Files ....................................... 741
Creating Web Pages..................................................................................... 741
Chapter 7: Running Sendmail. . . . . . . . . . . . . . . . . . . . . . . . . . . . . . . . . .743
Understanding E-Mail .................................................................................. 743
Installing Sendmail ...................................................................................... 744
Modifying sendmail.mc ............................................................................... 745
Enabling connections ........................................................................ 746
Enabling masquerading..................................................................... 747
Setting up aliases ............................................................................... 747
Using SpamAssassin .................................................................................... 748
Installing SpamAssassin .................................................................... 748
Customizing SpamAssassin .............................................................. 749
Blacklisting and whitelisting e-mail addresses .............................. 750
Using the Mail Console Client .................................................................... 750
Using Evolution ............................................................................................ 752
xxx
Networking All-in-One For Dummies, 4th Edition
Chapter 8: Running FTP . . . . . . . . . . . . . . . . . . . . . . . . . . . . . . . . . . . . . . .753
Installing vsftpd ........................................................................................... 753
Starting the vsftpd Service ......................................................................... 754
Coniguring FTP ........................................................................................... 754
Chapter 9: Linux Commands . . . . . . . . . . . . . . . . . . . . . . . . . . . . . . . . . . .759
Command Shell Basics ................................................................................ 759
Getting to a shell ................................................................................ 760
Editing commands ............................................................................. 761
Wildcards ............................................................................................ 761
Redirection and piping ...................................................................... 762
Environment variables ...................................................................... 762
Shell scripts ........................................................................................ 763
Directory and File Handling Commands ................................................... 764
The pwd command ............................................................................ 764
The cd command ............................................................................... 765
The mkdir command ......................................................................... 765
The rmdir command.......................................................................... 766
The ls command................................................................................. 766
The cp command ............................................................................... 767
The rm command............................................................................... 768
The mv command .............................................................................. 769
The touch command ......................................................................... 769
The cat command .............................................................................. 770
Commands for Working with Packages and Services ............................. 771
The service command ....................................................................... 771
The rpm command ............................................................................ 773
Commands for Administering Users ......................................................... 774
The useradd command ..................................................................... 774
The usermod command .................................................................... 775
The userdel command ...................................................................... 776
The chage command ......................................................................... 776
The passwd command ...................................................................... 777
The newusers command ................................................................... 777
The groupadd command................................................................... 777
The groupdel command .................................................................... 778
The gpasswd command .................................................................... 778
Commands for Managing Ownership and Permissions .......................... 779
The chown command ........................................................................ 779
The chgrp command ......................................................................... 780
The chmod command ....................................................................... 780
Table of Contents
xxxi
Networking Commands............................................................................... 781
The hostname command .................................................................. 781
The ifconig command ....................................................................... 782
The netstat command ....................................................................... 783
The ping command ............................................................................ 784
The route command .......................................................................... 785
The traceroute command ................................................................. 786
Appendix A: Directory of Useful Web Sites ........................ 787
Certiication .................................................................................................. 787
Hardware ...................................................................................................... 787
Home and Small Business Networking ..................................................... 788
Linux .............................................................................................................. 789
Magazines ..................................................................................................... 789
Microsoft....................................................................................................... 790
Network Standards Organizations ............................................................ 790
Reference ...................................................................................................... 791
Search ........................................................................................................... 791
TCP/IP and the Internet .............................................................................. 792
Wireless Networking ................................................................................... 793
Smartphones ................................................................................................ 794
Appendix B: Glossary ...................................................... 795
Index.............................................................................. 823
xxxii
Networking All-in-One For Dummies, 4th Edition
Introduction
W
elcome to the fourth edition of Networking All-in-One For Dummies,
the one networking book that’s designed to replace an entire shelf
full of the dull and tedious networking books you’d otherwise have to buy.
This book contains all the basic and not-so-basic information you need to
know to get a network up and running and to stay on top of the network as
it grows, develops problems, and encounters trouble.
If you’re just getting started as a network administrator, this book is ideal.
As a network administrator, you have to know about a lot of different topics:
installing and configuring network hardware, installing and configuring network operating systems, planning a network, working with TCP/IP, securing
your network, working with mobile devices, backing up your data, and many
others.
You can, and probably eventually will, buy separate books on each of these
topics. It won’t take long before your bookshelf is bulging with 10,000 or
more pages of detailed information about every imaginable nuance of networking. But before you’re ready to tackle each of those topics in depth,
you need to get a bird’s-eye picture. This book is the ideal way to do that.
And if you already own 10,000 pages or more of network information, you
may be overwhelmed by the amount of detail and wonder, “Do I really need
to read 1,000 pages about Bind to set up a simple DNS server?” or “Do I
really need a six-pound book to show me how to install Linux?” Truth is,
most 1,000-page networking books have about 100 or so pages of really
useful information — the kind you use every day — and about 900 pages of
excruciating details that apply mostly to networks at places like NASA and
the CIA.
The basic idea of this book is that I’ve tried to wring out the 100 or so most
useful pages of information on nine different networking topics: network
basics, building a network, network administration and security, troubleshooting and disaster planning, working with TCP/IP, home networking,
wireless networking, Windows server operating systems, and Linux.
So whether you’ve just been put in charge of your first network or you’re a
seasoned pro, you’ve found the right book.
2
About This Book
About This Book
Networking All-in-One For Dummies, 4th Edition, is intended to be a reference
for all the great things (and maybe a few not-so-great things) that you may
need to know when you’re setting up and managing a network. You can, of
course, buy a huge 1,000-page book on each of the networking topics covered in this book. But then, who would you get to carry them home from the
bookstore for you? And where would you find the shelf space to store them?
In this book, you get the information you need all conveniently packaged for
you in between one set of covers.
This book doesn’t pretend to be a comprehensive reference for every detail
of these topics. Instead, this book shows you how to get up and running fast
so that you have more time to do the things you really want to do. Designed
using the easy-to-follow For Dummies format, this book helps you get the
information you need without laboring to find it.
Networking All-in-One For Dummies, 4th Edition, is a big book made up of several smaller books — minibooks, if you will. Each of these minibooks covers
the basics of one key element of network management, such as setting up
network hardware, installing a network operating system, or troubleshooting network problems. Whenever one big thing is made up of several smaller
things, confusion is always a possibility. That’s why Networking All-in-One
For Dummies, 4th Edition, is designed to have multiple access points (I hear
an acronym coming on — MAP!) to help you find what you want. At the
beginning of the book is a detailed table of contents that covers the entire
book. Then, each minibook begins with a minitable of contents that shows
you at a glance what chapters are included in that minibook. Useful running heads appear at the top of each page to point out the topic discussed
on that page. And handy thumb tabs run down the side of the pages to help
you quickly find each minibook. Finally, a comprehensive index lets you find
information anywhere in the entire book.
This isn’t the kind of book you pick up and read from start to finish, as if it
were a cheap novel. If I ever see you reading it at the beach, I’ll kick sand in
your face. This book is more like a reference, the kind of book you can pick
up, turn to just about any page, and start reading. You don’t have to memorize anything in this book. It’s a need-to-know book: You pick it up when
you need to know something. Need to know how to set up a DHCP server in
Windows? Pick up the book. Need to know how to create a user account in
Linux? Pick up the book. Otherwise, put it down and get on with your life.
How This Book Is Organized
3
How to Use This Book
This book works like a reference. Start with the topic you want to find out
about. Look for it in the table of contents or in the index to get going. The
table of contents is detailed enough that you should be able to find most of
the topics you’re looking for. If not, turn to the index, where you can find
even more detail.
Of course, the book is loaded with information, so if you want to take a brief
excursion into your topic, you’re more than welcome. If you want to know
the big security picture, read the whole chapter on security. If you just want
to know how to make a decent password, read just the section on passwords. You get the idea.
Whenever I describe a message or information that you see on the screen, I
present it as follows:
A message from your friendly network
If you need to type something, you see the text you need to type like this:
Type this stuff. In this example, you type Type this stuff at the keyboard and
press Enter. An explanation usually follows, just in case you’re scratching
your head and grunting, “Huh?”
How This Book Is Organized
Each of the nine minibooks contained in Networking All-in-One For Dummies,
4th Edition, can stand by itself. The first minibook covers the networking
basics that you should know to help you understand the rest of the stuff in
this book. Of course, if you’ve been managing a network for awhile already,
you probably know all this stuff, so you can probably skip Book I or just
skim it quickly for laughs. The remaining minibooks cover a variety of networking topics that you would normally find covered in separate books.
Here’s a brief description of what you find in each minibook.
Book I: Networking Basics
This minibook covers the networking basics that you need to understand to
get going. You find out what a network is, how networking standards work,
what hardware components are required to make up a network, and what
network operating systems do. You discover the difference between peer-topeer networking and client-server networking. And you also get a comparison of the most popular network operating systems, including the current
incarnations of Windows Server and Linux.
4
How This Book Is Organized
Book II: Building a Network
In this minibook, you find the ins and outs of building a network. First, you see
how to create a plan for your network. After all, planning is the first step of
any great endeavor. Then, you discover how to install network hardware, such
as network interface cards, and how to work with various types of networking
cable. You receive some general pointers about installing a network server
operating system. You gain insight into how to configure various versions of
Windows to access a network. And finally, you get an overview of how virtualization technologies like VMWare can help you manage your servers.
Book III: Network Administration and Security
In this minibook, you discover what it means to be a network administrator, with an emphasis on how to secure your network so that it’s safe
from intruders but at the same time allows your network’s users access to
everything they need. In the real world, this responsibility isn’t as easy as
it sounds. This minibook begins with an overview of what network administrators do. Then, it describes some of the basic practices of good network
security, such as using strong passwords and providing physical security for
your servers. It includes detailed information about setting up and managing
network user accounts, using virus scanners, setting up firewalls, backing up
network data, keeping network software up to date, working with virtual private networks (VPNs), and troubleshooting common network problems.
Book IV: TCP/IP and the Internet
This minibook is devoted to the most popular network technology on the
planet: TCP/IP. (Actually, it may be the most popular protocol in the universe. The aliens in Independence Day had a TCP/IP network on their spaceship, enabling Will Smith and Jeff Goldblum to hack their way in. The aliens
should have read the section on firewalls in Book III.)
Book V: Wireless Networking
In this minibook, you discover the ins and outs of setting up and securing a
wireless network.
Book VI: Mobile Networking
This minibook is devoted to the special requirements for managing mobile
users who want to connect to your network. Here, you’ll find chapters on
working with the most popular types of smartphones, including Blackberry,
iPhone, and Android devices, as well as information about incorporating netbooks into your network.
Icons Used in This Book
5
Book VII: Windows Server 2008 R2 Reference
This minibook describes the basics of setting up and administering a server
using the latest version of Windows Server 2008 R2. You also find helpful
information about its predecessors, Windows Server 2008 and Windows
Server 2003. You find chapters on installing a Windows server, managing
user accounts, setting up a file server, and securing a Windows server. Plus,
you find a handy reference to the many Windows networking commands
that you can use from a command prompt.
Book VIII: Using Other Windows Servers
This minibook shows you the basics of setting up other popular Windows
server products, including the IIS Web server, Exchange Server 2010 for managing e-mail, SQL Server 2008 for databases, and SharePoint 2010 for creating
intranet sites.
Book IX: Managing Linux Systems
Linux has fast become an inexpensive alternative to Windows or NetWare. In
this minibook, you discover the basics of installing and managing Linux. You
find out how to install Fedora, work with Linux commands and GNOME (a
popular graphical interface for Linux), configure Linux for networking, set up a
Windows-compatible file server using Samba, and run popular Internet servers
such as DHCP, Bind, and Sendmail. Plus, you get a concise Linux command reference that will turn you into a Linux command line junkie in no time.
Icons Used in This Book
Like any For Dummies book, this book is chock-full of helpful icons that draw
your attention to items of particular importance. You find the following
icons throughout this book:
Hold it — technical stuff is just around the corner. Read on only if you have
your pocket protector.
Pay special attention to this icon; it lets you know that some particularly
useful tidbit is at hand.
Did I tell you about the memory course I took?
6
Where to Go from Here
Danger, Will Robinson! This icon highlights information that may help you
avert disaster.
Where to Go from Here
Yes, you can get there from here. With this book in hand, you’re ready to
plow right through the rugged networking terrain. Browse through the table
of contents and decide where you want to start. Be bold! Be courageous! Be
adventurous! And above all, have fun!
www.allitebooks.com
Book I
Networking Basics
Contents at a Glance
Chapter 1: Understanding Networks . . . . . . . . . . . . . . . . . . . . . . . . . . . . .9
Chapter 2: Understanding Network Protocols and Standards. . . . . . .21
Chapter 3: Understanding Network Hardware . . . . . . . . . . . . . . . . . . . .43
Chapter 4: Understanding Network Operating Systems . . . . . . . . . . . .61
Chapter 1: Understanding
Networks
In This Chapter
✓ Introducing computer networks
✓ Finding out all about clients, servers, and peers
✓ Understanding the various types of networks
✓ Figuring out the disadvantages of networking
T
he first computer network was invented when ancient mathematicians
connected their abacuses (or is it abaci?) together with kite string so they
could instantly share their abacus answers with each other. Over the years,
computer networks became more and more sophisticated. Now, instead of
string, networks use electrical cables, fiber-optic cables, or wireless radio
signals to connect computers to each other. The purpose, however, has
remained the same: sharing information and getting work done faster.
This chapter describes the basics of what computer networking is and how
it works.
What Is a Network?
A network is nothing more than two or more computers connected to each
other so that they can exchange information, such as e-mail messages or
documents, or share resources, such as disk storage or printers. In most
cases, this connection is made via electrical cables that carry the information in the form of electrical signals. But in some cases, other types of
connections are used. For example, fiber-optic cables let computers communicate at extremely high speeds by using impulses of light. Wireless networks let computers communicate by using radio signals, so the computers
aren’t restricted by physical cables.
In addition to the hardware that comprises the network, a network also
requires special software to enable communications. In the early days of
networking, you had to add this software to each computer on the network.
Nowadays, network support is built in to all major operating systems, including all current versions of Windows, Macintosh operating systems, and Linux.
10
What Is a Network?
Network building blocks
All networks, large or small, require specialized network hardware to make
them work. For small networks, the hardware may consist of nothing more
than a collection of computers that are equipped with network ports, a cable
for each computer, and a network switch that all the computers plug in to
via the cable. Larger networks probably have additional components, such
as routers or repeaters.
Small or large, all networks are built from the following basic building
blocks:
✦ Client computers: The computers that end users use to access the
resources of the network. Client computers are typically computers
located on users’ desks. They usually run a desktop version of Windows
such as Windows 7, Vista, or XP. In addition, the client computers usually run some type of application software such as Microsoft Office.
Client computers are sometimes referred to as workstations.
✦ Server computers: Computers that provide shared resources, such as
disk storage and printers, as well as network services, such as e-mail
and Internet access. Server computers typically run a specialized network operating system such as Windows Server 2008 or 2003, NetWare,
or Linux, along with special software to provide network services. For
example, a server may run Microsoft Exchange to provide e-mail services for the network, or it may run Apache Web Server so that the computer can serve Web pages.
✦ Network interface: An interface — sometimes called a network port —
that’s installed in a computer to enable the computer to communicate
over a network. Almost all network interfaces implement a networking
standard called Ethernet.
A network interface is sometimes called a NIC, which stands for network
interface card, because in the early days of networking you actually had
to install a separate circuit card in the computer to provide a network
interface. Nowadays, nearly all computers come with network interfaces
built in as an integral part of the computer’s motherboard. Although
separate network cards are rarely required these days, the term NIC is
still frequently used to refer to the network interface.
It’s still common to install separate network interface cards to provide
more than one network interface on a single computer, or to replace
a built-in network interface that has malfunctioned without having to
replace the entire motherboard.
✦ Cable: Computers in a network are usually physically connected to each
other using cable. Although several types of cable have been popular
over the years, most networks today use a type of cable called twistedpair, also known by its official designation 10BaseT.
What Is a Network?
11
Twisted-pair cable can also be referred to simply as copper, to distinguish it from fiber-optic cable which is used for the highest-speed network connections. Fiber-optic cable uses strands of glass to transmit
light signals at very high speeds.
In many cases, the cables run through the walls and converge on a central room called a wiring closet. But for smaller networks, the cables are
often just strung along the floor, hidden behind desks and other furniture whenever possible.
✦ Switches: Network cable usually doesn’t connect computers directly to
each other. Instead, each computer is connected by cable to a device
known as a switch. The switch, in turn, connects to the rest of the network. Each switch contains a certain number of ports, typically 8 or 16.
Thus, you can use an eight-port switch to connect up to eight computers. Switches can be connected to each other to build larger networks.
For more information about switches, see the “Network Topology” section later in this chapter. (Older networks may use a more primitive type
of device called a hub instead of a switch. A hub provides the same function as a switch, but it isn’t as efficient. The term hub is sometimes used
to mean switch, even though hubs and switches are not technically the
same thing.)
✦ Wireless networks: In many networks, cables and switches are making
way for wireless network connections, which enable computers to communicate via radio signals. In a wireless network, radio transmitters
and receivers take the place of cables. The main advantage of wireless
networking is its flexibility. With a wireless network, you don’t have to
run cables through walls or ceilings, and your client computers can be
located anywhere within range of the network broadcast. The main disadvantage of wireless networking is that it’s inherently less secure than
a cabled network.
✦ Network software: Although network hardware is essential, what really
makes a network work is software. A whole bunch of software has to be
set up just right in order to get a network working. Server computers
typically use a special network operating system (also known as a NOS)
in order to function efficiently, and client computers need to have their
network settings configured properly in order to access the network.
One of the most important networking choices to make is which network
operating system you’ll use on the network’s servers. That’s because
much of the task of building a new network and managing an existing
one is setting up and maintaining the network operating system on the
servers.
Book I
Chapter 1
Understanding
Networks
Twisted-pair cable is also sometimes referred to as Cat-5 or Cat-6 cable.
These terms refer to the standards that determine the maximum speed
with which the cable can carry data, Cat-6 being rated for more speed
than Cat-5.
12
What Is a Network?
Why bother?
If the truth be told, computer networks are a pain to set up. So, why bother?
Because the benefits of having a network make the difficulty of setting one
up worthwhile. You don’t have to be a Ph.D. to understand the benefits
of networking. In fact, you learned everything you need to know about
the benefits of networking in kindergarten. Networks are all about sharing. Specifically, networks are about sharing three things: information,
resources, and applications.
✦ Sharing information: Networks allow users to share information in
several different ways. The most common way of sharing information
is to share individual files. For example, two or more people can work
together on a single spreadsheet file or word-processing document. In
most networks, a large hard drive on a central server computer is set up
as a common storage area where users can store files to be shared with
other users.
In addition to sharing files, networks allow users to communicate with
each other in various ways. For example, messaging applications let
network users exchange messages with each other using an e-mail application such as Microsoft Outlook. Users can also hold online meetings
over the network. In fact, with inexpensive video cameras and the right
software, users can hold videoconferences over the network.
✦ Sharing resources: Certain computer resources, such as printers or hard
drives, can be set up so that network users can share them. Sharing these
resources can result in significant cost savings. For example, it’s cheaper
to buy a single high-speed printer with advanced features such as collating, stapling, and duplex printing that can be shared by an entire workgroup than it is to buy separate printers for each user in the group.
Hard drives can also be shared resources. In fact, providing users with
access to a shared hard drive is the most common method of sharing
files on a network. A computer whose main purpose in life is to host
shared hard drives is called a file server.
In actual practice, entire hard drives aren’t usually shared. Instead,
individual folders on a networked hard drive are shared. This way, the
network administrator can allow different network users to have access
to different shared folders. For example, a company may set up shared
folders for its sales department and accounting department. Then, sales
personnel can access the sales department’s folder, and accounting personnel can access the accounting department’s folder.
You can share other resources on a network. For example, a network
can be used to share an Internet connection. In the early days of the
Internet, it was common for each user who required access to the
Internet to have his or her own modem connection. Nowadays, it’s more
common for the network to provide a shared, high-speed Internet connection that everyone on the network can access.
Of Clients and Servers
13
Of Clients and Servers
The network computer that contains the hard drives, printers, and other
resources that are shared with other network computers is called a server.
This term comes up repeatedly, so you have to remember it. Write it on the
back of your left hand.
Any computer that’s not a server is called a client. You have to remember
this term, too. Write it on the back of your right hand.
Only two kinds of computers are on a network: servers and clients. Look at
your left hand and then look at your right hand. Don’t wash your hands until
you have these terms memorized.
The distinction between servers and clients in a network would be somewhat fun to study in a sociology class because it’s similar to the distinction
between the haves and the have-nots in society:
✦ Usually, the most powerful and expensive computers in a network are
the servers. This fact makes sense because every user on the network
shares the server’s resources.
✦ The cheaper and less powerful computers in a network are the clients.
Clients are the computers used by individual users for everyday work.
Because clients’ resources don’t have to be shared, they don’t have to
be as fancy.
✦ Most networks have more clients than servers. For example, a network
with ten clients can probably get by with one server.
✦ In some networks, a clear line of segregation exists between servers and
clients. In other words, a computer is either a server or a client, and not
both. A server can’t become a client, nor can a client become a server.
✦ Other networks are more progressive, allowing any computer in the
network to be a server and allowing any computer to be both server and
client at the same time. The network illustrated in Figure 1-1, later in this
chapter, is this type of network.
Book I
Chapter 1
Understanding
Networks
✦ Sharing applications: One of the most common reasons for networking in many businesses is so that several users can work together on
a single business application. For example, an accounting department
may have accounting software that can be used from several computers at the same time. Or a sales-processing department may have an
order-entry application that runs on several computers to handle a large
volume of orders.
14
Dedicated Servers and Peers
Dedicated Servers and Peers
In some networks, a server computer is a server computer and nothing else.
This server computer is dedicated solely to the task of providing shared
resources, such as hard drives and printers, to be accessed by the network
client computers. Such a server is referred to as a dedicated server because
it can perform no other tasks besides network services. A network that relies
on dedicated servers is sometimes called a client/server network.
Other networks take an alternative approach, enabling any computer on the
network to function as both a client and a server. Thus, any computer can
share its printers and hard drives with other computers on the network.
And while a computer is working as a server, you can still use that same
computer for other functions such as word processing. This type of network
is called a peer-to-peer network because all the computers are thought of as
peers, or equals.
While you’re walking the dog tomorrow morning, ponder these points concerning the difference between dedicated server networks and peer-to-peer
networks:
✦ Peer-to-peer networking has been built in to all versions of Windows
since Windows 95. Thus, you don’t have to buy any additional software
to turn your computer into a server. All you have to do is enable the
Windows server features.
✦ The network server features that are built in to desktop versions of
Windows (including Windows 7, Vista, and XP) aren’t very efficient
because these versions of Windows were not designed primarily to be
network servers. If you’re going to dedicate a computer to the task of
being a full-time server, you should use a full-fledged network operating
system, such as Windows Server 2008, instead.
Networks Big and Small
Networks come in all sizes and shapes. In fact, it’s common to categorize
networks based on the geographical size they cover, as described in the following list:
✦ Local area networks: A local area network, or LAN, is a network in which
computers are relatively close together, such as within the same office
or building.
Note that the term LAN doesn’t imply that the network is small. A LAN
can, in fact, contain hundreds or even thousands of computers. What
makes a network a LAN is that all those computers are located within
Network Topology
15
✦ Wide area networks: A wide area network, or WAN, is a network that
spans a large geographic territory, such as an entire city or region, or
even an entire country. WANs are typically used to connect two or more
LANs that are relatively far apart. For example, a WAN may connect an
office in San Francisco with an office in New York.
Again, it’s the geographic distance, not the number of computers
involved, that makes a network a WAN. If the office in San Francisco and
the office in New York both have only one computer, the WAN will have
a total of two computers but will span more than 3,000 miles.
✦ Metropolitan area networks: A metropolitan area network, or MAN,
is a network that’s smaller than a typical WAN but larger than a LAN.
Typically, a MAN connects two or more LANs that are within the same
city but are far enough apart that the networks can’t be connected using
a simple cable or wireless connection.
Network Topology
The term network topology refers to the shape of how the computers and
other network components are connected to each other. There are several different types of network topologies, each with advantages and disadvantages.
In the following discussion of network topologies, I use two important terms:
✦ Node: A node is a device that’s connected to the network. For your purposes here, a node is the same as a computer. Network topology deals
with how the nodes of a network are connected to each other.
✦ Packet: A packet is a message that’s sent over the network from one
node to another node. The packet includes the address of the node
that sent the packet, the address of the node the packet is being sent
to, and data.
Bus topology
The first type of network topology is called a bus, in which nodes are strung
together in a line, as shown in Figure 1-1. The key to understanding how a
bus topology works is to think of the entire network as a single cable, with
each node “tapping” into the cable so it can listen in on the packets being
sent over that cable. If you’re old enough to remember party lines, you get
the idea.
Book I
Chapter 1
Understanding
Networks
close proximity to each other. Usually a LAN is contained within a single
building, but a LAN can extend to several buildings on a campus —
provided the buildings are close to each other (typically within 300
feet of each other, though greater distances are possible with special
equipment).
16
Network Topology
Figure 1-1:
Bus
topology.
In a bus topology, every node on the network can see every packet that’s
sent on the cable. Each node looks at each packet to determine whether the
packet is intended for it. If so, the node claims the packet. If not, the node
ignores the packet. This way, each computer can respond to data sent to it
and ignore data sent to other computers on the network.
If the cable in a bus network breaks, the entire network is effectively disabled. Obviously the nodes on opposite sides of the break can’t continue to
communicate with each other because data can’t span the gap created by
the break. But even those nodes that are on the same side of the break will
be unable to communicate with each other, because the open end of the
cable left by the break disrupts the proper transmission of electrical signals.
In the early days of Ethernet networking, bus topology was commonplace.
Although bus topology has given way to star topology (see the next section)
for most networks today, many networks today still have elements that rely
on bus topology.
Star topology
In a star topology, each network node is connected to a central device called
a hub or a switch, as shown in Figure 1-2. Star topologies are commonly used
with LANs.
If a cable in a star network breaks, only the node connected to that cable is
isolated from the network. The other nodes can continue to operate without
interruption — unless, of course, the node that’s isolated because of the
break happens to be the file server.
You should be aware of the somewhat technical distinction between a hub
and a switch. Simply put, a hub doesn’t know anything about the computers
that are connected to each of its ports. So when a computer connected to
the hub sends a packet to a computer that’s connected to another port, the
hub sends a duplicate copy of the packet to all its ports. In contrast, a switch
knows which computer is connected to each of its ports. As a result, when
a switch receives a packet intended for a particular computer, it sends the
packet only to the port that the recipient is connected to.
www.allitebooks.com
Network Topology
17
Book I
Chapter 1
Figure 1-2:
Star
topology.
Strictly speaking, only networks that use switches have a true star topology.
If the network uses a hub, the network topology has the physical appearance of a star, but is actually a bus. That’s because when a hub is used, each
computer on the network sees all the packets sent over the network, just
like in a bus topology. In a true star topology, as when a switch is used, each
computer sees only those packets that were sent specifically to it, as well as
packets that were specifically sent to all computers on the network (those
types of packets are called broadcast packets).
Expanding stars
Physicists say that the universe is expanding, and network administrators
know they’re right. A simple bus or star topology is suitable only for small
networks, with a dozen or so computers. But small networks inevitably
become large networks as more computers are added. For larger networks,
it’s common to create more complicated topologies that combine stars and
buses.
For example, a bus can be used to connect several stars. In this case, two
or more hubs or switches are connected to each other using a bus. Each
of these hubs or switches is then the center of a star that connects two or
more computers to the network. This type of arrangement is commonly used
in buildings that have two or more distinct workgroups. The bus that connects the switches is sometimes called a backbone.
Another way to expand a star topology is to use a technique called daisychaining. When you use daisy-chaining, a switch is connected to another
switch as if it were one of the nodes on the star. Then, this second switch
serves as the center of a second star.
Understanding
Networks
Hub
18
Network Topology
Ring topology
A third type of network topology is called a ring, shown in Figure 1-3. In a
ring topology, packets are sent around the circle from computer to computer. Each computer looks at each packet to decide whether the packet
was intended for it. If not, the packet is passed on to the next computer in
the ring.
Figure 1-3:
Ring
topology.
Years ago, ring topologies were common in LANs, as two popular networking technologies used rings: ARCNET and Token Ring. ARCNET is still used
for certain applications such as factory automation, but is rarely used in
business networks. Token Ring is still a popular network technology for IBM
midrange computers. Although plenty of Token Ring networks are still in
existence, not many new networks use Token Ring any more.
Ring topology was also used by FDDI, one of the first types of fiber-optic
network connections. FDDI has given way to more efficient fiber-optic techniques, however. So ring networks have all but vanished from business
networks.
Mesh topology
A fourth type of network topology, known as mesh, has multiple connections between each of the nodes on the network, as shown in Figure 1-4. The
advantage of a mesh topology is that if one cable breaks, the network can
use an alternative route to deliver its packets.
Network Topology
Router
Book I
Chapter 1
Router
Router
Router
Computer
Computer
Router
Mesh networks aren’t very practical in a LAN setting. For example, to network eight computers in a mesh topology, each computer would have
to have seven network interface cards, and 28 cables would be required
to connect each computer to the seven other computers in the network.
Obviously, this scheme isn’t very scalable.
However, mesh networks are common for metropolitan or wide area networks. These networks use devices called routers to route packets from
network to network. For reliability and performance reasons, routers are
usually arranged in a way that provides multiple paths between any two
nodes on the network in a meshlike arrangement.
Understanding
Networks
Figure 1-4:
Mesh
topology.
19
20
Book I: Networking Basics
Chapter 2: Understanding Network
Protocols and Standards
In This Chapter
✓ Deciphering the layers of the OSI reference model
✓ Understanding an Ethernet
✓ Getting the inside scoop on TCP/IP and IPX/SPX
✓ Finding out about other important protocols
P
rotocols and standards are what make networks work together.
Protocols make it possible for the various components of a network to
communicate with each other. Standards also make it possible for network
components manufactured by different companies to work together. This
chapter introduces you to the protocols and standards that you’re most
likely to encounter when building and maintaining a network.
Understanding Protocols
A protocol is a set of rules that enables effective communications to occur.
You encounter protocols every day. For example, when you pay for groceries with a debit card, the clerk first tells you how much the groceries cost.
You then swipe your debit card in the card reader, punch in your security
code, indicate whether you want cash back, enter the amount of the cash
back if you so indicated, then verify the total amount. You then cross your
fingers behind your back and say a quiet prayer while the machine authorizes the purchase. Assuming the amount is authorized, the machine prints
out your receipt.
Here’s another example of an everyday protocol: making a phone call. You
probably take most of the details of the phone-calling protocol for granted,
but it’s pretty complicated if you think about it:
✦ When you pick up a phone, you must listen for a dial tone before dialing
the number (unless you’re using a cell phone). If you don’t hear a dial
tone, you know that either (1) someone else in your family is talking on
the phone or (2) something is wrong with your phone.
22
Understanding Protocols
✦ When you hear the dial tone, you initiate the call by dialing the number
of the party you want to reach. If the person you want to call is in the
same area code as you, most of the time you simply dial that person’s
seven-digit phone number. If the person is in a different area code, you
dial a one, the three-digit area code, and the person’s seven-digit phone
number.
✦ If you hear a series of long ringing tones, you wait until the other person
answers the phone. If the phone rings a certain number of times with no
answer, you hang up and try again later. If you hear a voice say, “Hello,”
you begin a conversation with the other party. If the person on the
other end of the phone has never heard of you, you say, “Sorry, wrong
number,” hang up, and try again.
✦ If you hear a voice that rambles on about how they’re not home but they
want to return your call, you wait for a beep and leave a message.
✦ If you hear a series of short tones, you know the other person is talking
to someone else on the phone. So you hang up and try again later.
✦ If you hear a sequence of three tones that increase in pitch, followed by
a recorded voice that says “We’re sorry . . .” you know that the number
you dialed is invalid. Either you dialed the number incorrectly, or the
number has been disconnected.
I can go on and on, but I think you probably get the point. Exchanges such
as using debit cards or making phone calls follow the same rules every time
they happen.
Computer networks depend upon many different types of protocols in order
to work. These protocols are very rigidly defined, and for good reason.
Network cards must know how to talk to other network cards in order to
exchange information, operating systems must know how to talk to network
cards in order to send and receive data on the network, and application programs must know how to talk to operating systems in order to know how to
retrieve a file from a network server.
Protocols come in many different types. At the lowest level, protocols define
exactly what type of electrical signal represents a one and what type of
signal represents a zero. At the highest level, protocols allow a computer
user in the United States to send an e-mail to another computer user in New
Zealand. And in between are many other levels of protocols. You find out
more about these levels of protocols (which are often called layers) in the
section, “The Seven Layers of the OSI Reference Model,” later in this chapter.
Various protocols tend to be used together in matched sets called protocol
suites. The two most popular protocol suites for networking are TCP/IP and
Ethernet. TCP/IP was originally developed for Unix networks and is the
Understanding Standards
23
Understanding Standards
A standard is an agreed-upon definition of a protocol. In the early days of
computer networking, each computer manufacturer developed its own networking protocols. As a result, you weren’t able to easily mix equipment
from different manufacturers on a single network.
Then along came standards to save the day. Standards are industry-wide
protocol definitions that are not tied to a particular manufacturer. With standard protocols, you can mix and match equipment from different vendors.
As long as the equipment implements the standard protocols, it should be
able to coexist on the same network.
Many organizations are involved in setting standards for networking. The
five most important organizations are
✦ American National Standards Institute (ANSI): The official standards
organization in the United States. ANSI is pronounced AN-see.
✦ Institute of Electrical and Electronics Engineers (IEEE): An international organization that publishes several key networking standards —
in particular, the official standard for the Ethernet networking system
(known officially as IEEE 802.3). IEEE is pronounced eye-triple-E.
✦ International Organization for Standardization (ISO): A federation of
more than 100 standards organizations from throughout the world. If
I had studied French in high school, I’d probably understand why the
acronym for International Organization for Standardization is ISO, and
not IOS.
✦ Internet Engineering Task Force (IETF): The organization responsible
for the protocols that drive the Internet.
✦ World Wide Web Consortium (W3C): An international organization that
handles the development of standards for the World Wide Web.
Table 2-1 lists the Web sites for each of these standards organizations.
Book I
Chapter 2
Understanding
Network Protocols
and Standards
protocol of the Internet and most local-area networks. Ethernet is a lowlevel protocol that spells out the electrical characteristics of the network
hardware used by most local-area networks. A third important protocol is
IPX/SPX, which is an alternative to TCP/IP that was originally developed for
NetWare networks. In the early days of networking, IPX/SPX was widely
used in local area networks, but TCP/IP is now the preferred protocol.
24
The Seven Layers of the OSI Reference Model
Table 2-1
Web Sites for Major Standards Organizations
Organization
Web Site
ANSI (American National Standards Institute)
www.ansi.org
IEEE (Institute of Electrical and Electronic Engineers)
www.ieee.org
ISO (International Organization for Standardization)
www.iso.org
IETF (Internet Engineering Task Force)
www.ietf.org
W3C (World Wide Web Consortium)
www.w3c.org
The Seven Layers of the OSI Reference Model
OSI sounds like the name of a top-secret government agency you hear about
only in Tom Clancy novels. What it really stands for in the networking world
is Open Systems Interconnection, as in the Open Systems Interconnection
Reference Model, affectionately known as the OSI model.
The OSI model breaks the various aspects of a computer network into seven
distinct layers. These layers are kind of like the layers of an onion: Each successive layer envelops the layer beneath it, hiding its details from the levels
above. The OSI model is also like an onion in that if you start to peel it apart
to have a look inside, you’re bound to shed a few tears.
The OSI model is not a networking standard in the same sense that Ethernet
and TCP/IP are networking standards. Rather, the OSI model is a framework
into which the various networking standards can fit. The OSI model specifies
what aspects of a network’s operation can be addressed by various network
standards. So, in a sense, the OSI model is sort of a standard of standards.
Table 2-2 summarizes the seven layers of the OSI model.
Table 2-2
The Seven Layers of the OSI Model
Layer
Name
Description
1
Physical
Governs the layout of cables and devices such as
repeaters and hubs.
2
Data Link
Provides MAC addresses to uniquely identify network nodes and a means for data to be sent over the
Physical layer in the form of packets. Bridges and
switches are layer 2 devices.
3
Network
Handles routing of data across network segments.
The Seven Layers of the OSI Reference Model
25
Name
Description
4
Transport
Provides for reliable delivery of packets.
5
Session
Establishes sessions between network applications.
6
Presentation
Converts data so that systems that use different data
formats can exchange information.
7
Application
Allows applications to request network services.
The first three layers are sometimes called the lower layers. They deal with
the mechanics of how information is sent from one computer to another
over a network. Layers 4 through 7 are sometimes called the upper layers.
They deal with how application software can relate to the network through
application programming interfaces.
The following sections describe each of these layers in greater detail.
The seven layers of the OSI model are a somewhat idealized view of how
networking protocols should work. In the real world, actual networking
protocols don’t follow the OSI model to the letter. The real world is always
messier than we’d like. Still, the OSI model provides a convenient — if not
completely accurate — conceptual picture of how networking works.
The Physical Layer
The bottom layer of the OSI model is the Physical layer. It addresses the
physical characteristics of the network, such as the types of cables used to
connect devices, the types of connectors used, how long the cables can be,
and so on. For example, the Ethernet standard for 10BaseT cable specifies
the electrical characteristics of the twisted-pair cables, the size and shape of
the connectors, the maximum length of the cables, and so on. The star, bus,
ring, and mesh network topologies described in Book I, Chapter 1 apply to
the Physical layer.
Another aspect of the Physical layer is the electrical characteristics of the
signals used to transmit data over the cables from one network node to
another. The Physical layer doesn’t define any meaning to those signals
other than the basic binary values of zero and one. The higher levels of
the OSI model must assign meanings to the bits that are transmitted at the
Physical layer.
One type of Physical layer device commonly used in networks is a repeater.
A repeater is used to regenerate the signal whenever you need to exceed
the cable length allowed by the Physical layer standard. 10BaseT hubs are
also Physical layer devices. Technically, they’re known as multiport repeaters because the purpose of a hub is to regenerate every packet received on
Book I
Chapter 2
Understanding
Network Protocols
and Standards
Layer
26
The Seven Layers of the OSI Reference Model
any port on all of the hub’s other ports. Repeaters and hubs don’t examine
the contents of the packets that they regenerate. If they did, they would be
working at the Data Link layer, and not at the Physical layer.
The network adapter (also called a network interface card or NIC) that’s
installed in each computer on the network is a Physical layer device. You
can display information about the network adapter (or adapters) installed
in a Windows computer by displaying the adapter’s Properties dialog box,
as shown in Figure 2-1. To access this dialog box in Windows 7 or Vista,
open the Control Panel, choose Network and Internet, choose View Network
Status and Tasks, and choose Change Adapter Settings. Then, right-click
the Local Area Connection icon and choose Properties from the menu that
appears.
Figure 2-1:
The
Properties
dialog
box for a
network
adapter.
The Data Link Layer
The Data Link layer is the lowest layer at which meaning is assigned to the
bits that are transmitted over the network. Data link protocols address
things such as the size of each packet of data to be sent, a means of addressing each packet so that it’s delivered to the intended recipient, and a way to
ensure that two or more nodes don’t try to transmit data on the network at
the same time.
The Data Link layer also provides basic error detection and correction to
ensure that the data sent is the same as the data received. If an uncorrectable error occurs, the data link standard must specify how the node is to be
informed of the error so that it can retransmit the data.
www.allitebooks.com
The Seven Layers of the OSI Reference Model
27
You can see the MAC address for a computer’s network adapter by opening
a command window and running the ipconfig /all command, as shown
in Figure 2-2. In this example, the MAC address of the network card is A4-BADB-01-99-E8. (The ipconfig command refers to the MAC address as the
physical address.)
Figure 2-2:
Using the
ipconfig /all
command
to display
the MAC
address of
a network
adapter.
One of the most import functions of the Data Link layer is to provide a way
for packets to be sent safely over the physical media without interference
from other nodes attempting to send packets at the same time. The two
most popular ways to do this are CSMA/CD and token passing. Ethernet networks use CSMA/CD, and Token Ring networks use token passing.
Two types of Data Link layer devices are commonly used on networks: bridges
and switches. A bridge is an intelligent repeater that is aware of the MAC
addresses of the nodes on either side of the bridge and can forward packets
accordingly. A switch is an intelligent hub that examines the MAC address of
arriving packets in order to determine which port to forward the packet to.
An important function of the Data Link layer is to make sure that two computers don’t try to send packets over the network at the same time. If they
do, the signals will collide with each other, and the transmission will be
garbled. Ethernet accomplishes this feat by using a technique called CSMA/
CD, which stands for carrier sense multiple access with collision detection.
Book I
Chapter 2
Understanding
Network Protocols
and Standards
At the Data Link layer, each device on the network has an address known as
the Media Access Control address, or MAC address. This address is actually
hard-wired into every network device by the manufacturer. MAC addresses
are unique; no two network devices made by any manufacturer anywhere in
the world can have the same MAC address.
28
The Seven Layers of the OSI Reference Model
This phrase is a mouthful, but if you take it apart piece by piece, you’ll get
an idea of how it works.
Carrier sense means that whenever a device wants to send a packet over the
network media, it first listens to the network media to see whether anyone
else is already sending a packet. If it doesn’t hear any other signals on
the media, the computer assumes that the network is free, so it sends the
packet.
Multiple access means that nothing prevents two or more devices from
trying to send a message at the same time. Sure, each device listens before
sending. However, suppose that two devices listen, hear nothing, and then
proceed to send their packets at the same time? Picture what happens
when you and someone else arrive at a four-way stop sign at the same time.
You wave the other driver on, he or she waves you on, you wave, he or she
waves, you both wave, and then you both go at the same time.
Collision detection means that after a device sends a packet, it listens carefully to see whether the packet crashes into another packet. This is kind of
like listening for the screeching of brakes at the four-way stop. If the device
hears the screeching of brakes, it waits a random period of time and then
tries to send the packet again. Because the delay is random, two packets
that collide are sent again after different delay periods, so a second collision
is unlikely.
CSMA/CD works pretty well for smaller networks. After a network hits about
30 computers, however, packets start to collide like crazy, and the network
slows to a crawl. When that happens, the network should be divided into
two or more separate sections that are sometimes called collision domains.
The Network Layer
The Network layer handles the task of routing network messages from one
computer to another. The two most popular layer 3 protocols are IP (which
is usually paired with TCP) and IPX (normally paired with SPX for use with
Novell and Windows networks).
Network layer protocols provide two important functions: logical addressing
and routing. The following sections describe these functions.
Logical addressing
As you know, every network device has a physical address called a MAC
address, which is assigned to the device at the factory. When you buy a
network interface card to install into a computer, the MAC address of that
card is fixed and can’t be changed. But what if you want to use some other
The Seven Layers of the OSI Reference Model
29
Logical addresses are created and used by Network layer protocols such as
IP or IPX. The Network layer protocol translates logical addresses to MAC
addresses. For example, if you use IP as the Network layer protocol, devices
on the network are assigned IP addresses such as 207.120.67.30. Because
the IP protocol must use a Data Link layer protocol to actually send packets
to devices, IP must know how to translate the IP address of a device to the
device’s MAC address.
You can use the ipconfig command shown earlier in Figure 2-2 to see the
IP address of your computer. The IP address shown in the figure is
192.168.1.100. Another way to display this information is to use the System
Information command, found on the Start menu under Start➪All Programs➪
Accessories➪System Tools➪System Information. The IP address is highlighted in Figure 2-3. Notice that the System Information program displays a
lot of other useful information about the network besides the IP address. For
example, you can also see the MAC address, what protocols are being used,
and other information.
Figure 2-3:
Displaying
network
information
using the
System
Information
program.
Book I
Chapter 2
Understanding
Network Protocols
and Standards
addressing scheme to refer to the computers and other devices on your
network? This is where the concept of logical addressing comes in; a logical address lets you access a network device by using an address that you
assign.
30
The Seven Layers of the OSI Reference Model
Although the exact format of logical addresses varies depending on the protocol being used, most protocols divide the logical address into two parts:
a network address and a device address. The network address identifies
which network the device resides on, and the device address then identifies the device on that network. For example, in a typical IP address, such
as 192.168.1.102, the network address is 192.168.1, and the device address
(called a host address in IP) is 102.
Similarly, IPX addresses consist of two parts: a network address and a
node address. In an IPX address, the node address is the same as the MAC
address. As a result, IPX doesn’t have to translate between layer 3 and layer
2 addresses.
Routing
Routing comes into play when a computer on one network needs to send
a packet to a computer on another network. In this case, a device called
a router is used to forward the packet to the destination network. In some
cases, a packet may actually have to travel through several intermediate networks in order to reach its final destination network. You can find out more
about routers in Book I, Chapter 3.
An important feature of routers is that you can use them to connect networks that use different layer 2 protocols. For example, a router can be used
to send a packet from an Ethernet to a Token Ring network. As long as both
networks support the same layer 3 protocol, it doesn’t matter whether their
layer 1 and layer 2 protocols are different.
A protocol is considered routable if it uses addresses that include a network part and a host part. Any protocol that uses physical addresses isn’t
routable because physical addresses don’t indicate to which network a
device belongs.
The Transport Layer
The Transport layer is the layer where you’ll find two of the most well-known
networking protocols: TCP (normally paired with IP) and SPX (normally
paired with IPX). As its name implies, the Transport layer is concerned with
the transportation of information from one computer to another.
The main purpose of the Transport layer is to ensure that packets are
transported reliably and without errors. The Transport layer does this task
by establishing connections between network devices, acknowledging the
receipt of packets, and resending packets that aren’t received or are corrupted when they arrive.
The Seven Layers of the OSI Reference Model
31
For some applications, speed and efficiency are more important than reliability. In such cases, a connectionless protocol can be used. A connectionless protocol doesn’t go to the trouble of establishing a connection before
sending a packet. Instead, it simply sends the packet. TCP is a connectionoriented Transport layer protocol. The connectionless protocol that works
alongside TCP is called UDP.
In Windows XP or Vista, you can view information about the status of TCP
and UDP connections by running the Netstat command from a command
window, as Figure 2-4 shows. In the figure, you can see that several TCP connections are established.
Figure 2-4:
Using the
Netstat
command.
In fact, you can use the command Netstat /N to see the numeric network
addresses instead of the names. With the /N switch, the output in Figure 2-4
would look like this:
Active Connections
Proto
TCP
TCP
TCP
TCP
TCP
TCP
Local Address
127.0.0.1:2869
127.0.0.1:5357
127.0.0.1:27015
127.0.0.1:49301
127.0.0.1:54170
192.168.1.100:49300
Foreign Address
127.0.0.1:54170
127.0.0.1:54172
127.0.0.1:49301
127.0.0.1:27015
127.0.0.1:2869
192.168.1.101:445
State
ESTABLISHED
TIME_WAIT
ESTABLISHED
ESTABLISHED
ESTABLISHED
ESTABLISHED
Book I
Chapter 2
Understanding
Network Protocols
and Standards
In many cases, the Transport layer protocol divides large messages into
smaller packets that can be sent over the network efficiently. The Transport
layer protocol reassembles the message on the receiving end, making sure
that all the packets that comprise a single transmission are received so that
no data is lost.
32
The Seven Layers of the OSI Reference Model
TCP is a connection-oriented Transport layer protocol. UDP is a connectionless Transport layer protocol.
The Session Layer
The Session layer establishes conversations known as sessions between networked devices. A session is an exchange of connection-oriented transmissions between two network devices. Each of these transmissions is handled
by the Transport layer protocol. The session itself is managed by the
Session layer protocol.
A single session can include many exchanges of data between the two computers involved in the session. After a session between two computers has
been established, it is maintained until the computers agree to terminate the
session.
The Session layer allows three types of transmission modes:
✦ Simplex: In this mode, data flows in only one direction.
✦ Half-duplex: In this mode, data flows in both directions, but only in one
direction at a time.
✦ Full-duplex: In this mode, data flows in both directions at the same time.
In actual practice, the distinctions in the Session, Presentation, and
Application layers are often blurred, and some commonly used protocols
actually span all three layers. For example, SMB — the protocol that is the
basis of file sharing in Windows networks — functions at all three layers.
The Presentation Layer
The Presentation layer is responsible for how data is represented to applications. Most computers — including Windows, Unix, and Macintosh
computers — use the American Standard Code for Information Interchange
(ASCII) to represent data. However, some computers (such as IBM mainframe computers) use a different code, known as Extended Binary Coded
Decimal Interchange Code (EBCDIC). ASCII and EBCDIC aren’t compatible
with each other. To exchange information between a mainframe computer
and a Windows computer, the Presentation layer must convert the data
from ASCII to EBCDIC and vice versa.
Besides simply converting data from one code to another, the Presentation
layer can also apply sophisticated compression techniques so that fewer
bytes of data are required to represent the information when it’s sent over
the network. At the other end of the transmission, the Presentation layer
then uncompresses the data.
Following a Packet through the Layers
33
The Presentation layer can also scramble the data before it is transmitted
and unscramble it at the other end by using a sophisticated encryption technique that even Sherlock Holmes would have trouble breaking.
The highest layer of the OSI model, the Application layer, deals with the
techniques that application programs use to communicate with the network.
The name of this layer is a little confusing. Application programs such as
Microsoft Office or QuickBooks aren’t a part of the Application layer. Rather,
the Application layer represents the programming interfaces that application programs such as Microsoft Office or QuickBooks use to request network services.
Some of the better-known Application layer protocols are
✦ DNS (Domain Name System) for resolving Internet domain names.
✦ FTP (File Transfer Protocol) for file transfers.
✦ SMTP (Simple Mail Transfer Protocol) for e-mail.
✦ SMB (Server Message Block) for file sharing in Windows networks.
✦ NFS (Network File System) for file sharing in Unix networks.
✦ Telnet for terminal emulation.
Following a Packet through the Layers
Figure 2-5 shows how a packet of information flows through the seven layers
as it travels from one computer to another on the network. The data begins
its journey when an end-user application sends data to another network
computer. The data enters the network through an Application layer interface, such as SMB. The data then works its way down through the protocol
stack. Along the way, the protocol at each layer manipulates the data by
adding header information, converting the data into different formats, combining packets to form larger packets, and so on. When the data reaches the
Physical layer protocol, it’s actually placed on the network media (in other
words, the cable) and sent to the receiving computer.
When the receiving computer receives the data, the data works its way up
through the protocol stack. Then, the protocol at each layer reverses the
processing that was done by the corresponding layer on the sending computer. Headers are removed, data is converted back to its original format,
packets that were split into smaller packets are recombined into larger messages, and so on. When the packet reaches the Application layer protocol,
it’s delivered to an application that can process the data.
Understanding
Network Protocols
and Standards
The Application Layer
Book I
Chapter 2
34
The Ethernet Protocol
Data sent by user
Figure 2-5:
How data
travels
through
the seven
layers.
Data received by user
Application
Layer 7
Application
Presentation
Layer 6
Presentation
Session
Layer 5
Session
Transport
Layer 4
Transport
Network
Layer 3
Network
Data Link
Layer 2
Data Link
Physical
Layer 1
Physical
Network Media
The Ethernet Protocol
As you know, the first two layers of the OSI model deal with the physical
structure of the network and the means by which network devices can send
information from one device on a network to another. By far, the most popular set of protocols for the Physical and Data Link layers is Ethernet.
Ethernet has been around in various forms since the early 1970s. (For a
brief history of Ethernet, see the sidebar, “Ethernet folklore and mythology,”
later in this chapter.) The current incarnation of Ethernet is defined by the
IEEE standard known as 802.3. Various flavors of Ethernet operate at different speeds and use different types of media. However, all the versions of
Ethernet are compatible with each other, so you can mix and match them on
the same network by using devices such as bridges, hubs, and switches to
link network segments that use different types of media.
The Ethernet Protocol
35
Ethernet operates at the first two layers of the OSI model — the Physical
and the Data Link layers. However, Ethernet divides the Data Link layer into
two separate layers known as the Logical Link Control (LLC) layer and the
Medium Access Control (MAC) layer. Figure 2-6 shows how the various elements of Ethernet match up to the OSI model.
OSI
Ethernet
Logical Link Control (LLC)
Data Link Layer
Medium Access Control (MAC)
Figure 2-6:
Ethernet
and the OSI
model.
Physical Layer
Standard Ethernet
10Base5
10Base2
10BaseT
10BaseFX
Fast Ethernet
100BaseTX
100BaseT4
100BaseFX
Gigabit Ethernet
1000BaseT
1000BaseLX
The following sections describe Standard Ethernet, Fast Ethernet, and
Gigabit Ethernet in more detail.
Standard Ethernet
Standard Ethernet is the original Ethernet. It runs at 10 Mbps, which was
considered fast in the 1970s but is pretty slow by today’s standards.
Although there is still plenty of existing Standard Ethernet in use, it is considered obsolete and should be replaced by Gigabit Ethernet as soon as
possible.
Standard Ethernet comes in four incarnations, depending on the type of
cable used to string the network together:
Book I
Chapter 2
Understanding
Network Protocols
and Standards
The actual transmission speed of Ethernet is measured in millions of bits per
second, or Mbps. Ethernet comes in three different speed versions: 10 Mbps,
known as Standard Ethernet; 100 Mbps, known as Fast Ethernet; and 1,000
Mbps, known as Gigabit Ethernet. Keep in mind, however, that network transmission speed refers to the maximum speed that can be achieved over the
network under ideal conditions. In reality, the actual throughput of an
Ethernet network rarely reaches this maximum speed.
36
The Ethernet Protocol
✦ 10Base5: The original Ethernet cable was thick (about as thick as
your thumb), heavy, and difficult to work with. It’s seen today only in
museums.
✦ 10Base2: This thinner type of coaxial cable (it resembles television
cable) became popular in the 1980s and lingered into the early 1990s.
Plenty of 10Base2 cable is still in use, but it’s rarely installed in new networks. 10Base2 (like 10Base5) uses a bus topology, so wiring a 10Base2
network involves running cable from one computer to the next until all
the computers are connected in a segment.
✦ 10BaseT: Unshielded twisted-pair cable (also known as UTP) became
popular in the 1990s because it’s easier to install, lighter, and more
reliable, and it offers more flexibility in how networks are designed.
10BaseT networks use a star topology with hubs at the center of
each star. Although the maximum length of 10BaseT cable is only 100
meters, hubs can be chained together to extend networks well beyond
the 100-meter limit.
10BaseT cable has four pairs of wires that are twisted together throughout the entire span of the cable. However, 10BaseT uses only two of
these wire pairs, so the unused pairs are spares.
✦ 10BaseFL: Fiber-optic cables were originally supported at 10 Mbps by
the 10BaseFL standard. However, because faster fiber-optic versions of
Ethernet now exist, 10BaseFL is rarely used.
Fast Ethernet
Fast Ethernet refers to Ethernet that runs at 100 Mbps, which is ten times
the speed of Standard Ethernet. The following are the three varieties of Fast
Ethernet:
✦ 100BaseT4: The 100BaseT4 protocol allows transmission speeds of
100 Mbps over the same UTP cable as 10BaseT networks. To do this, it
uses all four pairs of wire in the cable. 100BaseT4 simplifies the task of
upgrading an existing 10BaseT network to 100 Mbps.
✦ 100BaseTX: The most commonly used standard for office networks
today is 100BaseTX, which transmits at 100 Mbps over just two pairs of
a higher grade of UTP cable than the cable used by 10BaseT. The highergrade cable is referred to as Category 5. Most new networks are wired
with Category 5 or better cable.
✦ 100BaseFX: The fiber-optic version of Ethernet running at 100 Mbps
is called 100BaseFX. Because fiber-optic cable is expensive and tricky
to install, it isn’t used much for individual computers in a network.
However, it’s commonly used as a network backbone. For example, a
fiber backbone is often used to connect individual workgroup hubs to
routers and servers.
www.allitebooks.com
The TCP/IP Protocol Suite
37
Ethernet folklore and mythology
interface complete with icons, windows, and
menus, and the world’s first laser printer.)
In 1979, Xerox began working with Intel and
DEC (a once popular computer company) to
make Ethernet an industry standard networking
product. Along the way, they enlisted the help
of the IEEE, which formed committee number
802.3 and began the process of standardizing
Ethernet in 1981. The 802.3 committee released
the first official Ethernet standard in 1983.
Meanwhile, Bob Metcalfe left Xerox, turned
down a job offer from Steve Jobs to work at
Apple computers, and started a company
called the Computer, Communication, and
Compatibility Corporation — now known as
3Com. 3Com has since become one of the largest manufacturers of Ethernet equipment in the
world.
Gigabit Ethernet
Gigabit Ethernet is Ethernet running at a whopping 1,000 Mbps, which is 100
times faster than the original 10 Mbps Ethernet. Gigabit Ethernet was once
considerably more expensive than Fast Ethernet, so it was used only when
the improved performance justified the extra cost. However, today Gigabit
Ethernet is the standard for nearly all desktop and laptop PCs.
Gigabit Ethernet comes in two flavors:
✦ 1000BaseT: Gigabit Ethernet can run on Category 5 UTP cable, but
higher grades such as Category 5e or Category 6 are preferred because
they’re more reliable.
✦ 1000BaseLX: Several varieties of fiber cable are used with Gigabit
Ethernet, but the most popular is called 1000BaseLX.
The TCP/IP Protocol Suite
TCP/IP, the protocol on which the Internet is built, is actually not a single
protocol but rather an entire suite of related protocols. TCP is even older
than Ethernet. It was first conceived in 1969 by the Department of Defense.
Understanding
Network Protocols
and Standards
If you’re a history buff, you may be interested in
the story of how Ethernet came to be so popular. Here’s how it happened: The original idea
for the Ethernet was hatched in the mind of a
graduate computer science student at Harvard
University named Robert Metcalfe. Looking for
a thesis idea in 1970, he refined a networking
technique that was used in Hawaii, called the
AlohaNet (it was actually a wireless network),
and developed a technique that would enable
a network to efficiently use as much as 90 percent of its capacity. By 1973, he had his first
Ethernet network up and running at the famous
Xerox Palo Alto Research Center (PARC). Bob
dubbed his network “Ethernet” in honor of
the thick network cable, which he called “the
ether.” (Xerox PARC was busy in 1973. In addition to Ethernet, PARC developed the first
personal computer that used a graphical user
Book I
Chapter 2
38
The TCP/IP Protocol Suite
For more on the history of TCP/IP, see the sidebar, “The fascinating story of
TCP/IP,” later in this chapter. Currently, the Internet Engineering Task Force,
or IETF, manages the TCP/IP protocol suite.
The TCP/IP suite is based on a four-layer model of networking that is similar to the seven-layer OSI model. Figure 2-7 shows how the TCP/IP model
matches up with the OSI model and where some of the key TCP/IP protocols
fit into the model. As you can see, the lowest layer of the model, the Network
Interface layer, corresponds to the OSI model’s Physical and Data Link
layers. TCP/IP can run over a wide variety of Network Interface layer protocols, including Ethernet, as well as other protocols, such as Token Ring and
FDDI (an older standard for fiber-optic networks).
OSI Layers
TCP/IP Layers
TCP/IP Protocols
Application Layer
Presentation Layer
Application Layer
HTTP
FTP
Telnet
SMTP
DNS
Session Layer
Figure 2-7:
TCP/IP and
the OSI
model.
Transport Layer
Transport Layer
Network Layer
Network Layer
Data Link Layer
Network Interface
Layer
Physical Layer
TCP
UDP
IP
Ethernet
Token Ring
Other Link-Layer
Protocols
The Application layer of the TCP/IP model corresponds to the upper three
layers of the OSI model — that is, the Session, Presentation, and Application
layers. Many protocols can be used at this level. A few of the most popular
are HTTP, FTP, Telnet, SMTP, DNS, and SNMP.
You can find out about many of the details of these and other TCP/IP protocols in Book IV. In the following sections, I just want to point out a few more
details of the three most important protocols in the TCP/IP suite: IP, TCP,
and UDP.
IP
IP, which stands for Internet Protocol, is a Network layer protocol that is
responsible for delivering packets to network devices. The IP protocol uses
logical IP addresses to refer to individual devices rather than physical (MAC)
addresses. A protocol called ARP (for Address Resolution Protocol) handles
the task of converting IP addresses to MAC addresses.
The TCP/IP Protocol Suite
39
Book I
Chapter 2
The names of Ethernet cable standards resemble the audible signals a quarterback might
shout at the line of scrimmage. In reality, the
cable designations consist of three parts:
✓ The first number is the speed of the net-
work in Mbps. So 10BaseT is for 10 Mbps
networks (Standard Ethernet), 100BaseTX
is for 100 Mbps networks (Fast Ethernet),
and 1000BaseT is for 1,000 Mbps networks
(Gigabit Ethernet).
✓ The word Base indicates the type of net-
work transmission that the cable uses.
Base is short for baseband. Baseband
transmissions carry one signal at a time
and are relatively simple to implement.
The alternative to baseband is broadband,
which can carry more than one signal at a
time but is more difficult to implement. At
one time, broadband incarnations of the
802.x networking standards existed, but
they have all but fizzled due to lack of use.
✓ The tail end of the designation indicates the
cable type. For coaxial cables, a number is
used that roughly indicates the maximum
length of the cable in hundreds of meters.
10Base5 cables can run up to 500 meters.
10Base2 cables can run up to 185 meters.
(The IEEE rounded 185 up to 200 to come up
with the name 10Base2.) If the designation
ends with a T, twisted-pair cable is used.
Other letters are used for other types of
cables.
Because IP addresses consist of a network part and a host part, IP is a
routable protocol. As a result, IP can forward a packet to another network if
the host is not on the current network. (The ability to route packets across
networks is where IP gets its name. An internet is a series of two or more
connected TCP/IP networks that can be reached by routing.)
TCP
TCP, which stands for Transmission Control Protocol, is a connection-oriented Transport layer protocol. TCP lets a device reliably send a packet to
another device on the same network or on a different network. TCP ensures
that each packet is delivered if at all possible. It does so by establishing
a connection with the receiving device and then sending the packets. If a
packet doesn’t arrive, TCP resends the packet. The connection is closed
only after the packet has been successfully delivered or an unrecoverable
error condition has occurred.
One key aspect of TCP is that it’s always used for one-to-one communications. In other words, TCP allows a single network device to exchange data
with another single network device. TCP isn’t used to broadcast messages
to multiple network recipients. Instead, the User Datagram Protocol (UDP) is
used for that purpose.
Understanding
Network Protocols
and Standards
10Base what?
40
The TCP/IP Protocol Suite
The fascinating story of TCP/IP
Some people are fascinated by history. They
subscribe to cable TV just to get the History
Channel. If you’re one of those history buffs,
you may be interested in the following chronicle of TCP/IP’s humble origins. (For maximum
effect, play some melancholy violin music in
the background as you read the rest of this
sidebar.)
In the summer of 1969, the four mop-topped
singers from Liverpool were breaking up. The
war in Vietnam was escalating. Astronauts
Neil Armstrong and Buzz Aldrin walked on the
moon. And the Department of Defense built a
computer network called ARPANET to link its
defense installations with several major universities throughout the United States.
By the early 1970s, ARPANET was becoming
difficult to manage. So it was split into two networks: one for military use, called MILNET, and
the other for nonmilitary use. The nonmilitary
network retained the name ARPANET. To link
MILNET with ARPANET, a new method of connecting networks, called Internet Protocol or
just IP for short, was invented.
The whole purpose of IP was to enable these
two networks to communicate with each other.
Fortunately, the designers of IP realized that it
wouldn’t be too long before other networks
wanted to join in the fun, so they designed IP to
allow for more than two networks. In fact, their
ingenious design allowed for tens of thousands
of networks to communicate via IP.
The decision was a fortuitous one, as the
Internet quickly began to grow. By the mid1980s, the original ARPANET reached its limits.
Just in time, the National Science Foundation
(NSF) decided to get into the game. NSF had
built a network called NSFNET to link its huge
supercomputers. NSFNET replaced ARPANET
as the new background for the Internet.
Around that time, such magazines as Time and
Newsweek began writing articles about this
new phenomenon called the Internet, and the
Net (as it became nicknamed) began to grow
like wildfire. Soon NSFNET couldn’t keep up
with the growth, so several private commercial networks took over management of the
Internet backbone. The Internet has grown at
a dizzying rate ever since, and nobody knows
how long this frenetic growth rate will continue. One thing is sure: TCP/IP is now the most
popular networking protocol in the world.
Many well-known Application layer protocols rely on TCP. For example,
when a user running a Web browser requests a page, the browser uses
HTTP to send a request via TCP to the Web server. When the Web server
receives the request, it uses HTTP to send the requested Web page back to
the browser, again via TCP. Other Application layer protocols that use TCP
include Telnet (for terminal emulation), FTP (for file exchange), and SMTP
(for e-mail).
UDP
The User Datagram Protocol (or UDP) is a connectionless Transport layer
protocol that is used when the overhead of a connection isn’t required.
After UDP has placed a packet on the network (via the IP protocol), it forgets
Other Protocols Worth Knowing About
41
Probably the best-known Application layer protocol that uses UDP is DNS,
the Domain Name System. When an application needs to access a domain
name such as www.wiley.com, DNS sends a UDP packet to a DNS server
to look up the domain. When the server finds the domain, it returns the
domain’s IP address in another UDP packet. (Actually, the process is much
more complicated than that. For a more detailed explanation, see Book IV,
Chapter 4.)
Other Protocols Worth Knowing About
Other networks besides Ethernet, TCP/IP, and IPX/SPX are worth knowing
about:
✦ NetBIOS: Short for Network Basic Input/Output System, this is the basic
application-programming interface for network services on Windows
computers. It’s installed automatically when you install TCP/IP, but
doesn’t show up as a separate protocol when you view the network connection properties. (Refer to Figure 2-1.) NetBIOS is a Session layer protocol that can work with Transport layer protocols such as TCP, SPX, or
NetBEUI.
✦ NetBEUI: Short for Network BIOS Extended User Interface, this is a
Transport layer protocol that was designed for early IBM and Microsoft
networks. NetBEUI is now considered obsolete.
✦ IPX/SPX: A protocol suite that was made popular in the 1980s by Novell
for use with their NetWare servers. TCP/IP has become so dominant that
IPX/SPX is now only rarely used.
✦ AppleTalk: Apple computers have their own suite of network protocols
known as AppleTalk. The AppleTalk suite includes a Physical and Data
Link layer protocol called LocalTalk, but can also work with standard
lower-level protocols, including Ethernet and Token Ring.
✦ SNA: Systems Network Architecture is an IBM networking architecture
that dates back to the 1970s, when mainframe computers roamed the
earth and PCs had barely emerged from the primordial computer soup.
SNA was designed primarily to support huge terminals such as airline
reservation and banking systems, with tens of thousands of terminals
attached to central host computers. Now that IBM mainframes support
TCP/IP and terminal systems have all but vanished, SNA is beginning to
fade away. Still, many networks that incorporate mainframe computers
have to contend with SNA.
Book I
Chapter 2
Understanding
Network Protocols
and Standards
about it. UDP doesn’t guarantee that the packet actually arrives at its destination. Most applications that use UDP simply wait for any replies expected
as a result of packets sent via UDP. If a reply doesn’t arrive within a certain
period of time, the application either sends the packet again or gives up.
42
Book I: Networking Basics
Chapter 3: Understanding
Network Hardware
In This Chapter
✓ Introducing servers
✓ Working with network interface cards
✓ Becoming familiar with network cable, network hubs, and switches
✓ Exploring repeaters, bridges, and routers
✓ Figuring out network storage
T
he building blocks of networks are network hardware devices such as
servers, adapter cards, cables, hubs, switches, routers, and so on. This
chapter provides an overview of these building blocks.
Servers
Server computers are the lifeblood of any network. Servers provide the
shared resources that network users crave, such as file storage, databases,
e-mail, Web services, and so on. Choosing the equipment you use for your
network’s servers is one of the key decisions you’ll make when you set up a
network. In the following sections, I describe some of the various ways you
can equip your network’s servers.
Right off the bat, I want to make one thing clear: Only the smallest networks
can do without at least one dedicated server computer. For a home network
or a small office network with only a few computers, you can get away with
true peer-to-peer networking. That’s where each client computer shares its
resources such as file storage or printers, and a dedicated server computer
isn’t needed. For a more-detailed explanation of why this isn’t a good idea
for larger networks, see Book II, Chapter 1.
What’s important in a server
Here are some general things to keep in mind when picking a server computer for your network:
44
Servers
✦ Scalability: Scalability refers to the ability to increase the size and
capacity of the server computer without unreasonable hassle. It’s a
major mistake to purchase a server computer that just meets your current needs because, you can rest assured, your needs will double within
a year. If at all possible, equip your servers with far more disk space,
RAM, and processor power than you currently need.
✦ Reliability: The old adage “you get what you pay for” applies especially
well to server computers. Why spend $10,000 on a server computer
when you can buy one with seemingly similar specifications at a discount electronics store for $2,000?
One reason is reliability. When a client computer fails, only the person
who uses that computer is affected. When a server fails, however, everyone on the network is affected. The less-expensive computer is probably
made of inferior components that are more likely to fail.
✦ Availability: This concept of availability is closely related to reliability. When a server computer fails, how long does it take to correct the
problem and get the server up and running again? Server computers are
designed so their components can be easily diagnosed and replaced,
which minimizes the downtime that results when a component fails. In
some servers, components are hot swappable, which means that certain
components can be replaced without shutting down the server. Some
servers are designed to be fault-tolerant so that they can continue to
operate even if a major component fails.
✦ Service and support: Service and support are factors often overlooked
when picking computers. If a component in a server computer fails, do
you have someone on site qualified to repair the broken computer? If
not, you should get an on-site maintenance contract for the computer.
Don’t settle for a maintenance contract that requires you to take the
computer in to a repair shop or, worse, mail it to a repair facility. You
can’t afford to be without your server that long.
Components of a server computer
The hardware components that comprise a typical server computer are similar to the components used in less expensive client computers. However,
server computers are usually built from higher-grade components than
client computers for the reasons given in the preceding section. The following paragraphs describe the typical components of a server computer:
✦ Motherboard: The motherboard is the computer’s main electronic
circuit board to which all the other components of your computer are
connected. More than any other component, the motherboard is the
computer. All other components attach to the motherboard.
Servers
45
✦ Processor: The processor, or CPU, is the brain of the computer.
Although the processor isn’t the only component that affects overall
system performance, it’s the one that most people think of first when
deciding what type of server to purchase. At the time of this writing,
Intel had two processor models specifically designed for use in server
computers, as summarized in Table 3-1.
Each motherboard is designed to support a particular type of processor.
CPUs come in two basic mounting styles: slot or socket. However, you
can choose from several types of slots and sockets, so you have to make
sure that the motherboard supports the specific slot or socket style
used by the CPU. Some server motherboards have two or more slots or
sockets to hold two or more CPUs.
The term clock speed refers to how fast the basic clock that drives the processor’s operation ticks. In theory, the faster the clock speed, the faster
the processor. However, clock speed alone is reliable only for comparing
processors within the same family. In fact, the Itanium processors are
faster than Xeon processors at the same clock speed. That’s because the
Itanium processor models contain more advanced circuitry than the older
model, so they can accomplish more work with each tick of the clock.
The number of processor cores also has a dramatic effect on performance. Each processor core acts as if it’s a separate processor. Most
server computers use dual-core (two processor cores) or quad-core
(four cores) chips.
Table 3-1
Intel Processors
Processor
Clock Speed
Processor Cores
Itanium 9300
1.60–1.73GHz
4
Xeon
1.83–3.4GHz
2–6
✦ Memory: Don’t scrimp on memory. People rarely complain about servers having too much memory. Many different types of memory are available, so you have to pick the right type of memory to match the memory
supported by your motherboard. The total memory capacity of the
server depends on the motherboard. Most new servers can support at
least 16GB of memory, and some can handle up to 256GB.
Book I
Chapter 3
Understanding
Network Hardware
The major components on the motherboard include the processor (or
CPU), supporting circuitry called the chipset, memory, expansion slots,
a standard IDE hard drive controller, and I/O ports for devices such as
keyboards, mice, and printers. Some motherboards also include additional built-in features such as a graphic adapter, SCSI disk controller, or
network interface.
46
Servers
✦ Hard drives: Most desktop computers use inexpensive hard drives
called SATA drives. These drives are adequate for individual users, but
because performance is more important for servers, another type of
drive known as SCSI is usually used instead. For the best performance,
use the SCSI drives along with a high-performance SCSI controller card.
(However, because of its low cost, SATA drives are often used in inexpensive servers.)
✦ Network connection: The network connection is one of the most important parts of any server. Many servers have network adapters built into
the motherboard. If your server isn’t equipped as such, you’ll need
to add a separate network adapter card. See the section, “Network
Interface Cards,” later in this chapter, for more information.
✦ Video: Fancy graphics aren’t that important for a server computer.
You can equip your servers with inexpensive generic video cards and
monitors without affecting network performance. (This is one of the few
areas where it’s acceptable to cut costs on a server.)
✦ Power supply: Because a server usually has more devices than a typical desktop computer, it requires a larger power supply (typically 300
watts). If the server houses a large number of hard drives, it may require
an even larger power supply.
Server form factors
The term form factor refers to the size, shape, and packaging of a hardware
device. Server computers typically come in one of three form factors:
✦ Tower case: Most servers are housed in a traditional tower case, similar
to the tower cases used for desktop computers. A typical server tower
case is 18-inches high, 20-inches deep, and 9-inches wide and has room
inside for a motherboard, five or more hard drives, and other components. Tower cases also come with built-in power supplies.
Some server cases include advanced features specially designed for
servers, such as redundant power supplies (so both servers can continue operating if one of the power supplies fails), hot-swappable fans,
and hot-swappable disk drive bays. (Hot-swappable components can be
replaced without powering down the server.)
✦ Rack mount: If you need only a few servers, tower cases are fine. You
can just place the servers next to each other on a table or in a cabinet
that’s specially designed to hold servers. If you need more than a few
servers, though, space can quickly become an issue. For example, what
if your departmental network requires a bank of ten file servers? You’d
need a pretty long table.
Servers
47
✦ Blade servers: Blade servers are designed to save even more space than
rack-mount servers. A blade server is a server on a single card that can
be mounted alongside other blade servers in a blade chassis, which
itself fits into a standard 19-inch equipment rack. A typical blade chassis
holds six or more servers, depending on the manufacturer.
One of the key benefits of blade servers is that you don’t need a separate power supply for each server. Instead, the blade enclosure provides
power for all its blade servers. Some blade server systems provide
rack-mounted power supplies that can serve several blade enclosures
mounted in a single rack.
In addition, the blade enclosure provides KVM switching so that you
don’t have to use a separate KVM switch. You can control any of the
servers in a blade server network from a single keyboard, monitor, and
mouse. (For more information, see the sidebar, “Saving space with a
KVM switch.”)
One of the biggest benefits of blade servers is that they drastically cut
down the amount of cable clutter. With rack-mount servers, each server
requires its own power cable, keyboard cable, video cable, mouse cable,
and network cables. With blade servers, a single set of cables can service all the servers in a blade enclosure.
Saving space with a KVM switch
If you have more than two or three servers in
one location, you should consider getting a
device called a KVM switch to save space. A
KVM switch lets you connect several server
computers to a single keyboard, monitor, and
mouse. (KVM stands for keyboard, video, and
mouse.) Then, you can control any of the servers from a single keyboard, monitor, and mouse
by turning a dial or by pressing a button on the
KVM switch.
Simple KVM switches are mechanical affairs
that let you choose from among 2 to 16 or more
computers. More elaborate KVM switches can
control more computers, using a pop-up menu
or a special keyboard combination to switch
among computers. Some advanced KVMs can
even control a mix of PCs and Macintosh computers from a single keyboard, monitor, and
mouse.
To find more information about KVM switches,
go to a Web search engine such as Google and
search for “KVM.”
Book I
Chapter 3
Understanding
Network Hardware
Rack-mount servers are designed to save space when you need more
than a few servers in a confined area. A rack-mount server is housed in
a small chassis that’s designed to fit into a standard 19-inch equipment
rack. The rack allows you to vertically stack servers in order to save
space.
48
Network Interface Cards
Network Interface Cards
Every computer on a network, both clients and servers, requires a network
interface card (or NIC) in order to access the network. A NIC is usually a
separate adapter card that slides into one of the server’s motherboard
expansion slots. However, most newer computers have the NIC built into the
motherboard, so a separate card isn’t needed.
For client computers, you can usually get away with using the inexpensive
built-in NIC because client computers are used to connect only one user to
the network. However, the NIC in a server computer connects many network users to the server. As a result, it makes sense to spend more money
on a higher-quality NIC for a heavily used server. Most network administrators prefer to use name-brand cards from manufacturers such as Intel,
SMC, or 3Com.
Most NICs made today support 1 Gbps networking and will also support
slower 100 Mbps and even ancient 10 Mbps networks. These cards automatically adjust their speed to match the speed of the network. So you can use
a gigabit card on a network that has older 100 Mbps cards without trouble.
You can find inexpensive gigabit cards for as little as $5 each, but a typical
name-brand card (such as Linksys or Intel) will cost around $25 or $30.
Here are a few other points to ponder concerning network interface cards:
✦ A NIC is a Physical layer and Data Link layer device. Because a NIC
establishes a network node, it must have a physical network address,
also known as a MAC address. The MAC address is burned into the NIC
at the factory, so you can’t change it. Every NIC ever manufactured has a
unique MAC address.
✦ For server computers, it makes sense to use more than one NIC. That
way, the server can handle more network traffic. Some server NICs have
two or more network interfaces built into a single card.
✦ Fiber-optic networks also require NICs. Fiber-optic NICs are still too
expensive for desktop use in most networks. Instead, they’re used for
high-speed backbones. If a server connects to a high-speed fiber backbone, it will need a fiber-optic NIC that matches the fiber-optic cable
being used.
Network Cable
Nearly all modern networks are constructed using a type of cable called
twisted-pair cable, which looks a little like phone cable but is subtly different.
Network Cable
49
A choice that’s becoming more popular every day is to forego network
cable and instead build your network using wireless network components.
Because Book V is devoted exclusively to wireless networking, I don’t
describe wireless network components in this chapter.
Coaxial cable
A type of cable that was once popular for Ethernet networks is coaxial cable,
sometimes called thinnet or BNC cable because of the type of connectors
used on each end of the cable. Thinnet cable operates only at 10 Mbps and is
rarely used for new networks. However, you’ll find plenty of existing thinnet
networks still being used. Figure 3-1 shows a typical coaxial cable.
Figure 3-1:
Coax cable.
Here are some salient points about coaxial cable:
✦ You attach thinnet to the network interface card by using a goofy twiston connector called a BNC connector. You can purchase preassembled
cables with BNC connectors already attached in lengths of 25 or 50 feet,
or you can buy bulk cable on a big spool and attach the connectors
yourself by using a special tool. (I suggest buying preassembled cables.
Attaching connectors to bulk cable can be tricky.)
✦ With coaxial cables, you connect your computers point-to-point in a
bus topology. At each computer, a T connector is used to connect two
cables to the network interface card.
✦ A special plug called a terminator is required at each end of a series of
thinnet cables. The terminator prevents data from spilling out the end of
the cable and staining the carpet.
Book I
Chapter 3
Understanding
Network Hardware
You may encounter other types of cable in an existing network: coax cable
that resembles TV cable, thick yellow cable that used to be the only type of
cable used for Ethernet, fiber-optic cables that span long distances at high
speeds, or thick twisted-pair bundles that carry multiple sets of twisted-pair
cable between wiring closets in a large building. But as I mentioned, it’s
twisted-pair cable for nearly all new networks.
50
Network Cable
✦ The cables strung end-to-end from one terminator to the other are collectively called a segment. The maximum length of a thinnet segment is
about 200 meters (actually, 185 meters). You can connect as many as 30
computers on one segment. To span a distance greater than 185 meters
or to connect more than 30 computers, you must use two or more segments with a device called a repeater to connect each segment.
✦ Although Ethernet coaxial cable resembles TV coaxial cable, the two
types of cable aren’t interchangeable. Don’t try to cut costs by wiring
your network with cheap TV cable.
Twisted-pair cable
The most popular type of cable today is twisted-pair cable, or UTP. (The U
stands for unshielded, but no one says unshielded twisted pair. Just twisted
pair will do.) UTP cable is even cheaper than thin coaxial cable, and best
of all, many modern buildings are already wired with twisted-pair cable
because this type of wiring is often used with modern phone systems.
Figure 3-2 shows a twisted-pair cable.
Figure 3-2:
Twisted-pair
cable.
When you use UTP cable to construct an Ethernet network, you connect the
computers in a star arrangement. In the center of the star is a device called a
hub. Depending on the model, Ethernet hubs enable you to connect from 4 to
24 computers using twisted-pair cable.
An advantage of UTP’s star arrangement is that if one cable goes bad, only
the computer attached to that cable is affected; the rest of the network continues to chug along. With coaxial cable, a bad cable affects the entire network, and not just the computer to which the bad cable is connected.
Here are a few other details that you should know about twisted-pair cabling:
✦ UTP cable consists of pairs of thin wire twisted around each other;
several such pairs are gathered up inside an outer insulating jacket.
Ethernet uses two pairs of wires, or four wires altogether. The number
of pairs in a UTP cable varies, but it’s often more than two.
✦ UTP cable comes in various grades called Categories. Don’t use anything
less than Category 5e cable for your network. Although cheaper, it may
not be able to support faster networks.
Switches
51
✦ If you want to sound like you know what you’re talking about, say “Cat
5e” instead of “Category 5e.”
✦ Many existing networks are cabled with Category 5 cable, which is fine
for 100Mbps networks but isn’t rated for Gigabit networks. Category
5e cable (the e stands for enhanced) and Category 6 cable will support
1,000 Mbps networks.
✦ UTP cable connectors look like modular phone connectors but are a bit
larger. UTP connectors are officially called RJ-45 connectors.
✦ Like thinnet cable, UTP cable is also sold in prefabricated lengths.
However, RJ-45 connectors are much easier to attach to bulk UTP cable
than BNC cables are to attach to bulk coaxial cable. As a result, I suggest
that you buy bulk cable and connectors unless your network consists of
just two or three computers. A basic crimp tool to attach the RJ-45 connectors costs about $50.
✦ The maximum allowable cable length between the hub and the computer is 100 meters (about 328 feet).
Switches
The biggest difference between using coaxial cable and twisted-pair cable is
that when you use twisted-pair cable, you also must use a separate device
called a switch. Years ago, switches were expensive devices — expensive
enough that most do-it-yourself networkers who were building small networks opted for thinnet cable in order to avoid the expense and hassle of
using hubs.
Nowadays, the cost of switches has dropped so much that the advantages
of twisted-pair cabling outweigh the hassle and cost of using switches. With
twisted-pair cabling, you can more easily add new computers to the network, move computers, find and correct cable problems, and service the
computers that you need to remove from the network temporarily.
Note that in some older networks, you may see a device known as a hub used
instead of a switch. Hubs used to be used because they were less expensive than switches. However, the cost of switches came down dramatically,
pushing hubs into relic status. If you have an older network that uses hubs
and seems to run slowly, you can probably improve the network’s speed by
replacing the older hubs with newer switches. For more information, see the
sidebar, “Hubs and switches demystified,” later in this chapter.
Book I
Chapter 3
Understanding
Network Hardware
Although higher-Category cables are more expensive than lower-Category
cables, the real cost of installing Ethernet cabling is the labor required to
actually pull the cables through the walls. As a result, I recommend that
you always spend the extra money to buy Category 5e cable.
52
Switches
Hubs and switches demystified
Both hubs and switches let you connect multiple computers to a twisted-pair network.
Switches are more efficient than hubs, but not
just because they’re faster. If you really want
to know, here’s the actual difference between
a hub and a switch:
✓ In a hub, every packet that arrives at the
hub on any of its ports is automatically sent
out on every other port. The hub has to do
this because it’s a Physical layer device,
so it has no way to keep track of which
computer is connected to each port. For
example, suppose that John’s computer
is connected to port 1 on an 8-port hub,
and Andrea’s computer is connected to
port 5. If John’s computer sends a packet
of information to Andrea’s computer, the
hub receives the packet on port 1 and then
sends it out on ports 2–8. All the computers
connected to the hub get to see the packet
so that they can determine whether the
packet was intended for them.
✓ A switch is a Data Link layer device, which
means it’s able to look into the packets
that pass through it to examine a critical
piece of Data Link layer information: the
MAC address. With this information in
hand, a switch can keep track of which
computer is connected to each of its ports.
So if John’s computer on port 1 sends a
packet to Andrea’s computer on port 5,
the switch receives the packet on port 1
and then sends the packet out on port 5
only. This process is not only faster, but
also improves the security of the system
because other computers don’t see packets that aren’t meant for them.
If you use twisted-pair cabling, you need to know some of the ins and outs of
using hubs:
✦ Because you must run a cable from each computer to the switch, find a
central location for the switch to which you can easily route the cables.
✦ The switch requires electrical power, so make sure that an electrical
outlet is handy.
✦ When you purchase a switch, purchase one with at least twice as many
connections as you need. Don’t buy a four-port switch if you want to network four computers because when (not if) you add the fifth computer,
you have to buy another switch.
✦ You can connect switches to one another, as shown in Figure 3-3; this is
called daisy chaining. When you daisy chain switches, you connect one
end of a cable to a port on one switch and the other end to a port on the
other switch. Note that on some switches, you must use a special designated port for daisy chaining. So be sure to read the instructions that
come with the switch to make sure that you daisy chain it properly.
Switches
53
Book I
Chapter 3
Understanding
Network Hardware
Switch
Switch
Figure 3-3:
Daisy
chaining
switches
together.
✦ You can daisy chain no more than three switches together. If you have
more computers than three hubs can accommodate, don’t panic. For a
small additional cost, you can purchase hubs that have a BNC connection on the back. Then you can string the hubs together using thinnet
cable. The three-hub limit doesn’t apply when you use thinnet cable
to connect the hubs. You can also get stackable switches that have
high-speed direct connections that enable two or more switches to be
counted as a single switch.
✦ When you shop for network hubs, you may notice that the expensive
ones have network-management features that support something called
SNMP. These hubs are called managed hubs. Unless your network is very
large and you know what SNMP is, don’t bother with the more expensive
managed hubs. You’d be paying for a feature that you may never use.
54
Repeaters
✦ For large networks, you may want to consider using a managed switch.
A managed switch allows you to monitor and control various aspects
of the switch’s operation from a remote computer. The switch can alert
you when something goes wrong with the network, and it can keep
performance statistics so that you can determine which parts of the network are heavily used and which aren’t. A managed switch costs two or
three times as much as an unmanaged switch, but for larger networks,
the benefits of managed switches are well worth the additional cost.
Repeaters
A repeater (sometimes called an extender) is a gizmo that gives your network signals a boost so that the signals can travel farther. It’s kind of like a
Gatorade station in a marathon. As the signals travel past the repeater, they
pick up a cup of Gatorade, take a sip, splash the rest of it on their heads,
toss the cup, and hop in a cab when they’re sure that no one is looking.
You need a repeater when the total length of a single span of network cable
exceeds 100 meters (328 feet). The 100-meter length limit applies to the
cable that connects a computer to the switch or the cable that connects
switches to each other when switches are daisy chained together. In other
words, you can connect each computer to the switch with no more than 100
meters of cable, and you can connect switches to each other with no more
than 100 meters of cable.
Figure 3-4 shows how you can use a repeater to connect two groups of computers that are too far apart to be strung on a single segment. When you use
a repeater like this, the repeater divides the cable into two segments. The
cable length limit still applies to the cable on each side of the repeater.
Here are some points to ponder when you lie awake tonight wondering
about repeaters:
✦ Repeaters are not typically used with twisted-pair networks.
Well, technically, that’s not true because the switches themselves function as repeaters. So what I really meant is that you typically see repeaters as stand-alone devices only when a single cable segment would be
more than 100 meters.
✦ A basic rule of Ethernet life is that a signal can’t pass through more than
three repeaters on its way from one node to another. That doesn’t mean
you can’t have more than three repeaters or switches, but if you do, you
have to carefully plan the network cabling so that the three-repeater
rule isn’t violated.
Bridges
55
Switch
Repeater
Switch
Figure 3-4:
Using a
repeater.
Bridges
A bridge is a device that connects two networks so that they act as if they’re
one network. Bridges are used to partition one large network into two
smaller networks for performance reasons. You can think of a bridge as a
kind of smart repeater.
Book I
Chapter 3
Understanding
Network Hardware
✦ Repeaters are legitimate components of a by-the-book Ethernet network.
They don’t extend the maximum length of a single segment; they just
enable you to tie two segments together. Beware of the little black boxes
that claim to extend the segment limit beyond the standard 100-meter
limit for 10/100BaseT cable. These products usually work, but playing by
the rules is better.
56
Bridges
Repeaters listen to signals coming down one network cable, amplify them,
and send them down the other cable. They do this blindly, paying no attention to the content of the messages that they repeat.
In contrast, a bridge is a little smarter about the messages that come down
the pike. For starters, most bridges have the capability to listen to the
network and automatically figure out the address of each computer on
both sides of the bridge. Then the bridge can inspect each message that
comes from one side of the bridge and broadcast it on the other side of
the bridge, but only if the message is intended for a computer that’s on the
other side.
This key feature enables bridges to partition a large network into two
smaller, more efficient networks. Bridges work best in networks that are
highly segregated. For example (humor me here — I’m a Dr. Seuss fan), suppose that the Sneetches networked all their computers and discovered that,
although the Star-Bellied Sneetches’ computers talked to each other frequently and the Plain-Bellied Sneetches’ computers also talked to each other
frequently, rarely did a Star-Bellied Sneetch’s computer talk to a Plain-Bellied
Sneetch’s computer.
A bridge can partition the Sneetchnet into two networks: the Star-Bellied network and the Plain-Bellied network. The bridge automatically learns which
computers are on the Star-Bellied network and which are on the Plain-Bellied
network. The bridge forwards messages from the Star-Bellied side to the
Plain-Bellied side (and vice versa) only when necessary. The overall performance of both networks improves, although the performance of any network
operation that has to travel over the bridge slows down a bit.
Here are a few additional things to consider about bridges:
✦ Some bridges also have the capability to translate the messages from
one format to another. For example, if the Star-Bellied Sneetches build
their network with Ethernet and the Plain-Bellied Sneetches use Token
Ring, a bridge can tie the two together.
✦ You can get a basic bridge to partition two Ethernet networks for about
$500 from mail order suppliers. More sophisticated bridges can cost as
much as $5,000 or more.
✦ For simple bridge applications, you don’t need an expensive specialized bridge device; instead, you can just use a switch. That’s because a
switch is effectively a multi-port bridge.
✦ If you’ve never read Dr. Seuss’s classic story of the Sneetches, you
should.
Routers
57
Routers
Book I
Chapter 3
One key difference between a bridge and a router is that a bridge is essentially transparent to the network. In contrast, a router is itself a node on the
network, with its own MAC and IP addresses. This means that messages can
be directed to a router, which can then examine the contents of the message
to determine how it should handle the message.
You can configure a network with several routers that can work cooperatively together. For example, some routers are able to monitor the network
to determine the most efficient path for sending a message to its ultimate
destination. If a part of the network is extremely busy, a router can automatically route messages along a less-busy route. In this respect, the router is
kind of like a traffic reporter up in a helicopter. The router knows that the
101 is bumper-to-bumper all the way through Sunnyvale, so it sends the message on 280 instead.
Here’s some additional information about routers:
✦ The functional distinctions between bridges and routers — and switches
and hubs, for that matter — get blurrier all the time. As bridges, hubs,
and switches become more sophisticated, they’re able to take on some
of the chores that used to require a router, thus putting many routers
out of work.
✦ Some routers are nothing more than computers with several network
interface cards and special software to perform the router functions.
✦ Routers can also connect networks that are geographically distant from
each other via a phone line (using modems) or ISDN.
✦ You can also use a router to join your LAN to the Internet. Figure 3-5
shows a router used for this purpose.
Understanding
Network Hardware
A router is like a bridge, but with a key difference. Bridges are Data Link layer
devices, so they can tell the MAC address of the network node to which each
message is sent, and can forward the message to the appropriate segment.
However, they can’t peek into the message itself to see what type of information is being sent. In contrast, a router is a Network layer device, so it can
work with the network packets at a higher level. In particular, a router can
examine the IP address of the packets that pass through it. And because IP
addresses have both a network and a host address, a router can determine
what network a message is coming from and going to. Bridges are ignorant of
this information.
58
Network Attached Storage
Figure 3-5:
Connecting
to the
Internet
with a
router.
Switch
Router
The
Internet
Network Attached Storage
Many network servers exist solely for the purpose of making disk space
available to network users. As networks grow to support more users, and
users require more disk space, network administrators are constantly finding ways to add more storage to their networks. One way to do that is to add
more file servers. However, a simpler and less expensive way is to use network attached storage, also known as NAS.
A NAS device is a self-contained file server that’s preconfigured and ready
to run. All you have to do to set it up is take it out of the box, plug it in, and
turn it on. NAS devices are easy to set up and configure, easy to maintain,
and less expensive than traditional file servers.
NAS should not be confused with a related technology called storage area
networks, or SAN. SAN is a much more complicated and expensive technology that provides huge quantities of data storage for large networks. For
more information on SAN, see the sidebar, “SAN is NAS spelled backwards.”
A typical entry-level NAS device is the Dell PowerVault NX300. This device is
a self-contained file server built into a small rack-mount chassis. It supports
up to four hard drives with a total capacity up to four terabyte (or 4,000GB).
The NX300 uses a Xeon processor and two built-in gigabit network ports.
Network Printers
59
It’s easy to confuse the terms storage area
network (SAN) and network attached storage
(NAS). Both refer to relatively new network
technologies that let you manage the disk storage on your network. However, NAS is a much
simpler and less expensive technology. A NAS
device is nothing more than an inexpensive
self-contained file server. Using NAS devices
actually simplifies the task of adding storage
to a network because the NAS eliminates
the chore of configuring a network operating
system for routine file-sharing tasks.
A storage area network is designed for managing very large amounts of network storage —
sometimes downright huge amounts. A SAN
consists of three components: storage devices
(perhaps hundreds of them), a separate highspeed network (usually fiber-optic) that directly
connects the storage devices to each other,
and one or more SAN servers that connect the
SAN to the local area network. The SAN server
manages the storage devices attached to the
SAN and allows users of the LAN to access the
storage.
Setting up and managing a storage area network is a job for a SAN expert. For more information about storage area networks, see the
home page of the Storage Networking Industry
Association at www.snia.org.
The Dell NX300 runs a special version of Windows Server 2008 called the
Windows Storage Server 2008. This version of Windows is designed specifically for NAS devices. It allows you to configure the network storage from
any computer on the network by using a Web browser.
Note that some NAS devices use customized versions of Linux rather than
Windows Storage Server. Also, in some systems, the operating system
resides on a separate hard drive that’s isolated from the shared disks. This
prevents the user from inadvertently damaging the operating system.
Network Printers
Although you can share a printer on a network by attaching the printer to a
server computer, many printers have network interfaces built in. This lets
you connect the printer directly to the network. Then network users can
connect to the printer and use it without going through a server.
Even if you connect a printer directly to the network, it’s still a good idea to
have the printer managed by a server computer running a network operating system such as Windows Server 2003 or 2007. That way, the server can
store print jobs sent to the printer by multiple users and print the jobs in the
order in which they were received.
Understanding
Network Hardware
SAN is NAS spelled backwards
Book I
Chapter 3
60
Book I: Networking Basics
Chapter 4: Understanding Network
Operating Systems
In This Chapter
✓ Understanding what network operating systems do
✓ Figuring out the advantages of Windows Server 2003
✓ Analyzing Windows 2000 Server
✓ Taking a look at Windows NT Server
✓ Navigating NetWare
✓ Delving into peer-to-peer networking
✓ Exploring other network operating systems
O
ne of the basic choices that you must make before you proceed any
further is to decide which network operating system (NOS) to use as
the foundation for your network. This chapter begins with a description of
several important features found in all network operating systems. Next,
it provides an overview of the advantages and disadvantages of the most
popular network operating systems.
Network Operating System Features
All network operating systems, from the simplest to the most complex, must
provide certain core functions. These include the ability to connect to other
computers on the network, share files and other resources, provide for
security, and so on. In the following sections, I describe some of these core
NOS features in general terms.
Network support
It goes without saying that a network operating system should support networks. (I can picture Mike Myers in his classic Saturday Night Live role as
Linda Richman, host of Coffee Talk, saying “I’m getting a little verklempt. . . .
Talk amongst yourselves. . . . I’ll give you a topic — network operating systems do not network, nor do they operate. Discuss.”)
62
Network Operating System Features
A network operating system must support a wide variety of networking protocols in order to meet the needs of its users. That’s because a large network
typically consists of a mixture of various versions of Windows, as well as a
few scattered Macintosh (mostly in the art department) and possibly some
Linux computers. The computers often have distinct protocols.
Many servers have more than one network interface card installed. In
that case, the NOS must be able to support multiple network connections.
Ideally, the NOS should have the ability to balance the network load among
its network interfaces. In addition, in the event that one of the connections
fails, the NOS should be able to seamlessly switch to another connection.
Finally, most network operating systems include a built-in ability to function
as a router that connects two networks. The NOS router functions should
also include firewall features in order to keep unauthorized packets from
entering the local network.
File-sharing services
One of the most important functions of a network operating system is its
ability to share resources with other network users. The most common
resource that’s shared is the server’s file system. A network server must
be able to share some or all of its disk space with other users so that those
users can treat the server’s disk space as an extension of their own computers’ disk spaces.
The NOS allows the system administrator to determine which portions of the
server’s file system to share. Although an entire hard drive can be shared, it
isn’t commonly done. Instead, individual directories or folders are shared.
The administrator can control which users are allowed to access each
shared folder.
Because file sharing is the reason many network servers exist, network operating systems have more sophisticated disk management features than are
found in desktop operating systems. For example, most network operating
systems have the ability to manage two or more hard drives as if they were
a single drive. In addition, most can create mirrors, which automatically keep
backup copies of drives on a second drive.
Multitasking
Only one user at a time uses a desktop computer; however, multiple users
simultaneously use server computers. As a result, a network operating
system must provide support for multiple users who access the server
remotely via the network.
Network Operating System Features
63
Although multitasking creates the appearance that two or more programs
are executing on the computer at one time, in reality, a computer with a
single processor can execute only one program at a time. The operating
system switches the CPU from one program to another to create the appearance that several programs are executing simultaneously, but at any given
moment, only one of the programs is actually executing. The others are
patiently waiting for their turns. (However, if the computer has more than
one CPU, the CPUs can execute programs simultaneously, which is called
multiprocessing.)
To see multitasking in operation on a Windows computer, press
Ctrl+Alt+Delete to bring up the Windows Task Manager and then click the
Processes tab. All the tasks currently active on the computer appear.
For multitasking to work reliably, the network operating system must completely isolate the executing programs from each other. Otherwise, one
program may perform an operation that adversely affects another program.
Multitasking operating systems do this by providing each task with its own
unique address space that makes it almost impossible for one task to affect
memory that belongs to another task.
In most cases, each program executes as a single task or process within the
memory address space allocated to the task. However, a single program can
also be split into several tasks. This technique is usually called multithreading, and the program’s tasks are called threads.
The two approaches to multitasking are preemptive and non-preemptive. In
preemptive multitasking, the operating system decides how long each task
gets to execute before it should step aside so that another task can execute.
When a task’s time is up, the operating system’s task manager interrupts the
task and switches to the next task in line. All the network operating systems
in widespread use today use preemptive multitasking.
The alternative to preemptive multitasking is non-preemptive multitasking. In non-preemptive multitasking, each task that gets control of the CPU is
allowed to run until it voluntarily gives up control so that another task can
run. Non-preemptive multitasking requires less operating system overhead
because the operating system doesn’t have to keep track of how long each
task has run. However, programs have to be carefully written so that they
don’t hog the computer all to themselves.
Book I
Chapter 4
Understanding
Network Operating
Systems
At the heart of multiuser support is multitasking, which is the ability of an
operating system to execute more than one program — called a task or a
process — at a time. Multitasking operating systems are like the guy who
used to spin plates balanced on sticks on the old Ed Sullivan Show. He’d
run from plate to plate, trying to keep them all spinning so they wouldn’t
fall off the sticks. To make it challenging, he’d do it blindfolded or riding on
a unicycle.
64
Network Operating System Features
Directory services
Directories are everywhere. When you need to make a phone call, you look
up the number in a phone directory. When you need to find the address of a
client, you look up his or her name in your Rolodex. And when you need to
find the Sam Goody store at a shopping mall, you look for the mall directory.
Networks have directories, too. Network directories provide information
about the resources that are available on the network, such as users, computers, printers, shared folders, and files. Directories are an essential part of
any network operating system.
In early network operating systems, such as Windows NT 3.1 and NetWare
3.x, each server computer maintained its own directory database of
resources that were available on just that server. The problem with that
approach was that network administrators had to maintain each directory
database separately. That wasn’t too bad for networks with just a few servers, but maintaining the directory on a network with dozens or even hundreds of servers was next to impossible.
In addition, early directory services were application specific. For example,
a server would have one directory database for user logins, another for file
sharing, and yet another for e-mail addresses. Each directory had its own
tools for adding, updating, and deleting directory entries.
Most modern networks — particularly those based on Windows servers —
use a directory service called Active Directory. Active Directory is essentially
a database that organizes information about a network and allows users and
computers to gain permission to access network resources. Active Directory
is simple enough to use for small networks with just a few dozen computers
and users, but powerful enough to work with large networks containing tens
of thousands of computers.
Security services
All network operating systems must provide some measure of security to
protect the network from unauthorized access. Hacking seems to be the
national pastime these days. With most computer networks connected to
the Internet, anyone anywhere in the world can and probably will try to
break into your network.
The most basic type of security is handled through user accounts, which
grant individual users the right to access the network resources — and
govern what resources each user can access. User accounts are secured
by passwords; therefore, good password policy is a cornerstone of any security system. Most network operating systems let you establish password
Microsoft’s Server Operating Systems
65
Most network operating systems also provide for data encryption, which
scrambles data before it is sent over the network or saved on disk, and digital certificates, which are used to ensure that users are who they say they are
and files are what they claim to be.
Microsoft’s Server Operating Systems
Over the years, Microsoft has released several versions of its Windowsbased server operating system: Windows NT Server 4, Windows 2000 Server,
Windows Server 2003, and Windows Server 2008. Windows Server 2008 is
the newest version, but because it’s relatively new, many organizations are
still using Windows Server 2003. In fact, some are still using Windows 2000
Server, and there are probably a few (mostly on deserted islands cut off
from civilization) running Windows NT Server 4.
It’s useful to discuss these operating systems in the order they were
released, because each new version builds on the previous version by introducing new and improved features. However, keep in mind as you read the
following sections that Windows NT Server 4 and Windows 2000 Server are
considered obsolete, and Windows Server 2003 will be too in a few short
years.
NTFS drives
All server versions of Windows use a special type of formatting for hard drives, different from the standard FAT system used by
MS-DOS since the early 1980s. (FAT stands
for File Allocation Table, in case you’re interested.) The new system, called NTFS (for NT
File System), offers many advantages over FAT
drives:
✓ NTFS is much more efficient at using the
space on your hard drive. As a result, NTFS
can cram more data onto a given hard
drive than FAT.
✓ NTFS drives provide better security fea-
tures than FAT drives. NTFS stores security
information on disk for each file and directory. In contrast, FAT has only rudimentary
security features.
✓ NTFS drives are more reliable because
NTFS keeps duplicate copies of important
information, such as the location of each
file on the hard drive. If a problem develops on an NTFS drive, Windows NT Server
can probably correct the problem without
losing any data. In contrast, FAT drives are
prone to losing information.
Book I
Chapter 4
Understanding
Network Operating
Systems
policies, such as requiring that passwords have a minimum length and
include a mix of letters and numerals. In addition, passwords can be set to
expire after a certain number of days, so users can be forced to frequently
change their passwords.
66
Microsoft’s Server Operating Systems
Windows 2000 Server
Windows 2000 Server built on the strengths of Windows NT Server 4 by
adding new features that made Windows 2000 Server faster, easier to
manage, more reliable, and easier to use for large and small networks alike.
The most significant new feature offered by Windows 2000 Server is called
Active Directory, which provides a single directory of all network resources
and enables program developers to incorporate the directory into their programs. Active Directory drops the 15-character domain and computer names
in favor of Internet-style DNS names, such as Marketing.MyCompany.com or
Sales.YourCompany.com. (However, it still supports the old-style names for
older clients that don’t deal well with DNS names.)
Windows 2000 Server came in three versions:
✦ Windows 2000 Server was the basic server, designed for small- to
medium-sized networks. It included all the basic server features, including file and printer sharing, and acted as a Web and e-mail server.
✦ Windows 2000 Advanced Server was the next step up, designed for
larger networks. Advanced Server could support server computers that
have up to 8GB of memory (not hard drive — RAM!) and four integrated
processors instead of the single processor that desktop computers and
most server computers had.
✦ Windows 2000 Datacenter Server supported servers that have as many
as 32 processors with up to 64GB of RAM and was specially designed for
large database applications.
For small networks with 50 or fewer computers, Microsoft offered a special
bundle called the Small Business Server, which included the following components for one low, low price:
✦ Windows Server 2003: The operating system for your network server.
✦ Exchange Server 2003: For e-mail and instant messaging.
✦ SQL Server 2000: A database server.
✦ FrontPage 2000: For building Web sites.
✦ Outlook 2000: For reading e-mail.
Windows Server 2003
The next server version of Windows was Windows Server 2003. Windows
Server 2003 built on Windows 2000 Server, with the following added features:
Microsoft’s Server Operating Systems
67
✦ A new-and-improved version of Active Directory with tighter security, an
easier-to-use interface, and better performance.
✦ A major change in the application-programming interface for Windows
programs, known as the .NET Framework.
✦ Support for ever-larger clusters of computers. A cluster is a set of computers that work together as if they were a single server. Windows 2000
Server Datacenter Edition and previous versions supported clusters of
four servers; Windows Server 2003 Enterprise and Datacenter Editions
support clusters of eight servers. (Obviously, this is a benefit only for
very large networks. The rest of us should just grin and say, “Cool!”)
✦ An enhanced distributed file system that lets you combine drives on several servers to create one shared volume.
✦ Support for storage area networks.
✦ A built-in Internet firewall to secure your Internet connection.
✦ A new version of Microsoft’s Web server, Internet Information Services
(IIS) 6.0.
Like its predecessor, Windows Server 2003 comes in several versions. Four,
to be specific:
✦ Windows Server 2003, Standard Edition: This is the basic version of
Windows 2003. If you’re using Windows Server 2003 as a file server or
to provide other basic network services, this is the version you’ll use.
Standard Edition can support servers with up to four processors and
4GB of RAM.
✦ Windows Server 2003, Web Edition: A version of Windows 2003 optimized for use as a Web server.
✦ Windows Server 2003, Enterprise Edition: Designed for larger networks, this version can support servers with up to eight processors,
32GB of RAM, server clusters, and advanced features designed for high
performance and reliability.
✦ Windows Server 2003, Datacenter Edition: The most powerful version
of Windows 2003, with support for servers with 64 processors, 64GB of
RAM, and server clusters, as well as advanced fault-tolerance features
designed to keep the server running for mission-critical applications.
Understanding
Network Operating
Systems
✦ A better and easier-to-use system management interface, called the
Manage My Server window. On the flip side, for those who prefer bruteforce commands, Windows Server 2003 includes a more comprehensive
set of command line management tools than is offered by Windows 2000
Server. Of course, the familiar Microsoft Management Console tools
from Windows 2000 Server are still there.
Book I
Chapter 4
68
Other Server Operating Systems
Windows Server 2008
In February of 2008, Microsoft finally released the successor to Windows
Server 2003, not surprisingly known as Windows Server 2008. Windows
Server 2008 adds many new features to Windows Server 2003, including the
following:
✦ Even more enhancements to Active Directory, including the ability to
manage digital certificates, a new type of domain controller called a
read-only domain controller, and the ability to stop and restart Active
Directory services without shutting down the entire server.
✦ A new graphical user interface based on Windows Vista, including a new
all-in-one management tool called the Server Manager.
✦ A new version of the operating system called Server Core, which has no
graphical user interface. Server Core is run entirely from the command
line or by a remote computer that connects to the server via Microsoft
Management Console. Server Core is designed to provide efficient file
servers, domain controllers, or DNS and DHCP servers.
✦ Remote connection enhancements that enable computers to establish
Web-based connections to the server using the HTTPS protocol without
having to establish a Virtual Private Network (VPN) connection.
✦ Yet another new version of the Internet Information Services (IIS) Web
server (7.0).
Windows Server 2008 R2
In the fall of 2009, Microsoft issued an update to Windows Server 2008, officially called Windows Server 2008 R2. Network administrators the world
over rejoiced, in part because most of them are also Star Wars fans and they
can now refer to their favorite operating system as “R2.”
R2 builds on Windows Server 2008 with a variety of new features, including
virtualization features that let you run more than one instance of the operating system on a single server computer, a new version of IIS (7.5), and support for up to 256 processors.
Also, R2 officially drops support for 32-bit processors. In other words, R2
only runs on server-class 64-bit processors such as Itanium and Xeon.
Other Server Operating Systems
Although Windows Server is the most popular choice for network operating systems, it isn’t the only game in town. The following sections briefly
describe three other server choices: Linux, Macintosh OS/X Server, and
Novell’s NetWare.
Other Server Operating Systems
69
Linux
Linux offers the same networking benefits as Unix and can be an excellent
choice as a server operating system.
Apple Mac OS/X Server
All the other server operating systems I describe in this chapter run on
Intel-based PCs with Pentium or Pentium-compatible processors. But what
about Macintosh computers? After all, Macintosh users need networks, too.
For Macintosh networks, Apple offers a special network server operating
system known as Mac OS/X Server. Mac OS/X Server has all the features
you’d expect in a server operating system: file and printer sharing, Internet
features, e-mail, and so on.
Novell NetWare
NetWare was once the king of network operating systems. Today, NetWare
networks are rare, but you can still find them if you look hard enough.
NetWare has always had an excellent reputation for reliability. In fact, some
network administrators swear that they have NetWare servers on their networks that have been running continuously, without a single reboot, since
Ronald Reagan was president. (Unfortunately, there hasn’t been a major
upgrade to NetWare since George W. Bush’s first term.)
Novell released the first version of NetWare in 1983, two years before the
first version of Windows and four years before Microsoft’s first network
operating system, the now defunct LAN Manager. Over the years, NetWare
has gone through many versions. The most important versions were:
✦ NetWare version 3.x, the version that made NetWare famous. NetWare
3.x used a now outdated directory scheme called the bindery. Each
NetWare 3.x server has a bindery file that contains information about the
resources on that particular server. With the bindery, you had to log on
separately to each server that contained resources you wanted to use.
✦ NetWare 4.x, in which NetWare Directory Service, or NDS, replaced the
bindery. NDS is similar to Active Directory. It provides a single directory
for the entire network rather than separate directories for each server.
Understanding
Network Operating
Systems
Perhaps the most interesting operating system available today is Linux.
Linux is a free operating system that’s based on Unix, a powerful network
operating system often used on large networks. Linux was started by
Linus Torvalds, who thought it would be fun to write a version of Unix in
his free time — as a hobby. He enlisted help from hundreds of programmers throughout the world, who volunteered their time and efforts via the
Internet. Today, Linux is a full-featured version of Unix; its users consider it
to be as good or better than Windows.
Book I
Chapter 4
70
Peer-to-Peer Networking with Windows
✦ NetWare 5.x was the next step. It introduced a new user interface based
on Java for easier administration, improved support for Internet protocols, multiprocessing with up to 32 processors, and many other features.
✦ NetWare 6.0 introduced a variety of new features, including a new disk
management system called Novell Storage Services, Web-based access
to network folders and printers, and built-in support for Windows, Linux,
Unix, and Macintosh file systems.
✦ Novell released its last major version of NetWare (6.5) in summer 2003.
It included improvements to its browser-based management tools and
was bundled with open-source servers such as Apache and MySQL.
Beginning in 2005, NetWare has transformed itself into a Linux-based system
called Open Enterprise System (OES). In OES, the core of the operating
system is actually Linux, with added applications that run the traditional
NetWare services such as directory services. (For more information, see
“Linux” earlier in this chapter.)
Peer-to-Peer Networking with Windows
If you’re not up to the complexity of dedicated network operating systems,
you may want to opt for a simple peer-to-peer network based on a desktop
version of Windows.
Advantages of peer-to-peer networks
The main advantage of a peer-to-peer network is that it’s easier to set up
and use than a network with a dedicated server. Peer-to-peer networks rely
on the limited network server features that are built into Windows, such as
the ability to share files and printers. Recent versions of Windows, including
Windows 7, Vista, and Windows XP, include wizards that automatically configure a basic network for you so that you don’t have to manually configure
any network settings.
Another advantage of peer-to-peer networks is that they can be less expensive than server-based networks. Here are some of the reasons that peer-topeer networks are inexpensive:
✦ Peer-to-peer networks don’t require you to use a dedicated server computer. Any computer on the network can function as both a network
server and a user’s workstation. (However, you can configure a computer as a dedicated server if you want to. Doing so results in better performance but negates the cost benefit of not having a dedicated server
computer.)
Peer-to-Peer Networking with Windows
71
✦ You must consider the cost of the server operating system itself.
Windows Server can cost as much as $200 per user. And the total cost
increases as your network grows, although the cost per user drops. For a
peer-to-peer Windows server, you pay for Windows once. You don’t pay
any additional charges based on the number of users on your network.
Drawbacks of peer-to-peer networks
Yes, peer-to-peer networks are easier to install and manage than domainbased networks, but they do have their drawbacks:
✦ Because peer-to-peer networks are based on computers running client
versions of Windows, they’re subject to the inherent limitations of those
Windows versions. Client versions of Windows are designed primarily to
be an operating system for a single-user desktop computer rather than
to function as part of a network. These versions can’t manage a file or
printer server as efficiently as a real network operating system.
✦ If you don’t set up a dedicated network server, someone (hopefully,
not you) may have to live with the inconvenience of sharing his or her
computer with the network. With Windows Server, the server computers are dedicated to network use so that no one has to put up with this
inconvenience.
✦ Although a peer-to-peer network may have a lower cost per computer
for smaller networks, the cost difference between peer-to-peer networks
and Windows Server is less significant in larger networks (say, ten or
more clients).
✦ Peer-to-peer networks don’t work well when your network starts to
grow. Peer-to-peer servers just don’t have the security or performance
features required for a growing network.
Windows 7
The current version of Windows is known as Windows 7. It has powerful
peer-to-peer networking features built in, so it’s easy to create a small peerto-peer network based on Windows 7.
Vista comes in six editions:
✦ Starter: A simplified version that is available only pre-installed on computer systems from manufacturers such as Dell.
Book I
Chapter 4
Understanding
Network Operating
Systems
✦ Peer-to-peer networks are easier to set up and use, which means that
you can spend less time figuring out how to make the network work
and keep it working. And, as Einstein proved, time is money (hence his
famous equation, E=M$2).
72
Peer-to-Peer Networking with Windows
✦ Home Basic: A special version that is available only in certain geographic markets such as China, India, and Pakistan. It is not available in
Europe or the United States.
✦ Home Premium: The standard edition for home use. You can use the
Home Premium edition to build a simple peer-to-peer network, but not
as part of a domain-based network.
✦ Professional: Designed for business users with domain networks.
✦ Enterprise: The complete version of Windows 7, which includes all the
features of Windows 7 Professional and a few extra bells and whistles.
This edition is available only to large businesses that have volume
licenses with Microsoft.
✦ Ultimate: The retail version of the Enterprise Edition. This version
includes all of the features of Windows 7 Enterprise but can be purchased individually by home or small business users.
Windows 7 provides the following networking features:
✦ Built-in file and printer sharing allows you to share files and printers
with other network users.
✦ A Network Setup Wizard automatically sets the most common configuration options. The wizard eliminates the need to work through multiple
Properties dialog boxes to configure network settings.
✦ An Internet Connection Sharing (ICS) feature allows a Windows computer to share an Internet connection with other users. The ICS feature
includes firewall features that protect your network from unauthorized
access via the Internet connection.
✦ A built-in firewall protects the computer when it’s connected to the
Internet.
✦ Simple user account management lets you create multiple users and
assign passwords.
✦ Built-in support for wireless networking makes connecting to a wireless
network a breeze.
✦ Advanced network diagnostics and troubleshooting tools help you find
and correct networking problems.
Windows Vista
The previous version of Windows was known as Windows Vista. Like
Windows 7, Windows Vista came in several editions. The most popular were:
Peer-to-Peer Networking with Windows
73
✦ Home Basic: For the simplest home users.
✦ Business: Designed for business users with domain networks.
✦ Ultimate: Includes all of the available Windows features.
Most of the improvements made in Windows 7 were in the user interface
rather than in the networking features. As a result, Windows Vista provided
most of the same networking capabilities as Windows 7.
Older Windows versions
Previous versions of Windows also offer peer-to-peer networking features.
The following list summarizes the networking features of the major Windows
releases prior to Windows Vista:
✦ Windows XP: This is still a popular version of Windows, even though it
was replaced by Windows Vista in 2005.
✦ Windows Me: The release of Me (short for Millennium Edition) was
aimed at home users. It provided a Home Networking Wizard to simplify
the task of configuring a network. It was the last version of Windows that
was based on the old 16-bit MS-DOS code.
✦ Windows 2000 Professional: This is a desktop version of Windows 2000
Server. It has powerful peer-to-peer networking features similar to those
found in Windows XP, although they are a bit more difficult to set up.
It was the first desktop version of Windows that integrated well with
Active Directory.
✦ Windows 98 and Windows 98 Second Edition: These were popular
upgrades to Windows 95 that enhanced its basic networking features.
✦ Windows 95: This was the first 32-bit version of Windows. However, it
still relied internally on 16-bit MS-DOS code, so it wasn’t a true 32-bit
operating system. It provided basic peer-to-peer network features, with
built-in drivers for common network adapters and basic file- and printersharing features.
✦ Windows for Workgroups: This was the first version of Windows to
support networking without requiring an add-on product. It simplified
the task of creating NetBIOS-based networks for file and printer sharing.
However, it had only weak support for TCP/IP.
Book I
Chapter 4
Understanding
Network Operating
Systems
✦ Home Premium: Has more advanced features but is still designed for
home users. Both of the Home versions can be used to create peer-topeer networks but can’t be used with domain-based networks.
74
Peer-to-Peer Networking with Windows
Workgroups versus domains
In a Windows network, a domain is a group of
server computers that share a common user
account database. A user at a client computer can log in to a domain to access shared
resources for any server in the domain. Each
domain must have at least one server computer designated as the domain controller,
which is ultimately in charge of the domain.
Most domain networks share this work among
at least two domain controllers, so that if one
of the controllers stops working, the network
can still function.
A peer-to-peer network can’t have a domain
because it doesn’t have a dedicated server
computer to act as a domain controller.
Instead, computers in a peer-to-peer network
are grouped in workgroups, which are simply
groups of computers that can share resources
with each other. Each computer in a workgroup
keeps track of its own user accounts and security settings, so no single computer is in charge
of the workgroup.
To create a domain, you have to designate a
server computer as the domain controller and
configure user accounts. Workgroups are
much easier to administer. In fact, you don’t
have to do anything to create a workgroup
except decide on the name you want to use.
Although you can have as many workgroups as
you want on a peer-to-peer network, most networks have just one workgroup. That way, any
computers on the network can share resources
with any other computer on the network.
One of the most common mistakes when setting up a peer-to-peer network is misspelling
the workgroup name on one of the computers. For example, suppose you decide that all
the computers should belong to a workgroup
named MYGROUP. If you accidentally spell
the workgroup name MYGRUOP for one of the
computers, that computer will be isolated in its
own workgroup. If you can’t locate a computer
on your network, the workgroup name is one of
the first things to check.
Book II
Building a Network
Contents at a Glance
Chapter 1: Planning a Network . . . . . . . . . . . . . . . . . . . . . . . . . . . . . . . . .77
Chapter 2: Installing Network Hardware. . . . . . . . . . . . . . . . . . . . . . . . .95
Chapter 3: Setting Up a Network Server . . . . . . . . . . . . . . . . . . . . . . . .111
Chapter 4: Configuring Windows Clients. . . . . . . . . . . . . . . . . . . . . . . .121
Chapter 5: Macintosh Networking . . . . . . . . . . . . . . . . . . . . . . . . . . . . .135
Chapter 6: Configuring Other Network Features . . . . . . . . . . . . . . . . .141
Chapter 7: Verifying Your Network Installation . . . . . . . . . . . . . . . . . .151
Chapter 8: Going Virtual . . . . . . . . . . . . . . . . . . . . . . . . . . . . . . . . . . . . . .157
Chapter 1: Planning a Network
In This Chapter
✓ Making a network plan
✓ Taking stock of your computer stock
✓ Making sure that you know why you need a network
✓ Making the three basic network decisions that you can’t avoid
✓ Using a starter kit
✓ Looking at a sample network
O
kay, so you’re convinced that you need to network your computers.
What now? Do you stop by Computers-R-Us on the way to work, install
the network before drinking your morning coffee, and expect the network to
be fully operational by noon?
I don’t think so.
Networking your computers is just like any other worthwhile endeavor:
Doing it right requires a bit of planning. This chapter helps you to think
through your network before you start spending money. It shows you how
to come up with a networking plan that’s every bit as good as the plan that a
network consultant would charge thousands of dollars for. See? This book is
already saving you money!
Making a Network Plan
Before you begin any networking project, whether it’s a new network installation or an upgrade of an existing network, you should first make a detailed
plan. If you make technical decisions too quickly, before studying all the
issues that affect the project, you’ll regret it. You’ll discover too late that a
key application won’t run over the network, that the network has unacceptably slow performance, or that key components of the network don’t work
together.
Here are some general thoughts to keep in mind while you create your network plan:
78
Being Purposeful
✦ Don’t rush the plan. The most costly networking mistakes are the ones
that you make before you install the network. Think things through and
consider alternatives.
✦ Write down the network plan. The plan doesn’t have to be a fancy, 500page document. If you want to make it look good, pick up a 1⁄2-inch threering binder. This binder will be big enough to hold your network plan
with room to spare.
✦ Ask someone else to read your network plan before you buy anything. Preferably, ask someone who knows more about computers
than you do.
✦ Keep the plan up to date. If you add to the network, dig up the plan,
dust it off, and update it.
“The best laid schemes of mice and men gang aft agley, and leave us naught
but grief and pain for promised joy.” Robert Burns lived a few hundred years
before computer networks, but his famous words ring true. A network plan
isn’t chiseled in stone. If you discover that something doesn’t work the way
you thought it would, that’s okay. Just change your plan.
Being Purposeful
One of the first steps in planning your network is making sure that you
understand why you want the network in the first place. Here are some of
the more common reasons for needing a network, all of them quite valid:
✦ My coworker and I exchange files using CDs or flash drives just about
every day. With a network, it would be easier to trade files.
✦ I don’t want to buy everyone a laser printer when I know the one we have
now just sits there taking up space most of the day. So wouldn’t buying a
network be better than buying a laser printer for every computer?
✦ I want to provide an Internet connection for all my computers. (Many
networks, especially smaller ones, exist solely for the purpose of sharing
an Internet connection.)
✦ Someone figured out that we’re destroying seven trees a day by printing
interoffice memos on paper, so we want to save the rainforest by setting
up an e-mail system.
✦ Business is so good that one person typing in orders eight hours each
day can’t keep up. With a network, I can have two people entering
orders, and I won’t have to pay overtime to either person.
✦ My brother-in-law just put in a network at his office, and I don’t want him
to think that I’m behind the times.
Taking Stock
79
✦ I already have a network, but it’s so old it may as well be made of kite
string and tin cans. An improved network will speed up access to shared
files, provide better security, and be easier to manage.
Make sure that you identify all the reasons why you think you need a network and then write them down. Don’t worry about winning the Pulitzer
Prize for your stunning prose. Just make sure that you write down what you
expect a network to do for you.
If you were making a 500-page networking proposal, you’d place the description of why a network is needed in a tabbed section labeled “Justification.” In
your 1⁄2-inch network binder, file the description under “Purpose.”
Taking Stock
One of the most challenging parts of planning a network is figuring out how
to work with the computers that you already have. In other words, how do
you get from here to there? Before you can plan how to get “there,” you have
to know where “here” is. In other words, you have to take a thorough inventory of your current computers.
What you need to know
You need to know the following information about each of your computers:
✦ The processor type and, if possible, its clock speed: It would be nice
if each of your computers had a shiny new i7 Quad Core processor. In
most cases, though, you find a mixture of computers: some new, some
old, some borrowed, some blue. You may even find a few archaic prePentium computers.
You can’t usually tell what kind of processor that a computer has just
by looking at the computer’s case. Most computers, however, display
the processor type when you turn them on or reboot them. If the information on the startup screen scrolls too quickly for you to read it, try
pressing the Pause key to freeze the information. After you finish reading it, press the Pause key again so that your computer can continue
booting.
✦ The size of the hard drive and the arrangement of its partitions: To
find out the size of your computer’s hard drive in Windows Vista or
Windows 7, open the Computer window, right-click the drive icon, and
choose the Properties command from the shortcut menu that appears.
Planning a Network
As you consider the reasons why you need a network, you may conclude
that you don’t need a network after all. That’s okay. You can always use the
binder for your stamp collection.
Book II
Chapter 1
80
Taking Stock
Figure 1-1 shows the Properties dialog box for a 922GB hard drive that
has about 867GB of free space.
Figure 1-1:
The
Properties
dialog
box for a
disk drive
(Windows
Vista).
If your computer has more than one hard drive, Windows lists an icon
for each drive in the Computer window. Jot down the size and amount of
free space available on each drive.
✦ The amount of memory: To find this information in Windows, right-click
Computer on the Start menu and choose the Properties command. The
amount of memory on your computer is shown in the dialog box that
appears. For example, Figure 1-2 shows the System Properties dialog
box for a computer running Windows 7 with 8GB of RAM.
✦ The operating system version: This you can also deduce from the
System Properties dialog box. For example, the Properties page shown
in Figure 1-2 indicates that the computer is running Windows 7 Ultimate.
✦ What type of network card, if any, is installed in the computer: The
easiest way to get this information is to right-click Computer on the
Start menu, choose Manage, click Device Manager, right-click the network adapter, and choose Properties. For example, Figure 1-3 shows the
Properties dialog box for the network adapter that’s built into the motherboard on my computer.
Taking Stock
81
Book II
Chapter 1
Figure 1-3:
The
Properties
page for
a network
adapter.
Planning a Network
Figure 1-2:
The
Properties
page for a
Windows 7
system.
82
Taking Stock
The Device Manager is also useful for tracking down other hardware
devices attached to the computer.
✦ What network protocols are in use: To determine this in Windows
Vista, open Control Panel, open Network and Sharing Center, click
Manage Network Connections, and then right-click the Local Area connection and choose Properties. In Windows 7, open Control Panel, click
View Network Status and Tasks, click Change Adapter Settings, then
right-click the Local Area Connection and choose Properties. The dialog
box shown in Figure 1-4 appears.
Figure 1-4:
The
Properties
page for a
local area
network
connection.
✦ What kind of printer, if any, is attached to the computer: Usually, you
can tell just by looking at the printer. You can also tell by doubleclicking the Printers icon in Control Panel.
✦ Any other devices connected to the computer: A CD, DVD, or CD-RW
drive? Scanner? Zip or Jazz drive? Tape drive? Video camera? Battle
droid? Hot tub?
✦ Which driver and installation disks are available: Hopefully, you’ll be
able to locate the disks or CDs required by hardware devices such as
the network card, printers, scanners, and so on. If not, you may be able
to locate the drivers on the Internet.
✦ What software is used on the computer: Microsoft Office? AutoCAD?
QuickBooks? Make a complete list and include version numbers.
Taking Stock
83
Programs that gather information for you
Gathering information about your computers is a lot of work if you have
more than a few computers to network. Fortunately, several software programs are available that can automatically gather the information for you.
These programs inspect various aspects of a computer, such as the CPU
type and speed, amount of RAM, and the size of the computer’s hard drives.
Then they show the information on the screen and give you the option of
saving the information to a hard drive file or printing it.
Windows comes with just such a program, called Microsoft System
Information. Microsoft System Information gathers and prints information
about your computer. You can start Microsoft System Information by choosing Start➪All Programs➪Accessories➪System Tools➪System Information.
Figure 1-5:
Let the
System
Information
program
gather the
data you
need.
Planning a Network
When you fire up Microsoft System Information, you see a window similar to
the one shown in Figure 1-5. Initially, Microsoft System Information displays
basic information about your computer, such as your version of Microsoft
Windows, the processor type, the amount of memory on the computer,
and so on. You can obtain more detailed information by clicking Hardware
Resources, Components, or other categories in the left side of the window.
Book II
Chapter 1
84
To Dedicate or Not to Dedicate: That Is the Question
To Dedicate or Not to Dedicate: That Is the Question
One of the most basic questions that a network plan must answer is
whether the network will have one or more dedicated servers or rely completely on peer-to-peer networking. If the only reason for purchasing your
network is to share a printer and exchange an occasional file, you may not
need a dedicated server computer. In that case, you can create a peer-topeer network by using the computers that you already have. However, all
but the smallest networks will benefit from having a separate, dedicated
server computer.
✦ Using a dedicated server computer makes the network faster, easier to
work with, and more reliable. Consider what happens when the user of
a server computer, which doubles as a workstation, decides to turn off
the computer, not realizing that someone else is accessing files on his or
her hard drive.
✦ You don’t necessarily have to use your biggest and fastest computer
as your server computer. I’ve seen networks where the slowest computer on the network is the server. This advice is especially true when
the server is mostly used to share a printer or to store a small number
of shared files. So if you need to buy a computer for your network, consider promoting one of your older computers to be the server and using
the new computer as a client.
Types of Servers
Assuming that your network will require one or more dedicated servers, you
should next consider what types of servers the network will need. In some
cases, a single server computer can fill one or more of these roles. Whenever
possible, it’s best to limit each server computer to a single server function.
File servers
File servers provide centralized disk storage that can be conveniently shared
by client computers on the network. The most common task of a file server
is to store shared files and programs. For example, the members of a small
workgroup can use disk space on a file server to store their Microsoft Office
documents.
File servers must ensure that two users don’t try to update the same file at
the same time. The file servers do this by locking a file while a user updates
the file so that other users can’t access the file until the first user finishes.
For document files (for example, word processing or spreadsheet files), the
whole file is locked. For database files, the lock can be applied just to the
portion of the file that contains the record or records being updated.
Types of Servers
85
Print servers
Sharing printers is one of the main reasons that many small networks exist.
Although it isn’t necessary, a server computer can be dedicated for use as
a print server, whose sole purpose is to collect information being sent to a
shared printer by client computers and print it in an orderly fashion.
✦ A single computer may double as both a file server and a print server, but
performance is better if you use separate print and file server computers.
Web servers
A Web server is a server computer that runs software that enables the
computer to host an Internet Web site. The two most popular Web server
programs are Microsoft’s IIS (Internet Information Services) and Apache, an
open-source Web server managed by the Apache Software Foundation.
Mail servers
A mail server is a server that handles the network’s e-mail needs. It is configured with e-mail server software, such as Microsoft Exchange Server.
Exchange Server is designed to work with Microsoft Outlook, the e-mail
client software that comes with Microsoft Office.
Most mail servers actually do much more than just send and receive electronic mail. For example, here are some of the features that Exchange Server
offers beyond simple e-mail:
✦ Collaboration features that simplify the management of collaborative
projects.
✦ Audio and video conferencing.
✦ Chat rooms and instant messaging (IM) services.
✦ Microsoft Exchange Forms Designer, which lets you develop customized
forms for applications, such as vacation requests or purchase orders.
Database servers
A database server is a server computer that runs database software, such as
Microsoft’s SQL Server 2000. Database servers are usually used along with
customized business applications, such as accounting or marketing systems.
Book II
Chapter 1
Planning a Network
✦ With inexpensive inkjet printers running about $100 each, just giving
each user his or her own printer is tempting. However, you get what
you pay for. Instead of buying $100 printers for 15 users, you may be
better off buying one $1,500 laser printer and sharing it. The $1,500 laser
printer will be much faster, will probably produce better-looking output,
and will be cheaper to operate.
86
Choosing a Server Operating System
Choosing a Server Operating System
If you determine that your network will require one or more dedicated servers, the next step is to determine what network operating system those servers should use. If possible, all the servers should use the same NOS so that
you don’t find yourself supporting different operating systems.
Although you can choose from many network operating systems, from a
practical point of view, your choices are limited to the following:
✦ Windows Server 2003 or 2008
✦ Linux or another version of Unix
For more information, refer to Book I, Chapter 4.
Planning the Infrastructure
You also need to plan the details of how you will connect the computers in
the network. This task includes determining which network topology the
network will use, what type of cable will be used, where the cable will be
routed, and what other devices (such as repeaters, bridges, hubs, switches,
and routers) will be needed.
Although you have many cabling options to choose from, you’ll probably use
Cat 5e or better UTP for most — if not all — of the desktop client computers on the network. However, you have many decisions to make beyond this
basic choice:
✦ Will you use hubs, which are cheaper, or switches, which are faster but
more expensive?
✦ Where will you place workgroup hubs or switches — on a desktop somewhere within the group or in a central wiring closet?
✦ How many client computers will you place on each hub or switch, and
how many hubs or switches will you need?
✦ If you need more than one hub or switch, what type of cabling will you
use to connect the hubs and switches to one another?
For more information about network cabling, see Book II, Chapter 2, and
Book I, Chapter 3.
If you’re installing new network cable, don’t scrimp on the cable itself.
Because installing network cable is a labor-intensive task, the cost of the
cable itself is a small part of the total cable installation cost. And if you
spend a little extra to install higher-grade cable now, you won’t have to
replace the cable in a few years when it’s time to upgrade the network.
Drawing Diagrams
87
Drawing Diagrams
One of the most helpful techniques for creating a network plan is to draw a
picture of it. The diagram can be a detailed floor plan, showing the actual
location of each network component. This type of diagram is sometimes
called a physical map. If you prefer, the diagram can be a logical map, which
is more abstract and Picasso-like. Any time you change the network layout,
update the diagram. Also include a detailed description of the change, the
date that the change was made, and the reason for the change.
Figure 1-6:
Using Visio
to draw a
network
diagram.
✦ Smart shapes and connectors maintain the connections you’ve drawn
between network components, even if you rearrange the layout of the
components on the page.
✦ Stencils provide dozens of useful shapes for common network
components — not just for client and server computers, but for routers, hubs, switches, and just about anything else you can imagine. If
Book II
Chapter 1
Planning a Network
You can diagram very small networks on the back of a napkin, but if the network has more than a few computers, you’ll want to use a drawing program
to help you create the diagram. One of the best programs for this purpose
is Microsoft Visio, shown in Figure 1-6. Here’s a rundown of some of the features that make Visio so useful:
88
Sample Network Plans
you’re really picky about the diagrams, you can even purchase stencil
sets that have accurate drawings of specific devices, such as Cisco
routers or IBM mainframe computers.
✦ You can add information to each computer or device in the diagram, such
as the serial number or physical location. Then, you can quickly print an
inventory that lists this information for each device in the diagram.
✦ You can easily create large diagrams that span multiple pages.
Sample Network Plans
In what’s left of this chapter, I present some network plans that are drawn
from real-life situations. These examples illustrate many of the network
design issues I’ve covered so far in this chapter. The stories you’re about to
read are true. The names have been changed to protect the innocent.
Building a small network: California
Sport Surface, Inc.
California Sport Surface, Inc. (CSS) is a small company specializing in the
installation of outdoor sports surfaces, such as tennis courts, running tracks,
and football fields. CSS has an administrative staff of just four employees
who work out of a home office. The company currently has three computers:
✦ A brand-new Dell desktop computer running Windows 7 Basic, shared
by the president (Mark) and vice president (Julie) to prepare proposals
and marketing brochures, to handle correspondence, and to do other
miscellaneous chores. This computer has a built-in gigabit Ethernet network port.
✦ An older Gateway computer running Windows XP Home Edition, used
by the bookkeeper (Erin), who uses QuickBooks to handle the company’s accounting needs. This computer has a built-in 10/100 Mbps
Ethernet port.
✦ A notebook that runs Windows Vista, used by the company’s chief engineer (Daniel), who often takes it to job sites to help with engineering
needs. This computer has a built-in 10/100 Mbps Ethernet port.
The company owns just one printer, a moderately priced inkjet printer that’s
connected to Erin’s computer. The computers aren’t networked, so whenever Mark, Julie, or Daniel needs to print something, the file must be copied
to a flash drive and given to Erin, who then prints the document. The computer shared by Mark and Julie is connected to the Internet via a residential
DSL connection.
Sample Network Plans
89
The company wants to install a network to support these three computers.
Here are the primary goals of the network:
✦ Provide shared access to the printer so that users don’t have to
exchange data on flash drives to print their documents.
✦ Provide shared access to the Internet connection so that users can
access the Internet from any of the computers.
✦ Allow for the addition of another desktop computer, which the company
expects to purchase within the next six months, and potentially another
notebook computer. (If business is good, the company hopes to hire
another engineer.)
CSS’s networking needs can be met with the simple peer-to-peer network diagrammed in Figure 1-7. Here’s what the network requires:
✦ The network needs a combination DSL router and four-port gigabit
network switch. The company may outgrow this device when it adds a
laptop, but if and when that happens, another 4- or 8-port switch can be
added at that time.
✦ The firewall features of the DSL router will need to be enabled to protect
the network from Internet hackers.
✦ File and printer sharing will need to be activated on Erin’s computer,
and the printer will need to be shared.
Printer
Mark/Julie
Figure 1-7:
California
Sport
Surface’s
new peerto-peer
network.
Erin
DSL router/
gigabit network switch
DSL modem
The Internet
Daniel
Book II
Chapter 1
Planning a Network
✦ The network should be intuitive to the users and shouldn’t require
extensive upkeep.
90
Sample Network Plans
Connecting two networks: Creative
Course Development, Inc.
Creative Course Development, Inc. (CCD) is a small educational publisher
located in central California that specializes in integrated math and science curriculum for primary and secondary grades. It publishes a variety of
course materials, including textbooks, puzzle books, and CD-ROM software.
CCD leases two office buildings that are adjacent to each other, separated
only by a small courtyard. The creative staff, which consists of a dozen writers and educators, works in Building A. The sales, marketing, and administrative staff, which consists of six employees, works in Building B.
The creative staff (Building A) has a dozen relatively new personal computers, all running Windows Vista Business Edition, and a server computer
running Windows 2003 Server. These computers are networked via a single
24-port gigabit network switch. A fractional T1 line that’s connected to the
network through a small Cisco router provides Internet access.
The sales, marketing, and administrative staff (Building B) has a hodgepodge of computers, some running Windows Vista but most running
Windows XP. They have a small Windows 2003 server that meets their
needs. The older computers have 10/100BaseT network interfaces; the
newer ones have gigabit interfaces. However, the computers are all connected to a 10/100 Mbps Ethernet switch with 12 ports. Internet access is
provided by an ISDN connection.
Both groups are happy with their computers and networks. The problem
is that the networks can’t communicate with each other. For example, the
creative team in Building A prepares weekly product-development status
reports to share with the Administrative staff in Building B, and they frequently go to the other building to look into important sales trends.
Although several solutions to this problem exist, the easiest is to bridge the
networks with a pair of wireless switches. To do this, CCD will purchase
two wireless access points. One will be plugged into the gigabit switch in
Building A, and the other will be plugged into the switch in Building B. After
the access points are configured, the two networks will function as a single
network. Figure 1-8 shows a logical diagram for the completed network.
Although the wireless solution to this problem sounds simple, a number of
complications still need to be dealt with. Specifically:
✦ Depending on the environment, the wireless access points may have
trouble establishing a link between the buildings. It may be necessary
to locate the devices on the roof. In that case, CCD will have to spend a
little extra money for weatherproof enclosures.
Sample Network Plans
Dave Y.
Brenda M. Deborah Q.
Julie D.
Chris E.
91
Alice M.
The Internet
24-port Gigabit Switch
Cisco 1700
T1
Building A
Sarah L.
Toby S.
Juan S.
Richard O.
Planning a Network
Emily D.
Elias H.
Wireless Access Point
Wireless Access Point
Building B
Figure 1-8:
Creative
Course
Development’s
wireless
network
solution.
12-port 10/100 Mbps Switch
Andrew T.
Bill B.
Shawna S.
Maria L.
Erin C.
Book II
Chapter 1
William H.
✦ Before the networks were connected, each network had its own DHCP
server to assign IP addresses to users as needed. Unfortunately, both
DHCP servers have the same local IP address (192.168.0.1). When the networks are combined, one of these DHCP servers will have to be disabled.
✦ In addition, both networks had their own Internet connections. With the
networks bridged, CCD can eliminate the ISDN connection altogether.
Users in both buildings can get their Internet access via the shared T1
connection.
92
Sample Network Plans
✦ The network administrator will also have to determine how to handle
directory services for the network. Previously, each network had its own
domain. With the networks bridged, CCD may opt to keep these domains
separate, or it may decide to merge them into a single domain. (Doing so
will require considerable work, so the company will probably leave the
domains separate.)
Improving network performance: DCH Accounting
DCH Accounting is an accounting firm that has grown in two years from
15 employees to 35, all located in one building. Here’s the lowdown on the
existing network:
✦ The network consists of 35 client computers and three servers running
Windows 2003 Server.
✦ The 35 client computers run a variety of Windows operating systems.
About a third (a total of 11) run Windows Vista Professional. The rest
run Windows XP Professional. None of the computers run Windows 7.
✦ The Windows Vista computers all have gigabit Ethernet cards. The older
computers have 10/100 Mbps cards.
✦ The server computers are somewhat older computers that have 10/100
Mbps network interfaces.
✦ All the offices in the building are wired with Category 5e wiring to a
central wiring closet, where a small equipment rack holds two 24-port
10/100 switches.
✦ Internet access is provided through a T1 connection with a Cisco 1700
router.
Lately, network performance has been noticeably slow, particularly
Internet access and large file transfers between client computers and the
servers. Users have started to complain that sometimes the network seems
to crawl.
The problem is most likely that the network has outgrown the old
10/100BaseT switches. All network traffic must flow through them, and
they’re limited to the speed of 100 Mbps. As a result, the new computers
with the gigabit Ethernet cards are connecting to the network at 100 Mbps.
The performance of this network can be dramatically improved in two steps.
The first step is to replace the 10/100 Mbps network interface cards in the
three servers with gigabit cards (or, better yet, replace the servers with
newer models). Second, add a 24-port gigabit switch to the equipment rack.
The equipment rack can be rewired, as shown in Figure 1-9.
10/100 Mbps
10/100 Mbps
Gigabit
Figure 1-9:
DCH
Accounting’s
switched
network.
24-port 10/100 Switch
24-port 10/100 Switch
24-port Gigabit
Switch
Planning a Network
Cisco 1700
The Internet
Servers
Sample Network Plans
93
Book II
Chapter 1
94
Sample Network Plans
1. Connect the servers, the Cisco router, and the gigabit clients to the
new gigabit switch. This will use 15 of the 24 ports.
2. Connect the two 10/100 switches to the new gigabit switch. This will
use two more ports, leaving 7 ports for future growth.
3. Divide the remaining clients between the two 10/100 switches. Each
switch will have 12 computers connected.
This arrangement connects all the gigabit clients to gigabit switch ports and
100 Mbps clients to 100 Mbps switch ports.
For even better performance, DCH can simply replace both switches with
24-port gigabit switches.
Chapter 2: Installing
Network Hardware
In This Chapter
✓ Installing network interface cards
✓ Installing network cable
✓ Attaching cable connectors
✓ Figuring out pinouts for twisted-pair cabling
✓ Building a crossover cable
✓ Installing switches
A
fter you have your network planned out, then comes the fun of actually putting everything together. In this chapter, I describe some of
the important details for installing network hardware, including cables,
switches, network interface cards, and professional touches, such as patch
panels.
Installing a Network Interface Card
To connect a computer to your network, the computer must have a network
interface. Virtually all computers sold in the last 10 years or so have a network interface built-in on the motherboard. However, you may still encounter the occasional older computer that doesn’t have a built-in network
interface. In that case, you must install a network interface card to enable
the computer for your network. Installing a network interface card is a manageable task, but you have to be willing to roll up your sleeves.
If you’ve installed one adapter card, you’ve installed them all. In other
words, installing a network interface card is just like installing a modem, a
new video controller card, a sound card, or any other type of card. If you’ve
ever installed one of these cards, you can probably install a network interface card blindfolded.
Here’s a step-by-step procedure for installing a network interface card:
96
Installing a Network Interface Card
1. Gather up the network card and the driver disks. While you’re at it,
get your Windows installation CD just in case.
2. Shut down Windows and then turn off the computer and unplug it.
Never work in your computer’s insides with the power on or the power
cord plugged in!
3. Remove the cover from your computer.
Figure 2-1 shows the screws that you must typically remove in order to
open the cover. Put the screws someplace where they won’t wander off.
Remove these screws
Figure 2-1:
Removing
your
computer’s
cover.
Note that if you have a name-brand computer such as a Dell or a
Compaq, opening the cover may be trickier than just removing a few
screws. You may need to consult the owner’s manual that came with the
computer to find out how to open the case.
4. Find an unused expansion slot inside the computer.
The expansion slots are lined up in a neat row near the back of the computer; you can’t miss ’em. Any computer less than five years old should
have at least two or three slots known as PCI slots.
5. When you find a slot that doesn’t have a card in it, remove the metal
slot protector from the back of the computer’s chassis.
If a small retaining screw holds the slot protector in place, remove the
screw and keep it in a safe place. Then pull the slot protector out and
put the slot protector in a box with all your other old slot protectors.
(After a while, you collect a whole bunch of slot protectors. Keep them
as souvenirs or Christmas tree ornaments.)
6. Insert the network interface card into the slot.
Installing Twisted-Pair Cable
97
Line up the connectors on the bottom of the card with the connectors in the expansion slot and then press the card straight down.
Sometimes you have to press uncomfortably hard to get the card to
slide into the slot.
7. Secure the network interface card with the screw that you removed in
Step 5.
8. Put the computer’s case back together.
Watch out for the loose cables inside the computer; you don’t want to
pinch them with the case as you slide it back on. Secure the case with
the screws that you removed in Step 3.
9. Plug in the computer and turn it back on.
Installing Twisted-Pair Cable
Most Ethernet networks are built using twisted-pair cable, which resembles
phone cable but isn’t the same. Twisted-pair cable is sometimes called UTP.
For more information about the general characteristics of twisted-pair cable,
refer to Book I, Chapter 3.
In the following sections, you find out what you need to know in order to
select and install twisted-pair cable.
Cable categories
Twisted-pair cable comes in various grades called Categories. These
Categories are specified by the ANSI/EIA standard 568. (ANSI stands for
American National Standards Institute; EIA stands for Electronic Industries
Association.) The standards indicate the data capacity, also known as the
bandwidth, of the cable. Table 2-1 lists the various Categories of twistedpair cable.
Although higher-Category cables are more expensive than lower-Category
cables, the real cost of installing Ethernet cabling is the labor required to
actually pull the cables through the walls. You should never install anything less than Category 5 cable. And if at all possible, you should invest in
Category 5e (the e stands for enhanced) or even Category 6 cable to allow
for future upgrades to your network.
Installing Network
Hardware
If you’re using a Plug and Play card with Windows, the card is automatically
configured after you start the computer again. If you’re working with an
older computer or an older network interface card, you may need to run an
additional software installation program. See the installation instructions
that come with the network interface card for details.
Book II
Chapter 2
98
Installing Twisted-Pair Cable
If you want to sound like you know what you’re talking about, say “Cat 5”
instead of “Category 5.”
Table 2-1
Twisted-Pair Cable Categories
Category
Maximum Data Rate
Intended Use
1
1 Mbps
Voice only
2
4 Mbps
4 Mbps Token Ring
3
16 Mbps
10BaseT Ethernet
4
20 Mbps
16 Mbps Token Ring
5
100 Mbps (2 pair)
100BaseT Ethernet
1,000 Mbps (4 pair)
Gigabit Ethernet
5e
1,000 Mbps (2 pair)
Gigabit Ethernet
6
1,000 Mbps (2 pair)
Gigabit Ethernet
6a
10,000 Mbps
10 gigabit (experimental)
7
10,000 Mbps
10 gigabit (experimental)
What’s with the pairs?
Most twisted-pair cable has four pairs of wires, for a total of eight wires.
Standard Ethernet actually uses only two of the pairs, so the other two pairs
are unused. You may be tempted to save money by purchasing cable with
just two pairs of wires, but that’s a bad idea. If a network cable develops
a problem, you can sometimes fix it by switching over to one of the extra
pairs. But if you try to carry a separate connection over the extra pairs, electrical interference will prevent the signals from getting through.
You may also be tempted to use the extra pairs for some other purpose,
such as for a voice line. Don’t. The electrical noise generated by voice signals in the extra wires can interfere with your network.
To shield or not to shield
Unshielded twisted-pair cable, or UTP, is designed for normal office environments. When you use UTP cable, you must be careful not to route cable
close to fluorescent light fixtures, air conditioners, or electric motors (such
as automatic door motors or elevator motors). UTP is the least expensive
type of cable.
Installing Twisted-Pair Cable
99
In environments that have a lot of electrical interference, such as factories, you may want to use shielded twisted-pair cable, also known as STP.
Because STP can be as much as three times more expensive than regular
UTP, you won’t want to use STP unless you have to. With a little care, UTP
can withstand the amount of electrical interference found in a normal
office environment.
Most STP cable is shielded by a layer of aluminum foil. For buildings with
unusually high amounts of electrical interference, you can use more expensive, braided copper shielding for even more protection.
When to use plenum cable
Most local building codes require that you use plenum cable whenever the
wiring is installed within the plenum space of the building. The plenum space
is a compartment that’s part of the building’s air distribution system and is
usually the space above a suspended ceiling or under a raised floor.
Note that the area above a suspended ceiling is not a plenum space if both
the delivery and return lines of the air-conditioning and heating system are
ducted. Plenum cable is required only if the air-conditioning and heating
system are not ducted. When in doubt, it’s best to have the local inspector
look at your facility before you install cable.
Sometimes solid, sometimes stranded
The actual copper wire that composes the cable comes in two varieties:
solid and stranded. Your network will have some of each.
✦ In stranded cable, each conductor is made from a bunch of very small
wires that are twisted together. Stranded cable is more flexible than
solid cable, so it doesn’t break as easily. However, stranded cable is
more expensive than solid cable and isn’t very good at transmitting signals over long distances. Stranded cable is best used for patch cables,
such as the cable used to connect a computer to a wall jack or the cable
used to connect patch panels to hubs and switches.
Installing Network
Hardware
The outer sheath of both shielded and unshielded twisted-pair cable comes
in two varieties: PVC and Plenum. PVC cable is the most common and least
expensive type. Plenum cable is a special type of fire-retardant cable that is
designed for use in the plenum space of a building. Plenum cable has a special Teflon coating that not only resists heat, but also gives off fewer toxic
fumes if it does burn. Unfortunately, plenum cable costs more than twice as
much as ordinary PVC cable.
Book II
Chapter 2
100
Installing Twisted-Pair Cable
Strictly speaking, the cable that connects your computer to the wall jack
is called a station cable — not a patch cable. Patch cables are used in the
wiring closet, usually to connect patch panels to switches.
✦ In solid cable, each conductor is a single solid strand of wire. Solid
cable is less expensive than stranded cable and carries signals farther,
but it isn’t very flexible. If you bend it too many times, it will break. Solid
cable is usually used for permanent wiring within the walls and ceilings
of a building.
Installation guidelines
The hardest part about installing network cable is the physical task of pulling
the cable through ceilings, walls, and floors. This job is just tricky enough that
I recommend that you don’t attempt it yourself except for small offices. For
large jobs, hire a professional cable installer. You may even want to hire a professional for small jobs if the ceiling and wall spaces are difficult to access.
Here are some general pointers to keep in mind if you decide to install cable
yourself:
✦ You can purchase twisted-pair cable in prefabricated lengths, such as 50
feet, 75 feet, or 100 feet. You can also special-order prefabricated cables
in any length you need. However, attaching connectors to bulk cable
isn’t that difficult. I recommend that you use prefabricated cables only
for very small networks and only when you don’t need to route the cable
through walls or ceilings.
✦ Always use a bit more cable than you need, especially if you’re running
cable through walls. For example, when you run a cable up a wall, leave
a few feet of slack in the ceiling above the wall. That way, you’ll have
plenty of cable if you need to make a repair later on.
✦ When running cable, avoid sources of interference, such as fluorescent
lights, big motors, X-ray machines, and so on. The most common source
of interference for cables that are run behind fake ceiling panels are fluorescent lights; be sure to give light fixtures a wide berth as you run your
cable. Three feet should do it.
✦ The maximum allowable cable length between the hub and the computer is 100 meters (about 328 feet).
✦ If you must run cable across the floor where people walk, cover the
cable so that no one trips over it. Inexpensive cable protectors are available at most hardware stores.
✦ When running cables through walls, label each cable at both ends. Most
electrical supply stores carry pads of cable labels that are perfect for
the job. These pads contain 50 sheets or so of precut labels with letters
Installing Twisted-Pair Cable
101
and numbers. They look much more professional than wrapping a loop
of masking tape around the cable and writing on the tape with a marker.
Or, if you want to scrimp, you can just buy a permanent marker and
write directly on the cable.
✦ When several cables come together, tie them with plastic cable ties.
Avoid masking tape if you can; the tape doesn’t last, but the sticky glue
stuff does. It’s a mess a year later. Cable ties are available at electrical
supply stores.
✦ Cable ties have all sorts of useful purposes. Once on a backpacking trip,
I used a pair of cable ties to attach an unsuspecting buddy’s hat to a
high tree limb. He wasn’t impressed with my innovative use of the cable
ties, but my other hiking companions were.
Getting the tools that you need
Of course, to do a job right, you must have the right tools.
Start with a basic set of computer tools, which you can get for about $15
from any computer store or large office-supply store. These kits include the
right screwdrivers and socket wrenches to open up your computers and
insert adapter cards. (If you don’t have a computer toolkit, make sure that
you have several flat-head and Phillips screwdrivers of various sizes.)
If all your computers are in the same room and you’re going to run the
cables along the floor and you’re using prefabricated cables, the computer
tool kit should contain everything that you need.
If you’re using bulk cable and plan on attaching your own connectors, you
need the following tools in addition to the tools that come with the basic
computer tool kit:
✦ Wire cutters: You need big ones for thinnet cable; smaller ones are okay
for 10BaseT cable. If you’re using yellow cable, you need the Jaws of Life.
✦ Crimp tool: You need the crimp tool to attach the connectors to the
cable. Don’t use a cheap $10 crimp tool. A good one will cost $100 and
will save you many headaches in the long run. Remember this adage:
When you crimp, you mustn’t scrimp.
✦ Wire stripper: You need this only if the crimp tool doesn’t include a
wire stripper.
Installing Network
Hardware
✦ When you run cable above suspended ceiling panels, use cable ties,
hooks, or clamps to secure the cable to the actual ceiling or to the metal
frame that supports the ceiling tiles. Don’t just lay the cable on top of
the tiles.
Book II
Chapter 2
102
Installing Twisted-Pair Cable
If you plan on running cables through walls, you need these additional tools:
✦ A hammer.
✦ A bell.
✦ A song to sing. Just kidding about these last two.
✦ A keyhole saw. This is useful if you plan on cutting holes through walls
to route your cable.
✦ A flashlight.
✦ A ladder.
✦ Someone to hold the ladder.
✦ Possibly a fish tape. A fish tape is a coiled-up length of stiff metal tape.
To use it, you feed the tape into one wall opening and fish it toward the
other opening, where a partner is ready to grab it when the tape arrives.
Next, your partner attaches the cable to the fish tape and yells something like “Let ’er rip!” or “Bombs away!” Then you reel in the fish tape
and the cable along with it. (You can find fish tape in the electrical section of most well-stocked hardware stores.)
If you plan on routing cable through a concrete subfloor, you need to rent a
jackhammer and a backhoe and hire someone to hold a yellow flag while you
work.
Pinouts for twisted-pair cables
Each pair of wires in a twisted-pair cable is one of four colors: orange, green,
blue, or brown. The two wires that make up each pair are complementary:
One is a solid color, the other is white with a stripe of the corresponding
color. For example, the orange pair has an orange wire and a white wire with
an orange stripe. Likewise, the blue pair has a blue wire and a white wire
with a blue stripe.
When you attach a twisted-pair cable to a modular connector or jack, you
must match up the right wires to the right pins. You can use several different standards to wire the connectors. To confuse matters, you can use one
of the two popular standard ways of hooking up the wires. One is known as
EIA/TIA 568A; the other is EIA/TIA 568B, also known as AT&T 258A. Table 2-2
shows both wiring schemes.
It doesn’t matter which of these wiring schemes you use, but pick one and
stick with it. If you use one wiring standard on one end of a cable and the
other standard on the other end, the cable won’t work.
Installing Twisted-Pair Cable
Table 2-2
103
Pin Connections for Twisted-Pair Cable
Function
EIA/TIA 568A
EIA/TIA 568B
AT&T 258A
Pin 1
Transmit +
White/green
White/orange
Pin 2
Transmit –
Green
Orange
Pin 3
Receive +
White/orange
White/green
Pin 4
Unused
Blue
Blue
Pin 5
Unused
White/blue
White/blue
Pin 6
Receive –
Orange
Green
Pin 7
Unused
White/brown
White/brown
Pin 8
Unused
Brown
Brown
10BaseT and 100BaseT actually use only two of the four pairs, connected to
pins 1, 2, 3, and 6. One pair is used to transmit data, and the other is used to
receive data. The only difference between the two wiring standards is which
pair is used to transmit data and which pair is used to receive data. In the
EIA/TIA 568A standard, the green pair is used to transmit and the orange
pair is used to receive. In the EIA/TIA 568B and AT&T 258A standards, the
orange pair is used to transmit and the green pair to receive.
If you want, you can get away with connecting only pins 1, 2, 3, and 6.
However, I suggest that you connect all four pairs as indicated in Table 2-2.
Attaching RJ-45 connectors
RJ-45 connectors for twisted-pair cables aren’t too difficult to attach if you
have the right crimping tool. The trick is in both making sure that you attach
each wire to the correct pin and pressing the tool hard enough to ensure a
good connection.
Here’s the procedure for attaching an RJ-45 connector:
1. Cut the end of the cable to the desired length.
Make sure that you make a square cut — not a diagonal cut.
2. Insert the cable into the stripper portion of the crimp tool so that the
end of the cable is against the stop.
Squeeze the handles and slowly pull the cable out, keeping it square.
This strips off the correct length of outer insulation without puncturing
the insulation on the inner wires.
Book II
Chapter 2
Installing Network
Hardware
Pin Number
104
Installing Twisted-Pair Cable
3. Arrange the wires so that they lay flat and line up according to
Table 2-2.
You’ll have to play with the wires a little bit to get them to lay out in the
right sequence.
4. Slide the wires into the pinholes on the connector.
Double-check to make sure that all the wires slipped into the correct
pinholes.
5. Insert the plug and wire into the crimping portion of the tool and then
squeeze the handles to crimp the plug.
Squeeze it tight!
6. Remove the plug from the tool and double-check the connection.
You’re done!
Here are a few other points to remember when dealing with RJ-45 connectors and twisted-pair cable:
✦ The pins on the RJ-45 connectors aren’t numbered, but you can tell
which is pin 1 by holding the connector so that the metal conductors
are facing up, as shown in Figure 2-2. Pin 1 is on the left.
678
12345
Figure 2-2:
Attaching
an RJ-45
connector
to twistedpair cable.
Pin connections:
Pin 1 - White/Orange
Pin 2 - Orange/White
Pin 3 - White/Green
Pin 6 - Green/White
✦ Some people wire 10baseT cable differently — using the green and white
pair for pins 1 and 2 and the orange and white pair for pins 3 and 6. This
doesn’t affect the operation of the network (the network is color-blind),
as long as the connectors on both ends of the cable are wired the same!
✦ If you’re installing cable for a Fast Ethernet system, you should be extra
careful to follow the rules of Category-5 cabling. That means, among other
things, making sure that you use Category-5 components throughout.
Installing Twisted-Pair Cable
105
The cable and all the connectors must be up to Category-5 specs. When
you attach the connectors, don’t untwist more than 1⁄2 inch of cable.
And don’t try to stretch the cable runs beyond the 100-meter maximum.
When in doubt, have cable for a 100 Mbps Ethernet system professionally
installed.
Crossover cables
A crossover cable is a cable that you can use to directly connect two devices
without a switch. You can use a crossover cable to connect two computers
directly to each other, but crossover cables are more often used to daisychain hubs and switches to each other.
Note that you don’t need to use a crossover cable if one of the switches or
hubs that you want to connect has a crossover port, usually labeled Uplink.
If the switch has an Uplink port, you can daisy-chain it by using a normal network cable. For more information about daisy-chaining hubs and switches,
see the section, “Installing Switches,” later in this chapter.
Table 2-3
Creating a Crossover Cable
Pin
Connector A
Connector B
Pin 1
White/green
White/orange
Pin 2
Green
Orange
Pin 3
White/orange
White/green
Pin 4
Blue
Blue
Pin 5
White/blue
White/blue
Pin 6
Orange
Green
Pin 7
White/brown
White/brown
Pin 8
Brown
Brown
Wall jacks and patch panels
If you want, you can run a single length of cable from a network switch in
a wiring closet through a hole in the wall, up the wall to the space above
the ceiling, through the ceiling space to the wall in an office, down the
Installing Network
Hardware
If you want to create your own crossover cable, you have to reverse the
wires on one end of the cable, as shown in Table 2-3. This table shows how
you should wire both ends of the cable to create a crossover cable. Connect
one of the ends according to the Connector A column and the other according to the Connector B column.
Book II
Chapter 2
106
Installing Twisted-Pair Cable
wall, through a hole, and all the way to a desktop computer. That’s not a
good idea, however, for a variety of reasons. For one, every time someone
moves the computer or even cleans behind it, the cable will get moved a
little bit. Eventually, the connection will fail, and the RJ-45 plug will have
to be replaced. Then the cables in the wiring closet will quickly become a
tangled mess.
The alternative is to put a wall jack in the wall at the user’s end of the cable
and connect the other end of the cable to a patch panel. Then, the cable
itself is completely contained within the walls and ceiling spaces. To connect a computer to the network, you plug one end of a patch cable (properly called a station cable) into the wall jack and plug the other end into the
computer’s network interface. In the wiring closet, you use a patch cable
to connect the wall jack to the network switch. Figure 2-3 shows how this
arrangement works.
Patch panel
Switch
Figure 2-3:
Using
wall jacks
and patch
panels.
Modular
wall jacks
Connecting a twisted-pair cable to a wall jack or a patch panel is similar to
connecting it to an RJ-45 plug. However, you don’t usually need any special
tools. Instead, the back of the jack has a set of slots that you lay each wire
Installing Coaxial Cable
107
across. You then snap a removable cap over the top of the slots and press
it down. This forces the wires into the slots, where little metal blades pierce
the insulation and establish the electrical contact.
When you connect the wire to a jack or patch panel, be sure to untwist as
little of the wire as possible. If you untwist too much of the wire, the signals
that pass through the wire may become unreliable.
Installing Coaxial Cable
Here are some salient points about working with coaxial cable:
✦ You attach thinnet to the network interface card by using a goofy twiston connector called a BNC connector. You can purchase preassembled
cables with BNC connectors already attached in lengths of 25 or 50 feet,
or you can buy bulk cable on a big spool and attach the connectors
yourself by using a special tool. (I suggest buying preassembled cables.
Attaching connectors to bulk coaxial cable can be tricky.)
✦ With coaxial cables, you run cable from computer to computer until all
the computers are chained together. At each computer, use a T connector to connect two cables to the network interface card.
✦ A special plug called a terminator is required at each end of a series of
thinnet cables. The terminator prevents data from spilling out the end of
the cable and staining the carpet.
✦ The cables strung end-to-end from one terminator to the other are collectively called a segment. The maximum length of a thinnet segment
is about 200 meters (actually, 185 meters). You can connect as many
as 30 computers on one segment. To span a distance greater than 185
meters or to connect more than 30 computers, you must use two or
more segments with a funky device called a repeater to connect each
segment.
✦ Although Ethernet coaxial cable resembles TV coaxial cable, the two
types of cable aren’t interchangeable. Don’t try to cut costs by wiring
your network with cheap TV cable.
Book II
Chapter 2
Installing Network
Hardware
Although twisted-pair cable is by far the most commonly used type of networking cable, some networks still rely on old-fashioned coaxial cable, usually called thinnet or sometimes BNC cable because of the type of connectors
used on each end of the cable.
108
Attaching a BNC Connector to Coaxial Cable
Attaching a BNC Connector to Coaxial Cable
Properly connecting a BNC connector to coaxial cable is an acquired skill.
You need two tools — a wire stripper that can cut through the various layers
of the coaxial cable at just the right location and a crimping tool that crimps
the connector tightly to the cable after you get the connector into position.
BNC connectors have three separate pieces, as shown in Figure 2-4.
Here’s the procedure, in case you ignore my advice and try to attach the
connectors yourself:
1. Slide the hollow tube portion of the connector (lovingly called the ferrule) over the cable.
Let it slide back a few feet to get it out of the way.
2. Cut the end of the cable off cleanly.
3. Use the stripping tool to strip the cable.
Strip the outer jacket back 1⁄2 inch from the end of the cable; strip the
braided shield back 1⁄4 inch from the end; and then strip the inner insulation back 3⁄16 inch from the end.
Connector body
Center pin
Ferrule
Figure 2-4:
Attaching
a BNC
connector
to coaxial
cable.
Properly stripped cable
4. Insert the solid center conductor into the center pin.
Slide the center pin down until it covers the inner insulation.
Daisy-Chaining Switches
109
5. Use the crimping tool to crimp the center pin.
6. Slide the connector body over the center pin and inner insulation but
under the braided shield.
After you push the body back far enough, the center pin clicks into place.
7. Now slide the ferrule forward until it touches the connector body.
Crimp it with the crimping tool.
Don’t get sucked into the trap of trying to use easy “screw-on” connectors.
They aren’t very reliable.
Setting up a network switch is remarkably simple. In fact, you need to know
only a few details:
✦ Installing a switch is usually very simple. Just plug in the power cord
and then plug in patch cables to connect the network.
✦ Each port on the switch has an RJ-45 jack and a single LED indicator
labeled Link that lights up when a connection has been established on
the port. If you plug one end of a cable into the port and the other end
into a computer or other network device, the Link light should come on.
If it doesn’t, something is wrong with the cable, the hub (or switch port),
or the device on the other end of the cable.
✦ Each port may also have an LED indicator that flashes to indicate network activity. If you stare at a switch for awhile, you can find out who
uses the network most by noting which activity indicators flash the most.
✦ The ports may also have a Collision indicator that flashes whenever a
packet collision occurs on the port. It’s perfectly acceptable for this light
to flash now and then, but if it flashes a lot, you may have a problem
with the network. Usually this just means that the network is overloaded
and should be segmented with a switch to improve performance. But in
some cases, a flashing Collision indicator may be caused by a faulty network node that clogs up the network with bad packets.
Daisy-Chaining Switches
If a single switch doesn’t have enough ports for your entire network,
you can connect switches together by daisy-chaining them. If one of the
switches has an uplink port, you can use a normal patch cable to connect
the uplink port to one of the regular ports on the other switch. If neither
Installing Network
Hardware
Installing Switches
Book II
Chapter 2
110
Daisy-Chaining Switches
device has an uplink port, use a crossover cable to connect them. (For
instructions on making a crossover cable, see the section, “Crossover
cables,” earlier in this chapter.)
On some hubs and switches, a button is used to switch one of the ports
between a normal port and an uplink port. This button is often labeled MDI/
MDIX. To use the port as a normal port, switch the button to the MDI position. To use the port as an uplink port, switch the button to MDIX.
Some hubs and switches have a separate jack for the uplink port, but it turns
out that the uplink port shares one of the normal ports internally. If that’s
the case, plugging a cable into the uplink port disables one of the normal
ports. You shouldn’t plug cables into both of these jacks. If you do, the
switch won’t work properly.
Note that the number of switches that you can chain together is limited. For
10BaseT networks, you shouldn’t connect more than three switches to each
other. For 100 Mbps or gigabit segments, you can chain only two switches
together.
You can get around this rule by using stackable switches. Stackable switches
have a special type of cable connector that connects two or more switches
in a way that lets them function as if they were a single switch. Stackable
switches are a must for large networks.
Chapter 3: Setting Up
a Network Server
In This Chapter
✓ Thinking about the different ways to install a network operating
system
✓ Getting ready for the installation
✓ Installing a network operating system
✓ Figuring out what to do after you install the network operating system
A
fter you’ve installed the network cables and other devices, such as
hubs and switches, the next step in building a network is usually setting up a server. After you’ve physically connected the server computer
to the network, you can install the network operating system (NOS) on the
server. Then, you can configure it to provide the network services that you
expect and need from the server.
The Many Ways to Install a
Network Operating System
Regardless of which network operating system you choose to use for your
network servers, you can use any of several common ways to actually install
the NOS software on the server computer. The following sections describe
these alternatives.
Full install versus upgrade
One of the basic NOS installation choices is whether you want to perform a
full installation or an upgrade installation. In some cases, you may be better
off performing a full installation even if you’re installing the NOS on a computer that already has an earlier version of the NOS installed.
112
The Many Ways to Install a Network Operating System
✦ If you’re installing the NOS on a brand-new server, you’ll be performing
a full installation that installs the operating system and configures it with
default settings.
✦ If you’re installing the NOS on a server computer that already has a
server operating system installed, you can perform an upgrade installation that replaces the existing operating system with the new one but
retains as many of the settings from the existing operating system as
possible.
✦ You can also perform a full installation on a computer that already has
an operating system installed. In that case, you have the option of deleting the existing operating system or performing a multiboot installation
that installs the new server operating system alongside the existing
operating system. Then, when you restart the computer, you can choose
which operating system you want to run.
✦ Although multiboot installation may sound like a good idea, it’s fraught
with peril. I suggest that you avoid multiboot unless you have a specific
reason to use it. For more information about multiboot setups, see the
sidebar, “Giving multiboot the boot.”
✦ You can’t upgrade a client version of Windows to a server version.
Instead, you must perform a full installation, which deletes the existing
Windows operating system, or a multiboot installation, which leaves
the existing client Windows intact. Either way, however, you can preserve existing data on the Windows computer when you install the
server version.
Installing over the network
Normally, you install the NOS directly from the CD-ROM distribution discs
on the server’s CD-ROM drive. However, you can also install the operating
system from a shared drive located on another computer, provided that the
server computer already has access to the network. You can either use a
shared CD-ROM drive or you can copy the entire contents of the distribution
CD-ROM disc onto a shared hard drive.
Obviously, the server computer must have network access in order for this
technique to work. If the server already has an operating system installed,
it probably already has access to the network. If not, you can boot the computer from a floppy that has basic network support.
If you’re going to install the NOS onto more than one server, you can save
time by first copying the distribution CD onto a shared hard drive. That’s
because even the fastest CD-ROM drives are slower than the network. Even
with a basic 10 Mbps network, access to hard drive data over the network is
much faster than access to a local CD-ROM drive.
The Many Ways to Install a Network Operating System
113
Giving multiboot the boot
Multiboot installations enable you to have more
than one operating system on a single computer. Of course, only one of these operating
systems can be running at any time. When you
boot the computer, a menu appears with each
of the installed operating systems listed. You
can choose which operating system to boot
from this menu.
The best way to set up a multiboot system is to
install each operating system into its own partition. Then, you can use a boot manager program to choose the partition you want to boot
from when you start the computer.
If you still insist on loading two or more operating systems on a network server, be sure to
Automated and remote installations
In case you find yourself in the unenviable position of installing a NOS onto
several servers, you can use a few tricks to streamline the process:
✦ Automated setup lets you create a setup script that provides answers to
all the questions asked by the installation program. After you’ve created
the script, you can start the automated setup, leave, and come back
when the installation is finished. Creating the setup script is a bit of
work, so automated setup makes sense only if you have more than a few
servers to install.
✦ Microsoft has a feature called Remote Installation Services (RIS) that lets
you install Windows server versions from a remote network location
without even going to the server computer. This is tricky to set up, however, so it’s really worth it only if you have a lot of servers on which to
install operating systems. (You can also use RIS to install client operating systems.)
Book II
Chapter 3
Setting Up a
Network Server
Multiboot is most useful for software developers or network managers who want to make
sure that software is compatible with a wide
variety of operating systems. Rather than set
up a bunch of separate computers with different operating system versions, you can install
several operating systems on a single PC and
use that one PC to test the software. For production network servers, however, you probably don’t need to have more than one operating
system installed.
install each operating system into its own disk
partition. Although most network operating
systems let you install two (or more) operating systems into a single partition, doing so is
not a very good idea. To support two operating
systems in a single partition, the operating systems have to play a risky shell game with key
system files — moving or renaming them each
time you restart the computer. Unfortunately,
things can go wrong. For example, if lightning
strikes and the power goes out just as the NOS
is switching the startup files around, you may
find yourself with a server that can’t boot to any
of its installed operating systems.
114
Gathering Your Stuff
Gathering Your Stuff
Before you install a network operating system, you should gather everything you need so you don’t have to look for something in the middle of
the setup. The following sections describe the items you’re most likely to
need.
A capable server computer
Obviously, you have to have a server computer on which to install the NOS.
Each NOS has a list of the minimum hardware requirements supported by
the operating system. For example, Table 3-1 summarizes the minimum
requirements for the Standard Edition of the current edition of Windows
Server, known as Windows Server 2008 Rw.
My suggestion is that you take these minimums with a grain of salt.
Windows Server 2008 will crawl like a snail with 512MB of RAM; I wouldn’t
bother with less than 4GB, and 16GB is a more appropriate minimum for
most purposes.
Table 3-1
Minimum Hardware Requirements
for Windows Server 2008 R2
Item
Windows Server 2008 R2
CPU
1.4 GHz
RAM
512MB
Free disk space
32GB
You should also check your server hardware against the list of compatible
hardware published by the maker of your NOS. For example, Microsoft
publishes a list of hardware that it has tested and certified as compatible
with Windows servers. This list is called the Hardware Compatibility List, or
HCL for short. You can check the HCL for your specific server by going to
Microsoft’s Web site at www.microsoft.com/whdc/hcl/default.mspx.
You can also test your computer’s compatibility by running the Check
System Compatibility option from the Windows distribution CD-ROM.
You can find more specific details on server computer recommendations in
Book I, Chapter 3.
Gathering Your Stuff
115
The server operating system
You also need a server operating system to install. You’ll need either the
distribution CDs or DVDs or access to a copy of them over the network. In
addition to the discs, you should have the following:
✦ The product key: The installation program asks you to enter the product key during the installation to prove that you have a legal copy of the
software. If you have the actual CDs or DVDs, the product key should be
on a sticker attached to the case.
✦ Manuals: If the operating system came with printed manuals, you should
keep them handy.
Check the CD or DVD distribution disc for product documentation and additional last-minute information. For example, Windows servers have a \docs
folder that contains several files that have useful setup information.
Other software
In most cases, the installation program should be able to automatically configure your server’s hardware devices and install appropriate drivers. Just
in case, though, you should dig out the driver disks that came with your
devices, such as network interface cards, SCSI devices, DVD drives, printers,
scanners, and so on.
A working Internet connection
This isn’t an absolute requirement, but the installation will go much
smoother if you have a working Internet connection before you start. The
installation process may use this Internet connection for several things:
✦ Downloading late-breaking updates or fixes to the operating system.
This can eliminate the need to install a service pack after you finish
installing the NOS.
✦ Locating drivers for nonstandard devices. This can be a big plus if you
can’t find the driver disk for your obscure SCSI card.
✦ Activating the product after you complete the installation (for
Microsoft operating systems).
Book II
Chapter 3
Setting Up a
Network Server
✦ Your license type: You can purchase Microsoft operating systems on a
per-server or a per-user/per device basis. You need to know which plan
you have when you install the NOS.
116
Making Informed Decisions
A good book
You’ll spend lots of time watching progress bars during installation, so you
may as well have something to do while you wait. May I recommend The
Hitchhiker’s Guide to the Galaxy?
Making Informed Decisions
When you install a NOS, you have to make some decisions about how you
want the operating system and its servers configured. Most of these decisions
aren’t cast in stone, so don’t worry if you’re not 100 percent sure how you
want everything configured. You can always go back and reconfigure things.
However, you’ll save yourself time if you make the right decisions up front
rather than just guess when the setup program starts asking you questions.
The following list details most of the decisions that you’ll need to make.
(This list is for Windows Server 2003 and 2008 installations. For other network operating systems, the decisions may vary slightly.)
✦ The existing operating system: If you want to retain the existing operating
system, the installation program can perform a multiboot setup, which
allows you to choose which operating system to boot to each time you
start the computer. This is rarely a good idea for server computers, so I
recommend that you elect to delete the existing operating system.
✦ Partition structure: Most of the time, you’ll want to treat the entire
server disk as a single partition. However, if you want to divide the disk
into two or more partitions, you should do so during setup. (Unlike most
of the other setup decisions, this one is hard to change later.)
✦ File system: Windows servers provide two choices for the file system to
format the server’s disk: FAT32 and NTFS. In every case, you should elect
to use NTFS. FAT32 should never be used for a server operating system.
✦ Computer name: During the operating system setup, you’re asked to
provide the computer name used to identify the server on the network.
If your network has only a few servers, you can just pick a name such
as Server01 or MyServer. If your network has more than a few servers,
you’ll want to follow an established guideline for creating server names.
✦ Administrator password: Okay, this one is tough. You don’t want to pick
something obvious, like Password, Administrator, or your last name.
On the other hand, you don’t want to type in something random that
you’ll later forget, because you’ll find yourself in a big pickle if you forget
the administrator password. I suggest that you make up a complex
password consisting of a mix of uppercase and lowercase letters, some
numerals, and a special symbol or two; then write it down and keep it in
a secure location where you know it won’t get lost.
Installing a Network Operating System
117
✦ Networking protocols: You’ll almost always need to install the TCP/
IP protocol, the Microsoft network client protocol, and file and printer
sharing. Depending on how the server will be used, you may want to
install other protocols as well.
✦ TCP/IP configuration: You’ll need to know what IP address to use for
the server. Even if your network has a DHCP server to dynamically
assign IP addresses to clients, most servers use static IP addresses.
✦ Workgroup or domain: You’ll need to decide whether the server will
join a domain or just be a member of a workgroup. In either case, you’ll
need to know the domain name or the workgroup name.
Final Preparations
✦ Clean up the server’s disk by uninstalling any software that you don’t
need and removing any old data that is no longer needed. This cleanup
is especially important if you’re converting a computer that’s been in
use as a client computer to a server. You probably don’t need Microsoft
Office or a bunch of games on the computer after it becomes a server.
✦ Do a complete backup of the computer. Operating system setup programs
are almost flawless, so the chances of losing data during installation are
minimal. But you still face the chance that something may go wrong.
✦ If the computer is connected to an uninterruptible power supply (UPS)
that has a serial or USB connection to the computer, unplug the serial
or USB connection. In some cases, this control connection can confuse
the operating system’s setup program when it tries to determine which
devices are attached to the computer.
✦ If the computer has hard drives compressed with DriveSpace or
DoubleSpace, uncompress the drives before you begin.
✦ Light some votive candles, take two Tylenol, and put on a pot of coffee.
Installing a Network Operating System
The following sections present an overview of a typical installation of
Windows Server 2008. Although the details vary, the overall installation process for other network operating systems is similar.
In most cases, the best way to install Windows Server 2008 is to perform
a new install directly from the DVD installation media. Although upgrade
installs are possible, your server will be more stable if you perform a new
install. (For this reason, most network administrators avoid upgrading to
Windows Server 2008 until it’s time to replace the server hardware.)
Setting Up a
Network Server
Before you begin the actual installation, you should take a few more steps:
Book II
Chapter 3
118
Installing a Network Operating System
To begin the installation, insert the DVD distribution media in the server’s
DVD drive and then restart the server. This causes the server to boot
directly from the distribution media, which initiates the setup program.
As the setup program proceeds, it leads you through two distinct installation phases: Collecting Information and Installing Windows. The following
sections describe these installation phases in greater detail.
Phase 1: Collecting Information
In the first installation phase, the setup program asks for the preliminary
information that it needs to begin the installation. A setup wizard prompts
you for the following information:
✦ Language: Select your language, time-zone, and keyboard type.
✦ Product Key: Enter the 25-character product key that came with the
installation media. If setup says you entered an invalid product key,
double-check it carefully. You probably just typed the key incorrectly.
✦ Operating System Type: The setup program lets you select Windows
Server 2008 Standard Edition or Core. Choose Standard Edition to install
the full server operating system; choose Core if you want to install the
new text-only version.
✦ License Agreement: The official license agreement is displayed. You
have to agree to its terms in order to proceed.
✦ Install Type: Choose an Upgrade or Clean Install type.
✦ Disk Location: Choose the partition in which you want to install
Windows.
✦ Upgrade to NTFS: If you want to upgrade a FAT32 system to NTFS, you’ll
need to say so now.
Phase 2: Installing Windows
In this phase, Windows setup begins the actual process of installing
Windows. The following steps are performed in sequence:
1. Copying Files: Compressed versions of the installation files are copied
to the server computer.
2. Expanding Files: The compressed installation files are expanded.
3. Installing Features: Windows server features are installed.
4. Installing Updates: The setup program checks Microsoft’s Web site and
downloads any critical updates to the operating system.
5. Completing Installation: When the updates are installed, the setup program reboots so it can complete the installation.
Configuring Your Server
119
Configuring Your Server
After you’ve installed Windows Server 2008, the computer automatically
reboots, and you’re presented with the Initial Configuration Tasks Wizard,
as shown in Figure 3-1. This wizard guides you through the most important
initial tasks for configuring your new server.
Book II
Chapter 3
Setting Up a
Network Server
Figure 3-1:
Initial
Configuration Tasks.
The following list describes the server configuration settings available from
this wizard:
✦ Set the Administrator Password: The very first thing you should do
after installing Windows is set a secure administrator password.
✦ Set the Time Zone: This is necessary only if the indicated time zone is
incorrect.
✦ Configure Networking: The default network settings are usually appropriate, but you can use this option to change the defaults if you wish.
✦ Provide Computer Name and Domain: This option lets you change the
server’s computer name and join a domain.
✦ Enable Automatic Updating: Use this option if you want to let the server
automatically check for operating system updates.
✦ Download and Install Updates: Use this option to check for critical
operating system updates.
✦ Add Roles: This option launches the Add Roles Wizard, which lets you
configure important roles for your server.
120
Configuring Your Server
✦ Add Features: This option lets you add more operating system features.
✦ Enable Remote Desktop: Use this option to enable the Remote Desktop
feature, which lets you administer this server from another computer.
✦ Configure Windows Firewall: If you want to use the built-in Windows
firewall, this option lets you configure it.
Chapter 4: Configuring
Windows Clients
In This Chapter
✓ Configuring network connections for Windows clients
✓ Setting the computer name, description, and workgroup
✓ Joining a domain
✓ Setting logon options
B
efore your network setup is complete, you must configure the network’s client computers. In particular, you have to configure each
client’s network interface card so that it works properly, and you have to
install the right protocols so that the clients can communicate with other
computers on the network.
Fortunately, the task of configuring client computers for the network is
child’s play in Windows. For starters, Windows automatically recognizes
your network interface card when you start up your computer. All that
remains is to make sure that Windows properly installed the network protocols and client software.
With each version of Windows, Microsoft has simplified the process of configuring client network support. In this chapter, I describe the steps for configuring networking for Windows XP, Vista, and Windows 7.
Configuring Network Connections
Windows automatically detects the presence of a network adapter; normally, you don’t have to install device drivers manually for the adapter.
When Windows detects a network adapter, it automatically creates a network connection and configures it to support basic networking protocols.
However, you may need to change the configuration of a network connection manually. The procedures for Windows XP and Vista are described in
the following sections.
122
Configuring Network Connections
Configuring Windows XP network connections
The following steps show how to configure your network connection on a
Windows XP system:
1. Choose Start➪Control Panel to open the Control Panel.
The Control Panel appears.
2. Double-click the Network Connections icon.
The Network Connections folder appears, as shown in Figure 4-1.
Figure 4-1:
The
Network
Connections
folder.
3. Right-click the connection that you want to configure and then choose
Properties from the menu that appears.
Or you can select the network connection and click Change Settings of
This Connection in the task pane.
Either way, the Properties dialog box for the network connection
appears, as shown in Figure 4-2.
4. To configure the network adapter card settings, click Configure.
This action summons the Properties dialog box for the network adapter,
as shown in Figure 4-3. This dialog box has five tabs that let you configure the NIC:
• General: This tab shows basic information about the NIC, such as
the device type and status. For example, the device shown in Figure
4-3 is an Intel Pro 100 network interface. (It’s installed in slot 3 of the
computer’s PCI bus.)
Configuring Network Connections
123
Figure 4-2:
The
Properties
dialog
box for a
network
connection.
Book II
Chapter 4
• Advanced: This tab lets you set a variety of device-specific parameters that affect the operation of the NIC. For example, some cards
allow you to set the speed parameter (typically at 10 Mbps or 100
Mbps) or the number of buffers the card should use.
Consult the manual that came with the card before you play around
with any of those settings.
• Driver: This tab displays information about the device driver that’s
bound to the NIC and lets you update the driver to a newer version,
roll back the driver to a previously working version, or uninstall the
driver.
• Resources: With this tab, you can use manual settings to limit the
system resources used by the card — including the memory range,
I/O range, IRQ, and DMA channels.
In the old days, before Plug and Play cards, you had to configure
these settings whenever you installed a card, and it was easy to
create resource conflicts. Windows configures these settings automatically so that you should rarely need to fiddle with them.
• Power Management: This tab lets you set power-management
options. You can specify that the network card be shut down whenever the computer goes into sleep mode — and that the computer
wake up periodically to refresh its network state.
Configuring
Windows Clients
If you’re having trouble with the adapter, you can click the Troubleshoot button to open the Windows XP Hardware Troubleshooter.
You can also disable the device if it’s preventing other components
of the computer from working properly.
124
Configuring Network Connections
Figure 4-3:
The
Properties
dialog
box for a
network
adapter.
When you click OK to dismiss the network adapter’s Properties dialog box,
the network connection’s Properties dialog box closes. Select the Change
Settings of This Connection option again to continue the procedure.
5. Make sure that the network items your client requires are listed in the
network connection Properties dialog box.
The following list describes the items you commonly see listed here.
Note that not all networks need all these items:
• Client for Microsoft Networks: This item is required if you want to
access a Microsoft Windows network. It should always be present.
• File and Printer Sharing for Microsoft Networks: This item allows your
computer to share its files or printers with other computers on the
network.
This option is usually used with peer-to-peer networks, but you can
use it even if your network has dedicated servers. However, if you
don’t plan to share files or printers on the client computer, you
should disable this item.
• Internet Protocol (TCP/IP): This item enables the client computer to
communicate by using the TCP/IP protocol.
If all servers on the network support TCP/IP, this protocol should be
the only one installed on the client.
• NWLink IPX/SPX/NetBIOS Compatible Transport Protocol: This protocol is required only if your network needs to connect to an older
NetWare network that uses the IPX/SPX protocol.
In most modern networks, you should enable TCP/IP only and leave
this item disabled.
Configuring Network Connections
125
6. If a protocol that you need isn’t listed, click the Install button to add
the needed protocol.
A dialog box appears, asking whether you want to add a network client,
protocol, or service. Click Protocol and then click Add. A list of available
protocols appears. Select the one you want to add; then click OK. (You
may be asked to insert a disc or the Windows CD.)
7. Make sure that the network client that you want to use appears in the
list of network resources.
For a Windows-based network, make sure that Client for Microsoft
Networks is listed. For a NetWare network, make sure that Client Service
for NetWare appears. If your network uses both types of servers, you
can choose both clients.
8. If the client that you need isn’t listed, click the Install button to add
the client that you need, click Client, and then click Add. Then choose
the client that you want to add and click OK.
The client you select is added to the network connection’s Properties
dialog box.
9. To remove a network item that you don’t need (such as File and
Printer Sharing for Microsoft Networks), select the item and click the
Uninstall button.
For security reasons, you should make it a point to remove any clients,
protocols, or services that you don’t need.
10. To configure TCP/IP settings, click Internet Protocol (TCP/IP) and
click Properties to display the TCP/IP Properties dialog box. Adjust
the settings and then click OK.
The TCP/IP Properties dialog box, shown in Figure 4-4, lets you choose
from these options:
• Obtain an IP Address Automatically: Choose this option if your network has a DHCP server that assigns IP addresses automatically.
Choosing this option drastically simplifies the administering of TCP/
IP on your network. (See Book IV, Chapter 3, for more information
about DHCP.)
• Use the Following IP Address: If your computer must have a specific
IP address, choose this option and then type the computer’s IP
address, subnet mask, and default gateway address. (For more information about these settings, see Book IV, Chapter 2.)
• Obtain DNS Server Address Automatically: The DHCP server can also
provide the address of the Domain Name System (DNS) server that the
computer should use. Choose this option if your network has a DHCP
server. (See Book IV, Chapter 4, for more information about DNS.)
Configuring
Windows Clients
If you have NetWare servers, use the NetWare client software that comes
with NetWare rather than the client supplied by Microsoft with Windows.
Book II
Chapter 4
126
Configuring Network Connections
• Use the Following DNS Server Addresses: Choose this option if a DNS
server isn’t available. Then type the IP address of the primary and
secondary DNS servers.
Figure 4-4:
Configuring
TCP/IP.
Configuring Windows Vista network connections
The procedure for configuring a network connection on Windows Vista is
similar to the procedure for Windows XP, except that Microsoft decided to
bury the configuration dialog boxes a little deeper in the bowels of Windows.
To find the settings you need, follow these steps:
1. Choose Start➪Control Panel to open the Control Panel.
The Control Panel appears.
2. Choose View Network Status and Tasks under the Network and
Internet heading.
This step opens the Network and Sharing Center, shown in Figure 4-5.
3. Click Manage Network Connections.
The Network Connections folder appears, as shown in Figure 4-6.
4. Right-click the connection that you want to configure and then choose
Properties from the menu that appears.
Configuring Network Connections
127
Figure 4-5:
The
Network
and Sharing
Center
(Windows
Vista).
Book II
Chapter 4
Configuring
Windows Clients
Figure 4-6:
The
Network
Connections
folder
(Windows
Vista).
The Properties dialog box for the network connection appears, as shown
in Figure 4-7. If you compare this dialog box with the dialog box that was
shown earlier, in Figure 4-2, you see that they’re the same.
5. Click Configure to configure the network connection.
128
Configuring Network Connections
From this point, the steps for configuring the network connection are
the same as they are for Windows XP. As a result, you can continue,
beginning with Step 4 in the previous section, “Configuring Windows XP
network connections.”
Figure 4-7:
The
Properties
dialog
box for a
network
connection
(Windows
Vista).
Configuring Windows 7 network connections
The procedure to configure a Windows 7 network connection is similar to the
Windows Vista procedure, with just a few minor variations. Here are the steps:
1. Choose Start➪Control Panel to open the Control Panel.
The Control Panel appears.
2. Choose View Network Status and Tasks under the Network and
Internet heading.
This step opens the Network and Sharing Center, shown in Figure 4-8.
3. Click the Change Adapter Settings link on the left.
The Network Connections folder appears, as shown in Figure 4-9.
4. Right-click the connection that you want to configure and then choose
Properties from the menu that appears.
The Properties dialog box for the network connection appears, as shown
in Figure 4-10. If you compare this dialog box with the dialog box that
was shown earlier, in Figure 4-2, you see that they’re the same.
Configuring Network Connections
129
Book II
Chapter 4
Figure 4-9:
The
Network
Connections
folder
(Windows 7).
Configuring
Windows Clients
Figure 4-8:
The
Network
and Sharing
Center
(Windows 7).
130
Configuring Client Computer Identification
5. Click Configure to configure the network connection.
From this point, the steps for configuring the network connection are
the same as they are for Windows XP. As a result, you can continue,
beginning with Step 4 in the earlier section, “Configuring Windows XP
network connections.”
Figure 4-10:
The
Properties
dialog
box for a
network
connection
(Windows 7).
Configuring Client Computer Identification
Every client computer must identify itself to participate in the network.
The computer identification consists of the computer’s name, an optional
description, and the name of either the workgroup or the domain to which
the computer belongs.
The computer name must follow the rules for NetBIOS names; it may be 1 to 15
characters long and may contain letters, numbers, or hyphens but no spaces
or periods. For small networks, it’s common to make the computer name
the same as the username. For larger networks, you may want to develop a
naming scheme that identifies the computer’s location. For example, a name
such as C-305-1 may be assigned to the first computer in Room 305 of
Building C. Or MKTG010 may be a computer in the Marketing department.
If the computer will join a domain, you need to have access to an
Administrator account on the domain, unless the administrator has already
created a computer account on the domain. Note that only the following versions of Windows have the ability to join a domain:
Configuring Client Computer Identification
131
✦ Windows 7 Professional, Enterprise, or Ultimate
✦ Windows Vista Business, Enterprise, or Ultimate
✦ Windows XP Professional
When you install Windows on the client system, the Setup program asks for
the computer name and workstation or domain information. You can change
this information later, if you want. The procedure varies depending on the
Windows version you’re using.
Configuring Windows XP computer identification
To change the computer identification in Windows XP, follow these steps:
System Properties dialog box.
2. Click the Computer Name tab.
The computer identification information is displayed.
3. Click the Change button.
This step displays the Computer Name Changes dialog box, as shown in
Figure 4-11.
4. Type the new computer name and then specify the workgroup or
domain information.
To join a domain, select the Domain radio button and type the domain
name into the appropriate text box. To join a workgroup, select the
Workgroup radio button and type the workgroup name in the corresponding text box.
5. Click OK.
Figure 4-11:
The
Computer
Name
Changes
dialog box
(Windows
XP).
Configuring
Windows Clients
1. Open the Control Panel and double-click the System icon to open the
Book II
Chapter 4
132
Configuring Client Computer Identification
6. If you’re prompted, enter the username and password for an
Administrator account.
You’re asked to provide this information only if a computer account has
not already been created for the client computer.
7. When a dialog box appears, informing you that you need to restart the
computer, click OK. Then restart the computer.
You’re done!
Configuring Windows Vista or Windows 7
computer identification
To change the computer identification in Windows Vista or Windows 7,
follow these steps:
1. Click the Start button, and then right-click Computer and choose
Properties.
This step displays the System information window, as shown in Figure
4-12. Notice the section that lists computer name, domain, and workgroup settings.
2. Click the Change Settings link in the lower-right.
Figure 4-12:
The System
information
window
(Windows 7).
Configuring Client Computer Identification
133
If a dialog box appears and asks for your permission to continue, click
Continue. The System Properties dialog box then appears, as shown in
Figure 4-13.
3. Click the Change button.
This step displays the Computer Name/Domain Changes dialog box, as
shown in Figure 4-14.
4. Enter the computer name and the workgroup or domain name.
If you want to join a domain, choose the Domain option button and type
the domain name. To join a workgroup, choose the Workgroup option
button and type the workgroup name.
Book II
Chapter 4
Configuring
Windows Clients
Figure 4-13:
The System
Properties
dialog box
(Windows 7).
Figure 4-14:
The
Computer
Name/
Domain
Changes
dialog box
(Windows 7).
134
Configuring Network Logon
5. Click OK.
6. Enter the username and password for an Administrator account when
prompted.
You’re asked to provide this information only if a computer account
hasn’t already been created for the client computer.
7. When a dialog box appears, informing you that you need to restart the
computer, click OK. Then restart the computer.
The computer is then added to the domain or workgroup.
Configuring Network Logon
Every user who wants to access a domain-based network must log on to the
domain by using a valid user account. The user account is created on the
domain controller — not on the client computer.
Network logon isn’t required to access workgroup resources. Instead, workgroup resources can be password-protected to restrict access.
When you start a Windows computer that’s been configured to join
a domain, as described in the section “Configuring Client Computer
Identification,” earlier in this chapter, the Log On to Windows dialog box is
displayed. The user can use this dialog box to log on to a domain by entering
a domain username and password and then selecting the domain that she
wants to log on to (from the Log On To drop-down list).
You can create local user accounts in Windows that allow users to access
resources on the local computer. To log on to the local computer, the user
selects This Computer from the Log On To drop-down list and enters the
username and password for a local user account. When a user logs on by
using a local account, he isn’t connected to a network domain. To log on to a
domain, the user must select the domain from the Log On To drop-down list.
If the computer isn’t part of a domain, Windows can display a friendly logon
screen that displays an icon for each of the computer’s local users. The user
can log on simply by clicking the appropriate icon and entering a password.
(This feature isn’t available for computers that have joined a domain.)
Note that if the user logs on by using a local computer account rather than a
domain account, she can still access domain resources. A Connect To dialog
box appears whenever the user attempts to access a domain resource. Then
the user can enter a domain username and password to connect to the
domain.
Chapter 5: Macintosh Networking
In This Chapter
✓ Hooking up a Macintosh network
✓ Using a Macintosh network
✓ Mixing Macs and PCs
T
his book dwells on networking Windows-based computers, as if
Microsoft were the only game in town. (Hah! They wish.) To be politically correct, I should at least acknowledge the existence of a different
breed of computer: the Apple Macintosh.
This chapter presents what you need to know to hook up a Macintosh
network, use a Macintosh network, and mix Macintoshes and Windows
PCs on the same network. This chapter isn’t a comprehensive tome on
Macintoshes, but it’s enough to start.
What You Need to Know to Hook
Up a Macintosh Network
The following sections present some key things you should know about networking Macintosh computers before you start plugging in cables.
Mac networking protocols
Every Macintosh ever built, even an original 1984 model, includes networking support. Of course, newer Macintosh computers have better built-in
networking features than older Macintosh computers. The newest Macs
include built-in gigabit Ethernet adapters and sophisticated networking support built in to the operating system — similar to the networking features
that come with Windows. Because the network support is built in, you don’t
have to fuss with installing and configuring the network.
Originally, Macintosh computers used a set of networking protocols collectively known as AppleTalk. In the mid 1990s, AppleTalk was supplanted by a
networking scheme called Open Transport.
136
What You Need to Know to Hook Up a Macintosh Network
Who’s winning in the AFP West?
AFP is not a division of the NFL but an abbreviation for AppleTalk Filing Protocol. It’s the part
of AppleTalk that governs how files are stored
and accessed on the network. AFP allows files
to be shared with non-Macintosh computers.
You can integrate Macintoshes into any network operating system that recognizes AFP.
NetWare and all versions of Windows since
Windows 95 use AFP to support Macintoshes
in their networks.
In case you’re interested (and you shouldn’t
be), AFP is a Presentation layer protocol. (See
Book I, Chapter 2, if you don’t have a clue about
what I’m talking about.)
The current generation of Macintosh computers uses industry-standard
TCP/IP networking. The only protocol left over from the AppleTalk days that
is still in widespread use is AFP, used to enable file sharing. For a brief explanation of this protocol, see the sidebar “Who’s winning in the AFP West?”
Mac OS X Server
Apple offers a dedicated network operating system known as Mac OS
X Server (the X is pronounced “Ten,” not “Ex”), which is designed for
PowerMac G3 or later computers. Mac OS X Server is based on a Unix
operating-system kernel known as Mach. Mac OS X Server can handle many
network-server tasks as efficiently as any other network operating system,
including Windows 2000, NetWare, and Unix.
Mac OS X Server is the server version of the Mac OS X operating system,
which is the current operating system version for client Macintosh computers.
The Mac OS X Server includes the following features:
✦ Apache Web server, which also runs on Windows and Linux systems
✦ NetBoot, a feature that simplifies the task of managing network client
computers
✦ File services using AFP
✦ WebObjects, a high-end tool for creating Web sites
✦ QuickTime Streaming Server, which lets the server broadcast multimedia programs over the network
What You Need to Know to Use a Macintosh Network
137
What You Need to Know to Use a Macintosh Network
The following questions often come up after you install the network cable.
Note that the following sections assume that you’re working with AppleTalk
networking using Mac OS X. The procedures may vary somewhat if you’re
using Open Transport networking or an earlier version of the Macintosh
operating system.
Configuring a Mac for networking
Before you can access the network from your Mac, you must configure your
Mac for networking: Activate AppleTalk and assign your network name and
password.
After all the cables are in place, you have to activate AppleTalk. Here’s how:
1. Select the Chooser from the Apple menu.
The Chooser is an application for choosing network resources.
2. Click the Active button.
3. Close the Chooser.
Assigning your name and password
After you activate AppleTalk, you’re ready to assign an owner name, a password, and a name for your computer. This process allows other network
users to access your Mac. Here’s how:
1. Choose the File Sharing control panel from the Apple menu (Apple➪
Control Panels➪File Sharing).
2. Type your name in the Owner Name field.
3. Type a password in the Owner Password field.
Don’t forget what the password is.
4. Type a descriptive name for your computer in the Computer Name
field.
Other network users will know your computer by this name.
5. Click the Close button.
Macintosh
Networking
Activating AppleTalk
Book II
Chapter 5
138
What You Need to Know to Use a Macintosh Network
Accessing a network printer
Accessing a network printer with AppleTalk is no different than accessing a
printer when you don’t have a network. If more than one printer is available
on the network, you use the Chooser to select the printer you want to use.
Chooser displays all the available network printers — just pick the one you
want to use. And keep the following points in mind:
✦ Be sure to enable Background Printing for the network printer. If you
don’t, your Mac is tied up until the printer finishes your job — that can
be a long time if someone else sent a 500-page report to the printer just
before you. When you enable Background Printing, your printer output
is captured to a disk file and then sent to the printer later while you continue with other work.
To enable Background Printing
1. Choose Apple➪Chooser desk accessory.
2. Select the printer you want to use from the Chooser.
3. Click the Background Printing On button.
✦ Don’t enable Background Printing if a dedicated print server has
been set up. In that case, print data is spooled automatically to the print
server’s disk so your Mac doesn’t have to wait for the printer to become
available.
Sharing files with other users
To share files on your Mac with other network users, you set up a shared
resource. You can share a disk or just individual folders and restrict access
to certain users.
Before you can share files with other users, you must activate the AppleTalk
file-sharing feature. Here’s how:
1. Choose the File Sharing control panel from the Apple Menu.
2. Click the Start button in the File Sharing section of the control panel.
3. Click the Close button.
To share a file or folder, click the file or folder once. Then open the File
menu, choose Get Info, and choose Sharing from the submenu that appears.
You can also use the Sharing section of the Info window to restrict access to
the file or folder.
What You Need to Know to Network Macintoshes with PCs
139
Accessing shared files
To access files on another Macintosh, follow this procedure:
1. Choose the Chooser from the Apple menu.
2. Click the AppleShare icon from the Chooser window.
3. Click the name of the computer you want to access. (If your network
has zones, you must first click the zone you want to access.)
4. Click OK.
A logon screen appears.
5. If you have a user account on the computer, click the Registered User
button and enter your username and password. Otherwise, click the
Guest button and then click OK.
6. Click the folders and disks you want to access.
A check box appears next to each item. If you check this box, you connect to the corresponding folder or disk automatically when you start
your computer.
7. Click OK.
With Mac OS 8.5 and later, you can also use the Network Browser, found in
the Apple menu, to access network drives or folders. Just open the Network
Browser from the Apple menu, double-click the server that contains the shared
disk or folder, and then double-click the drive or folder you want to use.
What You Need to Know to Network
Macintoshes with PCs
Life would be too boring if Macs really lived on one side of the tracks and
PCs lived on the other. If your organization has a mix of both Macs and
PCs, odds are good that you eventually want to network them together.
Fortunately, you have several ways:
✦ If your network has an OS X Server, you can use the Windows client software that comes with OS X Server to connect any version of Windows to
the server. Doing so enables Windows users to access the files and printers on the Macintosh server.
Macintosh
Networking
A list of shared folders and disks appears.
Book II
Chapter 5
140
What You Need to Know to Network Macintoshes with PCs
✦ The server versions of Windows include a feature called Services for
Macintosh that allows Macintosh computers to access files and printers
managed by the Windows servers without installing special client software on the Macintosh computers.
✦ If you use NetWare, you must purchase separate NetWare client software
for your Macintosh computers. After you install this client software, the
Macs can access files and printers managed by your NetWare servers.
The biggest complication that occurs when you mix Macintosh and Windows
computers on the same network is that the Mac OS and Windows have
slightly different rules for naming files. For example:
✦ Macintosh filenames are limited to 31 characters, but Windows filenames can be up to 255 characters.
✦ Although a Macintosh filename can include any characters other than
a colon, Windows filenames can’t include backslashes, greater-than or
less-than signs, and a few other oddball characters.
The best way to avoid filename problems is to stick with short names (under
31 characters) and limit your filenames to letters, numbers, and common
symbols (such as the hyphen or pound sign). Although you can translate any
filenames that violate the rules of the system being used into a form that’s
acceptable to both Windows and the Macintosh, doing so sometimes leads
to cryptic or ambiguous filenames. But hey, network administration is as
much an art as a science.
Chapter 6: Configuring Other
Network Features
In This Chapter
✓ Setting up network printers
✓ Configuring your client computer’s Internet connections
✓ Mapping network drives
A
fter you have your network servers and clients up and running, you
still have many details to attend to before you can pronounce your
network “finished.” In this chapter, you discover a few more configuration
chores that have to be done: configuring Internet access, setting up network
printers, configuring e-mail, and configuring mapped network drives.
Configuring Network Printers
Before network users can print on the network, the network’s printers must
be properly configured. For the most part, this is a simple task. All you have
to do is configure each client that needs access to the printer.
Before you configure a network printer to work with network clients, read
the client configuration section of the manual that came with the printer.
Many printers come with special software that provides more advanced
printing and networking features than the standard features provided by
Windows. If so, you may want to install the printer manufacturer’s software
on your client computers rather than use the standard Windows network
printer support.
Adding a network printer
The exact procedure for adding a network printer varies a bit, depending on
the Windows version that the client runs. The following steps describe the
procedure for Windows 7 (the procedure for Windows Vista is similar):
1. Choose Start➪Devices and Printers.
2. Click the Add a Printer button on the toolbar.
This step starts the Add Printer Wizard, shown in Figure 6-1.
142
Configuring Network Printers
Figure 6-1:
The Add
Printer
Wizard
comes to
life.
3. Select the Add a Network, Wireless or Bluetooth Printer option.
The wizard searches the network for available printers and displays a
list of the printers it finds, as shown in Figure 6-2.
4. Click the printer you want to use.
If you can’t find the printer you want to use, click The Printer That I
Want Isn’t Listed and enter the UNC or IP address for the printer when
prompted.
5. Click Next to add the printer.
Figure 6-2:
The Add
Printer
Wizard asks
you to pick a
printer.
Configuring Network Printers
143
The wizard copies to your computer the correct printer driver for the
network printer. (You may be prompted to confirm that you want to add
the driver. If so, click Install Driver to proceed.)
The Add Printer Wizard displays a screen that shows the printer’s name
and asks whether you want to designate the printer as your default
printer.
6. If you want, designate the printer as your default printer.
7. Click Next to continue.
A final confirmation dialog box is displayed.
8. Click Finish.
You’re done!
Printers that have a direct network connection often include a built-in Web
server that lets you manage the printer from any browser on the network.
For example, Figure 6-3 shows the home page for a Xerox Phaser 6125
printer. This Web interface lets you view status information about the
printer and check the printer’s configuration. You can even view error logs
to find out how often the printer jams.
Figure 6-3:
Using a
printer’s
Web
interface.
Configuring Other
Network Features
Accessing a network printer using a Web interface
Book II
Chapter 6
144
Configuring Network Printers
To call up a printer’s Web interface, enter its IP address or host name in the
address bar of any Web browser.
In addition to simply displaying information about the printer, you can also
adjust the printer’s configuration from a Web browser. For example, Figure
6-4 shows the Network Settings page for the Xerox printer. Here, you can
change the network configuration details, such as the TCP/IP host name, IP
address, subnet mask, domain name, and so on. Other configuration pages
allow you to tell the printer to send an e-mail notification to an address that
you specify whenever you encounter a problem with the printer.
As the network administrator, you may need to visit the printer’s Web page
frequently. I suggest that you add it to your browser’s Favorites menu so
that you can get to it easily. If you have several printers, add them under a
folder named Network Printers.
Figure 6-4:
Changing
network
settings via
a printer’s
Web
interface.
Configuring Internet Access
145
Configuring Internet Access
To enable the network users to access the Internet, you need to make sure
that the TCP/IP configuration settings on each client computer are set correctly. If you have a high-speed Internet connection, such as T1, DSL, cable,
or ISDN, connected to the Internet via a router and your network uses DHCP
for automatic TCP/IP configuration, you may not need to do anything special
to get your clients connected to the Internet.
Configuring clients for DHCP
Before you configure the clients to use DHCP, you should first set up the
DHCP server. The DHCP server’s configuration should include:
✦ A scope that specifies the range of IP addresses and the subnet mask to
be distributed to client computers.
✦ The IP address of the router that should be used as the default gateway
for client computers to reach the Internet.
✦ The IP addresses of the DNS servers that clients should use.
Note that DHCP can be provided either by a server computer or by an intelligent router that has built-in DHCP. For more information about configuring
DHCP, see Book IV, Chapter 3.
After the DHCP server is configured, setting up Windows clients to use it is a
snap. Just follow these steps for Windows 7:
1. Open the Control Panel and click View Network Status and Tasks.
2. Click Change Adapter Settings.
3. Right-click the LAN connection icon and choose Properties.
This brings up the Local Area Connection Properties dialog box, as
shown in Figure 6-5.
Book II
Chapter 6
Configuring Other
Network Features
The easiest way to configure client computers to access the Internet via a
shared high-speed connection is to use DHCP. DHCP automatically distributes the detailed TCP/IP configuration information to each client. Then, if
your configuration changes, all you have to do is change the DHCP server’s
configuration. You don’t have to manually change each client. Plus, the
DHCP server avoids common manual configuration errors, such as assigning
the same IP address to two computers.
146
Configuring Internet Access
Figure 6-5:
The Local
Area
Connection
Properties
dialog box.
4. Select Internet Protocol Version 4 (TCP/IPv4) from the list of items
used by the connection and then click the Properties button.
This displays the Internet Protocol Version 4 (TCP/IP) Properties dialog
box, as shown in Figure 6-6.
5. Make sure that both the Obtain An IP Address Automatically and
Obtain DNS Server Address Automatically options are selected.
These options enable DHCP for the client.
Figure 6-6:
The Internet
Protocol
Version 4
(TCP/IPv4)
Properties
dialog box.
Mapping Network Drives
147
6. Click OK to return to the Local Area Connection Properties dialog box
and then click OK again.
That’s all there is to it. The computer is now configured to use DHCP. You
should check to make sure that every computer on your network is configured for DHCP.
If your network doesn’t have a DHCP server, you’ll have to configure the
TCP/IP configuration manually for each computer. Start by deciding the IP
address that you want to assign to each computer. Then, follow the preceding procedure on every computer. When you get to Step 4, enter the computer’s IP address as well as the IP address of the default gateway (your Internet
router) and the IP addresses of your DNS servers.
Using Internet Connection Sharing
Actually, the title of this section is misleading. It should be “Not Using
Internet Connection Sharing.” Windows XP, Vista, and Windows 7 come with
a built-in feature, called Internet Connection Sharing (ICS), designed to let you
share an Internet connection with several computers on a small network.
However, this feature is designed to be used only on very small networks
that don’t have a separate router to enable the connection to be shared.
All versions of Windows that support ICS also include a feature called the
Windows Firewall that provides basic firewall support for home networks.
This feature keeps hackers from invading your home network.
I recommend that you use ICS and the Windows Firewall only for home networks with no more than three computers. Even then, you’re better off purchasing an inexpensive connection-sharing device.
If the Windows Firewall has been enabled and you don’t need it, you should
disable it. Otherwise, it will disrupt your network. For information about
how to enable or disable this feature, refer to Book III, Chapter 4.
Mapping Network Drives
One of the main reasons that users want to use a network is to access
shared disk storage located on network file servers. Although you can do
this in several ways, the most common method is called mapping. Mapping
assigns a drive letter to a shared folder on a network server. Then, the user
can use the drive letter to access the shared folder as if it were a local drive.
Configuring Other
Network Features
Frankly, setting up a DHCP server is a lot easier than manually configuring
each computer’s TCP/IP information, unless your network has only two or
three computers. So unless your network is tiny, get a DHCP server.
Book II
Chapter 6
148
Mapping Network Drives
Before you map network drives for your network’s client computers, you
should devise a strategy for how you’ll share folders and map them to
drives. Here are just two possibilities:
✦ For private storage, you can create a separate shared folder for each
user on the file server and then map a drive letter on each user’s computer to that user’s shared folder. For example, you can create shares
named jBrannan, dHodgson, and mCaldwell. Then, you can map drive
N: to jBrannan on jBrannan’s computer, dHodgson on dHodgson’s computer, and mCaldwell on mCaldwell’s computer.
✦ For shared storage for an entire department, you can create a share for
the entire department and then map a drive to that share on each computer in the department. For example, you may map drive M: to a share
named Marketing for the entire Marketing department to use.
After you’ve decided how to map the file server’s shared folder, the next
step is to create and share the folders on the server. For information about
how to do that, refer to the appropriate chapters on specific network operating systems later in this book.
When you’re ready to map drives on the client computers, follow these
steps:
1. Choose Start➪Computer.
2. Click the Map Network Drive button.
The Map Network Drive dialog box appears, as shown in Figure 6-7.
Figure 6-7:
Mapping
a network
drive.
Mapping Network Drives
149
3. Select the drive letter that you want to map in the Drive drop-down list.
4. Type a valid path to the server and share that you want to map in the
Folder text box.
For example, to map a folder named pCaldwell on a server named
MKTSERVER, type \\MKTSERVER\pCaldwell.
If you don’t know the server or share name, click the Browse button and
browse your way to the folder that you want to map.
5. To cause the network drive to be automatically mapped each time the
user logs on, select the Reconnect at Logon check box.
If you leave this check box deselected, the drive is mapped only until the
next time you shut down Windows or log off.
That’s it! You’re done.
If you’re the type who prefers to do things through the command line, you
can quickly map network drives by using the NET USE command at a command prompt. For example, here’s a NET USE command that maps drive Z:
to \\MKTSERVER\pCaldwell:
net use z: \\MKTSERVER\pCaldwell /persistent:yes
Specifying /persistent:yes causes the drive to be remapped each time
the user logs on. To remove a drive mapping via the command line, use a
command like this:
net use z: /delete
Here, the mapping for drive Z: is removed.
Manually setting up drive mappings as described here works well enough
for small networks but not so well for large networks. If a server or share
name changes, would you want to go to 200 computers in order to update
drive mappings? How about 2,000 computers? For larger networks, you’re
more likely to use either login scripts or group policies to configure network
storage for end users. You can find more information about login scripts and
group policies in Book VII, Chapters 4 and 6.
Configuring Other
Network Features
6. Click Finish.
Book II
Chapter 6
150
Book II: Building a Network
Chapter 7: Verifying Your
Network Installation
In This Chapter
✓ Checking the network configuration settings
✓ Pinging yourself and others
✓ Making sure that you can log on
✓ Verifying mapped drives and checking network printers
Y
ou’ve installed all the network cards, plugged in all the cables, and
configured all the software. However, one task remains before you can
declare your network finished: You must verify that the network works as
expected.
Verifying a network isn’t difficult. All you have to do is make sure that
users can log on and access the network resources they need. If everything works the way it should, you can declare victory, give yourself a high
five, and take the afternoon off. If not, you have to do some troubleshooting to determine the source of the problem.
In this short chapter, I describe some of the tests that you should perform to
make sure that your network is functioning. Along the way, I suggest a few of
the most common problems that may interrupt the network. However, the
focus of this chapter is on verifying that your network is functioning — not on
troubleshooting it if it isn’t. For information about network troubleshooting,
refer to Book III, Chapters 6 and 7, as well as Book VII, Chapter 7.
Incidentally, most of the techniques described in this chapter work from an
MS-DOS command prompt. You can open a command prompt in Windows
Vista or Windows 7 by clicking the Start button, typing cmd, and pressing
Enter. In Windows XP, choose Start➪Run, type cmd, and then click OK.
Is the Computer Connected to the Network?
This one is easy to check. Just check the Link light on the computer’s network interface card and the light on the network hub or switch port that the
computer is connected to. If both are lit, the computer is connected to the
network. If one or both aren’t lit, you have a connection problem. Several
things may be wrong:
152
Is the Network Configuration Working?
✦ The patch cable that connects the computer to the wall outlet or that
connects to the hub or switch may be bad. Replace it with one that you
know is good in order to verify this problem.
✦ The cable run between the wall outlet and the patch panel may be bad.
The cable may be physically broken, or it may be routed right next to a
20,000-watt generator or an elevator motor.
✦ The computer’s NIC may be bad or configured incorrectly. Check the
configuration settings. If necessary, replace the card.
✦ The hub or switch may be bad.
Is the Network Configuration Working?
You can run three commands from a command window to verify the
basic configuration of each computer. These commands are net config
workstation, net config server, and ipconfig.
The net config workstation command displays basic information
about the computer’s network configuration. Here’s a sample of the output it
displays:
C:>net config workstation
Computer name
\\DOUG
Full Computer name
doug
User name
Doug Lowe
Workstation active on
NetbiosSmb (000000000000)
NetBT_Tcpip_{FC6D2F39-FDDD-448E-9B3C-0C12847F2B61}
(0050BA843911)
Software version
Windows 2002
Workstation domain
WORKGROUP
Workstation Domain DNS Name
(null)
Logon domain
DOUG
COM Open Timeout (sec)
0
COM Send Count (byte)
16
COM Send Timeout (msec)
250
The command completed successfully.
The most important information to check in the net config work
station command’s output is the computer name and domain information.
If the computer is configured to enable file and print sharing, you can also
run net config server to display basic information about the server configuration. Here’s a sample of its output:
Is the Network Configuration Working?
153
C:>net config server
Server Name
\\DOUG
Server Comment
Software version
Windows 2002
Server is active on
NetbiosSmb (000000000000)
NetBT_Tcpip_{FB6D2F79-FDDF-418E-9B7C-0C82887F2A61}
(0050ba843911)
Server hidden
No
Maximum Logged On Users
5
Maximum open files per session
16384
Idle session time (min)
15
The command completed successfully.
C:>ipconfig /all
Windows IP Configuration
Host Name . . . . . . . . . . .
Primary Dns Suffix . . . . . .
Node Type . . . . . . . . . . .
IP Routing Enabled. . . . . . .
WINS Proxy Enabled. . . . . . .
Ethernet adapter Local Area Connection:
Connection-specific DNS Suffix
attbi.com
Description . . . . . . . . . .
PCI Adapter
Physical Address. . . . . . . .
Dhcp Enabled. . . . . . . . . .
Autoconfiguration Enabled . . .
IP Address. . . . . . . . . . .
Subnet Mask . . . . . . . . . .
Default Gateway . . . . . . . .
DHCP Server . . . . . . . . . .
DNS Servers . . . . . . . . . .
.
.
.
.
.
:
:
:
:
:
doug
Unknown
No
No
. : we1.client2.
. : D-Link DFE-530TX+
.
.
.
.
.
.
.
.
:
:
:
:
:
:
:
:
00-50-BA-84-39-11
Yes
Yes
192.168.1.100
255.255.255.0
192.168.1.1
192.168.1.1
204.127.198.19
63.240.76.19
Lease Obtained. . . . . . . . . . : Saturday, May 24,
2003 6:28:49 PM
Lease Expires . . . . . . . . . . : Sunday, May 25,
2003 6:28:49 PM
The most important information to glean from this output is the computer’s
IP address. You should also verify that the default gateway matches the IP
address of your Internet router and that the IP addresses for the DHCP and
DNS servers are correct.
Verifying
Your Network
Installation
The ipconfig command displays information about the computer’s TCP/
IP configuration. If you type ipconfig by itself, the computer’s IP address,
subnet mask, and default gateway are displayed. If you type ipconfig /all,
you see more detailed information. Here’s typical output from the ipconfig
/all command:
Book II
Chapter 7
154
Can the Computers Ping Each Other?
Can the Computers Ping Each Other?
A basic test that you can perform to ensure that your network is functioning is to use the ping command from a command prompt to make sure that
the computers on the network can contact each other. The ping command
simply sends a packet to another computer and requests that the second
computer send a packet back in reply. If the reply packet is received, ping
displays a message indicating how long it took to hear from the other computer. If the reply packet isn’t received, ping displays an error message indicating that the computer couldn’t be reached.
You should try several ping tests. First, you can make sure that TCP/IP is
up and running by having the computer try to ping itself. Open a command
prompt and type ping 127.0.0.1. (127.0.0.1 is the standard loop-back address
that a computer can use to refer to itself.) If you prefer, you can type ping
localhost instead.
Next, have the computer ping itself by using the IP address displayed by
the \ ipconfig command. For example, if Ipconfig says the computer’s IP
address is 192.168.0.100, type ping 192.168.0.100 at the command prompt.
Now try to ping your servers. You’ll have to run ipconfig at each of the
servers to determine their IP addresses. Or, you can just ping the computer’s name.
A final test is to make sure that you can ping the workstation from other
computers on the network. You don’t have to try to ping every computer
from every other computer on the network unless you’ve determined that
you have a connectivity problem that you need to pinpoint. However, you
should try to ping each workstation from each of the servers, just to make
sure the servers can see the workstations. Make a list of the IP addresses of
the workstations as you test them and then take that list to the servers and
ping each IP address on the list.
Can You Log On?
After you’ve established that the basic network connections are working, the
next step is to verify that network logon works. This is as simple as attempting to log on from each computer by using the correct user account for the
computer. If you can’t log on, several things may be causing the problem.
Here are the most common:
✦ You may not have the right user account information. Double-check the
username, password, and domain.
✦ Make sure that the domain name is correct.
Do Network Printers Work?
155
✦ Passwords are case-sensitive. Make sure that you have typed the password correctly and that the Caps Lock key isn’t on.
✦ You may not have a computer account for the computer. Double-check
the computer name and make sure that you have a valid computer
account on the server.
✦ Double-check the user account policies to make sure that there isn’t
something that would prevent the user from logging on, such as a timeof-day restriction.
Are Network Drives Mapped Correctly?
C:>net use
New connections will be remembered.
Status Local Remote
Network
--------------------------------------------------------------OK
M:
\\Doug\Prod
Microsoft Windows Network
OK
X:
\\Doug\admin
Microsoft Windows Network
OK
Z:
\\Doug\Marketing Microsoft Windows Network
The command completed successfully.
Here, you can see that three drives are mapped, and you can tell the server
and share name for each mapped drive.
Next, try to display a directory list of each drive to make sure that you can
actually reach it. For example, type dir m:. If everything is working, you see a
directory of the shared folder you’ve mapped to drive M:.
Do Network Printers Work?
The final test I describe in this chapter is making sure that your network
printers work. The easiest way to do this is to print a short document to the
network printer and make sure that the document prints. I suggest that you
open Notepad (choose Start➪Accessories➪Notepad), type a few words (like
“Yo, Adrianne!”), and then choose File➪Print to bring up the Print dialog
box. Select the network printer and click OK.
If the network printer doesn’t appear in the list of available printers, go to
the Printers and Faxes window and recheck the network printer. You may
have incorrectly configured the printer. If the configuration looks okay, go to
the printer itself and make sure that it’s turned on and ready to print.
Verifying
Your Network
Installation
After you know the user can log on, you should make sure that mapped
network drives are available. To do so, type net use at a command prompt.
You’ll see a list of all the network mappings. For example:
Book II
Chapter 7
156
Book II: Building a Network
Chapter 8: Going Virtual
In This Chapter
✓ Examining the basics of virtualization
✓ Weighing the benefits of virtualization
✓ Installing VMWare Player
✓ Creating and using virtual machines
V
irtualization is one of the hottest trends in networking today.
According to some industry pundits, virtualization is the best thing to
happen to computers since the invention of the transistor. If you haven’t
already begun to virtualize your network, you’re standing on the platform
watching as the train is pulling out.
This chapter is a brief introduction to virtualization, with an emphasis on
using it to leverage your network server hardware to provide more servers
using less hardware. In addition to the general concepts of virtualization,
you find out how to experiment with virtualization using VMWare’s free virtualization product, called VMWare Player.
Mastering a virtualization environment calls for a book of its own — I
recommend Virtualization For Dummies by Bernard Golden or VMWare
Infrastructure 3 For Dummies by William Lowe (no relation, honest).
Understanding Virtualization
The basic idea behind virtualization is to use software to simulate the existence of hardware. This powerful idea enables you to run more than one
independent computer system on a single physical computer system. For
example, suppose your organization requires a total of 12 servers to meet
its needs. You could run each of these 12 servers on a separate computer,
in which case you would have 12 computers in your server room. Or, you
could use virtualization to run these 12 servers on just two computers. In
effect, each of those computers would simulate six separate computer systems, each running one of your servers.
158
Understanding Virtualization
The Roots of Virtualization
Kids these days think they invented everything,
including virtualization.
Little do they know.
Virtualization was developed for PC-based
computers in the early 1990s, around the
time Captain Picard was flying the Enterprise
around in Star Trek: The Next Generation.
But the idea is much older than that.
The first virtualized server computers predate
Captain Picard by about 20 years. In 1972, IBM
released an operating system called simply VM
which had nearly all of the basic features found
in today’s virtualization products.
VM allowed the administrators of IBM’s
System/370 mainframe computers to create
multiple independent virtual machines, each
of which was called (you guessed it) a virtual
machine or VM. This terminology is still in use
today.
Each VM could run one of the various guest
operating systems that were compatible with
the System/370 and appeared to this guest
operating system to be a complete, independent System/370 computer with its own processor cores, virtual memory, disk partitions,
and input/output devices.
The core of the VM system itself was called
the hypervisor, another term that persists to
this day.
The VM product IBM released in 1972 was
actually based on an experimental product
they released on a limited basis in 1967.
So whenever someone tells you about this
new technology called virtualization, you can
tell them that it was invented when Star Trek
was on the air. When they ask, “you mean the
one with Picard?” you can say, “No, the one
with Kirk.”
Each of the simulated computers is called a virtual machine or VM. For all
intents and purposes, each virtual machine appears to be a complete, selfcontained computer system with its own processor (or, more likely, processors), memory, disk drives, CD-ROM/DVD drives, keyboard, mouse, monitor,
network interfaces, USB ports, and so on.
Like a real computer, each virtual machine requires an operating system to
do productive work. In a typical network server environment, each virtual
machine runs its own copy of Windows Server 2008 (or an earlier version).
The operating system has no idea that it’s running on a virtual machine
rather than on a real machine.
Here are a few terms you need to be familiar with if you expect to discuss
virtualization intelligently:
✦ Host: The actual physical computer on which one or more virtual
machines run.
Looking at the Benefits of Virtualization
159
✦ Bare Metal: Another term for the host computer that runs one or more
virtual machines.
✦ Guest: Another term for a virtual machine running on a host.
✦ Guest Operating System: An operating system that runs within a virtual
machine. By itself, a guest is just a machine; it requires an operating
system to run. The guest operating system is what brings the guest to life.
As far as licensing is concerned, Microsoft treats each virtual machine
as a separate computer. Thus, if you run six guests on a single host and
each guest runs Windows Server 2008, you need six licenses of Windows
Server 2008.
✦ Hypervisor: The virtualization operating system that creates and runs
virtual machines.
For production use, you should always use a Type 1 hypervisor because
they’re much more efficient than Type 2 hypervisors. However, Type 1
hypervisors are considerably more expensive than Type 2 hypervisors.
As a result, many people use inexpensive or free Type 2 hypervisors to
experiment with virtualization before making a commitment to purchase
an expensive Type 1 hypervisor.
Looking at the Benefits of Virtualization
You might suspect that virtualization is inefficient because a real computer
is inherently faster than a simulated computer. Although it’s true that real
computers are faster than simulated computers, virtualization technology
has become so advanced that the performance penalty for running on a virtualized machine rather than a real machine is only a few percent.
The small amount of overhead imposed by virtualization is usually more
than made up for by the simple fact that even the most heavily utilized
servers spend most of their time twiddling their digital thumbs, waiting for
something to do. In fact, many servers spend nearly all of their time doing
nothing. As computers get faster and faster, they spend even more of their
time with nothing to do.
Virtualization is a great way to put all of this unused processing power to
good use.
Besides this basic efficiency benefit, there are several other compelling benefits to virtualization:
Going Virtual
There are two basic types of hypervisors: Type 1 and Type 2. A Type 1
hypervisor is a hypervisor that itself runs directly on the bare metal. A
Type 2 hypervisor is a hypervisor that runs within an operating system,
which in turn runs on the bare metal.
Book II
Chapter 8
160
Looking at the Benefits of Virtualization
✦ Hardware cost: You can typically save a lot of money by reducing
hardware costs when you use virtualization. For example, suppose you
replace ten servers that cost $4,000 each with one host server. Granted,
you’ll probably spend more than $4,000 on that server, because it needs
to be maxed out with memory, processor cores, network interfaces, and
so on. So you’ll probably end up spending $15,000 or $20,000 for the
host server. And you’ll end up spending something like $5,000 for the
hypervisor software. But that’s still a lot less than the $40,000 you would
have spent on ten separate computers at $4,000 each.
✦ Energy costs: Many organizations have found that going virtual has
reduced their overall electricity consumption for server computers by
80 percent. This savings is a direct result of using less computer hardware to do more work. For example, one host computer running ten virtual servers uses approximately one tenth of the energy used if each of
the ten servers were run on separate hardware.
✦ Recoverability: One of the biggest benefits of virtualization is not the
cost savings, but the ability to quickly recover from hardware failures.
For example, suppose your organization has ten servers each running on
separate hardware. If any one of those servers goes down due to a hardware failure — say a bad motherboard — that server will remain down
until you can fix the computer. On the other hand, if those ten servers
are running as virtual machines on two different hosts and one of the
hosts fails, the virtual machines that were running on the failed host can
be brought up on the other host in a matter of minutes.
Granted, the servers will run less efficiently on a single host than they
would have on two hosts, but the point is that they’ll all be running after
only a short downtime.
In fact, with the most advanced hypervisors available, the transfer from
a failing host to another host can be done automatically and instantaneously, so downtime is all but eliminated.
✦ Disaster recovery: Besides the benefit of recoverability when hardware
failures occur, an even bigger benefit of virtualization comes into play in
a true disaster recovery situation. For example, suppose your organization’s sever infrastructure consists of 20 separate servers. In the case of
a devastating disaster, such as a fire in the server room that destroys all
hardware, how long will it take you to get all 20 of those servers back up
and running on new hardware? Quite possibly the recovery time will be
measured in weeks.
In contrast, virtual machines are actually nothing more than files that
can be backed up onto tape. As a result, in a disaster-recovery situation,
all you have to do is rebuild a single host computer and reinstall the
hypervisor software. Then you can restore the virtual machine backups
from tape, restart the virtual machines, and be back up and running in a
matter of days instead of weeks.
Getting Started with Virtualization
161
Getting Started with Virtualization
Virtualization is a complex subject, and mastering the ins and outs of working with a full-fledged virtualization system like VMWare Infrastructure is a
topic that’s beyond the scope of this book. However, you can dip your toes
into the shallow end of the virtualization pond by downloading and experimenting with VMWare’s free virtualization product, called VMWare Player.
You can download it from www.vmware.com.
Figure 8-1 shows VMWare Player’s main screen. From this screen, you can
create a new virtual machine or run one of the virtual machines you have
already created. As you can see, I’ve created two virtual machines so far:
one running Windows Server 2008 R2, the other running Linux.
Book II
Chapter 8
Going Virtual
Figure 8-1:
VMWare
Player
lets you
experiment
with
virtualization.
You can run an existing virtual machine by selecting the VM and clicking
Play Virtual Machine. This launches the virtual machine, which opens in a
new window, as shown in Figure 8-2. When you launch a virtual machine, the
VM behaves exactly as a real computer would when you power it up: First it
initializes its virtual hardware devices and then it loads the guest operating
system that has been installed in the VM. In the figure, Windows Server 2008
has booted up and is waiting for you to press Ctrl+Alt+Del to log on.
The prompt to press Ctrl+Alt+Del shown in Figure 8-2 illustrates one of the
peculiar details of running a virtual machine within a host operating system
(in this case, running Windows Server 2008 R2 within Windows 7 Ultimate):
When you press Ctrl+Alt+Del, which operating system — the host or the
guest — responds? The answer is that the host operating system responds
to the Ctrl+Alt+Del, so the guest operating system never sees it.
162
Creating a Virtual Machine
Figure 8-2:
A virtual
machine
running
Windows
Server 2008
R2.
To get around this limitation, VMWare uses the special keyboard shortcut Ctrl+Alt+End to send a Ctrl+Alt+Del to the guest operating system.
Alternatively, you can use the VM pull-down menu that appears in the menu
bar above the virtual machine menu. This menu lists several actions that can
be applied to the virtual machine, including Send Ctrl+Alt+Del.
Another detail you should know about when working with a VM is that when
you click in the virtual machine’s window, the VM captures your mouse
and keyboard so that your input will be directed to the virtual machine
rather than the host computer. If you want to break the bonds of the virtual
machine and return to the host computer, press Ctrl and Alt.
Creating a Virtual Machine
Creating a new virtual machine in VMWare Player is relatively easy. In fact,
the most challenging part is that you’ll need the installation disk for the
operating system you want to install on the VM. Remember that a virtual
machine is useless without a guest operating system, so you need to have
the installation disk available before you create the virtual machine.
Creating a Virtual Machine
163
If you just want to experiment with virtualization and don’t have extra
licenses of a Windows server operating system, you can always download
an evaluation copy of Windows Server 2008 R2 from www.microsoft.com/
windowsserver2008. The evaluation period is six months, so you’ll have
plenty of time to experiment.
The downloadable trial version of Windows Server 2008 R2 comes in the
form of an .iso file, which is an image of a DVD file that you can mount
within your virtual machine as if it were a real disk.
Once you have your .iso file or installation disk ready to go, you can create a
new virtual machine by following these steps:
1. Click Create a New Virtual Machine from the VMWare Player home
Book II
Chapter 8
screen.
Figure 8-3:
The first
page of the
New Virtual
Machine
Wizard.
2. Choose the installation option you want to use.
There are three choices:
• Select Installer Disc and then choose the drive you will install from if
you want to install from an actual CD or DVD.
• Select Install Disc Image File (iso) and then click the Browse button
and browse to the iso file for the operating system installation disc if
you want to install from an iso file.
• Select I Will Install the Operating System Later if you want to create
the virtual machine but install the operating system later.
Going Virtual
This brings up the New Virtual Machine Wizard, as shown in Figure 8-3.
164
Creating a Virtual Machine
Note that the remaining steps in this procedure assume that you
selected a Windows Server 2008 R2 iso file as the installation option.
3. Click Next.
The screen shown in Figure 8-4 appears. You can enter the product key
now or skip this step until later.
Figure 8-4:
The New
Virtual
Machine
Wizard asks
for your
product key.
4. If you have the Windows product key, enter it and click Next.
Otherwise just click Next.
You can always enter the product key later if you don’t have it handy
now. Either way, the screen shown in Figure 8-5 appears next.
Figure 8-5:
Creating a
name and
specifying
the VM disk
location.
Creating a Virtual Machine
165
5. Enter a name for the virtual machine.
6. Enter the location for the virtual machine’s disk file.
If you want, you can click the Browse button and browse to the folder
where you want to create the file.
7. Click Next.
The Wizard asks for the size of the disk to create for the virtual machine,
as shown in Figure 8-6.
Book II
Chapter 8
Going Virtual
Figure 8-6:
Specifying
the VM disk
size.
8. Set the size of the virtual machine’s hard drive.
The default setting is 40GB, but you can change this depending on your
needs. Note that you must have sufficient space available on the host
computer’s disk drive.
9. Click Next.
The Wizard displays a final confirmation page, as shown in Figure 8-7.
10. Click Finish.
The Wizard creates the virtual machine and then starts it. Because the
machine doesn’t have an operating system installed, it boots from the
CD/DVD installation image you specified back in Step 2. In this case,
I booted with the Windows Server 2008 R2 evaluation software disk
image, so the new virtual machine displays the Install Windows screen,
as shown in Figure 8-8.
166
Creating a Virtual Machine
Figure 8-7:
VMWare
is ready
to create
the virtual
machine.
Figure 8-8:
Installing
Windows
Server
2008 R2 in
a virtual
machine.
11. Follow the steps to install the operating system.
Installing an operating system in a virtual machine is exactly the same as
installing it on a physical computer, except that the installation screens
appear within a virtual machine window.
Creating a Virtual Machine
167
12. You’re done!
When the operating system is installed, you can then proceed to use the
virtual machine.
You can adjust the hardware configuration of a virtual machine by choosing
VM➪Settings while the virtual machine is running. This brings up the Virtual
Machine Settings dialog box, as shown in Figure 8-9. From this dialog box,
you can adjust the virtual machine’s hardware configuration including the
amount of RAM available to the VM and the number of processor cores. You
can also adjust the disk drive size, add CD, DVD, or floppy drives, and configure network adapters, USB connections, and sound and display settings.
Book II
Chapter 8
Going Virtual
Figure 8-9:
Configuring
virtual
machine
settings.
168
Book II: Building a Network
Book III
Network Administration
and Security
Contents at a Glance
Chapter 1: Help Wanted: Job Description for
a Network Administrator . . . . . . . . . . . . . . . . . . . . . . . . . . . . . . . . . . . . .171
Chapter 2: Security 101 . . . . . . . . . . . . . . . . . . . . . . . . . . . . . . . . . . . . . . .185
Chapter 3: Managing User Accounts . . . . . . . . . . . . . . . . . . . . . . . . . . .195
Chapter 4: Firewalls and Virus Protection. . . . . . . . . . . . . . . . . . . . . . .203
Chapter 5: Extending Your Network with VPN Access. . . . . . . . . . . .215
Chapter 6: Managing Network Software. . . . . . . . . . . . . . . . . . . . . . . .221
Chapter 7: Solving Network Problems . . . . . . . . . . . . . . . . . . . . . . . . . .233
Chapter 8: Network Performance Anxiety. . . . . . . . . . . . . . . . . . . . . . .249
Chapter 9: Backing Up Your Data . . . . . . . . . . . . . . . . . . . . . . . . . . . . . .259
Chapter 10: Disaster Recovery and Business Continuity Planning 271s
Chapter 1: Help Wanted: Job
Description for a Network
Administrator
In This Chapter
✓ Deciphering the many jobs of the network administrator
✓ Dusting, vacuuming, and mopping
✓ Managing the network users
✓ Choosing the right tools
✓ Getting certified
H
elp wanted. Network administrator to help small business get control of
a network run amok. Must have sound organizational and management
skills. Only moderate computer experience required. Part time only.
Does this ad sound like one that your company should run? Every network
needs a network administrator, whether the network has 2 computers or
200. Of course, managing a 200-computer network is a full-time job, whereas
managing a 2-computer network isn’t. At least, it shouldn’t be.
This chapter introduces you to the boring job of network administration.
Oops . . . you’re probably reading this chapter because you’ve been elected
to be the network manager, so I’d better rephrase that: This chapter introduces you to the wonderful, exciting world of network management! Oh,
boy! This is going to be fun!
Knowing What Network Administrators Do
Simply put, network administrators administer networks, which means that
they take care of the tasks of installing, configuring, expanding, protecting,
upgrading, tuning, and repairing the network. Network administrators take
care of the network hardware, such as cables, hubs, switches, routers, servers, and clients, as well as network software, such as network operating
systems, e-mail servers, backup software, database servers, and application
software. Most importantly, network administrators take care of network
users by answering their questions, listening to their troubles, and solving
their problems.
172
Knowing What Network Administrators Do
On a big network, these responsibilities constitute a full-time job. Large networks tend to be volatile: Users come and go, equipment fails, cables break,
and life in general seems to be one crisis after another.
Smaller networks are much more stable. After you get your network up and
running, you probably won’t have to spend much time managing its hardware and software. An occasional problem may pop up, but with only a few
computers on the network, problems should be few and far between.
Regardless of the network’s size, all network administrators must attend to
several common chores:
✦ Equipment upgrades: The network administrator should be involved
in every decision to purchase new computers, printers, or other equipment. In particular, the network administrator should be prepared to
lobby for the most network-friendly equipment possible, such as new
computers that already have network cards installed and configured and
printers that are network ready.
✦ Configuration: The network administrator must put on the pocket
protector whenever a new computer is added to the network. The network administrator’s job includes considering what changes to make
to the cabling configuration, what computer name to assign to the new
computer, how to integrate the new user into the security system, what
rights to grant the user, and so on.
✦ Software upgrades: Every once in a while, your trusty operating system
vendor (in other words, Microsoft) releases a new version of your network operating system. The network administrator must read about the
new version and decide whether its new features are beneficial enough to
warrant an upgrade. In most cases, the hardest part of upgrading to a new
version of your network operating system is determining the migration
path — that is, how to upgrade your entire network to the new version
while disrupting the network or its users as little as possible. Upgrading to
a new network operating system version is a major chore, so you need to
carefully consider the advantages that the new version can bring.
✦ Patches: Between upgrades, Microsoft releases patches and service
packs that fix minor problems with its server operating systems. For
more information, see the section “Patching Up Your Operating System
and Software” later in this chapter.
✦ Performance maintenance: One of the easiest traps that you can get
sucked into is the quest for network speed. The network is never fast
enough, and users always blame the hapless network manager. So the
administrator spends hours and hours tuning and tweaking the network
to squeeze out that last 2 percent of performance. You don’t want to get
caught in this trap, but in case you do, Chapter 8 of this book can help. It
clues you in to the basics of tuning your network for best performance.
Choosing the Part-Time Administrator
173
✦ Ho-hum chores: Network administrators perform routine chores, such
as backing up the servers, archiving old data, freeing up server hard
drive space, and so on. Much of network administration is making sure
that things keep working and finding and correcting problems before
any users notice that something is wrong. In this sense, network administration can be a thankless job.
✦ Software inventory: Network administrators are also responsible for
gathering, organizing, and tracking the entire network’s software inventory. You never know when something is going to go haywire on Joe in
Marketing’s ancient Windows 2000 computer and you’re going to have to
reinstall that old copy of WordPerfect. Do you have any idea where the
installation discs are?
Choosing the Part-Time Administrator
The larger the network, the more technical support it needs. Most small
networks — with just a dozen or two computers — can get by with a parttime network administrator. Ideally, this person should be a closet computer
geek: someone who has a secret interest in computers but doesn’t like to
admit it. Someone who will take books home with him or her and read them
over the weekend. Someone who enjoys solving computer problems just for
the sake of solving them.
Here are some additional ideas on picking a part-time network administrator:
✦ The network administrator needs to be an organized person. Conduct a
surprise office inspection and place the person with the neatest desk in
charge of the network. (Don’t warn them in advance, or everyone may
mess up their desks intentionally the night before the inspection.)
✦ Allow enough time for network administration. For a small network (say,
no more than 20 or so computers), an hour or two each week is enough.
More time is needed upfront as the network administrator settles into
the job and discovers the ins and outs of the network. After an initial
settling-in period, though, network administration for a small office network doesn’t take more than an hour or two per week. (Of course, larger
networks take more time to manage.)
✦ Make sure that everyone knows who the network administrator is and
that the network administrator has the authority to make decisions about
the network, such as what access rights each user has, what files can and
can’t be stored on the server, how often backups are done, and so on.
Help Wanted: Job
Description for a
Network Administrator
The job of managing a network requires some computer skills, but it isn’t
entirely a technical job. Much of the work that the network administrator
does is routine housework. Basically, the network administrator dusts, vacuums, and mops the network periodically to keep it from becoming a mess.
Book III
Chapter 1
174
Establishing Routine Chores
✦ Pick someone who is assertive and willing to irritate people. A good network administrator should make sure that backups are working before a
hard drive fails and make sure that antivirus protection is in place before
a virus wipes out the entire network. This policing will irritate people,
but it’s for their own good.
✦ In most cases, the person who installs the network is also the network
administrator. This is appropriate because no one understands the network better than the person who designs and installs it.
✦ The network administrator needs an understudy — someone who knows
almost as much about the network, is eager to make a mark, and smiles
when the worst network jobs are delegated.
✦ The network administrator has some sort of official title, such as
Network Boss, Network Czar, Vice President in Charge of Network
Operations, or Dr. Network. A badge, a personalized pocket protector,
or a set of Spock ears helps, too.
Establishing Routine Chores
Much of the network administrator’s job is routine stuff — the equivalent
of vacuuming, dusting, and mopping. Or if you prefer, changing the oil and
rotating the tires every 3,000 miles. Yes, it’s boring, but it has to be done.
✦ Backup: The network administrator needs to make sure that the network is properly backed up. If something goes wrong and the network
isn’t backed up, guess who gets the blame? On the other hand, if
disaster strikes, yet you’re able to recover everything from yesterday’s
backup with only a small amount of work lost, guess who gets the pat
on the back, the fat bonus, and the vacation in the Bahamas? Chapter 9
of this book describes the options for network backups. You’d better
read it soon.
✦ Protection: Another major task for network administrators is sheltering
your network from the evils of the outside world. These evils come in
many forms, including hackers trying to break into your network and
virus programs arriving through e-mail. Chapter 4 of this book describes
this task in more detail.
✦ Cleanup: Users think that the network server is like the attic: They want
to throw files up there and leave them forever. No matter how much
storage your network has, your users will fill it up sooner than you think.
So the network manager gets the fun job of cleaning up the attic once
in a while. Oh, joy. The best advice I can offer is to constantly complain
about how messy it is up there and warn your users that spring cleaning
is coming up.
Patching Up Your Operating System and Software
175
Managing Network Users
Managing network technology is the easiest part of network management.
Computer technology can be confusing at first, but computers aren’t nearly
as confusing as people. The real challenge of managing a network is managing the network’s users.
The difference between managing technology and managing users is obvious: You can figure out computers, but you can never really figure out
people. The people who use the network are much less predictable than the
network itself. Here are some tips for dealing with users:
✦ Training is a key part of the network manager’s job. Make sure that
everyone who uses the network understands it and knows how to use
it. If the network users don’t understand the network, they may unintentionally do all kinds of weird things to it.
✦ Never treat your network users like they’re idiots. If they don’t understand the network, it isn’t their fault. Explain it to them. Offer a class.
Buy them each a copy of Networking All-in-One For Dummies and tell
them to read it during their lunch hour. Hold their hands. But don’t treat
them like idiots.
✦ Be as responsive as possible when a network user complains of a network problem. If you don’t fix the problem soon, the user may try to fix
it. You probably don’t want that.
✦ The better you understand the psychology of network users, the more
prepared you’ll be for the strangeness they often serve up. Toward that
end, I recommend that you read the Diagnostic and Statistical Manual of
Mental Disorders (also known as DSM-IV) cover to cover.
Patching Up Your Operating System and Software
One of the annoyances that every network manager faces is applying software patches to keep your operating system and other software up to date.
A software patch is a minor update that fixes small glitches that crop up
from time to time, such as minor security or performance issues. These
glitches aren’t significant enough to merit a new version of the software,
but they’re important enough to require fixing. Most of the patches correct
security flaws that computer hackers have uncovered in their relentless
attempts to prove that they’re smarter than the security programmers at
Microsoft.
Book III
Chapter 1
Help Wanted: Job
Description for a
Network Administrator
✦ Make up a network cheat sheet that contains everything that the users
need to know about using the network on one page. Make sure that
everyone gets a copy.
176
Discovering Software Tools for Network Administrators
Periodically, all the recently released patches are combined into a service
pack. Although the most diligent network administrators apply all patches as
they’re released, many administrators just wait for the service packs.
For all versions of Windows, you can use Windows Update to apply patches
to keep your operating system and other Microsoft software up to date. You
can find Windows Update in the Start menu. Or, you can fire up Internet
Explorer and browse to http://update.microsoft.com. Windows
Update automatically scans your computer’s software and creates a list of
software patches and other components that you can download and install.
You can also configure Windows Update to automatically notify you of
updates so that you don’t have to remember to check for new patches.
For larger networks, you can set up a server that runs Microsoft’s Software
Update Services (SUS) to automate software updates. SUS essentially lets
you set up your own Windows Update site on your own network. Then, you
have complete control over how software updates are delivered to the computers on your network. For more information, see www.microsoft.com/
windowsserversystem/updateservices.
Discovering Software Tools for Network Administrators
Network administrators need certain tools to get their jobs done. Administrators of big, complicated, and expensive networks need big, complicated,
and expensive tools. Administrators of small networks need small tools.
Some of the tools that the administrator needs are hardware tools, such as
screwdrivers, cable crimpers, and hammers. The tools that I’m talking about
here, however, are software tools. Here’s a sampling of the tools you’ll need:
✦ A diagramming tool: A diagramming tool lets you draw pictures of your
network. Microsoft sells a program called Visio that’s specially designed
for the types of diagrams you’ll want to make as a network administrator.
✦ A network discovery program: For larger networks, you may want
to invest in a network discovery program such as NetworkView (www.
networkview.com) that can automatically document your network’s
structure for you. These programs scan the network carefully, looking
for computers, printers, routers, and other devices. They then create a
database of the network components, draw diagrams for you, and chug
out helpful reports.
✦ The network’s built-in tools: Many of the software tools that you need
to manage a network come with the network itself. As the network
administrator, you should read through the manuals that come with
your network software to see what management tools are available. For
example, Windows includes a net diag command that you can use to
make sure that all the computers on a network can communicate with
Discovering Software Tools for Network Administrators
177
each other. (You can run net diag from an MS-DOS prompt.) For TCP/
IP networks, you can use the TCP/IP diagnostic commands summarized
in Table 1-1. For more information about these commands, check out
Book IV, Chapter 6.
Table 1-1
TCP/IP Diagnostic Commands
Command
What It Does
arp
Displays address resolution information used by the Address
Resolution Protocol (ARP).
hostname
Displays your computer’s host name.
ipconfig
Displays current TCP/IP settings.
nbtstat
Displays the status of NetBIOS over TCP/IP connections.
netstat
Displays statistics for TCP/IP.
nslookup
Displays DNS information.
ping
Verifies that a specified computer can be reached.
route
Displays the PC’s routing tables.
tracert
Displays the route from your computer to a specified host.
Book III
Chapter 1
✦ Hotfix Checker: Another handy tool available from Microsoft is the
Hotfix Checker, which scans your computers to see what patches need
to be applied. You can download the Hotfix Checker free of charge from
Microsoft’s Web site. Just go to www.microsoft.com and search for
hfnetchk.exe.
✦ Microsoft Baseline Security Analyzer: If you prefer GUI-based tools,
check out Microsoft Baseline Security Analyzer. You can download it
from Microsoft’s Web site free of charge. To find it, go to www.micro
soft.com and search for Microsoft Baseline Security Analyzer.
✦ A utility program: I suggest that you get one of those 100-in-1 utility
programs, such as Symantec’s Norton Utilities. Norton Utilities includes
invaluable utilities for repairing damaged hard drives, rearranging the
directory structure of your hard drive, gathering information about your
computer and its equipment, and so on.
Never use a hard drive repair program that wasn’t designed to work
with the operating system or version that your computer uses or the file
system you’ve installed. Any time that you upgrade to a newer version of
your operating system, you should also upgrade your hard drive repair
programs to a version that supports the new operating system version.
Help Wanted: Job
Description for a
Network Administrator
✦ System Information: The System Information program that comes with
Windows is a useful utility for network managers.
178
Building a Library
✦ A protocol analyzer: A protocol analyzer is a program that’s designed to
monitor and log the individual packets that travel along your network.
(Protocol analyzers are also called packet sniffers.) You can configure
the protocol analyzer to filter specific types of packets, watch for specific types of problems, and provide statistical analysis of the captured
packets. Most network administrators agree that Sniffer, by Network
General (www.networkgeneral.com), is the best protocol analyzer
available. However, it’s also one of the most expensive. If you prefer a
free alternative, check out Ethereal, which you can download free from
www.ethereal.com.
✦ Network Monitor: All current versions of Windows include a program
called Network Monitor that provides basic protocol analysis and can
often help solve pesky network problems.
Building a Library
One of Scotty’s best lines in the original Star Trek series was when he
refused to take shore leave so he could get caught up on his technical journals. “Don’t you ever relax?” asked Kirk. “I am relaxing!” Scotty replied.
To be a good network administrator, you need to read computer books. Lots
of them. And you need to enjoy doing it. If you’re the type who takes computer
books with you to the beach, you’ll make a great network administrator.
You need books on a variety of topics. I’m not going to recommend specific
titles, but I do recommend that you get a good, comprehensive book on each
of the following topics:
✦ Network security and hacking
✦ Wireless networking
✦ Network cabling and hardware
✦ Ethernet
✦ Windows Server 2003 or 2008
✦ Windows XP or Vista
✦ Linux
✦ TCP/IP
✦ DNS and BIND
✦ Sendmail
✦ Exchange Server
Getting Certified
179
In addition to books, you may also want to subscribe to some magazines to
keep up with what’s happening in the networking industry. Here are a few
you should probably consider, along with their Web addresses:
✦ InformationWeek: www.informationweek.com
✦ InfoWorld: www.infoworld.com
✦ Network Computing: www.networkcomputing.com
✦ Network World: www.networkworld.com
✦ 2600 (a great magazine on computer hacking and security):
www.2600.com
The Internet is one of the best sources of technical information for network
administrators. You’ll want to stock your browser’s Favorites menu with
plenty of Web sites that contain useful networking information. In addition, you may want to subscribe to one of the many online newsletters that
deliver fresh information on a regular basis via e-mail.
Getting Certified
Remember the scene near the end of The Wizard of Oz when the Wizard
grants the Scarecrow a diploma, the Cowardly Lion a medal, and the Tin Man
a testimonial?
The Wizard: “And as for you, my network-burdened friend, any geek with
thick glasses can administer a network. Back where I come from, there
are people who do nothing but configure Cisco routers all day long.
And they don’t have any more brains than you do. But they do have one
thing you don’t have: certification. And so, by the authority vested in
me by the Universita Committeeatum E Pluribus Unum, I hereby confer
upon you the coveted certification of CND.”
You: “CND?”
The Wizard: “Yes, that’s, uh, Certified Network Dummy.”
You: “The Seven Layers of the OSI Reference Model are equal to the Sum
of the Layers on the Opposite Side. Oh, rapture! I feel like a network
administrator already!”
My point is that certification in and of itself doesn’t guarantee that you
really know how to administer a network. That ability comes from realworld experience — not exam crams.
Help Wanted: Job
Description for a
Network Administrator
Network certifications are kind of like that. I can picture the scene now:
Book III
Chapter 1
180
Getting Certified
Nevertheless, certification is becoming increasingly important in today’s
competitive job market. So you may want to pursue certification — not just
to improve your skills, but also to improve your resume. Certification is
an expensive proposition. Each test can cost several hundred dollars, and
depending on your technical skills, you may need to buy books to study or
enroll in training courses before you take the tests.
You can pursue two basic types of certification: vendor-specific certification and vendor-neutral certification. The major software vendors such as
Microsoft and Cisco provide certification programs for their own equipment
and software. CompTIA, a nonprofit industry trade association, provides the
best-known vendor-neutral certification.
The following sections describe some of the certifications offered by
CompTIA, Microsoft, Novell, and Cisco.
CompTIA
www.comptia.org
✦ A+ is a basic certification for an entry-level computer technician. To
attain A+ certification, you have to pass two exams: one on computer
hardware, the other on operating systems.
✦ Linux+ covers basic Linux skills such as installation, operations, and
troubleshooting. This certification is vendor neutral, so it doesn’t
depend on any particular version of Linux.
✦ Network+ is a popular vendor-neutral networking certification. It covers
four major topic areas: Media and Topologies, Protocols and Standards,
Network Implementation, and Network Support.
✦ Server+ covers network server hardware. It includes details such as
installing and upgrading server hardware, installing and configuring a
NOS, and so on.
✦ Security+ is for security specialists. The exam topics include general
security concepts, communication security, infrastructure security,
basics of cryptography, and operational/organizational security.
Microsoft
www.microsoft.com/learning/mcp
✦ MCTS, or Microsoft Certified Technology Specialist, is a certification in a
specific Microsoft technology or product.
✦ MCITP, or Microsoft Certified IT Professional, is a certification in deploying and maintaining IT infrastructure.
Gurus Need Gurus, Too
181
✦ MCSE, or Microsoft Certified Systems Engineer, is a prestigious certification for networking professionals who design and implement networks.
To gain this certification, you have to pass a total of seven exams.
Microsoft offers separate Windows 2000 Server and Windows Server
2003 certification tracks.
✦ MCSA, or Microsoft Certified System Administrator, is for networking
professionals who administer existing networks.
Cisco
www.cisco.com/certification
✦ CCNA, or Cisco Certified Network Associate, is an entry-level apprentice
certification. A CCNA should be able to install, configure, and operate
Cisco equipment for small networks (under 100 nodes).
✦ CCNP, or Cisco Certified Network Professional, is a professional-level
certification for Cisco equipment. A CCNP should be able to install, configure, and troubleshoot Cisco networks of virtually any size.
✦ CCDA, or Cisco Certified Design Associate, is an entry-level certification
for network design.
✦ CCDP, or Cisco Certified Design Professional, is for network design professionals. Both the CCDA and CCNA certifications are prerequisites for
the CCDP.
✦ CCIE, or Cisco Certified Internetwork Expert, is the top dog of Cisco
certifications.
✦ And much more! There are many more Cisco certifications to choose
from, including certification for security, voice technology, wireless networking, and more.
Gurus Need Gurus, Too
No matter how much you know about computers, plenty of people know
more than you do. This rule seems to apply at every rung of the ladder of
computer experience. I’m sure that a top rung exists somewhere, occupied
by the world’s best computer guru. However, I’m not sitting on that rung,
and neither are you. (Not even Bill Gates is sitting on that rung. In fact, Bill
Gates got to where he is today by hiring people on higher rungs.)
Help Wanted: Job
Description for a
Network Administrator
✦ CCIP, or Cisco Certified Internetwork Professional, is a professional-level
certification that emphasizes advanced use of IP and related protocols
to create intranetworks.
Book III
Chapter 1
182
Helpful Bluffs and Excuses
As the local computer guru, one of your most valuable assets can be a
knowledgeable friend who’s a notch or two above you on the geek scale.
That way, when you run into a real stumper, you have a friend to call for
advice. Here are some tips for handling your own guru:
✦ In dealing with your own guru, don’t forget the Computer Geek’s Golden
Rule: “Do unto your guru as you would have your own users do unto
you.” Don’t pester your guru with simple stuff that you just haven’t
spent the time to think through. If you have thought it through and can’t
come up with a solution, however, give your guru a call. Most computer
experts welcome the opportunity to tackle an unusual computer problem. It’s a genetic defect.
✦ If you don’t already know someone who knows more about computers
than you do, consider joining your local PC users’ group. The group
may even have a subgroup that specializes in your networking software
or may be devoted entirely to local folks who use the same networking
software that you use. Odds are good that you’re sure to make a friend
or two at a users’ group meeting. Also, you can probably convince your
boss to pay any fees required to join the group.
✦ If you can’t find a real-life guru, try to find an online guru. Check out
the various computing newsgroups on the Internet. Subscribe to online
newsletters that are automatically delivered to you via e-mail.
Helpful Bluffs and Excuses
As network administrator, you just won’t be able to solve a problem sometimes, at least not immediately. You can do two things in this situation. The
first is to explain that the problem is particularly difficult and that you’ll
have a solution as soon as possible. The second solution is to look the user
in the eyes and, with a straight face, try one of these phony explanations:
✦ Blame it on the version of whatever software you’re using. “Oh, they
fixed that with version 39.”
✦ Blame it on cheap, imported memory chips.
✦ Blame it on Democrats. Or Republicans. Or hanging chads. Whatever.
✦ Blame it on oil company executives.
✦ Blame it on global warming.
✦ Hope that the problem wasn’t caused by stray static electricity. Those
types of problems are very difficult to track down. Tell your users that
not properly discharging themselves before using their computers can
cause all kinds of problems.
Helpful Bluffs and Excuses
183
✦ You need more memory.
✦ You need a bigger hard drive.
✦ You need a faster processor.
✦ Blame it on Jar-Jar Binks.
✦ You can’t do that in Windows Vista.
✦ You can only do that in Windows Vista.
✦ Could be a virus.
✦ Or sunspots.
✦ No beer and no TV make Homer something something something. . . .
Book III
Chapter 1
Help Wanted: Job
Description for a
Network Administrator
184
Book III: Network Administration and Security
Chapter 2: Security 101
In This Chapter
✓ Assessing the risk for security
✓ Determining your basic security philosophy
✓ Physically securing your network equipment
✓ Figuring out user account security
✓ Using other network security techniques
B
efore you had a network, computer security was easy. You simply
locked your door when you left work for the day. You could rest easy,
secure in the knowledge that the bad guys would have to break down the
door to get to your computer.
The network changes all that. Now, anyone with access to any computer on
the network can break into the network and steal your files. Not only do you
have to lock your door, but you also have to make sure that other people
lock their doors, too.
Fortunately, network operating systems have built-in provisions for network
security. This situation makes it difficult for someone to steal your files,
even if they do break down the door. All modern network operating systems
have security features that are more than adequate for all but the most
paranoid users.
When I say more than adequate, I mean it. Most networks have security
features that would make even Maxwell Smart happy. Using all these security features is kind of like Smart insisting that the Chief lower the “Cone of
Silence.” The Cone of Silence worked so well that Max and the Chief couldn’t
hear each other! Don’t make your system so secure that even the good guys
can’t get their work done.
If any of the computers on your network are connected to the Internet, you
have to contend with a whole new world of security issues. For more information about Internet security, see Chapter 4 of this minibook. Also, if your
network supports wireless devices, you have to contend with wireless security issues. For more information about security for wireless networks, see
Book V, Chapter 2.
186
Do You Need Security?
Do You Need Security?
Most small networks are in small businesses or departments where everyone knows and trusts everyone else. Folks don’t lock up their desks when
they take a coffee break, and although everyone knows where the petty cash
box is, money never disappears.
Network security isn’t necessary in an idyllic setting like this one, is it? You
bet it is. Here’s why any network should be set up with at least some minimal concern for security:
✦ Even in the friendliest office environment, some information is and
should be confidential. If this information is stored on the network, you
want to store it in a directory that’s available only to authorized users.
✦ Not all security breaches are malicious. A network user may be routinely scanning through his or her files and come across a filename that
isn’t familiar. The user may then call up the file, only to discover that it
contains confidential personnel information, juicy office gossip, or your
résumé. Curiosity, rather than malice, is often the source of security
breaches.
✦ Sure, everyone at the office is trustworthy now. However, what if someone becomes disgruntled, a screw pops loose, and he or she decides to
trash the network files before jumping out the window? What if someone
decides to print a few $1,000 checks before packing off to Tahiti?
✦ Sometimes the mere opportunity for fraud or theft can be too much for
some people to resist. Give people free access to the payroll files, and
they may decide to vote themselves a raise when no one is looking.
✦ If you think that your network doesn’t contain any data that would be
worth stealing, think again. For example, your personnel records probably contain more than enough information for an identity thief: names,
addresses, phone numbers, Social Security numbers, and so on. Also,
your customer files may contain your customers’ credit card numbers.
✦ Hackers who break into your network may not be interested in stealing
your data. Instead, they may be looking to plant a Trojan horse program
on your server, which enables them to use your server for their own
purposes. For example, someone may use your server to send thousands of unsolicited spam e-mail messages. The spam won’t be traced
back to the hackers; it will be traced back to you.
✦ Finally, remember that not everyone on the network knows enough
about how Windows and the network work to be trusted with full access
to your network’s data and systems. One careless mouse click can wipe
out an entire directory of network files. One of the best reasons for activating your network’s security features is to protect the network from
mistakes made by users who don’t know what they’re doing.
Physical Security: Locking Your Doors
187
Considering Two Approaches to Security
When you’re planning how to implement security on your network, you
should first consider which of two basic approaches to security you will take:
✦ An open-door type of security, in which you grant everyone access to
everything by default and then place restrictions just on those resources
to which you want to limit access.
✦ A closed-door type of security, in which you begin by denying access to
everything and then grant specific users access to the specific resources
that they need.
In most cases, the open-door policy is easier to implement. Typically, only a
small portion of the data on a network really needs security, such as confidential employee records or secrets such as the Coke recipe. The rest of the
information on a network can be safely made available to everyone who can
access the network.
If you choose the closed-door approach, you set up each user so that he or
she has access to nothing. Then, you grant each user access only to those
specific files or folders that he or she needs.
You can think of the open-door approach as an entitlement model, in which
the basic assumption is that users are entitled to network access. In contrast, the closed-door policy is a permissions model, in which the basic
assumption is that users aren’t entitled to anything but must get permission
for every network resource that they access.
Physical Security: Locking Your Doors
The first level of security in any computer network is physical security. I’m
amazed when I walk into the reception area of an accounting firm and see
an unattended computer sitting on the receptionist’s desk. As often as not,
the receptionist has logged on to the system and then walked away from the
desk, leaving the computer unattended.
Book III
Chapter 2
Security 101
The closed-door approach results in tighter security, but can lead to the
Cone of Silence Syndrome: Like Max and the Chief who can’t hear each other
talk while they’re under the Cone of Silence, your network users will constantly complain that they can’t access the information that they need. As a
result, you’ll find yourself frequently adjusting users’ access rights. Choose
the closed-door approach only if your network contains a lot of information
that is very sensitive, and only if you’re willing to invest time administrating
your network’s security policy.
188
Physical Security: Locking Your Doors
Physical security is important for workstations but vital for servers. Any
hacker worth his or her salt can quickly defeat all but the most paranoid
security measures if he or she can gain physical access to a server. To protect the server, follow these guidelines:
✦ Lock the computer room.
✦ Give the keys only to people you trust.
✦ Keep track of who has the keys.
✦ Mount the servers on cases or racks that have locks.
✦ Disable the floppy drive on the server. (A common hacking technique
is to boot the server from a floppy, thus bypassing the carefully crafted
security features of the network operating system.)
✦ Keep a trained guard dog in the computer room and feed it only enough
to keep it hungry and mad. (Just kidding.)
There’s a big difference between a locked door and a door with a lock. Locks
are worthless if you don’t use them.
Client computers should be physically secure as well. You should instruct
users to not leave their computers unattended while they’re logged on. In
high-traffic areas (such as the receptionist’s desk), users should secure
their computers with the keylock. Additionally, users should lock their office
doors when they leave.
Here are some other potential threats to physical security that you may not
have considered:
✦ The nightly cleaning crew probably has complete access to your facility. How do you know that the person who vacuums your office every
night doesn’t really work for your chief competitor or doesn’t consider
computer hacking to be a sideline hobby? You don’t, so you’d better
consider the cleaning crew a threat.
✦ What about your trash? Paper shredders aren’t just for Enron accountants. Your trash can contain all sorts of useful information: sales
reports, security logs, printed copies of the company’s security policy,
even handwritten passwords. For the best security, every piece of paper
that leaves your building via the trash bin should first go through a
shredder.
✦ Where do you store your backup tapes? Don’t just stack them up next
to the server. Not only does that make them easy to steal, it also defeats
one of the main purposes of backing up your data in the first place:
securing your server from physical threats, such as fires. If a fire burns
down your computer room and the backup tapes are sitting unprotected
Securing User Accounts
189
next to the server, your company may go out of business — and you’ll
certainly be out of a job. Store the backup tapes securely in a fireproof
safe and keep a copy off-site, too.
✦ I’ve seen some networks in which the servers are in a locked computer
room, but the hubs or switches are in an unsecured closet. Remember
that every unused port on a hub or a switch represents an open door
to your network. The hubs and switches should be secured just like the
servers.
Securing User Accounts
Next to physical security, the careful use of user accounts is the most important type of security for your network. Properly configured user accounts
can prevent unauthorized users from accessing the network, even if they
gain physical access to the network. The following sections describe some
of the steps that you can take to strengthen your network’s use of user
accounts.
Obfuscating your usernames
You can slow down a hacker by using names that are more obscure. Here
are some suggestions on how to do that:
✦ Add a random three-digit number to the end of the name. For example:
BarnyM320 or baMiller977.
✦ Throw a number or two into the middle of the name. For example:
Bar6nyM or ba9Miller2.
✦ Make sure that usernames are different from e-mail addresses. For example, if a user’s e-mail address is [email protected], do not use
baMiller as the user’s account name. Use a more obscure name.
Do not rely on obfuscation to keep people out of your network! Security by
obfuscation doesn’t work. A resourceful hacker can discover even the most
obscure names. The purpose of obfuscation is to slow intruders down — not
to stop them. If you slow an intruder down, you’re more likely to discover
that he or she is trying to crack your network before he or she successfully
gets in.
Book III
Chapter 2
Security 101
Huh? When it comes to security, obfuscation simply means picking obscure
usernames. For example, most network administrators assign usernames
based on some combination of the user’s first and last names, such as
BarnyM or baMiller. However, a hacker can easily guess such a user ID if he
or she knows the name of at least one employee. After the hacker knows a
username, he or she can focus on breaking the password.
190
Securing User Accounts
Using passwords wisely
One of the most important aspects of network security is the use of passwords. Usernames aren’t usually considered secret. Even if you use obscure
names, casual hackers will eventually figure them out.
Passwords, on the other hand, are top secret. Your network password is the
one thing that keeps an impostor from logging on to the network by using
your username and therefore receiving the same access rights that you ordinarily have. Guard your password with your life.
Here are some tips for creating good passwords:
✦ Don’t use obvious passwords, such as your last name, your kid’s name,
or your dog’s name.
✦ Don’t pick passwords based on your hobbies, either. A friend of mine
is into boating, and his password is the name of his boat. Anyone who
knows him can guess his password after a few tries. Five lashes for
naming your password after your boat.
✦ Store your password in your head — not on paper. Especially bad:
Writing down your password on a sticky note and sticking it on your
computer’s monitor. Ten lashes for that. (If you must write down your
password, write it on digestible paper that you can swallow after you’ve
memorized the password.)
✦ Most network operating systems enable you to set an expiration time
for passwords. For example, you can specify that passwords expire after
30 days. When a user’s password expires, the user must change it. Your
users may consider this process a hassle, but it helps to limit the risk
of someone swiping a password and then trying to break into your computer system later.
✦ You can also configure user accounts so that when they change passwords, they can’t specify a password that they’ve used recently. For
example, you can specify that the new password can’t be identical to
any of the user’s past three passwords.
✦ You can also configure security policies so that passwords must include
a mixture of uppercase letters, lowercase letters, numerals, and special
symbols. Thus, passwords like DIMWIT or DUFUS are out. Passwords like
87dIM@wit or duF39&US are in.
✦ One of the newest trends is the use of devices that read fingerprints as a
way to keep passwords. These devices store your passwords in a secret
encoded file, then supply them automatically to whatever programs or
Web sites require them — but only after the device has read your fingerprint. Fingerprint readers used to be exotic and expensive, but you can
now add a fingerprint reader to a computer for as little as $50.
Securing User Accounts
191
A Password Generator For Dummies
How do you come up with passwords that no one can guess but that you
can remember? Most security experts say that the best passwords don’t correspond to any words in the English language, but they consist of a random
sequence of letters, numbers, and special characters. Yet, how in the heck
are you supposed to memorize a password like Dks4%DJ2? Especially when
you have to change it three weeks later to something like 3pQ&X(d8.
Here’s a compromise solution that enables you to create passwords that
consist of two four-letter words back to back. Take your favorite book (if it’s
this one, you need to get a life) and turn to any page at random. Find the first
four- or five-letter word on the page. Suppose that word is When. Then repeat
the process to find another four- or five-letter word; say you pick the word
Most the second time. Now combine the words to make your password:
WhenMost. I think you agree that WhenMost is easier to remember than
3PQ&X(D8 and is probably just about as hard to guess. I probably wouldn’t
want the folks at the Los Alamos Nuclear Laboratory using this scheme, but
it’s good enough for most of us.
Here are some additional thoughts on concocting passwords from your
favorite book:
✦ If the words end up being the same, pick another word. And pick different words if the combination seems too commonplace, such as
WestWind or FootBall.
✦ To further confuse your friends and enemies, use medieval passwords
by picking words from Chaucer’s Canterbury Tales. Chaucer is a great
source for passwords because he lived before the days of word processors with spell-checkers. He wrote seyd instead of said, gret instead of
great, and litel instead of little. And he used lots of seven-letter and eightletter words suitable for passwords, such as glotenye (gluttony), benygne
(benign), and opynyoun (opinion). And he got As in English.
✦ If you use any of these password schemes and someone breaks into
your network, don’t blame me. You’re the one who’s too lazy to memorize D#Sc$h4@bb3xaz5.
✦ If you do decide to go with passwords such as KdI22UR3xdkL, you can
find random password generators on the Internet. Just go to a search
engine, such as Google (www.google.com), and search for password
generator. You can find Web pages that generate random passwords
Security 101
✦ For an interesting variation, insert the page numbers on which you
found both words either before or after the words. For example:
135Into376Cat or 87Tree288Wing. The resulting password will be a
little harder to remember, but you’ll have a password worthy of a Dan
Brown novel.
Book III
Chapter 2
192
Hardening Your Network
based on criteria that you specify, such as how long the password
should be, whether it should include letters, numbers, punctuation,
uppercase and lowercase letters, and so on.
Securing the Administrator account
It stands to reason that at least one network user must have the authority
to use the network without any of the restrictions imposed on other users.
This user is called the administrator. The administrator is responsible for setting up the network’s security system. To do that, the administrator must be
exempt from all security restrictions.
Many networks automatically create an administrator user account when
you install the network software. The username and password for this initial administrator are published in the network’s documentation and are
the same for all networks that use the same network operating system. One
of the first things that you must do after getting your network up and running is to change the password for this standard administrator account.
Otherwise, your elaborate security precautions will be a complete waste of
time. Anyone who knows the default administrator username and password
can access your system with full administrator rights and privileges, thus
bypassing the security restrictions that you so carefully set up.
Don’t forget the password for the administrator account! If a network user
forgets his or her password, you can log on as the supervisor and change
that user’s password. If you forget the administrator’s password, though,
you’re stuck.
Hardening Your Network
In addition to taking care of physical security and user account security, you
should also take steps to protect your network from intruders by configuring
the other security features of the network’s servers and routers. The following sections describe the basics of hardening your network.
Using a firewall
A firewall is a security-conscious router that sits between your network and
the outside world and prevents Internet users from wandering into your LAN
and messing around. Firewalls are the first line of defense for any network
that’s connected to the Internet. You should never connect a network to the
Internet without installing a carefully configured firewall. For more information about firewalls, refer to Chapter 4 of this book.
Securing Your Users
193
Disabling unnecessary services
A typical network operating system can support dozens of different types of
network services: file and printer sharing, Web server, mail server, and many
others. In many cases, these features are installed on servers that don’t need
or use them. When a server runs a network service that it doesn’t really
need, the service not only robs CPU cycles from other services that are
needed, but also poses an unnecessary security threat.
When you first install a network operating system on a server, you should
enable only those network services that you know the server will require.
You can always enable services later if the needs of the server change.
Patching your servers
Hackers regularly find security holes in network operating systems. After
those holes are discovered, the operating system vendors figure out how
to plug the hole and release a software patch for the security fix. The trouble is that most network administrators don’t stay up to date with these
software patches. As a result, many networks are vulnerable because they
have well-known holes in their security armor that should have been fixed
but weren’t.
Even though patches are a bit of a nuisance, they’re well worth the effort
for the protection that they afford. Fortunately, newer versions of the popular network operating systems have features that automatically check for
updates and let you know when a patch should be applied.
Security techniques, such as physical security, user account security, server
security, and locking down your servers, are child’s play compared to the
most difficult job of network security: securing your network’s users. All
the best-laid security plans will go for naught if your users write down their
passwords on sticky notes and post them on their computers.
The key to securing your network users is to create a written network security
policy and stick to it. Have a meeting with everyone to go over the security
policy to make sure that everyone understands the rules. Also, make sure to
have consequences when violations occur.
Here are some suggestions for some basic security rules you can incorporate into your security policy:
Security 101
Securing Your Users
Book III
Chapter 2
194
Securing Your Users
✦ Never write down your password or give it to someone else.
✦ Accounts should not be shared. Never use someone else’s account to
access a resource that you can’t access under your own account. If you
need access to some network resource that isn’t available to you, you
should formally request access under your own account.
✦ Likewise, never give your account information to a coworker so that he
or she can access a needed resource. Your coworker should instead formally request access under his or her own account.
✦ Don’t install any software or hardware on your computer — especially
wireless access devices or modems — without first obtaining permission.
✦ Don’t enable file and printer sharing on workstations without first getting permission.
✦ Never attempt to disable or bypass the network’s security features.
Chapter 3: Managing
User Accounts
In This Chapter
✓ Understanding user accounts
✓ Looking at the built-in accounts
✓ Using rights and permissions
✓ Working with groups and policies
✓ Running login scripts
U
ser accounts are the backbone of network security administration.
Through the use of user accounts, you can determine who can access
your network, as well as what network resources each user can and can’t
access. You can restrict access to the network to just specific computers
or to certain hours of the day. In addition, you can lock out users who no
longer need to access your network.
The specific details for managing user accounts are unique to each network
operating system and are covered in separate chapters later in this book.
The purpose of this chapter is simply to introduce you to the concepts of
user account management, so you know what you can and can’t do, regardless of which network operating system you use.
Exploring What User Accounts Consist Of
Every user who accesses a network must have a user account. User accounts
allow the network administrator to determine who can access the network
and what network resources each user can access. In addition, the user
account can be customized to provide many convenience features for users,
such as a personalized Start menu or a display of recently used documents.
Every user account is associated with a username (sometimes called a
user ID), which the user must enter when logging on to the network. Each
account also has other information associated with it. In particular:
✦ The user’s password: This also includes the password policy, such as
how often the user has to change his or her password, how complicated
the password must be, and so on.
196
Looking at Built-In Accounts
✦ The user’s contact information: This includes full name, phone number,
e-mail address, mailing address, and other related information.
✦ Account restrictions: This includes restrictions that allow the user to
log on only during certain times of the day. This feature enables you to
restrict your users to normal working hours so that they can’t sneak in
at 2 a.m. to do unauthorized work. This feature also discourages your
users from working overtime because they can’t access the network
after hours, so use it judiciously. You can also specify that the user can
log on only at certain computers.
✦ Account status: You can temporarily disable a user account so that the
user can’t log on.
✦ Home directory: This specifies a shared network folder where the user
can store documents.
✦ Dial-in permissions: These authorize the user to access the network
remotely via a dialup connection.
✦ Group memberships: These grant the user certain rights based on
groups to which they belong. For more information, see the section,
“Assigning Permissions to Groups,” later in this chapter.
Looking at Built-In Accounts
Most network operating systems come preconfigured with two built-in
accounts, named Administrator and Guest. In addition, some server services,
such as Web or database servers, create their own user accounts under
which to run. The following sections describe the characteristics of these
accounts.
The Administrator account
The Administrator account is the King of the Network. This user account
isn’t subject to any of the account restrictions to which other, mere mortal
accounts must succumb. If you log on as the administrator, you can do
anything.
Because the Administrator account has unlimited access to your network,
it’s imperative that you secure it immediately after you install the server.
When the NOS Setup program asks for a password for the Administrator
account, start off with a good random mix of uppercase and lowercase letters, numbers, and symbols. Don’t pick some easy-to-remember password to
get started, thinking you’ll change it to something more cryptic later. You’ll
forget, and in the meantime, someone will break in and reformat the server’s
C: drive or steal your customers’ credit card numbers.
Looking at Built-In Accounts
197
Here are a few additional things worth knowing about the Administrator
account:
✦ You can’t delete it. The system must always have an administrator.
✦ You can grant administrator status to other user accounts. However,
you should do so only for users who really need to be administrators.
✦ You should use it only when you really need to do tasks that require
administrative authority. Many network administrators grant administrative authority to their own user accounts. That isn’t a very good idea.
If you’re killing some time surfing the Web or reading your e-mail while
logged on as an administrator, you’re just inviting viruses or malicious
scripts to take advantage of your administrator access. Instead, you
should set yourself up with two accounts: a normal account that you
use for day-to-day work, and an Administrator account that you use only
when you need it.
✦ The default name for the Administrator account is usually simply
Administrator. You may want to consider changing this name. Better
yet, change the name of the Administrator account to something more
obscure and then create an ordinary user account that has few — if
any — rights and give that account the name Administrator. That way,
hackers who spend weeks trying to crack your Administrator account
password will discover that they’ve been duped, once they finally break
the password. In the meantime, you’ll have a chance to discover their
attempts to breach your security and take appropriate action.
The Guest account
Another commonly created default account is called the Guest account. This
account is set up with a blank password and few — if any — access rights.
The Guest account is designed to allow people to step up to a computer and
log on, but after they do, it then prevents them from doing anything. Sounds
like a waste of time to me. I suggest you disable the Guest account.
Service accounts
Some network users aren’t actual people. I don’t mean that some of your
users are subhuman. Rather, some users are actually software processors
that require access to secure resources and therefore require user accounts.
These user accounts are usually created automatically for you when you
install or configure server software.
Managing User
Accounts
✦ Above all, don’t forget the Administrator account password. Write it
down in permanent ink and store it in Fort Knox, a safe-deposit box, or
some other secure location.
Book III
Chapter 3
198
Assigning Using Rights
For example, when you install Microsoft’s Web server (IIS), an Internet
user account called IUSR is created. The complete name for this account is
IUSR_<servername>. So if the server is named WEB1, the account is named
IUSR_WEB1. IIS uses this account to allow anonymous Internet users to
access the files of your Web site.
As a general rule, you shouldn’t mess with these accounts unless you know
what you’re doing. For example, if you delete or rename the IUSR account,
you must reconfigure IIS to use the changed account. If you don’t, IIS will
deny access to anyone trying to reach your site. (Assuming that you do
know what you’re doing, renaming these accounts can increase your network’s security. However, don’t start playing with these accounts until
you’ve researched the ramifications.)
Assigning User Rights
User accounts and passwords are only the front line of defense in the game
of network security. After a user gains access to the network by typing a
valid user ID and password, the second line of security defense — rights —
comes into play.
In the harsh realities of network life, all users are created equal, but some
users are more equal than others. The Preamble to the Declaration of
Network Independence contains the statement, “We hold these truths to be
self-evident, that some users are endowed by the network administrator with
certain inalienable rights. . . .”
The specific rights that you can assign to network users depend on which
network operating system you use. Here’s a partial list of the user rights that
are possible with Windows servers:
✦ Log on locally: The user can log on to the server computer directly from
the server’s keyboard.
✦ Change system time: The user can change the time and date registered
by the server.
✦ Shut down the system: The user can perform an orderly shutdown of
the server.
✦ Back up files and directories: The user can perform a backup of files
and directories on the server.
✦ Restore files and directories: The user can restore backed-up files.
✦ Take ownership of files and other objects: The user can take over files
and other network resources that belong to other users.
Controlling User Access with Permissions (Who Gets What)
199
Controlling User Access with Permissions
(Who Gets What)
User rights control what a user can do on a network-wide basis. Permissions
enable you to fine-tune your network security by controlling access to
specific network resources, such as files or printers, for individual users
or groups. For example, you can set up permissions to allow users in the
accounting department to access files in the server’s \ACCTG directory.
Permissions can also enable some users to read certain files but not modify
or delete them.
Each network operating system manages permissions in a different way.
Whatever the details, the effect is that you can give permission to each user
to access certain files, folders, or drives in certain ways.
Any permissions that you specify for a folder apply automatically to any of
that folder’s subfolders, unless you explicitly specify a different set of permissions for the subfolder.
Windows refers to file system rights as permissions. Windows servers have
six basic permissions, listed in Table 3-1. You can assign any combination of
Windows permissions to a user or group for a given file or folder.
Windows Basic Permissions
Permission
Abbreviation
What the User Can Do
Read
R
The user can open and read the file.
Write
W
The user can open and write to the file.
Execute
X
The user can run the file.
Delete
D
The user can delete the file.
Change
P
The user can change the permissions for
the file.
Take Ownership
O
The user can take ownership of the file.
Note the last permission listed in Table 3-1. In Windows, the concept of file
or folder ownership is important. Every file or folder on a Windows server
system has an owner. The owner is usually the user who creates the file or
folder. However, ownership can be transferred from one user to another. So
why the Take Ownership permission? This permission prevents someone
from creating a bogus file and giving ownership of it to you without your
Managing User
Accounts
Table 3-1
Book III
Chapter 3
200
Assigning Permissions to Groups
permission. Windows doesn’t allow you to give ownership of a file to another
user. Instead, you can give another user the right to take ownership of the
file. That user must then explicitly take ownership of the file.
You can use Windows permissions only for files or folders that are created
on drives formatted as NTFS volumes. If you insist on using FAT or FAT32 for
your Windows shared drives, you can’t protect individual files or folders on
the drives. This is one of the main reasons for using NTFS for your Windows
servers.
Assigning Permissions to Groups
A group account is an account that doesn’t represent an individual user.
Instead, it represents a group of users who use the network in a similar way.
Instead of granting access rights to each of these users individually, you can
grant the rights to the group and then assign individual users to the group.
When you assign a user to a group, that user inherits the rights specified for
the group.
For example, suppose that you create a group named Accounting for the
accounting staff and then allow members of the Accounting group access
to the network’s accounting files and applications. Then, instead of granting each accounting user access to those files and applications, you simply
make each accounting user a member of the Accounting group.
Here are a few additional details about groups:
✦ Groups are key to network-management nirvana. As much as possible, you should avoid managing network users individually. Instead,
clump them into groups and manage the groups. When all 50 users in
the accounting department need access to a new file share, would you
rather update 50 user accounts or just one group account?
✦ A user can belong to more than one group. Then, the user inherits the
rights of each group. For example, suppose that you have groups set
up for Accounting, Sales, Marketing, and Finance. A user who needs to
access both Accounting and Finance information can be made a member
of both the Accounting and Finance groups. Likewise, a user who needs
access to both Sales and Marketing information can be made a member
of both the Sales and Marketing groups.
✦ You can grant or revoke specific rights to individual users to override
the group settings. For example, you may grant a few extra permissions
for the manager of the Accounting department. You may also impose a
few extra restrictions on certain users.
Automating Tasks with Logon Scripts
201
Understanding User Profiles
A user profile is a Windows feature that keeps track of an individual user’s
preferences for his or her Windows configuration. For a non-networked computer, profiles enable two or more users to use the same computer, each
with his or her own desktop settings, such as wallpaper, colors, Start menu
options, and so on.
The real benefit of user profiles becomes apparent when profiles are used on
a network. A user’s profile can be stored on a server computer and accessed
whenever that user logs on to the network from any Windows computer on
the network.
The following are some of the elements of Windows that are governed by
settings in the user profile:
✦ Desktop settings from the Display Properties dialog box, including wallpaper, screen savers, and color schemes
✦ Start menu programs and Windows toolbar options
✦ Favorites, which provide easy access to the files and folders that the
user accesses frequently
✦ Network settings, including drive mappings, network printers, and
recently visited network locations
Book III
Chapter 3
✦ Application settings, such as option settings for Microsoft Word
Automating Tasks with Logon Scripts
A logon script is a batch file that runs automatically whenever a user logs
on. Logon scripts can perform several important logon tasks for you, such
as mapping network drives, starting applications, synchronizing the client
computer’s time-of-day clock, and so on. Logon scripts reside on the server.
Each user account can specify whether to use a logon script and which
script to use.
Here’s a sample logon script that maps a few network drives and synchronizes the time:
net
net
net
net
use m: \\MYSERVER\Acct
use n: \\MYSERVER\Admin
use o: \\MYSERVER\Dev
time \\MYSERVER /set /yes
Managing User
Accounts
✦ The Documents folder (My Documents in Windows XP)
202
Automating Tasks with Logon Scripts
Logon scripts are a little out of vogue because most of what a logon script
does can be done via user profiles. Still, many administrators prefer the simplicity of logon scripts, so they’re still used even on Windows Server 2003
and 2008 systems.
Chapter 4: Firewalls and
Virus Protection
In This Chapter
✓ Understanding what firewalls do
✓ Examining the different types of firewalls
✓ Looking at virus protection
✓ Discovering Windows security
I
f your network is connected to the Internet, a whole host of security
issues bubble to the surface. You probably connected your network
to the Internet so that your network’s users could access the Internet.
Unfortunately, however, your Internet connection is a two-way street. Not
only does it enable your network’s users to step outside the bounds of your
network to access the Internet, but it also enables others to step in and
access your network.
And step in they will. The world is filled with hackers looking for networks
like yours to break into. They may do it just for fun, or they may do it to
steal your customer’s credit card numbers or to coerce your mail server
into sending thousands of spam messages on their behalf. Whatever their
motive, rest assured that your network will be broken into if you leave it
unprotected.
This chapter presents an overview of two basic techniques for securing
your network’s Internet connection: firewalls and virus protection.
Firewalls
A firewall is a security-conscious router that sits between the Internet and
your network with a single-minded task: preventing them from getting to us.
The firewall acts as a security guard between the Internet and your local
area network (LAN). All network traffic into and out of the LAN must pass
through the firewall, which prevents unauthorized access to the network.
204
Firewalls
Some type of firewall is a must-have if your network has a connection to the
Internet, whether that connection is broadband (cable modem or digital subscriber line; DSL), T1, or some other high-speed connection. Without it,
sooner or later a hacker will discover your unprotected network and tell his
friends about it. Within a few hours, your network will be toast.
You can set up a firewall two basic ways. The easiest way is to purchase a
firewall appliance, which is basically a self-contained router with built-in
firewall features. Most firewall appliances include a Web-based interface
that enables you to connect to the firewall from any computer on your network using a browser. You can then customize the firewall settings to suit
your needs.
Alternatively, you can set up a server computer to function as a firewall
computer. The server can run just about any network operating system, but
most dedicated firewall systems run Linux.
Whether you use a firewall appliance or a firewall computer, the firewall
must be located between your network and the Internet, as shown in Figure
4-1. Here, one end of the firewall is connected to a network hub, which is in
turn connected to the other computers on the network. The other end of the
firewall is connected to the Internet. As a result, all traffic from the LAN to
the Internet and vice versa must travel through the firewall.
Switch
Figure 4-1:
Using a
firewall
appliance.
The Internet
Firewall Router
The Many Types of Firewalls
205
The term perimeter is sometimes used to describe the location of a firewall on
your network. In short, a firewall is like a perimeter fence that completely surrounds your property and forces all visitors to enter through the front gate.
The Many Types of Firewalls
Firewalls employ four basic techniques to keep unwelcome visitors out of
your network. The following sections describe these basic firewall techniques.
Packet filtering
A packet-filtering firewall examines each packet that crosses the firewall and
tests the packet according to a set of rules that you set up. If the packet
passes the test, it’s allowed to pass. If the packet doesn’t pass, it’s rejected.
Packet filters are the least expensive type of firewall. As a result, packetfiltering firewalls are very common. However, packet filtering has a number
of flaws that knowledgeable hackers can exploit. As a result, packet filtering
by itself doesn’t make for a fully effective firewall.
Port numbers are often specified with a colon following an IP address. For
example, the HTTP service on a server whose IP address is 192.168.10.133
would be 192.168.10.133:80.
Literally thousands of established ports are in use. Table 4-1 lists a few of
the most popular ports.
Table 4-1
Some Well-Known TCP/IP Ports
Port
Description
20
File Transfer Protocol (FTP)
21
File Transfer Protocol (FTP)
22
Secure Shell Protocol (SSH)
23
Telnet
25
Simple Mail Transfer Protocol (SMTP)
(continued)
Book III
Chapter 4
Firewalls and
Virus Protection
Packet filters work by inspecting the source and destination IP and port
addresses contained in each Transmission Control Protocol/Internet Protocol
(TCP/IP) packet. TCP/IP ports are numbers that are assigned to specific services that help to identify for which service each packet is intended. For example, the port number for the HTTP protocol is 80. As a result, any incoming
packets headed for an HTTP server will specify port 80 as the destination port.
206
The Many Types of Firewalls
Table 4-1 (continued)
Port
Description
53
Domain Name Server (DNS)
80
World Wide Web (HyperText Transport Protocol; HTTP)
110
Post Office Protocol (POP3)
119
Network News Transfer Protocol (NNTP)
137
NetBIOS Name Service
138
NetBIOS Datagram Service
139
NetBIOS Session Service
143
Internet Message Access Protocol (IMAP)
161
Simple Network Management Protocol (SNMP)
194
Internet Relay Chat (IRC)
389
Lightweight Directory Access Protocol (LDAP)
396
NetWare over IP
443
HTTP over TLS/SSL (HTTPS)
The rules that you set up for the packet filter either permit or deny packets
that specify certain IP addresses or ports. For example, you may permit
packets that are intended for your mail server or your Web server and deny
all other packets. Or, you may set up a rule that specifically denies packets
that are heading for the ports used by NetBIOS. This rule keeps Internet
hackers from trying to access NetBIOS server resources, such as files or
printers.
One of the biggest weaknesses of packet filtering is that it pretty much trusts
that the packets themselves are telling the truth when they say who they’re
from and who they’re going to. Hackers exploit this weakness by using a
hacking technique called IP spoofing, in which they insert fake IP addresses
in packets that they send to your network.
Another weakness of packet filtering is that it examines each packet in
isolation without considering what packets have gone through the firewall
before and what packets may follow. In other words, packet filtering is stateless. Rest assured that hackers have figured out how to exploit the stateless
nature of packet filtering to get through firewalls.
The Many Types of Firewalls
207
In spite of these weaknesses, packet filter firewalls have several advantages
that explain why they are commonly used:
✦ Packet filters are very efficient. They hold up each inbound and outbound packet for only a few milliseconds while they look inside the
packet to determine the destination and source ports and addresses.
After these addresses and ports are determined, the packet filter quickly
applies its rules and either sends the packet along or rejects it. In contrast, other firewall techniques have a more noticeable performance
overhead.
✦ Packet filters are almost completely transparent to users. The only
time a user will be aware that a packet filter firewall is being used is
when the firewall rejects packets. Other firewall techniques require that
clients and/or servers be specially configured to work with the firewall.
✦ Packet filters are inexpensive. Most routers include built-in packet
filtering.
Stateful packet inspection (SPI)
Stateful packet inspection was once found only on expensive, enterpriselevel routers. Now, however, SPI firewalls are affordable enough for small- or
medium-sized networks to use.
Circuit-level gateway
A circuit-level gateway manages connections between clients and servers
based on TCP/IP addresses and port numbers. After the connection is
established, the gateway doesn’t interfere with packets flowing between
the systems.
For example, you could use a Telnet circuit-level gateway to allow Telnet
connections (port 23) to a particular server and prohibit other types of connections to that server. After the connection is established, the circuit-level
gateway allows packets to flow freely over the connection. As a result, the
circuit-level gateway can’t prevent a Telnet user from running specific programs or using specific commands.
Book III
Chapter 4
Firewalls and
Virus Protection
Stateful packet inspection, also known as SPI, is a step up in intelligence from
simple packet filtering. A firewall with stateful packet inspection looks at
packets in groups rather than individually. It keeps track of which packets
have passed through the firewall and can detect patterns that indicate unauthorized access. In some cases, the firewall may hold on to packets as they
arrive until the firewall gathers enough information to make a decision about
whether the packets should be authorized or rejected.
208
The Built-In Windows Firewall
Application gateway
An application gateway is a firewall system that is more intelligent than a
packet-filtering firewall, stateful packet inspection, or circuit-level gateway
firewall. Packet filters treat all TCP/IP packets the same. In contrast, application gateways know the details about the applications that generate the
packets that pass through the firewall. For example, a Web application
gateway is aware of the details of HTTP packets. As a result, it can examine
more than just the source and destination addresses and ports to determine
whether the packets should be allowed to pass through the firewall.
In addition, application gateways work as proxy servers. Simply put, a proxy
server is a server that sits between a client computer and a real server. The
proxy server intercepts packets that are intended for the real server and processes them. The proxy server can examine the packet and decide to pass it
on to the real server, or it can reject the packet. Or, the proxy server may be
able to respond to the packet itself without involving the real server at all.
For example, Web proxies often store copies of commonly used Web pages in
a local cache. When a user requests a Web page from a remote Web server,
the proxy server intercepts the request and checks whether it already has a
copy of the page in its cache. If so, the Web proxy returns the page directly to
the user. If not, the proxy passes the request on to the real server.
Application gateways are aware of the details of how various types of TCP/
IP servers handle sequences of TCP/IP packets to can make more intelligent
decisions about whether an incoming packet is legitimate or is part of an
attack. As a result, application gateways are more secure than simple packetfiltering firewalls, which can deal with only one packet at a time.
The improved security of application gateways, however, comes at a price.
Application gateways are more expensive than packet filters, both in terms
of their purchase price and in the cost of configuring and maintaining them.
In addition, application gateways slow network performance because they
do more detailed checking of packets before allowing them to pass.
The Built-In Windows Firewall
Windows comes with a built-in packet-filtering firewall. If you don’t have a
separate firewall router, you can use this built-in firewall to provide a basic
level of protection. Here are the steps to activate this feature in Windows 7:
1. Choose Start➪Control Panel.
Control Panel appears.
The Built-In Windows Firewall
209
2. Click System and Security.
The System and Security page appears.
3. Click Windows Firewall.
The Windows Firewall page appears.
4. Click Turn Windows Firewall On or Off.
The page shown in Figure 4-2 appears.
Figure 4-2:
Activating
the firewall in
Windows 7.
Book III
Chapter 4
The firewall is enabled.
Do not enable Windows Firewall if you’re using a separate firewall router to
protect your network. Because the other computers on the network are connected directly to the router and not to your computer, Windows Firewall
won’t protect the rest of the network. Additionally, as an unwanted side
effect, the rest of the network will lose the ability to access your computer.
Windows Firewall is turned on by default. If your computer is already
behind a firewall, you should disable Windows Firewall. (In some cases, the
network’s group policy settings may prevent you from disabling Windows
Firewall. In that case, you must change the group policy so that Windows
Firewall can be disabled. For more information about group policy, see Book
VII, Chapter 6.)
Firewalls and
Virus Protection
5. Click Turn On Windows Firewall.
6. Click OK.
210
Virus Protection
Virus Protection
Viruses are one of the most misunderstood computer phenomena around
these days. What is a virus? How does it work? How does it spread from
computer to computer? I’m glad you asked.
What is a virus?
Make no mistake — viruses are real. Now that most people are connected
to the Internet, viruses have really taken off. Every computer user is susceptible to attacks by computer viruses, and using a network increases your vulnerability because it exposes all network users to the risk of being infected
by a virus that lands on any one network user’s computer.
Viruses don’t just spontaneously appear out of nowhere. Viruses are computer programs that are created by malicious programmers who’ve lost a
few screws and should be locked up.
What makes a virus a virus is its capability to make copies of itself that can
be spread to other computers. These copies, in turn, make still more copies
that spread to still more computers, and so on, ad nauseam.
Then, the virus patiently waits until something triggers it — perhaps when
you type a particular command or press a certain key, when a certain date
arrives, or when the virus creator sends the virus a message. What the virus
does when it strikes also depends on what the virus creator wants the virus
to do. Some viruses harmlessly display a “gotcha” message. Some send an
e-mail to everyone it finds in your address book. Some wipe out all the data
on your hard drive. Ouch.
A few years back, viruses moved from one computer to another by latching
themselves onto floppy disks. Whenever you borrowed a floppy disk from
a buddy, you ran the risk of infecting your own computer with a virus that
may have stowed away on the disk.
Virus programmers have discovered that e-mail is a very efficient method
to spread their viruses. Typically, a virus masquerades as a useful or interesting e-mail attachment, such as instructions on how to make $1,000,000
in your spare time, pictures of naked celebrities, or a Valentine’s Day greeting from your long-lost sweetheart. When a curious but unsuspecting user
double-clicks the attachment, the virus springs to life, copying itself onto
the user’s computer — and, in some cases, sending copies of itself to all the
names in the user’s address book.
After the virus works its way onto a networked computer, the virus can then
figure out how to spread itself to other computers on the network.
Virus Protection
211
Here are some more tidbits about protecting your network from virus
attacks:
✦ The term virus is often used to refer not only to true virus programs
(which are able to replicate themselves) but also to any other type
of program that’s designed to harm your computer. These programs
include so-called Trojan horse programs that usually look like games but
are, in reality, hard drive formatters.
✦ A worm is similar to a virus, but it doesn’t actually infect other files.
Instead, it just copies itself onto other computers on a network. After
a worm has copied itself onto your computer, there’s no telling what it
may do there. For example, a worm may scan your hard drive for interesting information, such as passwords or credit card numbers, and then
e-mail them to the worm’s author.
✦ Computer virus experts have identified several thousand “strains” of
viruses. Many of them have colorful names, such as the I Love You virus,
the Stoned virus, and the Michelangelo virus.
✦ Antivirus programs can recognize known viruses and remove them from
your system, and they can spot the telltale signs of unknown viruses.
Unfortunately, the idiots who write viruses aren’t idiots (in the intellectual
sense), so they’re constantly developing new techniques to evade detection by antivirus programs. New viruses are frequently discovered, and
antivirus programs are periodically updated to detect and remove them.
The best way to protect your network from virus infection is to use an
antivirus program. These programs have a catalog of several thousand
known viruses that they can detect and remove. In addition, they can spot
the types of changes that viruses typically make to your computer’s files,
thus decreasing the likelihood that some previously unknown virus will go
undetected.
It would be nice if Windows came with built-in antivirus software, but alas —
it does not. You have to purchase a program on your own. The two bestknown antivirus programs for Windows are Norton AntiVirus by Symantec
and VirusScan by McAfee.
The people who make antivirus programs have their fingers on the pulse of
the virus world and frequently release updates to their software to combat the
latest viruses. Because virus writers are constantly developing new viruses,
your antivirus software is next to worthless unless you keep it up to date by
downloading the latest updates.
Firewalls and
Virus Protection
Antivirus programs
Book III
Chapter 4
212
Virus Protection
Here are several approaches to deploying antivirus protection on your
network:
✦ Install antivirus software on each network user’s computer. This technique would be the most effective if you could count on all your users
to keep their antivirus software up to date. Because that’s an unlikely
proposition, you may want to adopt a more reliable approach to virus
protection.
✦ Managed antivirus services place antivirus client software on each
client computer in your network. Then, an antivirus server automatically updates the clients on a regular basis to make sure that they’re
kept up to date.
✦ Server-based antivirus software protects your network servers from
viruses. For example, you can install antivirus software on your mail
server to scan all incoming mail for viruses and remove them before
your network users ever see them.
✦ Some firewall appliances include antivirus enforcement checks that
don’t allow your users to access the Internet unless their antivirus
software is up to date. This type of firewall provides the best antivirus
protection available.
Safe computing
Besides using an antivirus program, you can take a few additional precautions to ensure virus-free computing. If you haven’t talked to your kids about
these safe-computing practices, you had better do so soon.
✦ Regularly back up your data. If a virus hits you, and your antivirus software can’t repair the damage, you may need the backup to recover your
data. Make sure that you restore from a backup that was created before
you were infected by the virus!
✦ If you buy software from a store and discover that the seal has been
broken on the disk package, take the software back. Don’t try to install
it on your computer. You don’t hear about tainted software as often as
you hear about tainted beef, but if you buy software that’s been opened,
it may well be laced with a virus infection.
✦ Use your antivirus software to scan your disk for virus infection after
your computer has been to a repair shop or worked on by a consultant.
These guys don’t intend harm, but they occasionally spread viruses accidentally, simply because they work on so many strange computers.
✦ Don’t open e-mail attachments from people you don’t know or attachments you weren’t expecting.
✦ Use your antivirus software to scan any floppy disk or CD that doesn’t
belong to you before you access any of its files.
Using Windows Action Center
213
Using Windows Action Center
Windows 7 includes a new feature called the Windows Action Center. As
shown in Figure 4-3, the Windows Action Center monitors the status of security-related issues on your computer. You can summon the Windows Action
Center by opening the Control Panel, clicking System and Security, and then
clicking Action Center.
Book III
Chapter 4
The Windows Action Center alerts you to issues with your computer’s security status as well as reminds you of maintenance that should be done, such
as installing operating system updates.
Here are a couple of additional points to ponder concerning the Windows
Action Center:
✦ A flag icon (shown in the margin) appears in the notification area on the
right end of the Windows taskbar to alert you to items you should attend
to in the Windows Action Center.
✦ Windows Vista and Windows XP included a similar feature called the
Windows Security Center, which you can access from the Control Panel.
Firewalls and
Virus Protection
Figure 4-3:
The
Windows 7
Action
Center.
214
Book III: Network Administration and Security
Chapter 5: Extending Your
Network with VPN Access
In This Chapter
✓ Examining the uses of VPN
✓ Looking at how VPN works
✓ Considering VPN clients and servers
✓ Pondering VPN hardware and software
T
oday’s network users frequently need to access their networks from
remote locations such as their home offices, hotel rooms, beach villas,
and their kid’s soccer fields. In the early days of computer networking, the
only real option for remotely accessing a network was to set up dial-up
access with telephone lines and modems.
Dial-up access worked, but it was slow and unreliable. Today, enabling
remote access to a local area network is easily done with a virtual private
network, or VPN. Simply put, VPN enables remote users to access a local
area network via any Internet connection.
This chapter is a short introduction to VPNs. You find out the basics of what
a VPN is, how to set one up, and how to access one remotely. Enjoy!
Understanding VPN
A virtual private network (VPN) is a type of network connection that creates
the illusion that you’re directly connected to a network when in fact you are
not. For example, suppose you’ve set up a local area network at your office
but you also occasionally work from home. But how will you access the files
on your work computer from home?
✦ You could simply copy whatever files you need from your work computer onto a flash drive and take them home with you, work on the files,
copy the updated files back to the flash drive, and take them back to
work with you the next day.
✦ You could e-mail the files to your personal e-mail account, work on
them at home, and then e-mail the changed files back to your work
e-mail account.
216
Looking at VPN Security
✦ You could get a laptop and use the Windows Offline Files feature to
automatically synchronize files from your work network with files on the
laptop.
Or, you could set up a VPN that allows you to log on to your work network
from home. The VPN uses a secured Internet connection to connect you
directly to your work network, so you can access your network files as if you
had a really long Ethernet cable that ran from your home computer all the
way to the office and plugged directly into the work network.
There are at least three situations in which a VPN is the ideal solution:
✦ One or more workers need to occasionally work from home (as in the
scenario described above). In this situation, a VPN connection establishes a connection between the home computer and the office network.
✦ One or more mobile users — who may not ever actually show up at the
office — need to connect to the work network from mobile computers,
often from locations like hotel rooms, clients’ offices, airports, or coffee
shops. This type of VPN configuration is similar to the home user’s configuration, except that the exact location of the remote user’s computer
is not fixed.
✦ Your company has offices in two or more locations, each with its own
local area network, and you want to connect the locations so that users
on either network can access each other’s network resources. In this
situation, the VPN doesn’t connect a single user with a remote network;
instead, it connects two remote networks to each other.
Looking at VPN Security
The V in VPN stands for virtual, which means that a VPN creates the
appearance of a local network connection when in fact the connection is
made over a public network — the Internet. The term tunnel is sometimes
used to describe a VPN because the VPN creates a tunnel between two
locations which can only be entered from either end. The data that travels through the tunnel from one end to the other is secure as long as it is
within the tunnel — that is, within the protection provided by the VPN.
The P in VPN stands for private, which is the purpose of creating the tunnel.
If the VPN did not create effective security so that data can enter the tunnel
only at one of the two ends, the VPN would be worthless; you may as well
just open your network and your remote computer up to the Internet and let
the hackers have their way.
Prior to VPN technology, the only way to provide private remote network
connections was through actual private lines, which were (and still are) very
expensive. For example, to set up a remote office you could lease a private
Understanding VPN Servers and Clients
217
T1 line from the phone company to connect the two offices. This private T1
line provided excellent security because it physically connected the two
offices and could be accessed only from the two endpoints.
VPN provides the same point-to-point connection as a private leased line,
but does it over the Internet instead of through expensive dedicated lines.
To create the tunnel that guarantees privacy of the data as it travels from
one end of the VPN to the other, the data is encrypted using special security
protocols.
The most important of the VPN security protocols is called IPSec, which
stands for Internet Protocol Security. IPSec is a collection of standards for
encrypting and authenticating packets that travel on the Internet. In other
words, it provides a way to encrypt the contents of a data packet so that only
a person who knows the secret encryption keys can decode the data. And it
provides a way to reliably identify the source of a packet so that the parties
at either end of the VPN tunnel can trust that the packets are authentic.
Referring to the OSI reference model presented in Chapter 2 of Book 1, the
IPSec protocol operates at layer 3 of the OSI model, also called the Network
layer. What that means is that the IPSec protocol has no idea about what
kind of data is being carried by the packets it encrypts and authenticates.
The IPSec protocol concerns itself only with the details of encrypting the
contents of the packets (sometimes called the payload) and ensuring the
identity of the sender.
Many VPNs today use a combination of L2TP and IPSec, called L2TP Over
IPSec. This type of VPN combines the best features of L2TP and IPSec to provide a high degree of security and reliability.
Understanding VPN Servers and Clients
A VPN connection requires a VPN Server and a VPN Client — the server is
the gatekeeper at one end of the tunnel, the client at the other. The main difference between the server and the client is that it’s the client that initiates
the connection with the server. A VPN client can establish a connection with
just one server at a time. However, a server can accept connections from
many clients.
Extending Your
Network with
VPN Access
Another commonly used VPN protocol is L2TP. L2TP stands for Layer 2
Tunneling Protocol. This protocol does not provide data encryption. Instead,
it is designed to create end-to-end connections called tunnels through which
data can travel. L2TP is actually a combination of two older protocols,
one (called Layer 2 Forwarding Protocol, or L2FP) developed by Cisco, and
the other (called Point-to-Point Tunneling Protocol, or PPTP) developed by
Microsoft.
Book III
Chapter 5
218
Understanding VPN Servers and Clients
Typically, the VPN server is a separate hardware device, most often a security appliance such as a Cisco ASA security appliance. VPN servers can also
be implemented in software. For example, Windows Server 2008 includes
built-in VPN capabilities, though they are not easy to configure. And a VPN
server can be implemented in Linux as well.
Figure 5-1 shows one of the many VPN configuration screens for a Cisco
ASA appliance. This screen provides the configuration details for an IPSec
VPN connection. The most important item of information on this screen is
the Pre-Shared Key, which is used to encrypt the data sent over the VPN.
The client will need to provide the identical key in order to participate in
the VPN.
Figure 5-1:
An IPSec
configuration page on
a Cisco ASA
security
appliance.
A VPN client is usually software that runs on a client computer that wants to
connect to the remote network. The VPN client software must be configured
with the IP address of the VPN server as well as authentication information
such as a username and the Pre-Shared Key that will be used to encrypt the
data. If the key used by the client doesn’t match the key used by the server,
the VPN server will reject the connection request from the client.
Understanding VPN Servers and Clients
219
Figure 5-2 shows a typical VPN software client. When the client is configured with the correct connection information (which you can do by clicking the New button), you just click Connect. After a few moments, the VPN
client will announce that the connection has been established and the VPN
is connected.
Figure 5-2:
A VPN
client.
Book III
Chapter 5
Extending Your
Network with
VPN Access
A VPN client can also be a hardware device, like another security appliance.
This is most common when the VPN is used to connect two networks at separate locations. For example, suppose your company has an office in Pixley
and a second office in Hootersville. Each office has its own network with
servers and client computers. The easiest way to connect these offices with
a VPN would be to put an identical security appliance at each location. Then,
you could configure the security appliances to communicate with each other
over a VPN.
220
Book III: Network Administration and Security
Chapter 6: Managing
Network Software
In This Chapter
✓ Understanding the types of software licenses
✓ Using license servers
✓ Exploring the deployment options
✓ Keeping up to date with patches and service packs
A
n important task of any network administrator is managing the various
bits and pieces of software that are used by your users throughout
the network. Most, if not all, of your network users will have a version of
Microsoft Office installed on their computers. Depending on the type of
business, other software may be widely used. For example, accounting firms
require accounting software; engineering firms require engineering software; and the list goes on.
Long gone are the days when you could purchase one copy of a computer
program and freely install it on every computer on your network. Most software has built-in features — commonly called copy protection — designed
to prevent such abuse. But even in the absence of copy protection, nearly
all software is sold with a license agreement that dictates how many computers you can install and use the software on. As a result, managing software licenses is an important part of network management.
Some software programs have a license feature that uses a server computer
to regulate the number of users who can run the software at the same time.
As the network administrator, your job is to set up the license server and
keep it running.
Another important aspect of managing software on the network is figuring
out the most expedient way to install the software on multiple computers.
The last thing you want to do is manually run the software’s Setup program
individually on each computer in your network. Instead, you’ll want to use
the network itself to aid in the deployment of the software.
222
Understanding Software Licenses
Finally, you’ll want to ensure that all the software programs installed
throughout your network are kept up to date with the latest patches and
updates from the software vendors.
This chapter elaborates on these aspects of network software management.
Understanding Software Licenses
Contrary to popular belief, you don’t really buy software. Instead, you buy
the right to use the software. When you purchase a computer program
at a store, all you really own after you complete the purchase is the box
the software comes in, the disks/discs the software is recorded on, and a
license that grants you the right to use the software according to the terms
offered by the software vendor. The software itself is still owned by the
vendor.
That means that you’re obligated to follow the terms of the license agreement that accompanies the software. Very few people actually read the complete text of a software agreement before they purchase and use software. If
you do, you’ll find that a typical agreement contains restrictions, such as the
following:
✦ You’re allowed to install the software on one and only one computer.
Some license agreements have specific exceptions to this, allowing you
to install the software on a single computer at work and a single computer at home, or on a single desktop computer and a single notebook
computer, provided that both computers are used by the same person.
However, most software licenses stick to the one-computer rule.
✦ The license agreement probably allows you to make a backup copy of
the disks/discs. The number of backup copies you can make, though, is
probably limited to one or two.
✦ You aren’t allowed to reverse-engineer the software. In other words,
you can’t use programming tools to dissect the software in an effort to
learn the secrets of how it works.
✦ Some software restricts the kinds of applications it can be used for.
For example, you might purchase a student or home version of a program that prohibits commercial use. And some software — for example,
Sun Microsystem’s Java — prohibits its use for military applications.
✦ Some software has export restrictions that prevent you from taking it
out of the country.
Understanding Software Licenses
223
✦ Nearly all software licenses limit the liability of the software vendor
to replacing defective installation disks/discs. In other words, the
software vendor isn’t responsible for any damage that might be caused
by bugs in the software. In a few cases, these license restrictions have
been set aside in court, and companies have been held liable for damage
caused by defective software. For the most part, though, you use software at your own risk.
In many cases, software vendors give you a choice of several different types
of licenses to choose from. When you purchase software for use on a network, you need to be aware of the differences between these license types
so you can decide which type of license to get. The most common types are
✦ Retail: A retail license is the software you buy directly from the software
vendor, a local store, or an online store. A retail software license usually grants you the right for a single user to install and use the software.
Depending on the agreement, the license may allow that user to install
the software on two computers — one at work and one at home. The
key point is that only one user may use the software. (However, it is
usually acceptable to install the software on a computer that’s shared
by several users. In that case, more than one user can use the software,
provided they use it one at a time.)
✦ OEM: An OEM license is for software that’s installed by a computer manufacturer on a new computer. (OEM stands for original equipment manufacturer.) For example, if you purchase a computer from Dell and order
Microsoft Office Professional along with the computer, you’re getting an
OEM license. The most important thing to know about an OEM license
is that it applies only to the specific computer for which you purchased
the software. You are never allowed to install the software on any computer other than the one for which you purchased the software.
Thus, if one day in a fit of rage you throw your computer out the fifth
floor window of your office and the computer smashes into little pieces
in the parking lot below, your OEM version of Office is essentially lost
forever. When you buy a replacement computer, you’ll have to buy a
new OEM license of Office for the new computer. You can’t install the
old software on the new computer.
If this sounds like a severe limitation, it is. However, OEM licenses are
usually substantially less expensive than retail licenses. For example, a
retail license of Microsoft Office 2007 Professional sells for about $500.
The OEM version is less than $400.
Book III
Chapter 6
Managing Network
Software
The main benefit of a retail license is that it stays with the user when
the user upgrades his or her computer. In other words, if you get a new
computer, you can remove the software from your old computer and
install it on your new computer.
224
Using a License Server
✦ Volume: A volume license allows you to install and use the software on
more than one computer. The simplest type of volume license simply
specifies how many computers on which you can install the software.
For example, you might purchase a 20-user version of a program that
allows you to install the software on 20 computers. Usually, you’re on
the honor system to make sure that you don’t exceed the quantity. You
want to set up some type of system to keep track of this type of software
license. For example, you could create an Excel spreadsheet in which
you record the name of each person for whom you install the software.
Volume licenses can become considerably more complicated. For example, Microsoft offers several different types of volume license programs,
each with different pricing and different features and benefits. Table 6-1
summarizes the features of these license programs. For more information, refer to www.microsoft.com/licensing.
Table 6-1
Microsoft Volume License Plans
Plan
Features
Open License
Purchase as few as five end-user licenses.
Open Value
Purchase as few as five end-user licenses and receive free
upgrades during the subscription term (three years).
Select License
This is a licensing program designed for companies with 250
or more employees.
Enterprise
This is an alternative to the Select License program that’s
designed to cost-effectively provide Windows Vista, Office,
and certain other programs throughout an organization of at
least 250 employees.
✦ Subscription: A subscription isn’t really a separate type of license but
rather an optional add-on to a volume license. The added subscription
fee entitles you to technical support and free product upgrades during
the term of the subscription, which is usually annual. For some types
of products, the subscription also includes periodic downloads of new
data. For example, antivirus software usually includes a subscription
that regularly updates your virus signature data. Without the subscription, the antivirus software would quickly become ineffective.
Using a License Server
Some programs let you purchase network licenses that enable you to install
the software on as many computers as you want, but regulate the number
of people who can use the software at any given time. To control how many
Using a License Server
225
people use the software, a special license server is set up. Whenever a user
starts the program, the program checks with the license server to see
whether a license is available. If so, the program is allowed to start, and the
number of available licenses on the license server is reduced by one. Later,
when the user quits the program, the license is returned to the server.
One of the most commonly used license server software is FlexLM, by
Macrovision. It is used by AutoCAD as well as by many other network
software applications. FlexLM uses special license files that are issued by
a software vendor to indicate how many licenses of a given product you
have purchased. Although the license file is a simple text file, its contents
are cryptic and generated by a program that only the software vendor has
access to. Here’s an example of a typical license file for AutoCAD:
SERVER server1 000ecd0fe359
USE_SERVER
VENDOR adskflex port=2080
INCREMENT 57000ARDES_2010_0F adskflex 1.000 permanent 6 \
VENDOR_STRING=commercial:permanent BORROW=4320 SUPERSEDE \
DUP_GROUP=UH ISSUED=07-May-2007 SN=339-71570316 SIGN=”102D \
85EC 1DFE D083 B85A 46BB AFB1 33AE 00BD 975C 8F5C 5ABC 4C2F \
F88C 9120 0FB1 E122 BA97 BCAE CC90 899F 99BB 23C9 CAB5 613F \
E7BB CA28 7DBF 8F51 3B21” SIGN2=”033A 6451 5EEB 3CA4 98B8 F92C \
184A D2BC BA97 BCAE CC90 899F 2EF6 0B45 A707 B897 11E3 096E 0288 \
787C 997B 0E2E F88C 9120 0FB1 782C 00BD 975C 8F5C 74B9 8BC1”
One drawback to software that uses a license server is that you have to
take special steps to run the software when the server isn’t available. For
example, what if you have AutoCAD installed on a notebook computer and
you want to use it while you’re away from the office? In that case, you have
two options:
✦ Use virtual private network (VPN) software to connect to the network.
After you’re connected with the VPN, the license server will be available
so you can use the software.
✦ Borrow a license. When you borrow a license, you can use the software
for a limited period of time while you’re disconnected from the network.
Of course, the borrowed license is subtracted from the number of available licenses on the server.
In most cases, the license server is a mission-critical application — as important as any other function on your network. If the license server goes down,
all users who depend on it will be unable to work. Don’t worry; they’ll let you
know. They’ll be lining up outside your door demanding to know when you
can get the license server up and running so they can get back to work.
Book III
Chapter 6
Managing Network
Software
(Don’t get any crazy ideas here. I changed the numbers in this license file so
that it won’t actually work. I’m not crazy enough to publish an actual valid
AutoCAD license file!)
226
Options for Deploying Network Software
Because the license server provides such an important function, treat it with
special care. Make sure that the license server software runs on a stable,
well-maintained server computer. Don’t load up the license server computer
with a bunch of other server functions.
And make sure that it’s backed up. If possible, install the license server software on a second server computer as a backup. That way, if the main license
server computer goes down and you can’t get it back up and running, you
can quickly switch over to the backup license server.
Options for Deploying Network Software
After you acquire the correct license for your software, the next task of the
network administrator is deploying the software — that is, installing the
software on your users’ computers and configuring the software so that it
runs efficiently on your network. The following sections describe several
approaches to deploying software to your network.
Deploying software manually
Most software is shipped on CD or DVD media along with a Setup program
that you run to install the software. The Setup program usually asks you a
series of questions, such as where you want the program installed, whether
you want to install all of the program’s features or just the most commonly
used features, and so on. You may also be required to enter a serial number,
registration number, license key, or other code that proves you purchased
the software. When all these questions are answered, the Setup program
then installs the program.
If only a few of your network users will be using a particular program, the
Setup program may be the most convenient way to deploy the program.
Just take the installation media with you to the computer you want to
install the program on, insert the disc into the CD/DVD drive, and run the
Setup program.
When you finish manually installing software from a CD or DVD, don’t forget
to remove the disc from the drive! It’s easy to leave the disc in the drive,
and if the user rarely or never uses the drive, it might be weeks or months
before anyone discovers that the disc is missing. By that time, you’ll be hard
pressed to remember where it is.
Running Setup from a network share
If you plan on installing a program on more than two or three computers
on your network, you’ll find it much easier to run the Setup program from a
network share rather than from the original CDs or DVDs. To do so, follow
these steps:
Options for Deploying Network Software
227
1. Create a network share and a folder within the share where you can
store the Setup program and other files required to install the program.
I usually set up a share named Software and then create a separate
folder in this share for each program I want to make available from the
network. You should enable Read access for all network users, but allow
full access only for yourself and your fellow administrators.
2. Copy the entire contents of the program’s CD or DVD to the folder you
create in Step 1.
To do so, insert the CD or DVD in your computer’s CD/DVD drive. Then,
use Windows Explorer to select the entire contents of the disc and drag
it to the folder you create in Step 1.
Alternatively, you can choose Start➪Run and enter cmd to open a command prompt. Then, enter a command, such as this:
xcopy d:\*.* \\server1\software\someprogram\*.* /s
In this example, d: is the drive letter of your CD/DVD drive, server1 is
the name of your file server, and software and someprogram are the
names of the share and folder you created in Step 1.
3. To install the program on a client computer, open a Windows Explorer
window, navigate to the share and folder you create in Step 1, and
double-click the Setup.exe file.
This launches the Setup program.
When the Setup program is finished, the software is ready to use.
Copying the Setup program to a network share spares you the annoyance
of carrying the installation discs to each computer you want to install the
software on. It doesn’t spare you the annoyance of purchasing a valid license
for each computer! It’s illegal to install the software on more computers than
the license you acquired from the vendor allows.
Installing silently
Copying the contents of a program’s installation media to a network share
spares you the annoyance of carrying the installation discs from computer
to computer, but you still have to run the Setup program and answer all its
annoying questions on every computer. Wouldn’t it be great if there were a
way to automate the Setup program so that after you run it, it runs without
any further interaction from you? With many programs, you can.
In some cases, the Setup program itself has a command line switch that
causes it to run silently. You can usually find out what command line
switches are available by entering the following at a command prompt:
setup /?
Managing Network
Software
4. Follow the instructions displayed by the Setup program.
Book III
Chapter 6
228
Options for Deploying Network Software
With luck, you’ll find that the Setup program itself has a switch, such as /
quiet or /silent, that installs the program with no interaction, using the
program’s default settings.
If the Setup program doesn’t offer any command line switches, don’t despair!
The following procedure describes a technique that often lets you silently
install the software:
1. Open an Explorer window and navigate to
• Windows 7 and Vista: C:\Users\name\AppData\Local\Temp
• Windows XP: C:\Documents and Settings\name\Local
Settings\Temp
Then, delete the entire contents of this folder.
This is the Temporary folder where various programs deposit temporary files. Windows may not allow you to delete every file in this folder,
but it’s a good idea to begin this procedure by emptying the Temp folder
as much as possible.
2. Run the Setup program and follow the installation steps right up to the
final step.
When you get to the confirmation screen that says the program is about
ready to install the software, stop! Don’t click the OK or Finish button.
3. Return to the Temp folder you open in Step 1, and then poke around
until you find the .msi file created by the Setup program you run in
Step 2.
The .msi file is the actual Windows Installer program that Setup runs to
install the program. It may have a cryptic name, such as 84993882.msi.
4. Copy the .msi file to the network share from which you want to
install the program on your client computers.
For example, \\server1\software\someprogram.
5. Rename the .msi file to setup.msi.
This step is optional, but I prefer to run setup.msi rather than
84993882.msi.
6. Use Notepad to create a batch file to run the .msi file with the /quiet
switch.
To create the batch file
a. Right-click in the folder where the .msi file is stored.
b. Choose New➪Text Document.
c. Change the name of the text document to Setup.bat.
Options for Deploying Network Software
229
d. Right-click the Setup.bat file and choose Edit.
e. Add the following line to the file:
setup.msi /quiet
7. Save the file.
You can now install the software by navigating to the folder you created
the setup.bat file in and double-clicking the setup.bat file.
Creating an administrative installation image
Some software, such as Microsoft Office and AutoCAD, comes with tools
that let you create a fully configured silent setup program that you can then
use to silently install the software. For Microsoft software, this silent setup
program is called an administrative installation image. (Note that the OEM
versions of Microsoft Office don’t include this feature. You need to purchase
a volume license to create an administrative installation.)
To create an administrative image, you simply run the configuration tool
supplied by the vendor. The configuration tool lets you choose the installation options you want to have applied when the software is installed. Then,
it creates a network setup program on a network share that you specify. You
can then install the software on a client computer by opening an Explorer
window, navigating to the network share where you saved the network setup
program, and running the network setup program.
One final option you should consider for network software deployment is
using Windows Group Policy to automatically install software to network
users. Group Policy is a feature of Windows Server 2003 and 2007 that lets
you create policies that are assigned to users. You use the Windows Group
Policy feature to specify that certain users should have certain software programs available to them.
Note that group policies aren’t actually assigned to individual users, but to
Organizational Units (OUs), which are used to categorize users in Active
Directory. Thus, you might create a Group Policy to specify that everyone in
the Accounting Department OU should have Microsoft Excel.
Then, whenever anyone in the Accounting Department logs on to Windows,
Windows checks to make sure that Excel is installed on the user’s computer. If Excel is not installed, Windows advertises Excel on the computer.
Advertising software on a computer means that a small portion of the software is downloaded to the computer — just enough to display an icon for
the program on the Start menu and to associate Excel with the Excel file
extensions (such as .xls).
Managing Network
Software
Pushing out software with group policy
Book III
Chapter 6
230
Keeping Software Up to Date
If the user clicks the Start menu icon for the advertised application or
attempts to open a document that’s associated with the advertised application, the application is automatically installed on the user’s computer. The
user will have to wait a few minutes while the application is installed, but the
installation is automatic.
For more information about setting up group policy software installation,
search Google or any other search engine for “Group Policy Software.”
Keeping Software Up to Date
One of the annoyances that every network manager faces is applying software patches to keep the operating system and other software up to date.
A software patch is a minor update that fixes the small glitches that crop
up from time to time, such as minor security or performance issues. These
glitches aren’t significant enough to merit a new version of the software, but
they’re important enough to require fixing. Most of the patches correct security flaws that computer hackers have uncovered in their relentless attempts
to wreak havoc on the computer world.
Periodically, all the recently released patches are combined into a service
pack. Although the most diligent network administrators apply all patches
when they’re released, many administrators just wait for the service packs.
Windows includes a feature called Windows Update that automatically
installs patches and service packs when they become available. These
patches apply not just to Windows but to other Microsoft software as well.
To use Windows Update, open the Control Panel, click System and Security,
then click Windows Update. A window appears, such as the one shown in
Figure 6-1.
From the Windows Update window, you can click the Install Updates button
to download any updates that apply to your computer. You can also configure Windows Update so that it automatically checks for updates and installs
them without asking. To set this option, click the Change Settings link. This
displays the Windows Update Change Settings page, as shown in Figure 6-2.
The Important Updates drop-down list gives you several options for automatic operation:
✦ Install Updates Automatically: This option checks for updates on a regular basis and installs them without asking. You can specify how often to
check for updates and at what time.
Keeping Software Up to Date
231
Figure 6-1:
Windows
Update.
Book III
Chapter 6
Managing Network
Software
Figure 6-2:
Changing
the
Windows
Update
settings.
✦ Download Updates But Let Me Choose Whether to Install Them: If you’re
a picky computer user, you should choose this option. It automatically
downloads the updates but then gives you the option of whether or not to
install them. This lets you opt out of updates you may not want.
232
Keeping Software Up to Date
✦ Check for Updates But Let Me Choose Whether to Download and
Install Them: This option lets you determine which updates should be
downloaded.
✦ Never Check for Updates: This option disables automatic updates
altogether.
Chapter 7: Solving Network
Problems
In This Chapter
✓ Checking the obvious things
✓ Fixing computers that have expired
✓ Pinpointing the cause of trouble
✓ Restarting client and server computers
✓ Reviewing network event logs
✓ Keeping a record of network woes
F
ace it: Networks are prone to breaking.
They have too many parts. Cables. Connectors. Cards. Switches. Routers.
All these parts must be held together in a delicate balance, and the network
equilibrium is all too easy to disturb. Even the best-designed computer networks sometimes act as if they’re held together with baling wire, chewing
gum, and duct tape.
To make matters worse, networks breed suspicion. After your computer is
attached to a network, users begin to blame the network every time something goes wrong, regardless of whether the problem has anything to do
with the network. You can’t get columns to line up in a Word document?
Must be the network. Your spreadsheet doesn’t add up? The @@#$% network’s acting up again. The stock market’s down? Arghhh!!!!!!
The worst thing about network failures is that sometimes they can shut
down an entire company. It’s not so bad if just one user can’t access a particular shared folder on a file server. If a critical server goes down, however,
your network users may be locked out of their files, applications, e-mail, and
everything else they need to conduct business as usual. When that happens,
they’ll be beating down your doors and won’t stop until you get the network
back up and running.
In this chapter, I review some of the most likely causes of network trouble
and suggest some basic troubleshooting techniques that you can employ
when your network goes on the fritz.
234
When Bad Things Happen to Good Computers
When Bad Things Happen to Good Computers
The following are some basic troubleshooting steps explaining what you
should examine at the first sign of network trouble. In many (if not most)
of the cases, one of the following steps can get your network back up and
running:
1. Make sure that your computer and everything attached to it is
plugged in.
Computer geeks love it when a user calls for help and they get to tell the
user that the computer isn’t plugged in or that its power strip is turned
off. They write it down in their geek logs so that they can tell their
geek friends about it later. They may even want to take your picture so
that they can show it to their geek friends. (Most “accidents” involving
computer geeks are a direct result of this kind of behavior. So try to be
tactful when you ask a user whether he or she is sure the computer is
actually turned on.)
2. Make sure that your computer is properly connected to the network.
3. Note any error messages that appear on the screen.
4. Try restarting the computer.
An amazing number of computer problems are cleared up by a simple
restart of the computer. Of course, in many cases, the problem recurs,
so you’ll have to eventually isolate the cause and fix the problem. Some
problems are only intermittent, and a simple reboot is all that’s needed.
5. Try the built-in Windows network troubleshooter.
For more information, see the section, “Using the Windows Networking
Troubleshooter,” later in this chapter.
6. Check the free disk space on your computer and on the server.
When a computer runs out of disk space or comes close to it, strange
things can happen. Sometimes you get a clear error message indicating
such a situation, but not always. Sometimes the computer just grinds to a
halt; operations that used to take a few seconds now take a few minutes.
7. Do a little experimenting to find out whether the problem is indeed a
network problem or just a problem with the computer itself.
See the section, “Time to Experiment,” later in this chapter, for some
simple things that you can do to isolate a network problem.
8. Try restarting the network server.
See the section, “Restarting a Network Server,” later in this chapter.
Fixing Dead Computers
235
Fixing Dead Computers
If a computer seems totally dead, here are some things to check:
✦ Make sure that the computer is plugged in.
✦ If the computer is plugged into a surge protector or a power strip,
make sure that the surge protector or power strip is plugged in and
turned on. If the surge protector or power strip has a light, it should be
glowing.
✦ Make sure that the computer’s On/Off switch is turned on. This advice
sounds too basic to even include here, but many computers have two
power switches: an on/off switch on the back of the computer, and a
push-button on the front that actually starts the computer. If you push
the front button and nothing happens, check the switch on the back to
make sure it’s in the ON position.
✦ If you think the computer isn’t plugged in but it looks like it is, listen
for the fan. If the fan is running, the computer is getting power, and the
problem is more serious than an unplugged power cord. (If the fan isn’t
running but the computer is plugged in and the power is on, the fan may
be out to lunch.)
✦ If the computer is plugged in, turned on, and still not running, plug a
lamp into the outlet to make sure that power is getting to the outlet.
You may need to reset a tripped circuit breaker or replace a bad surge
protector. Or you may need to call the power company. (If you live in
California, don’t bother calling the power company. It probably won’t do
any good.)
✦ Check the surge protector. Surge protectors have a limited life span.
After a few years of use, many surge protectors continue to provide electrical power for your computer, but the components that protect your
computer from power surges no longer work. If you’re using a surge
protector that is more than two or three years old, replace the old surge
protector with a new one.
Book III
Chapter 7
Solving Network
Problems
To complicate matters, newer computers have a Sleep feature, in which
they appear to be turned off but really they’re just sleeping. All you have
to do to wake such a computer is jiggle the mouse a little. (I used to have
an uncle like that.) It’s easy to assume that the computer is turned off,
press the power button, wonder why nothing happened, and then press
the power button and hold it down, hoping it will take. If you hold down
the power button long enough, the computer will actually turn itself off.
Then, when you turn the computer back on, you get a message saying
the computer wasn’t shut down properly. Arghhh! The moral of the
story is to jiggle the mouse if the computer seems to have nodded off.
236
Ways to Check a Network Connection
✦ Make sure that the monitor is plugged in and turned on. The monitor
has a separate power cord and switch. (The monitor actually has two
cables that must be plugged in. One runs from the back of the monitor
to the back of the computer; the other is a power cord that comes from
the back of the monitor and must be plugged into an electrical outlet.)
✦ Make sure that all cables are plugged in securely. Your keyboard, monitor, mouse, and printer are all connected to the back of your computer
by cables.
Make sure that the other ends of the monitor and printer cables are
plugged in properly, too.
✦ If the computer is running but the display is dark, try adjusting the
monitor’s contrast and brightness. Some monitors have knobs that you
can use to adjust the contrast and brightness of the monitor’s display.
They may have been turned down all the way.
Ways to Check a Network Connection
The cables that connect client computers to the rest of the network are
finicky beasts. They can break at a moment’s notice, and by “break,” I don’t
necessarily mean “to physically break in two.” Although some broken cables
look like someone got to the cable with pruning shears, most cable problems
aren’t visible to the naked eye.
✦ Twisted-pair cable: If your network uses twisted-pair cable, you can
quickly tell whether the cable connection to the network is good by
looking at the back of your computer. Look for a small light located near
where the cable plugs in; if this light is glowing steadily, the cable is
good. If the light is dark or it’s flashing intermittently, you have a cable
problem (or a problem with the network card or the hub or switch that
the other end of the cable is plugged in to).
If the light isn’t glowing steadily, try removing the cable from your computer and reinserting it. This action may cure the weak connection.
✦ Patch cable: Hopefully, your network is wired so that each computer is
connected to the network with a short (six feet or so) patch cable. One
end of the patch cable plugs into the computer, and the other end plugs
into a cable connector mounted on the wall. Try quickly disconnecting
and reconnecting the patch cable. If that doesn’t do the trick, try to find
a spare patch cable that you can use.
✦ Switches: Switches are prone to having cable problems, too — especially
switches that are wired in a “professional manner,” involving a rat’s nest
of patch cables. Be careful whenever you enter the lair of the rat’s nest. If
you need to replace a patch cable, be very careful when you disconnect
the suspected bad cable and reconnect the good cable in its place.
Double-Checking Your Network Settings
237
A Bunch of Error Messages Just Flew By!
Error messages that display when your computer boots can provide invaluable clues to determine the source of the problem.
If you see error messages when you start up the computer, keep the following points in mind:
✦ Don’t panic if you see a lot of error messages. Sometimes, a simple
problem that’s easy to correct can cause a plethora of error messages
when you start your computer. The messages may look as if your computer is falling to pieces, but the fix may be very simple.
✦ If the messages fly by so fast that you can’t see them, press your computer’s Pause key. Your computer comes to a screeching halt, giving
you a chance to catch up on your error-message reading. After you’ve
read enough, press the Pause key again to get things moving. (On keyboards that don’t have a Pause key, pressing Ctrl+Num Lock or Ctrl+S
does the same thing.)
✦ If you miss the error messages the first time, restart the computer and
watch them again.
Double-Checking Your Network Settings
I swear that there are little green men who sneak into offices at night, turn
on computers, and mess up TCP/IP configuration settings just for kicks.
These little green men are affectionately known as networchons.
Remarkably, network configuration settings sometimes get inadvertently
changed so that a computer, which enjoyed the network for months or even
years, one day finds itself unable to access the network. So one of the first
things you do, after making sure that the computers are actually on and that
the cables aren’t broken, is a basic review of the computer’s network settings. Check the following:
✦ At a command prompt, run ipconfig to make sure that TCP/IP is up
and running on the computer and that the IP addresses, subnet masks,
and default gateway settings look right.
✦ Call up the network connection’s Properties dialog box and make sure
that the necessary protocols are installed correctly.
Book III
Chapter 7
Solving Network
Problems
✦ Better yet, press F8 when you see the Starting Windows message. This
displays a menu that allows you to select from several startup options,
including one that processes each line of your CONFIG.SYS file separately so that you can see the messages displayed by each command
before proceeding to the next command.
238
Using the Windows Networking Troubleshooter
✦ Open the System Properties dialog box (double-click System in
Control Panel) and check the Computer Name tab.
Make sure that the computer name is unique and that the domain or
workgroup name is spelled properly.
✦ Double-check the user account to make sure that the user really has
permission to access the resources he or she needs.
For more information about network configuration settings, see Book II,
Chapters 3 and 6.
Using the Windows Networking Troubleshooter
Windows comes with a built-in troubleshooter that can often help you to pin
down the cause of a network problem. Figure 7-1 shows the Windows 7 version. Answer the questions asked by the troubleshooter and click Next to
move from screen to screen. The Networking Troubleshooter can’t solve all
networking problems, but it does point out the causes of the most common
problems.
Figure 7-1:
The
Windows 7
Networking
Troubleshooter.
Time to Experiment
239
The procedure for starting Networking Troubleshooter depends on which
version of Windows you’re using:
✦ Windows 7: Open the Control Panel, click View Network Status and
Tasks, and then click Troubleshoot Problems. Then select the troubleshooter that seems most directly related to the problem you’re experiencing. You’ll find troubleshooters for wireless network problems, home
networks, and local area network (LAN) and Internet connections.
✦ Windows Vista: Choose Start➪Help and Support, click Troubleshooting,
and then click the link for the network troubleshooter that seems most
directly related to the problem you’re experiencing. You’ll find troubleshooters for wireless network problems, home networks, and local area
network (LAN) and Internet connections.
✦ Windows XP: Choose Start➪Help and Support➪Networking and the
Web➪Fixing Network or Web Problems. Then click Home and Small
Office Networking Troubleshooter.
Time to Experiment
If you can’t find some obvious explanation for your troubles — like the computer is unplugged — you need to do some experimenting to narrow down
the possibilities. Design your experiments to answer one basic question: Is it
a network problem or a local computer problem?
✦ Try performing the same operation on someone else’s computer. If no
one on the network can access a network drive or printer, something is
probably wrong with the network. On the other hand, if the error occurs
on only one computer, the problem is likely with that computer. The
wayward computer may not be reliably communicating with the network
or configured properly for the network, or the problem may have nothing to do with the network at all.
✦ If you’re able to perform the operation on another computer without problems, try logging on to the network with another computer
using your own username. Then see whether you can perform the
operation without error. If you can, the problem is probably on your
computer. If you can’t, the problem may be with the way your user
account is configured.
✦ If you can’t log on at another computer, try waiting for a bit. Your
account may be temporarily locked out. This can happen for a variety of
reasons — the most common of which is trying to log on with the wrong
password several times in a row. If you’re still locked out an hour later,
call the network administrator and offer a doughnut.
Solving Network
Problems
Here are some ways you can narrow down the cause of the problem:
Book III
Chapter 7
240
Who’s on First?
Who’s on First?
When troubleshooting a networking problem, it’s often useful to find out
who is actually logged on to a network server. For example, if a user can’t
access a file on the server, you can check whether the user is logged on.
If so, you know that the user’s account is valid, but the user may not have
permission to access the particular file or folder that he’s attempting to
access. On the other hand, if the user isn’t logged on, the problem may
lie with the account itself or how the user is attempting to connect to the
server.
It’s also useful to find out who’s logged on in the event that you need to
restart the server. For more information about restarting a server, see the
section, “Restarting a Network Server,” later in this chapter.
To find out who is currently logged on to a Windows server, right-click the
Computer icon on the desktop (My Computer in Windows Server 2003,
Computer in Windows Server 2008) and choose Manage from the menu that
appears. This brings up the Computer Management window. Open System
Tools in the tree list and then open Shared Folders and select Sessions. A list
of users who are logged on appears.
You can immediately disconnect all users by right-clicking Sessions in the
Computer Management window and choosing All Tasks➪Disconnect All.
Restarting a Client Computer
Sometimes, trouble gets a computer so tied up in knots that the only thing
you can do is reboot. In some cases, the computer just starts acting weird.
Strange characters appear on the screen, or Windows goes haywire and
doesn’t let you exit a program. Sometimes, the computer gets so confused
that it can’t even move. It just sits there, like a deer staring at oncoming
headlights. It won’t move, no matter how hard you press Esc or Enter. You
can move the mouse all over your desktop, or you can even throw it across
the room, but the mouse pointer on the screen stays perfectly still.
When a computer starts acting strange, you need to reboot. If you must
reboot, you should do so as cleanly as possible. I know this procedure may
seem elementary, but the technique for safely restarting a client computer is
worth repeating, even if it is basic:
1. Save your work if you can.
Restarting a Client Computer
241
Use the File➪Save command to save any documents or files that you
were editing when things started to go haywire. If you can’t use the
menus, try clicking the Save button on the toolbar. If that doesn’t
work, try pressing Ctrl+S (the standard keyboard shortcut for the Save
command).
2. Close any running programs if you can.
Use the File➪Exit command or click the Close button in the upper-right
corner of the program window. Or press Alt+F4.
3. Restart the computer.
• Windows XP: Choose Start➪Turn Off Computer to summon the
Shut Down Windows dialog box. Select the Restart option, and then
click OK.
• Windows 7 and Vista: Click the Start button, click the right arrow that
appears at the bottom-right corner of the Start menu, and then click
Restart.
If restarting your computer doesn’t seem to fix the problem, you may need
to turn your computer off and then turn it on again. To do so, follow the previous procedure but choose Shut Down instead of Restart.
Here are a few things to try if you have trouble restarting your computer:
1. If your computer refuses to respond to the Start➪Shut Down comThis is called the “three-finger salute.” It’s appropriate to say, “Queueue”
while you do it.
When you press Ctrl+Alt+Delete, Windows displays a dialog box that
enables you to close any running programs or shut down your computer
entirely.
2. If pressing Ctrl+Alt+Delete doesn’t do anything, you’ve reached the
last resort. The only thing left to do is turn off the computer by pressing the power On/Off button and holding it down for a few seconds.
Turning off your computer by pressing the power button is a drastic
action that you should take only after your computer becomes completely unresponsive. Any work you haven’t yet saved to disk is lost.
(Sniff.) (If your computer doesn’t have a Reset button, turn off the computer, wait a few moments, and then turn the computer back on again.)
If at all possible, save your work before restarting your computer. Any work
you haven’t saved is lost. Unfortunately, if your computer is totally tied up in
knots, you probably can’t save your work. In that case, you have no choice
but to push your computer off the digital cliff.
Solving Network
Problems
mand, try pressing Ctrl+Alt+Delete.
Book III
Chapter 7
242
Booting in Safe Mode
Booting in Safe Mode
Windows provides a special start-up mode called Safe Mode that’s designed
to help fix misbehaving computers. When you start your computer in Safe
Mode, Windows loads only the most essential parts of itself into memory —
the bare minimum required for Windows to work. Safe Mode is especially
useful when your computer has developed a problem that prevents you
from using the computer at all.
To boot your computer in Safe Mode, first restart the computer. Then, as
soon as the computer begins to restart, start pressing the F8 key — just tap
away at it until a menu titled Advanced Boot Options appears. One of the
options on this menu is Safe Mode; use the up- or down-arrow keys to select
that option and then press Enter to boot in Safe Mode.
Using System Restore
System Restore is a Windows feature that periodically saves important
Windows configuration information and allows you to later return your
system to a previously saved configuration. This can often fix problems by
reverting your computer to a time when it was working.
By default, Windows saves restore points whenever you install new software
on your computer or apply a system update. Restore points are also saved
automatically every seven days.
Although System Restore is turned on by default, you should verify that
System Restore is active and running to make sure that System Restore
points are being created. To do that, right-click Computer in the Start menu,
choose Properties, and then click the System Protection tab. The dialog
box shown in Figure 7-2 is displayed. Verify that the Protection status for
your computer’s C: drive is “On.” If it isn’t, select the C: drive and click the
Configure button to configure System Restore for the drive.
If your computer develops a problem, you can restore it to a previously
saved restore point by clicking System Restore the System Protection tab.
This brings up the System Restore Wizard, as shown in Figure 7-3. This
wizard allows you to select the restore point you want to use.
Here are a few additional thoughts to remember about System Restore:
✦ System Restore does not delete data files from your system. Thus, files in
your Documents folder won’t be lost.
Using System Restore
243
Figure 7-2:
The System
Protection
tab of the
System
Properties
dialog box.
Book III
Chapter 7
Solving Network
Problems
Figure 7-3:
Using
System
Restore to
restore your
system to
an earlier
configuration.
✦ System Restore does remove any applications or system updates you
have installed since the time the restore point was made. Thus, you
will need to re-install those applications or system updates — unless,
of course, you determine that an application or system update was the
cause of your problem in the first place.
✦ System Restore automatically restarts your computer. The restart may
be slow because some of the changes made by System Restore happen
after the restart.
244
Restarting Network Services
✦ Do not turn off or cut power to your computer during System Restore.
Doing so may leave your computer in an unrecoverable state.
Restarting Network Services
Once in awhile, the operating system service that supports the task that’s
causing you trouble inexplicably stops or gets stuck. If users can’t access a
server, it may be because one of the key network services has stopped or is
stuck.
You can review the status of services by using the Services tool, as shown in
Figure 7-4. To display it, right-click Computer on the Start menu and choose
Manage; then, expand the Services and Applications node and click Services.
Review this list to make sure that all key services are running. If an important service is paused or stopped, restart it.
Figure 7-4:
Looking at
services
(Windows 7).
Which services qualify as “important” depends on what roles you define for
the server. Table 7-1 lists a few important services that are common to most
Windows network operating systems. However, many servers require additional services besides these. In fact, a typical server will have many dozens
of services running simultaneously.
Restarting a Network Server
Table 7-1
245
Key Windows Services
Service
Description
Computer
Browser
Maintains a list of computers on the network that can be
accessed. If this service is disabled, the computer won’t be
able to use browsing services, such as My Network Places.
DHCP Client
Enables the computer to obtain its IP address from a Dynamic
Host Configuration Protocol (DHCP) server. If this service is
disabled, the computer’s Internet Protocol (IP) address won’t
be configured properly.
DNS Client
Enables the computer to access a Domain Name Server
(DNS) server to resolve DNS names. If this service is disabled,
the computer won’t be able to handle DNS names, including
Internet addresses and Active Directory names.
Server
Provides basic file- and printer-sharing services for the server.
If this service is stopped, clients won’t be able to connect to
the server to access files or printers.
Workstation
Enables the computer to establish client connections with
other servers. If this service is disabled, the computer won’t
be able to connect to other servers.
Restarting a Network Server
Sometimes, the only way to flush out a network problem is to restart the network server that’s experiencing trouble.
Restarting a network server is something you should do only as a last
resort. Windows Server is designed to run for months or even years at a
time without rebooting. Restarting a server invariably results in a temporary
shutdown of the network. If you must restart a server, try to do it during off
hours if possible.
Before you restart a server, check whether a specific service that’s required
has been paused or stopped. You may be able to just restart the individual
service rather than the entire server. For more information, see the section,
“Restarting Network Services,” earlier in this chapter.
Solving Network
Problems
Key services usually stop for a reason, so simply restarting a stopped service probably won’t solve your network’s problem — at least, not for long.
You should review the System log to look for any error messages that may
explain why the service stopped in the first place.
Book III
Chapter 7
246
Looking at Event Logs
Here’s the basic procedure for restarting a network server:
1. Make sure that everyone is logged off the server.
The easiest way to do that is to restart the server after normal business
hours, when everyone has gone home for the day. Then, you can just
shut down the server and let the shutdown process forcibly log off any
remaining users.
To find out who’s logged on, refer to the earlier section, “Who’s on
First?”
2. After you’re sure the users have logged off, shut down the network
server.
You want to do this step behaving like a good citizen if possible —
decently, and in order. Use the Star➪Shut Down command to shut
down the server. This summons a dialog box that requires you to indicate the reason for the shutdown. The information you supply here is
entered into the server’s System log, which you can review by using
Event Viewer.
3. Reboot the server computer or turn it off and then on again.
Watch the server start up to make sure that no error messages appear.
4. Tell everyone to log back on and make sure that everyone can now
access the network.
Remember the following when you consider restarting the network server:
✦ Restarting the network server is more drastic than restarting a client
computer. Make sure that everyone saves his or her work and logs
off the network before you do it! You can cause major problems if you
blindly turn off the server computer while users are logged on.
✦ Obviously, restarting a network server is a major inconvenience to
every network user. Better offer treats.
Looking at Event Logs
One of the most useful troubleshooting techniques for diagnosing network problems is to review the network operating system’s built-in event
logs. These logs contain information about interesting and potentially
troublesome events that occur during the daily operation of your network.
Ordinarily, these logs run in the background, quietly gathering information
about network events. When something goes wrong, you can check the logs
Documenting Your Trials and Tribulations
247
to see whether the problem generated a noteworthy event. In many cases,
the event logs contain an entry that pinpoints the exact cause of the problem and suggests a solution.
To display the event logs in a Windows server, use Event Viewer, which is
available from the Administrative Tools menu. For example, Figure 7-5 shows
an Event Viewer from a Windows Server 2008 system. The tree listing on
the left side of Event Viewer lists five categories of events that are tracked:
Application, Security, System, Directory Service, and File Replication Service.
Select one of these options to see the log that you want to view. For details
about a particular event, double-click the event to display a dialog box with
detailed information about the event.
Book III
Chapter 7
Documenting Your Trials and Tribulations
For a large network, you probably want to invest in problem-management
software that tracks each problem through the entire process of troubleshooting, from initial report to final resolution. For small- and medium-sized
networks, it’s probably sufficient to put together a three-ring binder with
pre-printed forms. Or record your log in a Word document or an Excel
spreadsheet.
Regardless of how you track your network problems, the tracking log should
include the following information:
Solving Network
Problems
Figure 7-5:
Event
Viewer.
248
Documenting Your Trials and Tribulations
✦ The real name and the network username of the person reporting the
problem
✦ The date the problem was first reported
✦ An indication of the severity of the problem
Is it merely an inconvenience, or is a user unable to complete his or her
work because of the problem? Does a workaround exist?
✦ The name of the person assigned to resolve the problem
✦ A description of the problem
✦ A list of the software involved, including versions
✦ A description of the steps taken to solve the problem
✦ A description of any intermediate steps that were taken to try to solve
the problem, along with an indication of whether those steps were
“undone” when they didn’t help solve the problem
✦ The date the problem was finally resolved
Chapter 8: Network Performance
Anxiety
In This Chapter
✓ Understanding performance problems
✓ Looking at bottlenecks
✓ Developing a procedure for solving performance problems
✓ Monitoring performance
✓ Implementing other tips for speeding up your network
T
he term network performance refers to how efficiently the network
responds to users’ needs. It goes without saying that any access to
resources that involves a network will be slower than similar access that
doesn’t involve a network. For example, it takes longer to open a Word
document that resides on a network file server than it takes to open a similar document that resides on a user’s local hard drive. However, it shouldn’t
take much longer. If it does, you have a network performance problem.
This chapter is a general introduction to the practice of tuning your network
so that it performs as well as possible. Keep in mind that many specific bits
of network tuning advice are scattered throughout this book. In this chapter, you can find some specific techniques for analyzing your network’s performance, taking corrective action when a performance problem develops,
and charting your progress.
Why Administrators Hate Performance Problems
Network performance problems are among the most difficult network problems to track down and solve. If a user simply can’t access the network, it
usually doesn’t take long to figure out why: A cable is broken, a network
card or hub is malfunctioning, a user doesn’t have permission to access the
resource, and so on. After a little investigation, the problem usually reveals
itself. You fix it and move on to the next problem.
250
What Exactly Is a Bottleneck?
Unfortunately, performance problems are messier. Here are just a few of the
reasons that network administrators hate performance problems:
✦ Performance problems are difficult to quantify. Exactly how much
slower is the network now than it was a week ago, a month ago, or even
a year ago? Sometimes the network just feels slow, but you can’t quite
define exactly how slow it really is.
✦ Performance problems usually develop gradually. Sometimes, a network slows down suddenly and drastically. More often, though, the network gradually gets slower, a little bit at a time, until one day when the
users notice that the network is slooow.
✦ Performance problems often go unreported. Users gripe about the
problem to each other around the water cooler, but they don’t formally contact you to let you know that their network seems 10 percent
slower than usual. As long as they can still access the network, they just
assume that the problem is temporary or just in their imaginations.
✦ Many performance problems are intermittent. Sometimes, a user
calls you and complains that a certain network operation has become
slower than molasses — and by the time you get to the user’s desk,
the operation performs like a snap. Sometimes, you can find a pattern
to the intermittent behavior, such as it’s slower in the morning than in
the afternoon, or it’s only slow while backups are running or while the
printer is working. Other times, you can’t find a pattern. Sometimes the
operation is slow; sometimes it isn’t.
✦ Performance tuning is not an exact science. Improving performance
sometimes involves educated guesswork. Will upgrading all the users
from 100 Mbps to gigabit Ethernet improve performance? Probably.
Will segmenting the network improve performance? Maybe. Will adding
another 4GB of RAM to the server improve performance? Hopefully.
✦ The solution to performance problems is sometimes a hard sell. If a
user can’t access the network because of a malfunctioning component,
there’s usually not much question that the purchase of a replacement is
justified. However, if the network is slow and you think you can fix it by
upgrading the entire network to gigabit Ethernet, you may have trouble
selling management on the upgrade.
What Exactly Is a Bottleneck?
The term bottleneck does not in any way refer to the physique of your typical computer geek. (Well, I guess it could, in some cases.) Rather, computer
geeks coined the phrase when they discovered that the tapered shape of a
bottle of Jolt Cola limited the rate at which they could consume the beverage.
What Exactly Is a Bottleneck?
251
“Hey,” a computer geek said one day, “the gently tapered narrowness of this
bottle’s neck imposes a distinct limiting effect upon the rate at which I can
consume the tasty caffeine-laden beverage contained within. This draws to
mind a hitherto undiscovered yet obvious analogy to the limiting effect that a
single slow component of a computer system can have upon the performance
of the system as a whole.”
“Fascinating,” replied all the other computer geeks, who were fortunate
enough to be present at that historic moment.
The term stuck and is used to this day to draw attention to the simple fact
that a computer system is only as fast as its slowest component. It’s the
computer equivalent of the old truism that a chain is only as strong as its
weakest link.
For a simple demonstration of this concept, consider what happens when
you print a word processing document on a slow printer. Your word processing program reads the data from disk and sends it to the printer. Then
you sit and wait while the printer prints the document.
Would buying a faster CPU or adding more memory make the document
print faster? No. The CPU is already much faster than the printer, and your
computer already has more than enough memory to print the document.
The printer itself is the bottleneck, so the only way to print the document
faster is to replace the slow printer with a faster one.
✦ A computer system always has a bottleneck. For example, suppose that
you decided that the bottleneck on your file server is a slow IDE hard
drive, so you replace it with the fastest SCSI drive money can buy. Now,
the hard drive is no longer the bottleneck: The drive can process information faster than the controller card to which the disk is connected.
You haven’t really eliminated the bottleneck: You just moved it from the
hard drive to the disk controller. No matter what you do, the computer
will always have some component that limits the overall performance of
the system.
✦ One way to limit the effect of a bottleneck is to avoid waiting for the
bottleneck. For example, print spooling lets you avoid waiting for a slow
printer. Spooling doesn’t speed up the printer, but it does free you to do
other work while the printer chugs along. Similarly, disk caching lets you
avoid waiting for a slow hard drive.
✦ One of the reasons computer geeks are switching from Jolt Cola to
Snapple is that Snapple bottles have wider necks.
Network
Performance
Anxiety
Here are some other random thoughts about bottlenecks:
Book III
Chapter 8
252
The Five Most Common Network Bottlenecks
The Five Most Common Network Bottlenecks
Direct from the home office in sunny Fresno, California, here are the ten —
oops, five — most common network bottlenecks, in no particular order.
The hardware inside your servers
Your servers should be powerful computers capable of handling all the work
your network will throw at them. Don’t cut corners by using a bottom-of-theline computer that you bought at a discount computer store.
The following are the four most important components of your server
hardware:
✦ Processor: Your server should have a powerful processor. As a general
rule, any processor that’s available in a $500 computer from a store
that sells TVs and washing machines as well as computers is not a
processor that you want to see in your file server. In other words,
avoid processors that are designed for consumer-grade home computers. For optimum performance, your servers should use server-class
Itanium or Xeon processors.
✦ Memory: You can’t have too much memory. Memory is cheap, so don’t
skimp. Don’t even think about running a server with less than 8GB of RAM.
✦ Disk: Don’t mess around with inexpensive SATA hard drives. To be
respectable, you should have nothing but SCSI drives.
✦ Network interface: A $9.95 network card might be fine for your home
network, but don’t use one in a file server that supports 50 users and
then expect to be happy with the server’s performance. Remember that
the server computer uses the network a lot more than any of the clients,
so equip your servers with good network cards.
The server’s configuration options
All network operating systems have options that you can configure. Some
of these options can make the difference between a pokey network and a
zippy network. Unfortunately, no hard-and-fast rules exist for setting these
options. Otherwise, you wouldn’t have options.
The following are some of the more important tuning options available for
most servers:
The Five Most Common Network Bottlenecks
253
✦ Virtual memory options: Virtual memory refers to disk paging files that
the server uses when it doesn’t have enough real memory to do its work.
Few servers ever have enough real memory, so virtual memory is always
an important server feature. You can specify the size and location of the
virtual memory paging files. For best performance, you should provide
at least 1.5 times the amount of real memory. For example, if you have
16GB of real memory, allocate at least 24GB of virtual memory. If necessary, you can increase this size later.
✦ Disk striping: Use Disk Defragmenter to optimize the data storage on
your server’s disks. If the server has more than one hard drive, you
can increase performance by creating striped volumes, which allow
disk I/O operations to run concurrently on each of the drives in the
stripe set.
✦ Network protocols: Make sure that your network protocols are configured correctly; remove any protocols that aren’t necessary.
✦ Free disk space on the server: Servers like to have plenty of breathing room on their disks. If the amount of free disk space on your server
drops precipitously low, the server chokes up and slows to a crawl.
Make sure that your server has plenty of space: A few dozen GBs of
unused disk space provide a healthy buffer.
Servers that do too much
For example, if your network needs more disk space, consider adding
a second file server rather than adding another drive to the server that
already has four drives that are nearly full. Or better yet, purchase a file
server appliance that is dedicated just to the task of serving files.
As a side benefit, your network will be easier to administer and more reliable
if you place separate functions on separate servers. For example, if you have
a single server that doubles as a file server and a mail server, you’ll lose
both services if you have to take down the server to perform an upgrade or
Network
Performance
Anxiety
One common source of network performance problems is servers that are
overloaded with too many duties. Just because modern network operating
systems come equipped with dozens of different types of services doesn’t
mean that you should enable and use them all on a single server. If a single
server is bogged down because of too much work, add a second server
to relieve the first server of some of its chores. Remember the old saying:
“Many hands make light work.”
Book III
Chapter 8
254
The Five Most Common Network Bottlenecks
repair a failed component. However, if you have separate file and mail server
computers, only one of the services will be interrupted if you have to take
down one of the servers.
The network infrastructure
A network infrastructure comprises the cables and any switches, hubs, routers, and other components that sit between your clients and your servers.
The following network infrastructure items can slow down your network:
✦ Switches: Because switches are so inexpensive now, you can affordably solve a lot of performance problems by replacing outdated hubs
with switches. Using switches instead of hubs reduces the overall load
on your network. Also, make sure that your switches can handle the
performance requirements of your network. For best performance, the
switches should have gigabit ports.
✦ Segment sizes: Keep the number of computers and other devices on
each network segment to a reasonable number. About 20 devices is
usually the right number. (Note that if you replace your old hubs with
switches, you instantly cut the size of each segment because each port
on a switch constitutes a separate segment.)
✦ The network’s speed: If you have an older network, you’ll probably discover that many — if not all — of your users are still working at 100 Mbps.
Upgrading to gigabit speed will speed up the network dramatically.
✦ The backbone speed: If your network uses a backbone to connect segments, consider upgrading the backbone to 1 Gbps.
The hardest part about improving the performance of a network is determining what the bottlenecks are. With sophisticated test equipment and years of
experience, network gurus can make pretty good educated guesses. Without
the equipment and experience, you can still make pretty good uneducated
guesses.
Malfunctioning components
Sometimes a malfunctioning network card or other component slows down
the network. For example, a switch may malfunction intermittently, occasionally letting packets through but dropping enough of them to slow down
the network. After you identify the faulty component, replacing it will restore
the network to its original speed.
Tuning Your Network the Compulsive Way
255
Tuning Your Network the Compulsive Way
You have two ways to tune your network. The first is to think about it a bit,
take a guess at what may improve performance, try it, and see whether the
network seems to run faster. This approach is how most people go about
tuning the network.
Then you have the compulsive way, which is suitable for people who organize their sock drawers by color and their food cupboards alphabetically by
food groups. The compulsive approach to tuning a network goes something
like this:
1. Establish a method for objectively testing the performance of some
aspect of the network.
This method is benchmarking, and the result of your benchmark is a
baseline.
2. Change one variable of your network configuration and rerun the test.
For example, suppose you think that increasing the size of the disk
cache can improve performance. Change the cache size, restart the
server, and run the benchmark test. Note whether the performance
improves, stays the same, or becomes worse.
3. Repeat Step 2 for each variable that you want to test.
✦ If possible, test each variable separately. In other words, reverse the
changes you made to other network variables before proceeding.
✦ Write down the results of each test. That way, you have an accurate
record of the impact that each change made on your network’s
performance.
✦ Be sure to change only one aspect of the network each time you run
the benchmark. If you make several changes, you won’t know which one
caused the change. One change may improve performance, but the other
change may worsen performance so that the changes cancel each other
out — kind of like offsetting penalties in a football game.
✦ If possible, conduct the baseline test during normal working hours.
That way, the network is undergoing its normal workload.
✦ To establish your baseline performance, run your benchmark test two
or three times to make sure that the results are repeatable.
Network
Performance
Anxiety
Here are some salient points to keep in mind if you decide to tune your network the compulsive way:
Book III
Chapter 8
256
Monitoring Network Performance
Monitoring Network Performance
One way to monitor network performance is to use a stopwatch to see how
long it actually takes to complete common network tasks, such as opening
documents or printing reports. If you choose to monitor your network by
using the stopwatch technique, you’ll want to get a clipboard, baseball cap,
and gray sweat suit to complete the ensemble.
A more high-tech approach to monitoring network performance is to use a
monitor program that automatically gathers network statistics for you. After
you set up the monitor, it plugs away, silently spying on your network and
recording what it sees in performance logs. You can then review the performance logs to see how your network is doing.
For large networks, you can purchase sophisticated monitoring programs
that run on their own dedicated servers. For small- and medium-sized networks, you can probably get by with the built-in monitoring facilities that
come with the network operating system. For example, Figure 8-1 shows
the Performance Monitor tool that comes with Windows Server 2003. Other
operating systems come with similar tools.
Figure 8-1:
Monitoring
performance.
Windows Performance Monitor lets you keep track of several different
aspects of system performance at once. You track each performance aspect
by setting up a counter. You can choose from dozens of different counters.
Monitoring Network Performance
257
Table 8-1 describes some of the most commonly used counters. Note that
each counter refers to a server object, such as physical disk, memory, or the
processor.
Table 8-1
Commonly Used Performance Counters
Object
Counter
Description
Physical
Disk
% Free
Space
The percentage of free space on the server’s
physical disks. Should be at least 15 percent.
Physical
Disk
Length
Average
Queue
Indicates how many disk operations are waiting
while the disk is busy servicing other disk operations. Should be two or fewer.
Memory
Pages/
second
The number of pages retrieved from the virtual
memory page files per second. A typical threshold is about 2,500 pages per second.
Processor
% Processor
Time
Indicates the percentage of the processor’s time
that it’s busy doing work rather than sitting idle.
Should be 85 percent or less.
Here are a few more things to consider about performance monitoring:
✦ You can schedule logging to occur at certain times of the day and for
certain intervals. For example, you may schedule the log to gather data
every 15 seconds from 9:00 to 9:30 every morning and then again from
3:00 to 3:30 every afternoon.
✦ Even if you don’t have a performance problem now, you should set up
performance logging and let it run for a few weeks to gather baseline
data. If you develop a problem, this baseline data will prove invaluable
while you research the problem.
✦ Don’t leave performance logging turned on all the time. Gathering
performance data slows down your server. Use it only occasionally
to gather baseline data or when you’re experiencing a performance
problem.
Network
Performance
Anxiety
✦ Performance Monitor enables you to view real-time data or to view
data that you can save in a log file. Real-time data gives you an idea
about what’s happening with the network at a particular moment, but
the more useful information comes from the logs.
Book III
Chapter 8
258
More Performance Tips
More Performance Tips
Here are a few last-minute performance tips that barely made it in:
✦ You can often find the source of a slow network by staring at the network hubs or switches for a few minutes. These devices have colorful
arrays of green and red lights. The green lights flash whenever data is
transmitted; the red lights flash when a collision occurs. An occasional
red flash is normal, but if one or more of the red lights is flashing
repeatedly, the network interface card (NIC) connected to that port
may be faulty.
✦ Check for scheduled tasks, such as backups, batched database
updates, or report jobs. If at all possible, schedule these tasks to run
after normal business hours, such as at night when no one is in the
office. These jobs tend to slow down the network by hogging the server’s hard drives.
✦ Sometimes, faulty application programs can degrade performance.
For example, some programs develop a memory leak: They use memory
but then forget to release the memory after they finish. Programs
with memory leaks can slowly eat up all the memory on a server, until
the server runs out and grinds to a halt. If you think a program has a
memory leak, contact the manufacturer of the program to see whether a
fix is available.
✦ Spyware can slow a system to a crawl. A common source of performance
problems on client computers is spyware, those annoying programs that
you almost can’t help but pick up when you surf the Internet. Fortunately,
you can remove spyware with a variety of free or inexpensive spyware
removal tools. For more information, use Google or another search engine
to search for spyware removal.
Chapter 9: Backing Up Your Data
In This Chapter
✓ Understanding the need for backups
✓ Working with tape drives and other backup media
✓ Understanding the different types of backups
✓ Mastering tape rotation and other details
I
f you’re the hapless network manager, the safety of the data on your
network is your responsibility. In fact, it’s your primary responsibility.
You get paid to lie awake at night worrying about your data. Will it be there
tomorrow? If it’s not, can you get it back? And — most importantly — if you
can’t get it back, will you have a job tomorrow?
This chapter covers the ins and outs of being a good, responsible, trustworthy network manager. No one gives out merit badges for this stuff, but
someone should.
Backing Up Your Data
Having data backed up is the cornerstone of any disaster recovery plan.
Without backups, a simple hard drive failure can set your company back
days or even weeks while it tries to reconstruct lost data. In fact, without
backups, your company’s very existence is in jeopardy.
The main goal of a backup is simple: Keep a spare copy of your network’s
critical data so that no matter what happens, you never lose more than one
day’s work. The stock market may crash, hanging chads may factor into
another presidential election, and George Lucas may decide to make a preprequel. When you stay on top of your backups, though, you’ll never lose
more than one day’s work.
The way to do this, naturally, is to make sure that data is backed up on a
daily basis. For many networks, you can back up all the network hard drives
every night. And even if full nightly backups aren’t possible, you can still use
techniques that can ensure that every file on the network has a backup copy
that’s no more than one day old.
260
All about Tapes and Tape Drives
All about Tapes and Tape Drives
If you plan on backing up the data on your network server’s hard drives,
you obviously need some type of media on which to back up the data. You
could copy the data onto CDs, but a 500GB hard drive would need more than
750 CDs to do a full backup. That’s a few more discs than most people want
to keep in the closet. And you could use DVDs, but you’ll still need about
a dozen of them as well as an hour or so to fill each one. Sigh. That means
devoting a Saturday to creating your backup.
Because of the limitations of CDs and DVDs, most network administrators
back up network data to tape. Depending on the make and model of the tape
drive, you can copy as much as 800GB of data onto a single tape.
One of the benefits of tape backup is that you can run it unattended. In fact,
you can schedule a tape backup to run automatically during off hours when
no one is using the network. For unattended backups to work, though, you
must ensure that you have enough tape capacity to back up your entire network server’s hard drive without having to manually switch tapes. If your
network server has only 100GB of data, you can easily back it up onto a
single tape. However, if you have 1,000GB of data, invest in a tape drive that
features a magazine changer that can hold several tapes and automatically
cycle them in and out of the drive. That way, you can run your backups
unattended.
Here are some additional thoughts concerning tape backups:
✦ Travan drives: A popular style of tape backup for small servers is a
Travan drive, which comes in a variety of models with tape capacities
ranging from 20GB to 40GB. You can purchase a 20GB drive for less
than $200.
✦ DAT and DLT units: For larger networks, you can get tape backup units
that offer higher capacity and faster backup speed than Travan drives —
for more money, of course. Digital audio tape (DAT) units can back up as
much as 80GB on a single tape, and DLT (digital linear tape) drives can
store up to 800GB on one tape. DAT and DLT drives can cost $1,000 or
more, depending on the capacity.
✦ Robotic units: If you’re really up the backup creek with hundreds of
gigabytes to back up, you can get robotic tape backup units that automatically fetch and load tape cartridges from a library. That way, you
can do complete backups without having to load tapes manually. As you
can likely guess, these units aren’t inexpensive: Small ones, which have
a library of about eight tapes and a total backup capacity of more than
5,000GB, start at about $4,000.
Backup Software
261
Backup Software
All versions of Windows come with a built-in backup program. In addition,
most tape drives come with backup programs that are often faster or more
flexible than the standard Windows backup.
You can also purchase sophisticated backup programs that are specially
designed for networks that have multiple servers with data that must be
backed up. For a basic Windows file server, you can use the backup program that comes with Windows Server. Server versions of Windows come
with a decent backup program that can run scheduled, unattended tape
backups.
Backup programs do more than just copy data from your hard drive to tape.
Backup programs use special compression techniques to squeeze your data
so that you can cram more data onto fewer tapes. Compression factors of
2:1 are common, so you can usually squeeze 100GB of data onto a tape that
would hold only 50GB of data without compression. (Tape drive manufacturers tend to state the capacity of their drives by using compressed data,
assuming a 2:1 compression ratio. Thus, a 200GB tape has an uncompressed
capacity of 100GB.)
Whether you achieve a compression factor of 2:1 depends on the nature of
the data you’re backing up:
✦ Graphics: If your network data consists primarily of graphic image files,
you probably won’t get much compression. Most graphic image file formats are already compressed, so they can’t be compressed much more
by the backup software’s compression methods.
Backup programs also help you keep track of which data has been backed
up and which hasn’t. They also offer options, such as incremental or differential backups that can streamline the backup process, as I describe in the
next section.
If your network has more than one server, invest in good backup software.
The most popular is Yosemite Backup, made by BarracudaWare (www.
barracudaware.com). Besides being able to handle multiple servers, one
of the main advantages of backup software (such as Yosemite Backup) is
that it can properly back up Microsoft Exchange server data.
Backing Up
Your Data
✦ Documents: If your network is used primarily for Office applications and
is filled with Word and Excel documents, you’ll probably get better than
2:1 compression.
Book III
Chapter 9
262
Types of Backups
Types of Backups
You can perform five different types of backups. Many backup schemes rely
on full daily backups, but for some networks, using a scheme that relies on
two or more of these backup types is more practical.
The differences among the five types of backups involve a little technical
detail known as the archive bit. The archive bit indicates whether a file has
been modified since it was backed up. The archive bit is a little flag that’s
stored along with the filename, creation date, and other directory information. Any time a program modifies a file, the archive bit is set to the On position. That way, backup programs know that the file has been modified and
needs to be backed up.
The differences among the various types of backups center around
whether they use the archive bit to determine which files to back up as
well as whether they flip the archive bit to the Off position after they back
up a file. Table 9-1 summarizes these differences, which I explain in the
following sections.
Backup programs allow you to select any combination of drives and folders
to back up. As a result, you can customize the file selection for a backup
operation to suit your needs. For example, you can set up one backup plan
that backs up all a server’s shared folders and drives plus its mail server
stores but then leaves out folders that rarely change, such as the operating
system folders or installed program folders. You can then back up those
folders on a less regular basis. The drives and folders that you select for a
backup operation are collectively called the backup selection.
Table 9-1
How Backup Types Use the Archive Bit
Backup Type
Selects Files Based on
Archive Bit?
Resets Archive Bits After
Backing Up?
Normal
No
Yes
Copy
No
No
Daily
No*
No
Incremental
Yes
Yes
Differential
Yes
No
*Selects files based on the Last Modified date.
Types of Backups
263
The archive bit would have made a good Abbott and Costello routine. (“All
right, I wanna know who modified the archive bit.” “What.” “Who?” “No,
what.” “Wait a minute . . . just tell me what’s the name of the guy who modified the archive bit!” “Right.”)
Normal backups
A normal backup — also called a full backup — is the basic type of backup. In
a normal backup, all files in the backup selection are backed up regardless of
whether the archive bit has been set. In other words, the files are backed up
even if they haven’t been modified since the last time they were backed up.
When each file is backed up, its archive bit is reset, so backups that select
files based on the archive bit setting won’t back up the files.
When a normal backup finishes, none of the files in the backup selection
have their archive bits set. As a result, if you immediately follow a normal
backup with an incremental backup or a differential backup, no files will be
selected for backup by the incremental or differential backup because no
files will have their archive bits set.
The easiest backup scheme is to simply schedule a normal backup every
night. That way, all your data is backed up on a daily basis. Then, if the need
arises, you can restore files from a single tape or set of tapes. Restoring files
is more complicated when other types of backups are involved.
If you can’t get a normal backup on a single tape and you can’t afford a
second tape drive or a tape changer, take a hard look at the data that’s being
included in the backup selection. I recently worked on a network that was
difficult to back up onto a single tape. When I examined the data that was
being backed up, I discovered a large amount of static data that was essentially an online archive of old projects. This data was necessary because
network users needed it for research purposes, but the data was read-only.
Even though the data never changed, it was being backed up to tape every
night, and the backups required two tapes. After we removed this data from
the cycle of nightly backups, the backups were able to squeeze onto a single
tape again.
If you remove static data from the nightly backup, make sure that you have a
secure backup of the static data on tape, CD-RW, or some other media.
Backing Up
Your Data
Do normal backups nightly if you have the tape capacity to do them unattended: that is, without having to swap tapes. If you can’t do an unattended
normal backup because the amount of data to be backed up is greater than
the capacity of your tape drive(s), you have to use other types of backups in
combination with normal backups.
Book III
Chapter 9
264
Types of Backups
Copy backups
A copy backup is similar to a normal backup except that the archive bit isn’t
reset when each file is copied. As a result, copy backups don’t disrupt the
cycle of normal and incremental or differential backups.
Copy backups are usually not incorporated into regular, scheduled backups.
Instead, you use a copy backup when you want to do an occasional oneshot backup. For example, if you’re about to perform an operating system
upgrade, you should back up the server before proceeding. If you do a full
backup, the archive bits are reset, and your regular backups are disrupted.
However, if you do a copy backup, the archive bits of any modified files
remain unchanged. As a result, your regular normal and incremental or differential backups are unaffected.
If you don’t incorporate incremental or differential backups into your
backup routine, the difference between a copy backup and a normal backup
is moot.
Daily backups
A daily backup backs up just those files that have been changed the same
day when the backup is performed. A daily backup examines the modification date stored with each file’s directory entry to determine whether a file
should be backed up. Daily backups don’t reset the archive bit.
I’m not a big fan of this option because of the small possibility that some
files may slip through the cracks. Someone may be working late one night
and modify a file after the evening’s backups have completed — but before
midnight — meaning that those files won’t be included in the following
night’s backups. Incremental or differential backups, which rely on the
archive bit rather than the modification date, are more reliable.
Incremental backups
An incremental backup backs up only those files that were modified since
the last time you did a backup. Incremental backups are a lot faster than full
backups because your network users probably modify only a small portion
of the files on the server in any given day. As a result, if a full backup takes
three tapes, you can probably fit an entire week’s worth of incremental backups on a single tape.
When an incremental backup copies each file, it resets the file’s archive bit.
That way, the file will be backed up again before your next normal backup
only when a user modifies the file again.
Types of Backups
265
Here are some thoughts about using incremental backups:
✦ The easiest way to use incremental backups is the following:
• A normal backup every Monday
If your full backup takes more than 12 hours, you may want to do it
on Friday so that it can run over the weekend.
• An incremental backup on each remaining normal business day (for
example, Tuesday, Wednesday, Thursday, and Friday)
✦ When you use incremental backups, the complete backup consists of
the full backup tapes and all the incremental backup tapes that you’ve
made since you did the full backup.
If the hard drive crashes and you have to restore the data onto a new
drive, you first restore Monday’s normal backup and then you restore
each of the subsequent incremental backups.
✦ Incremental backups complicate restoring individual files because the
most recent copy of the file may be on the full backup tape or on any
of the incremental backups.
Backup programs keep track of the location of the most recent version
of each file in order to simplify the process.
✦ When you use incremental backups, you can choose whether you
want to
Book III
Chapter 9
• Store each incremental backup on its own tape.
Often, you can use a single tape for a week of incremental backups.
Differential backups
A differential backup is similar to an incremental backup except that it
doesn’t reset the archive bit when files are backed up. As a result, each differential backup represents the difference between the last normal backup
and the current state of the hard drive.
To do a full restore from a differential backup, you first restore the last
normal backup and then you restore the most recent differential backup.
For example, suppose that you do a normal backup on Monday and differential backups on Tuesday, Wednesday, and Thursday, and then your hard
drive crashes Friday morning. On Friday afternoon, you install a new hard
drive. To restore the data, you first restore the normal backup from Monday.
Then, you restore the differential backup from Thursday. The Tuesday and
Wednesday differential backups aren’t needed.
Backing Up
Your Data
• Append each backup to the end of an existing tape.
266
Local versus Network Backups
The main difference between incremental and differential backups is that
✦ Incremental backups result in smaller and faster backups.
✦ Differential backups are easier to restore.
If your users often ask you to restore individual files, consider using differential backups.
Local versus Network Backups
When you back up network data, you have two basic approaches to running
the backup software: You can perform a local backup, in which the backup
software runs on the file server itself and backs up data to a tape drive that’s
installed in the server. Or, you can perform a network backup, in which you
use one network computer to back up data from another network computer.
In a network backup, the data has to travel over the network to get to the
computer that’s running the backup.
If you run the backups from the file server, you’ll tie up the server while the
backup is running — and users will complain that their server access has
slowed to a snail’s pace. On the other hand, if you run the backup over the
network from a client computer or a dedicated backup server, you’ll flood
the network with gigabytes of data being backed up. Your users will then
complain that the entire network has slowed to a snail’s pace.
Network performance is one of the main reasons why you should try to
run your backups during off hours, when other users aren’t accessing the
network. Another reason to run backups during off hours is so that you can
perform a more thorough backup. If you run your backup while other users
are accessing files, the backup program is likely to skip over any files that
are being accessed by users at the time the backup runs. As a result, your
backup won’t include those files. Ironically, the files most likely to get left
out of the backup are often the files that need backing up the most because
they’re the files that are being used and modified.
Here are some extra thoughts on client and server backups:
✦ Backing up directly from the server isn’t necessarily more efficient
than backing up from a client because data doesn’t have to travel
over the network. The network may well be faster than the tape drive.
The network probably won’t slow down backups unless you back up
during the busiest time of the day, when hordes of network users are
storming the network gates.
How Many Sets of Backups Should You Keep?
267
✦ To improve network backup speed and to minimize the effect that network backups have on the rest of the network, consider using a 1,000
Mbps switch instead of a normal 100 Mbps switch to connect the servers and the backup client. That way, network traffic between the server
and the backup client won’t bog down the rest of the network.
✦ Any files that are open while the backups are running won’t get backed
up. That’s usually not a problem because backups are run at off hours
when people have gone home. However, if someone leaves his computer
on with a Word document open, that Word document won’t be backed up.
One way to solve this problem is to set up the server so that it automatically logs everyone off the network before the backups begin.
✦ Some backup programs have special features that enable them to back
up open files. For example, the Windows Server 2003 and 2008 backup
programs do this by creating a snapshot of the volume when it begins,
thus making temporary copies of any files that are modified during the
backup. The backup backs up the temporary copies rather than the versions being modified. When the backup finishes, the temporary copies
are deleted.
How Many Sets of Backups Should You Keep?
The safest scheme is to use a new backup tape every day and keep all your
old tapes in a vault. Pretty soon, though, your tape vault can start looking
like the warehouse where they stored the Ark of the Covenant at the end of
Raiders of the Lost Ark.
As a compromise between these two extremes, most users purchase several
tapes and rotate them. That way, you always have several backup tapes to fall
back on, just in case the file you need isn’t on the most recent backup tape.
This technique is tape rotation, and several variations are commonly used:
✦ The simplest approach is to purchase three tapes and label them A, B,
and C. You use the tapes on a daily basis in sequence: A the first day, B
the second day, C the third day; then A the fourth day, B the fifth day,
C the sixth day, and so on. On any given day, you have three generations of backups: today’s, yesterday’s, and the day-before-yesterday’s.
Computer geeks like to call these the grandfather, father, and son tapes.
Book III
Chapter 9
Backing Up
Your Data
Don’t try to cut costs by purchasing one backup tape and reusing it every
day. What happens if you accidentally delete an important file on Tuesday
and don’t discover your mistake until Thursday? Because the file didn’t exist
on Wednesday, it won’t be on Wednesday’s backup tape. If you have only
one tape that’s reused every day, you’re outta luck.
268
A Word about Tape Reliability
✦ Another simple approach is to purchase five tapes and use one each
day of the workweek.
✦ A variation of the preceding bullet is to buy eight tapes. Take four
of them and write Tuesday on one label, Wednesday on the second,
Thursday on the third, and Friday on the fourth label. On the other four
tapes, write Monday 1, Monday 2, Monday 3, and Monday 4. Now, tack up
a calendar on the wall near the computer and number all the Mondays in
the year: 1, 2, 3, 4, 1, 2, 3, 4, and so on.
On Tuesday through Friday, you use the appropriate daily backup tape.
When you run a full backup on Monday, consult the calendar to decide
which Monday tape to use. With this scheme, you always have four
weeks’ worth of Monday backup tapes, plus individual backup tapes for
the rest of the week.
✦ If bookkeeping data lives on the network, make a backup copy of all
your files (or at least all your accounting files) immediately before
closing the books each month; then retain those backups for each
month of the year. This doesn’t necessarily mean that you should purchase 12 additional tapes. If you back up just your accounting files, you
can probably fit all 12 months on a single tape. Just make sure that you
back up with the “append to tape” option rather than the “erase tape”
option so that the previous contents of the tape aren’t destroyed. Also,
treat this accounting backup as completely separate from your normal
daily backup routine.
Keep at least one recent full backup at another location. That way, if your
office should fall victim to an errant Scud missile or a rogue asteroid, you
can re-create your data from the backup copy that you stored offsite. Make
sure the person entrusted with the task of taking the backups to this off-site
location is trustworthy.
A Word about Tape Reliability
From experience, I’ve found that although tape drives are very reliable, they
do run amok once in a while. The problem is that they don’t always tell you
when they’re not working. A tape drive (especially the less-expensive Travan
drives) can spin along for hours, pretending to back up your data — but in
reality, your data isn’t being written reliably to the tape. In other words, a
tape drive can trick you into thinking that your backups are working just
fine. Then, when disaster strikes and you need your backup tapes, you may
just discover that the tapes are worthless.
Don’t panic! Here’s a simple way to assure yourself that your tape drive is
working. Just activate the “compare after backup” feature of your backup
software. Then, as soon as your backup program finishes backing up your
About Cleaning the Heads
269
data, it rewinds the tape, reads each backed-up file, and compares it with the
original version on the hard drive. If all files compare, you know your backups are trustworthy.
Here are some additional thoughts about the reliability of tapes:
✦ The compare-after-backup feature doubles the time required to do a
backup, but that doesn’t matter if your entire backup fits on one tape.
You can just run the backup after hours. Whether the backup and repair
operation takes one hour or ten doesn’t matter, as long as it’s finished
by the time the network users arrive at work the next morning.
✦ If your backups require more than one tape, you may not want to run
the compare-after-backup feature every day. However, be sure to run it
periodically to check that your tape drive is working.
✦ If your backup program reports errors, throw away the tape and use a
new tape.
✦ Actually, you should ignore that last comment about waiting for your
backup program to report errors. You should discard tapes before your
backup program reports errors. Most experts recommend that you
should use a tape only about 20 times before discarding it. If you use the
same tape every day, replace it monthly. If you have tapes for each day
of the week, replace them twice yearly. If you have more tapes than that,
figure out a cycle that replaces tapes after about 20 uses.
An important aspect of backup reliability is proper maintenance of your tape
drives. Every time you back up to tape, little bits and specks of the tape rub
off onto the read and write heads inside the tape drive. Eventually, the heads
become too dirty to reliably read or write data.
To counteract this problem, clean the tape heads regularly. The easiest way
to clean them is to use a cleaning cartridge for the tape drive. The drive
automatically recognizes when you insert a cleaning cartridge and then performs a routine that wipes the cleaning tape back and forth over the heads
to clean them. When the cleaning routine is done, the tape is ejected. The
whole process takes only about 30 seconds.
Because the maintenance requirements of each drive differ, check the
drive’s user’s manual to find out how and how often to clean the drive. As a
general rule, clean the drives once weekly.
Backing Up
Your Data
About Cleaning the Heads
Book III
Chapter 9
270
Backup Security
The most annoying aspect of tape drive cleaning is that the cleaning cartridges have a limited life span. And, unfortunately, if you insert a used-up
cleaning cartridge, the drive accepts it and pretends to clean the drive. For
this reason, keep track of how many times you used the cleaning cartridge
and replace it as recommended by the manufacturer.
Backup Security
Backups create an often-overlooked security exposure for your network.
No matter how carefully you set up user accounts and enforce password
policies, if any user (including a guest) can perform a backup of the system,
that user may make an unauthorized backup. In addition, your backup tapes
themselves are vulnerable to theft. As a result, make sure that your backup
policies and procedures are secure by taking the following measures:
✦ Set up a user account for the user who does backups. Because this user
account has backup permission for the entire server, guard its password
carefully. Anyone who knows the username and password of the backup
account can log on and bypass any security restrictions that you place
on that user’s normal user ID.
✦ Counter potential security problems by restricting the backup user ID
to a certain client and a certain time of the day. If you’re really clever
(and paranoid), you can probably set up the backup user’s account so
that the only program it can run is the backup program.
✦ Use encryption to protect the contents of your backup tapes.
✦ Secure the backup tapes in a safe location, such as, um, a safe.
Chapter 10: Disaster Recovery and
Business Continuity Planning
In This Chapter
✓ Realizing the need for backups
✓ Making a plan
✓ Practicing disaster recovery
✓ Remembering tape rotation and other details
O
n April Fools’ Day about 20 years ago, my colleagues and I discovered that some loser had broken into the office the night before and
pounded our computer equipment to death with a crowbar. (I’m not making
this up.)
Sitting on a shelf right next to the mangled piles of what used to be a Wang
minicomputer system was an undisturbed disk pack that contained the only
complete backup of all the information that was on the destroyed computer.
The vandal didn’t realize that one more swing of the crowbar would have
escalated this major inconvenience into a complete catastrophe. Sure, we
were up a creek until we could get the computer replaced. And in those
days, you couldn’t just walk into your local Computer Depot and buy a new
computer off the shelf — this was a Wang minicomputer system that had
to be specially ordered. After we had the new computer, though, a simple
restore from the backup disk brought us right back to where we were on
March 31. Without that backup, getting back on track would have taken
months.
I’ve been paranoid about disaster planning ever since. Before then, I thought
that disaster planning meant doing good backups. That’s a part of it, but I
can never forget the day we came within one swing of the crowbar of losing
everything. Vandals are probably much smarter now: They know to smash
the backup disks as well as the computers themselves. Being prepared for
disasters entails much more than just doing regular backups.
Nowadays, the trendy term for disaster planning is a business continuity plan
(BCP). I suppose the term disaster planning sounded too negative, like we
were planning for disasters to happen. The new term refocuses attention on
the more positive aspect of preparing a plan that will enable a business to
carry on with as little interruption as possible in the event of a disaster.
272
Assessing Different Types of Disasters
For more in-depth information about this topic, please refer to IT Disaster
Recovery Planning For Dummies by Peter Gregory.
Assessing Different Types of Disasters
Disasters come in many shapes and sizes. Some types of disasters are more
likely than others. For example, your building is more likely to be struck by
lightning than to be hit by a comet. In some cases, the likelihood of a particular type of disaster depends on where you’re located. For example, crippling
snowstorms are more likely in New York than in Florida.
In addition, the impact of each type of disaster varies from company to company. What may be a disaster for one company may only be a mere inconvenience for another. For example, a law firm may tolerate a disruption in
telephone service for a day or two. Loss of communication via phone would
be a major inconvenience but not a disaster. To a telemarketing firm, however, a day or two with the phones down is a more severe problem because
the company’s revenue depends on the phones.
One of the first steps in developing a business continuity plan is to assess
the risk of the various types of disasters that may affect your organization.
Weigh the likelihood of a disaster happening with the severity of the impact
that the disaster would have. For example, a meteor crashing into your
building would probably be pretty severe, but the odds of that happening
are miniscule. On the other hand, the odds of your building being destroyed
by fire are much higher, and the consequences of a devastating fire would be
about the same as those from a meteor impact.
The following sections describe the most common types of risks that most
companies face. Notice throughout this discussion that although many of
these risks are related to computers and network technology, some are not.
The scope of business continuity planning is much larger than just computer
technology.
Environmental disasters
Environmental disasters are what most people think of first when they think
of disaster recovery. Some types of environmental disasters are regional.
Others can happen pretty much anywhere.
✦ Fire: Fire is probably the first disaster that most people think of when
they consider disaster planning. Fires can be caused by unsafe conditions; carelessness, such as electrical wiring that isn’t up to code; natural causes, such as lightning strikes; or arson.
Assessing Different Types of Disasters
273
✦ Earthquakes: Not only can earthquakes cause structural damage to your
building, but they can also disrupt the delivery of key services and utilities, such as water and power. Serious earthquakes are rare and unpredictable, but some areas experience them with more regularity than
others. If your business is located in an area known for earthquakes,
your BCP should consider how your company would deal with a devastating earthquake.
✦ Weather: Weather disasters can cause major disruption to your business. Moderate weather may close transportation systems so that your
employees can’t get to work. Severe weather may damage your building
or interrupt delivery of services, such as electricity and water.
✦ Water: Flooding can wreak havoc with electrical equipment, such as
computers. If floodwaters get into your computer room, chances are
good that the computer equipment will be totally destroyed. Flooding
can be caused not only by bad weather but also by burst pipes or malfunctioning sprinklers.
✦ Lightning: Lightning storms can cause electrical damage to your computer and other electronic equipment from lightning strikes as well as
surges in the local power supply.
Deliberate disasters
Some disasters are the result of deliberate actions by others. For example
Don’t neglect the possibility of sabotage. A disgruntled employee who
gets hold of an administrator’s account and password can do all sorts of
nasty things to your network.
✦ Theft: Theft is always a possibility. You may come to work someday to
find that your servers or other computer equipment have been stolen.
✦ Terrorism: Terrorism used to be something that most Americans weren’t
concerned about, but September 11, 2001, changed all that. No matter
where you live in the world, the possibility of a terrorist attack is real.
Disruption of services
You may not realize just how much your business depends on the delivery
of services and utilities. A BCP should take into consideration how you will
deal with the loss of certain services:
Disaster Recovery
and Business
Continuity Planning
✦ Intentional damage: Vandalism or arson may damage or destroy your
facilities or your computer systems. The vandalism or arson may be
targeted at you specifically, by a disgruntled employee or customer, or it
may be random. Either way, the effect is the same.
Book III
Chapter 10
274
Assessing Different Types of Disasters
✦ No juice: Electrical power is crucial for computers and other types
of equipment. During a power failure once (I live in California, so I’m
used to it), I discovered that I can’t even work with pencil and paper
because all my pencil sharpeners are electric. Electrical outages are
not uncommon, but the technology to deal with them is readily available. UPS (uninterruptible power supply) equipment is reliable and
inexpensive.
✦ No communications: Communication connections can be disrupted
by many causes. A few years ago, a railroad overpass was constructed
across the street from my office. One day, a backhoe cut through the
phone lines, completely cutting off our phone service — including our
Internet connection — for a day and a half.
✦ No water: An interruption in the water supply may not shut down your
computers, but it can disrupt your business by forcing you to close your
facility until the water supply is reestablished.
Equipment failure
Modern companies depend on many different types of equipment for their
daily operations. The failure of any of these key systems can disrupt business until the systems are repaired:
✦ Computer equipment failure can obviously affect business operations.
✦ Air-conditioning systems are crucial to regulate temperatures, especially in computer rooms. Computer equipment can be damaged if the
temperature climbs too high.
✦ Elevators, automatic doors, and other equipment may also be necessary for your business.
Other disasters
You should assess many other potential disasters. Here are just a few:
✦ Labor disputes
✦ Loss of key staff because of resignation, injury, sickness, or death
✦ Workplace violence
✦ Public health issues, such as epidemics, mold infestations, and so on
✦ Loss of a key supplier
✦ Nearby disaster, such as a fire or police action across the street that
results in your business being temporarily blocked off
Analyzing the Impact of a Disaster
275
Analyzing the Impact of a Disaster
With a good understanding of the types of disasters that can affect your
business, you can turn your attention to the impact that these disasters can
have on your business. The first step is to identify the key business processes that can be impacted by different types of disasters. These business
processes are different for each company. For example, here are a few of the
key business processes for a publishing company:
✦ Editorial processes, such as managing projects through the process of
technical editing, copyediting, and production
✦ Acquisition processes, such as determining product development strategies, recruiting authors, and signing projects
✦ Human resource processes, such as payroll, hiring, employee review,
and recruiting
✦ Marketing processes, including sales tracking, developing marketing
materials, sponsoring sales conferences, exhibiting at trade events, and
so on
✦ Sales and billing processes, such as filling customer orders, maintaining
the company Web site, managing inventory, and handling payments
The impact of a disruption to each of these processes will vary. One
common way to assess the impact of business process loss is to rate the
impact of various degrees of loss for each process. For example, you may
rate the loss of each process for the following time frames:
✦ 0 to 2 hours
✦ 2 to 24 hours
✦ 1 to 2 days
✦ 2 days to 1 week
✦ More than 1 week
For some business processes, an interruption of two hours or even one day
may be minor. For other processes, even the loss of a few hours may be very
costly.
Book III
Chapter 10
Disaster Recovery
and Business
Continuity Planning
✦ Executive and financial processes, such as managing cash flow, securing credit, raising capital, deciding when to go public, and deciding
when to buy a smaller publisher or sell out to a bigger publisher
276
Developing a Business Continuity Plan
Developing a Business Continuity Plan
A BCP is simply a plan for how you will continue operation of your key business processes should the normal operation of the process fail. For example,
if your primary office location is shut down for a week because of a major
fire across the street, you won’t have to suspend operations if you have a
business continuity plan in place.
The key to a BCP is redundancy of each component that is essential to your
business processes. These components include:
✦ Facilities: If your company already has multiple office locations, you
may be able to temporarily squeeze into one of the other locations for
the duration of the disaster. If not, you should secure arrangements in
advance with a real estate broker so that you can quickly arrange an
alternate location. By having an arrangement made in advance, you can
move into an emergency location on a moment’s notice.
✦ Computer equipment: It doesn’t hurt to have a set of spare computers
in storage somewhere so that you can dig them out to use in an emergency. Preferably, these computers would already have your critical
software installed. The next best thing would be to have detailed plans
available so that your IT staff can quickly install key software on new
equipment to get your business up and running.
Always keep a current set of backup tapes at an alternate location.
✦ Phones: Discuss emergency phone services in advance with your
phone company. If you’re forced to move to another location on
24-hour notice, how quickly can you get your phones up and running?
And can you arrange to have your incoming toll-free calls forwarded to
the new location?
✦ Staff: Unless you work for a government agency, you probably don’t
have redundant employees. However, you can make arrangements in
advance with a temp agency to provide clerical and administrative help
on short notice.
✦ Stationery: This sounds like a small detail, but you should store a
supply of all your key stationery products (letterhead, envelopes,
invoices, statements, and so on) in a safe location. That way, if your
main location is suddenly unavailable, you don’t have to wait a week to
get new letterhead or invoices printed.
✦ Hard copy files: Keep a backup copy of important printed material (customer billing files, sales records, and so on) at an alternate location.
Holding a Fire Drill
277
Holding a Fire Drill
Remember in grade school when the fire alarm would go off and your
teacher would tell you and the other kids to calmly put down your work and
walk out to the designated safe zone in an orderly fashion? Drills are important so that if a real fire occurs, you don’t run and scream and climb all over
each other in order to be the first one to get out.
Any disaster recovery plan is incomplete unless you test it to see whether it
works. Testing doesn’t mean that you should burn your building down one
day to see how long it takes you to get back up and running. You should,
though, periodically simulate a disaster in order to prove to yourself and
your staff that you can recover.
The most basic type of disaster recovery drill is a simple test of your network backup procedures. You should periodically attempt to restore key
files from your backup tapes just to make sure that you can. You achieve
several benefits by restoring files on a regular basis:
✦ Tapes are unreliable. The only way to be sure that your tapes are working is to periodically restore files from them.
✦ Restoring files can be a little confusing, especially when you use a
combination of normal and incremental or differential backups. Add
to that the pressure of having the head of the company watching over
your shoulder while you try to recover a lost file. If you regularly conduct file restore drills, you’ll familiarize yourself with the restore features of your backup software in a low-pressure situation. Then, you can
easily restore files for real when the pressure’s on.
You can also conduct walkthroughs of more serious disaster scenarios. For
example, you can set aside a day to walk through moving your entire staff to
an alternate location. You can double-check that all the backup equipment,
documents, and data are available as planned. If something is missing, it’s
better to find out now rather than while the fire department is still putting
water on the last remaining hot spots in what used to be your office.
Book III
Chapter 10
Disaster Recovery
and Business
Continuity Planning
✦ Backup programs are confusing to configure. I’ve seen people run
backup jobs for years that don’t include all the data they think they’re
backing up. Only when disaster strikes and they need to recover a key
file do they discover that the file isn’t included in the backup.
278
Book III: Network Administration and Security
Book IV
TCP/IP and the Internet
Contents at a Glance
Chapter 1: Introduction to TCP/IP and the Internet . . . . . . . . . . . . . . .281
Chapter 2: Understanding IP Addresses . . . . . . . . . . . . . . . . . . . . . . . .289
Chapter 3: Using DHCP . . . . . . . . . . . . . . . . . . . . . . . . . . . . . . . . . . . . . . .307
Chapter 4: Using DNS . . . . . . . . . . . . . . . . . . . . . . . . . . . . . . . . . . . . . . . .321
Chapter 5: Using FTP . . . . . . . . . . . . . . . . . . . . . . . . . . . . . . . . . . . . . . . . .347
Chapter 6: TCP/IP Tools and Commands . . . . . . . . . . . . . . . . . . . . . . . .371
Chapter 1: Introduction to TCP/IP
and the Internet
In This Chapter
✓ Introducing the Internet
✓ Familiarizing yourself with TCP/IP standards
✓ Figuring out how TCP/IP lines up with the OSI reference model
✓ Discovering important TCP/IP applications
N
ot too many years ago, Transmission Control Protocol/Internet
Protocol (TCP/IP) was known primarily as the protocol of the
Internet. The biggest challenge of getting a local area network (LAN) connected
to the Internet was figuring out how to mesh TCP/IP with the proprietary
protocols that were the basis of the LANs — most notably Internetwork
Packet Exchange/Sequenced Packet Exchange (IPX/SPX) and NetBIOS
Extended User Interface (NetBEUI). A few years ago, network administrators
realized that they could save the trouble of combining TCP/IP with IPX/SPX
and NetBEUI by eliminating IPX/SPX and NetBEUI from the equation altogether.
As a result, TCP/IP is not just the protocol of the Internet now, but it’s also
the protocol on which most LANs are based.
This chapter is a gentle introduction to the Internet in general and the TCP/
IP suite of protocols in particular. After I get the introductions out of the
way, you’ll be able to focus more in-depth on the detailed TCP/IP information given in the remaining chapters of Book IV.
What Is the Internet?
The Goliath of all computer networks, the Internet links hundreds of millions
of computer users throughout the world. Strictly speaking, the Internet is a
network of networks. It consists of tens of thousands of separate computer
networks, all interlinked, so that a user on any of those networks can reach
out and potentially touch a user on any of the other networks. This network
of networks connects more than half a billion computers to each other.
(That’s right, billion with a b.)
282
What Is the Internet?
Just how big is the Internet?
Because the Internet is not owned or controlled by any one organization, no one knows
how big the Internet really is. Several organizations do attempt to periodically determine
the size of the Internet, including the Internet
Systems Consortium (ISC), which completed its
last survey in July 2009. ISC found that more
than 681 million host computers are connected
to the Internet. The same survey showed a
mere 353 million hosts in July 2005, so the size
of the Internet almost doubled in four years.
The first year the ISC did the survey (1993), it
found only 1.3 million host computers.
Unfortunately, no one knows how many actual
users are on the Internet. Each host can support a single user, or in the case of domains —
such as aol.com (America Online) or msn.
com (MSN) — hundreds of thousands or
perhaps even millions of users. No one really
knows. Still, the indisputable point is that the
Internet is big and growing every day.
If you’re already on the Net and are interested,
you can check up on the latest Internet statistics from ISC by visiting its Web site at www.
isc.org.
One of the official documents (RFC 2026) of the Internet Engineering Task
Force (IETF) defines the Internet as “a loosely organized international
collaboration of autonomous, interconnected networks.” Broken down
piece by piece, this definition encompasses several key aspects of what the
Internet is:
✦ Loosely organized: No single organization has authority over the
Internet. As a result, the Internet is not highly organized. Online services,
such as America Online or MSN, are owned and operated by individual
companies that control exactly what content appears on the service and
what software can be used with the service. No one exercises that kind of
control over the Internet. As a result, you can find just about any kind
of material imaginable on the Internet. No one guarantees the accuracy
of information that you find on the Internet, so you have to be careful as
you work your way through the labyrinth.
✦ International: Nearly 200 countries are represented on the Internet,
from Afghanistan to Zimbabwe.
✦ Collaboration: The Internet exists only because many different
organizations cooperate to provide the services and support needed to
sustain it. For example, much of the software that drives the Internet is
open-source software that’s developed collaboratively by programmers
throughout the world, who constantly work to improve the code.
✦ Autonomous: The Internet community respects that organizations that
join the Internet are free to make their own decisions about how they configure and operate their networks. Although legal issues sometimes boil
up, for the most part, each player on the Internet operates independently.
A Little Internet History
283
✦ Interconnected: The whole key to the Internet is the concept of
interconnection, which uses standard protocols that enable networks to
communicate with each other. Without the interconnection provided by
the TCP/IP protocol, the Internet would not exist.
✦ Networks: The Internet would be completely unmanageable if it consisted
of half a billion individual users, all interconnected. That’s why the
Internet is often described as a network of networks. Most individual
users on the Internet don’t access the Internet directly. Instead, they
access the Internet indirectly through another network, which may be a
LAN in a business or academic environment, or a dialup or broadband
network provided by an Internet service provider (ISP). In each case,
however, the users of the local network access the Internet via a gateway
IP router.
The Internet is composed of several distinct types of networks:
Government agencies, such as the Library of Congress and the White
House; military sites (did you ever see War Games or any of the
Terminator movies?); educational institutions, such as universities and
colleges (and their libraries); businesses, such as Microsoft and IBM;
ISPs, which allow individuals to access the Internet; and commercial
online services, such as America Online and MSN.
A Little Internet History
The Internet has a fascinating history, if such things interest you. There’s
no particular reason why you should be interested in such things, of course,
except that a superficial understanding of how the Internet got started may
help you to understand and cope with the way this massive computer network exists today. So here goes.
The good folks who designed IP had the foresight to realize that, soon,
more than two networks would want to be connected. In fact, they left room
for tens of thousands of networks to join the game, which is a good thing
because it wasn’t long before the Internet began to take off.
By the mid-1980s, ARPANET was beginning to reach the limits of what it
could do. Enter the National Science Foundation (NSF), which set up a
nationwide network designed to provide access to huge supercomputers,
those monolithic computers used to discover new prime numbers and
Book IV
Chapter 1
Introduction to TCP/
IP and the Internet
The Internet traces its beginnings back to a small network called ARPANET,
built by the Department of Defense in 1969 to link defense installations.
ARPANET soon expanded to include not only defense installations but universities as well. In the 1970s, ARPANET was split into two networks: one for
military use (renamed MILNET) and the original ARPANET (for nonmilitary
use). The two networks were connected by a networking link called IP — the
Internet protocol — so called because it allowed communication between two
networks.
284
TCP/IP Standards and RFCs
calculate the orbits of distant galaxies. The supercomputers were never put
to much use, but the network that was put together to support the supercomputers — NSFNET — was used. In fact, NSFNET replaced ARPANET as
the new backbone for the Internet.
Then, out of the blue, it seemed as if the whole world became interested in
the Internet. Stories about it appeared in Time and Newsweek. Any company
that had “dot com” in its name practically doubled in value every month. Al
Gore claimed he invented the Internet. The Net began to grow so fast that
even NSFNET couldn’t keep up, so private commercial networks got into
the game. The size of the Internet nearly doubled every year for most of the
1990s. Then, in the first few years of the millennium, the growth rate slowed
a bit. However, the Internet still seems to be growing at the phenomenal rate
of about 30 to 50 percent per year, and who knows how long this dizzying
rate of growth will continue.
TCP/IP Standards and RFCs
The TCP/IP protocol standards that define how the Internet works are
managed by the IETF. However, the IETF doesn’t impose standards. Instead,
it simply oversees the process by which ideas are developed into agreed-upon
standards.
An Internet standard is published in the Request for Comments (RFC)
document. When a document is accepted for publication, it is assigned an
RFC number by the IETF. The RFC is then published. After it’s published, an
RFC is never changed. If a standard is enhanced, the enhancement is covered
in a separate RFC.
At the time of this writing, more than 3,500 RFCs were available from the
IETF Web site (www.ietf.org). The oldest RFC is RFC 0001, published in
April, 1969. It describes how the host computers communicated with each
other in the original ARPANET. The most recent RFC (as of February, 2010) is
RFC 5777, a proposed standard entitled “Traffic Classification and Quality of
Service (QoS) Attributes for Diameter.”
Not all RFCs represent Internet standards. The following paragraphs
summarize the various types of RFC documents:
✦ Internet Standards Track: This type of RFC represents an Internet
standard. Standards Track RFCs have one of three maturity levels,
as described in Table 1-1. An RFC enters circulation with Proposed
Standard status but may be elevated to Draft Standard status — and,
ultimately, to Internet Standard status.
TCP/IP Standards and RFCs
Table 1-1
285
Maturity Levels for Internet Standards Track RFCs
Maturity Level
Description
Proposed
Standard
Proposed standards are generally stable, have resolved known
design choices, are believed to be well understood, have
received significant community review, and appear to enjoy
enough community interest to be considered valuable.
Draft Standard
Draft standards are well understood and known to be quite
stable. At least two interoperable implementations must exist,
developed independently from separate code bases. The
specification is believed to be mature and useful.
Internet
Standard
Internet Standards have been fully accepted by the Internet
community as highly mature and useful standards.
✦ Experimental specifications: These are a result of research or development
efforts. They’re not intended to be standards, but the information they
contain may be of use to the Internet community.
✦ Informational specifications: These simply provide general information
for the Internet community.
✦ Historic specifications: These RFCs have been superceded by a more
recent RFC and are thus considered obsolete.
✦ Best Current Practice (BCP): RFCs are documents that summarize the
consensus of the Internet community’s opinion on the best way to
perform an operation or procedure. BCPs are guidelines, not standards.
Table 1-2 summarizes the RFCs that apply to the key Internet standards
described in this book.
Table 1-2
RFCs for Key Internet Standards
Book IV
Chapter 1
Date
Description
768
August 1980
User Datagram Protocol (UDP)
791
September 1981
Internet Protocol (IP)
792
September 1981
Internet Control Message Protocol (ICMP)
793
September 1981
Transmission Control Protocol (TCP)
826
November 1982
Ethernet Address Resolution Protocol (ARP)
(continued)
Introduction to TCP/
IP and the Internet
RFC
286
The TCP/IP Protocol Framework
Table 1-2 (continued)
RFC
Date
Description
950
August 1985
Internet Standard Subnetting Procedure
959
October 1985
File Transfer Protocol (FTP)
1034
November 1987
Domain Names — Concepts and Facilities
(DNS)
1035
November 1987
Domain Names — Implementation and
Specification (DNS)
1939
May 1996
Post Office Protocol Version 3 (POP3)
2131
March 1997
Dynamic Host Configuration Protocol (DHCP)
2236
November 1997
Internet Group Management Protocol (IGMP)
(Updates RFC 1112)
2616
June 1999
Hypertext Transfer Protocol — HTTP/1.1
2821
April 2001
Simple Mail Transfer Protocol (SMTP)
My favorite RFC is 1149, an experimental specification for the “Transmission
of IP datagrams on avian carriers.” The specification calls for IP datagrams
to be written in hexadecimal on scrolls of paper and secured to “avian
carriers” with duct tape. (Not surprisingly, it’s dated 1 April, 1990. Similar
RFCs are frequently submitted on April 1.)
The TCP/IP Protocol Framework
Like the seven-layer OSI Reference Model, TCP/IP protocols are based on
a layered framework. TCP/IP has four layers, as shown in Figure 1-1. These
layers are described in the following sections.
Network Interface layer
The lowest level of the TCP/IP architecture is the Network Interface layer.
It corresponds to the OSI Physical and Data Link layers. You can use many
different TCP/IP protocols at the Network Interface layer, including Ethernet
and Token Ring for LANs and protocols such as X.25, Frame Relay, and ATM
for wide area networks (WANs).
The Network Interface layer is assumed to be unreliable.
The TCP/IP Protocol Framework
TCP/IP Layers
Application Layer
TCP/IP Protocols
HTTP
FTP
Transport Layer
Figure 1-1:
The four
layers of
the TCP/IP
framework.
Network Layer
Network Interface
Layer
287
Telnet
TCP
IP
Ethernet
SMTP
DNS
UDP
ARP
Token Ring
ICMP
IGMP
Other Link-Layer
Protocols
Network layer
The Network layer is where data is addressed, packaged, and routed among
networks. Several important Internet protocols operate at the Network layer:
✦ Internet Protocol (IP): A routable protocol that uses IP addresses to
deliver packets to network devices. IP is an intentionally unreliable
protocol, so it doesn’t guarantee delivery of information.
✦ Address Resolution Protocol (ARP): Resolves IP addresses to hardware
MAC addresses, which uniquely identify hardware devices.
✦ Internet Control Message Protocol (ICMP): Sends and receives diagnostic
messages. ICMP is the basis of the ubiquitous ping command.
✦ Internet Group Management Protocol (IGMP): Used to multicast
messages to multiple IP addresses at once.
Transport layer
✦ Transmission Control Protocol (TCP): Provides reliable connectionoriented transmission between two hosts. TCP establishes a session
between hosts, and then ensures delivery of packets between the hosts.
✦ User Datagram Protocol (UDP): Provides connectionless, unreliable,
one-to-one or one-to-many delivery.
Introduction to TCP/
IP and the Internet
The Transport layer is where sessions are established and data packets are
exchanged between hosts. Two core protocols are found at this layer:
Book IV
Chapter 1
288
The TCP/IP Protocol Framework
Application layer
The Application layer of the TCP/IP model corresponds to the Session,
Presentation, and Application layers of the OSI Reference Model. A few of the
most popular Application layer protocols are
✦ HyperText Transfer Protocol (HTTP): The core protocol of the World
Wide Web
✦ File Transfer Protocol (FTP): A protocol that enables a client to send
and receive complete files from a server
✦ Telnet: The protocol that lets you connect to another computer on the
Internet in a terminal emulation mode
✦ Simple Mail Transfer Protocol (SMTP): One of several key protocols
that are used to provide e-mail services
✦ Domain Name System (DNS): The protocol that allows you to refer to
other host computers by using names rather than numbers
Chapter 2: Understanding
IP Addresses
In This Chapter
✓ Delving into the binary system
✓ Digging into IP addresses
✓ Finding out how subnetting works
✓ Looking at network address translation
O
ne of the most basic components of TCP/IP is IP addressing. Every
device on a TCP/IP network must have a unique IP address. In this
chapter, I describe the ins and outs of these IP addresses. Enjoy!
Understanding Binary
Before you can understand the details of how IP addressing works, you need
to understand how the binary numbering system works because binary is
the basis of IP addressing. If you already understand binary, please skip to
the section, “Introducing IP Addresses.” I don’t want to bore you with stuff
that’s too basic.
Counting by ones
Binary is a counting system that uses only two numerals: 0 and 1. In the
decimal system (with which most people are accustomed), you use 10
numerals: 0–9. In an ordinary decimal number — such as 3,482 — the rightmost
digit represents ones; the next digit to the left, tens; the next, hundreds; the
next, thousands; and so on. These digits represent powers of ten: first 100
(which is 1); next, 101 (10); then 102 (100); then 103 (1,000); and so on.
In binary, you have only two numerals rather than ten, which is why binary
numbers look somewhat monotonous, as in 110011, 101111, and 100001.
The positions in a binary number (called bits rather than digits) represent
powers of two rather than powers of ten: 1, 2, 4, 8, 16, 32, and so on. To
figure the decimal value of a binary number, you multiply each bit by its
corresponding power of two and then add the results. The decimal value of
binary 10111, for example, is calculated as follows:
290
Understanding Binary
+
+
+
+
1
1
1
0
1
×
×
×
×
×
20
21
22
23
24
=
=
=
=
=
1
1
1
0
1
× 1
× 2
× 4
× 8
× 16
=
1
=
2
=
4
=
0
= _16
23
Fortunately, converting a number between binary and decimal is something
a computer is good at — so good, in fact, that you’re unlikely ever to need
to do any conversions yourself. The point of learning binary is not to be able
to look at a number such as 1110110110110 and say instantly, “Ah! Decimal
7,606!” (If you could do that, Barbara Walters would probably interview you,
and they would even make a movie about you — starring Dustin Hoffman.)
Instead, the point is to have a basic understanding of how computers store
information and — most important — to understand how the binary counting
system works, which I describe in the following section.
Here are some of the more interesting characteristics of binary and how the
system is similar to and differs from the decimal system:
✦ In decimal, the number of decimal places allotted for a number
determines how large the number can be. If you allot six digits, for
example, the largest number possible is 999,999. Because 0 is itself a
number, however, a six-digit number can have any of 1 million different
values.
Similarly, the number of bits allotted for a binary number determines
how large that number can be. If you allot eight bits, the largest value
that number can store is 11111111, which happens to be 255 in decimal.
✦ To quickly figure how many different values you can store in a binary
number of a given length, use the number of bits as an exponent
of two. An eight-bit binary number, for example, can hold 28 values.
Because 28 is 256, an eight-bit number can have any of 256 different
values. This is why a byte — eight bits — can have 256 different values.
✦ This “powers of two” thing is why computers don’t use nice, even,
round numbers in measuring such values as memory or disk space.
A value of 1K, for example, is not an even 1,000 bytes: It’s actually 1,024
bytes because 1,024 is 210. Similarly, 1MB is not an even 1,000,000 bytes
but instead 1,048,576 bytes, which happens to be 220.
One basic test of computer nerddom is knowing your powers of two
because they play such an important role in binary numbers. Just for
the fun of it, but not because you really need to know, Table 2-1 lists the
powers of two up to 32.
Table 2-1 also shows the common shorthand notation for various
powers of two. The abbreviation K represents 210 (1,024). The M in
MB stands for 220, or 1,024K, and the G in GB represents 230, which is
Understanding Binary
291
1,024MB. These shorthand notations don’t have anything to do with
TCP/IP, but they’re commonly used for measuring computer disk and
memory capacities, so I thought I’d throw them in at no charge because
the table had extra room.
Table 2-1
Power
21
Powers of Two
Bytes
Kilobytes
Power
Bytes
K, MB,
or GB
2
217
2
2
4
18
2
262,144
256K
23
8
219
524,288
512K
24
16
220
1,048,576
1MB
32
21
2,097,152
2MB
5
2
6
2
27
28
9
2
210
11
2
12
2
64
2
4,194,304
4MB
128
223
8,388,608
8MB
256
224
16,777,216
16MB
512
25
33,554,432
1,024
2,048
4,096
2
8,192
214
16,384
2
16
2
128K
22
13
15
2
131,072
32,768
65,536
2
32MB
1K
226
67,108,864
64MB
2K
27
134,217,728
128MB
28
4K
2
268,435,456
256MB
8K
29
2
536,870,912
512MB
16K
230
1,073,741,824
1GB
32K
31
2,147,483,648
2GB
32
4,294,967,296
4GB
64K
2
2
2
Doing the logic thing
The following list summarizes the basic logical operations:
✦ AND: An AND operation compares two binary values. If both values are
1, the result of the AND operation is 1. If one or both of the values are 0,
the result is 0.
Understanding IP
Addresses
One of the great things about binary is that it’s very efficient at handling
special operations: namely, logical operations. Four basic logical operations
exist although additional operations are derived from the basic four operations.
Three of the operations — AND, OR, and XOR — compare two binary digits
(bits). The fourth (NOT) works on just a single bit.
Book IV
Chapter 2
292
Understanding Binary
✦ OR: An OR operation compares two binary values. If at least one of the
values is 1, the result of the OR operation is 1. If both values are 0, the
result is 0.
✦ XOR: An XOR operation compares two binary values. If exactly one of
them is 1, the result is 1. If both values are 0 or if both values are 1, the
result is 0.
✦ NOT: The NOT operation doesn’t compare two values. Instead, it simply
changes the value of a single binary value. If the original value is 1, NOT
returns 0. If the original value is 0, NOT returns 1.
Table 2-2 summarizes how AND, OR, and XOR work.
Table 2-2
Logical Operations for Binary Values
First Value
Second Value
AND
OR
XOR
0
0
0
0
0
0
1
0
1
1
1
0
0
1
1
1
1
1
1
0
Logical operations are applied to binary numbers that have more than one
binary digit by applying the operation one bit at a time. The easiest way to
do this manually is to line the two binary numbers on top of one another and
then write the result of the operation beneath each binary digit. The following
example shows how you would calculate 10010100 AND 11011101:
10010100
AND 11011101
10010100
As you can see, the result is 10010100.
Working with the binary Windows Calculator
The Calculator program that comes with all versions of Windows has a
special Scientific mode that many users don’t know about. When you flip the
Calculator into this mode, you can do instant binary and decimal conversions,
which can occasionally come in handy when you’re working with IP addresses.
To use the Windows Calculator in Scientific mode, launch the Calculator
by choosing Start➪All Programs➪Accessories➪Calculator. Then, choose
the View➪Scientific command from the Calculator menu. The Calculator
changes to a fancy scientific model — the kind I paid $200 for when I was in
college. All kinds of buttons appear, as shown in Figure 2-1.
Introducing IP Addresses
293
Figure 2-1:
The free
Windows
scientific
Calculator.
You can select the Bin and Dec radio buttons to convert values between
decimal and binary. For example, to find the binary equivalent of decimal
155, enter 155 and then select the Bin radio button. The value in the display
changes to 10011011.
Here are a few other things to note about the Scientific mode of the
Calculator:
✦ Although you can convert decimal values to binary values with the
scientific Calculator, the Calculator can’t handle the dotted-decimal
IP address format that’s described later in this chapter. To convert a
dotted-decimal address to binary, just convert each octet separately.
For example, to convert 172.65.48.120 to binary, first convert 172; then
convert 65; then convert 48; and finally, convert 120.
✦ The scientific Calculator has several features that are designed specifically
for binary calculations, such as AND, XOR, NOT, NOR, and so on.
✦ The scientific Calculator can also handle hexadecimal conversions.
Hexadecimal doesn’t come into play when dealing with IP addresses, but
it is used for other types of binary numbers, so this feature sometimes
proves to be useful.
Introducing IP Addresses
An IP address is a number that uniquely identifies every host on an IP network.
IP addresses operate at the Network layer of the TCP/IP protocol stack, so
they are independent of lower-level Data Link layer MAC addresses, such as
Ethernet MAC addresses.
Understanding IP
Addresses
✦ Windows 7 does the scientific Calculator one step better by providing
a Programmer mode which has even more features for working with
binary numbers.
Book IV
Chapter 2
294
Introducing IP Addresses
IP addresses are 32-bit binary numbers, which means that theoretically,
a maximum of something in the neighborhood of 4 billion unique host
addresses can exist throughout the Internet. You’d think that would be
enough, but TCP/IP places certain restrictions on how IP addresses are
allocated. These restrictions severely limit the total number of usable IP
addresses. Many experts predict that we will run out of IP addresses as soon
as next year. However, new techniques for working with IP addresses have
helped to alleviate this problem, and a standard for 128-bit IP addresses has
been adopted, though it still is not yet in widespread use.
Networks and hosts
IP stands for Internet protocol, and its primary purpose is to enable
communications between networks. As a result, a 32-bit IP address actually
consists of two parts:
✦ The network ID (or network address): Identifies the network on which a
host computer can be found
✦ The host ID (or host address): Identifies a specific device on the network
indicated by the network ID
Most of the complexity of working with IP addresses has to do with figuring
out which part of the complete 32-bit IP address is the network ID and which
part is the host ID, as described in the following sections.
As I describe the details of how host IDs are assigned, you may notice that
two host addresses seem to be unaccounted for. For example, the Class C
addressing scheme, which uses eight bits for the host ID, allows only 254
hosts — not the 256 hosts you’d expect. That’s because host 0 (the host ID
is all zeros) is always reserved to represent the network itself. The host ID
can’t be 255 (the host ID is all ones) because that host ID is reserved for use
as a broadcast request that’s intended for all hosts on the network.
The dotted-decimal dance
IP addresses are usually represented in a format known as dotted-decimal
notation. In dotted-decimal notation, each group of eight bits — an octet — is
represented by its decimal equivalent. For example, consider the following
binary IP address:
11000000101010001000100000011100
To convert this value to dotted-decimal notation, first divide it into four
octets, as follows:
11000000 10101000 10001000 00011100
Classifying IP Addresses
295
Then, convert each of the octets to its decimal equivalent:
11000000 10101000 10001000 00011100
192
168
136
28
Then, use periods to separate the four decimal numbers, like this:
192.168.136.28
This is the format in which you’ll usually see IP addresses represented.
Figure 2-2 shows how the 32 bits of an IP address are broken down into four
octets of eight bits each. As you can see, the four octets of an IP address are
often referred to as w, x, y, and z.
Network ID
Class A
Host ID
0
Network ID
Class B
Figure 2-2:
Octets and
dotteddecimal
notation.
1 0
Network ID
Class C
Host ID
Host ID
1 1 0
Book IV
Chapter 2
When the original designers of the IP protocol created the IP addressing
scheme, they could have assigned an arbitrary number of IP address bits
for the network ID. The remaining bits would then be used for the host ID.
For example, suppose that the designers decided that half of the address
(16 bits) would be used for the network, and the remaining 16 bits would be
used for the host ID. The result of that scheme would be that the Internet
could have a total of 65,536 networks, and each of those networks could
have 65,536 hosts.
Understanding IP
Addresses
Classifying IP Addresses
296
Classifying IP Addresses
What about IPv6?
Most of the current Internet is based on version
4 of the Internet Protocol, also known as IPv4.
IPv4 has served the Internet well for more than
20 years. However, the growth of the Internet
has put a lot of pressure on IPv4’s limited 32-bit
address space. This chapter describes how
IPv4 has evolved to make the best possible
use of 32-bit addresses. Eventually, though, all
the addresses will be assigned, and the IPv4
address space will be filled to capacity. When
that happens, the Internet will have to migrate
to the next version of IP, known as IPv6.
IPv6 is also called IP next generation, or IPng,
in honor of the favorite television show of most
Internet gurus, Star Trek: The Next Generation.
IPv6 offers several advantages over IPv4,
but the most important is that it uses 128 bits
for Internet addresses instead of 32 bits. The
number of host addresses possible with 128
bits is a number so large that it would have
made Carl Sagan proud. It doesn’t just double
or triple the number of available addresses, or
even a thousand-fold or even a million-fold.
Just for the fun of it, here is the number of
unique Internet addresses provided by IPv6:
340,282,366,920,938,463,463,374,607,431,768,21
1,456
This number is so large it defies understanding.
If the IANA had been around at the creation
of the universe and started handing out IPv6
addresses at a rate of one per millisecond —
that is, 1,000 addresses every second —
it would now, 15 billion years later, have not
yet allocated even 1 percent of the available
addresses.
The transition from IPv4 to IPv6 has been a
slow one. IPv6 is available on all new computers and has been supported on Windows since
Windows XP Service Pack 1 (released in 2002).
However, most Internet service providers
(ISPs) still base their service on IPv4. Thus, the
Internet will continue to be driven by IPv4 for at
least a few more years.
In the early days of the Internet, this scheme probably seemed like several
orders of magnitude more than would ever be needed. However, the IP
designers realized from the start that few networks would actually have tens
of thousands of hosts. Suppose that a network of 1,000 computers joins the
Internet and is assigned one of these hypothetical network IDs. Because that
network will use only 1,000 of its 65,536 host addresses, more than 64,000 IP
addresses would be wasted.
As a solution to this problem, the idea of IP address classes was introduced.
The IP protocol defines five different address classes: A, B, C, D, and E. Each
of the first three classes, A–C, uses a different size for the network ID and
host ID portion of the address. Class D is for a special type of address called
a multicast address. Class E is an experimental address class that isn’t used.
The first four bits of the IP address are used to determine into which class a
particular address fits, as follows:
✦ If the first bit is zero, the address is a Class A address.
297
Classifying IP Addresses
✦ If the first bit is one and if the second bit is zero, the address is a Class
B address.
✦ If the first two bits are both one and if the third bit is zero, the address
is a Class C address.
✦ If the first three bits are all one and if the fourth bit is zero, the
address is a Class D address.
✦ If the first four bits are all one, the address is a Class E address.
Because Class D and E addresses are reserved for special purposes, I focus
the rest of the discussion here on Class A, B, and C addresses. Table 2-3
summarizes the details of each address class.
Table 2-3
IP Address Classes
Class
Address Number
Range
Starting
Bits
Length of
Network ID
Number of
Networks
Hosts
A
1–126.x.y.z
0
8
126
16,777,214
B
128–191.x.y.z
10
16
16,384
65,534
C
192–223.x.y.z
110
24
2,097,152
254
Class A addresses
Class A addresses are designed for very large networks. In a Class A address,
the first octet of the address is the network ID, and the remaining three
octets are the host ID. Because only eight bits are allocated to the network
ID and the first of these bits is used to indicate that the address is a Class A
address, only 126 Class A networks can exist in the entire Internet. However,
each Class A network can accommodate more than 16 million hosts.
Just for fun, Table 2-4 lists some of the better-known Class A networks. You’ll
probably recognize many of them. In case you’re interested, you can find a
complete list of all the Class A address assignments at
www.iana.org/assignments/ipv4-address-space
You may have noticed in Table 2-3 that Class A addresses end with
126.x.y.z, and Class B addresses begin with 128.x.y.z. What happened
to 127.x.y.z? This special range of addresses is reserved for loopback
testing, so these addresses aren’t assigned to public networks.
Book IV
Chapter 2
Understanding IP
Addresses
Only about 40 Class A addresses are actually assigned to companies or
organizations. The rest are either reserved for use by the Internet Assigned
Numbers Authority (IANA) or are assigned to organizations that manage IP
assignments for geographic regions such as Europe, Asia, and Latin America.
298
Classifying IP Addresses
Table 2-4
Some Well-Known Class A Networks
Net
Description
Net
Description
3
General Electric Company
32
Norsk
Informasjonsteknology
4
Bolt Beranek and Newman
Inc.
33
DLA Systems Automation
Center
6
Army Information Systems
Center
35
MERIT Computer Network
8
Bolt Beranek and Newman
Inc.
38
Performance Systems
International
9
IBM
40
Eli Lilly and Company
11
DoD Intel Information
Systems
43
Japan Inet
12
AT&T Bell Laboratories
44
Amateur Radio Digital
Communications
13
Xerox Corporation
45
Interop Show Network
15
Hewlett-Packard Company
46
Bolt Beranek and Newman
Inc.
16
Digital Equipment
Corporation
47
Bell-Northern Research
17
Apple Computer Inc.
48
Prudential Securities Inc.
18
MIT
51
Department of Social
Security of UK
19
Ford Motor Company
52
E.I. duPont de Nemours and
Co., Inc.
20
Computer Sciences
Corporation
53
Cap Debis CCS (Germany)
22
Defense Information
Systems Agency
54
Merck and Co., Inc.
25
Royal Signals and Radar
Establishment
55
Boeing Computer Services
26
Defense Information
Systems Agency
56
U.S. Postal Service
28
Decision Sciences Institute
(North)
57
SITA
29–30
Defense Information
Systems Agency
Subnetting
299
Class B addresses
In a Class B address, the first two octets of the IP address are used as the
network ID, and the second two octets are used as the host ID. Thus, a Class
B address comes close to my hypothetical scheme of splitting the address
down the middle, using half for the network ID and half for the host ID. It
isn’t identical to this scheme, however, because the first two bits of the first
octet are required to be 10, in order to indicate that the address is a Class
B address. As a result, a total of 16,384 Class B networks can exist. All Class
B addresses fall within the range 128.x.y.z to 191.x.y.z. Each Class B
address can accommodate more than 65,000 hosts.
The problem with Class B networks is that even though they are much
smaller than Class A networks, they still allocate far too many host IDs. Very
few networks have tens of thousands of hosts. Thus, careless assignment
of Class B addresses can lead to a large percentage of the available host
addresses being wasted on organizations that don’t need them.
Class C addresses
In a Class C address, the first three octets are used for the network ID, and
the fourth octet is used for the host ID. With only eight bits for the host ID,
each Class C network can accommodate only 254 hosts. However, with 24
network ID bits, Class C addresses allow for more than 2 million networks.
The problem with Class C networks is that they’re too small. Although few
organizations need the tens of thousands of host addresses provided by a
Class B address, many organizations need more than a few hundred. The
large discrepancy between Class B networks and Class C networks is what
led to the development of subnetting, which I describe in the next section.
Subnetting
Subnetting provides a more flexible way to designate which portion of an IP
address represents the network ID and which portion represents the host ID.
With standard IP address classes, only three possible network ID sizes exist:
8 bits for Class A, 16 bits for Class B, and 24 bits for Class C. Subnetting lets
you select an arbitrary number of bits to use for the network ID.
Book IV
Chapter 2
Understanding IP
Addresses
Subnetting is a technique that lets network administrators use the 32 bits
available in an IP address more efficiently by creating networks that aren’t
limited to the scales provided by Class A, B, and C IP addresses. With
subnetting, you can create networks with more realistic host limits.
300
Subnetting
Two reasons compel people to use subnetting. The first is to allocate the
limited IP address space more efficiently. If the Internet were limited to Class
A, B, or C addresses, every network would be allocated 254, 64 thousand, or
16 million IP addresses for host devices. Although many networks with more
than 254 devices exist, few (if any) exist with 64 thousand, let alone 16 million.
Unfortunately, any network with more than 254 devices would need a Class
B allocation and probably waste tens of thousands of IP addresses.
The second reason for subnetting is that even if a single organization has
thousands of network devices, operating all those devices with the same
network ID would slow the network to a crawl. The way TCP/IP works
dictates that all the computers with the same network ID must be on the
same physical network. The physical network comprises a single broadcast
domain, which means that a single network medium must carry all the traffic
for the network. For performance reasons, networks are usually segmented
into broadcast domains that are smaller than even Class C addresses provide.
Subnets
A subnet is a network that falls within a Class A, B, or C network. Subnets are
created by using one or more of the Class A, B, or C host bits to extend the
network ID. Thus, instead of the standard 8-, 16-, or 24-bit network ID, subnets
can have network IDs of any length.
Figure 2-3 shows an example of a network before and after subnetting has
been applied. In the unsubnetted network, the network has been assigned
the Class B address 144.28.0.0. All the devices on this network must
share the same broadcast domain.
In the second network, the first four bits of the host ID are used to divide the
network into two small networks, identified as subnets 16 and 32. To the
outside world (that is, on the other side of the router), these two networks
still appear to be a single network identified as 144.28.0.0. For example,
the outside world considers the device at 144.28.16.22 to belong to the
144.28.0.0 network. As a result, a packet sent to this device will be delivered to the router at 144.28.0.0. The router then considers the subnet
portion of the host ID to decide whether to route the packet to subnet 16 or
subnet 32.
Subnet masks
For subnetting to work, the router must be told which portion of the host
ID should be used for the subnet network ID. This little sleight of hand is
accomplished by using another 32-bit number, known as a subnet mask.
Those IP address bits that represent the network ID are represented by a 1
in the mask, and those bits that represent the host ID appear as a 0 in the
mask. As a result, a subnet mask always has a consecutive string of ones on
the left, followed by a string of zeros.
Subnetting
301
Before subnetting
The Internet
144.28.0.0
144.28.0.0
Router
After subnetting
Figure 2-3:
A network
before
and after
subnetting.
144.28.16.0
The Internet
144.28.0.0
Router
144.28.32.0
For example, the subnet mask for the subnet shown in Figure 2-3, where the
network ID consists of the 16-bit network ID plus an additional 4-bit subnet
ID, would look like this:
11111111 11111111 11110000 00000000
In other words, the first 20 bits are ones, and the remaining 12 bits are zeros.
Thus, the complete network ID is 20 bits in length, and the actual host ID
portion of the subnetted address is 12 bits in length.
For example, here’s how the network address is extracted from an IP
address using the 20-bit subnet mask from the previous example:
144 .
28 .
16 .
17
IP address: 10010000 00011100 00010000 00010001
Subnet mask: 11111111 11111111 11110000 00000000
Network ID: 10010000 00011100 00010000 00000000
144 .
28 .
16 .
0
Thus, the network ID for this subnet is 144.28.16.0.
Book IV
Chapter 2
Understanding IP
Addresses
To determine the network ID of an IP address, the router must have both the
IP address and the subnet mask. The router then performs a bitwise operation
called a logical AND on the IP address in order to extract the network ID. To
perform a logical AND, each bit in the IP address is compared with the
corresponding bit in the subnet mask. If both bits are 1, the resulting bit in
the network ID is set to 1. If either of the bits are 0, the resulting bit is set to 0.
302
Subnetting
The subnet mask itself is usually represented in dotted-decimal notation. As
a result, the 20-bit subnet mask used in the previous example would be
represented as 255.255.240.0:
Subnet mask: 11111111 11111111 11110000 00000000
255 .
255 .
240 .
0
Don’t confuse a subnet mask with an IP address. A subnet mask doesn’t
represent any device or network on the Internet. It’s just a way of indicating
which portion of an IP address should be used to determine the network ID.
(You can spot a subnet mask right away because the first octet is always
255, and 255 is not a valid first octet for any class of IP address.)
Network prefix notation
Because a subnet mask always begins with a consecutive sequence of ones
to indicate which bits to use for the network ID, you can use a shorthand
notation — a network prefix — to indicate how many bits of an IP address
represent the network ID. The network prefix is indicated with a slash
immediately after the IP address, followed by the number of network ID bits
to use. For example, the IP address 144.28.16.17 with the subnet mask
255.255.240.0 can be represented as 144.28.16.17/20 because the
subnet mask 255.255.240.0 has 20 network ID bits.
Network prefix notation is also called classless interdomain routing notation
(CIDR, for short) because it provides a way of indicating which portion of an
address is the network ID and which is the host ID without relying on standard
address classes.
Default subnets
The default subnet masks are three subnet masks that correspond to the
standard Class A, B, and C address assignments. These default masks are
summarized in Table 2-5.
Table 2-5
The Default Subnet Masks
Class
Binary
Dotted-Decimal
Network
Prefix
A
11111111 00000000
00000000 00000000
255.0.0.0
/8
B
11111111 11111111
00000000 00000000
255.255.0.0
/16
C
11111111 11111111
11111111 00000000
255.255.255.0
/24
Subnetting
303
Keep in mind that a subnet mask is not actually required to use one of these
defaults because the IP address class can be determined by examining the
first three bits of the IP address. If the first bit is 0, the address is Class A,
and the subnet mask 255.0.0 is applied. If the first two bits are 10, the
address is Class B, and 255.255.0.0 is used. If the first three bits are 110,
the Class C default mask 255.255.255.0 is used.
The great subnet roundup
You should know about a few additional restrictions that are placed on
subnets and subnet masks. In particular
✦ The minimum number of network ID bits is eight. As a result, the first
octet of a subnet mask is always 255.
✦ The maximum number of network ID bits is 30. You have to leave at
least two bits for the host ID portion of the address to allow for at least
two hosts. If you use all 32 bits for the network ID, that leaves no bits
for the host ID. Obviously, that won’t work. Leaving just one bit for the
host ID won’t work, either, because a host ID of all ones is reserved for a
broadcast address, and all zeros refers to the network itself. Thus, if you
use 31 bits for the network ID and leave only 1 for the host ID, host ID
1 would be used for the broadcast address, and host ID 0 would be the
network itself, leaving no room for actual hosts. That’s why the maximum
network ID size is 30 bits.
✦ Because the network ID portion of a subnet mask is always composed
of consecutive bits set to 1, only eight values are possible for each
octet of a subnet mask: 0, 128, 192, 224, 248, 252, 254, and 255.
✦ A subnet address can’t be all zeros or all ones. Thus, the number of
unique subnet addresses is two less than two raised to the number of
subnet address bits. For example, with three subnet address bits, six
unique subnet addresses are possible (23 – 2 = 6). This implies that you
must have at least two subnet bits. (If a single-bit subnet mask were
allowed, it would violate the “can’t be all zeros or all ones” rule because
the only two allowed values would be 0 or 1.)
A subnet can be thought of as a range or block of IP addresses that have a
common network ID. For example, the CIDR 192.168.1.0/28 represents
the following block of 14 IP addresses:
192.168.1.1
192.168.1.5
192.168.1.9
192.168.1.13
192.168.1.2
192.168.1.6
192.168.1.10
192.168.1.14
192.168.1.3
192.168.1.7
192.168.1.11
192.168.1.4
192.168.1.8
192.168.1.12
Understanding IP
Addresses
IP block parties
Book IV
Chapter 2
304
Subnetting
Given an IP address in CIDR notation, it’s useful to be able to determine
the range of actual IP addresses that the CIDR represents. This matter is
straightforward when the octet within which the network ID mask ends
happens to be 0, as in the preceding example. You just determine how many
host IDs are allowed based on the size of the network ID and count them off.
However, what if the octet where the network ID mask ends is not 0? For
example, what are the valid IP addresses for 192.168.1.100 when the
subnet mask is 255.255.255.240? In that case, the calculation is a little
harder. The first step is to determine the actual network ID. You can do that
by converting both the IP address and the subnet mask to binary and then
extracting the network ID as in this example:
192 .
168 .
1 .
100
IP address: 11000000 10101000 00000001 01100100
Subnet mask: 11111111 11111111 11111111 11110000
Network ID: 11000000 10101000 00000001 01100000
192 .
168 .
1 .
96
As a result, the network ID is 192.168.1.96.
Next, determine the number of allowable hosts in the subnet based on the
network prefix. You can calculate this by subtracting the last octet of the
subnet mask from 254. In this case, the number of allowable hosts is 14.
To determine the first IP address in the block, add 1 to the network ID.
Thus, the first IP address in my example is 192.168.1.97. To determine
the last IP address in the block, add the number of hosts to the network
ID. In my example, the last IP address is 192.168.1.110. As a result, the
192.168.1.100 with subnet mask 255.255.255.240 designates the
following block of IP addresses:
192.168.1.97
192.168.1.101
192.168.1.105
192.168.1.109
192.168.1.98 192.168.1.99
192.168.1.102 192.168.1.103
192.168.1.106 192.168.1.107
192.168.1.110
192.168.1.100
192.168.1.104
192.168.1.108
Private and public addresses
Any host with a direct connection to the Internet must have a globally
unique IP address. However, not all hosts are connected directly to the
Internet. Some are on networks that aren’t connected to the Internet. Some
hosts are hidden behind firewalls, so their Internet connection is indirect.
Several blocks of IP addresses are set aside just for this purpose, for use
on private networks that are not connected to the Internet or to use on
networks that are hidden behind a firewall. Three such ranges of addresses
exist, summarized in Table 2-6. Whenever you create a private TCP/IP network,
you should use IP addresses from one of these ranges.
Network Address Translation
Table 2-6
305
Private Address Spaces
CIDR
Subnet Mask
Address Range
10.0.0.0/8
255.0.0.0
10.0.0.1–10.255.255.254
172.16.0.0/12
255.255.240.0
172.16.1.1–172.31.255.254
192.168.0.0/16
255.255.0.0
192.168.0.1–192.168.255.254
Network Address Translation
Many firewalls use a technique called network address translation (NAT) to
hide the actual IP address of a host from the outside world. When that’s the
case, the NAT device must use a globally unique IP to represent the host to
the Internet. Behind the firewall, though, the host can use any IP address it
wants. When packets cross the firewall, the NAT device translates the private
IP address to the public IP address and vice versa.
One of the benefits of NAT is that it helps to slow down the rate at which the
IP address space is assigned. That’s because a NAT device can use a single
public IP address for more than one host. It does so by keeping track of
outgoing packets so that it can match incoming packets with the correct
host. To understand how this works, consider the following sequence of steps:
1. A host whose private address is 192.168.1.100 sends a request to
216.239.57.99, which happens to be www.google.com. The NAT
device changes the source IP address of the packet to 208.23.110.22,
the IP address of the firewall. That way, Google will send its reply back
to the firewall router. The NAT records that 192.168.1.100 sent a
request to 216.239.57.99.
2. Now another host, at address 192.168.1.107, sends a request to
3. A few seconds later, the firewall receives a reply from 216.239.57.99.
The destination address in the reply is 208.23.110.22, the address
of the firewall. To determine to whom to forward the reply, the firewall
checks its records to see who is waiting for a reply from 216.239.57.99.
It discovers that 192.168.1.100 is waiting for that reply, so it changes
the destination address to 192.168.1.100 and sends the packet on.
Actually, the process is a little more complicated than that, because it’s very
likely that two or more users may have pending requests from the same
public IP. In that case, the NAT device uses other techniques to figure out to
which user each incoming packet should be delivered.
Book IV
Chapter 2
Understanding IP
Addresses
207.46.134.190, which happens to be www.microsoft.com. The
NAT device changes the source of this request to 208.23.110.22 so
that Microsoft will reply to the firewall router. The NAT records that
192.168.1.107 sent a request to 207.46.134.190.
306
Book IV: TCP/IP and the Internet
Chapter 3: Using DHCP
In This Chapter
✓ Discovering the basics of DHCP
✓ Exploring scopes
✓ Configuring a DHCP server
✓ Setting up a DHCP client
E
very host on a Transmission Control Protocol/Internet Protocol (TCP/
IP) network must have a unique IP address. Each host must be properly
configured so that it knows its IP address. When a new host comes online, it
must be assigned an IP address that’s within the correct range of addresses
for the subnet but not already in use. Although you can manually assign IP
addresses to each computer on your network, that task quickly becomes
overwhelming if the network has more than a few computers.
That’s where DHCP — Dynamic Host Configuration Protocol — comes into
play. DHCP automatically configures the IP address for every host on a
network, thus assuring that each host has a valid, unique IP address. DHCP
even automatically reconfigures IP addresses as hosts come and go. As you
can imagine, DHCP can save a network administrator many hours of tedious
configuration work.
In this chapter, you discover the ins and outs of DHCP: what it is, how it
works, and how to set it up.
Understanding DHCP
DHCP allows individual computers on a TCP/IP network to obtain their
configuration information — in particular, their IP address — from a server.
The DHCP server keeps track of which IP addresses are already assigned so
that when a computer requests an IP address, the DHCP server offers it an
IP address that’s not already in use.
Configuration information provided by DHCP
Although the primary job of DHCP is to dole out IP addresses and subnet
masks, DHCP actually provides more configuration information than just the
IP address to its clients. The additional configuration information are DHCP
options. The following is a list of some common DHCP options that can be
configured by the server:
308
Understanding DHCP
✦ The router address, also known as the Default Gateway address
✦ The expiration time for the configuration information
✦ Domain name
✦ Domain Name Server (DNS) server address
✦ Windows Internet Name Service (WINS) server address
DHCP servers
A DHCP server can be a server computer located on the TCP/IP network.
All modern server operating systems have a built-in DHCP server. To set up
DHCP on a network server, all you have to do is enable the server’s DHCP
function and configure its settings. In the upcoming section, “Working with
a DHCP Server,” I show you how to configure a DHCP server for Windows
Server 2008. (The procedure for Windows Server 2003 is similar.)
A server computer running DHCP doesn’t have to be devoted entirely to
DHCP unless the network is very large. For most networks, a file server can
share duty as a DHCP server. This is especially true if you provide long
leases for your IP addresses. (I explain the idea of leases later in this chapter.)
Many multifunction routers also have built-in DHCP servers. If you don’t
want to burden one of your network servers with the DHCP function, you
can enable the router’s built-in DHCP server. An advantage of allowing the
router to be your network’s DHCP server is that you rarely need to power-down
a router. In contrast, you occasionally need to restart or power-down a file
server to perform system maintenance, apply upgrades, or perform
troubleshooting.
Most networks require only one DHCP server. Setting up two or more
servers on the same network requires that you carefully coordinate the IP
address ranges (known as scopes) for which each server is responsible. If
you accidentally set up two DHCP servers for the same scope, you may end
up with duplicate address assignments if the servers attempt to assign the
same IP address to two different hosts. To prevent this from happening, just
set up one DHCP server unless your network is so large that one server can’t
handle the workload.
How DHCP actually works
You can configure and use DHCP without knowing the details of how DHCP
client configuration actually works. However, a basic understanding of the
process can help you to understand what DHCP is actually doing. Not
only is this understanding enlightening, but it can also help when you’re
troubleshooting DHCP problems.
Understanding DHCP
309
The following paragraphs contain a blow-by-blow account of how DHCP
configures TCP/IP hosts. This procedure happens every time you boot up a
host computer. It also happens when you release an IP lease and request a
fresh lease.
1. When a host computer starts up, the DHCP client software sends a
special broadcast packet, known as a DHCP Discover message.
This message uses the subnet’s broadcast address (all host ID bits set to
one) as the destination address and 0.0.0.0 as the source address.
The client has to specify 0.0.0.0 as the source address because it
doesn’t yet have an IP address, and it specifies the broadcast address
as the destination address because it doesn’t know the address of any
DHCP servers. In effect, the DHCP Discover message is saying, “Hey! I’m
new here. Are there any DHCP servers out there?”
2. The DHCP server receives the broadcast DHCP Discover message and
responds by sending a DHCP Offer message.
The DHCP Offer message includes an IP address that the client can use.
Like the DHCP Discover message, the DHCP Offer message is sent to the
broadcast address. This makes sense because the client to which the
message is being sent doesn’t yet have an IP address and won’t have
one until it accepts the offer. In effect, the DHCP Offer message is saying,
“Hello there, whoever you are. Here’s an IP address you can use, if you
want it. Let me know.”
What if the client never receives a DHCP Offer message from a DHCP
server? In that case, the client waits for a few seconds and tries again.
The client will try four times — at 2, 4, 8, and 16 seconds. If it still
doesn’t get an offer, it will try again after five minutes.
3. The client receives the DHCP Offer message and sends back a message
known as a DHCP Request message.
At this point, the client doesn’t actually own the IP address: It’s simply
indicating that it’s ready to accept the IP address that was offered by the
server. In effect, the DHCP Request message says, “Yes, that IP address
would be good for me. Can I have it, please?”
address as assigned to the client and broadcasts a DHCP Ack message.
The DHCP Ack message says, in effect, “Okay, it’s all yours. Here’s the
rest of the information you need to use it.”
5. When the client receives the DHCP Ack message, it configures its TCP/IP
stack by using the address it accepted from the server.
Using DHCP
4. When the server receives the DHCP Request message, it marks the IP
Book IV
Chapter 3
310
Understanding Scopes
Understanding Scopes
A scope is simply a range of IP addresses that a DHCP server is configured
to distribute. In the simplest case, where a single DHCP server oversees IP
configuration for an entire subnet, the scope corresponds to the subnet.
However, if you set up two DHCP servers for a subnet, you can configure
each with a scope that allocates only one part of the complete subnet range.
In addition, a single DHCP server can serve more than one scope.
You must create a scope before you can enable a DHCP server. When you
create a scope, you can provide it with the following properties:
✦ A scope name, which helps you to identify the scope and its purpose
✦ A scope description, which lets you provide additional details about the
scope and its purpose
✦ A starting IP address for the scope
✦ An ending IP address for the scope
✦ A subnet mask for the scope
You can specify the subnet mask with dotted-decimal notation or with
network prefix notation.
✦ One or more ranges of excluded addresses
These addresses won’t be assigned to clients. For more information, see
the section “Feeling excluded?” later in this chapter.
✦ One or more reserved addresses
These are addresses that will always be assigned to particular host
devices. For more information, see the section “Reservations suggested”
later in this chapter.
✦ The lease duration, which indicates how long the host will be allowed to
use the IP address
The client will attempt to renew the lease when half of the lease duration
has elapsed. For example, if you specify a lease duration of eight days,
the client will attempt to renew the lease after four days pass. This
allows the host plenty of time to renew the lease before the address is
reassigned to some other host.
✦ The router address for the subnet
This value is also known as the Default Gateway address.
✦ The domain name and the IP address of the network’s DNS servers
and WINS servers
Understanding Scopes
311
Feeling excluded?
Everyone feels excluded once in awhile. With a wife, three daughters, and
a female dog, I know how it feels. Sometimes, however, being excluded is a
good thing. In the case of DHCP scopes, exclusions can help you to prevent
IP address conflicts and can enable you to divide the DHCP workload for a
single subnet among two or more DHCP servers.
An exclusion is a range of addresses that are not included in a scope. The
exclusion range falls within the range of the scope’s starting and ending
addresses. In effect, an exclusion range lets you punch a hole in a scope. The
IP addresses that fall within the hole won’t be assigned.
Here are a few reasons for excluding IP addresses from a scope:
✦ The computer that runs the DHCP service itself must usually have
a static IP address assignment. As a result, the address of the DHCP
server should be listed as an exclusion.
✦ Some hosts may not be able to support DHCP. In that case, the host
will require a static IP address. For example, you may have a really old
MS-DOS computer that doesn’t have a DHCP client. By excluding its
IP address from the scope, you can prevent that address from being
assigned to any other host on the network.
Reservations suggested
In some cases, you may want to assign a particular IP address to a particular
host. One way to do this is to configure the host with a static IP address so
that the host doesn’t use DHCP to obtain its IP configuration. However, here
are two major disadvantages to that approach:
✦ TCP/IP configuration supplies more than just the IP address. If you use
static configuration, you must manually specify the subnet mask, the
Default Gateway address, the DNS server address, and other configuration
information required by the host. If this information changes, you have
to change it not only at the DHCP server, but also at each host that you
configured statically.
A better way to assign a fixed IP address to a particular host is to create a
DHCP reservation. A reservation simply indicates that whenever a particular
host requests an IP address from the DHCP server, the server should provide
it the address that you specify in the reservation. The host won’t receive the
IP address until the host requests it from the DHCP server, but whenever the
host does request IP configuration, it will always receive the same address.
Using DHCP
✦ You must remember to exclude the static IP address from the DHCP
server’s scope. Otherwise, the DHCP server won’t know about the static
address and may assign it to another host. Then, you’ll have two hosts
with the same address on your network.
Book IV
Chapter 3
312
Understanding Scopes
What about BootP?
BootP — Bootstrap Protocol — is an Internet
protocol that enables diskless workstations
to boot themselves over the Internet or local
network. Like DHCP, BootP allows a
computer to receive an IP address assigned
from a server. However, unlike DHCP, BootP
also enables the computer to download a boot
image file, which the computer can then use
to boot itself from. A significant difference
between BootP and DHCP is that BootP comes
into play before the computer actually loads
an operating system. In contrast, DHCP is used
after an operating system has been loaded,
during the configuration of network devices.
Most DHCP servers can also support BootP. If
your network has diskless workstations, you
can use the DHCP server’s BootP support to
boot those computers. At one time, diskless
workstations were all the rage because
network administrators thought they’d be
easier to manage. Users hated them, however.
Most diskless workstations have now been
buried in landfills, and BootP isn’t used much.
To create a reservation, you associate the IP address that you want assigned
to the host with the host’s MAC address. As a result, you need to get the
MAC address from the host before you create the reservation. You can get
the MAC address by running the command ipconfig /all from a command
prompt. (If that fails because TCP/IP has not yet been configured on the
computer, you can also get the MAC address [the number that uniquely
identifies the hardware device] by running the System Information command,
which is Start➪All Programs➪Accessories➪System Tools➪System Information.)
If you set up more than one DHCP server, each should be configured to
serve a different range of IP addresses. Otherwise, the servers might assign
the same address to two different hosts.
How long to lease?
One of the most important decisions that you’ll make when you configure
a DHCP server is the length of time to specify for the lease duration. The
default value is eight days, which is appropriate in many cases. However,
you may encounter situations in which a longer or shorter interval may be
appropriate:
✦ The more stable your network, the longer the lease duration can safely
exist. If you only periodically add new computers to the network or
replace existing computers, you can safely increase the lease duration
past eight days.
✦ The more volatile the network, the shorter the lease duration should be.
For example, a wireless network in a university library is used by students
who bring their laptop computers into the library to work for a few hours at
a time. For this network, a duration such as one hour may be appropriate.
Working with a DHCP Server
313
Don’t configure your network to allow infinite duration leases. Some
administrators feel that this cuts down the workload for the DHCP server
on stable networks. However, no network is permanently stable. Whenever
you find a DHCP server that’s configured with infinite leases, look at the
active leases. I guarantee you’ll find IP leases assigned to computers that no
longer exist.
Working with a DHCP Server
The exact steps that you should follow when configuring and managing a
DHCP server depend on the network operating system that you’re using. The
following procedures show you how to work with a DHCP server in Windows
Server 2008. The procedures for other operating systems are similar.
Installing and configuring a DHCP server
To install the DHCP server role on Windows Server 2008, follow these steps:
1. Choose Start➪Administrative Tools➪Server Manager.
The Manage Your Server application appears.
2. Click the Roles link and then click Add a Role.
The Add Roles Wizard appears.
3. Click Next to get the wizard started.
The wizard displays a list of available server roles.
4. Select DHCP Server from the list of roles and then click Next.
The wizard displays an explanation of DHCP.
5. Click Next.
The wizard displays a list of the server’s network connections that have
static IP addresses, as shown in Figure 3-1. (In this example, only one
network connection has a static IP address assigned. Most network
servers will have at least two.)
Book IV
Chapter 3
6. Select the static IP addresses you want to use for the DHCP server.
The wizard asks for the DNS configuration information, as shown in
Figure 3-2.
7. Enter the domain name and DNS servers. To enter a DNS server, type
its address in the IP address text box and then click Add.
You typically have more than one DNS server.
Using DHCP
Then click Next.
314
Working with a DHCP Server
Figure 3-1:
Select the
static IP
addresses
to use for
this DHCP
server.
Figure 3-2:
Specify
the DNS
information.
8. Click Next.
The wizard next asks for the WINS configuration information.
9. (Optional) If you want to enable WINS, enter the WINS server
configuration and then click Next.
If you don’t want to use WINS, skip this step and just click Next.
Either way, the next screen lets you configure scopes.
Working with a DHCP Server
315
10. To create a new scope, click the Add Scope button.
The wizard asks for a name and description for the new scope, as shown
in Figure 3-3.
Figure 3-3:
Creating a
new scope.
11. Enter the information for the new scope.
You must enter the following information:
• Scope Name: The name can be anything you want. I suggest that you
use a generic name such as Office or your company name unless
you’re creating two or more scopes. Then, the names should indicate
the function of each scope.
• Scope Starting IP Address: This is the lowest IP address that will be
issued for this scope.
• Scope Ending IP Address: This is the highest IP address that will be
issued for this scope.
• Subnet Mask: This is the subnet mask issued for IP addresses in this
scope.
• Default Gateway: This is the default gateway address that will be
used for this scope. This is usually the address of your router.
12. Select the Activate This Scope check box and then Click OK.
The scope is created, as shown in Figure 3-4.
Using DHCP
• Subnet type: Choose Wired or Wireless. The difference is how long
the IP address will be valid. For wired networks, the addresses will
be valid for six days. For wireless networks, the addresses will expire
in eight hours.
Book IV
Chapter 3
316
Working with a DHCP Server
Figure 3-4:
The scope is
created.
13. If you want to create additional scopes, repeat Steps 10–12.
You can create as many scopes as you want for your DHCP server.
14. When you finish creating scopes, click Next.
The wizard asks whether you want to enable stateless mode, which is
used for IPv6. I recommend disabling this mode unless dealing with IPv6
clients is important to your network.
15. Click Next.
The wizard asks for the credentials to use when creating this DHCP
server. The default is to use your current login credentials.
16. Click Next.
The wizard displays a confirmation screen that summarizes the settings
you’ve entered for the DHCP server.
17. Click Install.
The DHCP server is created. This might take a few minutes. When the
server is finished, a final results page is displayed to confirm that the
server was properly installed.
18. Click Close.
You’re done!
Managing a DHCP server
You can bring up the DHCP management console by choosing Start➪
Administrative Tools➪DHCP or by clicking Manage This DHCP Server from
the Manage Your Server application. Either way, the DHCP management
console appears, as shown in Figure 3-5.
Working with a DHCP Server
317
Figure 3-5:
The DHCP
management
console.
From the DHCP console, you have complete control over the DHCP server’s
configuration and operation. The following list summarizes some of the
things that you can do from the DHCP console:
✦ You can authorize the DHCP server, which allows it to begin assigning
client IP addresses. To authorize a server, select the server, choose
Action➪Manage Authorized Servers, and then click Authorize.
✦ To add another scope, right-click the server in the tree and choose
the New Scope command from the menu that appears. This brings
up the New Scope Wizard. You can follow Steps 5–18 in the preceding
section to complete the wizard.
✦ To activate or deactivate a scope, right-click the scope in the tree and
then choose the Activate or Deactivate command.
✦ To change scope settings, right-click the scope and choose the
Properties command. This brings up the Scope Properties dialog box, as
shown in Figure 3-6. From this dialog box, you can change the scope’s
start and end IP addresses, subnet mask, and DNS configuration.
✦ To view or change reservations, click Reservations in the tree.
✦ To view a list of assigned addresses, click Address Leases in the tree.
Using DHCP
✦ To change the scope exclusions, click Address Pool under the scope in
the tree. This lists each range of addresses that’s included in the scope.
You can add or delete a range by right-clicking the range and choosing the Delete command from the menu that appears. You can also add
a new exclusion range by right-clicking Address Pool in the tree and
choosing Add New Exclusion from the contextual menu that appears.
Book IV
Chapter 3
318
How to Configure a Windows DHCP Client
Figure 3-6:
The Scope
Properties
dialog box.
How to Configure a Windows DHCP Client
Configuring a Windows client for DHCP is easy. The DHCP client is
automatically included when you install the TCP/IP protocol, so all you have
to do is configure TCP/IP to use DHCP. To do this, bring up the Network
Properties dialog box by choosing Network or Network Connections in the
Control Panel (depending on which version of Windows the client is running).
Then, select the TCP/IP protocol and click the Properties button. This brings
up the TCP/IP Properties dialog box, as shown in Figure 3-7. To configure the
computer to use DHCP, select the Obtain an IP Address Automatically option
and the Obtain DNS Server Address Automatically option.
Figure 3-7:
Configuring
a Windows
client to use
DHCP.
How to Configure a Windows DHCP Client
319
Automatic Private IP Addressing
If a Windows computer is configured to use DHCP but the computer can’t
obtain an IP address from a DHCP server, the computer automatically
assigns itself a private address by using a feature called Automatic Private IP
Addressing (APIPA). APIPA assigns a private address from the 169.254.x.x
range and uses a special algorithm to ensure that the address is unique on
the network. As soon as the DHCP server becomes available, the computer
requests a new address, so the APIPA address is used only while the DHCP
server is unavailable.
Renewing and releasing leases
Normally, a DHCP client attempts to renew its lease when the lease is halfway
to the point of being expired. For example, if a client obtains an eight-day
lease, it attempts to renew the lease after four days. However, you can renew
a lease sooner by issuing the ipconfig /renew command at a command
prompt. You may want to do this if you changed the scope’s configuration or
if the client’s IP configuration isn’t working correctly.
You can also release a DHCP lease by issuing the ipconfig /release
command at a command prompt. When you release a lease, the client
computer no longer has a valid IP address. This is shown in the output from
the ipconfig /release command:
C:\>ipconfig /release
Windows IP Configuration
Ethernet adapter Local Area
Connection-specific
IP Address. . . . .
Subnet Mask . . . .
Default Gateway . .
Connection:
DNS Suffix
. . . . . .
. . . . . .
. . . . . .
.
.
.
.
:
: 0.0.0.0
: 0.0.0.0
:
Here, you can see that the IP address and subnet masks are set to 0.0.0.0
and that the Default Gateway address is blank. When you release an IP lease,
you can’t communicate with the network by using TCP/IP until you issue an
ipconfig /renew command to renew the IP configuration or restart the
computer.
Book IV
Chapter 3
Using DHCP
320
Book IV: TCP/IP and the Internet
Chapter 4: Using DNS
In This Chapter
✓ Discovering the basics of DNS
✓ Exploring zones
✓ Examining resource records
✓ Configuring a DNS server
✓ Setting up a DNS client
D
omain Name Server — DNS — is the TCP/IP facility that lets you use
names rather than numbers to refer to host computers. Without DNS,
you’d buy books from 207.171.166.252 instead of from www.amazon.
com, you’d sell your used furniture at 66.211.160.87 instead of on
www.ebay.com, and you’d search the Web at 74.125.19.147 instead of
at www.google.com.
Understanding how DNS works and how to set up a DNS server is crucial
to setting up and administering a Transmission Control Protocol/Internet
Protocol (TCP/IP) network. This chapter introduces you to the basics of
DNS, including how the DNS naming system works and how to set up a DNS
server.
If you want to review the complete official specifications for DNS, look up
RFC 1034 and 1035 at www.ietf.org/rfc/rfc1034.txt and www.ietf.
org/rfc/rfc1035.txt, respectively.
Understanding DNS Names
DNS is a name service that provides a standardized system for providing
names to identify TCP/IP hosts as well as a way to look up the IP address
of a host, given the host’s DNS name. For example, if you use DNS to look
up the name www.ebay.com, you get the IP address of the eBay Web host:
66.211.160.87. Thus, DNS allows you to access the eBay Web site by
using the DNS name www.ebay.com instead of the site’s IP address.
The following sections describe the basic concepts of DNS.
322
Understanding DNS Names
Domains and domain names
To provide a unique DNS name for every host computer on the Internet, DNS
uses a time-tested technique: Divide and conquer. DNS uses a hierarchical
naming system that’s similar to how folders are organized hierarchically on
a Windows computer. Instead of folders, however, DNS organizes its names
into domains. Each domain includes all the names that appear directly
beneath it in the DNS hierarchy.
For example, Figure 4-1 shows a small portion of the DNS domain tree. At
the very top of the tree is the root domain, which is the anchor point for
all domains. Directly beneath the root domain are four top-level domains,
named edu, com, org, and gov.
(Root)
edu
com
org
gov
LoweWriter
LoweWriter.com domain
doug
Figure 4-1:
DNS names.
debbie
server1
printer1
server1.LoweWriter.com.
In reality, many more top-level domains than this exist in the Internet’s root
domain. For more information, see the section “Top-Level Domains” later in
this chapter.
Beneath the com domain in Figure 4-1 is another domain called LoweWriter,
which happens to be my own personal domain. (Pretty clever, eh?) To
completely identify this domain, you have to combine it with the name of
its parent domain (in this case, com) to create the complete domain name:
LoweWriter.com. Notice that the parts of the domain name are separated
from each other with periods, which are called dots. As a result, when you
read this domain name, you pronounce it LoweWriter dot com.
Understanding DNS Names
323
Beneath the LoweWriter node are four host nodes, named doug, debbie,
server1, and printer1. Respectively, these correspond to three computers
and a printer on my home network. You can combine the host name with
the domain name to get the complete DNS name for each of my network’s
hosts. For example, the complete DNS name for my server is server1.
LoweWriter.com. Likewise, my printer is printer1.LoweWriter.com.
Here are a few additional details that you need to remember about DNS names:
✦ DNS names are not case sensitive. As a result, LoweWriter and
Lowewriter are treated as the same name, as are LOWEWRITER,
LOWEwriter, and LoWeWrItEr. When you use a domain name, you can
use capitalization to make the name easier to read, but DNS ignores the
difference between capital and lowercase letters.
✦ The name of each DNS node can be up to 63 characters long (not
including the dot) and can include letters, numbers, and hyphens.
No other special characters are allowed.
✦ A subdomain is a domain that’s beneath an existing domain. For
example, the com domain is actually a subdomain of the root domain.
Likewise, LoweWriter is a subdomain of the com domain.
✦ DNS is a hierarchical naming system that’s similar to the hierarchical
folder system used by Windows.
However, one crucial difference exists between DNS and the Windows
naming convention. When you construct a complete DNS name, you
start at the bottom of the tree and work your way up to the root. Thus,
doug is the lowest node in the name doug.LoweWriter.com. In
contrast, Windows paths are the opposite: They start at the root and
work their way down. For example, in the path \Windows\System32\
dns, dns is the lowest node.
✦ The DNS tree can be up to 127 levels deep. However, in practice, the
DNS tree is pretty shallow. Most DNS names have just three levels (not
counting the root). And although you’ll sometimes see names with four
or five levels, you’ll rarely see more levels than that.
Fully qualified domain names
If a domain name ends with a trailing dot, that trailing dot represents the
root domain, and the domain name is said to be a fully qualified domain
name (also known as an FQDN). A fully qualified domain name is also called
an absolute name. A fully qualified domain name is unambiguous because it
Using DNS
✦ Although the DNS tree is shallow, it’s very broad. In other words, each
of the top-level domains has a huge number of second-level domains
immediately beneath it. For example, at the time of this writing, the com
domain had well over a million second-level domains beneath it.
Book IV
Chapter 4
324
Top-Level Domains
identifies itself all the way back to the root domain. In contrast, if a domain
name doesn’t end with a trailing dot, the name may be interpreted in the
context of some other domain. Thus, DNS names that don’t end with a
trailing dot are called relative names.
This is similar to how relative and absolute paths work in Windows. For
example, if a path begins with a backslash, such as \Windows\System32\
dns, the path is absolute. However, a path that doesn’t begin with a backslash,
such as System32\dns, uses the current directory as its starting point. If
the current directory happens to be \Windows, then \Windows\System32\
dns and System32\dns refer to the same location.
In many cases, relative and fully qualified domain names are interchangeable
because the software that interprets them always interprets relative names
in the context of the root domain. That’s why, for example, you can type
www.wiley.com (without the trailing dot) — not www.wiley.com — to go
to the Wiley home page in a Web browser. Some applications, such as DNS
servers, may interpret relative names in the context of a domain other than
the root.
Top-Level Domains
A top-level domain appears immediately beneath the root domain. Top-level
domains come in two categories: generic domains and geographic domains.
These categories are described in the following sections. (Actually, a third
type of top-level domain exists, which is used for reverse lookups. I describe
it later in this chapter, in the section, “Reverse Lookup Zones.”)
Generic domains
Generic domains are the popular top-level domains that you see most often
on the Internet. Originally, seven top-level organizational domains existed.
In 2002, seven more were added to help ease the congestion of the original
seven — in particular, the com domain.
Table 4-1 summarizes the original seven generic top-level domains. Of these,
you can see that the com domain is far and away the most populated, with
nearly 1.9 million second-level domains beneath it.
The Size column in this table indicates approximately how many second-level
domains existed under each top-level domain as of January 2007, according
to an Internet Software Consortium survey, found at www.isc.org.
Top-Level Domains
Table 4-1
325
The Original Seven Top-Level Domains
Domain
Description
Size
com
Commercial organizations
1,291,296
edu
Educational institutions
3,873
gov
U.S. government institutions
966
int
International treaty organizations
119
mil
U.S. military institutions
110
net
Network providers
253,741
org
Noncommercial organizations
140,968
Because the com domain ballooned to an almost unmanageable size in the
late 1990s, the Internet authorities approved seven new top-level domains
in an effort to take some of the heat off of the com domain. Most of these
domains, listed in Table 4-2, became available in 2002. As you can see, they
haven’t really caught on yet even though they’ve been around for several
years.
Table 4-2
The New Seven Top-Level Domains
Domain
Description
Size
aero
Aerospace industry
147
biz
Business
11,399
coop
Cooperatives
263
info
Informational sites
16,276
museum
Museums
11
name
Individual users
710
pro
Professional organizations
30
Although the top-level domains are open to anyone, U.S. companies and
organizations dominate them. An additional set of top-level domains
corresponds to international country designations. Organizations outside
the United States often use these top-level domains to avoid the congestion
of the generic domains.
Using DNS
Geographic domains
Book IV
Chapter 4
326
Top-Level Domains
Table 4-3 lists those geographic top-level domains with more than 200
registered subdomains at the time of this writing, in alphabetical order. In
all, about 150 geographic top-level domains exist. The exact number varies
from time to time as political circumstances change.
Table 4-3
Geographic Top-Level Domains with
More Than 200 Subdomains
Domain
Description
Domain
Description
ac
Ascension Island
hu
Hungary
ae
United Arab Emirates
ie
Ireland
ag
Antigua and Barbuda
in
India
am
Armenia
is
Iceland
an
Netherlands Antilles
it
Italy
as
American Samoa
jp
Japan
at
Austria
kz
Kazakhstan
be
Belgium
la
Lao People’s Democratic
Republic
bg
Bulgaria
li
Liechtenstein
br
Brazil
lk
Sri Lanka
by
Belarus
lt
Lithuania
bz
Belize
lu
Luxembourg
ca
Canada
lv
Latvia
cc
Cocos (Keeling)
Islands
ma
Morocco
ch
Switzerland
md
Moldova
cl
Chile
nl
Netherlands
cn
China
no
Norway
coop
Cooperatives
nu
Niue
cx
Christmas Island
pl
Poland
cz
Czech Republic
pt
Portugal
de
Germany
ro
Romania
dk
Denmark
ru
Russian Federation
ee
Estonia
se
Sweden
es
Spain
si
Slovenia
eu
European Union
sk
Slovakia
The Hosts File
327
Domain
Description
Domain
Description
fi
Finland
st
Sao Tome and Principe
fm
Micronesia
su
Soviet Union
fo
Faroe Islands
to
Tonga
fr
France
tv
Tuvalu
ge
Georgia
tw
Taiwan
gov
Government
ua
Ukraine
gr
Greece
us
United States
hr
Croatia
ws
Samoa
The Hosts File
Long ago, in a network far, far away, the entire Internet was small enough
that network administrators could keep track of it all in a simple text file.
This file, called the Hosts file, simply listed the name and IP address of every
host on the network. Each computer had its own copy of the Hosts file. The
trick was keeping all those Hosts files up to date. Whenever a new host was
added to the Internet, each network administrator would manually update
his copy of the Hosts file to add the new host’s name and IP address.
As the Internet grew, so did the Hosts file. In the mid-1980s, it became obvious
that a better solution was needed. Imagine trying to track the entire Internet
today by using a single text file to record the name and IP address of the
millions of hosts on the Internet! DNS was invented to solve this problem.
Understanding the Hosts file is important for two reasons:
✦ The Hosts file is not dead. For small networks, a Hosts file may still be
the easiest way to provide name resolution for the network’s computers.
In addition, a Hosts file can coexist with DNS. The Hosts file is always
checked before DNS is used, so you can even use a Hosts file to override
DNS if you want.
The Hosts file is a simple text file that contains lines that match IP addresses
with host names. You can edit the Hosts file with any text editor, including
Notepad or by using the MS-DOS EDIT command. The exact location of the
Hosts file depends on the client operating system, as listed in Table 4-4.
Using DNS
✦ The Hosts file is the precursor to DNS. DNS was devised to circumvent
the limitations of the Hosts file. You’ll be in a better position to appreciate
the benefits of DNS when you understand how the Hosts file works.
Book IV
Chapter 4
328
The Hosts File
Table 4-4
Location of the Hosts File
Operating System
Location of Hosts File
Windows 9x/Me
c:\windows\hosts
Windows NT/2000
c:\winnt\system32\drivers\etc\hosts
Windows XP and Vista
c:\windows\system32\drivers\etc\hosts
Unix/Linux
/etc/hosts
All TCP/IP implementations are installed with a starter Hosts file. For example,
Listing 4-1 shows the sample Windows 7 TCP/IP Hosts file. As you can see,
the starter file begins with some comments that explain the purpose of the file.
The Windows 7 Hosts file ends with comments which show the host mapping
commands used to map for the host name localhost, mapped to the IP
address 127.0.0.1. The IP address 127.0.0.1 is the standard loopback
address. As a result, this entry allows a computer to refer to itself by using
the name localhost.
Note that after the 127.0.0.1 localhost entry, another localhost entry
defines the standard IPv6 loopback address (::2). This is required because
unlike previous versions of Windows, Vista provides built-in support for IPv6.
Prior to Windows 7, these lines were not commented out in the Hosts file.
But beginning with Windows 7, the name resolution for localhost is handled
by DNS itself, so its definition isn’t required in the Hosts file.
Listing 4-1: A Sample Hosts File
#
#
#
#
#
#
#
#
#
#
#
#
#
#
#
#
#
Copyright (c) 1993-2009 Microsoft Corp.
This is a sample HOSTS file used by Microsoft TCP/IP for Windows.
This file contains the mappings of IP addresses to host names. Each
entry should be kept on an individual line. The IP address should
be placed in the first column followed by the corresponding host name.
The IP address and the host name should be separated by at least one
space.
Additionally, comments (such as these) may be inserted on individual
lines or following the machine name denoted by a ‘#’ symbol.
For example:
102.54.94.97
38.25.63.10
rhino.acme.com
x.acme.com
# source server
# x client host
# localhost name resolution is handled within DNS itself.
#127.0.0.1
localhost
#::1
localhost
The Hosts File
329
To add an entry to the Hosts file, simply edit the file in any text editor. Then,
add a line at the bottom of the file, after the localhost entry. Each line
that you add should list the IP address and the host name that you want
to use for the address. For example, to associate the host name server1.
LoweWriter.com with the IP address 192.168.168.201, you add this line
to the Hosts file:
192.168.168.201 server1.LoweWriter.com
Then, whenever an application requests the IP address of the host name
server1, the IP address 192.168.168.201 is returned.
You can also add an alias to a host mapping. This enables users to access a
host by using the alias as an alternative name. For example, consider the
following line:
192.168.168.201 server1.LoweWriter.com s1
Here, the device at address 192.168.168.201 can be accessed as
server1.LoweWriter.com or just s1.
Listing 4-2 shows a Hosts file with several hosts defined.
Listing 4-2: A Hosts File with Several Hosts Defined
Copyright (c) 1993-2009 Microsoft Corp.
This is a sample HOSTS file used by Microsoft TCP/IP for Windows.
This file contains the mappings of IP addresses to host names. Each
entry should be kept on an individual line. The IP address should
be placed in the first column followed by the corresponding host name.
The IP address and the host name should be separated by at least one
space.
Additionally, comments (such as these) may be inserted on individual
lines or following the machine name denoted by a ‘#’ symbol.
For example:
102.54.94.97
38.25.63.10
rhino.acme.com
x.acme.com
# source server
# x client host
# localhost name resolution is handled within DNS itself.
# 127.0.0.1
localhost
# ::1
localhost
192.168.168.200
192.168.168.201
192.168.168.202
192.168.168.203
doug.LoweWriter.com
server1.LoweWriter.com s1
debbie.LoweWriter.com
printer1.LoweWriter.com p1
#Doug’s computer
#Main server
#Debbie’s computer
#HP Laser Printer
Even if your network uses DNS, every client still has a Hosts file that defines
at least localhost.
Book IV
Chapter 4
Using DNS
#
#
#
#
#
#
#
#
#
#
#
#
#
#
#
#
#
330
Understanding DNS Servers and Zones
Understanding DNS Servers and Zones
A DNS server is a computer that runs DNS server software, helps to maintain
the DNS database, and responds to DNS name resolution requests from
other computers. Although many DNS server implementations are available,
the two most popular are Bind and the Windows DNS service. Bind runs
on Unix-based computers (including Linux computers), and Windows DNS
(naturally) runs on Windows computers. Both provide essentially the same
services and can interoperate.
The key to understanding how DNS servers work is to realize that the DNS
database — that is, the list of all the domains, subdomains, and host
mappings — is a massively distributed database. No single DNS server
contains the entire DNS database. Instead, authority over different parts of
the database is delegated to different servers throughout the Internet.
For example, suppose that I set up a DNS server to handle name resolutions
for my LoweWriter.com domain. Then, when someone requests the IP
address of doug.LoweWriter.com, my DNS server can provide the answer.
However, my DNS server wouldn’t be responsible for the rest of the Internet.
Instead, if someone asks my DNS server for the IP address of some other
computer, such as coyote.acme.com, my DNS server will have to pass the
request on to another DNS server that knows the answer.
Zones
To simplify the management of the DNS database, the entire DNS namespace
is divided into zones, and the responsibility for each zone is delegated to a
particular DNS server. In many cases, zones correspond directly to domains.
For example, if I set up a domain named LoweWriter.com, I can also set
up a DNS zone called LoweWriter.com that’s responsible for the entire
LoweWriter.com domain.
However, the subdomains that make up a domain can be parceled out to
separate zones, as shown in Figure 4-2. Here, a domain named LoweWriter.
com has been divided into two zones. One zone, us.LoweWriter.com, is
responsible for the entire us.LoweWriter.com subdomain. The other zone,
LoweWriter.com, is responsible for the entire LoweWriter.com domain
except for the us.LoweWriter.com subdomain.
Why would you do that? The main reason is to delegate authority for the
zone to separate servers. For example, Figure 4-2 suggests that part of the
LoweWriter.com domain is administered in the United States and that part
of it is administered in France. The two zones in the figure allow one server
to be completely responsible for the U.S. portion of the domain, and the
other server handles the rest of the domain.
Understanding DNS Servers and Zones
331
(Root)
com
LoweWriter
LoweWriter.com zone
france
us
Figure 4-2:
DNS zones.
us.LoweWriter.com
zone
The old phony Hosts file trick
The Hosts file can be the basis of a fun, practical joke. Of course, neither I nor my editors
or publishers recommend that you actually do
this. If it gets you into trouble, don’t send your
lawyers to me. This sidebar is here only to let
you know what to do if it happens to you.
Now, whenever your husband tries to call up
the ESPN Web site, he’ll get the Carnival Cruise
Lines home page instead.
The idea is to edit your poor victim’s Hosts
file so that whenever the user tries to access
his favorite Web site, a site of your choosing
comes up instead. For example, if you’re trying
to get your husband to take you on a cruise,
add a line to his Hosts file that replaces his
favorite Web site with the Web site for a cruise
line. For example, this line should do the trick:
Be warned: If the wrong Web sites suddenly
start coming up, check your Hosts file to see
whether it’s been tampered with.
151.124.250.181 www.espn.com
Using DNS
Of course, to actually pull a stunt like this would
be completely irresponsible. Especially if you
didn’t first make a backup copy of the Hosts
file, just in case it somehow gets messed up.
Book IV
Chapter 4
332
Understanding DNS Servers and Zones
The following are the two basic types of zones:
✦ A primary zone is the master copy of a zone. The data for a primary
zone is stored in the local database of the DNS server that hosts the
primary zone. Only one DNS server can host a particular primary zone.
Any updates to the zone must be made to the primary zone.
✦ A secondary zone is a read-only copy of a zone. When a server hosts a
secondary zone, the server doesn’t store a local copy of the zone data.
Instead, it obtains its copy of the zone from the zone’s primary server by
using a process called zone transfer. Secondary servers must periodically
check primary servers to see whether their secondary zone data is still
current. If not, a zone transfer is initiated to update the secondary zone.
Primary and secondary servers
Each DNS server is responsible for one or more zones. The following are the
two different roles that a DNS server can take:
✦ Primary server for a zone, which means that the DNS server hosts a
primary zone. The data for the zone is stored in files on the DNS server.
Every zone must have one primary server.
✦ Secondary server for a zone, which means that the DNS server obtains
the data for a secondary zone from a primary server. Every zone should
have at least one secondary server. That way, if the primary server goes
down, the domain defined by the zone can be accessed via the secondary
server or servers.
A secondary server should be on a different subnet than the zone’s primary
server. If the primary and secondary servers are on the same subnet, both
servers will be unavailable if the router that controls the subnet goes down.
Note that a single DNS server can be the primary server for some zones and
a secondary server for other zones. A server is said to be authoritative for
the primary and secondary zones that it hosts because it can provide
definitive answers for queries against those zones.
Root servers
The core of DNS comprises the root servers, which are authoritative for
the entire Internet. The main function of the root servers is to provide the
address of the DNS servers that are responsible for each of the top-level
domains. These servers, in turn, can provide the DNS server address for
subdomains beneath the top-level domains.
The root servers are a major part of the glue that holds the Internet
together. As you can imagine, they’re swamped with requests day and night.
A total of 13 root servers are located throughout the world. Table 4-5 lists
the IP address and location of each of the 13 root servers.
Understanding DNS Servers and Zones
Table 4-5
333
The 13 Root Servers
IP Address
Operator
Location
A
198.41.0.4
VeriSign Global
Registry Services
Dulles, VA
B
192.228.79.201
Information
Sciences Institute
Marina Del Rey, CA
C
192.33.4.12
Cogent
Communications
Herndon, VA and
Los Angeles, CA
D
128.8.10.90
University of
Maryland
College Park, MD
E
192.203.230.10
NASA Ames
Research Center
Mountain View, CA
F
192.5.5.241
Internet Systems
Consortium
Palo Alto, CA; San
Jose, CA; New York
City; San Francisco;
Madrid; Hong Kong;
Los Angeles
G
192.112.36.4
U.S. DOD Network
Information
Vienna, VA Center
H
128.63.2.53
U.S. Army
Research Lab
Aberdeen, MD
I
192.36.148.17
Autonomica
Stockholm
J
192.58.128.30
VeriSign Global
Registry Services
Dulles, VA;
Mountain View CA;
Sterling, VA (two
locations); Seattle,
WA; Amsterdam,
NL; Atlanta, GA; Los
Angeles
K
193.0.14.129
Reseaux IP
Europeens
Network
London
Coordination Centre
L
199.7.83.42
IANA
Los Angeles
M
202.12.27.33
WIDE Project
Tokyo
DNS servers learn how to reach the root servers by consulting a root hints
file that’s located on the server. In the Unix/Linux world, this file is known
as named.root and can be found at /etc/named.root. For Windows
DNS servers, the file is called cache.dns and can be found in \windows\
system32\dns\ or \winnt\system32\dns\, depending on the Windows
version. Listing 4-3 shows the file itself.
Book IV
Chapter 4
Using DNS
Server
334
Understanding DNS Servers and Zones
Listing 4-3: The Named.Root File
;
This file holds the information on root name servers needed to
;
initialize cache of Internet domain name servers
;
(e.g. reference this file in the “cache . <file>”
;
configuration file of BIND domain name servers).
;
;
This file is made available by InterNIC
;
under anonymous FTP as
;
file
/domain/named.root
;
on server
FTP.INTERNIC.NET
;
-ORRS.INTERNIC.NET
;
;
last update:
Dec 12, 2008
;
related version of root zone:
2008121200
;
; formerly NS.INTERNIC.NET
;
.
3600000 IN NS
A.ROOT-SERVERS.NET.
A.ROOT-SERVERS.NET.
3600000
A
198.41.0.4
A.ROOT-SERVERS.NET.
3600000
AAAA 2001:503:BA3E::2:30
;
; FORMERLY NS1.ISI.EDU
;
.
3600000
NS
B.ROOT-SERVERS.NET.
B.ROOT-SERVERS.NET.
3600000
A
192.228.79.201
;
; FORMERLY C.PSI.NET
;
.
3600000
NS
C.ROOT-SERVERS.NET.
C.ROOT-SERVERS.NET.
3600000
A
192.33.4.12
;
; FORMERLY TERP.UMD.EDU
;
.
3600000
NS
D.ROOT-SERVERS.NET.
D.ROOT-SERVERS.NET.
3600000
A
128.8.10.90
;
; FORMERLY NS.NASA.GOV
;
.
3600000
NS
E.ROOT-SERVERS.NET.
E.ROOT-SERVERS.NET.
3600000
A
192.203.230.10
;
; FORMERLY NS.ISC.ORG
;
.
3600000
NS
F.ROOT-SERVERS.NET.
F.ROOT-SERVERS.NET.
3600000
A
192.5.5.241
F.ROOT-SERVERS.NET.
3600000
AAAA 2001:500:2F::F
;
; FORMERLY NS.NIC.DDN.MIL
;
.
3600000
NS
G.ROOT-SERVERS.NET.
G.ROOT-SERVERS.NET.
3600000
A
192.112.36.4
;
; FORMERLY AOS.ARL.ARMY.MIL
;
.
3600000
NS
H.ROOT-SERVERS.NET.
H.ROOT-SERVERS.NET.
3600000
A
128.63.2.53
H.ROOT-SERVERS.NET.
3600000
AAAA 2001:500:1::803F:235
;
; FORMERLY NIC.NORDU.NET
;
.
3600000
NS
I.ROOT-SERVERS.NET.
Understanding DNS Queries
I.ROOT-SERVERS.NET.
3600000
;
; OPERATED BY VERISIGN, INC.
;
.
3600000
J.ROOT-SERVERS.NET.
3600000
J.ROOT-SERVERS.NET.
3600000
;
; OPERATED BY RIPE NCC
;
.
3600000
K.ROOT-SERVERS.NET.
3600000
K.ROOT-SERVERS.NET.
3600000
;
; OPERATED BY ICANN
;
.
3600000
L.ROOT-SERVERS.NET.
3600000
L.ROOT-SERVERS.NET.
3600000
;
; OPERATED BY WIDE
;
.
3600000
M.ROOT-SERVERS.NET.
3600000
M.ROOT-SERVERS.NET.
3600000
; End of File
A
192.36.148.17
NS
A
AAAA
J.ROOT-SERVERS.NET.
192.58.128.30
2001:503:C27::2:30
NS
A
AAAA
K.ROOT-SERVERS.NET.
193.0.14.129
2001:7FD::1
NS
A
AAAA
L.ROOT-SERVERS.NET.
199.7.83.42
2001:500:3::42
NS
A
AAAA
M.ROOT-SERVERS.NET.
202.12.27.33
2001:DC3::35
335
Caching
DNS servers don’t really like doing all that work to resolve DNS names, but
they’re not stupid. They know that if a user visits www.wiley.com today,
he’ll probably do it again tomorrow. As a result, name servers keep a cache
of query results. The next time the user visits www.wiley.com, the name
server is able to resolve this name without having to query all those other
name servers.
The Internet is constantly changing, however, so cached data can quickly
become obsolete. For example, suppose that Wiley Publishing, Inc., switches
its Web site to a different server? It can update its name servers to reflect
the new IP address, but any name servers that have a cached copy of the
query will be out of date.
Understanding DNS Queries
When a DNS client needs to resolve a DNS name to an IP address, it uses a
library routine — a resolver — to handle the query. The resolver takes care of
sending the query message over the network to the DNS server, receiving and
interpreting the response, and informing the client of the results of the query.
Using DNS
To prevent this from being a major problem, DNS data is given a relatively
short expiration time. The expiration value for DNS data is called the TTL
(Time to Live). TTL is specified in seconds. Thus, a TTL of 60 means the data
is kept for one minute.
Book IV
Chapter 4
336
Understanding DNS Queries
A DNS client can make two basic types of queries: recursive and iterative.
The following list describes the difference between these two query types.
(The following discussion assumes that the client is asking the server for the
IP address of a host name, which is the most common type of DNS query.
You find out about other types of queries later; they, too, can be either
recursive or iterative.)
✦ Recursive queries: When a client issues a recursive DNS query, the
server must reply with either the IP address of the requested host name
or an error message indicating that the host name doesn’t exist. If the
server doesn’t have the information, it asks another DNS server for the
IP address. When the first server finally gets the IP address, it sends it
back to the client. If the server determines that the information doesn’t
exist, it returns an error message.
✦ Iterative queries: When a server receives an iterative query, it returns
the IP address of the requested host name if it knows the address. If the
server doesn’t know the address, it returns a referral, which is simply
the address of a DNS server that should know. The client can then issue
an iterative query to the server to which it was referred.
Normally, DNS clients issue recursive queries to DNS servers. If the server
knows the answer to the query, it replies directly to the client. If not, the
server issues an iterative query to a DNS server that it thinks should know
the answer. If the original server gets an answer from the second server,
it returns the answer to the client. If the original server gets a referral to a
third server, the original server issues an iterative query to the third server.
The original server keeps issuing iterative queries until it either gets the
answer or an error occurs. It then returns the answer or the error to the
client.
A real-life DNS example
Confused? I can understand why. An example may help to clear things up.
Suppose that a user wants to view the Web page www.wiley.com. The
following sequence of steps occurs to resolve this address:
1. The browser asks the client computer’s resolver to find the IP address
of www.wiley.com.
2. The resolver issues a recursive DNS query to its name server.
In this case, I’ll call the name server ns1.LoweWriter.com.
3. The name server ns1LoweWriter.com checks whether it knows the IP
address of www.wiley.com.
It doesn’t, so the name server issues an iterative query to one of the root
name servers to see whether it knows the IP address of www.wiley.com.
Zone Files and Resource Records
337
4. The root name server doesn’t know the IP address of www.wiley.com,
so it returns a list of the name servers that are authoritative for the com
domain.
5. The ns1.LoweWriter.com name server picks one of the com domain
name servers and sends it an iterative query for www.wiley.com.
6. The com name server doesn’t know the IP address of www.wiley.com,
so it returns a list of the name servers that are authoritative for the
wiley.com domain.
7. The ns1.LoweWriter.com name server picks one of the name
servers for the wiley.com domain and sends it an iterative query for
www.wiley.com.
8. The wiley.com name server knows the IP address for www.wiley.com,
so the name server returns it.
9. The ns1.LoweWriter.com name server shouts with joy for having
finally found the IP address for www.wiley.com. It gleefully returns this
address to the client. It also caches the answer so that the next time the
user looks for www.wiley.com, the name server won’t have to contact
other name servers to resolve the name.
10. The client also caches the results of the query.
The next time the client needs to look for www.wiley.com, the client
can resolve the name without troubling the name server.
Zone Files and Resource Records
Each DNS zone is defined by a zone file (also known as a DNS database or a
master file). For Windows DNS servers, the name of the zone file is domain.
zone. For example, the zone file for the LoweWriter.com zone is named
LoweWriter.com.zone. For BIND DNS servers, the zone files are named
db.domain. Thus, the zone file for the LoweWriter.com domain would be
db.LoweWriter.com. The format of the zone file contents is the same for
both systems, however.
Resource records are written as simple text lines, with the following fields:
Owner
TTL
Class
Type
RDATA
Using DNS
A zone file consists of one or more resource records. Creating and updating
the resource records that comprise the zone files is one of the primary tasks
of a DNS administrator. The Windows DNS server provides a friendly graphical
interface to the resource records. However, you should still be familiar with
how to construct resource records.
Book IV
Chapter 4
338
Zone Files and Resource Records
These fields must be separated from each other by one or more spaces. The
following list describes the five resource record fields:
✦ Owner: The name of the DNS domain or the host that the record applies
to. This is usually specified as a fully qualified domain name (with a
trailing dot) or as a simple host name (without a trailing dot), which is
then interpreted in the context of the current domain.
You can also specify a single @ symbol as the owner name. In that case,
the current domain is used.
✦ TTL: Also known as Time to Live; the number of seconds that the record
should be retained in a server’s cache before it’s invalidated. If you omit
the TTL value for a resource record, a default TTL is obtained from the
Start of Authority (SOA) record.
✦ Class: Defines the protocol to which the record applies. You should
always specify IN, for the Internet protocol. If you omit the class field,
the last class field that you specified explicitly is used. As a result, you’ll
sometimes see zone files that specify IN only on the first resource
record (which must be an SOA record) and then allow it to default to IN
on all subsequent records.
✦ Type: The resource record type. The most commonly used resource
types are summarized in Table 4-6 and are described separately later
in this section. Like the Class field, you can also omit the Type field and
allow it to default to the last specified value.
✦ RDATA: Resource record data that is specific to each record type.
Table 4-6
Common Resource Record Types
Type
Name
Description
SOA
Start of Authority
Identifies a zone
NS
Name Server
Identifies a name server that is authoritative for the zone
A
Address
Maps a fully qualified domain name to
an IP address
CNAME
Canonical Name
Creates an alias for a fully qualified
domain name
MX
Mail Exchange
Identifies the mail server for a domain
PTR
Pointer
Maps an IP address to a fully qualified
domain name for reverse lookups
Most resource records fit on one line. If a record requires more than one
line, you must enclose the data that spans multiple lines in parentheses.
Zone Files and Resource Records
339
You can include comments to clarify the details of a zone file. A comment
begins with a semicolon and continues to the end of the line. If a line begins
with a semicolon, the entire line is a comment. You can also add a comment
to the end of a resource record. You see examples of both types of comments
later in this chapter.
SOA records
Every zone must begin with an SOA record, which names the zone and
provides default information for the zone. Table 4-7 lists the fields that
appear in the RDATA section of an SOA record. Note that these fields are
positional, so you should include a value for all of them and list them in the
order specified. Because the SOA record has so many RDATA fields, you’ll
probably need to use parentheses to continue the SOA record onto multiple
lines.
Table 4-7
RDATA Fields for an SOA Record
Description
MNAME
The domain name of the name server that is authoritative for the zone.
RNAME
An e-mail address (specified in domain name format; not regular
e-mail format) of the person responsible for this zone.
SERIAL
The serial number of the zone. Secondary zones use this value to
determine whether they need to initiate a zone transfer to update
their copy of the zone.
REFRESH
A time interval that specifies how often a secondary server should
check whether the zone needs to be refreshed. A typical value is
3600 (one hour).
RETRY
A time interval that specifies how long a secondary server should
wait after requesting a zone transfer before trying again. A typical
value is 600 (ten minutes).
EXPIRE
A time interval that specifies how long a secondary server should keep
the zone data before discarding it. A typical value is 86400 (one day).
MINIMUM
A time interval that specifies the TTL value to use for zone resource
records that omit the TTL field. A typical value is 3600 (one hour).
Note two things about the SOA fields:
✦ The e-mail address of the person responsible for the zone is given in
DNS format, not in normal e-mail format. Thus, you separate the user
from the mail domain with a dot rather than an @ symbol. For example,
[email protected] would be listed as doug.lowewriter.com.
Book IV
Chapter 4
Using DNS
Name
340
Zone Files and Resource Records
✦ The serial number should be incremented every time you change
the zone file. If you edit the file via the graphic interface provided
by Windows DNS, the serial number is incremented automatically.
However, if you edit the zone file via a simple text editor, you have to
manually increment the serial number.
Here’s a typical example of an SOA record, with judicious comments to
identify each field:
lowewriter.com. IN SOA (
ns1.lowewriter.com
doug.lowewriter.com
148
3600
600
86400
3600 )
;
;
;
;
;
;
;
authoritative name server
responsible person
version number
refresh (1 hour)
retry (10 minutes)
expire (1 day)
minimum TTL (1 hour)
NS records
Name Server (NS) records identify the name servers that are authoritative
for the zone. Every zone must have at least one NS record. Using two or
more NS records is better so that if the first name server is unavailable, the
zone will still be accessible.
The owner field should either be the fully qualified domain name for the
zone, with a trailing dot, or an @ symbol. The RDATA consists of just one
field: the fully qualified domain name of the name server.
The following examples show two NS records that serve the lowewriter.
com domain:
lowewriter.com.
lowewriter.com.
IN
IN
NS
NS
ns1.lowewriter.com.
ns2.lowewriter.com.
A records
Address (A) records are the meat of the zone file: They provide the IP
addresses for each of the hosts that you want to make accessible via DNS.
In an A record, you usually list just the host name in the owner field, thus
allowing DNS to add the domain name to derive the fully qualified domain
name for the host. The RDATA field for the A record is the IP address of the
host.
The following lines define various hosts for the LoweWriter.com domain:
doug
server1
debbie
printer1
router1
www
IN
IN
IN
IN
IN
IN
A
A
A
A
A
A
192.168.168.200
192.168.168.201
192.168.168.202
192.168.168.203
207.126.127.129
64.71.129.102
Zone Files and Resource Records
341
Notice that for these lines, I don’t specify the fully qualified domain names
for each host. Instead, I just provide the host name. DNS will add the name of
the zone’s domain to these host names in order to create the fully qualified
domain names.
If I wanted to be more explicit, I could list these A records like this:
doug.lowewriter.com.
server1.lowewriter.com.
debbie.lowewriter.com.
printer1.lowewriter.com.
router1.lowewriter.com
www.lowewriter.com.
IN
IN
IN
IN
IN
IN
A
A
A
A
A
A
192.168.168.200
192.168.168.201
192.168.168.202
192.168.168.203
207.126.127.129
64.71.129.102
However, all this does is increase the chance for error. Plus, it creates more
work for yourself later if you decide to change your network’s domain.
CNAME records
A Canonical Name (CNAME) record creates an alias for a fully qualified
domain name. When a user attempts to access a domain name that is actually
an alias, the DNS system substitutes the real domain name — known as the
Canonical Name — for the alias. The owner field in the CNAME record provides
the name of the alias that you want to create. Then, the RDATA field provides
the Canonical Name — that is, the real name of the host.
For example, consider these resource records:
ftp.lowewriter.com.
files.lowewriter.com.
IN
IN
A
CNAME
207.126.127.132
www1.lowewriter.com.
Here, the host name of an FTP server at 207.126.127.132 is ftp.lowe
writer.com. The CNAME record allows users to access this host as files.
lowewriter.com if they prefer.
Book IV
Chapter 4
PTR records
102.129.71.64.in-addr.arpa. IN
PTR
www.lowewriter.com.
PTR records don’t usually appear in normal domain zones. Instead, they
appear in special reverse lookup zones. For more information, see the section,
“Reverse Lookup Zones,” later in this chapter.
Using DNS
A Pointer (PTR) record is the opposite of an address record: It provides the
fully qualified domain name for a given address. The owner field should
specify the reverse lookup domain name, and the RDATA field specifies the
fully qualified domain name. For example, the following record maps the
address 64.71.129.102 to www.lowewriter.com:
342
Reverse Lookup Zones
MX records
Mail Exchange (MX) records identify the mail server for a domain. The
owner field provides the domain name that users address mail to. The
RDATA section of the record has two fields. The first is a priority number
used to determine which mail servers to use when several are available.
The second is the fully qualified domain name of the mail server itself.
For example, consider the following MX records:
lowewriter.com.
lowewriter.com.
IN
IN
MX
MX
0
10
mail1.lowewriter.com.
mail2.lowewriter.com.
In this example, the lowewriter.com domain has two mail servers, named
mail1.lowewriter.com and mail2.lowewriter.com. The priority
numbers for these servers are 0 and 10. Because it has a lower priority
number, mail will be delivered to mail1.lowewriter.com first. The
mail2.lowewriter.com server will be used only if mail1.lowewriter.
com isn’t available.
The server name specified in the RDATA section should be an actual host
name, not an alias created by a CNAME record. Although some mail servers
can handle MX records that point to CNAMEs, not all can. As a result, you
shouldn’t specify an alias in an MX record.
Be sure to create a reverse lookup record (PTR, described in the next
section) for your mail servers. Some mail servers won’t accept mail from a
server that doesn’t have valid reverse lookup entries.
Reverse Lookup Zones
Normal DNS queries ask a name server to provide the IP address that
corresponds to a fully qualified domain name. This kind of query is a forward
lookup. A reverse lookup is the opposite of a forward lookup: It returns the
fully qualified domain name of a host based on its IP address.
Reverse lookups are possible because of a special domain called the inaddr.arpa domain, which provides a separate fully qualified domain name
for every possible IP address on the Internet. To enable a reverse lookup for
a particular IP address, all you have to do is create a PTR record in a reverse
lookup zone (a zone that is authoritative for a portion of the in-addr.arpa
domain). The PTR record maps the in-addr.arpa domain name for the
address to the host’s actual domain name.
The technique used to create the reverse domain name for a given IP
address is pretty clever. It creates subdomains beneath the in-addr.arpa
domain by using the octets of the IP address, listing them in reverse order.
For example, the reverse domain name for the IP address 207.126.67.129
is 129.67.126.207.in-addr.arpa.
Working with the Windows DNS Server
343
Why list the octets in reverse order? Because that correlates the network
portions of the IP address (which work from left to right) with the subdomain
structure of DNS names (which works from right to left). The following
description should clear this up:
✦ The 255 possible values for the first octet of an IP address each have a
subdomain beneath the in-addr.arpa domain. For example, any IP
address that begins with 207 can be found in the 207.in-addr.arpa
domain.
✦ Within this domain, each of the possible values for the second octet can
be found as a subdomain of the first octet’s domain. Thus, any address
that begins with 207.126 can be found in the 126.207.in-addr.arpa
domain.
✦ The same holds true for the third octet, so any address that begins with
207.126.67 can be found in the 67.126.207.in-addr.arpa domain.
✦ By the time you get to the fourth octet, you’ve pinpointed a specific host.
The fourth octet completes the fully qualified reverse domain name. Thus,
207.126.67.129 is mapped to 129.67.126.207.in-addr.arpa.
As a result, to determine the fully qualified domain name for the computer
at 207.126.67.129, the client queries its DNS server for the FQDN that
corresponds to 129.67.126.207.in-addr.arpa.
Working with the Windows DNS Server
Installing and managing a DNS server depends on the network operating
system that you’re using. The following sections are specific to working with
a DNS server in Windows 2003. Working with BIND in a Unix/Linux environment
is similar but without the help of a graphical user interface (GUI).
You can install the DNS server on Windows Server 2008 from the Server
Manager application. Choose Start➪Administrative Tools➪Server Manager.
Click the Server Roles, click the Add Roles link, and then follow the wizard
instructions to add the DNS role.
To add a new host (that is, an A record) to a zone, right-click the zone in the
DNS management console and choose the Add New Host command. This
brings up the New Host dialog box, as shown in Figure 4-4. From this dialog
box, specify the following information:
Using DNS
After you set up a DNS server, you can manage the DNS server from the
DNS management console, as shown in Figure 4-3. From this management
console, you can perform common administrative tasks, such as adding
additional zones, changing zone settings, adding A or MX records to an
existing zone, and so on. The DNS management console hides the details
of the actual resource records from you, thus allowing you to work with a
friendly GUI instead.
Book IV
Chapter 4
344
Working with the Windows DNS Server
Figure 4-3:
The DNS
management
console.
Figure 4-4:
The New
Host
dialog box.
✦ Name: The host name for the new host.
✦ IP Address: The host’s IP address.
✦ Create Associated Pointer (PTR) Record: Automatically creates a PTR
record in the reverse lookup zone file. Select this option if you want to
allow reverse lookups for the host.
✦ Allow Any Authenticated User to Update: Select this option if you want
to allow other users to update this record or other records with the
same host name. You should usually leave this option deselected.
You can add other records, such as MX or CNAME records, in the same way.
How to Configure a Windows DNS Client
345
How to Configure a Windows DNS Client
Client computers don’t need much configuration in order to work properly
with DNS. The client must have the address of at least one DNS server.
Usually, this address is supplied by DHCP, so if the client is configured to
obtain its IP address from a DHCP server, it will also obtain the DNS server
address from DHCP.
To configure a client computer to obtain the DNS server location from
DHCP, bring up the Network Properties dialog box by choosing Network
or Network Connections in Control Panel (depending on which version of
Windows the client is running). Then, select the Internet Protocol Version
4 (TCP/IPv4) protocol and click the Properties button. This summons the
dialog box shown in Figure 4-5. To configure the computer to use Dynamic
Host Configuration Protocol (DHCP), select the Obtain an IP Address
Automatically and the Obtain DNS Server Address Automatically options.
Figure 4-5:
Configuring
a Windows
client to
obtain
its DNS
address
from DHCP.
Book IV
Chapter 4
Using DNS
If the computer doesn’t use DHCP, you can use this same dialog box to
manually enter the IP address of your DNS server.
346
Book IV: TCP/IP and the Internet
Chapter 5: Using FTP
In This Chapter
✓ Figuring out the basics of FTP
✓ Setting up an FTP server
✓ Retrieving files from an FTP server
✓ Using FTP commands
F
ile Transfer Protocol (FTP) is the basic method for exchanging files over
the Internet. If you need to access files from someone’s FTP site, this
chapter shows you how to do so by using a Web browser or a command
line FTP client. If you need to set up your own FTP server to share files with
other users, this chapter shows you how to do that, too.
Discovering FTP
FTP is as old as the Internet. The first versions of FTP date to the early
1970s, and even the current FTP standard (RFC 959) dates to 1985. You can
use FTP with the command line FTP client (which has a decidedly 1980s feel
to it), or you can access FTP sites with most modern Web browsers if you
prefer a graphic interface. Old computer hounds prefer the FTP command
line client, probably for nostalgic reasons.
In spite of its age, FTP is still commonly used on the Internet. For example,
InterNIC (the organization that manages Internet names) maintains an FTP
site at ftp.rs.internic.net. There, you can download important files,
such as named.root, which provides the current location of the Internet’s
root name servers. Many other companies maintain FTP sites from which
you can download software, device drivers, documentation, reports, and
so on. FTP is also one of the most common ways to publish HTML files to a
Web server. Because FTP is still so widely used, it pays to know how to use
it from both the command line and from a browser.
In the Windows world, an FTP server is integrated with the Microsoft Web
server, Internet Information Services (IIS). As a result, you can manage FTP
from the IIS management console along with other IIS features. Note that
the FTP component is an optional part of IIS, so you may need to install it
separately if you opted to not include it when you first installed IIS.
348
Configuring an FTP Server
On Unix and Linux systems, FTP isn’t usually integrated with a Web server.
Instead, the FTP server is installed as a separate program. You’re usually
given the option to install FTP when you install the operating system. If you
choose not to, you can always install it later.
When you run an FTP server, you expose a portion of your file system to the
outside world. As a result, you need to be careful about how you set up your
FTP server so that you don’t accidentally allow hackers access to the bowels
of your file server. Fortunately, the default configuration of FTP is pretty
secure. You shouldn’t tinker much with the default configuration unless you
know what you’re doing.
Configuring an FTP Server
In the following sections, I show you how to configure FTP services in
Microsoft IIS. The examples show IIS version 6 running on Windows Server
2008, but the procedures are essentially the same for other IIS versions.
Installing FTP
Although FTP is integrated with IIS, FTP is not installed by default when you
install IIS. As a result, if you didn’t specifically select FTP when you installed
IIS, you need to install FTP before you can set up an FTP site. Here are the
procedures for Windows Server 2003 and 2008:
✦ For Windows Server 2003, you install the FTP protocol by choosing
Control Panel➪Add or Remove Programs➪Add/Remove Windows
Components. Then, select Application Server from the list of components,
click Details, and choose Internet Information Services (IIS). Click Details
again and then select File Transfer Protocol (FTP) from the list of IIS
subcomponents. Finally, click OK to install FTP. If asked, you’ll need to
insert the Windows Server 2003 setup disc.
✦ For Windows Server 2008, choose Start➪Server Manager and select the
Web Server (IIS) role. Scroll down to the Role Services section and
then click Add Role Services. Select the FTP Server role, click Next,
and then click Install.
Creating an FTP site
After you install FTP, you must create at least one FTP site. To do that,
follow these steps:
1. Choose Start➪Administrative Programs➪Internet Information Services
(IIS) Manager.
This launches the IIS Manager console, as shown in Figure 5-1.
Configuring an FTP Server
349
Figure 5-1:
The IIS
management
console.
2. Right-click the Sites node and choose Add FTP Site.
The first page of the Add FTP Site Wizard appears, as shown in Figure 5-2.
Figure 5-2:
The Add FTP
Site Wizard
asks for the
name and
data folder
for the FTP
site.
Book IV
Chapter 5
Using FTP
3. Enter a name for your ftp site.
In Figure 5-2, I entered the name ftp.
350
Configuring an FTP Server
4. Enter the path to the folder that will hold the FTP site’s data.
This field determines the location on the server where the data stored
on the FTP site will be located. If you don’t know the exact path, click
the Browse button and browse to the folder location.
5. Click Next.
The second page of the Add FTP Site Wizard appears, as shown in
Figure 5-3. This page lets you set the port number that the FTP site will
use, and lets you indicate whether you will use SSL security.
Figure 5-3:
The second
page of the
Add FTP
Site Wizard.
6. Leave the IP Address and Port fields unchanged unless you want to
use a nonstandard port.
By default, the FTP site will use port 21, which is the standard port for
the FTP protocol.
7. Select the SSL security option you want to use.
If you have an SSL certificate and want to use SSL security, select either
Allow SSL or Require SSL. If you select Allow SSL, users can access your
site with or without SSL security. If you select Require SSL, users must
always use SSL security to access the FTP site.
If you don’t have a certificate available or if the site will contain data
that doesn’t require tight security, select No SSL.
8. Click Next.
The third page of the Add FTP Site Wizard appears, as shown in Figure
5-4. This page lets you set the basic login security to be used for the site.
Configuring an FTP Server
351
Figure 5-4:
The third
page of the
Add FTP
Site Wizard.
9. Select the Anonymous option if you want to allow anonymous users to
access your FTP site.
If you check this option, users can access your FTP site without providing
any login information. You should specify this option only for sites that
have no security requirements.
10. Select the Basic option if you want to allow Basic authentication.
This option allows users to log in using a Windows username and
password. Note that because this option transmits the password in
unencrypted form, you should use it only when you know that the
connection between the user and the FTP server is secure.
11. Select the user access permissions you want to grant.
You can grant Read and Write permissions to All Users (as shown in the
figure), to anonymous users, and to individual users or groups.
Do not grant Write permissions to anonymous users. If you do, your FTP
site will quickly become a dumping ground for all kinds of trash as word
gets out about your totally unsecured FTP site.
Your FTP site is created!
Changing the FTP site properties
You can change the properties for an FTP site by selecting the site in IIS
Manager. This brings up a page with several icons that let you change
various settings for the site, as shown in Figure 5-5.
Using FTP
12. Click Finish.
Book IV
Chapter 5
352
Configuring an FTP Server
Figure 5-5:
The FTP Site
page.
The FTP Site Properties dialog box contains the following tabs that let you
configure the properties of your FTP site:
✦ FTP Authentication: Lets you enable or disable Anonymous and Basic
authentication for the FTP site.
✦ FTP Authorization: Lets you grant access rights to individual users,
groups of users, anonymous users, or all users.
✦ Current Sessions: Displays a list of users who are currently accessing
the FTP site.
✦ FTP Directory Browsing: Sets several options that determine how users
can browse the data directories in the FTP site.
✦ FTP Firewall Support: Sets several advanced options for working with
firewalls. Best leave these settings alone unless you’re a firewall guru.
✦ FTP IPv4 Address and Domain Restrictions: You can use this page to
grant or deny access to users based on their IP addresses or domain
names. This page is useful if you want to restrict access to a specific set
of users.
✦ FTP Logging: Lets you control logging for the site.
✦ FTP Messages: Lets you create four customized messages that appear
when users access the site, as shown in Figure 5-6.
Configuring an FTP Server
353
Figure 5-6:
Customizing
the site’s
messages.
The four messages you can configure are:
• The Banner message appears when a user first accesses the site,
before he or she has logged on. If the site allows anonymous logons,
you may mention that in the Banner message.
• The Welcome message appears after the user has successfully logged
on to your site.
• The Exit message appears when the user leaves the site.
• The Maximum Connections message appears when the connection
limit has been exceeded.
Adding content to your FTP site
Book IV
Chapter 5
Using FTP
When you set up an FTP site, the data for the site is stored in a folder on one
of the server’s disks. To make your FTP site useful, you’ll need to add files
to this folder. Those files will then be available for download on the site.
The easiest way to do that is to simply open Windows Explorer, browse to
the folder, and copy the files you want to include. If you’re not sure where
the site’s home folder is located, you can find it by opening the site in IIS
Manager and choosing the site in the IIS Manager and clicking Basic Settings
in the task pane on the right side of the screen.
354
Accessing an FTP Site with a Browser
The following list offers some useful tips for setting up FTP site content:
✦ Create a readme.txt file in the FTP site’s home directory that
describes the content and rules for your site. Hopefully, users will view
this file when they visit your site. There’s no guarantee that they will,
but you can always hope.
✦ If your site has a lot of files, organize them into subdirectories
beneath the home directory.
✦ Stick to short filenames. Users working with command line clients
appreciate brevity because they’ll have to type the filenames accurately
to retrieve your files.
✦ Don’t use spaces in filenames. Some clients balk at names that include
spaces.
Accessing an FTP Site with a Browser
Modern Web browsers include built-in support for FTP. Internet Explorer
lets you access an FTP site almost as if it were a local disk. You can even
drag and drop files to and from an FTP site.
To access an FTP site in a Web browser, just type the name of the site in
the address bar. If you want, you can explicitly specify the FTP protocol by
typing ftp:// before the FTP site name, but that’s usually not necessary. The
browser determines that the name you type is an FTP site and invokes the
FTP protocol automatically.
Figure 5-7 shows you how a typical FTP site appears when accessed with
Windows Explorer on a Windows 7 system. As you can see, the files and
folders appear as if they were on a local disk. Double-click a folder to display
the files contained in that folder; download files by dragging them from the
browser window to the desktop or to another window. You can also upload
files by dragging them from the desktop or another window into the FTP
browser window.
If the contents of an FTP site don’t appear in the browser window, you
may need to log on to the site. Choose File➪Login As to display the Log
On As dialog box. If the site administrator has given you a name and
password, you can enter it here to access the site. Otherwise, select the
Log On Anonymously check box and then click the Log On button.
Using an FTP Command Line Client
355
Figure 5-7:
Browsing an
FTP site.
Using an FTP Command Line Client
If you’re a command line junkie, you’ll appreciate the FTP command that
comes with Windows. It isn’t pretty, but it gets the job done. At the end
of this chapter, you can find a command reference that details all the
subcommands you can use with the FTP command. In this section, I just
show you a typical session in which I sign on to an FTP server named ftp.
lowewriter.com, switch to a directory named pics, download a file, and
then log off.
First, open a command window: Choose Start➪Run, type Command in the
text box, and then click OK. Navigate to the directory to where you want to
download files. This step is important because, although you can change the
local working directory from within the FTP command, it’s much easier to
just start FTP from the right directory.
C:\>ftp ftp.lowewriter.com
Using FTP
To start FTP, type ftp with the name of the FTP server as the parameter, like
this:
Book IV
Chapter 5
356
Using an FTP Command Line Client
Assuming that you typed the site name correctly, the FTP command connects
to the site, displays the banner message, and prompts you to log on:
Connected to ftp.lowewriter.com.
220-Microsoft FTP Service
220 We have 999 spooks here, but there’s always room for one
more! To volunteer, log in as Anonymous.
User (ftp.lowewriter.com:(none)):
To log on anonymously, type Anonymous and then press Enter. The server
responds by telling you that Anonymous access is allowed and asks for your
e-mail address as a password:
331 Anonymous access allowed, send identity (e-mail name) as
password.
Password:
Type your e-mail address as the password and then press Enter. The
Welcome message appears, followed by the ftp> prompt:
230-Welcome to my FTP site! For spooky Halloween pictures,
check out the Pics folder.
230 Anonymous user logged in.
ftp>
Whenever you see the ftp> prompt, the FTP command is waiting for you to
enter a subcommand. Start by entering dir to see a directory listing:
200 PORT command successful.
150 Opening ASCII mode data connection
06-30-07 08:05PM
<DIR>
06-30-07 07:55PM
2365
06-30-07 07:55PM
<DIR>
06-30-07 07:56PM
<DIR>
226 Transfer complete.
ftp: 190 bytes received in 0.00Seconds
ftp>
for /bin/ls.
pics
readme.txt
sounds
videos
190000.00Kbytes/sec.
As you can see, the response from the dir command isn’t quite as clean as
the display from an MS-DOS command. Still, you can pick out that the directory
includes three subdirectories, named pics, sounds, and videos, and a
single file, named readme.txt. The size of the file is 2,365 bytes.
Here’s a good question: If you enter a dir command, why does the response
read 200 PORT command successful? The answer has to do with how
the FTP protocol works. When you enter a dir command, the FTP client
forwards a PORT command to the server that opens a data transfer port that
is then used to return the resulting directory listing. The server replies that
the PORT command has successfully opened a data transfer port. Then, it
sends back the directory listing. Finally, it sends two more lines: one to
indicate that the transfer is complete (that is, that the dir output has been
successfully sent), and the other to summarize the number of bytes of data
that were sent and the data transfer rate.
Using an FTP Command Line Client
357
The files that I want to download are located in the pics subdirectory, so
the next command to issue is cd pics. This results in the following output:
250 CWD command successful.
ftp>
Once again, the command’s output isn’t exactly what you’d expect. The FTP
protocol doesn’t actually have a CD command. Instead, it uses a command
named CWD, which stands for change working directory, to change the directory.
The Windows FTP client uses command CD instead of CWD to be more
consistent with the Windows/MS-DOS user interface, which uses the command
CD to change directories. When you type a CD command at the ftp> prompt,
the FTP client sends a CWD command to the FTP server. The server then
replies with the message CWD command successful to indicate that the
directory has been changed.
Next, type dir again. The FTP server displays the directory listing for the
pics directory:
200 PORT command successful.
150 Opening ASCII mode data connection
06-27-07 10:04PM
123126
06-27-07 10:06PM
112457
06-27-07 10:06PM
81610
06-27-07 10:09PM
138102
06-27-07 10:09PM
83712
06-27-07 10:10PM
166741
06-27-07 09:58PM
119859
06-27-07 10:05PM
87720
226 Transfer complete.
ftp: 400 bytes received in 0.00Seconds
ftp>
for /bin/ls.
door.jpg
echair.jpg
fence.jpg
fog.jpg
gallows.jpg
ghost.jpg
skel01.jpg
wall.jpg
400000.00Kbytes/sec.
Here, you can see that the pics directory contains eight files. To download
a file, you use the GET command, specifying the name of the file that you
want to download. For example, to download the door.jpg file, type get
door.jpg. The FTP server transfers the file to your computer and displays
the following response:
Notice again that the response indicates that the command actually processed
by the server is a PORT command. The file is transferred in ASCII mode.
The entire transfer takes 0.13 seconds, which works out to a transfer rate of
about 985K per second.
After you download the file, you can end the session by typing bye. FTP
responds by displaying the site’s goodbye message; then it returns you to
the MS-DOS command prompt:
Using FTP
200 PORT command successful.
150 Opening ASCII mode data connection for door.jpg(123126 bytes).
226 Transfer complete.
ftp: 123126 bytes received in 0.13Seconds 985.01Kbytes/sec.
ftp>
Book IV
Chapter 5
358
FTP Command and Subcommand Reference
221 Hurry back...
C:\>
Of course, FTP is a lot more involved than this simple session suggests. Still,
the most common use of FTP is to download files, and most downloads are
no more complicated than this example.
FTP Command and Subcommand Reference
The rest of this chapter is an FTP command reference. In the following
sections, you can find complete reference information for the FTP
command and all its subcommands. The first command described is the
FTP command itself. After that, all the FTP command subcommands are listed
in alphabetical order.
The FTP command
What it does:
Starts the FTP client so that you can transfer files to
and from an FTP server
Syntax:
ftp [-v] [-d] [-i] [-n] [-g] [-s:filename] [-a]
[-w:windowsize] [-A] [host]
Parameters:
-v
Turns off Verbose mode.
-d
Turns on Debug mode.
-i
Turns off Prompt mode.
-n
Forces manual logon.
-g
Turns off Glob mode.
-s
Specifies a script file that contains FTP commands.
-a
Specifies that any network interface can be
used to bind the data connection.
-w
Specifies the size of the transmission buffer.
The default is 4K.
-A
Automatically logs on as Anonymous.
Host:
The FTP server to which you want to connect.
This can be the server’s DNS name or an IP address.
Examples:
ftp ftp.lowewriter.com
ftp ftp.lowewriter.com -A
FTP Command and Subcommand Reference
More info:
359
Unlike most Windows commands, the switches for this
command begin with a hyphen, not a slash.
If you want to script subcommands, use the -s switch.
Input redirection doesn’t work with FTP.
When FTP is running, the prompt ftp> appears.
When this prompt is displayed, you can enter any of
the FTP subcommands described in the rest of this
chapter.
! (Escape)
What it does:
Escape to a command shell
Syntax:
!
More info:
This command brings up a temporary command prompt
so that you can enter commands. To return to the ftp>
prompt, type exit.
? (Help)
What it does:
Displays Help information
Syntax:
? [command]
help [command]
Example:
help mput
More info:
? and help are interchangeable. If you enter ? or help
by itself, a list of FTP commands appears. If you enter
? or help followed by a command name, a summary of
that command’s function appears.
Book IV
Chapter 5
append
Uploads a file and appends it to the end of an existing
file on the remote system
Syntax:
append localfile [remotefile]
Example:
append extra.txt start.txt
More info:
If you omit the remotefile parameter, the remote file
is assumed to have the same name as the local file.
Using FTP
What it does:
360
FTP Command and Subcommand Reference
ascii
What it does:
Sets the ASCII transfer mode
Syntax:
ascii
More info:
This command sets the transfer type of ASCII, which is
best suited for text files. ASCII is the default transfer
type.
bell
What it does:
Causes the FTP client to beep when each transfer is
complete
Syntax:
bell
More info:
This command is useful when you’re downloading long
files and want to take a nap during the download.
Unfortunately, it doesn’t beep when it sees your boss
approaching your office, so you’ll need some other
alarm system to cover that contingency.
binary
What it does:
Sets the binary transfer type
Syntax:
binary
More info:
The binary file type is best for executable files and
other nontext files.
bye
What it does:
Ends the FTP session and exits the FTP client
Syntax:
bye
More info:
This is the command to use when you’re done. It’s the
same as the quit command.
cd
What it does:
Changes the working directory on the remote computer
Syntax:
cd remotedirectory
Example:
cd pics
FTP Command and Subcommand Reference
More info:
361
Use this to change to the directory that contains the
files you want to download or the directory to which
you want to upload files.
Type cd \ to go to the root directory.
close
What it does:
Closes the session with the remote computer but
doesn’t leave the FTP program
Syntax:
close
More info:
You can use this command if you want to switch to
another FTP server without leaving and restarting the
FTP program. This command is the same as the
disconnect command.
debug
What it does:
Toggles Debug mode
Syntax:
debug
More info:
When Debug mode is on, the FTP client displays the
actual FTP commands that are sent to the FTP server.
This can be useful if you’re an FTP guru trying to
diagnose a problem with a server or a client, but it can
also be fun if you just want to see how FTP client
commands (like CD) get translated into FTP server
commands (like CWD).
delete
Deletes the specified file on the remote computer
Syntax:
delete remotefile
Example:
delete fright.txt
More info:
You can delete only one file at a time with this command.
To delete more than one file in a single command, use
the mdelete command.
dir
What it does:
Lists contents of remote directory
Syntax:
dir [remotedirectory] [localfile]
Book IV
Chapter 5
Using FTP
What it does:
362
FTP Command and Subcommand Reference
Examples:
dir
dir \pics
dir \pics picdir.txt
More info:
The first parameter lets you list a directory other than
the current working directory. The second parameter lets
you capture the output to a file on the local computer.
disconnect
What it does:
Disconnects from the remote computer but doesn’t
leave the FTP program
Syntax:
disconnect
More info:
You can use this command if you want to switch to
another FTP server without leaving and restarting the
FTP program. This command is the same as the close
command.
get
What it does:
Downloads a file from the remote computer
Syntax:
get remotefile [localfile]
Examples:
get boo.exe
get boo.exe bar.exe
More info:
This command downloads the specified file from the
current working directory on the remote system to the
current directory on the local system. The second
parameter lets you save the file using a different name
than the name used on the remote system.
You can use this command to download only one file
at a time. To download multiple files, use the mget
command.
This command is the same as the recv command.
glob
What it does:
Toggles the use of wildcards for local filenames
Syntax:
glob
More info:
If globbing is on, you can use * and ? characters in
local filenames. Globbing is on by default.
FTP Command and Subcommand Reference
363
hash
What it does:
Toggles the display of hash marks (#) to indicate
transfer progress
Syntax:
hash
More info:
Hash is off by default. If you turn it on by issuing the
hash command, a hash mark (#) appears each time a
2K data block is transferred. This helps you track the
progress of transfers.
help
What it does:
Displays Help information
Syntax:
? [command]
help [command]
Example:
help mput
More info:
? and help are interchangeable. If you enter ? or help
by itself, a list of FTP commands appears. If you enter
? or help followed by a command name, a summary of
that command’s function appears.
lcd
What it does:
Changes the working directory on the local computer
Syntax:
lcd localdirectory
Example:
lcd \docs
More info:
Use this to change to the directory you want to
download files to or that contains files you want to
upload.
What it does:
Sends a native FTP command directly to the server
Syntax:
literal arguments . . .
Example:
literal cwd pics
More info:
Use this command if you’re an FTP guru and you want
to send a native FTP command to the server. It’s the
same as the quote command.
Using FTP
literal
Book IV
Chapter 5
364
FTP Command and Subcommand Reference
ls
What it does:
List contents of remote directory
Syntax:
ls [remotedirectory] [localfile]
Examples:
ls
ls \pics
ls \pics picdir.txt
More info:
The first parameter lets you list a directory other than
the current working directory. The second parameter
lets you capture the output to a file on the local computer.
mdelete
What it does:
Delete multiple files
Syntax:
mdelete remotefile . . .
Examples:
mdelete file1.txt
mdelete file1.txt file2.txt file3.txt
More info:
This command deletes one or more files from the
current working directory on the remote system.
mdir
What it does:
Lists the contents of multiple remote directories
Syntax:
mdir remotedirectory . . . [localfile]
Example:
mdir pics videos
More info:
Specify a hyphen as the last parameter to display the
output on the screen. Otherwise, the last parameter
will be interpreted as the name of the local file you
want the directory listing captured to.
mget
What it does:
Downloads multiple files
Syntax:
mget remotefile . . .
Examples:
mget file1.txt
mget file1.txt file2.txt file3.txt
FTP Command and Subcommand Reference
More info:
365
This command downloads one or more files from the
current working directory on the remote system to the
current directory on the local computer.
mkdir
What it does:
Creates a directory on the remote system
Syntax:
mkdir remotedirectory
Example:
mdir plans
More info:
The new subdirectory is created in the current working
directory on the remote system.
mls
What it does:
Lists the contents of multiple remote directories
Syntax:
mls remotedirectory . . . [localfile]
Example:
mls pics videos
More info:
Specify a hyphen as the last parameter to display the
output on the screen. Otherwise, the last parameter
will be interpreted as the name of the local file you
want the directory listing captured to.
mput
Uploads multiple files
Syntax:
mput localfile . . .
Examples:
mput file1.txt
mput file1.txt file2.txt file3.txt
More info:
This command uploads one or more files from the
current directory on the local system to the current
working directory on the remote system.
open
What it does:
Connects to an FTP server
Syntax:
open remotesystem [port]
Book IV
Chapter 5
Using FTP
What it does:
366
FTP Command and Subcommand Reference
Examples:
open ftp.microsoft.com
open ftp.weirdport.com 1499
More info:
Specify the port number only if the remote system
does not use the standard FTP ports (20 and 21).
prompt
What it does:
Toggles prompting for multiple transfers
Syntax:
prompt
More info:
When Prompt mode is on, you’re prompted for each
file before the file is transferred. Prompt mode is on by
default.
put
What it does:
Uploads a file to the remote computer
Syntax:
put localfile [remotefile]
Examples:
put boo.exe
put boo.exe bar.exe
More info:
This command uploads the specified file from the
current directory on the local system to the current
working directory on the remote system. The second
parameter lets you save the file with a different name
than the name used on the local system.
You can use this command to upload only one file at a
time. To upload multiple files, use the mput command.
This command is the same as the send command.
pwd
What it does:
Displays the current working directory on the remote
computer
Syntax:
pwd
More info:
If you aren’t sure what the current directory is on the
remote system, use this command to find out.
FTP Command and Subcommand Reference
367
quit
What it does:
Ends the FTP session and quits the FTP program
Syntax:
quit
More info:
This is the command to use when you’re done. It’s the
same as the bye command.
quote
What it does:
Sends a native FTP command directly to the server
Syntax:
quote arguments . . .
Example:
quote cwd pics
More info:
Use this command if you’re an FTP guru and you want
to send a native FTP command to the server. It’s the
same as the literal command.
recv
What it does:
Downloads a file from the remote computer
Syntax:
recv remotefile [localfile]
Examples:
recv boo.exe
recv boo.exe bar.exe
More info:
This command downloads the specified file from the
current working directory on the remote system to the
current directory on the local system. The second
parameter lets you save the file with a different name
than the name used on the remote system.
This command is the same as the get command.
Using FTP
You can use this command to download only one file at
a time. To download multiple files, use the mget
command.
Book IV
Chapter 5
368
FTP Command and Subcommand Reference
remotehelp
What it does:
Displays help for remote commands
Syntax:
remotehelp [command]
Example:
remotehelp cwd
More info:
If you enter remotehelp by itself, a list of FTP
commands is displayed. If you enter remotehelp
followed by a command name, a summary of that
command’s function appears.
rename
What it does:
Renames a file on the remote system
Syntax:
rename filename newfilename
Example:
rename door.jpg doorway.jpg
More info:
Use this command to change the name of a file on the
remote system.
rmdir
What it does:
Removes a directory on the remote system
Syntax:
rmdir directoryname
Example:
rmdir oldpics
More info:
This command removes a directory and all the files in
it, so use it with caution!
send
What it does:
Uploads a file to the remote computer
Syntax:
send localfile [remotefile]
Examples:
send boo.exe
send boo.exe bar.exe
FTP Command and Subcommand Reference
More info:
369
This command uploads the specified file from the
current directory on the local system to the current
working directory on the remote system. The second
parameter lets you save the file with a different name
than the name used on the local system.
You can use this command to upload only one file at a
time. To upload multiple files, use the mput command.
This command is the same as the put command.
status
What it does:
Displays the current status of the FTP client
Syntax:
status
More info:
Use this command to display the current settings of
options, such as bell, prompt, and verbose, as well
as the current connection status.
trace
What it does:
Activates Trace mode
Syntax:
trace
More info:
When Trace mode is on, detailed information about
each packet transmission is displayed. trace is off by
default and should be left off unless you’re digging
deep into the bowels of FTP or just want to show off.
type
Sets the transfer type to ASCII or binary or displays the
current mode
Syntax:
type [ascii or binary]
Examples:
type ascii
type binary
type
Book IV
Chapter 5
Using FTP
What it does:
370
FTP Command and Subcommand Reference
More info:
Use ASCII transfers for text files, and use binary
transfers for nontext files.
If you don’t specify a type, the current transfer type
appears.
You can also use the ascii or binary command to
switch the transfer type.
user
What it does:
Logs you on to a remote system
Syntax:
user username [password]
Examples:
user doug
user doug notmypw
More info:
This command logs you on to the remote system by
using the username and password you provide. If you
omit the password, you’re prompted to enter it.
verbose
What it does:
Toggles Verbose mode
Syntax:
verbose
More info:
When Verbose mode is on, FTP responses appear.
Verbose mode is on by default.
Chapter 6: TCP/IP Tools
and Commands
In This Chapter
✓ Recognizing tools and commands
✓ Making all your hosts sing with IPConfig and Ping
M
ost client and server operating systems that support Transmission
Control Protocol/Internet Protocol (TCP/IP) come with a suite of
commands and tools that are designed to let you examine TCP/IP configuration
information and diagnose and correct problems. Although the exact form of
these commands varies between Windows and Unix/Linux, most are
surprisingly similar. This chapter is a reference to the most commonly used
TCP/IP commands.
Using the arp Command
Using the arp command allows you to display and modify the Address
Resolution Protocol (ARP) cache. An ARP cache is a simple mapping of IP
addresses to MAC addresses. Each time a computer’s TCP/IP stack uses ARP
to determine the Media Access Control (MAC) address for an IP address, it
records the mapping in the ARP cache so that future ARP lookups go faster.
If you use the arp command without any parameters, you get a list of the
command’s parameters. To display the ARP cache entry for a specific IP
address, use an -a switch followed by the IP address. For example:
C:\>arp -a 192.168.168.22
Interface: 192.168.168.21 --- 0x10004
Internet Address
Physical Address
192.168.168.22
00-60-08-39-e5-a1
C:\>
Type
dynamic
372
Using the hostname Command
You can display the complete ARP cache by using -a without specifying an
IP address, like this:
C:\>arp -a
Interface: 192.168.168.21 --- 0x10004
Internet Address
Physical Address
192.168.168.9
00-02-e3-16-e4-5d
192.168.168.10
00-50-04-17-66-90
192.168.168.22
00-60-08-39-e5-a1
192.168.168.254
00-40-10-18-42-49
C:\>
Type
dynamic
dynamic
dynamic
dynamic
ARP is sometimes useful when diagnosing duplicate IP assignment problems.
For example, suppose you can’t access a computer that has an IP address
of 192.168.168.100. You try to ping the computer, expecting the ping to
fail; but lo and behold, the ping succeeds. One possible cause for this may
be that two computers on the network have been assigned the address
192.168.168.100, and your ARP cache is pointing to the wrong one.
The way to find out is to go to the 192.168.168.100 computer that you
want to access, run ipconfig /all, and make a note of the physical
address. Then return to the computer that’s having trouble reaching the
192.168.168.100 computer, run arp -a, and compare the physical
address with the one you noted. If they’re different, that two computers
are assigned the same IP address. You can then check the Dynamic Host
Configuration Protocol (DHCP) or static TCP/IP configuration of the
computers involved to find out why.
Using the hostname Command
The hostname command is the simplest of all the TCP/IP commands presented
in this chapter. It simply displays the computer’s host name. For example:
C:\>hostname
doug
C:\>
Here, the host name for the computer is doug. The Windows version of the
hostname command has no parameters. However, the Unix/Linux versions
of hostname let you set the computer’s host name as well as display it. You
do that by specifying the new host name as an argument.
Using the ipconfig Command
373
Using the ipconfig Command
Using the ipconfig command displays information about a computer’s
TCP/IP configuration. It can also be used to update DHCP and Domain Name
Server (DNS) settings.
Displaying basic IP configuration
To display the basic IP configuration for a computer, use the ipconfig
command without any parameters, like this:
C:\>ipconfig
Windows IP Configuration
Ethernet adapter Local Area Connection:
Connection-specific DNS
Link-local IPv6 Address
IPv4 Address. . . . . .
Subnet Mask . . . . . .
Default Gateway . . . .
Suffix
. . . .
. . . .
. . . .
. . . .
.
.
.
.
.
:
:
:
:
:
fe80::cca:9067:9427:a911%8
192.168.1.110
255.255.255.0
192.168.1.1
Tunnel adapter Local Area Connection* 6:
Connection-specific DNS
IPv6 Address. . . . . .
Link-local IPv6 Address
Default Gateway . . . .
Suffix
. . . .
. . . .
. . . .
.
.
.
.
:
: 2001:0:4136:e38c:2c6c:670:3f57:fe91
: fe80::2c6c:670:3f57:fe91%9
: ::
Tunnel adapter Local Area Connection* 7:
Connection-specific DNS Suffix . :
Link-local IPv6 Address . . . . . : fe80::5efe:192.168.1.110%10
Default Gateway . . . . . . . . . :
C:\>
When you use ipconfig without parameters, the command displays the
name of the adapter, the domain name used for the adapter, the IP address,
the subnet mask, and the default gateway configuration for the adapter. This
is the easiest way to determine a computer’s IP address.
TCP/IP Tools and
Commands
If your computer indicates an IP address in the 169.254.x.x block, odds
are good that the DHCP server isn’t working. 169.254.x.x is the Class B
address block that Windows uses when it resorts to IP Autoconfiguration.
This usually happens only when the DHCP server can’t be reached or isn’t
working.
Book IV
Chapter 6
374
Using the ipconfig Command
Displaying detailed configuration information
You can display detailed IP configuration information by using an /all
switch with the ipconfig command, like this:
C:\>ipconfig /all
Windows IP Configuration
Host Name . . . . .
Primary Dns Suffix
Node Type . . . . .
IP Routing Enabled.
WINS Proxy Enabled.
.
.
.
.
.
.
.
.
.
.
.
.
.
.
.
.
.
.
.
.
.
.
.
.
.
.
.
.
.
.
.
.
.
.
.
:
:
:
:
:
WK07-001
Hybrid
No
No
Ethernet adapter Local Area Connection:
Connection-specific DNS Suffix
Description . . . . . . . . . .
Physical Address. . . . . . . .
DHCP Enabled. . . . . . . . . .
Autoconfiguration Enabled . . .
Link-local IPv6 Address . . . .
IPv4 Address. . . . . . . . . .
Subnet Mask . . . . . . . . . .
Default Gateway . . . . . . . .
DNS Servers . . . . . . . . . .
.
.
.
.
.
.
.
.
.
.
:
:
:
:
:
:
:
:
:
:
Intel(R) PRO/100 VE Network Connection
00-12-3F-A7-17-BA
No
Yes
fe80::cca:9067:9427:a911%8(Preferred)
192.168.1.110(Preferred)
255.255.255.0
192.168.1.1
192.168.1.10
68.87.76.178
NetBIOS over Tcpip. . . . . . . . : Enabled
C:\>
You can determine a lot of information about the computer from the
ipconfig /all command. For example:
✦ The computer’s host name is WK07-001.
✦ The computer’s IPv4 address is 192.168.1.110, and the subnet mask
is 255.255.255.0.
✦ The default gateway is a router located at 192.168.1.1.
✦ This router is also the network’s DHCP server.
✦ The DNS servers are at 192.168.1.10 and 68.87.76.178.
Renewing an IP lease
If you’re having an IP configuration problem, you can often solve it by
renewing the computer’s IP lease. To do that, use a /renew switch, like this:
C:\>ipconfig /renew
Windows IP Configuration
Ethernet adapter Local Area
Connection-specific
IP Address. . . . .
Subnet Mask . . . .
Default Gateway . .
C:\>
Connection:
DNS Suffix
. . . . . .
. . . . . .
. . . . . .
.
.
.
.
:
: 192.168.1.110
: 255.255.255.0
: 192.168.1.1
Using the nbtstat Command
375
When you renew an IP lease, the ipconfig command displays the new lease
information.
This command won’t work if you configured the computer to use a static IP
address.
Releasing an IP lease
You can release an IP lease by using an ipconfig command with the /
release parameter, like this:
C:\>ipconfig /release
Windows IP Configuration
Ethernet adapter Local Area
Connection-specific
IP Address. . . . .
Subnet Mask . . . .
Default Gateway . .
C:\>
Connection:
DNS Suffix
. . . . . .
. . . . . .
. . . . . .
.
.
.
.
:
: 0.0.0.0
: 0.0.0.0
:
As you can see, the DNS suffix and default gateway for the computer are
blank, and the IP address and subnet mask are set to 0.0.0.0.
After you release the DHCP lease, you can use an ipconfig /renew
command to obtain a new DHCP lease for the computer.
Flushing the local DNS cache
You probably won’t need to do this unless you’re having DNS troubles. If
you’ve been tinkering with your network’s DNS configuration, you may need
to flush the cache on your DNS clients so that they’ll be forced to reacquire
information from the DNS server. You can do that by using a /flushdns
switch:
C:\>ipconfig /flushdns
Windows IP Configuration
Successfully flushed the DNS Resolver Cache.
C:\>
Using the nbtstat Command
nbtstat is a Windows-only command that can help solve problems with
NetBIOS name resolution. (nbt stands for NetBIOS over TCP/IP.) You can
use any of the switches listed in Table 6-1 to specify what nbtstat output
TCP/IP Tools and
Commands
Even if you don’t need to do this, it’s fun just to see the computer read
flushed. If I worked at Microsoft, you’d be able to revert Windows Vista
computers back to XP by using a /flushVista switch.
Book IV
Chapter 6
376
Using the nbtstat Command
you want to display. For example, you can use an -a switch to display the
cached name table for a specified computer, like this:
C:\>nbtstat -a WK07-001
Local Area Connection:
Node IpAddress: [192.168.1.110] Scope Id: []
NetBIOS Remote Machine Name Table
Name
Type
Status
--------------------------------------------WK07-001
<00> UNIQUE
Registered
WORKGROUP
<00> GROUP
Registered
WK07-001
<20> UNIQUE
Registered
WORKGROUP
<1E> GROUP
Registered
WORKGROUP
<1D> UNIQUE
Registered
..__MSBROWSE__.<01> GROUP
Registered
MAC Address = 00-12-3F-A7-17-BAC:\>
C:\>
Table 6-1 lists the switches that you can use with nbtstat and explains the
function of each switch.
Table 6-1
nbtstat Command Switches
Switch
What It Does
-a name
Lists the specified computer’s name table given the
computer’s name
-A IP-address
Lists the specified computer’s name table given the
computer’s IP address
-c
Lists the contents of the NetBIOS cache
-n
Lists locally registered NetBIOS names
-r
Displays a count of the names resolved by broadcast and
via WINS
-R
Purges and reloads the cached name table from the
LMHOSTS file
-RR
Releases and then reregisters all names
-S
Displays the sessions table using IP addresses
-s
Displays the sessions table and converts destination IP
addresses to computer NetBIOS names
Using the netdiag Utility
377
Using the netdiag Utility
netdiag is a powerful, network-testing utility that performs a variety of
network diagnostic tests that can help you to pinpoint a networking problem.
Listing 6-1 shows the output from a typical execution of the Netdiag
command. (I took the liberty of editing it somewhat to make it more compact.)
You can scan this listing to see the types of tests that the netdiag command
performs.
Unfortunately, the netdiag command is not available for Windows 9x
computers (including Windows Me), and it isn’t installed by default in
Windows XP or Vista. However, you can install it in Windows XP or Vista by
inserting your Windows installation disc in your computer’s optical drive.
If you’re asked to reinstall Windows, say no. Instead, choose to browse the
install CD. Navigate your way down to the \Support\Tools folder on the
install CD and then double-click the Setup.exe icon in the \Support\Tools
folder.
The netdiag command has several switches that let you control the output
generated by the command:
✦ /q: Lists only those tests that fail
✦ /v: Generates verbose output (even more verbose than usual)
✦ /debug: Generates extremely verbose output — way more than when
you use /v
✦ /l: Stores the output from the command in a file named NetDiag.log
✦ /fix: Attempts to fix DNS problems that are discovered
Listing 6-1: Output from the netdiag Command
...............................
Computer Name: DOUG
DNS Host Name: Doug
System info : Windows 2000 Professional (Build 2600)
Processor : x86 Family 15 Model 2 Stepping 4, GenuineIntel
List of installed hotfixes :
Q147222
Q308677
Q308678
Q310601
Q311889
Q315000
Netcard queries test . . . . . . . : Passed
Per interface results:
Adapter : Local Area Connection
Netcard queries test . . . : Passed
Host Name. . . . . . . . . : Doug
IP Address . . . . . . . . : 192.168.168.21
Subnet Mask. . . . . . . . : 255.255.255.0
Book IV
Chapter 6
TCP/IP Tools and
Commands
(continued)
378
Using the netstat Command
Listing 6-1 (continued)
Default Gateway. . . . . . : 192.168.168.254
Dns Servers. . . . . . . . : 192.168.168.10
168.215.210.50
192.9.9.3
AutoConfiguration results. . . . . . : Passed
Default gateway test . . . : Passed
NetBT name test. . . . . . : Passed
WINS service test. . . . . : Skipped
There are no WINS servers configured for this interface.
Global results:
Domain membership test . . . . . . : Passed
Dns domain name is not specified.
Dns forest name is not specified.
NetBT transports test. . . . . . . : Passed
List of NetBt transports currently configured:
NetBT_Tcpip_{4A526104-BAEB-44F0-A2F6-A804FE31BBAA}
1 NetBt transport currently configured.
Autonet address test . . . . . . . : Passed
IP loopback ping test. . . . . . . : Passed
Default gateway test . . . . . . . : Passed
NetBT name test. . . . . . . . . . : Passed
Winsock test . . . . . . . . . . . : Passed
DNS test . . . . . . . . . . . . . : Passed
Redir and Browser test . . . . . . : Passed
List of NetBt transports currently bound to the Redir
NetBT_Tcpip_{4A526104-BAEB-44F0-A2F6-A804FE31BBAA}
The redir is bound to 1 NetBt transport.
List of NetBt transports currently bound to the browser
NetBT_Tcpip_{4A526104-BAEB-44F0-A2F6-A804FE31BBAA}
The browser is bound to 1 NetBt transport.
DC discovery test. . . . . . . . . : Skipped
DC list test . . . . . . . . . . . : Skipped
Trust relationship test. . . . . . : Skipped
Kerberos test. . . . . . . . . . . : Skipped
LDAP test. . . . . . . . . . . . . : Skipped
Bindings test. . . . . . . . . . . : Passed
WAN configuration test . . . . . . : Skipped
No active remote access connections.
Modem diagnostics test . . . . . . : Passed
IP Security test . . . . . . . . . : Passed
Service status is: Started
Service startup is: Automatic
IPSec service is available, but no policy is assigned or active
Note: run “ipseccmd /?” for more detailed information
The command completed successfully
Using the netstat Command
Using the Netstat command displays a variety of statistics about a
computer’s active TCP/IP connections. It’s a useful tool to use when you’re
having trouble with TCP/IP applications, such as File Transfer Protocol
(FTP), HyperText Transport Protocol (HTTP), and so on.
Using the netstat Command
379
Displaying connections
If you run netstat without specifying any parameters, you get a list of
active connections, something like this:
C:\>netstat
Active Connections
Proto Local Address
TCP
Doug:1463
TCP
Doug:1582
TCP
Doug:3630
TCP
Doug:3716
TCP
Doug:3940
C:\>
Foreign Address
192.168.168.10:1053
192.168.168.9:netbios-ssn
192.168.168.30:9100
192.168.168.10:4678
192.168.168.10:netbios-ssn
State
ESTABLISHED
ESTABLISHED
SYN_SENT
ESTABLISHED
ESTABLISHED
This list shows all the active connections on the computer and indicates the
local port used by the connection, as well as the IP address and port number
for the remote computer.
You can specify the -n switch to display both local and foreign addresses in
numeric IP form:
C:\>netstat -n
Active Connections
Proto Local Address
TCP
192.168.168.21:1463
TCP
192.168.168.21:1582
TCP
192.168.168.21:3658
TCP
192.168.168.21:3716
TCP
192.168.168.21:3904
TCP
192.168.168.21:3940
C:\>
Foreign Address
192.168.168.10:1053
192.168.168.9:139
192.168.168.30:9100
192.168.168.10:4678
207.46.106.78:1863
192.168.168.10:139
State
ESTABLISHED
ESTABLISHED
SYN_SENT
ESTABLISHED
ESTABLISHED
ESTABLISHED
Finally, you can specify the -a switch to display all TCP/IP connections and
ports that are being listened to. I won’t list the output from that command
here because it would run several pages, and I want to do my part for the
rainforests. Suffice it to say that it looks a lot like the netstat output shown
previously, but a lot longer.
Book IV
Chapter 6
Displaying interface statistics
C:\>netstat -e
Interface Statistics
Bytes
Unicast packets
Non-unicast packets
Discards
Errors
Unknown protocols
C:\>
Received
672932849
1981755
251869
0
0
1829
Sent
417963911
1972374
34585
0
0
TCP/IP Tools and
Commands
If you use an -e switch, netstat displays various protocol statistics, like
this:
380
Using the netstat Command
The items to pay attention to in this output are the Discards and Errors.
These numbers should be zero, or at least close to it. If they’re not, the
network may be carrying too much traffic or the connection may have a
physical problem. If no physical problem exists with the connection, try
segmenting the network to see whether the error and discard rates drop.
You can display additional statistics by using an -s switch, like this:
C:\>netstat -s
IPv4 Statistics
Packets Received
Received Header Errors
Received Address Errors
Datagrams Forwarded
Unknown Protocols Received
Received Packets Discarded
Received Packets Delivered
Output Requests
Routing Discards
Discarded Output Packets
Output Packet No Route
Reassembly Required
Reassembly Successful
Reassembly Failures
Datagrams Successfully Fragmented
Datagrams Failing Fragmentation
Fragments Created
=
=
=
=
=
=
=
=
=
=
=
=
=
=
=
=
=
9155
0
0
0
0
0
14944
12677
0
71
0
0
0
0
0
0
0
=
=
=
=
=
=
=
=
=
=
=
=
=
=
=
=
=
3
0
0
0
0
0
345
377
0
0
0
0
0
0
0
0
0
IPv6 Statistics
Packets Received
Received Header Errors
Received Address Errors
Datagrams Forwarded
Unknown Protocols Received
Received Packets Discarded
Received Packets Delivered
Output Requests
Routing Discards
Discarded Output Packets
Output Packet No Route
Reassembly Required
Reassembly Successful
Reassembly Failures
Datagrams Successfully Fragmented
Datagrams Failing Fragmentation
Fragments Created
ICMPv4 Statistics
Using the netstat Command
Received
6
0
6
0
0
0
0
0
0
0
0
0
0
0
0
Sent
14
0
14
0
0
0
0
0
0
0
0
0
0
0
0
Received
3
0
0
0
0
0
0
0
0
0
0
0
3
0
0
0
0
Sent
7
0
0
0
0
0
0
0
0
0
0
6
0
1
0
0
0
Messages
Errors
Destination Unreachable
Time Exceeded
Parameter Problems
Source Quenches
Redirects
Echo Replies
Echos
Timestamps
Timestamp Replies
Address Masks
Address Mask Replies
Router Solicitations
Router Advertisements
381
ICMPv6 Statistics
Messages
Errors
Destination Unreachable
Packet Too Big
Time Exceeded
Parameter Problems
Echos
Echo Replies
MLD Queries
MLD Reports
MLD Dones
Router Solicitations
Router Advertisements
Neighbor Solicitations
Neighbor Advertisements
Redirects
Router Renumberings
Book IV
Chapter 6
TCP Statistics for IPv4
=
=
=
=
=
=
=
=
527
2
1
301
1
8101
6331
301
TCP Statistics for IPv6
Active Opens
Passive Opens
= 1
= 1
TCP/IP Tools and
Commands
Active Opens
Passive Opens
Failed Connection Attempts
Reset Connections
Current Connections
Segments Received
Segments Sent
Segments Retransmitted
382
Using the nslookup Command
Failed Connection Attempts
Reset Connections
Current Connections
Segments Received
Segments Sent
Segments Retransmitted
=
=
=
=
=
=
0
1
0
142
142
0
UDP Statistics for IPv4
Datagrams Received
No Ports
Receive Errors
Datagrams Sent
=
=
=
=
6703
0
0
6011
=
=
=
=
32
0
0
200
UDP Statistics for IPv6
Datagrams Received
No Ports
Receive Errors
Datagrams Sent
C:\>
Using the nslookup Command
The nslookup command is a powerful tool for diagnosing DNS problems.
You know you’re experiencing a DNS problem when you can access a
resource by specifying its IP address but not its DNS name. For example, if
you can get to www.ebay.com by typing 66.135.192.87 in your browser’s
address bar but not by typing www.ebay.com, you have a DNS problem.
Looking up an IP address
The simplest use of nslookup is to look up the IP address for a given DNS
name. For example, how did I know that 66.135.192.87 was the IP address
for ebay.com? I used nslookup to find out:
C:\>nslookup ebay.com
Server: ns1.orng.twtelecom.net
Address: 168.215.210.50
Non-authoritative answer:
Name:
ebay.com
Address: 66.135.192.87
C:\>
As you can see, just type nslookup followed by the DNS name you want to
look up. Nslookup issues a DNS query to find out. This DNS query was sent
to the server named ns1.orng.twtelecom.net at 168.215.210.50. It
then displayed the IP address that’s associated with ebay.com: namely,
66.135.192.87.
Using the nslookup Command
383
Get me out of here!
One of my pet peeves is that it seems as if every
program that uses subcommands chooses a
different command to quit the application. I
can never remember whether the command
to get out of nslookup is quit, bye, or
exit. I usually end up trying them all. And no
matter what program I’m using, I always seem
to choose the one that works for some other
program first. When I’m in nslookup, I
use bye first. When I’m in FTP, I try exit
first. Arghh! If I were King of the Computer
Hill, every program that had subcommands
would respond to the following commands by
exiting the program and returning to a
command prompt:
Quit
Sayonara
Exit
Ciao
Bye
Mañana
Leave
Makelikeatree
Of course, the final command to try would be
Andgetouttahere (in honor of Biff from
the Back to the Future movies).
In some cases, you may find that using an nslookup command gives you the
wrong IP address for a host name. To know that for sure, of course, you have
to know with certainty what the host IP address should be. For example, if
you know that your server is 203.172.182.10 but Nslookup returns a
completely different IP address for your server when you query the server’s
host name, something is probably wrong with one of the DNS records.
Using nslookup subcommands
If you use nslookup without any arguments, the nslookup command
enters a subcommand mode. It displays a prompt character (>) to let you
know that you’re in nslookup subcommand mode rather than at a normal
Windows command prompt. In subcommand mode, you can enter various
subcommands to set options or to perform queries. You can type a question
mark (?) to get a list of these commands. Table 6-2 lists the subcommands
you’ll use most.
The Most Commonly Used nslookup Subcommands
Subcommand
What It Does
name
Queries the current name server for the specified name.
server name
Sets the current name server to the server you specify.
root
Sets the root server as the current server.
(continued)
TCP/IP Tools and
Commands
Table 6-2
Book IV
Chapter 6
384
Using the nslookup Command
Table 6-2 (continued)
Subcommand
What It Does
set type=x
Specifies the type of records to be displayed, such as A,
CNAME, MX, NS, PTR, or SOA. Specify ANY to display all
records.
set debug
Turns on Debug mode, which displays detailed information
about each query.
set nodebug
Turns off Debug mode.
set recurse
Enables recursive searches.
set norecurse
Disables recursive searches.
exit
Exits the nslookup program and returns you to a
command prompt.
Displaying DNS records
One of the main uses of nslookup is to examine your DNS configuration to
make sure that it’s set up properly. To do that, follow these steps:
1. At a command prompt, type nslookup without any parameters.
nslookup displays the name of the default name server and displays
the > prompt.
C:\>nslookup
Default Server: ns1.orng.twtelecom.net
Address: 168.215.210.50
>
2. Type the subcommand set type=any.
nslookup silently obeys your command and displays another prompt:
> set type=any
>
3. Type your domain name.
nslookup responds by displaying the name servers for your domain:
> lowewriter.com
Server: ns1.orng.twtelecom.net
Address: 168.215.210.50
Non-authoritative answer:
lowewriter.com nameserver = NS000.NS0.com
lowewriter.com nameserver = NS207.PAIR.com
lowewriter.com nameserver = NS000.NS0.com
lowewriter.com nameserver = NS207.PAIR.com
>
Using the nslookup Command
385
4. Use a server command to switch to one of the domain’s name servers.
For example, to switch to the first name server listed in Step 3, type
server NS000.NS0.com. nslookup replies with a message that indicates
the new default server:
> server ns000.ns0.com
Default Server: ns000.ns0.com
Address: 216.92.61.61
>
5. Type your domain name again.
This time, nslookup responds by displaying the DNS information for
your domain:
> lowewriter.com
Server: ns000.ns0.com
Address: 216.92.61.61
lowewriter.com
primary name server = ns207.pair.com
responsible mail addr = root.pair.com
serial = 2001121009
refresh = 3600 (1 hour)
retry
= 300 (5 mins)
expire = 604800 (7 days)
default TTL = 3600 (1 hour)
lowewriter.com nameserver = ns000.ns0.com
lowewriter.com nameserver = ns207.pair.com
lowewriter.com MX preference = 50, mail exchanger =
sasi.pair.com
lowewriter.com internet address = 209.68.34.15
>
6. Type exit to leave the Nslookup program.
You return to a command prompt.
> exit
C:\>
Wasn’t that fun?
If you’re having trouble delivering mail to someone, you can use nslookup
to determine the IP address of the user’s mail server. Then, you can use the
ping command to see whether you can contact the user’s mail server. If not,
you can use the tracert command to find out where the communication
breaks down.
To find a user’s mail server, start nslookup and enter the command set
type=MX. Then, enter the domain portion of the user’s e-mail address.
For example, if the user’s address is [email protected], enter
TCP/IP Tools and
Commands
Locating the mail server for an e-mail address
Book IV
Chapter 6
386
Using the nslookup Command
LoweWriter.com. nslookup will display the MX (Mail eXchanger) information
for the domain, like this:
C:\>nslookup
Default Server: ns7.attbi.com
Address: 204.127.198.19
> set type=mx
> lowewriter.com
Server: ns7.attbi.com
Address: 204.127.198.19
lowewriter.com MX preference = 50, mail exchanger = sasi.pair.com
lowewriter.com nameserver = ns000.ns0.com
lowewriter.com nameserver = ns207.pair.com
ns000.ns0.com
internet address = 216.92.61.61
ns207.pair.com internet address = 209.68.2.52
>
Here, you can see that the name of the mail server for the LoweWriter.com
domain is sasi.pair.com.
Taking a ride through DNS-Land
Ever find yourself wondering how DNS really works? I mean, how is it that
you can type a DNS name like www.disneyland.com into a Web browser
and you’re almost instantly transported to the Magic Kingdom? Is it really
magic?
Nope. It isn’t magic; it’s DNS. In Book IV, Chapter 4, I present a somewhat dry
and theoretical overview of DNS. After you have the nslookup command in
your trusty TCP/IP toolbox, take a little trip through the Internet’s maze of
DNS servers to find out how DNS gets from www.disneyland.com to an IP
address in just a matter of milliseconds.
DNS does its whole name resolution thing so fast, it’s easy to take it for granted.
If you follow this little procedure, you’ll gain a deeper appreciation for what DNS
does literally tens of thousands of times every second of every day.
1. At a command prompt, type nslookup without any parameters.
nslookup displays the name of the default name server and displays
the > prompt.
C:\>nslookup
Default Server: ns1.orng.twtelecom.net
Address: 168.215.210.50
>
2. Type root to switch to one of the Internet’s root servers.
nslookup switches to one of the Internet’s 13 root servers and then
displays the > prompt.
> root
Default Server: A.ROOT-SERVERS.NET
Address: 198.41.0.4
Using the nslookup Command
387
3. Type www.disneyland.com.
nslookup sends a query to the root server to ask if it knows the IP address
of www.disneyland.com. The root server answers with a referral,
meaning that it doesn’t know about www.disneyland.com, but you should
try one of these servers because they know all about the com domain.
4. Type server followed by the name or IP address of one of the com
domain name servers.
It doesn’t really matter which one you pick. nslookup switches to that
server. (The server may spit out some other information besides what
I’ve shown here; I left it out for clarity.)
> server 192.48.79.30
Default Server: [192.5.6.30]
Address: 192.5.6.30
>
Book IV
Chapter 6
TCP/IP Tools and
Commands
> www.disneyland.com
Server: A.ROOT-SERVERS.NET
Address: 198.41.0.4
Name:
www.disneyland.com
Served by:
- A.GTLD-SERVERS.NET
192.5.6.30
com
- G.GTLD-SERVERS.NET
192.42.93.30
com
- H.GTLD-SERVERS.NET
192.54.112.30
com
- C.GTLD-SERVERS.NET
192.26.92.30
com
- I.GTLD-SERVERS.NET
192.43.172.30
com
- B.GTLD-SERVERS.NET
192.33.14.30
com
- D.GTLD-SERVERS.NET
192.31.80.30
com
- L.GTLD-SERVERS.NET
192.41.162.30
com
- F.GTLD-SERVERS.NET
192.35.51.30
com
- J.GTLD-SERVERS.NET
192.48.79.30
com
>
388
Using the nslookup Command
5. Type www.disneyland.com again.
nslookup sends a query to the com server to ask whether it knows
where the Magic Kingdom is. The com server’s reply indicates that it
doesn’t know where www.disneyland.com is, but it does know which
server is responsible for disneyland.com.
Server: [192.5.6.30]
Address: 192.5.6.30
Name:
www.disney.com
Served by:
- huey.disney.com
204.128.192.10
disney.com
- huey11.disney.com
208.246.35.40
disney.com
>
Doesn’t it figure that Disney’s name server is huey.disney.com? There’s
probably also a dewey.disney.com and a louie.disney.com.
6. Type server followed by the name or IP address of the second-level
domain name server.
nslookup switches to that server:
> server huey.disney.com
Default Server: huey.disney.com
Address: 204.128.192.10
>
7. Type www.disneyland.com again.
Once again, nslookup sends a query to the name server to find out
whether it knows where the Magic Kingdom is. Of course, huey.
disney.com does know, so it tells us the answer:
> www.disneyland.com
Server: huey.disney.com
Address: 204.128.192.10
Name:
disneyland.com
Address: 199.181.132.250
Aliases: www.disneyland.com
>
8. Type Exit, and then shout like Tigger in amazement at how DNS
queries work.
And be glad that your DNS resolver and primary name server do all this
querying for you automatically.
Okay, maybe that wasn’t an E Ticket ride, but it never ceases to amaze me
that the DNS system can look up any DNS name hosted anywhere in the
world almost instantly.
Using the pathping Command
389
Using the pathping Command
pathping is an interesting command that’s unique to Windows. It’s sort of
a cross between the ping command and the tracert command, combining
the features of both into one tool. When you run pathping, it first traces
the route to the destination address much the way tracert does. Then,
it launches into a 25-second test of each router along the way, gathering
statistics on the rate of data loss to each hop. If the route has a lot of hops,
this can take a long time. However, it can help you to spot potentially
unreliable hops. If you’re having intermittent trouble reaching a particular
destination, using pathping may help you pinpoint the problem.
The following command output is typical of the pathping command. (Using
an -n switch causes the display to use numeric IP numbers only, instead of
DNS host names. Although fully qualified host names are convenient, they
tend to be very long for network routers, which makes the pathping output
very difficult to decipher.)
Book IV
Chapter 6
TCP/IP Tools and
Commands
C:\>pathping -n www.lowewriter.com
Tracing route to lowewriter.com [209.68.34.15]
over a maximum of 30 hops:
0 192.168.168.21
1 66.193.195.81
2 66.193.200.5
3 168.215.55.173
4 168.215.55.101
5 168.215.55.77
6 66.192.250.38
7 66.192.252.22
8 208.51.224.141
9 206.132.111.118
10 206.132.111.162
11 64.214.174.178
12 192.168.1.191
13 209.68.34.15
Computing statistics for 325 seconds...
Source to Here
This Node/Link
Hop RTT Lost/Sent = Pct Lost/Sent = Pct Address
0
192.168.168.21
0/ 100 = 0%
|
1
1ms
0/ 100 = 0%
0/ 100 = 0% 66.193.195.81]
0/ 100 = 0%
|
2
14ms 0/ 100 = 0%
0/ 100 = 0% 66.193.200.5
0/ 100 = 0%
|
3
10ms 0/ 100 = 0%
0/ 100 = 0% 168.215.55.173
0/ 100 = 0%
|
4
10ms 0/ 100 = 0%
0/ 100 = 0% 168.215.55.101
0/ 100 = 0%
|
5
12ms 0/ 100 = 0%
0/ 100 = 0% 168.215.55.77
0/ 100 = 0%
|
6
14ms 0/ 100 = 0%
0/ 100 = 0% 66.192.250.38
0/ 100 = 0%
|
390
Using the ping Command
7
14ms
0/ 100 =
0%
8
14ms
0/ 100 =
0%
9
81ms
0/ 100 =
0%
10
81ms
0/ 100 =
0%
11
84ms
0/ 100 =
0%
12
--- 100/ 100 =100%
13
85ms 0/ 100 =
Trace complete.
0%
0/
0/
0/
0/
0/
0/
0/
0/
0/
0/
100/
0/
0/
100
100
100
100
100
100
100
100
100
100
100
100
100
= 0%
= 0%
= 0%
= 0%
= 0%
= 0%
= 0%
= 0%
= 0%
= 0%
=100%
= 0%
= 0%
66.192.252.22
|
208.51.224.141
|
206.132.111.118
|
206.132.111.162]
|
64.214.174.178]
|
192.168.1.191
|
209.68.34.15
Using the ping Command
ping is probably the most basic TCP/IP command line tool. Its main purpose
is to determine whether you can reach another computer from your computer.
It uses Internet Control Message Protocol (ICMP) to send mandatory
ECHO_REQUEST datagrams to the specified host computer. When the reply
is received back from the host, the ping command displays how long it took
to receive the response.
You can specify the host to ping by using an IP address, as in this example:
C:\>ping 192.168.168.10
Pinging 192.168.168.10 with 32 bytes of data:
Reply from 192.168.168.10: bytes=32 time<1ms TTL=128
Reply from 192.168.168.10: bytes=32 time<1ms TTL=128
Reply from 192.168.168.10: bytes=32 time<1ms TTL=128
Reply from 192.168.168.10: bytes=32 time<1ms TTL=128
Ping statistics for 192.168.168.10:
Packets: Sent = 4, Received = 4, Lost = 0 (0% loss),
Approximate round trip times in milli-seconds:
Minimum = 0ms, Maximum = 0ms, Average = 0ms
C:\>
By default, the ping command sends four packets to the specified host. It
displays the result of each packet sent. Then it displays summary statistics:
how many packets were sent, how many replies were received, the error
loss rate, and the approximate round-trip time.
You can also ping by using a DNS name, as in this example:
C:\>ping www.lowewriter.com
Pinging lowewriter.com [209.68.34.15] with 32 bytes of data:
Reply from 209.68.34.15: bytes=32 time=84ms TTL=53
Reply from 209.68.34.15: bytes=32 time=84ms TTL=53
Reply from 209.68.34.15: bytes=32 time=84ms TTL=53
Using the route Command
391
Reply from 209.68.34.15: bytes=32 time=84ms TTL=53
Ping statistics for 209.68.34.15:
Packets: Sent = 4, Received = 4, Lost = 0 (0% loss),
Approximate round trip times in milli-seconds:
Minimum = 84ms, Maximum = 84ms, Average = 84ms
C:\>
The ping command uses a DNS query to determine the IP address for the
specified host, and then pings the host based on its IP address.
The ping command has a number of other switches that you’ll use rarely, if
ever. Some of these switches are available only for some operating systems.
To find out which switches are available for your version of Ping, type ping
/? (Windows) or man ping (Unix/Linux).
You can find a very interesting story about the creation of the ping command
written by the command’s author, Mike Muus, at his Web site at http://
ftp.arl.mil/~mike/ping.html. (Sadly, Mr. Muus was killed in an
automobile accident in November of 2000.)
Using the route Command
Using the route command displays or modifies the computer’s routing
table. For a typical computer that has a single network interface and is
connected to a local area network (LAN) that has a router, the routing table
is pretty simple and isn’t often the source of network problems. Still, if
you’re having trouble accessing other computers or other networks, you can
use the route command to make sure that a bad entry in the computer’s
routing table isn’t the culprit.
For a computer with more than one interface and that’s configured to work
as a router, the routing table is often a major source of trouble. Setting up
the routing table properly is a key part of configuring a router to work.
Displaying the routing table
C:\>route print
===========================================================================
Interface List
8 ...00 12 3f a7 17 ba ...... Intel(R) PRO/100 VE Network Connection
1 ........................... Software Loopback Interface 1
9 ...02 00 54 55 4e 01 ...... Teredo Tunneling Pseudo-Interface
10 ...00 00 00 00 00 00 00 e0 isatap.{D0F85930-01E2-402F-B0FC-31DFF887F06F}
===========================================================================
TCP/IP Tools and
Commands
To display the routing table (both IPv4 and IPv6) in Windows, use the route
print command. In Unix/Linux, you can just use route without any command
line switches. The output displayed by the Windows and Unix/Linux commands
are similar. Here’s an example from a typical Windows client computer:
Book IV
Chapter 6
392
Using the route Command
IPv4 Route Table
===========================================================================
Active Routes:
Network Destination
Netmask
Gateway
Interface Metric
0.0.0.0
0.0.0.0
192.168.1.1
192.168.1.110
276
127.0.0.0
255.0.0.0
On-link
127.0.0.1
306
127.0.0.1 255.255.255.255
On-link
127.0.0.1
306
127.255.255.255 255.255.255.255
On-link
127.0.0.1
306
192.168.1.0
255.255.255.0
On-link
192.168.1.110
276
192.168.1.110 255.255.255.255
On-link
192.168.1.110
276
192.168.1.255 255.255.255.255
On-link
192.168.1.110
276
224.0.0.0
240.0.0.0
On-link
127.0.0.1
306
224.0.0.0
240.0.0.0
On-link
192.168.1.110
276
255.255.255.255 255.255.255.255
On-link
127.0.0.1
306
255.255.255.255 255.255.255.255
On-link
192.168.1.110
276
===========================================================================
Persistent Routes:
Network Address
Netmask Gateway Address Metric
0.0.0.0
0.0.0.0
192.168.1.1 Default
===========================================================================
IPv6 Route Table
===========================================================================
Active Routes:
If Metric Network Destination
Gateway
9
18 ::/0
On-link
1
306 ::1/128
On-link
9
18 2001::/32
On-link
9
266 2001:0:4136:e38c:2c6c:670:3f57:fe91/128
On-link
8
276 fe80::/64
On-link
9
266 fe80::/64
On-link
10
281 fe80::5efe:192.168.1.110/128
On-link
8
276 fe80::cca:9067:9427:a911/128
On-link
9
266 fe80::2c6c:670:3f57:fe91/128
On-link
1
306 ff00::/8
On-link
9
266 ff00::/8
On-link
8
276 ff00::/8
On-link
===========================================================================
Persistent Routes:
None
C:\>
For each entry in the routing table, five items of information are listed:
✦ The destination IP address
Actually, this is the address of the destination subnet, and must be
interpreted in the context of the subnet mask.
✦ The subnet mask that must be applied to the destination address to
determine the destination subnet
✦ The IP address of the gateway to which traffic intended for the
destination subnet will be sent
✦ The IP address of the interface through which the traffic will be sent
to the destination subnet
Using the route Command
393
✦ The metric, which indicates the number of hops required to reach
destinations via the gateway
Each packet that’s processed by the computer is evaluated against the
rules in the routing table. If the packet’s destination address matches the
destination subnet for the rule, the packet is sent to the specified gateway
via the specified network interface. If not, the next rule is applied.
The computer on which I ran the route command in this example
is on a private 192.168.1.0 subnet. The computer’s IP address is
192.168.1.100, and the default gateway is a router at 192.168.1.1.
Here’s how the rules shown in this example are used. Notice that you have
to read the entries from the bottom up:
✦ The first rule is for packets sent to 255.255.255.255, with subnet
mask 255.255.255.255. This special IP address is for broadcast
packets. The rule specifies that these broadcast packets should be
delivered to the local network interface (192.168.1.100).
✦ The next rule is for packets sent to 192.168.1.255, again with subnet
mask 255.255.255.255. These are also broadcast packets and are
sent to the local network interface.
✦ The next rule is for packets sent to 192.168.1.100, again with subnet
mask 255.255.255.255. This is for packets that the computer is
sending to itself via its own IP address. This rule specifies that these
packets will be sent to the local loopback interface on 127.0.0.1.
✦ The next rule is for packets sent to 192.168.1.0, with subnet mask
255.255.255.0. These are packets intended for the local subnet.
They’re sent to the subnet via the local interface at 192.169.1.100.
✦ The next rule is for packets sent to the loopback address (127.0.0.1,
subnet mask 255.0.0.0). These packets are sent straight through to
the loopback interface, 127.0.0.1.
One major difference between the Windows version of route and the Unix/
Linux version is the order in which they list the routing table. The Windows
route command lists the table starting with the most general entry and
works toward the most specific. The Unix/Linux version is the other way
around: It starts with the most specific and works toward the more general.
The Unix/Linux order makes more sense — the Windows route command
displays the routing list upside down.
Book IV
Chapter 6
TCP/IP Tools and
Commands
✦ The last rule is for everything else. All IP addresses will match the
destination IP address 0.0.0.0 with subnet mask 0.0.0.0 and will be
sent to the default gateway router at 192.168.1.1 via the computer’s
network interface at 192.168.1.100.
394
Using the route Command
Modifying the routing table
Besides displaying the routing table, the route command also lets you
modify it by adding, deleting, or changing entries.
You shouldn’t do this unless you know what you’re doing. If you mess up the
routing table, your computer may not be able to communicate with anyone.
The syntax for the route command for adding, deleting, or changing a route
entry is
route [-p] command dest [mask subnet] gateway [-if interface]
The following list describes each of the route command’s parameters:
✦ –p: Makes the entry persistent. If you omit -p, the entry will be deleted
the next time you reboot. (Use this only with add commands.)
✦ command: Add, delete, or change.
✦ dest: The IP address of the destination subnet.
✦ mask subnet: The subnet mask. If you omit the subnet mask, the
default is 255.255.255.255, meaning that the entry will apply only to
a single host rather than a subnet. You usually want to include the mask.
✦ gateway: The IP address of the gateway to which packets will be sent.
✦ -if interface: The IP address of the interface through which packets
will be sent. If your computer has only one network interface, you can
omit this.
Suppose that your network has a second router that serves as a link to
another private subnet, 192.168.2.0 (subnet mask 255.255.255.0). The
interface on the local side of this router is at 192.168.1.200. To add a
static route entry that sends packets intended for the 192.168.2.0 subnet
to this router, use a command like this:
C:\>route -p add 192.168.2.0 mask 255.255.255.0 192.168.1.200
Now, suppose that you later change the IP address of the router to
192.168.1.222. You can update this route with the following command:
C:\>route change 192.168.2.0 mask 255.255.255.0 192.168.1.222
Notice that I specify the mask again. If you omit the mask from a route
change command, the command changes the mask to 255.255.255.255!
Finally, suppose that you realize that setting up a second router on this
network wasn’t such a good idea after all, so you want to just delete the
entry. The following command will do the trick:
C:\>route delete 192.168.2.0
Using the tracert Command
395
Using the tracert Command
The tracert command (spelled traceroute in Unix/Linux implementations)
is one of the key diagnostic tools for TCP/IP. It displays a list of all the routers
that a packet must go through to get from the computer where tracert
is run to any other computer on the Internet. Each one of these routers is
called a hop, presumably because the original designers of the IP protocol
played a lot of hopscotch when they were young. If you can’t connect to
another computer, you can use tracert to find out exactly where the
problem is occurring.
tracert makes three attempts to contact the router at each hop and displays
the response time for each of these attempts. Then, it displays the DNS name
of the router (if available) and the router’s IP address.
To use tracert, type the tracert command followed by the host name of
the computer to which you want to trace the route. For example, suppose
that you’re having trouble sending mail to a recipient at wiley.com. You’ve
used nslookup to determine that the mail server for wiley.com is xmail.
wiley.com, so now you can use tracert to trace the routers along the
path from your computer to xmail.wiley.com:
Wow, when I send mail to my editors at Wiley, the mail travels through 17
routers along the way. No wonder I’m always missing deadlines!
The most likely problem that you’ll encounter when you use tracert is a
timeout during one of the hops. Timeouts are indicated by asterisks where
you’d expect to see a time. For example, the following tracert output
shows the fourth hop timing out on all three attempts:
C:\>tracert xmail.wiley.com
Tracing route to xmail.wiley.com [208.215.179.78]
Book IV
Chapter 6
TCP/IP Tools and
Commands
C:\>tracert xmail.wiley.com
Tracing route to xmail.wiley.com [208.215.179.78]
over a maximum of 30 hops:
1
27 ms
14 ms
10 ms 10.242.144.1
2
11 ms
43 ms
10 ms bar01-p5-0-0.frsnhe4.ca.attbb.net [24.130.64.125]
3
9 ms
14 ms
12 ms bar01-p4-0-0.frsnhe1.ca.attbb.net [24.130.0.5]
4
25 ms
30 ms
29 ms bic01-p6-0.elsgrdc1.ca.attbb.net [24.130.0.49]
5
25 ms
29 ms
43 ms bic02-d4-0.elsgrdc1.ca.attbb.net [24.130.0.162]
6
21 ms
19 ms
20 ms bar01-p2-0.lsanhe4.ca.attbb.net [24.130.0.197]
7
37 ms
38 ms
19 ms bic01-p2-0.lsanhe3.ca.attbb.net [24.130.0.193]
8
20 ms
22 ms
21 ms 12.119.9.5
9
21 ms
21 ms
22 ms tbr2-p012702.la2ca.ip.att.net [12.123.199.241]
10
71 ms
101 ms
62 ms tbr2-p013801.sl9mo.ip.att.net [12.122.10.13]
11
68 ms
77 ms
71 ms tbr1-p012401.sl9mo.ip.att.net [12.122.9.141]
12
79 ms
81 ms
83 ms tbr1-cl4.wswdc.ip.att.net [12.122.10.29]
13
83 ms
107 ms
103 ms tbr1-p012201.n54ny.ip.att.net [12.122.10.17]
14
106 ms
85 ms
105 ms gbr6-p30.n54ny.ip.att.net [12.122.11.14]
15
104 ms
96 ms
88 ms gar3-p370.n54ny.ip.att.net [12.123.1.189]
16
98 ms
86 ms
83 ms 12.125.50.162
17
85 ms
90 ms
87 ms xmail.wiley.com [208.215.179.78]
Trace complete.
396
Using the tracert Command
over a maximum of 30 hops:
1
27 ms
14 ms
10 ms
2
11 ms
43 ms
10 ms
3
9 ms
14 ms
12 ms
4
*
*
*
10.242.144.1
bar01-p5-0-0.frsnhe4.ca.attbb.net [24.130.64.125]
bar01-p4-0-0.frsnhe1.ca.attbb.net [24.130.0.5]
Request timed out.
Sometimes, timeouts are caused by temporary problems, so you should try
the tracert again to see if the problem persists. If you keep getting timeouts
at the same router, the router could be having a genuine problem.
Understanding how tracert works
Understanding how tracert works can
provide some insight that may help you to
interpret the results it provides. Plus, you can
use this knowledge to impress your friends,
who probably don’t know how it works.
The key to tracert is a field that’s a
standard part of all IP packets called TTL,
which stands for Time to Live. In most other
circumstances, a value called TTL would be a
time value — not in IP packets, however. In an
IP packet, the TTL value indicates how many
routers a packet can travel through on its way
to its destination. Every time a router forwards
an IP packet, it subtracts one from the packet’s
TTL value. When the TTL value reaches zero,
the router refuses to forward the packet.
The tracert command sends a series of
special messages called ICMP Echo Requests
to the destination computer. The first time it
sends this message, it sets the TTL value of the
packet to 1. When the packet arrives at the first
router along the path to the destination, that
router subtracts one from the TTL value, sees
that the TTL value has become 0, so it sends a
Time Exceeded message back to the original
host. When the tracert command receives
this Time Exceeded message, it extracts the
IP address of the router from it, calculates
the time it took for the message to return, and
displays the first hop.
Then the tracert command sends another
Echo Request message: this time, with the TTL
value set to 2. This message goes through the
first router to the second router, which sees
that the TTL value has been decremented
to 0 and then sends back a Time Exceeded
message. When tracert receives the Time
Exceeded message from the second router,
it displays the line for the second hop. This
process continues, each time with a greater
TTL value, until the Echo Request finally
reaches the destination.
Pretty clever, eh?
(Note that the Unix/Linux traceroute
command uses a slightly different set of TCP/
IP messages and responses to accomplish the
same result.)
Book V
Wireless Networking
Contents at a Glance
Chapter 1: Setting Up a Wireless Network . . . . . . . . . . . . . . . . . . . . . .399
Chapter 2: Securing a Wireless Network . . . . . . . . . . . . . . . . . . . . . . .419
Chapter 3: Hotspotting . . . . . . . . . . . . . . . . . . . . . . . . . . . . . . . . . . . . . . . .431
Chapter 4: Troubleshooting a Wireless Network. . . . . . . . . . . . . . . . .437
Chapter 5: Wireless Networking with Bluetooth. . . . . . . . . . . . . . . . .443
Chapter 1: Setting Up
a Wireless Network
In This Chapter
✓ Looking at wireless network standards
✓ Reviewing some basic radio terms
✓ Considering infrastructure and ad-hoc networks
✓ Working with a wireless access point
✓ Configuring Windows for wireless networking
S
ince the beginning of Ethernet networking, cable has been getting
smaller and easier to work with. The original Ethernet cable was about
as thick as your thumb, weighed a ton, and was difficult to bend around
tight corners. Then came coaxial cable, which was lighter and easier to work
with. Coaxial cable was supplanted by unshielded twisted-pair (UTP) cable,
which is the cable used for most networks today.
Although cable through the years has become smaller, cheaper, and easier
to work with, it is still cable. So you have to drill holes in walls and pull
cable through ceilings and get insulation in your hair in order to wire your
entire home or office.
That’s why wireless networking has become so popular. With wireless networking, you don’t need cables to connect your computers. Instead, wireless networks use radio waves to send and receive network signals. As a
result, a computer can connect to a wireless network at any location in your
home or office.
Wireless networks are especially useful for notebook computers. After all,
the main benefit of a notebook computer is that you can carry it around
with you wherever you go. At work, you can use your notebook computer
at your desk, in the conference room, in the break room, or even out in the
parking lot. At home, you can use it in the bedroom, kitchen, den, game
room, or out by the pool. With wireless networking, your notebook computer can be connected to the network, no matter where you take it.
This chapter introduces you to the ins and outs of setting up a wireless
network. I tell you what you need to know about wireless networking standards, how to plan a wireless network, how to install and configure wireless
network components, and how to create a network that mixes both wireless
and cabled components.
400
Diving into Wireless Networking
Diving into Wireless Networking
A wireless network is a network that uses radio signals rather than direct
cable connections to exchange information. A computer with a wireless network connection is like a cell phone. Just as you don’t have to be connected
to a phone line to use a cell phone, you don’t have to be connected to a network cable to use a wireless networked computer.
The following paragraphs summarize some of the key concepts and terms that
you need to understand in order to set up and use a basic wireless network:
✦ A wireless network is often referred to as a WLAN, for wireless local area
network. Some people prefer to switch the acronym around to local area
wireless network, or LAWN. The term Wi-Fi is often used to describe wireless networks, although it technically refers to just one form of wireless
networks: the 802.11b standard. (See the section “Eight-Oh-Two-DotEleventy Something? [Or, Understanding Wireless Standards]” later in
this chapter, for more information.)
✦ A wireless network has a name, known as a SSID. SSID stands for service
set identifier — wouldn’t that make a great Jeopardy! question? (I’ll take
obscure four-letter acronyms for $400, please!) Each of the computers
that belong to a single wireless network must have the same SSID.
✦ Wireless networks can transmit over any of several channels. In order
for computers to talk to each other, they must be configured to transmit
on the same channel.
✦ The simplest type of wireless network consists of two or more computers with wireless network adapters. This type of network is called an
ad-hoc mode network.
✦ A more complex type of network is an infrastructure mode network. All
this really means is that a group of wireless computers can be connected not only to each other, but also to an existing cabled network via
a device called a wireless access point, or WAP. (I tell you more about
ad-hoc and infrastructure networks later in this chapter.)
A Little High School Electronics
I was a real nerd in high school: I took three years of electronics. The electronics class at my school was right next door to the auto shop. Of course,
all the cool kids took auto shop, and only nerds like me took electronics. We
hung in there, though, and learned all about capacitors and diodes while the
cool kids were learning how to raise their cars and install 2-gigawatt stereo
systems.
A Little High School Electronics
401
Waves and frequencies
For starters, radio consists of electromagnetic waves that are sent through
the atmosphere. You can’t see or hear them, but radio receivers can pick
them up and convert them into sounds, images, or — in the case of wireless networks — data. Radio waves are actually cyclical waves of electronic
energy that repeat at a particular rate, called the frequency. Figure 1-1 shows
two frequencies of radio waves: The first is one cycle per second; the second
is two cycles per second. (Real radio doesn’t operate at that low of a frequency, but I figured one and two cycles per second would be easier to draw
than 680,000 cycles per second or 2.4 million cycles per second.)
Cycles per second: 1
0.0
Time
1.0
Cycles per second: 2
Figure 1-1:
Radio
waves
frequently
have
frequency.
0.0
Time
1.0
Book V
Chapter 1
Setting Up a
Wireless Network
It turns out that a little of that high school electronics information proves
useful when it comes to wireless networking. Not much, but a little. You’ll
understand wireless networking much better if you know the meanings of
some basic radio terms.
402
A Little High School Electronics
The measure of a frequency is cycles per second, which indicates how many
complete cycles the wave makes in one second (duh). In honor of Heinrich
Hertz, who didn’t invent catsup, rather was the first person to successfully
send and receive radio waves (it happened in the 1880s), cycles per second
is usually referred to as Hertz, abbreviated Hz. Thus, 1 Hz is one cycle per
second. Incidentally, when the prefix K (for kilo, or 1,000), M (for mega, 1 million), or G (for giga, 1 billion) is added to the front of Hz, the H is still capitalized. Thus, 2.4 MHz is correct (not 2.4 Mhz).
The beauty of radio frequencies is that transmitters can be tuned to broadcast radio waves at a precise frequency. Likewise, receivers can be tuned to
receive radio waves at a precise frequency, ignoring waves at other frequencies. That’s why you can tune the radio in your car to listen to dozens of different radio stations: Each station broadcasts at its own frequency.
Wavelength and antennas
A term related to frequency is wavelength. Radio waves travel at the speed
of light. The term wavelength refers to how far the radio signal travels with
each cycle. For example, because the speed of light is roughly 300,000,000
meters per second, the wavelength of a 1-Hz radio wave is about 300,000,000
meters. The wavelength of a 2-Hz signal is about 150,000,000 meters.
As you can see, the wavelength decreases as the frequency increases. The
wavelength of a typical AM radio station broadcasting at 580 KHz is about
500 meters. For a TV station broadcasting at 100 MHz, it’s about 3 meters.
For a wireless network broadcasting at 2.4 GHz, the wavelength is about
12 centimeters.
It turns out that the shorter the wavelength, the smaller the antenna needs
to be in order to adequately receive the signal. As a result, higher frequency
transmissions need smaller antennas. You may have noticed that AM radio
stations usually have huge antennas mounted on top of tall towers, but cell
phone transmitters are much smaller and their towers aren’t nearly as tall.
That’s because cell phones operate on a higher frequency than do AM radio
stations. So who decides what type of radio gets to use specific frequencies?
That’s where spectrums and the FCC come in.
Spectrums and the FCC
The term spectrum refers to a continuous range of frequencies on which
radio can operate. In the United States, the Federal Communications
Commission (FCC) regulates not only how much of Janet Jackson can be
shown at the Super Bowl, but also how various portions of the radio spectrum can be used. Essentially, the FCC has divided the radio spectrum into
dozens of small ranges called bands and restricted certain uses to certain
bands. For example, AM radio operates in the band from 535 KHz to 1,700 KHz.
A Little High School Electronics
403
And now a word from the irony department
So here’s my juicy bit of irony for today: The
very first Ethernet system was actually a wireless network. Ethernet traces its roots back to
a network developed at the University of Hawaii
in 1970, called the AlohaNet. This network
transmitted its data by using small radios. If two
computers tried to broadcast data at the same
time, the computers detected the collision and
tried again after a short, random delay. This
technique was the inspiration for the basic
technique of Ethernet, now called carrier sense
multiple access with collision detection, or
CSMA/CD. The wireless AlohaNet was the network that inspired Robert Metcalfe to develop
his cabled network, which he called Ethernet,
as his doctoral thesis at Harvard in 1973.
For the next 20 years or so, Ethernet was pretty
much a cable-only network. It wasn’t until the
mid-1990s that Ethernet finally returned to its
wireless roots.
Table 1-1 lists some of the most popular bands. Note that some of these
bands are wide — for example, UHF television begins at 470 MHz and ends at
806 MHz, but other bands are restricted to a specific frequency. The difference between the lowest and highest frequency within a band is called the
bandwidth.
Table 1-1
Popular Bands of the Radio Spectrum
Band
Use
535 KHz–1,700 KHz
AM radio
5.9 MHz–26.1 MHz
Short wave radio
26.96 MHz–27.41 MHz
Citizens Band (CB) radio
54 MHz–88 MHz
Television (VHF channels 2 through 6)
88 MHz–108 MHz
FM radio
174 MHz–220 MHz
Television (VHF channels 7 through 13)
470 MHz–806 MHz
Television (UHF channels)
806 MHz–890 MHz
Cellular networks
900 MHz
Cordless phones
1850 MHz–1990 MHz
PCS cellular
2.4 GHz–2.4835 GHz
Cordless phones and wireless networks
(802.11b and 802.11g)
(continued)
Setting Up a
Wireless Network
I was an English literature major in college, so I
like to use literary devices such as irony. I don’t
get to use it much in the computer books I write,
so when I get the chance to use irony I like to
jump on it like a hog out of the water.
Book V
Chapter 1
404
Understanding Wireless Standards
Table 1-1 (continued)
Band
Use
4 GHz–5 GHz
Large dish satellite TV
5 GHz
Wireless networks (802.11a)
11.7 GHz–12.7 GHz
Small dish satellite TV
Two of the bands in the spectrum are allocated for use by wireless networks:
2.4 GHz and 5 GHz. Note that these bands aren’t devoted exclusively to wireless networks. In particular, the 2.4-GHz band shares its space with cordless
phones. As a result, cordless phones can sometimes interfere with wireless
networks.
Eight-Oh-Two-Dot-Eleventy Something? (Or,
Understanding Wireless Standards)
The most popular standards for wireless networks are the IEEE 802.11 standards. These standards are essential wireless Ethernet standards and use
many of the same networking techniques that the cabled Ethernet standards
(in other words, 802.3) use. Most notably, 802.11 networks use the same
CSMA/CD technique as cabled Ethernet to recover from network collisions.
The 802.11 standards address the bottom two layers of the IEEE seven-layer
model: The Physical layer and the Media Access Control (MAC) layer. Note
that TCP/IP protocols apply to higher layers of the model. As a result, TCP/IP
runs just fine on 802.11 networks.
The original 802.11 standard was adopted in 1997. Two additions to the standard, 802.11a and 802.11b, were adopted in 1999. The latest and greatest versions are 802.11g and 802.11n.
Table 1-2 summarizes the basic characteristics of the four variants of 802.11.
Table 1-2
802.11 Variations
Standard
Speeds
Frequency
Typical Range (Indoors)
802.11a
Up to 54 Mbps
5 GHz
150 feet
802.11b
Up to 11 Mbps
2.4 GHz
300 feet
802.11g
Up to 54 Mbps
2.4 GHz
300 feet
802.11n
Up to 600Mbps (but
most devices are in
the 100Mbps range)
2.4GHz
230 feet
Home on the Range
405
Currently, most wireless networks are based on the 802.11g standard. In
2009, the standard was upgraded to 802.11n, and 802.11n devices are now
finding their way into many wireless networks.
The maximum range of an 802.11g wireless device indoors is about 300 feet.
This can have an interesting effect when you get a bunch of wireless computers together — such that some of them are in range of each other, but others
are not. For example, suppose that Wally, Ward, and the Beaver all have
wireless notebooks. Wally’s computer is 200 feet away from Ward’s computer,
and Ward’s computer is 200 feet away from Beaver’s in the opposite direction.
(See Figure 1-2.) In this case, Ward is able to access both Wally’s computer
and Beaver’s computer. But Wally can access only Ward’s computer, and
Beaver can access only Ward’s computer. In other words, Wally and Beaver
won’t be able to access each other’s computers because they’re outside of
the 300-feet range limit. (This is starting to sound suspiciously like an algebra problem. Now suppose that Wally starts walking toward Ward at 2 miles
per hour, and Beaver starts running toward Ward at 4 miles per hour. . . .)
Figure 1-2:
Ward,
Wally, and
the Beaver
playing
with their
wireless
network.
Wally
Ward
Beaver
Although the normal range for 802.11g is 300 feet, the range may be less in
actual practice. Obstacles such as solid walls, bad weather, cordless phones,
microwave ovens, backyard nuclear reactors, and so on can all conspire
together to reduce the effective range of a wireless adapter. If you’re having
trouble connecting to the network, sometimes just adjusting the antenna
helps.
Also, wireless networks tend to slow down when the distance increases.
802.11g network devices claim to operate at 54 Mbps, but they usually
achieve that speed only at ranges of 100 feet or less. At 300 feet, they often
Setting Up a
Wireless Network
Home on the Range
Book V
Chapter 1
406
Wireless Network Adapters
slow down to a crawl. You should also realize that when you’re at the edge
of the wireless device’s range, you’re more likely to suddenly lose your connection due to bad weather.
Wireless Network Adapters
Each computer that will connect to your wireless network needs a wireless network adapter. The wireless network adapter is similar to the network interface card (NIC) that’s used for a standard Ethernet connection.
However, instead of having a cable connector on the back, a wireless network adapter has an antenna.
Just about all notebook computers come with wireless networking built in,
so you don’t have to add a separate wireless network adapter to a notebook
computer. Desktop computers are a different story: They typically do not
have built-in wireless networking, so you’ll need to purchase one of two
types of wireless adapters:
✦ A wireless PCI card is a wireless network adapter that you install into
an available slot inside a desktop computer. In order to install this type
of card, you need to take your computer apart. So use this type of card
only if you have the expertise and the nerves to dig into your computer’s guts.
✦ A wireless USB adapter is a separate box that plugs into a USB port on
your computer. Because the USB adapter is a separate device, it takes
up extra desk space. However, you can install it without taking your
computer apart.
You can purchase a combination 802.11b/g PCI adapter for less than $50.
USB versions cost about $10 more.
At first, you may think that wireless network adapters are prohibitively
expensive. After all, you can buy a regular Ethernet adapter for as little
as $20. However, when you consider that you don’t have to purchase and
install cable to use a wireless adapter, the price of wireless networking
becomes more palatable. And if you shop around, you can sometimes find
wireless adapters for as little as $19.95.
Figure 1-3 shows a typical wireless network adapter. This one is a Linksys
WUSB11, which sells for about $50. To install this device, you simply connect it to one of your computer’s USB ports with the included USB connector. You then install the driver software that comes on the CD, and you’re
ready to network. The device is relatively small. You’ll find a little strip of
Velcro on the back, which you can use to mount it on the side of your computer or desk if you want. The adapter gets its power from the USB port
itself, so there’s no separate power cord to plug in.
Wireless Access Points
407
Book V
Chapter 1
Setting Up a
Wireless Network
Figure 1-3:
A typical
wireless
networking
adapter.
Wireless Access Points
Unlike cabled networks, wireless networks don’t need a hub or switch. If all
you want to do is network a group of wireless computers, you just purchase
a wireless adapter for each computer, put them all within 300 feet of each
other, and voilà! — instant network.
But what if you already have an existing cabled network? For example, suppose that you work at an office with 15 computers all cabled up nicely, and
you just want to add a couple of wireless notebook computers to the network. Or suppose that you have two computers in your den connected to
each other with network cable, but you want to link up a computer in your
bedroom without pulling cable through the attic.
That’s where a wireless access point, also known as a WAP, comes in. A WAP
actually performs two functions. First, it acts as a central connection point
for all your computers that have wireless network adapters. In effect, the
WAP performs essentially the same function as a hub or switch performs for
a wired network.
Second, the WAP links your wireless network to your existing wired network
so that your wired computer and your wireless computers get along like one
big happy family. Sounds like the makings of a Dr. Seuss story. (“Now the
408
Wireless Access Points
wireless sneeches had hubs without wires. But the twisted-pair sneeches
had cables to thires. . . .”)
Wireless access points are sometimes just called access points, or APs. An
access point is a box that has an antenna (or often a pair of antennae) and
an RJ-45 Ethernet port. You just plug the access point into a network cable
and then plug the other end of the cable into a hub or switch, and your wireless network should be able to connect to your cabled network.
Figure 1-4 shows how an access point acts as a central connection point for
wireless computers and how it bridges your wireless network to your wired
network.
Infrastructure mode
When you set up a wireless network with an access point, you are creating an infrastructure mode network. It’s called infrastructure mode because
the access point provides a permanent infrastructure for the network. The
access points are installed at fixed physical locations, so the network has
relatively stable boundaries. Whenever a mobile computer wanders into the
range of one of the access points, it has come into the sphere of the network
and can connect.
Computer
Notebook
Figure 1-4:
A wireless
access
point
connects
a wireless
network to
a cabled
network.
Wireless Access
Point
10BaseT
Switch
Computer
Computer
Notebook
Wireless Network
10BaseT Network
Wireless Access Points
409
Multifunction WAPs
Wireless access points often include other built-in features. For example,
some access points double as Ethernet hubs or switches. In that case, the
access point will have more than one RJ-45 port. In addition, some access
points include broadband cable or DSL firewall routers that enable you to
connect to the Internet. For example, Figure 1-5 shows a Linksys BEFW11S4
wireless access point router. I have one of these little guys in my home. This
inexpensive (about $60) device includes the following features:
Figure 1-5:
A typical
wireless
router.
Book V
Chapter 1
Setting Up a
Wireless Network
An access point and all the wireless computers that are connected to it are
referred to as a Basic Service Set, or BSS. Each BSS is identified by a Service
Set Identifier, or SSID. When you configure an access point, you specify the
SSID that you want to use. The SSID is often a generic name such as wireless, or it can be a name that you create. Some access points use the MAC
address of the WAP as the SSID.
410
Roaming
✦ An 802.11b wireless access point that lets me connect a notebook computer and a computer located on the other side of the house because I
didn’t want to run cable through the attic.
✦ A four-port 10/100 MHz switch that I can connect up to four computers
to via twisted-pair cable.
✦ A DSL/cable router that I connect to my cable modem. This enables all the
computers on the network (cabled and wireless) to access the Internet.
A multifunction access point that’s designed to serve as an Internet gateway
for home networks sometimes is called a residential gateway.
Roaming
You can use two or more wireless access points to create a large wireless
network in which computer users can roam from area to area and still be
connected to the wireless network. As the user moves out of the range of
one access point, another access point automatically picks up the user and
takes over without interrupting the user’s network service.
To set up two or more access points for roaming, you must carefully place
the WAPs so that all areas of the office or building that are being networked
are in range of at least one of the WAPs. Then, just make sure that all the
computers and access points use the same SSID and channel.
Two or more access points joined for the purposes of roaming, along with all
the wireless computers connected to any of the access points, form what’s
called an Extended Service Set, or ESS. The access points in the ESS are usually connected to a wired network.
One of the current limitations of roaming is that each access point in an ESS
must be on the same TCP/IP subnet. That way, a computer that roams from
one access point to another within the ESS retains the same IP address. If
the access points had a different subnet, a roaming computer would have to
change IP addresses when it moved from one access point to another.
Wireless bridging
Another use for wireless access points is to bridge separate subnets that
can’t easily be connected by cable. For example, suppose that you have
two office buildings that are only about 50 feet apart. To run cable from one
building to the other, you’d have to bury conduit — a potentially expensive
job. Because the buildings are so close, though, you can probably connect
them with a pair of wireless access points that function as a wireless bridge
between the two networks. Connect one of the access points to the first
Configuring a Wireless Access Point
411
network and the other access point to the second network. Then, configure
both access points to use the same SSID and channel.
A wireless access point is not necessary to set up a wireless network. Any
time two or more wireless devices come within range of each other, they
can link up to form an ad-hoc network. For example, if you and a few of your
friends all have notebook computers with 802.11b/g wireless network adapters, you can meet anywhere and form an ad-hoc network.
All of the computers within range of each other in an ad-hoc network are
called an Independent Basic Service Set, or IBSS.
Configuring a Wireless Access Point
The physical setup for a wireless access point is pretty simple: You take it
out of the box, put it on a shelf or on top of a bookcase near a network jack
and a power outlet, plug in the power cable, and plug in the network cable.
The software configuration for an access point is a little more involved, but
still not very complicated. It’s usually done via a Web interface. To get to
the configuration page for the access point, you need to know the access
point’s IP address. Then, you just type that address into the address bar of a
browser from any computer on the network.
Multifunction access points usually provide DHCP and NAT services for the
networks and double as the network’s gateway router. As a result, they typically have a private IP address that’s at the beginning of one of the Internet’s
private IP address ranges, such as 192.168.0.1 or 10.0.0.1. Consult the documentation that came with the access point to find out more.
If you use a multifunction access point that is both your wireless access
point and your Internet router and you can’t remember the IP address, run
the IPCONFIG command at a command prompt from any computer on the
network. The Default Gateway IP address should be the IP address of the
access point.
Basic configuration options
Figure 1-6 shows the main configuration screen for a Linksys BEFW11S4 wireless access point router that is pictured in Figure 1-5. I called up this configuration page by entering 192.168.1.1 in the address bar of a Web browser and
then supplying the login password when prompted.
Setting Up a
Wireless Network
Ad-hoc networks
Book V
Chapter 1
412
Configuring a Wireless Access Point
Figure 1-6:
The main
configuration
page for
a Linksys
wireless
router.
This configuration page offers the following configuration options that are
related to the wireless access point functions of the device. Although these
options are specific to this particular device, most access points have similar configuration options.
✦ Enable/Disable: Enables or disables the device’s wireless access point
functions.
✦ SSID: The Service Set Identifier used to identify the network. Most
access points have well-known defaults. You can talk yourself into thinking that your network is more secure by changing the SSID from the
default to something more obscure, but in reality, that only protects you
from first-grade hackers. By the time most hackers get into the second
grade, they learn that even the most obscure SSID is easy to get around.
So I recommend that you leave the SSID at the default and apply better
security measures, as described in the next chapter.
✦ Allow broadcast SSID to associate? Disables the access point’s periodic
broadcast of the SSID. Normally, the access point regularly broadcasts
its SSID so that wireless devices that come within range can detect the
network and join in. For a more secure network, you can disable this
function. Then, a wireless client must already know the network’s SSID
in order to join the network.
✦ Channel: Lets you select 1 of 11 channels on which to broadcast. All the
access points and computers in the wireless network should use the
Configuring a Wireless Access Point
413
Switching channels is also a friendly way for neighbors with wireless
networks to stay out of each other’s way. For example, if you share a
building with another tenant who also has a wireless network, you can
agree to use separate channels so that your wireless networks won’t
interfere with each other. Keep in mind that this doesn’t give you any
real measure of security because your neighbor could secretly switch
back to your channel and listen in on your network. So you still need to
secure your network as described in the next chapter.
✦ WEP — Mandatory or Disable: Lets you use a security protocol called
wired equivalent privacy. I have more to say about this in the next chapter.
DHCP configuration
You can configure most multifunction access points to operate as a DHCP
server. For small networks, it’s common for the access point to also be the
DHCP server for the entire network. In that case, you need to configure the
access point’s DHCP server. Figure 1-7 shows the DHCP configuration page
for the Linksys WAP router. To enable DHCP, you select the Enable option
and then specify the other configuration options to use for the DHCP server.
Figure 1-7:
Configuring
DHCP for
a Linksys
wireless
router.
Book V
Chapter 1
Setting Up a
Wireless Network
same channel. If you find that your network is frequently losing connections, try switching to another channel. You may be experiencing interference from a cordless phone or other wireless device operating on the
same channel.
414
Configuring Windows XP for Wireless Networking
Larger networks that have more demanding DHCP requirements are likely
to have a separate DHCP server running on another computer. In that case,
you can defer to the existing server by disabling the DHCP server in the
access point.
For more information on configuring a DHCP server, please refer to Book IV,
Chapter 3.
Configuring Windows XP for Wireless Networking
The first step in configuring Windows XP for wireless networking is to install
the appropriate device driver for your wireless network adapter. To do that,
you need the installation CD that came with the adapter. Follow the instructions that came with the adapter to install the drivers.
Windows XP has some nice built-in features for working with wireless networks. You can configure these features by opening the Network Connections
folder. Choose Start➪Control Panel and then double-click the Network
Connections icon. Right-click the wireless network connection and then choose
Properties to bring up the Properties dialog box. Then, click the Wireless
Networks tab to display the wireless networking options shown in Figure 1-8.
Figure 1-8:
Configuring
wireless
networking
in Windows
XP.
Each time you connect to a wireless network, Windows XP adds that network to this dialog box. Then, you can juggle the order of the networks
Using a Wireless Network with Windows XP
415
To add a network that you haven’t yet actually joined, click the Add button.
This brings up the dialog box shown in Figure 1-9. Here, you can type the
SSID value for the network that you want to add. You can also specify other
information, such as whether to use data encryption, how to authenticate
yourself, and whether the network is an ad-hoc rather than an infrastructure
network.
Figure 1-9:
Adding a
wireless
network in
Windows
XP.
Using a Wireless Network with Windows XP
Windows XP also has some nice built-in features that simplify the task of
using a wireless network. For example, when your computer comes within
range of a wireless network, a pop-up balloon appears in the taskbar, indicating that a network is available.
If one of your preferred networks is within range, clicking the balloon automatically connects you to that network. If Windows XP doesn’t recognize
any of the networks, clicking the balloon displays the dialog box shown in
Figure 1-10. With this dialog box, you can choose the network that you want
to join (if more than one network is listed) and then click Connect to join the
selected network.
Book V
Chapter 1
Setting Up a
Wireless Network
in the Preferred Networks section to indicate which network you’d prefer
to join if you find yourself within range of two or more networks at the
same time. You can use the Move Up and Move Down buttons next to the
Preferred Networks list to change your preferences.
416
Using a Wireless Network with Windows XP
Figure 1-10:
Joining a
wireless
network in
Windows
XP.
After you’ve joined a wireless network, a network status icon appears in the
notification area of the taskbar. You can quickly see the network status by
hovering the mouse cursor over this icon; a balloon appears to indicate the
state of the connection. For more detailed information, you can click the
status icon to display the Wireless Network Connection Status dialog box,
shown in Figure 1-11.
Figure 1-11:
The
Wireless
Network
Connection
Status
dialog box
(Windows
XP).
This dialog box provides the following items of information:
✦ Status: Indicates whether you are connected.
✦ Duration: Indicates how long you’ve been connected.
✦ Speed: Indicates the current network speed. Ideally, this should say 11
Mbps for an 802.11b network, or 54 Mbps for an 802.11a or 802.11g network.
Connecting to a Wireless Network with Windows 7
417
However, if the network connection is not of the highest quality, the
speed may drop to a lower value.
✦ Packets Sent & Received: Indicates how many packets of data you’ve
sent and received over the network.
You can click the Properties button to bring up the Connection Properties
dialog box for the wireless connection.
Connecting to a Wireless Network with Windows Vista
Wireless networking in Windows Vista is considerably simpler than
Windows XP. When Windows Vista detects that a wireless network is within
range, a balloon notification appears on the screen to indicate that one or
more wireless networks are available. You can double-click this balloon to
summon the dialog box shown in Figure 1-12. Then, you can double-click the
network you want to connect to.
Figure 1-12:
Choosing
a wireless
network in
Vista.
Connecting to a Wireless Network with Windows 7
Wireless networking in Windows 7 is similar to Windows Vista. When
Windows Vista detects a nearby wireless network, it displays a balloon
Setting Up a
Wireless Network
✦ Signal Strength: Displays a graphic representation of the quality of the
signal.
Book V
Chapter 1
418
Connecting to a Wireless Network with Windows 7
notification in the Windows task bar. You can click the balloon to display
the dialog box shown in Figure 1-13, which lists the available networks. Then
double-click the network you want to connect to.
Figure 1-13:
Choosing
a wireless
network in
Windows 7.
Chapter 2: Securing a
Wireless Network
In This Chapter
✓ Reviewing the threats posed by wireless networks
✓ Examining the strange world of wardriving and warchalking
✓ Enabling the security features of your wireless access point
B
efore you dive headfirst into the deep end of the wireless networking
pool, you should first consider the inherent security risks in setting up
a wireless network. With a cabled network, the best security tool that you
have is the lock on the front door of your office. Unless someone can physically get to one of the computers on your network, he or she can’t get into
your network. (Well, I’m sort of ignoring your wide-open broadband Internet
connection for the sake of argument.)
If you go wireless, an intruder doesn’t have to get into your office to hack
into your network. He or she can do it from the office next door. Or the
lobby. Or the parking garage beneath your office. Or the sidewalk outside. In
short, when you introduce wireless devices into your network, you usher in
a whole new set of security issues to deal with.
This chapter explores some of the basic security issues that come with the
territory when you go wireless.
Understanding Wireless Security Threats
Wireless networks have the same basic security considerations as wired
networks. As a network administrator, you need to balance the need of
legitimate users to access network resources against the risk of illegitimate
users breaking into your network. That’s the basic dilemma of network security. Whether the network uses cables, wireless devices, kite strings and tin
cans, or smoke signals, the basic issues are the same.
On one extreme of the wireless network security spectrum is the totally open
network, in which anyone within range of your wireless transmissions can
log on as an administrator and gain full access to every detail of your network. On the other end is what I call the “cone-of-silence syndrome,” in which
the network is so secure that no one can gain access to the network — not
even legitimate users.
420
Understanding Wireless Security Threats
The goal of securing a wireless network is to find the happy medium
between these two extremes that meets the access and risk-management
needs of your organization.
The following sections describe the most likely types of security threats that
wireless networks encounter. You should take each of these kinds of threats
into consideration when you plan your network’s security.
Intruders
With a wired network, an intruder must usually gain access to your facility
to physically connect to your network. Not so with a wireless network — in
fact, with wireless, hackers equipped with notebooks that have wireless
network capability can gain access to your network if they can place themselves physically within range of your network’s radio signals. Consider
these possibilities:
✦ If you share a building with other tenants, the other tenants’ offices may
be within range.
✦ If you’re in a multifloor building, the floor immediately above or below
you may be in range.
✦ The lobby outside your office may be within range of your network.
✦ The parking lot outside or the parking garage in the basement may be
in range.
If a would-be intruder can’t get within normal broadcast range, he or she
may try one of several tricks to increase the range:
✦ A would-be intruder can switch to a bigger antenna to extend the range
of his or her wireless computer. Some experiments have shown that
big antennas can receive signals from wireless networks that are miles
away. In fact, I once read of someone who listened in on wireless networks based in San Francisco from the Berkeley hills, which is across
the San Francisco Bay.
✦ If a would-be intruder is serious about breaking into your network, he
or she may smuggle a wireless repeater device into your facility — or
near it — to extend the range of your wireless network to a location that
he or she can get to.
Of course, a physical connection to your network is not the only way an
intruder can gain access. You must still take steps to prevent an intruder
from sneaking into your network through your Internet gateway. In most
cases, this means that you need to set up a firewall to block unwanted and
unauthorized traffic.
Understanding Wireless Security Threats
421
Freeloaders
Even though freeloaders may be relatively benign, they can be a potential
source of trouble. In particular:
✦ Freeloaders use bandwidth that you’re paying for. As a result, their mere
presence can slow down Internet access for your legitimate users.
✦ After freeloaders gain Internet access through your network, they can
potentially cause trouble for you or your organization. For example, they
may use your network to download illegal pornography. Or they may try
to send spam via your mail server. Most ISPs will cut you off cold if they
catch you sending spam, and they won’t believe you when you tell them
the spam came from a kid parked in a Pinto out in your parking lot.
✦ If you’re in the business of selling access to your wireless network, freeloaders are obviously a problem.
✦ Freeloaders may start out innocently looking for free Internet access.
But once they get in, curiosity may get the better of them, leading them
to snoop around your network.
✦ If freeloaders can get in, so can more malicious intruders.
Eavesdroppers
Eavesdroppers just like to listen to your network traffic. They don’t actually
try to gain access via your wireless network — at least, not at first. They just
listen.
Unfortunately, wireless networks give them plenty to listen to. For example:
✦ Most wireless access points regularly broadcast their SSID to anyone
who’s listening.
✦ When a legitimate wireless network user joins the network, an exchange
of packets occurs as the network authenticates the user. An eavesdropper can capture these packets and, if security isn’t set up right, determine the user’s logon name and password.
✦ An eavesdropper can steal files that are opened from a network server.
For example, if a wireless user opens a confidential sales report that’s
Securing a
Wireless Network
Freeloaders are intruders who want to piggyback on your wireless network
to get free access to the Internet. If they manage to gain access to your wireless network, they probably won’t do anything malicious: They’ll just fire up
their Web browsers and surf the Internet. These are folks who are too cheap
to spend $40 per month on their own broadband connection at home, so
they’d rather drive into your parking lot and steal yours.
Book V
Chapter 2
422
Understanding Wireless Security Threats
saved on the network, the sales report document is broken into packets
that are sent over the wireless network to the user. A skilled eavesdropper can copy those packets and reconstruct the file.
✦ When a wireless user connects to the Internet, an eavesdropper can see
any packets that the user sends to or receives from the Internet. If the
user purchases something online, the transaction may include a credit
card number and other personal information. (Hopefully, these packets
will be encrypted so the eavesdropper won’t be able to decipher the data.)
Spoilers
A spoiler is a hacker who gets kicks from jamming networks so that they
become unusable. A spoiler usually accomplishes this by flooding the network with meaningless traffic so that legitimate traffic gets lost in the flow.
Spoilers may also try to place viruses or worm programs on your network
via an unsecured wireless connection.
Rogue access points
One of the biggest problems that network administrators have to deal with
is the problem of rogue access points. A rogue access point is an access point
that suddenly appears out of nowhere on your network. What usually happens is that an employee decides to connect a notebook computer to the
network via a wireless computer. So the user stops at Computers-R-Us on
the way home from work one day and buys a Fisher-Price wireless access
point for $25 and plugs it into the network, without asking permission.
Now, in spite of all the elaborate security precautions you’ve taken to fence
in your network, this well-meaning user has opened the barn door. It’s very
unlikely that the user will enable the security features of the wireless access
point; in fact, he or she probably isn’t even aware that wireless access
devices have security features.
Unless you take some kind of action to find it, a rogue access point can operate undetected on your network for months or even years. You may not
discover it until you report to work one day and find that your network has
been trashed by an intruder who found his or her way into your network via
an unprotected wireless access point that you didn’t even know existed.
Here are some steps you can take to reduce the risk of rogue access points
appearing on your system:
✦ Establish a policy prohibiting users from installing wireless access
points on their own. Then, make sure that you inform all network users
of the policy and let them know why installing an access point on their
own can be such a major problem.
✦ If possible, establish a program that quickly and inexpensively grants
wireless access to users who want it. The reasons rogue access points
What About Wardrivers and Warchalkers?
423
✦ Once in awhile, take a walk through the premises looking for rogue
access points. Take a look at every network outlet in the building and
see what’s connected to it.
✦ Turn off all your wireless access points and then walk around the premises with a wireless-equipped notebook computer that has scanning
software, such as NetStumbler (www.netstumbler.com), looking for
wireless access. (Of course, just because you detect a wireless network
doesn’t mean you have found a rogue access point — you may have
stumbled onto a wireless network from a nearby office or home.)
✦ If your network is large, consider using a software tool such as AirWave
(www.airwave.com) to snoop for unauthorized access points.
What About Wardrivers and Warchalkers?
The recent explosion of wireless networking has led to a few new terms, including wardriving and warchalking. Whether wardriving and warchalking actually
represent security threats is a question that’s subject to a lot of debate.
Wardriving
Wardriving refers to the practice of driving around town with notebook computers looking for open access to wireless networks just to see what networks
are out there. Some wardrivers even make maps and put them on the Internet.
The basic intent of wardriving is to discover open wireless networks that
can be accessed from public places. A side benefit is that it can help network
administrators discover holes in their network security. If your network
shows up on a wardriving map, be grateful for the wardrivers who discovered your vulnerability. And by publishing it, they’ve given you incentive to
plug the hole!
The downside of wardriving is that intruders can check the wardriving maps
posted on the Internet to find potential targets.
Wardrivers arm themselves with the following equipment:
✦ A car
✦ A notebook computer with a wireless adapter
✦ An external antenna isn’t a must, but it helps
✦ Software that can scan for open wireless networks
Book V
Chapter 2
Securing a
Wireless Network
show up in the first place are (1) users need it, and (2) it’s hard to get
through channels. If you make it easier for users to get legitimate wireless access, you’re less likely to find wireless access points hidden
behind file cabinets or in flower pots.
424
What About Wardrivers and Warchalkers?
✦ A GPS, or global positioning system, a device that can automatically track
where you are
✦ Software that correlates the discovery of open networks with location
data obtained from the GPS device
✦ Free time
For more information about wardriving, check out the Web site www.
wardriving.com.
Warchalking
Warchalking refers to marking the location of open access points with special chalk symbols on the sidewalk. The chalk symbols indicate that a network is nearby. So if you’re wandering around downtown San Francisco and
you spot a warchalk symbol on the curb, you can sit down at the nearest
park bench, fire up your notebook computer, and start surfing the Internet.
Figure 2-1 shows the common warchalking symbol for an open (unprotected)
wireless network. The SSID of the open network is listed above the symbol.
You may also find other information written, such as the bandwidth of the
Internet connection available through the access point.
linksys
Figure 2-1:
A
warchalking
symbol.
The origins of war
Where does the term wardriving come from?
Although the term has nothing to do with actual
combat, I’ve heard two plausible explanations
for its origin:
✦ It derives from the popular hacker word
warez (pronounced wayrz), which refers to
pirated software. Thus, wardriving refers to
looking for pirated wireless network access.
✦ It derives from the movie War Games, in
which a very young Matthew Broderick
hacks his way into the Pentagon’s topsecret nuclear defense network by setting
up his computer to dial numbers sequentially until it finds a computer worth hacking
into. This practice was called wardialing.
Securing Your Wireless Network
425
Securing Your Wireless Network
Hopefully, you’re convinced that wireless networks do indeed pose many
security risks. In the following sections, I describe some steps that you can
take to help secure your wireless network.
Changing the password
Probably the first thing you should do when you install a wireless access
point is to change its administrative password. Most access points have a
built-in, Web-based setup page that you can access from any Web browser
to configure the access point’s settings. The setup page is protected by a
username and password. However, the username and password are initially
set to default values that are easy to guess.
For example, the default username for Linksys access points is blank, and
the password is “admin.” If you leave the username and password set to
their default values, anyone can access the access point and change its
configuration settings, thus bypassing any other security features that you
enable for the access point.
So, the first step in securing your wireless access point is changing the setup
password to a value that can’t be guessed. I suggest that you use a random
combination of numerals and both uppercase and lowercase letters. Be sure
to store the password in a secure location. (If you forget the password, you
can press the Reset button on the router to restore it to its factory default.
Then, you can log on using the default password, which you can find with
the documentation that came with the router.)
Securing the SSID
The next step is to secure the SSID that identifies the network. A client must
know the access point’s SSID in order to join the wireless network. If you can
prevent unauthorized clients from discovering the SSID, you can prevent
them from accessing your network.
Book V
Chapter 2
Securing a
Wireless Network
Warchalking Web sites like to relate that the practice of warchalking dates
back to the Great Depression in the United States, when homeless people
used chalk or coal to write symbols on sidewalks, fences, or railroad trestles
to provide information or warnings to their fellow travelers. For example,
some symbols represented food, water, or safe places to camp, while other
symbols represented dangerous areas or aggressive police. I leave it up to
you to decide whether college kids wandering the streets looking for free
Internet access is analogous to the unemployed and homeless of the Great
Depression looking for food.
426
Securing Your Wireless Network
Securing the SSID is not a complete security solution, so you shouldn’t rely
on it as your only security mechanism. SSID security can slow down casual
intruders and wardrivers who are just looking for easy and free Internet
access, but it isn’t possible to prevent serious hackers from discovering
your SSID.
You can do three things to secure your SSID:
✦ Change the SSID from the default. Most access points come preconfigured with well-known default SSIDs. For example, Table 2-1 lists some
well-known default SSIDs. By changing your access point’s SSID, you can
make it more difficult for an intruder to determine your SSID and gain
access.
Table 2-1
Common Default SSID Values
SSID
Manufacturer
3com
3Com
Compaq
Compaq
linksys
Linksys
tsunami
Cicso
Wireless
NetGear
WLAN
DLink
WLAN
SMC
✦ Disable SSID broadcast. Most access points frequently broadcast their
SSIDs so that clients can discover the network when they come within
range. Clients that receive this SSID broadcast can then use the SSID to
join the network.
You can increase network security somewhat by disabling the SSID
broadcast feature. That way, clients won’t automatically learn the
access point’s SSID. To join the network, a client computer must figure
out the SSID on its own. You can then tell your wireless network users
the SSID to use when they configure their clients.
Unfortunately, when a client computer connects to a wireless network,
it sends the SSID to the access point in an unencrypted packet. So a
sophisticated intruder who’s using a packet sniffer to eavesdrop on your
wireless network can determine your SSID as soon as any legitimate
computer joins the network.
Securing Your Wireless Network
427
Enabling WEP
WEP stands for wired equivalent privacy and is designed to make wireless
transmission as secure as transmission over a network cable. WEP encrypts
your data by using either a 40-bit key or a 128-bit key. Keep in mind that 40-bit
encryption is faster than 128-bit encryption and is adequate for most purposes.
So I suggest that you enable 40-bit encryption unless you work for the CIA.
Note that in order to use WEP, both the client and the server must know the
encryption keys being used. So a client that doesn’t know the access point’s
encryption keys won’t be able to join the network.
You can specify encryption keys for WEP in two ways. The first is to create
the ten-digit key manually by making up a random number. The second
method, which I prefer, is to use a passphrase, which can be any word or
combination of numerals and letters that you want. WEP automatically converts the passphrase to the numeric key used to encrypt data. If the client
knows the passphrase used to generate the keys on the access point, the
client will be able to access the network.
As it turns out, security experts have identified a number of flaws with WEP
that compromise its effectiveness. As a result, with the right tools, a sophisticated intruder can get past WEP. So although it’s a good idea to enable
WEP, you shouldn’t count on it for complete security.
Besides just enabling WEP, you should take two steps to increase its
effectiveness:
✦ Make WEP mandatory. Some access points have a configuration setting
that enables WEP but makes it optional. This may prevent eavesdroppers from viewing the data transmitted on WEP connections, but it
doesn’t prevent clients that don’t know your WEP keys from accessing
your network.
✦ Change the encryption keys. Most access points come preconfigured
with default encryption keys that make it easy for even casual hackers
to defeat your WEP security. You should change the default keys either
by using a passphrase or by specifying your own keys. Figure 2-2 shows
the WEP key configuration page for a typical access point (in this case, a
Linksys BEFW11).
Book V
Chapter 2
Securing a
Wireless Network
✦ Disable guest mode. Many access points have a guest mode feature that
enables client computers to specify a blank SSID or to specify “any” as
the SSID. If you want to ensure that only clients that know the SSID can
join the network, you must disable this feature.
428
Securing Your Wireless Network
Figure 2-2:
Changing
the WEP
settings on
a Linksys
wireless
router.
Using WPA
WPA, which stands for Wi-Fi Protected Access, is a new and improved form
of security for wireless networks that’s designed to plug some of the holes
of WEP. WPA is similar in many ways to WEP. But the big difference is that
when you use WPA, the encryption key is automatically changed at regular
intervals, thus thwarting all but the most sophisticated efforts to break the
key. Most newer wireless devices support WPA. If your equipment supports
it, I suggest you use it.
Here are a few additional things to know about WPA:
✦ A small office and home version of WPA, called WPA-PSK, bases its
encryption keys on a passkey value that you supply. However, true WPA
devices rely on a special authentication server to generate the keys.
✦ Windows XP with Service Pack 2 has built-in support for WPA, as does
Windows Vista.
✦ The official IEEE standard for WPA is 802.11i. However, WPA devices
were widely available before the 802.11i standard was finalized. As a
result, not all WPA devices implement every aspect of 802.11i. In Wi-Fi
circles, the 802.11i standard is sometimes called WPA2.
Securing Your Wireless Network
429
Using MAC address filtering
MAC address filtering is a great idea for wireless networks with a fixed
number of clients. For example, if you set up a wireless network at your
office so that a few workers can connect their notebook computers, you
can specify the MAC addresses of those computers in the MAC filtering
table. Then, other computers won’t be able to access the network via the
access point.
Unfortunately, it isn’t difficult to configure a computer to lie about its MAC
address. Thus, after a potential intruder determines that MAC filtering is
being used, he or she can just sniff packets to determine an authorized MAC
address and then configure his or her computer to use that address. (This is
called MAC spoofing.) So you shouldn’t rely on MAC address filtering as your
only means of security.
Figure 2-3 shows the screen used to edit the MAC address table for a Linksys
wireless access point.
Figure 2-3:
A MAC
address
table for
a Linksys
wireless
router.
Securing a
Wireless Network
MAC address filtering allows you to specify a list of MAC addresses for the
devices that are allowed to access the network. If a computer with a different MAC address tries to join the network via the access point, the access
point will deny access.
Book V
Chapter 2
430
Securing Your Wireless Network
Don’t neglect the basics
The security techniques described in this chapter are specific to wireless networks. They
should be used alongside the basic security
techniques that are presented in Book III. In
other words, don’t forget the basics, such as:
✓ Change default server account information
✓ Use strong passwords for your user
✓ Install virus protection.
accounts.
(especially the administrator password).
✓ Disable unnecessary services.
✓ Regularly check your server logs.
✓ Back up!
✓ Apply security patches to your servers.
Placing your access points outside the firewall
The most effective security technique for wireless networking is to place all
your wireless access points outside of your firewall. That way, all network
traffic from wireless users will have to travel through the firewall to access
the network.
As you can imagine, doing this can significantly limit network access for
wireless users. To get around those limitations, you can enable a virtual private network (VPN) connection for your wireless users. The VPN will allow
full network access to authorized wireless users.
Obviously, this solution requires a bit of work to set up and can be a little
inconvenient for your users. However, it’s the only way to completely secure
your wireless access points.
Chapter 3: Hotspotting
In This Chapter
✓ Exploring hotspots
✓ Using hotspots safely
✓ Comparing free and fee-based hotspots
✓ Creating your own hotspot
W
ireless networks aren’t just for private use within your home or at
your place of work. Nowadays, many public places such as airports,
libraries, hotels, restaurants, and coffee houses host public-access wireless
networks, called hotspots. If you visit one of these establishments with a
wireless-equipped laptop computer in tow, you can use these hotspots to
access the Internet.
In this chapter, you read about these public hotspots and find out how to
use them. As you read this chapter, keep in mind that public hotspots use
the same 802.11 technology as private wireless networks described in the
first two chapters of this minibook. So the techniques that you use to connect to a hotspot are the same as those you use to connect to any wireless
network. And the security implications are the same, too.
What Is a Hotspot?
A hotspot is an area that has wireless networking available to the public. The
first public hotspots were in airports and hotels, where business travelers
could connect to the Internet with their laptop computers to pick up e-mail
while on the road. Soon libraries jumped on the bandwagon, providing
Internet access to anyone who brings a wireless-equipped laptop into the
library.
Lately, restaurants and trendy coffee houses have been providing wireless
hotspots so that you can stream music and video or play an online game
while sipping a vanilla latte. Starbucks is probably the best-known trendy
hotspot, but many others are joining in. For example, many Schlotzsky’s
Deli locations have free hotspot access. And even McDonald’s is equipping
many of its restaurants with hotspots. Bookstores like Borders and Barnes
& Noble also provide access.
432
What’s So Great about Hotspots?
What’s So Great about Hotspots?
If you’re puzzled about why so many businesses are getting into the hotspotting business, the following paragraphs offer some of the most common
reasons:
✦ To increase traffic and, therefore, business. For example, the CEO of
Schlotzsky’s Deli (www.schlotzskys.com) has said that free Internet
access results in 15,000 additional visits to each store every year. And
those people who come in simply to use the free Internet access usually
buy something, even if it’s just a soda and a bag of chips.
✦ To identify the business as hip or trendy.
✦ To make money directly from the hotspot. Note that just because a
business charges for its wireless access doesn’t mean it is making a significant amount of money from it. Some must charge fees to help cover
the costs because they can’t justify the expense of commercial-quality
broadband access simply on the basis of good will and a little increased
traffic.
Safe Hotspotting
To simplify the connection process, most hotspots — both free and feebased — disable the security features that are available for wireless networks. As a result, you should take some basic precautions when you use a
public hotspot:
✦ Make sure that you have a firewall installed and running. If you don’t
have a separate firewall program, enable the Windows Firewall that’s
built in to Windows.
✦ Disable file sharing on your laptop computer.
✦ Avoid sites that ask for confidential information but don’t use the secure
HTTPS protocol.
✦ Use a VPN if you plan on accessing your company’s network.
✦ Disconnect from the wireless network when you’re finished using it.
Free Hotspots
Many hotspots are free of charge. For example, the hotspots at Schlotzsky’s
Deli are free. And hotspots at libraries are typically free.
Fee-Based Hotspots
433
Connecting to a free hotspot is easy. The hard part is finding an available
hotspot to connect to, especially a free one. If you happen to live across the
street from a library or a Schlotzsky’s Deli, you’re in luck. Otherwise, you’ll
have to search to find a hotspot. Fortunately, there are several Web sites
you can consult to locate hotspots in your area:
✦ www.freenetworks.org: An organization of free networks around
the world
✦ www.sflan.org: Free networks in the San Francisco area
✦ www.socalfreenet.org: Free networks in Southern California
✦ www.seattlewireless.org: Free networks in the Seattle,
Washington, area
With Google and a little perseverance, you may be able to find a Web site
devoted to your city. Note, however, that you’re much more likely to find
free hotspot access in a big city than in Mayberry.
Fee-Based Hotspots
Although some hotspots are free, most charge a fee. Although some charge
for hourly use, others offer subscriptions that give you unlimited use for a
monthly fee, usually in the neighborhood of $30 per month.
When you connect to a fee-based hotspot, a logon page is displayed. On
this logon page, you can enter your user ID and password if you are already
a subscriber. If not, you can join on the spot — just have your credit card
handy. After you’ve joined and logged on, you can access the Internet by
using your Web browser.
Many fee-based providers have roaming agreements with one another that
effectively increase the number of locations that are available. However, you
may have to pay an additional surcharge if you use roaming.
The following sections describe several well-known wireless service
providers.
Book V
Chapter 3
Hotspotting
To use a free hotspot, all you have to do is turn on your wireless-equipped
laptop computer in the vicinity of the hotspot access point. Then, when you
see the notification bubble in the bottom-right corner indicating that a wireless network is in range, click it to connect to the network. You can then fire
up your Web browser to surf the Web.
434
Setting Up Your Own Hotspot
T-Mobile
A well-known and widely available subscription hotspot provider is
T-Mobile, which provides the hotspots found in Starbucks, Barnes & Noble,
FedEx/Kinkos, and many other locations. At the time I wrote this (April
2010), T-Mobile had more than 10,000 hotspot locations in the United States
and more than 35,000 additional locations worldwide.
Of course, T-Mobile is also a cell phone company, and like any cell phone
company, it offers a variety of plans you can choose from. If you’re willing
to commit to the service for a year, the monthly fee is $29.95. This gives you
unlimited access to any T-Mobile hotspot within the United States. (If you’re
already a T-Mobile wireless customer, you can add the hotspot service for
just $9.99 per month on top of your T-Mobile bill.) Without the one-year
commitment, the plan costs $39.95 per month. You can also purchase a oneday pass for $7.99 or pay for the service hourly. The hourly rate is $6 for the
first hour and $0.10 per minute for each additional minute.
For information about T-Mobile’s hotspot subscriptions, visit www.
tmobile.com/hotspot.
Boingo
With more than 125,000 locations worldwide, Boingo Wireless may be the
biggest wireless network on earth. Plus it has the coolest name. Boingo is
designed primarily for business travelers, so most of its hotspots are in
hotels, airports, and business service centers. The basic plan is $9.95 per
month for unlimited access in the United States.
Unlike most other providers, Boingo uses its own software to connect you to
its wireless network. This simplifies the task of connecting to the network.
Boingo’s Wi-Fi software is available for Windows, Macs, and Pocket PCs.
For more information, check out www.boingo.com.
Setting Up Your Own Hotspot
So you own a little café and you think it would be cool to set up a hotspot
for your customers to use, eh? If you want to set up a free hotspot, here’s all
you need:
✦ A reliable broadband Internet connection. DSL, cable, or T-1 will work
nicely.
✦ A wireless access point. For a small hotspot, a simple consumer-grade
access point (like a Linksys wireless router) will do fine.
✦ A sign to tell your customers about the hotspot and how to connect to it.
Setting Up Your Own Hotspot
435
Of course, there’s a lot more to it than this. Here are a few additional issues
to consider:
✦ No matter how good your sign is, your customers will have questions
about how to connect. So in addition to how to make a mocha latte, you
need to teach your employees how to help customers connect to your
hotspot.
✦ Your broadband provider may not appreciate it if you let the general
public access the Internet through your wireless access point. In fact,
your service contract may prohibit it. As a result, you probably need
to pay a bit more to share your broadband connection with the general
public.
If you want to charge for hotspot access, you’ve got a lot more work to do. In
particular, you need to devise a way to charge your customers. The easiest
way to do this is to purchase a single-box solution that includes the necessary wireless devices as well as software that handles the authentication and
billing.
Hotspotting
✦ You need a firewall to prevent your customers from poking around
inside your private network. The wireless access point should be outside
of the firewall.
Book V
Chapter 3
436
Book V: Wireless Networking
Chapter 4: Troubleshooting
a Wireless Network
In This Chapter
✓ Isolating the cause of wireless problems
✓ Changing channels
✓ Hardware that can improve wireless connections
✓ Resetting your access point/router password
W
ireless networks are great until something goes haywire. When a
regular network doesn’t work, you usually know about it right away
because the network simply becomes unavailable. You can’t display Web
pages, read e-mail, or access files on shared drives. The troubleshooting
chapters in Book III address the most common problems encountered on
cabled networks.
But wireless networks can cause problems of their own. And to add to the
frustration, wireless networks tend to degrade rather than completely fail.
Performance gets slower. Web pages that usually pop up in a second or two
take 15 to 20 seconds to appear. Or sometimes they don’t appear at all, but
then if you try again a few minutes later, they download fine.
This chapter offers some troubleshooting tips that can help you restore normalcy to a failing wireless network.
Checking for Obvious Problems
Before you roll up your sleeves and take drastic corrective action, you should
check for a few obvious things if you’re having wireless network trouble. The
following list highlights some basic things you should check for:
✦ Is everything turned on? Make sure you have lights on your wireless
access point/router as well as on your cable or DSL modem.
✦ Many access point/routers use a power supply transformer that plugs
into the wall. Make sure that the transformer is plugged into the wall
outlet and that the small cable that comes out of the transformer is
plugged into the power connector on the access point/router.
438
Pinpointing the Problem
✦ Are the cables connected? Check the network cable that connects your
access point/router to the cable or DSL modem.
✦ Try restarting everything. Turn off the computer, the access point/
router, and your cable or DSL modem. Leave everything off for at least
two minutes. Then turn everything back on. Sometimes simply cycling
the power off and back on clears up a connection problem.
Pinpointing the Problem
If you can’t connect to the Internet, one of the first steps (after you’ve made
sure everything is turned on) is to find out whether the problem is with your
access point/router or with your broadband connection. Here is one way
you can check to find out if your wireless connection is working:
1. Open a command prompt window by choosing Start➪Run, typing
cmd, and pressing Enter.
2. At the command prompt, type ipconfig and press Enter.
You should get a display similar to this:
Ethernet adapter Wireless Network Connection:
Connection-specific DNS Suffix . : hsd1.ca.comcast.net)).
IP Address. . . . . . . . . . . . : 192.168.1.101
Subnet Mask . . . . . . . . . . . : 255.255.255.0
Default Gateway . . . . . . . . . : 192.168.1.1
If the display resembles this but with different numbers, you’re connected to
the wireless network, and the problem most likely lies with your broadband
modem.
But if the IP Address, Subnet Mask, and Default Gateway indicate 0.0.0.0 instead
of valid IP addresses, you have a problem with your wireless network.
Changing Channels
One of the most common problems of wireless network trouble is interference from other wireless devices. The culprit might be a cordless phone, or
it could be a neighbor who also has a wireless network.
The simplest solution to this type of interference is to change channels.
802.11b access points let you select 1 of 11 different channels to broadcast
on. If you’re having trouble connecting to your access point, try changing
the channel. To do that, you must log on to the router with the administrator
password. Then, hunt around the router’s administrator pages until you find
the controls that let you change the channel.
You may have to try changing the channel several times before you solve
the problem. Unfortunately, 802.11b channels overlap slightly, which means
Fiddle with the Antennas
439
Fiddle with the Antennas
Sometimes you can fix intermittent connection problems by fiddling with the
antennas on the access point and your computer’s wireless adapter. This is
similar to playing with old-fashioned rabbit-ear antennas on a TV to get the
best reception.
The angle of the antennas can sometimes make a difference, so try adjusting
the antenna angles. In addition, you usually have better results if you place
the access point at a high location, such as on top of a bookshelf.
In some cases, you may actually need to add a high-gain antenna to the
access point to increase its range. These high-gain antennas simply snap
or screw on to the access point to provide a bigger antenna. For example,
Figure 4-1 shows high-gain antennas that are designed to work with Linksys
access points. Antennas such as these cost about $70 for the pair.
Figure 4-1:
High-gain
antennas
for a Linksys
wireless
router.
Photo courtesy of Linksys.
Book V
Chapter 4
Troubleshooting a
Wireless Network
that broadcasts on one channel may interfere with broadcasts on adjacent
channels. Thus, if you’re having trouble connecting on channel 1, don’t
bother switching to channel 2. Instead, try switching to channel 5 or 6. If that
doesn’t work, switch to channel 10 or 11.
440
Adding Another Access Point
A more drastic fix is to add a signal booster to your access point. A signal
booster is a power amplifier that increases the transmission power of most
wireless devices by a factor of five. A typical signal booster costs about $100.
Adding Another Access Point
If you have a computer that’s out of range of your access point, one solution
is to add a second access point closer to the problematic computer. Most
likely, the only difficulty will be getting an Ethernet cable to the location
where you want to put your second access point.
If possible, you can simply run a length of cable through your walls or attic
to the second access point. If that isn’t feasible, you can use a PowerLine or
Phone (HPNA) network connection for the second access point.
An alternative to a second access point is to simply add a repeater, such as
the Linksys Wireless-G Range Expander shown in Figure 4-2. All you have to
do is place this device midway between your access point and the computer
that’s having trouble connecting.
Figure 4-2:
A wireless
repeater
such as this
one from
Linksys
can help
increase
the range
of your
wireless
network.
Photo courtesy of Linksys.
Help! I Forgot My Router’s Password!
441
Help! I Forgot My Router’s Password!
Hopefully, you’ve already taken my sage advice and changed the password
on your combination wireless access point/router. Good for you. But what if
you later forget the password? Is there any way to get back into your access
point/router then?
Fortunately, there is. Most access point/routers have a reset button. It’s
usually located on the back or on the bottom of the router’s case. Press this
button to restore the access point/router to its factory default settings. That
will reset the administrator password to the factory default. It will also reset
any other custom settings you’ve applied, so you may have to reconfigure
your router to get it working again.
Troubleshooting a
Wireless Network
I mention many times throughout this book that you should always change
default passwords that come with computer and operating systems to more
secure passwords, usually consisting of a random combination of letters,
digits, and special symbols.
Book V
Chapter 4
442
Book V: Wireless Networking
Chapter 5: Wireless Networking
with Bluetooth
In This Chapter
✓ Discovering how Bluetooth works
✓ Digging into some of Bluetooth’s technical issues
✓ Installing a USB Bluetooth adapter
✓ Using Bluetooth in Windows XP and Vista
A
vast! If ’twere up to me, the name Bluetooth surely would be the proud
name of a pirate, not some lilly-livered computer network device. Aye,
and make no mistake. Blame it on those scurvy bilge rats whats call themselves Engineers. The next land-lubber Engineer whats wastes a perfectly
good pirate name on some network technology will soon be feeding fish in
Davey Jones’ locker, says I. Alas me hearties, the deed is done, so forevermore Bluetooth shall be the topic of a chapter in blaggard books about computers instead of proper books about piracy.
Arrrrr!
Understanding Bluetooth
Bluetooth is the name of a short-range wireless network technology that’s
designed to let devices connect to each other without need for cables or a
Wi-Fi network access point. The two main uses for Bluetooth are to connect
peripheral devices such as keyboards or mice to a computer and to connect
hand-held devices such as phones and PDAs (Personal Digital Assistants) to
computers.
Here are just a few of the many uses of Bluetooth:
✦ Wirelessly connecting a keyboard and mouse to a computer so that
you don’t have to fuss with cables. This is marginally useful for desktop
computers because it eliminates the need for cables. But it’s even more
useful for laptop computers because it lets you use a keyboard and
mouse simply by placing them next to the laptop.
✦ Synchronizing the address book in your cell phone with your computer’s address book, with no cables.
444
Bluetooth Technical Stuff
✦ Exchanging files between your Pocket PC or Palm PDA and your laptop
or desktop computers.
✦ Using a cord-free headset with your cell phone.
✦ Connecting a Global Positioning System (GPS) device to a computer so
that it can track your location. This is especially useful when used in
your car with a laptop, Pocket PC, or Palm PDA.
✦ Swapping electronic business cards between handheld computers.
Bluetooth Technical Stuff
For you technical enthusiasts out there, here’s a whole section that gets the
Technical Stuff icon. The following paragraphs point out some of the important and obscure technical highlights of Bluetooth:
✦ Bluetooth was originally developed in 1998 by a consortium of companies,
including IBM, Intel, Ericsson, Nokia, and Toshiba. Not wanting to be left
out of the action, IEEE turned Bluetooth into a standard called 802.15.
✦ Bluetooth operates in the same 2.4-GHz bandwidth as 802.11 Wi-Fi networks. Although it’s possible for Bluetooth and Wi-Fi networks to interfere with one another, Bluetooth includes features that usually minimize
or eliminate this interference.
✦ Bluetooth is slow — about 721 Kbps, way slower than Wi-Fi networks.
Bluetooth isn’t designed to transport large amounts of data, such as
huge video files. For that, you should use Wi-Fi.
✦ Bluetooth devices periodically “sniff” the air to see whether other
Bluetooth devices are nearby so that they can automatically hook up.
✦ Bluetooth has very low power requirements. As a result, it’s ideal for
battery-powered devices such as cell phones and PDAs.
✦ Bluetooth comes in three flavors, as described in Table 5-1. Class 1 is the
most powerful form of Bluetooth and the most commonly used. Class 2
is ideal for devices such as wireless mice or keyboards and wireless cell
phone headsets, which need to communicate only at close range. Class 3 is
for devices that operate at even closer range, but few Bluetooth devices
actually implement Class 3.
Table 5-1
Bluetooth Classes
Class
Power
Range
Class 1
100 mW
300 feet (100 meters)
Class 2
10 mW
30 feet (10 meters)
Class 3
1 mW
< 30 feet (10 meters)
Using Bluetooth in Windows
445
✦ The name Bluetooth is an English translation of Harald Blatand, a Viking
king who united Denmark and Norway in the 10th century.
How to Add Bluetooth to Your Computer
Many computers sold today — especially laptop computers and PDAs —
come equipped with Bluetooth technology. If your computer doesn’t already
support Bluetooth, you can easily add Bluetooth support. Just purchase a
USB Bluetooth adapter, which is a small device that plugs into any available
USB port on your computer. After you plug it in, your computer is Bluetooth
enabled and can connect to any other Bluetooth device that’s in range.
Many companies make Bluetooth USB adapters, and most look and work similarly. Figure 5-1 shows an adapter made by Linksys that sells for about $40.
Figure 5-1:
A typical
USB
Bluetooth
adapter.
Photo courtesy of Linksys.
Using Bluetooth in Windows
Unfortunately, the original version of Windows XP didn’t have any support
for Bluetooth. When Microsoft released Windows XP Service Pack 1 a few
years later, it included limited Bluetooth support. Windows XP Service Pack
Book V
Chapter 5
Wireless
Networking
with Bluetooth
✦ Bluetooth was originally conceived by cell phone giant Ericsson as a
way to connect a wireless earpiece to a cell phone. As the developers
worked on the idea, they soon realized that the technology had uses far
beyond wireless earpieces for cell phones.
446
Installing a USB Bluetooth Adapter
2 included excellent built-in support for Bluetooth, as does Windows Vista
and Windows 7.
If your computer has Bluetooth, a special Bluetooth icon will appear in the
System Tray (the panel at the right side of the taskbar). You can click this
icon to bring up a menu with the following choices:
✦ Add a Bluetooth Device
✦ Show Bluetooth Devices
✦ Send a File
✦ Receive a File
✦ Join a Personal Area Network
✦ Open Bluetooth Settings
✦ Remove Bluetooth Icon
Installing a USB Bluetooth Adapter
Installing a USB Bluetooth adapter is easy. All you have to do is install the
software provided with the adapter and plug the adapter into a free USB
port. Usually, you can start the installation process by inserting the CD that
comes with the adapter into your CD drive. Then, the installation program
automatically starts up. After the installation program starts, follow its steps
and plug the adapter in when the installation program instructs you to.
Be sure to follow the installation instructions that come with the adapter.
In most cases, you should install the software that comes with the adapter
before you plug in the adapter.
Enabling Discovery
By default, your computer remains hidden from other Bluetooth devices. If
you want other Bluetooth devices to be able to recognize your computer,
you need to enable a feature called discovery. Here are the steps:
1. Right-click the Bluetooth icon in the system tray and choose Open
Bluetooth Settings from the shortcut menu.
2. In the Bluetooth Properties dialog box that appears, click the
Options tab.
3. Select the Turn Discovery On check box.
Installing a Bluetooth Mouse or Keyboard
447
4. Select the Allow Bluetooth Devices to Connect to This Computer
check box.
Book V
Chapter 5
5. Select the Alert Me When a New Bluetooth Device Wants to Connect
6. Click OK.
Installing a Bluetooth Mouse or Keyboard
Installing a Bluetooth-enabled mouse or keyboard is easy. The only trick,
ironically, is that you have to have a normal mouse or keyboard installed
before you can install a Bluetooth mouse or keyboard. However, after you
install the Bluetooth mouse or keyboard, you can unplug the normal mouse
or keyboard.
The main trick to installing a Bluetooth mouse or keyboard is that you must
first enable discovery on the mouse or keyboard. Most Bluetooth mice
and keyboards have a button on the bottom to do this. After Bluetooth
is enabled, you can install the mouse or keyboard by right-clicking the
Bluetooth icon in the system and choosing the Add a Bluetooth Device command. Then, follow the wizard’s steps to install the mouse or keyboard.
Wireless
Networking
with Bluetooth
check box.
448
Book V: Wireless Networking
Book VI
Mobile Networking
Contents at a Glance
Chapter 1: Managing Mobile Devices . . . . . . . . . . . . . . . . . . . . . . . . . .451
Chapter 2: Managing BlackBerry Devices . . . . . . . . . . . . . . . . . . . . . .455
Chapter 3: Managing iPhone Devices . . . . . . . . . . . . . . . . . . . . . . . . . .461
Chapter 4: Managing Android Devices . . . . . . . . . . . . . . . . . . . . . . . . .469
Chapter 5: Managing Netbooks . . . . . . . . . . . . . . . . . . . . . . . . . . . . . . . .473
Chapter 1: Managing
Mobile Devices
In This Chapter
✓ Looking at mobile devices
✓ Configuring Windows Mobile devices for Exchange access
✓ Examining BlackBerry and BlackBerry Enterprise Server (BES)
✓ Considering security implications
A
computer consultant once purchased a used BlackBerry device on
eBay for $15.50. When he put in a new battery and turned on the
device, he discovered that it contained confidential e-mails and personal
contact information for executives of a well-known financial institution.
Oops!
It turns out that a former executive with the company sold his old BlackBerry
on eBay a few months after he left the firm. He had assumed that because he
had removed the battery, everything on the BlackBerry had been erased.
The point of this true story is that mobile devices such as BlackBerry pose a
new set of challenges for network administrators. These challenges are now
being faced even by administrators of small networks. For example, just a
few years ago, only large companies had BlackBerry or other mobile devices
that integrated with Exchange e-mail. But now it isn’t uncommon for companies with just a few employees to have mobile devices.
This chapter is a brief introduction to mobile devices and the operating
systems they run. In the remaining chapters of this minibook, you’ll learn
some specifics for working with three of the most common types of mobile
devices: BlackBerry, iPhone, and Android devices.
The Many Types of Mobile Devices
Once upon a time, there were mobile phones and PDAs. A mobile phone was
just that — a handheld telephone you could take with you. The good ones
452
The Many Types of Mobile Devices
had nice features such as a call log, an address book, and perhaps a crude
game, but not much else. PDAs — Personal Digital Assistants — were little
handheld computers that were designed to replace the old-fashioned Day
Timer books people used to carry around with them to keep track of their
appointment calendars and address books.
All that changed when cellular providers began adding data capabilities to their
networks. Now, cell phones can have complete mobile Internet access. This
has resulted in sophisticated PDA features being added to mobile phones and
phone features being added to PDAs so that the distinctions are now blurred.
The term mobile device is used to describe a wide assortment of devices that
you can hold in one hand and that are connected through a wireless network. The term handheld is a similar generic name for such devices. The following list describes some of the more common specifics of mobile devices:
✦ Mobile phone: A mobile phone (or cell phone) is a mobile device whose
primary purpose is to enable phone service. Most mobile phones
include features such as text messaging, address books, appointment
calendars, and games, and they may provide Internet access.
✦ Smartphone: A smartphone is a mobile phone with advanced features
that aren’t typically found on mobile phones. There’s no clearly drawn
line between mobile phones and smartphones. One distinction is
whether the phone can provide integrated access to corporate e-mail.
The screen on a smartphone is typically bigger than the screen on a
traditional cell phone, but the device still resembles a cell phone with a
keyboard located beneath the screen.
✦ Personal Digital Assistant (PDA): A PDA is a handheld device whose
main function is to provide Personal Information Management (PIM)
applications such as contact lists, appointment calendars, and e-mail. A
typical PDA has a full (albeit small) QWERTY keyboard and a relatively
large display. PDAs can also have phone capabilities.
✦ BlackBerry: BlackBerry devices are sophisticated PDAs made by
Research In Motion (RIM) with cell phone capabilities. The most distinctive feature of BlackBerry is their ability to synchronize with Exchange
e-mail servers to provide instant access to your corporate e-mail.
Typically, this synchronization requires a special server called BlackBerry
Enterprise Server (BES) running on the corporate network. BlackBerry
devices use a proprietary operating system developed by RIM.
For more information about working with BlackBerry devices, see
Chapter 2 of this minibook.
Considering Security for Mobile Devices
453
✦ iPhone: Apple’s iPhone has taken the smartphone market by storm.
Although there are still more BlackBerry devices in use than iPhones,
iPhone is gaining market share and may soon overtake Blackberry.
Unlike BlackBerry, iPhone doesn’t require a separate server to enable
full Exchange mailbox synchronization.
One of the biggest limitations of the iPhone is that it is available from
only one provider: AT&T.
For more information, see Chapter 3 of this minibook.
For more information, see Chapter 4 of this minibook.
Considering Security for Mobile Devices
As a network administrator, one of your main responsibilities regarding
mobile devices is to keep them secure. Unfortunately, that’s a significant
challenge. Here are some of the reasons why:
✦ Mobile devices connect to your network via other networks that are
out of your control. You can go to great lengths to set up firewalls,
encryption, and a host of other security features. But mobile devices
connect via public networks whose administrators may not be as conscientious as you.
✦ Mobile devices are easy to lose. A user might leave his or her smartphone
at a restaurant or hotel, or it might fall out of his pocket on the subway.
✦ Mobile devices run operating systems that aren’t as security-conscious
as Windows.
✦ Users who wouldn’t dare install renegade software on their desktop
computers will think nothing of downloading free games or other
applications to their handhelds. Who knows what kinds of viruses or
Trojans these downloads carry?
✦ Inevitably, someone will buy his own handheld device and connect it
to your network without your knowledge or permission.
Book VI
Chapter 1
Managing Mobile
Devices
✦ Android: Android is an open-source operating system for smartphones
developed by Google. Android is designed in many ways to mimic the
features of the iPhone, so experienced iPhone users will find Android
phones to be very similar. Unlike iPhone, however, Android is vendorneutral. Thus, most major cell phone providers, including AT&T,
Verizon, and Sprint, offer Android-based smartphones.
454
Considering Security for Mobile Devices
Here are some recommendations for beefing up security for your mobile
devices:
✦ Establish clear and consistent policies for mobile devices and enforce them.
✦ Make sure employees understand that they are not allowed to bring
their own devices into your network. Allow only company-owned
devices to connect.
✦ Train your users in the security risks associated with using mobile
devices.
✦ Implement antivirus protection for your mobile devices.
Chapter 2: Managing
BlackBerry Devices
In This Chapter
✓ Looking at how the BlackBerry infrastructure works
✓ Setting up new BlackBerry users
✓ Locking or disabling a BlackBerry device
B
lackBerry devices are the most popular type of smartphone in use
today. The great strength of a BlackBerry is (and always has been) its
seamless integration with corporate e-mail accounts — specifically its ability to synchronize with Microsoft Exchange. Other smartphones are beginning to offer this capability, but for the time being, BlackBerry is still the
King of the Smartphones.
The BlackBerry devices themselves are made by a company called RIM,
which stands for Research In Motion. RIM has arrangements with a variety
of cell phone providers, so you can get BlackBerry devices from AT&T,
Verizon, and Sprint, as well as other major providers.
This chapter begins with an overview of how the BlackBerry works — not
just how the BlackBerry phone itself works, but how the entire BlackBerry
architecture works to provide its legendary e-mail integration over cellular networks. Then, it presents a few basic procedures for working with
the server-side BlackBerry software, known as BES (BlackBerry Enterprise
Server).
Understanding BlackBerry
BlackBerry is more than just a phone — it’s a complete integrated system
of hardware and software devices that are designed to provide smooth and
nearly instantaneous integration with Microsoft Exchange Server. You may
be surprised to discover just how complex this infrastructure actually is.
Figure 2-1 shows a simplified diagram of its major components.
456
Understanding BlackBerry
User’s
Computer
#
Q
*
A
alt
1
W
4
S
7
Z
2
E
5
D
8
3
R
6
F
9
X
0
aA
C
(
)
T
’
K
J
H
.
,
!
B
space
I
;
:
G
V
–
—
U
Y
Q
?
N
M
+
@
O
P
”
Del
L
s
BlackBerry
Handheld
Device
sym
aA
Exchange
Server
Cellular
Network
BlackBerry
Enterprise
Server
Figure 2-1:
The
BlackBerry
infrastructure.
Firewall
Internet
BlackBerry
Network
Operations
Center
The following paragraphs describe several of the components pictured in
Figure 2-1:
✦ BlackBerry Handheld Device: The BlackBerry handheld device itself is
a combination of a cell phone and a handheld computer. The cell phone
has the ability to handle not only voice communications, but also data
communications over the provider’s cellular network. Most BlackBerry
handhelds include a small LCD screen and a keyboard, though the
BlackBerry Storm model doesn’t have a separate keyboard; instead, it
uses a touch-sensitive screen.
✦ Cellular Network: The cellular network is how the BlackBerry device
communicates with the rest of the world. This part of the BlackBerry
infrastructure is provided and managed by the cell phone provider you
purchase the BlackBerry from. Because different providers have different coverage areas, you should choose the provider that has the best
coverage for the areas you most often visit.
✦ BlackBerry Network Operations Center: The BlackBerry Network Operations Center (NOC) handles the routing of data between the Internet and
the cell network. RIM maintains several NOC locations throughout the country (actually, throughout the world) to ensure that data can be efficiently
routed between the Internet and its handheld devices via the cell network.
✦ BlackBerry Enterprise Server: Also known as BES, this is the key piece
of software that makes BlackBerries do their magic. BES is a software
server that runs one of the server computers within your network. The
Understanding BlackBerry
457
main purpose of BES is to act as an interface between e-mail servers
(most often Microsoft Exchange Server) and the BlackBerry NOC. Simply
put, BES monitors all activity on a user’s Exchange mailbox and sends
periodic updates over the Internet to the BlackBerry NOC, which relays
the updates to the handheld device via the cellular network.
As a network administrator, BES is the critical piece in the BlackBerry
puzzle. Most of the time you spend administering BlackBerry users will be
spent in BES. Here are some additional details you should know about BES:
✦ Although it’s possible to run BES on the same computer that you run
Exchange on, this configuration isn’t recommend. Instead, BES should
be run on its own, dedicated, server computer.
✦ BES works like a client as far as Microsoft Exchange is concerned. BES
logs on to Exchange using a special account called BESAdmin and uses
this account to access the data in BlackBerry users’ mailboxes. BES
retrieves the data from these mailboxes and then sends it over the
Internet to the BlackBerry NOC.
✦ For BES to work, you must grant the BESAdmin account full mailbox
rights for each BlackBerry user. Without this right, the BESAdmin
account won’t be able to access the BlackBerry user’s mailbox.
✦ To connect a BlackBerry handheld device with a BES server, you must
go through a process called Enterprise Activation.
✦ BES uses sophisticated encryption techniques to ensure that the data sent
over the Internet to the BlackBerry NOC and then from the BlackBerry
NOC to the handheld is secure. Thus, you can be confident that no one
can intercept your Exchange data as it travels from your Exchange server,
through the Internet, and over the cellular network to your BlackBerry.
One final note before I get into the details of working with BES: It was developed
at a time when the bandwidth capacity of cellular networks was very limited. As
a result, BES goes to great lengths to optimize the delivery of data over the cell
network. Where this becomes most evident is in how BES handles attachments.
Instead of sending the attachment directly to the handheld, BES creates a compressed JPEG image of the attachment and sends the image. Initially, this image
is scaled to keep the file size as small as possible. Even this small image is sent
only when the BlackBerry user requests it. The viewer built in to the BlackBerry
handheld includes the ability to zoom in for a closer look at the image. When
the user zooms in, the handheld requests a more detailed JPEG rendering of the
attachment. BES then creates and sends the requested detail.
This arrangement may seem cumbersome, especially with the high-capacity 3G
cellular networks that are available in many areas now. But it is very efficient.
Managing
BlackBerry Devices
✦ A free version of BES called BlackBerry Enterprise Server Express is available for smaller systems with fewer than 75 handheld users. For larger
organizations, you’ll need to purchase the Enterprise edition of BES.
Book VI
Chapter 2
458
Adding a BES User
Adding a BES User
One of the most common BES administration tasks is to add new BlackBerry
users. To do this, follow these steps:
1. In Active Directory Users and Computers, right-click the user you want
to add and choose Properties.
This brings up the Properties page for the user.
2. Select the Exchange Advanced tab and click the Mailbox Rights button.
This brings up the Permissions dialog box, which lets you grant mailbox
rights for the user’s mailbox.
3. Click Add, type BESAdmin, and click OK.
This adds the BESAdmin account to the list of users who have mailbox
rights permissions for the user you selected in Step 1, but doesn’t actually grant any permissions.
4. Select the Full Mailbox Access check box and click OK.
This grants full mailbox access rights to the BESAdmin account for the
BlackBerry user.
5. Click OK again to dismiss the Properties dialog box.
You’re done with Active Directory Users and Computers; you can now
close it if you want.
6. Open the BlackBerry Manager by clicking the BlackBerry Manager
icon on the desktop.
BlackBerry Manager comes to life, as shown in Figure 2-2.
7. In the Explorer View pane, navigate to the server you’re managing.
In Figure 2-2, I navigated to the server BCFWEB01.
8. Click in a blank area within the list of BlackBerry users and choose
Add Users.
A dialog box named Select Mailbox appears. This dialog box lists all the
Active Directory users who have Exchange mailboxes.
9. Select the user you want to add and then click OK.
The Select Mailbox dialog box vanishes and the user is added to the list
of BlackBerry users.
10. Right-click the user and then choose Generate an Email Activation
Password.
This action initiates the Enterprise Activation process by generating an
activation password and e-mailing it to the user, as shown in Figure 2-3.
This e-mail provides not only the password, but also the instructions the
user needs to follow to activate his or her BlackBerry device.
Adding a BES User
459
Book VI
Chapter 2
Managing
BlackBerry Devices
Figure 2-2:
BlackBerry
Manager in
action.
Figure 2-3:
This e-mail
is sent to
invite a
BlackBerry
user to
Enterprise
Activation.
11. You’re done!
After you’ve created the activation password, it’s up to the user to activate
the BlackBerry device. The user does this by navigating to the Options
screen and selecting Enterprise Activation. Then, the user enters his or her
e-mail address and the activation password that was generated and sent via
e-mail. After the e-mail address and password are verified, the activation
process begins. It should take 10–15 minutes to complete. After the activation is complete, the phone should begin receiving e-mails, contacts, and calendar items from the user’s Exchange mailbox.
460
Locking and Erasing a Handheld
Locking and Erasing a Handheld
After adding new BlackBerry users, the next most common BES administration task is either locking or erasing a missing handheld. If a user complains
that his or her BlackBerry is missing, I usually start by locking the device.
That way, if the device has fallen into the wrong hands, they won’t be able to
access the device without the correct password.
If the BlackBerry doesn’t turn up within a few days, the next step is to erase
the BlackBerry entirely so that even if the new owners manage to get past
the password lock, they won’t find any useful information on the phone.
Both of these tasks are handled via the BlackBerry Manager. Right-click the
user whose phone you want to lock or erase and then choose one of the following commands:
✦ Set Password and Lock Handheld: This command displays the dialog
box shown in Figure 2-4. This dialog box lets you set a new password for
the handheld device. It also lets you change the owner information that’s
displayed when the handheld device is locked. When you click OK, a message will be sent to the handheld directing it to change the password and
(optionally) the owner information and then to lock the keyboard. Once
locked, the keyboard can be unlocked only by entering the password.
✦ Erase Data and Disable Handheld: This command is more drastic: It
erases all of the contents of the handheld, including any stored e-mails,
contacts, calendar items, or other files. It also disables the enterprise
activation. This command effectively restores the handheld device to
it’s original, factory-new state.
Figure 2-4:
Remotely
locking a
BlackBerry
handheld
device.
Chapter 3: Managing
iPhone Devices
In This Chapter
✓ Looking at how the iPhone works
✓ Enabling ActiveSync for iPhone Users
✓ Configuring an Exchange e-mail account
I
n 2007, the Apple iPhone was one of the most innovative little gadgets
to hit the technology market in many, many years. As a result, in just a
few short years the iPhone has captured a huge share of a market that was
previously owned almost exclusively by RIM and its BlackBerry devices.
Some experts predict that the iPhone will eventually take over the lead
that BlackBerry has in the smartphone market — especially if Apple ever
releases its exclusive contract with AT&T so that other cell phone providers
can offer iPhones that work on their networks.
This chapter covers the iPhone. You get a brief overview of what the iPhone
actually is, as well as simple procedures for setting it up to access enterprise e-mail.
Understanding the iPhone
The iPhone is essentially a combination of four different devices:
✦ A cell phone
✦ An iPod with a memory capacity of either 8, 16, or 32GB
✦ A 2- or 3-megapixel digital camera
✦ An Internet device with its own Web browser (named Safari) and other
applications such as e-mail, calendar, and contact management
The most immediately noticeable feature of the iPhone is its lack of a keyboard. Instead, nearly the entire front surface of the iPhone is occupied by
a high-resolution, touch-sensitive LCD display. The display is not only the
main output device of the iPhone, but also its main input device. When necessary, the display becomes either a keypad input for dialing a telephone
number or a keyboard for entering text. You can also use various finger
gestures, such as tapping icons to start programs or pinching to zoom in the
display.
462
Integrating iPhone with Exchange
In addition, the iPhone has several other innovative features:
✦ An accelerometer tracks the motion of the iPhone in three directions.
The main use of the accelerometer is to adjust the orientation of the
display from landscape to portrait based on how the user is holding the
phone. Some other applications — mostly games — use the accelerometer as well.
✦ A Wi-Fi interface lets the iPhone connect to local Wi-Fi networks for
faster Internet access.
✦ GPS capability provides location-awareness for many applications,
including Google Maps.
✦ The VPN client lets you connect to your internal network.
Of all the unique features of the iPhone, probably the most important is its
huge collection of third-party applications that can be downloaded from a
special Web portal called the App Store. Many of these applications are free
or cost just a few dollars. (Many are just $0.99 or $1.99.) At the time I wrote
this chapter (April 2010), there were more than 150,000 applications available on the App Store. These applications provide everything from business
productivity to games.
As innovative as the iPhone is, it isn’t without limitations. Here are a few of the
most significant limitations business users will encounter with the iPhone:
✦ Limited battery life. Compared with other devices, the iPhone battery life
is relatively short. You’ll need to keep it on a charger as much as you can.
✦ Speaking of the battery, it is not user-replaceable. If the battery goes
bad, you have to take the dead iPhone to an Apple store to have the battery replaced — a process which can take several days if the phone is
not under warranty.
✦ Although the iPhone has VPN capability, it doesn’t have a native file
storage system that lets you navigate into your network’s file servers to
copy or save files.
✦ The iPhone is available only from AT&T. It doesn’t work with other cell
phone networks.
Integrating iPhone with Exchange
The iPhone can integrate with Microsoft Exchange e-mail. There are three
procedures you must follow to do that. First, you must enable the mobile
services feature of Microsoft Exchange. Second, you must enable ActiveSync
Integrating iPhone with Exchange
463
for the user’s mailbox. And third, you must configure the iPhone to connect
to the user’s Exchange mailbox. The following sections describe each of
these procedures.
Enabling Exchange Mobile Services
To enable an Exchange mailbox for the iPhone, you must first enable the
Exchange Mobile Services feature on the Exchange server. Note that this procedure must be done just one time for each Exchange server. Here are the steps:
Log on to the Exchange server with an Exchange Administrator account.
Choose Start➪Administrative Tools➪Exchange System Manager.
In the navigation pane, expand the Global Settings node.
Right-click Mobile Services and then choose Properties.
The dialog box shown in Figure 3-1 appears.
Figure 3-1:
Enabling
Outlook
Mobile
Access.
5. Select all the check boxes on the General tab.
This step enables all the capabilities of Outlook Mobile Access and
Exchange ActiveSync.
6. Click OK.
7. Close Exchange System Manager.
You’re done!
Book VI
Chapter 3
Managing iPhone
Devices
1.
2.
3.
4.
464
Integrating iPhone with Exchange
Enabling ActiveSync for a user’s mailbox
Once you have enabled Exchange Mobile Services for your Exchange server,
you can enable ActiveSync for the user’s Exchange mailbox. Enabling
ActiveSync allows the mailbox to be synchronized with a remote mail client
such as an iPhone.
Here are the steps:
1. Choose Start➪Administrative Tools➪Active Directory Users and
Computers.
The Active Directory Users and Computers console opens.
2. Expand the domain and locate the user you want to enable mobile
access for.
3. Right-click the user and choose Properties.
4. Click the Exchange Features tab.
The Exchange Features options are displayed, as shown in Figure 3-2.
Figure 3-2:
Enabling
mobile
access for a
user.
5. Enable all three options listed under Mobile Services.
If the options aren’t already enabled, right-click each option and choose
Enable.
Integrating iPhone with Exchange
465
6. Click OK.
7. Repeat Steps 5 and 6 for any other users you want to enable mobile
access for.
8. Close Active Directory Users and Computers.
That’s all there is to it. After you have enabled these features, any users running Windows Mobile will be able to synchronize their handhelds with their
Exchange mailboxes.
Configuring the iPhone for Exchange e-mail
Once ActiveSync is enabled for the mailbox, you can configure the iPhone to
tap into the Exchange account by following these steps:
then tap Add Account.
The screen shown in Figure 3-3 appears.
Figure 3-3:
Adding
an e-mail
account.
2. Tap Add Account.
The screen shown in Figure 3-4 appears, allowing you to choose the type
of e-mail account you wish to add.
Managing iPhone
Devices
1. On the iPhone, tap Settings, then tap Mail, Contacts, Calendars, and
Book VI
Chapter 3
466
Integrating iPhone with Exchange
Figure 3-4:
The iPhone
can support
many
different
types of
e-mail
accounts.
3. Tap Microsoft Exchange.
The screen shown in Figure 3-5 appears, which lets you enter the basic
information for your Exchange account.
Figure 3-5:
Entering
your e-mail
address
and logon
information.
Integrating iPhone with Exchange
467
4. Enter your e-mail address, Windows username, and password.
For most installations, you should leave the Domain field empty. (If the
e-mail configuration doesn’t work, come back to this screen and enter
your domain name here.)
5. Tap Next.
The screen shown in Figure 3-6 appears.
Book VI
Chapter 3
Managing iPhone
Devices
Figure 3-6:
Entering
your
Exchange
server.
6. Enter either the DNS name or the IP address of your Exchange server.
For example, I entered smtp.lowewriter.com for my Exchange server.
7. Tap Next.
The screen shown in Figure 3-7 appears. This screen lets you select
which mailbox features you want to synchronize: Mail, Contacts, or
Calendars.
8. Select the features you want to synchronize and then tap Done.
The e-mail account is created.
468
Integrating iPhone with Exchange
Figure 3-7:
Selecting
the
features to
synchronize.
After the e-mail account has been configured, the user can access it via the
Mail icon found on the iPhone’s home page.
Chapter 4: Managing
Android Devices
In This Chapter
✓ Looking at how Android phones work
✓ Looking at the Android operating system
✓ Examining the Android’s core applications
✓ Working with Exchange e-mail accounts
F
or the better part of a year, Apple had the touch-screen smartphone
market all to itself. But in late 2008, T-Mobile released a touch-screen
smartphone called the Dream, made by HTC. This smartphone was the first
of many subsequent phones based on an operating system developed by
Google, named Android. Android-based phones are similar to the iPhone
in many ways, but there are many differences — the most important being
that Android phones are available from a variety of cell phone providers,
whereas the iPhone is available only from AT&T.
This chapter is a brief introduction to the Android platform. You find out a
bit about what Android actually is, and you discover the procedures for setting up Exchange e-mail access on an Android phone.
Understanding Android Phones
In many ways, Android phones are similar to the iPhone. Like the iPhone,
Android phones feature a touch-screen display, have built-in MP3 music
players, and provide access to a large library of downloadable third-party
applications. In essence, Android phones are competitors to the iPhone.
However, there are crucial differences between Android phones and the
iPhone. The most important difference — in many ways the only important
difference — is that Android phones are based on an open-source operating system that is derived from the Linux operating system and can be
extended and adapted to work on a wide variety of hardware devices from
different vendors. With the iPhone, you’re locked in to Apple hardware and
the AT&T cellular network. With an Android phone, you can buy hardware
from a variety of different manufacturers, and you can use the phone on
a variety of different cellular networks. In all, there are about 20 different
Android-based phones available on the market, supported by several dozen
different cellular providers.
470
Looking at the Android Operating System
Looking at the Android Operating System
Most people associate the Android operating system with Google, and
it’s true that Google is the driving force behind Android. However, the
Android operating system is actually an organization called the Open
Handset Alliance (OHA). Google still plays a major role in the development
of Android, but there are actually more than 50 companies involved in the
OHA, including hardware manufacturers such as HTC, Intel, and Motorola,
software companies such as Google and eBay, and mobile phone operators
such as T-Mobile and Sprint-Nextel.
Technically speaking, Android is more than an operating system: It’s a complete software stack which consists of several key components that work
together to create the complete Android platform:
✦ The operating system core, which is based on the popular Linux operating system.
✦ A middleware layer, which provides drivers and other support code
that enable the operating system core to work with the hardware
devices that make up a complete phone, such as a touch-sensitive display, the cell phone radio, the speaker and microphone, Bluetooth or
Wi-Fi networking components, and so on.
✦ A set of core applications that the user interacts with to make phone
calls, read e-mail, send text messages, take pictures, and so on.
✦ A Software Developers Kit (SDK) that lets third-party software developers create their own applications to run on an Android phone, as well as
a marketplace where the applications can be marketed and sold, much
like the iStore lets iPhone developers market and sell applications for
the iPhone.
Besides the basic features provided by all operating systems, here are a few
of the bonus features found within the Android software stack:
✦ An optimized graphical display engine that can produce sophisticated
2D and 3D graphics
✦ GPS capabilities that provide location-awareness that can be integrated
with applications such as Google Maps
✦ Compass and accelerometer capabilities that can determine whether the
phone is in motion and in which direction it’s pointed
✦ A built-in SQL database server for data storage
✦ Support for several different network technologies, including 3G,
Bluetooth, and Wi-Fi
✦ Built-in media support including common formats for still images, audio,
and video files
Integrating Android with Exchange
471
Perusing Android’s Core Applications
The Android operating system comes preconfigured with several standard
applications, which provide the functionality that most people demand from
a modern smartphone. These applications include
✦ Dialer: Provides the basic cell phone function that lets users make calls.
✦ Browser: A built-in Web browser that’s similar to Google’s Chrome
browser.
✦ Messaging: Provides text (SMS) and multimedia (MMS) messaging.
✦ Email: A basic e-mail client which works best with Google’s Gmail but
can be configured to work with other e-mail servers including Exchange.
✦ Camera: Lets you use the phone’s camera hardware (if any) to take
pictures.
✦ Calculator: A simple calculator application.
✦ Alarm Clock: A basic alarm clock. You can set up to three different
alarms.
✦ Maps: An integrated version of Google Maps.
✦ YouTube: An integrated version of YouTube.
✦ Music: An MP3 player similar to iPod. You can purchase and download
music files from Amazon.
✦ Market: Lets you purchase and download third-party applications for
the Android phone.
✦ Settings: Lets you control various settings for the phone.
Integrating Android with Exchange
The Android’s core Email application can integrate with Microsoft Exchange
e-mail. To do that, you must first enable ActiveSync on the Exchange server.
I won’t go over the details of configuring Microsoft Exchange for ActiveSync
here. Instead, I refer you to Chapter 3 of this minibook.
After you have enabled Exchange Mobile Services and ActiveSync on your
Exchange server, you can easily configure the Android phone for e-mail
access. Just run the Email application on the Android phone and follow the
configuration steps, which will ask you for basic information such as your
e-mail address, username, password, and Exchange mail server.
Managing Android
Devices
✦ Contacts: Provides a contacts list that integrates with the Dialer and
Email applications.
Book VI
Chapter 4
472
Integrating Android with Exchange
Unfortunately, the Exchange features available natively on an Android phone
are pretty limited. Although the Email application can sync an Exchange
inbox, it can’t synchronize your contacts, calendar, or task list. As a result,
you need to turn to a third-party application to be able to fully access your
Exchange mailbox from your Android smartphone.
To access an Exchange mailbox from an Android phone, I recommend you
purchase and install an application called TouchDown, from a company called
NitroDesk (www.nitrodesk.com). It provides much better Exchange integration than the native Email application. Here are just a few of its features:
✦ View not just your inbox but other mailbox folders such as Sent Items or
Drafts as well.
✦ Download attachments.
✦ Create meetings and accept or reject meeting invitations.
✦ Synchronize with your Outlook contacts list.
✦ Create or delete out-of-office replies.
TouchDown is available from the Android Market for $19.99.
Chapter 5: Managing Netbooks
In This Chapter
✓ Checking out typical specifications for netbooks
✓ Understanding how networks connect
✓ Getting tips for working with netbooks
O
ne of the newest trends in mobile computing is the use of netbook computers, or just netbooks, instead of traditional notebook or laptop computers. Netbooks are like a cross between a smartphone and a laptop, with a
strange blend of the strengths and weaknesses of both.
This chapter is a brief overview of what netbooks are and what factors you
should take into consideration when incorporating them into your mobile
network plans.
Understanding Netbook Computers
As you probably know, a netbook looks like a notebook computer that got
run through the wash with hot water and has shrunk to about half of its
original size. This small size makes it an ideal companion for many mobile
users: It’s larger than a smartphone, so it can be used for ordinary computer
tasks like word processing or spreadsheet analysis, but it’s much smaller
than a notebook computer, so it’s easier to take with you.
Figure 5-1 shows a typical netbook computer — in this case, an HP Mini 311.
This computer comes with the following features:
✦ 11.6-inch display, which is actually on the large size for a netbook; most
are closer to 10 inches.
✦ Intel Atom processor, which chugs along at 1.6 GHz. The Atom is a single-core processor that’s optimized for very low power usage.
✦ Up to 3GB of RAM.
✦ 160GB, 250GB, or 320GB hard drive.
✦ Built-in wireless 802.11g or 802.11n network interface (or both).
474
Connecting with a Netbook
✦ Built-in mobile broadband compatible with Sprint, AT&T, or Verizon.
✦ Windows 7 Home Premium edition (32-bit).
Figure 5-1:
A typical
netbook
computer
The entire system is about 8 x 11 inches and about 3⁄4 inch thick — about the
size of a small hardcover book. It weighs just over 3 pounds.
Connecting with a Netbook
Other than its small size, the most distinguishing characteristic of a netbook
computer is that it usually comes equipped with a built-in mobile broadband
Internet connection from a mobile phone provider such as AT&T, Sprint,
Verizon, or T-Mobile. In fact, these companies typically discount the purchase
Connecting with a Netbook
475
price of the netbook to $100 or $200 provided you sign up for a two-year network plan, which typically costs about $50 per month.
The built-in mobile broadband network connection means that no matter
where you are, you can access the network, provided you’re within range of
one of your provider’s cell towers. With a traditional laptop computer, you
have to find an available Wi-Fi network to connect to. With a netbook, you
can connect from almost anywhere — a restaurant, a street corner, even
riding on a bus.
The mobile broadband provider provides software that connects to its
broadband network. For example, Figure 5-2 shows the software provided by
Verizon.
Figure 5-2:
Connecting
via
broadband
with
Verizon.
Here are a few tips that may help your users keep their usage under the
maximum:
✦ Besides mobile broadband connections, all netbooks also include a
built-in Wi-Fi interface. You should encourage your users to use the Wi-Fi
connection rather than the mobile broadband connection whenever
possible. Any data transferred over the Wi-Fi connection does not count
against the 5GB maximum imposed by the mobile broadband connection.
✦ Similarly, all netbook computers include an RJ45 connector for a standard Ethernet cable connection. Your users should use this connection
Book VI
Chapter 5
Managing Netbooks
Unfortunately, the service plans available for netbook computers don’t provide for unlimited data transfers. Most are limited to 5GB per month; after
that, you’re charged an additional overage fee. As a result, you want to make
sure your users are careful about the amount of data they transfer. A 5GB
limit is plenty for most legitimate business uses, but if your users spend their
free time watching videos on YouTube, they’ll quickly exceed the 5GB limit.
476
Tips for Using a Netbook Effectively
whenever possible — for example, when using the netbook from a desk
or from a home office.
✦ Be sure to disable Windows Update. Otherwise, whenever an update is
available, Windows Update downloads it regardless of the type of connection that’s in place. Instead, your users should manually check for
Windows updates on a regular basis when using a Wi-Fi or cabled network connection.
✦ Educate your users about the differences between mobile broadband,
Wi-Fi, and cabled network connections to be sure that they understand
the appropriate use of each.
Tips for Using a Netbook Effectively
In this section, I offer some random suggestions that I’ve found useful when
working with netbooks. Here they are, in no particular order:
✦ Carry a standard-sized keyboard and mouse in your car. The keyboard
on a netbook computer is pretty small, and the touch-pad mouse is
small. You may not want to lug the keyboard and mouse into a restaurant or coffee shop, but it’s handy to have when you take the netbook
into your hotel room and want to do some real work.
✦ Consider disabling the tap feature of the netbook’s touch pad. Because
of the netbook’s small size, the touch pad is usually located uncomfortably close to the keyboard. I end up tapping it with the base of my
thumbs when I type, which causes the mouse pointer to jump all over
the place almost at random. I solved this problem by disabling the tap
feature of the touch pad.
✦ Create a desktop icon that will take your users directly to your Office
Web Access (OWA) site. That way, your users can easily access their
e-mail whenever they have an Internet connection.
✦ Install VPN client software to allow your users to tunnel in to your network. For more information, refer to Book III, Chapter 5.
✦ Because netbook computers usually run one of the Home editions of
Windows 7, netbooks can’t join your domain. That’s probably for the
best, though, because most users will use the netbook mostly for Web
browsing and e-mail, which, as mentioned earlier, can be easily accomplished with OWA.
✦ Keep in mind that although the netbook computer can’t join the
domain, it can still access network shares. The user has to provide a
valid username and password each time he or she tries to open a network share.
Book VII
Windows Server 2008
Reference
Contents at a Glance
Chapter 1: Installing and Configuring Windows Server 2008 R2. . . .479
Chapter 2: Managing Windows Server 2008 . . . . . . . . . . . . . . . . . . . . .493
Chapter 3: Dealing with Active Directory . . . . . . . . . . . . . . . . . . . . . . .509
Chapter 4: Managing Windows User Accounts . . . . . . . . . . . . . . . . . .519
Chapter 5: Managing a File Server . . . . . . . . . . . . . . . . . . . . . . . . . . . . .539
Chapter 6: Using Group Policy . . . . . . . . . . . . . . . . . . . . . . . . . . . . . . . . .553
Chapter 7: Troubleshooting . . . . . . . . . . . . . . . . . . . . . . . . . . . . . . . . . . .563
Chapter 8: Windows Commands . . . . . . . . . . . . . . . . . . . . . . . . . . . . . . .575
Chapter 1: Installing and Configuring
Windows Server 2008 R2
In This Chapter
✓ Making sure you have everything you need
✓ Planning how you will install Windows Server 2008 R2
✓ Installing Windows Server 2008 R2
T
his chapter presents the procedures that you need to follow in order to
install Windows Server — specifically, Windows Server 2008 R2. Note
that although the specific details provided are for Windows Server 2008 R2,
installing the previous version (just plain Windows Server 2008) is very
similar, as is installing the older Windows Server 2003. So you won’t have
any trouble adapting these procedures if you’re installing Windows Server
2008 R2 or Windows Server 2003.
Planning a Windows Server Installation
Before you begin the Setup program to actually install a Windows Server
operating system, you need to make a number of preliminary decisions, as
the following sections describe.
Checking system requirements
Before you install a Windows Server operating system, you should make
sure that the computer meets the minimum requirements. Table 1-1 lists the
official minimum requirements for Windows Server 2008 R2. (The minimums
for Windows Server 2003 are a bit less.) Table 1-1 also lists what I consider
to be more realistic minimums if you expect satisfactory performance from
the server as a moderately used file server.
Table 1-1
Minimum Hardware Requirements for
Windows Server 2008 R2 (Standard Edition)
Item
Official Minimum
A More Realistic Minimum
CPU
1.4 GHz
3 GHz
RAM
512MB
4GB
Free disk space
32GB
100GB
480
Planning a Windows Server Installation
Besides meeting the minimum requirements, you should also make sure that
your specific hardware has been checked out and approved for use with
Windows Server 2008 R2. Microsoft publishes an official list of supported
hardware, called the Hardware Compatibility List, or HCL. You can find the
HCL at www.microsoft.com/whdc/hcl/default.mspx.
The Windows Server 2008 R2 distribution DVD includes a feature called the
Check System Compatibility option that automatically checks your hardware
against the HCL.
Reading the release notes
The Windows Server 2008 R2 distribution DVD includes a file called readme.
rtf, located in the Sources folder. When you open this file, the page shown
in Figure 1-1 is displayed. You should read this file before you start Setup,
just to check whether any of the specific procedures or warnings it contains
apply to your situation.
Figure 1-1:
The
Windows
Server 2008
R2 Readme
file.
Planning a Windows Server Installation
481
Deciding whether to upgrade or install
Windows offers two installation modes to choose from: full installation or
upgrade installation.
A full installation deletes any existing operating system(s) it finds on the
computer and configures the new operating system from scratch. If you do
a full installation onto a disk that already has an operating system installed,
the full installation offers to keep any existing data files that it finds on the
disk.
An upgrade installation assumes that you already have a previous Windows
Server (Windows Server 2008 or Windows Server 2003) installation in place.
The operating system is upgraded to Windows Server 2008 R2, preserving as
many settings from the previous installation as possible.
Here are some points to ponder before you perform an upgrade installation:
✦ You can’t upgrade a client version of Windows to a server version.
✦ With an upgrade installation, you don’t have to reinstall any applications
that were previously installed on the disk.
✦ Always perform a full backup before doing an upgrade installation!
Two types of licenses are required to run a Windows Server operating system:
a server license, which grants you permission to run a single instance of the
server, and Client Access Licenses (CALs), which grant users or devices
permission to connect to the server. When you purchase Windows Server,
you ordinarily purchase a server license plus some number of CALs.
To complicate matters, there are two distinct types of CALs: per-user and
per-device. Per-user CALs limit the number of users that can simultaneously
access a server, regardless of the number of devices (for example, client
computers) in your organization. In contrast, per-device CALs limit the
number of unique devices that can access the server regardless of the
number of users in your organization.
Thinking about multiboot
Windows includes a multiboot feature that lets you set up the computer so
that it has more than one operating system. Then, when you boot up the
computer, you can select which operating system you want to boot up from
a menu.
Installing and
Configuring Windows
Server 2008 R2
Considering your licensing options
Book VII
Chapter 1
482
Planning a Windows Server Installation
If you’re a software developer or a network manager who needs to make
sure that software is compatible with multiple operating systems, the
multiboot feature can be useful. For most servers, however, you want to
install just one operating system.
A much better alternative to a multiboot installation is to use virtual
machine software such as VMWare. This software allows you to install a
development version of an operating system such as Windows Server 2008
R2 within an already installed operating system. For more information, see
www.vmware.com.
Choosing a file system
Windows servers provide three choices for the file system format: FAT,
FAT32, and NTFS. In most cases, you should choose NTFS. Well, actually, you
should use NTFS in almost all cases. Come to think of it, you should always
use NTFS.
The name FAT refers to the file allocation table, which was used in the original
version of MS-DOS back when disco was still popular. FAT was a simple but
effective way to track disk space allocated to files on diskettes and on small
hard drives. The original FAT system used 16-bit disk addresses to divide
the total space on a disk into 65,526 units, called clusters, each of which
could be allocated to any file on the disk. The size of each cluster could vary
from as little as 2K to as much as 256K, depending on the size of the drive.
When disk drives started to get bigger than 512MB (can you remember when
512MB was a huge disk?), FAT was upgraded to FAT32, which used 32-bit
addresses for clusters. That allowed a maximum of 524,208 clusters on the
disk with the size of each cluster ranging from 4K to 32K, depending on the
size of the drive.
FAT32 was a nice improvement over FAT, but both suffer from several
inherent problems:
✦ Even with 32-bit addresses, FAT32 is stretched by today’s 200GB+ disk
drives.
✦ Neither FAT nor FAT32 has built-in security features.
✦ Frankly, FAT and FAT32 are inherently unreliable. Most users, at one
time or another, lose files due to the unreliability of FAT/FAT32.
✦ FAT and FAT32 allocate space inefficiently on large volumes because the
smallest unit of space that they can allocate must be large — as much as
256K in some cases.
Planning a Windows Server Installation
483
Here are just a few of the reasons why choosing NTFS for Windows servers
is a no-brainer:
✦ NTFS has built-in security features that track security information for
individual files and directories.
✦ NTFS tracks clusters with 64-bit disk addresses rather than 32-bit
addresses (FAT32) or 16-bit addresses (FAT). As a result, an NTFS
volume can theoretically have something in the neighborhood of
18 million billion disk clusters, which should keep you going for awhile.
✦ The benefit of having so many clusters available is that the size of each
cluster can be kept small. NTFS can efficiently use 4KB clusters for even
the largest drives available today.
✦ NTFS drives are more reliable because NTFS keeps duplicate copies
of important information, such as the location of each file on the hard
drive. If a problem develops on an NTFS drive, Windows can usually
correct the problem automatically without losing any data. In contrast,
FAT drives are prone to losing data.
✦ The system that FAT uses to keep track of which disk clusters belong to
a given file is prone to errors. In contrast, NTFS has more redundancy
built into its record keeping, so it’s less likely to scramble your files.
✦ NTFS has better support for large drives and large files. Table 1-2 compares
some of the upper limits of the FAT, FAT32, and NTFS file systems.
File System Limits
Limit
FAT
FAT32
NTFS
Maximum volume size
4GB
32GB
16TB
Maximum file size
2GB
4GB
16TB
Maximum files per folder
512
65,534
4,294,967,295
Maximum files per volume
65,526
524,208
Too many to count
Planning your partitions
Partitioning enables you to divide a physical disk into one or more separate
units called partitions. Each disk can have up to four partitions. All four of
the partitions can be primary partitions, each of which can be formatted with
a different file system, such as NTFS or FAT32. Or you can create up to three
primary partitions and one extended partition, which can then be subdivided
into one or more logical drives. Then, each logical drive can be formatted
with a file system.
Installing and
Configuring Windows
Server 2008 R2
Table 1-2
Book VII
Chapter 1
484
Planning a Windows Server Installation
Although you can set up partitions for a Windows server in many ways, the
following two approaches are the most common:
✦ Allocate the entire disk as a single partition that will be formatted
with NTFS. The operating system is installed into this partition, and
disk space that isn’t needed by the operating system or other network
applications can be shared.
✦ Divide the disk into two partitions. Install the operating system and
any other related software (such as Exchange Server or a backup utility)
on the first partition. If the first partition will contain just the operating
system, 10GB is a reasonable size, although you can get by with as little
as 4GB if space is at a premium. Then, use the second partition for
application data or network file shares.
Note that the disk partitioning scheme is independent of any hardwarebased RAID configuration your server might employ. For example, your
server might actually include five physical hard drives that are combined by
the hardware disk controller to form a single logical drive. Within this logical
drive, you can create one or more operating system partitions.
Deciding your TCP/IP configuration
Before you install the operating system, you should have a plan for how you
will implement TCP/IP on the network. Here are some of the things you need
to decide or find out:
✦ What are the IP subnet address and mask for your network?
✦ What is the domain name for the network?
✦ What is the host name for the server?
✦ Will the server obtain its address from DHCP?
✦ Will the server have a static IP address? If so, what?
✦ Will the server be a DHCP server?
✦ What is the Default Gateway for the server? (That is, what is the IP
address of the network’s Internet router?)
✦ Will the server be a DNS server?
If the server will host TCP/IP services (such as DHCP or DNS), you should
assign the server a static IP address.
For more information about planning your TCP/IP configuration, see Book IV.
Before You Install . . .
485
Choosing workgroups or domains
A domain is a method of placing user accounts and various network
resources under the control of a single directory database. Domains ensure
that security policies are consistently applied throughout a network and
greatly simplify the task of managing user accounts on large networks.
A workgroup is a simple association of computers on a network that makes it
easy to locate shared files and printers. Workgroups don’t have sophisticated
directory databases, so they can’t enforce strict security.
Microsoft says that workgroups should be used only for very small networks
with just a few users. In fact, any network that is large enough to have a
dedicated server running Windows Server 2008 R2 is too large to use
workgroups. As a result, if you’re installing a Windows server, you should
always opt for domains.
After you decide to use domains, you have to make two basic decisions:
✦ What will the domain name be? If you have a registered Internet
domain name, such as mydomain.com, you may want to use it for your
network’s domain name. Otherwise, you can make up any name you
want.
You can always change the role of a server from a domain controller to a
member server and vice versa if the needs of your network change. If your
network has more than one server, it’s always a good idea to create at least
two domain controllers. That way, if one fails, the other one can take over.
Before You Install . . .
After you’ve made the key planning decisions for your Windows server
installation, you should take a few precautionary steps before you actually
start the Setup program. The following sections describe the steps that
you should take before you perform an upgrade installation. Note that all
these steps except the last one apply only to upgrades. If you’re installing a
Windows server on a new system, you can skip the first steps.
Book VII
Chapter 1
Installing and
Configuring Windows
Server 2008 R2
✦ What computer or computers will be the domain controllers for the
domain? If this is the first server in a domain, you must designate it as
a domain controller. If you already have a server acting as a domain
controller, you can either add this computer as an additional domain
controller or designate it as a member server.
486
Running Setup
Backing up
Do a complete backup of the server before you begin. Although Windows
Setup is reliable, sometimes something serious goes wrong, and data is lost.
Note that you don’t have to back up the drive to external media, such as tape.
If you can find a network disk share with enough free space, back up to it.
Checking the event logs
Look at the event logs of the existing server computer to check for recurring
errors. You may discover that you have a problem with a SCSI device or
your current TCP/IP configuration. Better to find out now rather than in the
middle of setup.
Uncompressing data
If you’ve used DriveSpace or any other disk compression software to compress
a drive, you have to uncompress the drive before you run Setup. Neither
Windows 2003 Server nor Windows Server 2008 supports DriveSpace or
other disk compression programs.
Disconnecting UPS devices
If you have installed an uninterruptible power supply (UPS) device on the
server and connected it to your computer via a serial cable, you should
temporarily disconnect the serial cable before you run Setup. After Setup is
complete, you can reconnect the serial cable.
Running Setup
Now that you’ve planned your installation and prepared the computer,
you’re ready to run the Setup program. The following procedure describes
the steps that you must follow in order to install Windows Server 2008 R2 on
a new computer that has a bootable DVD drive.
1. Insert the distribution CD in the DVD drive and restart the computer.
After a few moments, the Windows Setup Wizard fires up, as shown in
Figure 1-2.
2. Click Install Now to start the installation.
The wizard next asks for the product key, which is printed on a sticker
attached to the CD case.
Running Setup
487
Figure 1-2:
Welcome
to Windows
Setup!
3. Enter the 25-character product key and then click Next.
Because the key is so long, it’s easy to make a mistake. If Setup
complains that the product key is invalid, don’t panic. Just try again.
4. Select the edition you want to install and then click Next.
The Setup Wizard displays the License Agreement information. Read it if
you enjoy legalese.
5. Click I Accept the License Terms and then click Next.
The Setup Wizard then asks whether you want to perform an upgrade
installation or a full installation.
6. Click the installation option you want to use.
Setup continues by displaying the computer’s current partition
information. Here, you can select the partition that you want to use for
the installation. If necessary, you can reconfigure your partitions from
this screen by deleting existing partitions or creating new ones. I assume
here that you want to create a single partition that uses all available
space on the drive.
Book VII
Chapter 1
Installing and
Configuring Windows
Server 2008 R2
After you input the correct product key, the wizard asks which edition
of the operating system you want to install. The options here depend on
which version you have purchased. For the Standard Edition, you can
choose to install the full Standard Edition server operating system or the
Core edition.
488
Running Setup
7. Select the partition on which you want to install Windows and then
click Next.
Setup now formats the drive and then copies files to the newly formatted
drive. This step usually takes awhile. I suggest you bring along your
favorite book. Start reading at Chapter 1.
After all the files have been copied, Setup reboots your computer. Then,
Setup examines all the devices on the computer and installs any
necessary device drivers. You can read Chapter 2 of your book during
this time.
When Setup finishes installing drivers, it displays the Initial
Configuration Tasks page, shown in Figure 1-3. You can use this page to
perform additional configuration tasks that are required to make your
server usable.
Figure 1-3:
The Initial
Configuration
Tasks page.
In particular, the Initial Configuration Tasks page provides the following
capabilities:
• Set the time zone.
• Configure networking.
• Provide the computer name and domain.
• Enable automatic updating.
Adding Server Roles and Features
489
• Download and install updates.
• Add more server roles and features.
• Enable remote desktop access.
• Configure the Windows Firewall.
You’ll want to work your way through each of these steps. The steps are
pretty self-explanatory, and simple wizards help guide you through each
task.
You can find more information about adding server roles and features in the
next section, “Adding Server Roles and Features.”
Adding Server Roles and Features
Server roles refer to the roles that your server can play on your network —
roles such as a file server, a Web server, or a DHCP or DNS server. Features
refer to additional capabilities of the Windows operating system itself, such
as the .NET Framework or Windows Backup. Truthfully, the distinctions
between roles and features are a bit arbitrary. For example, the Web server
is considered a role, but the Telnet server is a feature. Go figure.
Figure 1-4:
The Server
Manager
page.
Book VII
Chapter 1
Installing and
Configuring Windows
Server 2008 R2
The Initial Configuration Tasks page that was shown in Figure 1-3 lets you
add additional roles or features to your server. After you’ve finished with
the initial configuration of your server, you can choose Start➪Administrative
Tools➪Server Manager to bring up the Server Manager page, as shown in
Figure 1-4. As you can see, this page also provides links that let you add
roles or features.
490
Adding Server Roles and Features
The following procedure describes how to install server roles. The procedure for installing server features is similar.
1. Click the Add Roles link either on the Server Manager page or on the
Initial Server Configuration Tasks page.
Either way, the Add Roles Wizard appears, as shown in Figure 1-5.
Figure 1-5:
The Add
Roles
Wizard.
2. Click Next.
The Select Server Roles page shown in Figure 1-6 appears. This page lets
you select one or more roles to add to your server.
Figure 1-6:
The Select
Server
Roles page.
Adding Server Roles and Features
491
3. Select one or more roles to install.
You can click each role to display a brief description of the role. For
example, if you click the File Services role, the following text is displayed:
File Services provides technologies that help you manage storage,
enable file replication, manage shared folders, ensure fast file
searching, and enable access for UNIX client computers.
4. Click Next.
Depending on the role or roles you select, an additional page may be
displayed asking you to select the role services you want to install. For
example, Figure 1-7 shows the Role Services page for the File Services
role.
Book VII
Chapter 1
Installing and
Configuring Windows
Server 2008 R2
Figure 1-7:
The Role
Services
page.
5. Select the services you want to install.
Again, you can select each service to see a brief text description of the
service. For example, if you select Windows Search Service, the following
text is displayed:
Windows Search Service permits fast file searches on this server
from clients that are compatible with Windows Search Service.
Windows Search Service is intended for desktop search or small file
server scenarios, and not for enterprise scenarios.
6. Click Next.
A confirmation page appears, listing the roles and services you have
selected.
7. Click Install.
492
Adding Server Roles and Features
Windows installs the server role and its services. A progress screen
is displayed during the installation so you can gauge the installation’s
progress. When the installation finishes, a final results page is displayed.
8. Click OK.
You’re done!
Chapter 2: Managing
Windows Server 2008
In This Chapter
✓ Working with the trusty Administrator account
✓ Using Remote Desktop Connection to administer a server from the
comfort of your desktop
✓ Perusing the list of Microsoft Management Consoles
✓ Customizing your own management console
T
his chapter provides an introduction to the most important tools that
you’ll use to administer Windows Server 2008.
Using the Administrator Account
Windows comes with a built-in account named Administrator that has
complete access to all the features of the server. As a network administrator,
you frequently log on using the Administrator account to perform maintenance
chores.
Because the Administrator account is so powerful, you should always enforce
good password practices for it. In other words, don’t use your dog’s name as
the Administrator account password. Instead, pick a random combination of
letters and numbers. Then, change the password periodically.
Write down the Administrator account password and keep it in a secure
location. Note that by “secure location,” I don’t mean taped to the front of
the monitor. Keep it in a safe place where you can retrieve it if you forget
it, but where it won’t easily fall into the hands of someone looking to break
into your network.
Note that you cannot delete or disable the Administrator account. If
Windows allowed you to do that, you could potentially find yourself locked
out of your own system.
As much as possible, you should avoid using the Administrator account.
Instead, you should create accounts for each of your system administrators
and grant them administrator privileges by assigning their accounts to the
Administrators group.
494
Using Remote Desktop Connection
Although you can’t delete or disable the Administrator account, you
can rename it. Some network managers use this ability to hide the true
Administrator account. To do this, just follow these steps:
1. Rename the Administrator account.
Write down the new name you use for the Administrator account, along
with the password, and store it in a top-secret secure location.
2. Create a new account named Administrator and assign it a strong
password, but don’t give this account any significant privileges.
This new account will become a “decoy” Administrator account. The
idea is to get hackers to waste time trying to crack this account’s
password. Even if a hacker does manage to compromise this account, he
won’t be able to do anything when he gets in.
Using Remote Desktop Connection
One of the most useful tools available to system administrators is a program
called Remote Desktop Connection, or RDC for short. RDC lets you connect to
a server computer from your own computer and use it as if you were actually
sitting at the server. In short, RDC lets you administer your server computers
from your own office.
Enabling remote access
Before you can use Remote Desktop Connection to access a server, you
must first enable remote access on the server. To do that, follow these steps
(on the server computer, not your desktop computer):
1. Open the Control Panel and then double-click System.
This step brings up the System applet.
2. Click the Remote tab.
This step brings up the remote access options, as shown in Figure 2-1.
3. Select one of the two Allow Connections check boxes.
Which one should you select? If you select Allow Connections Only from
Computers Running Remote Desktop with Network Level Authentication,
you can connect to the server only from clients running Windows Vista
or Windows 7. The other option, Allow Connections from Computers
Running Any Version of Remote Desktop, lets you connect from
Windows XP clients.
4. Click OK.
Using Remote Desktop Connection
495
Figure 2-1:
Configuring
remote
access.
You’re done! Repeat this procedure for each server computer you want to
allow access to.
Here are a few other points to ponder concerning remote access:
✦ There’s no question that RDC is convenient and useful. However, it’s
also inherently dangerous. Don’t enable it unless you’ve also taken
precautions to secure your Administrator accounts by using strong
passwords; you should also already have a firewall installed to keep
unwanted visitors out of your network. For more information on account
security, see Book VII, Chapter 6.
Connecting remotely
After you’ve enabled remote access on a server, you can connect to the
server by using the Remote Desktop Client that’s automatically installed
with Windows XP, Windows Vista, or Windows 7. Here’s the procedure for
Windows XP:
1. Choose Start➪All Programs➪Accessories➪Communications➪Remote
Desktop Connection.
The Remote Desktop Connection client comes to life, as shown in
Figure 2-2.
Managing Windows
Server 2008
✦ You can click the Select Users button to create a list of users who are
authorized to access the computer remotely. Note that all members of
the Administrators group are automatically granted access, so you don’t
have to add administrators to this list.
Book VII
Chapter 2
496
Using Remote Desktop Connection
Figure 2-2:
Connecting
with Remote
Desktop
Connection.
2. Enter the name of the computer you want to connect to.
Alternatively, you can use the drop-down list to select the computer
from the list of available computers.
3. Click the Connect button.
You’re connected to the computer you selected, and the computer’s
logon screen is displayed.
4. Log on and use the computer.
After you log on, you can use the computer as if you were sitting right in
front of it.
Here are a few other tips for working with the Remote Desktop Connection
client:
✦ When you’re using the Remote Desktop Connection client, you can’t just
Alt+Tab to another program running on the client computer. Instead,
you must first minimize the RDC client’s window by clicking its minimize
button. Then, you can access other programs running on your computer.
✦ If you minimize the RDC client window, you have to provide your logon
credentials again when you return. This security feature is there in case
you forget you have an RDC session open.
✦ If you use RDC a lot on a particular computer (such as your own desktop
computer), I suggest you create a shortcut to RDC and place it on the
desktop, at the top of the Start menu, or in the Quick Launch portion of
the taskbar.
✦ RDC has several useful configuration options that you can access by
clicking the Options button.
Using Microsoft Management Console
497
Using Microsoft Management Console
Microsoft Management Console, also known as MMC, is a general-purpose
management tool that’s used to administer many different types of objects
on a Windows system. Throughout this minibook, you see many examples of
MMC for working with objects such as user accounts, disk drives, event logs,
and so on. This section provides a general overview of how to use MMC.
By itself, MMC doesn’t actually manage anything. Instead, it’s a framework
that accepts management snap-ins. It’s the snap-ins that do the actual managing.
The main point of MMC is that it provides a consistent framework for building
management snap-ins. That way, the snap-ins all behave in similar ways.
As a result, you don’t have to struggle to learn completely different tools to
manage various aspects of Windows Server 2008.
Another advantage of MMC is that you can create your own custom
management consoles with just the right combination of snap-ins. For
example, suppose that you spend most of your time managing user
accounts, disk devices, and IIS (Internet Information Services, the Web
server that comes with Windows Server 2008), and studying event logs. You
can easily craft a management console with just these four snap-ins. For
more information, see the section “Customizing MMC,” later in this chapter.
Working with MMC
You can also start MMC from a command prompt or from the Run dialog box
(opened by choosing Start➪Run). To start MMC without opening a snap-in,
just type mmc at a command prompt or in the Run dialog box. To open a
specific console, type the path to the console file after mmc. For example, the
following command opens the Computer Management console:
mmc \Windows\System32\compmgmt.msc
Figure 2-3 shows a typical Microsoft Management Console window, displaying
the Active Directory Users and Computers snap-in. As you can see, the MMC
window consists of two panes. The pane on the left is a tree pane that
displays a hierarchical tree of the objects that you can manage. The pane on
the right is a details pane that shows detailed information about the object
that’s selected in the tree pane.
Managing Windows
Server 2008
There are several ways to open a Microsoft Management Console
window. The easiest is to open one of the predefined consoles that
come with Windows Server 2008. These consoles are available from the
Start➪Administrative Tools menu.
Book VII
Chapter 2
498
Using Microsoft Management Console
Figure 2-3:
A typical
MMC
window.
The procedures for working with the information in the Details pane vary
depending on the console you’re viewing. However, most of the consoles
display a list of some kind, such as a list of settings or a list of user accounts.
Double-clicking an item usually brings up a properties box that lets you view
or set properties for the object. In most cases, you can click the column
headings at the top of the list to change the order in which the list items are
displayed.
MMC also includes a menu and toolbar with commands and buttons that
vary depending on the item selected in the tree. In particular, the Action
menu contains commands that apply to the current item. For example, the
Action menu includes a New User command when you’re working with the
Active Directory Users and Computers console and a Defragment command
when you view the Disk Defragmenter item in the Computer Management
Console. As you work with different items within the different consoles, be
sure to check the Action menu frequently to find out what commands are
available.
An overview of the MMC consoles
The Start➪Administrative Tools menu gives you direct access to many
useful management consoles. You find detailed descriptions of several of
these tools later in this minibook. The following paragraphs give you a brief
overview of the most important of these consoles:
✦ Active Directory Domains and Trusts: Manages the domains and trusts
relationships for the server.
✦ Active Directory Sites and Services: Manages Active directory services.
✦ Active Directory Users and Computers: This is the console where you
create and modify user accounts.
Using Microsoft Management Console
499
✦ Certification Authority: If you’ve configured your server to act as a
Certificate Authority, you can use this console to manage certificate
services.
✦ Cluster Administrator: This console is available only on Windows
Server 2008 Enterprise Server. It lets you manage clustering, which
allows several servers to work together as a single unit.
✦ Component Services: This console lets you manage how COM+
(Component Object Model) services work on the server. You mess with
this console only if you’re involved in developing applications that use
COM+ services.
✦ Computer Management: This console provides access to several useful
tools for managing a server. In particular, the Computer Management
console provides the following management tools:
• Event Viewer: Lets you view event logs.
• Shared Folders: Lets you manage shared folders for a file server. In
addition to finding out what shares are available, you can use this
tool to find out which users are connected to the server and which
files are open.
• Local Users and Groups: This tool is available only on servers that
are not domain controllers. It lets you manage local user and group
accounts. For a domain controller, you use the Active Directory
Users and Computers console to manage user accounts.
• Device Manager: This tool lets you manage the hardware devices
connected to a server. You’ll probably use it only if you’re having a
problem with the server that you suspect may be hardware related.
• Removable Storage: You can use this tool to manage removable
storage devices such as CD-ROM drives and tape drives.
• Disk Defragmenter: This tool lets you defragment the server’s disks.
• Disk Management: This console tool lets you view the physical disks
and volumes that are available to the system. You can also use this
tool to create and delete partitions, set up RAID volumes, format
disks, and so on.
• Services: This tool lets you manage system services. You can use this
tool to start or stop services such as Exchange e-mail services, TCP/
IP services such as DNS and DHCP, and so on.
• WMI Control: This tool lets you configure Windows Management
Instrumentation services, which are used to track management data
about computers, users, applications, and other objects in large
Enterprise networks.
Managing Windows
Server 2008
• Performance Logs and Alerts: Use this tool to monitor system
performance counters.
Book VII
Chapter 2
500
Using Microsoft Management Console
• Indexing Service: The Indexing Service dynamically builds indexes to
make searching for documents easier. Although these indexes are
useful, keeping them constantly up to date can consume a lot
of system resources, thus slowing down the server. As a result,
many administrators disable this service to improve the server’s
performance.
• Telephony: This console lets you configure telephony services if
you’ve enabled them on the server.
✦ Data Sources (ODBC): Manages database connections that use ODBC.
You’ll probably use this console only if you’re a developer or database
administrator.
✦ DHCP: Manages the DHCP server.
✦ Distributed File System: Manages Distributed File System, which lets
you create the appearance of a single disk file structure from multiple
shares that may be located on different drives and even different servers.
✦ DNS: Manages the DNS server.
✦ Domain Controller Security Policy: Lets you set security policy for a
domain controller.
✦ Domain Security Policy: Lets you set security policies that apply to an
entire domain.
✦ Event Viewer: Lets you view event logs.
✦ Group Policy Management: Lets you set system policies that can be
applied to objects such as users and groups.
✦ Health Monitor: Displays a console that lets you monitor the health of
the server.
✦ Internet Information Services (IIS) Manager: If IIS (Microsoft’s Web
server) is installed on the server, this console lets you manage the
services it provides.
✦ Performance: This console lets you monitor a server’s performance and
twiddle with various settings that can have a positive or negative effect
on performance.
✦ Routing and Remote Access: This console lets you manage Routing and
Remote Access Services, also known as RRAS. The first R in RRAS refers
to routing, which essentially lets you configure Windows Server 2008 to
function as a router. The RAS in RRAS refers to setting up the server so
that remote clients can access it via dialup lines or VPN connections.
✦ Server Management: The Server Management console is a general-purpose
console that combines several of the most commonly used management
consoles for specific server roles, such as file servers, Web servers, and
so on.
✦ Services: This console lets you start and stop Windows services. (It’s
also available via the Computer Management console.)
Customizing MMC
501
Customizing MMC
One of the best things about Microsoft Management Console is that you can
customize it so that the tools you use most often are grouped together in
whatever combination you choose. To create a custom console, first start
Microsoft Management Console without loading a console by choosing
Start➪Run, typing mmc in the Open text box, and clicking OK or pressing
Enter. This creates an empty console, as shown in Figure 2-4.
Figure 2-4:
An empty
MMC
console.
Book VII
Chapter 2
After you’ve created an empty console, you can customize it by adding
whatever snap-ins you want to make use of in the console. To add a snap-in,
follow these steps:
1. Choose File➪Add/Remove Snap-In.
This brings up the Add or Remove Snap-Ins dialog box, shown in
Figure 2-5.
2. Select the snap-in you want to add, and then click the Add button.
Depending on which snap-in you select, a dialog box will appear asking if
you want to use the add-in to manage settings on your own computer or
on a local computer.
3. Repeat Step 2 if you want to add other snap-ins to the console.
4. Click OK.
The console is now equipped with the snap-ins you’ve selected.
Managing Windows
Server 2008
Adding snap-ins
502
Customizing MMC
Figure 2-5:
The Add
or Remove
Snap-Ins
dialog box.
Adding taskpads
A taskpad is a customized page that’s displayed within a console. Taskpads
are designed to provide quick access to the most common chores for a
particular snap-in. A taskpad can display shortcuts that run programs,
execute menu commands, open Web pages, or open folders. For example,
Figure 2-6 shows a simple taskpad that I created for managing local user
accounts. As you can see, it includes icons that let you quickly add an
account, delete an account, and change an account’s password.
Figure 2-6:
A taskpad
for
managing
user
accounts.
To add a taskpad, follow these steps:
1. Select the tree node where you want the taskpad to appear.
Customizing MMC
503
Each taskpad you create is specific to a tree node. For example, the
taskpad shown in Figure 2-6 is displayed only when you select a user
account. To create this taskpad, I opened the Local Users and Groups
node and selected the Users node.
2. Choose Action➪New Taskpad View.
This step brings up the New Taskpad View Wizard, as shown in
Figure 2-7.
Figure 2-7:
The New
Taskpad
View
Wizard.
Book VII
Chapter 2
The Taskpad Style page appears, as shown in Figure 2-8.
Figure 2-8:
Setting the
style options
for a new
taskpad
page.
Managing Windows
Server 2008
3. Click Next.
504
Customizing MMC
This page provides the following options for formatting the taskpad
display:
• Vertical List: If you want to include the list from the details page, you
can select this option to place taskpad icons to the left of the list.
This is the option I selected for the taskpad shown in Figure 2-6.
• Horizontal List: This option places the taskpad icons beneath the
details page list.
• No List: This option creates a taskpad with no list, just taskpad icons.
• Hide Standard Tab: Each taskpad can have a standard view, which
simply lists all of the items in the taskpad without showing custom
tasks. The Hide Standard Tab check box, which is selected by
default, hides this tab. Most of the time, you’ll want to leave this
check box selected.
• Text: This option displays descriptive information beneath each
taskpad icon.
• InfoTip: This option displays descriptive information as a pop-up tip
that appears when you hover the mouse over the icon.
• List Size: This drop-down list lets you select how much of the
taskpad area should be devoted to the list. The options are Small,
Medium, and Large.
It’s a good thing this wizard wasn’t designed by a fast-food company.
If it was, the options for List Size would be Large, Extra Large, and
MegaSuperKing.
4. Select the taskpad options you want and then click Next.
The next page of the wizard presents two options that let you control
when the taskpad should be displayed. The choices are:
• Selected Tree Item: The taskpad will be displayed only for the specific
tree item that you selected in Step 1.
• All Tree Items That Are the Same Type as the Selected Item: The
taskpad will be displayed not only for the selected tree item, but also
for other items of the same type. This is the more common option.
5. Select the taskpad display option and then click Next.
The next page of the wizard asks for a name and description for the
taskpad.
6. Type a name and description for the taskpad and then click Next.
The final page of the New Taskpad View Wizard is displayed, as shown
in Figure 2-9.
Customizing MMC
505
Figure 2-9:
The final
page of
the New
Taskpad
View
Wizard.
7. Select the Add New Tasks to This Taskpad After the Wizard Closes
check box and then click Finish.
This completes the New Taskpad View Wizard but automatically launches
the New Task Wizard so that you can begin adding tasks to the taskpad.
The New Task Wizard begins by displaying a typical greeting page.
8. Click Next.
Figure 2-10:
The New
Task Wizard
gives you
several
choices for
adding new
tasks to a
taskpad.
Book VII
Chapter 2
Managing Windows
Server 2008
The page shown in Figure 2-10 is displayed. This page lets you select one
of three types of shortcuts to create on the taskpad:
506
Customizing MMC
• Menu Command: This option lets you choose one of the console’s
menu commands. All three of the shortcuts shown in the taskpad in
Figure 2-6 are menu commands.
• Shell Command: Lets you run another program, start a batch file, or
open a Web page.
• Navigation: Lets you go to one of the views you’ve added to the
Favorites menu. (If you want to add shortcuts that navigate to
different taskpads in a console, first add each taskpad view to
your Favorites menu by navigating to the taskpad and choosing
Favorites➪Add to Favorites.)
9. Choose the type of shortcut command you want to create and then
click Next.
The page that’s displayed next depends on which option you selected
in Step 8. The rest of this procedure assumes you selected the Menu
Command option, which displays the page shown in Figure 2-11.
Figure 2-11:
Choosing
a menu
command
for a
taskpad
shortcut.
10. Choose the command you want to use and then click Next.
The available commands are listed in the Available Commands list box.
Note that you can bring up several different lists of available commands
by choosing an option in the Command Source drop-down list.
When you click Next, the wizard asks for a name and description for the
command you’ve selected.
11. Enter a name and description for the command and then click Next.
This step brings up the page shown in Figure 2-12.
Customizing MMC
507
Figure 2-12:
Selecting an
icon.
12. Choose the icon you want to use and then click Next.
Note that in many cases, the New Task Wizard suggests an appropriate
icon. For example, if you select a Delete command, the standard Delete
icon will be selected.
When you click Next, the final page of the wizard is displayed, as shown
in Figure 2-13.
Book VII
Chapter 2
Managing Windows
Server 2008
Figure 2-13:
The final
page of the
New Task
Wizard.
13. If you want to create additional tasks, select the When I Click Finish,
Run This Wizard Again check box and then click Finish and repeat
Steps 8 through 13.
You can run the wizard as many times as necessary to add tasks to your
taskpad.
508
Customizing MMC
14. When you’re finished adding tasks, deselect the When I Click Finish,
Run This Wizard Again check box and click Finish.
You’re done!
Here are a few other pointers for working with taskpads:
✦ You can edit an existing taskpad by selecting the tree node that displays
the taskpad and choosing Action➪Edit Taskpad View. This brings up a
Properties dialog box that lets you change the taskpad layout options
and add or remove tasks.
✦ To delete a taskpad, select the tree node that displays the taskpad and
choose Action➪Delete Taskpad View.
✦ Don’t forget to save (File➪Save) often while you’re creating custom
taskpads.
Chapter 3: Dealing with
Active Directory
In This Chapter
✓ Discovering directories
✓ Examining how Active Directory is structured
✓ Setting up a domain controller
✓ Creating organizational units
A
ctive Directory is among the most important features of Windows
Server, and much of your time as a network administrator will be
spent keeping Active Directory neat and tidy. In Chapter 4 of this minibook,
I discuss the details of working with the most common and troublesome
types of Active Directory objects, users, and groups. But first, this chapter
lays some foundation by explaining what Active Directory is and how it
works.
What Directories Do
Everyone uses directory services of one type or another every day. When
you look up someone’s name in a phone book, you’re using a directory
service. But you’re also using a directory service when you make a call:
When you enter someone’s phone number into your touch-tone phone, the
phone system looks up that number in its directory to locate that person’s
phone.
Almost from the very beginning, computers have had directory services.
I remember when I first got started in the computer business back in the
1970s, using IBM mainframe computers and a transaction-processing system
called CICS that is still in widespread use today. CICS relied on many different
directories to track such things as files available to the system, users that
were authorized to access the system, and application programs that could
be run.
510
Remembering the Good-Ol’ Days of NT Domains
But the problem with this directory system, and with most other directory
systems until recently, is that it was made up of many small directory
systems that didn’t know how to talk to each other. I have the very same
problem at home. We have our own little personal address book that has
phone numbers and addresses for our friends and family. And I have a
Day-Timer book with a bunch of other phone numbers and addresses. Then I
have a church directory that lists everyone who goes to my church. Oh, and
there’s the list of players on the softball team I coach. And of course, my cell
phone has a directory.
All counted, I probably have a dozen sources for phone numbers that I
routinely call. So when I need to look up someone’s phone number, I first
have to decide which directory to look in. And, of course, some of my friends
are listed in two or three of these sources, which raises the possibility that
their listings might be out of sync.
That’s exactly the type of problem that Active Directory is designed to
address. Before I get into the specifics of Active Directory, however, I show
you the directory system that Microsoft used on Windows networks before
Active Directory became available.
Remembering the Good-Ol’ Days of NT Domains
Active Directory was introduced with Windows 2000 Server. Before then,
the directory management system in a Windows network was managed by
Windows NT domains, which stored directory information in a database
called the Security Account Manager (SAM) database.
PDCs and BDCs
The most important thing to know about NT domains is that they are servercentric. That is, every Windows NT domain is under the control of a Windows
NT server computer that hosts the primary copy of the SAM database. This
server is called the Primary Domain Controller, or PDC.
Of course, large networks couldn’t work efficiently if all directory access
had to be channeled through a single computer. To solve that bottleneck
problem, Windows NT domains can also be serviced by one or more Backup
Domain Controllers, or BDCs. Each BDC stores a read-only copy of the SAM
database, and any changes made to the SAM database on the PDC must be
propagated down to the BDC copies of the database.
Note that although any of the BDC servers can service access requests such
as user logons, all changes to the SAM database must be made via the PDC.
Then, those changes are copied to the BDC servers. Naturally, this raises the
possibility that the PDC and BDC database can get out of sync.
Active Directory to the Rescue
511
If the PDC should fail for some reason, one of the BDCs can be promoted so
that it becomes the PDC for the domain. This allows the domain to continue to
function while the original PDC is repaired. Because the BDC is an important
backup for the PDC, it’s important that all NT networks have at least one BDC.
Trusts
Many organizations have directory needs that are too complicated to store
on just one NT domain PDC. In that case, the organization can create two or
more separate domains for its network, each with its own PDC and BDCs.
Then, the organization can set up trusts among its domains.
Simply put, a trust is a relationship in which one domain trusts the directory
information stored in another domain. The domain that does the trusting
is called — you guessed it — the trusting domain, while the domain that
contains the information being trusted is called the trusted domain.
Trust relationships work in one direction. For example, suppose you have
two domains, named DomainA and DomainB, and a trust relationship is set
up so that DomainA trusts DomainB. That means that users whose accounts
are defined in DomainB can log on to DomainA and access resources.
However, the trust relationship doesn’t work in the other direction: Users in
DomainA can’t log on and access resources defined in DomainB.
NetBIOS names
One other important characteristic of Windows NT domains is that they
use NetBIOS names. Thus, NT names such as computer names and domain
names are limited to 15 characters.
Actually, NetBIOS names are 16 characters long. But NT uses the last character
of the 16-character NetBIOS name for its own purposes, so that character
isn’t available for use. As a result, NT names can be only 15 characters long.
Active Directory to the Rescue
Active Directory solves many of the inherent limitations of Windows NT
domains by creating a distributed directory database that keeps track of
every conceivable type of network object.
Book VII
Chapter 3
Dealing with Active
Directory
Also, trust relationships are not transitive. (There’s a word that takes you
back to high school algebra.) That means that even if DomainA trusts
DomainB and DomainB trusts DomainC, DomainA does not automatically
trust DomainC. For DomainA to trust DomainC, you’d have to create a
separate trust relationship between DomainA and DomainC.
512
Understanding How Active Directory Is Structured
Active Directory is a comprehensive directory management system that
tracks just about everything worth tracking in a Windows network, including
users, computers, files, folders, applications, and much more. Much of your
job as a network administrator involves working with Active Directory. So
it’s vital that you have a basic understanding of how it works.
One of the most important differences between Active Directory and NT
domains is that Active Directory is not server-centric. In other words, Active
Directory isn’t tied to a specific server computer the way a Windows NT
domain is. Although Active Directory still uses domains and domain controllers,
these concepts are much more flexible in Active Directory than they are in
Windows NT.
Another important difference between Active Directory and NT domains
is that Active Directory uses the same naming scheme that’s used on the
Internet: Domain Name Service (DNS). Thus, an Active Directory domain
might have a name like sales.mycompany.com.
Understanding How Active Directory Is Structured
Like all directories, Active Directory is essentially a database management
system. The Active Directory database is where the individual objects
tracked by the directory are stored. Active Directory uses a hierarchical
database model, which groups items in a tree-like structure.
The terms object, organizational unit, domain, tree, and forest are used to
describe the way Active Directory organizes its data. The following sections
explain the meaning of these important Active Directory terms.
Objects
The basic unit of data in Active Directory is called an object. Active Directory
can store information about many different kinds of objects. The objects you
work with most are users, groups, computers, and printers.
Figure 3-1 shows the Active Directory Manager displaying a list of built-in
objects that come preconfigured with Windows Server 2008 R2. To get to
this management tool, choose Start➪Administrative Tools➪Active Directory
Users and Computers. Then click the Builtin node to show the built-in
objects.
Objects have descriptive characteristics called properties or attributes. You
can call up the properties of an object by double-clicking the object in the
management console.
Understanding How Active Directory Is Structured
513
Figure 3-1:
Objects
displayed by
the Active
Directory
Manager
console.
Domains
Note that because Active Directory domains use DNS naming conventions,
you can create subdomains that are considered to be child domains. You
should always create the top-level domain for your entire network before
you create any other domain. For example, if your company is named
Nimbus Brooms and you’ve registered NimbusBroom.com as your domain
name, you should create a top-level domain named NimbusBroom.com
before you create any other domains. Then, you can create subdomains such
as Accounting.NimbusBroom.com, Manufacturing.NimbusBroom.com,
and Sales.NimbusBroom.com.
If you have Microsoft Visio, you can use it to draw diagrams for your Active
Directory domain structure. Visio includes several templates that provide
cool icons for various types of Active Directory objects. For example,
Figure 3-2 shows a diagram that shows an Active Directory with four
domains created with Visio.
Book VII
Chapter 3
Dealing with Active
Directory
A domain is the basic unit for grouping related objects in Active Directory.
Typically, domains correspond to departments in a company. For example,
a company with separate Accounting, Manufacturing, and Sales departments
might have domains named (you guessed it) Accounting, Manufacturing,
and Sales. Or the domains correspond to geographical locations. For
example, a company with offices in Detroit, Dallas, and Denver might have
domains named det, dal, and den.
514
Understanding How Active Directory Is Structured
Figure 3-2:
Domains for
a company
with three
departments.
Note that these domains have little to do with the physical structure of your
network. In Windows NT, domains usually are related to the network’s
physical structure.
Every domain must have at least one domain controller, which is a server
that’s responsible for the domain. However, unlike a Windows NT PDC, an
Active Directory domain controller doesn’t have unique authority over its
domain. In fact, a domain can have two or more domain controllers that
share administrative duties. A feature called replication works hard at
keeping all the domain controllers in sync with each other.
Organizational units
Many domains have too many objects to manage all together in a single
group. Fortunately, Active Directory lets you create one or more organizational
units, also known as OUs. OUs let you organize objects within a domain,
without the extra work and inefficiency of creating additional domains.
One reason to create OUs within a domain is so that you can assign
administrative rights to each OU of different users. Then, these users can
perform routine administrative tasks such as creating new user accounts or
resetting passwords.
For example, suppose the domain for the Denver office, named den, houses
the Accounting and Legal departments. Rather than create separate
domains for these departments, you could create organizational units for the
departments.
Trees
A tree is a set of Active Directory names that share a common namespace.
For example, the domains NimbusBroom.com, Accounting.
Understanding How Active Directory Is Structured
515
NimbusBroom.com, Manufacturing.NimbusBroom.com, and Sales.
NimbusBroom.com make up a tree that is derived from a common root
domain, NimbusBroom.com.
The domains that make up a tree are related to each other through transitive
trusts. In a transitive trust, if DomainA trusts DomainB and DomainB trusts
DomainC, then DomainA automatically trusts DomainC.
Note that a single domain all by itself is still considered to be a tree.
Forests
As its name suggests, a forest is a collection of trees. In other words, a forest
is a collection of one or more domain trees that do not share a common
parent domain.
For example, suppose Nimbus Brooms acquires Tracorum Technical
Enterprises, which already has its own root domain named TracorumTech.
com, with several subdomains of its own. Then, you can create a forest from
these two domain trees so the domains can trust each other. Figure 3-3
shows this forest.
Book VII
Chapter 3
Dealing with Active
Directory
Figure 3-3:
A forest
with two
trees.
The key to Active Directory forests is a database called the global catalog.
The global catalog is sort of a super-directory that contains information
about all of the objects in a forest, regardless of the domain. Then, if a user
account can’t be found in the current domain, the global catalog is searched
for the account. The global catalog provides a reference to the domain in
which the account is defined.
516
Creating a Domain
Creating a Domain
To create a domain, you start by designating a Windows Server 2008 R2
system to be the new domain’s controller. You can do that by using the
Configure Your Server Wizard as described in Chapter 1 of this minibook. This
wizard is automatically started when you first install Windows Server 2008
R2. However, you can start it at any time by choosing Start➪Administrative
Tools➪Configure Your Server.
From the Configure Your Server Wizard, select Domain Controller (Active
Directory) to start the Active Directory Installation Wizard. This wizard
lets you create a new domain by choosing the Domain Controller for a New
Domain option. You can also create a new forest or create the new domain in
an existing forest.
The Active Directory Installation Wizard asks for a name for the new domain.
If you’re creating the first domain for your network, use your company’s
domain name, such as NimbusBroom.com. If you’re creating a subdomain,
use a name such as Sales.NimbusBroom.com.
Creating an Organizational Unit
Organizational units can simplify the task of managing large domains by
dividing users, groups, and other objects into manageable collections. By
default, Active Directory domains include several useful OUs. For example,
the Domain Controllers OU contains all of the domain controllers for the
domain.
If you want to create additional organizational units to help manage a
domain, follow these steps:
1. Choose Start➪Administrative Tools➪Active Directory Users and
Computers.
The Active Directory Users and Computers console appears, as shown
in Figure 3-4.
2. Right-click the domain you want to add the OU to and choose
New➪Organizational Unit.
The New Object — Organizational Unit dialog box appears, as shown in
Figure 3-5.
3. Type a name for the new organization unit.
4. Click OK.
You’re done!
Creating an Organizational Unit
517
Figure 3-4:
The Active
Directory
Users and
Computers
console.
Book VII
Chapter 3
Dealing with Active
Directory
Figure 3-5:
Creating
a new
organizational
unit.
Here are just a few more thoughts about OUs to ponder as you drift off to sleep:
✦ You can delegate administrative authority for an OU to another user by
right-clicking the OU and choosing Select Delegate Control. Then you
can select the user or group that will have administrative authority over
the OU. You can also choose which administrative tasks will be assigned
to the selected user or group.
✦ Remember that OUs are not the same as groups. Groups are security
principals, which means that you can assign them rights. Then, when
you assign a user to a group, the user is given the rights of the group.
In contrast, an OU is merely an administrative tool that lets you control
how user and group accounts are managed.
✦ For more information about how to create user and group accounts as
well as other Active Directory objects, turn to the next chapter.
518
Book VII: Windows Server 2008 Reference
Chapter 4: Managing
Windows User Accounts
In This Chapter
✓ Understanding user accounts
✓ Creating user accounts
✓ Setting account options
✓ Working with groups
✓ Creating a roaming profile
E
very user who accesses a network must have a user account. User
accounts let you control who can access the network and who can’t. In
addition, user accounts let you specify what network resources each user
can use. Without user accounts, all your resources would be open to anyone
who casually dropped by your network.
Understanding Windows User Accounts
User accounts are one of the basic tools for managing a Windows server.
As a network administrator, you’ll spend a large percentage of your time
dealing with user accounts — creating new ones, deleting expired ones,
resetting passwords for forgetful users, granting new access rights, and so
on. Before I get into the specific procedures of creating and managing user
accounts, this section presents an overview of user accounts and how they
work.
Local accounts versus domain accounts
A local account is a user account that’s stored on a particular computer and
applies only to that computer. Typically, each computer on your network
will have a local account for each person who uses that computer.
In contrast, a domain account is a user account that’s stored by Active
Directory and can be accessed from any computer that’s a part of the
domain. Domain accounts are centrally managed. This chapter deals
primarily with setting up and maintaining domain accounts.
520
Creating a New User
User account properties
Every user account has a number of important account properties that specify the characteristics of the account. The three most important account
properties are
✦ Username: A unique name that identifies the account. The user must
enter the username when logging on to the network. The username is
public information. In other words, other network users can (and often
should) find out your username.
✦ Password: A secret word that must be entered in order to gain access
to the account. You can set up Windows so that it enforces password
policies, such as the minimum length of the password, whether the password must contain a mixture of letters and numerals, and how long the
password remains current before the user must change it.
✦ Group membership: The group or groups to which the user account
belongs. Group memberships are the key to granting access rights to
users so that they can access various network resources, such as file
shares or printers or to perform certain network tasks, such as creating
new user accounts or backing up the server.
Many other account properties record information about the user, such
as the user’s contact information, whether the user is allowed to access
the system only at certain times or from certain computers, and so on. I
describe some of these features in later sections of this chapter, and some
are described in more detail in Chapter 6 of this minibook.
Creating a New User
To create a new domain user account in Windows Server 2008, follow these
steps:
1. Choose Start➪Administrative Tools➪Active Directory Users and
Computers.
This fires up the Active Directory Users and Computers management
console, as shown in Figure 4-1.
2. Right-click the domain that you want to add the user to and then
choose New➪User.
This summons the New Object — User Wizard, as shown in Figure 4-2.
3. Type the user’s first name, middle initial, and last name.
As you type the name, the New Object Wizard automatically fills in the
Full Name field.
Creating a New User
521
Figure 4-1:
The Active
Directory
Users and
Computers
management
console.
Book VII
Chapter 4
Managing Windows
User Accounts
Figure 4-2:
Creating a
new user.
4. Change the Full Name field if you want it to appear differently than
proposed.
For example, you may want to reverse the first and last names so the
last name appears first.
5. Type the user logon name.
This name must be unique within the domain.
Pick a naming scheme to follow when creating user logon names. For
example, use the first letter of the first name followed by the complete
last name, the complete first name followed by the first letter of the last
name, or any other scheme that suits your fancy.
522
Creating a New User
6. Click Next.
The second page of the New Object — User Wizard appears, as shown in
Figure 4-3.
Figure 4-3:
Setting
the user’s
password.
7. Type the password twice.
You’re asked to type the password twice, so type it correctly. If you don’t
type it identically in both boxes, you’re asked to correct your mistake.
8. Specify the password options that you want to apply.
The following password options are available:
• User must change password at next logon.
• User cannot change password.
• Password never expires.
• Account is disabled.
For more information about these options, see the section “Setting
account options,” later in this chapter.
9. Click Next.
You’re taken to the final page of the New Object — User Wizard, as
shown in Figure 4-4.
10. Verify that the information is correct and then click Finish to create
the account.
If the account information is not correct, click the Back button and
correct the error.
You’re done! Now you can customize the user’s account settings. At a minimum,
you’ll probably want to add the user to one or more groups. You may also
want to add contact information for the user or set up other account options.
Setting User Properties
523
Figure 4-4:
Verifying
the user
account
information.
Setting User Properties
After you’ve created a user account, you can set additional properties for
the user by right-clicking the new user and choosing Properties. This brings
up the User Properties dialog box, which has about a million tabs that you
can use to set various properties for the user. Figure 4-5 shows the General
tab, which lists basic information about the user, such as the user’s name,
office location, phone number, and so on.
Book VII
Chapter 4
Managing Windows
User Accounts
Figure 4-5:
The General
tab.
The following sections describe some of the administrative tasks that you
can perform via the various tabs of the User Properties dialog box.
524
Setting User Properties
Changing the user’s contact information
Several tabs of the User Properties dialog box contain contact information
for the user:
✦ Address: Lets you change the user’s street address, post office box, city,
state, zip code, and so on.
✦ Telephones: Lets you specify the user’s phone numbers.
✦ Organization: Lets you record the user’s job title and the name of his or
her boss.
Setting account options
The Account tab of the User Properties dialog box, shown in Figure 4-6,
features a variety of interesting options that you can set for the user. From
this dialog box, you can change the user’s logon name. In addition, you can
change the password options that you set when you created the account
and you can set an expiration date for the account.
Figure 4-6:
The
Account
tab.
Setting User Properties
525
The following account options are available in the Account Options list box:
✦ User must change password at next logon: This option, which is
selected by default, allows you to create a one-time-only password that
can get the user started with the network. The first time the user logs on
to the network, he or she is asked to change the password.
✦ User cannot change password: Use this option if you don’t want to
allow users to change their passwords. (Obviously, you can’t use this
option and the previous one at the same time.)
✦ Password never expires: Use this option if you want to bypass the
password expiration policy for this user so that the user will never have
to change his or her password.
✦ Store password using reversible encryption: This option stores
passwords using an encryption scheme that hackers can easily break, so
you should avoid it like the plague.
✦ Account is disabled: This option allows you to create an account that
you don’t yet need. As long as the account remains disabled, the user
won’t be able to log on. See the section “Disabling and Enabling User
Accounts,” later in this chapter, to find out how to enable a disabled
account.
✦ Smart card is required for interactive logon: If the user’s computer
has a smart card reader to automatically read security cards, check this
option to require the user to use it.
✦ Account is sensitive and cannot be delegated: Prevents other users
from impersonating this account.
✦ Use DES encryption types for this account: Beefs up the encryption for
applications that require extra security.
✦ Do not require Kerberos preauthentication: Select this option if you
use a different implementation of the Kerberos protocol.
Specifying logon hours
You can restrict the hours during which the user is allowed to log on to the
system by clicking the Logon Hours button from the Account tab of the User
Properties dialog box. This brings up the Logon Hours for [User] dialog box,
shown in Figure 4-7.
Managing Windows
User Accounts
✦ Account is trusted for delegation: This option indicates that the
account is trustworthy and can set up delegations. This is an advanced
feature that’s usually reserved for Administrator accounts.
Book VII
Chapter 4
526
Setting User Properties
Figure 4-7:
Restricting
the user’s
logon hours.
Initially, the Logon Hours dialog box is set to allow the user to log on at any
time of day or night. To change the hours that you want the user to have
access to, click a day and time or a range of days and times and choose
either Logon Permitted or Logon Denied.
Restricting access to certain computers
Normally, a user can use his or her user account to log on to any computer
that’s a part of the user’s domain. However, you can restrict a user to certain
computers by clicking the Log On To button on the Account tab of the User
Properties dialog box. This brings up the Logon Workstations dialog box, as
shown in Figure 4-8.
Figure 4-8:
Restricting
the user
to certain
computers.
To restrict the user to certain computers, select the radio button labeled
The Following Computers. Then, for each computer you want to allow the
user to log on from, type the computer’s name in the text box and click Add.
Setting User Properties
527
If you make a mistake, you can select the incorrect computer name and
either click Edit to change the name or click Remove to delete the name.
Setting the user’s profile information
The Profile tab, shown in Figure 4-9, lets you configure the user’s profile
information. This dialog box lets you configure three bits of information
related to the user’s profile:
Book VII
Chapter 4
✦ Profile Path: This field specifies the location of the user’s roaming
profile. For more information, see the section “User Profiles,” later in
this chapter.
✦ Logon Script: This is the name of the user’s logon script. A logon script
is a batch file that’s run whenever the user logs on. The main purpose
of the logon script is to map the network shares that the user requires
access to. Logon scripts are a carryover from the early versions of
Windows NT Server. In Windows Server 2008, profiles are the preferred
way to configure the user’s computer when the user logs on, including setting up network shares. However, many administrators still like
the simplicity of logon scripts. For more information, see the section
“Creating a Logon Script” later in this chapter.
✦ Home Folder: This is where you specify the default storage location for
the user.
Managing Windows
User Accounts
Figure 4-9:
The Profile
tab.
528
Resetting User Passwords
The Profile tab lets you specify the location of an existing profile for the
user, but it doesn’t actually let you set up the profile. For more information
about setting up a profile, see the section “User Profiles,” later in this chapter.
Resetting User Passwords
By some estimates, the single most time-consuming task of most network
administrators is resetting user passwords. It’s easy to just think users
are forgetful idiots, but put yourself in their shoes. We insist that they set
their passwords to something incomprehensible, such as 94kD82leL384K,
that they change it a week later to something more unmemorable, such as
dJUQ63DWd8331, and that they don’t write it down. Then we get mad when
they forget their passwords.
So when a user calls and says he or she forgot his or her password, the least
we can do is be cheerful when we reset it for them. After all, they’ve probably
already spent 15 minutes trying to remember it before they finally gave up
and admitted failure.
Here’s the procedure to reset the password for a user domain account:
1. Log on as an administrator.
You must have administrator privileges in order to perform this procedure.
2. Choose Start➪Administrative Tools➪Active Directory Users and
Computers.
The Active Directory Users and Computers management console
appears.
3. Click Users in the console tree.
4. In the Details pane, right-click the user who forgot his or her password
and choose Reset Password.
5. Type the new password in both password boxes.
You have to type the password twice to ensure that you type it correctly.
6. If desired, select the User Must Change Password at Next Logon
option.
If you select this option, the password that you assign will work for only
one logon. As soon as the user logs on, he or she will be required to
change the password.
7. Click OK.
That’s all there is to it! The user’s password is now reset.
Deleting a User
529
Disabling and Enabling User Accounts
If you want to temporarily prevent a user from accessing the network, you
can disable his or her account. Then you can enable the account later, when
you’re ready to restore the user to full access. Here’s the procedure:
1. Log on as an administrator.
You must have administrator privileges to perform this procedure.
2. Choose Start➪Administrative Tools➪Active Directory Users and
Computers.
The Active Directory Users and Computers management console
appears.
3. Click Users in the console tree.
4. In the Details pane, right-click the user that you want to enable or
disable. Then choose either Enable Account or Disable Account to
enable or disable the user.
Deleting a User
Deleting a user account is surprisingly easy. Just follow these steps:
You must have administrator privileges in order to perform this procedure.
2. Choose Start➪Administrative Tools➪Active Directory Users and
Computers.
The Active Directory Users and Computers management console
appears.
3. Click Users in the console tree.
4. In the details pane, right-click the user that you want to delete and
then choose Delete.
Windows asks whether you really want to delete the user, just in case
you’re kidding.
5. Click Yes.
Poof! The user account is deleted.
Deleting a user account is a permanent, non-reversible action. Do it only if
you’re absolutely sure that you’ll never want to restore the user’s account. If
there is any possibility of restoring the account later, you should disable the
account instead of deleting it.
Managing Windows
User Accounts
1. Log on as an administrator.
Book VII
Chapter 4
530
Working with Groups
Working with Groups
A group is a special type of account that represents a set of users who have
common network access needs. Groups can dramatically simplify the task
of assigning network access rights to users. Rather than assigning access
rights to each user individually, groups let you assign rights to the group
itself. Then, those rights automatically extend to any user that you add to
the group.
The following sections describe some of the key concepts that you need to
understand in order to use groups and some of the most common procedures
you’ll employ when setting up groups for your server.
Group types
Two distinct types of groups exist:
✦ Security groups: Most groups are security groups, which extend access
rights to members of the group. For example, if you want to allow a
group of users to access your high-speed color laser printer, you can
create a group called ColorPrintUsers. Then, you can grant permission
to use the printer to the ColorPrintUsers group. Finally, you can add
individual users to the ColorPrintUsers group.
✦ Distribution groups: Distribution groups aren’t used as much as security
groups. They’re designed as a way to send e-mail to a group of users by
specifying the group as the recipient.
Group scope
A group can have any of three distinct scopes, which determines what
domains the group’s members can belong to. Three distinct scopes exist:
✦ Domain local: A group with domain local scope can have members from
any domain. However, the group can be granted permissions only from
the domain in which the group is defined.
✦ Global: A group with global scope can have members only from the
domain in which the group is defined. However, the group can be
granted permissions in any domain in the forest. (For more information
about forests, refer to Chapter 3 of this minibook.)
✦ Universal scope: Groups with universal scope are available in all
domains that belong to the same forest.
As you can probably guess, universal scope groups are usually found
only on very large networks.
Working with Groups
531
One common way you can use domain local and global groups is as follows:
1. Use domain local groups to assign access rights for network resources.
For example, to control access to a high-speed color printer, create
a domain local group for the printer. Grant the group access to the
printer, but don’t add any users to the group.
2. Use global groups to associate users with common network access
needs.
For example, create a global group for users who need to access color
printers. Then, add each user who needs access to a color printer
membership to the group.
3. Finally, add the global group to the domain local group.
That way, access to the printer is extended to all members of the global
group.
This technique gives you the most flexibility when your network grows.
Default groups
Windows Server 2008 comes with a number of predefined groups that you
can use. Although you shouldn’t be afraid to create your own groups when
you need them, there’s no reason to create your own group if you find a
default group that meets your needs.
Table 4-1
Default Groups Located in the Built-In Container
Group
Description
Account
Operators
This group is for users who should be allowed to create,
edit, or delete user accounts but shouldn’t be granted full
administrator status.
Administrators
These are the system administrators who have full control
over the domain. The Administrator account is a default
member of this group. You should create only a limited
number of accounts that belong to this group.
Backup Operators
This group is for users who need to perform backup
operations. Because this group must have access to the
files that are backed up, it presents a security risk. So you
should limit the number of users that you add to this group.
(continued)
Managing Windows
User Accounts
Some of these groups are listed in the Built-in container in the Active
Directory Users and Computers management console. Others are found in
the Users container. Table 4-1 lists the more useful default groups found in
Builtin, while Table 4-2 lists the default groups found in the Users container.
Book VII
Chapter 4
532
Working with Groups
Table 4-1 (continued)
Group
Description
Guests
This group allows members to log on, but little else. The
default Guest account is a member of this group.
Network
Configuration
This group is allowed to twiddle with network configuration
settings, including releasing and renewing DHCP leases.
Print Operators
This group grants users access to printers, including the
ability to create and share new printers and manage print
queues.
Remote Desktop
Users
This group can remotely log on to domain controllers in the
domain.
Replicator
This group is required to support directory replication.
Don’t add users to this group.
Server Operators
These users can log on locally to a domain controller.
Users
These users can perform common tasks, such as running
applications and using local and network printers.
Table 4-2
Default Groups Located in the Users Container
Group
Description
Cert Publishers
These users can publish security certificates for users and
computers.
DnsAdmins
This group is installed if you install DNS. It grants
administrative access to the DNS Server service.
DnsUpdateProxy
This group is installed if you install DNS. It allows DNS
clients to perform dynamic updates on behalf of other
clients, such as DHCP servers.
Domain Admins
These users have complete control of the domain. By
default, this group is a member of the Administrators group
on all domain controllers, and the Administrator account is
a member of this group.
Domain
Computers
This group contains all computers that belong to the
domain. Any computer account created becomes a
member of this group automatically.
Domain
Controllers
This group contains all domain controllers in the domain.
Domain Guests
This group contains all domain guests.
Working with Groups
533
Group
Description
Domain Users
This group contains all domain users. Any user account
created in the domain is added to this group automatically.
Group Policy
These users can modify Group Policy for the domain.
IIS_WPG
This group is created if you install IIS. It’s required for IIS to
operate properly.
RAS and IAS
Servers
This group is required for RAS and IAS servers to work
properly.
Creating a group
If none of the built-in groups meets your needs, you can create your own
group by following these steps:
1. Log on as an administrator.
You must have administrator privileges to perform this procedure.
2. Choose Start➪Administrative Tools➪Active Directory Users and
Computers.
The Active Directory Users and Computers management console
appears.
choose New➪Group.
The New Object — Group dialog box appears, as shown in Figure 4-10.
Figure 4-10:
Creating a
new group.
Managing Windows
User Accounts
3. Right-click the domain to which you want to add the group and then
Book VII
Chapter 4
534
Working with Groups
4. Type the name for the new group.
Enter the name in both text boxes.
5. Choose the group scope.
The choices are Domain Local, Global, and Universal. For groups that will
be granted access rights to network resources, choose Domain Local. Use
Global for groups to which you’ll add users and Domain Local groups. Use
Universal groups only if you have a large network with multiple domains.
6. Choose the group type.
The choices are Security and Distribution. In most cases, choose
Security.
7. Click OK.
The group is created.
Adding a member to a group
Groups are collections of objects, called members. The members of a group
can be user accounts or other groups. When you create a group, it has
no members. As a result, the group isn’t useful until you add at least one
member.
Follow these steps to add a member to a group:
1. Log on as an administrator.
You must have administrator privileges to perform this procedure.
2. Choose Start➪Administrative Tools➪Active Directory Users and
Computers.
The Active Directory Users and Computers management console
appears.
3. Open the folder that contains the group to which you want to add
members and then double-click the group.
The Group Properties dialog box appears.
4. Click the Members tab.
The members of the group are displayed, as shown in Figure 4-11.
5. Type the name of a user or other group that you want to add to this
group and then click Add.
The member is added to the list.
6. Repeat Step 5 for each user or group that you want to add.
Keep going until you’ve added everyone!
7. Click OK.
User Profiles
535
Figure 4-11:
Adding
members to
a group.
That’s all there is to it.
The Group Properties dialog box also has a Member Of tab that lists each
group that the current group is a member of.
User Profiles
User profiles automatically maintain desktop settings for Windows users. By
default, user profiles are stored on each user’s local computer. The following
items are just some of the settings that are stored as part of the user profile:
✦ Desktop settings in the Display Properties dialog box, including
wallpaper, screen savers, and color schemes
✦ Start menu programs and Windows toolbar options
✦ Favorites, which provide easy access to the files and folders that the
user accesses frequently
✦ Application Data, such as option settings, custom dictionaries, and so on
✦ Cookies, used for Internet browsing
Book VII
Chapter 4
Managing Windows
User Accounts
Adding members to a group is only half the process of making a group
useful. The other half is adding access rights to the group so that the
members of the group can actually do something. The procedures for doing
that are covered in the next chapter.
536
User Profiles
✦ My Recent Documents, which keeps shortcuts to the documents most
recently accessed by the user
✦ Templates, which stores user templates
✦ Network Neighborhood, which keeps shortcuts to the user’s network
locations
✦ Send To, which keeps shortcuts to document-handling utilities
✦ Local Settings, such as history and temporary files
✦ Printers, which keeps shortcuts to the user’s printers
✦ My Documents
Types of user profiles
Four types of user profiles exist:
✦ Local user profile: A local user profile is stored on the user’s local
computer and is applied only when the user logs on to that computer. A
local user profile is created automatically when a new user logs on.
✦ Roaming user profile: A roaming user profile is created on a network
share. That way, the user can access the roaming profile when he or she
logs on to any computer on the network.
✦ Mandatory user profile: A mandatory user profile is a roaming user
profile that the user is not allowed to change. One benefit of mandatory
user profiles is that users can’t mess up their desktop settings. Another
is that you can create a single mandatory profile that can be used by
multiple users.
✦ Temporary user profile: If a roaming or mandatory profile is not available
for some reason, a temporary user profile is automatically created for
the user. The temporary profile is deleted when the user logs off, so any
changes that the user makes while using a temporary profile are lost at
the end of the session.
Creating a roaming profile
A roaming user profile is simply a user profile that has been copied to a
network share so that it can be accessed from any computer on the network.
Before you can create roaming user profiles, you should create a shared
folder on the server to hold the profiles. You can name the shared folder
anything you like, but most administrators call it Users. For information on
the procedure to create a shared folder, see Chapter 3 of this minibook.
After you’ve created the shared Users folder, you can copy the profile to the
server by following these steps at the user’s local computer (Windows 7 or
Vista):
User Profiles
537
1. Log on to the computer by using an account other than the one you
want to make a user account.
Windows won’t let you copy the profile that you’re logged on with.
2. Click the Start button and type the word Profile. Then choose the
Configure Advanced User Profile Properties option from the menu
that appears.
This brings up the User Profiles dialog box shown in Figure 4-12.
Figure 4-12:
The User
Profiles
dialog box.
Book VII
Chapter 4
A Copy To dialog box appears.
4. Type the path and name for the roaming profile in the Copy Profile
To box.
For example, to copy a profile named Doug to the User share on a server
named Server01, type \\Server01\Users\Doug.
5. Click OK.
The profile is copied.
Now, you can go back to the server, log on as an administrator, and follow
these steps to designate a roaming profile for the user’s domain account:
1. Choose Start➪Administrative Tools➪Active Directory Users and
Computers.
The Active Directory Users and Computers management console
appears.
Managing Windows
User Accounts
3. Select the profile that you want to copy and then click Copy To.
538
Creating a Logon Script
2. Right-click the user account and choose Properties.
The User Properties dialog box appears.
3. Click the Profile tab.
The Profile tab appears. This tab was shown in Figure 4-9, so I won’t
repeat it again here.
4. Type the path and name of the profile in the Profile Path text box.
The path and name that you type here should be the same path and
name that you used to copy the profile to the server.
5. Click OK.
Creating a Logon Script
A logon script is a batch file that’s run automatically whenever a user logs
on. The most common reason for using a logon script is to map the network
shares that the user needs access to. For example, here’s a simple logon
script that maps three network shares:
echo off
net use m: \\server1\shares\admin
net use n: \\server1\shares\mktg
net use o: \\server2\archives
Here, two shares on server1 are mapped to drives M and N, and a share on
server2 is mapped as drive O.
If you want, you can use the special variable %username% to get the user’s
username. This is useful if you’ve created a folder for each user and you
want to map a drive to each user’s folder. For example:
net use u: \\server1\users\%username%
For example, if a user logs on with the username dlowe, drive U is mapped
to \\server1\users\dlowe.
Scripts should be saved in the Scripts folder, which is buried deep in the
bowels of the SYSVOL folder — typically, c:\Windows\SYSVOL\Sysvol\
domainname\Scripts, where domainname is your domain name. Because
you frequently need to access this folder, I suggest creating a shortcut to it
on your desktop.
After you’ve created a logon script, you can assign it to a user by using the
Profile tab of the User Properties dialog box. For more information, see the
section “Setting the user’s profile information,” earlier in this chapter.
Chapter 5: Managing a File Server
In This Chapter
✓ Configuring a file server
✓ Sharing folders
✓ Setting permissions
I
n this chapter, you discover how to set up and manage file and print
servers for Windows Server 2008. Because the features for file and print
servers are essentially the same for both operating systems, the techniques
presented in this chapter should work for either system.
Understanding Permissions
Before I get into the details of setting up a file server, you need to have a
solid understanding of the concept of permissions. Permissions allow users
to access shared resources on a network. Simply sharing a resource such
as a disk folder or a printer doesn’t guarantee that a given user is able to
access that resource. Windows makes this decision based on the permissions
that have been assigned to various groups for the resource and group
memberships of the user. If the user belongs to a group that has been
granted permission to access the resource, the access is allowed. If not,
access is denied.
In theory, permissions sound pretty simple. In practice, however, they
can get pretty complicated. The following paragraphs explain some of the
nuances of how access control and permissions work:
✦ Every object — that is, every file and folder — on an NTFS volume has
a set of permissions called the Access Control List, or ACL, associated
with it.
✦ The ACL identifies the users and groups who can access the object and
specifies what level of access each user or group has. For example, a
folder’s ACL may specify that one group of users can read files in the
folder, while another group can read and write files in the folder, and a
third group is denied access to the folder altogether.
✦ Container objects — files and volumes — allow their ACLs to be
inherited by the objects that they contain. As a result, if you specify
permissions for a folder, those permissions extend to the files and child
folders that appear within it.
540
Understanding Permissions
✦ Table 5-1 lists the six permissions that can be applied to files and folders
on an NTFS volume.
Table 5-1
File and Folder Permissions
Permission
Description
Full control
The user has unrestricted access to the file or folder.
Modify
The user can change the file or folder’s contents, delete the
file or folder, read the file or folder, or change the attributes
of the file or folder. For a folder, this permission allows you
to create new files or subfolders within the folder.
Read & Execute
For a file, this permission grants the right to read or execute
the file. For a folder, this permission grants the right to list
the contents of the folder or to read or execute any of the
files in the folder.
List Folder
Contents
This permission applies only to folders; it grants the right to
list the contents of the folder.
Write
Grants the right to change the contents of a file or its
attributes. For a folder, grants the right to create new files
and subfolders within the folder.
Read
Grants the right to read the contents of a file or folder.
✦ Actually, the six file and folder permissions comprise various combinations
of special permissions that grant more detailed access to files or folders.
Table 5-2 lists the special permissions that apply to each of the six file
and folder permissions.
✦ It’s best to assign permissions to groups rather than to individual users.
Then, if a particular user needs access to a particular resource, add that
user to a group that has permission to use the resource.
Table 5-2
Special Permission
Traverse Folder/
Execute File
List Folder/
Read Data
Read Extended
Attributes
Special Permissions
Full
Control
Modify
Read &
Execute
List Folder
Contents
Read
✓
✓
✓
✓
✓
✓
✓
✓
✓
✓
✓
✓
✓
✓
Write
Understanding Shares
Special Permission
Create Files/
Write Data
Create Folders/
Append Data
Write Attributes
Write Extended
Attributes
Delete Subfolders
and Files
Delete
Read Permissions
Change
Permissions
Take Ownership
Synchronize
Full
Control
Modify
Read &
Execute
List Folder
Contents
Read
541
Write
✓
✓
✓
✓
✓
✓
✓
✓
✓
✓
✓
✓
✓
✓
✓
✓
✓
✓
✓
✓
✓
✓
✓
✓
✓
✓
✓
✓
✓
Understanding Shares
✦ Share name: The name by which the share is known over the network.
To be compatible with older computers, you should stick to eight-character
share names whenever possible.
✦ Path: The path to the folder on the local computer that’s being shared,
such as C:\Accounting.
✦ Description: A one-line description of the share.
✦ Permissions: A list of users or groups who have been granted access to
the share.
When you install Windows and configure various server roles, special shared
resources are created to support those roles. You shouldn’t disturb these
special shares unless you know what you’re doing. Table 5-3 lists some of
the more common special shares.
Managing a File
Server
A share is simply a folder that is made available to other users via the
network. Each share has the following elements:
Book VII
Chapter 5
542
Configuring the File Server Role
Table 5-3
Special Shares
Share Name
Description
drive$
The root directory of a drive.
ADMIN$
Used for remote administration of a computer. This share
points to the operating system folder (usually,
C: \Windows).
IPC$
Used by named pipes, a programming feature that lets processes communicate with one another.
NETLOGON
Required in order for domain controllers to function.
SYSVOL
Another required domain controller share.
PRINT$
Used for remote administration of printers.
FAX$
Used by fax clients.
Notice that some of the special shares end with a dollar sign ($). These
shares are hidden shares that aren’t visible to users. However, you can still
access them by typing the complete share name (including the dollar sign)
when the share is needed. For example, the special share C$ is created to
allow you to connect to the root directory of the C: drive from a network
client. You wouldn’t want your users to see this share, would you? (Of
course, shares such as C$ are also protected by privileges so that if an
ordinary user finds out that C$ is the root directory of the server’s C: drive,
he or she still can’t access it.)
Configuring the File Server Role
To use Windows Server 2003 or 2008 as a file server, you must first enable
the file server role. In Windows Server 2003, you can do so by running
Manage Your Server (choose Start➪Administrative Tools➪Manage Your
Server). Then, choose Add or Remove a Role and select the File Server
role. In Windows Server 2008, choose Start➪Administrative Tools➪Server
Management, choose Roles, and then enable the File Services role.
Managing Your File Server
Windows Server 2008 includes a useful new management console called
Share and Storage Management, as shown in Figure 5-1. From this console,
you can easily create new shares, set up the permissions for a share,
remove a share, and so on. To summon the File Server Manager, choose
Start➪Administrative Tools➪Share and Storage Management.
Managing Your File Server
543
Figure 5-1:
The Share
and Storage
Management
console.
The following sections describe some of the more common procedures that
you’ll use when managing your file server.
Using the Provision a Shared Folder Wizard
To be useful, a file server should offer one or more shares — folders that
have been designated as publicly accessible via the network. You can see
a list of the current shares available from a file server by firing up the File
Server Manager and clicking Shares in the console tree. The Share and
Storage Management console displays the share name, description, and
network path for each share that you’ve already created.
1. In the Share and Storage Management console, choose Provision
Share.
The opening screen of the Provision a Shared Folder Wizard appears, as
shown in Figure 5-2. Here, the wizard asks you what folder you want to
share.
2. Type the path of the folder that you want to share over the network
and then click Next.
If you aren’t sure of the path, you can click Browse. This action calls up
a dialog box that lets you search the server’s hard drive for a folder to
share. You can also create a new folder from this dialog box if the folder
that you want to share doesn’t yet exist. After you’ve selected or created
the folder to share, click OK to return to the wizard.
Next, the dialog box shown in Figure 5-3 appears.
Managing a File
Server
To create additional shares, use the Provision a Shared Folder Wizard, as
described in the following procedure.
Book VII
Chapter 5
544
Managing Your File Server
Figure 5-2:
The
Provision
a Shared
Folder
Wizard asks
what folder
you want to
share.
Figure 5-3:
The wizard
asks
whether you
want to set
the NTFS
permissions.
3. Change the NTFS Permissions if you want and then click Next.
The NTFS permissions are the permissions that are applied to the folder
that you are sharing, not to the share itself. If you want to change the
underlying NTFS permissions for the folder you are sharing, click Edit
Permissions and set the permissions the way you want. Otherwise,
click Next to proceed to the next step. The wizard displays the dialog
box shown in Figure 5-4, which lets you set the name this share will be
known by.
Managing Your File Server
545
Figure 5-4:
Specifying
the share
name.
4. Type the name that you want to use for the share in the Share
Name box.
The default name is the name of the folder being shared. If the folder
name is long, you can use a more succinct name here.
5. Click Next.
The dialog box shown in Figure 5-5 appears.
6. Enter a description for the share and then click Next.
The dialog box shown in Figure 5-6 appears.
7. Select the sharing permissions you want to impose.
You have four choices:
• All users have read-only access. Use this option to share information
that you want everyone to have access to, but you don’t want to
allow anyone to change the information.
• Administrators have full control, and everyone else has read-only
access.
• Administrators have full control, and everyone else has read/write
access.
• Custom permissions: When you select this option, you can then click
the Permissions button to set custom permissions.
Managing a File
Server
Windows Server 2008 includes the ability to share files using the Unix
NFS file protocol. If you’ve enabled NFS sharing on this computer, this
dialog box also lets you set the sharing information for NFS.
Book VII
Chapter 5
546
Managing Your File Server
Figure 5-5:
Entering a
description
for the
share.
Figure 5-6:
Setting
the share
permissions.
8. Click Next.
The dialog box shown in Figure 5-7 appears.
9. If you’ve set up a Distributed File System (DFS) namespace and want
to connect this share to it, select the Publish the SMB Share to a DFS
Namespace check box.
DFS is a system that lets you combine two or more separate file shares
under a single name. Its purpose is to simplify the management of large
file server networks, so it is typically used only on networks that have a
large number of file servers.
Managing Your File Server
547
If you’ve never heard of DFS until now, skip this step.
Figure 5-7:
Joining a
Distributed
File System
network.
10. Click Next.
The dialog box shown in Figure 5-8 appears.
Book VII
Chapter 5
Managing a File
Server
Figure 5-8:
Verifying
the share
settings.
11. Verify that all the settings are correct and then click Create.
The share is created, and a final confirmation dialog box is displayed, as
shown in Figure 5-9.
548
Managing Your File Server
Figure 5-9:
You’re
done!
Sharing a folder without the wizard
If you think wizards should be confined to Harry Potter movies, you can set
up a share without bothering with the wizard. Just follow these steps:
1. Open the My Computer window and navigate to the folder that you
want to share.
2. Right-click the folder and choose Properties.
This action brings up the Properties dialog box for the folder.
3. Click the Sharing tab.
The Sharing tab comes to the front, as shown in Figure 5-10.
4. Click the Advanced Sharing button.
The dialog box shown in Figure 5-11 appears.
5. Select the Share This Folder check box to designate the folder as
shared.
The rest of the controls in this dialog box will be unavailable until you
select this check box.
6. Type the name that you want to use for the share in the Share Name
box and type a description of the share in the Comments box.
The default name is the name of the folder being shared. If the folder
name is long, you can use a more succinct name here.
The description is strictly optional but can sometimes help users
determine the intended contents of the folder.
Managing Your File Server
549
Figure 5-10:
Manually
sharing a
folder.
Book VII
Chapter 5
Managing a File
Server
Figure 5-11:
Setting the
share name.
7. If you want to specify permissions now, click Permissions.
This brings up a dialog box that lets you create permissions for the
share. For more information, see the next section, “Granting permissions.”
8. Click OK.
The folder is now shared.
Granting permissions
When you first create a file share, all users are granted read-only access to
the share. If you want to allow users to modify files in the share or allow
them to create new files, you need to add additional permissions. Here’s
how to do this via the Share and Storage Management console:
550
Managing Your File Server
1. Choose Start➪Administrative Tools➪Share and Storage Management.
The Share and Storage Management console appears.
2. Right-click the share you want to set permissions for, choose
Properties, and then click the Permissions tab.
The dialog box shown in Figure 5-12 appears. This dialog box lets you
set the permissions for the share itself or set the NTFS permissions for
the folder being shared.
Figure 5-12:
Setting
permissions.
3. Click Share Permissions.
The dialog box shown in Figure 5-13 appears. This dialog box lists all
the users and groups to whom you’ve granted permission for the folder.
When you select a user or group from the list, the check boxes at the
bottom of the list change to indicate which specific permissions you’ve
assigned to each user or group.
4. Click Add.
The dialog box shown in Figure 5-14 appears.
5. Type the name of the user or group to whom you want to grant
permission and then click OK.
You return to the Share Permissions tab, with the new user or group
added.
Managing Your File Server
551
Figure 5-13:
Setting
the Share
Permissions.
Figure 5-14:
The Select
Users,
Computers,
Service
Accounts,
or Groups
dialog box.
Book VII
Chapter 5
Alternatively, you can enter the first part of the name that you’re looking
for before you click Find Now to search more specifically. When you find
the user or group that you’re looking for, click OK.
6. Select the appropriate Allow or Deny check boxes to specify which
permissions to allow for the user or group.
7. Repeat Steps 4 through 6 for any other permissions that you want
to add.
8. When you’re done, click OK.
Managing a File
Server
If you’re not sure of the name, click Advanced. This action brings up the
Select Users, Computers, Service Accounts, or Groups dialog box shown.
Then, you can click the Find Now button to display a list of all users and
groups in the domain.
552
Managing Your File Server
Here are a few other thoughts to ponder concerning adding permissions:
✦ If you want to grant full access to everyone for this folder, don’t bother
adding another permission. Instead, select the Everyone group and then
select the Allow check box for each permission type.
✦ You can remove a permission by selecting the permission and then
clicking Remove.
✦ If you’d rather not fuss with the Share and Storage Management console,
you can set the permissions from My Computer. Right-click the shared
folder and choose Sharing and Security and then click Permissions. You
can then follow the preceding procedure, picking up at Step 4.
✦ The permissions assigned in this procedure apply only to the share
itself. The underlying folder can also have permissions assigned to it. If
that’s the case, whichever of the restrictions is more restrictive always
applies. For example, if the Share Permissions grant a user Full Control
permission, but the folder permission grants the user only Read
permission, the user has only Read permission for the folder.
Chapter 6: Using Group Policy
In This Chapter
✓ Looking at group policy concepts
✓ Enabling group policy on a Windows Server
✓ Editing group policy objects
G
roup policy refers to a feature of Windows operating systems that
lets you control how certain aspects of Windows and other Microsoft