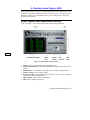
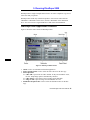
1
Plextor CD-ROM, CD-R, and CD-RW
Software Suite and Utilities
For Microsoft® Windows® 95, 98 and NT
Congratulations!
Plextor Manager 2000 is a remarkable suite of software utilities that help you get the
most from your Plextor drive. Plextor Manager 2000 puts more features at your
fingertips and makes them easier to use than ever before. This manual will show you
how to begin using Plextor Manager 2000 for greater productivity—and more fun!
ii Plextor Manager 2000 User’s Manual
Table of Contents
1. Plextor Manager 2000 Applications................................................................ 1
System Requirements ......................................................................................... 1
About Plextor Manager 2000 Modules .............................................................. 2
MVP 2000 ...................................................................................................... 2
Audio Capture 2000 ....................................................................................... 2
DiscDupe 2000............................................................................................... 3
Enhanced Drive Properties............................................................................. 3
AudioFS ......................................................................................................... 4
2. Installing and Starting Plextor Manager 2000............................................... 5
Installing in Windows 95/98 and NT ................................................................. 5
About Windows NT Installation ........................................................................ 5
The Plextor Icon ................................................................................................. 5
Starting Plextor Manager 2000 Modules............................................................ 6
The Plextor Manager Splash Screen................................................................... 6
Uninstalling Plextor Manager 2000.................................................................... 6
3. Running MVP 2000.......................................................................................... 7
MVP 2000 Application Controls........................................................................ 7
Selecting the Default Drives............................................................................... 9
Playing an Audio CD with CD/DA Player ......................................................... 9
Playing Digital Files (Audio and Video)............................................................ 10
Viewing or Changing File Associations............................................................. 10
Graphic Display of Audio .................................................................................. 10
Recording Audio ................................................................................................ 10
Recording Digital Music to CD-R or CD-RW ............................................... 11
Using Test Mode When Making an Audio CD .............................................. 11
Creating and Using a Playlist ............................................................................. 12
Playlist Controls ............................................................................................. 12
Building a Playlist .......................................................................................... 13
Arranging your Playlist .................................................................................. 13
Saving a Playlist ............................................................................................. 13
Opening a Playlist .......................................................................................... 13
Recording from a Playlist............................................................................... 14
Using CDDB ...................................................................................................... 14
What You Need for CDDB ............................................................................ 14
Storing CD Information Locally .................................................................... 14
Retrieving and Viewing CDDB Information.................................................. 14
4. Running Audio Capture 2000 ......................................................................... 17
Audio Capture 2000 Application Controls......................................................... 17
Selecting a Drive ................................................................................................ 18
Capturing Audio Tracks to WAV files............................................................... 18
Selecting Multiple Tracks .............................................................................. 18
Specifying Audio Quality............................................................................... 19
Specifying Error Correction ........................................................................... 19
Plextor Manager 2000 User’s Manual
iii
5. Running DiscDupe 2000...................................................................................21
DiscDupe 2000 Application Controls.................................................................21
Duplicating from CD to CD ...............................................................................22
Duplicating When the PlexWriter Is Your Only Drive ......................................22
Using DiscDupe 2000 Options ...........................................................................23
Using a Temporary Image ..............................................................................23
Using Images..................................................................................................23
Selecting the Speed.........................................................................................23
Emulate/Test...................................................................................................24
Verifying the Copied Disc..............................................................................24
How Duplication Occurs ....................................................................................24
6. Using the Enhanced Drive Properties.............................................................25
How to View the Enhanced Drive Properties.....................................................25
About the Enhanced Properties ..........................................................................25
Details Screen.................................................................................................25
Settings Screen ...............................................................................................27
7. Using AudioFS ..................................................................................................29
Advantages of AudioFS .....................................................................................29
Enabling AudioFS ..............................................................................................29
Using AudioFS for Audio Extraction .................................................................30
Turning Off AudioFS .........................................................................................30
Using USB Speakers with Digital Audio ...........................................................30
Why Use Digital Audio? ................................................................................30
What You Need for USB Digital Audio Sound..............................................31
Windows 95 Users and AudioFS WAV Files ....................................................32
Windows 95 Sound Utilities...........................................................................32
Apparent Problems with Sound Recorder ......................................................32
Changing the Default Player...........................................................................32
Appendix A: Plextor Applications for DOS and Windows 3.1.........................35
Installation ..........................................................................................................35
DOS Device Driver and Plextor Manager ..........................................................36
DOS CD-ROM Utilities (PLEXTOR.EXE) ...................................................36
Plextor Manager 16-bit Utilities for Microsoft Windows 3.1 and 3.11..............38
Drives Page.....................................................................................................38
Drive Setup Page ............................................................................................38
Audio Setup Page ...........................................................................................39
CD Audio Page...............................................................................................39
Save Settings ..................................................................................................39
Plextor Video Acceleration ............................................................................40
Plextor Audio Capture Program for Windows 3.1 and 3.11...........................40
Appendix B: Contacting Plextor Technical Support.........................................43
How to Contact Us .............................................................................................43
Before You E-mail/Log On/FAX/Call ...............................................................44
Appendix C: Software License ............................................................................45
Index ......................................................................................................................49
iv Plextor Manager 2000 User’s Manual
1. Plextor Manager 2000 Applications
Just look at all you get with Plextor Manager 2000:
• MVP 2000: A music/video player and recorder specifically designed to take
advantage of your Plextor drive’s audio capabilities, including support for MP3.
• Audio Capture 2000: The one software tool you need to capture music tracks
from CD to hard disk.
• AudioFS: View and manipulate CD-Audio files as WAV files.
• DiscDupe 2000: Duplicate music, video, or data CDs with this one-touch
program.
• Drive Properties: Enhanced of control and more information about your drive
and media.
System Requirements
• Hardware: Personal computer,
not a Macintosh or UNIX machine
• Operating systems: Windows 95, 98, or NT
• CPU: Pentium 133 MHz
• RAM: 32 MB
• Sound Card for MVP 2000
• Graphics: Super VGA
• SCSI Controller: PCI bus mastering
• Plextor drive: CD-ROM, CD-R, or CD-RW drive for playing; CD-R or CD-RW
drive for writing
Supported Plextor drive models are:
• CD-ROM drives: Models PX-4XCE, PX-8XCS, or later
• CD-R/RW drives: Models PX-R412C, PX-R820T, PX-W4220T, or later
NOTE: Plextor Manager 2000 does not support the Plextor MegaPleX jukebox.
NOTE: If you’re running Windows 3.x or MS-DOS, Plextor Manager includes a full set
of 16-bit utilities for control in that environment. Please refer to Appendix A for
information on the Plextor Manager 16-bit version.
Plextor Manager 2000 User’s Manual
1
1. Plextor Manager 2000 Applications
About Plextor Manager 2000 Modules
Here are the modules that make up the Plextor Manager 2000 suite.
MVP 2000
Music Video Producer 2000 is a full-featured Windows application for recording and
playing both music and video with your Plextor drive.
Features of MVP 2000 include:
• Informative main display: Shows disc title, track, time, and other information.
During playback, double-click this display to switch the time display from
counting up to counting down.
• CD/DA or A/V player mode: Toggle between playing audio from a CD/DA
audio CD, or playing digital audio/video from a playlist or individual file.
• Comprehensive playback controls: Includes standard track controls such as
play, record, fast forward, skip track forward or backward, etc. A handy
adjustment bar allows you to move anywhere within a CD track.
• Digital CD/DA playback: All audio CDs in CD/DA mode are played back
digitally through the SCSI bus for better sound quality.
• Graphic display: View music as you play it.
• Digital jukebox: Create your own mixed audio, MP3, WAV format playlists.
Play them back sequentially or at random.
• CDDB: MVP 2000 can link to CDDB, the world's largest online database of
audio CD information, and download the album name, artist and song titles as
your CD plays. The CDDB database has information on most commercially
manufactured audio CDs.
• Support for variety of digital formats: Play MP3, WAV, CDA, AVI, MPEG,
or QuickTime formats. Record MP3 and WAV files to audio CD tracks. MVP
2000 automatically decodes these formats and records them on CD, ready for
playing on most home, car, or computer audio CD players.
Audio Capture 2000
Audio Capture 2000 lets you extract CD-Audio tracks right to your hard drive. The
extracted audio tracks are saved as WAV files, and are ready for playing in Windows
by MVP 2000 or any other digital audio player, and for encoding to formats such as
MP3, Real Audio, etc. These files can also be used with sound editing software.
Features of Audio Capture 2000 include:
• Comprehensive track information: A track selection screen gives you all
necessary information about the source disc at a glance. Double-click to capture
an individual track or select several tracks at once.
• Choose the sound quality: You can select the sound quality level of the tracks
you want to capture. Audio Capture 2000 supports sampling rates of 44 kHz, 22
kHz, or 11 kHz, 8-bit or 16-bit resolution, as well as CD (44-kHz sampling, 16bit stereo), stereo and monaural sound.
2 Plextor Manager 2000 User’s Manual
1. Plextor Manager 2000 Applications
• Error correction: You can adjust the error correction rate as needed to eliminate
pops, clicks, or hissing noises from the source disc. Error correction can be set
from 0 percent to 100 percent.
DiscDupe 2000
DiscDupe 2000 is a single disc replication program. Simple to use, the feature-filled
interface provides numerous ways to copy discs and includes a disc verification
function to ensure your duplicate disc is identical to the master. You can copy most
kinds of discs.
Features of DiscDupe 2000 include:
• Disc-to-disc duplication: You can copy a disc from a Plextor drive to another
Plextor drive.
• Disc-to-image and image-to-disc: Copy an entire CD as an image on your hard
drive. Store the image for future use and copy that image to a CD-R or CD-RW
disc as needed.
• Single-drive disc duplication: If you have only a single Plextor drive, DiscDupe
2000 writes an image to a temporary file on your hard drive, allowing you to read
from the hard drive to your PlexWriter source drive for writing.
Enhanced Drive Properties
Plextor Manager 2000 adds features to the Properties menu; just right-click on the
Plextor drive’s icon, located in My Computer or Windows Explorer, then select
Properties.
Enhanced drive properties include:
• Settings Tab: Enable/disable AudioFS, set spindown timeout, set drive read
speed, lock or unlock the eject button for security, and adjust sound balance and
volume settings, all from a convenient dialog box.
• Details Tab: Shows you details about your Plextor drive, including the model
number, serial number, the SCSI driver that’s loaded, the ASPI version, and other
data. Also provides information about the disc in the drive, such as disc format,
number of sessions, number of data and audio tracks, and more. With PlexWriter
drives you can also identify the CD-R and CD-RW media manufacturer and disc
type.
Plextor Manager 2000 User’s Manual
3
1. Plextor Manager 2000 Applications
AudioFS
Enabled by default during Plextor Manager 2000 installation, AudioFS is currently
available only from Plextor. AudioFS makes tracks on Audio CDs (Red Book
CD/DA format discs) appear automatically as WAV files on Windows 95 and 98
systems. This has a number of advantages:
• Allows easy drag and drop of audio tracks to your hard disk for simple and quick
audio extraction to WAV format.
• Removes the need to use third-party software for audio extraction.
• Eliminates the need to store large WAV files on your hard disk, because your
application can now access the tracks from the audio CD directly through
AudioFS.
• Simplifies audio editing, encoding and creation or compilation of audio CDs.
4 Plextor Manager 2000 User’s Manual
2. Installing and Starting Plextor Manager 2000
This section explains how to install and launch Plextor Manger 2000.
Installing in Windows 95/98 and NT
To install Plextor Manager 2000 in Windows 95/98 and NT:
1. You need to have a Plextor drive installed. Make sure the drive operates
correctly.
2. Insert the Plextor software disc into the drive.
3. In Windows, click on My Computer, then click the CD drive icon.
4. When the contents of the disc are displayed, open the Plextor folder.
5. In the Plextor folder, open the PM2K folder, then double-click on Setup.exe.
6. Accept the defaults offered during the installation process.
About Windows NT Installation
Plextor Manager 2000 installs Plextor’s own ASPI manager under Windows NT.
Unlike Windows 98 and 95, Windows NT does not have its own ASPI manager.
With Plextor’s ASPI manager installed, you can take full advantage of Plextor
Manager 2000 extended features.
NOTE: If an ASPI manager already exists on a Windows NT system, Plextor
Manager does not install its ASPI manager and will use the one already installed.
The Plextor Icon
After installation of Plextor Manager 2000 and rebooting your computer, the Plextor
Manager 2000 icon appears on the Windows taskbar at the lower right of your
screen. This is supported in Windows 95, 98, and NT.
NOTE: Plextor Manager 2000 will install and update CD drive icons for all Plextor
drives in your system. The change will not take effect until you reboot your system
after software installation. This feature is available only with Windows 98 and with
systems running Windows 95/NT if Internet Explorer 4.0 or higher has been installed.
Plextor Manager 2000 User’s Manual
5
2. Installing and Starting Plextor Manager 2000
Starting Plextor Manager 2000 Modules
To start Plextor Manager 2000 modules:
• Click the Plextor icon on the taskbar, then choose the module to run.
-or• Click the Start button, then select Programs, then Plextor Manager 2000; finally,
select the module you want.
-or• In My Computer or Windows Explorer, right-click the Plextor drive icon, then
choose one of the menu items added by Plextor Manager 2000. These menu
items include Copy CD, Extract Audio, or Play/Play with MVP 2000. Some
menu items are only available when a disc is present inside the Plextor drive.
The Plextor Manager Splash Screen
Every time you start your system, you will see the Plextor Manager 2000 splash
screen. By default, this screen is installed by the Plextor Manager 2000 installation.
An option in MVP 2000 allows you to disable this screen.
To disable the Plextor Manager 2000 splash screen:
1. Start MVP 2000.
2. Click on the Options button.
3. Click on the General tab.
4. Uncheck the box “Display splash screen on system startup.”
5. Click the OK button to exit the options dialog box.
6. Exit MVP 2000.
Uninstalling Plextor Manager 2000
To uninstall Plextor Manager 2000:
1. On the Windows Taskbar, right-click on the Plextor icon and select OK to
remove the icon.
2. From the Windows Start menu, select Settings | Control Panel. You see the
Windows Control Panel.
3. In the Control Panel, select Add/Remove Programs. You see the Install/Uninstall
dialog box.
4. In the list of programs in the dialog box, select Plextor Manager 2000, then click
Add/Remove and follow the prompts to remove Plextor Manager completely.
6 Plextor Manager 2000 User’s Manual
3. Running MVP 2000
MVP 2000 (Music Video Producer 2000) lets you use your Plextor drives to play
music and video CDs. If you are using a PlexWriter drive, it even will let you record
an audio CD from your playlist.
MVP 2000 Application Controls
Figure 1 gives a detailed view of the main MVP 2000 window.
Figure 1: MVP 2000 Controls
Plextor Manager 2000 User’s Manual
7
3. Running MVP 2000
• CD/DA–A/V Rocker Switch: Click to toggle playing audio from a CD/DA disc
or playing digital audio/video from a playlist or an individual file.
• Open File: Select digital audio/video files for playing.
• Options: Open an option screen with other options for MVP 2000.
• About: Click here to see the Plextor ID and web site.
• Graphic Display: Click once to bring up a graphic display screen. Click twice to
close the screen. Click inside the graphic display screen itself to toggle the
display type.
• Volume Adjust bar: Drag up or down to control audio volume.
• Quit: Click to close the MVP 2000 window.
• Playlist: Click to open the playlist screen. Click again to close the screen.
• MVP 2000 Main Display: Shows title, track, time, and other information.
During playback, double-click this window to switch the time display.
• Playback controls:
! Record to CD-R or CD-RW: Click to start recording to CD-R or CD-RW
media.
! Play: Click to begin playback of the active digital file, playlist or CD-Audio
track.
! Pause: Click to pause playback.
Resumes from current location in file or on audio CD.
! Stop: Click to stop playback.
Resumes from the beginning of this file or audio CD track.
! Track/Item Back: Click to move to the previous CD track or digital file.
! Skip Back: Click to move backward or “rewind” the CD-Audio track or
digital file.
! Skip Forward: Click to move forward in this CD-Audio track or digital file.
! Track/Item Forward: Click to move to the next CD-Audio track or digital
file.
! Eject: Click to open the drive’s tray.
• Position Adjust slider: Click and drag to adjust playback position within the
CD-Audio track or digital file.
8 Plextor Manager 2000 User’s Manual
3. Running MVP 2000
Selecting the Default Drives
Figure 2 illustrates how to select the default drives for playing and writing.
Figure 2: Choosing the Default Drives
To select the default drives for MVP 2000:
1. On the MVP 2000 main window, click on the Options button. You see the
MVP 2000 options.
2. Click the General tab to view general options.
3. In the upper drop-down list box, select the Plextor drive to use as default for
playback.
4. From the lower drop-down list box, select the PlexWriter as the default for
recording to CD-R or CD-RW media.
NOTE: The player and writer can be the same drive.
Playing an Audio CD with CD/DA Player
To play an audio CD:
1. Insert the audio CD into a Plextor drive.
2. In the MVP 2000 main window, flip the CD/DA–A/V rocker switch to the
CD/DA (upper) position.
3. Click the Play button.
Plextor Manager 2000 User’s Manual
9
3. Running MVP 2000
Playing Digital Files (Audio and Video)
To play a digital audio or video file:
1. In the MVP 2000 main window, flip the CD/DA–A/V rocker switch to the A/V
(lower) position.
2. Click the Open File button and select the file you want to play.
-orClick on the Playlist icon and load a playlist that you previously saved.
3. Click the Play button.
Viewing or Changing File Associations
MVP 2000 supports a number of file types. During installation the following file
types are claimed by MVP 2000: MP3, WAV, CDA, AVI, MOV, QT, and MPEG
video. CD Audio format discs (CD/DA) are also claimed. Double-click on any file
with these extensions to play the file. Files with these file extensions will play if you
double-click on the file name.
To view or change the file or disc format associations:
1. In the main MVP 2000 window, click the Options button. You see tabs for
MVP 2000 options.
2. Click the Associations tab. You see the Associations screen.
3. Check boxes to enable the association, or uncheck the boxes to disable them.
The new set of associations will not take effect until Windows is restarted.
NOTE: Although we feel that you will not want to use similar programs after using
MVP 2000, you can, if desired, go back to your player of choice. During Plextor
Manager 2000 installation, we save information about your system when we claim the
file associations. When you disable a specific association, we revert back to the
player that you had set as your default player before Plextor Manager 2000 was
installed.
Graphic Display of Audio
To show a graphical display as a track is played:
1. Click the Graphic Display icon. You see a graphical display of the audio as music
is played.
2. Click inside the graphic display screen to toggle the display type.
Recording Audio
You can use MVP 2000 to record MP3 files, WAV files, or CDA tracks directly to a
blank CD media. MVP 2000 will automatically decode these formats and record
them on the fly as a standard audio CD (CD/DA, Red Book audio). These audio CDs
can be played on most home, car, and computer CD players.
10 Plextor Manager 2000 User’s Manual
3. Running MVP 2000
Recording Digital Music to CD-R or CD-RW
To record digital music to CD-R or CD-RW:
1. Place a blank CD-R or CD-RW disc in the PlexWriter.
2. In the main MVP 2000 window, set the CD/DA–A/V rocker switch to the A/V
(lower) position.
3. Click the Playlist icon and create a playlist of your selections. Use the
Add/Delete buttons to select any of a variety of supported music formats. Change
the order of your selections in the list by clicking and dragging.
4. Once your playlist is complete, click the Record to CD-R button to record your
compilation to CD using the PlexWriter.
NOTE: If you have CD writing software that auto starts when a blank disc is inserted,
please wait for the application to load. Then exit the software and start MVP 2000. A
good example of such an application is DirectCD from Adaptec.
NOTE: Depending on your system’s decoding speed and overall performance, the
recording speed may not always be set to your PlexWriter’s maximum possible
speed. MVP 2000 will determine the safest recording speed and proceed
accordingly.
Using Test Mode When Making an Audio CD
Recording to a CD requires continuous data flow to the CD-R drive in order to
successfully complete a write session. System and source drive performance are
sometimes limiting factors, and can determine whether or not you will have a
successful write session. Test mode in MVP 2000 allows you to determine before
writing whether or not your session will be successful.
To specify test mode before recording an audio CD:
1. Open MVP 2000.
2. On the main MVP 2000 window, click on the Options button. You see tabs for
MVP 2000 options.
3. Click the General tab to view general options.
4. In the Write Mode section, select Test only or select Test & Write.
You can choose to leave the selection at Write only if you are confident Test
mode is not needed.
5. Click on OK to exit options and return to MVP 2000.
You should use Test mode after any configuration change (such as a new SCSI
device, new hard drive, new software, new SCSI controller, etc) in the system. This
will allow you to verify that the change has not affected CD writing capabilities.
You can use the Test mode to assess the state of your source drive, too. For example,
if your source drive contains a disc that is dirty or scratched and you are not sure if
you can successfully read it, use the Test mode. Test mode will verify that the CD
can read the disc at a speed sufficient to provide the data to MVP 2000 in order to
create the audio CD.
Plextor Manager 2000 User’s Manual
11
3. Running MVP 2000
Creating and Using a Playlist
Creating a playlist is similar to programming a digital jukebox. Select music tracks,
regardless of file type, put them in any order, and then play back or record..
Playlist Controls
Figure 3 shows the main controls for the playlist screen in MVP 2000.
Figure 3: Playlist Controls
• Load Playlist: Click to select and load a playlist .PLL file.
• Save Playlist: Click to save the current playlist as a .PLL file.
• Edit Playlist Entry: Click to edit the selected playlist entry. To move an entry
from one position to another, click on the track then use the down arrow to move
the track into the correct position.
• Clear Playlist: Click to clear all entries from the current playlist.
• Add to Playlist: Click to add a digital audio or video file to the playlist.
12 Plextor Manager 2000 User’s Manual
3. Running MVP 2000
• Clear Playlist Entry: Click to delete the selected entry from the playlist.
• Random/Sequential Mode: Click to toggle between random and sequential
modes for playing the playlist. This button is red to indicate when random mode
is active, black when in sequential mode.
Building a Playlist
To build a playlist:
1. In the main MVP 2000 window, set the CD/DA–A/V rocker switch to the A/V
(lower) position. You see the Playlist button is enabled.
2. Click the Playlist button to open the playlist screen. You see a blank playlist.
3. Click the Add to Playlist button to browse and select a file you want to be added.
-orOn the main MVP 2000 window, click Open File and select a file to be added to
the playlist.
-orDrag and drop files to the open playlist screen.
4. Add other files as desired.
NOTE: When you make your first selection, the file automatically starts to play. To
stop it, click the Stop button on the main MVP 2000 window.
Arranging your Playlist
To arrange order in playlist:
1. Click on a track, or shift and click on several tracks, then drag them up or down
the list to alter the order you want tracks played back or recorded. You can also
use the up and down arrows to move tracks.
2. Repeat for additional tracks, until your playlist is set up the way you want it.
Saving a Playlist
To save a playlist:
1. Click on Save on the playlist screen. You see a text box where you can select a
name and location for the playlist file.
2. In the text box, navigate to the desired folder and enter a filename for the playlist.
The file is saved with extension .PLL.
Opening a Playlist
To open a playlist:
1. In the main MVP 2000 window, set the CD/DA–A/V rocker switch to the A/V
(lower) position. You see the Playlist button enabled.
2. Click on Open in the playlist screen. You see a text box showing playlist .PLL
files.
-orClick on Playlist to open the playlist screen, then click on Load Playlist.
3. Click the desired file .PLL file. The playlist is loaded and displayed on the
playlist screen.
Plextor Manager 2000 User’s Manual
13
3. Running MVP 2000
Recording from a Playlist
To record a playlist:
1. Place a blank CD-R or CD-RW disc in the PlexWriter.
2. In the main MVP 2000 window, set the CD/DA–A/V rocker switch to the A/V
(lower) position.
3. Load an existing playlist or create a new one as described on page 12.
4. Click Record to CD-R to record the entire file to a CD.
Using CDDB
CDDB, or “CD Database,” is an online database of audio CD information that you
access through the Internet. Because Plextor’s MVP 2000 application is CDDBenabled, it can provide information about the album, artist, and song names right on
the screen as your CD/DA audio CD plays.
Here’s how it works: When CDDB is enabled and connected to the Internet, each
time you insert an audio CD, MVP 2000 accesses CDDB for information about that
specific disc. CDDB has data on all kinds of music, even CDs with multiple
pressings. Accessing CDDB is a free service provided for your private use.
NOTE: CDDB supports only commercially available audio CDs. Information is
available for most audio CDs and is continuously updated.
What You Need for CDDB
In order to view CDDB information, you need:
• An active connection to the Internet.
• MVP 2000 open and running.
• A commercially available audio CD in your Plextor drive.
Storing CD Information Locally
You only need the connection to the Internet the first time you play a particular disc.
After that, the CDDB information is saved in a small database on your hard drive.
Then every time you put that CD in your system, the related information appears.
Retrieving and Viewing CDDB Information
To retrieve and view CDDB information:
1. Ensure that your computer has an active connection to the Internet.
2. Start MVP 2000.
3. In the MVP 2000 window, click Options. You see tabs for MVP 2000 options.
4. Click the CDDB tab. You see the CDDB screen.
14 Plextor Manager 2000 User’s Manual
3. Running MVP 2000
Figure 4: Connecting to the CDDB Database
5. In the E-mail Address field, enter your e-mail address.
6. Click the Use Escient CDDB box until it is checked (on).
7. If desired, click on the Get Server List arrow to obtain a list of CDDB servers,
then select the location to connect to.
8. On the CDDB screen, click OK to connect to the CDDB server.
9. Now insert the audio CD into your Plextor drive. (It must be the default playback
drive.) You see another screen with a message indicating you are connecting.
MVP 2000 downloads the disc data for you and shows it in the MVP 2000 main
display. You see information such as the album and artist name.
10. When you play the CD, you also see the song name scroll across the screen.
11. You can now eject the disc, insert another disc, and repeat steps 9 and 10 above.
12. When finished updating MVP 2000 with information about new discs, click on
the Options button again.
13. Click on the CDDB tab and uncheck the box Use Escient CDDB.
14. Click the OK button to exit options.
NOTE: If desired, click the CDDB icon in the CDDB screen to connect to the CDDB
home page. Your Internet browser shows the home page, where you can get more
information about artists and albums.
Plextor Manager 2000 User’s Manual
15
3. Running MVP 2000
This page intentionally left blank.
16 Plextor Manager 2000 User’s Manual
4. Running Audio Capture 2000
Audio Capture 2000 lets you extract audio tracks from an audio CD directly to your
hard drive, saving them as digital WAV files. You can vary the sound quality, select
multiple or single tracks, and rename tracks as you are saving them. You can also
perform error correction.
Audio Capture 2000 Application Controls
Figure 5 shows the main controls for the Audio Capture 2000 application.
Figure 5: Audio Capture 2000 Controls
• About: Click to view information about this application.
• Track Selection Display: View track information, or click a track to select it for
capture.
• Default Drive: Click and choose a default drive from which to capture audio.
• Capture Track(s): Click to begin capture.
• Error Correction: Click and drag to select error correction level. (Not supported
by Plextor CD-R and CD-RW drives.)
• Audio Quality: Click to choose audio quality.
• Quit: Click to exit this application.
Plextor Manager 2000 User’s Manual
17
4. Running Audio Capture 2000
Selecting a Drive
The Drive Selection drop-down box displays all Plextor drives in your system and
allows you to select the drive from which to extract audio tracks.
To select a drive:
1. Start Audio Capture 2000.
2. In the main Audio Capture 2000 window, click the Drive Selection drop-down
list box and select a drive.
Capturing Audio Tracks to WAV files
To capture audio tracks from an audio CD to your hard drive:
1. Start Audio Capture 2000.
2. Click the Default Drive drop-down list box and select a default drive from which
to capture audio.
3. Insert an audio CD into the drive. In the track selection display you see
information about the tracks on the CD. The Length column shows how long the
track plays (in minutes and seconds) and also the file size necessary to save that
track as a WAV file to your hard disk.
4. Click the Audio Quality drop-down list box and select the level of quality for the
audio file. Level of audio quality determines the file size.
5. If using a Plextor CD-ROM drive as a source, click and drag the Error Correction
bar to set error correction. PlexWriters do not support this feature.
6. In the track selection display, click a track to select it. You can double-click any
track to start capture; or you can click it once, then click the Capture button to
proceed. When a single track is selected you can specify the location and
filename of the track.
The audio track is now saved as a WAV file.
Selecting Multiple Tracks
To select multiple tracks:
• Hold down the Control key while clicking on tracks in the track selection display
to select one track at a time; or hold down the Shift key to select several tracks in
a row.
The tracks are saved as TRACKxx.WAV (where xx is the track number) in the
location you specify.
18 Plextor Manager 2000 User’s Manual
4. Running Audio Capture 2000
Specifying Audio Quality
To specify audio quality:
• Select the Audio Quality drop-down list and choose a level of audio quality.
You can choose from many different levels of audio quality. In general, the higher
the quality, the greater the time required for capture, and the greater the file size. As
you select different levels of audio quality, note the change to file size shown under
Length in the track selection display.
Specifying Error Correction
To specify error correction during audio capture:
• Click and drag the Error Correction bar.
Plextor CD-ROM drives are renowned for their ability to read audio at high speeds
as if it were data. Most of our newer model CD-ROM drives can extract audio at a
maximum speed of 24X. In most cases, the quality of the extracted WAV files is
excellent, with no pops, clicks, or hissing noise.
However, if the source disc has scratches, fingerprints, or is badly manufactured, the
drive may read errors due to the quality of the disc. Such read errors could result in
noisy or imperfect extracted WAV files. By changing the Error Correction setting in
Audio Capture 2000, you can ensure high-quality audio in your WAV files. You can
set error correction anywhere from 0 percent (no correction, the default setting) to
100 percent.
NOTE: Error correction is not available for Plextor CD-R and CD-RW drives.
It may not be possible to accomplish perfect audio extraction from discs with large
imperfections. However, with Audio Capture 2000 and Plextor drives you have the
best possible chance to achieve a perfect recording.
Error correction affects recording speed as follows:
• When Error Correction is set to 0 percent, the drive almost never slows down and
will always extract audio at the highest possible speed for best performance.
• When Error Correction is set higher, the drive and the software ensure good
quality; however, the techniques they use to achieve this quality cause the
extraction to take a longer time to complete.
HINT: Normally, you don’t need to set error correction. Error correction is not
necessary unless you experience poor quality in your extracted WAV files.
Plextor Manager 2000 User’s Manual
19
4. Running Audio Capture 2000
This page intentionally left blank.
20 Plextor Manager 2000 User’s Manual
5. Running DiscDupe 2000
DiscDupe 2000 is single CD duplication software. It creates a duplicate copy from a
source disc that you provide.
DiscDupe 2000 works only with Plextor products. You can use either a Plextor
CD-ROM or a PlexWriter as the source, and use a PlexWriter as the destination
drive. You can even use a single PlexWriter as both source and destination.
DiscDupe 2000 Application Controls
Figure 6 shows the main controls for DiscDupe 2000.
Figure 6: DiscDupe 2000 Controls
• About: Click to see information about this application.
• Source drop-down list: Click to select the source drive for the disc copy.
• Select Operation:
! CD to CD: Copies from one CD to another. If only one PlexWriter exists,
the Use Temp Image option is automatically checked.
! CD to Image: Copies from a CD to an image on the hard disk.
! Image to CD: Copies an image from the hard disk to a CD.
• Destination drop-down list: Click to select the destination drive for the disc
copy.
Plextor Manager 2000 User’s Manual
21
5. Running DiscDupe 2000
• Options panel:
! Use Temp Image: When duplicating, disc image is read from the source
disc to a temporary file on your hard drive. It is then written to the
PlexWriter.
! Verify Disc: Reads data from the duplicate CD and compares it to the
original disc.
! Emulate/Test Mode: Performs all functions as for an actual duplication, but
the PlexWriter’s laser is not turned on and nothing is actually written to the
disc.
• Speed Select drop-down list: Click to choose the speed of writing.
• Start Copy: Click to begin copying a disc.
• Quit: Click to quit this application.
Duplicating from CD to CD
To duplicate a CD disc:
1. In DiscDupe 2000, use the drop-down lists to select a source and destination
drive.
2. Insert the source disc in the source drive. This can be an audio CD or a data CD.
3. Insert a CD-R or CD-RW disc in the destination drive.
4. Click the CD to CD selection to enable it.
5. Click the Start Copy icon.
Duplicating When the PlexWriter Is Your Only Drive
To duplicate a CD when the PlexWriter is the only drive in the system:
1. Make sure you have enough free space on your hard disk.
NOTE: You may need as much as 700 MB of free space on your hard disk in order to
create the CD image. Most CDs contain 650 MB of data per 72-minute disc.
2. Insert the source CD in the PlexWriter drive.
3. Click the CD to CD selection to enable it. The Use Temp Image option is
automatically set on.
4. Click the Start Copy icon. DiscDupe 2000 creates a temporary image of the CD
on your hard disk.
5. When the image has been created, remove the source CD from the PlexWriter
and insert a blank CD-R or CD-RW disc, then proceed as directed by the onscreen prompts. A copy of the source disc is made to the destination disc.
22 Plextor Manager 2000 User’s Manual
5. Running DiscDupe 2000
Using DiscDupe 2000 Options
This section explains how to use DiscDupe 2000 options.
Using a Temporary Image
Use Temp Image allows you to save a temporary image file on your hard disk and
then write the image to your PlexWriter. The file is automatically deleted when the
duplication is completed.
You should use a temporary image file for a CD-to-CD copy if the source disc is
damaged or scratched. Use Temp Image is the safest way to copy a CD, but requires
extra time if the source disc is poor quality. Depending on the size of the source disc,
you may need up to 700 MB of free space on your hard drive.
Use Temp Image also lets you use a single PlexWriter both as source and destination
drive.
Using Images
The CD to Image option creates an image of the source CD disc in a user-specified
location on your hard disk. This image is only useful for later writing to a PlexWriter
in DiscDupe 2000.
Images are particularly useful when several copies of a disc are needed or if another
duplicate of this disc will be needed at a later time. It is also extremely helpful if you
do not have a blank disc available.
The Image to CD option copies the image of your CD from your hard drive to the
PlexWriter drive.
Selecting the Speed
When speed is set to Auto, DiscDupe 2000 tests the source disc for read errors and
determines the maximum data read speed. (Maximum read speed is affected by
fingerprints, poor disc manufacturing, scratches, etc.) The software will always find
the highest possible read speed and set the write speed accordingly.
If you are using extremely poor quality CD-R discs as a destination, or if the Auto
speed setting failed and created a bad copy, you may need to use a manual setting for
Speed. The 1X speed setting will give the best chance to make a clean copy, but will
take the most time.
If you are not successful recording from CD to CD (even at 1X speed) try the Use
Temp Space option or Image File option. Either of these options creates an image
file on your hard disk and then writes that image file to a PlexWriter. This will give
you the best chance to duplicate a disc successfully.
Plextor Manager 2000 User’s Manual
23
5. Running DiscDupe 2000
Emulate/Test
If you select Emulate/Test Mode, the software and your PlexWriter perform all the
functions for an actual duplication, except the PlexWriter’s laser is not turned on,
and nothing is actually written to the disc.
Use Emulate/Test mode after any configuration change (new SCSI device, new hard
drive, new software, new SCSI controller, etc) in the system. This will allow you to
verify that the change has not affected CD writing capabilities. Test mode may also
be used with a dirty or scratched CD to see if it can be successfully read. Test mode
allows you to verify that the CD can be read fast enough for duplication.
Verifying the Copied Disc
The Verify Disc option reads the data from your duplicate CD and compares it to the
original disc. Audio CD verification is not supported at this time.
How Duplication Occurs
All CDs made with DiscDupe 2000 use the Session-At-Once mode for duplication.
Session-At-Once mode copies CDs without turning the PlexWriter’s laser off
between tracks or sessions. (That is, the laser is turned on at the beginning of the disc
and does not turn off until the end of the disc is reached.) This mode is best for
creating bit-for-bit identical duplicates.
Session-At-Once is similar to Disc-At-Once, but it allows you to create accurate, bitfor-bit duplicates of multi-session CDs.
24 Plextor Manager 2000 User’s Manual
6. Using the Enhanced Drive Properties
When you install Plextor Manager 2000 in Windows 95, 98, and NT, the installation
makes some changes to the appearance of the drive icons shown in My Computer or
Windows Explorer. During the installation options are added to the right-click menu
for your Plextor drive.
How to View the Enhanced Drive Properties
To view the enhanced drive properties added by Plextor Manager 2000:
1. In Windows, select My Computer; or select Windows Explorer.
1. In My Computer or Explorer, navigate until you see the drive icon for your
Plextor drive.
2. Right-click (that is, click the right mouse button) on the Plextor drive icon. You
see a drop-down list that includes choices for the Plextor Manager 2000
applications. The new choices are:
! Play/Play with MVP 2000: Launches MVP 2000.
! Copy CD: Launches DiscDupe 2000.
! Extract Audio: Launches Audio Capture 2000.
! Properties: Additional dialog boxes with enhanced properties for the Plextor
drive.
3. Select any of the applications; or select Properties to view the Properties dialog
box.
About the Enhanced Properties
The enhanced properties provide information about your Plextor drive and allow
greater control of drive operation.
Details Screen
The Details screen provides a wealth of information about your Plextor drive, your
system configuration, and your disc. You can view information on:
• SCSI adapter
• Drive model number
• Drive firmware version
• Drive buffer size
• Drive serial number
• ASPI version
• Current settings of the drive.
Plextor Manager 2000 User’s Manual
25
6. Using the Enhanced Drive Properties
If a disc is in the drive, the Details screen also provides disc information:
• Format of the disc
• Number of tracks on the disc
• Type of tracks (data or audio)
• Number of sessions
• CDDB identifier that tells the CD database on the Internet what information to
provide for display in MVP 2000
• Media manufacturer (with PlexWriters only)
• Type of media (with PlexWriters only)
Figure 7: Details Screen
26 Plextor Manager 2000 User’s Manual
5. Running DiscDupe 2000
Settings Screen
The Settings screen extends your control over your Plextor drive and lets you change
many of the operational parameters for the drive.
Figure 8: Drive Settings Screen
• AudioFS: Turns AudioFS on (default) or off. See the next chapter for
information on AudioFS.
• Lock: Locks the drive, preventing use of the Plextor drive’s front-panel eject
button.
• Unlock: Unlocks the drive, allowing use of the Plextor drive’s front-panel eject
button.
• Drive Speed: Click to choose a read speed for the drive.
• Spindown Timeout: Click to choose how long the drive will continue to spin the
disc before stopping when not playing or recording.
• Volume slider: Click and drag to set music volume.
• Balance slider: Click and drag to change stereo balance between left and right
channels.
• Left channel output: Click to toggle between left and right.
• Right channel output: Click to toggle between right and left.
• Restore Defaults: Click to restore drive default settings.
NOTE: All audio controls actually affect the drive, not the sound board.
Plextor Manager 2000 User’s Manual
27
6. Using the Enhanced Drive Properties
This page intentionally left blank.
28 Plextor Manager 2000 User’s Manual
7. Using AudioFS
AudioFS makes all tracks on audio CDs (Red Book CD/DA format discs) appear as
WAV files on Windows 95 and 98 systems. This allows easy drag and drop of audio
tracks to your hard drive for simple and quick audio extraction.
Advantages of AudioFS
AudioFS has several advantages:
• AudioFS saves time by accessing tracks from the audio CD directly as WAV
files.
• If you are encoding to compression formats such as MP3, Real Audio, Liquid
Audio, etc., AudioFS eliminates the need for third-party software to first extract
audio tracks to your hard disk as WAV files.
• Because a CD’s audio tracks now appear as WAV files to your operating system
and applications, AudioFS eliminates the need for hard disk storage space to
store those large WAV files.
• AudioFS makes the creation or compilation of audio CDs very easy.
Enabling AudioFS
To enable AudioFS:
1. In Windows, select My Computer; or select Windows Explorer.
2. In My Computer or Explorer, navigate until you see the drive icon for the Plextor
drive for which you want to enable AudioFS.
3. Right-click on the Plextor drive icon. You see a drop-down menu that includes
choices for Plextor Manager 2000.
4. Select Properties to view the enhanced Drive Properties.
5. In the Properties screen, click on the Settings tab.
6. In the Settings screen, ensure the AudioFS check box is checked on to enable
AudioFS.
7. Click the OK button to save your changes and exit the Properties screen.
NOTE: AudioFS is enabled by default during the Plextor Manager 2000 installation.
You only need to use this procedure to manually enable AudioFS if you have
previously disabled it.
If an audio CD is in the drive when you change AudioFS from enabled to disabled or
vice versa, the drive ejects the CD. In tray model drives, the tray with the CD is
automatically re-inserted on its own. In caddy model drives, you must insert the
caddy with the CD back into the drive. Ejecting the CD is necessary in order to
update the file system when switching from and to AudioFS.
NOTE: AudioFS is not supported under Windows NT.
Plextor Manager 2000 User’s Manual
29
7. Using AudioFS
Using AudioFS for Audio Extraction
To use AudioFS:
1. Ensure AudioFS is enabled.
2. Place an audio CD in the Plextor drive. The Volume Label for the Audio CD is
AudioFS.
3. Using My Computer or Windows Explorer, open or explore the disc. You see a
list of WAV files (instead of the CDA file extensions normally seen when
exploring an audio CD).
4. You can now drag and drop the audio WAV files into a folder on your hard drive.
Turning Off AudioFS
To disable AudioFS:
1. Go to My Computer and right-click the drive icon that shows an AudioFS
volume label.
-orIn Windows Explorer, right-click the drive icon that shows an AudioFS volume
label.
You see a drop-down menu.
2. From the drop-down menu, choose Properties. You see the Drive Properties
screen.
3. Click on the Settings tab.
4. Uncheck the AudioFS check box to turn it off.
Using USB Speakers with Digital Audio
Support for USB (Universal Serial Bus) speakers for Digital Audio is a unique
feature of Plextor Manager 2000. With this feature, any Windows 98 system
equipped with USB speakers, a Plextor drive, and Plextor Manager 2000 can be used
to play audio CDs digitally. The data is sent from the Plextor drive directly over the
SCSI bus, and through a USB port to your USB speakers.
NOTE: At this time, no other SCSI CD-based drive and very few ATAPI CD-ROM
drives can stream digital audio directly to USB speakers. This makes Plextor products
the only SCSI devices that support this feature.
Why Use Digital Audio?
Your drive normally transmits an analog signal from the audio output to the sound
board. This can be limiting if you have more then one drive. You don’t want to open
your computer and re-connect the analog signal wire to another drive just to play a
CD. Furthermore, there is a limit to the number of devices that can be connected to a
sound board using analog connections.
30 Plextor Manager 2000 User’s Manual
7. Using AudioFS
Plextor Manager 2000 and Plextor drives allow you to play digital audio on
Windows 98 systems equipped with USB speakers. With this combination of
hardware and software, music from a CD is now played digitally over the SCSI bus
straight to your USB speakers. This provides you with digital sound, which has a
much better quality than that from the analog speakers normally used with sound
boards. Digital audio also allows for multiple drives to be used as source drives, and
has fewer restrictions caused by cabling.
What You Need for USB Digital Audio Sound
Discs that are supported by the Plextor Manager 2000 USB feature include:
• Standard CD/DA audio music CDs
• Enhanced music CDs such as CD Extra
• Multimedia game CDs that have audio tracks on them
To take advantage of USB digital audio, you need the following:
• Personal computer with USB support
• Windows 98 installed on the PC
• USB speakers installed on your system
• Plextor Manager 2000 installed on your system
• A Plextor drive installed on your system. These are the Plextor drives you can
use:
! All Plextor CD-ROM drives starting with 4.5x, 8x, or higher
! All Plextor CD-R and CD-RW drives starting with 4x or higher
To enable USB digital audio:
1. In Windows 98, from the Start menu select Settings, then select Control Panel
and click the Multimedia icon. You see the Multimedia Properties screen.
2. In the Properties dialog box, select the CD Music tab and turn on Enable Digital
Audio.
3. Also in the Properties dialog box, specify the drive letter of your Plextor drive to
be the default for music playback.
4. Click OK to exit the Multimedia Properties screen and enable USB digital audio.
Plextor Manager 2000 User’s Manual
31
7. Using AudioFS
Windows 95 Users and AudioFS WAV Files
When Plextor Manager 2000 was installed, it automatically made MVP 2000 the
default player for most multimedia files.
However, if you disabled WAV file association in MVP 2000 then there may be a
chance that you are using another player for WAV file playback.
• If you are using the default Sound Player installed by Windows 95, please read
further.
• If you are using another player, you can skip this section.
Windows 95 Sound Utilities
Windows 95 has several utilities that use WAV sound files. For example:
• You play back WAV files with Media Player (MPLAYER.EXE).
• You can play, edit and record WAV files with Sound Recorder (Sndrec32.exe).
Apparent Problems with Sound Recorder
Plextor's AudioFS creates WAV files from regular audio discs (CD/DA Red Book
only) on the fly. The typical WAV file size from a song on a CD is about 40 MB.
This causes the appearance of a problem with Sound Recorder.
Here’s why: If Sound Recorder is set as the default player in Windows 95, it
launches when you click on a WAV file. However, it does not start to play until the
entire WAV file is loaded into memory (in most computers, it is cached as a swap
file on the hard drive), which can take quite a long time. In fact, it may appear that
Sound Recorder is not working!
To eliminate this inconvenience, we recommend you switch the default player of
WAV files from Sound Recorder to MVP 2000; or you can select Media Player as
your default player. Either of these utilities will play back a WAV file directly from
the CD drive without having to cache it.
Changing the Default Player
The following procedures explain how to select MVP 2000 or Media Player as your
default player in Windows 95.
To switch the default WAV player to MVP 2000:
1. Start MVP 2000 by clicking on Start, then selecting Programs, then Plextor
Manager 2000, then MVP 2000.
2. In MVP 2000, click on Options.
3. Click on the tab labeled Associations.
4. Make sure the WAV check box is selected.
5. Click on OK.
6. Exit MVP 2000.
32 Plextor Manager 2000 User’s Manual
7. Using AudioFS
NOTE: You may need to restart your computer before this change takes effect.
To switch the default WAV player to Media Player:
1. Go to My Computer or Windows Explorer.
2. From the Taskbar choose View.
3. In the View menu, choose Option.
4. On the Option screen, choose the File Type tab.
5. Scroll the Registered File Types until you find the Wave Sound icon.
6. Double click the Wave Sound icon, or select it and chose Edit.
7. In the Edit File Type dialog box, double-click on Play Entry, or click on Play
Entry and select Edit.
8. In the new edit screen that pops up, change the line.
Change the line from c:\windows\sndrec32.exe
Change the line to c:\windows\mplayer.exe
CAUTION: Do NOT modify the command line parameters in this screen.
9. Click OK.
10. Click Close on the next two selections to complete the change.
At this point, you are ready to double-click on any WAV file on your computer
(specifically those created by AudioFS). Your default player will play them
automatically.
Plextor Manager 2000 User’s Manual
33
7. Using AudioFS
This page intentionally left blank.
34 Plextor Manager 2000 User’s Manual
Appendix A: Plextor Applications for DOS and
Windows 3.1
With your Plextor drive you will find a CD-ROM disc labeled “Plextor.” You will
need the DOS/Windows device driver from this CD-ROM disc to properly install
and operate your Plextor drive in a DOS/Windows 3.x environment. You can contact
our Technical Support Department for other options.
Plextor Manager is also on this CD-ROM. Plextor Manager is the 16-bit version of
Plextor Manager 2000, and will be useful when installing Windows 95 from a CDROM on a new computer where a CD-ROM device driver has not yet been installed.
Windows 95 provides a standard 32-bit device driver, so once it has been installed,
you will disable the DOS device driver.
Installation
Plextor Manager may be installed from either DOS or Microsoft Windows. This
software was designed for your Plextor CD-ROM drives (4PleX and later models)
and Plextor PlexWriter drives (PlexWriter 2/4 and later models). It will not support
CD drives made by other manufacturers. Prior to installing Plextor Manager, you
must first install the Plextor drive and SCSI host adapter. You can refer to the
hardware installation chapter of your operation manual and the SCSI host adapter
manual for instructions.
If your drive includes a Plextor-supplied SCSI host adapter, the necessary
installation files for the SCSI controller can also be found on the Plextor-provided
CD. If you already have access to read this CD you can copy necessary files to
floppies. If you purchased your drive without a Plextor-supplied SCSI host adapter,
you must load the ASPI Manager before installing Plextor Manager. The ASPI
Manager should have been supplied by the manufacturer of your SCSI host adapter.
If you do not find this file, please contact the manufacturer of your SCSI host adapter
to obtain it. If you are having difficulties obtaining this file, please contact Plextor's
Technical Support Department at 1-800-886-3935.
Installing from DOS
1. Insert your CD with Plextor Manager into the CD-ROM drive.
2. Type x:\PLEXTOR\PMDOS\INSTALL (where x=your drive specification).
3. Follow the instructions in the install program.
4. Remove the CD-ROM disc.
5. Reboot your computer.
Plextor Manager 2000 User’s Manual
35
Appendix A: Plextor Applications for DOS and Windows 3.1
Installing from Microsoft Windows 3.1 with Plextor Manager:
1. Insert your CD with Plextor Manager into the CD-ROM drive.
2. Select File and Run from the Program Manager menu bar. When the dialog box
appears, type x:\ PLEXTOR\PMDOS\INSTALL (x=your drive specification).
3. Follow the instructions in the install program.
4. Remove the CD-ROM disc.
5. Exit Windows.
6. Reboot your computer.
The next time you load Windows, icons for the Plextor utility will be added and you
will be asked if you wish to have Plextor Manager added to your start-up group. If
your answer is yes, it will be loaded each time you start Windows. Some features of
the Plextor Manager, such as AutoPlay and the data transfer rate monitor, are
available only when the manager is loaded.
DOS Device Driver and Plextor Manager
The Plextor device driver is essential for proper operation of your Plextor drive.
Plextor is the first CD drive manufacturer to include its own driver for SCSI drives in
order to ensure optimum performance. Installation of Plextor Manager loads your
device driver and gives you access to various CD-ROM, CD-R, and CD-RW driverelated utilities.
DOS CD-ROM Utilities (PLEXTOR.EXE)
Many of the utilities provided with your Plextor drive (PLEXTOR.EXE) are DOS
executable. They may be run from a DOS command prompt, or they can be
automatically loaded when you boot your system by placing them into your
AUTOEXEC.BAT file.
The DOS utilities are used by typing the word “Plextor”, followed by a space, a
forward slash, and then an option code. If you have more than one Plextor drive
installed in your computer and wish to limit applicability to a single drive, you may
add a qualifier at the end. For example:
PLEXTOR /option [d]
Command line options:
/A
Start Video Acceleration <default>—This command starts the Plextor drive video
acceleration. Refer to “Plextor Video Acceleration” on page 40 for more
information.
/D
Disable Video Acceleration.
36 Plextor Manager 2000 User’s Manual
Appendix A: Plextor Applications for DOS and Windows 3.1
/S
Display Driver Status—This command displays various status information about the
drive(s).
/E
Eject Disc—This command sends a software eject command to the Plextor drive. If
the drive is not locked, the disc is ejected. You can use this instead of the eject button
on the front of the Plextor drive.
/L
Lock Drive—This command locks all (or specified) Plextor CD-ROM drives
connected to the system and prevents ejection of a CD-ROM disc either manually or
by using a software eject command. This feature is useful for drives in public areas
where discs are subject to loss or misplacement. See the section about setting drive
switches, jumpers, and dials in your operation manual for information on locking
your drive automatically by using the eject jumper or switch on the back of your
drive.
/U
Unlock Drive—This command unlocks the drive and allows ejection of the
CD-ROM discs.
/M
Toggle Monaural Enhancement—If only one speaker is operating in a CD-ROM
application, it is probably using monaural sound, typical of older multimedia
applications. This command enhances monaural sound by sending the single channel
of sound data to both the left and right speakers.
/?
List of commands.
If a drive letter is not used, the operation will be performed on all CD-ROM drives.
For example:
PLEXTOR /A—start acceleration for all Plextor drives.
PLEXTOR /L —lock all drives.
PLEXTOR /L E:—lock / drive E:
Plextor Manager 2000 User’s Manual
37
Appendix A: Plextor Applications for DOS and Windows 3.1
Plextor Manager 16-bit Utilities for Microsoft
Windows 3.1 and 3.11
Plextor Manager’s 16-bit utilities provide access to all utilities via a graphical user
interface environment. It also provides access to additional utilities not available in
DOS. Plextor Manager is divided into four different pages or sheets. To switch
pages, click on the notebook tabs at the bottom of the window.
Drives Page
The Drives page displays all Plextor drives in your system and allows you to select
which drive you would like to manipulate using the other pages. If you have only
one Plextor drive in your system, selecting that drive is automatic. If you have more
than one Plextor drive connected to your computer, you may click on the drive you
wish to manipulate and then go to the other three pages to customize various features
and performance aspects of the highlighted drive. The Drives page displays the drive
letter, SCSI ID, model, cache size, ROM revision, and current CD-ROM disc for
each Plextor drive in your system.
Video Acceleration
Selecting this option enables and applies Plextor's Video Acceleration utility to any
Plextor drive in the system. Refer to “Plextor Video Acceleration” on page 40 for
more information.
Transfer Rate Monitor
Selecting this option causes the title bar or icon title of the Plextor Manager to
display the current transfer rate demanded of the Plextor drive. This option is only
available when Plextor Manager is running.
AutoPlay Enabled
Selecting this option will automatically start audio playback any time you insert a
CD audio disc, and will automatically execute CD-ROM discs that contain an
AUTORUN.INF file, as well as CD Plus and Windows 95 disks designed for
AutoPlay. This option is only available when Plextor Manager is running.
Drive Setup Page
The Drive Setup page allows you to control the speed, spindown time, and eject
functions of your drive. The Speed Control option allows you to set your drive to any
of its supported operating speeds. The Spindown Time option allows you to set the
inactivity time before the drive stops spinning. Setting the spindown time to infinite
will prevent your drive from cooling down and is not recommended. Selecting
Prevent Eject will lock the disc in the drive. The Eject button will eject the disc
unless Prevent Eject is enabled.
38 Plextor Manager 2000 User’s Manual
Appendix A: Plextor Applications for DOS and Windows 3.1
Audio Setup Page
The Audio Setup page allows you to set basic audio output characteristics of your
drive. Sound-related options for non-audio CDs must be controlled via the software
provided with your sound board. The rear audio output of your drive is connected to
the CD input of your sound board or any other amplified input/device to which it is
connected. The options on the Audio Setup page control the signal to your sound
board rather than the sound board itself.
The Volume control will increase or decrease sound output to the audio connection
on the back of the drive. The software Volume control will adjust both the rear
output and the headphone jack; the wheel knob volume control on the front of the
Plextor drive adjusts only the headphone jack volume. With some sound boards,
audio CDs might sound distorted if the drive's audio output level is too high for the
sound board CD input. If this is the case, you can decrease the drive's audio volume
and turn up the sound board volume to eliminate distortion. Please note that this
allows you to control the volume without having a sound board software mixer.
The Balance control will emphasize the left or right channel as you move the slider.
If you wish sound from only one speaker, move the Balance control all the way to
the left or the right. With the Output Channels control, you may reverse the left and
right channels or listen to only one audio channel through both speakers.
CD Audio Page
The CD Audio page is a simple CD audio player for your Plextor drive. Features
include: Play, Stop, Pause, Track Reverse, Reverse Scan, Forward Scan, and Track
Advance. Scan is a unique feature from Plextor that allows you to hear the audio
track while you fast forward until you get to the desired location. You may scan a
recording by clicking on and holding down the forward/reverse Scan buttons. The
Track Advance button will automatically start the next audio track on the CD. The
Track Reverse button will restart the current audio track. To start the previous audio
track, quickly double-click the Reverse Track button. The Capture button will load
the Plextor Audio Capture Program. See “Plextor Audio Capture Program for
Windows 3.1 and 3.11” on page 40 for more information.
Save Settings
When you exit Plextor Manager, this automatic feature saves your changes. This
affects the Volume Control, Drive Speed, and Spindown Timeout.
Plextor Manager 2000 User’s Manual
39
Appendix A: Plextor Applications for DOS and Windows 3.1
Plextor Video Acceleration
Video acceleration is an optional utility of the Plextor device driver. To use your
Plextor drive in a DOS/Windows 3.x environment you need only the Plextor device
driver (PLEXTOR.SYS), an ASPI Manager for your interface board, and
MSCDEX.EXE. The Plextor device driver requires only 7K of memory. Enabling
acceleration will require an additional 8K of memory. If available memory is limited,
you should run the Plextor device driver without enabling acceleration. If you find
that the acceleration does not improve your drive performance, or it causes any
disturbance to your system, you should disable it and use the Plextor driver without
this option.
If you are using a PIO-type SCSI controller, use of acceleration will not improve
performance. However, performance will increase significantly if you enable
acceleration in conjunction with a bus mastering SCSI controller such as a BusLogic
BT-540CF, Adaptec AHA-2940UW, and many others. In a bus mastering
environment, Plextor's acceleration feature will improve the transfer of data and
significantly reduce CPU utilization. Best performance will be obtained with PCI
adapters. Less improvement will result with VLB, EISA, and ISA adapters.
In DOS, acceleration will enhance performance when downloading large files, e.g.,
pictures, images, and Photo CDs from a CD-ROM disc. It will also improve
performance of DOS-based games featuring graphics, animation, or video read from
the CD-ROM. In Windows, acceleration will enhance applications such as Video for
Windows, software MPEG videos, QuickTime for Windows, animation, and any
other multimedia graphics and large data files accessed from a drive.
Plextor Audio Capture Program for Windows 3.1 and 3.11
This utility allows you to capture CD audio tracks to Windows-compatible .WAV
files on your hard drive. Clicking the Capture button on the CD Audio page will
open the Plextor Audio Capture window, where you may specify the Plextor drive in
which the audio CD is inserted, the track number you wish to capture, and various
quality and performance characteristics. The quality characteristics you specify will
affect the size of the file created. The estimated file size will be displayed.
The captured audio will yield a perfect digital copy of the audio on the disc, with no
jitter or distortion. Several choices are available for capture quality. Full CD-quality
audio is stereo 44.1-kHz samples per second and 16 bits per sample. This requires
172 kilobytes per second of audio, or just over 10 megabytes per minute.
You can reduce the file size of the capture by reducing the sample rate, capturing
less than full stereo sound, or eliminating the 16-bit requirement in favor of an 8-bit
capture. A very low quality capture requires 11 kilobytes per second from a single
channel at 8 bits per sample, and consumes one megabyte every 95 seconds.
40 Plextor Manager 2000 User’s Manual
Appendix A: Plextor Applications for DOS and Windows 3.1
If no tracks are listed in the Track window, there are no audio tracks on the current
disc. If Channel is set to mono, the left and right channels will be digitally mixed.
Plextor Manager 2000 User’s Manual
41
Appendix A: Plextor Applications for DOS and Windows 3.1
This page intentionally left blank.
42 Plextor Manager 2000 User’s Manual
Appendix B: Contacting Plextor Technical Support
Store Plextor’s email, web site, phone, and fax numbers in a convenient location.
Keep your drive’s serial number and a copy of your sales receipt handy as well.
If you experience a problem while installing or operating your this application,
please refer first to the relevant sections of the manual regarding setup and
installation. You may also wish to refer to the Frequently Asked Questions (FAQ)
section of our web site to assist you in troubleshooting the problem on your own.
NOTE: We encourage you to go the Plextor web site (www.plextor.com) before
attempting to contact Technical Support. The answers to the most common questions
callers ask can be found quickly in the FAQ area. A link to the FAQ area can be found
on our home page.
If you have not been successful in your quest, our Technical Support Department
will help you solve problems that relate specifically to your PlexWriter drive and
Plextor software. In many cases, a problem that appears to be caused by your
software or PlexWriter actually originates in another part of your computer. In such
instances, our technical support staff will try to help you identify the part (e.g., SCSI
interface board) at fault and will refer you to the manufacturer of that part for further
assistance.
How to Contact Us
There are several ways for you to contact Plextor’s Technical Support Department:
• Visit our web site (www.plextor.com) for answers to Frequently Asked
Questions.
• Send us email at [email protected], or send a fax to the attention of the
Technical Support Department at 408-986-1010. Include your telephone number
and the hours during which you can be reached. Be as detailed as possible in
describing your problem. It is helpful if you also send us information about your
computer, such as hardware configuration, versions and names of drivers, etc…
• Call 800-886-3935 and select the technical support extension.
Plextor Manager 2000 User’s Manual
43
Appendix B: Contacting Plextor Technical Support
Before You E-mail/Log On/FAX/Call
Please gather as much of the following information as possible before contacting us.
• The serial number and TLA number of your PlexWriter. Your serial number can
be found both on the warranty card that accompanied the drive and on a label on
the drive itself. The TLA number appears both on the drive label and on a sticker
at the rear of internal drives.
• The version of Plextor Manager you are using,.
• The latest version of firmware you loaded onto the drive, if applicable.
• The name and model number of your SCSI interface board (e.g., Adaptec
AHA-2940, Advansys ABP-930UA).
• The version of the software device drivers, if any, that came with your SCSI
interface board (this typically is found on the label of the floppy disk which
contains the device drivers).
• The version of the Windows, DOS, or other operating system you are using.
• The brand name and model number of your computer (e.g., Dell 466/NP, Micron
P66PCI Powerstation, ALR Evolution V, Performa 575, etc.).
• The type of VGA, Super VGA, or other graphics card you use.
• Brand name and model number of any other peripherals you have installed or
connected to your computer (e.g., CD-ROM, scanner, fax board, network board).
44 Plextor Manager 2000 User’s Manual
Appendix C: Software License
PLEXTOR SOFTWARE LICENSE
AGREEMENT
PLEASE READ THIS LICENSE CAREFULLY BEFORE OPENING THIS
PACKAGE. PLEXTOR IS WILLING TO LICENSE THE ENCLOSED
SOFTWARE TO YOU ONLY UPON THE CONDITION THAT YOU ACCEPT
ALL OF THE TERMS CONTAINED IN THIS AGREEMENT. BY OPENING
THIS PACKAGE YOU ACKNOWLEDGE THAT YOU HAVE READ THIS
AGREEMENT AND UNDERSTAND IT AND YOU AGREE TO BE BOUND BY
ITS TERMS AND CONDITIONS. IF YOU DO NOT AGREE TO THE TERMS
AND CONDITIONS OF THIS LICENSE DO NOT OPEN THIS PACKAGE AND
PROMPTLY RETURN IT UNOPENED TO THE PLACE WHERE YOU
OBTAINED IT FOR A FULL REFUND FOR THE VALUE OF THE SOFTWARE.
The enclosed computer program(s) (“Software”) is licensed, not sold, to you by
Plextor (“Plextor”) for use only under the terms of this License, and Plextor reserves
any right not expressly granted to you. As Licensee, you own the media upon which
the software is fixed, but Plextor retains title and ownership of the Software recorded
on the original media and all subsequent copies of the Software regardless of the
form or media in which or on which the original and other copies may exist. This
License is not a sale of the Software or any copy.
In return for acquiring a license to use the Software and related documentation, you
agree to the following terms and conditions:
1. License. This Agreement grants you, the Licensee, a License to:
a) Use one copy of the Software on a single computer at a time. To “use” the
Software means that the Software is either loaded in the temporary memory (i.e.,
RAM) of a computer or installed on the permanent memory of a computer (i.e.,
hard disk, CD ROM, etc.). You may install the Software on a common storage
devise which is accessible by multiple computers, provided that if more
computers have access to the common storage device than the number of licensed
copies of the Software, you must have some software mechanism which locksout any concurrent users in excess of the number of licensed copies of the
Software (an additional license is not needed for the one copy of Software
installed on the common storage device accessed by multiple computers);
Plextor Manager 2000 User’s Manual
45
Appendix C: Software License
b) Make one copy of the Software in machine readable form solely for back-up
purposes, provided you reproduce Plextor’s copyright notice and any proprietary
legends.
2. Restrictions.
a) The Software contains trade secrets and in order to protect them you may not
decompile, reverse engineer, disassemble, or otherwise reduce the Software to a
human-perceivable form. YOU MAY NOT MODIFY, ADAPT, TRANSLATE,
RENT, LEASE, LOAN RESELL FOR PROFIT, DISTRIBUTE, NETWORK
OR CREATE DERIVATIVE WORKS BASED UPON THE SOFTWARE OR
ANY PART THEREOF.
b) YOU MAY NOT USE THE SOFTWARE TO MAKE UNAUTHORIZED
COPIES OF ANY COMPUTER PROGRAM OR OTHER WORKS. You shall
defend, indemnify and hold Plextor harmless from any loss, damage, claim or
liability incurred by Plextor as a result of any unauthorized copies of third-party
computer programs or other works made by you with the Software.”
3. Termination. This license is effective until terminated. This License will
terminate immediately without notice from Plextor or judicial resolution if you
fail to comply with any provision of this License. Upon such termination, you
must destroy the Software, all accompanying written materials and all copies
thereof, and sections 4, 5, 6 and 10 of this Agreement will survive any
termination.
4. Limited Warranty: Plextor warrants only that the disk(s) upon which the
Software is recorded will be free from defects in material or workmanship under
normal use and service for a period of thirty (30) days from your date of
purchase. PLEXTOR DOES NOT AND CANNOT WARRANT THE
PERFORMANCE OR RESULTS YOU MAY OBTAIN BY USING THE
SOFTWARE OR DOCUMENTATION. EXCEPT FOR THE FOREGOING
LIMITED WARRANTY, PLEXTOR MAKES NO WARRANTIES, EXPRESS
OR IMPLIED, AS TO NONINFRINGEMENT OF THIRD PARTY RIGHTS,
MERCHANTABILITY OR FITNESS FOR A PARTICULAR PURPOSE. Some
states do not allow the exclusion of implied warranties or limitations on how long
an implied warranty must last, so the above limitations may not apply to you.
This warranty gives you specific legal rights and you may also have other rights
which vary from state to state.
46 Plextor Manager 2000 User’s Manual
Appendix C: Software License
5. Limitation of Liability: IN NO EVENT WILL PLEXTOR BE LIABLE TO
YOU FOR ANY SPECIAL DAMAGES, INCLUDING ANY LOST PROFITS,
LOST SAVINGS OR OTHER INCIDENTALS OR CONSEQUENTIAL
DAMAGES, EVEN IF PLEXTOR HAS BEEN ADVISED OF THE
POSSIBILITY OF SUCH DAMAGES, OR FOR ANY CLAIM BY ANY
OTHER PARTY. Some states do not allow the exclusion or limitation of special,
incidental, or consequential damages, so the above limitation may not apply to
you.
6. Limitation of Remedies. Plextor’s entire liability and your exclusive remedy
shall be:
a) The replacement of any disk not meeting Plextor’s limited warranty which is
returned to Plextor; or
b) If Plextor or its distributor is unable to deliver replacement media which is
free of defects in materials or workmanship, you may terminate this Agreement
by returning the Software and your money will be refunded.
7. Export. You acknowledge that the laws and regulations of the United States
restrict the export and re-export of the Software. You agree that you will not
export or re-export the Software in any form without the appropriate United
States and foreign government approval.
8. U.S. Government Restricted Rights Legend for Units of the DoD. Use,
duplication or disclosure by the Government is subject to restrictions as set forth
in subparagraph (c)(1)(ii) of the Rights in Technical Data and Computer Software
clause at 252.227-7013. Plextor Corp., 4255 Burton Drive, Santa Clara, CA
95054.
9. U.S. Government Restricted Rights Legend for Civilian Agencies. Use,
reproduction or disclosure is subject to restrictions as set forth in subparagraphs
(a) through (d) of the Commercial Computer Software - Restricted Rights clause
at 52.227-19 and the limitations set forth in this standard commercial agreement
for this software. Unpublished rights reserved under the copyright laws of the
United States.
10. General. This Agreement shall be governed by California law except as to
copyright matters which are covered by Federal law. This Agreement is deemed
entered into at Santa Clara, California by both parties. Should any provision of
this Agreement be declared unenforceable in any jurisdiction, then such provision
shall be deemed to be severable from this Agreement and shall not affect the
remainder hereof. All rights in the Software not specifically granted in this
Agreement are reserved by Plextor.
Plextor Manager 2000 User’s Manual
47
Appendix C: Software License
Should you have any questions concerning this Agreement, you may contact Plextor
by writing to Plextor Corp., 4255 Burton Drive, Santa Clara, CA 95054.
48 Plextor Manager 2000 User’s Manual
Index
A
add to playlist control ∙ 12
application controls
Audio Capture 2000 ∙ 17
DiscDupe 2000 ∙ 21
MVP 2000 ∙ 7
ASPI manager ∙ 35
Windows NT ∙ 5
audio
capturing ∙ 18
capturing in Windows 3.1/3.11 ∙ 40
digital ∙ 30, 31
error correction during capture ∙ 19
graphic display ∙ 10
quality ∙ 19
recording ∙ 10
requirements for digital ∙ 31
USB speakers ∙ 30
Audio Capture 2000 ∙ 2, 17
application controls ∙ 17
capturing audio tracks ∙ 18
selecting a drive ∙ 18
audio quality control ∙ 17
Audio Setup page ∙ 39
audio tracks
selecting ∙ 18
AudioFS ∙ 4, 29
advantages ∙ 29
control ∙ 27
default ∙ 29
enabling ∙ 29
turning off ∙ 30
using for extraction ∙ 30
WAV files and ∙ 29
Windows 95 and ∙ 32
Windows NT and ∙ 29
auto start software ∙ 11
B
balance slider ∙ 27
C
capture track control ∙ 17
capturing audio ∙ 18
CD
duplicating ∙ 22
space for copying ∙ 22
verifying copy ∙ 24
CD Audio Page ∙ 39
CD to CD copy ∙ 21
CD to image copy ∙ 21
CD/DA player
playing audio CD ∙ 9
CD/DA—A/V rocker switch ∙ 8
CDA track ∙ 10
CDDB ∙ 14
connecting to ∙ 15
home page ∙ 15
requirements ∙ 14
storing information ∙ 14
viewing information ∙ 14
clear playlist control ∙ 12
clear playlist entry control ∙ 13
D
default
AudioFS ∙ 29
drives ∙ 9
player ∙ 32
default drive control ∙ 17
destination drop-down list ∙ 21
Details screen ∙ 25
digital audio ∙ 30
enabling ∙ 31
requirements ∙ 31
digital file ∙ 10
digital music ∙ 11
DiscDupe 2000 ∙ 3, 21
application controls ∙ 21
duplicating with a single drive ∙ 22
duplication
CD to CD ∙ 22
duplication process ∙ 24
using options ∙ 23
DOS
device driver ∙ 36
Plextor applications ∙ 35
drive
duplicating with ∙ 22
enhanced properties ∙ 25
selecting ∙ 18
Drive Setup page ∙ 38
drive speed control ∙ 27
Drives page ∙ 38
drives supported ∙ 1
Plextor Manager 2000 User’s Manual
49
Index
duplicating CD to CD ∙ 22
duplication ∙ 24
single drive ∙ 22
lock control ∙ 27
M
E
edit playlist entry control ∙ 12
eject control ∙ 8
emulate/test ∙ 24
emulate/test mode control ∙ 22
enhanced drive properties ∙ 3, 25
about ∙ 25
viewing ∙ 25
error correction ∙ 3, 19
control ∙ 17
recording speed and ∙ 19
extraction
error correction and ∙ 19
using AudioFS ∙ 30
F
main display ∙ 8
Media Player ∙ 32
switching WAV player default to ∙ 33
MegaPleX jukebox ∙ 1
MP3 file
recording ∙ 10
MPLAYER.EXE ∙ 32
MVP 2000 ∙ 2, 7
application controls ∙ 7
CDDB ∙ 14
default drives ∙ 9
file associations ∙ 10
graphic audio display ∙ 10
playing audio CD ∙ 9
playing digital files ∙ 10
playlist ∙ 12
recording audio ∙ 10
recording digital music ∙ 11
switching WAV player default to ∙ 32
test mode ∙ 11
file associations
changing ∙ 10
viewing ∙ 10
file formats supported ∙ 2, 10
O
G
options
DiscDupe 2000 ∙ 23
MVP 2000 ∙ 6, 8, 9, 10, 11, 14
graphic display screen ∙ 8, 10
P
I
icon
drive ∙ 25
Plextor ∙ 5
image ∙ 23
temporary ∙ 23
image to CD copy ∙ 21
installation ∙ 5
Plextor applications for DOS/Windows 3.1 ∙
35
L
left channel output control ∙ 27
license ∙ 45
load playlist control ∙ 12
50 Plextor Manager 2000 User’s Manual
pause control ∙ 8
play control ∙ 8
playback controls ∙ 8
player
changing default ∙ 32
playing an audio CD ∙ 9
playlist
arranging ∙ 13
building ∙ 13
controls ∙ 12
creating and using ∙ 12
opening ∙ 13
recording from ∙ 14
saving ∙ 13
playlist control ∙ 8
Plextor icon ∙ 5
Plextor Manager
DOS device driver ∙ 36
Plextor Manager 16-bit ∙ 35, 38
Index
PLEXTOR.EXE ∙ 36
position adjust slider ∙ 8
properties
enhanced ∙ 3, 25
R
random/sequential mode control ∙ 13
record to CD-R or CD-RW control ∙ 8
recording
digital music ∙ 11
space required ∙ 22
using a playlist ∙ 14
recording audio ∙ 10
restore defaults control ∙ 27
right channel output control ∙ 27
S
save playlist control ∙ 12
save settings ∙ 39
Session-At-Once ∙ 24
Settings screen ∙ 27
skip back control ∙ 8
skip forward control ∙ 8
Sndrec32.exe ∙ 32
software license ∙ 45
sound quality ∙ 2
Sound Recorder ∙ 32
source drop-down list ∙ 21
speed
recording ∙ 11
selecting ∙ 23
setting for read ∙ 27
speed select drop-down list ∙ 22
spindown timeout control ∙ 27
splash screen ∙ 6
disabling ∙ 6
start copy control ∙ 22
starting Plextor Manager 2000 ∙ 6
stop control for MVP 2000 ∙ 8
system requirements ∙ 1
test mode ∙ 11
track selection ∙ 18
track selection display ∙ 17
track/item back control ∙ 8
track/item forward control ∙ 8
U
uninstalling ∙ 6
unlock control ∙ 27
USB speakers ∙ 30
use temp image control ∙ 22
V
verify disc control ∙ 22
verifying a copy ∙ 24
video acceleration ∙ 40
volume adjust bar ∙ 8
volume slider ∙ 27
W
WAV file
default for playback ∙ 32
drag and drop ∙ 30
recording ∙ 10
saving ∙ 17, 18
saving multiple ∙ 18
typical size ∙ 32
Windows 3.1/3.11
capturing audio ∙ 40
Plextor applications ∙ 35
Windows 95
installation in ∙ 5
sound utilities ∙ 32
WAV files and ∙ 32
Windows 98
installation in ∙ 5
Windows NT
AudioFS and ∙ 29
installation ∙ 5
T
technical support ∙ 43
temporary image ∙ 23
Plextor Manager 2000 User’s Manual
51
Index
This page intentionally left blank.
52 Plextor Manager 2000 User’s Manual