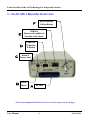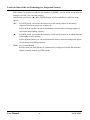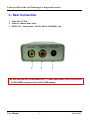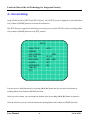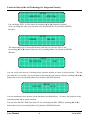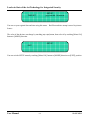
1
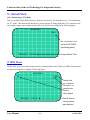
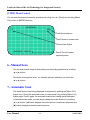
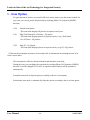
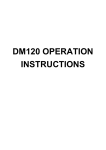
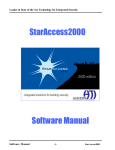
SA-SCAM-1
User Manual
Leader in State of the Art Technology for Integrated Security
Copyright and Trademarks
Copyright © 2004 - 2006 Access Technologies International, Inc.
All rights reserved. Printed in United States. No part of this book may be used or reproduced, or stored in any form by
any means, without the written consent of Access Technologies International, Inc.
The information in this book is subject to change without notice. This book is provided as is, without warranty of any kind,
either express or implied, including but not limited to performance, merchant ability, or fitness for any particular purpose.
Neither Access Technologies International, Inc. nor its dealers or distributors shall be liable to any person or entity with
respect to any liability, loss, or damage, caused or alleged to have been caused directly or indirectly by this information.
StarAccess® is the registered trademark of Access Technologies International, Inc.
Any other trademarks or service marks belong to their respective companies. Use of a term in this book should not be
regarded as affecting the validity of any trademark or service mark.
ACCESS TECHNOLOGIES INT’L, INC.
840 North Old World Third Street, Suite 600
Milwaukee, Wisconsin 53203
USA
Tel:
(414) 289-3121
Fax:
(414) 289-3129
Email:
[email protected]
WWW:
www.atiaccess.com
January 1, 2004
User Manual
- 2-
SA-SCAM-1
Leader in State of the Art Technology for Integrated Security
Contents
1.
SA-SCAM-1 Recorder front view
2.
SA-SCAM-1 Control Buttons
3.
Rear connection
4.
Screen Setup
5.
Screen View
6.
Manual Scan
7.
Automatic Scan
8.
Scan Option
9.
Warranty & Service
User Manual
- 3-
SA-SCAM-1
Leader in State of the Art Technology for Integrated Security
1.- SA-SCAM-1 Recorder front view:
F
E
D
C
B
Menu Selection
& Enter Button
USB Port
(Reserved for additional
Function in the future)
Power Off,
TV Monitor,
& Record
Alarm &
Sensor Jack
Active
Status
A
SD Card
* Please touch and push the Menu Ctrl. Key in software to prevent any damage.
User Manual
- 4-
SA-SCAM-1
Leader in State of the Art Technology for Integrated Security
2.- SA-SCAM-1 Control buttons:
A.
SD CARD
For storing captured image cuts
B.
ACT
Working Status LED
C.
DI & DO
Alarm & Sensor Connection Jack
Use Audio Jack for sensor or alarm connection.
D.
OFF/PLAY/REC Selector
This is a selector switch of “Power Off”, “Live Monitoring on TV”,
“Stored Picture Display”, “Menu Set-up” and “Motion Capture” Mode.
1) OFF : Power is off in the SA-SCAM-1 unit.
2) PLAY : Default to “Live Monitoring on TV” mode.
At this mode, you can display stored pictures in sequence and also you can set the
SA-SCAM-1 menu by controlling [Menu Ctrl.] key.
3) REC : Stores pictures by motion detection which is activated by camera sensor input image
Or Separate motion sensor.
E.
USB Port
Reserved – NOT USED - additional added function in the future.
F.
MENU SELECTION & VIEW BUTTON
Menu Set-up and Stored Picture Viewer Operation Control Button
This [Menu Ctrl.] button activates if the [OFF/PLAY/REC Selector] key is positioned at [PLAY].
[VIEW] Stored Picture Viewer Mode
If the [Menu Ctrl.] button is touched to the direction of [VIEW], you can see the stored
picture image on TV screen in sequence.
You can use [◄], [►], [MODE] and [Push] buttons to control viewer Operation.
[MODE]
SA-SCAM-1 Set-up Menu Mode
User Manual
- 5-
SA-SCAM-1
Leader in State of the Art Technology for Integrated Security
If the [Menu Ctrl.] button is touched to the direction of [MODE], you can see the set-up menu for
setting SA-SCAM-1 for your own purpose.
At this mode, you can use [◄], [►], [MODE] buttons to select and choose each of the menu
options.
[◄ ] In [VIEW] mode, you can use this button to see the stored pictures in descending
sequence from lower picture no. to higher no.
In [Set-up Menu] mode, you can use this button to choose menu and change option of
each menu in descending sequence.
[►]
In [VIEW] mode, you can use this button to see the stored pictures in ascending sequence
From higher to lower pictures.
In [Set-up Menu] mode, you can use this button to choose menu and change each option
of each menu in ascending sequence.
[Push] View Control Button
It works when you push [Menu Ctrl.] button and it is being used for only the automatic
display of stored pictures in [VIEW] mode.
User Manual
- 6-
SA-SCAM-1
Leader in State of the Art Technology for Integrated Security
3.- Rear Connection
1. Video Out: TV Out
2. Video In: Camera Video Input
3. DC5V/1.5A: Power Input – 5V DC/1.5A for SA-SCAM-1 only
1
2
3
* Be sure that you have to disconnect the [3 - Power Input] before plug-in and plug-out
the SD CARD for the prevention of SD CARD damage.
User Manual
- 7-
SA-SCAM-1
Leader in State of the Art Technology for Integrated Security
4.- Screen Setup
At the [PLAY] mode of [OFF/PLAY/REC Selector] , the [SETUP] screen is displayed if you touch [Menu
Ctrl.] button to [MODE] direction. It means down direction.
The SETUP menu is appeared as following screen and you can exit the SETUP screen by touching [Menu
Ctrl.] button to [MODE] direction on [EXIT] position.
SETUP
VIDEO TYPE :
FORMAT
REC INTERVAL
REC TIME
:
REC MODE :
ALARM
:
OVERWRITE :
TIME SET
EXIT
NSTC
:
0002
00 - 00
MOT + SEN
OFF
ON
You can move to individual menu by touching [◄] & [►] button and you can select each menu by
touching [Menu Ctrl.] button to [MODE] direction.
After you select a menu, you can change the default value by touching [◄] & [►] button in sequence.
After the selection, you can exit from that menu touching [Menu Ctrl.] button to [MODE] direction.
User Manual
- 8-
SA-SCAM-1
Leader in State of the Art Technology for Integrated Security
SETUP
VIDEO TYPE :
NTSC / PAL
You can change NTSC or PAL camera by touching [◄] & [►] button in sequence.
After you change the value, you can select it by touching [Menu Ctrl.] button to [MODE]
direction.
FORMAT
SETUP
:
YES / NO
This menu enables you to format SD memory card and you can select YES or NO
by touching [◄] & [►] button, then select it by touching [Menu Ctrl.] button to [MODE]
direction.
SETUP
REC INTERVAL
:
0004
You can set the time interval of storing picture when the motion or sensor is being detected. The max
time interval is 99 seconds. You can increase or decrease the time interval value by touching [◄] & [►]
button, then select it by touching [Menu Ctrl.] button to [MODE] direction.
REC TIME
SETUP
:
00 - 00
You can continuously store pictures for the duration of predefined hour. Of course, the picture is being
stored by motion and/or sensor detection.
You can select the REC TIME from 00 to 24. You can change the REC TIME by touching [◄] & [►]
button, then select it by touching [Menu Ctrl.] button to [MODE] direction.
User Manual
- 9-
SA-SCAM-1
Leader in State of the Art Technology for Integrated Security
REC MODE
SETUP
:
MOT + SEN
(MOT)
(SEN)
You can change the condition of recording pictures. The MOT + SEN means that the image recorded by
motion and/or sensor detection.
Each condition can be changed by touching [◄] & [►] button, then select it by touching [Menu Ctrl.]
button to [MODE] direction.
ALARM
SETUP
:
OFF
(MOT)
(SEN)
(MOT + SEN)
You can change ALARM condition with this menu and it has 4 conditions.
Each condition can be chosen by touching [◄] & [►] button, then select it by touching
[Menu Ctrl.] button to [MODE] direction.
SETUP
OVERWRITE
:
ON / OFF
If you select ON, you can continuously record images after removing previously recorded images in
sequence when the SD memory card becomes full
.
If you select OFF, SA-SCAM-1 stops recording images when the SD memory card becomes full and the
recorded images are remained before you remove it or you select ON again.
Important: This function is applied in SD memory fewer than only 1 GB
User Manual
-10-
SA-SCAM-1
Leader in State of the Art Technology for Integrated Security
TIME SET
:
SETUP
yyyy-mm-dd hh:mm:ss
You can set your regional date and time using this menu. Real Date and time stamp is stored in pictures
frames.
The value of date & time can change by touching [◄] & [►] button, then select it by touching [Menu Ctrl.]
button to [MODE] direction.
SETUP
EXIT
You can exit the SETUP menu by touching [Menu Ctrl.] button to [MODE] direction on [EXIT] position.
User Manual
-11-
SA-SCAM-1
Leader in State of the Art Technology for Integrated Security
5.- Screen View
[Live Monitoring on TV] Mode
The key of [OFF/PLAY/REC Selector] is positioned at [PLAY] , the default screen is “Live Monitoring
on TV” mode. This mode means that the live camera images are being displayed on TV monitor in realtime and the images are not being stored in SD Card. The screen is displayed as following figure.
SA-SCAM-1
1280
No. of picture to be
stored in SD CARD.
(remaining space)
2005-05-05 15:25:45
Current Date & Time
[VIEW] Mode
At this mode, you can see the stored pictures by touching [Menu Ctrl.] button to [VIEW] direction, then
the lastly stored picture is display as following figure.
SA-SCAM-1
F0
54/54
Stored total
no. of picture
Picture no. of
current view
Picture
Scan Option
2005-05-05 15:25:45
User Manual
Date & Time of
current picture
was captured.
-12-
SA-SCAM-1
Leader in State of the Art Technology for Integrated Security
[VIEW] Mode Control
You can scan the stored pictures by several mode using [◄] & [►], [Push] and touching [Menu
Ctrl.] button to [MODE] direction.
SA-SCAM-1
F0
54/54
Total Stored pictures
Total Pictures in current view
Picture Scan Option
2005-05-05 15:25:45
Date & Time of current
captured picture
6.- Manual Scan
You can scan stored image in descending and ascending sequence by touching
[◄] & [►] button.
During the stored picture scan, you can skip pictures whenever you touch the
[◄] & [►] button.
7.- Automatic Scan
The stored pictures are being displayed in sequence by pushing the [Menu Ctrl.]
button once. During the automatic scan, you can pause it by pushing [Menu Ctrl.]
button again. Push it again, the automatic scan mode is being performed again.
In automatic scan mode, you can simply change the scan direction by touching
[◄] & [►] button. [◄] button displays the stored picture in backward sequence and
[►] button displays pictures forward sequence.
User Manual
-13-
SA-SCAM-1
Leader in State of the Art Technology for Integrated Security
8.- Scan Option
If a great amount of pictures are stored in SD card, it takes time to scan the picture needed. For
easy scan, you can use picture skip function by touching [Menu Ctrl.] button to [MODE]
direction.
1) F0
2) F1
3) F2
: Default Scan Option
This scan mode displays all pictures in sequence one by one.
: Skip [Total Stored No. of Picture / 10] Option
This scan mode displays picture in sequence one by every [Total Stored
No. of Picture / 10] pictures.
: Skip [F1 / 10] Option
This scan mode displays picture in sequence one by every [F1/10] pictures.
* If the stored total number of pictures is lower than 100, its function has no meaning because of its
value is lower than 1.
This scan option is effective in both of manual and automatic scan mode.
During the scan, you can change the scan mode by touching [Menu Ctrl.] button to [MODE]
direction. It will be changed F0, F1 & F2 in sequence and its function will be performed
automatically.
In manual scan mode, it skips the picture according to the set of scan option.
In Automatic scan mode, it automatically skips the picture according to the set of scan option.
User Manual
-14-
SA-SCAM-1
Leader in State of the Art Technology for Integrated Security
9.- Warranty and Service
The following warranty and service information applies only to the United States of America. For the
information in other countries, please contact your local distributor.
To obtain in or out of warranty service, please prepay shipment and return the unit to the appropriate
facility listed below.
Access Technologies International, Inc.
840 North Old World Third Street
Milwaukee, WI 53203
Tel (414) 289-3121
Fax: (414 289-3129
Email: [email protected]
OUTSIDE OF THE UNITED STATES
Visit our Web-site: www.atiaccess.com for your local representative.
Please use the original container, or pack the unit(s) in a sturdy carton with sufficient packing to prevent
damage, include the following information:
1. A proof-of-purchase indicating model number and date of purchase.
2. Bill-to address
3. Ship-to address
4. Number and description of units shipped.
5. Name and telephone number of person to contact.
6. Reason for return and description of the problem.
NOTE: Damage occurring during shipment is deemed the responsibility of the carrier, and claims should
be made directly to the carrier.
User Manual
-15-
SA-SCAM-1