1
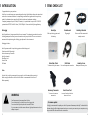
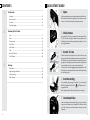
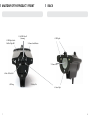
HOOK-EYE
User’s Manual
English
Download the updated manual and access all
functions on www.hook-eye.us | www.e-eye.us
INTRODUCTION
ITEMS CHECK LIST
Congratulations for your purchase.
Hook-Eye is a revolutionary new camera designed to shoot high-definition videos and capture fast
action even in extreme conditions. Its unique design and features, together with its easy set up,
make it the ultimate action camera for all kind of outdoor and underwater activities.
Completely waterproof up to 400 feet (120 meters), it is provided with a special LED LIGHTING
system able to RECORD a full HD video ( 1020x1080p) for 3 hours with its fully-charged battery
Packaging
Hook-Eye believes in being responsible to the environment. The packaging is made to be used as
a floating waterproof accessory case and comes free with your purchase. The case contains the
camera and the quick-start guide. Nothing gets disposed in the environment.
Hook-Eye
Centerboard
Hook-Eye Bracelet
With top hooking system and
the battery
30gr weight
To turn on/off the camera with
a simple contact
Microfiber Cloth
USB Cable
Hook-Eye Case
To clean and dry the camera
For a safe computer connection
Waterproof accessory box
Accessory Connector
Front Cover Pad
To connect to camera
accessories
to cover front top hook slot
when not in use
Packaging Includes :
Hook-Eye camera with its top hooking system and the battery pack
Centerboard with 30gr weight
Universal accessory connector
Hook Eye bracelet
Microfiber cloth
Smooth Pad
USB cable
Cloth
Use the cloth to dry the camera each time you get it out of the water before opening it.
Before using the microfiber cloth for the first time it is recommended to first rinse it.
Wash separately.
WARNING
Small components: keep away from children.
Do not leave Hook Eye under the sun for a long period.
Do not use Hook-Eye at depths which exceed 400 feet.
If you see water inside the camera after an high depth immersion do not
attempt to open it.
3
●● Firmware update:
It is highly recommended to update your Hook-Eye camera firmware periodically. To download the
firmware from the official website www.hook-eye.us connect your camera to your computer using
the provided USB cable and follow the instructions.
4
CONTENTS
1.
Introduction
Package ............................................................................................................................ 3
Items check list ................................................................................................................ 4
Contents ........................................................................................................................... 5
QUICK START GUIDE
1. Open
Log In to www.hook-eye.us to register and access all functions.
Open the camera: twist the upper part of the camera in order
to open it. Check that the battery is locked in position.
Quick Start guide ............................................................................................................. 6
2.
Anatomy of the Product
Front ................................................................................................................................. 7
Back .................................................................................................................................. 8
O-Ring Holder .................................................................................................................. 9
Front Panel ...................................................................................................................... 9
2. Check Status
Insert the Micro SD into the camera (we recommend a Class
10 SD). Check the Led Lights Status: leave on (switch on the
left side) if you wish that they automatically switch on in case
of low light condition.
Smooth Pad ..................................................................................................................... 9
USB.................................................................................................................................. 10
Micro SD Card Slot......................................................................................................... 10
On/Off Button ............................................................................................................... 10
3.
Settings
Video mode .................................................................................................................... 11
Digital Image Stabilization ........................................................................................... 11
Loop Recording ............................................................................................................. 12
Other Settings ............................................................................................................... 12
3. Attach To Line
Attach Hook-Eye to the fishing line. Use top hooks if you are
going to use live bait or floating lures, then mount centerboard
for stability, or pass the line below the centerboard if you are
going to use sinking baits, minnows or bottom fishing. Please
press and slide to insert or remove the centerboard.
In order to take out the engaging system please push out the
back frame. Do not attempt to remove the back frame forcing
on the holding clips.
4. Start Recording
Start recording by pressing the button
or placing the
BRACELET magnet ON THE ICON
until vibration and
orange led flash.
When the green light is flashing, the camera is recording.
5. Download Video
After recording, to download the videos on your computer
simply connect them via the included USB cable and access
your files. Share your best videos with your friends on social
networks!
5
6
ANATOMY OF THE PRODUCT / FRONT
1. LED Lights Switch:
Left On / Right Off
2. Slot USB Micro B
(Samsung)
/ BACK
6. LED Lights
3. Camera Switch Button
7. Camera Lens
4. Micro SD Card Slot
9. O-Rings
5. Battery Slot
8. Status Light
7
8
O-RINGS
USB
The double O-ring on Hook-Eye guarantees the camera to be waterproof.
The USB connector allows you to charge the camera’s battery and download your videos into the
computer. Connect the cable to the camera plugging it into the USB slot (2).
ATTENTION
Dirt and fragments on the O-ring’s may compromize the camera water tight, letting water enter
into the camera, damaging the device.
THIS KIND OF CAMERA DAMAGE IS NOT COVERED BY THE WARRANTY
Must always check the O-ring’s cleanliness, if damaged please replace with an original one.
In order to clean it, use your finger wet with clean water or saliva. Do not attempt to use salt water.
All Hook-Eye products are tested for endurance and quality.
FRONT PANEL
The front panel contains Status LED, the slot SD, USB, on and off button and battery.
Status Led (8)
The dual led indicates the current Hook-Eye operating status. One led is located on the front panel,
the other just below the lens on back end.
Action
HE Accension
Charging Connection
Led indication
State
Green Flashing
Recording
Red Flashing
Out of batteries
Red Steady
SD Card not present or recog
nized or to be formatted
Red Flashing
Charging
Green Steady
Charge Completed
Led Lighting System (6)
Hook-Eye has a smart integrated LED lighting system.
O
Position 1 (left) : this position allows Hook-Eye to automatically switch On and
Off the LED’s when needed.
Position 2 (right) : this position powers off the LED.
SMOOTH PAD
The upper smooth pad allows the user to get a completely smooth and obstacles free Hook-Eye
surface when using the lower hook for the fishing line, in order to avoid an accidental fishing line
break.
9
MICRO SD SLOT
The Micro SD Card Slot (4) allows you to use standard memory cards up to 32GB.
SD card formatting
It is recommended to keep your SD cards formatted and updated in order to avoid any damage
originating from the file system.
If you see steady red light and power on it means a SD card problem please proceed to formatting.
ATTENTION
Formatting eliminates any data in the SD card.
In order to format the SD card please keep pressed the power button until you
see red light flashing, then key up for few seconds then press again until the
red light stop flashing and stays steady on.
The red light will flash slowly until format completion. Once the formatting
has occurred the led will switch off.
ON/OFF BUTTON
Hook-Eye is a “One Button Camera”, that means that you only have to press one button to start
recording and power off the camera.
The Button is located on the front panel (3), but if you want to operate Hook-Eye without open the
cap there is a magnetic sensor on the left side of the camera body, indicated by the
icon.
Placing our wristband magnet on the icon or pushing the button have the same effect.
BATTERY
Hook-Eye uses last generation LiPo battery.
Please do not expose the battery to the sun or to the water. Keep battery and cables dry. Always
check that the battery slot (5) is locked.
First Use
Hook-Eye’s battery comes charged, however we suggest you to re-charge it completely before the
first use.
10
SETTINGS
Loop Recording
Hook-Eye is an extremely easy to use camera with a simple on and off touch command.
One single command to start and stop recording as well.
Hook-Eye is designed to make the usage of the camera easy and simple and allows you to be fully
concentrated in your fishing action.
Hook-Eye keeps saving new data automatically canceling old data in your SD card even if memory
is full.
You can deactivate this mode and the data will stop saving as soon SD is full.
Value
Settings profiles are stored in SD card, we recommend you to have few SD cards with different
saved profiles on to quick switch between them.
1.5
0
We invite you to visit our settings profiles library in our website and download the last one created
by our expert fishing staff.
Effect
Loop recording in fragments of specified length, old files are deleted when
memory full
Normal Recording
White Balance
NOTE: formatting will erase setting file too!
Hook-Eye’s video quality system provides a white balance AUTO set and adjustable values to match
any light conditions.
Video modes
Exposure
Video Mode
Resolution
Frame rate
Description
1
1920 x 1080
30 fps
Full HD NTSC Video
2
1920 x 1080p
25 fps
Full HD PAL Video
3
1280 x 720p
30 fps
HD NTSC Video
4
1280 x 720p
25 fps
HD PAL Video
5
1280 x 720p
60 fps
Slow motion NTSC HD video
6
1280 x 720p
50 fps
Slow motion PAL HD Video
Hook-Eye exposure control can be fully automatic in AUTO mode or manually set with an offset
from -2 Fstop to +2.
Invert
Hook-Eye can record video upside down when invert is ON to allow inverse mounts.
Name Prefix
Hook-Eye is compliant DCF standards, filing the videos into the folder NNNE-EYE under the name
of XXXXNNNN. XXXX is the name prefix and NNNN the file number. By setting the name prefix is
possible to use different file names prefixes for different cameras.
Date & Time
Digital Image Stabilization
Hook Eye can be set by a single click on the exact date and time, just enter in our website and reach
the time tool. ATTENTION : Date & Time will be updated in the camera firmware when disconnected from computer.
Hook-Eye has a digital Stabilization system useful when vibrations may arise.
Get the best out of your Hook-eye Cam – Tips & Tricks
Value
11
Effect
OFF
Normal Video
ON
DIS Active
Balancing - Fit the weight in the centerboard according to speed, fishing line diameter and sink-
ing behavior of the minnow. The more they increase, the more weight you should add to the centerboard.
Shooting - In order to shoot from below towards the surface, slide the centerboard towards the
front panel. To make the camera look down slide the centerboard towards the lens.
12
[email protected]
www.hook-eye.us ● www.e-eye.us
© E-Eye Inc. 2015