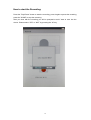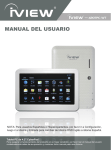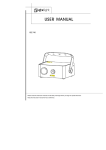
1
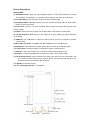
Table of Contents
*Introduction…………………………………………………………………page 1
*Device description…………………………………………………………page 2
*Front view…………………………………………………………………...page 2
*Navigation button view……………………………………………………page 3
*Bottom view…………………………………………………………………page 3
*Power management………………………………………………………..page 4
*General Operation………………………………………………………….page 4
*Main Menu……… …………………………………………………………..page 5
*Browser History…………………………………………………………….page 6
*eBook………………………………………………………………………page 6
*Music……………………………………………………………………….page 8
*Video………………………………………………………………………..page 11
*Photo………………………………………………………………………..page 12
*Voice Recording…………………………………………………………..page 13
*Setting………………………………………………………………………page 15
*Document Management………………………………………………....page 17
*Connect eBook to the computer……………………………………….page 17
*Manage files……………………………………………………………….page 17
*Inserting Micro SD card…………………………………………………page 17
*Taking care of your E Reader…………………………………………..page 17
*Maintenance and Attention……………………………………………..page 18
*Firmware upgrade………………………………………………………..page 18
*Technical specification………………………………………………….page 19
*Troubleshooting………………………………………………………….page 19
0
Thank you for purchase iview-700EB-T 7” Color E-Reader. We suggested
you to read through this user manual to have better understanding
before using this device. All pictures and graphics display below are
simulated and are not intended to specify included application or
content. Technical information and specification are subject to change
without notice.
Notes:
1. If the player can not power on for the first time, please charge it via USB
cable till the battery indicator is full.
2. Please handle this reader with care to prevent screen damage.
3. Please do not remove the built in battery when device is in charging mode.
4. Built in battery is replaceable however this need to be done by
manufacturer. Please contact manufacturer by phone or email.
5. Please contact manufacturer if you encounter problem with the device. Do
not intend to disassemble the device by yourself.
Special Features:
This E Reader has multifunction and is compatible with below format:
*E Book: TXT, EPUB, PDF, FB2, HTML
*Audio: MP3, WMA, WAV, ACC, ECT
*Photo: JPEG
*Video: AVI, RMVB, MPEG2
*Voice Recording: ACC
Accessories:
We includes below accessories together with this device. Please contact
manufacturer is you are missing some part:
*Leather Carrying Bag
*USB Cable
*AC Power Adaptor
1
Device Description
FRONT VIEW
[1] Home/ESC button: When you are prompted to select or enter, press this button to cancel
the operation; sub-interface, or to exit the current interface and return to the previous.
[2] Prev/Next Page: press this button to open the Previous/Next page.
[3] Navigation /Menu: Navigation button is a 4 way control button (left, right, up, down; Menu
button is menu and confirm.
[4] Zoom in/out : zoom in / out of the JPEG file. Also increase or decrease the font size of the
E book content.
[5] Rotate: Use this function to rotate your E Book either in horizontal or vertical view.
[6] 3.5 mm Earphone Jack: Connect your earphone for your private enjoyment (earphone
not included).
[7] USB Port: use USB cable to charge the device and to connect to computer to transfer
your contents.
[8] Micro SD card reader: Compatible with Micro SD/SDHC up to 16GB memory
[9] Play/Pause: Press this button to Start / Pause play the music or recording by MIC.
[10] Power button: Press the button 3-5 Seconds to power on/off the device.
[11] Volume +: press the UP button to increase the volume when playing music.
[12] Volume -: press the DOWN button to reduce the volume when playing music.
[13] Reset On/Off switch: This is located on the back of the device next to card reader. This
is to reset the device back to factory original default. You might use this key when you
encounter some minor problem with the device.
[14] Speaker: 0.5W audio output
[15] TFT LCD Display Screen: 7” in diagonal
2
NAVIGATION BUTTON VIEW
BOTTOM VIEW
3
Power Management
Charging the battery
The e-book's battery has been partially charged at the factory. The battery indicator is
located on the upper right hand side of the Main menu when you turn on the device. The
battery indicator is a graphic that shows the power left in the battery. If you find the
battery indicator has less than 2 bars, please charge the device via USB cable to AC
adaptor or to computer.
Please unplug the USB cable once the device is fully charged.
Charging via USB data cable to the computer.
1. Connect to your computer via USB data cable. Go to "Safely Remove
Hardware" icon located at the bottom of windows task bar then left click it , it will
safely remove your USB massive storage device.
2. Now the device goes to USB charging mode, and you will see a charging
battery icon displays on your e-book reader's screen.
Please note if you charge the device via computer, normally it will take longer time
compare to via AC adaptor. Again please do not remove the battery when the
charging is in process.
Replacing the Battery:
This device includes a Lithium polymer rechargeable battery (3.7V 2000mAh). Shall you
in need of replacing the battery, please contact manufacturer and DO NOT intend to do
so by yourself. This process only can be done by manufacturer’s technician.
General Operation
Power ON/OFF the device:
1. Slide the Power On/Off switch to on, press and hold the Power button for 5
seconds and release the button to turn on.
2. To turn OFF the device; press and hold the Power button for 5 seconds to turn
off this device. We recommend to slide the Power On/Off switch to OFF if you do
not plan to use this device for certain time
Button operation:
1. The Navigation button: Use the "< > keys" to select the left/right/up/down direction.
2. Confirm / Enter: Selected items press the "M" key to enter the currently selected
function or refurbish screen.
3. ESC: press the "Home/ESC" button to return to the previous screen.
4
Main Menu
This interface shows all features of this device as follows: "Browser History", "eBook",
"Music", "Video", "Photo“, "Record", "Explorer", "settings" Select the desire function, then
enter.
5
Browser History
Display the file recently browsed, move the Navigation keys to select a book press “M”
button to enter, it will go to the last page you read on the selected book.
Note: If the files are in the Micro SD card, read recently are deleted, the
records will continue to be retained in the "Browser history" list however you
can not open them.
eBook
Compatible Format: EPUB, FB2, HTML, PDF AND TXT
Selecting the Book: Select the desire book then click "M" button to start reading its
content.
Previous/Next Page: You can use these buttons to “turn” the page. You can also use
up and down in Navigation control to do the same task.
Page Jump, Save Mark, Load Mark, Del Mark, Browser
Mode
6
When in eBook mode, you can press “M” button to enter "Page Jump", "Save Mark",
"Load Mark", "Del Mark", "Browser Mode", "Flip Time", "Brightness", "Set color".
7
Page Jump:
Press the “M” key then select “page Jump”. Press the “M” button again
then key in the desire page number and press “M” to go to that specific page.
Bookmarks:
This feature allow you to go to certain page of certain book by just
selecting it from the bookmark list.
Save a bookmark:
When in eBook mode, press the "M" button then select “ save
mark" and press “M” again to add the current page as a bookmark.
Load a Bookmark:
When eBook mode, press "M" button then select "Load Mark "
and press “M” again to open the saved bookmark list. Select the desire bookmark and
press “M” key.
Delete a bookmark:
When eBook mode, press the "M" button then select "Del
mark"; a list of saved bookmark will pop out. Please select the one you wish to delete
then press “M” key to confirm.
Bookmark capacity: This device allow up to 8 saved bookmark. When it reach
its limit, the newly saved bookmark will overwrite the oldest bookmark.
Zoom:
Press this key to change the font size. There are 3 different font size: Small,
Medium and Large.
Rotate:
When in eBook mode, you can rotate the screen either horizontally or
vertically for your convenience by pressing this rotate button.
Browser Mode:
Flip Time:
There are two browser: ”Auto Mode” and “Manual Mode”.
There are five flip time to select: 10Sec, 15Sec, 20Sec, 25Sec, 30Sec.
Brightness:
There are five level brightness to select, you can select the desire
comfortable brightness.
Set Color:
There are five colors to select, you can select the comfortable color word
to read.
Music Mode
Open the audio files list in the main menu, select the desire audio file then press "M" to
play mode. You can add in audio file by connecting to your computer via USB cable and
8
just drag your desire audio files and paste into this device. This device supports MP3、
WMA, WAC, ACC and ECT format. This device allow you to listen to your audio file while
reading the E book or browsing the photo or menu.
Adjusting the volume:
Press the "Up/Down" key at the Navigation or Up/Prev
page, Down/Next page key to adjust the volume.
Play/Pause:
Press the "Play / Pause" key to pause or continue play.
Forward / Backward/Previous/Next:
Press and hold “left direction” key to
backward the music and “right direction” key to forward the music. Press and release “left
direction” key to go to previous audio file and “right direction” key to go to next audio file.
9
Music play mode:
There are five audio playing mode: "Repeat Mode", "Play
Mode"," MS EQ", "EQ Sel" and "User EQ setup". When in Music mode, press “M” then
select desire mode that you wish to made adjustment.
10
Video
Go to “Video” and press “M” key to enter the Video mode. This device AVI, RMVB and
MPEG2 video format.
Subtitle language:
When in video playing mode. If subtitles are available from
your video file, press the "M" button then press Subtitle Language to make change.
Select Time play:
Press the "M" button then select “time play”, you can change
the time to play.
Full screen:
Press the "M" button then select “Full Screen” to change the screen
display. There are three mode: “Full screen”, “Normal” and “Original”.
Brightness:
There are five level of brightness, you can select the comfortable
brightness.
11
Photo
Go to Photo and press "M" button to enter Photo mode. This device support JPEG and
BMP image format.
Photo previous and Next:
Press the "left / right" navigation keys to go to
Previous or Next photo.
Photo Rotation:
Press the "Play/Pause" key to rotate the photo in counter wise
sequence.
Zoom in / out:
Press these key to zoom in or out of photo.
Note: some large size files require more time to rotate than the small size files.
And it also require more time to load the photos into the photo viewer.
12
Voice Recording
Select the "Record" in the main menu, click "M" button to enter the voice record mode.
13
How to start the Recording:
Press the "Play/Pause" button to start the recording, press it again to pause the recording,
press the "HOME" to stop the recording.
After you done with the recording you will be prompted to ask if want to save into the
device. Please select “YES” or “NOT” by pressing the “M” key.
14
Record Playback Function:
1. Go to main menu and select “Music”, press “M” to go to “Musci Menu”.
2. Select "Record" and press the "M" button to go to “Recorded” file list.
3. Select the desire recorded file then press “M” to start playback.
Settings
Select "Settings" from main menu then click "M" button to enter the system settings mode.
It includes following sub-menu: "Display Settings", "System Settings", "language",
"System Information", "Auto-shut time", "Time ", "Calendar".
15
Display setting:
Select the "Display Settings", click "M" button to open the
Display settings Menu.
1. To select the "Light time", it will be display “5 Seconds”, “10 Seconds”, “15 Seconds”,
“20 Seconds”, “30 Seconds” and “Always On”. Please select the desire time and press
“M” to confirm.
2. There are 5 levels of "Brightness ". Please select desire Brightness level then press
“M” key to confirm.
System setting:
Select the "System Settings", click "M" button to go into the
system settings menu.
1. Select "Restorable" to restore your system to factory default settings. Please make
sure to back up all the data in the device before doing so.
2. To select the "Key Lock Time ", it will be display “10Secords ”, “ 30Secords ”, “ 5
Minutes ”, “10 Minutes ”, “ No Locking ”; To select the time or “ No Locking ” and click " M
" button to change the key locking time.
Language Settings:
This device provides several On Screen languages: English,
Chinese, Deutsch, Portugues, French, Spanish, and other languages. Please on system
setting menu select “language” then select desire language and press “M” key to confirm.
System Information:
It displays version information of the device, product
brands, company names, Software version, Memory Size and other information.
Automatic shutdown time:
There are five automatic shutdown time: 3
minutes, 5 minutes, 10 minutes, 15 minutes and 20 minutes. Please select desire time
and press “M” key to confirm.
Time Settings:
Display the current system's time information. You can change the
“HH” hour and “MM” minutes by “Up/Down/Left/Right” direction key, select “YES” to
confirm the change.
Date Settings:
Display the current system's date information. You can change the
“YY” year, “MM” month and “D” days by “Up/Down/Left/Right” direction key, select “YES”
to confirm the change.
Calendar:
Select the "Calendar" then click "M" button to enter.
16
Document Management
Connect e-book to the computer
Please connect this device to your computer via USB data cable. This reader with auto
turn on and the screen will show “USB Connection”, and your computer will identify
this reader as a Removable Disk after the connection is completed. Your computer
will show 2 Removable disk for this device: One is for Built in internal memory
of this device and the other is for Micro SD card(not included) if you have
insert one.
Manage files
After the device is properly connected to your computer, you can select the removable disk in the
"My Computer" and start transfer, copy or delete file in between this device and your computer.
Inserting a Micro SD card(Not included)
You can expand the memory of this device(up to 16GB) by inserting a micro SD or SDHC
card(its also call TF card). First power off the device then insert a micro SD card and turn
the device back on.
Note about the use of Micro SD card:
If your device is encounter a problem identifying your inserted Micro SD card, please turn
off the device, pull the memory card out and reinsert it again. VERY IMPORTANT:
Please make sure to turn the power off when pulling the memory care and/or inserting
the memory card. Also DO NOT reset the unit when your memory card is inserted into
the device.
Taking Care of your E Reader : This E reader is designed to be light,
compact and durable. However since it’s an electronic device and must be
treated and maintain carefully:
Putting unnecessary pressure on it or striking the device against other objects
can cause damage. In order to avoid damage to your E Reader, please:
• Keep the device covered when you are not using it. This will protect the
screen from being scratched or damaged in any way.
• Do not drop, crush, bend, or apply excessive force onto the device.
•
Do not expose this device to moisture, extreme temperature or any
harmful conditions.
•
Clean the device by wiping with a soft, dry cloth. Do not use harsh
chemicals.
17
Maintenance and Attention
Please DO NOT intend to repair or dissemble this reader but to contact manufacturer
shall your device encounter the below
1. The device subjects to spill or foreign liquid objects falling into the device.
2. The device got wet by rain or water.
3. The device got damaged by falling.
4. There are obvious overheating.
5. The implementation of the correct operation, but the product still can not work properly.
Firmware Upgrade
We will upload any firmware onto our website: www.iviewus.com shall it need any
firmware upgrade in the future. You can also download the user manual and/or any other
instruction related to this E Reader.
The proper environment when using this reader
The appropriate temperature for this device is between 32 to 120 F (0-50 degrees
Celsius). Beyond this temperature range, the screen display will deteriorate, so the user
should avoid using outdoors in the winter.
Please do not place this device in the environments of moisture, dust, or high
temperature.
Avoid causing extrusion of the device
Please do not shake severely, squeeze or impact this device, and avoid imposing too
much pressure on the screens and device.
We recommended that you put the device in the leather case we provided in the package
for better protection.
Avoid plugging objects into the Device
Do not place any object in the gaps or other opening space they are used to provide
ventilation and heat dissipation. These openings can not be blocked or hidden.
18
TECHNICAL SPECIFICATIONS
Size: 9.13 x 6 x 0.6 inches (201 x 132 x 12.8 mm)
Weight: 0.40 lb (170g) (battery included)
Screen Size: 7" TFT Color LCD,
Resolution: 800 x 480 pixels
Storage Memory: 32MB RAM, 2GB Flash
Processor: ARM 400MHz
Communication Ports: USB Client (v2.0) - Mini USB connector,
Micro SD card slot
Audio outputs: 3.5mm stereo earphone jack, built in speaker.
Battery: Rechargeable built-in Li-Polymer battery (2000 mAh)
Peripherals: USB synchronization cable
Operating System: Android
Software Suite: Multi-format eBook reader
Supported image formats: JPG, GIF, PNG
Supported sound format: WAV, WMA, MP3….
Supported Video formats: AVI, RMVB, MOV.MP4…
Supported TXT format: TXT, EPUB, FB2, PDF, HTML
Power Source: 5V--2A
Power Consumption: <5W
Troubleshooting
1. Can not Power on the e-book reader
a. Please charge the device till the power indicator bar is full.
b. Defective device; please contact manufacturer for instruction.
2. Not able to charge the device
a. Defective AC adaptor; please contact manufacturer for replacement.
b. Defective USB Cable; please contact manufacturer for replacement.
2. No sound or noise when using earphone
a. Adjust volume setting, make sure the volume not in 0 position.
b. Try another pair of earphone.
c. Make sure the music file compression rate is high , low quality music files may cause
noisy and distortion
3. Can not download files into the reader
a. Possible defective USB cable.
b. E Reader’s memory is full.
c. Windows 98 may require a new USB2.0 DRIVER to detect the e-book reader as the a
removable disk ( Please visit www.iviewus.com to download the driver).
4. Can not play the Music files
a. This reader has the powerful Audio processor and is able to play most of popular audio
formats. However there might be some latest music formats or resolutions not working
properly in this device. Please contact manufacturer tech support for assistance.
19