1
6
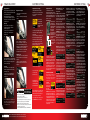
EYE RIBBON REMOVAL
MINI REG REMOVAL/ASSEMBLY - ADB REPLACEMENT
Mini Reg Removal and Assembly
Rubber Finger Detent Replacement
The mini-regulator is a second stage
regulator that is used to control the
velocity and regulate the gas pressure.
It can be deleted, but only if a suitable first
stage regulator is used that incorporates
a high flow and good regulation
properties across the tank pressure
range. Please ensure that the macro line
is removed from the fore grip
before disassembley.
The Angel FLY Sb incorporates the new
three piece eye cover strap. This eye
cover strap incorporates the improved
ADB fingers and is designed for ease of
replacement of the ADBs and trouble free
cleaning of the ANGEL eyes, if required.
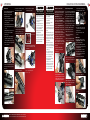
4. U
sing a 2mm Allen wrench
(or similar) push out the ADB finger
to be replaced.
5. T
ake a new ADB finger and insert
the grommet into the retaining hole
of the eye cover arm.
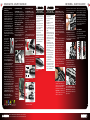
1. Remove the volume chamber
maintenance plug with a 4mm
Allen wrench.
1. Remove the velocity adjuster screw
located on the fore grip using a 1/8
Allen wrench.
Repeat this process for the other side.
To reassemble, reverse the above
procedure.
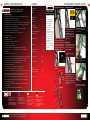
2. Slide the front section of the eye cover
forward and remove.
Note: It is important that the front section
of the eye cover is located correctly on
the eye cover arms as shown below.
2. U
nscrew the
mini reg.
3. Carefully remove the eye cover arms
from either side of the Angel FLY Sb.
Also note that it is important not to splay
the eye cover arms too far apart. This may
result in damage to the eye cover.
3. R
emove the
fore grip cap
using a suitable
wrench.
4. U
sing the
extraction tool
provided,
remove the
mini reg
cartridge.
Note: If replacement of the macro line hose
connector is required - remove the regulator
end cap from the fore grip before attempting
to replace the fitting. Failure to do so can
result in damage to the regulator end cap
or the fore grip.
Eye Ribbon Removal
ADHERE STRICTLY TO THESE
AND ALL OTHER SAFETY
INSTRUCTIONS AND GUIDELINES
follow instructions, warnings
· Aandlwaysguidelines
given with any first stage
regulator you use with the Angel FLY Sb.
compressed air/nitrogen gas only
· DOUseNOT
USE CO2.
Only use a paintball regulator that has
· been
designed for air or nitrogen gas.
Do not exceed 850 psi (58bar) input
· pressure
to the Angel FLY Sb.
ake suitable precautions when using
· Tsharp
cutting instruments.
he Macro Line hose must be cut back
· Tcleanly
and square prior to attachment
or re-attachment to ensure secure fitment.
SHOULD YOU BE UNSURE AT ANY STAGE
· YOU
MUST SEEK EXPERT ADVICE.
ADHERE STRICTLY TO THESE
AND ALL OTHER SAFETY
INSTRUCTIONS AND GUIDELINES
a barrel blocking device is fitted
· Etonsure
the Angel FLY Sb.
is removed from
· EthensureAngeltheFLYhopper
Sb.
that there are no paintballs
· Einnsure
the Angel FLY Sb.
the Angel FLY Sb is switched off
· Eviansurethe navigation
button on the rear of the
·
·
·
·
·
·
·
·
grip frame prior to fitting your first stage
regulator.
Paintball industry standard eye/face/ear
and head protection designed specifically
to stop paintballs and meeting ASTM
standard F1776 (USA) or CE standard
(Europe) must be worn by user and any
person within range.
Always follow instructions, warnings
and guidelines given with any first stage
regulator you use with the Angel FLY Sb.
Use compressed air/nitrogen gas only
DO NOT USE CO2.
Only use a paintball regulator that has
been designed for air or nitrogen gas.
Do not exceed 850 psi (58 bar) input
pressure to the Angel FLY Sb.
Take suitable precautions when using
sharp cutting instruments.
The Macro Line hose must be cut back
cleanly and square prior to attachment
or re-attachment to ensure secure fit.
SHOULD YOU BE UNSURE AT ANY STAGE
YOU MUST SEEK EXPERT ADVICE.
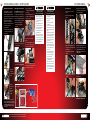
1. Remove the eye cover as shown
opposite.
6. Remove the two screws retaining the
grip frame using a 3mm Allen wrench
and remove the grip frame.
2. Remove the mini reg and mini reg
adaptor.
3. Remove the right hand grip cheek by
removing the 3 screws using a suitable
2mm Allen wrench.
4. Carefully unplug the solenoid from
the board.
7. A small rubber grommet is used to help
secure the eye ribbons in place along the
channel within the main body of the
Angel FLY Sb. Use a 2mm hex key to lift
out the grommet.
5. Carefully unplug the eye ribbons from
the board.
8. Carefully remove the eye ribbon from
the ribbon recess.
Mini reg cartridge assembly.
Note spring stack order.
To rebuild, reverse this procedure.
SPRING
STACK
ORDER
READ ALL WARNINGS BEFORE ATTEMPTING ANY WORK ON YOUR ANGEL.
SHOULD YOU BE UNSURE AT ANY STAGE YOU MUST SEEK EXPERT ADVICE.
READ ALL WARNINGS BEFORE ATTEMPTING ANY WORK ON YOUR ANGEL.
SHOULD YOU BE UNSURE AT ANY STAGE YOU MUST SEEK EXPERT ADVICE.
7