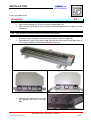
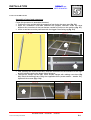
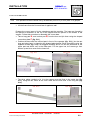
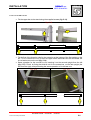
1
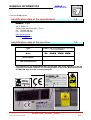
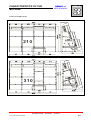
E
GB
I
D
F
NEO LT
210
310
ELECTRO
PLEXI TRIM
MANUALE D’USO
USER MANUAL
MANUEL UTILISATEUR
ANWENDER HANDBUCH
MANUAL DEL USUARIO
Electro plexy trim
210 / 310
MANUALE D’USO
USER’S MANUAL
MANUEL UTILISATEUR
ANWENDER HANDBUCH
MANUAL DEL USUARIO
Cod. NLT.PT-E-T-MM-7-4S-ALL
USOall- EPlexyT-4S.DOC
NEOLT
2007
NEOLT spa
MANUALE D’USO
Cod. NLT.PT-E-T-MM-7-4S-IT
Electro plexy trim
210 / 310
MANUALE D’USO
ITALIANO
Cod. NLT.PT-E-T-MM-7-3S-IT
USO-IT-EPlexyT-4S.DOC
VERSIONE: EPlexyT-04-02/2007
Electro plexi trim
NEOLT
2007
NEOLT spa
USER’S MANUAL
Cod. NLT.PT-E-T-MM-7-4S-GB
Electro plexy trim
210 / 310
USER’S MANUAL
ENGLISH
Cod. NLT.PT-E-T-MM-7-4S-GB
USO-GB-EPlexyT-4S.DOC
VERSION: EPlexyT-04-02/2007
Electro plexi trim
NEOLT
2007
CONTENTS
NEOLT spa
USER’S MANUAL
K SECTOR: ELECTRO PLEXY TRIM
K VERSION: EPlexyT-04-02/2007
NEOLT
K DATE: 12/01/2005
K WRITTEN BY: POLENI P.
Cod. NLT.PT-E-T-MM-7-4S-GB
Chapter 1 General information
1.1 Data of the manual ...............................................................................
1.2 Users ...................................................................................................
1.3 Property of the information....................................................................
1.4 Conventions used ................................................................................
1.4.1 Conventional terms used ............................................................
1.4.2 Conventional symbols used ........................................................
1.5 Identification data of the manufacturer ..................................................
1.6 Identification data of the machine .........................................................
1.7 EC conformity certification ....................................................................
1.8 Warranty...............................................................................................
1.9 Assistance ...........................................................................................
1.10 Use of the manual...............................................................................
1.11 Description of the machine .................................................................
1.11.1 Correct use ...............................................................................
1.11.2 Incorrect use .............................................................................
1.11.3 Structure of the machine ...........................................................
1-1
1-1
1-1
1-2
1-2
1-2
1-3
1-3
1-4
1-4
1-4
1-4
1-5
1-5
1-6
1-7
Chapter 2 Safety information
2.1 Safety criteria........................................................................................
2.1.1 Technical specifications of LASER module .................................
2.2 Qualifications of the personnel..............................................................
2.3 Responsibility .......................................................................................
2.3.1 Protection ...................................................................................
2.3.2 Active safety devices ..................................................................
2.4 Danger zones and residual risks...........................................................
2.5 Noise ...................................................................................................
2.5.1 Information on noise hazards ......................................................
2-1
2-2
2-2
2-3
2-3
2-4
2-4
2-6
2-6
Chapter
3 Characteristics of the machine
3.1 Technical specifications ........................................................................ 3-1
3.2 Power data ........................................................................................... 3-4
3.3 Machine performances ......................................................................... 3-4
Chapter
4 Operator interface
4.1 Operator interface................................................................................. 4-1
4.1.1 Emergency stop .......................................................................... 4-4
Electro plexi trim
VERSION: EPlexyT-04-02/2007
i
CONTENTS
NEOLT spa
USER’S MANUAL
NEOLT
Cod. NLT.PT-E-T-MM-7-4S-GB
Chapter 5 Installation
5.1 Qualifications of the operator ................................................................
5.2 Transportation .....................................................................................
5.2.1 Transportation conditions............................................................
5.2.2 Assessment of damages during transportation............................
5.3 Assembly .............................................................................................
5.4 Assembly of optional modular extensions .............................................
5.5 Assembly of work tool ...........................................................................
5.5.1 Adjustments ................................................................................
5.6 Storage.................................................................................................
5.6.1 Characteristics ...........................................................................
5.7 Placing of the machine .........................................................................
5.7.1 Characteristics of the area the machine is placed in ...................
5.7.2 Electric connection......................................................................
5.7.3 Testing .......................................................................................
5-1
5-1
5-1
5-2
5-3
5-14
5-17
5-20
5-24
5-24
5-25
5-25
5-26
5-26
Chapter 6 Use
6.1 Qualifications of the operator ................................................................
6.1.1 Place of work ..............................................................................
6.1.2 Switching the machine on and off ...............................................
6.1.3 Cutting procedure ......................................................................
6.1.4 Characteristics of the media to cut ..............................................
6-1
6-1
6-1
6-2
6-9
Chapter 7 Maintenance
7.1 Ordinary maintenance ..........................................................................
7.1.1 Qualifications of the operator ......................................................
7.1.2 Procedure ...................................................................................
7.2 Extraordinary maintenance ...................................................................
7-1
7-1
7-1
7-4
Chapter 8 Demolition
8.1 Qualifications of the operator ................................................................ 8-1
8.2 Deactivation of the machine.................................................................. 8-1
8.2.1 Procedure .................................................................................. 8-1
Chapter 9 Attachments
9.1 List of ATTACHMENTS ....................................................................... 9-1
Annex A EC conformity declaration
Electro plexi trim
VERSION: EPlexyT-04-02/2007
ii
GENERAL INFORMATION
NEOLT spa
USER’S MANUAL
NEOLT
Cod. NLT.PT-E-T-MM-7-4S-GB
Data of the manual
1.1
Instruction manual.
Code of Manual
NLT.PT-E-T-MM-7-4S-GB
Users
1.2
Instruction manual.
• Transporter.
• Installer.
• User.
• Maintenance personnel.
• Demolition squad.
For further details on the users of this manual, see 2.2 Qualifications of the personnel.
Property of the information
1.3
The information contained in this manual is reserved property. All rights are reserved.
This manual should be kept for future reference.
This manual cannot be reproduced or copied, as a whole or in parts, without prior written
consent of NEOLT S.p.A. These documents are provided only for the use of the client
whom the manual has been supplied to with the machine, and can be used only for the
installation, use and maintenance of the machine the manual refers to.
NEOLT S.p.A. states that the information of this manual is congruent to the technical
and safety requirements of the machine the manual refers to. The manufacturer cannot be
held responsible for any direct or indirect damages to people, objects or animals due to
the use of these documents or of the machine in conditions other than those authorized.
NEOLT S.p.A. reserves the right to change or improve, without notice, these
documents and these machines, and also other machines marketed of the same model as
the one this manual refers to but with a different serial number. The information of this
manual particularly refers to the machine specified in 1.6 Identification data of the
machine.
Electro plexi trim
VERSION: EPlexyT-04-02/2007
1-1
GENERAL INFORMATION
NEOLT spa
USER’S MANUAL
NEOLT
Cod. NLT.PT-E-T-MM-7-4S-GB
Conventions used
Conventional terms used
1.4
1.4.1
Machine: indicates the machine specified in 1.6. Identification data of the machine.
Frame: bearing structure of the machine.
Qualified personnel: people, who thanks to their knowledge and preparation and
experience, along with the knowledge of the relevant rules, safety requirements and
service conditions, are able to recognize and avoid any possible danger for the people,
the material and the machine.
The descriptions of direction, sense and position (on the right of the machine, on the
left of the machine) refer to the position of the operator in front of the machine.
Conventional symbols used
1.4.2
Text in italics: indicates the title of a chapter, a section, a sub-section, a paragraph, a table
or an illustration of this manual, or another reference manual.
1
(generic number as an example): symbolic representation of a command device or
signal.
A
(generic letter as an example): symbolic representation of a part of the machine.
Notes contain important information, and are pointed out after the text they refer to.
The
danger symbols indicate those procedures which, if not respected, could cause
physical damages to the operator. The manufacturer cannot be held responsible for any
damages to people due to noncompliance with these regulations.
The warning symbols indicate those procedures which, if not respected, could damage the
machines or the devices connected to it. The manufacturer cannot be held responsible for
any damages to objects due to the noncompliance with these regulations.
Electro plexi trim
VERSION: EPlexyT-04-02/2007
1-2
GENERAL INFORMATION
NEOLT spa
USER’S MANUAL
NEOLT
Cod. NLT.PT-E-T-MM-7-4S-GB
Identification data of the manufacturer
neolt
1.5
S.p.A.
Via G. Galilei, 8
24036 Ponte San Pietro (BG) - ITALY
Tel. +39 035 468 811
Fax +39 035 468 886
http://www.neolt.it
E-mail.: [email protected]
Identification data of the machine
1.6
TRIMMER WITH CYLINDRICAL CUTTER
CUTTING HEAD
Type
El.
Model
Plex trim XXX
Serial Number
Year of Construction
The machine has an identification label on the right side of the machine, under the
connection structure, with the EC and weight label on the side. Whereas the laser
ATTENTION sign is on the covering Plexiglas.
LASER DIODE
Wavelength: 400-700 nm
CEI EN 60825-1 : 1995
Max. Output: <5 mW
Class 3 A LASER Product
Electro plexi trim
VERSION: EPlexyT-04-02/2007
1-3
GENERAL INFORMATION
NEOLT spa
USER’S MANUAL
NEOLT
Cod. NLT.PT-E-T-MM-7-4S-GB
EC conformity certification
1.7
Annex A EC conformity certification includes a copy of the EC conformity certification of
the machine.
Warranty
1.8
NEOLT S.p.A. offers a one year warranty on the machine.
The parts subject to normal wear out are not included in the warranty. The warranty is
limited to the substitution or repair of the parts that should result damaged or defected.
The assessment of the defects and causes is carried out by NEOLT S.p.A.
The warranty is cancelled if the machine is used incorrectly, or in an improper or
excessive way, if any non-original spare parts are used and for noncompliance with the
regulations of this manual.
In no case can the purchaser demand the resolution of the contract, claim for
damages or the extension of the warranty.
The term "Original purchaser " refers to the person who initially bought the product
covered by this warranty for purposes other than selling. The warranty is applicable and
valid only for the original purchaser and only for the period (during the warranty period) in
which the purchaser himself has the equipment.
NEOLT S.p.A. cannot be held responsible for negative advertisement, or missed
profits, due to malfunctioning, technical or mechanical, of the product being used or on
display.
The correct and safe operation of the machine is assured only if used in accordance with
what is indicated in the manual and the relevant documentation. NEOLT S.p.A. cannot
be held responsible for damages to people or things due to an incorrect use of the
machine or modifications not authorized by the manufacturer himself.
Assistance
1.9
NEOLT S.p.A. provides, on request, assistance for the installation and the
maintenance of the machine.
Electro plexi trim
VERSION: EPlexyT-04-02/2007
1-4
GENERAL INFORMATION
NEOLT spa
USER’S MANUAL
NEOLT
Cod. NLT.PT-E-T-MM-7-4S-GB
Use of the manual
1.10
Carefully read the chapters General information, Safety information, Characteristics of the
machine and Operator interface.
Please consult the relative chapter for any transportation, installation, use, maintenance
and demolition operation.
This manual and the enclosed documentation (Attachment A EC conformity declaration),
must be kept for the entire technical life of the machine in order to consult it quickly when
necessary.
If the machine is sold as second-hand, this manual and the enclosed documentation must
be supplied along with the product..
Description of the machine
1.11
Correct use of the machine
1.11.1
The machine must be used only to cut the media which it has been designed for
(Plexiglas, Dibond, Alibond, PVC foam, etc...).
The machine is made of physically independent and autonomous groups, therefore the
proper use of the machine also refers to the correct functioning of only one part of it.
Use of the machine
The installation and the maintenance of the machine must be carried out by qualified
personnel only.
The machine was designed to be used in an area with the characteristics indicated in the
section PLACING OF THE MACHINE 5.7 and in the section POWER SUPPLY DATA 3.2.
Electro plexi trim
VERSION: EPlexyT-04-02/2007
1-5
GENERAL INFORMATION
NEOLT spa
USER’S MANUAL
NEOLT
Cod. NLT.PT-E-T-MM-7-4S-GB
Incorrect use of the machine
1.11.2
Any use other than that indicated in part 1.11.1 Correct use of the machine is to be
considered incorrect, especially:
• Using the machine in ways which differ from those which it has been designed for,
represents an anomalous condition and could therefore damage the structure of the
machine.
• Using the machine without its protections and without the safety equipment it is
provided with: particularly without the fixed protections that block access to the internal
equipment.
• Not observing the procedures of this manual and especially the maintenance and
repair regulations.
• Using the machine in an area at risk of fire or explosions if the machine itself does not
have the proper fire equipment.
• Using the machine in areas containing explosive materials.
• Using the machine in an inflammable area.
Electro plexi trim
VERSION: EPlexyT-04-02/2007
1-6
GENERAL INFORMATION
NEOLT spa
USER’S MANUAL
NEOLT
Cod. NLT.PT-E-T-MM-7-4S-GB
Structure of the machine
1.11.3
The machine includes the following
parts:
A Power unit panel
B
C1
C2
D1
D2
E
F
G
H
I
L
M
N1
N2
O
P
Q
R
S
Front view
B
F
D1
Upper panel
Left sheet holder bar
Right sheet holder bar
C1
Upper Plexiglas protection.
Lower Plexiglas protection
Support leg for extension
Laser tracer
G
Feeding table
ON/OFF switch
Power outlet
D2
F
A
Keyboard
E
Stop/Emergency switch
Left modular extension
C2
E
right modular extension
Additional left mod. extension
Suction tube
Suction tube power supply
N1
Mains fuses
N2
Foot pedal
O
Comands
E
Power supply
L
Details
230V
I R
H
M
Q
P
110V
S
I
R
H
Q
Electro plexi trim
VERSION: EPlexyT-04-02/2007
1-7
GENERAL INFORMATION
NEOLT spa
USER’S MANUAL
NEOLT
Cod. NLT.PT-E-T-MM-7-4S-GB
Electro plexi trim
VERSION: EPlexyT-04-02/2007
1-8
SAFETY
INFORMATION
NEOLT spa
USER’S MANUAL
NEOLT
Cod. NLT.PT-E-T-MM-7-4S-GB
Safety criteria
2.1
The machine has been designed and made in compliance with the essential safety criteria
and regulations set forth by:
89/336/ EC and follow. Amendments.
89/392/ EC and follow. Amendments.
EMC Directive
Machine Directive
(see Annex A CE conformity certification).
Thanks to the accurate analysis carried out by the manufacturer, most of the risks
depending on the conditions of use of the machine, both foreseeable and reasonably
foreseeable, have been eliminated.
The complete documentation including all the safety regulations adopted are in the
technical booklet of the machine, which is deposited at the manufacturer's premises.
The manufacturer recommends strict compliance with the instructions, procedures and
recommendations of this manual and with the laws in force on the safety in the work
place. This also refers to the use of the protection devices foreseen, both those integrated
in the machine and personal.
NEOLT S.p.A. cannot be held responsible for any damages to people, animals or
objects due to noncompliance with the safety regulations and recommendations of these
documents.
Safety laws and decrees
List of personal protection equipment and safety equipment.
D.P.R 462/01 section I general information
Regulation for the quick procedure for reporting installations and protection devices
against atmospheric discharges, ground connections for electric devices and dangerous
electric equipment.
Decree 2 May 2001
Criteria for the identification and use of Personal Protection Equipment (PPE).
Notice 3/2001 - Art. 2, section 4 of Law Decree 359/99
Information on the procedure for the periodic controls of certain work equipment.
Law 626/94 Safety and Health of workers.
Law 475/ 92 (updated on January 2, 1997) PPE.
Decree 303/56 (updated on March 18, 1996) General regulations on work hygiene.
Electro plexi trim
VERSION: EPlexyT-04-02/2007
2-1
SAFETY
INFORMATION
NEOLT spa
USER’S MANUAL
NEOLT
Cod. NLT.PT-E-T-MM-7-4S-GB
Technical specifications of LASER module
Laser classification
Standards
Emission
2.1.1
CEI,76-2
CEI EN 60825-1 laser class 3 A.
<5 mW
Safety
Class 3a lasers, in a wave length interval between 400 and
700 nm. do not require particular safety locks or keys for their
functioning. The opening of the beam through line generation
lens is < 40°.
LASER DIODE
Wavelength: 400-700 nm
CEI EN 60825-1 : 1995
Max. Output: <5 mW
Class 3 A LASER Product
Qualifications of the personnel
Stage of the technical life of the machine
2.2
Qualification of the operator in charge
Transportation
Qualified transportation
Installation
Qualified personnel
Use
Qualified personnel
Ordinary maintenance
Qualified personnel
Extraordinary maintenance
Technicians appointed by NEOLT S.p.A.
Demolition
Qualified personnel
Electro plexi trim
VERSION: EPlexyT-04-02/2007
2-2
SAFETY
INFORMATION
NEOLT spa
USER’S MANUAL
NEOLT
Cod. NLT.PT-E-T-MM-7-4S-GB
Responsibility
2.3
NEOLT S.p.A. cannot be held responsible for any damages to people, animals or
objects due to noncompliance with the safety regulations and recommendations of these
documents.
Tampering with the protections and the safety devices is dangerous for the people using
the machine and for those exposed to it.
NEOLT S.p.A. cannot be held responsible for any damages to people, animals or
objects due to tampering with the protections.
Protection
2.3.1
The machine is provided with the following types of protection.
Inter-locked moving protections:
• Magnetic microswitch of the lower Plexiglas protection.
Fixed protection:
• Lower control panel and driving gear panel.
• Upper protection panel of carriage movement chain return gears.
• Upper Plexiglas protection.
• Cable holder chain panel and material suction tube.
Electro plexi trim
VERSION: EPlexyT-04-02/2007
2-3
SAFETY
INFORMATION
NEOLT spa
USER’S MANUAL
NEOLT
Cod. NLT.PT-E-T-MM-7-4S-GB
Active safety devices
• The machine is provided with a
Stop/Emergency
button
on
the
keyboard.
• Ground circuit for all the electric,
electronic and metal parts of the
machine.
• Magnetic microswitch for lower Plexiglas
used for the interventions on the cutting
head. (fig. 2.1).
• Two carriage end of stroke sensors
(upper lower).
• Two end of stroke sensors (open close)
both for left and right sheet holder bar.
2.3.2
Fig. 2.1 Micro for plexiglas door
Dangerous areas and residual risks
2.4
All the areas around the machine in which people are at risk of injuries or health problems
are considered dangerous.
Fig. 2. 2 Sheet holder bar
Pay close attention to hands when the electric sheet
holder bar is being lowered (fig. 2.2) during the
cutting operations. Switch the machine off and
disconnect it, before carrying out any operation
different from the one it has been designed for, or to
open the upper and lower panel.
During certain intervention procedures on the
machine, which are pointed out each time in this
manual, residual risks for the operator may arise.
Residual risks can be avoided by carefully complying
with the procedures of this manual and using the
personal protection devices indicated in Chapter 2.1
Safety Criteria.
•
•
•
•
Position the power cable so that it is not stepped
on or ruined.
Maintenance and service operations must be
carried out only by the engineers authorized by the
manufacturer
During operation, avoid direct exposure to the LASER sources.
Attention: carrying out procedures or interventions on the LASER different from those
specified can cause exposure to dangerous levels of radiation.
Electro plexi trim
VERSION: EPlexyT-04-02/2007
2-4
SAFETY
INFORMATION
NEOLT spa
USER’S MANUAL
NEOLT
Cod. NLT.PT-E-T-MM-7-4S-GB
•
Pay attention to the danger signs on the trimmer.
The danger labels and the machine identification labels are placed on the machine in the
points indicated below.
LASER DIODE
Wavelength: 400-700 nm
CEI EN 60825-1 : 1995
8GMOD1136
8GMOD1136
Max. Output: <5 mW
Class 3 A LASER Product
Neolt
ITALY
LASER DIODE
Wavelength: 400-700 nm
CEI EN 60825-1 : 1995
Max. Output: <5 mW
Class 3 A LASER Product
Electro plexi trim
VERSION: EPlexyT-04-02/2007
2-5
SAFETY
INFORMATION
NEOLT spa
USER’S MANUAL
NEOLT
Cod. NLT.PT-E-T-MM-7-4S-GB
NEOLT S.p.A. cannot be held responsible for any damages to people, animals or
objects due to non compliance with the standards or for not using the prescribed personal
protection equipment. Chapter 2.1 Safety criteria
Noise
2.5
Figures on noises produced by a machine identical to the one described in this
manual, measured according to the "Machine Directives " (89/392/EC and following
modifications).
Average level of continuous acoustic pressure equivalent pondered, around the machine
at a distance of one meter:
• While it is running : lower than …… db.
Information on noise hazards
2.5.1
The levels of exposure of the worker are obviously linked to the emission levels of the
machine, however other factors affect the levels of exposure of the workers: duration of
the exposure, characteristics of the area and the presence of other machines. The levels
of emission of the machine, however, allow the users to assess the danger related to
acoustic emissions.
A continuous use of the machine and of other machinery present in the area of installation
could lead to a high level of personal daily exposure to noise.
When daily personal exposure is equal to or higher than 85 dB(A) the use of PPE is
recommended (protective caps, protective ear plugs, ...).
When daily personal exposure is equal to or higher than 90 dB(A) the use of PPE is
obligatory (protective caps, protective ear plugs, ...).
For further information on the protection measures, in Italy refer to the standard UNI
EN458 of 1995 and EN457
Electro plexi trim
VERSION: EPlexyT-04-02/2007
2-6
CHARACTERISTICS OF THE
MACHINE
NEOLT
NEOLT spa
USER’S MANUAL
Cod. NLT.PT-E-T-MM-7-4S-GB
Technical specifications
Model
Dimensions with support.
mm.
inches
Weight with support.
Kg.
Lbs.
Max. cutting format.
mm.
inches
Cutting thickness.
mm.
inches
3.1
210
310
2664x1160xh2770
104,8”x45,7”xh109”
2664x1450xh3750
104,8”x57”xh147,6”
380
838
480
1058
2100
82”
3100
122”
6 Plex - 10 Forex®
¼“Plex - 0,39” Forex®
Edging
±1 mm/mt.
Precision.
Linearity
±0,25 mm/mt.
Working modality.
Automatic, Semi-Automatic.
Allowed materials.
Plexiglas - Polycarbonate – Acrylic - Dibond - Forex® - PVC
Cutting speed.
from 0 to 12 m/min..
Type of cutter
30.000 rpm.
Electric absorption.
230/240V 50/60 Hz - 100/110V 50/60 Hz
Absorbed current
max. 7A
Temperature interval
-
max. 12A
from 5° C to 55°C
Relative humidity interval
From 30 % to 95°C
Required lighting
200 – 600 lux
Double electric sheet holder bar
Side extension
standard
Two left and one right side extensions, standard
Standard suction tank
230-240V 50/60HZ - 110V 60Hz
Classification
CEI, 76-2
Standard laser Standard
CEI EN 60825-1 laser class 3 A
Emission
<5 mW
Modular extension with support
Optional (it can be assembled both on the right and left)
Electro plexi trim
VERSION: EPlexyT-04-02/2007
3-1
CHARACTERISTICS OF THE
MACHINE
NEOLT spa
USER’S MANUAL
NEOLT
Cod. NLT.PT-E-T-MM-7-4S-GB
Mod.210
Mod.310
!
Electro plexi trim
VERSION: EPlexyT-04-02/2007
3-2
CHARACTERISTICS OF THE
MACHINE
NEOLT spa
USER’S MANUAL
NEOLT
Cod. NLT.PT-E-T-MM-7-4S-GB
The optional extensions can be assembled both on the right or left side, according to the
needs. In the illustrations below there is just one extension on the left side as an example.
As regards overall dimensions, keep in mind that each optional extension measures about
700 mm in width.
Mod.210
Mod.310
!
Electro plexi trim
VERSION: EPlexyT-04-02/2007
3-3
CHARACTERISTICS OF THE
MACHINE
NEOLT
NEOLT spa
USER’S MANUAL
Cod. NLT.PT-E-T-MM-7-4S-GB
Power supply data
3.2
Voltage and single-phase frequency:
Consumption
Absorption:
230V/240V 50Hz – (110V/60Hz).
1600W
Power fuse 230V
Power fuse 110V
T 10A.
T 16A. (x2)
max. 7A – (max. 12A).
Responsibility
NEOLT S.p.A. cannot be held responsible for problems, defects that should take place
due to non-compliance with the power supply values supplied.
Machine performances
K Max cutting thickness PLEX material/panels
K Max cutting thickness FOREX® material/panels
3.3
6 mm
10 mm
Electro plexi trim
VERSION: EPlexyT-04-02/2007
3-4
OPERATOR INTERFACE
NEOLT spa
USER’S MANUAL
NEOLT
Cod. NLT.PT-E-T-MM-7-4S-GB
Operator interface
4.1
The keyboard (fig. 4.1) is made of easy-to-use command and programming keys.
To use the operating keys, switch on the machine and follow the sequence below.
Fig. 4.1 Keyboard
1
5
8
10
Key
3
4
6
2
7
9
11
Description
1
Cut Key
Press this key to start the cutting phase and the carriage moves the cutting
head from top to bottom.
When the carriage is moving the green led of the key lights up.
2
Carriage Up Key
Press this key to start the cutting phase and the carriage moves the cutting
head from bottom to top.
When the carriage is moving the green led of the key lights up.
Electro plexi trim
VERSION: EPlexyT-04-02/2007
4-1
OPERATOR INTERFACE
NEOLT spa
USER’S MANUAL
NEOLT
Cod. NLT.PT-E-T-MM-7-4S-GB
Key
Description
3
Green led
The led switches on when the machine is powered, it flashes during the
sheet holder’s open and close movements.
4
Yellow led
The led switches on and flashes when a wrong command is given.
The led flashes when the command is not reset.
5
Sheet holder close key
Press this key to start closing the sheet holder.
The sheet holder is in position when the green led on the carriage up key
stops flashing.
If the sheet holder is not in position the cut cannot be performed.
6
Reset or stop key
Use this key to cancel the operation when a wrong command is given or to
stop an operation underway.
7
Sheet holder open key
Press this key to start opening the sheet holder, which automatically opens
up to the end of travel.
The sheet holder open signal is signaled by the green led of the carriage
down key which stops flashing.
Electro plexi trim
VERSION: EPlexyT-04-02/2007
4-2
OPERATOR INTERFACE
NEOLT spa
USER’S MANUAL
NEOLT
Cod. NLT.PT-E-T-MM-7-4S-GB
Key
Description
8
LASER tracer key
When this key is pressed the laser tracer is switched on. A double laser
beam sent from the two ends shows the operator the cutting line.
9
Cutter ON/OFF key
When this key is pressed the cutter rotation movement is enabled.
10
Stop/Emergency Key
When this key is pressed all the operations of the machine are interrupted.
Rotate key from left to right to unlock.
After pressing the emergency button, run a set up operation to determine
the height of the blade: press the key “height of blade” to position the blade
at the right height according to the thickness of the panel to cut.
11
Potentiometer speed control knob
The potentiometer knob is used to control the up and down speed of the
carriage. This assures a more effective and precise cut, especially for very
hard materials.
Electro plexi trim
VERSION: EPlexyT-04-02/2007
4-3
OPERATOR INTERFACE
NEOLT spa
USER’S MANUAL
NEOLT
Cod. NLT.PT-E-T-MM-7-4S-GB
Fig. 4.2 Foot pedal
12
13
12
Sheet holder close key
Press this key to start closing the sheet holder if the
sheet holder is open or vice versa, to open it if the sheet
holder is closed.
13
Cut key
When this key is pressed the cutting phase starts from
the bottom up, if the carriage is down, or vice versa,
from top to bottom if the carriage is up.
The cut command given from the foot pedal is enabled
only if the sheet holder is closed, thus blocking the
material to trim.
Emergency stop
4.1.1
The machine can be stopped by the operator, in any moment, if he notices an anomaly
during the working cycle or for safety reasons. To immediately stop the machine, press
the emergency button above the keyboard.
To restore the standard operation of the machine after solving the problem that caused
the emergency stop, rotate the button pressed previously clockwise or counter-clockwise.
Electro plexi trim
VERSION: EPlexyT-04-02/2007
4-4
INSTALLATION
NEOLT
NEOLT spa
USER’S MANUAL
Cod. NLT.PT-E-T-MM-7-4S-GB
Qualifications of the operator
5.1
The transportation, installation and connecting operations of the machine must be carried
out by qualified personnel only, transporters and electricians.
Transportation
5.2
Transportation conditions
5.2.1
The trimmer is shipped in a carton box
2.
1
to protect the panels on the top end and a box
(Fig. 5.1) which holds everything. Transportation conditions. The box contains the
standard side extensions, the lower stand, the stand for model 160, or the wall assembly
components for models 250-310, the tool bag needed to complete the few installation
operations of the machine and the user’s manual.
The size of the packaging and its total weight (packaging and trimmer and stand) are as
follows:
Dimension
cm.
Inches.
Gross weight
Kg.
Lbs.
210
310
380x72xh100
149,6”x28,4”x39,4”
480x72xh100
189”x28,4”x39,4”
440
970
560
1235
The hoisting, transportation and handling operations of the machine or its parts must be
exclusively carried out by competent personnel, properly trained for the task.
It is absolutely forbidden to pass or stop under hanging loads.
The machine hoisting, transportation and handling means must be adequate for the
weight of the machine and the size of the elements to lift, transport and handle and must
comply with the laws in force in the area of installation.
Protect the machine from external atmospherics, see paragraph Characteristics of the
area the machine is placed in 5.7.1.
Electro plexi trim
VERSION: EPlexyT-04-02/2007
5-1
INSTALLATION
NEOLT spa
USER’S MANUAL
NEOLT
Cod. NLT.PT-E-T-MM-7-4S-GB
Fig. 5.1 Transportation conditions
1
2
2
Assessment of damages during transportation
5.2.2
Check the conditions of the machine by visually inspecting it, after having removed it from
the shipping box. Any defects on the visible parts of the machine indicate crashes during
transportation, which could also affect the normal operation of the machine.
Especially assess the conditions of these parts:
• Emergency/Stop key and keyboard.
• Carriage speed adjustment Potentiometer.
• Keyboard.
• Carriage Plexiglas protection, upper and lower.
• Side extensions and guides for side extensions.
Verify that the screws and nuts of the protection panels are tight.
Electro plexi trim
VERSION: EPlexyT-04-02/2007
5-2
INSTALLATION
NEOLT spa
USER’S MANUAL
NEOLT
Cod. NLT.PT-E-T-MM-7-4S-GB
Assembly
•
•
5.3
Open the packaging box 1 which contains all parts (fig. 5.1).
Remove carton protections and all the parts needed to assemble the support and the
extensions.
This operation must be carried out by minimum two people.
•
•
Break the carton leaving the trimmer on its polystrene supports (fig. 5.2).
Assemble the upper fixing support (fig. 5.3) and the lower support legs (fig. 5.4), by
removing the supplied screws and putting them back on.
Fig. 5.2
Fig. 5.3
Fig. 5.4
Fig. 5.5
•
Attention: the screws are locked on
the opposite side with a nut. (fig.
5.5).
Electro plexi trim
VERSION: EPlexyT-04-02/2007
5-3
INSTALLATION
NEOLT spa
USER’S MANUAL
NEOLT
Cod. NLT.PT-E-T-MM-7-4S-GB
Assembly of stand and extensions
Follow this procedure to assemble the stand
• Position the long uprights with the supporting feet facing the same way (fig. 5.6).
• Insert the connection cross-bars between the uprights. Attention: there are three
different size cross bars in the box that are needed to position to the machine (fig. 5.7).
• All the cross bars must be positioned with the bigger holes facing up (fig. 5.8).
Fig. 5.6
Fig. 5.7
Fig. 5.8
• After inserting the central cross bars, insert the cross bars for the extension on the right
and left, always keeping the bigger holes facing up.
• Furthermore, always on the right, insert another upright with relating cross bars (fig.
5.9). Block the bearing frame using the supplied screws (screw washer – washer nut),
tighten all the screws (fig. 5.10).
Fig. 5.9
Fig. 5.10
Electro plexi trim
VERSION: EPlexyT-04-02/2007
5-4
INSTALLATION
NEOLT spa
USER’S MANUAL
NEOLT
Cod. NLT.PT-E-T-MM-7-4S-GB
This operation must be carried out by at least two (mod. 210) or four (mod. 310) people.
• Lift the frame from the floor and lean it against a wall.
Prepare the corner bars to fix the extensions and the machine. The bars are formed by
two pieces to assemble on the top of the support and two pieces on the bottom of the
support. Follow this procedure to assemble the corner bars:
• Take a long part A, and a short part B, from the box and join them using the shaped
connection plate C (fig. 5.11).
• Position the bars with the inclined part in front of the operator (fig. 5.11), join the two
long and short bars, by inserting the shaped plate behind. Block everything using the
supplied screws (fig. 5.12). we suggest deciding which one will be positioned in the
upper part and which one in the lower part. For the upper bar, the screws go from
bottom up and vice versa for the lower bar.
Fig. 5.11
Fig. 5.12
B
A
C
• The three plates needed to fix it to the support must be fixed to the upper bar (fig.
5.13), using the two holes at the outer ends and the side hole of the long bar (fig.
5.14).
Fig. 5.13
Fig. 5.14
Electro plexi trim
VERSION: EPlexyT-04-02/2007
5-5
INSTALLATION
NEOLT spa
USER’S MANUAL
NEOLT
Cod. NLT.PT-E-T-MM-7-4S-GB
• Fix the upper bar to the stand using the supplied screws (fig. 5.14).
Fig. 5.15
• Fix the first of the three tie rods for the extension at the bottom of the first upright on the
left. To fix it remove the nut, of the front upper screw and slide into the hole under the
tie rod and screw on the nut (fig. 5.16).
• Same operation for the second tie rod, inserting it on the second upright from the left
(fig. 5.17). Finish, by fixing the third tie rod for the extensions, on the last upright (the
first from the right), and performing the same operation to fix this last one.
Fig. 5.16
Fig. 5.17
Electro plexi trim
VERSION: EPlexyT-04-02/2007
5-6
INSTALLATION
NEOLT spa
USER’S MANUAL
NEOLT
Cod. NLT.PT-E-T-MM-7-4S-GB
• Now fix the lower inclined bar to the tie rods for the extensions inserting at the same
time the supporting feet. The screw must hold in order the tie rod that leans against the
inclined cross bar which is supported by the tube for the feet (fig. 5.18).
• The ties rods, the inclined cross bar and the tube for foot are fixed in the three points
where the tie rods for the extensions are positioned (fig. 5.19).
Fig. 5.18
Fig. 5.19
Electro plexi trim
VERSION: EPlexyT-04-02/2007
5-7
INSTALLATION
NEOLT spa
USER’S MANUAL
NEOLT
Cod. NLT.PT-E-T-MM-7-4S-GB
• After blocking the tie rods for the extensions, fix the two tie rods for the machine,
inserting them to the outside of upright three and four of the support (the remaining)
(fig. 5.17). Avoid, for now, to tighten the screws until the machine is installed.
• The opposite side of the tie rods of the machine is momentarily free.
Fig. 5.20
Assembly of side extensions
• Remove the three extensions that have to be assembled on the stand assembled
earlier.
• The first extension to put on the left is easily identified by the millimetric scale, already
fastened on the lower bar of the extension (fig. 5.21).
• The second extension to position on the left can be identified for the adjustment knob
fastened under the lower bar of the extension (fig. 5.22).
• The third extension to fasten on the right, can be identified because it has no particular
feature.(fig. 5.23).
Fig. 5.21
Fig. 5.22
Fig. 5.23
Electro plexi trim
VERSION: EPlexyT-04-02/2007
5-8
INSTALLATION
NEOLT spa
USER’S MANUAL
NEOLT
Cod. NLT.PT-E-T-MM-7-4S-GB
• To assemble the side extensions, put the extension on the inclined bar, assembled
previously (fig. 5.24) and fix it to the bars using the four supplied screws (two in the
upper part (fig. 5.25) and two in the lower part (fig. 5.26)). To perform this operation
one person should hold the extensions in position and the second should screws it onto
the stand.
Fig. 5.24
Fig. 5.25
Fig. 5.26
We suggest not tightening the screws until the machine is inserted.
Assembly of the machine
Carefully position the machine to avoid damaging people and the machine itself. To
position the machine in the right position follow this procedure:
At least four or six people must carry out this operation (mod. 210 - mod. 310).
• use a lift to bring the machine
which we left in the box on the
wooden pallet, as close to the
stand just assembled, with the
legs close to the seat on the stand
(fig. 5.27).
Fig. 5.27
Electro plexi trim
VERSION: EPlexyT-04-02/2007
5-9
INSTALLATION
NEOLT spa
USER’S MANUAL
NEOLT
Cod. NLT.PT-E-T-MM-7-4S-GB
• lift the machine vertically, letting the feet touch the floor (fig. 5.28).
• Rotate the machine towards the supporting stand (fig. 5.29).
• Very carefully bring the machine in its seat on the stand between the extensions just
assembled (fig. 5.30).
Fig. 5.28
Fig. 5.29
Fig. 5.30
• Tighten the three machine fastening screws to the stand both on the top and bottom
(fig. 5.31-32).
• Fasten the upper part of the machine to the supporting stand using the four supplied
screws (fig. 5.33).
• Now tighten the screws that support the side extensions to the stand which we had left
a little loose.
Fig. 5.31
Fig. 5.32
Fig. 5.33
Electro plexi trim
VERSION: EPlexyT-04-02/2007
5-10
INSTALLATION
NEOLT spa
USER’S MANUAL
NEOLT
Cod. NLT.PT-E-T-MM-7-4S-GB
• Fix the machine tie rods to the two external plates on the lower legs of the machine.
(fig. 5.34).
• Fix the right and left side extensions to the machine using the screws supplied. As you
tighten the screws don’t forget to line up the supporting brackets with the work table
(fig. 5.35).
Fig. 5.34
Fig. 5.35
Now fix the guides of the right and left extensions.
• To fix the right millimetric guide use the supplied screws. Since the guide is already
fixed in one point you just need to rotate it and screw it on, with a screw on the right
extension (fig. 5.36) and two on the machine work table (fig. 5.36(A)-37).
Fig. 5.36
Fig. 5.37
A
Electro plexi trim
VERSION: EPlexyT-04-02/2007
5-11
INSTALLATION
NEOLT spa
USER’S MANUAL
NEOLT
Cod. NLT.PT-E-T-MM-7-4S-GB
• Use the relevant pins to fix the left millimetric guide (fig. 5.38). Since the guide is
already fixed in one point, just rotate it and screw it on, with a pin on the right
extension (fig. 5.39a) and with two on the machine work table (fig. 5.39).
Fig. 5.38
Fig. 5.39
Fig. 5.39a
• Position the suction container, behind
the machine between the frame and
the back of the machine work table
(fig. 5.40).
• Hook the suction joint to the suction
tube of the device (fig. 5.41).
• Connect the electric wire of the suction device to the power outlet on the right of the
lower panel, where there is also the ON/OFF switch of the machine itself. (fig. 5.41 A).
Fig. 5.40
Fig. 5.41
A
Electro plexi trim
VERSION: EPlexyT-04-02/2007
5-12
INSTALLATION
NEOLT spa
USER’S MANUAL
NEOLT
Cod. NLT.PT-E-T-MM-7-4S-GB
Fixing the frame and machine to the wall
After assembling everything, support, extensions, machine and container, the trimmer is
steady and in the best conditions for use, but for those who want the machine can be fixed
to the wall for more stability.
Follow this procedure to fix the trimmer to the wall:
• Make a hole using a drill in the wall using the measures indicated as reference (fig.
5.42).
The holes must be made using a drill and bit for walls with a 9 mm diameter.
Fig. 5.42
Electro plexi trim
VERSION: EPlexyT-04-02/2007
5-13
INSTALLATION
NEOLT spa
USER’S MANUAL
NEOLT
Cod. NLT.PT-E-T-MM-7-4S-GB
Assembly of the optional modular extensions
5.4
Before starting the assembly procedure, disconnect the machine from the mains.
• To add one or more extensions, start, but putting together the external side upright and
the three cross bars. (fig. 5.43).
• Remove the four fastening screws of the upright with the three cross bars of the frame
already in position and use them again to fix both the cross bar of the optional stand
and the cross bar of the already assembled frame (fig. 5.44).
• Fix the two corner bars to the stand both on top and on the bottom using the two
supplied plates (fig. 5.45).
Fig. 5.43
Fig. 5.44
Fig. 5.45
Fig. 5.46
• Fix the lower tie rod and the foot of the new
optional extension. (fig. 5.46).
Electro plexi trim
VERSION: EPlexyT-04-02/2007
5-14
INSTALLATION
NEOLT spa
USER’S MANUAL
NEOLT
Cod. NLT.PT-E-T-MM-7-4S-GB
• Lean the optional extension on the frame that was just put together and screw it from
the back with the supplied screws (three above and three below) (fig. 5.47).
Fig. 5.47
• Screw the optional side extensions on the adjacent standard extension, with the
supplied screws (fig. 5.48). As we tighten the screws don’t forget to line up the
aluminum supporting frames between themselves (fig. 5.49).
Fig. 5.48
Fig. 5.49
If the structure of the machine is not fixed to the wall the assembly operations of the
optional extensions is considered completed and the machine is ready to be used. If on
the other hand the structure is fixed to the wall continue following the procedure described
below.
Electro plexi trim
VERSION: EPlexyT-04-02/2007
5-15
INSTALLATION
NEOLT spa
USER’S MANUAL
NEOLT
Cod. NLT.PT-E-T-MM-7-4S-GB
• Drill the wall for the optional extensions as indicated in (fig. 5.50). The measurement
depends on just one modular extension, for more than one count the multiples of the
measure indicated in the photo. The example is valid for the left and right extension.
Fig. 5.50
.
Electro plexi trim
VERSION: EPlexyT-04-02/2007
5-16
INSTALLATION
NEOLT spa
USER’S MANUAL
NEOLT
Cod. NLT.PT-E-T-MM-7-4S-GB
Assembly of work tool
5.5
The machine is packed and shipped with the cutting head on the carriage but without the
cutter. Follow this procedure to fix the cutter:
• The machine is supplied with four different cutter models, to be used to trim the various
type of media, with different thickness and rigidity (fig. 5.51).
• To choose the right cutter for the media to cut, bring the carriage down in the position
accessible from the lower inspection door (fig. 5.52 - 1).
• Remove the two knobs that fix the transparent Plexiglas door and remove it (fig. 5.44 2).
Fig. 5.51
Fig. 5.52
2
1
2
• Remove the knob that fixes the tool holder motor ring nut, disconnect the electric wire
of the motor, rotate the ring nut with the motor counter-clockwise and slide out the
entire group (sequence fig. 5.53).
Fig. 5.53
Electro plexi trim
VERSION: EPlexyT-04-02/2007
5-17
INSTALLATION
NEOLT spa
USER’S MANUAL
NEOLT
Cod. NLT.PT-E-T-MM-7-4S-GB
• To install the new router insert the mandrel block in the hole placed on the router
rotating axis. With the key in equipment unscrew the bush that acts as mandrel (fig.
5.54), insert the router upto the mandrel counter boring (fig. 5.55), and secure the bush
with the same key in equipment. (fig. 5.56).
Fig. 5.54
Fig. 5.55
• Slide the cutter in the support on the carriage, until the cutter supporting ring nut is in
position (fig. 5.57).
Fig. 5.56
Fig. 5.57
Electro plexi trim
VERSION: EPlexyT-04-02/2007
5-18
INSTALLATION
NEOLT spa
USER’S MANUAL
NEOLT
Cod. NLT.PT-E-T-MM-7-4S-GB
• Rotate the cutting head clockwise and block it with the knob that was removed earlier.
(fig. 5.58 – 58a).
• Reconnect the cutting head motor power cable (fig. 5.59).
Fig. 5.58
Fig. 5.58a
Fig. 5.59
Electro plexi trim
VERSION: EPlexyT-04-02/2007
5-19
INSTALLATION
NEOLT spa
USER’S MANUAL
NEOLT
Cod. NLT.PT-E-T-MM-7-4S-GB
Adjustments
5.5.1
Verify that the cutting angle is 90°
• Make a perpendicular cut on a panel of about 1mt by 1mt.
• Reposition the same panel on the right side and verify that the vertical cut performed
earlier is perfectly parallel with the cutting line.
• If possible use the knob that adjusts the inclination of the left millimetric guide, screwing
it on or off to increase or decrease the angle (fig. 5.60).
Fig. 5.60
Follow this procedure to line the guide supports with the panel:
• Put a rigid panel on the extensions with a straight side leaning on the millimetric
guides.
• Loosen the screws that are behind each millimetric guide and adjust them so that the
panel leans evenly on all.
Electro plexi trim
VERSION: EPlexyT-04-02/2007
5-20
INSTALLATION
NEOLT spa
USER’S MANUAL
NEOLT
Cod. NLT.PT-E-T-MM-7-4S-GB
Verify the correct distance between the work table and the cutting device needed to cut
the Dibond. To cut the media correctly the machine must be adjusted so that the media is
trimmed evenly along the entire length of the cut. Follow this procedure to adjust the
machine:
• Lay a panel of the media to cut (Dibond) on the machine. The media should have the
same dimensions of the length of cut of the machine.
• Perform the first cut along the panel. After the first cut, at both ends (on the top and
bottom) where the machine was factory adjusted, the blade removed all the first layer
and even the media in-between, without touching the layer of media on the opposite
side. Perhaps this did not happen towards the middle part of the cut. (fig. 5.61).
Fig. 5.61
NO
YES
Electro plexi trim
VERSION: EPlexyT-04-02/2007
5-21
INSTALLATION
NEOLT spa
USER’S MANUAL
NEOLT
Cod. NLT.PT-E-T-MM-7-4S-GB
• To adjust the table use the back tie rod
and tighten (if I need to push the table
towards the balde), or loosen (if I have
to move the table away from the blade),
the screw pin
5.62)
Fig. 5.62
1 of the tie rod. (fig.
1
Fig. 5.63
• Run a trial cut after every
adjustment until the cut is
even along the entire cutting
line. (fig. 5.63).
YES
Electro plexi trim
VERSION: EPlexyT-04-02/2007
5-22
INSTALLATION
NEOLT spa
USER’S MANUAL
NEOLT
Cod. NLT.PT-E-T-MM-7-4S-GB
• When the cut is perfect along the cutting
line, lock the screw of the tie rod using
Fig. 5.64
the lock nut 2 of the tie rod (fig. 5.64)
2
No other adjustments are necessary because the machine is factory tested.
Electro plexi trim
VERSION: EPlexyT-04-02/2007
5-23
INSTALLATION
NEOLT spa
USER’S MANUAL
NEOLT
Cod. NLT.PT-E-T-MM-7-4S-GB
Storage
5.6
The indications contained in this section must be followed during the periods of temporary
storage of the machine which could take place in the following situations:
• When the machine is not installed immediately after it is delivered.
• When the machine is disconnected and stored while waiting for it to be relocated
If possible the machine must be stored so no unauthorized people can reach it, it must be
protected against damages due to dust, humidity, heat, cold, sun rays or substances able
to corrode and attack it.
The storage areas must not be near any dangerous areas.
Characteristics
5.6.1
• Allowed temperature interval: from -5°C to +55°C, maximum temperature for short
periods.
• Allowed humidity interval: from 30% to 95% without condensate. Ideal humidity ~55%.
• Proper natural and/or artificial illumination.
• Proper protection from atmospherics.
• Adequate space to carry out the hoisting and transportation operations in a safe and
easy way.
• Horizontal surface with a capacity higher than the mass of the machine.
• Adequate space to carry out the ordinary maintenance and technical operations.
Electro plexi trim
VERSION: EPlexyT-04-02/2007
5-24
INSTALLATION
NEOLT spa
USER’S MANUAL
NEOLT
Cod. NLT.PT-E-T-MM-7-4S-GB
Placing of the machine
Characteristics of the area the machine is placed in
5.7
5.7.1
Power supply
The area where the machine is installed must be equipped with the power supply
connections described in 3.2 Power supply data.
Space requirements
For the normal use of the machine and the loading and unloading operations, it is
important to have an area directly proportional to the size of the media to cut.
Protection from atmospherics
The machine must be placed in a suitably protected room, away from atmospherics.
Floor requirements
Prepare the stable horizontal surface of the machine keeping in mind the mass of the
machine itself. Also take into account all extra accessories.
Optimal stability and using conditions can be obtained with a maximum planarity error of ±
… mm/m.
Illumination
A good illumination is necessary to safely use and carry out maintenance operations
(indicatively 200 - 600 lux), according to the standard UNI10380:1994.
Atmospheric characteristics of the area
• Temperature: from 18°C to 35°C.
• Humidity: from 30 % to 95% without condensate. Ideal humidity ~55%, with maximum
temperature of 40°C.
General features of use
• The machine must not be used in explosive atmospheres
• The machine must not be used near acids, corrosive agents, salt, etc.
• The machine must not be used with ionizing and non-ionizing radiations (X rays,
microwaves, ultraviolet rays).
Electro plexi trim
VERSION: EPlexyT-04-02/2007
5-25
INSTALLATION
NEOLT spa
USER’S MANUAL
NEOLT
Cod. NLT.PT-E-T-MM-7-4S-GB
Electric connection
5.7.2
Check that the electric line is able to carry the absorption of the machine.
Electric hazards. Before making any connections to the mains make sure the system has
been grounded.
• Position the power cable so it is not stepped on or ruined.
• Do not put the power cable where it can be damaged.
• Maintenance and service operations must be performed only by the assistance office
authorized by the manufacturer.
• Disconnect the mains that power the machine.
• If the disconnection device is the mains plug, the relating outlet must be easy to
access and near the machine.
• Power the line that feeds the machine.
• The electric system must be fitted with:
• Protection against over-currents thanks to devices with appropriate intervention
current, according to the maximum absorption of the machine.
• An intervention device for insulation problems (differential) appropriate for the type of
machine.
• An external equipotential protection circuit (ground connection) adequate and
complaint with the laws in force in the place of installation of the machine.
Testing
5.7.3
Before using the machine continuously check the general operation of the machine by
doing some sample cuttings.
If you hear vibrations or unusual noises, immediately switch off the machine and contact
the NEOLT assistance office see Identification data of manufacturer 1.5.
Electro plexi trim
VERSION: EPlexyT-04-02/2007
5-26
USE
NEOLT spa
USER’S MANUAL
NEOLT
Cod. NLT.PT-E-T-MM-7-4S-GB
Qualifications of the operator
6.1
The machine must be used by qualified personnel only.
Place of work
6.1.1
Position of the operator:
during the start up and cutting operations in front of the machine with the control panel in
the center. During maintenance operations the position depends on the specific operation
that needs to be carried out.
Switching the machine on and off
6.1.2
The main switch is placed on the lower right side of the power unit panel. After pressing
the main switch on “I”, the trimmer is ready to perform the cutting operations. (fig. 6.1).
Switching the machine off
After finishing the operating cycle, press the main switch on “0” to switch off the machine.
Fig. 6.1
The power cables of the following components must be connected to use the machine
correctly: (see sequence fig. 6.2).
1. Power supply of suction device (1).
2. Connection of the suction tube to the suction joint at the bottom of the machine
behind the machine(2).
3. The cutting head motor power supply (3).
Fig. 6.2
1
2
3
Electro plexi trim
VERSION: EPlexyT-04-02/2007
6-1
USE
NEOLT spa
USER’S MANUAL
NEOLT
Cod. NLT.PT-E-T-MM-7-4S-GB
Cutting procedure
6.1.3
Before starting the cutting procedure, you need to choose the right cutter for the media to
trim. The machine comes with four cutters each with different cutting features each
marked with a different code. The code of the cutter is stamped on the back of the cutter.
NEOLT A1:
it can cut rigid acrylic media, like PLEX, up to 6mm. thick.
it can cut media with Aluminum, type Alibond, Dibond, up to 6mm. thick.
NEOLT B1:
it can cut PVC Foam, like FOREX®, up to 6mm. thick.
NEOLT D1:
it can cut PVC Foam, like FOREX®, from 6mm. to 10mm. thick.
NEOLT E1:
to cut Dibond, with a 90° angle up to a 6mm thickness. It can be used to
fold the cut media to cover or create structures.
Electro plexi trim
VERSION: EPlexyT-04-02/2007
6-2
USE
NEOLT spa
USER’S MANUAL
NEOLT
Cod. NLT.PT-E-T-MM-7-4S-GB
It is highly recommended, before carrying out any cutting operations, to verify that the
cutter chosen is right for the thickness of the panel to cut. This will prevent low or high
cuts, or breaking the cutter.
• After selecting the right cutter, to fix it to the cutter, bring the carriage down to the
position accessible from the lower inspection door (fig. 6.3 - 1).
• Remove the two knobs that fix the transparent Plexiglas door and remove it (fig. 6.3 2).
• Remove the knob that fixes the tool holder motor ring nut, disconnect the motor power
cable, rotate the ring nut with the motor counter-clockwise and slide out the entire
group (sequence fig. 6.4).
Fig. 6.3
2
1
2
Fig. 6.4
Electro plexi trim
VERSION: EPlexyT-04-02/2007
6-3
USE
NEOLT spa
USER’S MANUAL
NEOLT
Cod. NLT.PT-E-T-MM-7-4S-GB
• To install the new router insert the mandrel block in the hole placed on the router
rotating axis. With the key in equipment unscrew the bush that acts as mandrel (fig.
6.5), insert the router upto the mandrel counter boring (fig. 6.6), and secure the bush
with the same key in equipment. (fig. 6.7).
Fig. 6.5
Fig. 6.6
• Slide the cutter in the support on the carriage, until the cutter supporting ring nut is in
position (fig. 6.8).
Fig. 6.7
Fig. 6.8
Electro plexi trim
VERSION: EPlexyT-04-02/2007
6-4
USE
NEOLT spa
USER’S MANUAL
NEOLT
Cod. NLT.PT-E-T-MM-7-4S-GB
• Rotate the cutting head clockwise and block it with the knob that was removed earlier
(fig. 6.9 – 9a).
• Reconnect the cutting head motor power cable (fig. 6.10).
Fig. 6.9
Fig. 6.9a
Fig. 6.10
• After positioning the tool and closing the transparent Plexiglas door, bring the cutting
carriage up or down.
The cut is made vertically from top to bottom and vice versa from bottom to top, selecting
the appropriate knob.
Electro plexi trim
VERSION: EPlexyT-04-02/2007
6-5
USE
NEOLT spa
USER’S MANUAL
NEOLT
Cod. NLT.PT-E-T-MM-7-4S-GB
• Position the panel to trim on the left
extensions. (Fig. 6.11). Select the
cutting sizes using the reference
brackets.
Fig. 6.11
• Lower the sheet holder bar, by using the
close key and wait for the green led on
the carriage down side, stops flashing,
before starting any operation. The sheet
holder bar closing operation can be
performed also using the foot pedal (fig.
6.12).
Pay close attention to the position of the hands (Fig. 6.13).
Fig. 6.12
Fig. 6.13
Do not perform any cuts until the green led stops flashing.
Electro plexi trim
VERSION: EPlexyT-04-02/2007
6-6
USE
NEOLT spa
USER’S MANUAL
NEOLT
Cod. NLT.PT-E-T-MM-7-4S-GB
• Adjust the speed of the carriage, according to the type of material, slow for rigid media
and thicker media, increasing the speed for softer and thinner media (fig. 6.14).
• Press the carriage up (fig. 6.15), or down key (fig. 6.16), according to the position of
the carriage. When one or the other key is pressed, both the motor of the cutter and the
motor of the scrap material suction device start automatically. If the panel to trim
already has guide lines for the cut, we suggest switching on the laser tracer before
cutting and position the material appropriately along the cutting line (fig. 6.17).
• Press the Stop Key (fig. 6.18) during the cutting phase, the carriage can be stopped
right after completing the cut on the material, when the height of the panel to cut has
been reached, and before it reaches the end of travel, at the top or bottom. Move the
panel to cut, then press the opposite Cut key for the other cuts.
Fig. 6.14
Fig. 6.15
Fig. 6.16
Fig. 6.17
Fig. 6.18
Fig. 6.19
Press the emergency button (fig. 6.19) to interrupt all machine functions. Rotate the
button from left to right to unlock.
Electro plexi trim
VERSION: EPlexyT-04-02/2007
6-7
USE
NEOLT spa
USER’S MANUAL
NEOLT
Cod. NLT.PT-E-T-MM-7-4S-GB
• After finishing the cut, press the sheet holder open key and wait for the green led, on
the carriage up key to stop flashing before performing any operation. The sheet holder
bar can also be opened by using the relevant foot pedal. (fig. 6.20).
Fig. 6.20
If you press the sheet holder bar and then again the same key, with the sheet holder
open, the machine emits an error signal and the yellow led starts flashing. To delete the
error press the Stop key. The same problem occurs with the sheet holder close key.
Follow the same procedure to delete the error. If the foot pedal is used to open and close
the bar, the pedal automatically switches the pedal to the open function if the sheet holder
bar is closed and to close if the bar is open.
Do not lean against or put any objects on the feeding table.
Electro plexi trim
VERSION: EPlexyT-04-02/2007
6-8
USE
NEOLT spa
USER’S MANUAL
NEOLT
Cod. NLT.PT-E-T-MM-7-4S-GB
Characteristics of the media to cut
6.1.4
This machine was designed to cut acrylic media, like Plex, with a maximum thickness of
6mm., PVC Foam (FOREX®) with a maximum thickness up to 10mm. (using the
appropriate cutters) and materials with an aluminum part like Alibond or Dibond with
maximum thickness of 6mm.
We recommend not trying to cut materials different form those which the machine has
been designed for. They could seriously damage the machine.
Electro plexi trim
VERSION: EPlexyT-04-02/2007
6-9
USE
NEOLT spa
USER’S MANUAL
NEOLT
Cod. NLT.PT-E-T-MM-7-4S-GB
Electro plexi trim
VERSION: EPlexyT-04-02/2007
6-10
MAINTENANCE
NEOLT spa
USER’S MANUAL
NEOLT
Cod. NLT.PT-E-T-MM-7-4S-GB
Ordinary maintenance
7.1
Risk of electric shocks and untimely movements during maintenance. Isolate the machine
from power supply sources by unplugging the power cable.
Ordinary maintenance includes all those periodical and preventive operations that allow
the machine to be used safely.
Qualifications of the operator
7.1.1
Ordinary maintenance of the machine must be carried out by qualified personnel only.
Procedures
7.1.2
Please carry out the periodic operations listed in the table below.
Operation to be
carried out
Frequency of
execution
Procedure
Precautions
General
dusting.
At user's discretion. •
Clean the entire machine with a Do not use
aggressive
damp cloth.
products.
Cleaning the
scrap material.
When the scrap
•
material the suction
tube did not remove •
is too much.
Remove the screws from the
Plexiglas.
Remove the plexiglas.
•
Wear a pair of
protection gloves.
With a suction tube and/or
compressed air eliminate the
scrap material the suction tube
did not remove.
Electro plexi trim
VERSION: EPlexyT-04-02/2007
7-1
MAINTENANCE
NEOLT spa
USER’S MANUAL
NEOLT
Cod. NLT.PT-E-T-MM-7-4S-GB
Operation to be
carried out
Frequency of
execution
Procedure
Precautions
Testing the
safety microswitch.
At user's discretion. Open the Plexiglas door, press the After the test, close
Cut Button and make sure the
door.
motor does not start.
Blade
replacement.
If the cut is not
regular.
Grease the
chain.
If there are noises •
and/or the carriage
doesn't run
•
smoothly.
•
Remove the Plexiglas
protection.
Remove the Plexiglas
Grease the chain with a drop of
oil
After carrying out
the operation,
reassemble the
carriage Plexiglas
shield.
Replacing the
power fuse.
If the fuse is burned. •
Open the fuse holder panel of
the main switch.
Remove the burned fuse.
Replace it with a new one (T
10A).
Isolate the machine
from the mains by
unplugging the
power cable from
the mains
See procedure assembly of work
tool 5.5
•
•
Wear a pair of
protection gloves.
Electro plexi trim
VERSION: EPlexyT-04-02/2007
7-2
MAINTENANCE
NEOLT spa
USER’S MANUAL
NEOLT
Cod. NLT.PT-E-T-MM-7-4S-GB
Operation to be
carried out
Empty out the
suction
container
Frequency of
execution
Empty out the
suction container
when it is too full.
Procedure
•
Open the two clamps on the
sides of the device and lift it by
lifting the motor block using the
relevant handle.
•
Lift the suction motor protection
filter.
•
•
Empty out the container
Close by reassembling
everything in sequence filter,
motor.
Precautions
Isolate the machine
from the mains by
unplugging the
power cable from
the mains.
Electro plexi trim
VERSION: EPlexyT-04-02/2007
7-3
MAINTENANCE
NEOLT spa
USER’S MANUAL
NEOLT
Cod. NLT.PT-E-T-MM-7-4S-GB
Extraordinary maintenance
7.2
Directly contact NEOLT S.p.A for any extraordinary maintenance operation non
contained in this manual.
Electro plexi trim
VERSION: EPlexyT-04-02/2007
7-4
DEMOLITION
NEOLT spa
USER’S MANUAL
NEOLT
Cod. NLT.PT-E-T-MM-7-4S-GB
Qualifications of the operator
8.1
The machine can be demolished by qualified personnel only.
Deactivation of the machine
8.2
Once the machine has reached the end of its technical and operating life, it must be
deactivated. The machine must be deactivated and put in the condition of not being used
for the purposes which it had originally been designed for. However, it must allow the
reuse of the raw materials which it was built with.
NEOLT S.p.A. cannot be held responsible for damages to people or animals due to the
reutilization of single parts of the machine for purposes or in situations different from those
which it has been designed for.
Procedure
8.2.1
• Disconnect the power supply.
• In case the machine has to be moved, refer to 5.2 Transportation.
The machine is made of non biodegradable materials. It must therefore be brought to an
authorized center for its disposal.
If for any reason the user decides to put the trimming machine out of order, it is important
to comply with certain rules to protect the environment. Aluminum, Iron, Plastic, generic
electric material and electronic boards must be disassembled and disposed of separately.
Qualified personnel must carry out these operations.
Electro plexi trim
VERSION: EPlexyT-04-02/2007
8-1
DEMOLITION
NEOLT spa
USER’S MANUAL
NEOLT
Cod. NLT.PT-E-T-MM-7-4S-GB
Electro plexi trim
VERSION: EPlexyT-04-02/2007
8-2