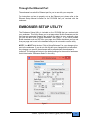
1
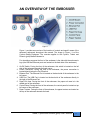
Cyclone, Trident
and Phoenix (gold)
Braille Embosser
User's Manual
Enabling Technologies
1601 Northeast Braille Place
Jensen Beach, Florida 34957 USA
Toll-Free Phone USA Only (800) 777 3687
Toll-Free Fax USA Only (800) 950 3687
Phone (772) 225 3687
Fax (772) 225 3299
E-Mail: [email protected]
Web: http://www.brailler.com
Copyright 1986-2015 by Enabling Technologies Company
All Rights Reserved. April 2015
No part of this publication may be reproduced, stored in a retrieval system, or
transmitted in any form, without the express written permission of Enabling
Technologies Company.
Every precaution has been taken in the preparation of this manual to ensure the
completeness and accuracy of the information it contains. Even so, Enabling
Technologies Company assumes no responsibility for such errors or omissions
that may occur. Neither do we assume any liability for damages resulting from the
use of information contained herein.
Brand names, company names, or product names mentioned in this document
may be trademarks, registered trademarks, or service marks of their respective
companies.
Trident, Cyclone and Phoenix (gold) User’s Manual
2
INTRODUCTION ...............................................................................................................................................................................4
AN OVERVIEW OF THE EMBOSSER .......................................................................................................................................... 5
SETTING UP THE EMBOSSER ..................................................................................................................................................... 6
Unpacking ................................................................................................................ 6
Connecting the Power Cord ..................................................................................... 6
The Control Panel..................................................................................................... 7
Installing Paper ......................................................................................................... 9
Setting Top-of-Form ............................................................................................... 10
Advancing Paper .................................................................................................... 11
Setting Up The Embosser With Your Computer ..................................................... 11
EMBOSSER SETUP UTILITY ...................................................................................................................................................... 12
CREATING YOUR DOCUMENTS ............................................................................................................................................... 13
Braille Text Documents .......................................................................................... 13
Tactile Graphic Documents .................................................................................... 13
CANCELING A PRINT JOB .......................................................................................................................................................... 13
TECHNICAL SPECIFICATIONS ................................................................................................................................................. 14
Special Features..................................................................................................... 15
WARRANTY, SUPPORT & SERVICE ....................................................................................................................................... 16
FREQUENTLY ASKED QUESTIONS .......................................................................................................................................... 18
Trident, Cyclone and Phoenix (gold) User’s Manual
3
INTRODUCTION
Congratulations on the purchase of your Trident, Cyclone or Phoenix (gold) Braille
Embosser.
The following items are included in the box with your new embosser:
Power adapter with power cord
USB interface cable
Quick Setup Guide
Product Registration Form
CD-Rom that contains the User Manual, Product Registration Form, Ethernet
Setup Manual, USB Setup Manual and the Firebird Software Suite that
includes the Firebird Graphics Editor program
We recommend that you verify that all of the items were received with your
embosser, and that you review the Braille Embossers User’s Manual.
If you did not receive all of the above items or have questions on the operation of
your embosser, please contact our Customer Support Group via email at
[email protected]
Please be sure to complete and return the enclosed Product Registration Form at
your earliest convenience.
We will use the contact information that you provide in the registration form to
send you notifications regarding available Firebird Graphics Editor software
updates and service maintenance agreement information and options.
The instructions contained in this manual are for the set up and proper use of the
Trident, Cyclone and Phoenix (gold) Braille Embosser. All instructions are the
same for all three embosser models, except where noted.
Trident, Cyclone and Phoenix (gold) User’s Manual
4
AN OVERVIEW OF THE EMBOSSER
Figure 1
Figure 1, provides an overview of the location of controls and specific areas of the
embosser referenced throughout this manual. The image in Figure 1 is of the
Cyclone Braille Embosser. The overview applies to the Cyclone, Trident and
Phoenix (gold) Braille Embosser’s.
For orientation purposes the front of the embosser is the side with the embosser’s
logo (the USB and Ethernet ports are located on the back side of the embosser).
1. On/Off Switch. Facing the front of the embosser, this switch is located on the left
side of the embosser towards the back corner.
2. Power Connection: Facing the front of the embosser, the power connection is
located directly below the On/Off switch.
3. Ethernet Port. The Ethernet Port is located on the back side of the embosser in the
left corner.
4. USB Port. The USB Port is located on the back side of the embosser directly to
the right of the Ethernet Port.
5. Paper Exit Area. Facing the front of the embosser, the paper exit area is in the
middle part of the embosser.
6. Control Panel. Facing the front of the embosser, the control panel is located on top
left corner of the embosser.
7. Paper Tractors. Facing the front of the embosser, the paper tractors are located on
the top of the embosser towards the back.
Trident, Cyclone and Phoenix (gold) User’s Manual
5
SETTING UP THE EMBOSSER
Unpacking
Remove the contents from the box and check the embosser and accessories
carefully for damage. If any damage is apparent, notify Enabling Technologies
immediately. Also, check the contents against the packing list, and if you find a
discrepancy, let us know as soon as possible.
Connecting the Power Cord
First, place the front of the embosser near the edge of a flat, stable surface such
as a desk or table. For orientation purposes the front of the embosser is the side
with the embosser’s logo (the embossers serial number and USB and Ethernet
ports are located on the back side of the embosser).
Next, check to be sure the embosser is off by making sure the power switch is in
the down position. Then, connect the power supply to the embosser by orienting
the flat edge of the power supply’s connector in the 3:00 o’clock position if you are
facing the left end of the embosser. See Figure 3 on the next page.
IMPORTANT!
The power supply’s connector only fits into the embosser’s
power receptacle one way. Never try to force the
connection. Otherwise, you could damage the connector.
Once the power supply’s connector is properly lined up with the embosser’s power
receptacle then proceed to push the power supply connector into the embosser’s
power receptacle. The connection will be tight and you will need to use slight
pressure until the connector snaps into the embosser’s power receptacle. If after
using slight pressure the connector will not snap into the power receptacle then
check to make sure the connecter is properly aligned with the receptacle. DO NOT
try to force the connection. See Figure 3.
IMPORTANT!
To remove the power supply connector from the
embosser’s power receptacle you need to grasp the flat
edge of the connector so the plastic sleeve that holds the
power supply connector in place slides back allowing you
to remove the connector. NEVER try to remove the power
supply connector by pulling on the power cord itself and
not the plastic sleeve. This can cause damage to the
embosser’s power receptacle.
Next, plug the supplied grounded power cord to the power supply, and then plug
the power cord into a grounded outlet. See Figure 3. (The embosser's power
requirements are listed under "Electrical" in the "Technical Specifications" section
later in this manual.)
At this time do not turn the power to the embosser on or connect the USB cable.
You will do this later in the setup process.
Trident, Cyclone and Phoenix (gold) User’s Manual
6
Figure 3
The Control Panel
The control panel is a small 3 button panel located in the top, back left corner of
the embosser. Each button on the control panel performs a different function.
Figure 4 below shows the layout of the control panel.
Figure 4
Trident, Cyclone and Phoenix (gold) User’s Manual
7
Tri-Color LED (Red, Green and Amber)
The Tri-Color LED located at the top of the control panel will provide you with the
current status of the embosser. The Red LED means the embosser is off-line and
not ready to receive data. The Green LED means the embosser is on-line and is
ready to receive data. To change from on-line to off-line, or vice versa, press the
O-Button, which is the middle button on the control panel. The Amber LED will
glow on power-up. The LED will turn green after a successful startup. If the startup
was not successful the LED will blink red.
T-Button (Top-of-Form)
The T-Button, the very top button on the control panel near the LED, sets the topof-form on your paper. Top-of-form tells the embosser where the paper starts and
where to begin the Braille. You need to tell the embosser to reset top-of-form
whenever you remove an emboss job, change paper or clear a paper jam. With
the embosser off-line, push the T-button one time and it will set the top-of-form.
When the top-of-form is found you will hear a low/high tone, the embosser will
return on-line automatically and the LED will glow green.
O-Button (On-Line/Off-Line)
The O-Button, the middle button on the control panel, takes the embosser on-line
and off-line. The embosser must be on-line to receive and print data from a
computer.
Press the O-Button one time to take the embosser from on-line (ready to receive
and print data) to off-line (not ready to receive and print data). Press it again to
return on-line. Take note of the high/low tones when pressing the O-Button, along
with the color of the LED. When you press the O-Button to take the embosser offline, you’ll hear a high/low tone, and the LED will turn red. When you press the OButton again to return on-line, you’ll hear a low/high tone, and the LED will turn
green.
If you press the O-Button while embossing, the embosser will pause. Any data left
in the buffer remains, and embossing will resume as soon as you press the OButton again.
F-Button (Form-Feed)
The F-Button is the bottom button on the control panel. When off-line, the F-Button
will allow you to form-feed one sheet of paper through the embosser each time this
button is pressed.
When on-line, the F-Button becomes the view button. While embossing, if you
press the F-Button the page currently being embossed will feed out of the
embosser for you to preview the document. In the view position the T and O
Buttons will not respond. You must press the F-Button a second time to feed the
paper back in and resume embossing and/or go off-line.
Trident, Cyclone and Phoenix (gold) User’s Manual
8
Installing Paper
Your embosser was manufactured to produce good quality single and or doublesided Braille on 100-pound traditional Braille paper.
To install the paper, first remove the paper from the box by turning the box upside
down and stack the paper neatly on the floor in back of the table.
IMPORTANT!
If you place your stack of Braille paper on top of the table,
behind the embosser, then make sure the height of the
paper is below the height of the tractors. If it is not, then
your paper may not feed properly into the embosser.
NOTE:
While facing the front of the embosser where the paper
exits the embosser, the right paper tractor should be to the
right side of the embosser. Adjust the left tractor to the
right or left to accommodate your size of paper.
Then, open the embosser's paper tractors by lifting on the inside edge of each
tractor door. They will stay open until closed by hand. See Figure 5.
Next, thread the paper into the embosser, lining up the perforation between the
first two sheets with the edge of the tractors closest to the center of the embosser.
Then insert the paper into the paper tractors making sure the paper is straight and
level, left to right and close the tractor doors. See Figure 5.
Figure 5
To move the tractors from side to side, push the small release handles, located
near the outside edge of each tractor, toward you. (They may be a little stiff at
first.) Although both tractors are able to move, it is the left tractor that needs to be
moved more often because that is how you adjust for differences in paper width.
Trident, Cyclone and Phoenix (gold) User’s Manual
9
After your paper is installed, make sure the paper is flat across and is not bowed.
If the paper is bowed, then move the left tractor to the left to remove any slack.
Verify that the embosser is positioned near the front edge of the work surface, so
that the embossed pages can stack on the floor in front of it. Turn the power switch
on.
IMPORTANT!
The paper-out sensor is located on the back top edge of the
embosser behind the right tractor. See Figure 6. Always
make sure the paper covers this sensor. If the paper does
not cover this sensor then you may hear the paper out alert
and the embosser will not function properly.
Figure 6
Setting Top-of-Form
Once the paper has been installed in the tractors, turn the power to the embosser
on. The embosser will go through the start up sequence and if successful, will
automatically be on-line and the LED will glow green. To set top-of-form, press the
O-button one time to go off-line. Next, press the T-Button one time to set your
paper to the top-of-form position.
After pressing the T-Button, the top-of-form sensor that is located on the right side
of the paper exit area, automatically moves the paper until it finds the top edge of
the first sheet of paper so the embosser knows where to begin. After the top edge
of the first sheet of paper is found the paper will stop moving and the embosser
returns on-line automatically and the LED will glow green.
NOTE:
When setting the top-of-form make sure you do not have
more than one sheet of paper out the front of the
Trident, Cyclone and Phoenix (gold) User’s Manual
10
embosser. If you do then you will need to press the TButton more than one time. Also, bright lights shining
down on the embosser can interfere with sensors causing
them not to function properly.
IMPORTANT!
The embosser's top-of-form sensor must find the paper's
edge to set top-of-form, which makes pages break in the
right places. See Figure 6 for the location of the top-of-form
sensor. When you reset top-of-form in the middle of a
printing session, remove any finished pages before
pressing the T-Button. Every time you install paper or
press the F-Button, you must reset the top-of-form.
Advancing Paper
If you need to advance paper through the embosser, you may do so by pressing
the O-Button to go Off-Line, then press the F-Button. The paper will advance
through the embosser one page for each time you press the F-Button. When
finished press the O-Button again to go back On-Line.
IMPORTANT!
After you advance paper through the embosser you must
reset the top-of-form. If you do not then the Braille may not
be positioned properly on the page.
Setting Up The Embosser With Your
Computer
First, make sure power to the embosser is off. The embosser has two interface
ports. They are the USB Port and the Ethernet Port. The CD-ROM included with
your embosser contains two separate manuals titled USB Setup and Ethernet
Setup. These manuals will provide step-by-step instructions for setting up your
embosser with your computer depending on which port you would like to use.
Through the USB Port (auto-install)
The embosser has a built-in USB port that is compatible with either USB 1.1 or
2.0 specifications.
Connect the USB cable to the embosser and then to the computer. Then turn the
embosser on. The embosser will automatically install itself and your computer will
display the “Installing the device driver software” bubble. Once installed the
embosser will be listed in Devices and Printers as Generic / Text Only.
Once the device driver software is installed please turn the embosser off and then
back on.
If you wish to rename your embosser then please refer to the “USB Setup Manual”
found on the CD-ROM.
Trident, Cyclone and Phoenix (gold) User’s Manual
11
Through the Ethernet Port
The embosser has a built-in Ethernet port for you to use with your computer.
For instructions on how to properly set up the Ethernet port, please refer to the
Ethernet Setup Manual included on the CD-ROM that you received with the
embosser.
EMBOSSER SETUP UTILITY
The Embosser Setup Utility is included on the CD-ROM that you received with
your embosser. This utility allows you to set page sizes, Braille characters per line
and lines per page and transmits the settings you select to your embosser when
you click the box “Click to Setup Embosser”. See Figure 7. If you use a modern
Braille translator such as DBT then your page size, Braille characters per line and
lines per page can be set in the translator and you do not need to use the utility.
NOTE: You MUST click the box “Click to Setup Embosser” for your changes to be
sent to the embosser. If you do not click this box your changes will not take effect.
Any changes you send to the embosser will be erased when the embosser is
turned off. The settings will return to the default settings for the model of embosser
that is listed under “Embosser Select” in the utility.
Figure 7
Trident, Cyclone and Phoenix (gold) User’s Manual
12
CREATING YOUR DOCUMENTS
Many people think that a Braille embosser automatically prints "in Braille" from
your computer files by substituting Braille letters for print ones. Although publishing
in Braille gets easier all the time, it's not quite that simple yet.
Braille Text Documents
To produce Braille text documents please use your existing Braille translation
program. Be sure to set up your Braille translator according to the software
provider’s instructions, so that your Braille documents are sent to the embosser
using the proper interface port.
Tactile Graphic Documents
Included free on the CD-ROM you will find the Firebird Graphics Editor. This
software will allow you to produce tactile graphic documents in 12.5 or 17 DPI and
send them to your Cyclone, Trident or Phoenix (gold) embosser. In addition you
can produce tactile graphic documents for the Phoenix (gold) in 20 and 25 DPI.
You may also use other software programs designed to produce tactile graphic
documents such as QuickTac for producing 12.5 and 17 DPI tactile graphics.
Please Note: We recommend using 100-pound traditional Braille paper with your
new embosser, especially when embossing Braille graphics.
The Firebird Graphics Editor provides tools to assist in the production of highquality Braille tactile graphic images. The Help files contained within the Firebird
Graphics Editor are the manual for this software. The Help files provide step-bystep instructions for using the software and include a comprehensive index.
Please Note: Enabling Technologies Customer Support Staff can assist in helping
you properly connect your embosser and properly install the software. Our
Customer Support Staff cannot teach you or help you learn how to convert your
existing graphic images into well formatted Braille graphic images.
CANCELING A PRINT JOB
If you have sent a print job to the embosser and want to cancel the print job then
press the O-button one time to go off-line. This will stop the embosser.
Next, go to your computer and cancel the print job being sent to the embosser.
After the print job has been canceled in your computer the embosser should still
be off-line and the LED should be red.
Now you may press the F-button on the embosser. This will cancel the print job
and form feed a page so you can remove any embossed pages. Then press the Tbutton to set the top-of-form. If the top-of-form is successfully found the LED will
glow green. Now the embosser is ready for the next print job.
Trident, Cyclone and Phoenix (gold) User’s Manual
13
TECHNICAL SPECIFICATIONS
Printing
Printing Method: Impact. Paper Feed: Sprocket. Line Width: 45 characters
(maximum). Graphics Resolution: All models 12.5 or 17 DPI. Phoenix (gold) only
20 or 25 DPI. Printing Direction: Bidirectional. Paper Width: Adjustable 1.5 to 12
inches (3.8 to 30.5 cm).
Page Length: Selectable 3.0 to 14 inches (7.6 to 35.6 cm).
Paper Weight: 100 lb. traditional Braille paper (recommended).
Text buffer: 32K (32,000 characters).
Default spacing (Library of Congress): Dot spacing: Alpha 0.090 inch, Graphics
0.080 inch standard. Dot Height: 0.020 inch. Character spacing: 0.240 inch. Line
spacing: 6 dot 0.400 inch, 8 dot 0.490 inch. Other spacing formats selectable:
Regular (Library of Congress), California sign, Jumbo, Marburg Medium, Regular
with relaxed line spacing, Petite (Japanese), and Petite with relaxed line spacing
for interline printing.
Cyclone: Printing Speed: Single-sided up to 60 characters per second.
Trident: Printing Speed: Double-sided up to 100 characters per second.
Phoenix (gold): Printing Speed Text side: up to 50 characters per second. High
Resolution Graphics Side: up to two pages per minute.
Actual printing speeds may vary based on paper grade setting, page layout, and
data format.
Physical Description
Width: 19.75 inches (50.17 cm). Depth: 11.75 inches (29.85 cm). Height: 9.5
inches (24.13 cm). Weight: 21 pounds (9.53 kg). Case Style: Desktop.
Environmental
Temperature: Operating or Storage 35 F to 100 F (2 C to 37.8 C).
Humidity: Operating or Storage 10% to 95% (noncondensing).
Electrical
Line voltage: Universal 105 to 260 VAC.
Interface
Port 1: Ethernet Network. Port 2: USB.
Service
User maintenance: None required. MTBF (excluding print head): 50,000,000
characters. Print head life: 100,000,000 characters.
Accessories
Standard: Line cord, 3 wire (USA). USB cable.
Trident, Cyclone and Phoenix (gold) User’s Manual
14
Special Features
1.
2.
3.
4.
5.
6.
7.
8.
9.
Fully configurable communications
All models 12.5 and 17 DPI graphics capability. In addition
Phoenix (gold) has 20 and 25 DPI graphics capability
Six or eight dot Braille codes
Eight Braille character sets
32K text buffer
Paper-out detector
No user maintenance required
All modular construction
Dynamic Braille Scaling allows size adjustment in Braille cell
size and spacing from Regular Library of Congress (default),
California Sign, Jumbo, Marburg Medium, Regular with Relaxed
Line Spacing, Petite (Japanese), and Petite Relaxed (Japanese
Interline)
Trident, Cyclone and Phoenix (gold) User’s Manual
15
WARRANTY, SUPPORT & SERVICE
Enabling Technologies Company warrants all parts and workmanship of the
Cyclone and Trident embosser to be free of defects for a period of one year (365
days) from date of delivery. The Phoenix (gold) warranty is for a period of one year
(365 days) or 75,000 pages, whichever comes first, from date of delivery. This
warranty is extended only to the original purchaser.
If the embosser requires service within the warranty period, Enabling Technologies
provides our customers located in the United States with complimentary round trip
shipping, via ground service, to and from our factory in Jensen Beach, Florida
USA for any eligible warranty repairs. In order to qualify for complimentary round
trip shipping you must have the original carton and packing material.
This warranty does not extend to defects resulting from improper use, overuse or
unauthorized service by the purchaser. Also, the warranty is invalid if any of the
instructions accompanying the product are not carefully followed. Damage caused
by adhesive accumulation or the build-up of any other foreign matter is specifically
excluded from coverage under this warranty.
This warranty is made in lieu of all other warranties, expressed or implied, and is
limited to the repair or replacement of the product. No warranty, expressed or
implied, is extended concerning the completeness, correctness, or suitability of the
Enabling Technologies Company equipment for any particular application. There
are no warranties which extend beyond those expressly stated herein.
Enabling Technologies Company offers a Service Maintenance Agreement
Program. For further details, contact:
Enabling Technologies Company
Service Contract Administrator
1601 Northeast Braille Place
Jensen Beach, Florida 34957
For support and service within the United States, contact our Customer
Support Group toll free at (800) 777 3687 or (772) 225 3687. For customers
outside the United States contact your local Enabling Technologies distributor.
They may be able to resolve your problem quickly on the phone. You may also
contact us via email at: [email protected].
If your problem cannot be resolved on the phone, request a Return Authorization
(RA) number from the Customer Support Group. You MUST have an RA number
before you can return your embosser to us for service. This number is necessary
for us to schedule service time for your embosser.
After you obtain a Return Authorization number from Customer Support, pack your
embosser in the original carton and packing material. If the original carton was
discarded then call us to purchase new packing materials.
Trident, Cyclone and Phoenix (gold) User’s Manual
16
Include a letter inside the package containing the following information:
1.
2.
3.
4.
5.
6.
Your name.
Your company name (if applicable).
Your shipping address and zip code.
Your mail drop code (if applicable).
Your RA number.
A description of the trouble you are experiencing. Please
include as much information as possible about the problem and
the conditions under which it occurs.
Please have your RA number printed clearly on the outside of the box. Address
the box containing your embosser to the location below:
Enabling Technologies Company
Attn: RA#
1601 Northeast Braille Place
Jensen Beach, Florida 34957 USA
Finally, before you ship your embosser, insure the package. We are not
responsible for shipping damage, and the carrier is not responsible if the
package is not properly packaged and insured. You could be charged for
shipping damage if the embosser was not properly packed.
You may find additional information regarding the repair of your embosser in
our Maintenance & Repair Policy Statement. This document may be found on
our website at http://www.brailler.com/ftp/etcmaintenance-repairpolicy.pdf
Trident, Cyclone and Phoenix (gold) User’s Manual
17
FREQUENTLY ASKED QUESTIONS
We get some of the same questions repeatedly, so we've included them below. If
you have a problem not covered here, call our Customer Support phone number at
1 (800) 777 3687 or 1 (772) 225 3687. You may also contact Customer Support by
e-mail at [email protected]. We will be equally pleased to help you OR to
learn from your experience.
Q. My embosser’s margins won’t stay set and/or change sporadically. What
could be the problem?
A. Some translators, such as the Duxbury Braille Translator, can remember
document-specific embosser settings. If your translator associates embosser
settings with documents you save in its native format, check the Document
Embosser Setup before you emboss your document to be sure that your
embosser settings are what you expect and make any necessary changes to your
margin settings. Then, save the document so that the correct settings will be
associated with the document the next time you open it.
Q. How do I switch from wide to narrow paper, and vice versa?
A. Leave the right tractor in its current position and move the left tractor to
fit the width of your paper. Then, select the desired form size and set the desired
line length in the Embosser Setup Utility or your Braille translator.
Q. When I try to emboss a document, I receive one of these error messages,
“Error -1” or “Embossing failed due to an error at line XXXX of the file
dxemb_job.c: The system cannot find the file specified.”
A. This is a communications error that is specific to the Duxbury Braille Translator.
It usually occurs when DBT is not configured to emboss through the correct port.
To resolve the problem, check the Global Embosser Setup to be sure that the
correct port or Windows printer driver is selected.
Q. Could it be that this Braille embosser doesn't understand contracted
Braille? The words have no contractions, and the punctuation doesn't
look right.
A. The embosser prints exactly what the computer sends. Most Braille
translators have both a Print and an Emboss command. Be sure that your file
is translated into Braille, and that you are using the translator's Emboss
command.
Q. What causes the embosser to skip a blank page after each full page?
A. This problem may occur if your Braille translator is set to interpoint mode.
Q. My embosser won't find top-of-form. What could be the problem?
A. In order for your embosser to find top-of-form, the top-of-form sensor must
detect the paper. Make sure that your embosser's right tractor is all the way to the
Trident, Cyclone and Phoenix (gold) User’s Manual
18
right, and the left tractor is properly adjusted for your paper size. Also, before
issuing the top-of-form command, make sure that no more than a page is sticking
out the front of the embosser.
If all these check out and you are still having problems, please contact our
Customer Support Group for assistance.
Q. My embosser is making an insistent, monotone beeping sound, and the
LED is flashing. What's happening, and how can I get it to stop?
A. Your embosser is having trouble detecting your paper. If the embosser were to
continue to emboss without paper installed, damage to the embosser could occur.
If the embosser is having trouble detecting the paper, there may be some reason
why the paper sensor is being uncovered during embossing. Check your paper
path. The stack of paper should be taken out of the box and stacked on the floor
behind and below the embosser. Your embosser's right tractor should be all the
way to the right, and the left tractor should be adjusted for the proper paper width,
so that the paper lies flat between the two tractors. Finally, the paper should flow
smoothly into and out of the embosser; it should not bunch up.
If all these check out and you are still having problems, please contact our
Customer Support Group for assistance.
Trident, Cyclone and Phoenix (gold) User’s Manual
19