1
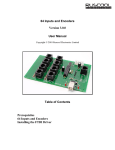
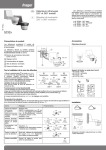
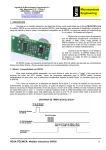
BFF Motion Driver (v2.6+) - SCN5 Actuator Start Guide
Introduction
Version v2.6 of the BFF Motion Driver for FS9/FSX introduced direct output of platform
position demand data to Dyadic SCN5 Actuators. The data output format uses the TermiBUS data bus to drive up to three SCN5 actuators from a single COM/USB port on the PC.
Most users with existing SCN5 actuator driven motion platforms/seats will however be
interested in the two actuator (2 DOF) system set up.
Hardware Setup
The basic hardware layout is shown in Figure 1 (on final page).
Actuator Arrangement
For 2 DOF systems in which the platform or seat has a central pivot point and two "rear"
SCN5 actuators then the two actuators are on outputs 2 and 3 of the BFF Motion Driver
and the motion driver is configured for coupled position demand outputs for "3 Point
Support" type platforms - in the .bff configuration file set Rig_Type=1.
The rear right actuator is BFF driver output 2, and the rear left actuator is BFF driver
output 3.
Termi-BUS Connections
Physically both SCN5 actuators are connected to a single USB-RS485 adaptor, ie the
actuators are two different "Axes" on the same Termi-BUS. In their supplied condition
each SCN5 actuator will be set to Axis No. 0. - one of these MUST be changed to a nonzero axis number to allow both actuators to be instructed through the same RS485 line.
The axis number of one actuator can be changed using the CTA-1 Setting Tool software
supplied with the actuators. This can only be done with one actuator connected to the PC
at one time, so connect one and then change its axis number before connecting the
second SCN5.
The mapping between your SCN5 Termi-BUS axis numbers and the Motion Driver output
channel numbers is made using the TB_Act1, TB_Act2 and TB_Act3 parameters in the .bff
configuration file – see the notes in the default SCN5-*.bff files.
RS485 Adaptor
If you are using SCN5 manufacturer supplied adaptors and cables then make your
connections as per the manufacturer's instructions.
To save money I used a Devantech USB-RS485 adaptor wired as shown in Figure 1.
Follow the manufacturer's instructions for proper driver installation for your adaptor – a
virtual serial (COM) port will be installed on the PC by the driver and the port number must
be defined in the .bff configuration file using the Port=COM* Parameter.
If you are using the Devantech USB-RS485 adaptor then faster data output speeds to the
actuators will be achieved if the Latency Timer parameter for the adaptor COM port is
reduced from the default 16 ms. To set this go to the Device Manager and right click the
COM port and select properties. Go to Port Settings-Advanced and under BM Options set
the Latency Timer to 1 msec. When you run the motion driver hit \s to reveal the
BFF_TMBS_Comms process – check the data output speed, it should be around the 60
sets/sec level when driving two actuators from the single adaptor. Hit \h to hide the comms
process window. You may have to experiment with the Latency Timer values to get the
best performance for your system.
Power Connections
The 24V power connections on the SCN5 14 pin connectors must be made in accordance
with the manufacturer's instructions. A basic arrangement is shown in figure 1. Take care to
fit the power cut off switch on the +24V supply line NOT on the 0V return line. The ILK pin
must be pulled high to 24V to enable operation of the actuator – care should be taken not
to allow over voltage on this pin.
Software Setup
Termi-BUS Comms
The Termi-BUS comms library TMBSCOM.dll must be present on the PC for the motion
driver to communicate with the SCN5 actuators. This will be the case already if you have
installed the SCN5 manufacturer's PC Tool software package containing the CTA-1 setting
tool. If you do not have the dll ask your SCN5 supplier or email me – it can be copied into
the motion driver software directory easily.
Driver Setup
The BFF Motion Driver can run on the same PC as the FS9/X flight sim, or on a LAN PC to
reduce the CPU load on the main sim PC. To install the driver unzip the contents of the
driver .zip file into a dedicated directory and run the motion driver .exe from that directory.
In the case of operation on a LAN PC the above installation is done on the LAN PC but the
Motion Driver Bridge package must be installed on the flight sim PC and the
Motion_Bridge.exe run on the sim PC. See the Motion Driver user guide for more details.
The motion driver configuration settings are held in a .bff configuration file which is
selected and opened when the motion driver is run. There are a wide range of parameters
that can be configured to affect the basic configuration and motion output. For full details
of these see the motion driver user manual.
Basic settings that must be made are Rig_Type=1
to define coupled position demand output for triangular support type rigs
Mode=SCN5
to define SCN5 motion output mode
Port=COM*
set the output COM port number
TB_Act1=-1
to map your SCN5 Axis numbers to the motion driver output channels (-1 = SCN5 inactive)
TB_Act2=0
(adjust 2 & 3 to suit your SCN5 axis numbers)
TB_Act3=1
TB_Vfast=7500
TB_Afast=5
to set the maximum SCN5 speeds and accelerations for normal ops (fast) and
homing ops (slow)
TB_Vslow=1000
TB_Aslow=10
TB_Gain=7
to set the SCN5 servo loop gain.
The SCN5 speed, acceleration and gain parameters can be experimented with to achieve the optimum
settings to give smooth motion on your platform.
A large number of the remaining parameters affect the motion output configuration and are
described in more detail in the user manual. However there are three basic .bff
configuration files included in the driver zip package SCN5-joystick.bff
To drive the platform/seat motion using joystick input.
SCN5-no-accels.bff
Simple motion in which pitch and roll follows aircraft pitch and
roll. No washout applied to the movement. Some on-ground
heave motion mixed into the pitch DOF.
SCN5-fwd-accels.bff
Simple motion in which pitch and roll follows aircraft pitch and
roll and some forward acceleration/braking pitch rotation. Slow
washout applied to the acceleration cue only. Some on-ground
heave motion mixed into the pitch DOF.
Achieving full configurations that suit your system will require some experimentation on
your part. Please read the configuration settings sections of the Motion Driver User Manual
for more information.
FS9/X Setup
Other than installation of an up to date version of Pete Dowson's FSUIPC for the version
of MSFS you are using there are no special setup requirements for the flight sim. FSUIPC
must be installed for the motion driver to communicate with the flight sim.
Setting the flight sim not to pause on task switch will make swapping between the flight
sim and motion driver windows more convenient as the flight will then not pause when you
switch away from the flight sim window to view the motion driver window.
Driver Operation
If you are using a joystick input configuration then the motion driver can be run on its own
and the appropriate .bff configuration file selected.
If you are using the normal FS9/FSX flight sim input then the flight sim must be started and
running BEFORE the motion driver is started.
In this case start a flight and put it into a stable position (eg parked on the ground). Start
the motion driver and select your .bff configuration file. On startup the driver will home the
actuators to calibrate their positions and then send them at slow speed to the defined start
positions. Select “Drive” to move the actuators to their drive positions and commence the
live motion output.
See the User Manual for details of the on-screen adjustments available through the driver
window.
FIGURE 1
SCN5 Quick start document – v1.1 Jan 2010