1
Installing and configuring Xen
Marios Andreou, Nimisha Walji
Internet Systems and Storage Laboratory
HP Laboratories Bristol
HPL-2004-207(R.1)
February 7, 2005*
Xen, utility
computing,
vmware,
virtualisation
We provide a detailed account of the procedures involved in the
configuration and use of Xen. This includes an explanation of the
method by which Xen can be installed and run within VMware Virtual
Machines to provide a flexible and scalable testing environment.
Consideration is also given to the creation and management of non- zero
domains with a description of how a graphical desktop may be obtained
for these, using RealVNC. In addition an insight is given into the various
approaches that may be adopted with respect to Storage Management,
focusing on the application of LVM.
* Internal Accession Date Only
Copyright Hewlett-Packard Company 2004
Approved for External Publication
Acknowledgements
We would like to thank Nigel Edwards, Chris Dalton and Mike Wray whose
contributions have been invaluable in helping to identify resources relevant to
the problem domain.
Contents
1. Using VMware Workstation 4.5 ................................................................................................. 1
1.1 Creating a Virtual Machine. .................................................................................................................................1
1.2 Installing Red Hat 9. ............................................................................................................................................1
1.3 Cloning the Red Hat Virtual Machine...................................................................................................................1
1.4 Configuring the Network Connection. ..................................................................................................................1
1.5 Installing VMware Tools......................................................................................................................................1
1.6 Converting the Red Hat VM into XEN. ................................................................................................................2
1.7 Editing the grub.conf file......................................................................................................................................2
1.8 Adding New Hard Disks. .....................................................................................................................................3
1.9 Modifying fstab. ..................................................................................................................................................3
2. Using Xen .................................................................................................................................... 4
2.1 Introduction .........................................................................................................................................................4
2.2 Xen Management Tools .......................................................................................................................................4
2.3 Domain Specification and Creation ......................................................................................................................5
2.4 Domain Consoles.................................................................................................................................................6
2.5 REALVNC ..........................................................................................................................................................7
3. Storage Management .................................................................................................................. 9
3.1 Adding a new Hard Disk ......................................................................................................................................9
3.2 LVM....................................................................................................................................................................9
1.4 Configuring the Network Connection.
1. Using VMware Workstation 4.5
Changing the ifcfg_eth0 file.
During the Red Hat boot sequence, a failure will occur
when the system attempts to bring up the interface eth0,
this is because the system will try to contact the actual
interface card which the VM is not connected to. This can
be fixed by amending the ifcfg_eth0 file…. as follows,
the items in bold must be added to the file:
The VMware Workstation 4.5 can be obtained from
www.vmware.com.
1.1 Creating a Virtual Machine.
New Virtual Machines can easily be created by clicking
the ‘New Virtual Machine’ icon and following the
provided wizard. Through the wizard, the memory
allocation, network type and disk drive can be
configured. Choosing the custom configuration at the
beginning of the wizard provides the user with more
control over these parameters.
<Sample ifcfg_eth0>
DEVICE=eth0
BOOTPROTO=dhcp
ONBOOT=yes
check_link_down () {
return 1;
}
Once the wizard has been followed through, a virtual
machine has been created. Although the guest operation
system to be used for the VM has been chosen through
the wizard, it must still be installed. For an installation of
Red Hat 9, the required disk images can be obtained
from:
http://ftp.redhat.com/pub/redhat/linux/9/en/iso/i386
</Sample ifcfg_eth0>
The VMs can be assigned IP addresses using the
following command and a suitable IP address:
ifconfig eth0 192.168.xx.xx up
The files needed are:
Once IP addresses have been assigned to both of the VMs
the network connection can be checked by launching a
ping from one VM and running a tcpdump on the other to
check that network traffic is passing between the two.
shrike-i386-disk1.iso
shrike-i386-disk2.iso
shrike-i386-disk3.iso
1.5 Installing VMware Tools.
VMware tools provide some useful extra functionality
when using VMware. The most important of these
features is the Shared Folder capability, which allows
files to be passed from the host operating system to a
Virtual Machine running within VMware and vice-versa.
Some problems have been faced when attempting to
install Red Hat 9 using normal CDs which is why use of
the disk images has been suggested.
1.2 Installing Red Hat 9.
Shared folders can be set up as follows:
With the VM running, from the ‘VM’ menu, choose the
‘Install VMware tools’ option. This will bring up a
window in the VM’s Red Hat for /mnt/cdrom containing
a file named vmware-linux-tools.tar.gz. Once untarred
into the home directory, the vmware-install.pl file must
be executed. This will run through the installation for
VMware Tools, offering options along the way for which
the default settings are generally suitable. At the end of
the installation process an ‘Execution aborted.’ Message
will be displayed, this occurs because the final part of the
installation must be executed out of an XFree86 session.
Clicking on the ‘Edit virtual machine settings’ link
displays a dialog box. In the ‘Hardware’ tab a list of the
VMs devices is shown. To install Red Hat 9, click on the
CD-ROM device, and within the ‘Connection’ section,
select ‘Use ISO image’. The location of the iso image
shrike-i386-disk1.iso must be provided below. Once set,
clicking on the ‘Start this virtual machine’ link, will boot
up the VM and start the Red Hat installation wizard.
1.3 Cloning the Red Hat Virtual Machine.
To clone the Red Hat VM, a copy must be made of the
folder containing all of its files. Within the folder the
‘vmware’ text document must be amended. The MAC
address needs to be temporarily manually assigned as
follows:
Change the ethernet0.generatedAddress value.
For example,
ethernet0.generatedAddress = “00:0c:29:3f:86:9d”
becomes:
ethernet0.generatedAddress= “00:50:56:00:00:01”
This final stage can be completed by pressing
Ctrl+Alt+F2, which takes the user out of the XFree86
session to the command line. Here, once logging in a
root, the vmware-config-tools.pl installer must be
executed which can be found in the /usr/bin/ directory.
Again the default options are suitable for the installation
and this time the installation will conclude completely.
Pressing Ctrl+Alt+F7 takes the user back to the XFree86
session.
VMware Tools are now installed and the blue warning
saying ‘You do not have VMware Tools installed’ at the
bottom left of the VMware workstation window should
now have disappeared.
VMware will then automatically assign it a value during
bootup. There are now two identical Red Hat Virtual
Machines already networked via VMNet1.
-1-
Configuring Shared Folders.
Now that VMware tools have been installed, the shared
folder function can be configured. The VM must first be
powered off. In the ‘Virtual Machine Settings’ dialogue
box that appears from clicking the ‘Edit virtual machine
settings’ link, choose the ‘Options’ tab. This tab shows
the status of the Shared Folders settings, this can be
‘enabled’ by selecting the Shared Folders setting and
choosing ‘properties’ which opens a dialog box. Within
this dialog box the destination of the ‘Host Folder’ on the
host operating system from which the user wishes to
share files, must be specified.
cd /mnt/hgfs/shared_folder
cp Twisted-1.3.0.tar.gz /home/marios
cd /home/marios
tar -xzvf Twisted-1.3.0.tar.gz
cd Twisted-1.3.0
python setup.py build
python setup.py install
xen-2.0.3-install.tgz
Again, copy the file to your home directory, and
expand the archive. An included bash script is
then used to complete the installation:
1.6 Converting the Red Hat VM into XEN.
The files needed for the Xen installation process are: (the
version or date values may differ, the most recent version
of the files should be used)
cd /mnt/hgfs/shared_folder
1) xen-2.0.3-install.tgz, found at
http://www.cl.cam.ac.uk/Research/SRG/net
os/xen/downloads.html
2) Twisted-1.3.0.tar.gz, found at
http://twistedmatrix.com/products/download
3) bridge-utils-0.9.6-1.i386.rpm, found at
http://bridge.sourceforge.net/download.html
cp xen-2.0.3-install.tgz /home/marios
cd /home/marios
tar -xvf xen-2.0.3-install.tgz
cd xen-2.0-install
Once obtained the files should be placed in the shared
folder for use by the VM. They can then be found within
the VM in the /mnt/hgfs/ directory. Installation of 2 and 3
(as above) is required before installation of xen can
begin. Installation procedure:
sh ./install.sh
1.7 Editing the grub.conf file.
The grub.conf file controls and provides the bootup
options available in the Red Hat splash screen. The
following modification of the grub.conf file will allow the
user the ability to run the VM as both a normal Red Hat 9
machine or as a Xen XenoLinux machine depending on
the option chosen in the splash screen. When further hard
disks are added to the VM, they can also be added to the
grub.conf file allowing the user to freely chose which of
the hard disks to boot into.
The items in bold must be added to the grub.conf file in
boot/grub/ as follows:
bridge-utils-0.9.6-1.i386.rpm
Copy the file from the shared folder to your
home directory (e.g. /home/marios). Then the
installation is simply a case of issuing “rpm -i
{filename}”
cd /mnt/hgfs/shared_folder
<Sample grub.conf>
cp bridge-utils-0.9.6-1.i386.rpm
/home/marios
#
#
#
#
#
#
#
#
#
#
cd /home/marios
rpm -i bridge-utils-0.9.6-1.i386.rpm
Twisted-1.3.0.tar.gz
As above, first copy the file to your home
directory. Then, you need to expand the archive,
and use the included python “build” and
“install” targets:
grub.conf generated by anaconda
Note that you do not have to rerun grub
after making changes to this file
NOTICE: You have a /boot partition. This
means that all kernel and initrd paths are
relative to /boot/, e.g.
root (hd0,0)
kernel /vmlinuz-version ro root=/dev/sda2
initrd /initrd-version.img
boot=/dev/sda
default=0
timeout=10
splashimage=(hd0,0)/grub/splash.xpm.gz
title Red Hat Linux (2.4.20-8)
root (hd0,0)
kernel /vmlinuz-2.4.20-8 ro root=LABEL=/
initrd /initrd-2.4.20-8.img
title Xen / XenoLinux (1.2 unstable)
root (hd0,0)
kernel /xen.gz dom0_mem=131072
com1=115200,8n1 noht console=com1
module /vmlinuz-2.4.27-xen0 ro
-2-
the CD drive again, in order to run Red Hat Installer. This
is done by pressing the ‘Esc’ key during the initial black
VMware startup screen. The user will be presented with
the ‘Boot Menu’ from which, the ‘CD-ROM Drive’
option should be selected. Red Hat can now be installed
onto the new hard disk.
root=/dev/sda2 console=tty0
</Sample grub.conf>
The first line, dictates the option that will be present in
the splash screen:
title Xen / XenoLinux (1.2 unstable)
Alternatively, another method for this process is by
taking the ‘bootdisk.img’ file and using it in the floppy
drive. The ‘bootdisk.img’ file can be obtained by
mounting the RedHat-9-i386-1.iso CD image into the
cdrom drive in Red Hat. The ‘bootdisk.img’ can be found
in the /images/ directory. This file can then be passed to
the host OS using the Shared Folder capability. Using this
floppy image in the virtual floppy drive in the same way
the CD images were used will boot the VM into the Red
Hat installer, in which the second hard disk can be chosen
as the installation destination. The installer can then be
followed through as described previously.
The second line specifies that root is to exist in the first
hard drive (hd0) in its first partition(0), this is where to
look for the kernel.
root (hd0,0)
The third line specifies which kernel file to use within the
first partition of the first hard drive, followed by some
parameters.
kernel /xen.gz dom0_mem=131072 com1=115200,8n1
noht console=com1
And finally the fourth line adds a module for domain 0,
specifying its root destination and kernel file.
module /vmlinuz-2.4.27-xen0 ro root=/dev/sda2
console=tty0
New hard drives can then be added to the grub.conf file,
by adding the following lines:
Further information about the grub.conf file and its
modification can be found at:
http://www.cpqlinux.com/grub.html
title Second Red Hat Linux (2.4.20-8)
root (hd1,0)
kernel /vmlinuz-2.4.20-8 ro root=/dev/sdb2
hdc=ide-scsi
initrd /initrd-2.4.20-8.img
1.8 Adding New Hard Disks.
New hard disks can be added very easily using VMware.
In the ‘Virtual Machine Settings’ dialog, the ‘Hardware’
tab provides the option for adding devices. Clicking the
‘Add’ button brings up a wizard for adding new devices.
When adding a new hard disk, the user is presented with
an option for creating a new, blank hard disk, or using an
existing hard disk, maybe a clone.
and so on. This time using the line root (hd1,0) pointing
to the first partition of the second hard disk for root and
so on.
Many extra hard disks can then easily be added using the
‘existing hard disk’ option and cloned hard disks,
provided the clones do not contain the bootloader.
The main cause for concern when adding new a hard
disk, is correct configuration of the bootloader. If a new
existing hard drive is added to the VM, during boot up,
the VM may boot into the second hard drive. To ensure
that the user has full control and choice over which hard
disk is used during bootup, the bootloader must only be
present on one of the hard drives, the one required to
control the VM. Once a new hard disk has been attached
using VMware, it will be completely blank, and therefore
needs to have an OS installed. As by default, the VM will
boot straight into the primary hard disk (containing the
bootloader file) which already has Red Hat installed, the
VM needs to be instructed to boot using the disk image in
(comment out the first two lines)
#LABEL=/
/
#LABEL=/boot
/boot
/dev/sda1
/boot
/dev/sda2
/
none
/dev/pts
none
/proc
none
/dev/shm
/dev/sda3
swap
/dev/cdrom
/mnt/cdrom
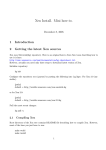
Figure 1: An Example fstab File
1.9 Modifying fstab.
When adding new hard disks, problems can also occur if
linux attempts to mount both of the hard disks
simultaneously to the same mount point. fstab is a
configuration file in which all information about a
systems partitions and storage devices is contained,
including the information which tells linux where and
how to mount these partitions and storage devices.
Make the following changes in bold to the fstab file,
which can be found in the /etc directory:
ext3
ext3
ext3
ext3
devpts
proc
tmpfs
swap
udf,iso9660
defaults
defaults
defaults
defaults
gid=5,mode=620
defaults
defaults
defaults
noauto,owner,kudzu,ro
More information about fstab can be found at: www.tuxfiles.org/linuxhelp/fstab.html
-3-
1
1
1
1
0
0
0
0
0
1
2
2
1
0
0
0
0
0
achieved through the use of three shell scripts that
are executed by xend following the occurrence of
certain events.
2. Using Xen
2.1 Introduction
A “typical” Linux installation requires the use of at least
three disk partitions. One is used as the “/boot”
partition, another as “/” (i.e. the root file system) and
the third as swap space (implementation of virtual
memory). A simplistic view of the boot sequence for such
an installation would then be as follows [lin01]:
•
•
•
•
BIOS performs memory integrity checks, and
looks for the MBR (Master Boot Record; this
would typically reside on the first sector of the
hard drive).
The MBR utilises a “partition table” which gives
details (e.g. size, type and starting cylinder) of up
to four partitions. One of these is flagged as
“bootable” (and will eventually be mounted as
“/boot”). The boot loader (e.g. Grub or LILO)
will also reside on this partition.
Invocation of the boot loader. In a multi boot
environment, the boot loader would await
instruction as to which OS kernel is to be booted,
or boot the “default” kernel following the lapse of
a predefined time interval. Basically the boot
loader is responsible for loading the kernel into
memory and executing it.
Invocation of the kernel. This would mount the
root file system, perform preliminary memory (and
other hardware) checks, and then spawn the “init”
process.
How do I use it?
Xend is invoked from the command line, and must
be provided with a single parameter from the set
{start | stop | restart}. This must be run as root, as
calls will be made to privileged system
management functions. Trying to use the domain
management application xm before “xend
start” has been invoked will result in an error
(“111 ‘Connection Refused’ Error:
error connecting to xend, is xend
running?”).
•
Where does it live?
/etc/rc.d/init.d/xend
This is a script to facilitate for xend to be started
by default every time the system boots. This can
be achieved by using chkconfig; for example:
chkconfig --level “12345” --add xend
The chkconfig utility “updates and queries runlevel information for system services”. It allows
you to set which services the “init” process is
required to start dependant on the run-level. This
requires only the presence of an appropriate script
in /etc/rc.d/init.d/; chkconfig will then
handle the creation of symbolic links in the correct
rc#d directories (e.g. /etc/rc.d/rc2.d/ for run-level
2). See the chkconfig manual pages for more
information.
Booting a Xen Domain (other than domain 0, which is a
special case) differs in that there is no need for allocation
of a “/boot” partition. A domain thus needs at minimum
just two partitions; one of these is used as the root file
system, and the other is used as the swap space. The size
of these is up to the user, but the “root” file system size is
dictated by the size of the Linux installation which is
placed therein. The boot process differs from the “typical
scenario” above in that the kernel file is provided by
Domain 0 itself, and a “pivot_root” call is made for
changing the root file system to the one defined for the
domain.
/usr/lib/python2.2/site-packages/xen/xend/
This directory contains all the python source and
bytecode files which collectively provide the
functionality offered by xend.
/usr/sbin/xend
2.2 Xen Management Tools
This is the script which provides the interface to
xend that allows command line invocation.
The Xen “toolbox” is comprised of xend, the “Xen
Management Daemon”, and xm, “The Xen Grand Unified
Management Application”. A brief overview is provided
to both of these tools below [xen01].
/etc/xen/scripts/
This directory contains the three networking
scripts that are called by xend to provide virtual
networking.
xend
•
•
What is it?
The Xen Management Daemon is a Python
program whose interface is provided by a shell
script. This is responsible for (amongst other
things) providing the console server (e.g. for
obtaining a console to a booted domain). Another
important function performed by xend is
management of Xen virtual networking which is
-4-
•
xm
•
What is it?
This provides a number of utilities for managing
xen from the command line. The general format of
an xm command is:
•
xm command [switches] [arguments] [variables]
Commands are provided for creating a domain,
listing active domains, destroying a domain,
obtaining a console to an active domain as well as
migrating a domain, to name but a few. A full
listing of commands can be obtained by issuing the
command ”xm help”.
•
How do I use it?
As previously explicated, in order that xm be used,
xend needs to be running. Information regarding
domain specification and creation can be found in
Section 2.3.
•
Where does it live?
dhcp: should the kernel try to obtain an ip address
via DHCP (i.e. “dhcp=dhcp” will instruct the
kernel to use dhcp and “dhcp=off” will
disable dhcp)
disk: this specifies the disk device(s) that is/are to
be made available to the domain. As previously
explained, a domain requires at minimum two disk
devices; one for the root file system and another as
swap space. The syntax for this property is:
where, DEV is the name of the physical disk
disk=phy:DEV,VDEV,MODE
device (e.g. /dev/sdc2), VDEV is the name with
which DEV is exported to the domain (e.g. sda1)
and MODE can be one of “w” (for read-write) and
“r” (for read-only). So, if we have allocated
/dev/sdc2 (which has a RedHat installation on it)
for use by the domain as a root file system, and
/dev/sdc3 as the swap space, then the specification
would read:
disk=[‘phy:/dev/sdc2,sda1,w’,
’phy:/dev/sdc3,sda2,w’]
/usr/lib/python2.2/site-packages/xen/xm/
This is the directory containing the python source
code and byte code files used by xm.
•
/usr/sbin/xm
This is the shell script that provides the interface
for xm to be invoked from the command line.
2.3 Domain Specification and Creation
A domain is defined by a number of properties that are
set during domain creation. A full listing of these
properties can be obtained by typing:
A final important point that needs to be made is regarding
the file /etc/fstab on the root device for the created
domain. This file holds information regarding the file
systems and it is used for specifying which file systems
should be mounted when the system is booted (there are
other uses as well but those are of no relevance here). As
explained, when setting the “disk=” property, “VDEV”
is the name with which the disk is exported to the
domain. Thus, the domain’s fstab file must be edited
accordingly to reflect the VDEV names, and not the actual
device names. For the example given above, fstab
would include the following:
xm help create | more
Some of the more important properties are:
•
•
•
•
root: this specifies which device is to be mounted
as root. This is specified according to the VDEV
name given to the disk option. In other words, we
don’t specify the root device according to the
physical device name (e.g. /dev/sdc2) but
rather according to whatever alias we gave to the
physical device name when setting the disk=
property
(e.g.
sda1).
For
example,
“root=/dev/sda1 ro”.
name: the domain name, which must be unique
(e.g. “Domain-1”)
kernel: the full path to the kernel image that is to
be used by the domain. Typically this would be
/boot/vmlinuz-2.4.27-xenU (obviously
the version number may be different for the
version of the kernel you are using)
memory: the amount of memory (in megabytes) to
be allocated to the domain (e.g. “memory=64”
will specify 64 megabytes)
ip: the kernel ip interface address (e.g.
ip=”192.168.174.150”)
/dev/sda1
/dev/sda2
/
swap
(…)
ext3
swap
(…)
defaults
defaults
1 1
0 0
The problem however is that if fstab is not correctly
edited, the domain will not be able to boot. One way to
-5-
solve this problem is to mount the file system that is to be
used by the domain as “/” and editing fstab before
creating the domain. It should be noted that the above is
only an example; the two VDEV names don’t have to be
those given above although they cannot be completely
arbitrary. The first two letters specify the device type (sd
for scsi, hd for IDE, xd for XT disks), the third letter
specifies the drive (“sda” is the first scsi drive, “sdb”
is the second etc) and the number specifies the partition.
Note: using the above example, the first line of the
file dom1SXPconfig.sxp would read “using
config file dom1config”. This line
needs to be removed if the sxp file is to be used
for domain creation, or xend will produce the error
“Error: Error creating domain:
missing vm name”. Alternatively, using the
“-q” option will suppress printing the name of
the configuration file being used, i.e. “xm
create
-qnf
dom1config
>
dom1configSXP.sxp”
A configuration file exists which sets the values of the
domain properties to the default values; this is the file
/etc/xen/xmdefconfig. So if you type “xm
create” at the command line (and nothing else), xen
will try and create a domain based on the values in
xmdefconfig.
3.
A domain may be created in one of three ways; using a
python configuration file, using an sxp configuration file,
or setting values at the command line:
1.
Python Configuration File
The file xmdefconfig
is a python
configuration file, and as such can be used as a
template. A copy of this file can be made for use
with a particular domain. This file should then be
edited to reflect your choice of values for the
various domain properties. Assuming that the
configuration file has been called dom1config,
the domain creation command will be:
xm create name=”Dom9” kernel=”/boot/
vmlinuz-2.4.27-xenU” memory=32 disk=phy:
/dev/sdb2,sda1,w disk=phy:/dev/sdb3,sda2
,w ip=”192.155.144.111” root=”/dev/sda1
ro” dhcp=off
2.4 Domain Consoles
Once you have successfully booted a domain, the
command “xm list” will produce a listing of
currently active domains complete with information
about each. Supplying the “-l” flag will produce a
longer output, which includes the SXP specification for
each domain. The output produced (without “-l”) has
the following format [xen01]:
xm create -f dom1config
Where the “-f” option specifies that the specified
python configuration file should be used instead of
the default xmdefconfig.
2.
Using the Command Line
The third option may be the most convenient if
you wish to specify a domain “on demand”, i.e., if
you aren’t able to previously predict what
resources your domain should be given. This is
straightforward, with values being specified as
“property=value” when issuing the xm
create command. This is best illustrated with an
example.
SXP Configuration File
SXP is the internal configuration format that is
used by Xen. An SXP configuration may be
written by hand; however, by supplying the “xm
create” utility with the “-n” flag, the SXP
configuration will be printed to the terminal. For
instance, to generate the SXP configuration for the
dom1config file, the command would be:
Name
Id Mem(MB) CPU State Time(s) Console
Domain-0 0
123
0 r---- 4862.4
Domain-1 10
63
0 -b--74.0
9610
•
•
xm create -nf dom1config
•
•
•
The SXP configuration which is output can then be
re-directed to an sxp file for later use.
•
•
xm create -nf dom1config > dom1SXPconfig.sxp
To create a domain using an SXP configuration (note the use of
uppercase ‘F’):
Name: the descriptive name given to the domain
when it was created
Id: the domain Id within which the virtual machine
is running
Mem(MB): the memory allocated to the domain
CPU: the CPU on which this domain is running
State: the current domain state (r = running, b =
blocked, p = paused, s = shutdown, c = crashed)
Time(s): the time (in seconds) that this domain has
had access to the CPU for.
Console: the TCP port which is accepting
connections to the domain console.
To obtain a domain console, the command “xm
console domain_name” is used. The domain can be
referenced either by its name or by the domain id. If the
“-c” flag is used with the “xm create” command, a
xm create -F dom1SXPconfig.sxp
-6-
console will be opened for you automatically, and you
can observe the domain booting. To connect to Domain-1
as it appears above:
RealVNC
can
be
downloaded
from
http://www.realvnc.com/download-free.html.
There are packages for x86 Linux and for RedHat
users there is an i386 RPM package. Information
regarding installation and troubleshooting can be
found on the website [vnc01]. Furthermore, there
are documentation packages that can be
downloaded in addition to the application package.
If you are using the RedHat RPM, installation is
very straight forward:
xm console Domain-1 OR xm console 10
To obtain a console immediately after the domain is created:
xm create -cf dom1config
rpm -i vnc-4.0-1.i386.rpm
2.5 REALVNC
•
What is it?
Non zero domains have neither frame buffers or
graphics devices (since unlike the disks and
network devices which are virtualised, only
Domain 0 has direct access to the display
hardware). As such, an X-server can only be run in
domain 0. Real VNC (Virtual Network
Computing) is a remote-access program available
under the GNU General Public Licence [vnc01]. It
can be used to overcome the non availability of the
x-server on non zero domains since it runs in
memory; clients can connect to the desktop being
served by the vncserver running on a host across a
network. The program is set up as a client server
application, with the vncserver running in a nonzero domain accepting connections from a
vncviewer which runs in domain 0. The vncserver
provides a “TWM” style window manager.
RealVNC is also fully cross platform, so that for
instance a vncviewer running on a Windows box
can access the desktop served by a vncserver on a
Linux box.
•
How do I use it?
First a password needs to be set which will be used
to allow remote vncviewers to connect to the
desktop being offered by a vncserver. Obviously,
the installation needs to be done on both domain 0
and the non zero domain whose desktop you will
be accessing. On the host which will be running
the vncserver you can set the password by issuing
the command vncpasswd. This will prompt for a
password and then ask you to verify this. Once this
has been done, the vncserver can be invoked. The
server can be used without any options; the default
geometry will be 1024x768, and the next available
display number will be taken (the vncserver
manual pages provide more information regarding
the various options; for example you can specify
which display number vncserver is to use). To run
the vncviewer on the client machine (in this case
Xen Domain 0) you will need to know the I.P.
address of the machine running the server, as well
as the display number the server is using (this
information is output to the terminal when the
vncserver is invoked). This is all best explained
with the aid of an example:
DOMAIN 0
DOMAIN N (N > 0)
IP address 192.168.174.111
(Install RealVNC)
(Install RealVNC)
1. Set a password:
vncpasswd
2. Start the vncserver
vncserver &
OR
vncserver -geometry 640x480 &
<<set up vncserver on non-zero domain>>
3. Make a note of the display number
that the vncserver is using.
New ‘localhost.localdomain:3
(root)’ desktop is
localhost.localdomain:3
4. Start the vncviewer:
vncviewer 192.168.174.111:3 &
•
5. Enter the password at the prompt.
How do I get it?
-7-
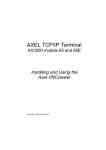
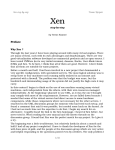
Once the TWM window manager is displayed, an X-Terminal will be provided.
The x-server can be invoked by executing:
cd /etc/X11/xinit
./Xclients
RealVNC in use. Domains 0,1,2 and 3 respectively (from left to right)
-8-
disk file and giving it an appropriate name. Then, this
copied disk can be added to the machine running
Domain-0 so that it can be made available for use by a
(non zero) domain.
3. Storage Management
As previously explained, a non zero domain needs access
to at minimum two disk partitions. One of these is to be
mounted and used as the root partition, and another to be
used as the Linux swap space. The root partition will
need to have a Linux installation placed upon it, and as
such will typically need to be about 1 to 1.5 Gb in size
(although this is dependant on the packages that the user
chooses to include with the Linux installation). The swap
space can be any size, but again, typically around 500
Mb.
3.2 LVM
Logical Volume Management (LVM) can be used to
overcome the problems associated with repartitioning a
file-system. It is difficult to pre-empt the number and
sizes of the partitions that you would like to make
available for Xen domains. Making a guess is risky, since
it could be the case that you will need to at some point
make backups of your file-systems, format them and then
re-partition your disks according to some new scheme
which will best suit your needs at the time. Please note
that this is by no means intended as a full on LVM
tutorial, but rather as an introduction to how LVM can be
used to implement a flexible and expandable storage
solution for your Xen Domains [lvm03].
Usually, the user is forced to pre-empt the number of
different partitions that they will require (which depends
on the number of domains to be created and used) and
partition their hard disk accordingly. A number of
approaches can be taken to implement this, two of which
are described below. The feasibility of each is very much
dependant on the user circumstances and work
environment. Furthermore, it should obviously be kept in
mind that the number of partitions that can be created is
restricted by the size of the physical hard disk(s) (when
working in a virtualised environment such as VMWare).
•
3.1 Adding a new Hard Disk
Physical Volume (PV): A physical storage
resource that is going to be made available for use
by LVM. This can either be a disk partition (e.g.
/dev/sdb2) or it can be a whole disk (e.g. /dev/sdb).
Volume Group (VG): A virtual “storage pool”
which is the amalgamation of all Physical
Volumes that have been “placed in” a VG. The
basic unit of measurement for a VG is the extent.
By default, each extent is 4mb in size, although
this can be changed during VG creation.
Logical Volume (LV): A logical partition created
from resources taken from a Volume Group.
If you are working in a virtualised environment (for
instance, Xen domain 0 is installed on a VMWare Virtual
Machine) then adding a new hard disk for each domain is
a straight forward way of handling storage management.
This can be implemented in one of two ways. The root
partition needs to have a Linux installation therein. You
can either create a hard disk, complete with two partitions
(one of which has Linux installed on it, as required by a
domain), and then clone this a number of times (for each
domain), or, you can start a new (custom) installation for
each domain. If you are using VMWare, cloning a hard
disk is simply a matter of making a copy of the virtual
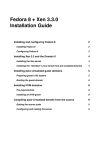
PV
(e.g. /dev/sdc)
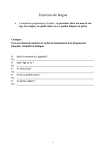
The following figure offers a graphical
representation of the key LVM components.
PV
(e.g. /dev/sdb2)
VG extents
How does it work?
To best understand the following, some definitions
are required [lvm02]:
PV
(e.g. /dev/sde)
VG
LV
LV
LV
The key components of LVM
-9-
PV
(e.g. /dev/sdb1)
LVM allows you to change the size of a LV
dynamically, and whilst it is in use. There is no
data loss, and there is not even the need to reboot
your system. Furthermore, the size of the Volume
Group can also be changed, so you may decide to
add a new PV or you may decide to reduce the VG
by removing a PV (which you may then go on to
assign to another VG for example).
•
Makefile exists within the directory holding
Linux source files, documentation and kernel
files (/usr/src), with targets for re-building
the kernel. This process involves first creating a
new
kernel
configuration
file
(/usr/src/linux-2.4.27xen0/.config), and setting up any
dependencies. The new kernel configuration will
need to include LVM support. Once the target
“make menuconfig” is invoked, LVM can
be included by selecting “Multiple devices
driver support”, and activating this; you will
then be presented with two more options,
“RAID support” and “Logical Volume Manager
(LVM) support”. You should ensure that the
latter is activated as part of the kernel, and not as
a loadable module. The new kernel
configuration should be saved and following this
we need to build the new kernel file, create any
loadable modules to be used with our new kernel
and then install these. The final step is to move
our new kernel file and system map to the
appropriate directory (/boot) which will
ensure that no changes are required to our
bootloader
configuration
(/boot/grub/grub.conf). The following
is the exact procedure that needs to be followed
(note the use of “ARCH=xen” before each
Makefile target to specify the architecture for
which we are re-building the kernel).
How do I get it?
[lvm04], [lvm05]
There are currently two versions of LVM; LVM
1.0 and LVM 2.0. The former is compatible with
2.4 series kernels and the latter with the 2.6 series
kernels. On a regular (i.e. unmodified) Linux
installation (2.4 series kernel) the chances are that
LVM support is already enabled. One way this can
be verified is by issuing the command “vgscan”
(which scans for active volume groups). If you
receive the following response:
vgscan -- LVM driver/module not
loaded?
then LVM is not enabled for your kernel, and you
will have to go through process of rebuilding the
kernel with LVM support enabled (see below).
Otherwise, if the response you receive is more
like:
vgscan -- reading all physical
volumes (this may take a while)
vgscan -- “/etc/lvmtab” and
“/etc/lvmtab.d“ successfully
created
vgscan -- WARNING: This program
does not do a VGDA backup of your
volume group
•
First change to the Linux kernel directory. It is
prudent to create a backup of your configuration
file before creating the new one
cd /usr/src/linux-2.4.27-xen0
cp .config .config.BACKUP
then you can skip the following section and move
on to “How do I use it?”.
Note that the configuration file has a filename
starting with “.”. As such it will only appear in
a directory listing obtained with “ls -a”.
How do I install it?
Invoke the Make target menuconfig to create
the new kernel configuration file.
There are a number of ways in which LVM can
be installed to a kernel without LVM support.
The following is a description of how to install
LVM1.0 by rebuilding your kernel. An
alternative could be to build LVM as a module
(LKM - Loadable Kernel Module) and use
insmod to insert this into the kernel.
Furthermore, if you are interested in installing
LVM2.0 then you should bear in mind that apart
from the LVM 2.0 packages, you will also need
to install the device-mapper packages. More
information for this can be found at [lvm05].
ARCH=xen make menuconfig
To re-build the XenoLinux kernel we follow
the same procedure as that for re-building a
“regular” (i.e. unmodified) Linux kernel. A
-10-
Select this
(press return)
Activate LVM
support
Create dependencies
ARCH=xen make dep
Build the new kernel (may take a while)
ARCH=xen make bzImage
Build any modules
ARCH=xen make modules
Install the modules to their correct locations
ARCH=xen make modules_install
Finally, move the new kernel file and system map to /boot. You may wish to first create backups of
the existing kernel and system map, in case there are any problems booting the new kernel
cp /boot/vmlinuz-2.4.27-xen0 /boot/vmlinuz-2.4.27-xen0.BACKUP
cp /boot/System.map-2.4.27-xen0 /boot/System.map-2.4.27-xen0.BACKUP
cd /usr/src/linux-2.4.27-xen0/arch/xen/boot
cp bzImage /boot/vmlinuz-2.4.27-xen0
cd /usr/src/linux-2.4.27-xen0
cp System.map /boot/System.map-2.4.27-xen0
reboot
-11-
•
How do I use it?
[lvm04]
An overview of some of the key LVM commands:
•
pvcreate:This initialises a disk device or disk
partition for use with LVM. If this is a disk
partition, then the filesystem on the partition needs
to be of type Ox8e (i.e. Linux LVM; this can be
accomplished with fdisk). If you are going to
use a whole disk device then the device must not
have a partition table (again, fdisk can be used
for this). So, lets say we want to use /dev/sda1
/dev/sdb3 /dev/sdc as our physical
volumes (and we have ensured that they meet the
requirements above):
vgreduce VolGrp1 /dev/sdc
Alternatively, if you don’t specify a PV, then all
unused Physical Volumes will be removed from
the Volume Group.
•
vgextend VolGrp1 /dev/sdd
space in your VG. So, the above would add a new
disk /dev/sdd (that we have available) to
VolGrp1:
pvcreate /dev/sda1 /dev/sdb3 /dev/sdc
•
As you can see, LVM is pretty straightforward to use. In
a virtualised environment such as VMWare, it is ideal
since if you start to run out of space in a VG, you can just
add a new virtual hard disk to your VMWare Virtual
Machine (i.e. Xen Dom 0) and then go through the steps
of initialising it (pvcreate), and then add it to your VG
using vgextend.
vgcreate:This creates a volume group, and
takes as parameters the physical volumes (that
have already been initialised using pvcreate).
Following from our example above:
vgcreate VolGrp1 /dev/sda1 /dev/sdb3
/dev/sdc
As explained earlier, it is required that the partition
assigned to a non-zero domain as the root filesystem
needs to have a Linux installation on it. The problem
encountered in doing this was that the RedHat installer
would not allow a Logical Volume to be used as an
installation target. The workaround is to have a clean
Linux installation on another partition, and simply copy
all files from that to your Logical Volume; typically you
would need to mount both filesystems to some known
location, copy the files over (this is a simple matter of
using
the
cp
utility,
e.g.
“cp
*
/destination/directory”), and then ensure that
you edit the /etc/fstab on the Logical Volume, as
explained in section 2.3 (Domain Specification and
Creation).
where VolGrp1 is the name that we are giving to
this volume group.
•
vgextend:This allows you to add a new PV to a
VG, for instance if you are running out of storage
lvcreate:Once we have a volume group, we
can create logical volumes, which is precisely
what lvcreate does. When creating a LV you
should specify its size (-L) , which VG you would
like the LV to be created from (since it is perfectly
possible that you have a number of Volume
Groups), and possibly its name (-n). So, to create
a 1.5Gb LV called lva1 from VolGrp1:
lvcreate -L 1536 -n lva1 VolGrp1
•
•
•
Finally a note on how the LVM logical volumes are
referenced, in case this is not clear from the above
explanations. A device file is created for all devices used
by Linux in the “/dev” directory; so for instance, the
hard disk “sdb” will have the file “/dev/sdb”
created for the Operating System to interact with it. This
convention is still true for LVM volumes, except that the
Volume Group name is included as part of the file path.
Thus, the Logical Volume “lva1” that has been created
in the “VolGrp1” Volume Group is referenced as
“/dev/VolGrp1/lva1”.
lvscan:This scans for the presence of any
logical volumes and produces a report
which is output to the terminal.
vgscan:As above but for volume groups.
lvremove:This can be used to remove a
LV. For instance, to remove the logical
volume lva1 created above:
lvremove /dev/VolGrp1/lva1
•
vgreduce:This will remove a PV from a
VG. For example, if you would like to
remove the volume /dev/sdc:
-12-
General Xen & Linux Resources:
[xen01]: The Xen Team, Xen User’s Manual,
http://www.cl.cam.ac.uk/Research/SRG/netos/xe
n/readmes/user/user.html, University of
Cambridge UK, October 2004.
[xen02]: Andresen, R. J., Install and run Xen-unstable
(2.0), http://openlab-muinternal.web.cern.ch/openlab-muinternal/Documents/Reports/Technical/Summer
%20Students/xenhowto.pdf, August 2004.
[lin01]: Boone, K., Understanding the Linux boot
process, http://www.kevinboone.com/boot.html,
July 2004.
RealVNC:
[vnc01]: RealVNC Ltd., VNC 4.0 Documentation,
http://www.realvnc.com/documentation.html,
2004.
LVM:
[lvm01]: Robbins, D., Common Threads: Learning Linux
LVM Part 1, http://www106.ibm.com/developerworks/linux/library/llvm/, March 2001.
[lvm02]: Robbins, D., Common Threads: Learning Linux
LVM Part 2, http://www106.ibm.com/developerworks/library/llvm2.html, April 2001.
[lvm03]: Tesfamariam, M., Giles, J., Implementing
Logical Volumes,
http://www.dell.com/downloads/global/power/4
q03-mic.pdf, November 2003.
[lvm04]: Lewis, A. J., LVM HOWTO,
http://www.tldp.org/HOWTO/LVM-HOWTO/,
October 2004.
[lvm05]: RedHat, LVM2 Resource Page,
http://sources.redhat.com/lvm2/, February 2004.
-13-