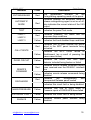
1
S2000-ASPT
Fire Alarm and Extinguishing
Control Panel
Engineer’s and User’s Manual
FIRE ALARM AND EXTINGUISHING CONTROL PANEL
ATTENTION!
To modify the panel configuration parameters use the program
UProg.exe of version 4.0.0.905 or higher.
2
www.bolid.com
S2000-ASPT
Table of Contents
1 GENERAL................................................................................................ 7
2 PANEL DESIGN .................................................................................... 13
2.1 Panel View and Basic Elements ............................................................ 13
2.2 Panel Front Plate ..................................................................................... 14
2.2.1 Front Plate Indicators ....................................................................... 14
2.2.2 Push Buttons .................................................................................... 17
2.3 Panel Internal PC Board ......................................................................... 19
2.3.1 PCB Terminal Blocks ........................................................................ 20
2.3.2 PCB XP1 and XP2 Jumpers ............................................................. 21
2.3.3 Voltage Test Points .......................................................................... 21
2.4 Panel Tamper Switch .............................................................................. 21
2.5 External Reader ....................................................................................... 22
3 TECHNICAL DESCRIPTION ................................................................. 23
3.1 Access Levels for the Indications and Controls .................................. 23
3.2 External Circuit Control Outputs ........................................................... 24
3.3 Transmitting Fault Conditions to a Central Monitoring Station.......... 25
3.4 Transmitting Fire Conditions to a Central Monitoring Station............ 26
3.5 Zone Monitoring ...................................................................................... 26
3.5.1 Monitoring Alarm Loops .................................................................... 26
3.5.2 Monitoring Input Circuits 4 to 7 ......................................................... 28
3.6 Monitoring Panel Outputs ...................................................................... 29
3.6.1 Monitoring Annunciator Appliance Circuits ....................................... 29
3.6.2 Monitoring Releasing Circuit............................................................. 30
3.7 Panel Configuration Parameters ........................................................... 30
3.7.1 Parameters of Alarm Loops and Monitored Circuits ......................... 31
3.7.2 Parameters of the NO-NC-C Relay Control ...................................... 33
3.7.3 Panel Configuration Parameters ...................................................... 36
3.7.4 System Configuration Parameters .................................................... 38
3.7.5 The Factory Default Settings ............................................................ 39
3.8 Panel Operating Modes .......................................................................... 41
3.8.1 Pre-operation .................................................................................... 42
3.8.2 Device Failure................................................................................... 42
3.8.3 Quiescent Mode ............................................................................... 43
3.8.4 Fault.................................................................................................. 43
3.8.5 Disabled............................................................................................ 43
3.8.6 Test................................................................................................... 43
3.8.7 On Batteries...................................................................................... 44
3.8.8 Battery Fault ..................................................................................... 44
3.8.9 Master Key Programming ................................................................. 44
3.8.10 User Key Programming .................................................................... 45
3.8.11 Prealarm ........................................................................................... 45
3.8.12 Fire Alarm ......................................................................................... 45
3.8.13 Pre-discharge Delay ......................................................................... 46
3.8.14 Blocked Release............................................................................... 46
[email protected], [email protected]
3
FIRE ALARM AND EXTINGUISHING CONTROL PANEL
3.8.15 Release ............................................................................................ 47
3.8.16 Extinguishing .................................................................................... 47
3.8.17 Release Fault ................................................................................... 47
3.8.18 Emergency Release ......................................................................... 47
3.9 The Modes to Release the Fire Suppression System .......................... 48
3.9.1 Remote Release ............................................................................... 48
3.9.2 Automatic Release ........................................................................... 48
3.10 Panel Indication ...................................................................................... 49
3.11 External Indication .................................................................................. 53
3.12 Panel Co-operation ................................................................................. 55
3.12.1 Zones Monitored by the Network Controller ..................................... 55
3.12.2 Outputs Monitored by the Network Controller .................................. 56
3.12.3 Implemented Network Controller Commands................................... 56
3.12.4 Panel Messages Being Transmitted to the Network Controller ........ 56
3.12.5 S2000-KPB Messages ..................................................................... 58
3.12.6 Control Commands Transmitted to S2000-KPB ............................... 58
3.13 Panel Powering ....................................................................................... 58
4 STANDARD DELIVERY, MARKING, AND PACKING............................60
4.1
4.2
4.3
Standard Delivery ................................................................................... 60
Marking .................................................................................................... 60
Packing .................................................................................................... 61
5 GENERAL INSTRUCTIONS ...................................................................62
5.1
5.2
Safety Precautions .................................................................................. 62
Storage ..................................................................................................... 62
6 GETTING STARTED ..............................................................................63
6.1 Mounting the Panel ................................................................................. 63
6.2 Connecting the External Circuits .......................................................... 64
6.2.1 Connecting the Alarm Loops ............................................................ 64
6.2.1.1
6.2.1.2
6.2.1.3
Smoke, Double Response Recognizable Alarm Loop......................65
Combined Smoke and Heat Alarm Loop ..........................................65
Heat, Double Response Recognizable Alarm Loop .........................66
6.2.2 Connecting Circuits to the Contacts +4-, +6, +7- ............................. 66
6.2.3 Сonnecting Manual Call Points ........................................................ 67
6.2.4 Connecting Light and Sound Alarms ................................................ 67
6.2.5 Connecting Releasing Circuit ........................................................... 68
6.2.6 Connecting Message Transmission Circuit ...................................... 68
6.2.7 Connecting Auxiliary Equipment ...................................................... 68
6.2.8 Connecting RS-485 Interface Lines ................................................. 69
6.3 Connecting Power Supply ..................................................................... 69
6.4 Setting the Panel Configuration Parameters ........................................ 70
6.4.1 Changing Configuration Parameters by Means of UProg ................ 70
6.4.2 Changing the Panel Network Address by Means of the S2000M .... 70
6.5 Testing the Panel .................................................................................... 71
6.6 Performance ............................................................................................ 74
7 TROUBLESHOOTING............................................................................75
8 MAINTENANCE .....................................................................................78
4
www.bolid.com
S2000-ASPT
9 BOLID CONTACT INFORMATION ........................................................ 81
Appendix A. Calculating the Battery Operating Time and Average
Consumed Current ................................................................................... 82
Appendix B. Personnel Action Plan in Case of Fixed Extinguishing
System Discharge .................................................................................... 84
[email protected], [email protected]
5
FIRE ALARM AND EXTINGUISHING CONTROL PANEL
This Engineer’s and User’s Manual is intended to help for studying
operability principles and maintenance of the S2000-ASPT Fire Alarm and
Extinguishing Control Panel version 3.05.
Please read these instructions completely before connecting,
operating or adjusting this product.
6
www.bolid.com
S2000-ASPT
General
1
GENERAL
The S2000-ASPT Fire Alarm and Extinguishing Control Panel
(hereinafter referred to as the panel) is designed to be used in standalone
or centralized fire alarm and protection systems.
The panel provides monitoring fire conditions, controlling audible and
visual alarms, and operating a fire suppression system both releasing
extinguishing agent and monitoring faults of the fire protection equipment.
The main S2000-ASPT functions are:
− Protecting a single hazard area
− Releasing extinguishing agent in gaseous, dry chemical, or aerosol
fire suppression system both automatically and remotely
− Receiving and processing signals from both manual call points and
automatic fire detectors (passive, active, two-wire, four-wire, normally
open, and normally closed)
− Controlling one sound and three visual alarms
− Controlling technological equipment such as ventilation systems and
so on
− Receiving commands from and transmitting alarm and fault
messages over the RS-485 interface line to the network controller
(either a S2000M fire and alarm control console or a PC with the
ARM Orion software package installed)
− Monitoring for faults of fire protection equipment and audible and
visual alarms
− Monitoring for faults of fire suppression installation
− Receiving signals from:
· Door open sensors
· Pressure detectors
· Mass of Pressure outputs of the fire protection equipment
· Connected S2000-KPB release modules
· Manual call points
· IButton reader
− Transmitting the "Fire Alarm" and "Fault" messages to a fire
department or central monitoring station.
The panel can operate both stand-alone and as an addressable part
of an Orion security installation controlled by its network controller.
Also the panel can be co-operated with S2000-KPB relay modules
allowing increasing the number of release circuits.
[email protected], [email protected]
7
FIRE ALARM AND EXTINGUISHING CONTROL PANEL
The panel can be powered by:
− mains power supply 220 V ac/ 50 Hz, or
− backup power supply: two connected in series batteries 12 V d.c.
DO NOT operate the panel without connecting batteries to it
The panel provides round-the-clock operation.
The panel must not be used under aggressive or dust ambient
conditions or in explosion-hazardous premises.
The panel construction design provides the ingress protection rating
in accordance with IP30 (IEC 529-89).
The panel has been ready to operate after no more than 30 s since
powering on.
The average operating life is 10 years, panel’s both backup batteries
needing to be replaced once every 5 years. Do not replace only one
battery but rather both batteries must be replaced.
The panel weight is no more than 6 kg without backup batteries.
Overall dimensions are equal to 305×255×95 mm.
The panel is intended to be used under the following ambient
conditions:
- operating temperatures:
from 0°C to 50°C provided that backup batteries are housed
within the panel, and
from -30°C to 50°C provided that backup batteries are stored
separately;
- relative humidity up to 98% (for 25°C) non-condensing;
- vibration load from 1 to 35 Hz, with maximum acceleration 0.5 g.
Following are the schemes that show some ways to use the panel
within a fire alarm and extinguishing system (see Figure 1-1 to Figure 1-4).
8
www.bolid.com
S2000-ASPT
General
Figure 1-1. A Standalone Dry Chemical Fire Extinguishing System
1 : Light Alarms (Caution Signs)
2 : Audible Alarm
3 : Manual Call Point
4 : iButton Reader
5 : Door Contact
[email protected], [email protected]
6 : S2000-ASPT Panel
7 : Smoke Detectors
8 : Heat Detectors
9 : Fire Protection Modules
10 : S2000-KPB module
9
FIRE ALARM AND EXTINGUISHING CONTROL PANEL
Figure 1-2. A Standalone Gaseous Fire Extinguishing System
1 : Light Alarms (Caution Signs)
2 : Audible Alarm
3 : Manual Call Point
4 : iButton Reader
5 : Door Contact
6 : S2000-ASPT Panel
10
7 : Smoke Detectors
8 : Heat Detectors
11 : Output Pressure Detector
12 : Release Activator
13 : Internal Pressure Detector
www.bolid.com
General
S2000-PT
S2000-ASPT
Figure 1-3. A Centralized Dry Chemical Fire Extinguishing System
1 : Hazardous Area
2 : S2000-PT CIE
3 : S2000M Control Console
[email protected], [email protected]
4 : Light and Sound Alarms
5 : S2000-KPB Module
11
S2000-PT
FIRE ALARM AND EXTINGUISHING CONTROL PANEL
Figure 1-4. A Centralized Gaseous Fire Extinguishing System
1 : Hazardous Area
2 : S2000-PT CIE
3 : S2000M Control Console
12
4 : Light and Sound Alarms
5 : S2000-KPB Module
6 : Gas Installation
www.bolid.com
S2000-ASPT
Panel Design
2
2.1
PANEL DESIGN
Panel View and Basic Elements
The basic panel elements are shown in Figure 2-1.
8
1
9
2
3
10
2
11
4
5
12
13
6
7
Figure 2-1. Basic Panel Elements
1 – Control Board
2 – Main PCB
3 –Tamper Switch
4 – F1 Fuse Holder
5 – Power and Earth
Terminals
6 – Transformer
7 – Panel Base
8 – Panel Top Cover
[email protected], [email protected]
9 – Front Plate
10 – Key Switch
11 – Mechanical Lock
12 – Battery Leads
13 – Backup Batteries
13
FIRE ALARM AND EXTINGUISHING CONTROL PANEL
2.2
Panel Front Plate
A number of light indicators and push buttons as well as a key switch
are located on the panel front plate as follows.
2.2.1
Front Plate Indicators
There are 27 light indicators (LEDs) on the panel front plate as shown
in Figure 2-2. Its destination and light modes are represented by Table 2-1.
Figure 2-2. The Panel LEDs
Table 2-1: Panel Faceplate Indicators
Indicator
Color
Destination
PREALARM
Red
The generalized indicator for prealarm fire
conditions
FIRE ALARM
Red
The generalized indicator for fire conditions
FAULT WARNING
Yellow
The generalized
conditions
DISABLED
Yellow
The generalized indicator for disabled
conditions
14
indicator
for
fault
www.bolid.com
S2000-ASPT
Panel Design
Indicator
Color
Destination
EXTINGUISHING
Red
The generalized indicator for the
Extinguishing operating mode of the panel
AUTOMATIC
MODE
Red
Indicates whether the automatic mode to
release extinguishing agent is set on of off;
also indicates the current status of the VA3
output
TEST
Yellow
LOOP 1
Red
Indicates prealarm, fire alarm and fire
response loop conditions
Yellow
Indicates fault and disabled loop conditions
Red
Indicates one or more manual call points
wired to the MCP panel terminals being
activated
Yellow
Indicates the MCP circuit failure or
disablement (as a result of pressing the
same-name button)
Yellow
Indicates the circuit with door open
detector included being broken or failed
Red
Indicates remote release command having
been received over the RS-485-1 interface
line
Yellow
Indicates remote release commands being
disabled
LOOP 2
LOOP 3
CALL POINTS
DOOR CIRCUIT
REMOTE
COMMAND
Red
DISCHARGE
Indicates the panel Test mode
Indicates
the
Extinguishing
Unexpected Release panel modes
and
Indicates this circuit fault or being disabled
MASS/PRESSURE
Yellow
Indicates that one or more Mass or
Pressure inputs of S2000-KPB have failed
EXTERNAL FAULT
Yellow
Indicates this circuit fault or being broken
SILENCE
Yellow
Indicates internal panel sounder being
disabled
[email protected], [email protected]
15
FIRE ALARM AND EXTINGUISHING CONTROL PANEL
Indicator
Color
Destination
Red
Indicates this output is activated causing
the connected sound alarms to sound
Yellow
Indicates that the output is disabled or the
connected circuit failed
Red
Indicates the VA1 and VA2 outputs are
activated and so are the connected caution
signs (the pre-discharge and discharge
alarms)
Yellow
Indicates that the VA1 and VA2 outputs
are disabled or the connected circuits
failed (see the note below the table)
Red
Indicates that fire condition is being
transmitted to a fire monitoring station
Yellow
Indicates the VA1 and VA2 outputs being
disabled
Yellow
Indicates that either a fault signal is being
sent on the fire monitoring station or the
output is disabled by pressing the samename button
Red
Indicates that the panel releasing circuit is
active (under current)
Yellow
Indicates fault or disabled condition of the
releasing circuit
SIREN
VISUAL ALARMS
FIRE
FAULT
RELEASE CIRCUIT
Red
Indicates that the relay is activated
Yellow
Indicates that the output is disabled
Yellow
Indicates that one or more of the S2000KPB modules connected to the panel failed
or are isolated
Power
Green
Indicates that the panel power is turned on
On Batteries
Yellow
Indicates faults of mains power, backup
batteries, and the battery charger
Device Failure
Yellow
Indicates the Device Failure panel mode
AUX.EQUIPMENT
S2000-KPB
16
www.bolid.com
S2000-ASPT
Panel Design
Note: For the VISUAL ALARM indicator, activating one of the VA
outputs by the panel is more priority condition to display than circuit failure
condition of the other VA output
The behavior of all the indicators in particular conditions while panel
operating is described below in the Section 3.10.
2.2.2
Push Buttons
There are 17 operating push buttons and a key switch on the panel
front plate.
Locating the push buttons on the panel front plate is shown in Figure
2-3. The push button and key switch functions are demonstrated by Table
2-2.
Figure 2-3. Panel Push Buttons and Key Switch
Table 2-2: Push Button Functions
Button
Fire RESET
Function
Cancels the Fire mode of the panel2)
Extinguishing
RESET
Aborts extinguishing2)
AUTOMATIC
MODE
Disables/Enables automatic discharge of extinguishing
equipment2)
[email protected], [email protected]
17
FIRE ALARM AND EXTINGUISHING CONTROL PANEL
Button
TEST
Function
Switches the panel to the Test mode2),3)
LOOP 1
LOOP 2
Disables/Enables the input zones of automatic
detection2),3)
LOOP 3
CALL POINTS
Disables/Enables the Manual Call Point circuit2),3)
REMOTE
COMMAND
Disables/Enables the remote release commands
received via the RS-485-1 interface2),3)
DISCHARGE
Disables/Enables the Pressure Detector circuit2),3)
SILENCE
Silences the internal sounder1)
SIREN
Disables/Enables the circuits controlled by the outputs
VA1 and VA22),3)
VISUAL ALARMS
Disables/Enables the circuits controlled by the outputs
VA1 and VA2 (pre-discharge and discharge alarms)2),3)
FIRE
FAULT
Disables/Enables the FIRE output2),3)
Disables/Enables the FAULT output2),3)
RELEASE CIRCUIT Disables/Enables the releasing circuit2),3)
AUX.EQUIPMENT
Key Switch
Disables/Enables the NO-NC-C output2),3)
Locks/Unlocks pressing the panel buttons by means of
the key provided2),3)
Note: The digits 1), 2), and 3) denote the access levels for which the
specified operations are enabled (see Section 3.1 of this Manual)
Once the Fire RESET button
has been pressed (available for the
access level 2), the panel resets all fire alarms and automatically arms all
responded alarm loops.
Once the Extinguishing RESET button
has been pressed
(available for the access level 2) the panel aborts the Extinguishing mode,
de-energizes the releasing circuit R, and switches the releasing outputs of
the S2000-KPB modules (if present) to initial conditions.
Pressing the AUTOMATIC MODE button
(available for the
access level 2) causes the panel to switch the mode of automatic release
on and off. If the automatic mode is enabled, pressing the button will
disable this one, and, otherwise, if the automatic mode is disabled,
pressing the button will enable it. If automatic mode is blocked (for
18
www.bolid.com
S2000-ASPT
Panel Design
example, the door sensor detector circuit is broken), pressing the button
causes the internal sounder to make a long sound.
If the Test button
is pressed (available for the access levels 2 and
3), the panel enters the TEST mode (see the Section 3.8.6).
The LOOP1 – LOOP3 and CALL POINTS buttons having been
pressed, the input zones of automatic detection and manual call points are
armed / disarmed.
The REMOTE COMMAND and the DISCHARGE buttons having
been pressed, the input of remote releasing commands and pressure
detector monitoring are disabled / enabled respectively.
Pressing the SILENCE button
(available for all the access levels)
silences the internal panel sounder when it is activated. The internal
sounder is unblocked manually by repeated pressing the button or
automatically after any event causing sounding having occurred. The
internal sounder CANNOT be silenced when the panel is in the Predischarge Delay mode.
Pressing the buttons SIREN, VISUAL ALARMS, FIRE, FAULT,
RELEASE CIRCUIT, and AUX.EQUIPMENT disables / enables the output
circuits SA, VA1 and VA2, Fire, Fault, R, and NO-NC-C respectively.
(locked position), the
When the key switch is positioned to the
manual panel control by means of its push buttons is disabled. This is
available for the access level 1. Pressing any button causes the internal
sounder to make a long sound indicating blocking the buttons.
When the key switch is positioned to the
(unlocked position), the
manual panel control by means of its push buttons is enabled. This is
available for the access level 2 and above. In such a mode if you press any
faceplate button the internal sounder makes short sound acknowledging
the pressing.
2.3
Panel Internal PC Board
The panel PCB layout can be shown in Figure 2-4.
The main internal panel components are:
− Terminal Blocks
− XP1 and XP2 jumpers
− HL1 internal light emitting indicator
− Voltage test points
[email protected], [email protected]
19
FIRE ALARM AND EXTINGUISHING CONTROL PANEL
2.3.1
PCB Terminal Blocks
XT6
sounder
XP3
tel.: 775-71-55
http://www.bolid.com
e-mail: [email protected]
control board
connection
tamper switch
contacts
HL1
internal indicator
battery
terminals
RS-485-1 End-Of-Line
resistor connector
XP1
RS-485-2 End-Of-Line
resistor connector
XP2
~40V
1 2
T1
+
–
+
–
+
–
+ +
–
+
+1–
+3–
+4–5+
+6–7+
4.7K
4.7K
4.7K 4.7K
4.7K 4.7K
1 2 1 2
FLT
FR
2 3 +
NO NC
C
–
+ 24V –
И +
I
-
RE+ 0V
А В А В
A1 B1
-
+
-R+
A2 B2
iButton
reader
fire detectors
+
-VA1+
r
b
-
r
b
-
+
-
-VA2+
-
1
2
1
2
1
2
1
2
1
3
4
3
4
3
4
3
4
3
4
b w
b
w
b w
b w
b w
reader LED
red
white
load connection module
red
1
4
white
black
2
3
black
Figure 2-4: Panel Printed Circuit Board Layout
The panel PCB terminal blocks (see Figure 2-4) are designed to:
+1-, +2-, +3+4+5+6+7FLT
FR
NO-NC-C
20
r
b
2
XT1
12 V
4 Ah
+
-SA+
r
b
r
b
+
-VA3+
: connect alarm loops 1, 2, 3 with fire detectors included
: connect door open sensors
: connect manual call points
: connect pressure detector contacts
: connect a fault circuit of fire protection equipment
: transmit fault condition to a fire department
: transmit fire conditions to a fire department
: connect auxiliary equipment to be controlled (such as
fans, dampers, and so on)
www.bolid.com
S2000-ASPT
+24VI
RE+
0V
А1, В1
А2, В2
+RVA1
VA2
VA3
SA
2.3.2
Panel Design
: supply 24 V d.c. to external devices
: connect the LED of the iButton reader
: connect the iButton reader
: (this is the panel 0V circuit output)
: link the panel with the network controller (RS-485-1)
: connect S2000-KPB modules to the panel (RS-485-2)
: connect the exploder (releasing circuit)
: connect a visual alarm 1 (EXIT sign)
: connect a visual alarm 2 (KEEP OUT sign)
: connect a visual alarm 3 (AUTOMATION OFF table)
: connect an audible alarm (siren)
PCB XP1 and XP2 Jumpers
In order to help keep the network line at optimum level for
communication, the End-of-Line (EOL) terminators or resistors have to be
connected to each end of the RS-485-1 and RS-485-2 interface lines.
For this purpose two jumpers, marked as XP1 and XP2 on the panel
PCB, are destined. If the S2000-ASPT panel is the first or the last device in
the RS-485-1 and/or RS-485-2 lines, then the relative jumper(s) must be
connected across the corresponding A and B lines. Otherwise the jumpers
must be removed.
2.3.3
Voltage Test Points
Following are the panel PCB voltage test points:
0
5
27
40
2.4
- the panel 0V circuit
- the regulated 5±0,5 V voltage supply output
- the regulated 27±1 V voltage supply output
- mains rectifier output voltage
Panel Tamper Switch
There is a tamper switch under the panel top cover (see Figure 2-1).
The tamper switch is connected to the XP3 terminal block of the panel
main PCB by a double-core cable. When the panel top cover is closed, the
tamper switch contacts are closed too.
You must open the panel cover to switch the panel to the Master Key
Programming mode.
[email protected], [email protected]
21
FIRE ALARM AND EXTINGUISHING CONTROL PANEL
2.5
External Reader
The panel provides connecting the reader of Dallas Touch Memory
electronic devices (or iButtons). The user authentication is performed by
key code reading.
The reading and writing iButton codes are implemented when an
iButton is touched to the reader.
The panel is supplied by a single input to connect a reader.
The distance between the panel and the reader cannot exceed
100 m provided the wire cross-section area is not less than 0.1 square
mm.
The panel provides storing up to eight iButton codes (including the
code of the Master Key) in its non-volatile memory.
22
www.bolid.com
S2000-ASPT
Technical Description
3
3.1
TECHNICAL DESCRIPTION
Access Levels for the Indications and Controls
The panel provides five different access levels for the indications and
controls which are used to have user access to panel operations.
Access Level 1:
The access level 1 is expected to be used by operating personnel
and safety officers responsible for safety supervision who might be
expected to investigate and respond to a fire alarm or a fault warning.
The following operations are available for these users:
− Monitoring indication of light emitting indicators of the panel front
plate, and
− Silencing the panel sounder, if activated
No special procedures for entry to access level 1 is needed; this level
is associated with the position of the Key Switch on the panel front plate
(see Figure 2-3).
Access Level 2:
The access level 2 is expected to be used by persons having a
specific responsibility for operating fire protection equipment, and who are
trained and authorized to operate the panel in the following conditions.
− Quiescent mode
− Fault mode
− Prealarm mode
− Fire Alarm mode
− Pre-discharge Delay mode
− Release mode
− Extinguishing mode
The access level 2 enables users to implement all the operations
available for the access level 1 and additionally the following operations:
− Resetting the Prealarm and Fire Alarm panel operating modes
− Resetting the Extinguishing, Pre-discharge Delay, and Release
panel operating modes
− Switching on/off the mode of automatic release
To entry for access level 2 switch the Key Switch on the panel front
plate (see Figure 2-3) to the
[email protected], [email protected]
position by means of the key provided.
23
FIRE ALARM AND EXTINGUISHING CONTROL PANEL
Access Level 3:
The access level 3 is expected to be used by persons who are trained
and authorized to operate fire protection equipment and all panel functions
including disabling panel input/output circuits and switching the panel to the
Test mode.
To entry for access level 3 touch the iButton reader connected to the
panel with the Master Key.
If the Master Key Provided Access panel configuration parameter
(see Section 3.7.3) is set off (off by default) all operations said above are
available for the access level 2 too.
Access Level 4:
The access level 4 is expected to be used by persons who are trained
and authorized to configure and re-configure the panel as well as to
maintain the panel, to repair the panel, or to alter its firmware.
A mechanical lock on the top panel cover and its key provided are
used for entry to access level 4.
Access Level 5:
When the panel operates under controlling of an Orion network
controller, an additional access level 5 can be provided for a system
operator (operator of the S2000/S2000M console or ARM Orion) which is
enabled to control the panel remotely.
For entry to access level 5, the proper password enrolled in the Orion
system database must be typed on the console keypad or PC keyboard.
3.2
External Circuit Control Outputs
The panel provides some outputs to connect and operate the external
devices as shown in Table 3-1.
Table 3-1: Panel Control Outputs
Output
Output type
Parameters
Normally
opened
contacts
monitored
for
short/open
failures
Provided that
the backup
batteries are
connected:
(24±2) V, 1amp,
up to 2 amp for
2 seconds
(See App.A)
control circuit
current
0.0015 amp
VA1
VA2
VA3
SA
R
24
Purpose
To connect a pre-discharge
alarm (EXIT light sign)
To connect a discharge
alarm (KEEP OUT sign)
To connect the
AUTOMATICS OFF sign
To connect an external
sound alarm (siren)
The release circuit to
connect exploders, valves
and so on
www.bolid.com
S2000-ASPT
Output
Technical Description
Output type
I
Voltage of
(5±0,5) V
RE+
FR
FLT
NO-NC-C
24V
3.3
Normally
opened solid
state relay
contacts
Parameters
0.015 amp
maximum
current
700 micro amp
maximum
current
Maximum
commuting
voltage is
100V/0.1amp
d.c.
Purpose
Connects the LED of the
iButton reader
Connects the iButton reader
Transmits the FIRE
message to the fire
department
Transmits the TROUBLE
message to the fire
department
Maximum
Controls auxiliary equipment
commuting
Change-over
such as ventilation, air
voltage is
relay
conditioning and air heating
28V/2amp d.c.
contacts
installations as well as air
or 128V/0.5amp
damper controls and so on
a.c.
Supplies 24 V power to
d.c. power
(24 ± 2) V
external devices consumed
supply
(See page 82)
no more than 0.2 amp
Transmitting Fault Conditions to a Central Monitoring Station
Transmitting fault conditions to a Central Monitoring Station (CMS) is
performed by opening the contacts of the FAULT panel output. The fault
conditions include:
− Short/open failure of an alarm loop, door sensor circuit, audible or
visual alarm circuit, manual call points’ circuit, pressure detector or fire
protection equipment fault circuit
− Audible or visual alarm circuit overcurrent
− Mains or backup power supply failure
− Panel tampering
− Disablement of a zone, circuit, or output
− Receiving fault conditions from a connected S2000-KPB module
− Loss of communication with any S2000-KPB module
[email protected], [email protected]
25
FIRE ALARM AND EXTINGUISHING CONTROL PANEL
3.4
Transmitting Fire Conditions to a Central Monitoring Station
Transmitting fire conditions to a CMS is performed by closing of the
contacts of the panel FIRE output in cases of as follows:
− Panel entering the Fire Alarm mode
− Remote releasing the extinguishing system
− Emergency release when an extinguishing agent is being
discharged without having received a release pulse
3.5
Zone Monitoring
The panel provides monitoring for such physical and logic zones as:
− zone #1: panel alarm loop #1
− zone #2: panel alarm loop #2
− zone #3: panel alarm loop #3
− zone #4: panel door sensor circuit
− zone #5: panel manual call points’ circuit
− zone #6: pressure detector circuit
− zone #7: panel mains power control
− zone #8: panel battery power control
− zone #9: panel automatic release mode control
− zone #10: panel operating mode control
− zone #11: panel remote release mode control
− zone #12: fire protection equipment fault monitoring
− zones #20, #21, #22: controlling the tamper switch and two zones
of the first S2000-KPB
− zones #30, #31, #32: controlling the tamper switch and two zones
of the second S2000-KPB
− …
− zones #170, #171, #172: controlling the tamper switch and two
zones of the 16th S2000-KPB
3.5.1
Monitoring Alarm Loops
The panel provides connecting and monitoring for statuses of three
alarm loops having the characteristics as follows:
− alarm loop resistance (without regard to termination resistor) no
more than 100 Ω
− leakage impedance between the loop wires or between any wire
and earth at least 50 kΩ
The termination 0.5 W, 4.7 kΩ±5% resistors provided have to be
included into each alarm loop.
26
www.bolid.com
S2000-ASPT
Technical Description
In the quiescent mode the panel provides alarm loop inputs with
power voltage ranging from 24 V down to 19 V depending on rated current
from 0 to 3 milliamps correspondently.
In case of a short failure in any loop the panel supplies other loops
with the same input voltage as mentioned above.
The panel provides limiting the loop current in case of a short circuit
failure by the value of 27 milliamps.
The effective voltage ripples are not to exceed 20 mV.
The panel recognizes the following alarm loop statuses as follows:
− Normal (Operating) status
− Responded (Broken) status
− Open Failure status
− Short Failure status
The statuses of alarm loops are defined depending on their
parameters accordingly with Table 3-2.
Table 3-2: Alarm Loop Parameters in Various Statuses
Alarm Loop
Type
Alarm Loop Parameters
Open
Failure
Short
Failure
resistance
> 6.6 kΩ
resistance
< 100 Ω
resistance
2
2.2 to 5.4 kΩ
Combined
0.1 to 1.8 kΩ
Smoke detectors
(smoke and
or
consume current from 6.6 to 14.4 kΩ
heat)
0 to 1.2 milliamp
resistance
> 16 kΩ
resistance
< 100 Ω
3
Heat, double
response
recognizable
resistance
> 30 kΩ
resistance
< 1.8 kΩ
Operating
resistance
1
Smoke,
2.2 to 5.4 kΩ
double
Smoke detectors
response consume current from
recognizable
0 to 3 milliamp
Responded
resistance
0.1 to 1.8 kΩ
resistance
resistance
resistance
2.2 to 5.4 kΩ
6.6 to 25 kΩ
Alarm loop resistance can be estimated based on its measured ADC
value by using the formula as follows:
[email protected], [email protected]
27
FIRE ALARM AND EXTINGUISHING CONTROL PANEL
Rloop =
280.8
− 1 , [KΩ],
ADC
Where Rloop is the actual resistance value of an alarm loop, and
ADC is the measured ADC-value of the resistance.
Reading the ADC values can be requested by means of the network
controller tools using the loop control menu.
The panel provides powering active two-wire detectors through alarm
loops. The maximum number of detectors to be wired into any alarm loop
can be estimated by formula:
N = Imax / i, where:
N
is the number of detectors
Imax is maximum load current (Imax = 3 milliamp for a loop type 1
Imax = 1.2 milliamp for a loop type 2)
i is the current in milliamps consumed by each detector in the
quiescent mode
If an alarm loop of type 1 (smoke, double response recognizable) is in
use then the wired detectors have to retain their operability in case of loop
voltage having fallen down to 12 V.
The integration time, the time the panel needs to detect loop
breaking, is 300 milliseconds for all loop types.
3.5.2
Monitoring Input Circuits 4 to 7
The panel provides monitoring for conditions of such input circuits as
the door sensor circuit, the manual call point circuit, the pressure detector
circuit, and the fault circuit of fire protection equipment which have the
characteristics as follows:
− wire resistance (without regard to termination resistors) no more
than 100 Ω
− leakage impedance between two wires or between any wire and
earth at least 50 kΩ
The termination resistor 0.5 W, 4,7 kΩ±5% has to be included into
each monitored circuit said above.
The panel recognizes the following statuses of the door sensor and
manual call point circuits:
− Normal (Operating) status
− Activated (Broken) status
− Open Failure status
− Short Failure status
28
www.bolid.com
S2000-ASPT
Technical Description
Table 3-3 gives the couples between the circuit parameter values and
the relevant statuses.
Table 3-3: Monitored Circuits 4 and 5 in Various States
Operating
Broken
Open Failure
Short Failure
From 2.2 kΩ to
5.4 kΩ
From 200 Ω to 1.8 kΩ,
or from 6.6 kΩ to 25 kΩ
More than
30 kΩ
Less than
100 Ω
The resistance of a monitored circuit can be estimated based on its
measured ADC value by using the formula as follows:
Rmc =
ADC
, [KΩ],
126.4 − 0.53 ⋅ ADC
where Rmc is the actual resistance of the monitored circuit, and
ADC is the measured ADC-value of the resistance.
Reading the ADC values can be requested by means of the network
controller tools using the loop control menu.
The integration time that is needed the panel to detect circuit
breaking is 1 s for manual call points circuit and 300 milliseconds for other
monitored circuits.
3.6
Monitoring Panel Outputs
The panel provides monitoring for conditions of the following panel
outputs:
− output #1: visual alarm #1 (EXIT light sign)
− output #2: visual alarm #2 (KEEP OUT light sigh)
− output #3: visual alarm #3 (AUTIMATICS OFF light sign)
− output #4: audible alarm (fire siren)
− output #5: releasing circuit
− outputs #21 to #26: executive outputs of the first S2000-KPB
− outputs #31 to #36: executive outputs of the second S2000-KPB
− …
− outputs #171 to #176: executive outputs of the 16th S2000-KPB
3.6.1
Monitoring Annunciator Appliance Circuits
The panel monitors the VA1, VA2, VA#, and SA circuits for open and
short failures both in activated and deactivated conditions.
[email protected], [email protected]
29
FIRE ALARM AND EXTINGUISHING CONTROL PANEL
The maximum commuting current for each output is:
− 1 amp in permanent mode
− Up to 2 amp for 2 s in pulse mode
The maximum circuit controlling current is 1.5 milliamps.
The panel recognizes the following statuses of the annunciator
appliances as:
− Normal (Operating) status
− Open Failure status
− Short Failure status
These statuses are defined depending on a voltage of alarm output
negative terminal relative to 12 V output one in agreement with Table 3-4.
Table 3-4: Alarm Circuit States
Operating
Voltage ranged from
0.35 V to 4.0 V
3.6.2
Open failure
ON
Less than
0.05 V
OFF
More than
4.1 V
Short failure
ON
More than
4.5 V
OFF
Less than
0.3 V
Monitoring Releasing Circuit
The panel monitors the releasing circuit for open and short failures
both for quiescent condition and while agent releasing.
If the panel is used in a gaseous extinguishing system, the release is
considered to be successive after pressure detector having actuated. If the
release pulse has completed but the pressure detector doesn't respond or
its circuit is in fault, the release is considered to be failed. In such a case
duration of the release pulse must comply with the maximum time of the
extinguishing agent releasing.
The release circuit parameters met the requirements listed in the
Section 3.6.1.
3.7
Panel Configuration Parameters
To adjust the panel for particular application it can be necessary to
change some configuration parameters stored in the panel non-volatile
memory. The panel configuration parameters can be sorted into the
following four groups:
− Parameters of alarm loops and monitored circuits
− Parameters to control the NC-NO-C relay output
− Parameters of the panel
− System parameters
30
www.bolid.com
S2000-ASPT
3.7.1
Technical Description
Parameters of Alarm Loops and Monitored Circuits
Table 3-5: Loop and Circuit Parameters
Parameter
Description
Determines the control algorithm
and available types of detectors to
Loop Type be connected (normally opened or
closed detectors; recognition of two
or more detectors actuating in one
loop)
Loop
Analysis
Delay
The pause before alarm loop status
analysis having begun since power
reset. It is defined by the time
period necessary for two-wire
detectors operating mode recovery
Loop
Blocks the repeated status request
Requery
of the actuated detector
Prohibition
Gives the time from the moment of
Recovery restoring a monitored circuit until
the moment of considering the
Time
circuit as being in norm
Range
1 – smoke with double
actuating recognition
2 – combined (smoke
and heat) without
double actuating
recognition
3 – heat with double
actuating recognition
3 to 255 s
On/Off
0 to 255 s
Loop Type parameter defines the panel a way to control the alarm
loop and detectors included. The Alarm Integration Time value for all loop
types is 1 s. The panel provides recognizing of such loop statuses as
Breaking, Open Failure, and Short Failure.
Having received a single response from a smoke (normally opened)
detector the panel transmits the “Fire Signal” message to the network
controller and requests the detector status again by shutting the loop
power down and waiting the repeated actuation during one minute. Unless
after power reset the detector has returned to the initial status, or the
detector has actuated again within one minute the panel enters the
Prealarm status. Otherwise the panel retains the Quiescent mode.
Single heat (normally closed) detector response immediately causes
the panel to enter the Prealarm mode.
Alarm loops of types 1 and 3 are capable of recognizing dual
actuating, that is, the panel perceives each of two or more actuated
detectors. In such a case the loop switches from the Armed or Fire
[email protected], [email protected]
31
FIRE ALARM AND EXTINGUISHING CONTROL PANEL
Prealarm statuses to the Fire status only after another detector having
actuated at the same loop.
For an alarm loop of type 2 only single detector actuating is
recognized. If so, the panel switches to the Prealarm status. The transition
to the Fire Alarm status becomes possible if another loop has transited to
the Fire Prealarm status.
Entering the Fire Alarm mode causes the panel to release
extinguishing agent. So, for loops of types 1 and 3 the extinguishing system
can be discharged in case of double detector response in a single loop
while for loops of the type 2 this one can be discharge when two detector
responses in two different alarm loops.
The loop of type 1 is intended to wire fire detectors with normally
opened contacts, powered by loop, with actuated detector voltage rest of
4.5 to 8 V and minimum operating voltage no more than 12 V. An additional
resistor has to be brought in a loop in series with fire detectors. The values
of the additional resistors are represented in clause 6.2.1.
The loop of type 2 is intended to wire both smoke (normally opened)
detectors without any series resistors and heat (normally closed) detectors
with shunt resistors connected across is contacts as shown in Figure 6-4.
The loop of type 3 is intended to wire fire contact detectors with
normally closed contacts. A shunt resistor needs to be brought in parallel
across the detector contacts. See clause 6.2.1 for more information.
Loop Analysis Delay parameter defines the time period during which
the panel doesn’t consider loop resistance changes after power reset. The
value of this delay is defined by detector pre-operating time, its minimum
value being equal to 3 s.
If necessary, the function of repeated request of actuated detector
can be disabled by setting the Loop Requery Prohibition parameter on.
This feature is suitable if, for example, normally opened four-wire detectors
with separate power supplying are in use.
The Recovery Time parameter is related to such circuits as the door
sensor circuit, discharge monitoring circuit, and fire protection equipment
trouble circuit. Varying the value of this parameter for the particular device
or equipment provides increasing or decreasing the time the device or
equipment needs to restore the circuit after breaking. This provides
avoiding unnecessary messages due to transient processes as well as
people passing through the door.
32
www.bolid.com
S2000-ASPT
3.7.2
Technical Description
Parameters of the NO-NC-C Relay Control
Table 3-6: NO-NC-C Parameters
Parameter
Description
Range
Executive
Program
The number of the executive program (see
Table 3-7) which defines both the way the
relay is controlled depending on the
condition of the related inputs/outputs (see
below) and the initial condition of the relay
0 to 8, 13 to 15,
19 to 24,
and 27 to 30
Activation
Time
The time the relay will be activated for
(only for those programs which suppose
activation the relay for a time)
From 0 to 8192 s
(2 h 16 min 32 s)
with increments
of 0.125 s
Links the relay with the panel inputs
Link the
and/or outputs which statuses can impact
Relay With
on the activating the relay
-
The Executive Program parameter defines the tactic of relay control
depending on the condition of the panel input/output circuits (so called local
control) or the initial relay condition just after panel power turning on until
receiving the first command from the network controller (so called
centralized control). All available programs are described in Table 3-7).
Table 3-7. Relay Executive Programs
№
Program
0
Remote Control
1
Description
Initial
Condition
The relay is controlled only remotely
Off
Switch On
The relay is switched on if there is an Intrusion Alarm
or Fire Alarm
Off
2
Switch Off
The relay is switched off if there is an Intrusion Alarm
or Fire Alarm
On
3
Switch On for a Time
The relay is switched on for a specified time if there is
an Intrusion Alarm or Fire Alarm
Off
4
Switch Off for a Time
The relay is switched off for a specified time if there is
an Intrusion Alarm or Fire Alarm
On
5
Blink From Off
Condition
The relay is switched on/off once per second if there is
an Intrusion Alarm or Fire Alarm
Off
6
Blink From On
Condition
The relay is switched on/off once per second if there is
an Intrusion Alarm or Fire Alarm
On
7
Blink for a Time From
Off Condition
The relay is switched on/off once per second for a
specified time if there is an Intrusion Alarm or Fire
Alarm
Off
[email protected], [email protected]
33
FIRE ALARM AND EXTINGUISHING CONTROL PANEL
№
Program
Description
Initial
Condition
8
Blink for a Time From
On Condition
The relay is switched on/off once per second for a
specified time if there is an Intrusion Alarm or Fire
Alarm
On
13
Fire Output
If the related loop has Fire Alarm or Fire Prealarm
status then the relay is switched on, else the relay is
switched off (open)
*
14
Trouble Output
If there are related alarm loops having Trouble, Arming
Failed, or Disarmed status, the relay is switched off.
Otherwise the relay is switched on
*
In case of a Fire Alarm the relay is switched on/off
twice per second in mode ‘On for .25s and Off for .25s’
In case of a Fire Prealarm the relay is switched on/off
once per second in mode ‘On for .25s and Off for .75s’
15
Fire Lamp
In case of a Trouble the relay is switched on/off once
per 2 seconds in mode ‘On for .25s and Off for 1.75s’
*
If all the alarm loops related with the relay are armed
the relay is switched on
Otherwise, the relay is switched off
19
Switch On For a Time If any related alarm loop has just been armed the relay
Upon Arming
is switched on for a given time
Off
20
Switch Off For a Time If any related alarm loop has just been armed the relay
Upon Arming
is switched off for a given time
On
21
Switch On For a Time If any related alarm loop has just been disarmed the
Upon Disarming
relay is switched on for a given time
Off
22
Switch Off For a Time If any related alarm loop has just been disarmed the
Upon Disarming
relay is switched off for a given time
On
23
Switch On For a Time If arming of any related alarm loop has just failed the
When Arming Failed relay is switched on for a given time
Off
24
Switch Off For a Time If arming of any related alarm loop has just failed the
When Arming Failed relay is switched off for a given time
On
27
Switch On
Upon Disarming
If at least one related loop is disarmed the relay is
switched on
Off
28
Switch Off
Upon Disarming
If at least one related loop is disarmed the relay is
switched off
On
29
Switch On
Upon Arming
If at least one related loop is armed the relay is
switched on
Off
30
Switch Off
Upon Arming
If at least one related loop is armed the relay is
switched off
On
NOTES:
1) * means that the relay condition is defined by the conditions of
input/outputs related with the relay
34
www.bolid.com
S2000-ASPT
Technical Description
2) “Off” relay conditions means the following conditions of the contacts:
NO-C: opened
NC-C: closed
3) “On” relay conditions means the following conditions of the contacts:
NO-C: closed
NC-C: opened
The Activation Time parameter defines the time the relay is
activated for if the program is supposed to be time limited. The maximum
time the relay can be activated for is 65,535 periods of 0.125 s (8192 s
total).
The relay can be linked with the following panel input zones:
− Zone 1: Detection Loop 1
− Zone 2: Detection Loop 2
− Zone 3: Detection Loop 3
− Zone 4: Door Sensor Circuit
− Zone 5: Manual Call Points
− Zone 6: Pressure Detector
− Zone 11: Remote Release
− Zone 12: Fire Protection Equipment Fault
The relay can be linked with the following panel outputs:
− Output 1: Visual Alarm 1 (EXIT caution sign)
− Output 2: Visual Alarm 2 (KEEP OUT caution sign)
− Output 3: Visual Alarm 3 (AUTOMATICS OFF sign)
− Output 4: Siren
− Output 5: Releasing Circuit
The relay should be linked to one or more outputs only for the
executive program No 14 (“Trouble output”).
If the relay is linked with a zone/output, the control commands from
the network controller are ignored. Local relay control is in priority to
centralized relay control.
The relay to be able to be controlled remotely by network controller
commands, do the following:
− Remove all links between the relay and panel inputs/outputs in the
panel configuration (by UProg tools)
− Select any executive program with the proper relay initial
conditions (“On” or “Off”) in the panel configuration (by UProg
tools)
[email protected], [email protected]
35
FIRE ALARM AND EXTINGUISHING CONTROL PANEL
− In the configuration of the network controller link the relay with the
proper partitions, assign the relay to proper executive program,
and define the required delay and activation time.
If the relay is not linked to the panel inputs/outputs in the panel
configuration, the Executive Program defines only the initial condition of the
relay, that is, the condition of the relay just after powering on the panel. If
the relay is to be controlled centrally, in most cases the program is given
which supposes the “Off” initial condition (for example, the program No 1,
“Switch On”). After turning panel power on and till receiving the centralized
command which is to switch the relay to the required condition some time
can be needed. So, if the centralized program supposes the “On” initial
condition, it is advisable to switch the relay to “On” condition just after
power turning on. To do this, assign the relay to any executive program
with “On” initial condition, for example, the program No 2, “Switch Off”.
3.7.3
Panel Configuration Parameters
The panel configuration parameters define the panel operating
tactics and the parameters of releasing the fire suppression system. These
are shown in Table 3-8.
Table 3-8: Panel Parameters
Parameter
Description
Range
Defines the pre-discharge time interval
Automatic
between fire conditions occurring as a
Pre-discharge
result of fire detector responses and
Delay
generating release pulse
0 to 255 s
Defines the pre-discharge time interval
between fire conditions occurring as a
result of manual call point activation or
receiving remote release command via
the RS-485 interface and generating
release pulse
0 to 255 s
Remote Predischarge
Delay
Release Pulse Defines the duration of release pulse
Siren
Sounding
Time
Defines the time to activate the sound
alarm, connected to the SA panel output
Automatic
Mode
Recovery
Allows auto restoring of automatic
discharge mode just after panel having
entered the Quiescent mode after door
closing or door circuit fault repairing
36
0 to 255 s
0 to 255 s
On/Off
www.bolid.com
S2000-ASPT
Technical Description
Parameter
Description
Range
Automatic
Release
Recovery
Enables returning the Pre-discharge
Delay mode in case of automatic release
after door circuit having been repaired
On/Off
Remote
Release
Priority
Enables remote releasing even in case of
door being open or a door circuit fault
On/Off
Pressure
Detector
Disabled
Blocks up the pressure detector circuit
input
On/Off
Blocking Two Disables automatic release which is the
result of two alarm loops being in the Fire
Prealarm
Prealarm statuses
Release
Master Key
Provided
Access
Restricts access to disabling/enabling the
panel inputs/outputs (see the Section
3.1)
S2000-KPB
Addresses
Defines the addresses of the connected
S2000-KPB modules controlled by the
panel
On/Off
On/Off
Up to 16
addresses
ranged from 1
to 127
The Automatic (Remote) Pre-discharge Delay parameters defines
the duration of delay (in seconds) between release conditions having
occurred and generating a pulse to release the fire extinguishing system.
The panel provides individual delays for automatic release and remote
release (both by remote release command received via RS-485 interface
and by activating a manual call point).
The Siren Sounding Time defines the time to activate an external
audible alarm connected to the panel when the panel has entered the Fire
Alarm or Pre-discharge Delay mode.
If the Automatic Mode Recovery parameter is set on then the panel
automatically restores the automatic release mode after a door having
closed or any door circuit trouble having repaired. If the parameter in
question is set off then breaking the door sensor circuit leads to disabling
automatic release, this mode being kept even after trouble having restored.
If the Automatic Release Recovery parameter is set on then the
panel automatically restores the Pre-discharge Delay release mode if upon
an automatic release the door sensor circuit has been broken and repaired
again (or the door has been open and then closed again). If this parameter
is set off, in case of automatic release breaking the door sensor circuit
[email protected], [email protected]
37
FIRE ALARM AND EXTINGUISHING CONTROL PANEL
aborts releasing, and the extinguishing system will not be discharged even
after the door circuit is restored.
It is sensible to set this parameter if the Automatic Mode Recovering
has been set on.
The Remote Release Priority parameter prioritizes the remote
release mode above blocking release upon any fault or opening the door
sensor circuit. This parameter being set on, the remote release can not be
blocked up by door opening, but only by reset.
The Pressure Detector Disabled parameter allows canceling
monitoring the pressure detector circuit of the panel if there is no need for
this, for example, if dry chemical or aerosol extinguishing equipment is in
use.
The Blocking Two Prealarm Release parameter blocks panel
entering the Fire Alarm mode in case of two different alarm loops entering
the Fire Prealarm status. This parameters provide implementing the tactics
of automatic releasing upon two detector responses in a single alarm loop.
The Master Key Provided Access parameter additionally restricts
the user rights to disable/enable (including arm/disarm) panel
inputs/outputs. If this parameter is set on, a user authorized for the second
access level can disable a zone or an output if only he or she has a Master
key. If the parameter is set off, users authorized for the second access
level are automatically enabled to make actions authorized for the third
access level.
The S2000-KPB Addresses define the S2000-KPB modules which
relate to this hazard extinguishing area and expand release output of the
panel. The S2000-KPB modules are connected to the S2000-ASPT panel
through its RS-485-2 interface line. Each module has to be assigned with
unique network number ranged from 1 to 127. The maximum number of
S2000-KPB modules to be connected to a single S2000-ASPT panel is 16.
After release conditions having occurred (see clause 3.8.13) and Predischarge Delay period having been expired the panel gives the discharge
command to each of the connected S2000-KPB modules. The discharge
pulse durations as well as pauses between S2000-KPB output activation
are given by S2000-KPB module configurations.
3.7.4
System Configuration Parameters
The system configuration parameters define the panel operating in
network mode as a part of Orion security system under S2000/S2000M or
ARM Orion PC controlling.
38
www.bolid.com
S2000-ASPT
Technical Description
Table 3-9: System Parameters
Parameter
Description
Range
Network
Address
Defines the panel address within the RS485 interface line connected to the
network controller (RS-485-1)
1 to 127
Response
Pause
Defines the time required the panel to
respond on the requests of the network
controller
1.5 ms to
500 ms with
increments of
0.125 ms
The Network Address is designed for unique identifying the S2000ASPT panel by the network controller. The panel transmits events to and
receives commands from the network controller using this address. This
address must be unique for each the device.
Setting the Response Pause parameter provides using the panel
within a system with a sophisticated network topology where long layover
can exist, for example, while converting RS-485 data into other interfaces
intended for transmission over local area networks, fiber optic channels, or
radio channels.
The current values of the Network Address and Response Pause can
be reset to factory (default) values by pressing the panel tamper switch
with special way: long-long-long-short. “Long pressing” means pressing
and holding the tamper switch pressed for more than 1.5 s, while “short”
one means pressing and holding the tamper switch pressed for a time
between 0.1 s and 0.5 s. A pause between pressings must last from 0.1 s
and 0.5 s.
3.7.5
The Factory Default Settings
The factory default values of parameters are represented by Table
3-10, Table 3-11, Table 3-11, and Table 3-12.
Table 3-10: The Factory Loop and Panel Configuration
Parameter
Loop Type for the loop #1
Loop Type for the loop #2
Loop Type for the loop #3
Loop Requery Prohibition for the loop #1
Loop Requery Prohibition for the loop #2
Loop Requery Prohibition for the loop #3
[email protected], [email protected]
Value
2
2
2
Off
Off
Off
39
FIRE ALARM AND EXTINGUISHING CONTROL PANEL
Loop Analysis Delay, s for the loop #1
Loop Analysis Delay, s for the loop #2
Loop Analysis Delay, s for the loop #3
Recovery Time, s for the door sensor circuit
Recovery Time, s for the pressure detector circuit
Recovery Time, s for the external fault circuit
Automatic Pre-discharge Delay, s
Remote Pre-discharge Delay, s
Release Pulse, s
Siren Sounding Time, s
Automatic Mode Recovery
Automatic Release Recovery
Remote Release Priority
Pressure Detector Disabled
Blocking Two Prealarm Release
Master Key Provided Access
3
3
3
15
15
15
30
15
15
120
Off
Off
Off
Off
Off
Off
Table 3-11: Default Addresses of the Controlled S2000-KPB
№
1
2
3
4
5
6
7
8
9
10 11 12 13 14 15 16
Addr
0
0
0
0
0
0
0
0
0
0
0
0
0
0
0
0
Table 3-12: The Factory System Parameters
Parameter
Value
127
1.5 ms
Network Address
Response Pause
Table 3-13: Default NO-NC-C Relay Parameters
Zone Number
1
2
3
4
5
6
7
8
9
10 11 12 13
Link the Relay
With
+
+
+
+
+
+
+
+
+
+
Executive
Program
13: Fire Output
Activation Time
Unlimited
+
+
+
The zone numbers means as follows:
1 : Detection Loop 1
2 : Detection Loop 2
40
www.bolid.com
S2000-ASPT
Technical Description
3 : Detection Loop 3
4 : Door Sensor Circuit
5 : Manual Call Points
6 : Pressure Detector Circuit
7 : Fire Protection Equipment Fault
8 : Releasing Circuit
9 : Visual Alarm 1 Circuit
10 : Visual Alarm 1 Circuit
11 : Visual Alarm 1 Circuit
12 : Sound Alarm Circuit
13 : Remote Release Commands
3.8
Panel Operating Modes
The panel supports the following operating modes:
− Pre-operation
− Device Failure
− Quiescent
− Fault
− On Batteries
− Battery Fault
− Disabled
− Test
− User Key Programming
− Master Key Programming
− Prealarm
− Fire Alarm
− Pre-discharge Delay
− Release
− Extinguishing
− Release Fault
− Emergency Release
− Blocked Release
[email protected], [email protected]
41
FIRE ALARM AND EXTINGUISHING CONTROL PANEL
3.8.1
Pre-operation
The panel switches from the power off condition to the Pre-operation
mode after mains power having been turned on. In this mode the panel has
analyzed the voltage at the AC/DC converter output for 3 s and then reads
zone conditions, the automatic release mode, and the panel mode from the
panel non-volatile memory. The only indicator on the panel faceplate which
is lit is the Power indicator .
If the voltage at the AC/DC converter output (the control point “40” on
the panel PCB) is below than 30 V or unstable, the panel keeps being in
the Pre-Operation mode infinitely. The panel leaves the Pre-operation
mode when the converter output voltage has a stable value higher than
30 V.
Having left the Pre-operation mode, the panel makes a sound and
returns to a mode in which it was before turning the power off.
If before turning the power off the panel was in the Release mode
(see below), extinguishing will be aborted automatically while turning the
panel on to avoid second releasing of the fire protection system.
If the panel keeps the Pre-operation mode and the TEST indicator
flashes, it means that the panel has not been completely tested upon
manufacturing. To switch the panel to the Quiescent mode (see below)
press and hold the tamper plunger for a long time or return the panel back
to the manufacturer.
3.8.2
Device Failure
The panel enters the Device Failure mode if a checksum error has
been detected during a microcontroller memory test or battery charger has
failed.
In case of a checksum error, both the Device Failure indicator
and the FAULT WARNING indicator on the panel front plate flash, and the
internal panel sounder beeps.
If after restarting the panel the checksum error is detected once
more, then update the microcontroller firmware by doing the following:
1. Connect the panel to a PC via one of the interface connectors such
as an S2000M in the programming mode, PI-GR, S2000-USB, or
USB-RS485. Use the А1 and В1 panel terminals.
2. Turn the panel power on.
3. With the help of the program "ORION_PROG.EXE" update the
firmware.
While the firmware is written to the panel, the panel sounder keeps
silent, the HL1 indicator on the panel PCB being lit with short breakings.
42
www.bolid.com
S2000-ASPT
Technical Description
When writing has been completed the panel enters the Pre-operating
mode.
NOTE: The program "ORION_PROG.EXE" and the firmware file can
be downloaded from the site of the Bolid Company, http://bolid.ru.
If a charger failure has been detected during the relevant self-test
procedure, the indicators FAULT WARNING,
, and
flash, the panel
sounder sounds interruptedly. In such case the panel should be sent to the
manufacturer for repair with the relevant notification.
3.8.3
Quiescent Mode
The panel is considered to be in the Quiescent mode if all its
monitored input and output circuits are in Norm conditions.
3.8.4
Fault
The panel enters the Fault mode, when generating any message
described in the section 3.3. After repairing all the faults the panel
automatically leaves the Fault mode.
3.8.5
Disabled
The panel enters the Disabled mode if a zone is disabled (disarmed),
or an output is disabled, or the panel sounder is disabled. Turning the
automatic release mode off doesn’t lead to the panel entering the Disabled
mode.
3.8.6
−
−
−
−
Test
The Test mode provides inspecting operating of the:
Outputs controlling the visual and sound alarms (VA1, VA2, VA3, SA)
Fire and Fault outputs
NC-NO-C relay (“Aux.Equipment”)
Electronic key to shut the power of the alarm loops off
To switch the panel to the Test mode you must be authorized to use
the access level #3. If so, use the Test push-button
to start the Test
mode.
To test a panel output, press the relevant output’s push-button. The
device condition will be displayed by the associated indicator: if the output
is active (closed) the indicator is turned on while, otherwise, if the output is
not active (open) the indicator is turned off. Switching over conditions of
the outputs VA1, VA2, VA3, Fire, Fault, and Aux.Equipment is
implemented by repeated pressings on the output push-button. The Siren
[email protected], [email protected]
43
FIRE ALARM AND EXTINGUISHING CONTROL PANEL
output can be activated for no more than 3 s. The outputs VA1 and VA2
(“Visual Alarms”) are activated in interrupted mode.
To inspect operating of the electronic key for shutting down the alarm
loop power, press any button of the Device Loop 1, Device Loop 2, and
Device Loop 3. In such case the power on the terminals “+1-”, “+2-”, and
“+3-” has turned on for 3 seconds.
To leave the Test mode press the Test button
repeatedly or press
the Reset button . The panel has automatically left the Test mode since
30 seconds after last pressing a button.
3.8.7
On Batteries
The panel enters the On Batteries mode when the mains power has
been off. The panel enters the On Batteries mode within no more than 60 s
since the mains power has failed. The panel leaves the On Batteries mode
within no more than 300 ms since the mains power has been restored.
3.8.8
Battery Fault
The panel enters the Battery Fault mode in the two following cases:
− One or two of the batteries has/have failed
− The battery charger has failed
The panel enters the Battery Failed mode within no more than:
− 15 minutes since the backup power has failed
− 300 ms since the battery charger has failed
The panel leaves the Battery Failed mode within no more than:
− 15 minutes since the backup power has been restored
− 300 ms since the battery charger has been restored
The time to exit the Battery Fault mode when the backup power has
been restored can be decreased down to 300 ms by pressing the Fire
Reset button
3.8.9
.
Master Key Programming
The panel can be switched to the Master Key Programming mode
only from the Quiescent mode by opening the panel top cover and pressing
the tamper switch with one long – one short – one long pressing. Long
pressing means keeping for at least 1.5 s, while short pressing means
keeping for 0.1 to 0.5 s. The pauses between pressings last 0.1 to 0.5 s.
This mode is designed for writing the code of a special Master Key
electronic device to the panel memory.
44
www.bolid.com
S2000-ASPT
Technical Description
The panel exits the Master Key Programming mode after repeated
touching the reader with the Master Key device or automatically after 30 s
timeout since last button pressing having expired.
The new Master Key being enrolled into the panel memory, all
already existed electronic identifiers are deleted.
3.8.10 User Key Programming
The panel enters the User Key Programming mode from the
Quiescent mode if the iButton reader connected to the panel is touched
with the Master Key. This mode is designed to enroll to the panel memory
the codes of User Keys (up to 7) which are supposed to be used to switch
the automatic release mode on and off.
Exit the User Key Programming mode is implemented:
− Automatically after the last, eighth User Key has been enrolled, or
− By second touching the iButton reader with the master Key, or
− Automatically after 30 s having been expired since the reading of a
User Key touched to the reader.
3.8.11 Prealarm
The panel switches from the Quiescent mode to the Prealarm mode
after response of a single fire detector wired to any alarm loop, the duration
of the response lasting at least 1 s. If active smoke detectors are wired into
the alarm loop, this transition is implemented with the repeated query of
the actuated detector status (see the Section 3.7.1).
To cancel the Prealarm mode, press the Fire Reset button
the relevant command by means of the network controller.
or give
3.8.12 Fire Alarm
The panel switches from the Prealarm mode to the Fire Alarm mode
after response of a second fire detector in the same or any other alarm
loop depending on the configuration settings (see the Section 3.7.1).
The panel enters the Fire Alarm mode from the Quiescent mode in
case of:
− Response of two or mode detectors in the same alarm loop or
different alarm loops depending on the current loop settings (see the
Section 3.7.1), or
− Response of a manual call point connected to the Manual Call Points
input of the panel, or
− Receiving a release command from the network controller
[email protected], [email protected]
45
FIRE ALARM AND EXTINGUISHING CONTROL PANEL
The panel having entered the Fire Alarm mode, its internal sounder is
activated, the SA output is activated, and the contacts of the Fire output
are closed.
To cancel the Fire Alarm mode, press the Fire Reset button
give the relevant command by means of the network controller.
or
3.8.13 Pre-discharge Delay
The panel enters the Pre-discharge Delay mode in cases of:
− Manual call point circuit breaking (a remote release), or
− Receiving a release extinguishing agent command from a network
controller (a remote release), or
− Actuating of two or more fire detectors connected to the panel (an
automatic release)
If the panel has entered the Pre-discharge Delay mode then:
− The SA (sound alarm) and the VA1 (visual alarm 1) outputs are
switching on, and
− The FR output contacts are closed
In this mode the Pre-discharge Delay begins to be counted if
programmed. The value of the Pre-discharge Delay is programmed
individually for automatic and remote release. While the Pre-discharge
Delay is being counted, the panel internal sounder beeps. Before 15 s
remaining until the Pre-discharge Delay has been expired the sounding
frequency is duplicated, and before 5 s sounding frequency is quadrupled.
The Pre-discharge Delay having expired, the panel transits into the
Release mode.
To cancel the Pre-discharge Delay mode, press the Extinguishing
Reset button
controller.
or give the relevant command by means of the network
3.8.14 Blocked Release
In automatic and remote launch modes counting of a launch Delay
can be terminated if one of the conditions described in Sections 3.9.1 and
3.9.2 has occurred. In such cases the panel enters the Blocked Release
mode.
For a remote release, the panel restores the Pre-discharge Delay
mode when the door sensor circuit has been restored.
For an automatic release, the panel restores the Pre-discharge Delay
mode when:
− The manual call points circuit has been broken, or a Release
Extinguishing Agent command has been received from the network
controller, or
46
www.bolid.com
S2000-ASPT
Technical Description
− The automatic release mode is repeatedly turned on if the Automatic
Release Recovery configuration parameter is set on
3.8.15 Release
Having entered the Release mode, the panel generates the release
pulse of given duration at the output of the releasing circuit R and gives
release commands to the connected S2000-KPB modules. The VA1 output
(usually assigned with an EXIT light sign) is turned off while the VA2 output
2 (usually assigned with a KEEP OUT light sign) flashes.
To cancel the Release mode, press the Extinguishing Reset button
or give the relevant command by means of the network controller.
3.8.16 Extinguishing
If response of the pressure detector has been detected during the
release pulse, then the panel switches from the Release to the
Extinguishing mode.
If the Pressure Detector Disabled parameter is set on, then the panel
transits to the Extinguishing mode just after the Release mode finishing.
To cancel the Extinguishing mode, press the Extinguishing Reset
button
controller.
or give the relevant command by means of the network
3.8.17 Release Fault
If no response of the pressure detector has been detected during the
release pulse then the panel transits from the Release mode to the
Release Fault mode. The panel in this mode can enter the Extinguishing
mode after pressure detector having actuated.
To cancel the Release Fault mode, press the Extinguishing Reset
button
controller.
or give the relevant command by means of the network
3.8.18 Emergency Release
The panel switches from the Quiescent mode to the Emergency
Release mode in case of a response of the Pressure Detector having
occurred.
In the Emergency Release mode:
− The outputs VA1, VA2, and SA are turned on, and
− The contacts of the FR output is closed
In the Emergency Release mode the release pulse doesn’t generate
and doesn’t give a command to launch the connected S2000-KPB
modules.
[email protected], [email protected]
47
FIRE ALARM AND EXTINGUISHING CONTROL PANEL
To cancel the Emergency Release mode, press the Extinguishing
Reset button
controller.
3.9
or give the relevant command by means of the network
The Modes to Release the Fire Suppression System
The panel provides the following modes to release a fire
extinguishing agent:
− Remote mode, and
− Automatic mode
3.9.1
Remote Release
The remote releasing the extinguishing system is implemented in
case of either activation manual call points or receiving the relevant
command from the network controller. When one of the conditions said
above is met, the panel immediately enters the Fire Alarm and Predischarge Delay modes.
If the Remote Release Priority parameter is set off, then in the remote
release mode the pre-discharge delay is stopped when the door sensor
circuit has been broken or failed. As soon as the door sensor circuit has
restored the pre-discharge delay continues to be counted. If the Remote
Launch Priority parameter is set, the pre-discharge delay is counted without
regard to opening or fault the door sensor circuit.
3.9.2
Automatic Release
In case of automatic releasing the panel enters the Pre-discharge
Delay mode just after having entered the Fire Alarm mode (after having
received two responses from automatic fire detectors). If the automatic
mode is disabled while the pre-discharge delay is being counted, the predischarge delay is stopped. In such case the panel can enter the Predischarge Delay mode again only by:
− Automatic release mode having restored (having repeatedly
activated), or
− Remote releasing the extinguishing system resulting from manual
call point activation or receiving the remote release command from
the network controller.
To switch the automatic release mode on/off:
− Press the AUTOMATIC MODE button
on the panel front plate,
or
− Touch the reader connected to the panel with an authorized User
Key enrolled in the panel memory, or
− Send the relevant command from the network controller.
48
www.bolid.com
S2000-ASPT
Technical Description
Automatic release is cancelled by the door sensor circuit being
broken or failed. If the Automatic Mode Recovery parameter is set on, the
automatic release mode recovers when the door sensor circuit has been
restored.
If the automatic release mode is disabled, the panel turns on the
visual alarm connected to the VA3 output (usually, the AUTOMATICS OFF
light sign).
3.10 Panel Indication
All panel indication is described by the Tables following.
Table 3-14:
Panel Mode
PREALARM Indicator
Indicator Behavior
Prealarm
Turned on for 0.5 s once per second
Other modes
Off
Table 3-15:
FIRE Indicator
Panel Mode
Indicator Behavior
Fire Alarm
Turned on for 0.25 s twice per second
Other modes
Off
Table 3-16:
Panel Mode
FAULT WARNING Indicator
Indicator Behavior
Fault
Disabled (excluding silencing the
internal sounder)
Turned on for 1 s once per two seconds
Device Failure
The panel enclosure is open
Other modes
Off
Table 3-17: DISABLED and SILENCE Indicators
Panel Mode
Indicator Behavior
Disabled (including silencing
the internal sounder)
Lit steady
Other modes
Off
[email protected], [email protected]
49
FIRE ALARM AND EXTINGUISHING CONTROL PANEL
Table 3-18:
EXTINGUISHING Indicator
Condition
Indicator Behavior
Launch Delay
Turned on for 0.5 s once per second
Launch
Emergency Launch
Turned on for 0.25 s twice per second
Launch Fault
Extinguishing
Other Modes
Off
Table 3-19: AUTOMATICS ON/OFF Indicator
Panel Mode
Indicator Behavior
Automatic launch is enabled
Off
Automatic launch is disabled
Lit steady
Table 3-20:
TEST Indicator
Panel Mode
Indicator Behavior
Test
Turned on for 0.25 s twice per second
Other modes
Off
Table 3-21: DETECTOR LOOP 1…3 Indicators
Zone Condition
Indicator Behavior
Color
Norm
Off
-
Detector response
Double flashes once per two seconds
Red
Prealarm
Turned on for 0.5 s once per second
Red
Fire Alarm
Turned on for 0.25 s twice per second
Red
Short/Open failure
Turned on for 1 s once per two seconds
Yellow
Disabled
Lit steady
Yellow
50
www.bolid.com
S2000-ASPT
Technical Description
Table 3-22: MANUAL CALL POINTS Indicator
REMOTE COMMAND Indicator
Zone Mode
Indicator Behavior
Color
Norm
Off
-
Fire Alarm
Turned on for 0.25 s twice per second
Red
Short/Open failure
Turned on for 1 s once per two seconds
Yellow
Disabled
Lit steady
Yellow
Table 3-23:
DOOR CIRCUIT Indicator
EXTERNAL FAULT Indicator
Zone Mode
Indicator Behavior
Norm
Off
Broken
Turned on for 0.5 s once per second
Short/Open failure
Turned on for 1 s once per two seconds
Table 3-24:
DISCHARGE Indicator
Zone Mode
Indicator Behavior
Color
Norm
Off
-
Broken
Turned on for 0.5 s once per second
Red
Short/Open failure
Turned on for 1 s once per two seconds
Yellow
Disabled
Lit steady
Yellow
Table 3-25: MASS/PRESSURE Indicator
Zone Mode
Indicator Behavior
Norm
Off
Breaking of the Mass or
Pressure input circuit of an
S2000-KPB
Turned on for 1 s once per two seconds
[email protected], [email protected]
51
FIRE ALARM AND EXTINGUISHING CONTROL PANEL
Table 3-26:
SIREN Indicator
VISUAL ALARMS Indicator
FIRE Output Indicator
RELEASE CIRCUIT Indicator
AUX.EQUIPMENT Indicator
Output Condition
Indicator Behavior
Color
Deactivated
Off
-
Activated
Lit steady
Red
Short/Open failure
Turned on for 1 s once per two seconds
Yellow
Disabled
Lit steady
Yellow
Table 3-27:
Output Condition
FAULT Output Indicator
Indicator Behavior
Activated
Off
Deactivated
Disabled
Lit steady
Table 3-28:
S2000-KPB Indicator
Condition
Indicator Behavior
Loss of communications with any
connected S2000-KPB module
Turned on for 1 s once per two
seconds
Other
Off
Table 3-29:
Power Indicator
On Batteries Indicator
Panel Condition
Indicator Behavior
Quiescent
Lit steady
Off
On Batteries
(mains power failed,
batteries in norm )
Turned on for 1 s once
per two seconds
Lit steady
52
www.bolid.com
S2000-ASPT
Technical Description
Indicator Behavior
Panel Condition
Battery fault
(Mains power in norm,
the batteries failed)
Lit steady
Turned on for 1 s once
per two seconds
Full power fault
(both mains and
backup power failed)
Turned on for 1 s once
per two seconds
Turned on for 1 s once
per two seconds
Power shutdown
Off
Off
Table 3-30:
Condition
Device Failure Indicator
Indicator Behavior
Device Failure Mode
Turned on for 1 s once per two
seconds
Other
Off
3.11 External Indication
The tables below describe the behavior of external indicators
connected to the panel.
Table 3-31:
Panel Condition
SIREN (SA Output)
Output Behavior
Fire Alarm, Pre-discharge Delay
Release, Extinguishing
Turned on for 1.5 s once per every 2
seconds
Emergency Release
Other
[email protected], [email protected]
Off
53
FIRE ALARM AND EXTINGUISHING CONTROL PANEL
Table 3-32:
Panel Condition
EXIT Sign (VA1 Output)
Output Behavior
Pre-discharge Delay
Emergency Release
Release, Extinguishing
Other
Turned on for 0.5 s once per second
Off
Off
Table 3-33: KEEP OUT Sign (VA2 Output)
Panel Condition
Output Behavior
Pre-discharge Delay
Emergency Release
Release, Extinguishing
Other
Off
Turned on for 0.5 s once per second
Off
Table 3-34: AUTO OFF Sign (VA3 Output)
Panel Condition
Output Behavior
Automatic release enabled
Automatic release disabled
Off
On
Table 3-35:
Reader LED
Panel Condition
LED Behavior
Automatic release enabled
Automatic release disabled
Programming User Keys
Lit steady
Off
Flashes
Table 3-36:
Panel Condition
FAULT Relay
Relay Contacts
Power shutoff
Fault mode
Disabled mode
Enclosure tampering
Other
54
Opened
Closed
www.bolid.com
S2000-ASPT
Technical Description
Table 3-37:
Panel Condition
FIRE Relay
Relay Contacts
Fire Alarm mode
Pre-discharge Delay
Release, Emergency Release
Extinguishing
Other
Closed
Opened
3.12 Panel Co-operation
The panel can be connected to the network controller via RS-485-1
interface terminals and to the controlled S2000-KPB modules via RS-485-2
terminals.
3.12.1 Zones Monitored by the Network Controller
Following are the zones that can be monitored by the network
controller through the S2000-ASPT panel:
− zone #1: panel alarm loop #1 control
− zone #2: panel alarm loop #2 control
− zone #3: panel alarm loop #3 control
− zone #4: panel door sensor control
− zone #5: panel manual call point control
− zone #6: panel pressure detector control
− zone #7: panel mains power control
− zone #8: panel battery power control
− zone #9: panel automatic release mode control
− zone #10: panel operating mode control
− zone #11: panel remote release mode control
− zone #12: fire protection equipment fault monitoring
− zones #20, #21, #22: controlling the tamper switch and loops of
the first S2000-KPB
− zones #30, #31, #32: controlling the tamper switch and loops of
second S2000-KPB
− …
− zones #170, #171, #172: controlling the tamper switch and loops
of the 6th S2000-KPB
[email protected], [email protected]
55
FIRE ALARM AND EXTINGUISHING CONTROL PANEL
3.12.2 Outputs Monitored by the Network Controller
The network controller is capable of monitoring the panel and S2000KPB outputs as follows:
− output #1: panel VA1 (EXIT)
− output #2: panel VA2 (KEEP OUT)
− output #3: panel VA3 (AUTOMATICS OFF)
− output #4: panel SA (SIREN)
− output #5: panel releasing circuit R
− outputs #21…#26: first S2000-KPB’s outputs
− outputs #31…#36: second S2000-KPB’s outputs
− outputs #41…#46: third S2000-KPB’s outputs
− …
− outputs #171…#176: 16th S2000-KPB’s outputs
3.12.3 Implemented Network Controller Commands
The panel is intended to receive through the RS-485-1 interface line
and to implement the network controller commands such as:
− Reading Configuration
− Writing Configuration
− Assigning the Network Address
− Resetting alarms
− Abort releasing
− Release extinguishing system
− Switch the release mode to automatic or remote
− Time synchronization
− Loop parameter request
The panel provides transmitting of launching/launch canceling
commands through the RS-485-2 interface to any S2000-KPB module registered in the panel configuration.
3.12.4 Panel Messages Being Transmitted to the Network Controller
The panel can transmit to the network controller some event
messages as follows:
“EMERGENCY LAUNCH” - Fire extinguishing equipment has been
launched (that is the outflow of extinguishing
agent has been detected) without having
received the launching pulse
“ARMED”
- Detector status monitoring has been turned
on
56
www.bolid.com
S2000-ASPT
“FIRE TRBL RST”
“ARM FAILED”
Technical Description
“LOOP TRBL OPEN”
“LOOP TRBL SHORT”
“RELAY TRBL OPEN”
“RELAY TRBL SHORT”
“RELAY RESTORE”
- Extinguishing equipment operates normally
- Arming has failed due to the actuated status
of detector
- Fire conditions have been detected
- Fire signal has been received and fire is
probable
- Fire alarm
- The pulse for the fire extinguishing equipment
launching has just been given out
- The condition for fire extinguishing equipment
launching has been met and the launching
delay is being counted
- Launching of the fire extinguishing equipment
was blocked up (e.g. due to the door opening
to the protected area)
- Access has denied due to the illegal entered
code
- Open-circuit failure in the alarm loop
- Short circuit failure in the alarm loop
- Open-circuit failure of relay output load circuit
- Short-circuit failure of relay output load circuit
- Relay output load circuit has been restored
“AC POWER FAILED”
- AC power has been lost
“AC POWER RESTORE”
“BATTERY FAILED”
“BATTERY RESTORED”
- AC power has been restored
- Battery supply has been out of range
- Battery supply has been restored
“TAMPER ALARM”
- Panel case is opened
“TAMPER RESTORE”
- Panel case is closed
“MANUAL TESTING”
- Panel diagnostic mode has been started
“ALARM RESET”
- Fire alarm has been cancelled. The detectors
have been monitored again.
“GAS PRESS SIGNAL”
“EXTINGUISHING”
- The pressure detector fixed pressure rising
- Fire extinguishing is in process (the launching
pulse was given out and outflow of fire
extinguishing agent has been detected)
“FIRE SIGNAL”
“FIRE PREALARM”
“FIRE ALARM”
“LAUNCHING”
“LAUNCHING DELAY”
“LAUNCH BLOCKED”
“ILLEGAL CODE”
[email protected], [email protected]
57
FIRE ALARM AND EXTINGUISHING CONTROL PANEL
“LAUNCH FAULT”
“EX MODE AUTO”
- Fire extinguishing equipment was not
successfully launched (the launching pulse was
given out but outflow of fire extinguishing agent
has not been detected)
- The auto launching mode of fire extinguishing
is in effect
“EX MODE MANUAL”
- The auto discharge mode is OFF
“PROGRAMMING”
“ALARM CANCEL”
- Programming mode having been entered
- The user has silenced the inner alert fire or
trouble signal
- A trouble has been detected in the process of
a panel self-testing procedure
“SELF-TEST ERROR”
3.12.5 S2000-KPB Messages
The panel receives events from the S2000-KPB modules connected
via RS-485-2 interface line:
“FIRE TROUBLE”
“FIRE TRBL RST”
“RELAY TRBL OPEN”
“RELAY TRBL SHORT”
“RELAY RESTORE”
- Extinguishing equipment fault
- Extinguishing equipment operates normally
- Open-circuit failure of relay output load circuit
- Short-circuit failure of relay output load circuit
- Relay output load circuit has been restored
“POWER FAILED”
- S2000-KPB power has been lost
“POWER RESTORE”
- S2000-KPB power has been restored
“TAMPER ALARM”
- S2000-KPB module case is opened
“TAMPER RESTORE”
- S2000-KPB module case is closed
While configuring S2000-KPB modules which are to operate under
the S2000-ASPT panel of versions 2.01+, set the Condition parameters of
programmable alarm loops only to Fire Equipment Fault or Fire Equipment
Restored values
3.12.6 Control Commands Transmitted to S2000-KPB
The panel provides transmitting release/abort commands over the
RS-485-2 interface line to each of the S2000-KPB modules programmed in
the configuration.
3.13 Panel Powering
The panel keeps it’s operability upon mains power supply from 130 V
to 250 V a.c./(50±1) Hz or upon backup battery supplying from 22 V to
58
www.bolid.com
S2000-ASPT
Technical Description
28 V d.c. Two backup batteries in series of 12 V and 4 to 4.5 Ah capacities
each are to be used as a backup power supply.
DO NOT operate the panel without connecting batteries to it
The panel generates an AC POWER FAILED message within 60 s
since:
− mains power has dropped below 130±10 V, or
− mains rectifier output voltage (test point “40” on the main panel
PCB) has been below 30±0.5 V
The panel generates an AC POWER RESTORED message when:
− mains power has exceeded 180±10 V, or
− mains rectifier output voltage (test point “40” on the main panel
PCB) has exceeded 40±0.5 V
If the mains power failed, the panel automatically begins to consume
power from backup batteries. When mains power has been restored, the
panel returns to consume power from mains.
The panel generates a BATTERY FAILED message within 15
minutes since the battery voltage has dropped below 22±0.5 V under load
current consumption 0.5 amp in the Quiescent mode. When the battery
voltage has exceeded 25±0.5 V the panel, the panel generates a
BATTERY RESTORED message.
If mains power failed and the backup battery voltage has dropped
below 20.5±0.5 V, the device power is shut down (full discharge).
The wattage consumed from mains power doesn’t exceed 30 W.
The method of calculating the value of current consumed in the
quiescent mode from backup batteries is represented in Appendix A.
[email protected], [email protected]
59
FIRE ALARM AND EXTINGUISHING CONTROL PANEL
4
4.1
STANDARD DELIVERY, MARKING, AND PACKING
Standard Delivery
Following is the list of the S2000-ASPT components provided:
The S2000-ASPT Fire Alarm and Extinguishing Control Panel itself
This Engineer’s and User’s Manual
The component parts including:
7 termination resistors MF 1/2W-4K7-5%
5 load connection modules
1 AC fuse 0.5 amp
2 mechanical lock keys
2 electric-contact lock keys
1 battery connector
3 woodscrews
3 wall plugs 8х35
2 plastic bushings
Notes:
The S2000-ASPT panel is delivered by manufacturer WITHOUT
backup batteries, iButton readers and iButtons which are to be purchased
separately.
The panel is delivered with XР1 and XР2 jumpers being put on, the
fuse being not housed.
4.2
Marking
Each panel is supplied with marking as follows:
Manufacturer logotype
Symbolic notation
The two last digits of the year and the quarter of the
manufacturing
Accordance mark
Factory number
The external panel terminal marking corresponds to the wiring
diagram.
Near the mains-operating socket there is the lettering denoting the
supply mains rated voltage.
60
www.bolid.com
S2000-ASPT
Standard Delivery, Marking, and packing
The panel enclosure is supplied with the ground terminal designed to
connect the protective earth.
4.3
Packing
The panel along with component parts and maintenance
documentation is packed into the carton box. It is assumed to pack the
panel into the proper container.
The boxes or containers are placed along with accompanying
documents into the transportation pickings.
Each transportation packing should be furnished by packing list
contained information as follows:
1) Manufacturer logotype;
2) The identification, the designation and the number of products
inside;
3) The designation and the number of replacement components;
4) Packager sign or stamp;
5) The date of packaging.
[email protected], [email protected]
61
FIRE ALARM AND EXTINGUISHING CONTROL PANEL
5
GENERAL INSTRUCTIONS
Install, test and maintain the S2000-ASPT panel according to
instructions as follows. Failure to follow these instructions may result in
failure to the device to operate properly or personal injury.
5.1
Safety Precautions
Do FOLLOW the electrical installation operational and electrical
safety code rules during the installation, operation, or maintenance of
S2000-ASPT panel and communication lines and associated equipment.
Only certificated personnel trained in the requirements of safety
codes have to be allowed to deal with this activity.
MAKE SURE that the protective ground is properly wired before
operating the panel. NEVER use the panel without system earth or in case
of fuse mismatching with the rating requirements.
Do SHUT OFF mains and backup power before installing the panel
or repairing any failure.
BEWARE of touching the "~220 В" terminals that can be alive and
dangerous.
5.2
Storage
There must not be any acids or alkalis vapor, aggressive gas or other
noxious agent with corrosive effect on premises where the device is
storied.
62
www.bolid.com
S2000-ASPT
Getting Started
6
GETTING STARTED
To provide the claimed features and functions, the panel must be
operated with connected and charged batteries.
After unpacking make visual inspection of the panel and ensure the
panel is free from mechanical damages. Check the panel completeness.
After transportation the panel shall be cured without packing under
normal condition for at least 24 hours.
Master this manual for technical features, display and control
elements of S2000-ASPT before you put the panel into service. If S2000ASPT is co-operated with other parts of fixed extinguishing or safety
system, namely S2000/S2000M and S2000-KPB, study these devices’
manuals closely.
6.1
Mounting the Panel
Overall and mounting dimensions of the S2000-ASPT panel given in
millimeters are shown in Figure 6-1 and Figure 6-2.
The S2000-ASPT panel is wall mountable. There are three holes on
the panel base to mount it on the wall at any required place and one hole
for fixing the panel with the screw.
Figure 6-1: S2000-ASPT Overall Dimensions
[email protected], [email protected]
63
FIRE ALARM AND EXTINGUISHING CONTROL PANEL
Figure 6-2: S2000-ASPT Mounting Dimensions
6.2
Connecting the External Circuits
The wiring of the external circuits to the panel is carried out in
accordance with the connecting diagram shown in Figure 2-4.
After all connection having been completed cover the panel top
cover. Then turn the key switch on the panel front plate to the Locked
position .
6.2.1
Connecting the Alarm Loops
Connect alarm loops with automatic detection included to the PCB
terminal blocks marked as "+1-", "+2-" and "+3-".
The detector wiring diagrams for specific loop types are
demonstrated in Figure 6-3, Figure 6-4, and Figure 6-5. If any alarm loop is
not in use, connect the supplied termination resistor of 4.7 kΩ across the
relative terminal blocks.
The number of detectors included into a single loop can be
calculated by formula being referred to in clause 3.5.1.
The values of additional series and shunt resistors are selected in
such a way so that a confirmed response of a single smoke detector or a
response of a heat detector causes the loop to get the Fire Prealarm status
while two detector responses causes the loop to get the Fire Alarm status.
64
www.bolid.com
S2000-ASPT
Getting Started
6.2.1.1 Smoke, Double Response Recognizable Alarm Loop
Bring the provided termination resistor 4.7 kΩ into the alarm loop as
shown in Figure 6-3.
Here Rterm is for the termination resistor mentioned above
SD is for a smoke detector
Rs is for a resistor brought in series with any smoke detector.
Its value varies from 1.5 kΩ up to 3 kΩ depending on specific
smoke detector type and can be corrected during testing
operability of the panel with specific detectors
lo o p +
Rs
Rs
SD
SD
R te rm
lo o p -
Figure 6-3: Smoke Detectors Wiring into Loop of Type 1
6.2.1.2 Combined Smoke and Heat Alarm Loop
Bring the provided termination resistor 4.7 kΩ into the alarm loop as
shown in Figure 6-4.
Here Rterm is for the termination resistor mentioned above
SD is for a smoke detector
HD is for a heat detector
Rs = 0 ÷ 510 Ω is a resistor brought in series with smoke
detectors (depends on the type of the detector)
Rsh = 8.2 kΩ is a resistor brought in parallel across a heat
detector
HD
loop+
Rs
SD
Rsh
Rterm
loop-
Figure 6-4: Smoke and Heat Detectors Wiring into Loop of Type 2
[email protected], [email protected]
65
FIRE ALARM AND EXTINGUISHING CONTROL PANEL
6.2.1.3 Heat, Double Response Recognizable Alarm Loop
Bring the provided termination resistor 4.7 kΩ into the alarm loop as
shown in Figure 6-5.
Here Rterm is for the termination resistor mentioned above
HD is for a heat detector
Rsh = 4.7 kΩ is for a resistor brought in parallel across a heat
detector
HD
HD
loop+
Rsh
Rsh
Rterm
loop-
Figure 6-5: Heat Detectors Wiring into Loop of Type 3
6.2.2
Connecting Circuits to the Contacts +4-, +6, +7-
Connect, if necessary, the door open sensor (door contact or another
detector), the discharge monitoring circuit, and the extinguishing
equipment fault circuit to the panel PCB terminal blocks marked as “+4-”,
“+6”, and “+7” respectively.
Any contact detectors or relay outputs of other devices can be used
as status detectors or signal devices brought into the circuits connected to
the “+6” and “+7” terminals.
Standard wiring of detectors along with termination, series and shunt
resistors is shown in Figure 6-6. Instead of door detectors or along with
them other burglary alarm device output circuits can be wired into this
circuit. The number of door detectors not powered by circuit in question is
unlimited.
If this circuit is not in use, connect the supplied termination resistor of
4.7 kΩ across the relevant terminals.
NC Detector
loop+
Rseries, 510 Ohm
Rshunt, 8.2 k
Rtermination, 4.7 k
NO Detector
loop-
Figure 6-6. Wiring Door Sensors or Pressure Annunciators
66
www.bolid.com
S2000-ASPT
6.2.3
Getting Started
Сonnecting Manual Call Points
The circuit with manual call points included is connected to the “+5-“
PCB terminals as shown in Figure 6-7.
J1
J2
J3
J1
J2
J3
X2
X
1
2
3
1
2
1
3
2
3
1
2
3
1 kΩ
8.2 kΩ
+loop
X2
X
+loop
+loop
+loop
Figure 6-7: Wiring Manual Call Points
You can include into circuit in question suitable manual devices
designed for d.c. voltage.
If this circuit is not in use, connect the termination resistor 4.7 kΩ
across the “+5-“ terminals.
6.2.4
Connecting Light and Sound Alarms
Connect the light and sound alarms if used to the "VA1", "VA2",
"VA3" and "SA" terminals according to the Figure 2-4 and Table 3-1.
DON’T CONNECT ANY RATED LOAD TO OUTPUTS WHEN
BACKUP BATTERIES ARE NOT CONNECTED.
THE LOAD CONNECTION MODULES ALLOWING THE PANEL TO
CONTROL THE CIRCUIT CONDITIONS SHALL BE INSTALLED
CLOSELY TO A LIGHT OR SOUND ALARM.
WHILE COMMISSIONING AS WELL AS WHEN ANY OUTPUT IS
NOT IN USE CONNECT A 1 KΩ, 1 W RESISTOR ACROSS THE
RELEVANT TERMINALS.
[email protected], [email protected]
67
FIRE ALARM AND EXTINGUISHING CONTROL PANEL
Figure 6-8: How to Connect Several Alarms to the Same Output
The schematic can require some additional resistors in case if the
total current exceeds the normal value.
6.2.5
Connecting Releasing Circuit
The releasing circuit is connected to the “R” panel terminals. All
required parameters are described in Table 3-1. If a releasing device
imposes any additional limitation on the value of current, then DO BRING a
suitable resistor in series with the releasing device.
6.2.6
Connecting Message Transmission Circuit
If the S2000-ASPT is intended to transmit FIRE and FAULT
messages to a fire department or a central monitoring station, connect the
appropriate circuits to the terminals marked as FR and FLT on the panel
PCB correspondently.
A FIRE message is generated as a result of closing the FR output
relay contacts, while a FAULT message is formed as a result of opening
the FLT relay contact.
6.2.7
Connecting Auxiliary Equipment
The engineering and technical equipment which are to be controlled
by the panel (ventilation controls, smoke management controls, hot-air
heating and conditioning system controls, fire control dampers, air closers,
door closers, and so on) are connected to the NO-NC-C panel terminals.
The NO - C terminals are normally opened, the NC - С terminals being
normally closed. The output parameters are shown in Table 3-1.
68
www.bolid.com
S2000-ASPT
6.2.8
Getting Started
Connecting RS-485 Interface Lines
If S2000-ASPT is to co-operate with an S2000M console or S2000KPB modules, it needs to be connected to these devices via the RS-485-1
interface port and the RS-485-2 interface port respectively. The typical
wiring diagrams are shown in Figure 1-1, Figure 1-2, Figure 1-3, and
Figure 1-4.
Connect A and B lines of the network controller RS-485 bus to the
"А1" and "В1" terminals of RS-485-1 panel port respectively. If the S2000ASPT panel is not the first or the last device in the RS-485 bus then
remove the XP1 jumper (that is RS-485 EOL terminator) from the panel PC
board, otherwise let it put on.
Connect A and B lines of the S2000-KPB modules’ RS-485 bus to
the "А2" and "В2" terminals of the panel RS-485-2 port correspondently. If
the S2000-ASPT panel is not the first or the last device in the RS-485 bus
then remove the XP2 jumper (that is RS-485 EOL terminator) from the
panel PC board, otherwise let it put on.
Separating the panel from RS-485-1 or RS-485-2 lines ALWAYS
TAKE AWAY BOTH WIRES!
6.3
Connecting Power Supply
Before connecting the panel to the mains power, insert the supplied
plastic bushing into the hole made in panel enclosure. This bushing is used
to isolate the power cable from panel metallic case.
The panel fuse, being housed into a special voltage insolating holder,
is used as mains power on-off switch.
ATTENTION! IT IS FORBIDDEN TO EXPLOIT THE S2000-ASPT
PANEL IN CASE OF DISCONNECTED BATTERY.
SWITCH THE MAINS POWER OFF AND PULL THE FUSE F1 OUT
BEFORE YOU INSTALL OR REPLACE THE BATTERY.
How to start the panel:
Connect the ground wire to the ground terminal.
Then connect the backup batteries interconnected with the connector
provided by coupling red panel wire to the "+" terminal and the white one to
the "-" terminal.
Finally put the fuse F1 into the holder.
How to shut the panel down:
Remove the fuse F1 from the holder on the panel PCB.
Then disconnect the batteries.
Finally cut the mains power out de-energizing the panel.
[email protected], [email protected]
69
FIRE ALARM AND EXTINGUISHING CONTROL PANEL
6.4
Setting the Panel Configuration Parameters
S2000-ASPT panel is delivered by manufacturer with configuration
parameters being set in accordance with the Table 3-10, Table 3-11, Table
3-12, and Table 3-13. In order to change default configuration, the panel
needs to be connected to the network controller via RS-485-1 line and to
the both power suppliers.
6.4.1
Changing Configuration Parameters by Means of UProg
To change the configuration by means of a computer, follow these
steps:
1. Connect the RS-485-1 port of the panel to the COM port of the PC
which the UProg Configuration Tool is installed on through one of
the Bolid manufactured interface converters PI-GR, S2000-PI,
S2000-USB, USB-RS485, or S2000M in programming mode.
2. Ensure the backup battery is connected to the panel. Turn up
mains power. Wait until Pre-operation mode is finished.
3. Run the UProg program of version no less than 4.0.0.905. Select
the proper COM port and start the device finding procedure.
NOTE: The program "ORION_PROG.EXE" can be downloaded
from the sites of the Bolid Company, http://bolid.ru and
www.bolid.com.
4. The program having found the connected devices, select the panel
by scrolling the device list.
5. Set the proper configuration parameters and save changes by
activating Write Configuration command.
6. If necessary, change the panel network address by using the
Network Address command.
6.4.2
Changing the Panel Network Address by Means of the S2000M
To change the panel network address by means of the
S2000/S2000M console, follow these steps:
1. Connect the panel to the S2000/S2000M console via RS-485-1
interface line.
2. Wait until S2000/S2000M console has detected the S2000-ASPT
panel.
2. Press the PRG console key.
3. Enter the password.
4. Select the ADDRESSES command from the console menu by
4 / 3 and ENT keys, or press hot key 3 .
70
www.bolid.com
S2000-ASPT
Getting Started
5. Select RS485 DEVICES menu command by 4 / 3 and ENT keys,
or press hot key 1 .
6. Enter the current panel address or select its value by ‘4 / 3 keys
and press ENT.
7. Enter the new panel address and press ENT. Short double console
sound acknowledges successfully performed assigning.
8. For the new address to come into effect, reset the panel power
suppliers. The outage duration has to take at least 3 seconds.
ATTENTION! Connecting the panel into the Orion system (or
connecting S2000-KPB modules to the panel RS-485-2 terminals) NEVER
ASSIGN THE SAME ADDRESS TO DIFFERENT DEVICES! Include the
devices into given interface line one at a time, assigning each of them the
new unique address. Although the addresses of devices brought to the RS485-1 line can coincide with those of devices brought to the RS-485-2 line,
that is, address spaces of different interface line are unrelated.
DISCONNECTING THE PANEL FROM THE RS-485 INTERFACE
NEVER DETACH ONLY A SINGLE WIRE BUT BOTH WIRES AT ONCE
6.5
Testing the Panel
Before operating the panel it is advisable to test panel operability by
doing the following:
1) Establish the test set-up shown in Figure 6-9.
2) Connect the panel A1 and B1 terminals with the S2000M
operating as a network controller through the RS-485 interface
line.
3) Insert the backup batteries and connect the panel to the mains
power.
4) After expiring the Pre-operation mode the panel shall enter the
Quiescent mode, the S2000M displaying the “CONNECTED
D127” message followed by the “DEVICE RESTART D127”
message.
5) Turn the key switch on the panel front plate to the Unlocked
position .
If the panel has entered any alarm mode, press the Fire RESET
button or Extinguishing RESET button to switch the panel to the Quiescent
mode.
If the AUTOMATIC MODE indicator is turned on, reset it by pressing
the relevant button. The H8 indicator (see Figure 6-9) shall start lighting.
[email protected], [email protected]
71
FIRE ALARM AND EXTINGUISHING CONTROL PANEL
6) Close the S1 contact (see Figure 6-9). H1 indicator shall have
being off for 3 s, the LOOP 2 indicator on the panel front plate
shall flash with red color, and the S2000M console shall display
“FIRE SIGNAL 127/002”.
When the H1 indicator has turned on again, the panel shall enter the
Prealarm mode, the S2000M console displaying “FIRE PREALARM
127/002”. Then the H4 indicator shall start lighting.
Figure 6-9. Wiring the Panel for Testing
7) Open the S1 contact and close the S2 contact. The H2 indicator
shall flash with red, the S2000M console displaying the “FIRE
SIGNAL 127/003” followed by the “FIRE PREALARM 127/003”.
Open the S2 contact.
72
www.bolid.com
S2000-ASPT
Getting Started
8) After 2 s since opening the S2 the panel shall enter the Fire Alarm
mode, the S2000M console displaying the “FIRE ALARM
127/010”. The H3 shall light steady, and the H9 shall flash.
9) Press the AUTOMATIC MODE button on the panel front plate.
The automatic release mode shall be turned on and the panel
shall enter the Pre-discharge Delay mode. The S2000-M console
shall display the message “AUTOMATICS ON 127/009” followed
by the message “LAUNCH DELAY 127/010”.
The H8 indicator shall turn off while the H6 indicator shall flash.
10) Close shortly the door sensor terminals “+4-”. The panel shall
enter the Blocked Release mode. The S2000M console shall
display the messages “LOOP TRBL SHORT 127/004”, “LAUNCH
BLOCKED 127/010”, and “EX MODE MANUAL 127/009”
sequentially. Both the H2 and H8 indicators shall be off.
11) Open the door sensor terminals “+4-”. The S2000M shall
display “AUX ZONE RESTORE 127/004”, the H2 indicator starting
light in 2 s.
12) Switch on the automatic mode again and repeat all the actions
described in the item 9). The panel shall enter the Pre-discharge
Delay mode again. The S2000M shall display the “EX MODE
AUTO 127/009” followed by “LAUNCH DELAY 127/010”. In 30 s
the panel shall enter the Release mode, the H5 indicator turning
on. Then the automatic release mode shall be turned off, the
S2000M shall displaying “LAUNCH 127/010” followed by “EX
MODE MANUAL 127/009”.
The H6 indicator shall turn off, while the H7 indicator shall start
flashing.
13) In 15 s the H5 indicator shall turn off, the S2000M displaying
the “LAUNCH FAULT 127/010”.
NOTE: The release fault message was generated because no
response of the pressure detector has been detected during the release
pulse.
14) Press the Extinguishing RESET button followed by pressing the
Fire RESET button. The panel shall enter the Quiescent mode.
The S2000M console will sequentially display the messages
“LAUNCH CANCEL 127/010”, “ALARM RESET LP 127/002”,
“ALARM RESET LP 127/003”, “ARMED LP 127/010”, “ARMED LP
127/002”, and “ARMED LP 127/003”.
15) Shut the panel power off by removing the F1 fuse from the fuse
holder on the panel main PCB. Within a minute the panel shall
enter the On Batteries mode. The H2 indicator shall turn off, the
S2000M console displaying “AC POWER FAILED 127/007”.
[email protected], [email protected]
73
FIRE ALARM AND EXTINGUISHING CONTROL PANEL
16) Restore the panel power again. The panel shall enter the
Quiescent mode, the S2000M displaying the “AC POWER
RESTORED 127/007”.
17) Detach the red wire from the relevant backup battery. In
15 minutes the panel shall enter the Battery Failed mode, the H2
indicator turning off. The S2000M shall display “BATTERY
FAILED 127/008”.
18) Connect the red wire to the battery again. Wait for 15 minutes
and press the Fire RESET button. The panel shall enter the
Quiescent mode, the S2000M displaying the “BATTERY
RESTORED 127/008” message.
19) Detach the backup batteries. Detach the panel mains power
connection. Close the panel top cover and turn the key switch o
the Locked position .
6.6
Performance
The basic panel performance and operations are described by
Sections 3.8 and 3.9 of this Manual.
The number of release outputs can be expanded up to 97 ones in
case of using S2000-KPB (up to 16 modules per a single panel). The
addresses of the S2000-KPB modules connected to the panel via the panel
RS-485-2 port can coincide with the addresses of the devices connected to
the panel RS-485-1 port. The addresses of the S2000-KPB modules which
are used to expand the number or releasing outputs MUST be enrolled in
the panel configuration.
Not only an S2000M console but also a PC with ARM Orion installed
can co-operate with the panel as a network controller.
Some typical ways to use the S2000-ASPT panel are shown in
Section 1 of this Manual.
Remote monitoring and controlling the panel can be implemented
with the help of an S2000-PT control and indicating equipment. To do this,
the network controller MUST be programmed properly by means of the
PProg programming tool.
74
www.bolid.com
S2000-ASPT
Troubleshooting
7
TROUBLESHOOTING
Use the Table 7-1 to resolve minor S2000-ASPT installation and
operating problems.
Table 7-1: Problem Resolving
Problem
If connected to the mains
power, the panel is not
turned on. The panel
indicators are not lit
When mains power has
been shuts down the
panel shuts down too,
but in case of the mains
power supplying the
panel indicates the
battery fault
Possible Cause
Solution
No utility voltage or F1 Check the S2000-ASPT
fuse is out of service
power supply connection.
Replace the fuse
Contact impairment
between battery leads
and terminals.
The battery is
inoperable or
discharged
Check the contacts
between the panel and
the battery and repair if
necessary. Measure
the battery voltage; if its
value has fallen below
12 V then replace or
charge the battery
The panel LEDs are not
The cord to couple the Connect the cable or
lit while the internal
main PCB and the
check the proper
indicator HL1 on the
indication PCB is
connecting
main PCB flashes rapidly disconnected or
defective
FAULT WARNING
The tamper switch
Remove the panel
indicator flashes, the
has been released or cover and check the
panel making no sounds out of service
tamper switch. When
the panel cover is
closed the plunger must
be pushed within 15 s
After panel having been
Device is being in the Check the value of the
turned on for more than
Powering On mode.
mains voltage at the
10 s the FAULT
Mains power voltage
panel power input and
is below the normal
the same value at the
WARNING and the
range
control point “40”
indicators flash, the
panel sounder being
silent
[email protected], [email protected]
75
FIRE ALARM AND EXTINGUISHING CONTROL PANEL
After powering up the
panel the FAULT
WARNING and the
indicators flash, the
panel sounder sounds
interruptedly, and the
HL1 internal indicator on
the main PCB flashes
rapidly
After powering up the
panel the indicators
FAULT WARNING,
,
and
flash, the panel
sounder sounds
interruptedly
After powering up the
panel the TEST indicator
flashes, the panel
making no sounds
The panel doesn’t display
S2000-KPB faults. A
S2000-KPB module is
not started along with
starting the fire protection
equipment
A firmware error has
been detected; the
panel is being in the
Device Failed mode
Update the
microcontroller firmware
(see Section Device
Failure)
A charger failure has
been detected; the
panel is being in the
Device Failed mode
Send the panel to the
manufacturer
The panel is not
completely factorytested
1. Press and hold the
tamper plunger until the
panel enters the
Operating mode, or
2. Send the panel to the
manufacturer
Change the panel
configuration having
specified the addresses
of the connected
S2000-KPB modules.
Turn the panel power
on and then off again
Find out and repair the
failure
The S2000-KPB
address is not
enrolled in the panel
configuration
The panel is not detected The interface line
by the network controller RS-485-1
is inoperable
76
Interface lines А1 and
В1 are interchanged
Supervise and correct if
necessary
The jumper XP1
connecting the EOL
Terminator to the
RS-485-1 line
is set improperly
Ensure the EOL
resistor (jumper) is put
on if the panel is the
first or the last device in
the RS-485-1 interface
line or removed
otherwise
www.bolid.com
S2000-ASPT
The panel doesn’t detect
connected S2000-KPB
modules. The S2000KPB indicator flashes,
the panel sounder
beeping
Troubleshooting
Some devices in the
interface line
RS-485-1 have the
same network
address
The interface line
RS-485-2
is inoperable
Check and change if
necessary network
addresses being in use
so that they have been
unique
Find out and repair the
failure
Interface lines А2 and
В2 are interchanged
Check and correct if
necessary
The jumper XP2
connecting the EOL
Terminator to the
RS-485-2 line
is set improperly
Ensure the EOL
resistor (jumper) is put
on if the panel is the
first or the last device in
the RS-485-2 interface
line or removed
otherwise
Check and change if
necessary S2000-KPB
addresses being in use
so that they have been
unique
Some S2000-KPB
modules have the
same addresses
[email protected], [email protected]
77
FIRE ALARM AND EXTINGUISHING CONTROL PANEL
8
MAINTENANCE
The S2000-ASPT maintenance needs to be performed by trained
personnel having learned closely this Manual and been aware of the panel
design along with the operating rules.
All maintenance operations have to be carried out by a person
knowledgeable in the electrical installation work codes.
It is necessary to comply with safety precautions exposed in clause
5.1 of this manual.
It is obligatory to keep up the periodicity and technological order and
technique of accomplishment of maintenance routines.
Disconnect the panel from the mains and backup power before you
begin the working.
To ensure that your system is fully operational perform the
maintenance according with dispatch lists as follows:
− According to the dispatch list#1 monthly, and
− According to the dispatch list#2 in case of receiving at least two
nuisance alarms within a month.
Try out all the control and measuring equipment.
Check the panel isolation resistance annually in accordance with the
step 4 of the dispatch list #2.
Register all the maintenance operations in a special log.
78
www.bolid.com
S2000-ASPT
Maintenance
DISPATCH LIST #1. Visual Checking and Cleaning the Panel
1.1
Disconnect the panel from the mains power supply and remove dust,
dirt and other contaminations from the panel surface with the help of
waste, grainer brush
1.2
Visually check the panel and remove of signs of corrosion, if present,
using a waste, grainer brush, and an oil-based solvent
1.3
Remove the panel top cover and clean all the terminals from dirt,
dust, and corrosion using a waste, grainer brush, and an oil-based
solvent
1.4
Remove the dust, dirt or humidity from the battery surface using
waste and grainer brush. Measure the voltage at each battery
output. If the voltage value has dropped below 12 V replace both
backup batteries
1.5
Check the fuse F1 rating (0.5 A) and usability
1.6
Check if the panel is grounded properly and the earth wire is
operable
1.7
Ensure connecting the external circuits matches with panel output
terminals using the panel connecting diagram (see Figure 2-4)
1.8
Using a screwdriver tighten terminal screws if necessary. Repair the
connection if there is any wire broken. Replace wires with broken
covering
1.9
Inspect operating the panel indicators, push buttons, internal and
external audible alarms, and visual alarms by switching the panel to
the Test mode (see clause 3.8.5)
[email protected], [email protected]
79
FIRE ALARM AND EXTINGUISHING CONTROL PANEL
DISPATCH LIST #2
1.
Inspect and clean the panel in accordance with the 1.1-1.8 steps of the
Dispatch List #1.
2.
Check the panel operability.
Simulate detector actuating and ensure the indication, messages
and control commands are in agreement with the mode programmed
3.
Disconnect the mains power and check the panel operability
similarly to the procedure mentioned above
4.
Measure the isolation resistance as follows:
−
Disconnect the mains and backup powers
−
Couple the 220 V block terminals
−
Using megaohm meter measure the isolation resistance
between the Earth and the Live terminals
The isolation resistance value should be no less than 20 MΩ.
80
www.bolid.com
S2000-ASPT
BOLID Contact Information
9
BOLID CONTACT INFORMATION
ZAO NVP BOLID
4 Pionerskaya Str., Korolev, Moscow Region, Russia, 141070
Tel/fax: +7 495 775 7155
E-mail: [email protected], [email protected]
Web-site: www.bolid.ru, www.bolid.com
[email protected], [email protected]
81
FIRE ALARM AND EXTINGUISHING CONTROL PANEL
Appendix A. Calculating the Battery Operating Time and
Average Consumed Current
The capacity of a backup battery must provide powering the panel for
24 hours in the Quiescent mode and 3 hours in the Fire mode.
The panel is intended to be supplied by a battery with voltage rating of
24 V.
The backup battery operating time is defined by its capacity and by
total load current consumed by the outputs VA1, VA2, VA3, SA and 24V.
This dependence is expressed by the formula:
Toр = W
I lΣ , [Hr],
where:
Top : the battery operating time in hours
W : the battery capacity in Ah
IlΣ : the total load current in Amp
I lΣ = I lVA1 + I lVA 2 + I lVA3 + I lSA + I l24V
, [Amp]
Σ
The relationship between the Il current and the battery supplying
current Ibat in the 0…0.5 A range can be considered as linear:
I bat = I lΣ + 0.06 , [Amp]
The panel provides housing two assembled batteries 12 V, 4.5 Ah each
within the panel enclosure.
Σ
1) Evaluating maximum Il for 24 hours of quiescent operating
Taking into account 25% reserved battery capacity, the average current
delivered by a battery during backup supplying can be evaluated as
I backup = 0.75 × W
24 Amp;
Because the current consumed from the battery, Ibat, must not exceed
the average current Ibackup, so
I lΣ < 0.75 ×
W
− 0.06 , [Amp]
24
Since all visual and sound alarms, except the VA3, are disabled in the
Quiescent mode and don’t consume current, therefore:
I lΣ = I lVA3 + I l24V , [A]
For a 4.5 Ah battery:
Ibackup = 0.14 [Аmp],
82
(1)
IнΣ < 0.08 [Amp]. (2)
www.bolid.com
S2000-ASPT
Thus, if there are no external devices connected to the 24V panel
output, then backup battery of the capacity of 4.5 Ah supplies power to
the panel for 24 hours provided that a visual alarm connected to the
VA3 panel output consumes no more than 80 mА.
Σ
2) Evaluating maximum Il for 3 hours of operating in the Fire mode
Taking into account 25% reserved battery capacity, the average current
delivered by a battery during backup supplying can be evaluated as:
I backup = W
3
, [A] ;
I lΣ < 0.75 × W / 3 − 0.06 , [Amp]
Since visual alarms VA1 and VA2 are turned on in a flashing mode and
can be turned on simultaneously only in the Emergency Launch mode, so the
maximum value can be evaluated as:
I lΣ = 0.5 ⋅ I lVA1 + 0.5 ⋅ I lVA 2 + I lVA 3 + 0.75 ⋅ I lSA + I l24V , [Amp]
(3)
For a 4.5 Ah battery we obtain that:
Ibackup = 1.125 [Аmp],
IlΣ < 1.065 [Amp] (4)
The values IlVA1, IlVA2, IlVA3, IlSA, Il24V must comply with IlΣ conditions and
are defined depending on specific alarms.
The procedure of calculation is as follows:
1. Based on the technical specifications for visual and sound alarms
being in use, find the values of current IlVA1, IlVA2, IlVA3, IlSA.
2. Based on the panel wiring diagram for operating, calculate the Il24V.
3. Calculate the IlΣ value based on the formula (1) and the conditions
(2) for the quiescent mode.
4. Calculate the IlΣ value based on the formula (3) and the conditions
(4) for the Fire mode.
[email protected], [email protected]
FIRE ALARM AND EXTINGUISHING CONTROL PANEL
Appendix B. Personnel Action
Extinguishing System Discharge
Plan
in
Case
of
Fixed
In order to prevent secondary actuating fire extinguishing installation in
the event of its launch it is advisable to follow this sequence of operations:
1) Visually inspect the protected zones to discover the reason the
extinguishing system has actuated: if it is the presence of combustion
products, or smoke-filling, or manual call point activation. Take the necessary
measures to protect occupants and premises against fire and extinguishing
agent releasing.
2) In cases of fire having been already suppressed or nuisance alarm,
suppress the audible alarm by means of SILENCE push-button pressing.
3) Check the conditions of panel faceplate indicators PREALARM,
FIRE ALARM, AUTOMATICS ON/OFF, and EXTINGUISHING. Define which
zones are in fire conditions.
4) Check the conditions of the indicators on responded fire detectors (if
applicable). Inspect the conditions of manual call points.
5) Abort the Extinguishing mode by pressing the RESET button at the
left lower corner of the panel faceplate. Abort the Fire mode by pressing the
RESET button at the left upper corner of the panel faceplate.
6) Cutoff both mains and backup power from the panel and the S2000KPB modules (if applicable).
7) Register your activity and observations into the user log.
8) After incident investigation having completed and before power
returning, separate automatic fire-extinguishing modules from panel starting
circuits and the S2000-KPB devices (if applicable), and replace them by
simulators. You can use a fuse with actuating current being equal to
automatic module’s one as a simulator.
9) Carry out the pre-commissioning routines to check the panel
operability.
10) Make sure the panel is not in an alarm mode and disable the mains
and backup power supplies. Replace the simulators by the effective fireextinguishing modules and restore the powering.
84
www.bolid.com
BOLID ONE YEAR LIMITED WARRANTY
Bolid Company and its divisions and subsidiaries («Seller»), 4 Pionerskaya Str., Korolev 141070, Moscow
Region, Russia warrants its security equipment (the «product») to be free from defects in materials and
workmanship for one year from date of original purchase, under normal use and service. Seller’s obligation is
limited to repairing or replacing, at its option, free of charge for parts or labor, any product proven to be
defective in materials or workmanship under normal use and service. Seller is not responsible for results
where the product is used improperly, where it is used for any application it is not intended for, used under
unacceptable environmental conditions and mishandled or stored under improperly. Seller shall have no
obligation under this warranty or otherwise if the product is altered or improperly repaired or serviced by
anyone other than the Seller. In case of defect, contact the security professional who installed and maintains
your security equipment or the Seller for product repair.
This one year Limited Warranty is in lieu of all other express warranties, obligations or liabilities. THERE ARE
NO EXPRESS WARRANTIES, WHICH EXTEND BEYOND THE FACE HEREOF. ANY IMPLIED
WARRANTIES, OBLIGATIONS OR LIABILITIES MADE BY SELLER IN CONNECTION WITH THIS
PRODUCT, INCLUDING ANY IMPLIED WARRANTY OF MERCHANTABILITY, OR FITNESS FOR A
PARTICULAR PURPOSE OR OTHERWISE, ARE LIMITED IN DURATION TO A PERIOD OF ONE YEAR
FROM THE DATE OF ORIGINAL PURCHASE. ANY ACTION FOR BREACH OF ANY WARRANTY,
INCLUDING BUT NOT LIMITED TO ANY IMPLIED WARRANTY OF MERCHANTABILITY, MUST BE
BROUGHT WITHIN 12 MONTHS FROM DATE OF ORIGINAL PURCHASE. IN NO CASE SHALL SELLER
BE LIABLE TO ANYONE FOR ANY CONSEQUENTIAL OR INCIDENTAL DAMAGES FOR BREACH OF
THIS OR ANY OTHER WARRANTY, EXPRESS OR IMPLIED, OR UPON ANY OTHER BASIS OF
LIABILITY WHATSOEVER, EVEN IF THE LOSS OR DAMAGE IS CAUSED BY THE SELLER’S OWN
NEGLIGENCE OR FAULT. Some countries do not allow limitation on how long an implied warranty lasts or
the exclusion or limitation of incidental or consequential damages, so the above limitation or exclusion may
not apply to you.
Seller does not represent that the product may not be compromised or circumvented; that the product will
prevent any personal injury or property loss by burglary, robbery, fire or otherwise; or that the product will in
all cases provide adequate warning or protection. Buyer understands that a properly installed and maintained
alarm may only reduce the risk of a burglary, robbery, fire or other events occurring without providing an
alarm, but it is not insurance or guarantee that such will not occur or that there will be no personal injury or
property loss as a result. CONSEQUENTLY, SELLER SHALL HAVE NO LIABILITY FOR ANY PERSONAL
INJURY, PROPERTY DAMAGE OR OTHER LOSS BASED ON A CLAIM THE PRODUCT FAILED TO GIVE
WARNING. HOWEVER, IF SELLER IS HELD LIABLE, WHETHER DIRECTLY OR INDIRECTLY, FOR ANY
LOSS OR DAMAGE ARISING UNDER THIS LIMITED WARRANTY OR OTHERWISE, REGARDLESS OF
CAUSE OR ORIGIN, SELLER’S MAXIMUM LIABILITY SHALL NOT IN ANY CASE EXCEED THE
PURCHASE PRICE OF THE PRODUCT, WHICH SHALL BE THE COMPLETE AND EXCLUSIVE REMEDY
AGAINST SELLER. This warranty gives you specific legal rights, and you may also have other rights which
vary from country to country. No increase or alteration, written or verbal, to this warranty is authorized.
4 Pionerskaya Str., Korolev 141070,
Moscow Region, Russia
Phone/fax: +7 495 775-7155
Email: [email protected]
www.bolid.com