1
CPIN002837
USER MANUAL
1
installation
installation
ii.
Make sure you use a drill which is suitable to the type of the wall on which
you intend to mount the heater. Drill the mounting holes at the marked
position.
iii. Insert the plastic fitting supplied with the accessory pack into the holes.
iv. Align the four mounting holes on the panel heater with the plastic fittings
and install the panel heater.
v. Screw the four fasten screws into the plastic fitting.
vi. Insert the screw caps over the screw heads.
vii.To remove the unit from wall, switch off and unplug the heater.
Remove the screw caps and unscrew the screws and remove the heater.
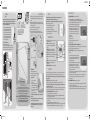
Wall Mounting
Important : The heater must always be positioned so that the power switch
is located to the top right hand side of the panel when installed either in
wall mounted or free standing position. The heater is NOT designed to be
operated in any other mounting position.
400W & 600W
i. Take into consideration the minimum required
clearance for wall mounting as indicated in the
figures below and locate the heater on the wall.
Position the heater so that the power switch is
located to the top right hand side of the panel.
The heater is not designed to be operated in
any other mounting position. Mark the four
mounting holes to be drilled.
Slimline Design
Do not install the panel heater:
• Under a fixed mains power socket.
• In Zone 1 & 2 of bathrooms as indicated in the diagram.
• Maybe installed in Zone 3 but must be above the shaded area.
Electrical socket must not be located in the shaded area.
1
ECO PANEL
HEATERS
2
3
THIS WAY
UP ONLY
Main ON/OFF
power switch
(Control box
on rear)
Four
Mounting
Holes
4
5
Zone 1
Zone 2
2.50m
Digital Timer
Zone 3
2.25m
6
400mm
150mm
FREESTANDING
When using the panel heater as free
standing it must always be used with feet
assembled and in upright position.
600mm
600mm
To assemble the feet:
Feet for Freestanding option
500mm
500mm
300mm
Minimum Furniture
Clearance
CPIN002837.indd 2-5
Before First Use
Remove any promotional material and packaging from the heater.
Unwind the cord to its full length and place the heater on a firm level surface in a
stable, upright position. Visually inspect the air inlets
and outlets on the control box to ensure that there are no blockages.
To avoid overheating to a circuit do not plug the heater into
a circuit that already has other appliance working.
CAUTION: There may be some odour coming from the heater for the very first time
you use it. This is normal during the break-in period or after
long term storage. Make sure the heater is in a well ventilated
area and continue running it until the smell goes away.
i.
Place the panel heater on a
flat surface.
ii. Align the feet in position as shown
in the figure and tighten the fixing
screw located at the rear of the feet.
Make sure the screw is tight and the
assembly is secured.
iii. The heater is now ready for use.
NOTE: When using freestanding, keep out of traffic areas where it may be
knocked over.
The heater is equipped with a tip over switch. If the heater is knocked
over the power will be cut off automatically.
The heater panel body is hot to touch when it is operating. Turn off the
heater and allow sufficient time to cool before your relocate the panel
heater or store it.
2
timer operation
operation
v. TO PROGRAM THE TIMER follow the steps as given below.
Caution: There may be some odour coming from the heater for the very first time you use it.
This is normal during the break-in period or after long term storage.
Make sure the heater is in a well ventilated area and continue running it until the smell goes away.
Please follow the instructions given below
i.
Check if the On/OFF Power switch is along the
side of the heater is at OFF position.
ii. Plug the heater into a 10 ampere wall socket.
iii. Press the On/Off Power Switch along side of the heater to ON
position to turn the heater ON.
3
timer identification
A. CLOCK Button to set the current day of the week and
time in hours and minutes.
B. PROG Button to set the timer to desired program,
G
in total there are 20 user programmable programs
available.
H
C. OFF/ON/AUTO Shows mode “OFF-0N-AUTO “ as
selected by pressing this manual override button .
D. RESET Clears all data in memory and resets the unit.
E. RECALL Button when pressed recalls the last stored data A
F. MIN Button used to set the minutes of the clock
B
setting.
G. HOUR Button used to set the hours of the clock setting
H. WEEK Button used to set the day of the week when
setting the clock.
I. POWER ON INDICATOR Indicates heater element is ON.
4
I
F
E
D
C
timer operation
The timer has a built in, rechargeable battery. If a power failure occurs or the unit is removed from the mains
outlet, the rechargeable battery will power the time switch avoiding the loss of any preset programs.
NOTE The rechargeable battery is a non replaceable type. The battery will not provide power to any appliance
during a power failure.
i. INITIAL SETUP Plug the timer into a mains outlet and switch on.
ii. All segments of the display should flash on momentarily if the screen was blank prior to power up.
NOTE: If screen remains blank after connection to mains supply, leave unit for approx. 14 hours to fully
charge the battery before operation.
iii. If unit was already operational before connection to mains outlet, reset unit by pressing small reset button
using a paperclip or pen. The display segments should all illuminate and the unit will reset to time 0:00
iv. TO SET PRESENT TIME AND DAY follow the steps as given below:
• Press the CLOCK button and follow the steps given below
• Press the WEEK button until the display shows the current day. Release the WEEK button when the
correct day is displayed on the LCD display.
• Press the HOUR button until the display shows the current time in hour. The hour icon on the display will
increment by 1 hr.
• Release the HOUR button once the display shows the current hour.
• Press the MIN button until the display shows the current time in minutes. The minute icon on the display
will increment by 1 min. Release the MIN button once the display shows the current minute.
• Press the button PROG to scroll and set the timer programs as desired.
There are in total 20 timer programs available with individual ON and OFF settings.
• Press the On/OFF/AUTO button until the display shows “AUTO OFF ”
• Press the button mark PROG, the display will come up with
program number and ON (as shown right) which indicates the
ON time when the heater should be turned ON is to be set.
• Press the WEEK button until the display shows the day
you want the heater to be turned on. The timer has been
programmed with several day/week groupings which are
given as below.
• a) All days of the week
• b) Each day of the week
• c) Monday – Tuesday-Wednesday – Thursday – Friday
• d) Saturday – Sunday
SELECT ONE OF THE PRESET DAY SETTING OPTIONS GIVEN ABOVE
vi. Press the HOUR and MIN button and the set the desired time of the day when you want the heater to be
turned ON. This completes the ON time setting for the heater.
vii. TO SET THE OFF TIME (time at which the heater must be turned off) follow the steps as
given below:
• Press the PROG button again and the display will come up
with same program number and OFF (as shown right). This
indicates the time which will be set is the time when the
heater should be turned OFF.
• Press the HOUR and MIN buttons and the set the desired time
of the day when you want the heater to be turned OFF.
• Press the WEEK button and choose the day you want the
heater to be turned OFF. The preset program can be same as
the ON setting or can be different.
This completes setting for one program. Repeat the steps given above for all the programs which you
desire to set (up to 20 programs in total).
• When the programs are set press the CLOCK button to return to the current time and day menu.
To check the program settings anytime press the PROG button repeatedly. To return back
press CLOCK button.
viii. TO DISABLE TIMER PROGRAMS follow the steps as given below:
• To disable all timer programs press the ON-OFF-AUTO button till the display shows only ON or OFF.
The AUTO Icon on the display will disappear.
• To enable the preset time programs press the ON-OFF-AUTO till the AUTO icon appears on the display.
The appliance will be turned ON or OFF at the first noticeable ON or OFF setting as programmed.
19/12/13 4:02 PM