1
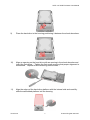
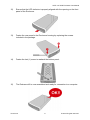
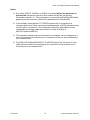
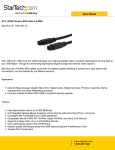
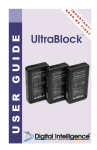
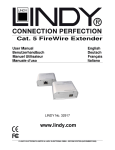
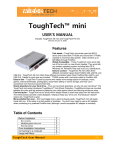
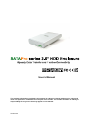
User’s Manual The product information provided in this manual is subject to change without prior notice and does not represent a commitment on the part of the vendor. The vendor assumes no liability or responsibility for any errors that may appear in this manual Version 02 SATA 3.5” HDD Enclosure User Manual Table of Contents Introduction...................................................................................................... 3 Important Reminders ....................................................................................... 3 Getting Started ................................................................................................ 3 System Requirements.................................................................................. 4 Assembling the SATA 3.5” HDD Enclosure ..................................................... 4 Hard Drive Installation.................................................................................. 4 Connecting the Enclosure to a Computer ........................................................ 9 Notes:......................................................................................................... 10 Notices and Classifications............................................................................ 11 FCC-B Radio Frequency Interference Statement ...................................... 11 Version 02 2 © 2007 All rights reserved. SATA 3.5” HDD Enclosure User Manual Introduction Thank you for purchasing the 3.5” SATA HDD Enclosure Kit. This User’s Manual provides instructions on assembling and using the following products. • • • SATA-eSATA 3.5” HDD Enclosure Kit SATA-eSATA/USB 2.0/FireWire800 3.5” HDD Enclosure Kit SATA-eSATA/USB 2.0/FireWire 3.5” HDD Enclosure Kit Please thoroughly read and follow the instructions provided in this manual. Failure to do so may result in damage to the Enclosure Kit and any or all of the connected devices. Important Reminders 1) 2) 3) 4) The main circuit board of the Enclosure is susceptible to static electricity. Proper grounding is required to prevent electrical damage to the Enclosure or other connected devices, including the computer host. Always place the Enclosure on a smooth surface and avoid all dramatic movement, vibration and percussion. Do NOT allow water to enter the Enclosure. Avoid placing the Enclosure near magnetic devices (such as a mobile phone), high-voltage devices (such as a hair dryer), or near a heat source (such as the dashboard of a car or any place where the Enclosure will be subject to direct sunlight). The operating system may NOT detect the Enclosure if it does not support the interface of your Enclosure. If so, installation of an appropriate driver or additional equipment in the host computer may be required. Getting Started The installation instructions in this manual apply to the following models. review the package contents for each model. Package Contents eSATA 3.5” HDD Enclosure Rear Panel • • • • • • Version 02 Please 3 Enclosure x 1 eSATA cable x 1 Quick Start Guide Fastening screws AC Power Adapter x 1 SATA II Host Card x 1 (upon model) © 2007 All rights reserved. SATA 3.5” HDD Enclosure User Manual eSATA/USB 2.0/FireWire800 HDD Enclosure Rear Panel Package Contents • • • • • • • • eSATA/USB 2.0/FireWire HDD Enclosure Rear Panel Enclosure x 1 eSATA cable x 1 USB A to mini B cable x 1 9-pin to 9-pin 1394b cable x 1 6-pin to 9-pin 1394 cable x 1 Quick Start Guide Fastening screws AC Power Adapter x 1 Package Content • • • • • • • Enclosure x 1 eSATA cable x 1 USB A to mini B cable x 1 6-pin to 6-pin 1394 cable x 1 Quick Start Guide Fastening screws AC Power Adapter x 1 System Requirements PC 266MHz or faster CPU 64MB of RAM Microsoft Windows, 2000, XP, 2003 One available eSATA, USB 2.0, FireWire or FireWire800 port (upon the model you buy) Macintosh Macintosh PowerPC or Intel Core Duo processor Mac OS 9.X or newer (PowerPC processor)/OS X.10.4 or higher (Intel Core Duo processor) One available eSATA, USB 2.0, FireWire or FireWire800 port (upon the model you buy) Assembling the SATA 3.5” HDD Enclosure To begin using the 3.5” SATA HDD Enclosure simply install a 3.5” SATA HDD in the Enclosure Kit and complete the assembly steps outlined below. Hard Drive Installation Install a hard disk drive in the Enclosure by completing the following steps. 1) Using a Phillips screwdriver, remove the screw from the rear panel of the Enclosure. Version 02 4 © 2007 All rights reserved. SATA 3.5” HDD Enclosure User Manual 2) Carefully remove the rear panel. 3) Slide the bottom panel out of the housing ensuring that adequate pressure is applied. 4) When disassembled, the Enclosure will appear as shown below. Version 02 5 © 2007 All rights reserved. SATA 3.5” HDD Enclosure User Manual 5) Locate the plastic bag containing (4) auto-limiting screws included in the package. Auto-limiting screws 6) Ensure that the shock absorbers are installed in the mounting brackets with the “thin” side facing out. 7) Insert the control board power cable into the hard drive. 8) Insert the SATA cable into the hard drive. Version 02 6 © 2007 All rights reserved. SATA 3.5” HDD Enclosure User Manual 9) Place the hard drive in the housing positioning it between the shock absorbers. 10) Align an opening on the hard drive with an opening in the shock absorber and insert the first screw. Tighten the first screw ensuring that proper alignment is maintained. Repeat for the remaining three screws. 11) Align the edges of the hard drive platform with the internal rails and carefully slide the assembled platform into the housing. Version 02 7 © 2007 All rights reserved. SATA 3.5” HDD Enclosure User Manual 12) Ensure that the LED indicator is properly aligned with the opening on the front panel of the Enclosure. 13) Fasten the rear panel to the Enclosure housing by replacing the screws included in the package. 14) Fasten the last (1) screw to reattach the bottom panel. 15) The Enclosure Kit is now assembled and ready for connection to a computer. Version 02 8 © 2007 All rights reserved. SATA 3.5” HDD Enclosure User Manual Connecting the Enclosure to a Computer Complete the following steps to connect the Enclosure to a host computer. 1. Connect the AC/DC power adapter, then turn on the power switch; ensure that the green LED indicator is active. 2. Insert the eSATA, USB 2.0 , FireWire or FireWire 800 connector into the corresponding port. 3. Connect the eSATA, USB 2.0, FireWire or FireWire 800 cable into an available port on the computer. Version 02 9 © 2007 All rights reserved. SATA 3.5” HDD Enclosure User Manual Notes: 1) Any cable (eSATA, FireWire, or USB 2.0) inserted before the enclosure is powered on has priority over the other cables and will be the primary connection method, i.e.: If the enclosure is connected via FireWire 800 before powering on the enclosure, data will be transferred via FireWire800. 2) In the unlikely event that the 3.5” HDD Enclosure Kit is connected to a computer host via all three connectors simultaneously, eSATA will take priority over the other connections. The connection hierarchy, applicable to every combination of multiple cable connections in order of priority is, eSATA>FireWire>USB 2.0. 3) The enclosure should only be connected to a computer via one interface at a time. Connection of the enclosure to a computer via two or more interfaces is not recommended. 4) For USB 2.0/FireWire800/eSATA 3.5” HDD Enclosure Kit, the 6-pin to 9-pin 1394 cable included in the package is for connection of the enclosure to a FireWire port in a computer host. Version 02 10 © 2007 All rights reserved. SATA 3.5” HDD Enclosure User Manual Notices and Classifications FCC-B Radio Frequency Interference Statement This device complies with part 15 of the FCC rules. Operation is subject to the following two conditions: (1) This device may not cause harmful interference. (2) This device must accept any interference received, including interference that may cause undesired operation. Note: This equipment has been tested and found to comply with the limits for a class B digital device, pursuant to part 15 of the FCC rules. These limits are designed to provide reasonable protection against harmful interference when the equipment is operated in a commercial environment. This equipment generates, uses and can radiate radio frequency energy and, if not installed and used in accordance with the instruction manual, may cause harmful interference to radio communications. Version 02 11 © 2007 All rights reserved.