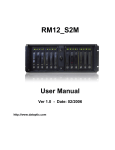
1
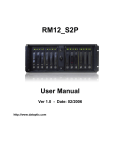
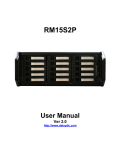
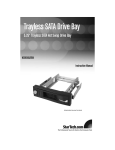
ezRAID4
1. Kit Includes
Rev 1.1
ezRAID4 Overview
USB 2.0 Cable FireWire800 Cable eSATA Cable 2. Overview
PCI SATA Bracket &
Internal SATA Cable Power Cord User’s Manual LEDs Description
LINK/ACT
On: HDDS is connected
Off: HDD is not connected
Flash: Access HDD
ERR
On: HDD error
Off: HDD is working
properly
Blinking: HDD is rebuilding
1. Trayless Mobile Racks
2. Tray Latches
3. Tray Locks
4. Rotary Dial Control Panel and LEDs
5. Power LED
6. Power Button
7. eSATA Connector
8. USB2.0 Connector
9. FireWire800 Connectors
10. 3” Cooling Fan
11. Power Connector
12. 115/230 Voltage Switch
RAID
On: RAID volume error
Off: RAID is working
properly
Blinkg: RAID 1 is rebuilding
PWR
On: Power is on
Off: Power is off
4. HW RAID Configuration
3. Rotary switch, Change mode button and LEDs
Configure the storage policy:
To configure the storage policy, set the rotary switch to the desired
position and keep press the recessed “Change Mode” button and
turn on the power to create the new virtual volume.
Change the storage policy:
To change the storage policy, set the rotary switch to
PM (Port Multiplier) position and keep press the recessed Change
Mode Button and turn on the power to delete the old virtual volume.
Turn off the power and proceed the “Configure the storage
policy” again.
1. RAID Rotary Switch
2. Change Mode Button
3. Power & RAID Status LEDs
4. Device Status LED
Rotary Switch & Change Mode Button
5. HW RAID Manager Utility
Note: Using HW RAID Manager Utility to configure the storage
policy
To configure the storage policy, run HW RAID Manager software
and select “Basic RAID Configuration” of “Basic Mode”. And then
choice RAID level and click on “Apply” button.
ezRAID4
Installation Guide
RAID 1 initialization The system will write RIB into both HDD. Managing Disk Failures
Pre‐Requisites for Disk‐Mirroring ‐ Although It is preferable that drives share the same manufacturer and model type, it is not mandatory. ‐ "Target Drive" must be equal or bigger capacity than the "Source Drive". Note: RIB =RAID Information Block. 1. To install two HDDs (Please refer to Installing HDDs) 2. To set the rotary switch to the “R1” position and keep press the recessed “Change Mode” button and turn on the power. When one Hard Disk Drive is broken-down, the Error indicator LED
will turn on, you may know which HDD is broken down. (Please
refer to LEDs Description).
To replace the disk, unmount it from the host (for Windows systems,
use safe removal; for Mac OS, use eject), disconnect the host
connection and power off.
3. The two HDDs will be initialized as a RAID 1 pair.
Note: Any data on the HDDs will be lost.
Formatting hard disk
To partition and format a disk, connect the iMirror525A to the
host through SATA port and perform one of the following.
Windows XP
right-click "My Computer"
click "Manage"
click "Disk Management"
the disk appears in the lower right-hand corner.
See the Windows help for further guidance.
Replace the failing disk with one of equal or large capacity and
power on again.
Mac OS X
When you connect the disk, the operating system should prompt
you to initialize the disk; otherwise, run "Disk Utility".
The "Auto-Rebuild" function will copy the content of the "Source
Drive" into the "Target Drive" automatically. When "Auto-Rebuild" is
completed, the indicator LEDs will return to normal status.
Change the RAID Mode
1. To change the storage policy, set the
rotary switch to PM (Port Multiplier)
position and press the recessed
“Change Mode” button and turn on the
power to delete the old virtual volume.
Turn off the power.
2. To configure the storage policy, set the rotary switch to the
desired position and keep press the recessed “Change Mode”
button and turn on the power to create the new virtual volume.
Note: Press the recessed “Change Mode” button for about 3 ~ 5 seconds
after power on.
For support call 714 558 1808 or email www.datoptic.com
You can also log in to our Forum to get / post tech Note: We recommend that you use a journalled file system, such as
NTFS or journalled MacFS.