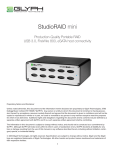
1
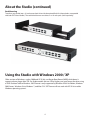
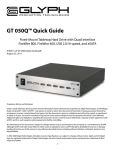
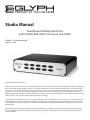
Studio Manual
Fixed-Mount Tabletop Hard Drive
with FireWire 800, USB 3.0 Hi-speed, and eSATA
610036-1.1 Studio Manual.pdf
August 1, 2014
Proprietary Notice and Disclaimer
Unless noted otherwise, this document and the information herein disclosed are proprietary to Glyph Technologies, 3736 Kellogg
Road, Cortland NY 13045 (“GLYPH”). Any person or entity to whom this document is furnished or having possession thereof, by
acceptance, assumes custody thereof and agrees that the document is given in confidence and will not be copied or reproduced
in whole or in part, nor used or revealed to any person in any manner except to meet the purposes for which it was delivered.
Additional rights and obligations regarding this document and its contents may be defined by a separate written agreement with
GLYPH, and if so, such separate written agreement shall be controlling.
The information in this document is subject to change without notice, and should not be construed as a commitment by GLYPH.
Although GLYPH will make every effort to inform users of substantive errors, GLYPH disclaims all liability for any loss or damage
resulting from the use of this manual or any software described herein, including without limitation contingent, special, or incidental liability.
© 2002-2013 Glyph Technologies. All rights reserved. Specifications are subject to change without notice. Glyph and the Glyph
logo are registered trademarks of Glyph Technologies. All other brands and product names mentioned are trademarks of their
respective holders.
1
Contacting Glyph
Please use the following contact information to contact Glyph and its distributors.
Glyph USA offers phone support Monday through Friday, 8:00 am to 5:00 PM Eastern Time.
Note: DO NOT ship any return goods to the mailing addresses below unless you have a valid RMA number.
All goods will be refused delivery unless a valid RMA number is displayed on the outside of the package.
United States of America
Glyph Technologies
3736 Kellogg Rd.
Cortland, NY 13045 USA
Phone: +1 607-275-0345, 1(800) 335-0345
Fax: +1 607-275-9464
www.glyphtech.com
Sales Contact:
[email protected]
Technical Support:
[email protected]
Unpacking Your Studio
Your Glyph Studio and accessories are packaged in a sturdy shipping container. Please inspect the container
for evidence of shipping damage and mishandling. If the container is damaged, file a report with the carrier
or dealer immediately. Do not attempt to unpack and operate your Studio until the carrier or dealer
confirms the damage. If the container is in good condition, proceed with unpacking the Studio. Verify that
all of the items described in the next section are present and in good condition. If any of the items you
expect to find in your container is missing or damaged, contact the dealer before proceeding any further.
In any case, do keep the shipping container and all packing materials in a safe place.
The Studio package includes:
Studio Hard Drive
USB 3.0 Cable
9-Pin FireWire 800 Cable
IEC Power Cable
2
About the Studio
Ports
The Studio enclosure contains a single hard disk drive, and has FW800, USB 3.0 Hi-speed and eSATA connections. Depending on which port(s) your computer has, you can connect the Studio in a number of ways.
The fastest interface on the Studio is eSATA and the USB 3.0 port. Both are located on the rear panel. The
Studio can sustain over 130MB/sec (reads) and over 140MB/s (writes) when connected to a 4-lane PCIe
eSATA card such as the Sonnet E4P. It can sustain 125MB/sec (reads) and 100MB/s (writes) when connected
to a 2-lane PCIe eSATA card such as a Glyph EC2 card. FireWire 800 is the next fastest and there are two
FW800 ports on the rear panel. Officially, these IEEE 1394b ports run at up to 800Mbits/sec. One of these
ports can be connected to your computer, and the other should be connected to other downstream
FireWire devices, if applicable. It doesn’t matter which port you connect to the computer, they are
functionally identical. If your computer has a FireWire 800 port you can use the provided FireWire 800 9-pin
cable. If your computer has a FireWire 400 port only, you can use a FW400 to FW800 adapter cable, which is
available from Glyph. If your computer doesn’t have any FireWire ports you can either purchase a FireWire
or eSATA adapter card (recommended), or use the USB 3.0 port on the back of the Studio.
Front panel LED
The Studio front panel has a single bi-color LED. The LED will display solid blue when power is on. The
LED will flash blue when there is disk activity. The LED will display red if there is a hard drive failure.
Power Switch
The power switch must be held for three seconds to power off the Studio. After three seconds the LED
will turn off, and releasing the button will power off the unit. This is a safety precaution against
unintended power off.
Internal Power Supply
Glyph uses efficient, high-quality power supplies, selected specifically for the demands of production
environments. The Studio has an auto-switching universal power supply. Its input voltage can range from
100- 240v at 50/60 Hz, allowing the Studio to be safely used overseas.
Internal Temperature-Controlled Fan
The Studio has an internal temperature-controlled fan. Software inside the Studio sets the fan RPM to
either HI or LOW speeds. We have found that both HI and LOW fan speeds are very quiet.
3
About the Studio (continued)
Rack Mounting
Transform your Studio into a 1U rack-mount hard drive with the optional Rack Kit (shown below, compatable
with both GPT50 and Studio). The rack kit holds one or two drives in a 1U rack space. (Sold separately).
Using the Studio with Windows 2000 / XP
Older versions of Windows, such as 2000 and XP 32-bit, use Master Boot Record (MBR) which doesn’t
support volumes larger than 2TB. For Studio models that are 3TB or higher, you must format the drive using
a GUID Partition Table in Windows. GUID format is only supported by Windows XP 64-bit Edition, Windows
2003 Server, Windows Vista, Windows 7, and Mac OS X. GPT format will not work with XP 32-bit or older
Windows operating systems.
4
System Requirements
Macintosh Computer with FireWire 400, FireWire 800, USB or eSATA port, or host bus adapter.
FireWire 400 requires OS 8.6 or later
FireWire 800 requires OS 10.2.5 or later
USB 3.0 requires OS 10.6 or later
USB 2.0 requires OS 10.1 or later
USB 1.1 requires OS 8.6 or later
eSATA requires OS 10.2.x or later
Windows Computer with FireWire 400, FireWire 800, USB or eSATA port, or host bus adapter.
FireWire 400 requires Windows ME or later
FireWire 800 requires Windows 2000 or later
USB 3.0 requires Windows XP or later
USB 2.0 requires Windows ME or later
USB 1.1 requires Windows 98 SE or later
eSATA requires Windows XP or later
Setting up the Studio with Mac OS X
Installing the Hardware
1. Position the Studio by placing the unit on a flat, level surface, or install the unit into a rack with the GPT
Rack Kit. Caution: Speakers are magnetic devices; they can harm your data if they’re too close to your hard
drives or tapes.
2. Connect the power cable. Make sure that the power is off on all of your computer equipment and the
Studio. Connect the power cable to the back of the Studio. Plug the three-prong plug into an
appropriate power receptacle, preferably with surge and spike protection.
3. Connect the FireWire, USB or eSATA cable. Plug one end of the cable into your computer’s port, and the
other into the back of the Studio. The two FireWire 800 ports are functionally identical, so it doesn’t
matter which one you use.
4. Power up the Studio and power up your computer.
Mac OS X Formatting Instructions
Since your Studio comes pre-formatted for Macintosh you don’t need to format it on installation. If you decide to reformat or partition your drive at a later date, use Disk Utility (supplied with the Mac OS X
operating system).
Caution: This procedure will destroy any data currently on the drive. Before formatting a drive, move or copy any
important data to another location.
1. Open Disk Utility:
-Single click on an empty space on the desktop.
5
2. From the top tool bar, click “Go” and select “Applications”.
3. When Finder window opens, navigate to “Utilities Folder”.
4. Double click “Disk Utility” to open.
5. Select your Studio drive(s) from the list on the left. The top entry represents the FireWire device and the entry
underneath it represents the volume associated with that device. Click on the top device which will say
something like “XXXGB Glyph Technologies”.
6. Click the “Erase” tab on the right side of the screen.
7. Choose the desired volume format from the drop-down list. Glyph recommends the default “Mac OS
Extended (Journaled)”.
8. Click in the “Name” field and type the desired name for the drive. This name will identify the drive on the
desktop.
9. Click the “Install Mac OS 9 Disk Driver” button if you would like your drive to be compatible with OS 9.
10. Click the “Erase” button to erase your drive. Your new drive should automatically mount on the desktop as
a Glyph volume.
Mac OS 9 Formatting Instructions
Since Glyph drives come pre-formatted for Macintosh you don’t need to format them on installation. If you
decide to reformat or partition your drive at a later date, you can use the Erase Disk command in the Mac
OS 9 operating system. This command will erase all the data on a volume and create a new file system. Erase
disk will not allow you to re-partition a FireWire drive or create a different volume structure than what was
previously there.
Caution: This procedure will destroy any data currently on the drive. Before formatting a drive, save any important
data it contains.
1. Select the volume by clicking on it once in the Finder.
2. Go to the Special menu and select Erase Disk... The Erase Disk dialog box opens to verify your decision to
erase the disk.
3. In the Name field, enter the new name for the disk or leave the name as it is.
4. In the Format drop-down menu, choose an Extended volume and click “Erase”.
Setting up the Studio with Windows
Installing the Hardware
1. Position the Studio by placing the unit on a flat, level surface, or install the unit into a rack with the GPT
Rack Kit. Caution: Speakers are magnetic devices; they can harm your data if they’re too close to your hard
drives or tapes.
2. Connect the power cable. Make sure that the power is off on all of your computer equipment and the
Studio. Connect the power cable to the back of the Studio. Plug the three-prong plug into an
appropriate power receptacle, preferably with surge and spike protection.
6
3. Connect the FireWire, USB or eSATA cable. Plug one end of the cable into your computer’s port, and the
other into the back of the Studio. The two FireWire 800 ports are functionally identical, so it doesn’t
matter which one you use.
4. Power up the Studio and power up your computer.
Windows 2000 / XP / Vista / 7 Formatting Instructions
1. Right-click My Computer and click Manage.
2. In the Computer Management window, under Storage, click Disk Management. The Write Signature wizard pops up, (if the Write Signature Wizard does not pop up, right-click the disk and initialize).
3. Use the wizard to write a signature to the new drive. If you want only one partition we suggest using a
primary partition and selecting the maximum size. In most cases you’ll want to use NTFS volumes, this is the
default for Windows 2000, Windows XP, Vista, 7, and 8. Choose FAT32 if you want to use the drives with
Windows 98 or ME, or if you want to use the drive with Windows and Mac OS 10.5 or lower. Chose exFAT if
you want to use the drive for Windows XP, Vista, 7, 8 and Mac OS 10.6 or higher.
4. Formatting will take a few minutes, after which your drive will be ready to use.
Windows 98 / 98SE Formatting Instructions
1. From your computer’s task bar, go to Start > Programs > MS-DOS Prompt.
2. At the prompt, type fdisk and press Enter. You’ll see a long message about disk support.
3. Enter Y (type Y and press Enter).
4. You are invited to make a choice. Enter 5 to change the current fixed disk drive. MS-DOS displays the connected disk drives.
5. Enter the number of the disk that has no corresponding drive letter.
6. You are invited to make a choice (same list as in Step 3). Enter 1 to create a primary DOS partition. Your
computer verifies the drive’s integrity, after which you are asked to choose whether you want to use all the
space available.
7. Enter Y to opt for using the maximum available space. Your computer again verifies the drive’s integrity.
8. When the drive’s integrity has been verified, press ESC (Escape) three times to exit fdisk.
9. At the prompt, type exit.
10. Restart your computer.
Your new drive is now ready to use.
7
More Information
Studio Features
Brushed, aluminum face plate
Scratch-resistant black powder-coated chassis
Engineered to support professional audio and video applications
125MB/sec sustained transfer rate over eSATA
Internal power supply, no wall wart, internal quiet fan
Bridging Chip
Maximum Transfer Rate
Sustained Transfer Rate
Dimensions
Configuration
Weight
Internal Power Supply
OS Compatibility
Warranty
Sxxx (xxx is equal to total capacity)
(2) 9-pin FW800 rear ports
(1) USB 3.0 Hi-speed rear port
(1) eSATA port
Bridging Chip JMicron
eSATA: 300MB/sec (3Gb/sec)
eSATA: >125MB/sec
H 1.7” x W 8.6” x D 6.5”
Desktop enclosure (rack mount optional)
4 lb. / 1.82 kg
Universal 100-240v 50/60 Hz
Mac OS 8.6, 9.X, 10.X
Microsoft Windows 98SE, ME, 2000, XP, Vista, 7, 8
Modern Unix-based, Linux, or BSD
3 Years Repair or Replace
2 Years Free Basic Data Recovery*
1 Year Overnight Advance Replacement in USA (Continental 48 states)
*While Glyph is not obligated to recover lost data, we always give it our best effort. Nonetheless, we can’t guarantee we’ll always be successful.
Content Creation Applications
Qualified with all major audio production packages that support FireWire storage, including Digidesign Pro
Tools, Steinberg Nuendo and Cubase, Apple Logic, MOTU Digital Performer, Cakewalk Sonar, Sony Vegas and
more...
Configuration
The Studio can be rack mounted in a standard 19-inch rack with Glyph’s optional rack kits. There is a
single kit for mounting one drive, and a dual kit for mounting two Studio drives.
8
About FireWire
FireWire is an implementation of the IEEE 1394 serial bus standard. It not only supports automatic configuration (“plug and play”) and hot-swapping of devices, it’s fast, and best of all it’s reliable for audio/video as
well as for computer peripherals. FireWire supports peripherals in a tree-like structure, and it allows peer-topeer device communication—e.g. between a scanner and a printer—to take place, without using system
memory or the CPU. With FireWire you can hook up to 63 devices to the same bus, with cable lengths of up
to 4.5 meters (14 feet) including internal cabling, allowed between devices. Its cable is convenient and can
also carry power. This allows low-consumption devices to operate without a separate power cord, by using
power supplied by other devices on the bus.
About FireWire 800
• FireWire 800 supports speeds up to 800 Mb/sec, twice as fast as FireWire 400.
• If your computer does not have built-in FireWire 800, you’ll need a PCI card to achieve a true FireWire 800
connection.
• Most 800 ports are Bi-Lingual, which means they speak both FireWire 400 and FireWire 800.
• If you connect a 400 device to an 800 device, you will be running at 400 speed maximum.
• FireWire is forward-compatible and back-compatible, but the bus always runs at the speed of the slowest
link.
• Beta cables are used to connect 800 devices to 800 devices.
• Bi-Lingual cables are available to connect 400 devices to 800 devices.
• Bi-Lingual cables have a 9-pin Bi-Lingual connector at one end and a 4-pin or 6-pin FireWire 400 connector
at the other end
About eSATA
• eSATA is an external interface technology that grew from the internal SATA I interface.
• The Studio’s eSATA port supports speeds up to 1.5 Gb/sec (150 MB/sec), much faster than FireWire 400 or
FireWire 800.
• Shielded eSATA cables up to 2 meters in length are available.
• eSATA cables are different than SATA I cables, they are shielded and cannot be used with internal SATA I
connectors.
• eSATA uses a “point-to-point” connection, therefore each eSATA drive needs to be connected to its own
eSATA port.
• Most computers do not have built-in eSATA, so you’ll need a PCI card to connect your drive with eSATA.
• PCI cards are available with 2 or more ports to accommodate your drives.
Frequently Asked Questions
Q: Do I need any drivers to use the Studio?
No drivers are required to read and write to the drive using FireWire or USB. Your computer must have a
FireWire, USB or eSATA port. You may need drivers if you install an eSATA card, please check the documentation that came with the card.
9
Q: How do I connect the Studio to my eSATA equipped computer?
Use an eSATA cable (not included) between the eSATA port on your computer and the port on the drive. We
strongly recommend you use high quality external SATA cables. Low quality cables do not offer the proper
shielding and durability that high quality cables offer, and may allow data to be corrupted.
Q: How do I connect the Studio to my USB equipped computer?
Use a USB cable between a USB 1.1, 2.0, or 3.0 port on your computer.
Q: My Windows computer doesn’t show the drive in My Computer. What’s up?
The default format on the Studio is for the Macintosh, and Windows doesn’t recognize it. Once you have
connected the Studio to your Windows PC, you have to re-initialize it for use with Windows. For most
ver-sions of Windows, that’s going to be NTFS format; for Win98/SE, that will be FAT32 format.
Instructions for re-initializing your drive are included in this manual.
Q: I’m still running Mac OS 9 or Win/ME. Can I still use the Studio?
Yes. You can connect the USB port on the drive to your OS 9 or Win/ME machine.
For more information, be sure to check out the Glyph website at www.glyphtech.com. There is information
posted there concerning FireWire 800/1394B, as well as information about the rest of Glyph’s product line.
Q: How can I make my drive work across Windows and Mac platforms?
The only file systems that work well between Mac OS and Windows are FAT32 (otherwise known as MSDOS) or exFAT. FAT32 is a native Windows file system, but Mac OS 9 and X will mount FAT32 volumes. Mac
OS 9 and 10.1.x would only work with FAT32 partitions less than 32GB. While Mac OS 10.2.x increased that
limitation to 128GB, it wasn't until Mac OS 10.3.x that you could use FAT32 partitions of any size. Mac OS
10.3.x can additionally read NTFS volumes but cannot write to them. When running Mac OS 10.6.5 or
higher, exFAT becomes an available formatting option. exFAT has the same compatibility as FAT32 EXCEPT,
it does not come with a file size limitation.
Q: How can I use my drive with Windows and Mac Pro Tools systems?
If you are trying to use a hard drive between Windows and Mac Pro Tools systems, FAT 32 will not work for
you because a Mac running Pro Tools can only work with HFS formatted volumes. Your best option is to install MacDrive (www.mediafour.com) on your Windows machine to mount your Mac formatted volumes.
10