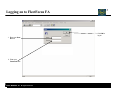
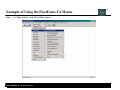
1
FleetFocus User Manual
Released: August 2003
Prepared for:
Office of Vehicle Fleet Management
State of Texas
©2003, MAXIMUS, Inc. All rights reserved.
2
Table of Contents
This manual provides step-by-step instructions for setting up and using FASuite.
Section
Page
I.
GUI Interface/General System Operation
II.
Primary Vehicle Information
19
III.
Subsystems – Parts - Specifications
74
IV.
Warranty
100
V.
Data Entry/Maintenance
116
VI.
Reports
150
©2003, MAXIMUS, Inc. All rights reserved.
3
3
GUI Interface/General System Operation
Section I
©2003, MAXIMUS, Inc. All rights reserved.
4
Section I Contents
Topic
Page
1.
Logging on to FleetFocus FA
5
2.
Changing your FleetFocus Password
6
3.
Example of Using the FleetFocus FA Menus
7
4.
Graphical User Interface
8
5.
Action Buttons
9
6.
Creating Toolbar Buttons
10
7.
Using the Keyboard on the Posting Screens
12
8.
FleetFocus FA GUI Basics – Filter
13
9.
Saving Filters and Sorts
15
10.
Export Data Filters
16
11.
Using the Online Help
17
12.
Saving Grid Columns
18
©2003, MAXIMUS, Inc. All rights reserved.
5
Logging on to FleetFocus FA
3. Click OK to
log on
1. Enter your User
ID here
2. Enter your
Password here
©2003, MAXIMUS, Inc. All rights reserved.
6
Changing your FleetFocus FA Password
System Management
Setup
Access Rights
Change Password
1. Click here to Prepare
for insert.
5. Click here to
process.
2. Type your Old
password.
3. Type your New
password.
4. Type your new
password again
to Verify it.
©2003, MAXIMUS, Inc. All rights reserved.
Example of Using the FleetFocus FA Menus
Data
Shop Activity
©2003, MAXIMUS, Inc. All rights reserved.
Work Order Center
7
8
Graphical User Interface (GUI)
Reports Choice List
Toolbar Buttons
Menu Bar
Communication Indicator
Movement Buttons for the Grid
The Grid
Splitter Bar
The Tabs
Status Bar
Look here for successful
processing or error messages!
©2003, MAXIMUS, Inc. All rights reserved.
Action Buttons
Custom Action Buttons
9
Action Buttons (and Useful Keyboard Shortcuts!)
Get Data
Filter
Define Sort
Prepare for
Insert
Prepare for
Copy
Prepare for
Update
(Ctrl + G)
(Ctrl + F)
(Ctrl + O)
(Ctrl + N)
(Ctrl + Y)
(Ctrl + U)
Unrestricted
Get Data
Restricted
Get Data
Process
Delete
Cancel
(Ctrl + S)
(Ctrl + D)
(Ctrl + Z)
Save
©2003, MAXIMUS, Inc. All rights reserved.
Unlock
Star for Start
Undo
Stop
About
Help Context
(F1)
Stop Data
Retrieval
Screen Specific
On-line Help
Creating Toolbar Buttons
Preferences
Toolbar
©2003, MAXIMUS, Inc. All rights reserved.
Setup
10
11
Creating Toolbar Buttons
Preferences
Toolbar
Setup
1. Navigate to screen
4. Click here to
process.
2. Click Add
3. Repeat for each screen
you want to create a
button for.
5.
When all toolbar buttons are the way you want them, go to
Preferences
©2003, MAXIMUS, Inc. All rights reserved.
Toolbar
Save
to save your changes!
Using the Keyboard on the Posting Screens
12
You can use the keyboard commands and shortcuts to make the data entry easier!
Remember to use the keyboard shortcuts for the Action Buttons too!
•
Ctrl + F for the Filter
•
Ctrl + N for Prepare for
Insert
•
Ctrl + U for Prepare for
Update (Unlock)
•
Ctrl + S for Process
(Save)
•
Ctrl + Z for Cancel
•
Ctrl + [SPACE] to move
into the group fields
F4 shows you the
Choice Lists.
Press Alt +
to move
from tab to tab on a screen
Press Ctrl + B to remove
an entire line of data
BEFORE you process (you
cannot remove or change
the line of data AFTER you
process)
Use SHIFT-TAB to move
Use the TAB key to move
backward through these
forward through these
columns or fields.
columns or fields.
Use Shift + ‘ (Shift + Quote) to copy the value in the field
above. For example, you can use this shortcut when
entering multiple lines of labor data and need to enter the
same Employee ID on all lines.
©2003, MAXIMUS, Inc. All rights reserved.
Use the SPACE
BAR to mark and
unmark
checkboxes
13
FleetFocus FA GUI Basics - Filter
On any screen, use the Filter button to look up data that is already in the system. Clicking this button
brings up a “request form” that you fill out in order to limit the data displayed.
Fleet Equipment screen
List of equipment units with
Equipment ID 103
Fleet Equipment screen
List of Ford equipment units assigned to
Repair location 01
In any filter dialog box, click the Get Data
button to fill the grid with matching data
©2003, MAXIMUS, Inc. All rights reserved.
Work Order Center screen
Open repair orders at Repair location 01
FleetFocus FA GUI Basics - Filter (continued)
Choice Lists and Wildcards
Choice Lists
Click the button at the right of the field to display a
list of valid choices.
Wildcards: % and _
% = “anything”
All equipment IDs starting with F00:
All equipment with asset numbers ending with 01:
All equipment with serial numbers containing 1X05:
Enter starting value(s) to limit the choice list.
_ = “any single character”
All equipment with 4-character repair locations
starting with 503:
All equipment with 5-character maintenance classes
starting with 83 and ending with 06:
©2003, MAXIMUS, Inc. All rights reserved.
14
Saving Filters and Sorts
Preferences
Filter/Sort
1. On Any screen, use
the filter and sort
buttons to display
the data how you
would like to see it
2. Navigate to the path
listed above and
choose:
Save Current
3. Enter a Name for
the saved Filter/Sort
4. Click OK
©2003, MAXIMUS, Inc. All rights reserved.
Save Current
15
Export Data Features
The Export Data button on the Tool bar provides the ability to export the information in the Grid.
Steps to using the Export Data button are:
1. Use the Filter to select the data you desire to export.
2. Click the down arrow on the Data Export Button and
select the destination where you want the data sent. You can
choose the clipboard or file option. Also, you can choose to
export the data as delimited or fixed length.
3. After you select the destination, re-click the Export
Data Button and the data is exported to your destination. If
you selected the file option, an Export Data Save box will
open, and you can select the file path.
4. The file you save may be opened in other applications.
If you selected the clipboard destination, you can Paste the
file in to applications that support the cut/copy/paste
functions.
©2003, MAXIMUS, Inc. All rights reserved.
16
Using FleetFocus FA Online Help
Help
Contents
FleetFocus FA includes a
modern online Help facility
which offers:
• Quick lookup tools for
explanations of a single item
on a screen
• Instructions for how to
accomplish tasks
• Comprehensive descriptions of
what FleetFocus FA does
when it processes entries and
generates displays
• A full set of hypertext links,
which makes it easy to move
from one Help topic to another
Remember that F1
is the shortcut to
open the online
Help system!
©2003, MAXIMUS, Inc. All rights reserved.
17
18
Saving Grid Columns
Preferences
States
Grid Columns
1. On Any screen, drag
the grid columns to
be in the order you
wish to see the data
2. Navigate to the path
listed above and
choose Save to
save your settings.
©2003, MAXIMUS, Inc. All rights reserved.
Save
19
Primary Vehicle Information
Section II
©2003, MAXIMUS, Inc. All rights reserved.
20
Section II Contents
Topic
Page
1.
Fleet Equipment
21
2.
Components
58
3.
Locations
70
©2003, MAXIMUS, Inc. All rights reserved.
21
Fleet Equipment
Data
Equipment Units
©2003, MAXIMUS, Inc. All rights reserved.
Fleet Equipment
22
Fleet Equipment – Basic Info
Data
Equipment Units
Highlighted fields are
required upon insert.
•
•
•
•
•
•
Equipment ID
Model year
Manufacturer ID
Model ID
Equipment type
Description
©2003, MAXIMUS, Inc. All rights reserved.
Fleet Equipment
(Basic Info tab)
23
Fleet Equipment – Basic Info
State of Texas Required Fields
FleetFocus Field
Name
State of Texas Required
Data
Definition
Equipment ID
Agency Number
Three-digit state agency number as defined by the Texas Comptroller of
Public Accounts. Enter as the first three digits of the Equipment ID
Equipment ID
Primary Location
Up to three digit location code for the facility, region, district, or section
to which the vehicle is assigned. Enter as the fourth through sixth digits
of the equipment ID. Enter as ‘000’ if no location code is assigned.
Year
Year
Year in which vehicle was manufactured. Enter year as a four digit
number.
Manufacturer
Make/Manufacturer
Vehicle manufacturer. Select manufacturer’s name from choice list
provided. Field will display only the first four letters of the
manufacturer’s name.
Model
Model
Vehicle model. Select model name from choice list provided.
Serial Number
Vehicle Identification
Number (VIN)
Vehicle identification number as defined by the manufacturer. VIN
should be provided in the vehicle’s purchase materials and marked on the
vehicle.
©2003, MAXIMUS, Inc. All rights reserved.
24
Fleet Equipment – Basic Info
State of Texas Required Fields
FleetFocus Field
Name
State of Texas Required
Data
Definition
Asset Number
SPA Number
State Property Accounting number. If you do not have access to SPA, you
agency’s property manager can provide this information. Enter SPA
number as provided
PM Program Type
PM Program Type
Select one of the following three options as provided:
Class – Select when standard maintenance will be provided on the vehicle
Individual – Select when an agency specific PM schedule is being defined
on the vehicle
None – Select when no maintenance is required on the vehicle.
Equipment Type
Purpose
Vehicle’s primary purpose. Select vehicle’s primary purpose from choice
list provided:
Staff Transport
Client Transport
Materials Transport
Law Enforcement
Emergency
Safety
Construction
Maintenance
©2003, MAXIMUS, Inc. All rights reserved.
Fleet Equipment – Meter Info
Data
Equipment Units
Highlighted fields are
required upon insert.
When a Meter Class is
selected the meter types for
Meters 1 and 2 will
automatically be displayed.
This tab tracks the latest meter
readings for the equipment unit
as well as meter history for the
equipment unit. FASuite will
manage meter roll-overs and
meter resets/change outs.
Roll-overs are determined
based on the Maximum meter
value entered here. Be sure
this is entered correctly for the
equipment unit.
The Life Total at the bottom of
the screen shows the total of all
meters for the life of the vehicle.
©2003, MAXIMUS, Inc. All rights reserved.
Fleet Equipment (Meter Info tab)
25
26
Fleet Equipment – Meter Info
State of Texas Required Fields
FleetFocus Field Name
State of Texas Required
Data
Definition
Equipment class for meter types
Meter Type
Type of use tracked by the vehicle’s odometer, calculated in either
miles or hours. Select appropriate meter type from choice list
provided:
Miles Only - Meters miles only
Hours Only - Meters hours only
Miles/Hours - Primary meter is miles
Hours/Miles - Primary meter is hours
Meter at Delivery
In-service Odometer
Enter odometer reading at time vehicle is entered into state service.
Latest meter reading
Odometer reading
System will update odometer reading as needed from work order
center, fuel tickets and ending month odometer reading.
Latest meter date
Odometer reporting date
Date of last odometer reading. The application will fill this field
automatically when a new meter reading is entered.
©2003, MAXIMUS, Inc. All rights reserved.
Fleet Equipment - Classes
Data
Equipment Units
Highlighted fields are
required upon insert.
Maintenance Class – This class
is used to compare equipment
costs for like equipment units,
and to define comeback ranges.
PM Program Class – This class
tracks vehicles with like PM
patterns and checklists.
Funding Source – This class
identifies the type of funds used
to procure the vehicle
Rental Rates Class – This class
specifies the rates you charge
for usage of the vehicle,
especially on a long term rental.
Resources Class – This class
specifies the parts, skills, bays,
and tools required for each task.
Skill, bay, and tool requirements
are currently used only by the
Shop Scheduling module.
©2003, MAXIMUS, Inc. All rights reserved.
Fleet Equipment (Classes tab)
27
28
Fleet Equipment - Classes
State of Texas Required Fields
FleetFocus Field
Name
State of Texas
Required Data
Definition
Equipment Class for
Maintenance
Vehicle Class
Vehicle type as defined by SPA class codes. Select appropriate class
code from choice list provided.
Equipment Class for PM
Program
PM Schedule
Preventative maintenance schedule. Select PM schedule from choice list
provided.
Funding Source
Procurement Funding Source
Source of funds for vehicle purchase. Select appropriate funding source
from choice list provided.
Equipment Class for
Rental Rates
Not Required by State of
Texas
Select NONE from choice list provided
Equipment Class for
Resources
Not Required by State of
Texas
Select NONE from choice list provided
©2003, MAXIMUS, Inc. All rights reserved.
Fleet Equipment - Locations
Data
Equipment Units
Highlighted fields are
required upon insert.
Assigned PM and Repair
locations should be filled in if
the vehicle is primarily serviced
at a particular location.
Access Rights field must be
filled with the correct agency
location information to ensure
you continue to have access to
the vehicle’s information.
©2003, MAXIMUS, Inc. All rights reserved.
Fleet Equipment (Locations tab)
29
Fleet Equipment - Assignments
Data
Equipment Units
Highlighted fields are
required upon insert.
If a vehicle is permanently
assigned to an Operator, that
information can be tracked on
this tab.
FASuite also tracks the
Department a vehicle is
assigned to and which
Department to notify for PM.
If the vehicle is on temporary
loan, that can be tracked as
well.
©2003, MAXIMUS, Inc. All rights reserved.
Fleet Equipment (Assignments tab)
30
31
Fleet Equipment - Assignments
State of Texas Required Fields
FleetFocus Field
Name
State of Texas Required
Data
Definition
Operator Name
Assignment Detail
Individual or group to which vehicle is assigned. If vehicle is assigned
to an individual, enter operator’s name and title. If vehicle is assigned
to a division or program, enter group name.
Department ID
Assignment
Designates vehicle as assigned to an individual, group or motor pool.
Select appropriate vehicle designation from choice list provided:
M - Motorpool
O - Assigned to Organization
I - Assigned to Individual
G - General Use
Department to Notify
for PM
Department to Notify for PM
Select NM – Notify Maintenance for PM.
Agency Equipment ID
Agency Specific Equipment
Number
Agency specific equipment number if unique from SPA, license plate
or system equipment numbers. Enter agency specific equipment
number if unique from SPA, license or system equipment numbers.
Allow Commute to
Home
Commute to Home
Designation of vehicle to be used to commute to and from an
employee’s home. Check box if assigned user is authorized to use the
vehicle to commute to and from his/her home.
©2003, MAXIMUS, Inc. All rights reserved.
Fleet Equipment - Status
Data
Equipment Units
Highlighted fields are
required upon insert.
The Life Cycle Status Code is
required when creating a new
Equipment Unit in FASuite.
Change this ID to track the
vehicle during its life cycle.
Note: Checking Ready for
disposition will display a
message on every work order
opened for that vehicle noting
that the equipment is about to
be disposed.
©2003, MAXIMUS, Inc. All rights reserved.
Fleet Equipment (Status tab)
32
33
Fleet Equipment - Status
State of Texas Required Fields
FleetFocus Field
Name
State of Texas Required
Data
Definition
Life Cycle Status Code
Life Cycle Status Code
Select appropriate vehicle designation from choice list provided:
A – Active
I - Inactive
P – Pending Sale/Disposal
R – Retired
©2003, MAXIMUS, Inc. All rights reserved.
Fleet Equipment - Authorization
Data
Equipment Units
Highlighted fields are
required upon insert.
Use this tab to authorize the
vehicle for Work orders, Usage
tickets and/or Fuel tickets.
Once the vehicle is disposed,
you can also choose to exclude
the vehicle from various reports
by checking the boxes on this
tab.
©2003, MAXIMUS, Inc. All rights reserved.
Fleet Equipment (Authorization tab)
34
Fleet Equipment - Comments
Data
Equipment Units
Highlighted fields are
required upon insert.
The Comments section on this
tab can be used to track
miscellaneous information about
the equipment unit.
Any information entered in the
Messages field will be
displayed on every work order
opened for that vehicle.
©2003, MAXIMUS, Inc. All rights reserved.
Fleet Equipment (Comments tab)
35
36
Fleet Equipment - Comments
State of Texas Required Fields
FleetFocus Field
Name
State of Texas Required
Data
Definition
Use Description
Primary Purpose Narrative
Detailed description of the primary purpose of the vehicle,
providing enough information to justify a need for the vehicle.
©2003, MAXIMUS, Inc. All rights reserved.
Fleet Equipment - Warranty
Data
Equipment Units
Highlighted fields are
required upon insert.
In order to track bumper to
bumper warranty for a vehicle,
the following fields on this tab
must be completed:
• Vendor ID
• Expiration date
• Expiration life meter 1
• Expiration life meter 2
(optional)
©2003, MAXIMUS, Inc. All rights reserved.
Fleet Equipment (Warranty tab)
37
38
Fleet Equipment - Warranty
State of Texas Required Fields
FleetFocus Field
Name
State of Texas Required
Data
Definition
Expiration Date
Warranty Expiration Date
Enter date vehicle warranty will expire. Include the cumulative warranty
time if extended warranty purchased.
Expiration Life Meter 1
Warranty Expiration Meter
Enter mileage point triggering warranty expiration.
©2003, MAXIMUS, Inc. All rights reserved.
Fleet Equipment – Replacement and Disposition
Data
Equipment Units
Highlighted fields are
required upon insert.
This tab is used to plan for
equipment replacement and
stores data concerning the
vehicle’s disposition.
©2003, MAXIMUS, Inc. All rights reserved.
Fleet Equipment (Replacement and Disposition tab)
39
Fleet Equipment – Replacement and Disposition
State of Texas Required Fields
FleetFocus Field
Name
State of Texas Required
Data
Definition
Planned Retirement Date
Replacement Schedule
Expected date of vehicle replacement based on State Vehicle Fleet
Management Plan replacement guidelines. Enter the anticipated
replacement date calculated by applying plan replacement guidelines to
the vehicle in-service date.
Retirement Date
Out-of-Service Date
Date vehicle was permanently removed from agency service. Do not
use this field to track vehicle down time for repair or other service.
Disposition Date
Disposal Date
Enter date vehicle was sold or ownership was transferred.
Sale Price
Disposal Price
Gross vehicle sale price or total value of other disposal methods. Enter
dollar value of vehicle sale or disposal. Do not enter negative values.
Net Disposal Value
Net Disposal Value
Sale price less any incidental expenses related to the disposal process.
Enter disposal value less any incidental expenses related to disposal.
©2003, MAXIMUS, Inc. All rights reserved.
40
Fleet Equipment – Additional Data
Data
Equipment Units
This tab is display only
This tab will display any optional
features stored in the
Subsystems and Parts section
for this vehicle. Subsystems
and Parts can be assigned to a
vehicle based on Equipment ID,
Equipment type, or
Maintenance class.
©2003, MAXIMUS, Inc. All rights reserved.
Fleet Equipment (Additional Data tab)
41
Fleet Equipment – Class PM Program
Data
Equipment Units
Highlighted fields are
required upon insert.
When ready to manage
standardized PM Program, a
vehicle will be assigned to a PM
Class. Before FASuite will
begin tracking PMs, this tab
needs to be completed with the
following information:
• Next PM service number
• Next PM due date
• Life meter at last PM
These values initiate the PM
schedule for this equipment
unit.
©2003, MAXIMUS, Inc. All rights reserved.
Fleet Equipment (Class PM Program tab)
42
Fleet Equipment - Inspections
Data
Equipment Units
Highlighted fields are
required upon insert.
Each vehicle will have its annual
inspection tracked on this tab in
the Additional Inspections group
field.
To initialize
Inspections:
1. In the Additional
Inspections area select
the Inspection
service(s) that need to
be performed on this
unit.
2. For each service
selected insert the
following:
•Next due date
•Interval between
inspections (in days)
©2003, MAXIMUS, Inc. All rights reserved.
Fleet Equipment (Inspections tab)
43
Fleet Equipment - Codes
Data
Equipment Units
Highlighted fields are
required upon insert.
Use this tab to track the Fuel
types and Default priority for
work performed on the vehicle.
©2003, MAXIMUS, Inc. All rights reserved.
Fleet Equipment (Codes tab)
44
45
Fleet Equipment - Codes
State of Texas Required Fields
FleetFocus Field
Name
State of Texas Required
Data
Definition
Fuel Type 1
Primary Fuel Type
Primary fuel used to power the vehicle. Select appropriate fuel from
choice list provided:
BDL – Biodiesel
CNG – Compressed Natural Gas
DSL – Diesel
ELE – Electricity
ETH – Ethanol
GAS – Gasoline
LPG – Propane
MTH - Methanol
Quantity of Tires
Number of Tires
Number of tires needed to operate vehicle. Number excludes any spare
tires carried on the vehicle. Enter number of tires.
©2003, MAXIMUS, Inc. All rights reserved.
Fleet Equipment – Recurring Costs
Data
Equipment Units
Highlighted fields are
required upon insert.
Any costs entered on this tab
will be posted to the historical
costs for the vehicle each time
End of Month Processing is
performed.
©2003, MAXIMUS, Inc. All rights reserved.
Fleet Equipment (Recurring Costs tab)
46
Fleet Equipment – Credit Cards
Data
Equipment Units
Highlighted fields are
required upon insert.
This tab tracks Credit Card
assignments for a vehicle.
When a new credit card is
entered, a new line is created in
the group field.
©2003, MAXIMUS, Inc. All rights reserved.
Fleet Equipment (Credit Cards tab)
47
Fleet Equipment - Acquisition
Data
Equipment Units
Highlighted fields are
required upon insert.
This tab tracks the acquisition
of the vehicle. The Actual
delivery date and Actual in
service date are required for
active vehicles.
In order to have FASuite
automatically calculate
depreciation, the Original cost
and Capitalized value (if
applicable) must be entered on
this tab (see FASuite Help for
depreciation calculation
definition).
©2003, MAXIMUS, Inc. All rights reserved.
Fleet Equipment (Acquisition tab)
48
49
Fleet Equipment - Acquisition
State of Texas Required Fields
FleetFocus Field
Name
State of Texas Required
Data
Definition
Original Cost
Acquisition Cost
Original cost to acquire vehicle. Cost excludes components or add-ons
not part of the original purchase agreement. Cost of transferred vehicles
is the book value carried in SPA. Enter dollar value of acquisition.
In Service Date - Actual
In-service Date
Enter date vehicle entered into use for agency operations.
Delivery Date - Actual
Acquisition Date
Date vehicle was accepted or received. For new vehicles, enter date
vehicle was accepted or received. For transferred vehicles, enter date
vehicle was delivered.
Outfitting Cost
Added Equipment Cost
After market vehicle additions, such as tool boxes, cargo racks, light
bars, radios, etc. Enter total dollar value of all equipment added to
vehicle.
Capitalized Value
Capitalized Value
Total cost of vehicle (new or transferred) including conversions,
components, and/or add-ons affixed to the vehicle. Enter dollar amount
of vehicle’s capitalized value.
©2003, MAXIMUS, Inc. All rights reserved.
Fleet Equipment - Registration
Data
Equipment Units
Highlighted fields are
required upon insert.
This tab tracks registration
information for the vehicle.
©2003, MAXIMUS, Inc. All rights reserved.
Fleet Equipment (Registration tab)
50
51
Fleet Equipment - Registration
State of Texas Required Fields
FleetFocus Field
Name
State of Texas Required
Data
Definition
License Number
License Plate Number
License plate number as listed on vehicle registration. Enter license
plate number as provided.
©2003, MAXIMUS, Inc. All rights reserved.
Fleet Equipment – Ownership/Depreciation
Data
Equipment Units
Highlighted fields are
required upon insert.
This tab tracks ownership and
depreciation information for the
vehicle.
©2003, MAXIMUS, Inc. All rights reserved.
Fleet Equipment (Ownership/Depreciation tab)
52
Fleet Equipment – Ownership/Depreciation
State of Texas Required Fields
FleetFocus Field
Name
State of Texas Required
Data
Definition
Depreciation Method
Depreciation Rate
Rate at which vehicle’s value will be depreciated. Select straight line
depreciation from choice list provided.
Salvage Value
Current Book Value
Book value of vehicle as carried in SPA system. Enter book value as
carried in SPA System at time of disposal.
©2003, MAXIMUS, Inc. All rights reserved.
53
Fleet Equipment – Wizard
Data
Equipment Units
Click on the New
equipment unit button.
©2003, MAXIMUS, Inc. All rights reserved.
Fleet Equipment
54
Fleet Equipment – Wizard
Data
Equipment Units
FASuite will guide you
through a series of
dialog boxes that let you
quickly enter required
information and create a
new record. After you
complete the Wizard,
the Fleet Equipment
screen validates the
data by placing the
information in the
appropriate fields and
displays them before
processing. This allows
you to add additional
information as required.
©2003, MAXIMUS, Inc. All rights reserved.
Fleet Equipment
55
Fleet Equipment – De-Activating Equipment
Data
Equipment Units
1. Use the Filter to limit the
display to the equipment ID you
want.
2. Click Unlock.
3. Uncheck the following
boxes:
•Work orders
•Usage Tickets
•Fuel Tickets
4. Check the following “Exclude
from” boxes:
•Cost reports
•Exception reports
•Inventory Lists
NOTE: When you change the
Life cycle status code ID (on the
Status tab) from “active” to not
“active”, FASuite will
automatically check the Exclude
from inventory lists box for you.
©2003, MAXIMUS, Inc. All rights reserved.
Fleet Equipment (Authorization tab)
56
Fleet Equipment – De-Activating Equipment (continued)
Data
Equipment Units
Fleet Equipment (Status tab)
4. Enter a Life cycle status
code ID field to de-activate the
equipment unit.
Changing to a life cycle code
that is not active frees up one
active equipment license and
ensures that no work orders,
fuel tickets or usage tickets can
be posted against that unit.
5. Click the Process button.
©2003, MAXIMUS, Inc. All rights reserved.
57
58
Components
Data
Equipment Units
Should this item be
a Component?
• The item has its own
identification
measures such as a
serial number or
meter
• You want to track
information and
costs about the item
separately
• The item may or
may not be
attached to or
associated with an
equipment unit
• The item does not
have any licensing
or registration
©2003, MAXIMUS, Inc. All rights reserved.
Component
Primary Information
59
Components – Basic Info
Data
Equipment Units
Highlighted fields are
required upon insert.
•
•
•
•
•
•
Equipment ID
Model year
Manufacturer ID
Model ID
Equipment type
Description
©2003, MAXIMUS, Inc. All rights reserved.
Component
Primary Information (Basic Info tab)
60
Components – Meter Info
Data
Equipment Units
Highlighted fields are
required upon insert.
When a Meter Class is
selected the meter type for
Meters 1 will automatically be
displayed.
This tab tracks the latest meter
reading for the component as
well as meter history for the
component. FASuite will
manage meter roll-overs and
meter resets/change outs.
Roll-overs are determined
based on the Maximum meter
value entered here. Be sure
this is entered correctly for the
component.
The Life Total at the bottom of
the screen shows the total for
the life of the vehicle.
©2003, MAXIMUS, Inc. All rights reserved.
Component
Primary Information (Meter Info tab)
61
Components - Classes
Data
Equipment Units
Highlighted fields are
required upon insert.
Maintenance Class – This class
is used to compare costs for like
equipment, and to define
comeback ranges.
PM Program Class – This class
tracks components with like PM
patterns and checklists.
Funding Source – This class
identifies the type of funds used
to procure the component.
Rental Rates Class – This class
specifies the rates you charge
for usage of the component,
especially on a long term rental.
Resources Class – This class
specifies the parts, skills, bays,
and tools required for each task.
Skill, bay, and tool requirements
are currently used only by the
Shop Scheduling module.
©2003, MAXIMUS, Inc. All rights reserved.
Component
Primary Information (Classes tab)
62
Components - Locations
Data
Equipment Units
Highlighted fields are
required upon insert.
Assigned PM and Repair
locations should be filled in if
the component is primarily
serviced at a particular location.
©2003, MAXIMUS, Inc. All rights reserved.
Component
Primary Information (Locations tab)
63
Components - Assignments
Data
Equipment Units
Highlighted fields are
required upon insert.
If a component is permanently
assigned to an Operator, that
information can be tracked on
this tab.
FASuite also tracks the
Department a component is
assigned to and which
Department to notify for PM.
©2003, MAXIMUS, Inc. All rights reserved.
Component
Primary Information (Assignments tab)
64
Components - Status
Data
Equipment Units
Highlighted fields are
required upon insert.
The Life Cycle Status Code is
required when creating a new
Component in FASuite. Change
this ID to track the component
during its life cycle.
Note: Checking Ready for
disposition will display a
message on every work order
opened for that component
noting that it is about to be
disposed.
©2003, MAXIMUS, Inc. All rights reserved.
Components
Primary Information (Status tab)
65
Components - Authorization
Data
Equipment Units
Highlighted fields are
required upon insert.
Use this tab to authorize the
component for Work orders,
Usage tickets and/or Fuel
tickets. Once the component is
disposed, you can also choose
to exclude the component from
various reports by checking the
boxes on this tab.
©2003, MAXIMUS, Inc. All rights reserved.
Components
Primary Information (Authorization tab)
66
Components – Class PM Program
Data
Equipment Units
Highlighted fields are
required upon insert.
When ready to manage
standardized PM Program, a
component will be assigned to a
PM Class. Before FASuite will
begin tracking PMs, this tab
needs to be completed with the
following information:
• Next PM service number
• Next PM due date
• Life meter at last PM
These values initiate the PM
schedule for this component.
©2003, MAXIMUS, Inc. All rights reserved.
Components
Primary Information (Class PM Program tab)
67
Components - Codes
Data
Equipment Units
Highlighted fields are
required upon insert.
Use this tab to track the Fuel
types and Default priority for
work performed on the vehicle.
©2003, MAXIMUS, Inc. All rights reserved.
Components
Primary Information (Codes tab)
68
Components - Acquisition
Data
Equipment Units
Highlighted fields are
required upon insert.
This tab tracks the acquisition
of the component. The Actual
delivery date and Actual in
service date are required for
active components.
In order to have FASuite
automatically calculate
depreciation, the Original cost
and Capitalized value (if
applicable) must be entered on
this tab (see FASuite Help for
depreciation calculation
definition).
©2003, MAXIMUS, Inc. All rights reserved.
Components
Primary Information (Acquisition tab)
69
Components - Warranty
Data
Equipment Units
Highlighted fields are
required upon insert.
In order to track bumper to
bumper warranty for a
component, the following fields
on this tab must be completed:
• Vendor ID
• Expiration date
• Expiration life meter 1
©2003, MAXIMUS, Inc. All rights reserved.
Components
Primary Information (Warranty tab)
70
Locations
Data
Setup
Organizational Setup
©2003, MAXIMUS, Inc. All rights reserved.
Locations
71
Locations – Basic Info
Data
Setup
Organizational Setup
When entering a new
location, be sure to enter
as much information as
possible.
Location ID must be a
unique value and the
Name field is also
required.
©2003, MAXIMUS, Inc. All rights reserved.
Locations (Basic Info tab)
72
Locations – Basic Info
State of Texas Required Fields
FleetFocus Field
Name
State of Texas Required
Data
Definition
Address – Line 1
Street Address
Enter the street address
Address – Line 2
City
Enter the city
Address – Line 3
State
Enter the state
Address – Line 4
Zip
Enter the zip code
©2003, MAXIMUS, Inc. All rights reserved.
73
Locations – Functions
Data
Setup
Organizational Setup
Specify the function this
location will serve. The
function(s) specified will
dictate fields on other tabs
that will also need to be
completed.
©2003, MAXIMUS, Inc. All rights reserved.
Locations (Functions tab)
74
Subsystems - Parts - Specifications
Section III
©2003, MAXIMUS, Inc. All rights reserved.
75
Section III Contents
Topic
Page
1.
Subsystems and Parts
77
2.
Specifications
81
3.
Adding a New Part
89
4.
Parts Primary
90
5.
Parts Location
92
6.
Parts Inventory Adjustments
96
7.
Vendor/Part Information
97
8.
Parts Cross-references
99
©2003, MAXIMUS, Inc. All rights reserved.
Subsystems and Parts - Overview
Data
Equipment Units
76
Subsystems and Parts
An equipment unit or equipment type may have many subsystems such as body, engine, transmission, fuel,
air, brakes, etc. Typically, subsystems have their own identification measures such as a serial number or
meter, and are fixed (cannot be moved from one equipment unit to another). You usually do not want to track
information about them separately from the equipment unit of which they are a part.
The purpose of the Subsystems and Parts screen is to assign subsystems and parts to equipment types and
equipment units, and to define the properties (elements) that the subsystems consist of.
EXAMPLE: You can define a fuel system as a subsystem of equipment type diesel bus (or of equipment unit
#001). You can then define parts for the subsystem, such as fuel filter, fuel pump, fuel cap, fuel key number,
etc.
Remember, much of the information about a vehicle is equipment type specific. Enter general information
once for an equipment type instead of entering it for each vehicle.
What will this screen do for you?
• Allows users to find answers to questions about specifications such as "Which units have Detroit Diesel
series 60 engines?"
• Allows users to build their recall campaigns by Subsystem or Property.
• Allows users to "share" specification information on the Equipment Primary tab to support maintenance staff
inquires without them needing to know anything more than use a Zoom button from Work order center.
• Allows a coding structure with Property IDs that can mimic VMRS Repair Groups.
• Allows a "Template" approach using the copy key to add needed data for new Equipment units.
©2003, MAXIMUS, Inc. All rights reserved.
77
Subsystems and Parts - Entry
Data
Equipment Units
Subsystems and Parts
1. Click Prepare for insert.
2. Enter the Equipment ID.
3. Enter the Subsystem.
4. Under the Property
column, enter the
subsystems that you want
to enter data for (engine
size, tire, etc).
5. In the Description
column, enter the values
for each property entered
in step 4.
6. Place a check in the
Display on equipment
primary checkbox for all
data you want to display on
the Additional Data tab of
the Fleet Equipment
screen.
7. Click Process to save entry.
… and Day to Day
©2003, MAXIMUS, Inc. All rights reserved.
78
Fleet Equipment – Subsystems and Parts
State of Texas Required Fields
FleetFocus
Subsystem
FleetFocus
Property
FleetFocus
Description
State of Texas
Required Data
Definition
Engine
Size
Key actual
displacement
Engine Size
Engine size, in either liters or cubic inches as
provided by the manufacturer.
Engine
Qty Cylinders
Key number of
cylinders.
Number of
Cylinders
Number of cylinders as provided by the
manufacturer.
Transmission
Transmission
‘Automatic’ or
‘Manual.’
Transmission
Designation of manual or automatic transmission.
Attributes
Wheel
Key ‘4 wheel drive’,
‘2 wheel drive’
Drive Type
Designation of 2-wheel or 4-wheel drive.
Tire Size
Tire
Key actual size.
Tire Size
Tire specifications as provided by the vehicle
manufacturer.
For all entries – check “Display on Equipment Primary” field
©2003, MAXIMUS, Inc. All rights reserved.
Fleet Equipment – Subsystems and Parts (continued)
State of Texas Required Fields
FleetFocus
Subsystem
FleetFocus
Property
FleetFocus
Description
State of Texas
Required Data
Definition
Attributes
Description
Enter emissions
rating in following
format: # VER
Vehicle Emissions
Rating
Vehicle emissions rating (VER) as provided by the
manufacturer.
Attributes
Description
Enter average
mileage in following
format: ## / ##
(city/highway
average miles)
EPA MPG Rating
Average mileage in both the city and highway as
approved by the EPA and provided by the
manufacturer.
Parts
Select
applicable
option from
choice list, if
unavailable
select
1,2,3,etc.
Key additional
detailed information
as appropriate.
Factory Installed
Options
Optional equipment or vehicle specifications
installed by the manufacturer prior to purchase or
delivery.
For all entries – check “Display on Equipment Primary” field
©2003, MAXIMUS, Inc. All rights reserved.
79
Fleet Equipment - Additional Data Information
Data
Equipment Units
All Subsystems and Properties
created with a check in the
Display on equipment
primary checkbox (see page
29) will display on the
Additional Data tab of the
Fleet Equipment screen.
NOTE: Additional rows on this
tab will slow the retrieval of data
on this screen, so only mark the
subsystems and properties that
are necessary to see here.
©2003, MAXIMUS, Inc. All rights reserved.
Fleet Equipment (Additional Data tab)
80
Specifications – Basic Info
Data
Equipment Units
General specifications about an
equipment unit may be entered
on this tab.
©2003, MAXIMUS, Inc. All rights reserved.
Specifications (Basic Info tab)
81
82
Specifications – Basic Info
State of Texas Required Fields
FleetFocus Field
Name
State of Texas Required
Data
Definition
Wheelbase
Wheelbase
Vehicle’s wheelbase measurement as provided by the manufacturer.
Enter wheelbase measurement as provided.
Passengers
Passenger Capacity
Enter total number of passengers vehicles can carry, including the
driver.
©2003, MAXIMUS, Inc. All rights reserved.
Specifications – Weights
Data
Equipment Units
Use this tab to enter weight
information.
©2003, MAXIMUS, Inc. All rights reserved.
Specifications (Weights tab)
83
84
Specifications – Weights
State of Texas Required Fields
FleetFocus Field
Name
State of Texas Required
Data
Definition
GVWR
GVWR
Gross Vehicle Weight Rating (GVWR) as provided by the
manufacturer. Enter GVWR as provided.
©2003, MAXIMUS, Inc. All rights reserved.
Specifications – Capacities
Data
Equipment Units
Use this tab to enter fuel and
fluid capacities.
NOTE: The values entered on
this tab will be validated when
processing fuel and fluids.
©2003, MAXIMUS, Inc. All rights reserved.
Specifications (Capacities tab)
85
86
Specifications – Capacities
State of Texas Required Fields
FleetFocus Field
Name
State of Texas Required
Data
Definition
Oil (Capacity and Unit)
Engine Oil Capacity
Quarts or liters of oil engine holds. Enter numerical amount of oil
capacity in capacity sub-field. If oil capacity is measured in quarts,
enter ‘Q’ in unit sub-field. If oil capacity is measured in liters, enter
‘L’ in unit sub-field.
Transmission Fluid
(Capacity and Unit)
Transmission Fluid Capacity
Quarts or liters of fluid the transmission holds. Enter numerical
amount of transmission fluid capacity in capacity sub-field. If
transmission fluid capacity is measured in quarts, enter ‘Q’ in unit
sub-field. If transmission fluid capacity is measured in liters, enter
‘L’ in unit sub-field.
Fuel (Capacity and
Unit)
Fuel Capacity
Maximum number of gallons (or gallon equivalents) or fuel the
vehicle is capable of carrying. Include auxiliary tanks only if used
for standard operation of the vehicle. Enter numerical amount of fuel
capacity in capacity sub-field. Enter ‘G’ in unit sub-field if fuel
measured in gallons. Enter ‘GE’ in sub-field if fuel measured in
gallon equivalents.
©2003, MAXIMUS, Inc. All rights reserved.
Specifications – Component Warranties
Data
Equipment Units
In order to track component
warranties for a vehicle, the
following fields on this tab must
be completed:
• Component type
• Vendor ID
• Warranty deductible
• Duration (months)
• Duration (meter units)
• Current expiration date
• Current expiration meter
The equipment component that
is under warranty must be
associated with the Equipment
Unit.
©2003, MAXIMUS, Inc. All rights reserved.
Specifications (Component Warranties tab)
87
Specifications – Special Equipment
Data
Equipment Units
The purpose of the Special
Equipment tab is to define
information about the special
equipment associated with or
mounted on an equipment unit.
©2003, MAXIMUS, Inc. All rights reserved.
Specifications (Special Equipment tab)
88
Adding a New Part
89
This section describes how to enter a new Part ID record in MAXIMUS FleetFocus FA. To complete a
parts record you will need to enter data into the following four screens:
•Parts Primary Information - To enter basic information about the part.
•Parts Location Information - To enter location specific information (bin,unit of measure).
•Parts Adjustments - To enter starting inventory level and price.
•Vendor/Part Information - To specify general information about the vendors of the part.
Note: New Part ID records can also be
created automatically using the MAXIMUS
FleetFocus FA Quick Orders screen
©2003, MAXIMUS, Inc. All rights reserved.
90
Parts Primary Information
Data
Parts Items
Primary Information
1. Click here to Prepare for
Insert.
2. Enter the Part ID.
3. Enter “0” in the Part suffix.
4. Enter a single descriptive
term as a Keyword
(ex: Filter).
5. Enter a full part description as
Short Description.
6. Enter -- as both Product
Category and Part
Classification.
Click on the Markup tab (continued on the next page).
©2003, MAXIMUS, Inc. All rights reserved.
91
Parts Primary Information (continued)
Data
Parts Items
Primary Information
7. Enter the Markup
percentage (e.g. 30)
8. Check No markup on this
part when no markup
applied to this part.
9. Enter the Markup cap (e.g
300).
11. Click here to Process.
©2003, MAXIMUS, Inc. All rights reserved.
92
Parts Location Information
Data
Parts Items
Location Information
1. Click here to Prepare for
Insert.
2. Enter the Part ID.
•
•
•
•
•
MAXIMUS FleetFocus FA
automatically displays:
Part Suffix
Keyword
Short Description
Product Category ID
Part Classification ID
3. Enter Station Location as an
Inventory Location ID
(EX: 8360P).
4. Select the Unit of Measure
from the choice list.
5. Enter the Bin location.
Click on the Stock Management tab (continued on the next page).
©2003, MAXIMUS, Inc. All rights reserved.
Parts Location Information (continued)
Data
Parts Items
Location Information
6. Enter Inventory
month from chose list
when inventory will be
counted. For a
stocked part select
ALL and for good on
demand part select
NONE.
7. Select default Stock
Status from the choice
list. Should be
STOCKED or ON
DEMAND
PROMOTABLE.
©2003, MAXIMUS, Inc. All rights reserved.
Click on the Purchasing Info tab (continued on the next page).
93
Parts Location Information (continued)
Data
Parts Items
Location Information
8. Enter
Manufacturer’s
part number.
9. Select a Preferred
vendor ID.
Click on the EOQ tab (continued on the next page).
©2003, MAXIMUS, Inc. All rights reserved.
94
Parts Location Information (continued)
Data
Parts Items
Location Information
10. Enter the
• Reorder Point
• Reorder Quantity
• Safety Stock Level
11. Click here to Process.
©2003, MAXIMUS, Inc. All rights reserved.
95
Parts Inventory Adjustments
Data
Parts Activity
Adjustments
Use this screen to adjust
inventory counts and
unit prices.
1. Click here to Prepare for
Insert.
2. Enter the Part ID.
3. Enter “0” in the Part suffix.
4. Enter Station Location as an
Inventory Location ID
(EX: 8360P).
5. Select desired Action.
6. Select Adjustment type
associated with Action
selected.]
7. Based on Action and
Adjustment type enter
- Quantity
- Unit Price
- Value
©2003, MAXIMUS, Inc. All rights reserved.
8. Click here to process.
96
97
Vendor/Part Information
Data
Purchasing
Vendor/Part Information
1. Retrieve the
(vendor/part) record by
filtering on the Vendor
ID and Part ID.
2. Click here to unlock the
record.
3. Enter the Unit of
purchase.
4. Enter the Price type.
5. Enter Vendor lead time
(days).
6. Enter Core credit value
if part has a core.
7. Select Warranty start if
part is warrantable.
©2003, MAXIMUS, Inc. All rights reserved.
Click on the Warranty tab (continued on the next page).
Vendor/Part Information (continued)
Data
Purchasing
Vendor/Part Information
9. Enter Warranty life
(Meter units).
10. Enter Warranty Life
(Months).
11. Click here to process.
©2003, MAXIMUS, Inc. All rights reserved.
98
99
Parts Cross-reference
Data
Parts Items
Cross-references
Use this screen to
quickly and easily
set up cross
references between
like parts from
different
manufacturers.
1. Enter Part ID (part number as it
is defined in FA).
2. Enter Part suffix for part
number as defined in FA.
3. Enter Cross-reference part ID
(another part ID for Part ID
entered).
4. Enter Cross-reference part
suffix.
5. Click here to Process.
©2003, MAXIMUS, Inc. All rights reserved.
100
Warranty
Section IV
©2003, MAXIMUS, Inc. All rights reserved.
101
Section IV Contents
Topic
Page
1.
Setting up Component Warranties
101
2.
Setting up Warranty Claims
109
3.
Component Warranty Claims
110
4.
Bumper to Bumper Warranty Claims
111
5.
Warranty Claims
114
©2003, MAXIMUS, Inc. All rights reserved.
Vendors – Setting up Component Warranties
Data
Purchasing
Setup
Vendors
Primary Information (Functions tab)
The following pages will assist you in setting up the functionality of Component Warranties.
Each Vendor that provides
component warranties must be
setup on the Vendor Primary
Information screen. On the
Functions tab of the Vendors
screen, check the Equipment
and component warranties
box.
©2003, MAXIMUS, Inc. All rights reserved.
102
Components – Setting up Component Warranties (continued)
Data
Equipment Units
All components that are
under warranty on the
equipment unit must be
defined in the Warranty
Components screen.
©2003, MAXIMUS, Inc. All rights reserved.
Setup
Warranty Components
103
Components – Setting up Component Warranties (continued)
Data
Shop Activity
Setup
To link expected tasks
on a work order to
components set up on
equipment units, the
repair task or repair
group must have a
Related component for
warranty purposes.
This linkage is what
activates the
component warranty
tracking for equipment
units on work orders.
©2003, MAXIMUS, Inc. All rights reserved.
Tasks
Primary Information (Related Component tab)
104
Usage – Setting up Component Warranties (continued)
Data
Shop Activity
Work Order Center (Tasks tab)
Open a work order for
an equipment unit that
has a component
warranty defined. Enter
the Repair Group or
Task ID associated with
the component warranty
in the Task ID field on
Tasks tab.
©2003, MAXIMUS, Inc. All rights reserved.
105
Usage – Setting up Component Warranties (continued)
Data
Shop Activity
Work Order Center (Messages tab)
If the Equipment unit
has a warranty
component defined and
the task ID entered is
associated with a
component warranty,
this message will
display in the
Messages tab of the
Work Order Center
screen.
NOTE: This information
will print on the work
order
©2003, MAXIMUS, Inc. All rights reserved.
106
Usage – Setting up Component Warranties (continued)
Data
Shop Activity
Work Order Center (Tasks tab)
To flag the Work Order
for the Component
Warranty Work, set the
Warranty work field on
the Tasks tab from
UNKNOWN to YES.
©2003, MAXIMUS, Inc. All rights reserved.
107
Usage – Setting up Component Warranties (continued)
Data
Shop Activity
Work Order Center
This message will
display when closing a
Work Order with an
associated component
warranty if the
Warranty work field is
set to UNKNOWN.
©2003, MAXIMUS, Inc. All rights reserved.
108
109
Setting up Warranty Claims
Data
Setup
Organizational Structure
To automatically create
an Equipment Warranty
Claim for component
warranty work or
Bumper to Bumper work
performed on a work
order, set the
Automatically create
warranty claims when
closing work order
including warranty
work option on the
Locations screen.
You cannot specify YES
for an equipment unit
that is not under
warranty unless the
work order’s location ID
has a check in the
Allow warranty set to
YES when warranty is
not in effect.
©2003, MAXIMUS, Inc. All rights reserved.
Locations (Work Orders – More Info tab)
Component Warranty Claims
Data
Shop Activity
Work Order Center
Once all work is
complete on the Work
Order and the Work
Order is closed, a
warranty claim will
automatically be
created if the
Automatically create
warranty claims when
closing work order
including warranty
work option is set.
©2003, MAXIMUS, Inc. All rights reserved.
110
Bumper to Bumper Warranty Claims (continued)
Data
Shop Activity
Work Order Center (Basic Info tab)
If the task on the work
order is under the
vehicle bumper to
bumper parameters, set
Warranty work to YES.
NOTE: To default the
Work Order, Warranty
work field to
UNKNOWN (if under
warranty), set the
Default setting for
warranty when
warranty is in effect to
UNKNOWN on the
Work Orders – More
Info tab of the
Locations screen.
©2003, MAXIMUS, Inc. All rights reserved.
111
Bumper to Bumper Warranty Claims (continued)
Data
Shop Activity
Work Order Center
If there are multiple
tasks on the Tasks tab,
this message will
display when closing a
Work Order if the
Warranty work field is
set to YES.
NOTE: This message
only applies when
Automatically create
warranty claims when
closing work order
including warranty
work option on the
Locations screen is
checked (see page 43).
Mark the Equip
warranty work field on
the Tasks tab for each
task that applies to the
warranty work
performed under the
bumper-to-bumper
warranty.
©2003, MAXIMUS, Inc. All rights reserved.
112
Bumper to Bumper Warranty Claims (continued)
Data
Shop Activity
Work Order Center
Once all work is
complete on the Work
Order and the Work
Order is closed, a
Warranty Claim will
automatically be
created if the optional
Automatically create
warranty claims when
closing work order
including warranty
work is set.
©2003, MAXIMUS, Inc. All rights reserved.
113
114
Warranty Claims
Data
Parts Activity
The purpose of the
Warranty Claims
screen is to define
and update warranty
claims made to
vendors or
manufacturers in
order to recover costs
related the return of
core parts and
equipment/parts
warranties.
©2003, MAXIMUS, Inc. All rights reserved.
Warranty Claims (Claim Data tab)
115
Warranty Claims
Data
Parts Activity
Once the vendor has
fully or partially paid
the claim, set the
Claim status field on
the Claim Data tab to
either APPROVED or
PARTIALLY
APPROVED, and
enter the Settlement
date and Settlement
amount on the
Settlement Data tab.
©2003, MAXIMUS, Inc. All rights reserved.
Warranty Claims (Settlement Data tab)
116
Data Entry/Maintenance
Section V
©2003, MAXIMUS, Inc. All rights reserved.
117
Section V Contents
Topic
Page
1.
Fuel/Fluid Tanks Setup
118
2.
Fueling – External and Internal Fuel Tickets
119
3.
Meter Readings-Assignments-Usage
125
4.
Usage Tickets
127
5.
Work Order Center
129
a)
Posting Labor
139
b)
Posting Parts
144
c)
Posting Commercial
146
d)
Closing a Work Order
149
©2003, MAXIMUS, Inc. All rights reserved.
118
Fuel/Fluid Tanks
Data
Fuel/Fluid Tanks
1.Click here to Insert a new
record
2.Give the Fuel/Fluid Tank
and unique Tank ID
3.Select a Location ID
from the list provided.
4.Choose the Fuel/Fluid
type that will go in this tank.
5.Enter total Tank
Capacity.
6.Enter Reorder Point to
enable automated
reordering.
7.Select Preferred Vendor
ID from the list provided to
enable automated
reordering.
8.Process the record
©2003, MAXIMUS, Inc. All rights reserved.
Primary Information
119
Fueling – External Fuel Tickets
Data
Equipment Activity
©2003, MAXIMUS, Inc. All rights reserved.
Fueling
External Fuel Tickets
120
Fueling – External Fuel Tickets
State of Texas Required Fields
FleetFocus Field
Name
State of Texas Required
Data
Definition
Fuel Type
Fuel Type Used
Type of fuel purchased. Select appropriate fuel type from
choice list provided:
BDL – Biodiesel
CNG – Compressed Natural Gas
DSL – Diesel
ELE – Electricity
ETH – Ethanol
GAS – Gasoline
LPG – Propane
MET - Methanol
Fuel Quantity
Fuel Quantity
Enter quantity of fuel purchased in gallons or gallon
equivalents.
Fuel Cost
Fuel Cost
Total cost of fuel purchased. Enter cost of fuel purchased for
external fuel tickets only.
©2003, MAXIMUS, Inc. All rights reserved.
121
Fueling – External Fuel Tickets
State of Texas Required Fields
FleetFocus Field
Name
State of Texas Required
Data
Definition
Fluid Type
Incidental Lubricants
Lubricants used during preventative maintenance and repairs,
such as engine oil, transmission fluid and brake fluid. Select
appropriate fluid type from choice list provided:
Engine Oil
Auto Trans Fluid
Antifreeze
Brake Fluid
Gear Oil
Air Cond Fluid
Fluid Quantity
Incidental Lubricant Quantity
Quantity of lubricants used during preventative maintenance
and repair work. Enter fluid quantity purchased.
Fluid Cost (External
Fuel Tickets)
Incidental Lubricants Cost
Cost of lubricants used during preventative maintenance and
repair work. Enter cost of fluids purchased for external tickets.
©2003, MAXIMUS, Inc. All rights reserved.
122
Fueling – Internal Fuel Tickets
Data
Equipment Activity
©2003, MAXIMUS, Inc. All rights reserved.
Fueling
Internal Fuel Tickets
123
Fueling – Internal Fuel Tickets
State of Texas Required Fields
FleetFocus Field
Name
State of Texas Required
Data
Definition
Fuel Type
Fuel Type Used
Type of fuel purchased. Select appropriate fuel type from
choice list provided:
BDL – Biodiesel
CNG – Compressed Natural Gas
DSL – Diesel
ELE – Electricity
ETH – Ethanol
GAS – Gasoline
LPG – Propane
MET - Methanol
Fuel Quantity
Fuel Quantity
Enter quantity of fuel purchased in gallons or gallon
equivalents.
©2003, MAXIMUS, Inc. All rights reserved.
124
Fueling – Internal Fuel Tickets
State of Texas Required Fields
FleetFocus Field
Name
State of Texas Required
Data
Definition
Fluid Type
Incidental Lubricants
Lubricants used during preventative maintenance and repairs,
such as engine oil, transmission fluid and brake fluid. Select
appropriate fluid type from choice list provided:
Engine Oil
Auto Trans Fluid
Antifreeze
Brake Fluid
Gear Oil
Air Cond Fluid
Fluid Quantity
Incidental Lubricant Quantity
Quantity of lubricants used during preventative maintenance
and repair work. Enter fluid quantity purchased.
Misc. Cost (Internal
Fuel Tickets)
Incidental Lubricants Cost
Cost of lubricants used during preventative maintenance and
repair work. Enter cost of fluids, if known, for internal tickets.
©2003, MAXIMUS, Inc. All rights reserved.
125
Meter Readings – Assignments – Usage
Data
Equipment Units
Usage
Meter Readings – Assignments – Usage (Meter Readings tab)
3.Enter the
Meter 1
reading.
1.Click here to
Prepare for Insert.
The Date and time
entered/displayed
here will be the
default for each row
entered
4.Select EQ
UPD or NO
EQ UPD if
reading is
out of range
5. Enter the
Meter 2
reading (if
applicable).
2.Enter the
Equipment ID.
Current Year,
Manufacturer,
Model and
meter reading
display.
End date and
time defaults to
system
date/time.
6.Select EQ UPD or NO EQ
UPD if reading is out of
range
©2003, MAXIMUS, Inc. All rights reserved.
7. Click here
to Process.
Meter Readings – Assignments – Usage
State of Texas Required Fields
Monthly Meter Readings
FleetFocus Field
Name
State of Texas Required
Data
Definition
End Date and Time
Odometer Reporting Date
Change default date to last day of month being entered.
Meter 1 Reading
Odometer Reading
Enter ending odometer reading.
Vehicle Disposal Meter Readings
FleetFocus Field
Name
State of Texas Required
Data
Definition
End Date and Time
Date and Time of Vehicle
Disposal
Change default date to date of vehicle disposal.
Meter 1 Reading
Odometer Reading at Disposal
Enter odometer reading at time of disposal.
©2003, MAXIMUS, Inc. All rights reserved.
126
127
Usage Tickets
Data
Equipment Activity
Usage
Usage Tickets
The purpose of the Usage Tickets screen is to display and insert equipment usage transactions.
1.Click here to
Prepare for Insert.
2.Enter the
Equipment ID.
Transaction Date and
time displayed will default
to the system date and
time
Current Year,
Manufacturer, Model
and meter reading
display.
3.Select Department
ID from the choice
list.
4.Enter Trips and/or
Passengers
©2003, MAXIMUS, Inc. All rights reserved.
5. Click here to Process
128
Usage Tickets
State of Texas Required Fields
FleetFocus Field
Name
State of Texas Required
Data
Definition
Trips
Number of Trips
Total number of trips vehicle completes during month. Enter
the total number of trips completed during the month. Number
of passengers can be entered at the same time on the same entry
line.
The following fields must also be completed to process the
record:
Equipment ID
Transaction Date (should match end of month during which
trips occurred.)
Department ID
Passengers
Number of Passengers
Number of passengers transported in the vehicle during the
month. Enter total number of passengers transported during the
month. Number of trips for the month can be entered at the
same time on the same entry line.
The following fields must also be completed to process the
record:
Equipment ID
Transaction Date (should match end of month during which
trips occurred.)
Department ID
©2003, MAXIMUS, Inc. All rights reserved.
FleetFocus FA’s Work Order Center
Data
Shop Activity
©2003, MAXIMUS, Inc. All rights reserved.
Work Order Center
129
Work Order Center Communication
Data
Shop Activity
Messages tab:
FleetFocus FA
messages about the
Equipment ID
Comments tab:
Your messages to other
users about the
Work Order
Service Requests
tab:
Information from other
users about the
Equipment ID
©2003, MAXIMUS, Inc. All rights reserved.
Work Order Center
130
Work Order Screens
131
Work Order Center – This is the most comprehensive work order screen in FA. All data about a work
order is displayed on this screen. Use this screen to view existing information about an open work order,
or to open work orders. When creating new work orders this screen works best if the work order is open
before work begins on the vehicle. No Labor, Parts or Commercial Charges can be posted to a work
order on this screen until the work order is processed for the first time.
Work Order Short Form – Use this screen to create work orders after the work has already been
completed by technicians or outside vendors. A user can create a work order, add parts labor and
commercial transactions, and finish the work order all in a single process.
Parts Issues and Returns – Use this screen to post parts issues to multiple work orders during a single
process. Parts can only be issued to OPEN or FINISHED work orders. Any parts issues posted to a work
order will be visible on the Work Order Center screen after processing. This screen is commonly used by
Parts Warehousers.
Timecards – Use this screen to post both direct and indirect labor entries to multiple work orders in a
single process. Labor transactions can only by posted to OPEN or FINISHED work orders. Any labor
transactions associated with a work order will be visible on the Work Order Center screen after
processing.
Commercial Work Order Charges – Use this screen to post Commercial Sublet work to OPEN or
FINISHED multiple work orders in a single process. Any commercial transactions associated with a work
order will be visible on the Work Order Center screen after processing.
©2003, MAXIMUS, Inc. All rights reserved.
Work Order Status
OPEN – Work Order has been created and the vehicle is in the
shop. Labor, Parts, and Commercial transactions can be posted.
DELAY – Work Order has been created but is not currently being
worked on.
WORK FINISHED - Work on the vehicle is complete and can be
returned to the customer. Labor, Parts, and Commercial
transactions can be posted.
CLOSED – All entries and edits to the work order are complete.
Work Order is ready to be sent to Billing. Edits are only allowed by
System Administrator
©2003, MAXIMUS, Inc. All rights reserved.
132
Inserting a New Repair Work Order Using Work Order Center
Data
Shop Activity
133
Work Order Center
12. Process the record
1. Click here to (Prepare
for) insert a new work order.
2.Confirm the work order ID
3. Select REPAIR as the
Job type.
4. Enter the Equipment ID.
11. Type any text you want
to print on the work
order hard copy on the
Comments tab.
10. Review the Messages
and the Service
Request tabs.
5. Enter the Repair reason
ID.
6. Enter Repair site.
7. Enter the Work class.
8. Check if Work is
Warranty related
©2003, MAXIMUS, Inc. All rights reserved.
9. Ensure that the dates
are correct
134
Inserting a New PM Work Order Using Work Order Center
Data
Shop Activity
Work Order Center
9.
1. Click here to (Prepare
for) insert a new work
order.
Click here to process.
8. Type any text you want
to print on the work
order hard copy on
the Comments tab.
2. Enter the Work order ID
FleetFocus FA displays
the year and the next
sequential number
automatically.
3. Select PM as the Job
type*
4. Enter the Equipment ID.
5. Make sure the PM
Service or Inspection
you want to perform is
entered here
7. Review the Messages
and the Service
Request tabs.
6. Complete Repair
Reason, Repair Site,
and Work Class
* Once you select PM as the Job type and Equipment ID, FleetFocus FA automatically displays the current values for PM service and PM
scheduled fields.
©2003, MAXIMUS, Inc. All rights reserved.
Work Order Center – Repair/PM Work Order
State of Texas Required Fields
FleetFocus Field
Name
State of Texas Required
Data
Definition
Job Type
PM / Repairs
Description of preventative maintenance work and repairs
performed. Include maintenance and repairs work on equipment
or components permanently attached to vehicle.
Select job type (REPAIR or PM).
Repair Reason ID
PM / Repairs
Select repair reason ID from choice list provided:
B – Breakdown: Other than routine wear and tear
C – Wear and Tear: Routine part replacement
D – Damaged in Operation: Damaged as a result of specific work
performed
E – Noted in PM: Preventative maintenance
F – Make Ready: Work in preparation for initial use
G – Seasonal Prep: Work in preparation for seasonal use
H – Vandalism: Intentional damage
I – Inspection: Routine inspection
J – Other: Use for weather related damage only
K – Statutory: Statutorily required repairs, conversions or
upgrades
L – Disposal: Work in preparation for disposal
M – Capital: DO NOT USE
N – Accident Employee at Fault
R – Recall/Service Bulletin: Manufacturer recall work
W – Car Wash: Routine as needed
©2003, MAXIMUS, Inc. All rights reserved.
135
Work Order Center – Repair/PM Work Order
State of Texas Required Fields
FleetFocus Field
Name
State of Texas Required
Data
Definition
Repair Reason ID
Accident Repair Expense
Total cost to repair damage due to an accident. Select Accident –
Employee Not at Fault (A) or Accident –Employee at Fault (N) as
appropriate from choice list provided.
Repair Reason ID
Incident Repair Expense
Total cost to repair damage unrelated to normal use of vehicle,
such as vandalism, hail damage or flood damage. Select
Vandalism (H) or Weather Related Damage (J) from choice list
provided.
Repair Site
PM / Repairs Facility
Type of shop where the preventative maintenance or repair work
was performed: commercial, in-house or interagency. Select
repair site from choice list provided:
01 Facility - In house Shop
02 Field - Roadside Repair/Maintenance
03 Terminal - Interagency Contract Shop
04 Outside Company - Commercial Shop
Date and Time In/Date
and Time Finished
PM / Repairs Time
Time between receipt of vehicle at maintenance facility and
completion of work. Enter date and time vehicle was received at
maintenance facility and date and time maintenance or repair
work was completed. Complete as many date and time fields as
possible and appropriate work performed.
©2003, MAXIMUS, Inc. All rights reserved.
136
Work Order Center - Delay
Data
Shop Activity
137
Work Order Center
To End Delay:
To Begin Delay:
•Filter for the Work
Order that will be
placed in Delay
•Unlock the record
•On the Delay tab
check the Begin
box
The Date and time
field will default to
the system date
and time.
4.Choose a Work
Delay ID from the
list provided.
5.Process the
change
©2003, MAXIMUS, Inc. All rights reserved.
•Filter for the Work
Order that will be
taken out of Delay
•Unlock the record
•On the Delay tab
check the End box
The Date and time
field will default to
the system date
and time.
4.Process the
change.
A row will be placed
in the group field
below noting the
details of the delay.
138
Work Order Center - Delay
State of Texas Required Fields
FleetFocus Field
Name
State of Texas Required
Data
Definition
Begin/End/Work Delay
ID
Downtime
Total time vehicle was out of use during repair or maintenance
work, including transfer time before and after work is conducted.
Complete information fields in delay tab as appropriate. Select
type of delay from choice list provided for work Delay ID field.
B Waiting bay
L Waiting labor
M Waiting commercial
P Waiting parts
T Waiting tow
TS Transfer shop responsibility
TU Transfer user responsibility
Z Waiting other
©2003, MAXIMUS, Inc. All rights reserved.
Posting Labor to a Work Order Using the Work Order Center
Data
Shop Activity
Work Order Center
1. Use the Filter to limit the display to the
work order you want.
2. Click here to unlock the work order.
4.
Enter Task ID.
5.
Enter Work Accomplish Code
6.
Check that the date is correct (this field defaults
to today’s date.
7.
Enter Employee ID of person who performed
the labor
8.
Mark if the entry is a reversal (this is used to
correct mistakes previously saved)
9.
Enter the number of hours worked on this task.
10.
Enter the Time code
©2003, MAXIMUS, Inc. All rights reserved.
Labor
3. Click the Labor tab.
11. Go to the Comments tab to
end and final comments about
the work order.
12. Click here to process.
139
Posting Labor to a Work Order Using the Timecards Screen
Data
Shop Activity
Work Order Center
1. Click the Prepare for Insert button
3.
Enter Work Order Location, Year, and
Number (needed only if posting time to a
direct Time Code)
•
Enter Time Code
•
Enter Task ID
•
Enter Work Accomplish Code
7.
Check that the Date is correct (this field
defaults to today’s date.
8.
Mark if the entry is a reversal (this is used to
correct mistakes previously saved)
9.
Enter the number of hours worked on this
task.
©2003, MAXIMUS, Inc. All rights reserved.
Labor
2. Enter the Employee ID
12. Click here to process.
140
Work Order Center – Labor Posting
State of Texas Required Fields
FleetFocus Field
Name
State of Texas Required
Data
Definition
Labor hours, Employee
ID
PM / Repairs Cost
Total cost of maintenance and repair work conducted. Labor costs
should be itemized. Include maintenance and repair costs related
to equipment or components permanently attached to vehicle. For
Internal Shop select Labor tab. Enter labor hours and employee
ID.
©2003, MAXIMUS, Inc. All rights reserved.
141
142
Work Order Center – Labor Rate Setup
Data
Shop Activity
©2003, MAXIMUS, Inc. All rights reserved.
Setup
Employees
Primary Information (Rates tab)
Work Order Center – Labor Rate Setup
State of Texas Required Fields
FleetFocus Field
Name
State of Texas Required
Data
Definition
Pay Rate
Standard Labor Rate
Standard labor rate of maintenance and repair work completed at
agency shop. Enter the standard hourly rate for each employee in
an agency shop.
©2003, MAXIMUS, Inc. All rights reserved.
143
Posting Parts to a Work Order Using the Work Order Center
Data
Shop Activity
Work Order Center
1. Use the Filter to limit the display to the
work order you want.
2. Click here to unlock the work order.
4.
Enter Task ID.
5.
Enter Work Accomplish Code
6.
Check that the Date is correct (this field defaults to
today’s date.
7.
Pick the correct Issuing Location
8.
Enter or pick the Part ID
9.
Enter 0 for Part Suffix
10.
Enter or pick the Vendor
11.
If this is a Contract Part, enter or pick the
Parts
3. Click the Parts tab.
Contract #
12.
Mark if the entry is a Reversal (this is used to
correct mistakes previously saved)
13.
Enter the Quantity Issued
14.
Verify Unit Price and Parts Description
©2003, MAXIMUS, Inc. All rights reserved.
15. Go to the Comments tab to
end and final comments about
the work order.
16. Click here to process.
144
Work Order Center – Parts Posting
State of Texas Required Fields
FleetFocus Field
Name
State of Texas Required
Data
Definition
Part ID, Quantity Issued
PM / Repairs Cost
Total cost of maintenance and repair work conducted. Parts costs
should be itemized. Include maintenance and repair costs related
to equipment or components permanently attached to vehicle.
Select Parts tab and enter part ID, quantity issued and unit price.
©2003, MAXIMUS, Inc. All rights reserved.
145
Posting Commercial Charges Using Work Order Center
Data
Shop Activity
Work Order Center
1. Use the Filter to limit the display to the
work order you want.
2. Click here to unlock the work order.
3. Click the Commercial tab.
4.
Enter the Task ID.
5.
Indicate Reversal.
6.
Enter Labor cost, and check the box if cost is
taxable.
7.
Enter Parts cost, and check the box if cost is
taxable.
8.
Enter Misc Cost
9.
Enter Vendor invoice number.
10.
Enter Vendor’s work order number.
11.
Enter Vendor contract ID.
Group Control
FleetFocus FA fills the Date field with today’s
date
12. Click here to process.
©2003, MAXIMUS, Inc. All rights reserved.
146
147
Posting Commercial Charges to a Work Order
Data
Shop Activity
Commercial Work Charges
1. Click here to Prepare for insert.
2. Enter Vendor ID.
3.
Enter the three-part Work order ID (Work order
location ID, Work order year, and Work order
number).
FleetFocus FA displays the Equipment ID.
4.
Enter Task ID and Work Accomplish Code.
5.
Indicate Reversal.
6.
Enter Labor cost
7.
Enter Parts cost
8.
Enter Misc cost
9.
Enter Vendor invoice number.
10.
Enter Vendor’s work order number.
11.
Enter Vendor contract ID.
Group Control
FleetFocus FA fills the Date field with today’s
date
12. Click here to process.
©2003, MAXIMUS, Inc. All rights reserved.
Work Order Center – Commercial Posting
State of Texas Required Fields
FleetFocus Field
Name
State of Texas Required
Data
Definition
Labor Cost, Parts Cost
PM / Repairs Cost
Total cost of maintenance and repair work conducted. Parts and
labor costs should be itemized. Include maintenance and repair
costs related to equipment or components permanently attached
to vehicle. Select Commercial Vendor. Enter labor cost and parts
cost.
©2003, MAXIMUS, Inc. All rights reserved.
148
Closing a Work Order
Data
Shop Activity
1. Use the Filter to limit
the display to the
work order you want.
2. Click here to unlock
the work order.
3. Review the Parts,
Labor, Commercial,
and Comments tabs
4. Click the box next to
Date and Time
Closed
©2003, MAXIMUS, Inc. All rights reserved.
149
Work Order Center
5. Click here to process.
150
Reports
Section VI
©2003, MAXIMUS, Inc. All rights reserved.
151
Section VI Contents
Topic
Page
1.
Reports Choice List
152
2.
Printer Icon Button
157
©2003, MAXIMUS, Inc. All rights reserved.
Running a Report – the Reports Choice List
Reports that the
users have access
to run will appear
in the reports
choice list
In order to run a
report the user will
do the following:
1. Click the
downward arrow
on the choice list
box.
2. Highlight the
report they want to
run and click on it.
©2003, MAXIMUS, Inc. All rights reserved.
152
Running a Report – the Reports Choice List (continued)
3. When the
Select Printer box
comes up the user
selects a printer
from the list and
clicks OK.
Note: if no printer
is chosen, the
output will be
displayed
onscreen.
©2003, MAXIMUS, Inc. All rights reserved.
153
Running a Report – the Reports Choice List (continued)
4. The user enters
values for the
prompts as
appropriate.
Note: Most reports
will prompt the
user for at least
one value. To
review prompts for
any of the
FleetFocus
standard reports,
please consult the
Directory of
Standard Reports
in the Doc
directory on any
FleetFocus CD
©2003, MAXIMUS, Inc. All rights reserved.
154
Running a Report – the Reports Choice List (continued)
Report Output Options
If no printer is
specified when the
user runs the
report, the output
will be displayed
onscreen
©2003, MAXIMUS, Inc. All rights reserved.
155
Running a Report – the Reports Choice List (continued)
Report Output Options
If the user has
access to a text file
printer, the output
will end up in a text
file on the user’s
machine.
This text file can be
opened by any text
editing program,
such as Notepad or
Wordpad.
Note: Please
consult your
administrator if you
do not know the
location and/or
name of the text file
output FleetFocus
creates.
©2003, MAXIMUS, Inc. All rights reserved.
156
Running a Report – the Printer Icon Button
The Printer Icon
Button is located on
the Toolbar next to
the Data Export
button and the
“Stop” hand button.
For users who do
have access to run
reports using this
button, it is not
active on every
screen.
If the button is
grayed out it means
the user either does
not have rights or
there is no screen
report for that
particular screen.
©2003, MAXIMUS, Inc. All rights reserved.
157
Running a Report – the Printer Icon Button
The screen specific
reports that run
from the Printer
Icon Button use the
values entered into
the Filter as the
prompt values.
In order to run a
screen report using
the Printer Icon
Button, a user must
first enter a value or
multiple values in
the filter and Get
Data.
©2003, MAXIMUS, Inc. All rights reserved.
158
Running a Report – the Printer Icon Button
Once data has
been returned to
the grid, the user
can then click on
the Printer Icon
Button to run the
report.
As with running a
report from the
Report Choice List,
the Select Printer
box pops up to
allow the user to
specify a printer.
Note: Remember
that if no printer is
specified output will
be displayed
onscreen.
©2003, MAXIMUS, Inc. All rights reserved.
159
Running a Report – the Printer Icon Button
©2003, MAXIMUS, Inc. All rights reserved.
160
161
Where to Find Help?
Keep this training information handy and use it as your FIRST reference!
• Hardware (monitor, keyboard, printer, etc.)
• Network (Novell, IntraNetWare, etc.)
• Don’t know?
• FASuite (screens, procedures, etc.)
• Data-Related Problems
• State Fleet Requirements/Procedures
Supervisor or
IS Department
Agency Fleet
Specialist
OVFM
• Still stumped?
©2003, MAXIMUS, Inc. All rights reserved.
Phone:
Fax:
Web:
(512) 463-1605
(512) 475-2508
www.tbpc.state.tx.us/fleet