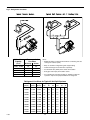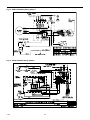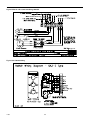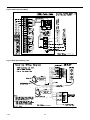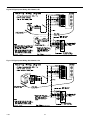
1
DX Remote & Self-Contained A/C
❖ INSTALLATION • OPERATION
Direct Expansion Systems
Revised: 12-2-04
L-2086 ❖ English
Table of Contents
DX Remote & Self-Contained A/C Systems
• Introduction
Inspecting the Cooling/Heating Unit
(Remote Condensing Unit Systems Only) ................................
Inspecting the Refrigerant Connections
(Remote Condensing Unit Systems Only) ................................
Inspecting the Air Distribution System .........................................
Inspecting the Control/Switch Assembly and Electrical Wiring ...
Drawings and Diagrams .................................................................. 4
Air Conditioning Basics ................................................................... 4
The Effect of Seawater Temperature ............................................... 4
Types of DX Systems ...................................................................... 4
Subsystems ..................................................................................... 5
System Controls .............................................................................. 5
Condensate Drain ............................................................................ 5
Charging the System with Refrigerant
6
Operating Instructions - Rotary Controls
SA & SSA Models ........................................................................ 16
7
8
9
Importance of a Self-Draining System ............................................ 9
Through-Hull Inlet Fitting ................................................................. 9
Seacock ........................................................................................... 9
Strainer ............................................................................................ 9
Seawater Pump ............................................................................... 9
Manifolds ...................................................................................... 10
Overboard Discharge ................................................................... 10
Seawater Piping ........................................................................... 10
Bonding ......................................................................................... 10
Owner Maintenance - Routine
10
11
The SMX Control ......................................................................... 11
The Rotary Knob Switch Assembly ............................................. 11
Installing the Pump Relay
11
16
16
16
16
16
17
17
17
17
17
17
17
17
18
Condensate Drains .......................................................................
Air Filters ......................................................................................
Seawater Connections .................................................................
Seawater Pump ............................................................................
Seawater Strainer .........................................................................
Refrigerant Gas ............................................................................
Winterizing the System ................................................................
Return Air Grill (RA Grills) ............................................................ 10
Ducts ............................................................................................. 10
Discharge Air Grill ........................................................................ 11
Installing the Control Unit
16
SMX II/SMX Net Operation ..........................................................
Power On ......................................................................................
System Off ....................................................................................
Selecting Setpoint ........................................................................
Displaying Temperature ................................................................
Cool Mode ....................................................................................
Heat Mode ....................................................................................
Automatic Changeover ................................................................
Manual Fan Speed Control ...........................................................
Automatic Fan Speed Control ......................................................
Adjusting Brightness ....................................................................
Using The Humidity Control Routine ..........................................
Anti-Ice Routine ............................................................................
Selecting the Site ............................................................................ 8
Site Location Checklist .................................................................... 8
Mounting the Cooling/Heating Unit ................................................. 8
Installing the Refrigerant Tubing ...................................................... 8
Installing The Air Distribution System
16
Operation Instructions - SMX Controls
Selecting the Site ............................................................................ 7
Site Location Checklist .................................................................... 7
Mounting the Remote Condensing Unit .......................................... 7
Installing the Seawater Cooling System
15
DX Remote & Self-Contained A/C Systems
• Operation
Selecting the Site ............................................................................ 6
Site Location Checklist .................................................................... 7
Mounting the Self-Contained Unit ................................................... 7
Installing The Cooling/Heating Unit
14
Initial Start Up
Installation Procedures .................................................................... 6
Electrical System ............................................................................. 6
Installing The Condensing Unit
13
13
13
Charging a New System ............................................................... 14
Field Charging the System ........................................................... 14
Removing Refrigerant from the System ....................................... 15
DX Remote & Self-Contained A/C Systems
• Installation
Installing The Self-Contained A/C Unit
13
18
18
18
18
18
18
18
Trouble Shooting
18
Limited Warranty Periods
19
Owner’s Limited Warranty
20
Descriptions of Figures
22
Cruisair Dealer Locator
41
Location ........................................................................................ 11
Voltage and Triggers ..................................................................... 12
Electrical Connections
12
Three Phase Power ...................................................................... 12
Final Inspection
13
Inspecting the Seawater Cooling System .................................... 13
Inspecting the Self Contained Unit .............................................. 13
Inspecting the Condensing Unit
(Remote Condensing Unit Systems Only) ................................ 13
Copyright 2004 Dometic Corporation, All Rights Reserved - Every precaution has been taken in the preparation of this manual to insure its accuracy. However, Dometic Corporation assumes
no responsibility for errors or omissions. Neither is any liability assumed for damages resulting from the use of this product and information contained herein.
L-2086
3
❖ English
DX Remote & Self-Contained A/C Systems • Introduction
Warning
90°F (32°C). At higher water temperatures the unit will
operate, but at reduced capacity. As the water temperature
rises, so does the refrigerant gas pressure. A high-pressure
safety switch will shut the unit down if the water temperature
gets too hot, or there is a loss of cooling water flow.
This manual contains essential information concerning
the safe and proper installation and operation of your
Cruisair air conditioning system. If there are any statements or procedures in this manual that you do not
understand, contact the Dometic Corporation Applications Department for assistance. Phone
804-746-1313 (8 am - 5 pm US Eastern Time),
Fax 804-746-7248, or email [email protected].
In heat mode, the opposite is true. As the seawater temperature gets colder, there is less heat available and heating
performance drops. Full heating capacity is available in water
temperatures as low as 55°F (13°C), but drops to about 50%
capacity in 40°F (4.4°C) water. Below this, the refrigerant
pressure can be so low that the unit will not produce heat, (or
may shut down on low-pressure fault, if this option is installed).
Notice
US federal law prohibits the intentional release of
refrigerant gases into the environment, including the
R-22 refrigerant used in most Cruisair air conditioning
systems. Special care must be taken when installing,
charging, and servicing Cruisair equipment to prevent
any loss of equipment. Only EPA certified technicians
with the proper equipment should perform service on
the refrigerant circuit of the system.
Types of DX Systems
Self-contained units have all major mechanical components
of an air conditioning system mounted on one chassis,
including the compressor, seawater condenser, evaporator
coil, blower, electrical box and related parts.
Drawings and Diagrams
The self-contained unit is normally mounted low in the living
area - under a settee or berth, or in a closet or locker. Cabin
air is pulled into the unit, where it is cooled or heated, then
discharged through ducting to a grill usually located on a
bulkhead high in the compartment.
The figures that are referenced throughout this manual can be
found immediately after the warranty section of the manual. In
addition, some Cruisair equipment will be shipped with
specific installation sheets or wiring diagrams that may
supercede the information located in this manual.
The refrigerant circuit in a self-contained unit is pre-charged
and sealed at the factory, and no additional charging is
needed at installation. A typical self-contained unit is shown in
Figure 1.
Air Conditioning Basics
The basic principle of an air conditioner is the movement of
heat. In a direct expansion (DX) water-cooled air conditioner,
heat is transferred from the cabin air to the refrigerant gas,
which then releases the heat into the seawater. In reverse
cycle heating (heat pump), the refrigerant flow is reversed and
heat is extracted from the seawater and then discharged into
the cabin.
Remote systems, also called split-gas, have the air conditioning components mounted on two separate chassis that are
installed in different locations and are connected by copper
refrigerant tubing.
The condensing unit consists of the compressor, seawater
condenser, and electrical components, and is mounted in the
engine room or other mechanical space.
The heat exchange process relies on the movement of both
cabin air and seawater to effectively work. If air flow or
seawater flow is compromised, the efficiency of the system
will drop, and the unit could eventually be damaged, or at
least shut down on one of its safety protection devices.
The cooling/heating unit includes the evaporator coil and a fan
or blower mounted on a drip pan. It is installed in the living
area in a similar manner to a self-contained unit. Two or three
cooling/heating units can be connected to one condensing
unit so that multiple or large cabins can be cooled.
Part of the cooling process, in addition to lowering the air
temperature, is the removal of moisture from the air. This
lowers the humidity, which makes the area feel more comfortable and helps keep the boat dry, reducing mold growth and
other moisture related problems.
A remote system must be charged with refrigerant after
installation by a certified technician. A typical condensing unit
is shown in Figure 2, and Figure 3 is a typical draw-through
type cooling/heating unit.
The Effect of Seawater Temperature
The efficiency of the system is dependent on both the
seawater and cabin temperatures. In cooling, the air conditioner works best when the seawater temperature is below
L-2086 Introduction
4
❖ English
Subsystems
system protection than mechanical controls. In addition, over
20 programmable functions allow the user to customize the
system to suit the specific needs of their boat and boating
environment.
Both self-contained units and remote condensing systems
require subsystems that are purchased separately because of
the many variations and options available. These include the
seawater, air distribution, and control subsystems.
The two SMX control systems available are SMX II and the
SMX Net. Each system consists of:
Seawater System
The seawater cooling system consists of an inlet through-hull
fitting, seacock (water shut-off valve), strainer, pump, and
overboard discharge fitting all connected by hose or piping. If
multiple air conditioning units are served by a single seawater
pump, then a pump relay and water manifold are required.
•
Power/Logic (P/L) board - Monitors and controls all
functions of the air conditioning unit. SMX II and SMX Net
have different P/L boards and are not interchangeable.
•
Keypad/Display - The SMXir is a 10-button user
interface with a digital readout and LED indicators. It is
used with SMX II or SMX Net systems.
•
Temperature-Sensing Element - Air temperature is
monitored by a temperature-sensing element (TSEP) that
plugs into the power/logic board.
•
Connecting Cable - The keypad/display connects to the
P/L board with a CX or CXP connecting cable.
Air Distribution System
Cabin air is drawn into the self-contained unit or cooling/
heating unit through a return air grill. It is then cooled or
warmed and blown back into the cabin through a ducting
system. The air should be discharged high in the cabin and
away from the return air grill to ensure good circulation. An air
filter is located on the cooling unit or on the return air grill and
must be cleaned regularly.
SMX Net systems may also have additional network cables
and an outside temperature sensor that plug into the P/L
board.
System Controls
Two different types of controls are available, either an electromechanical rotary knob switch assembly or one of the Cruisair
SMX series of microprocessor controls.
Condensate Drain
When the air conditioner is running in the cooling mode,
moisture is removed from the air by the evaporator coil. This
condensation is then caught in a drain pan and must be
drained off to a sump or overboard. In humid climates the
system can produce a large amount of condensate water that
could cause significant damage to your boat if the drain
system doesn’t work properly.
The electromechanical switch assemblies are typically 3-knob
switches that control mode (OFF, FAN, RUN), thermostat
(temperature setting), and fan speed. Other versions include 1
and 2 knob switches for control of “slave” cooling units, and a
4-knob switch for use on systems with auxiliary electric heat.
Cruisair SMX controls are advanced microprocessor systems
that provide a more comfortable environment and better
L-2086 Introduction
5
❖ English
DX Remote & Self-Contained A/C Systems • Installation
Installation Procedures
Dedicated 50Hz units will give full performance at 50Hz, and
should be used when the system is going to be run exclusively at 50Hz. If a boat is traveling in 50Hz and 60Hz
environments, then 60Hz equipment should be installed, with
special attention to sizing (especially the pumps) so that the
system performs up to expectations. When running 60Hz
equipment at 50Hz, the voltage should be reduced 17% to
prevent overheating a motor.
This first section covers installation procedures for Cruisair
direct expansion (DX) air conditioning systems, both selfcontained units and remote systems. Please read and
understand the manual before attempting to install any
equipment.
SMX Installation
For installation instructions for your SMX Control, refer to
SMX II Control Systems (L-2066) or the SMX Net Control
Systems (L-2067) manuals.
Installing The Self-Contained A/C Unit
Safety Warning
Electrical System
A Cruisair self-contained unit should never be placed
such that it can circulate carbon monoxide, fuel vapors
or other noxious fumes into the boat’s living spaces. Do
not install or operate a self-contained unit in the engine
room or near an internal combustion engine. Failure to
follow this precaution could result in serious injury or
death.
Cruisair air conditioning systems are available for use with
common power supplies throughout the world. In the United
States and most of North and South America, the systems are
115V or 230V, 60Hz, single phase AC (alternating current). In
Europe and most of Asia, power systems are typically 230V
50Hz single phase.
Compressors larger than 20,000 Btu/hr are only available in
230V single phase, 230V or 380/460V 3 phase. On 380/460V
3-phase units there is often a separate, lower voltage circuit
for the controls and blower, either 115V or 230V. On some
power systems this can be supplied by using one input line
and the neutral. If not, a separate control power feed or a
transformer will be required.
Selecting the Site
Self-contained units are designed for built-in installation low in
a closet, under a dinette seat or bunk, or any other convenient
location, with discharge air ducted to a grill high in the
compartment. See Figure 4 for a typical installation.
Ignition Protection Warning
Running and starting loads of an air conditioning system are
often the largest electrical loads on a boat. It is important that
the power supply system is large enough to handle these
loads, and is installed properly. Contact an electrician if you
are not sure about the proper wiring procedures. Always follow
local codes or ABYC codes for proper wiring guidelines.
Self-contained units do not meet federal requirements
for ignition protection. Do not install in spaces containing gasoline engines, tanks, LPG/CPG cylinders,
regulators, valves or fuel line fittings. Failure to comply
may result in injury or death.
The self-contained unit must be mounted in a space large
enough to provide clearance on all sides for air circulation. It is
not necessary that the coil be placed directly behind the
return air grill, but an unobstructed path must be provided for
the air to get to the coil. A 2" (50 mm) space in front of the
evaporator coil must be maintained.
Voltage and Frequency
The voltage rating of a unit is a nominal rating. The actual
voltage in a given location may be higher or lower by as much
as 10% and the system will still operate fine. For example, at
60 Hz, you will sometimes see 110VAC to 120VAC, or
208VAC to 240VAC, or 440VAC to 480VAC. In a 50Hz
environment, common voltages range from 220V to 240V, or
380V to 415V.
Measure carefully for horizontal and vertical clearance prior to
proceeding with installation. It is a good practice to place each
component physically in the area you have selected to ensure
that there is enough space and that connections can be easily
made.
When choosing a system, the voltage and frequency must be
known. While standard 60Hz equipment can often be run at
50Hz, it will experience a 17% drop in performance, however,
50Hz equipment can not be run at 60Hz because the 50Hz
motor will run too fast and cause damage. Seawater pumps
will lose even more performance at 50 Hz due to the nature of
centrifugal pumps.
L-2086 Installation
Note that some Cruisair self-contained units have a detachable electrical box, which can be remotely mounted to save
space in the installation.
6
❖ English
Site Location Checklist
Installing The Condensing Unit
• Unit is not located in an engine room or near an internal
combustion engine
This section applies only to remote condensing unit systems.
If you are installing a self-contained unit, skip this section and
go to “Installing The Seawater Cooling System.”
• There is no obstruction of airflow from return air grill to coil
• Seawater can be piped to the unit with no loops, dips, or
kinks
Selecting the Site
• Accessible for service and maintenance, including the
return air filter
Cruisair condensing units are designed to be installed in any
convenient location. The unit is normally placed in the engine
room or other machinery space, but it can be located in the
living areas. The condensing unit will produce condensation so
a drip pan may be needed. The space around the unit can be
insulated to reduce noise if desired. The unit is internally
cooled and does not require ventilation.
• Adequate space for seawater and condensate drain
connections
• Flat, horizontal and sturdy mounting location
• Condensate drain can be run continuously downhill from
unit to overboard fitting or sump
• Space is sealed from the bilge or outside air
Ignition Protection Warning
Mounting the Self-Contained Unit
Most Cruisair remote condensing units meet federal
requirements for ignition protection. However, there are
some condensing units, such as those with 3-phase
compressors, that are not ignition protected. Do not
install non-ignition protected units in spaces containing
gasoline engines, tanks, LPG/CPG cylinders, regulators, valves or fuel line fittings. Failure to comply may
result in injury or death.
Before mounting the unit, rotate the blower for discharge in
the desired direction by removing the screws from the blower
mounting flange and any supporting the rear of the blower,
then replacing all screws and remounting the electrical box (if
needed).
Mount the unit on a horizontal surface, and fasten securely
with the hold-down clips provided. If the unit has a detachable
electrical box and you wish to mount it remotely, it should be
securely fastened to a bulkhead or deck.
Site Location Checklist
• Adequate space for access to refrigerant, and seawater
and electrical connections
Route the condensate drain so that it flows freely to an
overboard fitting or sump. Do not permit condensate to puddle
in the bilge. Note that most Cruisair self-contained units have
two condensate drains, one at each end. It is recommended
that you use both drains for best results, but if you choose to
use only one condensate drain, place the included plug in the
other hole.
• Accessible for service and maintenance
• Flat, horizontal surface
• Away from direct spray from engine air intakes or water
washdown
• Maximum refrigerant tube run is 50ft (15m)
Once the unit is correctly mounted, proceed to section titled
“Installing The Seawater Cooling System.”
Mounting the Remote Condensing Unit
Orient the unit so the refrigerant, electrical connections and
service ports are accessible.
On models with a plywood base, simply drill 4 mounting holes
through the base in appropriate locations and fasten the unit
with screws or bolts. Do not remove the plywood base or
shock mounts as they are part of the vibration and noise
isolation built into the unit.
Some models utilize a drain pan with bottom or side condensate drains. Screw or bolt through all corner holes of the pan
to mount the unit.
Do not remove any covers, caps or fittings that may expose
any wiring or refrigerant. Only remove these items when you
are ready to complete the installation. Removal of any covers
may result in damage to the electrical components. Removal
of the caps or fittings may result in refrigerant loss.
L-2086 Installation
7
❖ English
Installing The Cooling/Heating Unit
available for the air to get to the coil. A 2" (50mm) space in
front of the evaporator coil must be maintained.
This section applies only to remote condensing unit systems.
If you are installing a self-contained unit, skip this section and
go to “Installing The Seawater Cooling System”.
Site Location Checklist
• Unit is not located in an engine room or near an internal
combustion engine
Safety Warning
• There is no obstruction of airflow from return air grill to coil
A Cruisair cooling/heating unit should never be placed
such that it can circulate carbon monoxide, fuel vapors
or other noxious fumes into the boat’s living spaces.
Failure to follow this precaution could result in serious
injury or death.
• Accessible for service and maintenance, including the
return air filter
• Adequate space for and condensate drain connections
• Flat, horizontal and sturdy mounting location
• Condensate drain can be run continuously downhill from
unit to overboard fitting or sump
Ignition Protection Warning
• Space is sealed from the bilge or outside air
Cooling/heating units do not meet federal requirements
for ignition protection. Do not install in spaces containing gasoline engines, tanks, LPG/CPG cylinders,
regulators, valves or fuel line fittings. Failure to comply
may result in injury or death.
• Maximum copper tubing run between condensing unit and
cooling unit is 50 ft. (15m)
Mounting the Cooling/Heating Unit
Mount the cooling/heating unit so that the condensate drip
pan is beneath the unit. Some models require a mounting
frame or mounting leg kit, which is supplied separately. Other
models have integral mounting frames or the condensate pan
itself is the mounting base. See individual spec sheets for
specific guidelines.
Safety Warning
Do not terminate air handler condensate drain lines
within 3 feet (1m) of any outlet of engine exhaust
systems, nor in a compartment housing an engine or
generator, nor in a bilge, unless the drain is properly
connected to a sealed condensate or shower sump
pump. Exhaust and/or bilge fumes can travel up a drain
line and mix with the return air blowing into living areas.
Route the condensate drain hose steadily downhill so that the
condensate flows freely to an overboard fitting or sump. Do
not permit condensate to puddle in the bilge. Some Cruisair
cooling/heating units have two condensate drains, one at
each end. It is recommended that you use both drains for best
results. If you choose to use only one condensate drain, plug
the other.
Selecting the Site
Because of the diversity of available cooling/heating units,
there is a great deal of flexibility in selecting the location.
Typically the unit is located low in the cabin, with the discharge grill as high as possible for good cooling performance
and away from the return air for proper air circulation.
Be careful when bending the extension tubes on the evaporators. Do not allow the tubing to kink and do not twist or bend
the tubing at the connection point close to the coil or the joints
may crack. If bending by hand make large radius bends. Use a
tube bender if a tight bend is required.
There are basically 2 types of cooling/heating units, drawthrough and blow-through. Figures 5 and 6 show typical
cooling/heating unit installations.
Installing the Refrigerant Tubing
1. Draw-through units typically have squirrel-cage blowers
that are strong enough to push air through ducting to the
discharge grill.
Use refrigerant-grade soft copper tubing of the correct sizes to
connect the cooling/heating unit to the condensing unit. Note
that tee-joints will be needed if more than one cooling/heating
unit is used with a single condensing unit. The tees must be
properly oriented to provide best efficiency. (See Figure 7,
Refrigerant Line Size Chart.)
2. Blow-through units use a fan or blower to blow air across
the evaporator coil for direct discharge through a grill. The
discharge air from these units should not be ducted.
Some cooling/heating units are designed for overhead use,
and may be mounted below a flybridge console or seating.
This setup will draw return air through the overhead, with
discharge air either directly blown back down into the area or
ducted to overhead grills.
Only use refrigerant-grade seamless soft copper tubing. Never
use any type of plastic or rubber hose or tubing.
The refrigerant tubes can run uphill, downhill or sloping as
required and can have as many bends as necessary. Avoid
sharp bends that could result in kinks in the tubing. The
cooling/heating unit has additional tubing to help with installa-
It is not necessary for the evaporator coil to be placed directly
in front of the return air grill, but an unobstructed path must be
L-2086 Installation
8
❖ English
also make winterizing the system much easier.
tion. Take care when bending this tubing as it can easily kink
or crack a weld joint resulting in refrigerant loss.
Figure 8 shows a properly plumbed system and some
common mistakes.
Both refrigerant lines should be insulated individually.
When putting the recommended closed cell foam insulation
over the tubes, cover the ends of the copper tubes to prevent
foreign material and moisture from getting inside the copper
tubing. After checking for leaks, insulate the connecting flare
nut joints and tee-joints to prevent secondary condensation.
Secure tubing every 3 feet (1m) as necessary for support.
Through-Hull Inlet Fitting
A separate through-hull fitting must be installed for each air
conditioning seawater pump. Do not attempt to draw water
from an engine, generator, or other through-hull fitting.
A scoop-type through hull should be installed facing forward,
and as far below the water line and close to the keel as
possible.
The copper tubing is connected to the condensing unit and
cooling/heating unit with flare joints. To prevent refrigerant
leaks, flares must be formed correctly with the proper flaring
tool. Only 45-degree single flares should be used.
Drill a properly sized hole for the through-hull fitting. Bed the
scoop with marine sealant designed for underwater use, and
tighten the nut onto the through-hull to secure it.
Flares should be made following the instructions of the
particular flaring tool. Make sure to slide the flare nut onto the
tube before flaring. A drop of oil on the tube can ease the
flaring process. The surface of the flare face must be smooth
and free of defects to ensure that the joint won’t leak. The flare
should be large enough in diameter to fill the flare nut
completely.
Seacock
A full flow seacock should be installed directly onto the
through-hull fitting. Use Teflon tape or other sealant on the
threads. The seacock must be accessible and easy to close in
case of emergency, or to clean the strainer.
Once you have completed installing the cooling/heating unit and
have made the refrigerant connections between the cooling/
heating unit and the condensing unit, proceed to on to the next
section “Installing The Seawater Cooling System.”
Strainer
A seawater strainer must be installed between the seacock
and the pump, and should be situated to provide easy access
for cleaning. The strainer must be located vertically above the
seacock and below the pump so any air that gets into the
strainer can get out.
Installing the Seawater Cooling System
Make sure the water flow through the strainer is in the correct
direction. Some strainers have an arrow that shows correct
flow direction.
The following installation instructions apply to both selfcontained and remote condensing units.
Importance of a Self-Draining System
Mount the strainer to a bulkhead so it is properly supported
before connecting hoses. Use Teflon tape or other sealant on
pipe threads.
Along with restricted ducting, a poorly plumbed seawater
system is one of the most common installation problems on
marine air conditioners. When water flow is lost, not only will
the air conditioning units no longer cool or heat, the units and
the pump could be damaged from running with no water flow.
Seawater Pump
Centrifugal pumps are not self-priming, and must be mounted
so that they are below the heeled waterline in any given
operating condition. The pump should be accessible for future
service.
When using a centrifugal seawater pump, it is imperative that
the seawater piping be routed continually uphill from the
through-hull inlet to pump and to the condenser, then smoothly
up or down to the overboard discharge, without any dips or
loops, and with only one high point in the system. This is said to
be self-draining because all water would drain out of the piping
if the boat were lifted out of the water.
Mount the pump so the outlet is directed upward so air can
escape. The head on some pumps can be rotated to allow
mounting on a vertical bulkhead. See Figure 9.
Self-priming pumps are available if the pump cannot be
mounted below the waterline.
Whenever air gets into the system, which can happen in
heavy seas or a sharp turn, it can become trapped in the
pump. Because a centrifugal pump cannot pump air, flow
through the system is lost.
Required seawater flowrate is 4 gpm per ton
(12,000 Btu/hr) of total system capacity.
A self-draining seawater system will allow air in the piping to
rise naturally through the pump and then be expelled. It will
L-2086 Installation
9
❖ English
Manifolds
need to be larger than the outlet pipe size. Do not use
pump connections to determine hose size.
If a pump is serving multiple units, then a seawater manifold
will be needed to supply water to all units. This can be as
simple as a TEE for 2 units, or a custom made manifold for up
to 7 or 8 units.
•
The "Pump Inlet" recommended pipe size includes all
fittings and hose (through-hull, seacock, strainer, etc.) up
to the pump inlet connection. The "Pump Discharge"
includes all piping/hose and fittings from the pump to the
air conditioning unit or manifold, and to the overboard
discharge.
•
Use larger hose when the run is longer than 16 feet (5m).
It is very important to consider manifold orientation so that all
air conditioning units get the proper flow of water. See Figure
10 for manifold information.
A manifold can also be used on the outlets of the air conditioning units when using a single overboard discharge.
Bonding
Bond all metallic parts (through-hull fittings, valves, strainer,
manifolds, etc.) that are in contact with seawater to the
vessel's bonding system in accordance with ABYC standards
E-8 and E-9. Items should only be bonded or grounded once.
If an item is in contact with an electrically grounded part
(pump head or seawater condenser) then it should not be
bonded again.
Overboard Discharge
The overboard fitting should be located between 1 to 2 inches
(25 - 50 mm) above the water line. This is to facilitate visual
confirmation of water flow, but also close enough to the water
to minimize splashing noise.
If the overboard fitting must be installed below the heeled water
line, then a valve must be installed per ABYC standards.
Installing The Air Distribution System
Seawater Piping
•
Only use reinforced marine grade hose or other suitable
piping (PVC, CPVC, Cupronickle, or Stainless steel).
•
Double clamp all hose connections.
•
Use only plastic, bronze, or stainless steel fittings (do not
use brass).
•
Avoid loops or dips in the hose runs.
•
Make sure enough hose is used to allow future removal of
components.
•
Use the correct size hose, fittings, and components. See
the table below for proper seawater sizing. Note that the
pump inlet piping (including through-hull and strainer) may
The following instructions apply to both self-contained units
and remote condensing systems, except as noted. Refer to
Figure 11 for proper grill and duct sizes.
Return Air Grill (RA Grills)
The return air grill should be located so there is unobstructed
airflow to the unit’s evaporator coils. Installing ducting between
the return air grill and the air conditioning unit is not normally
necessary and should be avoided. The grill may be located on
a side opposite the evaporator coil so long as airflow to the
coil is unobstructed.
An air filter must be used to prevent the evaporator coil from
collecting dirt and lint. The filter can be located at the evaporator coil or at the grill. Only one filter should be used. Most selfcontained units and cooling units are supplied with an air filter,
but if the filter is not easily accessible, use a filter on the return
air grill.
Recommended Seawater Pipe Sizes
Flow Rate
(gpm)
Pump
Inlet
Pump
Discharge
1-4
5/8"
5/8"
4-7
3/4"
5/8"
7 - 11
1"
3/4"
11 - 15
1"
1"
15 - 20
1 1/4"
1"
20 - 25
1 1/4"
1 1/4"
25 - 30
1 1/2"
1 1/4"
30 - 40
1 1/2"
1 1/2"
40 - 45
2"
1 1/2"
45 - 65
2"
2"
L-2086 Installation
Ducts
Insulated flexible ducting or built-in ducting may be used to
route air from the blower to the discharge grill. Note that blow
through cooling units are installed directly behind the discharge grill, and ducts are unnecessary. Likewise, with some
overhead cooling/heating units, air is discharged directly into
the compartment without ducts.
Ducting Guidelines
Secure duct to blower or transition box (plenum) with screws
and duct tape. When using insulated flexible ducting, make
sure inner duct is secured and sealed to adapter before
pulling insulation over connection.
10
❖ English
Plenums, or transition boxes are used with flexible ducting to
split and route the discharge air as needed. Figure 12 shows
several plenum configurations.
Location
The switch assembly should be mounted on a vertical
bulkhead where it can easily be seen and reached. There
should be rear access with sufficient clearance for the wiring
and the protective cover. The thermostat bulb is on a 10 ft
(3m) long capillary tube, and the switch assembly must be
installed close enough to the unit so the bulb can be mounted
in the return air path.
• Ducting must be properly sized for the airflow. If the duct run is
longer than 10 feet (3m), use the next larger duct size.
• Use of insulated duct is recommended, and is mandatory
when used in high heat areas or where condensation
would be a problem.
• Run flexible ducting tightly and smoothly, with as few bends
as possible.
Remote condensing systems use SA type switches which
have terminal strips that must be mounted to the back of the
bulkhead where all field wiring terminates. This location must
be easily accessible for wiring connections and service.
• Keep ducts as short as possible.
• Support ducting to prevent sagging during boat operation.
• Trim excess ducting before attaching to transition adapters.
• Make sure ducting is not crushed or kinked.
One and two-knob slave switch assemblies should be installed in
the cabin where the slave cooling unit is operating.
• Use a flexible transition duct between blower and any builtin ducting.
Mounting
• If possible, rotate blower to keep duct run as short and
direct as possible.
Cut a hole in the bulkhead using the template shipped with the
switch, or one from the back of this manual. See Figures 13a
and 13b for templates and switch dimensions.
Discharge Air Grill
Attach the terminal strip to an accessible location on the back
of the bulkhead (remote systems only). Self-contained
systems have a 10-foot (3m) harness with a plug that connects to the self-contained unit.
When used with flexible ducts, a grill plenum should be
incorporated behind the discharge grill. Location of this grill
should be as high as possible in the cabin, and oriented so
that air flow between discharge and return encompasses as
great an area as possible in the cabin. Care should be taken
to avoid “short cycling,” a situation where the conditioned air is
returned to the coil without being substantially affected by the
cabin air.
Carefully route the thermostat bulb from the switch to the
return air path of the unit so the capillary tube does not get
kinked. The large bulb must sense the return air, and not
touch the evaporator coil. If a second smaller "anticipator" bulb
is attached to the main bulb, it should be installed into the
discharge duct.
After making all wire connections, install the protective plastic
cover (remote systems only) over the terminal strip. Next
install the plastic cover over the back of the switch assembly
(remote and self-contained systems) and mount the switch to
the bulkhead with the 4 screws provided.
Installing the Control Unit
The SMX Control
If your system has SMX controls, refer to the appropriate SMX
II or SMX Net Control System Installation/Operation Manual.
The Rotary Knob Switch Assembly
Installing the Pump Relay
The following instructions apply to both self-contained and
remote condensing unit systems using a rotary-knob switch
assembly.
The following instructions apply to both self-contained and
remote condensing unit systems that have multiple A/C units
served by a single seawater pump. If you only have one A/C
unit, or each unit has it's own seawater pump, then skip to the
next section.
Warning
The rotary knob switch assembly switches line voltage
(115 or 230VAC) and in many case full power of the
unit. The selected mounting location must be safe in
regards to voltage as well as heat produced by the
switch assembly.
L-2086 Installation
Location
The pump relay is generally located in the engine room near
the seawater pump, but it can be mounted anywhere that is
convenient and accessible. It must be in a dry location, away
from any possible water spray, with room for some heat
dissipation.
11
❖ English
• If there is only one a/c unit, the seawater pump does not
require a separate breaker, but make sure the breaker is
sized for the combined load of the unit and the pump. If
multiple a/c units are supplied by a single pump, then a
pump relay will be needed, and will require it’s own circuit
breaker.
Warning
PR3X and PR8X pump relays are certified ignition
protected. However, pump relays with electromechanical relays or contactors (such as 3-phase pump relays)
are not ignition protected and must never be installed in
spaces containing gasoline engines, tanks, LPG/CPG
cylinders, regulators, valves or fuel line fittings. Failure
to comply may result in injury or death.
• All units must be grounded to minimize the potential hazard
of electrical shock and personal injury.
Voltage and Triggers
PR3X and PR8X pump relays are identical in operation. When
the first A/C unit turns on, the pump relay will turn on the
seawater pump, and the pump will stay on until the last A/C
unit shuts down.
The PR3X can operate up to 3 A/C units, and the PR8X can
operate up to 8 A/C units. Both can operate 115V and 230V
pumps.
Triggers are used in the pump relays to isolate the signals
from each A/C unit. Some pump relays come with preinstalled triggers, or you can buy triggers separately. Triggers
come in 115V and 230V, and must match the control voltage
of the A/C unit. Both 115V and 230V triggers can be used in a
single pump relay if the system requires it.
The trigger is simply a relay that closes when the A/C unit
turns on. Because each trigger is isolated, the polarity of the
signals from the A/C units does not matter.
Electrical Connections
• All metallic fittings in the seawater system that are isolated
from the a/c unit or pump by rubber hose should be bonded
per ABYC standards E-8 and E-9.
Warning
Make sure all power is off before opening any
electrical box.
• On larger F-type condensing units a fuse can be added to
protect the fan and control wires.
Note
The following guidelines apply to both self-contained and
remote condensing unit systems:
Always follow ABYC guidelines or local codes when selecting
breakers and wire sizes.
• Failure to properly ground and bond the system will void
warranty.
Three Phase Power
• All electrical connections should be made within the
electrical junction boxes supplied with the units. Most units
have terminal strips that are labeled or have color-coded
wiring. Open terminal strips (such as supplied with switch
assemblies) require that the included terminal strip covers
be installed over the strip and switch back after installation
is complete.
Some larger compressors and pumps have 3 phase motors
that will run forwards or backwards depending on the wire
connections. Reciprocating (piston type) compressors can run
either way without any problem, but scroll compressors and
centrifugal pumps are direction sensitive and must be wired
so the motors run the correct direction. If running backwards,
Scroll compressors will usually make loud, unusual noises
and will not perform properly.
• Wiring diagrams are included in the back of this manual
and under the cover of the electrical boxes on all units.
Contact Dometic Corporation if you are not sure if you have
the correct diagrams.
• Each air conditioning unit requires it’s own dedicated circuit
breaker, of the appropriate size. See the table below for
suggested circuit breaker and wire sizing.
L-2086 Installation
12
❖ English
Safety Warning
Inspecting the Self Contained Unit
To prevent a possible electrical shock in the event a
component has an electrical breakdown, which could
result in serious injury or death, always ground the
system in the following manner:
• Is the air conditioning unit securely mounted?
• Is the unit located so that it will not draw fumes from the
engine room and discharge them into the compartment?
• Are condensate drains properly routed to an overboard
discharge or sump?
• Use proper wire size with a ground to feed power from the
ship’s electrical panel to each cooling unit junction box.
Make sure the ground wire is properly connected to the
ground buss in the ship’s service distribution panel and to
the ground lug in the cooling unit’s junction box
• If only one condensate drain is being used, has the hole at
the other end of the tray been plugged?
Inspecting the Condensing Unit
• Connect the junction box ground lug to the P/L box green
wire (or to the switch assembly terminal strip).
(Remote Condensing Unit Systems Only)
• Use proper wire size with a ground to feed the power from
the ship’s electrical panel to the condensing unit’s junction
box. Make sure the ground wire is properly connected to
the ground buss in the ship’s service distribution panel and
to the condensing unit’s ground lug.
• Are the fasteners accessible if it is necessary to remove
the unit for service later?
• Is the condensing unit mounted securely using the integral
wooden baseboard or drain pan?
Inspecting the Cooling/Heating Unit
• Ground the seawater pump, and pump relay (if used) to the
condensing unit’s ground lug.
(Remote Condensing Unit Systems Only)
• Is the unit securely mounted?
• Bond the ground lug on the condensing unit to the ship’s
grounding system.
• Are condensate drains properly routed to an overboard
discharge or sump?
• Check the continuity of the ground system before the
system is energized.
• If only one condensate drain is used, have any other drain
holes in the drip tray been plugged?
Note
Inspecting the Refrigerant Connections
Always follow ABYC guidelines or local codes when selecting
breakers and wire sizes. ABYC standards are available from:
American Boat and Yacht Council, 3069 Solomon’s Island Rd.,
Edgewater, MD 21036, Telephone: (410) 956-1050.
(Remote Condensing Unit Systems Only)
• Are flare joints made with forged flare nuts and properly
tightened?
• Are flare joints and tees properly insulated?
• Are copper refrigerant tubes individually insulated?
Final Inspection
• Are tubes fastened securely to the boat every three feet or
as needed throughout their length?
Prior to charging or energizing the system, conduct a final
inspection, using the following checklist.
Inspecting the Air Distribution System
• Is there unobstructed airflow from the return air grill to the
coil?
Inspecting the Seawater Cooling System
• Is there a lint screen or filter in the return air path where it
is accessible for regular cleaning?
• Is the seawater pump properly sized for the system?
• Is the pump oriented correctly and mounted securely with
the pump outlet directed vertically upwards?
• Have flexible ducts been pulled tight to remove bends and
constrictions?
• Is the centrifugal seawater pump located so it is below the
water line at all times?
• Are grills correctly sized for the system?
• Are the inlet and outlet thru-hulls secure, properly sealed
and properly oriented?
• Are all hose clamps tight?
• Are seawater hoses double clamped?
• Are there any loops or dips in the seawater plumbing that
might cause the system to become air locked?
• Is the strainer located between the seacock and the pump,
and is it correctly oriented?
• Are all metallic seawater fittings properly bonded?
L-2086 Installation
13
❖ English
Inspecting the Control/Switch Assembly
and Electrical Wiring
You will need the following tools to complete the
charging procedure:
• Is the thermostat sensor or thermistor properly located and
secured in the return air path and not in direct contact with
any metal objects? (For switch assemblies with two
sensing bulbs, the large one goes in the return air path and
the small one in the discharge air path.)
• R-22 container (typically the disposable-type container
color-coded green for R-22)
• four-valve gauge manifold with self-closing fittings on the
charging hoses
• vacuum pump
• Are all wiring harnesses properly secured?
• base valve wrench and hand tools
• Are wiring connections made, color to color, correctly at
terminal strips?
• accurate thermometer
• Are plugs properly aligned and securely connected?
Proceed as follows:
• Are all components properly grounded and bonded?
1. Make sure all flare joints are well made and tight.
• Are proper sized circuit breakers used?
2. Do not touch the condensing unit base valve stem covers
or white port caps. Remove the red port cap on the
discharge (right side) base valve (or on a field-installed inline tee fitting).
• Are terminal strips located in a dry, safe place and properly
covered?
Charging the System with Refrigerant
3. Connect the vacuum pump hose to the vacuum pump.
Connect the refrigerant supply line to the refrigerant
container (making sure the refrigerant container valve is
OFF). Connect the low pressure gauge hose, to the red
capped port. At this point, do not connect the high
pressure charging hose to anything.
Self-contained units are precharged from the factory and do not
need further charging. If you are installing a self-contained
system, skip this section and proceed to “Initial Startup”.
The following instructions should be followed in evacuating
and charging a Cruisair remote condensing unit system with
R-22. Some special ordered units contain refrigerant other
than R-22. Please follow the special charging procedures
included with the unit.
4. Close all four gauge manifold valves.
5. Energize the vacuum pump and open the manifold valves
for the vacuum pump, the refrigerant container and the
red-capped access port.
Notice
6. As the pump operates, you will see the low pressure test
gauge fall to a vacuum. When the vacuum reaches 28 in.
Hg close the vacuum pump valve and turn the vacuum
pump off. Leave the system for 15 minutes and then
observe the gauge. If any vacuum has been lost, look for
leaks, especially at flare joints. Then return to step #3
above and re-evacuate the system.
US federal law prohibits the intentional release of
refrigerant gases into the environment, including the
R-22 refrigerant used in most Cruisair air conditioning
systems. Special care must be taken when installing,
charging, and servicing Cruisair equipment to prevent
any loss of equipment. Only EPA certified technicians
with the proper equipment should perform service on
the refrigerant circuit of the system.
7. Open the vacuum pump valve and leave the vacuum
pump operating for at least 6 hours, until a vacuum of at
least 29 in. Hg is achieved. Close the vacuum pump valve
and turn the vacuum pump off. Wait one hour. If no
vacuum is lost, proceed with charging. If any leaks are
indicated, reinspect flare joints for leakage, and return to
step #3 above to re-evacuate the system.
Charging a New System
There are three refrigerant circuit components in a Cruisair
remote condensing unit system: the condensing unit, the
cooling/heating unit and the copper refrigerant lines. The
condensing unit is shipped from the factory charged with
approximately the right amount of refrigerant needed for the
whole system.
8. Open the refrigerant container valve slowly and allow gas
to enter the system until the low pressure gauge rises to
zero. You have now vapor charged the evacuated lines
and cooling/heating unit with refrigerant to a gauge
pressure of zero. Close the refrigerant container valve.
The procedure will be to evacuate the nitrogen and air from
the cooling unit and the copper tubing, then release the
refrigerant from the condensing unit into the entire system. To
facilitate this procedure, there is a special evacuation port (red
cap) located on the base valve of the condensing unit .This
port has a schrader valve so you can evacuate and vapor
charge the lines and cooling unit without releasing the
refrigerant in the condensing unit.
L-2086 Installation
9. Remove the low pressure gauge hose from the red
capped port. Replace and tighten the red cap.
14
❖ English
Removing Refrigerant from the System
10. Remove both condensing unit base valve stem caps.
Open both base valves fully by turning the valve stems
fully counterclockwise. This will allow the refrigerant in the
condensing unit to enter the system. Replace and tighten
the valve stem caps.
When adjusting the charge in the refrigerant system, you may
have to remove refrigerant. It is a violation of federal law to
vent refrigerant to the atmosphere, and it is necessary that
you capture any refrigerant that is removed from the system.
There are two methods of doing this.
At this point, the system is basically charged and ready for
final gas charge adjustment once the boat is in the water.
1. Use an approved refrigerant recovery unit and refillable
refrigerant container.
Field Charging the System
2. Allow refrigerant to escape from the high pressure side
into a refillable refrigerant container.
To field charge a new unit, which has been evacuated and
basically charged, proceed as follows:
1. Remove both base valve stem caps and confirm that both
valve stems are in the back-seated or full counterclockwise position.
Initial Start Up
2. Remove the white gauge port caps from both base valves.
No gas should escape. If it does, retighten the cap and
call Dometic Corporation for assistance.
The following instructions apply to both self-contained and
remote condensing systems.
1. Open the seacock (seawater inlet valve).
3. Close all gauge manifold valves.
2. Turn on the circuit breaker for the air conditioner. If a
pump relay is installed, the breaker for the pump must
also be turned on.
4. Attach the gauge manifold hoses to the gauge ports: high
pressure on the right and low pressure on the left.
Connect the hose to the refrigerant container.
3. Following directions in the Operation manual, set the
system for cooling or heating at the switch or SMX
keypad, and adjust temperature setting so the unit will
turn on.
5. Open both base valves to the test position by rotating the
stems one turn clockwise.
6. Start the unit in the cooling mode, and observe the
system pressures. Use the charging curves shown in
Figure 29 to determine the proper pressures. These
charts are to be used as a GUIDE to setting pressures.
They are NOT designed to give EXACT pressure
settings. There are conditions that may cause pressures
to vary. Head pressures may vary +10%.
Accurate Suction Pressure settings are more critical for
proper functioning of the system. Through the gauge
manifold, adjust the gas charge to obtain the proper
system pressures.
4. Verify that water is flowing from the overboard discharge.
Check all overboards if more than one unit is installed.
5.
Allow unit to run for 10 minutes at high fan speed. Check
the temperature differential between discharge and return
air by placing an accurate thermometer in front of the
discharge grill and then in front of the return air grill.
In cooling, the difference between the discharge and
return should be 15 - 20°F (8.3 - 11.1°C), with normal
ambient air and water temperatures. In the heating mode
the differential can be as high as 25°F (13.9°C).
7. To remove the gauge manifold, backseat the base valves
by turning the stems fully counterclockwise. Tighten the
stem packing gland nuts. Replace and tighten the stem
caps. Remove the gauge hoses and replace and tighten
the port caps.
If everything checks out, the system is ready to go.
Note
It is recommended to charge the system in the cool mode (as
described above). If conditions are such that charging must be
done in the heat cycle, the gauge connections must be
reversed on the base valves. Also note that in the heat mode
the same pressures can be observed at two different charge
levels. This could lead to an overcharge condition.
L-2086 Installation
15
❖ English
DX Remote & Self-Contained A/C Systems • Operation
SMX II/SMX Net Operation
Operating Instructions - Rotary Controls
1. Open seacock (seawater inlet valve).
SA & SSA Models
2. Turn on main circuit breakers for the air conditioning
system. If there is more than one unit on board, you must
also turn on the breaker for the seawater pump.
1. Open the seawater inlet valve.
2. Set the OFF -
- ON knob to the OFF position.
3. Adjust SMX settings as desired.
3. Turn on the main circuit breakers on your boat’s electrical
panel designated for the air conditioning unit. If there is
more than one air conditioning system on board, you must
also turn on the breaker for the seawater pump.
Hint
It is good practice to check for seawater flow by observing the
overboard discharge when the system is first turned on. If you
do not observe steady water flow, shut the system down and
check the seawater system.
4. Set the thermostat by turning the knob (WARMER/
COOLER) to the desired mode of operation.
5. Set the fan speed control to
6. Turn the top control knob to
Power On
(HIGH).
When AC power is applied to the system at the circuit breaker,
the SMX microprocessor retrieves from permanent memory
the last operating configuration. This process takes about four
seconds, after which the system will begin operating just as it
had been when power was last turned off.
to energize the blower.
7. Turn the top control knob to ON. The compressor will
start, and the unit will begin to cool or heat, depending on
which mode of operation you have selected. Verify that
water is flowing from the overboard discharge.
System Off
Press the OFF key to turn the system off. Note that the data
display remains energized even when the system is off. The
fan can be turned on manually when the system is in the off
mode.
8. To set the thermostat, allow the unit to operate until the
area is cooled or heated to the desired temperature. At
this point, turn the
knob (WARMER/COOLER) slowly
toward the center position until you hear it “click” once.
The thermostat is now set to maintain the desired
temperature.
Note
The SMX has built-in protection against sudden power
interruptions. The system automatically stores the current
operating configuration in permanent memory every time you
make changes. (The new operation mode must be in affect
for 10 seconds before it is saved into permanent memory.)
When AC power is lost, the SMX system retains these
settings, and when AC power is restored it resumes operation
using the same settings as before.
9. Set the fan speed to provide the desired flow of air, using
the center knob.
10. If you turn the system off, or if you wish to switch between
cooling and heating, wait three minutes to allow the
system’s internal pressures to equalize before attempting
to restart.
Hint
Selecting Setpoint
It is good practice to check for seawater flow by observing the
overboard discharge when the system is first turned on. If you
do not observe steady water flow, shut the system down and
check for obstructions in the seawater cooling system.
Press the SET key and the current setpoint will be displayed.
Press the UP or DOWN key to change the setpoint.
Displaying Temperature
To display cabin temperature, press the TEMP key.
Operation Instructions - SMX Controls
SMX II Only
There are two different SMX control systems available, SMX II
and SMX Net. The following are basic operation instructions
for both systems. For complete installation and operation
information, consult the appropriate manual, L-2066 for SMX
II or L-2067 for SMX Net.
L-2086 Operation
Press TEMP a second time for an alternating display of inside
temperature and setpoint. Press a third time to return to
inside temperature only.
16
❖ English
temperature deviates from the setpoint. As setpoint is
approached, the fan speed automatically slows. Once setpoint
is reached, the compressor cycles off and the fan keeps
running on low speed.
SMX Net Series
If your boat is equipped with the optional outside thermistor,
press TEMP a second time to display outside temperature.
Press a third time for an alternating display of setpoint, inside
temperature and outside temperature. Note that the inside
and outside indicators show you which temperature is being
displayed.
Adjusting Brightness
Pressing the SET key repetitively will dim the LED display.
Keep pressing SET to return to full brightness.
Cool Mode
Note
To enter the COOL mode, press the COOL key. The Cool
Mode Indicator will light to show that you have selected the
cooling mode.
SMXLB keypads automatically adjust according to cabin
lighting.
Using The Humidity Control Routine
The Cooling Indicator will be lit whenever the system is in the
cooling mode and the compressor is actually running. When
the compressor cycles off, the Cooling Indicator goes off, but
the Cool Mode Indicator stays on.
When engaged, the SMX humidity control routine automatically turns the air conditioning system on at timed intervals to
remove moisture from the air. The system is programmed at
the factory for average values. To change the factory settings,
see “Humidity Control Program”.
Heat Mode
Press the HEAT key to select HEAT Mode. The Heat Mode
Indicator will light to show that you have selected the heating
mode.
To start the dehumidification program:
• Press OFF.
• Press COOL, HEAT and FAN keys simultaneously.
For the SMXir Remote Control only - Press the Dehumid
key to enter dehumidification mode.
The Heating Indicator will be lit whenever the system is in the
heating mode and the compressor is actually running. When
the compressor cycles off, the Heating Indicator goes off, but
the Heat Mode Indicator stays on.
• The data display will flash HU, indicating that the program
is active.
Automatic Changeover
• To halt the dehumidification program, press any key. The
HU message will stop flashing.
Press the COOL and HEAT keys simultaneously for AUTOMATIC CHANGEOVER between COOL and HEAT Modes.
The mode indicators will light, to show that the system is in
the automatic changeover mode.
Safety Note
Whenever the SMX system is in the dehumidification mode,
all of the system safeguard controls remain active. If the
seawater flow fails or if line voltage falls below preset limits,
the system will automatically shut down. If AC power is
interrupted, the system will automatically resume operation in
the dehumidification mode when power is restored.
For the SMXir Remote Control only - Press the Auto
Switchover key to enter automatic changeover mode.
Note that the Cooling or Heating Indicator will come on when
the compressor is running to show when the system is
running in the cooling or heating mode.
Anti-Ice Routine
The SMX control will occasionally shut down the compressor
in the cooling mode to allow any ice that may have formed on
the evaporator coil to melt. The anti-ice shutdown only occurs
at inside temperatures lower than 70°F (21°C).
Manual Fan Speed Control
Press the FAN key to select manual fan control. The Manual
Fan Indicator will light to show that it is in the manual mode.
Then use the SLOW and FAST keys to select the desired fan
speed.
In a 10 minute cycle period, the compressor will shut off for 15
seconds per degree (°F) below 70°F. For example, if the inside
temperature is 67°F, the compressor will shut off for 45
seconds every 10 minutes.
Note that you can use the manual fan control to circulate air
even when the system is in the OFF mode.
Automatic Fan Speed Control
If in manual fan mode, press FAN key to select automatic fan
control. The Manual Fan Indicator goes off, and the system
will automatically adjust fan speed as the actual cabin
L-2086 Operation
17
❖ English
Owner Maintenance - Routine
Situation
Condensate Drains
Solution
Every three months, check the condensate drains for obstructions by pouring a quart of water rapidly into the condensate pan.
If it does not drain completely within 30 seconds, check the drain
outlets for clogging. Remember that many Cruisair systems have
two drains and hoses, one at each end of the unit.
1.
The unit will not operate at all.
Blown fuse or tripped circuit breaker. Replace fuse with time
delay type or reset breaker. Check for correct sizing.
2. Low voltage to unit. Check shoreside power supply and
rating of electrical power cord to boat.
Situation
Air Filters
Air from the unit does not feel cool (or warm in the heating
mode).
At least once a month, check the lint screen or filter behind
the return air grill or on the face of the cooling/heating unit and
clean if necessary.
Solution
1. The selector switch is set for FAN only. Switch the system
into the cooling or heating mode.
Seawater Connections
2. The thermostat is set incorrectly. Set the thermostat for a
cooler or warmer setting.
Verify that all seawater connections are tight, and check for
water flow from each unit’s overboard discharge.
3. Water flow is restricted. Clear restriction. Clean strainer.
Seawater Pump
If your system uses a rubber-impeller seawater pump, you
should inspect the impeller after 300 hours of operation.
Replace it if worn. If you have a centrifugal pump, regular
maintenance is not needed.
Situation
The unit operates but the cabin fails to cool normally.
Solution
1. Dirty air filter. Clean lint screen or air filter.
Seawater Strainer
Check the seawater strainer daily. Remove any debris.
2. The thermostat is set too high. Reset the thermostat to a
cooler setting.
Refrigerant Gas
3. The evaporator has iced. Turn the system to FAN only for
5 minutes, then restart.
The refrigerant gas (most likely R-22) used in your Cruisair air
conditioning system is adequate for the life of the system.
Routine “seasonal” charging of the system is not typically
necessary.
Situation
Compressor cycles on and off.
Solution
Winterizing the System
1. Dirty air filter. Clean lint screen or air filter.
Close the seacock and remove the inlet water hose from the
air conditioner. Allow all water to drain from the system.
Loosen the screws on the pump head to allow the water to
drain from the pump. Drain and clean the seawater strainer.
2. Water flow restriction. Clear restriction. Clean strainer.
Situation
Water dripping inside cabin.
Solution
Trouble Shooting
1. Condensate drain is clogged. Clean out drain holes.
Before you call for service, review this list. It may save you
time and expense. This list contains common occurrences that
are not a result of defective workmanship or materials. If you
need service after trying these procedures, call your nearest
Cruisair dealer.
2. Blockage in hose. Clear hose. Check downhill routing of
hose.
L-2086 Operation
18
❖ English
Limited Warranty Periods
Please read and keep this document with your important paperwork. Use it as a reference in the future. If you have any questions, please contact the Dometic Corporation Service Department at (804)746-1313 for clarification.
Note: Any model or replacement part that has been installed due to a warranty failure will carry only the remainder of the
original warranty. All warranties begin when the customer takes possession of the equipment. The warranty is extended to all owners
of the equipment commencing the date the original owner takes possession of it. Proof of original purchase may be required. Fuses
and MOV’s are used as safety devices to protect Cruisair equipment against over-current conditions caused by lightning or inductive
switching environments. These are not covered under warranty. We reserve the right to change our warranty policies and
procedures as well as our warranty allowances without notice.
Cruisair Direct Expansion (DX)
and Modulating Systems
Refrigerators/Freezers/Fish Boxes
The below warranty periods do not apply to systems that are
installed as described in Section II, item #7, of the Owner’s
Limited Warranty, document # L-0123.
• New, complete system installation using any member of the
SMX family.
The warranty includes the pump.
• New installation of entire system including condensing unit,
line sets, evaporator, etc.
2 year warranty including Parts and Labor
1 year warranty including Parts and Labor
• New, complete system installation using an electromechanical control (3-knob).
• New complete model sold as a partial system retrofit to an
existing Cruisair system.
The warranty includes the pump.
1 year warranty including Parts and Labor
1 year warranty including Parts and Labor
• New installation of condensing unit only, with line sets,
evaporators, etc. done by others i.e. not Cruisair precharged line sets and evaporators.
• New, complete model sold as a partial system retrofit to an
existing system.
Includes SMX family.
1 year warranty including parts and labor on
mechanical and electrical parts of condensing unit
only.
1 year warranty including Parts and Labor
Cruisair Tempered Water
Replacement Parts
• New, complete system installation using any member of the
SMX family.
• Replacement parts and components - example: A-509,
40401-30.
2 year warranty including Parts and Labor
90 day warranty, Parts only
NOTE: Excludes pump which has a 1 year warranty
• Replacement Compressors for other than Tempered Water
Systems - example: R3101-16T, DX equipment - installed
in an existing Cruisair system or a competitor’s system.
• New, complete model sold as a partial system retrofit to an
existing system.
Includes SMX family.
1 year warranty including Parts and Labor
1 year warranty including Parts and Labor
• Replacement compressors for Tempered Water - example:
30130-36 installed in an existing Cruisair system.
1 year warranty including Parts and Labor
Sentry Battery Chargers
• A Tempered Water compressor - example: 30130-36
installed with competitor’s equipment.
• New SM and FR series installation.
2 year warranty including Parts and Labor
90 day warranty, Parts only
• New G-series installation.
1 year warranty including Parts and Labor
* The box denotes the part of the warranty that pertains to this particular product.
L-2086
19
Revised: 8-19-04 L-0694
❖ English
Owner’s Limited Warranty
As hereinafter described, Dometic Corporation limits the duration of any implied warranty to the duration of the underlying
express warranty and also disclaims any liability for consequential or incidental damages arising from any application,
installation, use or malfunction of any warranted product.
Section I
rights is limited to the duration of the express warranty
as found in Section III. Some states do not allow limitations
on how long an implied warranty lasts, so the above limitation
may not apply to you.
What does the Limited Warranty cover?
Products manufactured by Dometic Corporation (Dometic) are
under limited warranty to be free from defects in workmanship
or materials under normal use and service with the obligation
of Dometic under this limited warranty being limited to
replacing or repairing any component(s) which shall disclose
defects within the time limits defined in Section III and which,
upon examination by Dometic, shall appear to the satisfaction
of Dometic to be defective or not up to specifications.
Section II
What does this Limited Warranty not cover?
This Warranty Shall Not Apply to:
1. Failures resulting from improper installation or use
contrary to instructions.
This Limited Warranty is made in lieu of all other express
warranties, obligations, or liabilities on the part of
Dometic. In addition, Dometic shall not be responsible
for any incidental or consequential damages. In those
instances in which a cash refund is made, such refund shall
effect the cancellation of the contract of sale without reservation of rights on the part of the purchaser. Such refund shall
constitute full and final satisfaction of all claims which
purchaser has or may have against Dometic due to any
actual or alleged breach of warranty, either express or
implied, including, without limitation, any implied
warranty of merchantability or fitness for a particular
purpose. Some states do not allow the exclusion or limitation
of incidental or consequential damages so the above limitation
may not apply to you. The terms and conditions of this
warranty shall be governed by the laws of the Commonwealth
of Virginia.
2. Failures resulting from abuse, misuse, accident, fire, or
submergence.
3. Any part manufactured by Dometic which shall have been
altered so as to impair its original characteristics.
4. Any parts which fail as a result of misuse, improper
application or improper installation.
5. Items not manufactured by Dometic, i.e., items which are
purchased from another manufacturer and supplied as
received by Dometic without alteration or modification
except as any part of an Dometic-manufactured unit or
component.
6. Components or parts used by or applied by the purchaser
as an integral part of products not manufactured by
Dometic.
7. Warranty does not cover damage to components that
comprise a Custom Wrapped Box Evaporator refrigeration
system (aka: catch boxes, fish boxes, etc.) when the box
is installed in such a way that the customer can move it.
These damages may include, but are not limited to:
crimped refrigerant linesets (copper tubing or flexible
linesets), refrigerant leaks, moisture ingression into the
refrigeration system, subsequent damage to condensing
unit from being operated with low refrigerant charge or
moisture in the system, broken refrigerant connections,
broken thermostat sensors, and/or broken constant
pressure valves.
The Dealer is not an agent for Dometic except for the purpose
of administering the above warranty to the extent herein
provided, and Dometic does not authorize the dealer or any
other person to assume for Dometic any liability in connection
with such warranty, or any liability or expense incurred in the
replacement or repair of its products other than those
expressly authorized herein. Dometic shall not be responsible
for any liability or expense except as is specifically authorized
and provided in this section.
Dometic reserves the right to improve its products through
changes in design or material without being obligated to
incorporate such changes in products of prior manufacture,
and to make changes at any time in design, materials, or part
of units of any one year's model, without obligation or liability
to owners of units of the same year's model of prior manufacture.
Installation and application of Dometic components is not
warranted by Dometic because Dometic has no control or
authority over the selection, location, application, or installation of these components.
Section III
This warranty gives you, the purchaser, specific legal rights,
and you may also have other rights which vary from state to
state. You also have implied warranty rights, including an
implied warranty of merchantability, which means that your
product must be fit for the ordinary purposes for which such
goods are used. The duration of any implied warranty
L-2086
What is the period of coverage?
See the Limited Warranty Periods, document # L-0694, for the
period of coverage.
20
❖ English
WARNING
All Dometic components bear a data plate on which there are
model and serial numbers. The serial number is date coded.
To determine whether or not any Dometic component is in
warranty, proceed as follows:
Dometic Corporation (Dometic) manufacturers of Cruisair, Grunert, Marine Air,
Sentry and Tundra Products, makes the following safety warnings concerning the
application, installation, use and care of its products. Although these warnings are
extensive, there may be specific hazards which may arise out of circumstances
which we have not outlined herein. Use this as a guide for developing an
awareness of potential hazards of all kinds. Such an awareness will be a key factor
in assuring your SAFETY and comfort.
1. Determine the manufacture date of the component from
the serial number on the data plate. If you are not familiar
with the date code, write or call the Dometic Customer
Service Department at (804)746-1313, to obtain the
manufacture date. The hours of the Customer Service
Department are 8:00 am - 5:00 pm (USA, Eastern Time
Zone) Monday through Friday excluding holidays.
ELECTRICITY - Many Dometic products operate on 115, 230 or 440 volt AC power.
Such voltages can be LETHAL; therefore, the chassis, cabinets, bases, etc., on all
components must be grounded together and connected to the vessel's grounding
system. Sparks can occur as switches, thermostats and relays open and close in
the normal operation of the equipment. Since this is the case, ventilating blowers
for the removal of hazardous fumes or vapors should be operated at least 5
minutes before and during operation of any Dometic product or group of Dometic
products. All electrical connections must be covered and protected so accidental
contact cannot be made by persons using the equipment, as such contact could be
LETHAL.
2. It is possible that there might exist a considerable time lag
between the date a component is manufactured and the
date it is put in service. In such instances, the date of
manufacture could indicate that the item is out of warranty.
However, based on the date the equipment is first put in
service, the item may still be covered by the Dometic
warranty described in Section I. For proof of date put in
service, Dometic will require a copy of the bill of sale of
the Dometic equipment from the installer or new boat
dealer to the original owner.
ELECTROLYSIS - Electrical leakage of any component can cause electrolytic
deterioration (electrolysis) of thru-hull components which could result in leakage
serious enough to sink a vessel which could result in loss of life. All Dometic
components must be kept clean and dry and checked periodically for electrical
leakage. If any electrical leakage is detected, the component should be replaced or
the fault causing the leakage corrected before the component is put back into
service.
GAS - CRUISAIR, MARINE AIR, GRUNERT and TUNDRA components utilize R-22
(Chlorodifluoromethane), R134a refrigerant (Tetrafluoroethane), R-407C (which
contains Diflouromethane (HFC-32), Pentafluoroethane (HFC125), and 1.1.1.2 Tetrafluoroethane (HFC134a)), R404A (R125/R143a/R134 (44%/52%/4%)), or
R417a, which are non-toxic, non-flammable gases; however, these gases contain
no oxygen and will not support life. Refrigerant gas tends to settle in the lowest
areas of the compartment. If you experience a leak, evacuate all personnel, and
ventilate area. Do not allow open flames in the area of leaks because refrigerant
gas, when burned, decomposes into other potentially LETHAL gases. Refrigerant
components operate at high pressure and no servicing should be attempted
without gloves, long-sleeved clothing and eye protection. Liquid refrigerant gas can
cause severe frost burns to the skin and eyes.
Section IV
How do you get service? Please Read the following Warranty Procedure.
WARRANTY PROCEDURE
VENTILATION - To cool or heat air, CRUISAIR, MARINE AIR and GRUNERT
components are designed to move air through a heat exchanger by a blower or
propeller fan. This design necessarily produces a suction on one side of the air
handling component and a pressure on the other side. Air handling components
must be installed so that the suction-pressure action does not: (1) pressurize an
area to the extent that structural failure occurs which could cause harm to
occupants or bystanders, or (2) cause a suction or low pressure in an area where
hydrogen gas from batteries, raw fuel vapor from fuel tanks, carbon monoxide from
operating propulsion engines, power generators or heaters, methane gas from
sewage holding tanks, or any other dangerous gas or vapor could exist. If an air
handling unit is installed in such a manner that allows potentially lethal gases or
vapors to be discharged by the air handling unit into the living space, this could
result in loss of life.
If the failure of a Dometic component is determined to be
covered under the Dometic warranty and the time in service is
determined to be within the warranty time limit, the owner has
the following three options:
1. Preferred option: Have a Dometic authorized Servicing
Dealer perform the work needed. The customer should
call Dometic's Service Department for a recommendation
as to the closest dealer. If the customer already knows an
authorized servicing dealer, the dealer should be contacted directly.
Maximum protection against the introduction of dangerous gases or vapors into
living spaces can be obtained by providing living spaces which are sealed from all
other spaces by use of airtight bulkheads and decks, etc., and through the
introduction of clean air into the living space. Bear in mind that the advent of air
conditioning, whether it be for cooling or for heating, naturally leads to the practice
of closing a living space tightly. Never close all windows and doors unless auxiliary
ventilating systems, which introduce clean outside air into the living space, are
used. Always leave enough window and door openings to provide adequate
ventilation in the event potentially lethal gases or fumes should escape from any
source.
2. If the customer contacts Dometic's Service Department
for a Servicing Dealer and Dometic has no one in that
particular area, Dometic will authorize the use of a local
service company and Dometic will work with the local
company to assist in any way possible.
CONDENSATE - All cooling units produce water condensate when operating on the
cooling cycle. This water must be drained from the cooling unit overboard. If
condensate is allowed to drip on a wooden structure, rotting or decay and
structural failure may occur which could result in loss of life. If condensate is
allowed to drip on electrical components, deterioration of the electrical components
could result in hazardous conditions. When an air conditioning system is in
operation, condensate drains may be subjected to negative pressure. Always
locate condensate drains as far as possible from points where engine waste and
other dangerous gases are exhausted so no such dangerous gases can be drawn
into the condensate drains.
3. The customer may send his equipment back to the factory
to have the repair work done. Dometic will make every
effort to return the equipment to the customer within a
three week time period. If the claim represents a legitimate warranty problem, Dometic will pay the freight both
ways. Dometic prefers option one and two, if at all
possible.
Warning
The customer may contact the Dometic Service Department
at (804) 746-1313.
L-0123
L-2086
Never sleep in a closed area on a boat when any equipment, which functions as a
result of the combustion of a volatile fuel, is in operation (such as engines,
generators, power plants, or oil-fired heaters, etc.). At any time, the exhaust system
of such devices could fail, resulting in a build-up of LETHAL gases within the
closed area.
Warning Revised: 10-16-03
Revised: 10-16-03
21
❖ English
Descriptions of Figures
Fig. 1
Fig. 2
Fig. 3
Fig. 4
Fig. 5
Fig. 6
Fig. 7
Fig. 8
Fig. 9
Fig. 10
Fig. 11
Fig. 12
Fig. 13
Fig. 14
Fig. 15
Fig. 16
Fig. 17
Fig. 18
Fig. 19
Fig. 20
Fig. 21
Fig. 22
Fig. 23
Fig. 24
Fig. 25
Fig. 26
Fig. 27
Fig. 28
Fig. 29
Fig. 30
Fig. 31
Fig. 32
Fig. 33
Fig. 34
L-2086
Typical Self-Contained Unit
Typical Remote Condensing Unit
Typical Draw-Through Cooling Unit
Typical Self-Contained Installation
Typical Draw-Through Cooling Unit Installation
Typical Blow-Through Cooling Unit Installation
Refrigerant Line Sizes
Seawater Piping, Proper System and Common Mistakes
Pump Head Orientation
Seawater Manifolds
Duct and Grill Sizes
Plenum Configurations
Switch Dimension and Templates
SHR5-16 StowAway Wiring, #082611
SH24C StowAway Wiring, #080264
SHF5-16-C StowAway Compact w/ 3-knob Control Wiring
SHF24-C StowAway Compact w/ 3-knob Control Wiring
SHUF18(C/CK)/1-HV StowAway Compact w/ 3-knob Control Wiring
SHUF5-16(C/CK)/1-HV StowAway Compact w/ 3-knob Control Wiring
WFAH6-16 Condensing Unit Wiring, #082201
R/F20-60C 1-Ph. Cond. Unit Wiring, #082534
R/F24-72 3-Ph. Cond. Unit Wiring, #082556
SA3-Z Switch Wiring
SA5-Z Switch Wiring
PR3X Pump Relay Wiring
PR8X Pump Relay Wiring
WFAH System Wiring, 115V
WFAH System Wiring, 230V
WFAH System Wiring, 230V, w/ Aux. Heat
R/F Type System Wiring, SA3-Z Switch, 1Ph.
R/F Type System Wiring, SA3-B Switch, 1Ph.
R/F Type System Wiring, SA3-Z Switch, 3Ph.
Refrigerant Charging Curves (R22)
Charging Systems with Alternative Refrigerants
22
❖ English
Fig. 1 - Typical Self-Contained Unit
Fig. 4- Typical Self-Contained Installation
Fig. 2 - Typical Remote Condensing Unit
Fig. 5
Typical Cooling Unit Installation (draw-through)
Fig. 3 - Typical Draw-through Cooling Unit
Fig. 6
Typical Cooling Unit Installation (blow-through)
L-2086
23
Fig.7 - Refrigeration Line Sizes
Unit or Line
Capacity
(Btu/hr)
4,000 - 12,000
16,000
20,000 - 24,000
30,000 - 48,000
60,000 - 72,000
Notes:
Recommended
Line Sizes
Discharge
1/4"
1/4"
3/8"
3/8"
1/2"
Suction
3/8"
1/2"
1/2"
3/4"
3/4"
• Maximum length of refrigerant line between condensing unit and
cooling unit is 50 feet (15m).
• Only use seamless refrigeration grade copper tubing.
• Insulate discharge and suction tubes separately.
• Use minimum 3/8" (10mm) thick closed cell insulation.
• Seal (glue and/or tape) all insulation seams.
• Use "dead-head" orientation of TEEs on multiple cooling unit
systems to help ensure proper distribution of refrigerant.
Refrigerant Line Sizes for Typical 2-Unit Split Systems
Cond. Unit Evap.#1 Evap.#2
(Btu/hr)
(Btu/hr) (Btu/hr)
L-2086
Discharge Lines
DU
D1
D2
Suction Lines
SU
S1
S2
10,000
5,000
5,000
1/4"
1/4"
1/4"
3/8"
3/8"
3/8"
16,000
8,000
8,000
1/4"
1/4"
1/4"
1/2"
3/8"
3/8"
16,000
12,000
4,000
1/4"
1/4"
1/4"
1/2"
3/8"
3/8"
20,000
10,000
10,000
3/8"
1/4"
1/4"
1/2"
3/8"
3/8"
24,000
12,000
12,000
3/8"
1/4"
1/4"
1/2"
3/8"
3/8"
24,000
16,000
8,000
3/8"
1/4"
1/4"
1/2"
1/2"
3/8"
30,000
16,000
16,000
3/8"
1/4"
1/4"
3/4"
1/2"
1/2"
36,000
20,000
16,000
3/8"
3/8"
1/4"
3/4"
1/2"
1/2"
48,000
24,000
24,000
3/8"
3/8"
3/8"
3/4"
1/2"
1/2"
60,000
30,000
30,000
1/2"
3/8"
3/8"
3/4"
3/4"
3/4"
72,000
36,000
36,000
1/2"
3/8"
3/8"
3/4"
3/4"
3/4"
24
Fig. 8 - Seawater Piping - Proper System and Common Mistakes
Fig. 9 - Pump head orientation
L-2086
Fig.10 - Seawater manifolds
25
Fig. 11 - Duct and Grill Sizes Tables
Draw-through &
Self-Contained
Unit Capacity
Minimum
Return Air Grill
Area
Fig. 12 - Plenum Configurations
Minimum
Supply Air Grill
Area
Minimum
Recommended
Duct Size
(Btu/hr)
(sq in)
(sq cm)
(sq in)
(sq cm)
(in)
(mm)
4K
64
413
32
206
4
102
5K
64
413
32
206
4
102
6K
70
452
35
226
5
127
7K
80
516
45
290
5
12 7
9K
98
632
49
316
6
152
10K
100
645
60
387
6
152
12K
130
839
70
452
6
152
16K
16 0
1032
80
516
7
17 8
18K
200
1290
100
645
7*
178
24K
240
1548
140
903
9
229
30K
350
2258
170
1097
10
254
254
36K
360
2323
196
1265
10
48K
480
3097
256
1652
12
305
60K
570
3677
290
1871
12
305
72K
690
4452
350
2258
14
356
* Exception: Cruisair 18K Remote Evaporators use 8" (203mm) duct.
Overhead
Cooling Unit
Return Air
Grill Size
(inches)
Minimum
Discharge
Grill Area
(in2/cm2)
Minimum
Recommended
Duct Size
(in/mm)
EB(U)LP12
22" x 6"
(2x) 50/320
(2x) 5/125
EB(U)LP16
22" x 6"
(2x) 50/320
(2x) 5/125
EBULP24
-
(2x) 70/450
(2x) 6/150
ESS12
10" x 12"
70/450
6/150
ESS16
12" x 12"
80/520
7/175
ETB16
12" x 12"
(2x) 12" x 6"
-
ETBD30
22" x 14"
(2x) 80/520
(2x) 7/175
EDS24
22" x 14"
(2x) 70/450
(2x) 6/150
EDS30
22" x 14"
(2x) 80/520
(2x) 7/175
Blow-Through
Cooling Unit
(Btu/hr)
Minimum
Return Air
Grill Area
(in2/cm2)
Minimum
Discharge
Grill Area
(in2/cm2)
Minimum
Recommended
Duct Size
(in/mm)
4-5,000
60/390
60/390
None
7-8,000
70/450
70/450
None
10,000
100/650
100/650
None
12,000
120/780
120/780
None
16,000
144/930
144/930
None
L-2086
26
Fig. 13a - Switch Dimensions and Templates
L-2086
27
Fig. 13b - Switch Dimensions and Templates
L-2086
28
Fig. 14 - SHR5-16 StowAway Wiring, #082611
Fig. 15 - SH24C StowAway Wiring, #080264
L-2086
29
Fig. 16 - SHF5-16-C StowAway Compact w/ 3-knob Control Wiring
Fig. 17 - SHF24-C StowAway Compact w/ 3-knob Control Wiring
L-2086
30
Fig. 18 - SHUF18(C/CK)/1-HV StowAway Compact w/ 3-knob Control Wiring
Fig. 19 - SHUF5-16(C/CK)/1-HV StowAway Compact w/ 3-knob Control Wiring
L-2086
31
Fig. 20- WFAH6-16 Condensing Unit Wiring, #082201
Fig. 21- R/F20-60C 1-Ph. Cond. Unit Wiring, #082534
L-2086
32
Fig. 22- R/F24-72 3-Ph. Cond. Unit Wiring, #082556
Fig. 23- SA3-Z Switch Wiring
L-2086
33
Fig. 24- SA5-Z Switch Wiring
Fig. 25- PR3X Pump Relay Wiring
L-2086
34
Fig. 26- PR8X Pump Relay Wiring
Fig. 27- WFAH System Wiring, 115V
L-2086
35
Fig. 28- WFAH System Wiring, 230V
Fig. 29- WFAH System Wiring, 230V, w/ Aux. Heat
L-2086
36
Fig. 30- R/F Type System Wiring, SA3-Z Switch, 1Ph.
Fig. 31- R/F Type System Wiring, SA3-B Switch, 1Ph.
L-2086
37
Fig. 32- R/F Type System Wiring, SA3-Z Switch, 3Ph.
L-2086
38
Fig. 33- Refrigerant Charging Curves (R22)
L-2086
39
Fig. 34 Charging Systems with Alternative Refrigerants
New A/C units are available from the factory with non-HCFC refrigerants.
R-417A (also known as NU-22® or Isceon 59®) is a direct drop-in replacement for R22. It will work with Alkyl Benzene and mineral lubricants so
standard compressors can be used. Note that some self-contained units
(with rotary compressors) and chillers (with scroll compressors) might
have R-407C with POE lubricant.
Both R-417A and R-407C are blended refrigerants, meaning they are
made up from multiple component refrigerants. In most cases the user will
not notice a change in operation or performance of these systems, but
charging a system with a blend requires some special considerations.
•
We currently don’t have charging curves for either gas. A system with a
blend must be charged by superheat.
•
The system should be charged with liquid refrigerant from the tank to
prevent fractionation. Note that some tanks have a dip tube so the
tank is used in the upright position, while other tanks will need to be
turned upside down to get liquid. This should be clearly marked on the
tank.
•
A partial leak in the system doesn’t necessarily mean that the
refrigerant needs to be removed and recharged. However, it is possible
that enough fractionation can occur that would require a complete
evacuation and recharge. This will be evident when trying to charge the
system and the temperature/pressures will not respond correctly.
To charge a split system with a blend:
1. Evacuate lines and evaporator (cooling unit) as normal.
2. Open base valves to release the refrigerant in the condensing unit.
3. Attach an accurate thermometer or temperature sensor to the suction
line near the base valve, at the 3 or 9 o’clock position on the line.
Insulate over the sensor so that the ambient temperature does not
affect the reading.
4. Open the suction base valve to the test position. The low-side gauge
should now register a pressure reading.
Glossary
5. Turn on the system in the cooling mode, and set the thermostat to a low
setting so the unit will stay on.
6. Allow the system to run for five minutes so the pressures will stabilize,
then measure the superheat. This must be done using the Dew Point
for conversion.
Note: There is no ideal superheat temperature. It should be in the range of
10° to 20°F (5.6° to 11.1°C), depending on the heat load. On cool days,
superheat will be lower, and on hot days it will be higher.
7. To reduce superheat, slowly add liquid refrigerant to the suction line. Do
this in very small increments and allow the system to stabilize before
taking another reading. DO NOT OVERCHARGE! If the system is
overcharged, refrigerant must be removed from the liquid line, using an
approved recovery cylinder.
Warning: You are charging with liquid refrigerant. To prevent liquid from
“slugging” the compressor, open the manifold valve only a small amount to
allow the refrigerant to flash from liquid to vapor in the charging hose. GO
SLOWLY! A special valve is available for charging liquids.
8. Once the superheat is set properly, close the manifold gauge valves, and
backseat the discharge base valve. Tighten the stem packing nuts, remove
manifold gauges, and replace service port caps.
Blend - A refrigerant that is made up of two or more single-component refrigerants.
Fractionation - Change in the composition of a blend because one
(or more) of the component refrigerants is lost (or removed faster
than the others). This happens because the components have
different boiling points. It can occur in a tank or system that has lost
gas, or locally in a system component such as a coil or accumulator.
Temperature Glide - Because of the different boiling temperatures of
the components, a blend will evaporate over a range of temperatures
(at a constant pressure). The difference between the Bubble Point and
the Dew Point is the Temperature Glide.
Superheat - The "extra" heat (beyond what is required to fully
evaporate the refrigerant) that the refrigerant picks up in the evaporator. Superheat is determined by measuring the refrigerant temperature (at the suction line) and then subtracting the saturation temperature (found from the pressure-temperature chart using suction
pressure). Use the Dew Point pressure for blends.
Bubble Point - The pressure at which a blend starts to boil. Listed in
the pressure-temperature chart.
Dew Point - The pressure at which a blend finishes boiling. Listed in
the pressure-temperature chart.
L-2270 Rev 10-24-03
L-2086
40
Cruisair Worldwide Service Dealer Locator
The majority of the service listings displayed for the United States are key members of the national Cruisair distributor or master
dealer network. If you need service, please contact the closest company shown. In most cases they will direct you to a local dealer
or service port. We have over 500 Cruisair dealers in the national Cruisair network, and one should be convenient to you.
The international companies listed are, in many cases, distributors and are capable of managing the majority of service requests
for the countries listed. In some cases they will refer you to a local dealer.
You may also contact us directly via the web site or call us in the US at (804) 746-1313.
For a complete and up-to-date Dealer locator list, please visit our website at http://www.cruisair.com/cruisair/dealer.html
Connecticut
USA
AAP Inc.
Location: Milford, VA, USA
Territory: National Coach & Mobile Products Only
Phone:
Fax:
Web:
804-633-9454
804-633-5499
www.aap.com
Alabama
A.E.R. Supply, Inc.
Location: Seabrook, TX, USA
Phone:
Fax:
E-mail:
281-474-3276
281-474-2714
[email protected]
Thom Chase Heating and A/C
Location: Chattanooga, TN, USA
Territory: Northern Alabama, Northern Mississippi,
Tennessee, Western Kentucky
Phone:
Fax:
E-mail:
423-344-6356
423-344-6356
[email protected]
Alaska
Southern California Marine Enterprises
Location: San Diego, CA, USA
Phone:
Fax:
E-mail:
Web:
619-224-2869
619-226-0496
[email protected]
www.southerncalmarine.com
Arizona
Southern California Marine Enterprises
Location: San Diego, CA, USA
Phone:
Fax:
E-mail:
Web:
619-224-2869
619-226-0496
[email protected]
www.southerncalmarine.com
Arkansas
A.E.R. Supply, Inc.
Idaho
Charles S. Miller Yacht Engine Service
Sure Marine Services Inc.
Location: Old Saybrook, CT, USA
Location: Seattle, WA, USA
Territory: Connecticut River Area
Phone:
Fax:
E-mail:
Phone:
Fax:
860-388-9183
860-388-2223
Illinois
Nautical Air Conditioning, Inc.
Location: Copiague, NY, USA
Phone:
Fax:
E-mail:
Web:
631-956-3456
631-956-3479
[email protected]
www.nauticalair.com
Delaware
J & S Marine Sales & Service
Location: Detroit, MI, USA
Phone:
Fax:
E-mail:
281-474-3276
281-474-2714
[email protected]
California
Southern California Marine Enterprises
Midwest Marine Supply
Location: St. Clair Shores, MI, USA
Location: Copiague, NY, USA
Phone:
Fax:
Phone:
Fax:
E-mail:
Web:
631-956-3456
631-956-3479
[email protected]
www.nauticalair.com
Florida
Cruisair Southeast, A Division of T.K. Alley, Inc.
619-224-2869
619-226-0496
[email protected]
www.southerncalmarine.com
Colorado
A.E.R. Supply, Inc.
Location: Seabrook, TX, USA
Phone:
Fax:
E-mail:
281-474-3276
281-474-2714
[email protected]
586-778-8950
586-778-6108
Nautical Air Conditioning, Inc.
Location: Copiague, NY, USA
Phone:
Fax:
E-mail:
Web:
631-956-3456
631-956-3479
[email protected]
www.nauticalair.com
Location: Dania, FL, USA
Indiana
Territory: Southeast Florida
Phone:
Fax:
E-mail:
Web:
954-920-0300
954-920-0301
[email protected]
www.cruisair-southeast.com
Cruisair Suncoast, Inc.
J & S Marine Sales & Service
Location: Detroit, MI, USA
Phone:
Fax:
E-mail:
(586) 463-3400
(586) 463-1792
[email protected]
Location: St. Petersburg, FL, USA
Midwest Marine Supply
Territory: Tampa, St. Petersburg and surrounding areas
Location: St. Clair Shores, MI, USA
Phone:
Fax:
E-mail:
Phone:
Fax:
727-526-7875
727-528-9519
[email protected]
Ward's Marine Electric, Inc.
Location: Ft. Lauderdale, FL, USA
Territory: Battery Chargers Only
Phone:
Fax:
E-mail:
954-523-2815
954-523-1967
[email protected]
Georgia
Beard Marine/Savannah
Location: Savannah, GA, USA
Phone:
Fax:
E-mail:
(912) 356-5222
(912) 692-1006
[email protected]
Location: San Diego, CA, USA
Phone:
Fax:
E-mail:
Web:
(586) 463-3400
(586) 463-1792
[email protected]
Nautical Air Conditioning, Inc.
Hawaii
Southern California Marine Enterprises
Location: San Diego, CA, USA
Phone:
Fax:
E-mail:
Web:
619-224-2869
619-226-0496
[email protected]
www.southerncalmarine.com
586-778-8950
586-778-6108
Nautical Air Conditioning, Inc.
Location: Copiague, NY, USA
Phone:
Fax:
E-mail:
Web:
631-956-3456
631-956-3479
[email protected]
www.nauticalair.com
Iowa
Location: Seabrook, TX, USA
Phone:
Fax:
E-mail:
206 -784-9903
206-784-0506
[email protected]
J & S Marine Sales & Service
Location: Detroit, MI, USA
Phone:
Fax:
E-mail:
(586) 463-3400
(586) 463-1792
[email protected]
Midwest Marine Supply
Location: St. Clair Shores, MI, USA
Phone:
Fax:
586-778-8950
586-778-6108
Nautical Air Conditioning, Inc.
Location: Copiague, NY, USA
Phone:
Fax:
E-mail:
Web:
631-956-3456
631-956-3479
[email protected]
www.nauticalair.com
L-0384 Revised: 11-10-04
Kansas
Mississippi
North Carolina
A.E.R. Supply, Inc.
Sea Chest Marine Distr.
Martin's Marine
Location: Seabrook, TX, USA
Location: New Orleans, LA, USA
Location: Wilmington, NC, USA
Phone:
Fax:
E-mail:
Territory: Gulf Coast (LA & MS)
Territory: North Carolina and Myrtle Beach, SC
Phone:
Fax:
Phone:
Fax:
281-474-3276
281-474-2714
[email protected]
Kentucky
800-535-8630
504-288-1758
Thom Chase Heating and A/C
Thom Chase Heating and A/C
Location: Chattanooga, TN, USA
Location: Chattanooga, TN, USA
Territory: Northern Alabama, Northern Mississippi,
Tennessee, Western Kentucky
Territory: Northern Alabama, Northern Mississippi,
Tennessee, Western Kentucky
Phone:
Fax:
E-mail:
423-344-6356
423-344-6356
[email protected]
Louisiana
A.E.R. Supply, Inc.
Location: Seabrook, TX, USA
Phone:
Fax:
E-mail:
281-474-3276
281-474-2714
[email protected]
Phone:
Fax:
E-mail:
423-344-6356
423-344-6356
[email protected]
A.E.R. Supply, Inc.
Location: Seabrook, TX, USA
Phone:
Fax:
E-mail:
281-474-3276
281-474-2714
[email protected]
Location: New Orleans, LA, USA
Location: Seattle, WA, USA
800-535-8630
504-288-1758
Phone:
Fax:
E-mail:
Maryland
206 -784-9903
206-784-0506
[email protected]
A.E.R. Supply, Inc.
Location: Annapolis, MD, USA
Location: Seabrook, TX, USA
Territory: Baltimore & Areas South
Phone:
Fax:
E-mail:
410-224-0970
410-224-0050
[email protected]
Maryland (N of Baltimore)
281-474-3276
281-474-2714
[email protected]
Nautical Air Conditioning, Inc.
Location: Seabrook, TX, USA
Phone:
Fax:
E-mail:
631-956-3456
631-956-3479
[email protected]
www.nauticalair.com
Massachusetts
World Wide Enterprises
Location: Cape Cod, MA, USA
Phone:
281-474-3276
281-474-2714
[email protected]
Southern California Marine Enterprises
Phone:
Fax:
E-mail:
Web:
619-224-2869
619-226-0496
[email protected]
www.southerncalmarine.com
New Jersey
Nautical Air Conditioning, Inc.
J & S Marine Sales & Service
Location: Copiague, NY, USA
Location: Detroit, MI, USA
Phone:
Fax:
E-mail:
Web:
Phone:
Fax:
E-mail:
(586) 463-3400
(586) 463-1792
[email protected]
Midwest Marine Supply
Location: St. Clair Shores, MI, USA
Phone:
Fax:
586-778-8950
586-778-6108
Minnesota
Midwest Cruisair
Phone:
Fax:
E-mail:
651-388-4881
651-388-9186
[email protected]
Mississippi
A.E.R. Supply, Inc.
Location: Seabrook, TX, USA
Phone:
Fax:
E-mail:
281-474-3276
281-474-2714
[email protected]
Location: Copiague, NY, USA
Phone:
Fax:
E-mail:
Web:
631-956-3456
631-956-3479
[email protected]
www.nauticalair.com
Oklahoma
A.E.R. Supply, Inc.
Location: Seabrook, TX, USA
Phone:
Fax:
E-mail:
281-474-3276
281-474-2714
[email protected]
Oregon
Sure Marine Services Inc.
Location: Seattle, WA, USA
Phone:
Fax:
E-mail:
631-956-3456
631-956-3479
[email protected]
www.nauticalair.com
New Mexico
Location: Seabrook, TX, USA
Phone:
Fax:
E-mail:
281-474-3276
281-474-2714
[email protected]
New York
206 -784-9903
206-784-0506
[email protected]
Pennsylvania
Nautical Air Conditioning, Inc.
Location: Copiague, NY, USA
Phone:
Fax:
E-mail:
Web:
631-956-3456
631-956-3479
[email protected]
www.nauticalair.com
Rhode Island
Cay Electronics
Location: Portsmouth, Rhode Island, USA
Territory: Rhode Island
Phone:
Fax:
Web:
401-683-3520
401-683-3633
www.cayelectronics.com
Nautical Air Conditioning, Inc.
Location: Copiague, NY, USA
Phone:
Fax:
E-mail:
Web:
A.E.R. Supply, Inc.
Location: Red Wing, MN, USA
Territory: Minnesota and Western Wisconsin
Ohio
Location: San Diego, CA, USA
508-540-0963
Michigan
281-474-3276
281-474-2714
[email protected]
Nautical Air Conditioning, Inc.
Nevada
A.E.R. Supply, Inc.
Location: Copiague, NY, USA
Phone:
Fax:
E-mail:
Web:
Phone:
Fax:
E-mail:
Nebraska
Annapolis Cruisair
Phone:
Fax:
E-mail:
Location: Seabrook, TX, USA
Montana
Sure Marine Services Inc.
Phone:
Fax:
North Dakota
A.E.R. Supply, Inc.
Missouri
Sea Chest Marine Distr.
Territory: Gulf Coast (LA & MS)
910-799-9362
910-793-4267
631-956-3456
631-956-3479
[email protected]
www.nauticalair.com
South Carolina
Atlantic Boat ACR
Location: Charleston, SC, USA
Phone:
Fax:
E-mail:
888-529-0122
843-529-0101
[email protected]
Nautical Air Conditioning, Inc.
Martin's Marine
Location: Copiague, NY, USA
Location: Wilmington, NC, USA
Phone:
Fax:
E-mail:
Web:
Territory: North Carolina and Myrtle Beach, SC
631-956-3456
631-956-3479
[email protected]
www.nauticalair.com
Phone:
Fax:
910-799-9362
910-793-4267
South Dakota
A.E.R. Supply, Inc.
Location: Seabrook, TX, USA
Phone:
Fax:
E-mail:
281-474-3276
281-474-2714
[email protected]
L-0384 Revised: 11-10-04
Tennessee
Thom Chase Heating and A/C
Location: Chattanooga, TN, USA
Territory: Northern Alabama, Northern Mississippi,
Tennessee, Western Kentucky
Phone:
Fax:
E-mail:
423-344-6356
423-344-6356
[email protected]
Texas
A.E.R. Supply, Inc.
Location: Seabrook, TX, USA
Phone:
Fax:
E-mail:
281-474-3276
281-474-2714
[email protected]
Utah
A.E.R. Supply, Inc.
Location: Seabrook, TX, USA
Phone:
Fax:
E-mail:
281-474-3276
281-474-2714
[email protected]
Antigua
Aboard Refrigeration
Eberca
Location: English Harbour, Antigua
Location: , Netherlands
Phone:
Fax:
E-mail:
Phone:
Fax:
E-mail:
268-460-1690
419-858-0544
[email protected]
The Signal Locker
Phone:
Fax:
E-mail:
Web:
619-224-2869
619-226-0496
[email protected]
www.southerncalmarine.com
Virginia
Lamy Marine, Inc.
31 186621955
31 186621818
[email protected]
Bermuda
Location: English Harbour, Antigua
Phone:
Fax:
E-mail:
268-460-1528
268-460-1148
[email protected]
Flatt's Marine
Location: St. Georges, Bermuda
Argentina
Phone:
Fax:
E-mail:
Trimer S.A.
Botswana
441-293-5740
441-293-5740
[email protected]
Location: Buenos Aires, Argentina
Phone:
Fax:
E-mail:
Web:
5411-4580-0444
5411-4580-0440
[email protected]
www.trimer.ar
Australia
Southern California Marine Enterprises
Location: San Diego, CA, USA
Belgium
Seabreeze Industries
Southern Power Products
Location: Cape Town, South Africa
Phone:
Fax:
E-mail:
27-21-511-0653
27-21-510-3049
[email protected]
Brazil
Location: Coomera, Queensland, Australia
Sailing Products
Phone:
Fax:
E-mail:
Web:
Location: Rio de Janeiro, Brazil
61-7-55806371
61-7-55806372
[email protected]
www.seabreeze-industries.com.au
Austria
Phone:
Fax:
E-mail:
55 (0) 21 3154-9990
55 (0) 21 2494-7223
[email protected]
Sailing Products
Location: Sao Paulo, Brazil
Location: Chesapeake, VA, USA
Dometic Marine – Italy, Sales Company
Phone:
Fax:
E-mail:
Location: Milano, Italy
Phone:
Fax:
Phone:
Fax:
E-mail:
British Virgin Islands
757-494-3747
757-494-3740
[email protected]
Washington
390 26172583
390 266010223
[email protected]
Sure Marine Services Inc.
Nautica Centis di Nespolo Cinzia & C. Sne
Location: Seattle, WA, USA
Location: Bevazzana de Latisana (UD), Italy
Phone:
Fax:
E-mail:
Territory: Northeast Italy, Austria, Croatia, Slovenia
206 -784-9903
206-784-0506
[email protected]
Wisconsin (East)
J & S Marine Sales & Service
Phone:
Fax:
E-mail:
Web:
390-431-53-644
390-431-53-460
[email protected]
www.nauticacentis.it
Bahamas
Location: Detroit, MI, USA
Phone:
Fax:
E-mail:
(586) 463-3400
(586) 463-1792
[email protected]
Midwest Marine Supply
Location: St. Clair Shores, MI, USA
Phone:
Fax:
586-778-8950
586-778-6108
Wisconsin (West)
Midwest Cruisair
Location: Red Wing, MN, USA
Freezing Point, Ltd.
Location: Nassau, Bahamas
Phone:
Fax:
E-mail:
242-325-3589
242-356-5271
[email protected]
Nixon's Refrigeration
651-388-4881
651-388-9186
[email protected]
Wyoming
A.E.R. Supply, Inc.
Location: Seabrook, TX, USA
Phone:
Fax:
E-mail:
281-474-3276
281-474-2714
[email protected]
Southern Power Products
Location: Cape Town, South Africa
Phone:
Fax:
E-mail:
Phone:
Fax:
E-mail:
Web:
284-494-2400
284-494-5389
[email protected]
www.cayelectronics.com
Parts And Power
Location: Tortola, British Virgin Islands
Phone:
Fax:
E-mail:
284-494-2830
284-494-1584
[email protected]
British West Indies
Caribbean Marine & Diesel
Location: Turks and Caicos Islands, British West Indies
Phone:
Fax:
E-mail:
Phone:
Fax:
E-mail:
Location: Grand Cayman Island, British West Indies
Location: Abaco, Bahamas
242-367-5219
242-367-5219
[email protected]
Bahrain
Mantech
Location: Dubai, United Arab Emirates
Phone:
Fax:
E-mail:
971 4 333 25 42
971 4 333 06 49
[email protected]
Bangladesh
Tritex Equipment Pte. Ltd.
Location: , Singapore
Angola
Cay Electronics Ltd.
Location: Tortola, British Virgin Islands
Territory: Abaco Island only
Territory: Minnesota and Western Wisconsin
Phone:
Fax:
E-mail:
55 (0) 11 81 1985
55 (0) 11 81 1936
Phone:
Fax:
E-mail:
Web:
(65) 6861 1188
(65) 6861 4263, (65) 6861 8797
[email protected]
www.tritex.com.sg
649-941-5903
649-941-5902
[email protected]
Marine Power
Phone:
Fax:
E-mail:
345-947-1945
345-947-1909
[email protected]
Canada
British Columbia
Accutemp Refrigeration and Air Conditioning
Location: Victoria, BC, Canada
Territory: Western Canada
Phone:
Fax:
E-mail:
Web:
250-475-2665
250-475-1957
[email protected]
www.accutemp.ca
27-21-511-0653
27-21-510-3049
[email protected]
L-0384 Revised: 11-10-04
British Columbia
Airon Heating And Air Conditioning
Location: Richmond, BC, Canada
Territory: Western Canada
Phone:
Fax:
E-mail:
Web:
604-270-2040
604-270-3888
[email protected]
www.aironhvac.com
Ontario
J & S Marine Sales & Service
Location: Detroit, MI, USA
Phone:
Fax:
E-mail:
(586) 463-3400
(586) 463-1792
[email protected]
Northland Supply Company
Location: Queensville, ON, Canada
Phone:
Fax:
E-mail:
Web:
905-478-2244
905-478-2295
[email protected]
www.norsupco.com
Caribbean Islands
Enertech N.V.
Sun Cool Air Conditioning Copr
Location: Simpson Bay, St. Maarten/St. Martin, Netherland
Antilles
Location: Carolina, Puerto Rico
Phone:
Fax:
E-mail:
Web:
599-551-2145
305-675-5857 (USA)
[email protected]
www.enertechnv.com
First Needs Co.
Location: Curacao, Netherlands Antilles
Phone:
Fax:
E-mail:
Web:
599 966 69139
599 976 79003
[email protected]
www.firstneedscuracao.com
Freezing Point, Ltd.
Location: Nassau, Bahamas
Phone:
Fax:
E-mail:
242-325-3589
242-356-5271
[email protected]
Iceberg Refrigeration
Location: Guadeloupe, French West Indies
Phone:
Fax:
E-mail:
590-24 35 35
590-24 35 35
[email protected]
Aboard Refrigeration
Marine Power
Location: English Harbour, Antigua
Location: Grand Cayman Island, British West Indies
Phone:
Fax:
E-mail:
Phone:
Fax:
E-mail:
268-460-1690
419-858-0544
[email protected]
345-947-1945
345-947-1909
[email protected]
Phone:
Fax:
E-mail:
787-791-6971
787-791-3885
[email protected]
Technical House (E.T.S. Inc.)
Location: San Juan, Puerto Rico
Territory: Sentry Battery Chargers Only
Phone:
Fax:
E-mail:
Web:
787-781-1313
787-781-2020
[email protected]
www.technicalhouse.com
The Signal Locker
Location: English Harbour, Antigua
Phone:
Fax:
E-mail:
268-460-1528
268-460-1148
[email protected]
China
Chi-Mo Inc.
Location: Shanghai, China
Phone:
Fax:
E-mail:
Web:
8621-5917-1111
8621-5917-1166
[email protected]
www.springfieldmarine.com.cn
Tritex Equipment (H.K.) Ltd
Location: Shanghai, Beijing, Guangzhou, Wuhan, China
Territory: Dominican Republic
Territory: Puerto Rico, Dominican Republic
Phone:
Fax:
E-mail:
Web:
Phone:
Fax:
E-mail:
Phone:
Fax:
Location: , Singapore
Agencias Navieras B&R S.A.
May Day Marine
Location: Santo Domingo, Dominican Republic
Location: San Juan, Puerto Rico
809-562-3353
809-562-3383
[email protected]
C.S. Services
Location: Martinique, French West Indies
Phone:
Fax:
596-749113
596-749174
Caribbean Marine & Diesel
787-720-9628
787-790-2551
Nau-T-Kol Marine Refrigeration
Location: Chaguaramas, Trinidad
Phone:
Fax:
E-mail:
Web:
868-634-2174
868-634-2174
[email protected]
www.nautkol.com
8621-5240-2638
8621-5240-2153
[email protected]
www.tritex.com.sq
Tritex Equipment Pte. Ltd.
Phone:
Fax:
E-mail:
Web:
(65) 6861 1188
(65) 6861 4263, (65) 6861 8797
[email protected]
www.tritex.com.sg
Costa Rica
Location: Turks and Caicos Islands, British West Indies
Nixon's Refrigeration
Costa Rica Yacht Sales
Phone:
Fax:
E-mail:
Location: Abaco, Bahamas
Location: Marina Los Sueños, Playa Herradura, Costa Rica
649-941-5903
649-941-5902
[email protected]
Cay Electronics Ltd.
Location: Tortola, British Virgin Islands
Phone:
Fax:
E-mail:
Web:
284-494-2400
284-494-5389
[email protected]
www.cayelectronics.com
Territory: Abaco Island only
Territory: Costa Rica, Panama
Phone:
Fax:
E-mail:
Phone:
Fax:
E-mail:
242-367-5219
242-367-5219
[email protected]
506-637-7181
506-637-7180
[email protected]
Outfitters International
Metro Marine
Location: St. Georges, Grenada
Location: Herradura, Costa Rica
Phone:
Fax:
Centro Cruisair de Puerto Rico
Phone:
Fax:
E-mail:
Location: Santurce, Puerto Rico
Parts And Power
Phone:
Fax:
E-mail:
Location: Tortola, British Virgin Islands
Dometic Marine – Italy, Sales Company
Phone:
Fax:
E-mail:
Location: Milano, Italy
787-727-3637
787-727-3637
[email protected]
Cool-Tech Air Conditioning
473-440-7949
473-440-6680
[email protected]
284-494-2830
284-494-1584
[email protected]
506-643-3942
506-643-2426
Croatia
Phone:
Fax:
E-mail:
390 26172583
390 266010223
[email protected]
Location: Fajardo, Puerto Rico
Reefco
Phone:
Fax:
E-mail:
Location: St. Thomas, U.S. Virgin Islands
Nautica Centis di Nespolo Cinzia & C. Sne
Location: Bevazzana de Latisana (UD), Italy
Coral Bay Marine Service
Phone:
Fax:
E-mail:
Location: St. John, U.S. Virgin Islands
Regis Electronics (St Lucia) LTD.
Phone:
Fax:
Location: St. Lucia, West Indies
(787) 860-2615
(787) 801-2050
[email protected]
340-776-6859
340-776-6859
Dr. Ice
Location: St. Thomas, US Virgin Islands
Phone:
Fax:
E-mail:
340-776-0038
340-776-0038
[email protected]
758-452-0205
758-452-0206
[email protected]
Territory: St. Thomas
St. Croix Marine Corp.
Phone:
Fax:
E-mail:
Location: St. Croix, U.S. Virgin Islands
340-775-4540
340-775-6575
[email protected]
Phone:
Fax:
E-mail:
340-773-0289
340-778-8974
[email protected]
Territory: Northeast Italy, Austria, Croatia, Slovenia
Phone:
Fax:
E-mail:
Web:
390-431-53-644
390-431-53-460
[email protected]
www.nauticacentis.it
Cyprus
Dometic Marine - United Kingdom, Sales
Company
Location: Poole, Dorset, United Kingdom
Phone:
Fax:
E-mail:
Web:
44 (0) 870 3306101
44 (0) 870 3306102
[email protected]
www.dometic.com
L-0384 Revised: 11-10-04
Tuti Mare Trading Ltd
Location: Limassol, Cyprus
Phone:
Fax:
35 725 431313
35 725 431300
Dominican Republic
Agencias Navieras B&R S.A.
Location: Santo Domingo, Dominican Republic
Greece
Dometic Marine – Italy, Sales Company
Dometic Marine - United Kingdom, Sales
Company
Location: Poole, Dorset, United Kingdom
Phone:
Fax:
E-mail:
Web:
44 (0) 870 3306101
44 (0) 870 3306102
[email protected]
www.dometic.com
Territory: Dominican Republic
Polfrost Technical Ltd.
Phone:
Fax:
E-mail:
Location: Piraeus, Greece
809-562-3353
809-562-3383
[email protected]
May Day Marine
Location: San Juan, Puerto Rico
Territory: Puerto Rico, Dominican Republic
Phone:
Fax:
787-720-9628
787-790-2551
Phone:
Fax:
Climate Company
Grenada
Outfitters International
Location: St. Georges, Grenada
473-440-7949
473-440-6680
[email protected]
Guam
20-2-2598092
20-2-4523028
[email protected]
Equador
Navas-Bustos Representaciones
Location: Guayaquil, Equador
Phone:
Fax:
593-2-252542
593-2-251-421
Eritrea
DM Electrical Engineering
390 26172583
390 266010223
[email protected]
E.T.N. S.A.S.
Location: Milan, Italy
Territory: Northwest Italy
Phone:
Fax:
E-mail:
390-2-253-6115
390-2-253-6115
[email protected]
Nautica Centis di Nespolo Cinzia & C. Sne
Territory: Northeast Italy, Austria, Croatia, Slovenia
Phone:
Fax:
E-mail:
Web:
390-431-53-644
390-431-53-460
[email protected]
www.nauticacentis.it
Japan
Gunji Corporation
Location: Cairo, Egypt
Phone:
Fax:
E-mail:
Phone:
Fax:
E-mail:
Location: Bevazzana de Latisana (UD), Italy
Phone:
Fax:
E-mail:
Egypt
30-1-461-3370
30-1-461-4376
Location: Milano, Italy
Location: Osaka, Japan
Fentress Refrigeration Service Co.
Location: Tamuning, Guam
Phone:
Fax:
671-565-4038
671-565-3315
Guatemala
Phone:
Fax:
E-mail:
Web:
81-6-6451-5615
81-6-6454-0056
[email protected]
www.gunji.com
Kuwait
Automotores y Marina, S.A.
Mantech
Location: Villa Nueva, Guatemala
Location: Dubai, United Arab Emirates
Phone:
Fax:
E-mail:
Phone:
Fax:
E-mail:
502-6631-2033
502-6631-2034
[email protected]
Hong Kong
971 4 333 25 42
971 4 333 06 49
[email protected]
Luxembourg
Location: Asmara, Eritrea
Phone:
Fax:
291-1-126737
291-1-127650
France
Dometic Marine - France, Sales Company
Location: 60 128 Plailly, France
Phone:
Fax:
E-mail:
Cell: 0033 (0)680 415 543
0033 (0)344 633 518
[email protected]
Polymarine Distribution
Location: Cannet, Rocheville, France
Phone:
Fax:
E-mail:
0033 493463634
0033 493463634
[email protected]
Astral Marine, Ltd.
Eberca
Location: Sai Kung, NT, Hong Kong
Location: , Netherlands
Phone:
Fax:
E-mail:
Web:
Phone:
Fax:
E-mail:
852-2719-5982
852-2792-6567
[email protected]
www.astral.com.hk
Location: Kowloon, Hong Kong
Tritex Equipment Pte. Ltd.
Phone:
Fax:
E-mail:
Location: , Singapore
852-2341-3329
852-2343-1830
[email protected]
Indonesia
Tritex Equipment Pte. Ltd.
Location: , Singapore
C.S. Services
Phone:
Fax:
E-mail:
Web:
Phone:
Fax:
596-749113
596-749174
Iceberg Refrigeration
Location: Guadeloupe, French West Indies
Phone:
Fax:
E-mail:
590-24 35 35
590-24 35 35
[email protected]
Germany
(65) 6861 1188
(65) 6861 4263, (65) 6861 8797
[email protected]
www.tritex.com.sg
Israel
Phone:
Fax:
E-mail:
Web:
49-4502-2466
49-4502-2425
[email protected]
www.gemo_online.de
Phone:
Fax:
E-mail:
Web:
(65) 6861 1188
(65) 6861 4263, (65) 6861 8797
[email protected]
www.tritex.com.sg
Maldives
Tritex Equipment Pte. Ltd.
Location: , Singapore
Phone:
Fax:
E-mail:
Web:
(65) 6861 1188
(65) 6861 4263, (65) 6861 8797
[email protected]
www.tritex.com.sg
Yamit Mil Ltd.
Wheel Engineering Services
Location: Tel-Aviv, Israel
Location: Malé, Maldives
Phone:
Fax:
E-mail:
972-3-5271778
972-3-5271772
[email protected]
Italy
Territory: Maldives
Phone:
Fax:
E-mail:
960-327806
960-324145
[email protected]
Malta
GEMO GmbH
Location: Travemunde, Germany
Malaysia
Tritex Equipment (H.K.) Ltd.
French West Indies
Location: Martinique, French West Indies
31 186621955
31 186621818
[email protected]
Cummins Diesel Italia S.P.A
Location: Milan, Italy
Territory: Central & Southern Italy
Phone:
Fax:
E-mail:
39 02 51 655 856
39 02 51 65 58 55
[email protected]
Dometic Marine - United Kingdom, Sales
Company
Location: Poole, Dorset, United Kingdom
Phone:
Fax:
E-mail:
Web:
44 (0) 870 3306101
44 (0) 870 3306102
[email protected]
www.dometic.com
L-0384 Revised: 11-10-04
Inmartech Ltd
Location: St Maida, Malta
Territory: Malta
Phone:
Fax:
E-mail:
35 699 498502
35 621 376476
[email protected]
Mexico
Southern California Marine Enterprises
Location: San Diego, CA, USA
Phone:
Fax:
E-mail:
Web:
619-224-2869
619-226-0496
[email protected]
www.southerncalmarine.com
Monaco
New Zealand
Whiting Power Systems
Centro Cruisair de Puerto Rico
Location: Auckland, New Zealand
Location: Santurce, Puerto Rico
Phone:
Fax:
E-mail:
Web:
Phone:
Fax:
E-mail:
64-9-358-2050
64-9-358-0285
[email protected]
www.whitingpower.com
Phone:
Fax:
E-mail:
0033 493463634
0033 493463634
[email protected]
Mozambique
Southern Power Products
Location: Cape Town, South Africa
Phone:
Fax:
E-mail:
27-21-511-0653
27-21-510-3049
[email protected]
Myanmar
Tritex Equipment Pte. Ltd.
Location: , Singapore
Phone:
Fax:
E-mail:
Web:
(65) 6861 1188
(65) 6861 4263, (65) 6861 8797
[email protected]
www.tritex.com.sg
787-727-3637
787-727-3637
[email protected]
Cool-Tech Air Conditioning
Norway
Location: Fajardo, Puerto Rico
Refnor A.S.
Phone:
Fax:
E-mail:
Location: Østerås, Norway
Phone:
Fax:
E-mail:
47-67 14 07 50
47-67 14 70 88
[email protected]
Oman
(787) 860-2615
(787) 801-2050
[email protected]
May Day Marine
Location: San Juan, Puerto Rico
Territory: Puerto Rico, Dominican Republic
Phone:
Fax:
Polymarine Distribution
Location: Cannet, Rocheville, France
Puerto Rico
787-720-9628
787-790-2551
Hi-Tech Projects LLC
Sun Cool Air Conditioning Copr
Location: Muscat, Oman
Location: Carolina, Puerto Rico
Phone:
Fax:
E-mail:
Phone:
Fax:
E-mail:
968-595056/57/58
968-595054
[email protected]
787-791-6971
787-791-3885
[email protected]
Mantech
Technical House (E.T.S. Inc.)
Location: Dubai, United Arab Emirates
Location: San Juan, Puerto Rico
Phone:
Fax:
E-mail:
971 4 333 25 42
971 4 333 06 49
[email protected]
Pakistan
Communications & Machinery Corp.
Territory: Sentry Battery Chargers Only
Phone:
Fax:
E-mail:
Web:
787-781-1313
787-781-2020
[email protected]
www.technicalhouse.com
Qatar
Location: Karachi, Pakistan
Phone:
Fax:
E-mail:
92-21-5678252
92-21-5683283
[email protected]
Panama
Laffan Marine
Location: Doha, Qatar
Phone:
Fax:
E-mail:
974-4326893/4328021
974-4327452
[email protected]
Costa Rica Yacht Sales
Mantech
Location: Marina Los Sueños, Playa Herradura, Costa Rica
Location: Dubai, United Arab Emirates
Southern Power Products
Territory: Costa Rica, Panama
Location: Cape Town, South Africa
Phone:
Fax:
E-mail:
Phone:
Fax:
E-mail:
Nambia
Phone:
Fax:
E-mail:
27-21-511-0653
27-21-510-3049
[email protected]
506-637-7181
506-637-7180
[email protected]
971 4 333 25 42
971 4 333 06 49
[email protected]
Saudi Arabia
Productos Marine Air
Netherlands
Location: La Chorrea, Panama
Mantech
Territory: Panama
Location: Dubai, United Arab Emirates
Eberca
Phone:
Fax:
E-mail:
Phone:
Fax:
E-mail:
Location: , Netherlands
Phone:
Fax:
E-mail:
31 186621955
31 186621818
[email protected]
Netherlands Antilles
Enertech N.V.
Location: Simpson Bay, St. Maarten/St. Martin, Netherland
Antilles
Phone:
Fax:
E-mail:
Web:
599-551-2145
305-675-5857 (USA)
[email protected]
www.enertechnv.com
First Needs Co.
Location: Curacao, Netherlands Antilles
Phone:
Fax:
E-mail:
Web:
599 966 69139
599 976 79003
[email protected]
www.firstneedscuracao.com
New Caledonia
507-232-5406
507-232-7648
[email protected]
Papau New Guinea
971 4 333 25 42
971 4 333 06 49
[email protected]
Samaco Marine
Location: Jeddah, Saudi Arabia
Lohberger Engineering Pty
Location: Pors Moresby, Papau New Guinea
Phone:
Fax:
E-mail:
675-321-2122
675-321-2704
[email protected]
Philippines
Tritex Equipment Pte. Ltd.
Location: , Singapore
Phone:
Fax:
E-mail:
Web:
(65) 6861 1188
(65) 6861 4263, (65) 6861 8797
[email protected]
www.tritex.com.sg
Portugal
Phone:
Fax:
966-2-6990064
966-2-6991024
Scandinavia
Dometic Marine – Nordic Sales, Sales Company
Location: Halmstad, Sweden
Phone:
Fax:
E-mail:
Web:
+46 35 16 57 00
+46 35 16 57 10
[email protected]
www.dometic.com
Refnor A.S.
Location: Østerås, Norway
Phone:
Fax:
E-mail:
47-67 14 07 50
47-67 14 70 88
[email protected]
Powercool Lda
Location: Portimao, Portugal
Altomarine
Location: Noumea, New Caledonia
Phone:
Fax:
E-mail:
687 25 96 12
687 25 43 30
[email protected]
Phone:
Fax:
E-mail:
Web:
351 91 786 63 73
351 282 461 818
[email protected]
www.powercool.org
L-0384 Revised: 11-10-04
Singapore
Thailand
Uruguay
Tritex Equipment Pte. Ltd.
Thai Kolon Co. Ltd.
Trimer S.A.
Location: , Singapore
Location: Bangkok, Thailand
Location: Buenos Aires, Argentina
Phone:
Fax:
E-mail:
Web:
Phone:
Fax:
E-mail:
Phone:
Fax:
E-mail:
Web:
(65) 6861 1188
(65) 6861 4263, (65) 6861 8797
[email protected]
www.tritex.com.sg
66-2-745-6468-77 (10 lines)
66-2-745-6152
[email protected]
Trinidad & Tobago
Slovenia
5411-4580-0444
5411-4580-0440
[email protected]
www.trimer.ar
Venezuela
Nau-T-Kol Marine Refrigeration
Dometic Marine – Italy, Sales Company
Location: Chaguaramas, Trinidad
Rich Marine Center, C.A.
Location: Milano, Italy
Phone:
Fax:
E-mail:
Web:
Location: Puerto La Cruz,, Estado Anzoategui, Venezuela
Phone:
Fax:
E-mail:
390 26172583
390 266010223
[email protected]
Nautica Centis di Nespolo Cinzia & C. Sne
868-634-2174
868-634-2174
[email protected]
www.nautkol.com
Turkey
Phone:
Fax:
E-mail:
Web:
390-431-53-644
390-431-53-460
[email protected]
www.nauticacentis.it
South Africa
58 281 4180324, 25, or 26
58 281 2811630
[email protected]
www.tuyate.net
West Indies
Location: Bevazzana de Latisana (UD), Italy
Territory: Northeast Italy, Austria, Croatia, Slovenia
Phone:
Fax:
E-mail:
Web:
Dometic Marine - United Kingdom, Sales
Company
Regis Electronics (St Lucia) LTD.
Location: Poole, Dorset, United Kingdom
Location: St. Lucia, West Indies
Phone:
Fax:
E-mail:
Web:
Phone:
Fax:
E-mail:
44 (0) 870 3306101
44 (0) 870 3306102
[email protected]
www.dometic.com
758-452-0205
758-452-0206
[email protected]
Zambia
Southern Power Products
Egemar Mühendislik Ltd
Location: Cape Town, South Africa
Location: Istanbul, Turkey
Southern Power Products
Phone:
Fax:
E-mail:
Phone:
Fax:
E-mail:
Web:
Location: Cape Town, South Africa
27-21-511-0653
27-21-510-3049
[email protected]
Spain
90 (0) 216 494 22 27/8
90 (0) 216 494 22 18
[email protected]
www.egemar.com.tr
U.S. Virgin Islands
Phone:
Fax:
E-mail:
27-21-511-0653
27-21-510-3049
[email protected]
Zimbabwe
Acastimar
Location: Tarragona, Spain
Phone:
Fax:
E-mail:
349-77-362118
349-77-362687
[email protected]
Sri Lanka
Coral Bay Marine Service
Location: St. John, U.S. Virgin Islands
Phone:
Fax:
340-776-6859
340-776-6859
Dr. Ice
Southern Power Products
Location: Cape Town, South Africa
Phone:
Fax:
E-mail:
27-21-511-0653
27-21-510-3049
[email protected]
Location: St. Thomas, US Virgin Islands
G&M Enterprises
Territory: St. Thomas
Location: Borella-Colombo 8, Sri Lanka
Phone:
Fax:
E-mail:
Phone:
Fax:
E-mail:
94-11-2691966
94-11-2691751
[email protected]
340-775-4540
340-775-6575
[email protected]
Reefco
Sweden
Location: St. Thomas, U.S. Virgin Islands
Dometic Marine – Nordic Sales, Sales Company
Phone:
Fax:
E-mail:
Location: Halmstad, Sweden
Phone:
Fax:
E-mail:
Web:
+46 35 16 57 00
+46 35 16 57 10
[email protected]
www.dometic.com
Switzerland
340-776-0038
340-776-0038
[email protected]
St. Croix Marine Corp.
Location: St. Croix, U.S. Virgin Islands
Phone:
Fax:
E-mail:
340-773-0289
340-778-8974
[email protected]
United Arab Emirates
Marine Parts Heimgartner
Location: Volketswil, Switzerland
Mantech
Phone:
Fax:
E-mail:
Web:
Location: Dubai, United Arab Emirates
41-1-997 40 90
41-1-997 40 94
[email protected]
www.marineparts.ch
Phone:
Fax:
E-mail:
971 4 333 25 42
971 4 333 06 49
[email protected]
Taiwan
United Kingdom
Ing Hai Company, Ltd.
Dometic Marine - United Kingdom, Sales
Company
Location: Kaohsiung, Taiwan
Phone:
Fax:
886-7-802-1809
886-7-802-1809
Ing Hai Company, Ltd.
Location: Taipei, Taiwan
Phone:
Fax:
E-mail:
Location: Poole, Dorset, United Kingdom
Phone:
Fax:
E-mail:
Web:
44 (0) 870 3306101
44 (0) 870 3306102
[email protected]
www.dometic.com
886-2-2531-2088
886-2-2523-6531
[email protected]
L-0384 Revised: 11-10-04
Dometic Corporation
Environmental Systems
P.O. Box 15299 • Richmond, VA 23227-0699 USA • Phone: 804-746-1313 • Facsimile: 804-746-7248
For Sales and Service Calls within Europe and the Middle East, please contact +44 (0) 870 330 6101
Email: [email protected] • Website: www.cruisair.com
L-2086